Getting started with DfuSe USB device firmware upgrade ......Figure 10. Edit option byte dialog box...
22
July 2009 Doc ID 13379 Rev 4 1/22 UM0412 User manual Getting started with DfuSe USB device firmware upgrade STMicroelectronics extension Introduction This document describes the demonstration user interface that was developed to illustrate use of the STMicroelectronics device firmware upgrade library. A description of this library, including its application programming interface, is contained in the “DfuSe application programming interface” document and installed with the DfuSe software. www.st.com
Transcript of Getting started with DfuSe USB device firmware upgrade ......Figure 10. Edit option byte dialog box...
July 2009 Doc ID 13379 Rev 4 1/22
UM0412User manual
Getting started with DfuSe USB device firmware upgradeSTMicroelectronics extension
IntroductionThis document describes the demonstration user interface that was developed to illustrate use of the STMicroelectronics device firmware upgrade library. A description of this library, including its application programming interface, is contained in the “DfuSe application programming interface” document and installed with the DfuSe software.
www.st.com
Contents UM0412
2/22 Doc ID 13379 Rev 4
Contents
1 Getting started . . . . . . . . . . . . . . . . . . . . . . . . . . . . . . . . . . . . . . . . . . . . . . 5
1.1 System requirements . . . . . . . . . . . . . . . . . . . . . . . . . . . . . . . . . . . . . . . . . 5
1.2 Package contents . . . . . . . . . . . . . . . . . . . . . . . . . . . . . . . . . . . . . . . . . . . . 6
1.3 DfuSe demonstration installation . . . . . . . . . . . . . . . . . . . . . . . . . . . . . . . . 6
1.3.1 Software installation . . . . . . . . . . . . . . . . . . . . . . . . . . . . . . . . . . . . . . . . . 6
1.3.2 Hardware installation . . . . . . . . . . . . . . . . . . . . . . . . . . . . . . . . . . . . . . . . 6
2 DFU file . . . . . . . . . . . . . . . . . . . . . . . . . . . . . . . . . . . . . . . . . . . . . . . . . . . 12
3 User interface description . . . . . . . . . . . . . . . . . . . . . . . . . . . . . . . . . . . 13
3.1 DfuSe demonstration . . . . . . . . . . . . . . . . . . . . . . . . . . . . . . . . . . . . . . . . 13
3.2 DFU file manager . . . . . . . . . . . . . . . . . . . . . . . . . . . . . . . . . . . . . . . . . . . 15
3.2.1 “Want to do” dialog box . . . . . . . . . . . . . . . . . . . . . . . . . . . . . . . . . . . . . 15
3.2.2 File generation dialog box . . . . . . . . . . . . . . . . . . . . . . . . . . . . . . . . . . . 16
3.2.3 File extraction dialog box . . . . . . . . . . . . . . . . . . . . . . . . . . . . . . . . . . . . 17
4 Step-by-step procedures . . . . . . . . . . . . . . . . . . . . . . . . . . . . . . . . . . . . 19
4.1 DfuSe demonstration procedures . . . . . . . . . . . . . . . . . . . . . . . . . . . . . . . 19
4.1.1 How to upload a DFU file . . . . . . . . . . . . . . . . . . . . . . . . . . . . . . . . . . . . 19
4.1.2 How to download a DFU file . . . . . . . . . . . . . . . . . . . . . . . . . . . . . . . . . 19
4.2 DFU file manager procedures . . . . . . . . . . . . . . . . . . . . . . . . . . . . . . . . . 20
4.2.1 How to generate DFU files from S19/Hex/Bin files . . . . . . . . . . . . . . . . 20
4.2.2 How to extract S19/Hex/Bin files from DFU files . . . . . . . . . . . . . . . . . . 20
5 Revision history . . . . . . . . . . . . . . . . . . . . . . . . . . . . . . . . . . . . . . . . . . . 21
UM0412 List of tables
Doc ID 13379 Rev 4 3/22
List of tables
Table 1. DfuSe demo dialog box description . . . . . . . . . . . . . . . . . . . . . . . . . . . . . . . . . . . . . . . . . . 14Table 2. File generation dialog box description . . . . . . . . . . . . . . . . . . . . . . . . . . . . . . . . . . . . . . . . 16Table 3. Multi bin injection dialog box description . . . . . . . . . . . . . . . . . . . . . . . . . . . . . . . . . . . . . . 17Table 4. File extraction dialog box description . . . . . . . . . . . . . . . . . . . . . . . . . . . . . . . . . . . . . . . . . 18Table 5. Document revision history . . . . . . . . . . . . . . . . . . . . . . . . . . . . . . . . . . . . . . . . . . . . . . . . . 21
List of figures UM0412
4/22 Doc ID 13379 Rev 4
List of figures
Figure 1. System properties dialog box . . . . . . . . . . . . . . . . . . . . . . . . . . . . . . . . . . . . . . . . . . . . . . . . 5Figure 2. Selecting the installation location . . . . . . . . . . . . . . . . . . . . . . . . . . . . . . . . . . . . . . . . . . . . . 7Figure 3. Driver selection option . . . . . . . . . . . . . . . . . . . . . . . . . . . . . . . . . . . . . . . . . . . . . . . . . . . . . 8Figure 4. Driver selection . . . . . . . . . . . . . . . . . . . . . . . . . . . . . . . . . . . . . . . . . . . . . . . . . . . . . . . . . . . 9Figure 5. Installation from disk . . . . . . . . . . . . . . . . . . . . . . . . . . . . . . . . . . . . . . . . . . . . . . . . . . . . . 10Figure 6. Progress message . . . . . . . . . . . . . . . . . . . . . . . . . . . . . . . . . . . . . . . . . . . . . . . . . . . . . . . 10Figure 7. Warning message. . . . . . . . . . . . . . . . . . . . . . . . . . . . . . . . . . . . . . . . . . . . . . . . . . . . . . . . 11Figure 8. Installation finish . . . . . . . . . . . . . . . . . . . . . . . . . . . . . . . . . . . . . . . . . . . . . . . . . . . . . . . . . 11Figure 9. DfuSe demo dialog box . . . . . . . . . . . . . . . . . . . . . . . . . . . . . . . . . . . . . . . . . . . . . . . . . . . 13Figure 10. Edit option byte dialog box . . . . . . . . . . . . . . . . . . . . . . . . . . . . . . . . . . . . . . . . . . . . . . . . . 15Figure 11. “Want to do” dialog box. . . . . . . . . . . . . . . . . . . . . . . . . . . . . . . . . . . . . . . . . . . . . . . . . . . . 15Figure 12. “Generation” dialog box . . . . . . . . . . . . . . . . . . . . . . . . . . . . . . . . . . . . . . . . . . . . . . . . . . . 16Figure 13. “Multi bin injection” dialog box . . . . . . . . . . . . . . . . . . . . . . . . . . . . . . . . . . . . . . . . . . . . . . 17Figure 14. “Extract” dialog box. . . . . . . . . . . . . . . . . . . . . . . . . . . . . . . . . . . . . . . . . . . . . . . . . . . . . . . 17

UM0412 Getting started
Doc ID 13379 Rev 4 5/22
1 Getting started
1.1 System requirementsIn order to use the DfuSe demonstration with the Windows operating system, a recent version of Windows, such as Windows 98SE, Millennium, 2000, XP or VISTA, must be installed on the PC.
The version of the Windows OS installed on your PC may be determined by right-clicking on the “My Computer” icon in the desktop, then clicking on the “Properties” item in the displayed PopUpMenu. The OS type is displayed in the “System properties” dialog box under the “System” label in the “General” tabsheet (see Figure 1).
Figure 1. System properties dialog box
Getting started UM0412
6/22 Doc ID 13379 Rev 4
1.2 Package contentsThe following items are supplied in this package:
Software contents
1. STTube driver consisting of the two following files:
– STTub30.sys: Driver to be loaded for demo board.
– STDFU.inf: Configuration file for driver.
2. DfuSe_Demo_V3.0_Setup.exe: Installation file which installs the DfuSe applications and source code on your computer.
Hardware contents
This tool is designed to work with all STMicroelectronics devices which supports the Device Firmware Upgrade via an USB interface. For more details, please contact your ST representative or visit the ST web site (http://www.st.com).
1.3 DfuSe demonstration installation
1.3.1 Software installation
Run DfuSe_Demo_V3.0_Setup.exe file: the InstallShield Wizard will guide you to install DfuSe applications and source code on your computer. When the software is successfully installed, click the “Finish” button. You can then explore the driver directory.
The driver files are located in the “Driver” folder in your install path (C:\Program files\STMicroelectronics\DfuSe).
The source code for the Demo application and DfuSe library is located in the “C:\Program Files\STMicroelectronics\DfuSe\Sources” folder.
Documentation is located in the “C:\Program Files\STMicroelectronics\DfuSe\Sources\Doc” folder.
1.3.2 Hardware installation
● Connect the device to a spare USB port on your PC.
● The “Found New Hardware Wizard” then starts. Select the “Install from a list or specific location” as shown below and then click “Next”.

UM0412 Getting started
Doc ID 13379 Rev 4 7/22
Figure 2. Selecting the installation location
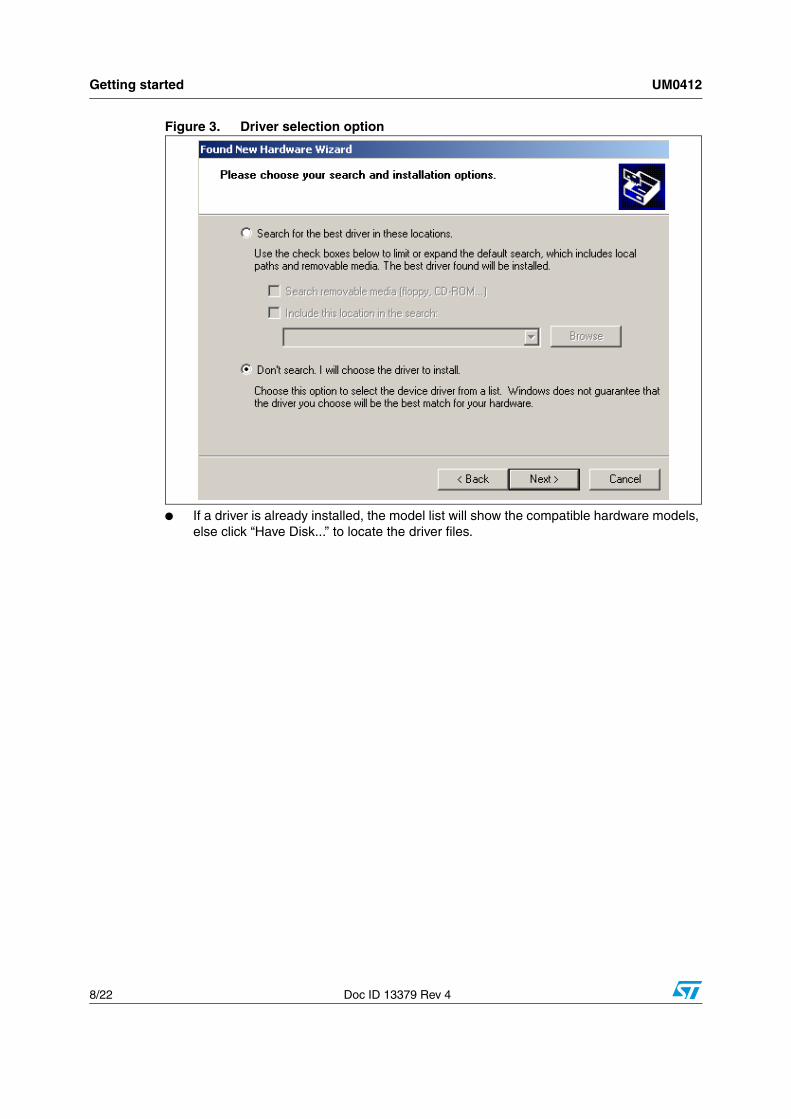
● Select “Don’t search. I will choose the driver to install” as shown below and then click “Next”.
Getting started UM0412
8/22 Doc ID 13379 Rev 4
Figure 3. Driver selection option
● If a driver is already installed, the model list will show the compatible hardware models, else click “Have Disk...” to locate the driver files.
UM0412 Getting started
Doc ID 13379 Rev 4 9/22
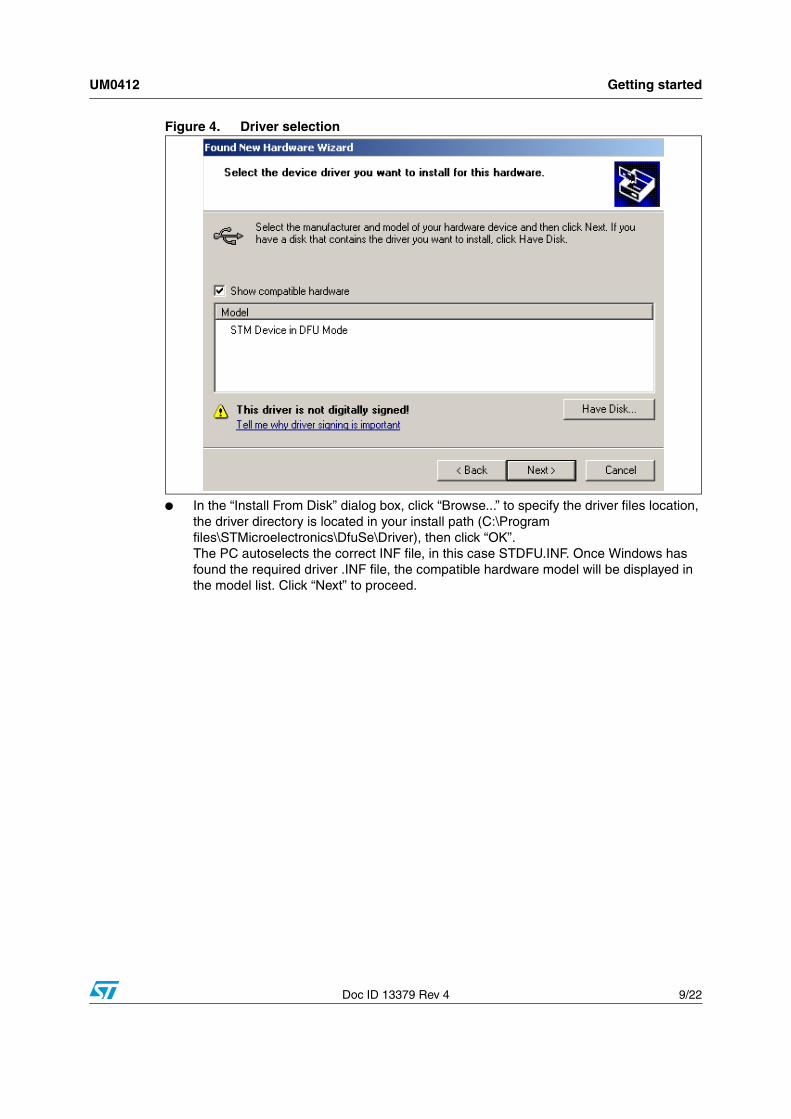
Figure 4. Driver selection
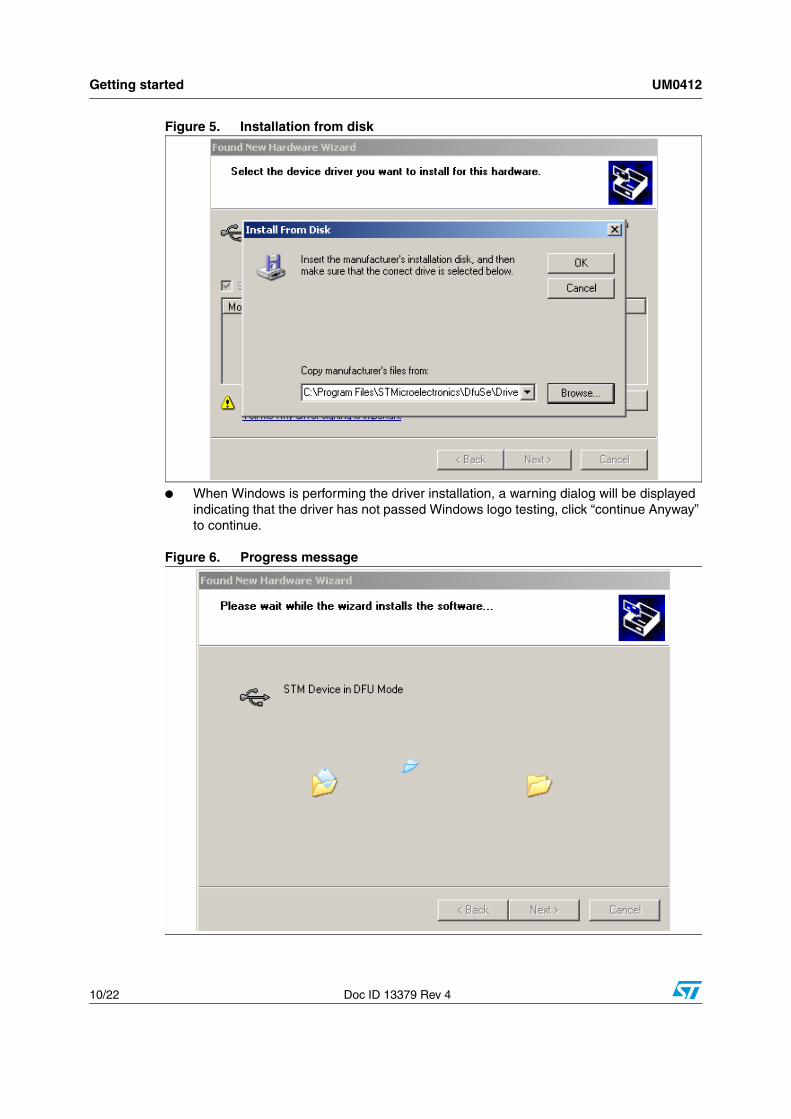
● In the “Install From Disk” dialog box, click “Browse...” to specify the driver files location, the driver directory is located in your install path (C:\Program files\STMicroelectronics\DfuSe\Driver), then click “OK”.The PC autoselects the correct INF file, in this case STDFU.INF. Once Windows has found the required driver .INF file, the compatible hardware model will be displayed in the model list. Click “Next” to proceed.
Getting started UM0412
10/22 Doc ID 13379 Rev 4
Figure 5. Installation from disk
● When Windows is performing the driver installation, a warning dialog will be displayed indicating that the driver has not passed Windows logo testing, click “continue Anyway” to continue.
Figure 6. Progress message
UM0412 Getting started
Doc ID 13379 Rev 4 11/22
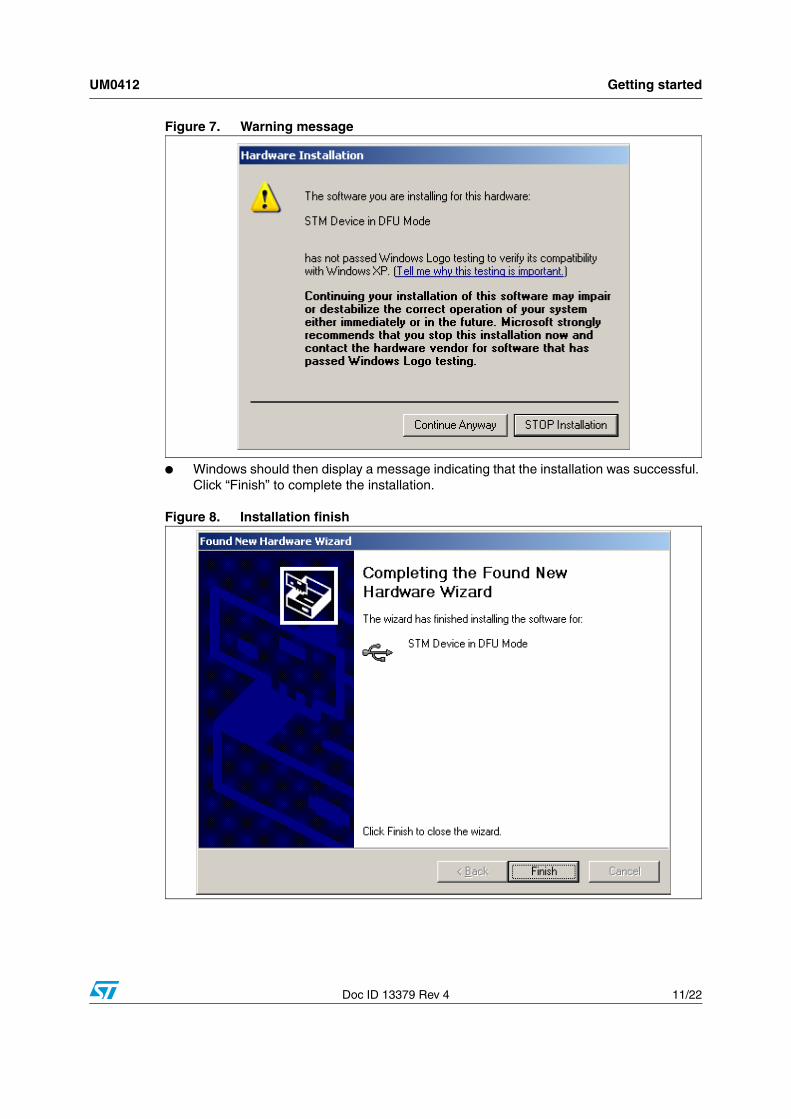
Figure 7. Warning message
● Windows should then display a message indicating that the installation was successful. Click “Finish” to complete the installation.
Figure 8. Installation finish
DFU file UM0412
12/22 Doc ID 13379 Rev 4
2 DFU file
Users that have purchased DFU devices require the ability to upgrade the firmware of these devices. Traditionally, firmware is stored in Hex, S19 or Binary files, but these formats do not contain the necessary information to perform the upgrade operation, they contain only the actual data of the program to be downloaded. However, the DFU operation requires more information, such as the product identifier, vendor identifier, Firmware version and the Alternate setting number (Target ID) of the target to be used, this information makes the upgrade targeted and more secure. To add this information, a new file format should be used, to be called DFU file format. For more details refer to the “DfuSe File Format Specification” document (UM0391).
UM0412 User interface description
Doc ID 13379 Rev 4 13/22
3 User interface description
This section describes the different user interfaces available in the DfuSe package, and explains how to use them to perform DFU operations such as Upload, Download and firmware file management.
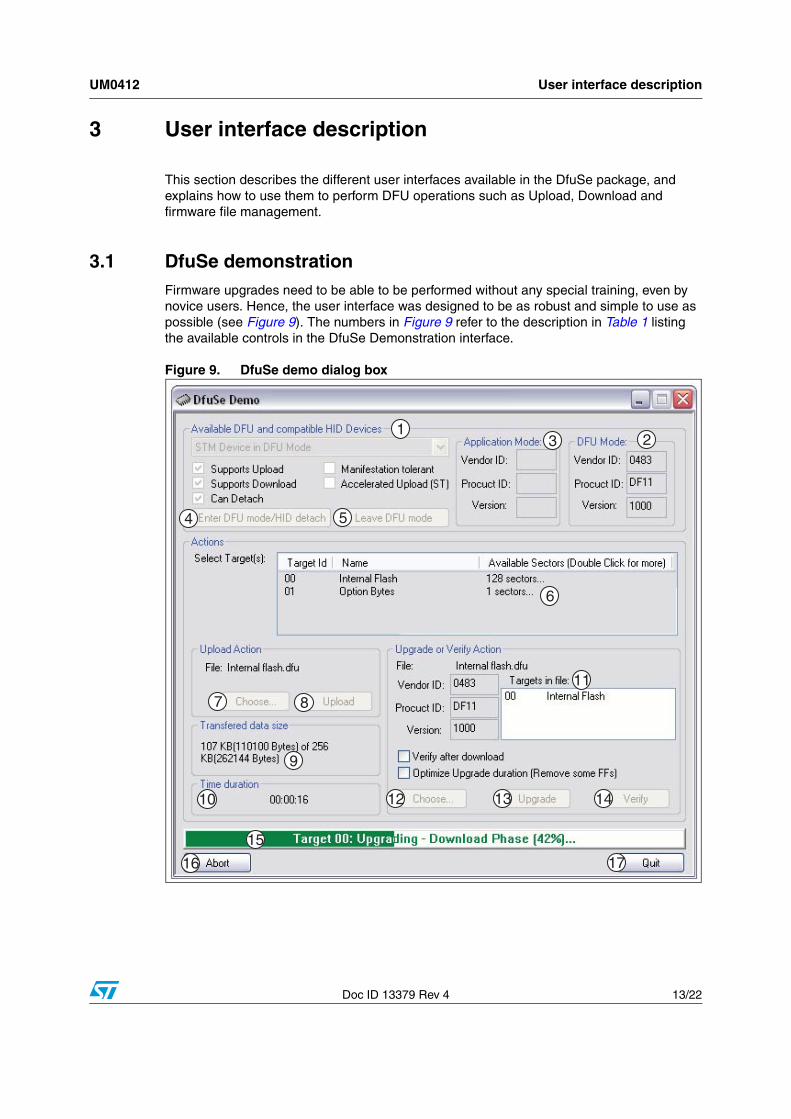
3.1 DfuSe demonstration Firmware upgrades need to be able to be performed without any special training, even by novice users. Hence, the user interface was designed to be as robust and simple to use as possible (see Figure 9). The numbers in Figure 9 refer to the description in Table 1 listing the available controls in the DfuSe Demonstration interface.
Figure 9. DfuSe demo dialog box
123
4 5
6
7 8
9
10 12 13 14
11
16 17
15
User interface description UM0412
14/22 Doc ID 13379 Rev 4
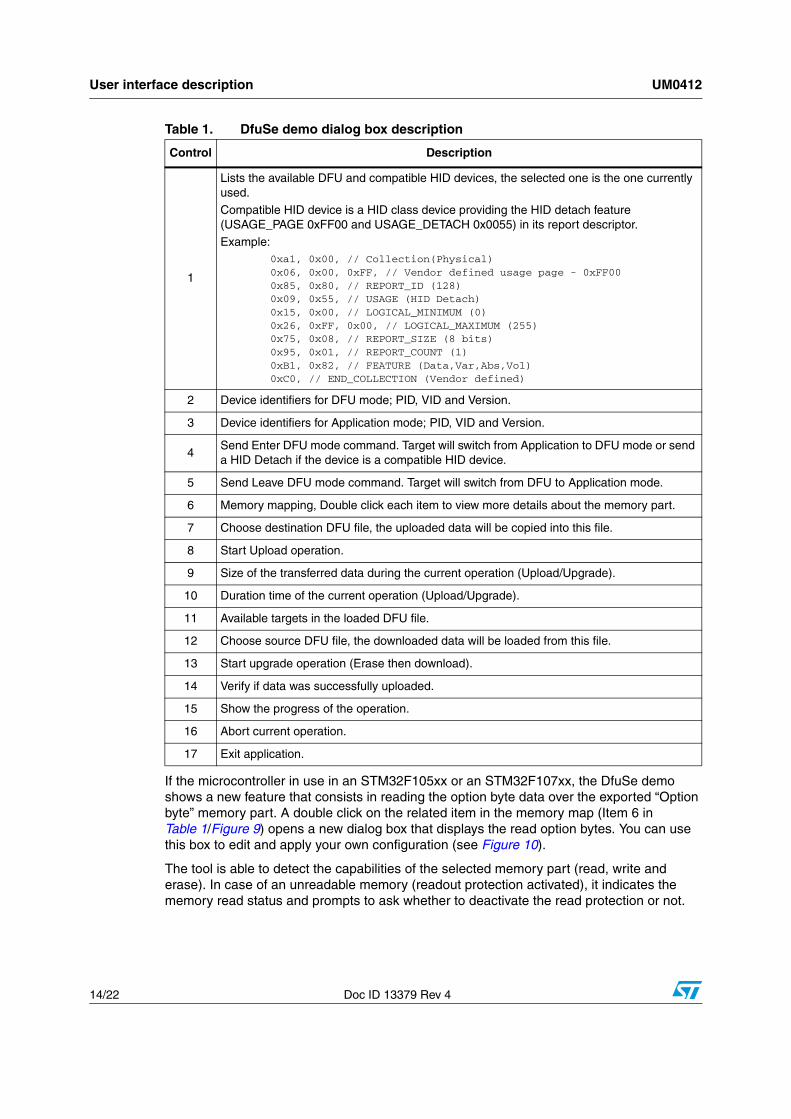
If the microcontroller in use in an STM32F105xx or an STM32F107xx, the DfuSe demo shows a new feature that consists in reading the option byte data over the exported “Option byte” memory part. A double click on the related item in the memory map (Item 6 in Table 1/Figure 9) opens a new dialog box that displays the read option bytes. You can use this box to edit and apply your own configuration (see Figure 10).
The tool is able to detect the capabilities of the selected memory part (read, write and erase). In case of an unreadable memory (readout protection activated), it indicates the memory read status and prompts to ask whether to deactivate the read protection or not.
Table 1. DfuSe demo dialog box description
Control Description
1
Lists the available DFU and compatible HID devices, the selected one is the one currently used.
Compatible HID device is a HID class device providing the HID detach feature (USAGE_PAGE 0xFF00 and USAGE_DETACH 0x0055) in its report descriptor.
Example:0xa1, 0x00, // Collection(Physical)0x06, 0x00, 0xFF, // Vendor defined usage page - 0xFF000x85, 0x80, // REPORT_ID (128)0x09, 0x55, // USAGE (HID Detach)0x15, 0x00, // LOGICAL_MINIMUM (0)0x26, 0xFF, 0x00, // LOGICAL_MAXIMUM (255)0x75, 0x08, // REPORT_SIZE (8 bits)0x95, 0x01, // REPORT_COUNT (1)0xB1, 0x82, // FEATURE (Data,Var,Abs,Vol)0xC0, // END_COLLECTION (Vendor defined)
2 Device identifiers for DFU mode; PID, VID and Version.
3 Device identifiers for Application mode; PID, VID and Version.
4Send Enter DFU mode command. Target will switch from Application to DFU mode or send a HID Detach if the device is a compatible HID device.
5 Send Leave DFU mode command. Target will switch from DFU to Application mode.
6 Memory mapping, Double click each item to view more details about the memory part.
7 Choose destination DFU file, the uploaded data will be copied into this file.
8 Start Upload operation.
9 Size of the transferred data during the current operation (Upload/Upgrade).
10 Duration time of the current operation (Upload/Upgrade).
11 Available targets in the loaded DFU file.
12 Choose source DFU file, the downloaded data will be loaded from this file.
13 Start upgrade operation (Erase then download).
14 Verify if data was successfully uploaded.
15 Show the progress of the operation.
16 Abort current operation.
17 Exit application.
UM0412 User interface description
Doc ID 13379 Rev 4 15/22
Figure 10. Edit option byte dialog box
3.2 DFU file manager
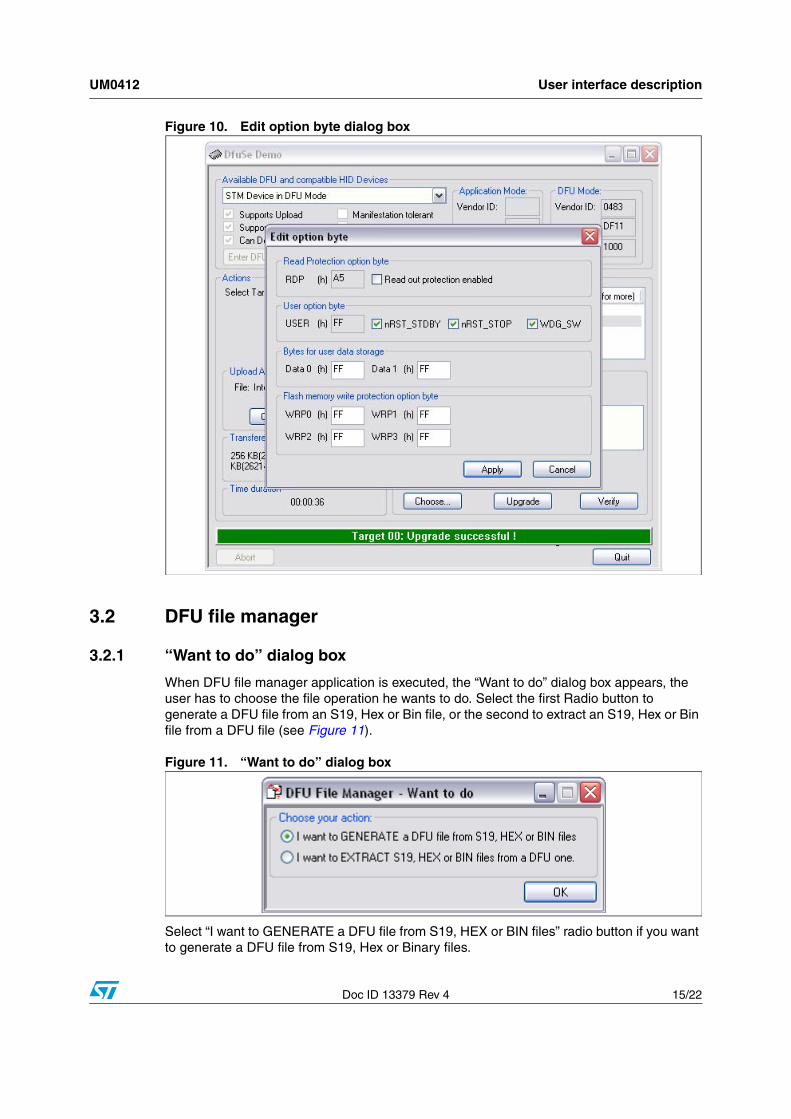
3.2.1 “Want to do” dialog box
When DFU file manager application is executed, the “Want to do” dialog box appears, the user has to choose the file operation he wants to do. Select the first Radio button to generate a DFU file from an S19, Hex or Bin file, or the second to extract an S19, Hex or Bin file from a DFU file (see Figure 11).
Figure 11. “Want to do” dialog box
Select “I want to GENERATE a DFU file from S19, HEX or BIN files” radio button if you want to generate a DFU file from S19, Hex or Binary files.
User interface description UM0412
16/22 Doc ID 13379 Rev 4
Select “I want to EXTRACT S19, HEX or BIN files from a DFU one” radio button if you want to extract an S19, Hex or Binary file from a DFU file.
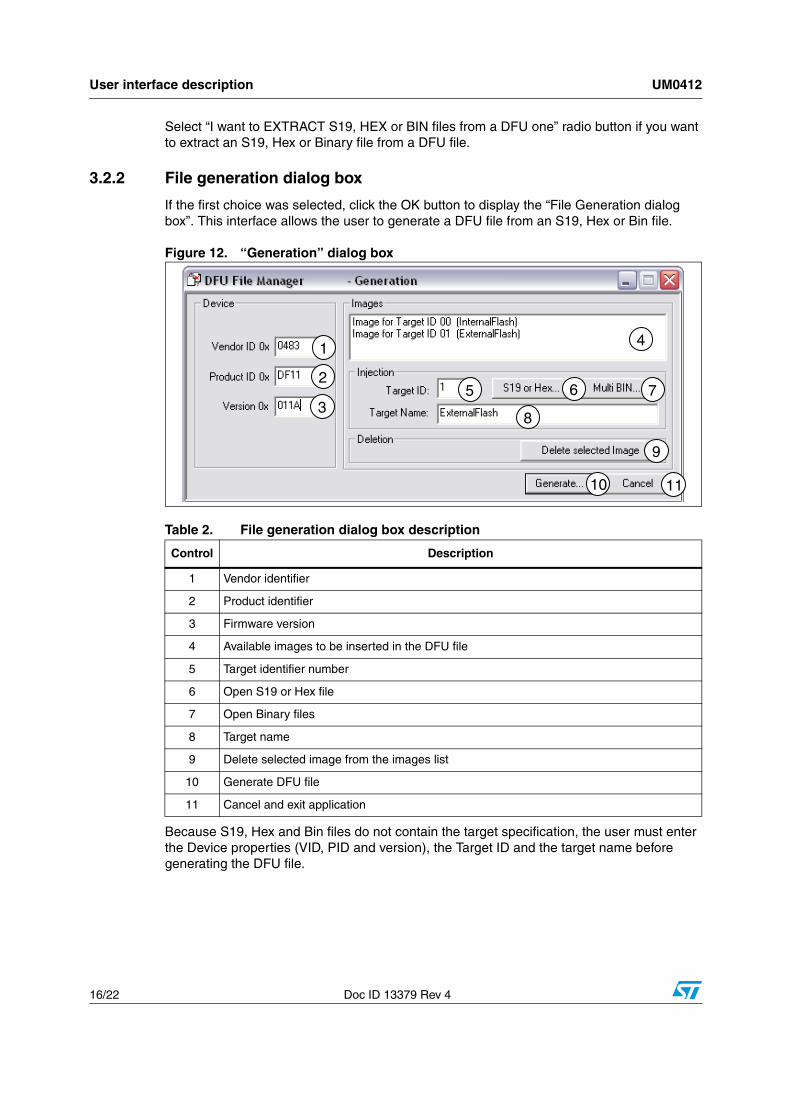
3.2.2 File generation dialog box
If the first choice was selected, click the OK button to display the “File Generation dialog box”. This interface allows the user to generate a DFU file from an S19, Hex or Bin file.
Figure 12. “Generation” dialog box
Because S19, Hex and Bin files do not contain the target specification, the user must enter the Device properties (VID, PID and version), the Target ID and the target name before generating the DFU file.
Table 2. File generation dialog box description
Control Description
1 Vendor identifier
2 Product identifier
3 Firmware version
4 Available images to be inserted in the DFU file
5 Target identifier number
6 Open S19 or Hex file
7 Open Binary files
8 Target name
9 Delete selected image from the images list
10 Generate DFU file
11 Cancel and exit application
UM0412 User interface description
Doc ID 13379 Rev 4 17/22
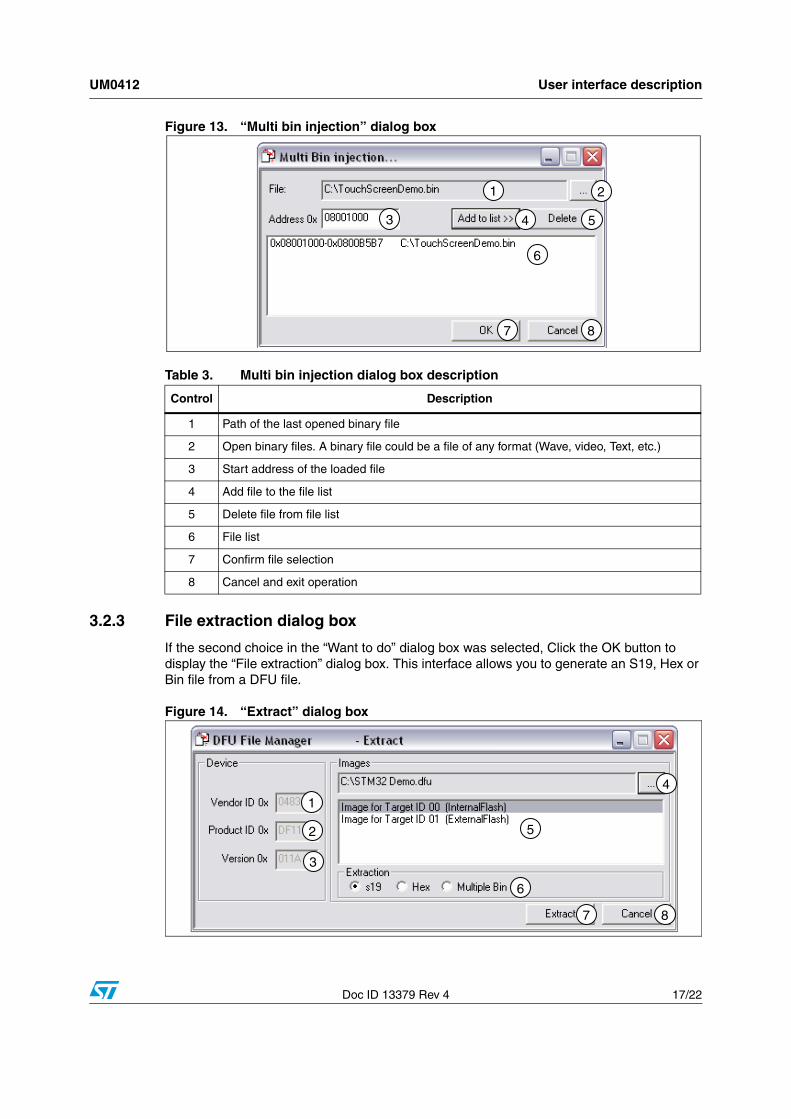
Figure 13. “Multi bin injection” dialog box
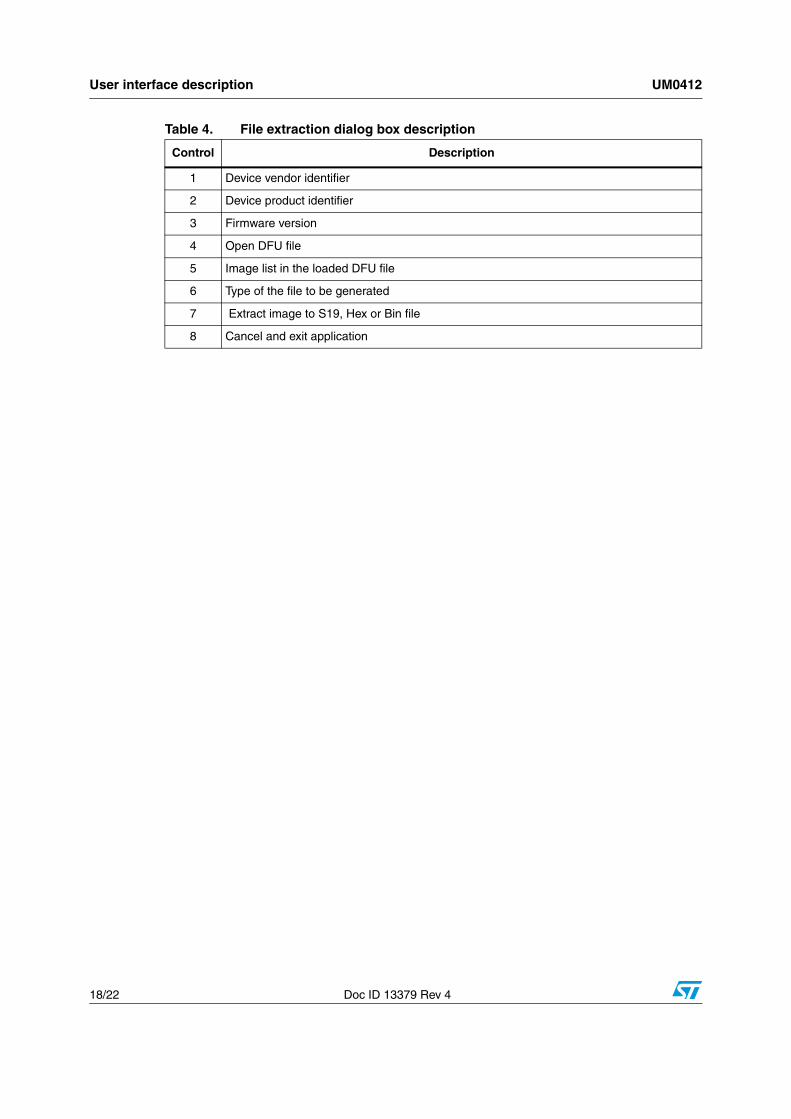
3.2.3 File extraction dialog box
If the second choice in the “Want to do” dialog box was selected, Click the OK button to display the “File extraction” dialog box. This interface allows you to generate an S19, Hex or Bin file from a DFU file.
Figure 14. “Extract” dialog box
Table 3. Multi bin injection dialog box description
Control Description
1 Path of the last opened binary file
2 Open binary files. A binary file could be a file of any format (Wave, video, Text, etc.)
3 Start address of the loaded file
4 Add file to the file list
5 Delete file from file list
6 File list
7 Confirm file selection
8 Cancel and exit operation
User interface description UM0412
18/22 Doc ID 13379 Rev 4
Table 4. File extraction dialog box description
Control Description
1 Device vendor identifier
2 Device product identifier
3 Firmware version
4 Open DFU file
5 Image list in the loaded DFU file
6 Type of the file to be generated
7 Extract image to S19, Hex or Bin file
8 Cancel and exit application
UM0412 Step-by-step procedures
Doc ID 13379 Rev 4 19/22
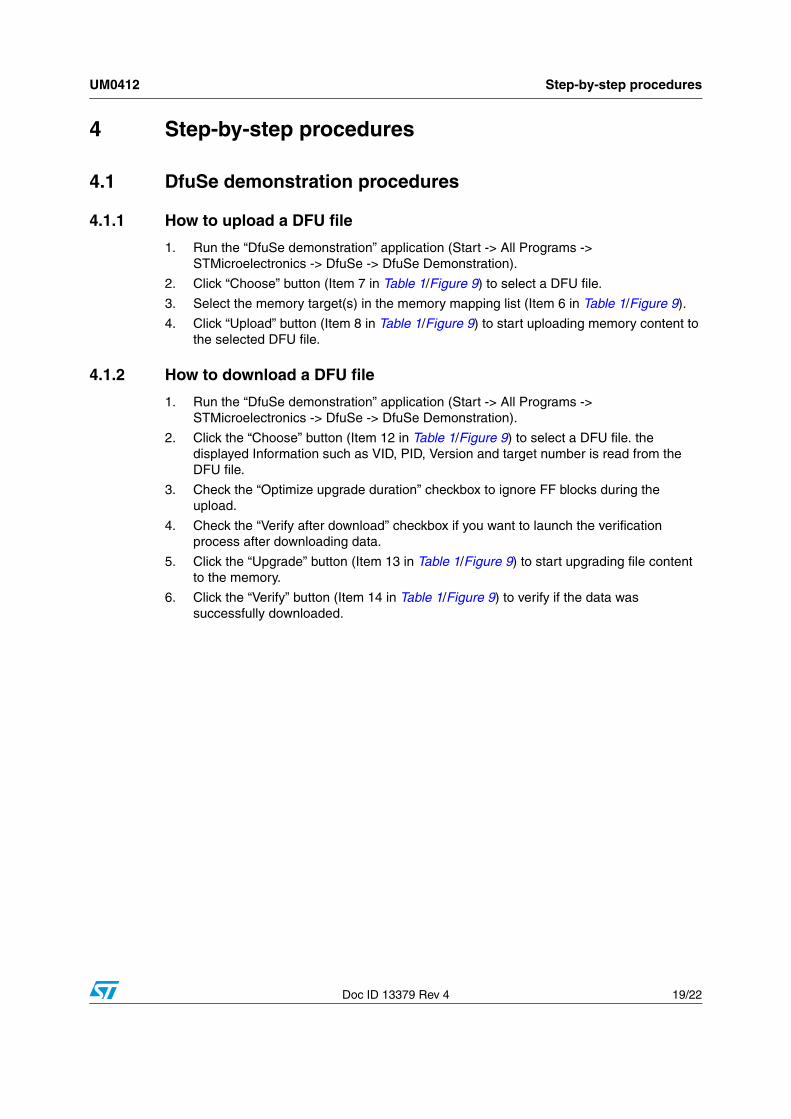
4 Step-by-step procedures
4.1 DfuSe demonstration procedures
4.1.1 How to upload a DFU file
1. Run the “DfuSe demonstration” application (Start -> All Programs -> STMicroelectronics -> DfuSe -> DfuSe Demonstration).
2. Click “Choose” button (Item 7 in Table 1/Figure 9) to select a DFU file.
3. Select the memory target(s) in the memory mapping list (Item 6 in Table 1/Figure 9).
4. Click “Upload” button (Item 8 in Table 1/Figure 9) to start uploading memory content to the selected DFU file.
4.1.2 How to download a DFU file
1. Run the “DfuSe demonstration” application (Start -> All Programs -> STMicroelectronics -> DfuSe -> DfuSe Demonstration).
2. Click the “Choose” button (Item 12 in Table 1/Figure 9) to select a DFU file. the displayed Information such as VID, PID, Version and target number is read from the DFU file.
3. Check the “Optimize upgrade duration” checkbox to ignore FF blocks during the upload.
4. Check the “Verify after download” checkbox if you want to launch the verification process after downloading data.
5. Click the “Upgrade” button (Item 13 in Table 1/Figure 9) to start upgrading file content to the memory.
6. Click the “Verify” button (Item 14 in Table 1/Figure 9) to verify if the data was successfully downloaded.
Step-by-step procedures UM0412
20/22 Doc ID 13379 Rev 4
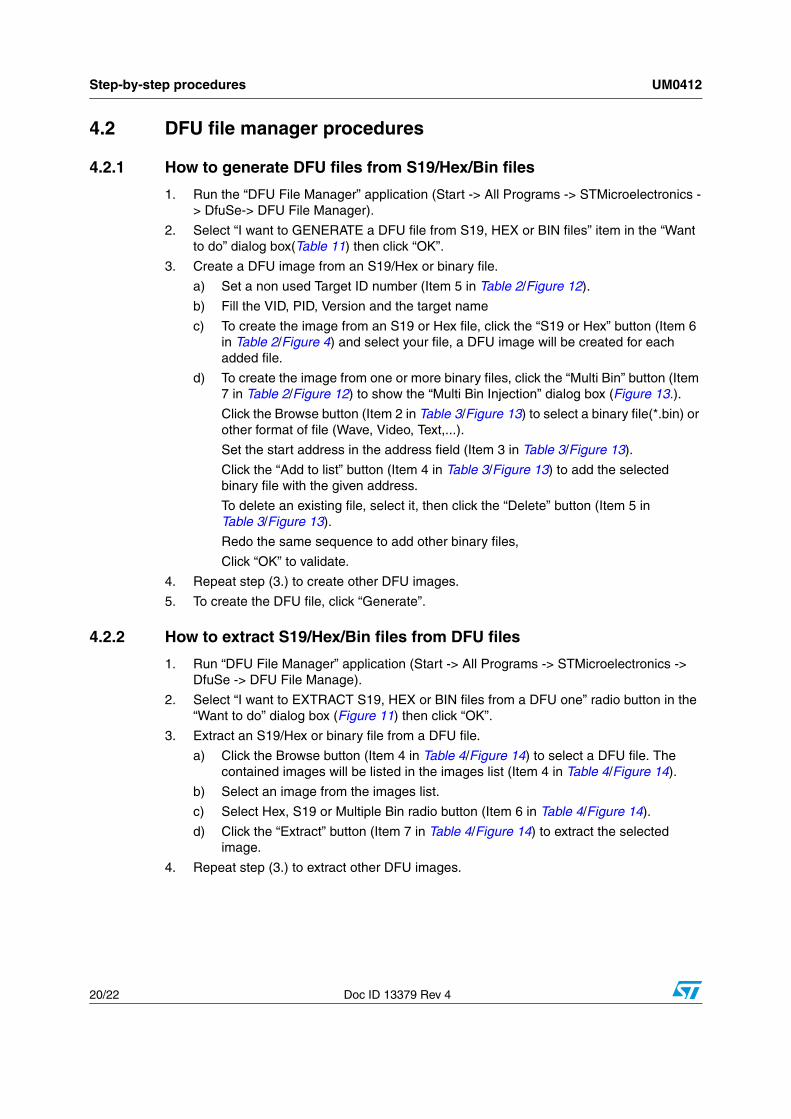
4.2 DFU file manager procedures
4.2.1 How to generate DFU files from S19/Hex/Bin files
1. Run the “DFU File Manager” application (Start -> All Programs -> STMicroelectronics -> DfuSe-> DFU File Manager).
2. Select “I want to GENERATE a DFU file from S19, HEX or BIN files” item in the “Want to do” dialog box(Table 11) then click “OK”.
3. Create a DFU image from an S19/Hex or binary file.
a) Set a non used Target ID number (Item 5 in Table 2/Figure 12).
b) Fill the VID, PID, Version and the target name
c) To create the image from an S19 or Hex file, click the “S19 or Hex” button (Item 6 in Table 2/Figure 4) and select your file, a DFU image will be created for each added file.
d) To create the image from one or more binary files, click the “Multi Bin” button (Item 7 in Table 2/Figure 12) to show the “Multi Bin Injection” dialog box (Figure 13.).
Click the Browse button (Item 2 in Table 3/Figure 13) to select a binary file(*.bin) or other format of file (Wave, Video, Text,...).
Set the start address in the address field (Item 3 in Table 3/Figure 13).
Click the “Add to list” button (Item 4 in Table 3/Figure 13) to add the selected binary file with the given address.
To delete an existing file, select it, then click the “Delete” button (Item 5 in Table 3/Figure 13).
Redo the same sequence to add other binary files,
Click “OK” to validate.
4. Repeat step (3.) to create other DFU images.
5. To create the DFU file, click “Generate”.
4.2.2 How to extract S19/Hex/Bin files from DFU files
1. Run “DFU File Manager” application (Start -> All Programs -> STMicroelectronics -> DfuSe -> DFU File Manage).
2. Select “I want to EXTRACT S19, HEX or BIN files from a DFU one” radio button in the “Want to do” dialog box (Figure 11) then click “OK”.
3. Extract an S19/Hex or binary file from a DFU file.
a) Click the Browse button (Item 4 in Table 4/Figure 14) to select a DFU file. The contained images will be listed in the images list (Item 4 in Table 4/Figure 14).
b) Select an image from the images list.
c) Select Hex, S19 or Multiple Bin radio button (Item 6 in Table 4/Figure 14).
d) Click the “Extract” button (Item 7 in Table 4/Figure 14) to extract the selected image.
4. Repeat step (3.) to extract other DFU images.
UM0412 Revision history
Doc ID 13379 Rev 4 21/22
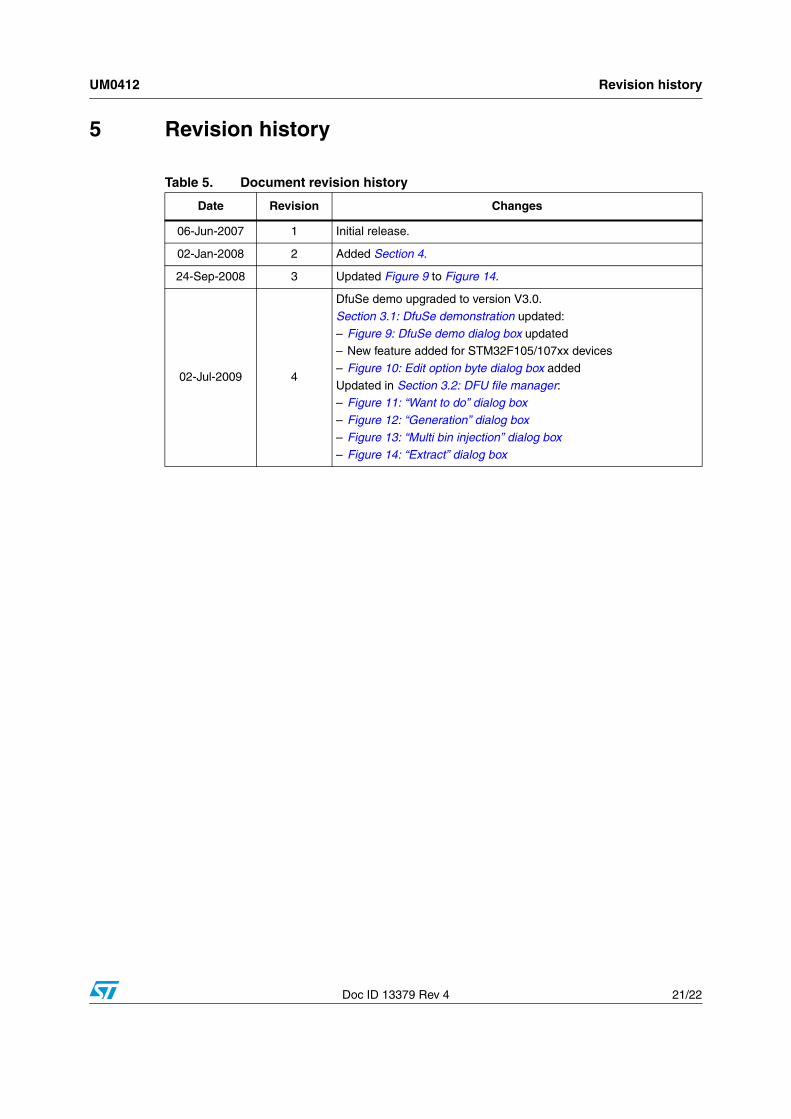
5 Revision history
Table 5. Document revision history
Date Revision Changes
06-Jun-2007 1 Initial release.
02-Jan-2008 2 Added Section 4.
24-Sep-2008 3 Updated Figure 9 to Figure 14.
02-Jul-2009 4
DfuSe demo upgraded to version V3.0.
Section 3.1: DfuSe demonstration updated:
– Figure 9: DfuSe demo dialog box updated– New feature added for STM32F105/107xx devices
– Figure 10: Edit option byte dialog box added
Updated in Section 3.2: DFU file manager:– Figure 11: “Want to do” dialog box
– Figure 12: “Generation” dialog box
– Figure 13: “Multi bin injection” dialog box
– Figure 14: “Extract” dialog box
UM0412
22/22 Doc ID 13379 Rev 4
Please Read Carefully:
Information in this document is provided solely in connection with ST products. STMicroelectronics NV and its subsidiaries (“ST”) reserve theright to make changes, corrections, modifications or improvements, to this document, and the products and services described herein at anytime, without notice.
All ST products are sold pursuant to ST’s terms and conditions of sale.
Purchasers are solely responsible for the choice, selection and use of the ST products and services described herein, and ST assumes noliability whatsoever relating to the choice, selection or use of the ST products and services described herein.
No license, express or implied, by estoppel or otherwise, to any intellectual property rights is granted under this document. If any part of thisdocument refers to any third party products or services it shall not be deemed a license grant by ST for the use of such third party productsor services, or any intellectual property contained therein or considered as a warranty covering the use in any manner whatsoever of suchthird party products or services or any intellectual property contained therein.
UNLESS OTHERWISE SET FORTH IN ST’S TERMS AND CONDITIONS OF SALE ST DISCLAIMS ANY EXPRESS OR IMPLIEDWARRANTY WITH RESPECT TO THE USE AND/OR SALE OF ST PRODUCTS INCLUDING WITHOUT LIMITATION IMPLIEDWARRANTIES OF MERCHANTABILITY, FITNESS FOR A PARTICULAR PURPOSE (AND THEIR EQUIVALENTS UNDER THE LAWSOF ANY JURISDICTION), OR INFRINGEMENT OF ANY PATENT, COPYRIGHT OR OTHER INTELLECTUAL PROPERTY RIGHT.
UNLESS EXPRESSLY APPROVED IN WRITING BY AN AUTHORIZED ST REPRESENTATIVE, ST PRODUCTS ARE NOTRECOMMENDED, AUTHORIZED OR WARRANTED FOR USE IN MILITARY, AIR CRAFT, SPACE, LIFE SAVING, OR LIFE SUSTAININGAPPLICATIONS, NOR IN PRODUCTS OR SYSTEMS WHERE FAILURE OR MALFUNCTION MAY RESULT IN PERSONAL INJURY,DEATH, OR SEVERE PROPERTY OR ENVIRONMENTAL DAMAGE. ST PRODUCTS WHICH ARE NOT SPECIFIED AS "AUTOMOTIVEGRADE" MAY ONLY BE USED IN AUTOMOTIVE APPLICATIONS AT USER’S OWN RISK.
Resale of ST products with provisions different from the statements and/or technical features set forth in this document shall immediately voidany warranty granted by ST for the ST product or service described herein and shall not create or extend in any manner whatsoever, anyliability of ST.
ST and the ST logo are trademarks or registered trademarks of ST in various countries.
Information in this document supersedes and replaces all information previously supplied.
The ST logo is a registered trademark of STMicroelectronics. All other names are the property of their respective owners.
© 2009 STMicroelectronics - All rights reserved
STMicroelectronics group of companies
Australia - Belgium - Brazil - Canada - China - Czech Republic - Finland - France - Germany - Hong Kong - India - Israel - Italy - Japan - Malaysia - Malta - Morocco - Philippines - Singapore - Spain - Sweden - Switzerland - United Kingdom - United States of America
www.st.com


![AN5275 Introduction Application note · [2] AN3156, Application note, USB DFU protocol used in the STM32 bootloader [3] UM0412, User manual, Getting started with DfuSe USB device](https://static.fdocuments.us/doc/165x107/60b7bb41ebf471325f4f489f/an5275-introduction-application-note-2-an3156-application-note-usb-dfu-protocol.jpg)