General Informationcrit.artic.edu/aoc/pdfs/aoc_3dpprep.pdf · This document is aailable...
9
Advanced Output Center Sullivan Center, Rm. 1232 312 629 6688 / [email protected] This document is available electronically at http://crit.artic.edu/aoc Page: 1 of 9 Last Modified: June 15, 2016 10:24 AM Guide for General Information Location: Advanced Output Center, 1232 Sullivan Access: Technician-run; Online order form available on the website; Files can be shared over Google Drive or dropped off in the AOC; Open to the whole SAIC community (students, faculty, staff, alumni) All payments are through ArtiCard only. 3D Printing Max Build Size Resolution Material Material Options Build Options Pricing Turnaround File Types Cost, Time, & Quality Applications and Benefits Table of contents: Objet30 Pro Estimation: Page 5 Dimension Estimation: Page 6 Form 1+ Estimation: Page 7 Dimension SST 10” x 10” x 12” 0.25mm ABS plastic in a solid color Model/support: $5.50/in³ Build base: $0.50/2in 2 White, ivory, gray, black, red, orange, yellow, blue, green 1 Week or less STL Fast, low cost, but low quality - Strong, moving parts - Nested Geometry - Parts can be sanded to achieve smooth finish Infill choices: (listed strongest - weakest) Solid High Density Sparse Low Density Sparse *more infill = more $ Objet30 Pro 11.57” x 7.55” x 5.85” 0.03mm Acrylic-like plastic in solid color Model: $0.50/gram *20% off for no color choice Suport: $0.20/gram White, gray, black, clear *polypropylene-like available on builds over 300 grams 1 Week or less Fast, high quality, but expensive - Fast printing - Presentation quality prints with highest resolution Infill choices: Solid Shelled *shelled may save $ on larger parts STL Form 1+ Acrylic-like plastic in solid color *specialty materials available White, gray, black, clear, tough ABS-like material in transparent blue, flexible in clear, and castable in blue Flexible & Castable: $0.65/ml All others: $0.40/ml 1 Week or less STL High quality, low cost, but potentially slow -Fast printing -Can do high resolution -Very strong *Tough only -Mold making *castable only N/A 4.9” × 4.9” × 6.5” 0.2mm-0.025mm *varies by material
Transcript of General Informationcrit.artic.edu/aoc/pdfs/aoc_3dpprep.pdf · This document is aailable...
Advanced Output CenterSullivan Center, Rm. 1232
312 629 6688 / [email protected] document is available electronically at http://crit.artic.edu/aoc
Page: 1 of 9 Last Modified: June 15, 2016 10:24 AM
Guide for
General InformationLocation: Advanced Output Center, 1232 SullivanAccess: Technician-run; Online order form available on the website; Files can be shared over Google Drive or dropped off in the AOC; Open to the whole SAIC community (students, faculty, staff, alumni) All payments are through ArtiCard only.
3D Printing
Max Build Size
Resolution
Material
Material Options
Build Options
Pricing
Turnaround
File Types
Cost, Time, & Quality
Applications and Benefits
Table of contents: Objet30 Pro Estimation: Page 5 Dimension Estimation: Page 6 Form 1+ Estimation: Page 7
Dimension SST 10” x 10” x 12”
0.25mm
ABS plastic in a solid color
Model/support: $5.50/in³Build base: $0.50/2in2
White, ivory, gray, black, red, orange, yellow, blue, green
1 Week or less
STL
Fast, low cost, but low quality
- Strong, moving parts- Nested Geometry- Parts can be sanded to achieve smooth finish
Infill choices:(listed strongest - weakest)SolidHigh Density SparseLow Density Sparse*more infill = more $
Objet30 Pro11.57” x 7.55” x 5.85”
0.03mm
Acrylic-like plastic in solid color
Model: $0.50/gram *20% off for no color choiceSuport: $0.20/gram
White, gray, black, clear
*polypropylene-like available on builds over 300 grams
1 Week or less
Fast, high quality, but expensive
- Fast printing- Presentation quality prints with highest resolution
Infill choices:SolidShelled*shelled may save $ on larger parts
STL
Form 1+
Acrylic-like plastic in solid color*specialty materials available
White, gray, black, clear, tough ABS-like material in transparent blue, flexible in clear, and castable in blue
Flexible & Castable: $0.65/mlAll others: $0.40/ml
1 Week or less
STL
High quality, low cost, but potentially slow
-Fast printing-Can do high resolution -Very strong *Tough only -Mold making *castable only
N/A
4.9” × 4.9” × 6.5”
0.2mm-0.025mm *varies by material

Advanced Output CenterSullivan Center, Rm. 1232
312 629 6688 / [email protected] document is available electronically at http://crit.artic.edu/aoc
Page: 2 of 9 Last Modified: June 15, 2016 10:24 AM
Model Preparation in Rhino
These instructions assume a basic working knowledge of modeling in Rhino. If you are unsure about your modeling skill, we recommend that you work with a faculty member who can guide you through the modeling process. You can also visit the AOC’s website for links to helpful tutorials (see the URL at the bottom of this page). Remember, modeling is a skill; it can take months and even years of practice to become proficient!
Units
We recommend modeling in either inches or millimeters, especially if accuracy of size is important to your part.The units you use during modeling must correspond to the actual units used during output. To set the units, click on ‘File -> Proper-ties…’ then click on ‘Units.’ Set the ‘Model Units:’ to either inches or millimeters.
CHECKING FOR NAKED EDGES
In order to output a correct .STL file for prototyping, NURBS objects in Rhino must be closed solids/polysurfaces (a.k.a “watertight” objects). This means your object can have no naked or unjoined edges.
This is one way to check for naked/unjoined edges during the modeling process (Fig. 1):
•Type the command ShowEdges into the command line, then hit Enter.•You will be prompted to Select surfaces, polysurfaces or meshes for edge display. Select the object(s) you want to check, then hit Enter. •This will bring up the Edge Analysis dialog. Select the radio button next to Naked Edges. All naked edges will be dis-played highlighted in the color shown.
(Fig. 1) Edge Analysis (Fig. 2) What Command
This is another way to check for naked/unjoined edges during the modeling process (Fig. 2):
•Type the command What into the command line, then hit Enter.•You will be prompted to Select objects. Select the object(s) you want to check, then hit Enter. •This will bring up the What dialog. Look under the heading ‘Geometry’; the object is described as open or closed (closed & valid = good; open &/or invalid = bad).
NOTE: We strongly recommend a periodic check of your model for naked edges as you work. Don’t wait until you think your model is finished; check often and fix naked edges as you find them.

Advanced Output CenterSullivan Center, Rm. 1232
312 629 6688 / [email protected] document is available electronically at http://crit.artic.edu/aoc
Page: 3 of 9 Last Modified: June 15, 2016 10:24 AM
.STL Export
To join two naked edges once they have been located:•Type the command JoinEdge into the command line, then hit Enter.•You will be prompted to Select two unjoined edges. Select the edges you want to join, then hit Enter.
Repairing naked Edges
Once your model has been made into a valid closed surface with no thin parts, you can export it to the .STL file format.
•Select the objectyou want to export.Models that will end up being physically separate pieces must be exported as individual STL files.
•Click on ‘File -> Export Selected…’
•Name your file and set the ‘Save as Type:’ option to ‘Stereolithography [*.STL],’ then click Save.
•In the ‘Polygon Mesh Detailed Options’ dialog, enter the settings for polygon conversion.
•You can preview the mesh settings, or export directly to an .STL in binary format.
NOTE:These settings are recommendations only, and may not be ideal for all parts. These settings may produce ex-tremely large .STL files. Files over 50MB will not be accepted.
Advanced Output CenterSullivan Center, Rm. 1232
312 629 6688 / [email protected] document is available electronically at http://crit.artic.edu/aoc
Page: 4 of 9 Last Modified: June 15, 2016 10:24 AM
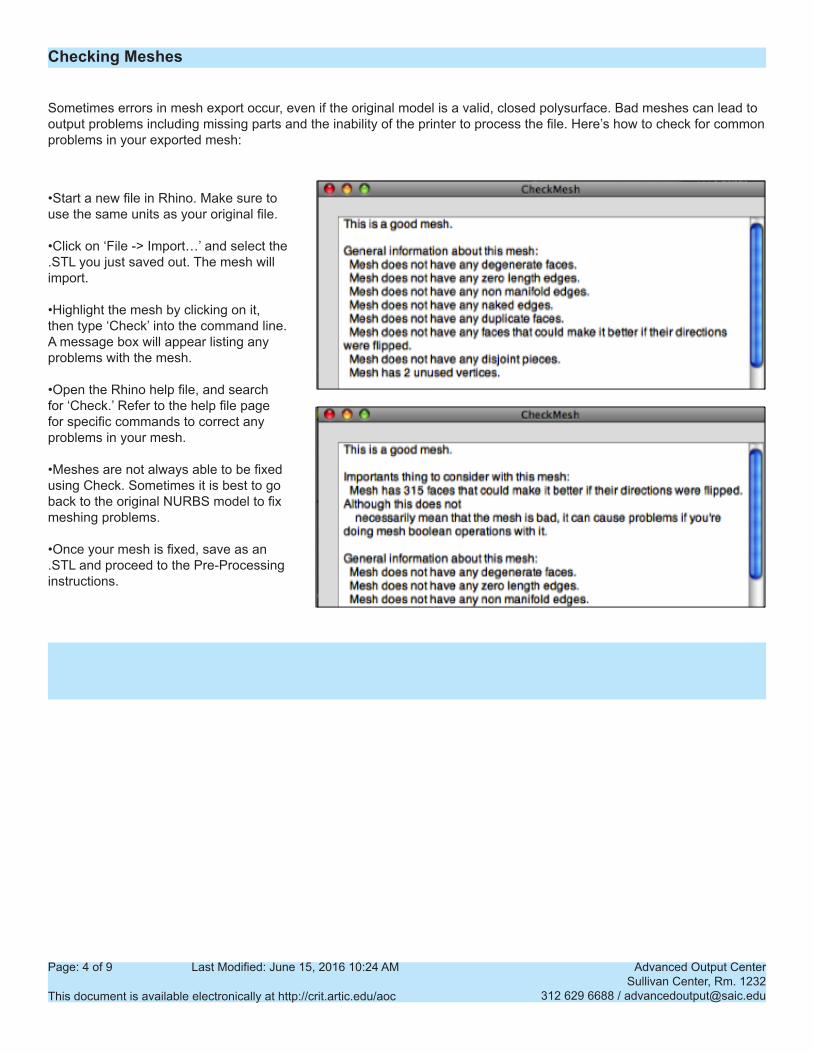
Checking Meshes
Sometimes errors in mesh export occur, even if the original model is a valid, closed polysurface. Bad meshes can lead to output problems including missing parts and the inability of the printer to process the file. Here’s how to check for common problems in your exported mesh:
•Start a new file in Rhino. Make sure to use the same units as your original file.
•Click on ‘File -> Import…’ and select the .STL you just saved out. The mesh will import.
•Highlight the mesh by clicking on it, then type ‘Check’ into the command line. A message box will appear listing any problems with the mesh.
•Open the Rhino help file, and search for ‘Check.’ Refer to the help file page for specific commands to correct any problems in your mesh.
•Meshes are not always able to be fixed using Check. Sometimes it is best to go back to the original NURBS model to fix meshing problems.
•Once your mesh is fixed, save as an .STL and proceed to the Pre-Processing instructions.
NOTE: CheckMesh may report a good mesh with minor problems listed under Important things…. Some of these minor problems, such as reversed normals, can prevent the 3D printer from properly processing a file.

Advanced Output CenterSullivan Center, Rm. 1232
312 629 6688 / [email protected] document is available electronically at http://crit.artic.edu/aoc
Page: 5 of 9 Last Modified: June 15, 2016 10:24 AM
Pre-Processing Your File for Objet 30
Once your .STL is exported, you can use the Objet Studio software installed on all AOC computers to ensure that it will process correctly, as well as to estimate the material costs of your file.
Click on ‘Start -> All Programs ->Objet ->Objet Studio’
1.Right click on the studio space and select “Insert”
2.Navigate to where you file is located, select your file and make sure “Arrange models” is checked. Then hit “Open”.
3.Once the part is imported select “Tray Validation” on the top menu part. This will make sure your part is able to be 3D Printed.
4.If the part turns purple and says “Unclosed contours are detected” it means you have a hole in your mesh, or reversed normal and must be fixed. If nothing happens after “Tray Validation,” that means the part can be printed.
5.Now select “Estimate” on the top menu bar. This will look at all the parts in the pack and figure out how much model and support is used.
6.Select the part that you want to know the cost of and go to the “Info” tab on the lower left portion of the screen. The text boxes contain the amount (in grams) of materials used for that part. Use the formula below to figure out your part’s cost.
NOTE: Material and cost totals calculated during pre-processing are estimates only. The ‘Time’ reading under ‘Build Estimates’ is NOT the turnaround time for your file. Turnaround time depends on the size of your part as well as the number of 3D print jobs ahead of yours. The AOC cannot guarantee any turnaround time less than 1 week; ask a lab monitor for details about turnaround times.
model consumpion x model cost+
support consumption x support cost= TOTAL COST
Advanced Output CenterSullivan Center, Rm. 1232
312 629 6688 / [email protected] document is available electronically at http://crit.artic.edu/aoc
Page: 6 of 9 Last Modified: June 15, 2016 10:24 AM
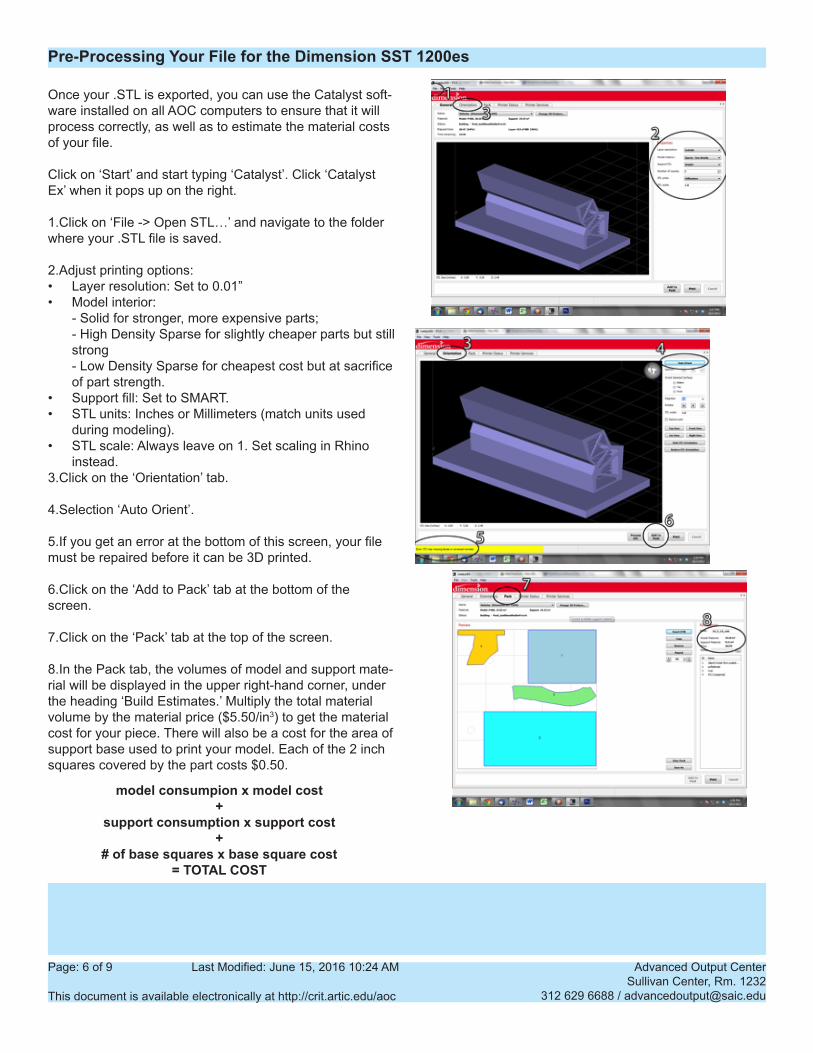
Pre-Processing Your File for the Dimension SST 1200es
Once your .STL is exported, you can use the Catalyst soft-ware installed on all AOC computers to ensure that it will process correctly, as well as to estimate the material costs of your file.
Click on ‘Start’ and start typing ‘Catalyst’. Click ‘Catalyst Ex’ when it pops up on the right.
1.Click on ‘File -> Open STL…’ and navigate to the folder where your .STL file is saved.
2.Adjust printing options: • Layer resolution: Set to 0.01” • Model interior:
- Solid for stronger, more expensive parts; - High Density Sparse for slightly cheaper parts but still strong - Low Density Sparse for cheapest cost but at sacrifice of part strength.
• Support fill: Set to SMART.• STL units: Inches or Millimeters (match units used
during modeling).• STL scale: Always leave on 1. Set scaling in Rhino
instead. 3.Click on the ‘Orientation’ tab.
4.Selection ‘Auto Orient’.
5.If you get an error at the bottom of this screen, your file must be repaired before it can be 3D printed.
6.Click on the ‘Add to Pack’ tab at the bottom of the screen.
7.Click on the ‘Pack’ tab at the top of the screen.
8.In the Pack tab, the volumes of model and support mate-rial will be displayed in the upper right-hand corner, under the heading ‘Build Estimates.’ Multiply the total material volume by the material price ($5.50/in3) to get the material cost for your piece. There will also be a cost for the area of support base used to print your model. Each of the 2 inch squares covered by the part costs $0.50.
NOTE: Material and cost totals calculated during pre-processing are estimates only. The ‘Time’ reading under ‘Build Esti-mates’ is NOT the turnaround time for your file. Turnaround time depends on the size of your part as well as the number of 3D print jobs ahead of yours. The AOC cannot guarantee any turnaround time less than 1 week; ask a lab monitor for details about turnaround times.
model consumpion x model cost+
support consumption x support cost+
# of base squares x base square cost= TOTAL COST

Advanced Output CenterSullivan Center, Rm. 1232
312 629 6688 / [email protected] document is available electronically at http://crit.artic.edu/aoc
Page: 7 of 9 Last Modified: June 15, 2016 10:24 AM
Pre-Processing Your File for the Form 1+
Once your .STL is exported, you can use the Preform software installed on all AOC computers to ensure that it will process correctly, as well as to estimate the material costs of your file. Preform is a free program and is avail-able for Mac and PC so you can install it on your own computer by visiting Form Labs’ website.
On the lab computers:Click on ‘Start’ and start typing ‘Preform’. Click ‘Preform’ when it pops up on the right.
1. A window will pop up asking you to choose your mate-rial and resolution. Since you will just be using the soft-ware to calculate cost, these options do not matter at the moment. Although, you will need to choose them when you submit your job. Keep in mind that higher resolutions will incur longer print times.
2.Click on ‘File’ → ‘Open...’’ and navigate to the folder where your .STL file is saved.
3. Once you’ve brought your model into the software, you will see a preview of it on the grided platform. Click the model to select it and it will turn blue. The 5 buttons on the left side of the software outline processing categories. Do not scale your model in this software as it should al-ready be scaled. Click on the 2nd button down and orient your model by clicking the ‘Orient Selected’ button.
4. Next, click the next button down and hit “Generate Selected” to generate the support system. Leave the support options at their defaults.
5. At this point, you can estimate your cost. At the bottom of the software, you will see a panel of information. The important value here is the ‘Volume’ which will be dis-played in milliliters. Use this value along with the equa-tion below to calculate your estimated cost.
NOTE: Material and cost totals calculated during pre-processing are estimates only. The ‘Time’ reading under ‘Build Esti-mates’ is NOT the turnaround time for your file. Turnaround time depends on the size of your part as well as the number of 3D print jobs ahead of yours. The AOC cannot guarantee any turnaround time less than 1 week; ask a lab monitor for details about turnaround times.
model consumpion x model cost= TOTAL COST

Advanced Output CenterSullivan Center, Rm. 1232
312 629 6688 / [email protected] document is available electronically at http://crit.artic.edu/aoc
Page: 8 of 9 Last Modified: June 15, 2016 10:24 AM
File Submission
When you’re ready to submit your job, fill out the online order form located on the AOC site under “3D Printing”. Each printer has its own form, so make sure you select the right one. The form contains options like color, finish, model fill, and quantity. If you have multiple print configurations (different quantities, color, etc.), please submit one form for each configu-ration.
You can send us your files using Google Drive, or simply drop them off in person at the AOC. When submitting multiple files using the same configuration, compress them to a .ZIP archive before uploading to Google Drive.
3D Printing File Checklist-No parts thinner than 0.04”/1mm-Solid .STL, with no open edges-When possible, export one .STL file per physically separate part-.STL file size less than 50MB each-.STL file preprocessed in Catalyst, Objet Studio, or Netfabb Studio to check for errors
Remember, you are responsible for the files you submit. Calculate your price, we do not provide quotes and will start printing as soon as we recieve your file
Check for errors and check your wall thickness. If you submit an invalid file, we can’t guarantee that it will print successfully.
If you submit fragile geometry, we can’t guarantee that it will stay in one piece. Payment and Pickup
The AOC will send an email notification as soon as your 3D print job is finished. Payment is due via ArtiCard when your prints are picked up.
Properties of a 3D Print: What to Expect3D printed parts will have a slightly ridged surface due to the way the printer outputs material. Depending on the shape of your parts, this will be more or less apparent. On the Dimension SST 1200es Parts will have a ‘seam’, or a slightly raised line where the extruded plastic sometimes layers up on itself.
This surface, including the ‘seam’, can be left as is or sanded down and/or covered with primer to achieve a smooth finish. ABS machines and sands very easily; solid ABS is durable enough to be used for mechanical parts. We recommend parts that will be sanded or machined be printed with a solid material fill.
This “seam” does not occur on Objet 30 prints.
Feel free to ask a lab monitor for sample parts to get an idea of standard resolution and surface quality.

Advanced Output CenterSullivan Center, Rm. 1232
312 629 6688 / [email protected] document is available electronically at http://crit.artic.edu/aoc
Page: 9 of 9 Last Modified: June 15, 2016 10:24 AM
Pricing
Model Material
Support Material
$0.50 / gram(20% discount if no color preference)$0.20 / gram
Objet30 Pro
Dimension SST 1200esABS Model Material Soluble Support Material Printing Base Area
$5.50 / in3
$5.50 / in3
$0.50/ 2in2
Form 1+Model Material (clear, white, black, grey, tough)Model Material (flexible & castable)
$0.40 / ml$0.65 / ml