
Gen y Mothion
75
User guide Version 2.5.2 | July 17th, 2015
-
Upload
karla-salho -
Category
Documents
-
view
224 -
download
4
description
Tutorial
Transcript of Gen y Mothion

User guideVersion 252 | July 17th 2015
CopyrightNo part of this document may be reproduced or transmittedin any form or by any means without prior writtenpermission of Genymobile
Android is a trademark of Google Inc
Genymotion 252 User Guide
Copyright - 2
Genymotion 252 User Guide
Table of Contents - 3
Table of contentsOverview 5
Requirements 6Operating system 6Hardware 6Software 6Web browser 7
Installing Genymotion 8Windows 8MacOS X 9Linux 9
License 11Registering the license key 11Validating the license 12
Enabling the license server 13
Getting Started 14
Genymotion Application 19Starting Genymotion 19Adding a new virtual device 20Starting a virtual device 24Configuring Genymotion 24Getting Genymotion details 31Getting help 31Updating Genymotion 31
Virtual Devices 32Managing virtual devices 32Starting virtual devices 35Deploying an application 36Emulating sensors and features 37Interacting with virtual devices 45Updating virtual devices 47Generating virtual device logs 48
Genymotion Plugin for Eclipse 50Installing the plugin 50Using the plugin 51
Genymotion 252 User Guide
Table of Contents - 4
Running Android applications 52
Genymotion Plugin for Android Studio 53Installing the plugin 53Using the plugin 54Running Android applications 55
Genymotion Shell 56Starting Genymotion Shell 56Interacting with Genymotion Shell 56Interacting with virtual devices 56Baseband commands 59Interacting with Genymotion 60Using Genymotion Shell from a command prompt 61
Keyboard Shortcuts 62Genymotion shortcuts 62Virtual device shortcuts 63
Glossary 66
Index 71
Overview - 5
Genymotion 252 User Guide
OverviewGenymotion is an Android emulator which comprises a complete set of sensors and features inorder to interact with a virtual Android environment With Genymotion you can test yourAndroid applications on a wide range of virtual devices for development test anddemonstration purposes
Genymotion is fast simple to install and powerful thanks to user-friendly sensor widgets andinteraction features It is available for Windows MacOS X and Linux operating systems
This user guide will take you through Genymotion download and installation steps andwill helpyou get familiar with the interface so that you canmake full use of Genymotion resources andhave a fully operational application
In this user guide the following instructional icons are used
Notes tips or additional information
Situations that could cause performance issues or data losses
Follow the simple installation process start one of the Android virtual devices and enjoy playingwith your application
Requirements - 6
Genymotion 252 User Guide
RequirementsThis chapter lists the prerequisites for an optimal use of Genymotion
Operating system
Genymotion is compatible with the following operating systems
Microsoft Windows Vista 7 881 (32 or 64 bits)Mac OS X 108 or aboveLinux Ubuntu 1204 (Precise Pangolin) or aboveLinux Debian 7 (Wheezy)
Genymotion cannot be run from a virtual machine Indeed it needs adirect access to the hardware in order to provide OpenGL accelerationRunning Genymotion from a virtual machine prevents it to directly accessthe hardware components Therefore Genymotion is incompatible wheninstalled from VMWare Parallels Hyper-V or VirtualPC
Hardware
Genymotion implies that you have the following hardware on your computer
OpenGL 20 capable video card with an up-to-date driverVT-x or AMD-V capable CPU enabled in BIOS settingsRAMmemory at least 2GBScreen resolution greater than 1024 x 768 pixelsFree space on hard disk at least 100MB
A minimum of 2GB of free space is required to deploy a virtual deviceYou might need more than 8GB depending on your use of the virtualdevices and the applications you have installed
Software
To run Genymotion virtual devices youmust install Oracle VMVirtualBox 41 or aboveHowever for performance reasons we recommend using version 4312
For more information please refer to chapter Installing Genymotion
Requirements - 7
Genymotion 252 User Guide
Web browser
For installation updates and services provided by the Genymotion website one of the followingweb browsers is required
Internet Explorer version 10 or aboveMozilla Firefox version 30 or aboveGoogle Chrome version 20 or aboveSafari version 40 or above
Installing Genymotion - 8
Genymotion 252 User Guide
Installing GenymotionGenymotion operation relies on the use of Oracle VMVirtualBox in the background Thisenables virtualizing Android operating systems If you do not already have Oracle VMVirtualBox installed on your computer youwill be asked to do so prior to installingGenymotion
If you already have Oracle VM VirtualBox installed note that versionsbelow 411 are not compatible with Genymotion For performancereasons we recommend using version 4312
To install Genymotion on your computer follow the steps corresponding to your operatingsystem
Windows
To download Genymotion for Windows
1 Go to the Genymotion download pageFrom this page you can
download the ready-to-run Genymotion installer for Windows (recommended)This package includes Oracle VMVirtualBox installer download theWindows 3264-bit packageIn this case youmust first download and install VirtualBox for Windows hosts from theDownload VirtualBox page
When installing VirtualBox in the Custom setup window makesure VirtualBox Networking is enabled
2 Save and run the exe file3 Select the setup language and click OK By default the Genymotion language corresponds
to your system languageThe Genymotion setupwizard opens
4 Click Next5 Select the destination folder by clicking Browse
The default destination folder is CProgram FilesGenymobileGenymotion6 Click Next7 Select the start menu folder by clicking Browse or check Dont create a Start menu folder
and click Next8 Select whether or not to create a desktop icon and click Next
Installing Genymotion - 9
Genymotion 252 User Guide
9 Click Install and Finish
Genymotion installer may not run properly onWindows Vista If so1 Click Start gt Run2 Enter cmdexe and click OK3 In the command prompt start Genymotion installer package byentering its full path USERPROFILEDownloadsltGenymotioninstaller pathgt
MacOS X
To download Genymotion for MacOS X
1 Download and install VirtualBox for OS X hosts from the Download VirtualBox page
When installing VirtualBox in the Custom setup window make sureVirtualBox Networking is enabled
2 When finished reboot3 Go to the Genymotion download page4 Download the MacOS X 64-bit package5 Open the dmg file6 Drag and drop Genymotion and Genymotion Shell to the Applications directory
Linux
Almost every GNULinux system comes with an installer package for Oracle VMVirtualBox
1 Browse for the Oracle VMVirtualBox installer in your directoriesIf you do not have the installer or if you need to install a specific version download andinstall VirtualBox for Linux hosts from the Download VirtualBox page
When installing VirtualBox in the Custom setup window make sureVirtualBox Networking is enabled
2 Go to the Genymotion download page3 Download the Linux package corresponding to your system4 Run the following commands
chmod +x ltGenymotion installer pathgtgenymotion-ltversiongt_
ltarchgtbin
cd ltGenymotion installer pathgt
genymotion-ltversiongt_ltarchgtbin -d ltGenymotion installer pathgt
Installing Genymotion - 10
Genymotion 252 User Guide
5 Run Genymotion using the following command
cd ltGenymotion installer pathgt
genymotion
Make sure that the dkms package is installed and that it compilesVirtualBox kernel modules each time a new kernel update is availableTo do so run sudo etcinitdvboxdrv status You should getthe message VirtualBox kernel modules (vboxdrv vboxnetfltvboxnetadp vboxpci) are loaded If not force VirtualBox kernel modulescompilation by running sudo etcinitdvboxdrv setup Make also sure that you are part of the vboxusers group If not runsudo usermod -a -G vboxusers ltlogingt
License - 11
Genymotion 252 User Guide
LicenseIf your company uses a Genymotion license server you can ignore this chapter and referdirectly to chapter Enabling the license server
This chapter details the license registration and validation steps
To register your license key you must have a valid Genymotion accountTo create your account please visit theAccount creation page
Registering the license key
To register your Genymotion license key
1 Start Genymotion in one of the following ways depending on your operating system
Windows Click from your desktop
MacOS X Click from the Applications directory
Linux Run ltGenymotion installer pathgtgenymotion
2 Click or Ctrl + AThe About Genymotion window opens
3 Copy and paste your license key in the License key field and click RegisterIf you are not already logged enter your username and password in the Credentials window
License - 12
Genymotion 252 User Guide
and click Sign in
If you have any problems registering your license key please contact us via the Support page
Validating the license
To validate your license you need to be connected to the Internet The Genymotion applicationautomatically connects to your Genymotion account If your license key is valid yourapplication will be fully unlocked and all corresponding features will be available
If Genymotion cannot connect to your account for several days the license switches to the freeversion until the next connection of the Genymotion application to your account This ensuresnobody else uses your license
When your license is about to expire Genymotion prompts you to sign in to your account
Enabling the license server - 13
Genymotion 252 User Guide
Enabling the license serverThis section is only intended to users whose company has subscribed to the license server
The license server 10 is only compatible with Genymotion 251 andgreater
This section explains you how to get ready to use Genymotionwith the license server To startusing Genymotion
1 Create a user account from httpswwwgenymotioncom2 Install Genymotion by following the steps detailed in chapter Installing Genymotion3 Open Genymotion4 Go to Settings gt Account5 Enter your username password and license server address
Depending on your network configuration you may need to add aport number eg server_ip8888 The default port is 443 as HTTPSprotocol is used
6 Click OKGenymotion connects to the license server and activates all features available for thelicense type retrieved
In case of a problem with the license server please contact your ITmanager
Getting Started - 14
Genymotion 252 User Guide
Getting StartedTo start using Genymotion and test your Android application follow the steps below
1 Start Genymotion in one of the following ways depending on your operating system
Windows Click from your desktop
Mac OS X Click from the Applications directory
Linux Run ltGenymotion installer pathgtgenymotion
The Genymotion main window opens
2 In the following window click Yes
Getting Started - 15
Genymotion 252 User Guide
The Select a new virtual devicewindow opens
3 Click Sign inThe Credentials window opens
Getting Started - 16
Genymotion 252 User Guide
4 Fill in the fields with your username and password and click Sign inThe Available virtual devices list appears
5 Select a virtual device from the list and click Next
If you cannot add a virtual device at this step you may be running outof free space We recommend that you check the free remaining spaceon your hard disk
The Create a new virtual devicewindow opens
Getting Started - 17
Genymotion 252 User Guide
6 Enter a name for your new virtual device and click NextYour virtual device is being downloaded and deployed
7 Click Finish to close the deployment windowYour virtual device appears in the Genymotion main window
Getting Started - 18
Genymotion 252 User Guide
8 Click to start your newly created virtual deviceThe virtual device window opens
9 Deploy your Android application in either of the following waysDrag and drop the application APK file into the virtual device windowRun the following command adb install ltapplication namegtapkDownload and install the application directly from the virtual device using a web link
For more information about sensor and feature emulation as well as interaction with a virtualdevice please refer to chapter Virtual Devices
Genymotion Application - 19
Genymotion 252 User Guide
Genymotion ApplicationThis chapter introduces Genymotion user interface and actions you can perform from thedifferent windows Therefore youwill learn to start Genymotion to add and start a virtualdevice to configure the application to get information and help and finally to updateGenymotion
Starting Genymotion
Start Genymotion in one of the following ways depending on your operating system
Windows click from your desktop
MacOS X click from the Applications directory
Linux run ltGenymotion installer pathgtgenymotion
The Genymotion main window opens
From the menu bar you can perform the following actions
Start the selected virtual device using Start
Add a new virtual device using Add
Open Genymotion settings using Settings
Open the informationwindow using About
Open the documentation usingHelp
Genymotion Application - 20
Genymotion 252 User Guide
Adding a new virtual device
To add a virtual device perform the action corresponding to your situation
You have never created a virtual deviceWhen the following window pops up click Yes
You have already created a virtual deviceClick from the main windowThe Select a new virtual devicewindow appears
Genymotion Application - 21
Genymotion 252 User Guide
If you cannot see any virtual device in the list you need to sign in to your Genymotion account
1 In the Select a new virtual devicewindow click Sign in
The Credentials window opens
2 Enter your username and password3 Choose whether or not to remember your credentials for future connections and click
Sign in
For more information about deploying a virtual device please refer to chapter Getting Started
You can then select a virtual device from the Available virtual devices list filter virtual devicesby Android version or device model or add a custom virtual device as explained in theprocedures mentioned below
Genymotion Application - 22
Genymotion 252 User Guide
Filtering virtual devices by Android version
From the Android version drop-down list of the Genymotion main window you can choose todisplay only virtual devices running a specific Android version
You can also filter virtual devices using the search bar
Available versions are
237 also known as API 10 or Gingerbread411 also known as API 16 or Jelly Bean422 also known as API 17 or Jelly Bean43 also known as API 18 or Jelly Bean444 also known as API 19 or KitKat500 also known as API 21 or Lollipop510 also known as API 22 or Lollipop
Filtering virtual devices by model
From theDevice model drop-down list of the Genymotion main window you can choose todisplay only a certain range of virtual devices
You can also filter virtual devices using the search bar
Available models are
Google devicesGoogle Galaxy NexusGoogle Nexus 9Google Nexus 6Google Nexus 10Google Nexus 4Google Nexus 5Google Nexus 7Google Nexus 7 2013Google Nexus OneGoogle Nexus S
HTC devicesHTC EvoHTC OneHTC One XHTC One XL
LG devicesLG Optimus L3 II
Genymotion Application - 23
Genymotion 252 User Guide
Motorola devicesMotorola Droid RazrMotorola Moto XMotorola Xoom
Samsung devicesSamsung Galaxy NoteSamsung Galaxy Note 2Samsung Galaxy Note 3Samsung Galaxy S2Samsung Galaxy S3Samsung Galaxy S4Samsung Galaxy S5
Sony devicesSony Xperia SSony Xperia Tablet SSony Xperia Tablet ZSony Xperia Z
Adding a custom virtual device
If you cannot find the virtual device you need you can select a customizable phone or tabletfrom the available ones
Custom Phone - 411 - API 16 - 768x1280Custom Phone - 422 - API 17 - 768x1280Custom Phone - 43 - API 18 - 768x1280Custom Phone - 444 - API 19 - 768x1280Custom Phone - 500 - API 21 - 768x1280Custom Phone - 510 - API 22 - 768x1280Custom Tablet - 411 - API 16 - 2560x1600Custom Tablet - 422 - API 17 - 2560x1600Custom Tablet - 43 - API 18 - 2560x1600Custom Tablet - 444 - API 19 - 2560x1600Custom Tablet - 500 - API 21 - 2560x1600Custom Tablet - 510 - API 22 - 2560x1600
Once you have deployed one of those virtual devices you can edit the RAM screen size anddensity from the Configuration menu by clicking
For more information about configuring virtual devices please refer to section Configuring avirtual device
Genymotion Application - 24
Genymotion 252 User Guide
Starting a virtual device
After having created one or several virtual devices they are made available in the Your virtualdevices list of the Genymotion main window
To start a virtual device
1 Select the virtual device youwish to run
2 Click
For more information about running a virtual device please refer to chapter Virtual Devices
Configuring Genymotion
When clicking from the main window you can configure Genymotion with different kinds ofparameters
GeneralAccountNetworkVirtualBoxADBMisc
Genymotion Application - 25
Genymotion 252 User Guide
General
The General tab contains some application preferences
You can check or uncheck options according to your preferences
Allow Genymotion to collect usage statistics allows Genymotion to retrieve usagestatisticsThis helps us understand how the application is used in order to further improve itNotify me when my license is about to expire enables license notificationsGenymotion warns youwhen your license is about to expireNotify me when Genymotion activation is about to expire enables activation notificationsGenymotionwarns youwhen you need to renew your activation in order to keep using theapplication To do so youmust sign in to your Genymotion account via the website
Genymotion Application - 26
Genymotion 252 User Guide
Account
From the Account tab you can store your credentials for quick connections and define a licenseserver address if your company uses a license server
To store your credentials in Genymotion youmust enter your username and password in thecorresponding fields
To enable the license server specify your license server address
Genymotion Application - 27
Genymotion 252 User Guide
Network
From theNetwork tab you canmodify the network settings to adapt to your Internet access
To define your HTTP proxy settings check the following options
Use HTTP Proxy enables the Genymotion application to use a proxy when connecting tothe Genymotion websiteYoumust set your HTTP proxy address and port in the corresponding fieldsUse authentication enables proxy authenticationYoumust enter your proxy username and password in the corresponding fields
Genymotion Application - 28
Genymotion 252 User Guide
VirtualBox
From the VirtualBox tab you can define the storage location of your virtual devices
In the Virtual devices field set where to store Genymotion virtual devices by clicking Browse
The virtual device path must be an absolute path
Genymotion Application - 29
Genymotion 252 User Guide
ADB
By default Genymotion uses its own Android tools From the ADB tab you can configureGenymotion to use specific Android tools (from the Android SDK)
Use Genymotion Android tools (default) is the option enabled by default
If youwish to use specific Android tools
1 Download Android Developer Tools (ADT) from the ADT Download page2 Extract the archive files in the folder of your choice3 Check Use custom Android SDK tools4 In the Android SDK field set the path to the Android SDK folder by clicking Browse5 Click OK
adt-bundlesdkplatform-tools is not a valid value
Genymotion Application - 30
Genymotion 252 User Guide
Misc
From theMisc tab you can define screen capture settings clear the cache and create an archivecontaining your logs
You can define the following options
Screen capture settings defines the storage path of screenshots and screencastsTo define where to store screen captures fill theDestination folder field by clicking BrowseCache usage indicates the disk space used by temporary filesYou can remove those files by clicking Clear cacheLog files generates an archive containing all virtual device logs To do so1 Click Save all logs2 Select the path to save the generated archive3 Wait until the archive is generated and click Close
By default the archive containing all log files is stored in the following folders
Windows LocalAppDataGenymobileGenymotiondeployedltvirtualdevice namegt
MacOS X $HOMEGenymobileGenymotiondeployedltvirtual devicenamegt
Linux $HOMEGenymobileGenymotiondeployedltvirtual devicenamegt
If you generate an archive for assistance purposes you can send it to us via the Supportform
Genymotion Application - 31
Genymotion 252 User Guide
Getting Genymotion details
Click to get details on the Genymotion version you are using your license type andexpiration date This window also allows you to register your license key
For more information about registering a license please refer to section Registering the licensekey
Getting help
Click to open this user guide
Updating Genymotion
If your virtual devices are up-to-date and a new version of Genymotion has been released apop-upwindow prompts you to download the latest version of Genymotion
To update Genymotion
1 When the following window pops up click Download
2 Follow the steps mentioned in section Installing Genymotion
Virtual Devices - 32
Genymotion 252 User Guide
Virtual DevicesVirtual devices are Android devices preconfigured and deployed by Genymotion They allow youto deploy and test your own application with the sensors and features provided by GenymotionThis chapter explains how to manage and run virtual devices deploy an application emulatesensors and features interact with virtual devices update them and generate their logs
Managing virtual devices
Your deployed Android virtual devices are displayed in the Your virtual devices list of theGenymotion main window
From this list you can
configure a virtual device using
clone a virtual device using
reset a virtual device using
delete a virtual device using
Virtual Devices - 33
Genymotion 252 User Guide
Configuring a virtual device
When clicking the Configuration window opens
From this window you can configure the following parameters
SystemProcessor(s) sets the number of processors used by the virtual deviceBy default the value is set to 1 which is the recommended value for an optimal use
When defining more processors we advise setting one less than thetotal amount of processors to leave one dedicated to the host andavoid performance issues
Virtual Devices - 34
Genymotion 252 User Guide
Base memory (MB) sets the memory space allocated to the virtual deviceThe value must be below the memory of your computer and take into account thememory space used by your computer
We advise that you set the values recommended for the real devices(512MB to 2048MB)
Screen size - densityPredefined sets the screen size and density from a predefined listCustom sets a custom screen size and density
You may experience display or performance issues when usingcustom screen size and density values
Run virtual device in full-screen mode displays the virtual device in full-screenmodeadjusted to your screen size
Android system optionsShow Android navigation bar displays the Android navigation bar in the virtual device
Use virtual keyboard for text input uses the virtual keyboardwhen selecting a text inputarea
Cloning a virtual device
Cloning a virtual device consists in duplicating a virtual device The clone contains all settings ofthe original virtual device
This feature is only available with Indie and Business licenses
To clone a virtual device
1 Select the virtual device youwish to clone
2 Click
3 Enter a name for the new virtual device4 Click Clone5 Wait until the cloning process is finished and click Finish
Resetting a virtual device
After the deployment of a new virtual device a snapshot is created Thus you can restore thefactory settings of your virtual device at any time
This feature is only available with Indie and Business licenses
Virtual Devices - 35
Genymotion 252 User Guide
To reset a virtual device
1 Click
2 In the confirmationwindow click Yes
When using Reset all installed applications system patches modifiedsettings and data will be lost
Deleting a virtual device
To delete a virtual device
1 Select the virtual device youwish to delete
2 Click
3 In the confirmationwindow click Yes
Starting virtual devices
You can start virtual devices using either the Genymotionmain window or a command prompt
From the Genymotion main window
To start a virtual device from the Genymotionmain window
1 Select the virtual device youwish to run
2 Click
From a command prompt
1 Open a command prompt2 Retrieve the list of available virtual devices by running
Windows ltGenymotion installer pathgtgenyshell -c devices listGenymotion default installation path is CProgramFilesGenymobileGenymotionMacOS X ApplicationsGenymotionappContentsMacOSgenyshell -c devices list
Linux ltGenymotion installer pathgtgenyshell -c devices list
3 Start one of the virtual devices by runningWindows ltGenymotion installer pathgtplayer --vm-name ltvirtualdevice namegt
MacOS X ApplicationsGenymotionappContentsMacOSplayer --vm-name ltvirtual device namegt
Linux ltGenymotion installer pathgtplayer --vm-name ltvirtualdevice namegt
Virtual Devices - 36
Genymotion 252 User Guide
After starting a virtual device the following window opens This is where your virtual deviceruns andwhere you can interact with it
For more information about deploying a virtual device please refer to sectionGetting Started
Deploying an application
To deploy an application to a virtual device use either of the following methods
Drag and drop the application APK file into the virtual device windowRun the following command adb install ltapplication namegtapkDownload and install the application directly from the virtual device using a web link
Virtual Devices - 37
Genymotion 252 User Guide
Emulating sensors and features
To simulate various behaviors of your application according to specific use casesGenymotion provides easy-to-use widgets which emulate the following sensors and features
BatteryGPSCameraCaptureRemote controlIdentifiersNetworkPhone
Battery
The Battery widget allows you to test how your application reacts with different battery chargelevels and states of charge
To use the Battery widget
1 Click
2 Activate the battery simulationmode by clickingOn3 Modify the charge level using the slider or enter a value in the Charge level field4 Modify the state of charge by clicking the State of charge button
Click once to activate the Charging stateThis simulates that the power supply is plugged in and the battery is charging
Virtual Devices - 38
Genymotion 252 User Guide
Click twice to activate theDischarging stateThis simulates that the power supply is unplugged and the battery is discharging
By default the virtual device emulates the same battery charge level asthe one of your computer If your computer does not have a battery(desktop computer) the simulation mode is automatically activated
GPS
The GPS widget allows real-time activation andmodifications of a position accuracy andbearing
To use the GPS widget
1 Click
2 Activate the GPS simulationmode by clickingOn This enables the reception of generatedGPS frames in the virtual device
3 Set the latitude value youwish to simulate using the Latitude fieldThe latitude value must range from -90deg to 90deg
4 Set the longitude value youwish to simulate using the Longitude fieldThe longitude value must range from -180deg to 180deg
5 Set the altitude value youwish to simulate using the Altitude fieldThe altitude value must range from -20m to 10000m
6 Set an accuracy value using the slider or by entering a value in the Accuracy fieldThe accuracy value must range from 0m to 200m
Virtual Devices - 39
Genymotion 252 User Guide
7 Set a bearing value using the compass or by entering a value in the Bearing fieldThe bearing value must range from 0deg to 35999deg
Many applications do not rely on the GPS orientation but use thedevice accelerometer or gyroscope to determine the bearing of thedevice which are not yet supported
Camera
The Camera widget allows you to send a video stream from a virtual device to the AndroidsystemWith this widget you can test an Android application that uses an Android built-incamera
The video stream can come from a dummy camera or a real physical webcam connected orintegrated into your computer
To use the Camera widget
1 Click
2 Activate the Camera widget by clickingOnGenymotion detects available webcams on your computer
3 Select the source of data youwish to use in the Front camera andBack camera fields Thefront camera sends data to the Android front camera and the back camera sends data tothe Android back camera
Dummy webcam data are images generated by the widgetPhysical (real) webcam data are images sent by the selectedwebcam
Virtual Devices - 40
Genymotion 252 User Guide
4 Click Preview to see the video stream sent to the Android system You can check thefollowing options
None does not display any dataFront displays the front camera dataBack displays the back camera data
Capture
The Capture widget allows you to take a screenshot or screencast of virtual devices This wayyou can broadcast images or videos of your applications
This feature is only available with Indie and Business licenses
To use the Capture widget click
Screenshot When clicking a screenshot of your virtual device is captured and stored inthe configured folder
Screencast When clicking a video of your virtual device starts recording Clicking twicestops the recordingIf your virtual device emits sound it will be captured in the video
Browse files When clicking your file explorer opens allowing you to directly access yourscreenshots and screencastsAll screenshots and screencasts are stored in your home directory in a folder namedwithyour virtual device name You can change this default folder in Genymotion Settings gt Miscas explained in sectionMisc
All features can be accessed via shortcuts even if the Capture widget is notdisplayed
Virtual Devices - 41
Genymotion 252 User Guide
Remote control
With the Remote control widget you can take control of a virtual device from a physical device(any phone or tablet running Android version 22API 8Froyo or above) This widget workswith a specific Android application that runs on the physical device and forwards touch inputsand accelerometer events to Genymotion As a result you can test your application as if youwere holding a device in your hands
This feature is only available with Indie and Business licenses
The Remote control widget requires to have ADB installed on your computer For moreinformation please refer to section ADB
To use the Remote control widget
1 Connect your physical device either by wire or withWi-FiTo connect withWi-Fi your physical device must support ADB over network If so1 On your physical device go toMenu gt System settings gt Developer options
If you have not unlocked this menu yet go to Menu gt Systemsettings gt About and click several times on Build number untilyou get a message meaning that Developer options are nowavailable
2 Check Android debugging and thenADB over network3 Connect your physical device to theWi-Fi and retrieve its IP address from theWi-Fi
menu4 Open a command prompt and enter ltpath to ADBgtconnect ltIPgt
2 Click
3 Activate the widget by clickingOnGenymotion tries to detect any connected Android device
Virtual Devices - 42
Genymotion 252 User Guide
4 Select your device from the Available devices drop-down list and click Start
If the device is connected to ADB and not visible in the list restart thewidget
5 Check the desired optionsEnable preview enables previewing your Genymotion screen on your physical deviceEnable touch screen allows your physical device to send touch events to GenymotionEnable accelerometer allows your physical device to send accelerometer events toGenymotion
The Remote control widget automatically stops when you disconnect your device
Identifiers
The Identifiers widget shows Device ID andAndroid ID numbers You can view and edit thesevalues at any time without having to reboot your virtual device
This feature is only available with Indie and Business licenses
To use the Identifiers widget click
Android IDAnAndroid ID is a 64-bit number randomly generatedwhen the user first sets up the deviceIt remains the same for the whole lifetime of the users device Android 422 and greaterversions support multiple user accounts each one having a unique Android IDWhen clicking a random Android identifier is generated Valid Android ID numbers are 16-hexadecimal digit long
You are not allowed to set an empty Android ID
Device ID IMEI MEIDBy default a new virtual device is deployedwith the default device ID number00000000000000 0When clicking a random identifier is generatedAs IMEI or MEID numbers are used as device ID Genymotion generates numbers compliant
Virtual Devices - 43
Genymotion 252 User Guide
with the GSM0216 standard and the 3GPP2 specification (14 digits or hexadecimal digits +a checksum digit)Valid characters for setting device IDIMEIMEID are
lower-case and upper-case letters [a-z A-Z]digits [0-9]dot []dash [-]underscore [_]
Network
The Network widget allows you to test how your application reacts with different networkquality and performance types
This feature is only available with Indie and Business licenses
To use the Network widget
1 Click
2 Activate the network simulation by clickingOn
When activating the widget for the first time the profile network isautomatically set toWifi It then takes the last network profile used
Virtual Devices - 44
Genymotion 252 User Guide
3 Select a network type from the Profile drop-down list Network profiles and theircorresponding values are listed in the table below
Uploadspeed
Downloadspeed
Uploaddelay
Downloaddelay
Uploadpacketloss
Downloadpacketloss
DNSdelay
No data 0Kbs 0Kbs 0ms 0ms 100 100 0ms
GPRS 40Kbs 40Kbs 500ms 500ms 001 001 1000ms
Edge 200Kbs 240Kbs 400ms 400ms 001 001 800ms
3G 15Mbs 72Mbs 100ms 100ms 001 001 200ms
4G 55Mbs 179Mbs 50ms 50ms 001 001 100ms
4G(high DNS delay)
55Mbs 179Mbs 50ms 50ms 001 001 3000ms
4G(high packet losses)
55Mbs 179Mbs 50ms 50ms 10 10 100ms
Wifi 330Mbs 400Mbs 0ms 0ms 0 0 0ms
Phone
The Phone widget allows to test applications relying on telephony features and observe theirbehavior when receiving a call or a text message
This feature is only available with Indie and Business licenses
Virtual Devices - 45
Genymotion 252 User Guide
To use the Phone widget click or Ctrl + 8
To simulate an incoming call
1 Enter an incoming phone number2 Click Call
To simulate an incoming message
1 Enter an incoming phone number2 Enter a text message3 Click Send message
The text message is displayed in the virtual device via a notification and can also be read intheMessaging application
Interacting with virtual devices
This section describes features that help you easily interact with your virtual devices
Multi-touch simulation
Because inmost cases virtual devices are controlled withmouse and keyboard some shortcutshave been implemented to help simulate common gestures
Zoom in right click + move mouse to the leftZoom out right click + move mouse to the rightTilt forth right click + move mouse upTilt back right click + move mouse downClockwise rotation Shift + right click + move mouse to the rightCounterclockwise rotation Shift + right click + move mouse to the left
If you useMac OS X replace right click with ctrl + click
Drag and drop
To drag and drop files from your computer to the virtual device ADB must be installed Toconfigure ADB please refer to section ADB The behavior of dragged and dropped files isdifferent according to the file type
Regular files Regular files are stored in sdcardDownloadThey can be accessed via the File Manager application provided in the virtual deviceAndroid applications APK files are installed on the virtual deviceIf the same application already exists but with another signature you can decide to overridethe existing application
Virtual Devices - 46
Genymotion 252 User Guide
Flashable archivesZip archives detected as flashable (containing a system folder) are flashed on the device
Such archives may damage your virtual device We recommendrestarting your virtual device after flashing an archive
Copy and paste
The clipboard is shared between your computer and Genymotion Thus you can easily copy andpaste text from your computer to Genymotion and vice versa
IncreaseDecrease volume
You can control the volume of the sound emitted by your virtual device
Click to increase the volume
Click to decrease the volume
Rotate screen
You can rotate the screen of your virtual device by clicking
Depending on the Android version and the density of your virtual devicethe Rotate screen feature may not be available If you are using anAndroid version 42 or above make sure that the Rotate screen feature isnot locked in the right-hand bar Rotation might also be locked in portraitor landscapemode by the current running application In this case it is notpossible to change it via the Rotate screen button or via the rotationsetangle command in Genymotion Shell
Pixel Perfect
With Pixel Perfect you can be highly precise in the development of your user interface andensure every pixel of your application really looks as it should One pixel of the virtual device isdisplayed using one pixel of your computer screen
This feature is only available with Indie and Business licenses
Click once to activate Pixel Perfect Click twice to deactivate it
If the virtual device screen size is larger than your computer screen sizethe virtual device window will be maximized and you will be able to usescrollbars to move inside the screen
Virtual Devices - 47
Genymotion 252 User Guide
Navigation buttons
With the navigation buttons you can navigate between applications or display actions that canbe performed
BackClick once to go back to the previous page Click twice to exit the application
Recent appsClick to display the recently used applications
MenuClick to display actions you can perform within an application
HomeClick to display the home page at any time
PowerClick to shut down the running virtual device
Display tips
When navigating within a virtual device you can at any time change its display
Full-screen mode You can switch to full-screenmode by pressing F11 Pressing a secondtime reverts to the original screen size
On Mac OS X you may have to use the key combination ctrl + fn +F11
Custom size You can resize the virtual device window by selecting and dragging an edge or acorner of the windowFit to content When the virtual device window is resized black areas appear on the bordersDouble-click in one of those areas to fit the virtual device window size to its content
Updating virtual devices
If Genymotion is up-to-date and a new version of virtual devices has been released a pop-upwindow prompts you to automatically update your virtual devices while keeping all yourinstalled packages and applications
This is only possible with an Indie or a Business license If you are using thefree version of Genymotion you must deploy the new version of virtualdevices
Virtual Devices - 48
Genymotion 252 User Guide
To update your virtual devices
1 When the following window pops up click Update
2 Wait until the update process is finished and click Finish
You must have the latest version of Genymotion to update your virtualdevices
Generating virtual device logs
In some cases notably for assistance purposes youmay need to generate a log archive eitherfor a specific virtual device or for all virtual devices Follow either of the procedures below
For one virtual device
From the Genymotion main window
1 Right-click on the virtual device2 Click Generate log archive3 Select the path to save the generated archive
By default log files are stored in the following foldersWindowsCUsersltusergtAppDataLocalGenymobileGenymotiondeployedltvirtual device namegtLogs
MacOS X $HOMEGenymobileGenymotiondeployedltvirtual devicenamegt
Linux $HOMEGenymobileGenymotiondeployedltvirtual devicenamegt
4 Wait until the archive is generated and click Close
If you have generated logs for assistance purposes you can send the archive or the log files tous via the Support form
Virtual Devices - 49
Genymotion 252 User Guide
For all virtual devices
From the Genymotion main window
1 Click
2 In theMisc tab click Save all logs3 Select the path to save the generated archive
By default log files are stored in the following foldersWindowsCUsersltusergtAppDataLocalGenymobileGenymotiondeployedltvirtual device namegtLogs
MacOS X $HOMEGenymobileGenymotiondeployedltvirtual devicenamegt
Linux $HOMEGenymobileGenymotiondeployedltvirtual devicenamegt
4 Wait until the archive is generated and click Close
If you have generated logs for assistance purposes you can send the archive or the log files tous via the Support form
Genymotion Plugin for Eclipse - 50
Genymotion 252 User Guide
Genymotion Plugin for EclipseThe Genymotion plugin for Eclipse allows you to test your application developedwith theEclipse IDE It uses ADB to connect to any active virtual device and push your application Touse the plugin you need to have the Android Developer Tools plugin for Eclipse installed In thischapter youwill be able to install use the plugin and run Android applications
Installing the plugin
You can install Genymotion plugin for Eclipse in one of the following ways
Update Site method (recommended)Manual method
Update Site method (recommended)
1 Start Eclipse2 Go to HelpInstall New Softwaremenu and click Add3 Fill in the fields with the following values and click OK
NameGenymotionLocation httppluginsgenymotioncomeclipse
4 ExpandGenymobile5 Click Select all and click Next6 Click Next7 Read and accept the license terms8 Click Finish
A security warning indicates that the plugin is not signed click OK9 Click Yes to restart Eclipse
The Genymotion plugin button is displayed in the toolbar
Manual method
1 Ensure Eclipse is closed2 Download the plugin from the Genymotion download page3 Follow the steps corresponding to your operating system
WindowsIf you have administrator rights put the jar archive in the Plugins directory of yourEclipse installation folderWithout administrator rights put the jar archive in the Plugins directory of yourLocal SettingsEclipse folder
Genymotion Plugin for Eclipse - 51
Genymotion 252 User Guide
MacOS XWith administrator rights put the jar archive in the Plugins directory of your Eclipseinstallation folderLinuxIf you have administrator rights put the jar archive in the Plugins directory of yourEclipse installation folderWithout administrator rights put the jar archive in the Plugins directory of yourhomeltusergtEclipse folder
Using the plugin
To start using the Genymotion plugin
1 Click The following window opens
2 In the Genymotion application field browse for the Genymotion application installationdirectory
Windows CProgram FilesGenymobileGenymotion
MacOS X ApplicationsGenymotionappLinux homeltusergtgenymotion
3 Click Apply andOK
4 Click to open the Genymotion Virtual Devices Managerwindow
From this window you can perform the following actionsCreate a new virtual device usingNewThis automatically starts the Genymotion creationwizard
Genymotion Plugin for Eclipse - 52
Genymotion 252 User Guide
Start a virtual device using StartRefresh the list of virtual devices using Refresh
The virtual device activation status is displayed in the State column Values can be
Off the virtual device is deactivatedPaused the virtual device has been started and pausedThe Restart action gets back to the exact same stateOn The virtual device is activated but not connected to ADBIt means that you cannot select this virtual device in the Android Device Chooserwindow ofthe ADT plugin
Running Android applications
To run an Android application in the Genymotion plugin for Eclipse you first need to make surethat your virtual device is connected to the ADB tool To do so please refer to section ADBThen follow the steps below
1 Click
2 Select the virtual device youwant to use and click Start3 Minimize the Genymotionwindow4 Right-click on your application project and select Run as Android application
The Android Device Chooserwindow opens
After a reboot or an unexpected halt of a virtual device its name in theAndroid Device Chooser window may become irrelevant Close andreopen the plugin to solve this
While the Genymotion plugin window is open errors are displayed in theEclipse console
Genymotion Plugin for Android Studio - 53
Genymotion 252 User Guide
Genymotion Plugin for Android StudioThe Genymotion plugin for Android Studio allows you to test your application developedwiththe Android Studio IDE It uses ADB to connect to any active virtual device and push yourapplication In this chapter youwill be able to install use the plugin and run Android applications
Installing the plugin
You can install Genymotion plugin for Android Studio in one of the following ways
JetBrains repository method (recommended)Manual method
JetBrains repository method (recommended)
1 Start Android Studio2 Go to
Windows and Linux FileSettingsMacOS X Android StudioPreferences
3 Select Plugins and click Browse repositories4 Right-click (double-click for MacOS X) onGenymotion5 Click Download and install6 Click Yes7 Click Close8 Click OK9 Restart Android Studio by clicking Restart
From Android Studio version 030 onwards the toolbar whereGenymotion plugin icon is displayed is hidden by default To display itclick View gt Toolbar
Manual method
1 Download the Genymotion plugin for Android Studio from the Genymotion download page2 Start Android Studio3 Go to
Windows and Linux FileSettingsMacOS X Android StudioPreferences
4 Select Plugins and click Install plugin from disk5 Select the genymotion-IDEA-pluginjar file6 Click OK
Genymotion Plugin for Android Studio - 54
Genymotion 252 User Guide
7 Restart Android Studio by clicking Restart
From Android Studio version 030 onwards the toolbar whereGenymotion plugin icon is displayed is hidden by default To display itclick View gt Toolbar
Using the plugin
To start using the Genymotion plugin
1 Click The following window opens
2 Browse for the Genymotion application installation directoryWindows CProgram FilesGenymobileGenymotion
MacOS X ApplicationsGenymotionappLinux homeltusergtgenymotion
3 Click OK
4 Click to open the Genymotion Device Managerwindow
From this window you can perform the following actionsCreate a new virtual device usingNewThis automatically starts the Genymotion creationwizardStart a virtual device using StartRefresh the list of virtual devices using Refresh
Genymotion Plugin for Android Studio - 55
Genymotion 252 User Guide
The virtual device activation status is displayed in the Status column Values can be
Off the virtual device is deactivatedPaused the virtual device has been started and pausedThe Restart action gets back to the exact same stateOn The virtual device is activated but not connected to ADBIt means that you cannot select this virtual device in the Choose Devicewindow of the ADBplugin
Running Android applications
1 Click
2 Select the virtual device youwant to use and click Start3 Close the Genymotionwindow
4 In your application project click The Choose Devicewindow opens
5 Click on the virtual device you started or created
After a reboot or an unexpected halt of a virtual device its name inthe Choose Device window may become irrelevant Close and reopenthe plugin to solve this
6 Click OK
While Genymotion plugin window is open errors are displayed in theAndroid Studio console
Genymotion Shell - 56
Genymotion 252 User Guide
Genymotion ShellGenymotion provides a shell to script the modification of sensor statuses This chapter explainshow to use Genymotion Shell and lists the available commands
Starting Genymotion Shell
To start Genymotion Shell perform the action corresponding to your operating system
Windows run CProgram FilesGenymobileGenymotiongenyshellexe
MacOS X click from the Applications directory
Linux run ltGenymotion installer pathgtgenymotion-shell
Interacting with Genymotion Shell
With the commands below you can perform various basic actions related to the use ofGenymotion Shell
help displays the list of available commandspause pauses the execution of Genymotion Shell The value must be set in secondsversion returns Genymotion Shell versionexit or quit closes Genymotion Shell
Interacting with virtual devices
To modify sensor statuses and values of a virtual device use the commands listed below
devices listLists available virtual devices and provides details such as current status IP address andnamedevices refreshRefreshes the virtual device listdevices selectSelects a virtual device Add the ID of the virtual device youwish to select (as displayed in thedevice list)devices pingSends a ping message to check that the virtual device is respondingdevices factoryresetResets the virtual device to factory state Add the ID of the device youwish to reset (asdisplayed in the device list) Adding the keyword force at the end skips the warning messageabout data lossbattery getmodeReturns the current battery mode of the selected virtual device
Genymotion Shell - 57
Genymotion 252 User Guide
battery setmodeSets the battery mode of the selected virtual device The mode can be
host the virtual battery values reflect the host battery values (if any)manual the virtual battery charge level and state of charge can be manually set
battery getlevelReturns the current battery charge level of the selected virtual device If the battery mode ishost the returned value is the host valuebattery setlevelSets the battery charge level of the selected virtual device The value must range from 0 to100 This command forces the activation of the manual modebattery getstatusReturns the current battery state of charge of the selected virtual devicebattery setstatusSets the battery state of charge of the selected virtual device Values can be
discharging simulates that the power supply is unplugged and the battery isdischargingThe value ranges from 0 to 100charging simulates that the power supply is plugged in and the battery is chargingThe value ranges from 0 to 100notcharging simulates that the power supply has just been unplugged and the batteryis not discharging yetThe value ranges from 0 to 100full simulates that the battery is fully charged
gps getstatusReturns the activation status of the GPS signal receptiongps setstatusSets the activation status of the GPS signal reception Values can be
enabled the GPS signal reception is enableddisabled the GPS signal reception is disabled
gps getlatitudeReturns the current latitude value (if the GPS is activated and a latitude value is set) or 0gps setlatitudeSets the latitude value (and forces the activation of the GPS if deactivated) The value mustrange from -90deg to 90deggps getlongitudeReturns the current longitude value (if the GPS is activated and a longitude value is set) or 0gps setlongitudeSets the longitude value (and forces the activation of the GPS if deactivated) The value mustrange from -180deg to 180deggps getaltitudeReturns the current altitude value (if the GPS is activated and an altitude value is set) or 0gps setaltitudeSets the altitude value (and forces the activation of the GPS if deactivated) The value mustrange from -20m to 10000m
Genymotion Shell - 58
Genymotion 252 User Guide
gps getaccuracyReturns the current accuracy value (if the GPS is activated and an accuracy value is set) or 0gps setaccuracySet the accuracy value (and forces the activation of the GPS if deactivated) The value mustrange from 0m to 200mgps getbearingReturns the current bearing value (if the GPS is activated and a bearing value is set) or 0gps setbearingSets the bearing value (and forces the activation of the GPS if deactivated) The value mustrange from 0deg to 35999degrotation setangleSets the rotation angle value of the virtual device The value must range from 0deg to 359degandroid versionReturns the Android version of the selected virtual deviceandroid getandroididReturns the Android ID number of the selected virtual device
This is only possible with an Indie or a Business license
android setandroididSets the Android ID number of the selected virtual deviceValues can be
random a random Android ID number is generatedcustom youmust enter a value containing 16 hexadecimal digits
This is only possible with an Indie or a Business license
If several users exist on the Android system the Android ID can onlybe set for the first user
android getdeviceidReturns the device ID (IMEIMEID) number of the selected virtual device
This is only possible with an Indie or a Business license
android setdeviceidSets the device ID (IMEIMEID) number of the selected virtual deviceValues can be
none no device ID number is generatedrandom a random device ID number is generatedcustom youmust enter a value containing alphanumeric characters dots dashes andorunderscores
This is only possible with an Indie or a Business license
network getprofileReturns the current network profile of the selected virtual device
Genymotion Shell - 59
Genymotion 252 User Guide
network setprofileSets the network profile of the selected virtual device Values can be
no-data no network connection is simulatedgprs a GPRS network connection is simulatededge an Edge network connection is simulated3g a 3G network connection is simulated4g a 4G network connection is simulated4g-high-losses a 4G network connectionwith packet losses set to 10 is simulated4g-bad-dns a 4G network connectionwith a DNS delay set to 3000ms is simulatedwifi a Wi-Fi network connection is simulated
phone call ltphone_numbergtsimulates an incoming phone call from a given phone numberphone sms ltphone_numbergt ltmessagegtsimulates an incoming text message from a given phone numberphone baseband ltcommandgtsends commands directly to the baseband This has been implemented in order to ease scriptcreation For more information on the phone baseband command and its capabilities pleaserefer to section Baseband commands
Baseband commands
The phone baseband commands send raw data directly to the baseband In this section youwill find all commands available in Genymotion Shell to directly interact with the baseband
Commands below return results in your logcat
gsm listlists all incoming and outgoing phone calls and their stategsm call ltphone_numbergtsimulates a new incoming call from a given phone numbergsm busy ltremote_numbergthangs up an outgoing call (performed from the integratedDialer application) and reports theremote phone as busygsm hold ltremote_numbergtsimulates that an incoming or outgoing phone call (performed from the integratedDialerapplication) is put on holdgsm accept ltremote_numbergtsimulates that the outgoing phone call (performed from the integratedDialer application) isansweredgsm cancel ltphone_numbergtsimulates that an incoming or outgoing phone call is hung upgsm datamodifies data connection state Values can be
Genymotion Shell - 60
Genymotion 252 User Guide
unregistered or off no network availablehome or on on local network non-roamingroaming on roaming networksearching searching networksdenied emergency calls only
gsm voicemodifies voice connection state Values can be
unregistered or off no network availablehome or on on local network non-roamingroaming on roaming networksearching searching networksdenied emergency calls only
gsm statusdisplays the current status of the GSM emulationgsm signal ltrssigt ltbergt ltrs_snrgtchanges the reported strength and error rate on next (15s) update
rssi the value must range from 0 to 31 Returns 99 if the value is unknownber the value must range from 0 to 7 Returns 99 if the value is unknownrs_snr the value must range from -200 to 300
cdma ssource ltssourcegtsets the current CDMA subscription source Values can be
nv the subscription is read from non-volatile RAMruim the subscription is read from RUIM
cdma prl_version ltversiongtdumps the current PRL versionsms send ltphone_numbergt ltmessagegtsimulates an incoming text message from a given phone numbersms pdu lthexstringgtsimulates a new incoming text message defined in the PDU format
Interacting with Genymotion
The commands below allow you to perform actions related to the Genymotion application viaGenymotion Shell
genymotion capabilitiesReturns Genymotion features available on the selected virtual devicegenymotion clearcacheClears temporary files and logsgenymotion versionReturns the Genymotion version of the selected virtual devicegenymotion licenseReturns information about the Genymotion license (type validity)
Genymotion Shell - 61
Genymotion 252 User Guide
Using Genymotion Shell from a command prompt
You can connect to Genymotion Shell and interact with a virtual device from a commandprompt using the commands defined in section Interacting with virtual devices
Options below are specific to the command prompt
-h displays the list of available options-r ip_address connects to a given virtual device-c command runs the command on the selected virtual device and returns correspondingvalues-f file runs the content of the file on the selected virtual device and returnscorresponding values line by line
Keyboard Shortcuts - 62
Genymotion 252 User Guide
Keyboard ShortcutsIn this section youwill find all available keyboard shortcuts for a faster use of Genymotion andvirtual device features
Genymotion shortcuts
Action ShortcutWindowsLinux
ShortcutMac OS X
Start virtual device + +
Add virtual device + +
Open About window + +
Open User Guide +
Open Genymotion settings + +
Delete virtual device + +
Open virtual device settings + +
Clone virtual device + +
Reset virtual device + +
Generate virtual device logarchive + +
Keyboard Shortcuts - 63
Genymotion 252 User Guide
Virtual device shortcuts
Category ActionShortcut
WindowsLinuxShortcutMac OS X
Widgets Open Battery widget + +
Widgets Open GPS widget + +
Widgets Open Camera widget + +
Widgets Open Capture widget + +
Widgets Open Remote Controlwidget + +
Widgets Open Identifiers widget + +
Widgets Open Network widget + +
Widgets Open Phone widget + +
Capture Take screenshot + + + +
Capture Make screencast + + + +
Capture Open screen capturedestination folder + + + +
Multi-touch Zoom in + + +
Multi-touch Zoom out + + +
Keyboard Shortcuts - 64
Genymotion 252 User Guide
Category ActionShortcut
WindowsLinuxShortcutMac OS X
Multi-touch Tilt forth + + +
Multi-touch Tilt back + + +
Multi-touch Rotate clockwise + + + +
Multi-touch Rotate counterclockwise + + + +
Volume Increase volume + +
Volume Decrease volume + +
Display Rotate screen +
Display ActivateDeactivatePixel Perfect + +
Display Activate full-screen + +
Display ShowHide widget tool-bar + +
Display ShowHide displayand volume tools + +
Navigation Back + +
Navigation Recent apps +
Keyboard Shortcuts - 65
Genymotion 252 User Guide
Category ActionShortcut
WindowsLinuxShortcutMac OS X
Navigation Menu + +
Navigation Home + +
Navigation Power +
Glossary - 66
Genymotion 252 User Guide
GlossaryA
AccelerometerA sensor that detects motion and orientation of a device
ADBSee Android Debug Bridge
ADTSee Android Developer Tools
Advanced Micro Dynamics virtualizationA set of hardware extensions for the X86 processor architecture designed to perform repetitivetasks normally performed by software and improve resource use and virtual machineperformance
AMD-VSee AdvancedMicro Dynamics Virtualization
Android Debug BridgeA command line utility that allows to communicate with an emulator instance or connectedAndroid device Android Debug Bridge is a client-server program that includes three componentsa client a server and a service Genymotion is compliant with Android Debug Bridge
Android Developer ToolsA plugin for Eclipse IDE that provides a suite of tools for developing applications on Androidplatforms
Android IDA 64-bit number randomly generatedwhen the user first sets up a device It remains the same forthe whole lifetime of the users device Android 422 and greater versions support multiple useraccounts each one having a unique Android ID
Android SDKThe software development kit that provides developer tools to build test and debug Androidapplications containing among others ADB ADT and AAPT
Android StudioAn integrated development environment from which you can develop Android applications It isbased on IntelliJ IDEA
Glossary - 67
Genymotion 252 User Guide
B
BasebandThe component in charge of a device telephony features Genymotion emulates a baseband andallows to interact with it via the Phone widget an API or Genymotion Shell
Basic Input Output SystemAn instruction program which checks each component during machine boot to adapt theoperating system to the hardware environment
Battery widgetA Genymotion feature that allows to test how your application reacts with different batterycharge levels and states of charge
BIOSSee Basic Input Output System
C
CacheA buffer storage where temporary files are stored
Camera widgetA Genymotion feature that allows to send a video stream from a webcam to the Android systemIt aims at testing an Android application that uses an Android built-in camera
Capture widgetA Genymotion feature that allows to take a screenshot or make a screencast of actionsperformed on virtual devices
Central Processing UnitThe functional unit of a computer that consists of one or more processors and their internalstorages
CPUSee Central Processing Unit
Glossary - 68
Genymotion 252 User Guide
D
Device IDIMEIMEIDA device unique identification number which comprises 14 digits or hexadecimal digits and achecksum digit complying with the GSM0216 standard and the 3GPP2 specification The deviceID corresponds to the IMEI number for GSM phones and to the MEID number for CDMA phones
E
EclipseAn integrated development environment from which one can develop various types ofapplications
F
Flashable archiveA zip-compressed archive file containing a system folder
G
Genymotion ShellA command prompt designed to interact with Genymotion virtual devices
GPS widgetA Genymotion feature that allows real-time activation andmodifications of a position accuracyand bearing of a virtual device
GradleA build engine running on the Java platform
H
Host-only networkA virtual network containedwithin the host computer Host-only network must be enabledwheninstalling VirtualBox for Genymotion to run on your computer
HTTP proxyAn intermediary component between a local network and the Internet that a HTTP requestqueries to retrieve information from the web
Glossary - 69
Genymotion 252 User Guide
I
IDESee IntegratedDevelopment Environment
Identifiers widgetA Genymotion feature that shows device ID and Android ID numbers and allows to view and editthese values at any time without having to reboot the virtual device
Integrated Development EnvironmentAn application from which one can develop applications
Intel virtualization technologyThe Intel processorrsquos hardware ability to divide and isolate its computing capacity for multiplehost virtual machines and their operating systems
Intel VT-xSee Intel virtualization technology
L
Log fileA file that records all events that occur when using an application
M
MavenA build engine running on the Java platform
Multi-touchThe ability of a device to recognize common gestures allowing to interact with a touch screen
N
Network widgetA Genymotion feature that allows to test the behavior of an application with different networkqualities of service
Glossary - 70
Genymotion 252 User Guide
O
OpenGLAn application programming interface for rendering 2D and 3D vector graphics
Oracle VM VirtualBoxA software that virtualizes operating systems by using hardware resources of the host system toinstall guest systems
P
Phone widgetA Genymotion feature that allows to test applications relying on telephony features
Pixel PerfectA Genymotion feature that enables being highly precise in the development of a user interfaceone pixel of a virtual device is displayed using one pixel of the computer screen
PluginA software element that can be added to an existing application to extend its capabilities
R
Remote control widgetA Genymotion feature that allows to take control of a virtual device from a physical device (anyphone or tablet running FroyoAPI 8 or greater)
S
Software Development KitA set of tools designed for helping developers create applications meant to run on a specificenvironment
V
Virtual deviceAnAndroid device preconfigured in Genymotion and run by Oracle VMVirtualBox Genymotionvirtual devices are the platforms onwhich applications are tested
Index - 71
Genymotion 252 User Guide
IndexA
ADB 29
Android applicationAndroid Studio 55Deployment 18 36Drag and drop 45Eclipse 52
Android SDK toolsCustom 29Default 29
Android StudioJetBrains repository 53Plugin 53Plugin icon 53-54
Android version 22 58
B
Baseband 59
BatteryCharge level 37 57State of charge 37 57Widget 37
C
Cache 30 60
CameraBack camera 39Dummy webcam 39Front camera 39Widget 39
Index - 72
Genymotion 252 User Guide
CaptureFile location 40Screencast 40Screenshot 40Settings 30Widget 40
CompatibilityOpenGL 6VirtualBox 6Web browsers 7
Copy and paste 46
Credentials 15
D
DownloadGenymotion 8-9 31VirtualBox 8-9
Drag and drop 45
E
EclipsePlugin 50Update Site 50
F
FiltersAndroid version 22Device model 22
G
Genymotion activation 25
Genymotion Shell 56Command prompt 61
Index - 73
Genymotion 252 User Guide
Virtual device commands 56
GPSAccuracy 38 58Altitude 38 57Bearing 39 58Latitude 38 57Longitude 38 57Widget 38
I
IdentifiersAndroid ID 42 58Device IDIMEIMEID 42 58Widget 42
L
Language 8
License 60Expiration 25 31Registration 11 31Validation 12
License server 13
LinuxGenymotion installation 9Log archive location 30
LogsGeneration 30
M
Mac OS XGenymotion installation 9Log archive location 30
Multi-touch 45
Index - 74
Genymotion 252 User Guide
N
NavigationAndroid navigation bar 34Navigation buttons 47
Network 27Profiles 44 58-59Widget 43
P
PhoneBaseband 59Call 45 59SMS 45 59Widget 44
Pixel Perfect 46
ProxyAuthentication 27Settings 27
R
Remote controlAccelerometer 42Touch screen 42Wi-Fi 41Widget 41
Rotate screen 46 58
S
Statistics 25
V
Virtual deviceClone 34
Index - 75
Genymotion 252 User Guide
Configure 33Custom 23Delete 35Reset 34 56Update 47
VirtualBoxInstallation 8Networking 8-9Settings 28
W
WidgetsBattery 37Camera 39Capture 40GPS 38Identifiers 42Network 43Phone 44Remote control 41
WindowsGenymotion installation 8Log archive location 30Vista 9
- Overview
- Requirements
-
- Operating system
- Hardware
- Software
- Web browser
-
- Installing Genymotion
-
- Windows
- Mac OS X
- Linux
-
- License
-
- Registering the license key
- Validating the license
-
- Enabling the license server
- Getting Started
- Genymotion Application
-
- Starting Genymotion
- Adding a new virtual device
- Starting a virtual device
- Configuring Genymotion
- Getting Genymotion details
- Getting help
- Updating Genymotion
-
- Virtual Devices
-
- Managing virtual devices
- Starting virtual devices
- Deploying an application
- Emulating sensors and features
- Interacting with virtual devices
- Updating virtual devices
- Generating virtual device logs
-
- Genymotion Plugin for Eclipse
-
- Installing the plugin
- Using the plugin
- Running Android applications
-
- Genymotion Plugin for Android Studio
-
- Installing the plugin
- Using the plugin
- Running Android applications
-
- Genymotion Shell
-
- Starting Genymotion Shell
- Interacting with Genymotion Shell
- Interacting with virtual devices
- Baseband commands
- Interacting with Genymotion
- Using Genymotion Shell from a command prompt
-
- Keyboard Shortcuts
-
- Genymotion shortcuts
- Virtual device shortcuts
-
- Glossary
- Index
-
Genymotion 252 User Guide
Table of Contents - 4
Running Android applications 52
Genymotion Plugin for Android Studio 53Installing the plugin 53Using the plugin 54Running Android applications 55
Genymotion Shell 56Starting Genymotion Shell 56Interacting with Genymotion Shell 56Interacting with virtual devices 56Baseband commands 59Interacting with Genymotion 60Using Genymotion Shell from a command prompt 61
Keyboard Shortcuts 62Genymotion shortcuts 62Virtual device shortcuts 63
Glossary 66
Index 71
Overview - 5
Genymotion 252 User Guide
OverviewGenymotion is an Android emulator which comprises a complete set of sensors and features inorder to interact with a virtual Android environment With Genymotion you can test yourAndroid applications on a wide range of virtual devices for development test anddemonstration purposes
Genymotion is fast simple to install and powerful thanks to user-friendly sensor widgets andinteraction features It is available for Windows MacOS X and Linux operating systems
This user guide will take you through Genymotion download and installation steps andwill helpyou get familiar with the interface so that you canmake full use of Genymotion resources andhave a fully operational application
In this user guide the following instructional icons are used
Notes tips or additional information
Situations that could cause performance issues or data losses
Follow the simple installation process start one of the Android virtual devices and enjoy playingwith your application
Requirements - 6
Genymotion 252 User Guide
RequirementsThis chapter lists the prerequisites for an optimal use of Genymotion
Operating system
Genymotion is compatible with the following operating systems
Microsoft Windows Vista 7 881 (32 or 64 bits)Mac OS X 108 or aboveLinux Ubuntu 1204 (Precise Pangolin) or aboveLinux Debian 7 (Wheezy)
Genymotion cannot be run from a virtual machine Indeed it needs adirect access to the hardware in order to provide OpenGL accelerationRunning Genymotion from a virtual machine prevents it to directly accessthe hardware components Therefore Genymotion is incompatible wheninstalled from VMWare Parallels Hyper-V or VirtualPC
Hardware
Genymotion implies that you have the following hardware on your computer
OpenGL 20 capable video card with an up-to-date driverVT-x or AMD-V capable CPU enabled in BIOS settingsRAMmemory at least 2GBScreen resolution greater than 1024 x 768 pixelsFree space on hard disk at least 100MB
A minimum of 2GB of free space is required to deploy a virtual deviceYou might need more than 8GB depending on your use of the virtualdevices and the applications you have installed
Software
To run Genymotion virtual devices youmust install Oracle VMVirtualBox 41 or aboveHowever for performance reasons we recommend using version 4312
For more information please refer to chapter Installing Genymotion
Requirements - 7
Genymotion 252 User Guide
Web browser
For installation updates and services provided by the Genymotion website one of the followingweb browsers is required
Internet Explorer version 10 or aboveMozilla Firefox version 30 or aboveGoogle Chrome version 20 or aboveSafari version 40 or above
Installing Genymotion - 8
Genymotion 252 User Guide
Installing GenymotionGenymotion operation relies on the use of Oracle VMVirtualBox in the background Thisenables virtualizing Android operating systems If you do not already have Oracle VMVirtualBox installed on your computer youwill be asked to do so prior to installingGenymotion
If you already have Oracle VM VirtualBox installed note that versionsbelow 411 are not compatible with Genymotion For performancereasons we recommend using version 4312
To install Genymotion on your computer follow the steps corresponding to your operatingsystem
Windows
To download Genymotion for Windows
1 Go to the Genymotion download pageFrom this page you can
download the ready-to-run Genymotion installer for Windows (recommended)This package includes Oracle VMVirtualBox installer download theWindows 3264-bit packageIn this case youmust first download and install VirtualBox for Windows hosts from theDownload VirtualBox page
When installing VirtualBox in the Custom setup window makesure VirtualBox Networking is enabled
2 Save and run the exe file3 Select the setup language and click OK By default the Genymotion language corresponds
to your system languageThe Genymotion setupwizard opens
4 Click Next5 Select the destination folder by clicking Browse
The default destination folder is CProgram FilesGenymobileGenymotion6 Click Next7 Select the start menu folder by clicking Browse or check Dont create a Start menu folder
and click Next8 Select whether or not to create a desktop icon and click Next
Installing Genymotion - 9
Genymotion 252 User Guide
9 Click Install and Finish
Genymotion installer may not run properly onWindows Vista If so1 Click Start gt Run2 Enter cmdexe and click OK3 In the command prompt start Genymotion installer package byentering its full path USERPROFILEDownloadsltGenymotioninstaller pathgt
MacOS X
To download Genymotion for MacOS X
1 Download and install VirtualBox for OS X hosts from the Download VirtualBox page
When installing VirtualBox in the Custom setup window make sureVirtualBox Networking is enabled
2 When finished reboot3 Go to the Genymotion download page4 Download the MacOS X 64-bit package5 Open the dmg file6 Drag and drop Genymotion and Genymotion Shell to the Applications directory
Linux
Almost every GNULinux system comes with an installer package for Oracle VMVirtualBox
1 Browse for the Oracle VMVirtualBox installer in your directoriesIf you do not have the installer or if you need to install a specific version download andinstall VirtualBox for Linux hosts from the Download VirtualBox page
When installing VirtualBox in the Custom setup window make sureVirtualBox Networking is enabled
2 Go to the Genymotion download page3 Download the Linux package corresponding to your system4 Run the following commands
chmod +x ltGenymotion installer pathgtgenymotion-ltversiongt_
ltarchgtbin
cd ltGenymotion installer pathgt
genymotion-ltversiongt_ltarchgtbin -d ltGenymotion installer pathgt
Installing Genymotion - 10
Genymotion 252 User Guide
5 Run Genymotion using the following command
cd ltGenymotion installer pathgt
genymotion
Make sure that the dkms package is installed and that it compilesVirtualBox kernel modules each time a new kernel update is availableTo do so run sudo etcinitdvboxdrv status You should getthe message VirtualBox kernel modules (vboxdrv vboxnetfltvboxnetadp vboxpci) are loaded If not force VirtualBox kernel modulescompilation by running sudo etcinitdvboxdrv setup Make also sure that you are part of the vboxusers group If not runsudo usermod -a -G vboxusers ltlogingt
License - 11
Genymotion 252 User Guide
LicenseIf your company uses a Genymotion license server you can ignore this chapter and referdirectly to chapter Enabling the license server
This chapter details the license registration and validation steps
To register your license key you must have a valid Genymotion accountTo create your account please visit theAccount creation page
Registering the license key
To register your Genymotion license key
1 Start Genymotion in one of the following ways depending on your operating system
Windows Click from your desktop
MacOS X Click from the Applications directory
Linux Run ltGenymotion installer pathgtgenymotion
2 Click or Ctrl + AThe About Genymotion window opens
3 Copy and paste your license key in the License key field and click RegisterIf you are not already logged enter your username and password in the Credentials window
License - 12
Genymotion 252 User Guide
and click Sign in
If you have any problems registering your license key please contact us via the Support page
Validating the license
To validate your license you need to be connected to the Internet The Genymotion applicationautomatically connects to your Genymotion account If your license key is valid yourapplication will be fully unlocked and all corresponding features will be available
If Genymotion cannot connect to your account for several days the license switches to the freeversion until the next connection of the Genymotion application to your account This ensuresnobody else uses your license
When your license is about to expire Genymotion prompts you to sign in to your account
Enabling the license server - 13
Genymotion 252 User Guide
Enabling the license serverThis section is only intended to users whose company has subscribed to the license server
The license server 10 is only compatible with Genymotion 251 andgreater
This section explains you how to get ready to use Genymotionwith the license server To startusing Genymotion
1 Create a user account from httpswwwgenymotioncom2 Install Genymotion by following the steps detailed in chapter Installing Genymotion3 Open Genymotion4 Go to Settings gt Account5 Enter your username password and license server address
Depending on your network configuration you may need to add aport number eg server_ip8888 The default port is 443 as HTTPSprotocol is used
6 Click OKGenymotion connects to the license server and activates all features available for thelicense type retrieved
In case of a problem with the license server please contact your ITmanager
Getting Started - 14
Genymotion 252 User Guide
Getting StartedTo start using Genymotion and test your Android application follow the steps below
1 Start Genymotion in one of the following ways depending on your operating system
Windows Click from your desktop
Mac OS X Click from the Applications directory
Linux Run ltGenymotion installer pathgtgenymotion
The Genymotion main window opens
2 In the following window click Yes
Getting Started - 15
Genymotion 252 User Guide
The Select a new virtual devicewindow opens
3 Click Sign inThe Credentials window opens
Getting Started - 16
Genymotion 252 User Guide
4 Fill in the fields with your username and password and click Sign inThe Available virtual devices list appears
5 Select a virtual device from the list and click Next
If you cannot add a virtual device at this step you may be running outof free space We recommend that you check the free remaining spaceon your hard disk
The Create a new virtual devicewindow opens
Getting Started - 17
Genymotion 252 User Guide
6 Enter a name for your new virtual device and click NextYour virtual device is being downloaded and deployed
7 Click Finish to close the deployment windowYour virtual device appears in the Genymotion main window
Getting Started - 18
Genymotion 252 User Guide
8 Click to start your newly created virtual deviceThe virtual device window opens
9 Deploy your Android application in either of the following waysDrag and drop the application APK file into the virtual device windowRun the following command adb install ltapplication namegtapkDownload and install the application directly from the virtual device using a web link
For more information about sensor and feature emulation as well as interaction with a virtualdevice please refer to chapter Virtual Devices
Genymotion Application - 19
Genymotion 252 User Guide
Genymotion ApplicationThis chapter introduces Genymotion user interface and actions you can perform from thedifferent windows Therefore youwill learn to start Genymotion to add and start a virtualdevice to configure the application to get information and help and finally to updateGenymotion
Starting Genymotion
Start Genymotion in one of the following ways depending on your operating system
Windows click from your desktop
MacOS X click from the Applications directory
Linux run ltGenymotion installer pathgtgenymotion
The Genymotion main window opens
From the menu bar you can perform the following actions
Start the selected virtual device using Start
Add a new virtual device using Add
Open Genymotion settings using Settings
Open the informationwindow using About
Open the documentation usingHelp
Genymotion Application - 20
Genymotion 252 User Guide
Adding a new virtual device
To add a virtual device perform the action corresponding to your situation
You have never created a virtual deviceWhen the following window pops up click Yes
You have already created a virtual deviceClick from the main windowThe Select a new virtual devicewindow appears
Genymotion Application - 21
Genymotion 252 User Guide
If you cannot see any virtual device in the list you need to sign in to your Genymotion account
1 In the Select a new virtual devicewindow click Sign in
The Credentials window opens
2 Enter your username and password3 Choose whether or not to remember your credentials for future connections and click
Sign in
For more information about deploying a virtual device please refer to chapter Getting Started
You can then select a virtual device from the Available virtual devices list filter virtual devicesby Android version or device model or add a custom virtual device as explained in theprocedures mentioned below
Genymotion Application - 22
Genymotion 252 User Guide
Filtering virtual devices by Android version
From the Android version drop-down list of the Genymotion main window you can choose todisplay only virtual devices running a specific Android version
You can also filter virtual devices using the search bar
Available versions are
237 also known as API 10 or Gingerbread411 also known as API 16 or Jelly Bean422 also known as API 17 or Jelly Bean43 also known as API 18 or Jelly Bean444 also known as API 19 or KitKat500 also known as API 21 or Lollipop510 also known as API 22 or Lollipop
Filtering virtual devices by model
From theDevice model drop-down list of the Genymotion main window you can choose todisplay only a certain range of virtual devices
You can also filter virtual devices using the search bar
Available models are
Google devicesGoogle Galaxy NexusGoogle Nexus 9Google Nexus 6Google Nexus 10Google Nexus 4Google Nexus 5Google Nexus 7Google Nexus 7 2013Google Nexus OneGoogle Nexus S
HTC devicesHTC EvoHTC OneHTC One XHTC One XL
LG devicesLG Optimus L3 II
Genymotion Application - 23
Genymotion 252 User Guide
Motorola devicesMotorola Droid RazrMotorola Moto XMotorola Xoom
Samsung devicesSamsung Galaxy NoteSamsung Galaxy Note 2Samsung Galaxy Note 3Samsung Galaxy S2Samsung Galaxy S3Samsung Galaxy S4Samsung Galaxy S5
Sony devicesSony Xperia SSony Xperia Tablet SSony Xperia Tablet ZSony Xperia Z
Adding a custom virtual device
If you cannot find the virtual device you need you can select a customizable phone or tabletfrom the available ones
Custom Phone - 411 - API 16 - 768x1280Custom Phone - 422 - API 17 - 768x1280Custom Phone - 43 - API 18 - 768x1280Custom Phone - 444 - API 19 - 768x1280Custom Phone - 500 - API 21 - 768x1280Custom Phone - 510 - API 22 - 768x1280Custom Tablet - 411 - API 16 - 2560x1600Custom Tablet - 422 - API 17 - 2560x1600Custom Tablet - 43 - API 18 - 2560x1600Custom Tablet - 444 - API 19 - 2560x1600Custom Tablet - 500 - API 21 - 2560x1600Custom Tablet - 510 - API 22 - 2560x1600
Once you have deployed one of those virtual devices you can edit the RAM screen size anddensity from the Configuration menu by clicking
For more information about configuring virtual devices please refer to section Configuring avirtual device
Genymotion Application - 24
Genymotion 252 User Guide
Starting a virtual device
After having created one or several virtual devices they are made available in the Your virtualdevices list of the Genymotion main window
To start a virtual device
1 Select the virtual device youwish to run
2 Click
For more information about running a virtual device please refer to chapter Virtual Devices
Configuring Genymotion
When clicking from the main window you can configure Genymotion with different kinds ofparameters
GeneralAccountNetworkVirtualBoxADBMisc
Genymotion Application - 25
Genymotion 252 User Guide
General
The General tab contains some application preferences
You can check or uncheck options according to your preferences
Allow Genymotion to collect usage statistics allows Genymotion to retrieve usagestatisticsThis helps us understand how the application is used in order to further improve itNotify me when my license is about to expire enables license notificationsGenymotion warns youwhen your license is about to expireNotify me when Genymotion activation is about to expire enables activation notificationsGenymotionwarns youwhen you need to renew your activation in order to keep using theapplication To do so youmust sign in to your Genymotion account via the website
Genymotion Application - 26
Genymotion 252 User Guide
Account
From the Account tab you can store your credentials for quick connections and define a licenseserver address if your company uses a license server
To store your credentials in Genymotion youmust enter your username and password in thecorresponding fields
To enable the license server specify your license server address
Genymotion Application - 27
Genymotion 252 User Guide
Network
From theNetwork tab you canmodify the network settings to adapt to your Internet access
To define your HTTP proxy settings check the following options
Use HTTP Proxy enables the Genymotion application to use a proxy when connecting tothe Genymotion websiteYoumust set your HTTP proxy address and port in the corresponding fieldsUse authentication enables proxy authenticationYoumust enter your proxy username and password in the corresponding fields
Genymotion Application - 28
Genymotion 252 User Guide
VirtualBox
From the VirtualBox tab you can define the storage location of your virtual devices
In the Virtual devices field set where to store Genymotion virtual devices by clicking Browse
The virtual device path must be an absolute path
Genymotion Application - 29
Genymotion 252 User Guide
ADB
By default Genymotion uses its own Android tools From the ADB tab you can configureGenymotion to use specific Android tools (from the Android SDK)
Use Genymotion Android tools (default) is the option enabled by default
If youwish to use specific Android tools
1 Download Android Developer Tools (ADT) from the ADT Download page2 Extract the archive files in the folder of your choice3 Check Use custom Android SDK tools4 In the Android SDK field set the path to the Android SDK folder by clicking Browse5 Click OK
adt-bundlesdkplatform-tools is not a valid value
Genymotion Application - 30
Genymotion 252 User Guide
Misc
From theMisc tab you can define screen capture settings clear the cache and create an archivecontaining your logs
You can define the following options
Screen capture settings defines the storage path of screenshots and screencastsTo define where to store screen captures fill theDestination folder field by clicking BrowseCache usage indicates the disk space used by temporary filesYou can remove those files by clicking Clear cacheLog files generates an archive containing all virtual device logs To do so1 Click Save all logs2 Select the path to save the generated archive3 Wait until the archive is generated and click Close
By default the archive containing all log files is stored in the following folders
Windows LocalAppDataGenymobileGenymotiondeployedltvirtualdevice namegt
MacOS X $HOMEGenymobileGenymotiondeployedltvirtual devicenamegt
Linux $HOMEGenymobileGenymotiondeployedltvirtual devicenamegt
If you generate an archive for assistance purposes you can send it to us via the Supportform
Genymotion Application - 31
Genymotion 252 User Guide
Getting Genymotion details
Click to get details on the Genymotion version you are using your license type andexpiration date This window also allows you to register your license key
For more information about registering a license please refer to section Registering the licensekey
Getting help
Click to open this user guide
Updating Genymotion
If your virtual devices are up-to-date and a new version of Genymotion has been released apop-upwindow prompts you to download the latest version of Genymotion
To update Genymotion
1 When the following window pops up click Download
2 Follow the steps mentioned in section Installing Genymotion
Virtual Devices - 32
Genymotion 252 User Guide
Virtual DevicesVirtual devices are Android devices preconfigured and deployed by Genymotion They allow youto deploy and test your own application with the sensors and features provided by GenymotionThis chapter explains how to manage and run virtual devices deploy an application emulatesensors and features interact with virtual devices update them and generate their logs
Managing virtual devices
Your deployed Android virtual devices are displayed in the Your virtual devices list of theGenymotion main window
From this list you can
configure a virtual device using
clone a virtual device using
reset a virtual device using
delete a virtual device using
Virtual Devices - 33
Genymotion 252 User Guide
Configuring a virtual device
When clicking the Configuration window opens
From this window you can configure the following parameters
SystemProcessor(s) sets the number of processors used by the virtual deviceBy default the value is set to 1 which is the recommended value for an optimal use
When defining more processors we advise setting one less than thetotal amount of processors to leave one dedicated to the host andavoid performance issues
Virtual Devices - 34
Genymotion 252 User Guide
Base memory (MB) sets the memory space allocated to the virtual deviceThe value must be below the memory of your computer and take into account thememory space used by your computer
We advise that you set the values recommended for the real devices(512MB to 2048MB)
Screen size - densityPredefined sets the screen size and density from a predefined listCustom sets a custom screen size and density
You may experience display or performance issues when usingcustom screen size and density values
Run virtual device in full-screen mode displays the virtual device in full-screenmodeadjusted to your screen size
Android system optionsShow Android navigation bar displays the Android navigation bar in the virtual device
Use virtual keyboard for text input uses the virtual keyboardwhen selecting a text inputarea
Cloning a virtual device
Cloning a virtual device consists in duplicating a virtual device The clone contains all settings ofthe original virtual device
This feature is only available with Indie and Business licenses
To clone a virtual device
1 Select the virtual device youwish to clone
2 Click
3 Enter a name for the new virtual device4 Click Clone5 Wait until the cloning process is finished and click Finish
Resetting a virtual device
After the deployment of a new virtual device a snapshot is created Thus you can restore thefactory settings of your virtual device at any time
This feature is only available with Indie and Business licenses
Virtual Devices - 35
Genymotion 252 User Guide
To reset a virtual device
1 Click
2 In the confirmationwindow click Yes
When using Reset all installed applications system patches modifiedsettings and data will be lost
Deleting a virtual device
To delete a virtual device
1 Select the virtual device youwish to delete
2 Click
3 In the confirmationwindow click Yes
Starting virtual devices
You can start virtual devices using either the Genymotionmain window or a command prompt
From the Genymotion main window
To start a virtual device from the Genymotionmain window
1 Select the virtual device youwish to run
2 Click
From a command prompt
1 Open a command prompt2 Retrieve the list of available virtual devices by running
Windows ltGenymotion installer pathgtgenyshell -c devices listGenymotion default installation path is CProgramFilesGenymobileGenymotionMacOS X ApplicationsGenymotionappContentsMacOSgenyshell -c devices list
Linux ltGenymotion installer pathgtgenyshell -c devices list
3 Start one of the virtual devices by runningWindows ltGenymotion installer pathgtplayer --vm-name ltvirtualdevice namegt
MacOS X ApplicationsGenymotionappContentsMacOSplayer --vm-name ltvirtual device namegt
Linux ltGenymotion installer pathgtplayer --vm-name ltvirtualdevice namegt
Virtual Devices - 36
Genymotion 252 User Guide
After starting a virtual device the following window opens This is where your virtual deviceruns andwhere you can interact with it
For more information about deploying a virtual device please refer to sectionGetting Started
Deploying an application
To deploy an application to a virtual device use either of the following methods
Drag and drop the application APK file into the virtual device windowRun the following command adb install ltapplication namegtapkDownload and install the application directly from the virtual device using a web link
Virtual Devices - 37
Genymotion 252 User Guide
Emulating sensors and features
To simulate various behaviors of your application according to specific use casesGenymotion provides easy-to-use widgets which emulate the following sensors and features
BatteryGPSCameraCaptureRemote controlIdentifiersNetworkPhone
Battery
The Battery widget allows you to test how your application reacts with different battery chargelevels and states of charge
To use the Battery widget
1 Click
2 Activate the battery simulationmode by clickingOn3 Modify the charge level using the slider or enter a value in the Charge level field4 Modify the state of charge by clicking the State of charge button
Click once to activate the Charging stateThis simulates that the power supply is plugged in and the battery is charging
Virtual Devices - 38
Genymotion 252 User Guide
Click twice to activate theDischarging stateThis simulates that the power supply is unplugged and the battery is discharging
By default the virtual device emulates the same battery charge level asthe one of your computer If your computer does not have a battery(desktop computer) the simulation mode is automatically activated
GPS
The GPS widget allows real-time activation andmodifications of a position accuracy andbearing
To use the GPS widget
1 Click
2 Activate the GPS simulationmode by clickingOn This enables the reception of generatedGPS frames in the virtual device
3 Set the latitude value youwish to simulate using the Latitude fieldThe latitude value must range from -90deg to 90deg
4 Set the longitude value youwish to simulate using the Longitude fieldThe longitude value must range from -180deg to 180deg
5 Set the altitude value youwish to simulate using the Altitude fieldThe altitude value must range from -20m to 10000m
6 Set an accuracy value using the slider or by entering a value in the Accuracy fieldThe accuracy value must range from 0m to 200m
Virtual Devices - 39
Genymotion 252 User Guide
7 Set a bearing value using the compass or by entering a value in the Bearing fieldThe bearing value must range from 0deg to 35999deg
Many applications do not rely on the GPS orientation but use thedevice accelerometer or gyroscope to determine the bearing of thedevice which are not yet supported
Camera
The Camera widget allows you to send a video stream from a virtual device to the AndroidsystemWith this widget you can test an Android application that uses an Android built-incamera
The video stream can come from a dummy camera or a real physical webcam connected orintegrated into your computer
To use the Camera widget
1 Click
2 Activate the Camera widget by clickingOnGenymotion detects available webcams on your computer
3 Select the source of data youwish to use in the Front camera andBack camera fields Thefront camera sends data to the Android front camera and the back camera sends data tothe Android back camera
Dummy webcam data are images generated by the widgetPhysical (real) webcam data are images sent by the selectedwebcam
Virtual Devices - 40
Genymotion 252 User Guide
4 Click Preview to see the video stream sent to the Android system You can check thefollowing options
None does not display any dataFront displays the front camera dataBack displays the back camera data
Capture
The Capture widget allows you to take a screenshot or screencast of virtual devices This wayyou can broadcast images or videos of your applications
This feature is only available with Indie and Business licenses
To use the Capture widget click
Screenshot When clicking a screenshot of your virtual device is captured and stored inthe configured folder
Screencast When clicking a video of your virtual device starts recording Clicking twicestops the recordingIf your virtual device emits sound it will be captured in the video
Browse files When clicking your file explorer opens allowing you to directly access yourscreenshots and screencastsAll screenshots and screencasts are stored in your home directory in a folder namedwithyour virtual device name You can change this default folder in Genymotion Settings gt Miscas explained in sectionMisc
All features can be accessed via shortcuts even if the Capture widget is notdisplayed
Virtual Devices - 41
Genymotion 252 User Guide
Remote control
With the Remote control widget you can take control of a virtual device from a physical device(any phone or tablet running Android version 22API 8Froyo or above) This widget workswith a specific Android application that runs on the physical device and forwards touch inputsand accelerometer events to Genymotion As a result you can test your application as if youwere holding a device in your hands
This feature is only available with Indie and Business licenses
The Remote control widget requires to have ADB installed on your computer For moreinformation please refer to section ADB
To use the Remote control widget
1 Connect your physical device either by wire or withWi-FiTo connect withWi-Fi your physical device must support ADB over network If so1 On your physical device go toMenu gt System settings gt Developer options
If you have not unlocked this menu yet go to Menu gt Systemsettings gt About and click several times on Build number untilyou get a message meaning that Developer options are nowavailable
2 Check Android debugging and thenADB over network3 Connect your physical device to theWi-Fi and retrieve its IP address from theWi-Fi
menu4 Open a command prompt and enter ltpath to ADBgtconnect ltIPgt
2 Click
3 Activate the widget by clickingOnGenymotion tries to detect any connected Android device
Virtual Devices - 42
Genymotion 252 User Guide
4 Select your device from the Available devices drop-down list and click Start
If the device is connected to ADB and not visible in the list restart thewidget
5 Check the desired optionsEnable preview enables previewing your Genymotion screen on your physical deviceEnable touch screen allows your physical device to send touch events to GenymotionEnable accelerometer allows your physical device to send accelerometer events toGenymotion
The Remote control widget automatically stops when you disconnect your device
Identifiers
The Identifiers widget shows Device ID andAndroid ID numbers You can view and edit thesevalues at any time without having to reboot your virtual device
This feature is only available with Indie and Business licenses
To use the Identifiers widget click
Android IDAnAndroid ID is a 64-bit number randomly generatedwhen the user first sets up the deviceIt remains the same for the whole lifetime of the users device Android 422 and greaterversions support multiple user accounts each one having a unique Android IDWhen clicking a random Android identifier is generated Valid Android ID numbers are 16-hexadecimal digit long
You are not allowed to set an empty Android ID
Device ID IMEI MEIDBy default a new virtual device is deployedwith the default device ID number00000000000000 0When clicking a random identifier is generatedAs IMEI or MEID numbers are used as device ID Genymotion generates numbers compliant
Virtual Devices - 43
Genymotion 252 User Guide
with the GSM0216 standard and the 3GPP2 specification (14 digits or hexadecimal digits +a checksum digit)Valid characters for setting device IDIMEIMEID are
lower-case and upper-case letters [a-z A-Z]digits [0-9]dot []dash [-]underscore [_]
Network
The Network widget allows you to test how your application reacts with different networkquality and performance types
This feature is only available with Indie and Business licenses
To use the Network widget
1 Click
2 Activate the network simulation by clickingOn
When activating the widget for the first time the profile network isautomatically set toWifi It then takes the last network profile used
Virtual Devices - 44
Genymotion 252 User Guide
3 Select a network type from the Profile drop-down list Network profiles and theircorresponding values are listed in the table below
Uploadspeed
Downloadspeed
Uploaddelay
Downloaddelay
Uploadpacketloss
Downloadpacketloss
DNSdelay
No data 0Kbs 0Kbs 0ms 0ms 100 100 0ms
GPRS 40Kbs 40Kbs 500ms 500ms 001 001 1000ms
Edge 200Kbs 240Kbs 400ms 400ms 001 001 800ms
3G 15Mbs 72Mbs 100ms 100ms 001 001 200ms
4G 55Mbs 179Mbs 50ms 50ms 001 001 100ms
4G(high DNS delay)
55Mbs 179Mbs 50ms 50ms 001 001 3000ms
4G(high packet losses)
55Mbs 179Mbs 50ms 50ms 10 10 100ms
Wifi 330Mbs 400Mbs 0ms 0ms 0 0 0ms
Phone
The Phone widget allows to test applications relying on telephony features and observe theirbehavior when receiving a call or a text message
This feature is only available with Indie and Business licenses
Virtual Devices - 45
Genymotion 252 User Guide
To use the Phone widget click or Ctrl + 8
To simulate an incoming call
1 Enter an incoming phone number2 Click Call
To simulate an incoming message
1 Enter an incoming phone number2 Enter a text message3 Click Send message
The text message is displayed in the virtual device via a notification and can also be read intheMessaging application
Interacting with virtual devices
This section describes features that help you easily interact with your virtual devices
Multi-touch simulation
Because inmost cases virtual devices are controlled withmouse and keyboard some shortcutshave been implemented to help simulate common gestures
Zoom in right click + move mouse to the leftZoom out right click + move mouse to the rightTilt forth right click + move mouse upTilt back right click + move mouse downClockwise rotation Shift + right click + move mouse to the rightCounterclockwise rotation Shift + right click + move mouse to the left
If you useMac OS X replace right click with ctrl + click
Drag and drop
To drag and drop files from your computer to the virtual device ADB must be installed Toconfigure ADB please refer to section ADB The behavior of dragged and dropped files isdifferent according to the file type
Regular files Regular files are stored in sdcardDownloadThey can be accessed via the File Manager application provided in the virtual deviceAndroid applications APK files are installed on the virtual deviceIf the same application already exists but with another signature you can decide to overridethe existing application
Virtual Devices - 46
Genymotion 252 User Guide
Flashable archivesZip archives detected as flashable (containing a system folder) are flashed on the device
Such archives may damage your virtual device We recommendrestarting your virtual device after flashing an archive
Copy and paste
The clipboard is shared between your computer and Genymotion Thus you can easily copy andpaste text from your computer to Genymotion and vice versa
IncreaseDecrease volume
You can control the volume of the sound emitted by your virtual device
Click to increase the volume
Click to decrease the volume
Rotate screen
You can rotate the screen of your virtual device by clicking
Depending on the Android version and the density of your virtual devicethe Rotate screen feature may not be available If you are using anAndroid version 42 or above make sure that the Rotate screen feature isnot locked in the right-hand bar Rotation might also be locked in portraitor landscapemode by the current running application In this case it is notpossible to change it via the Rotate screen button or via the rotationsetangle command in Genymotion Shell
Pixel Perfect
With Pixel Perfect you can be highly precise in the development of your user interface andensure every pixel of your application really looks as it should One pixel of the virtual device isdisplayed using one pixel of your computer screen
This feature is only available with Indie and Business licenses
Click once to activate Pixel Perfect Click twice to deactivate it
If the virtual device screen size is larger than your computer screen sizethe virtual device window will be maximized and you will be able to usescrollbars to move inside the screen
Virtual Devices - 47
Genymotion 252 User Guide
Navigation buttons
With the navigation buttons you can navigate between applications or display actions that canbe performed
BackClick once to go back to the previous page Click twice to exit the application
Recent appsClick to display the recently used applications
MenuClick to display actions you can perform within an application
HomeClick to display the home page at any time
PowerClick to shut down the running virtual device
Display tips
When navigating within a virtual device you can at any time change its display
Full-screen mode You can switch to full-screenmode by pressing F11 Pressing a secondtime reverts to the original screen size
On Mac OS X you may have to use the key combination ctrl + fn +F11
Custom size You can resize the virtual device window by selecting and dragging an edge or acorner of the windowFit to content When the virtual device window is resized black areas appear on the bordersDouble-click in one of those areas to fit the virtual device window size to its content
Updating virtual devices
If Genymotion is up-to-date and a new version of virtual devices has been released a pop-upwindow prompts you to automatically update your virtual devices while keeping all yourinstalled packages and applications
This is only possible with an Indie or a Business license If you are using thefree version of Genymotion you must deploy the new version of virtualdevices
Virtual Devices - 48
Genymotion 252 User Guide
To update your virtual devices
1 When the following window pops up click Update
2 Wait until the update process is finished and click Finish
You must have the latest version of Genymotion to update your virtualdevices
Generating virtual device logs
In some cases notably for assistance purposes youmay need to generate a log archive eitherfor a specific virtual device or for all virtual devices Follow either of the procedures below
For one virtual device
From the Genymotion main window
1 Right-click on the virtual device2 Click Generate log archive3 Select the path to save the generated archive
By default log files are stored in the following foldersWindowsCUsersltusergtAppDataLocalGenymobileGenymotiondeployedltvirtual device namegtLogs
MacOS X $HOMEGenymobileGenymotiondeployedltvirtual devicenamegt
Linux $HOMEGenymobileGenymotiondeployedltvirtual devicenamegt
4 Wait until the archive is generated and click Close
If you have generated logs for assistance purposes you can send the archive or the log files tous via the Support form
Virtual Devices - 49
Genymotion 252 User Guide
For all virtual devices
From the Genymotion main window
1 Click
2 In theMisc tab click Save all logs3 Select the path to save the generated archive
By default log files are stored in the following foldersWindowsCUsersltusergtAppDataLocalGenymobileGenymotiondeployedltvirtual device namegtLogs
MacOS X $HOMEGenymobileGenymotiondeployedltvirtual devicenamegt
Linux $HOMEGenymobileGenymotiondeployedltvirtual devicenamegt
4 Wait until the archive is generated and click Close
If you have generated logs for assistance purposes you can send the archive or the log files tous via the Support form
Genymotion Plugin for Eclipse - 50
Genymotion 252 User Guide
Genymotion Plugin for EclipseThe Genymotion plugin for Eclipse allows you to test your application developedwith theEclipse IDE It uses ADB to connect to any active virtual device and push your application Touse the plugin you need to have the Android Developer Tools plugin for Eclipse installed In thischapter youwill be able to install use the plugin and run Android applications
Installing the plugin
You can install Genymotion plugin for Eclipse in one of the following ways
Update Site method (recommended)Manual method
Update Site method (recommended)
1 Start Eclipse2 Go to HelpInstall New Softwaremenu and click Add3 Fill in the fields with the following values and click OK
NameGenymotionLocation httppluginsgenymotioncomeclipse
4 ExpandGenymobile5 Click Select all and click Next6 Click Next7 Read and accept the license terms8 Click Finish
A security warning indicates that the plugin is not signed click OK9 Click Yes to restart Eclipse
The Genymotion plugin button is displayed in the toolbar
Manual method
1 Ensure Eclipse is closed2 Download the plugin from the Genymotion download page3 Follow the steps corresponding to your operating system
WindowsIf you have administrator rights put the jar archive in the Plugins directory of yourEclipse installation folderWithout administrator rights put the jar archive in the Plugins directory of yourLocal SettingsEclipse folder
Genymotion Plugin for Eclipse - 51
Genymotion 252 User Guide
MacOS XWith administrator rights put the jar archive in the Plugins directory of your Eclipseinstallation folderLinuxIf you have administrator rights put the jar archive in the Plugins directory of yourEclipse installation folderWithout administrator rights put the jar archive in the Plugins directory of yourhomeltusergtEclipse folder
Using the plugin
To start using the Genymotion plugin
1 Click The following window opens
2 In the Genymotion application field browse for the Genymotion application installationdirectory
Windows CProgram FilesGenymobileGenymotion
MacOS X ApplicationsGenymotionappLinux homeltusergtgenymotion
3 Click Apply andOK
4 Click to open the Genymotion Virtual Devices Managerwindow
From this window you can perform the following actionsCreate a new virtual device usingNewThis automatically starts the Genymotion creationwizard
Genymotion Plugin for Eclipse - 52
Genymotion 252 User Guide
Start a virtual device using StartRefresh the list of virtual devices using Refresh
The virtual device activation status is displayed in the State column Values can be
Off the virtual device is deactivatedPaused the virtual device has been started and pausedThe Restart action gets back to the exact same stateOn The virtual device is activated but not connected to ADBIt means that you cannot select this virtual device in the Android Device Chooserwindow ofthe ADT plugin
Running Android applications
To run an Android application in the Genymotion plugin for Eclipse you first need to make surethat your virtual device is connected to the ADB tool To do so please refer to section ADBThen follow the steps below
1 Click
2 Select the virtual device youwant to use and click Start3 Minimize the Genymotionwindow4 Right-click on your application project and select Run as Android application
The Android Device Chooserwindow opens
After a reboot or an unexpected halt of a virtual device its name in theAndroid Device Chooser window may become irrelevant Close andreopen the plugin to solve this
While the Genymotion plugin window is open errors are displayed in theEclipse console
Genymotion Plugin for Android Studio - 53
Genymotion 252 User Guide
Genymotion Plugin for Android StudioThe Genymotion plugin for Android Studio allows you to test your application developedwiththe Android Studio IDE It uses ADB to connect to any active virtual device and push yourapplication In this chapter youwill be able to install use the plugin and run Android applications
Installing the plugin
You can install Genymotion plugin for Android Studio in one of the following ways
JetBrains repository method (recommended)Manual method
JetBrains repository method (recommended)
1 Start Android Studio2 Go to
Windows and Linux FileSettingsMacOS X Android StudioPreferences
3 Select Plugins and click Browse repositories4 Right-click (double-click for MacOS X) onGenymotion5 Click Download and install6 Click Yes7 Click Close8 Click OK9 Restart Android Studio by clicking Restart
From Android Studio version 030 onwards the toolbar whereGenymotion plugin icon is displayed is hidden by default To display itclick View gt Toolbar
Manual method
1 Download the Genymotion plugin for Android Studio from the Genymotion download page2 Start Android Studio3 Go to
Windows and Linux FileSettingsMacOS X Android StudioPreferences
4 Select Plugins and click Install plugin from disk5 Select the genymotion-IDEA-pluginjar file6 Click OK
Genymotion Plugin for Android Studio - 54
Genymotion 252 User Guide
7 Restart Android Studio by clicking Restart
From Android Studio version 030 onwards the toolbar whereGenymotion plugin icon is displayed is hidden by default To display itclick View gt Toolbar
Using the plugin
To start using the Genymotion plugin
1 Click The following window opens
2 Browse for the Genymotion application installation directoryWindows CProgram FilesGenymobileGenymotion
MacOS X ApplicationsGenymotionappLinux homeltusergtgenymotion
3 Click OK
4 Click to open the Genymotion Device Managerwindow
From this window you can perform the following actionsCreate a new virtual device usingNewThis automatically starts the Genymotion creationwizardStart a virtual device using StartRefresh the list of virtual devices using Refresh
Genymotion Plugin for Android Studio - 55
Genymotion 252 User Guide
The virtual device activation status is displayed in the Status column Values can be
Off the virtual device is deactivatedPaused the virtual device has been started and pausedThe Restart action gets back to the exact same stateOn The virtual device is activated but not connected to ADBIt means that you cannot select this virtual device in the Choose Devicewindow of the ADBplugin
Running Android applications
1 Click
2 Select the virtual device youwant to use and click Start3 Close the Genymotionwindow
4 In your application project click The Choose Devicewindow opens
5 Click on the virtual device you started or created
After a reboot or an unexpected halt of a virtual device its name inthe Choose Device window may become irrelevant Close and reopenthe plugin to solve this
6 Click OK
While Genymotion plugin window is open errors are displayed in theAndroid Studio console
Genymotion Shell - 56
Genymotion 252 User Guide
Genymotion ShellGenymotion provides a shell to script the modification of sensor statuses This chapter explainshow to use Genymotion Shell and lists the available commands
Starting Genymotion Shell
To start Genymotion Shell perform the action corresponding to your operating system
Windows run CProgram FilesGenymobileGenymotiongenyshellexe
MacOS X click from the Applications directory
Linux run ltGenymotion installer pathgtgenymotion-shell
Interacting with Genymotion Shell
With the commands below you can perform various basic actions related to the use ofGenymotion Shell
help displays the list of available commandspause pauses the execution of Genymotion Shell The value must be set in secondsversion returns Genymotion Shell versionexit or quit closes Genymotion Shell
Interacting with virtual devices
To modify sensor statuses and values of a virtual device use the commands listed below
devices listLists available virtual devices and provides details such as current status IP address andnamedevices refreshRefreshes the virtual device listdevices selectSelects a virtual device Add the ID of the virtual device youwish to select (as displayed in thedevice list)devices pingSends a ping message to check that the virtual device is respondingdevices factoryresetResets the virtual device to factory state Add the ID of the device youwish to reset (asdisplayed in the device list) Adding the keyword force at the end skips the warning messageabout data lossbattery getmodeReturns the current battery mode of the selected virtual device
Genymotion Shell - 57
Genymotion 252 User Guide
battery setmodeSets the battery mode of the selected virtual device The mode can be
host the virtual battery values reflect the host battery values (if any)manual the virtual battery charge level and state of charge can be manually set
battery getlevelReturns the current battery charge level of the selected virtual device If the battery mode ishost the returned value is the host valuebattery setlevelSets the battery charge level of the selected virtual device The value must range from 0 to100 This command forces the activation of the manual modebattery getstatusReturns the current battery state of charge of the selected virtual devicebattery setstatusSets the battery state of charge of the selected virtual device Values can be
discharging simulates that the power supply is unplugged and the battery isdischargingThe value ranges from 0 to 100charging simulates that the power supply is plugged in and the battery is chargingThe value ranges from 0 to 100notcharging simulates that the power supply has just been unplugged and the batteryis not discharging yetThe value ranges from 0 to 100full simulates that the battery is fully charged
gps getstatusReturns the activation status of the GPS signal receptiongps setstatusSets the activation status of the GPS signal reception Values can be
enabled the GPS signal reception is enableddisabled the GPS signal reception is disabled
gps getlatitudeReturns the current latitude value (if the GPS is activated and a latitude value is set) or 0gps setlatitudeSets the latitude value (and forces the activation of the GPS if deactivated) The value mustrange from -90deg to 90deggps getlongitudeReturns the current longitude value (if the GPS is activated and a longitude value is set) or 0gps setlongitudeSets the longitude value (and forces the activation of the GPS if deactivated) The value mustrange from -180deg to 180deggps getaltitudeReturns the current altitude value (if the GPS is activated and an altitude value is set) or 0gps setaltitudeSets the altitude value (and forces the activation of the GPS if deactivated) The value mustrange from -20m to 10000m
Genymotion Shell - 58
Genymotion 252 User Guide
gps getaccuracyReturns the current accuracy value (if the GPS is activated and an accuracy value is set) or 0gps setaccuracySet the accuracy value (and forces the activation of the GPS if deactivated) The value mustrange from 0m to 200mgps getbearingReturns the current bearing value (if the GPS is activated and a bearing value is set) or 0gps setbearingSets the bearing value (and forces the activation of the GPS if deactivated) The value mustrange from 0deg to 35999degrotation setangleSets the rotation angle value of the virtual device The value must range from 0deg to 359degandroid versionReturns the Android version of the selected virtual deviceandroid getandroididReturns the Android ID number of the selected virtual device
This is only possible with an Indie or a Business license
android setandroididSets the Android ID number of the selected virtual deviceValues can be
random a random Android ID number is generatedcustom youmust enter a value containing 16 hexadecimal digits
This is only possible with an Indie or a Business license
If several users exist on the Android system the Android ID can onlybe set for the first user
android getdeviceidReturns the device ID (IMEIMEID) number of the selected virtual device
This is only possible with an Indie or a Business license
android setdeviceidSets the device ID (IMEIMEID) number of the selected virtual deviceValues can be
none no device ID number is generatedrandom a random device ID number is generatedcustom youmust enter a value containing alphanumeric characters dots dashes andorunderscores
This is only possible with an Indie or a Business license
network getprofileReturns the current network profile of the selected virtual device
Genymotion Shell - 59
Genymotion 252 User Guide
network setprofileSets the network profile of the selected virtual device Values can be
no-data no network connection is simulatedgprs a GPRS network connection is simulatededge an Edge network connection is simulated3g a 3G network connection is simulated4g a 4G network connection is simulated4g-high-losses a 4G network connectionwith packet losses set to 10 is simulated4g-bad-dns a 4G network connectionwith a DNS delay set to 3000ms is simulatedwifi a Wi-Fi network connection is simulated
phone call ltphone_numbergtsimulates an incoming phone call from a given phone numberphone sms ltphone_numbergt ltmessagegtsimulates an incoming text message from a given phone numberphone baseband ltcommandgtsends commands directly to the baseband This has been implemented in order to ease scriptcreation For more information on the phone baseband command and its capabilities pleaserefer to section Baseband commands
Baseband commands
The phone baseband commands send raw data directly to the baseband In this section youwill find all commands available in Genymotion Shell to directly interact with the baseband
Commands below return results in your logcat
gsm listlists all incoming and outgoing phone calls and their stategsm call ltphone_numbergtsimulates a new incoming call from a given phone numbergsm busy ltremote_numbergthangs up an outgoing call (performed from the integratedDialer application) and reports theremote phone as busygsm hold ltremote_numbergtsimulates that an incoming or outgoing phone call (performed from the integratedDialerapplication) is put on holdgsm accept ltremote_numbergtsimulates that the outgoing phone call (performed from the integratedDialer application) isansweredgsm cancel ltphone_numbergtsimulates that an incoming or outgoing phone call is hung upgsm datamodifies data connection state Values can be
Genymotion Shell - 60
Genymotion 252 User Guide
unregistered or off no network availablehome or on on local network non-roamingroaming on roaming networksearching searching networksdenied emergency calls only
gsm voicemodifies voice connection state Values can be
unregistered or off no network availablehome or on on local network non-roamingroaming on roaming networksearching searching networksdenied emergency calls only
gsm statusdisplays the current status of the GSM emulationgsm signal ltrssigt ltbergt ltrs_snrgtchanges the reported strength and error rate on next (15s) update
rssi the value must range from 0 to 31 Returns 99 if the value is unknownber the value must range from 0 to 7 Returns 99 if the value is unknownrs_snr the value must range from -200 to 300
cdma ssource ltssourcegtsets the current CDMA subscription source Values can be
nv the subscription is read from non-volatile RAMruim the subscription is read from RUIM
cdma prl_version ltversiongtdumps the current PRL versionsms send ltphone_numbergt ltmessagegtsimulates an incoming text message from a given phone numbersms pdu lthexstringgtsimulates a new incoming text message defined in the PDU format
Interacting with Genymotion
The commands below allow you to perform actions related to the Genymotion application viaGenymotion Shell
genymotion capabilitiesReturns Genymotion features available on the selected virtual devicegenymotion clearcacheClears temporary files and logsgenymotion versionReturns the Genymotion version of the selected virtual devicegenymotion licenseReturns information about the Genymotion license (type validity)
Genymotion Shell - 61
Genymotion 252 User Guide
Using Genymotion Shell from a command prompt
You can connect to Genymotion Shell and interact with a virtual device from a commandprompt using the commands defined in section Interacting with virtual devices
Options below are specific to the command prompt
-h displays the list of available options-r ip_address connects to a given virtual device-c command runs the command on the selected virtual device and returns correspondingvalues-f file runs the content of the file on the selected virtual device and returnscorresponding values line by line
Keyboard Shortcuts - 62
Genymotion 252 User Guide
Keyboard ShortcutsIn this section youwill find all available keyboard shortcuts for a faster use of Genymotion andvirtual device features
Genymotion shortcuts
Action ShortcutWindowsLinux
ShortcutMac OS X
Start virtual device + +
Add virtual device + +
Open About window + +
Open User Guide +
Open Genymotion settings + +
Delete virtual device + +
Open virtual device settings + +
Clone virtual device + +
Reset virtual device + +
Generate virtual device logarchive + +
Keyboard Shortcuts - 63
Genymotion 252 User Guide
Virtual device shortcuts
Category ActionShortcut
WindowsLinuxShortcutMac OS X
Widgets Open Battery widget + +
Widgets Open GPS widget + +
Widgets Open Camera widget + +
Widgets Open Capture widget + +
Widgets Open Remote Controlwidget + +
Widgets Open Identifiers widget + +
Widgets Open Network widget + +
Widgets Open Phone widget + +
Capture Take screenshot + + + +
Capture Make screencast + + + +
Capture Open screen capturedestination folder + + + +
Multi-touch Zoom in + + +
Multi-touch Zoom out + + +
Keyboard Shortcuts - 64
Genymotion 252 User Guide
Category ActionShortcut
WindowsLinuxShortcutMac OS X
Multi-touch Tilt forth + + +
Multi-touch Tilt back + + +
Multi-touch Rotate clockwise + + + +
Multi-touch Rotate counterclockwise + + + +
Volume Increase volume + +
Volume Decrease volume + +
Display Rotate screen +
Display ActivateDeactivatePixel Perfect + +
Display Activate full-screen + +
Display ShowHide widget tool-bar + +
Display ShowHide displayand volume tools + +
Navigation Back + +
Navigation Recent apps +
Keyboard Shortcuts - 65
Genymotion 252 User Guide
Category ActionShortcut
WindowsLinuxShortcutMac OS X
Navigation Menu + +
Navigation Home + +
Navigation Power +
Glossary - 66
Genymotion 252 User Guide
GlossaryA
AccelerometerA sensor that detects motion and orientation of a device
ADBSee Android Debug Bridge
ADTSee Android Developer Tools
Advanced Micro Dynamics virtualizationA set of hardware extensions for the X86 processor architecture designed to perform repetitivetasks normally performed by software and improve resource use and virtual machineperformance
AMD-VSee AdvancedMicro Dynamics Virtualization
Android Debug BridgeA command line utility that allows to communicate with an emulator instance or connectedAndroid device Android Debug Bridge is a client-server program that includes three componentsa client a server and a service Genymotion is compliant with Android Debug Bridge
Android Developer ToolsA plugin for Eclipse IDE that provides a suite of tools for developing applications on Androidplatforms
Android IDA 64-bit number randomly generatedwhen the user first sets up a device It remains the same forthe whole lifetime of the users device Android 422 and greater versions support multiple useraccounts each one having a unique Android ID
Android SDKThe software development kit that provides developer tools to build test and debug Androidapplications containing among others ADB ADT and AAPT
Android StudioAn integrated development environment from which you can develop Android applications It isbased on IntelliJ IDEA
Glossary - 67
Genymotion 252 User Guide
B
BasebandThe component in charge of a device telephony features Genymotion emulates a baseband andallows to interact with it via the Phone widget an API or Genymotion Shell
Basic Input Output SystemAn instruction program which checks each component during machine boot to adapt theoperating system to the hardware environment
Battery widgetA Genymotion feature that allows to test how your application reacts with different batterycharge levels and states of charge
BIOSSee Basic Input Output System
C
CacheA buffer storage where temporary files are stored
Camera widgetA Genymotion feature that allows to send a video stream from a webcam to the Android systemIt aims at testing an Android application that uses an Android built-in camera
Capture widgetA Genymotion feature that allows to take a screenshot or make a screencast of actionsperformed on virtual devices
Central Processing UnitThe functional unit of a computer that consists of one or more processors and their internalstorages
CPUSee Central Processing Unit
Glossary - 68
Genymotion 252 User Guide
D
Device IDIMEIMEIDA device unique identification number which comprises 14 digits or hexadecimal digits and achecksum digit complying with the GSM0216 standard and the 3GPP2 specification The deviceID corresponds to the IMEI number for GSM phones and to the MEID number for CDMA phones
E
EclipseAn integrated development environment from which one can develop various types ofapplications
F
Flashable archiveA zip-compressed archive file containing a system folder
G
Genymotion ShellA command prompt designed to interact with Genymotion virtual devices
GPS widgetA Genymotion feature that allows real-time activation andmodifications of a position accuracyand bearing of a virtual device
GradleA build engine running on the Java platform
H
Host-only networkA virtual network containedwithin the host computer Host-only network must be enabledwheninstalling VirtualBox for Genymotion to run on your computer
HTTP proxyAn intermediary component between a local network and the Internet that a HTTP requestqueries to retrieve information from the web
Glossary - 69
Genymotion 252 User Guide
I
IDESee IntegratedDevelopment Environment
Identifiers widgetA Genymotion feature that shows device ID and Android ID numbers and allows to view and editthese values at any time without having to reboot the virtual device
Integrated Development EnvironmentAn application from which one can develop applications
Intel virtualization technologyThe Intel processorrsquos hardware ability to divide and isolate its computing capacity for multiplehost virtual machines and their operating systems
Intel VT-xSee Intel virtualization technology
L
Log fileA file that records all events that occur when using an application
M
MavenA build engine running on the Java platform
Multi-touchThe ability of a device to recognize common gestures allowing to interact with a touch screen
N
Network widgetA Genymotion feature that allows to test the behavior of an application with different networkqualities of service
Glossary - 70
Genymotion 252 User Guide
O
OpenGLAn application programming interface for rendering 2D and 3D vector graphics
Oracle VM VirtualBoxA software that virtualizes operating systems by using hardware resources of the host system toinstall guest systems
P
Phone widgetA Genymotion feature that allows to test applications relying on telephony features
Pixel PerfectA Genymotion feature that enables being highly precise in the development of a user interfaceone pixel of a virtual device is displayed using one pixel of the computer screen
PluginA software element that can be added to an existing application to extend its capabilities
R
Remote control widgetA Genymotion feature that allows to take control of a virtual device from a physical device (anyphone or tablet running FroyoAPI 8 or greater)
S
Software Development KitA set of tools designed for helping developers create applications meant to run on a specificenvironment
V
Virtual deviceAnAndroid device preconfigured in Genymotion and run by Oracle VMVirtualBox Genymotionvirtual devices are the platforms onwhich applications are tested
Index - 71
Genymotion 252 User Guide
IndexA
ADB 29
Android applicationAndroid Studio 55Deployment 18 36Drag and drop 45Eclipse 52
Android SDK toolsCustom 29Default 29
Android StudioJetBrains repository 53Plugin 53Plugin icon 53-54
Android version 22 58
B
Baseband 59
BatteryCharge level 37 57State of charge 37 57Widget 37
C
Cache 30 60
CameraBack camera 39Dummy webcam 39Front camera 39Widget 39
Index - 72
Genymotion 252 User Guide
CaptureFile location 40Screencast 40Screenshot 40Settings 30Widget 40
CompatibilityOpenGL 6VirtualBox 6Web browsers 7
Copy and paste 46
Credentials 15
D
DownloadGenymotion 8-9 31VirtualBox 8-9
Drag and drop 45
E
EclipsePlugin 50Update Site 50
F
FiltersAndroid version 22Device model 22
G
Genymotion activation 25
Genymotion Shell 56Command prompt 61
Index - 73
Genymotion 252 User Guide
Virtual device commands 56
GPSAccuracy 38 58Altitude 38 57Bearing 39 58Latitude 38 57Longitude 38 57Widget 38
I
IdentifiersAndroid ID 42 58Device IDIMEIMEID 42 58Widget 42
L
Language 8
License 60Expiration 25 31Registration 11 31Validation 12
License server 13
LinuxGenymotion installation 9Log archive location 30
LogsGeneration 30
M
Mac OS XGenymotion installation 9Log archive location 30
Multi-touch 45
Index - 74
Genymotion 252 User Guide
N
NavigationAndroid navigation bar 34Navigation buttons 47
Network 27Profiles 44 58-59Widget 43
P
PhoneBaseband 59Call 45 59SMS 45 59Widget 44
Pixel Perfect 46
ProxyAuthentication 27Settings 27
R
Remote controlAccelerometer 42Touch screen 42Wi-Fi 41Widget 41
Rotate screen 46 58
S
Statistics 25
V
Virtual deviceClone 34
Index - 75
Genymotion 252 User Guide
Configure 33Custom 23Delete 35Reset 34 56Update 47
VirtualBoxInstallation 8Networking 8-9Settings 28
W
WidgetsBattery 37Camera 39Capture 40GPS 38Identifiers 42Network 43Phone 44Remote control 41
WindowsGenymotion installation 8Log archive location 30Vista 9
- Overview
- Requirements
-
- Operating system
- Hardware
- Software
- Web browser
-
- Installing Genymotion
-
- Windows
- Mac OS X
- Linux
-
- License
-
- Registering the license key
- Validating the license
-
- Enabling the license server
- Getting Started
- Genymotion Application
-
- Starting Genymotion
- Adding a new virtual device
- Starting a virtual device
- Configuring Genymotion
- Getting Genymotion details
- Getting help
- Updating Genymotion
-
- Virtual Devices
-
- Managing virtual devices
- Starting virtual devices
- Deploying an application
- Emulating sensors and features
- Interacting with virtual devices
- Updating virtual devices
- Generating virtual device logs
-
- Genymotion Plugin for Eclipse
-
- Installing the plugin
- Using the plugin
- Running Android applications
-
- Genymotion Plugin for Android Studio
-
- Installing the plugin
- Using the plugin
- Running Android applications
-
- Genymotion Shell
-
- Starting Genymotion Shell
- Interacting with Genymotion Shell
- Interacting with virtual devices
- Baseband commands
- Interacting with Genymotion
- Using Genymotion Shell from a command prompt
-
- Keyboard Shortcuts
-
- Genymotion shortcuts
- Virtual device shortcuts
-
- Glossary
- Index
-
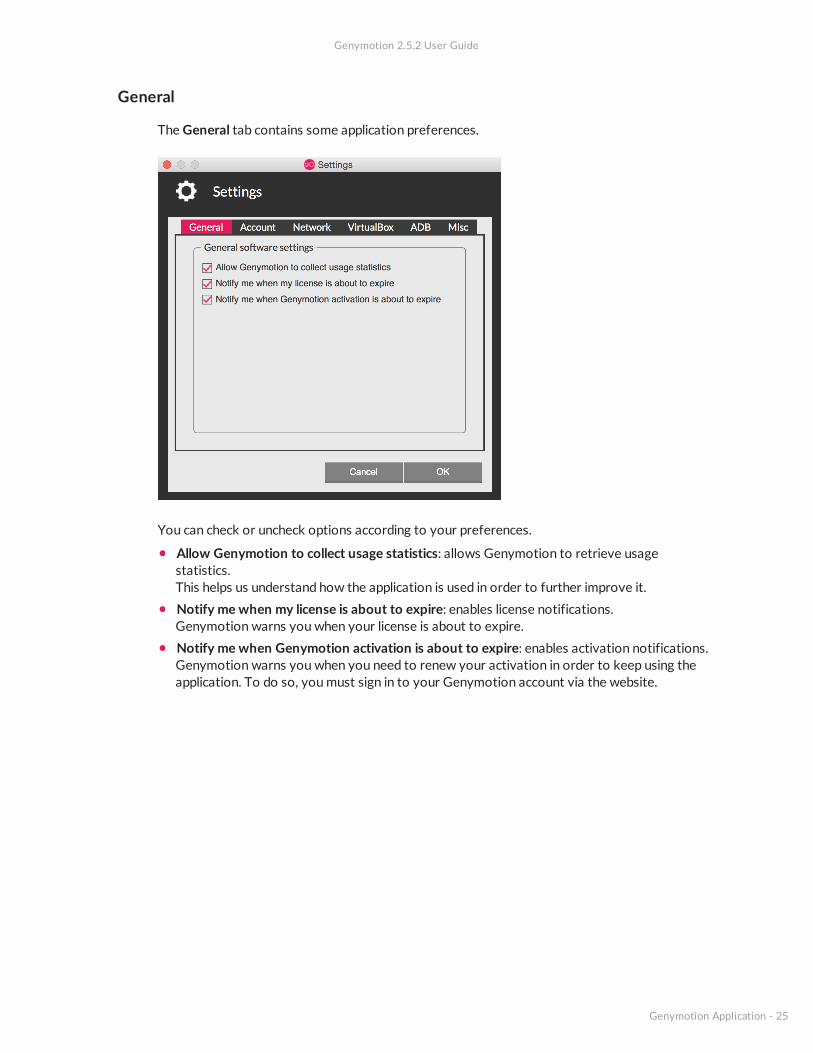
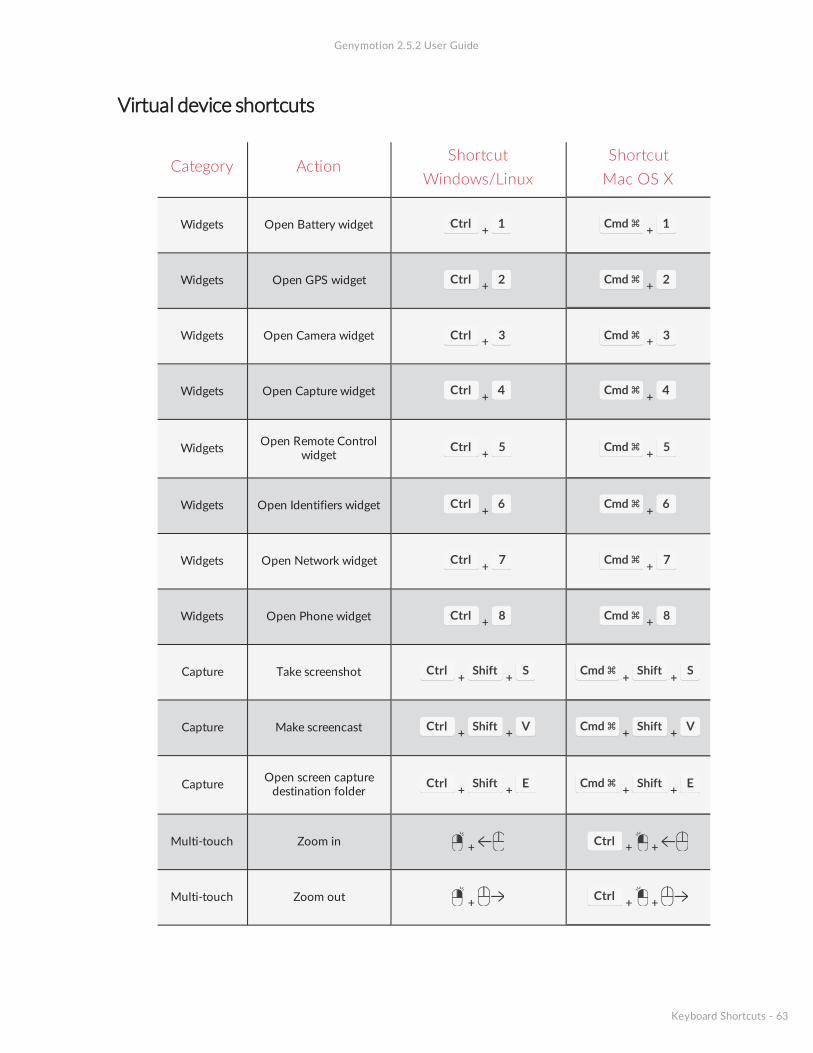