GEN II Robot Soccer NXT-G Training Curriculum (for … II NXT... · GEN II Robot Soccer NXT-G...
29
RoboCup Junior Australia Inc Copyright 2014 1 GEN II Robot Soccer NXT-G Training Curriculum (for pulsed ball) Brian Thomas
Transcript of GEN II Robot Soccer NXT-G Training Curriculum (for … II NXT... · GEN II Robot Soccer NXT-G...

RoboCup Junior Australia Inc Copyright 2014
1
GEN II Robot Soccer
NXT-G
Training Curriculum
(for pulsed ball)
Brian Thomas

RoboCup Junior Australia Inc Copyright 2014
2
GEN II Robot Soccer Training
Overview
Welcome! The aim of this curriculum is to guide you through a sequence of programming
steps in order to allow a robot to compete in RoboCup Junior and WRO. Every attempt has
been made to keep these steps simple and easy to attain. Consequently, modifications may be
needed to program a more efficient robot for the competitions.
You will find that GEN II is no harder than any other forms of Robot Soccer or other robot
competitions. It is actually easier for beginners to enter and compete successfully in
Soccer! They can then raise their expectations and skills as they progress. The GEN II field
just adds a further dimension of control for the robots and programmers when they get to
that stage. In short, it allows for advanced robots to have more control over where they are
on the GEN II field.
An added advantage is that the GEN II mat is very classroom friendly, you just have to roll
it out and then start playing.
The sequence of this Curriculum starts with programming for any Soccer Playing Robot,
signified by red coloured headings. This will allow any robot to successfully play soccer on
any field type. The controlling aspect of any robot soccer game is the ball. If the ball is on
the field then so should the robots be, chasing it.
After this GEN II units with green headings have been included show the tricks to make
robots more efficient while playing on a GEN II Field.
It is important that students work through this curriculum sequentially. They need to
understand the differences that may be required for their individual robots. Students have
often gone straight to the more complex programming, become lost and then disillusioned.
Students who work through the curriculum enjoy the success at each step, and carry with
them knowledge that will eventually allow them to develop their own algorithms programs.
Very few students complete this curriculum in a single year’s preparation. They set their
goals at a certain level and return the following year with their goal being the next level.
This is usually with a different robot, so they need to reprogram anyway.
This curriculum essentially deals with programming the striker robot. If you wish to have a
goalie, the programming for a goalie is very easy after mastering the striker. You use the
same principles, but limit the robots movement and for every forward command, have a
reverse.

RoboCup Junior Australia Inc Copyright 2014
3
An NXT Soccer Robot can be built from Damien Kee’s plans found at
http://www.damienkee.com/home/2011/8/20/domabot-classroom-robot-design.html. Sensors
ports and locations may have to be modified to suit this curriculum.
Further information can be obtained from our web site www.robocupjunior.org.au .
Please Note
These training notes are the property of RoboCup Junior Australia Inc. All or part of these
notes are not to be copied or used for commercial gain without the permission of the
RoboCup Junior Australia Inc Committee.
Contact: [email protected]
**LEGO, Mindstorms and Robolab are Registered Trademarks of the LEGO Corporation

RoboCup Junior Australia Inc Copyright 2014
4
Finding the Ball: The Mexican Wave
Overview The first part of playing any ball game is to find and chase the ball. This unit allows your
robot to chase the ball when it is in front of the robot.
If you get all of the robots in the class, you can create a Mexican wave of robots.
It is assumed that you have some prior knowledge of programming.
Robot Setup All that you need is motors plugged into outputs A and C and the IR V2 Sensor plugged into
Sensor Port 1.
You will also need to download the IR V2 tile. Just go to
http://www.hitechnic.com/downloadnew.php?category=13 and follow the instructions.
Programming Create the following simple program that will allow you to check that everything is working
OK.
In this program, the IR Seeker is just waiting for a reading from the ball and then the robot
will be told to move forward
The Wait(egg timer) icon should be set to IR Seeker V2 Sensor plugged into Port1. The
Mode should be set to AC(pulsed)
The motor icon is set to Inputs A and C, Power level 100% and Duration 1 second.

RoboCup Junior Australia Inc Copyright 2014
5
Save this program as MW. Download this to your robot. Push the orange button on the NXT 3
times until the MW Run file appears.
Place all of the class robots with their backs to the classroom wall
Push The Orange Button on the robots.
Nothing should happen.
The teacher will turn the ball on and roll the ball across the classroom.
Did you get a Mexican Wave?
Try rolling the ball further away from the robots. Which robot has the best range?
Notes The pulsed ball has an incredible range and also can be sensed by reflection off walls.
Experiment with the location of your IR V2 sensor and maybe shield it with black tape to
reduce the influence of reflections and still maintain the excellent range.
Extension The IR V2 sensor gives the following readings.
Introduce a Switch into your program to perform the same task, but with a little more
control.
Start by inserting a loop. It will already be set to Unlimited.

RoboCup Junior Australia Inc Copyright 2014
6
To get the other tiles, you will need to start with a Complete Palette and then go to the
Advanced Settings to find the IR V2 Sensor Tile
Complete Palette Advanced Settings IR V2 Tile
Then go to Data and Select the Range Tile
Data Range
Select the same setting for the IR V2 as above
Select a range of 4-6 for the Range tile.
Now insert the Switch Tile which can be found next to the Loop Tile in the Flow Palette
Set the Switch to Value and Logic
Use the same Motor Controls as before.
Wire up the Tiles as shown. The drop down controls can be obtained by hovering over the
bottom left hand corner of a tile and then clicking when the drop down tool appears.
Repeat your Mexican Wave. The robots should now only start moving when the ball is directly
in front of them.

RoboCup Junior Australia Inc Copyright 2014
7
Simple Soccer Player
Overview
You will now combine ball detection and the switch program from the previous unit to make
an efficient soccer playing program.
Robot Setup All that you need is motors plugged into outputs A and C and the IR V2 Sensor plugged into
Sensor Port 1.
Method
Insert a Loop and Motor Control into the program from the previous unit.
Set the Loop to run until the IR V2 detects the ball.
Set the Motors A and C so that the robot turns to the right at 75% power.
Adjustments for Improvement A fast robot will beat other robots to the ball. However if a robot is scanning too quickly it
may scan past the ball and miss it.
Increase the speed of the turn until the robot scans past the ball.
Go back to your previous setting and use this as your optimum scan speed.
This is the Simple Soccer Player. It will allow you to have fun and play a game of GEN
II Soccer. Save it and keep it in case your more complex programs fail.

RoboCup Junior Australia Inc Copyright 2014
8
Ball Chase
Overview You are now ready use the full facilities offered by the IR V2 to keep the ball under control
once you have it, and dribble it down the field.
There are two possible programming options and they both work.
Robot Setup All that you need is motors plugged into outputs A and C and the IR V2 Sensor plugged into
Sensor Port 1.
Method
Option 1: Switch Method
Insert two Switches together inside of an Unlimited Loop

RoboCup Junior Australia Inc Copyright 2014
9
Insert the IR V2 Sensor Tile and set it up as in the previous unit.
This time select the Compare Tile from the Data Palette
For the First Icon select Greater than 3
For the second Icon select Greater than 6
Wire up the data ports as shown
Set the bottom Motor Tile, so that the robot turns left for .2 Seconds and Coast
Set the top Motor Tile, so that the robot turns right for .2 Seconds and Coast
Set the middle Motor Tile to forward for 1 Second and Brake.
The robot will now respond to IR V2 readings in the following way.
0-3 Turn Left
4-6 Straight Ahead
7-9 Turn Right
The robot should now scan for the ball if it cannot see it. As soon as it sees the ball it will
chase it down the field.
Option 2: Data Method This method may take a little more to get your head around, but it works really well.
It involves the manipulation of data coming from the IR V2 to control the steering of the
motors.
The steering control operates on readings of +100 to turn full right and -100 to turn full left.
Data input of 0 will have the robot running straight ahead.
To convert the IR V2 data to this, you must subtract 5 from the reading.
This will give a result of 0 is the ball is straight ahead. 0 to -5 if it is to the left and 0-5 if it
is to the right.
To convert these figures to the 0-100 range required for the steering, you must multiply
them by 20.
You will find the Math blocks in the Data Palette.

RoboCup Junior Australia Inc Copyright 2014
10
Steering Control
Wire it up to the correct data points and run it
How good is that!!!
Create your Own Block
In order to reduce the number of icons later, you can create your own block. This is done
by clicking and dragging and selecting all of the icons inside of the loop, but not the loop.
Now click on the Create My Block on the tool bar.
Just follow the instructions after that.
Name the block “Ball Chase”.
You can adjust settings inside of the block just by double clicking on it.
You can now copy and paste this into any program where you want the robot to chase the
ball.
Cool Huh???

RoboCup Junior Australia Inc Copyright 2014
11
Smooth Simon Soccer Player
Overview Have you noticed that your Soccer robot doesn’t dribble the ball smoothly and tends to
weave backwards and forwards. If you try to build a program for every one of the IRV2
sensor directions using the greater than “filter” you program will take up most of your
programming space. The following “Tab” method allows you to fit all of the IRV2 directions in
one switch.
Robot Setup You will now need to modify your robot to retain the ball. Read the rules regarding robot size
and ball capturing zones and build a “bull bar” that will help to control the ball.
You still need to have motors plugged into outputs A and C and the IR V2 Sensor plugged
into Sensor Port 1.
Method
Option 1: Tab Method First you need to set up your Tab box. You need to allocate a tab for each of the 0-9 IRV2
readings.
Start a new program and insert a loop.
Add an IRV2 tile inside the loop
Add a switch
Set the switch to Value and Number as shown below.
Now deselect the flat view option by clicking on the tick.
You can now add more tabs by clicking on the “Add a new condition” button
You will need to add a total of 10 conditions. The left hand column is the condition number
and the right hand column shows the IRV2 reading number
Wire the sensor to the switch.

RoboCup Junior Australia Inc Copyright 2014
12
Your program looks a bit like this:
Don’t panic that you can’t see all of the tabs as they cannot fit on top of the switch.
Click on the first tab and this corresponds to an Irv2 reading of 0. This indicates that your
robot can’t see the ball. This rarely happens in a game and usually only occurs when a robot is
facing a wall. It is always a good idea to have a reverse command in a program for exactly
this situation.
Add two “Move” icons
Set the first to reverse for .5 seconds
Set the second to turn for around .3 seconds.
You will now notice that the rest of you Tabs are now visible
Now add a “Move” tile to the rest of the remaining conditions
Start off with each at 75% power and unlimited duration.
Now you can adjust the steering on each depending on the direction that the ball is in.
These conditions will vary from robot to robot depending on wheel size and turning circle.
Examples are given below.

RoboCup Junior Australia Inc Copyright 2014
13
Reading 1: Reading 2: Reading 3
Full Turn Left 1 click in from full turn 3 Clicks in from Full Turn
Reading 4: Reading 5 Reading 6:
2 clicks left from Straight ahead 2 clicks right from
Straight ahead Full Power Straight ahead
Reading 7: Reading 8: Reading 9:
3 Clicks from Full Turn 1 click from Full Turn Full Turn right
Reading 9 is a bit more difficult to select as its tab is not shown on the switch
Select the switch
Scroll down your tabs menu
Select the tab for Reading 9
Don’t forget to wire the sensor to the switch.
You will need to test and adjust these readings to best suit your robot.

RoboCup Junior Australia Inc Copyright 2014
14
Compass 1: Ball Avoidance
Overview
You are now able to look for the ball and kick it. The only thing left is to make sure that you
will kick it in the right direction. Therefore you must use your compass sensor to make sure
you are kicking in the right direction and not goals for the opposition.
Before using the compass sensor, you must devise tactics to avoid the ball when it is
detected but the robot is heading in the wrong direction.
The diagram above shows the desired path when the robot is kicking from right to left and is
stuck on the wrong side of the ball.
The robot must trace a path that takes it past the ball and quickly begin a scan that will have
it approaching the ball from the right direction.
1. The robot senses the ball.
2. The robot checks its compass to see if it is kicking the right direction.
3. It finds it is on the wrong side of the ball
4. The robot turns 90 degrees right.
5. The robot traces a circle approximately 50 cm in diameter.
6. The robot makes a short reverse to free it, if it has become stuck. Important!
This is not easy as the path varies from robot to robot and changes as battery levels
change.
Ball

RoboCup Junior Australia Inc Copyright 2014
15
Method
A sample program for Domabot can be seen below.
Start with the robot turning right for .2 sec at full power
Then veer left for about 2 sec
A quick reverse for .3 sec to free it if it is stuck.
Load this program and repeatedly test it with the ball(turned off) starting at different
distances between 20cm and 70cm from the ball.
Experiment by changing the different times that the robot is supposed to turn and circle
the ball
The robot should just go past the ball without touching it and finish behind the ball.
This takes time to perfect this,but it is important to persevere with it.
Create your Own Block
In order to reduce the number of icons later, you can create your own block. This is done
by clicking and dragging to select all of the motor icons. Now click on the Create My Block
on the tool bar.
Just follow the instructions after that.
Name the block “Ball Avoid”.
You can adjust motor settings in the block just by double clicking on it.
Cool Huh???

RoboCup Junior Australia Inc Copyright 2014
16
Programming for the Compass Sensor: Student’s Notes
Overview This unit introduces a compass switch that will allow the robot to chase the ball if it is facing
in the correct direction and use ball avoid if it is facing the opponents goal. This will allow
your robot to be very competitive at the top level of RoboCup Junior.
Using the Compass Sensor Make sure that you read all instructions before using the Hitechnic Compass Sensor.
You will need to go to the higher level of programming palettes. Just click on the Complete
Pallette icon at the bottom left of your screen.
Complete Palette
You may need to download the compass sensor icon from the Hitechnic web site.
http://www.hitechnic.com/downloadnew.php?category=13
Follow all instructions closely and you should be able to find a new Compass Sensor Icon in
your Advanced Palette of your NXT-G Controls.
Robot Setup The compass sensor can be plugged into sensor port 2 of the NXT. The ball sensor should be
plugged into Sensor Port 1. The down light sensor should be plugged into Sensor Port 3. The
down sensor is required to detect colours on the GEN II field.
Students have found it is advantageous to have a means of zeroing the compass on the robot.
They use a turntable that can be locked with a gear.

RoboCup Junior Australia Inc Copyright 2014
17
Keep in mind that some compasses have a bit of lag and take time to catch up with a spinning
robot. You will be able to minimise this effect by making sure that the scan is in an anti-
clockwise direction .
Remember to locate your compass as far away from motors and motor wires as possible, as
these tend to create their own magnetic fields.
The easiest way to zero your compass sensor is to:
Go back to the view function. Select Ultra Sonic cm sensor plugged into Port 2. It
should change its reading from 0-180 as you turn the robot around.
Start with your robot facing the direction that you want to kick.
Turn it clockwise to face right angles to the goal.
Rotate your compass on the robot until it is reading 0 degrees.
You will now find that with your Compass Sensor icon, less than 180 degrees is the
wrong direction. Greater than 180 degrees will be facing your goal.
Your Goal 270
180 0 /360
90
Opponents Goal
RoboCup Junior Australia Inc Copyright 2014
18
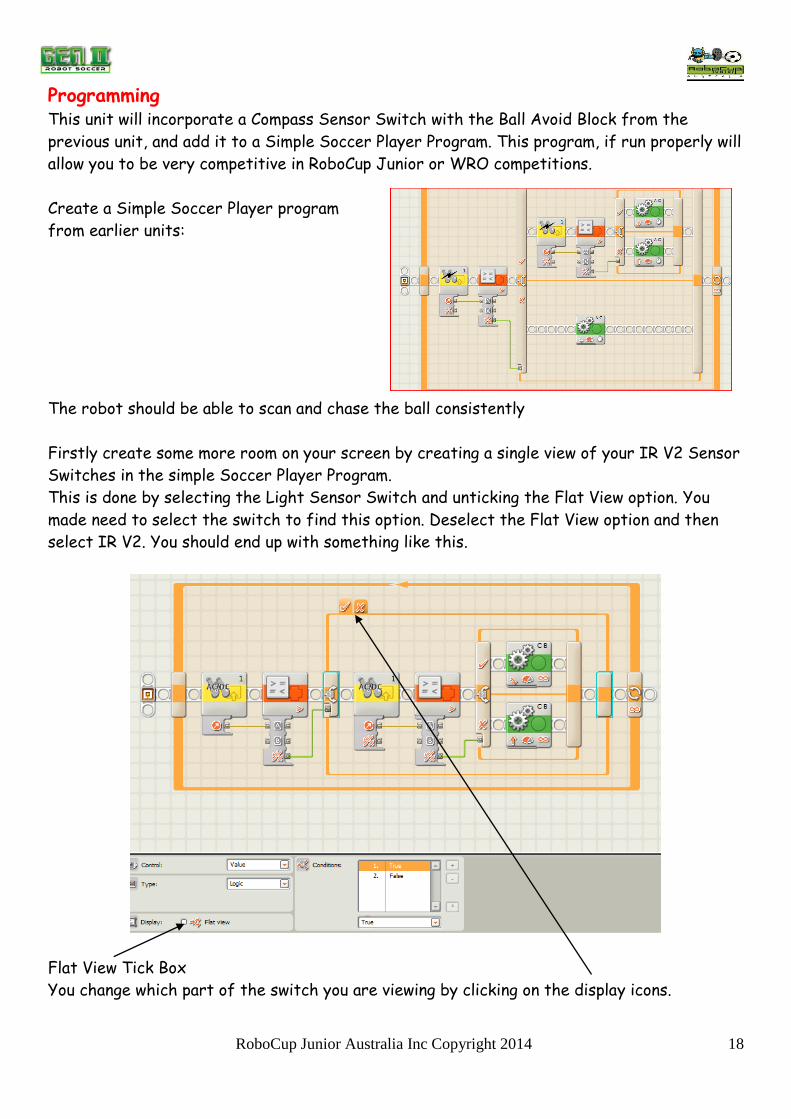
Programming This unit will incorporate a Compass Sensor Switch with the Ball Avoid Block from the
previous unit, and add it to a Simple Soccer Player Program. This program, if run properly will
allow you to be very competitive in RoboCup Junior or WRO competitions.
Create a Simple Soccer Player program
from earlier units:
The robot should be able to scan and chase the ball consistently
Firstly create some more room on your screen by creating a single view of your IR V2 Sensor
Switches in the simple Soccer Player Program.
This is done by selecting the Light Sensor Switch and unticking the Flat View option. You
made need to select the switch to find this option. Deselect the Flat View option and then
select IR V2. You should end up with something like this.
Flat View Tick Box
You change which part of the switch you are viewing by clicking on the display icons.
RoboCup Junior Australia Inc Copyright 2014
19
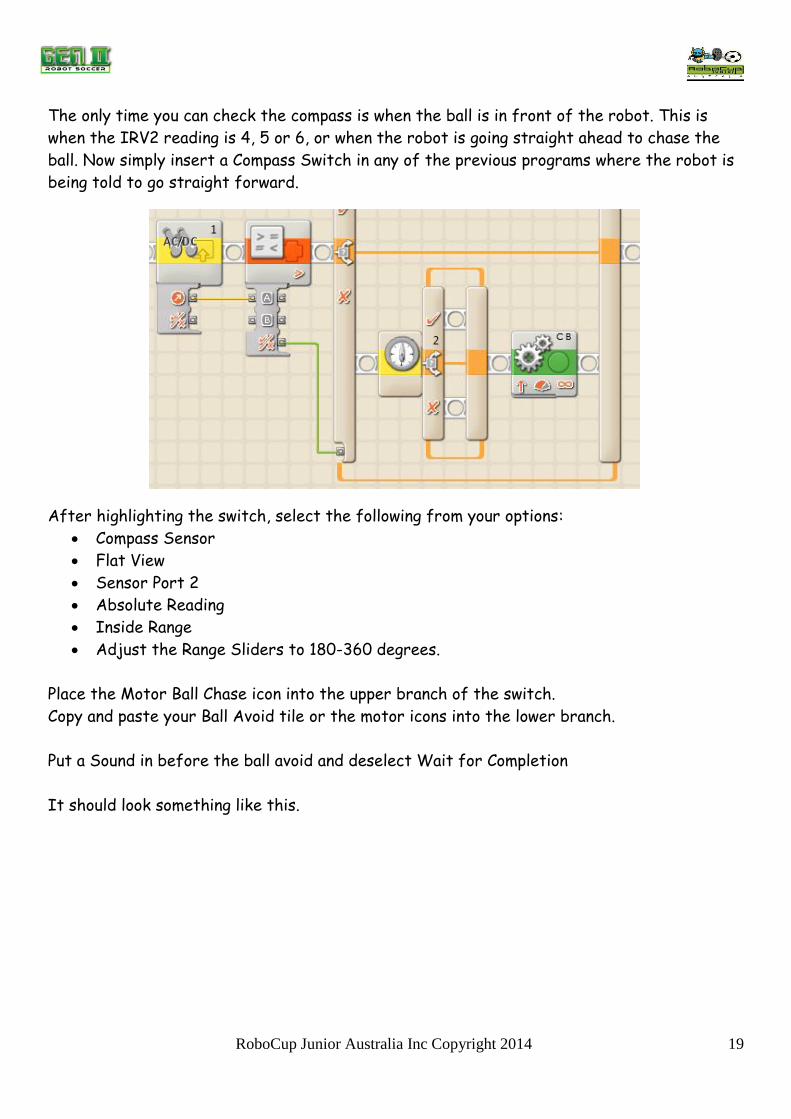
The only time you can check the compass is when the ball is in front of the robot. This is
when the IRV2 reading is 4, 5 or 6, or when the robot is going straight ahead to chase the
ball. Now simply insert a Compass Switch in any of the previous programs where the robot is
being told to go straight forward.
After highlighting the switch, select the following from your options:
Compass Sensor
Flat View
Sensor Port 2
Absolute Reading
Inside Range
Adjust the Range Sliders to 180-360 degrees.
Place the Motor Ball Chase icon into the upper branch of the switch.
Copy and paste your Ball Avoid tile or the motor icons into the lower branch.
Put a Sound in before the ball avoid and deselect Wait for Completion
It should look something like this.

RoboCup Junior Australia Inc Copyright 2014
20
Deselect flat view on the second switch and the whole program will look like this:
Notes The ball avoidance will have to be varied for different robots so that they most
efficiently avoid the ball.
You may have to slow down the turning speeds as the compass need time to catch up.

RoboCup Junior Australia Inc Copyright 2014
21
Super Soccer Player
Overview You will by now have noticed that after the ball avoid, the robot rarely lines up directly in
line with the goal. Goals are missed even though the robot has detected the ball directly in
front.
This program will tell the robot to continue to avoid the ball until it is directly in line with
the goals.
Similar to high performance cars, this is a high performance program is more susceptible to
things going wrong. It is recommended that all of the simpler programs are mastered before
attempting this program. The operator need to have solid experience beforehand to
recognise problems and to trouble shoot them
Robot Set-up IR V2 sensor(ball) Port 1
Compass Sensor Port 2
Programming Start with the ball chase program from the previous unit.
Add a Compare Block
Set this to “A Equal to 5”
Add a Logic Switch
On the True Branch Insert a Sound Block
Select a musical note and remember to untick the “Wait for Completion” box.
If you run the program, it will chase the ball make a sound when the IR V2 has a reading of
5. This corresponds to the robot facing directly at the ball. It is at this stage that you want
the robot to check the compass sensor.

RoboCup Junior Australia Inc Copyright 2014
22
Untick Flat View for the Logic Switch.
It should now look like this:
Delete the Sound Block
In its place add a Compass Sensor Block
Set the range to the direction that is kicking directly towards your goals. From
previous units, this would be 225-315 degrees.
Add a Logic switch
It will now look like this:

RoboCup Junior Australia Inc Copyright 2014
23
If the Compass Logic switch is False, then the robot is not facing towards goal. All that you
need to do now is to get the robot to work its way around the ball without touching it.
This is simply done by getting the robot to turn right for about 0.3 seconds and then go
forward for 1 second.
Notes Although this program looks good when testing a robot on its own, it is difficult to get
working totally consistently in a game situation.
You must keep testing and making minor adjustments for your robot.
You must be aware that any stray IR must be eliminated, as the robot will tend to
chase this. This can be done by changing the position of your IR V2 on the robot and
testing.
You can also limit the range of vision of the IR V2 by creating “blinkers” by sticking
black tape to the front of the IR V2.
You may also need to limit the speed that the robot scans for the ball, if it keeps on
scanning past it.
That’s it, now to work on using the colours of the GEN II field.

RoboCup Junior Australia Inc Copyright 2014
24
NXT GEN II Simple Soccer Player
Overview This program shows how simple it is to adapt a program to GEN II Soccer. All you need to do
is to create a working soccer program and then insert a couple measures that interrupt a
forward moving robot when it passes into the white field surrounds. The down sensor will
detect the outer border with a high reading (over 50 in this case) and reverse back onto the
playing area.
Robot Set-Up The IR V2 sensor for ball sensing is plugged into Input Port 1
The compass sensor is plugged into Input Port 2
The downward light sensor is plugged into Input Port 3.
Programming Start with the Super Soccer Player Program or Simple Soccer Player from above.
Select the control on the Main Loop
Change this to Loop While, Light Sensor in Port 3 is Less than 50.
Add another Loop to the program. This Loop should be set to Unlimited.
Select the original loop and drag it inside of the second loop.

RoboCup Junior Australia Inc Copyright 2014
25
Add a sound. The note High C is good for a Truck Reverse type sound. Make sure that
you deselect “Wait for Completion”.
Add a Motor Reverse for 1 second and a Turn Left for 0.3-0.5 seconds after the
original loop.
Now if the robot moves forwards, it will do so inside of the Light Sensor Loop while
constantly checking Sensor Port 3 to see if it is out.
If the robot does go out, it will make a truck reverse beep, execute a quick reverse and
return back to its normal program.
Remember the ball is the controlling factor in GEN II so the robot should just about always
chase it within the borders of the field anyway.
How easy is it to play GEN II???

RoboCup Junior Australia Inc Copyright 2014
26
NXT GEN II With Colour Filter Overview
To program a robot that finesses its way around a field, you need to introduce a number of
options to the robot when it approaches the ball. The programs to date have involved
switches where there has been a choice of only two options. By linking more switches
together, you can increase the number of options depending on where the robot is at the
time.
This program introduces the options for the robot depending on which part of the GEN II
field it has found the ball. The robot will attempt to work the ball back to the central
corridor and then move it directly down the field.
This is a very high performance program and is quite technical to trouble shoot. This is for
experienced programmers only and you need to fully understand all of the preceding
programming steps.
This will also need to have two programs, one for each direction the robot is kicking ie dark
green on the right or left when you are facing the goal you are kicking to. This program will
be designed for a robot kicking with the dark green on the right.
Programming
Start with the Super Soccer Player program with the additional loops from above.
Note that this view shows the True for the First Switch and Second Switches.
This will occur when the robot is facing toward the ball and towards the goals.
Instead of the robot just going forwards in this situation, it will need to change its
movement to work the ball in the direction of the goal. The addition of a Colour Filter will
allow the robot to detect where it is on the field and then alter its movements accordingly as
it heads towards the goal.

RoboCup Junior Australia Inc Copyright 2014
27
Programming a Colour Filter
You will need to calibrate your robot to the readings given from the GEN II field. Data
logging will give you the most accurate indication of colour readings.
The following readings were taken directly from a GEN II field with the light sensor 8mm
from the surface
Black Dark Green Mid Green Lime Green White
32 37 42 50 60
Mid-
Reading
35 40 46 55
You can now be confident that at greater than each of the mid readings, you will be sitting
over the next lightest colour.
You will now need to create the colour filter in a new program.
You need to connect up 4 switches. You will quickly run out of room after two switches.

RoboCup Junior Australia Inc Copyright 2014
28
In order to make more room, click on the check tick for flat view, that way all four switches
can be fitted on the screen.
Insert the motor controls for each False reading. Examples of possible strategies can be
found in the table below.
The reverse for the robot being over the white area(out) is placed in the “Greater Than”
section of the fourth switch.
Colour Reading Robot Action Reason
Black
Less than 35 Forward 1 sec, Stop
0.2sec
Stop pushed goal
Dark Green
Greater Than 35 Straight Ahead
100% Power
Heading for goal:
Go for it!!
Mid Green
Greater Than 40 Veer Left
75% Power
Less power: more
ball control
Lime Green
Greater Than 46 Veer Right
75% Power
Less power: more
ball control
White
Greater Than 55 Out (Reverse and
Turn)
Get back into play
You can place the colour filter in an indefinite loop to test the robot movements. You will
need to experiment extensively with the motor settings. All robots will behave differently
with the ball. The addition of a ball capturing zone may change the whole strategy you need
for your robot. You may find that the robot doing a quick flick to the centre of the field is
better than carrying the ball in the direction of the goal. The number of possibilities is
endless.
RoboCup Junior Australia Inc Copyright 2014
29
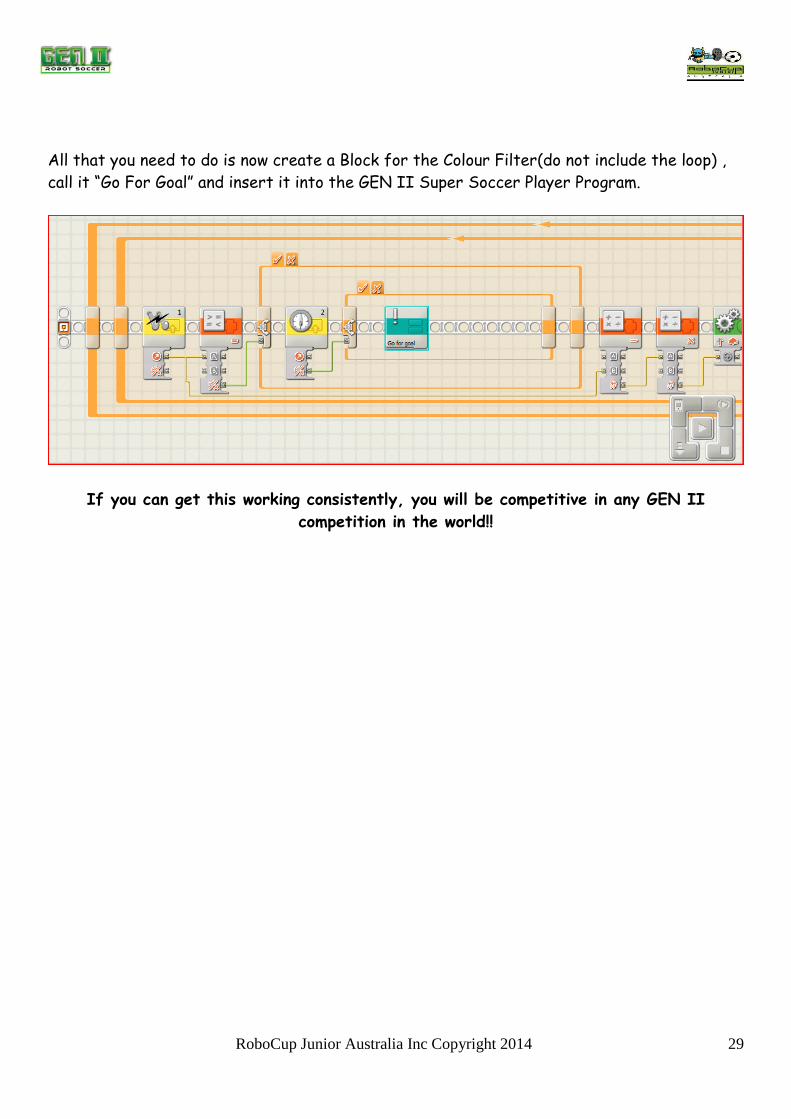
All that you need to do is now create a Block for the Colour Filter(do not include the loop) ,
call it “Go For Goal” and insert it into the GEN II Super Soccer Player Program.
If you can get this working consistently, you will be competitive in any GEN II
competition in the world!!