Gear VR User Manual
61
User Manual Please read this manual before operating your device and keep it for future reference.
Transcript of Gear VR User Manual

User ManualPlease read this manual before operating your device
and keep it for future reference.

i
Table of ContentsSupport .......................................................................... 3
Read me first ................................................................ 4Wearing the Gear VR .............................................. 5
Precautions ............................................................... 6
Before Using the Gear VR Headset ..................... 6
About the Gear VR .................................................. 7
Additional Notifications ........................................... 8
Getting Started ............................................................ 9Device Features ....................................................... 9
Function Overview .................................................12
Device Installation and Set Up ............................13
Removing the Mobile Device ..............................19
Connecting a Headset ..........................................20
Replacing the Foam Cushioning ........................21
Initial Configuration ...............................................22
Completing the Set Up Process .........................24
Basic Navigation and Selection ............................25Using the Touchpad ..............................................25
Moving the On-Screen Pointer ............................28
Making a Selection ...............................................29
Navigation - Home Screen ...................................30
Navigation - App Screen ......................................31
Using the Universal Menu ....................................34
Calls .........................................................................40
Viewing Notifications .............................................41
Applications ................................................................42Loading New Applications ...................................42
Uninstalling Existing Applications .......................43
Oculus Cinema ......................................................44
Oculus 360 Videos ...............................................45
Oculus 360 Photos ...............................................45
GEN_SM-R320_ENG_UM_PS_120514_R5

ii
Health and Safety Information ...............................46Seizures ...................................................................46
General Instructions and Precautions ...............46
Discomfort ..............................................................48
Other Warnings ......................................................49
Care and Maintenance .........................................50
Restricting Children’s Access to Your Mobile Device ........................................................52
Additional Cautions ...............................................52
Other Important Safety Information ....................53
Warranty Information ................................................54Standard Limited Warranty ..................................54

3
SupportWarning! This product contains chemicals known to the State of California to cause cancer and reproductive toxicity.
This guide provides you with the information you need to get started. For more information and additional support, please visit the main www.samsung.com support page.
• Get support for your Gear VR online.
• Review your Gear VR’s troubleshooting FAQs, and solutions.
Note: Mobile devices and software are constantly evolving—screen images you see here are for reference only.
Note: The Gear VR and it’s connected mobile device should only be used with firmware versions that have been approved for use by the device manufacturer.
For additional information, please visit: www.samsung.com/us/gearsupport.

4
Read me firstPlease read this guide before using the Gear VR to ensure safe and proper use.
The Gear VR is an Innovator Edition device intended specifically for developers and early adopters of technology.
• Descriptions in this guide are based on the mobile device’s default settings.
Important: Use the Gear VR for its intended purpose only. Using the Gear VR for other purposes may result in injury.
Important: The Gear VR must be connected with a Samsung GALAXY Note® 4 mobile device when in use. The Gear VR cannot be operated by itself. The GALAXY Note® Edge is not compatible with the Gear VR.
Note: Some languages or content may not be available depending on the region or network.
Note: To view the open source license for the Gear VR, refer to opensource.samsung.com.

5
Wearing the Gear VRWarning! Do not wear glasses when using the Gear VR®. Doing so may cause facial injuries. If you have poor eyesight, it is recommended to wear contact lenses when using the Gear VR.
Note: Keep the lenses clean and protect them from getting scratched. If the lenses get dirty or steam up, clean them with the lens cleaning cloth.
• The factory lens protectors are pre-installed on the Gear VR.
• Remove the mobile device screen protector to get clear visibility.
• Ensure that the lenses are not scratched and keep them clean for clear visibility.
• The foam cushioning may get dirty if your face is sweating while wearing the Gear VR. Doing so may deteriorate the quality of the foam cushioning. Ensure that you keep your face clean and dry when wearing the Gear VR.
• When you remove the Gear VR from your head, the Samsung GALAXY Note 4’s screen locks and the touch pad stops working.
• When you are not wearing the Gear VR, do not place objects on the Gear VR’s proximity sensor. Doing so may cause the proximity sensor to remain on and drain the battery.
• Refer to your mobile device online support material for more information.

6
PrecautionsEnsure that you have read the warnings below carefully before using the Gear VR to reduce the risk of personal injury, discomfort, or property damage.
• The Gear VR should not be used by children under the age of 13. Watching videos or playing games with the Gear VR may affect the visual development of children.
• When children, age 13 or older, use the Gear VR, adults should limit their usage time and ensure they take frequent breaks. Adults should monitor children closely after using the Gear VR if children feel discomfort.
Before Using the Gear VR Headset• The Gear VR should be adjusted for each individual user, and calibrated by using the configuration
software (if available) before starting a virtual reality experience. Failure to follow this instruction may increase the risk of discomfort.
• People who are prone to motion sickness in the real world also have a heightened risk of experiencing discomfort while using the Gear VR. Such individuals should take extra care to read and follow these warnings carefully.
• We recommend consulting with a doctor before using the Gear VR if you are pregnant, elderly, have psychiatric disorders, suffer from a heart condition, have pre-existing binocular vision abnormalities or suffer from a heart condition or other serious medical condition.

7
• Do not use the Gear VR if you have symptoms of squint, amblyopia, or anisometropia. Using the Gear VR may aggravate these symptoms.
• Do not use the Gear VR when the attached mobile device is hot as this may cause mild burns. To prevent any injuries, take frequent breaks when using the Gear VR.
• Make sure the Gear VR is level and secured comfortably on your head, and that you see a single, clear image. If you wear the Gear VR tilted to one side, you may feel discomfort.
• Just as with the symptoms people can experience after they disembark a cruise ship, symptoms of virtual reality exposure can persist and become more apparent hours after use. These post-use symptoms can include the symptoms above, as well as excessive drowsiness and decreased ability to multi-task. These symptoms may put you at an increased risk of injury when engaging in normal activities in the real world.
About the Gear VRThe Samsung Gear VR Innovator Edition powered by Oculus™ (also referred to as Gear VR) is a headmounted, virtual reality device that provides an immersive experience for a wide range of users.

8
Additional Notifications• Heating
The Samsung GALAXY Note 4 may become hotter than normal when used with the Gear VR since VR applications, especially if you use the devices to play games for an extended period. When the Gear VR detects a high temperature, the quality of the application may be degraded or VR applications may be terminated in order to prevent overheating. This is normal and does not affect the Samsung GALAXY Note 4’s lifespan or performance.
• Runtime
The Samsung GALAXY Note 4’s battery runtime may become shorter than normal when it is used with the Gear VR since VR applications use more of the device’s resources and may contribute to battery drain.
• Performance
You may experience slow loading speed or diminished playback quality in some circumstances, such as after extended use (to prevent the device from overheating) or if your carrier or Wi-Fi network is slow or out of range.
• Applications and Languages
The availability of VR-enabled content and applications and language support may vary by region.

9
Getting Started
Device FeaturesFocus Adjustment Wheel
Main Head Strap
USB Connector
Phone Lock Key
Lens

10
Securing Slot
Foam Cushioning
Proximity Sensor
Securing SlotLenses

11
Front Cover
Back Key
Touchpad
Volume Key
Note: The Gear VR does not require charging as it obtains power from the Samsung GALAXY Note 4.

12
Function Overview
Keys FunctionBack • Press to return to the previous screen.
• Press and hold to access the Universal menu where you can then use features such as Camera Passthrough (to see outside the device using the mobile device’s rear camera), Reorient (to realign the viewing angle), Brightness, Do Not Disturb, and Comfort Mode options.
Volume • Press to adjust the volume.
Focus Adjustment Wheel
• Rotate to focus by adjusting the distance between the mobile device and lenses.
Phone Lock Key • Press to separate the mobile device from the Gear VR.
Touchpad • Swipe across to move around the screen.
• Tap to make selections. (Similar to a laptop touchpad)

13
Device Installation and Set Up
Install the strap1. Carefully insert the hook (from the top head strap) into the front bar of the Gear VR (1), then pull it
upwards until it locks in place (2). The hook will snap once secured.

14
2. Slide the opposite end of the top head strap through the hole on the back of the main strap (3) and secure the velcro tip to the underside of the strap (4). This end of the strap contains a smaller velcro strip.
3
4
Note: The opposite end of this strap contains a longer velcro strip and is used to secure the top head strap to the front of the Gear VR frame.

15
Install the Mobile Device1. Press the Phone Lock key to release the latch and raise it upwards.
Note: At this time, the Gear VR is only compatible with the Samsung GALAXY Note 4.
2. In a single motion, carefully insert the mobile device (face down) at an angle and insert the Gear VR connector (1) into the mobile device’s MicroUSB port. This process is similar to installing the mobile device into a standard charging port. Ensure that the connector is fully inserted into the mobile device’s multipurpose jack.

16
3. Once securely connected, carefully push the opposite end of the mobile device downwards (2) until the Phone Lock latch snaps onto the mobile device and holds it in place against the lenses.
Important: Do not forcefully insert the connector into the mobile device as this may damage the connector.
Note: Verify your mobile device is not on silent and volume is active. If the sound is not emitted when you insert the connector into the Samsung GALAXY Note 4, the Gear VR may not have recognized it. Reconnect the mobile device until you hear the sound.

17
Beginning the Software Installation1. After connecting the mobile device and the Gear VR for the first time, the mobile device will notify you
(via audio message) that it needs to now be removed.
2. Follow the procedures described in Initial Configuration.
Note: This set up process requires an active network or Wi-Fi connection. If prompted, tap OK to accept a data connection via your cellular network.
Important: This software is required to properly use the Gear VR.
Replacing the Front Cover ► Align the cover over the compartment (1) and press down firmly until it clicks/snaps closed (2).
Important: Do not forcefully insert the front cover over the mobile device. Doing so may damage the front cover.

18
Wearing the Gear VR1. Align your face and the foam cushioning and put on the Gear VR.
Caution! Do not walk or drive while wearing the Gear VR. Always be aware of your surroundings while using the Gear VR to avoid injury to yourself or others.
2. Adjust the length of the top head strap and the main strap.
Caution! If you wear the Gear VR tilted to one side, it may cause discomfort.

19
Removing the Mobile DeviceRemove the mobile device from the Gear VR when you are not using it.
1. Take off the Gear VR and carefully remove the front cover.
2. Press the Phone Lock key on the left side of the Gear VR. You can now safely remove the connected mobile device.
3
3. Disconnect the mobile device from the Gear VR connector by carefully sliding it out.
4. Replace the front cover back onto the unit.

20
Connecting a HeadsetNote: A audio headset is not included with the Gear VR.
1. Press the Phone Lock key to open the front cover.
2. Connect a headset/headphone to the currently connected mobile device’s headset jack.
3. Carefully install the front cover making sure not to damage the connected cable.
Note: You can connect a headset or a Bluetooth headset to the Samsung GALAXY Note 4 when using the Gear VR. A headset or a Bluetooth headset is not supplied with the Gear VR. For more information about connecting a Bluetooth headset, refer to the Samsung GALAXY Note 4’s user manual.

21
Replacing the Foam CushioningOver time and with normal use, the foam cushioning will wear down. Replace the foam when necessary.
Note: You can either replace the foam cushioning if it deteriorates over time, or you can change it to another type of foam cushioning that fits comfortably over your nose.
1. Place the Gear VR face down and carefully detach the previous face foam from the nose area.
2. In a single motion carefully align the new foam cushioning and press it onto the Gear VR.
Caution! Do not stretch the replacement foam cushioning. Doing so may cause it to deform or tear. Do not use the Gear VR without the foam cushioning. Without the foam cushioning, the Gear VR may not sit properly on your face and may cause discomfort.

22
Initial Configuration• To use the Gear VR, you must manually install the Gear VR software. When you connect the Samsung
GALAXY Note 4 to the Gear VR for the first time, the software installation will start automatically.
Note: Before beginning the set up and configuration process, ensure that your mobile device is connected to a Wi-Fi or mobile network. If prompted, tap OK to accept a data connection via your cellular network.
Important: Tap Create Account and follow the on-screen instructions to create an Oculus account. If you already have an Oculus account, tap Sign In and enter your information.
1. Carefully install the compatible mobile device into the Gear VR compartment. For more information refer to Install the Mobile Device.
Important: A mobile device should be connected to the Gear VR connector. If this connection is not properly made, you will not be prompted to continue with the initial set up process.
2. When a voice prompt requests for you to remove the mobile device from the Gear VR, follow the previous procedures to remove the mobile device (Removing the Mobile Device). Then perform steps 3-9 on the mobile device.
Note: These one-time on-screen set up and configuration procedures are displayed on the mobile device. At this point you will complete the set up process on the removed mobile device.
3. Read the on-screen information and tap Next on the mobile device’s screen. The necessary Gear VR software will then begin to download onto your mobile device.
Note: If prompted, read the on-screen Google security message and select an option.

23
4. Read and agree to all of the terms and conditions and tap Next > Install. The mobile device will then continue the software download process.
5. If prompted, tap Install Apps to begin installing select Oculus applications onto your mobile device (ex: Oculus Cinema and Oculus 360 apps).
6. If prompted, install the provided VR microSD card and tap Continue to proceed.
Note: You need to replace your existing microSD card, with the new VR version, only if you wish to access the loaded VR sample content that was installed on that card. If you decide not to access this content and keep your current SD card in place, tap Skip.
7. Follow the on-screen instructions to sign in to your Oculus account. Make a selection.
• Create an Account: To begin the process of creating a new Oculus account via your mobile device.
• Sign In: To enter in your previously created Oculus account information.
8. To complete the Oculus account registration, you will need to access the verification email and follow its’ instructions.
9. Read the on-screen Terms of use and tap Agree and Continue to access the Oculus store.
10. Connect the Samsung GALAXY Note 4 to the Gear VR.
- or - Tap Browse Oculus Store to launch the Oculus Store app. When the software is installed, the Oculus Store app will appear on the All apps screen of the Samsung GALAXY Note 4
11. Carefully re-connect the mobile device back into the Gear VR. The next step checks whether or not you are correctly wearing the Gear VR.

24
Important: Make sure the screen is not locked when you reconnect the mobile device back onto the Gear VR.
Note: If the screen appears tilted or skewed while using the Gear VR, take it off. Then, place the Gear VR on a flat surface with the lenses facing forwards and the Focus Adjustment wheel at the top. Wait 5-7 seconds before using it again.
Completing the Set Up Process1. Read the on-screen Health & Safety Warning! information and then use your head to position the on-
screen Pointer (crosshair) into the Oculus logo area to continue.
2. Follow the on-screen instructions to learn how to:
• Position your on-screen cursor at desired locations.
• Use the Touchpad to make on-screen selections.
• Swipe forwards and backwards using the Touchpad.
• Swipe up and down
• Use the VR’s Back key to return to a previous selection.
• Press and hold the Back key to access the Universal menu. Press the Back key again to exit.
- This menu contains items such as: Home, Passthrough Camera, Reorient, Do Not Disturb mode, Brightness, and Comfort mode.
3. Select Continue at each option to complete the tutorial.
4. If prompted to take a tour of the gamepad, make an on-screen selection.

25
Basic Navigation and Selection
Using the TouchpadThe Touchpad, located at the right side of the Gear VR, is used for both selection and navigation of on-screen elements.
Making Selections (Tapping)1. Move your head to place the on-screen pointer atop the desired item.
2. Tap the Touchpad with your finger.
Note: When you are not wearing the Gear VR, the touch pad does not work

26
Moving Around the screen (Swiping)
• To move to the next item:
– In a single motion, swipe forwards across the touch pad.
• To move to the previous item:
– In a single motion, swipe backwards across the touch pad.
Swiping to next item (Forward)
Swiping to previous item (Backwards)
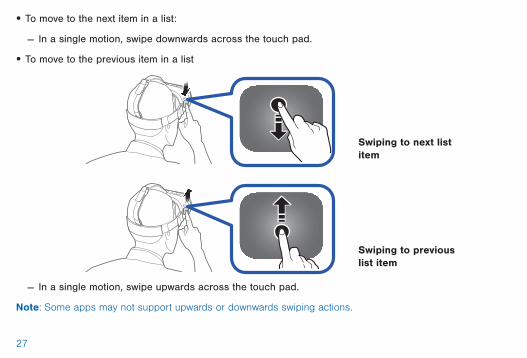
27
Swiping to next list item
Swiping to previous list item
• To move to the next item in a list:
– In a single motion, swipe downwards across the touch pad.
• To move to the previous item in a list
– In a single motion, swipe upwards across the touch pad.
Note: Some apps may not support upwards or downwards swiping actions.

28
Moving the On-Screen PointerThe Gear VR recognizes your head movements and then translates that information as a location within your current screen environment. Some screens may not have a pointer available.
• Moving your head around also changes the views and perspectives of the current screen.
• The pointer and screen views change depending on the detected location of your head.
Pointer
Pointer
Note: The pointer is centered in your line sight and follows your head movements. It may not appear on some screens.

29
Making a SelectionYou can select items or apps by moving your head and then tapping the touch pad.
1. Move your head to place the on-screen pointer onto a desired on-screen selection.
2. Tap the Touchpad (on the right side of the unit).
Pointer

30
Navigation - Home ScreenNote: Anytime the Gear VR application restarts, you are prompted to read the on-screen Health and Safety information and tap the Touchpad to accept the terms before proceeding.
The Oculus Home screen is the starting point for accessing Apps, files, and features.
Recent Apps
Application Library
Access to different pages
Samsung Featured Content
Oculus Store
Current Screen
From this Home screen you can navigate to any of the three main screens:

31
• HOME screen: Provides access to the Oculus store, Samsung content, Recent apps, and Library (of apps)
• STORE screen: Provides access to either All (new downloadable VR applications) or Samsung (providing Samsung Features content). Use either of the available category tabs (All/Samsung) to then swipe through the available downloads.
• LIBRARY screen: Provides access to all currently installed VR content and applications. Swipe through your available selections and tap the Touchpad to activate an app.
Navigation - App ScreenOnce you have selected an app (from either your Recent Apps or Library screen), you can then select additional related options.
Launching a Loaded Application1. From the Home screen, select Library > Installed tab.
2. Swipe backwards or forwards across the Touchpad to move through your available applications.
3. Hover the pointer over an available app and select Start.

32
Accessing Additional Application Functions1. Navigate to the HOME screen, direct the pointer to the Store button and tap the Touchpad.
2. Select an application entry to view the Apps screen.
– or –
From within the Library screen, scroll to the desired application, and select View Details.
User Ranking
Comfort Rating
Launch App
Access to different pages
Additional Functions
Application Logo
Current Screen

33
3. This Apps screen provides both useful application information and additional related options such as:
• Rating: View current user ranking for this application (1-5).
• Comfort: View the current user comfort rating for this application (1-3).
• Install/Launch/Play Now: Install an application that is not currently downloaded or Launch/Play the available app.
• Summary: Review a brief description of the current application. Tap Close to go back.
• Info: provides game related information such as Genre, Publisher, Developer, Controller mode, and Number of players. Tap Close to go back.
• Media: displays related application images. Tap Close to go back.
• More: provides access to available application updates.

34
Using the Universal MenuThis menu can be accessed from within any active VR application screen and provides ready access to some very useful features.
Accessing the Universal Menu1. From within an active VR screen, press and hold the Back key.
2. Place the on-screen pointer atop an available entry and tap the Touchpad. Options include:
• Oculus Home: Returns you to the Oculus Home screen.
• Passthrough Camera: Activates the Note 4’s rear camera and allows you to see through and
to the outside environment.
• Reorient: Realigns the screen based on the current direction you are facing.
• Do Not Disturb (On/Off): When activated, sets the Gear VR to mute the sounds of incoming calls and notifications. Incoming calls do not appear on-screen and are ignored.
Note: The default state of the Do Not Disturb feature is Off.
• Brightness: Adjusts the brightness.
• Comfort Mode (On/Off): Restores the default color settings or using warm color settings.

35
Note: These features may not be available in some apps.
Charge Status
Brightness
Comfort Mode
Reorient Do Not Disturb
Oculus Home
Passthrough Camera
Notifications

36
Going to Oculus Home1. From within an active VR screen or application, press and hold the Back key.
2. Place the pointer atop Oculus Home, to begin exiting the current app and return to the main Home screen.
Using Passthrough CameraThis feature activates the Note 4’s rear camera and projects it onto your screen so that you can see your surroundings while keeping the Gear VR on.
To activate Passthrough Camera:
1. From within an active VR screen, press and hold the Back key.
2. Place the pointer atop Passthrough Camera and tap the Touchpad to activate the feature. The screen will display Passthrough Camera: On.
To deactivate Passthrough Camera:
1. From within the active passthrough screen, place the pointer atop Passthrough Camera.
2. Tap the Touchpad to deactivate the feature and turn off the Note 4 camera. The screen will display Passthrough Camera: Off.

37
Reorienting the Gear VRThere may be times when the viewing angle of the screen might change and not appear centered in your line of sight. Reorienting the screen “resets” the viewing angle to match your current line of sight and orientation by “resetting the forward location”.
1. From within an active VR screen, press and hold the Back key.
2. Orient your head to the direction you wish to now set as the new “forward” view.
3. Place the pointer atop Reorient and tap the Touchpad to “reset” the view.
Using Do Not DisturbWhen activated, this feature is enabled, you will not receive any audio notifications and incoming calls will be ignored.
To activate the Do Not Disturb Mode:
1. From within an active VR screen, press and hold the Back key.
2. Place the pointer atop Do Not Disturb and tap the Touchpad to activate the feature. The screen will display Do Not Disturb: On.

38
To deactivate the Do Not Disturb Mode:
1. From within an active VR screen, press and hold the Back key.
2. Place the pointer atop Do Not Disturb and tap the Touchpad to deactivate the feature. The screen will display Do Not Disturb: Off.
Note: Once deactivated, you will now hear new notifications such as those for new incoming calls.
Adjusting Brightness1. From within an active VR screen, press and hold the Back key.
2. Place the pointer atop Brightness, then position it over the on-screen slider.
3. Swipe upwards/downwards over the Touchpad to move the on-screen slider up (increase brightness) or down (decrease brightness).

39
Using Comfort ModeThere might be times when you need to soften the brightness or intensity of the background blue light. This is accomplished by activating the Comfort Mode feature.
To activate the Comfort Mode:
1. From within an active VR screen, press and hold the Back key.
2. Place the pointer atop Comfort Mode and tap the Touchpad to activate the feature. The blue background light will then dim. The screen will display Comfort Mode: On.
To deactivate the Comfort Mode:
1. From within an active VR screen, press and hold the Back key.
2. Place the pointer atop Comfort Mode and tap the Touchpad to deactivate the feature. The blue background light will then return to standard illumination levels. The screen will display Comfort Mode: Off.

40
CallsThe icon will appear on the screen if you receive a call while you are using the Gear VR.
► You can reject the call, by using the pointer atop your selection and tapping the Touchpad.
Caution! The Samsung GALAXY Note 4 may become hotter than normal when it is used with the Gear VR. To avoid overheating of the Samsung GALAXY Note 4, it is recommended you answer incoming calls by connecting an audio headset or by using a speakerphone to avoid overheating.
Important: If the Do Not Disturb feature (from the Universal menu) is enabled, you will not be notified of any new notifications and incoming calls will be ignored.
Answering a call1. When a call comes in, move your head to place the pointer atop Incoming Call.
2. Take off the Gear VR and separate the Samsung GALAXY Note 4 from the Gear VR.
3. On the Note 4, tap Answer from the pop-up window.
Note: When you answer a call, the currently running VR app will be closed.
Note: If you do not see the calling pop up on your Note 4, you might have to tap the X at the top of the blank screen to close the current VR app.

41
Rejecting a call1. When a call comes in, move your head to place the pointer atop Incoming Call.
2. Move your head to position the pointer atop Reject Call.
3. Once the button appears highlighted, tap the touch pad to reject incoming call.
Viewing NotificationsWhile using the Gear VR, you can view general notifications, such as events, messages, and alarms when they appears as a pop-up notification on the screen.
To see more notification details, review them on the Samsung GALAXY Note 4 after you separate it from the Gear VR.

42
Applications
Loading New ApplicationsApplications can be loaded from one of two locations:
• STORE: Found on the HOME page.
• OCULUS app: Available on the Note 4’s Applications page.
Loading via the Store1. Navigate to the HOME screen, direct the pointer to the Store button and tap the Touchpad.
2. Select an application type (All or Samsung).
3. Swipe through the available pages and select an application entry.
4. Place the pointer over the Install button and tap the Touchpad to make your selection.
5. Once your application has completed loading, select Play.

43
Loading via the Note 41. From the Home screen, tap Apps > Oculus.
2. Tap Menu and select either Library or Apps.
3. Scroll to an available application and select Install.
4. Once successfully installed, place the Note 4 securely back into the VR compartment and install the cover (Install the Mobile Device).
5. Navigate to the HOME screen, direct the pointer to the Library button and tap the Touchpad.
6. Select the application and follow the on-screen instructions.
Uninstalling Existing ApplicationsApplications can only be uninstalled from the OCULUS application (available on the Note 4’s Applications page).
Uninstalling Apps via the Note 4:1. From the Home screen, tap Apps > Oculus.
2. Tap Menu and select Library.
3. Scroll to an available application and select Uninstall.
4. Once successfully uninstalled, place the Note 4 securely back into the VR compartment and install the cover (Install the Mobile Device).

44
Oculus CinemaEnjoy videos on a screen in your own virtual movie theatre.
1. Navigate to the HOME screen, direct the pointer to the Library button and tap the Touchpad.
2. Select All and then swipe across your Touchpad until the Oculus Cinema app is visible.
3. Select Start and choose a screen category from the top of the page. Videos will be sorted based on the screen type.
• Trailers: View movie previews of a video downloaded from Oculus Store.
• Multiscreen: View a video downloaded from Oculus Store on a three-sided screen.
• My Videos: View an available video recorded by the Samsung GALAXY Note 4.4. Select a video and then choose an available surrounding for your movie watching experience.
Note: When the video finishes, the next video will play automatically after several seconds.
To access the playback controls:
1. While the movie is playing, hover your on-screen pointer over the bottom area of the on-screen movie and tap the Touchpad.
2. Once the controls appear, hover over a selection use the Touchpad to activate a function.
• / : Pause and resume playback.
• / : Rewind or fast-forward a video.
Note: You can also swipe backwards across the touch pad to rewind a video or swipe forwards across it to fast-forward a video.
• : View the list of available videos.
45
Oculus 360 VideosThis application provides 360 degree views of available panoramic videos.
1. Navigate to the HOME screen, direct the pointer to the Library button and tap the Touchpad.
2. Select All and then swipe across your Touchpad until the Oculus 360 Videos app is visible.
3. Select Start and choose a video. Turn your head and view a panorama of the video.
• To go to the previous video, swipe backwards across the Touchpad.
• To go to the next video, swipe forwards across the Touchpad.
• To view the list of videos, tap the touch pad twice.
Oculus 360 PhotosThis application provides 360 degree views of available panoramic images.
1. Navigate to the HOME screen, direct the pointer to the Library button and tap the Touchpad.
2. Select All and then swipe across your Touchpad until the Oculus 360 Photos app is visible.
3. Select Start and select an image. Turn your head and view a panorama of the image.
While viewing the image, you can tap the touch pad to use the following features:
• View a list of images.
• Set the image as your favorite image.
- To view the previous image, swipe backwards across the Touchpad.
- To view the next image, swipe forwards across the Touchpad.

46
Health and Safety Information
SeizuresSome people (about 1 in 4000) may have severe dizziness, seizures, epileptic seizures or blackouts triggered by light flashes or patterns, and this may occur while they are watching TV, playing video games or experiencing virtual reality, even if they have never had a seizure or blackout before or have no history of seizures or epilepsy. Such seizures are more common in children and young people under the age of 20. Anyone who has had a seizure, loss of awareness, or other symptom linked to an epileptic condition should consult with a doctor before using the Gear VR.
General Instructions and PrecautionsWarning! You should always follow these instructions and observe these precautions while using the Gear VR headset to reduced the risk of injury or discomfort.
• Use only in a safe environment. The Gear VR produces an immersive virtual reality experience that distracts you from and blocks your view of your actual surroundings. Always be aware of your surroundings when using the Gear VR and remain seated at all times. Take special care to ensure that you are not near other people, objects, stairs, balconies, windows, furniture, or other items that you can bump into or knock down when using — or immediately after using—the Gear VR headset. Do not handle sharp or otherwise dangerous objects while using the Gear VR. Never wear the Gear VR in situations that require attention, such as walking, bicycling, or driving.

47
• Make sure the Gear VR headset is level and secured comfortably on your head, and that you see a single, clear image.
• Ease into the use of the Gear VR to allow your body to adjust; use for only a few minutes at a time at first, and only increase the amount of time using the Gear VR gradually as you grow accustomed to virtual reality. Looking around when first entering virtual reality can help you adjust to any small differences between your real world movements and the resulting virtual reality experience.
• A comfortable virtual reality experience requires an unimpaired sense of motion and balance. Do not use the Gear VR when you are tired, need sleep, are under the influence of alcohol or drugs, are hung-over, have digestive problems, are under emotional stress or anxiety, or when suffering from cold, flu, headaches, migraines, or earaches, as this can increase your susceptibility to adverse symptoms.
• Take at least a 10 to 15 minute break every 30 minutes, even if you don’t think you need it. Each person is different, so take more frequent and longer breaks if you feel discomfort. You should decide what works best.
• Listening to sound at high volumes can cause irreparable damage to your hearing. Background noise, as well as continued exposure to high volume levels, can make sounds seem quieter than they actually are. Due to the immersive nature of virtual reality, do not use the Gear VR with the sound at a high volume, so that you can maintain awareness of your surroundings and reduce the risk of hearing damage.
• The Gear VR may be equipped with a “passthrough” feature which permits you to temporarily see your surroundings for brief real world interaction. You should always remove the Gear VR for any situation that requires attention or coordination.
• Stop using the Gear VR if it seems to be hot. Prolonged contact with an overheated device can cause burns.

48
• Do not wear the Gear VR without a phone attached.
• Do not use the Gear VR while in a moving vehicle such as a car, bus, or train, as this can increase your susceptibility to adverse symptoms.
Discomfort• Immediately discontinue use if anyone using the Gear VR experiences any of the following symptoms:
seizures; loss of awareness; eye strain; eye or muscle twitching; involuntary movements; altered, blurred, or double vision or other visual abnormalities; dizziness; disorientation; impaired balance; impaired hand-eye coordination; excessive sweating; increased salivation; nausea; lightheadedness; discomfort or pain in the head or eyes; drowsiness; fatigue; or any symptoms similar to motion sickness.
• Do not drive, operate machinery, or engage in other visually or physically demanding activities that have potentially serious consequences (i.e., activities in which experiencing any symptoms could lead to death, personal injury, or damage to property), or other activities that require unimpaired balance and hand-eye coordination (such as playing sports or riding a bicycle, etc.) until you have fully recovered from any symptoms.
• Do not use the Gear VR until all symptoms have completely subsided for several hours. Make sure you have properly configured the Gear VR before resuming use.
• Be mindful of the type of content that you were using prior to the onset of any symptoms because you may be more prone to symptoms based upon the content being used.
• Consult with a doctor if you have serious and/or persistent symptoms.

49
Other Warnings• Repetitive Stress Injury. Prolonged use can make your muscles, joints or skin hurt. If any part of your
body becomes tired or sore while playing, or if you feel symptoms such as tingling, numbness, burning or stiffness, stop and rest for several hours before playing again. If you continue to have any of the above symptoms or other discomfort during or after play, stop playing and consult a doctor.
• Radio Frequency Interference. The Gear VR headset, when coupled with the mobile device, can emit radio waves that can affect the operation of nearby electronics, including cardiac pacemakers. If you have a pacemaker or other implanted medical device, do not use the Gear VR without first consulting your doctor or the manufacturer of your medical device.
Note: The Gear VR does not come with a power adapter and receives its power from the connected mobile device.
• Electrical Shock. To reduce risk of electric shock:
– Do not modify or disassemble any of the components provided.
– Do not use the Gear VR if any cable is damaged or any wires are exposed.
– Do not expose the power adapter on your mobile device to water or moisture.
– Unplug the mobile device’s power adapter before cleaning, and clean only with a dry cloth.
– Keep the mobile device’s power adapter away from open flames and other heat sources.
– Use only the power adapter provided with the mobile device.

50
• Sunlight Damage. Do not leave the Gear VR in direct sunlight. Exposure to direct sunlight can damage the Gear VR.
Care and MaintenanceYour Gear VR is a product of superior design and craftsmanship and should be treated with care. The suggestions below will help you fulfill any warranty obligations and allow you to enjoy this product for many years:
Keep your Samsung Mobile Device away from:
• Deliberate exposure to liquids of any kind.
• Precipitation, humidity, and liquids contain minerals that will corrode electronic circuits.
• If the mobile device does get wet, do not accelerate drying with the use of an oven, microwave, or dryer, because this may damage the mobile device and could cause a fire or explosion. Do not use the mobile device in very wet conditions. Doing so may cause an electric shock to you or damage to the mobile device. Do not expose the straps to very wet conditions. Wet straps can cause skin irritations. Dry the straps first. If you experience skin irritation when wearing the Gear VR, stop wearing the Gear VR and consult a physician.
• Extreme heat or cold
– Avoid temperatures below 0°C / 32°F or above 45°C / 113°F.
• Microwaves
– Do not try to dry your mobile device in a microwave oven. Doing so may cause a fire or explosion.

51
• Dust and dirt
– Do not expose your mobile device to dust, dirt, or sand.
• Cleaning solutions
– Do not use harsh chemicals, cleaning solvents, or strong detergents to clean the mobile device. Wipe it with a soft cloth slightly dampened in a mild soap-and-water solution. If the mobile device has a retractable camera lens, do not use soap and water to clean the lens. Use a blower or brush or lens cleaning paper dampened in a lens cleaning solution.
• Shock or vibration
– Do not drop, knock, or shake the mobile device. Rough handling can break internal circuit boards.
• Paint
– Do not paint the mobile device. Paint can clog the mobile device’s moving parts or ventilation openings and prevent proper operation.
• Strap
– Ensure that the strap is kept clean.
Caution! The factory lens protectors are pre-installed on the Gear VR. Remove the mobile device screen protector to get clear visibility.
Caution! Ensure that the lenses are not scratched and keep them clean for clear visibility.

52
Restricting Children’s Access to Your Mobile DeviceYour mobile device is not a toy. Do not allow children to play with it because they could hurt themselves and others, damage the mobile device, or make calls that increase your mobile device bill.
Keep the mobile device and all its parts and accessories out of the reach of small children.
The Gear VR headset should not be used by children under the age of 13, as these children may be at increased health and safety risk.
Adults should monitor children (age 13 and older) who are using or have used the Gear VR for any of the symptoms described below, and should limit the time children spend using the Gear VR and ensure they take breaks during use. Prolonged use should be avoided, as this could negatively impact hand-eye coordination, balance, and multi-tasking ability. Adults should monitor children closely during and after use of the Gear VR for any decrease in these abilities.
Additional Cautions
CautionsAny changes or modifications to your mobile device not expressly approved by Samsung could void your warranty for this equipment and void your authority to operate this equipment. Only use approved batteries, antennas, and chargers. The use of any unauthorized accessories may be dangerous and void the mobile device warranty if said accessories cause damage or a defect to the mobile device.
Although your mobile device is quite sturdy, it is a complex piece of equipment and can be broken. Avoid dropping, hitting, bending, or sitting on it.

53
Other Important Safety Information• When using a Gear VR in dry environments, static electricity can build up in the Gear VR and cause
a small quick static electrical shock. To minimize the risk of electrostatic discharge from the Gear VR avoid using the Gear VR in extremely dry environments or touch a grounded unpainted metal object to discharge static electricity before inserting a headset.
• Do not store or carry flammable liquids, gases, or explosive materials in the same compartment as the mobile device, its parts, or accessories.
• Failure to observe these instructions may lead to the suspension or denial of cell phone services to the offender, or legal action, or both.
• Seizures or blackouts can occur when you are exposed to flashing lights while watching videos or playing games for extended periods. If you feel any discomfort, stop using the Gear VR immediately.
• Reduce risk of repetitive motion injuries. When you repetitively perform actions, such as pressing keys, drawing characters on a touch screen with your fingers, or playing games, you may experience occasional discomfort in your hands, neck, shoulders, or other parts of your body. When using your Gear VR for extended periods, hold the Gear VR with a relaxed grip, press the keys lightly, and take frequent breaks. If you continue to have discomfort during or after such use, stop use and see a physician. [111314]

54
Warranty InformationSAMSUNG TELECOMMUNICATIONS AMERICA, LLC (“SAMSUNG”) warrants that SAMSUNG’s devices and accessories (“Products”) are free from defects in material and workmanship under normal use and service.
Samsung Telecommunications America, LLC
1301 E. Lookout Drive Richardson, Texas 75082
Phone: 1-800-SAMSUNG (726-7864) Phone: 1-888-987-HELP (4357)
Standard Limited WarrantyWhat is covered and for how long?
The warranty period commences upon the date of purchase by the first consumer purchaser and continuing for the following specified period of time after that date:
Device 1 Year
Battery(ies)* 1 Year
Other Accessories* 1 Year
*If applicable.

55
What is not covered?
This Limited Warranty is conditioned upon proper use of the Product.
This Limited Warranty does not cover: (a) defects or damage resulting from accident, misuse, abnormal use, abnormal conditions, improper storage, exposure to liquid, moisture, dampness, sand or dirt, neglect, or unusual physical, electrical or electromechanical stress; (b) scratches, dents and cosmetic damage, unless caused by SAMSUNG; (c) defects or damage resulting from excessive force or use of a metallic object when pressing on a touch screen; (d) equipment that has the serial number or the enhancement data code removed, defaced, damaged, altered or made illegible; (e) ordinary wear and tear; (f) defects or damage resulting from the use of Product in conjunction or connection with accessories, products, or ancillary/peripheral equipment not furnished or approved by SAMSUNG; (g) defects or damage resulting from improper testing, operation, maintenance, installation, service, or adjustment not furnished or approved by SAMSUNG, including but not limited to installation of unauthorized software and unauthorized root access, both of which shall void this limited warranty; (h) defects or damage resulting from external causes such as collision with an object, fire, flooding, dirt, windstorm, lightning, earthquake, exposure to weather conditions, theft, blown fuse, or improper use of any electrical source; (i) defects or damage resulting from cellular signal reception or transmission, or viruses or other software problems introduced into the Product; or (j) Product used or purchased outside the United States. This Limited Warranty covers batteries only if battery capacity falls below 80% of rated capacity or the battery leaks, and this Limited Warranty does not cover any battery if (i) the battery has been charged by a battery charger not specified or approved by SAMSUNG for charging the battery; (ii) any of the seals on the battery are broken or show evidence of tampering; or (iii) the battery has been used in equipment other than the SAMSUNG device for which it is specified.

56
What are SAMSUNG’s obligations?
During the applicable warranty period, provided the Product is returned in accordance with the terms of this Limited Warranty, SAMSUNG will repair or replace the Product, at SAMSUNG’s sole option, without charge. SAMSUNG may, at SAMSUNG’s sole option, use rebuilt, reconditioned, or new parts or components when repairing any Product, or may replace the Product with a rebuilt, reconditioned or new Product.
Repaired/replaced cases, pouches and holsters will be warranted for a period of ninety (90) days. All other repaired/replaced Products will be warranted for a period equal to the remainder of the original Limited Warranty on the original Product or for ninety (90) days, whichever is longer. All replaced Products, parts, components, boards and equipment shall become the property of SAMSUNG. Except to any extent expressly allowed by applicable law, transfer or assignment of this Limited Warranty is prohibited.
What must you do to obtain warranty service?
To obtain service under this Limited Warranty, you must return the Product to an authorized phone service facility in an adequate container for shipping, accompanied by the sales receipt or comparable proof of sale showing the original date of purchase, the serial number of the Product and the seller’s name and address.
To obtain assistance on where to deliver the Product, please call SAMSUNG Customer Care at 1-888-987-4357. If SAMSUNG determines that any Product is not covered by this Limited Warranty, you must pay all parts, shipping, and labor charges for the repair or return of such Product.
You should keep a separate backup copy of any contents of the Product before delivering the Product to SAMSUNG for warranty service, as some or all of the contents may be deleted or reformatted during the course of warranty service.

57
What are the limits on SAMSUNG’s liability?
THIS LIMITED WARRANTY SETS OUT THE FULL EXTENT OF SAMSUNG’S RESPONSIBILITIES, AND THE EXCLUSIVE REMEDY REGARDING THE PRODUCTS.
ALL IMPLIED WARRANTIES, INCLUDING WITHOUT LIMITATION, IMPLIED WARRANTIES OF MERCHANTABILITY AND FITNESS FOR A PARTICULAR PURPOSE, ARE LIMITED TO THE DURATION OF THIS LIMITED WARRANTY. IN NO EVENT SHALL SAMSUNG BE LIABLE FOR DAMAGES IN EXCESS OF THE PURCHASE PRICE OF THE PRODUCT OR FOR, WITHOUT LIMITATION, COMMERCIAL LOSS OF ANY SORT; LOSS OF USE, TIME, DATA, REPUTATION, OPPORTUNITY, GOODWILL, PROFITS OR SAVINGS; INCONVENIENCE; INCIDENTAL, SPECIAL, CONSEQUENTIAL OR PUNITIVE DAMAGES; OR DAMAGES ARISING FROM THE USE OR INABILITY TO USE THE PRODUCT. SOME STATES AND JURISDICTIONS DO NOT ALLOW LIMITATIONS ON HOW LONG AN IMPLIED WARRANTY LASTS, OR THE DISCLAIMER OR LIMITATION OF INCIDENTAL OR CONSEQUENTIAL DAMAGES, SO THE ABOVE LIMITATIONS AND DISCLAIMERS MAY NOT APPLY TO YOU.
SAMSUNG MAKES NO WARRANTIES OR REPRESENTATIONS, EXPRESS OR IMPLIED, STATUTORY OR OTHERWISE, AS TO THE QUALITY, CAPABILITIES, OPERATIONS, PERFORMANCE OR SUITABILITY OF ANY THIRD-PARTY SOFTWARE OR EQUIPMENT USED IN CONJUNCTION WITH THE PRODUCT, OR THE ABILITY TO INTEGRATE ANY SUCH SOFTWARE OR EQUIPMENT WITH THE PRODUCT, WHETHER SUCH THIRD-PARTY SOFTWARE OR EQUIPMENT IS INCLUDED WITH THE PRODUCT DISTRIBUTED BY SAMSUNG OR OTHERWISE. RESPONSIBILITY FOR THE QUALITY, CAPABILITIES, OPERATIONS, PERFORMANCE AND SUITABILITY OF ANY SUCH THIRD-PARTY SOFTWARE OR EQUIPMENT RESTS SOLELY WITH THE USER AND THE DIRECT VENDOR, OWNER OR SUPPLIER OF SUCH THIRD-PARTY SOFTWARE OR EQUIPMENT.

58
Nothing in the Product instructions or information shall be construed to create an express warranty of any kind with respect to the Products. No agent, employee, dealer, representative or reseller is authorized to modify or extend this Limited Warranty or to make binding representations or claims, whether in advertising, presentations or otherwise, on behalf of SAMSUNG regarding the Products or this Limited Warranty.
This Limited Warranty gives you specific legal rights, and you may also have other rights that vary from state to state.
What is the procedure for resolving disputes?
ALL DISPUTES WITH SAMSUNG ARISING IN ANY WAY FROM THIS LIMITED WARRANTY OR THE SALE, CONDITION OR PERFORMANCE OF THE PRODUCTS SHALL BE RESOLVED EXCLUSIVELY THROUGH FINAL AND BINDING ARBITRATION, AND NOT BY A COURT OR JURY.
Any such dispute shall not be combined or consolidated with a dispute involving any other person’s or entity’s Product or claim, and specifically, without limitation of the foregoing, shall not under any circumstances proceed as part of a class action. The arbitration shall be conducted before a single arbitrator, whose award may not exceed, in form or amount, the relief allowed by the applicable law. The arbitration shall be conducted according to the American Arbitration Association (AAA) Commercial Arbitration Rules applicable to consumer disputes. This arbitration provision is entered pursuant to the Federal Arbitration Act. The laws of the State of Texas, without reference to its choice of laws principles, shall govern the interpretation of the Limited Warranty and all disputes that are subject to this arbitration provision. The arbitrator shall decide all issues of interpretation and application of this arbitration provision and the Limited Warranty.

59
For any arbitration in which your total damage claims, exclusive of attorney fees and expert witness fees, are $5,000.00 or less (“Small Claim”), the arbitrator may, if you prevail, award your reasonable attorney fees, expert witness fees and costs as part of any award, but may not grant SAMSUNG its attorney fees, expert witness fees or costs unless it is determined that the claim was brought in bad faith. In a Small Claim case, you shall be required to pay no more than half of the total administrative, facility and arbitrator fees, or $50.00 of such fees, whichever is less, and SAMSUNG shall pay the remainder of such fees. Administrative, facility and arbitrator fees for arbitrations in which your total damage claims, exclusive of attorney fees and expert witness fees, exceed $5,000.00 (“Large Claim”) shall be determined according to AAA rules. In a Large Claim case, the arbitrator may grant to the prevailing party, or apportion among the parties, reasonable attorney fees, expert witness fees and costs. Judgment may be entered on the arbitrator’s award in any court of competent jurisdiction.
This arbitration provision also applies to claims against SAMSUNG’s employees, representatives and affiliates if any such claim arises from the Product’s sale, condition or performance.
You may opt out of this dispute resolution procedure by providing notice to SAMSUNG no later than 30 calendar days from the date of the first consumer purchaser’s purchase of the Product. To opt out, you must send notice by e-mail to [email protected], with the subject line: “Arbitration Opt Out.” You must include in the opt out e-mail (a) your name and address; (b) the date on which the Product was purchased; (c) the Product model name or model number; and (d) the IMEI or MEID or Serial Number, as applicable, if you have it (the IMEI or MEID or Serial Number can be found (i) on the Product box; (ii) on the Product information screen, which can be found under “Settings;” (iii) on a label on the back of the Product beneath the battery, if the battery is removable; and (iv) on the outside of the Product if the battery is not removable). Alternatively, you may opt out by calling 1-888-987-4357 no later than 30 calendar days from the date of the first consumer purchaser’s

60
purchase of the Product and providing the same information. These are the only two forms of notice that will be effective to opt out of this dispute resolution procedure. Opting out of this dispute resolution procedure will not affect the coverage of the Limited Warranty in any way, and you will continue to enjoy the benefits of the Limited Warranty.
Severability
If any portion of this Limited Warranty is held to be illegal or unenforceable, such partial illegality or unenforceability shall not affect the enforceability of the remainder of the Limited Warranty.
Precautions for Transfer and DisposalIf data stored on the mobile device is deleted or reformatted using the standard methods, the data only appears to be removed on a superficial level, and it may be possible for someone to retrieve and reuse the data by means of special software.
To avoid unintended information leaks and other problems of this sort, it is recommended that the device be returned to Samsung’s Customer Care Center for an Extended File System (EFS) Clear which will eliminate all user memory and return all settings to default settings. Please contact the Samsung Customer Care Center for details.
Important! Please provide warranty information (proof of purchase) to Samsung’s Customer Care Center in order to provide this service at no charge. If the warranty has expired on the device, charges may apply.
No reproduction in whole or in part allowed without prior written approval. Specifications and availability subject to change without notice. [090114]