GC-WB867D-I GC-WB867D - Support - GIGABYTE...
64
GC-WB867D-I GC-WB867D User's Manual 12WE6-WIFIAC-10AR
Transcript of GC-WB867D-I GC-WB867D - Support - GIGABYTE...
GC-WB867D-IGC-WB867DUser's Manual12WE6-WIFIAC-10AR

- 2 -
Engl
ish
Step 1:Install the Wi-Fi/Bluetooth card in a PCI Express x1 slot. Connect one end of the USB cable to the USB connector on the Wi-Fi/Bluetooth card.
Step 2: Connect the other end of the USB cable to the F_USB connector on the motherboard.
Chapter 1 Installing the Wi-Fi/Bluetooth Card
Antenna Connector
Antenna Connector
Wi-Fi/Bluetooth Card
USB Connector
Antenna
USB Cable

- 3 -
English
Step 4:Then move the antennas to a place where the signal is good.
Step 3: Tighten the antenna cables to the antenna connectors on the Wi-Fi/Bluetooth card respectively.

- 4 -
Engl
ish
The Wi-Fi Share utility is supported in Windows 8/7 only.
After installing the Wi-Fi/Bluetooth card, install the drivers and utilities in the operating system. Insert the included driver disk and when the autorun screen appears, install all of the items that are listed. Follow the on-screen instructions to install the drivers and utilities in sequence.
2-1 Installing the Drivers and Utilities
2-2 Using the Wi-Fi Share Utility
To use Wi-Fi Share for the first time, click the Wi-Fi Share Manager icon on the Start screen (Windows 8) or launch it from Start\All Applications (Windows 7). Then right-click the Wi-Fi Share icon in the notification area to display configuration options.
Option DescriptionsOption DescriptionManage Wi-Fi Share Opens the Wi-Fi Share ManagerLocal Share Directory Goes to the directory where shared files are located (File
Transfer)Mode Choice Selects which mode to operateSetting Configures further settings depending on the mode selected Reset Router Reset the Wi-Fi Share utility Live Update Updates Wi-Fi Share onlineHelp Displays the help file About Displays the Wi-Fi Share versionExit Exits Wi-Fi Share
The Wi-Fi Share utility allows you to configure how your Wi-Fi/Bluetooth card will act. First it can turn your computer into a virtual wireless access point (Hotspot), which allows WiFi-capable computers or mobile devices to access the Internet through the virtual wireless access point. Second, it can be configured to let your computer share data to another computer by simply dragging the data from your computer to the target computer (File Transfer). Third, it surely can be used as a normal wireless LAN card (WiFi).
Chapter 2 Installing the Drivers and Utilities

- 5 -
English
Mode SelectionWi-Fi Share provides three modes for users to select as follows:
A. HotspotThe Hotspot turns your computer into a virtual wireless access point (WAP). Refer to the steps below for detailed configurations.
Step 1:Right-click the Wi-Fi Share icon in the notification area and select Mode Choice > Hotspot to turn your computer into a virtual wireless AP. Then select Setting.
Step 2:When the Wi-Fi Share Settings dialog box appears, select a currently running network connection you want to share from the Share Connection list. Then click Save. The Password represents the network security key which is required when other computer wants to access the Internet through the virtual wireless AP. You can keep the default password or create your own one.
Configuring your computer:
Configuring the computer that wants to access the Internet through the virtual wireless AP:
Step 1:Left-click the Internet Access icon in the notification area. When the Currently connected to list appears, select the virtual wireless AP you want to connect to and click Connect.
Step 2:When the Connect to a Network dialog box appears, enter the security key of the network connection the virtual wireless AP is sharing and click OK.

- 6 -
Engl
ish Step 3:
After the connection, the Currently connected to list shows that this computer is currently using the network connection shared by the virtual wireless AP.
B. File TransferThe File Transfer allows two computers with File Transfer enabled to share files to each other. Note: Be sure to turn off the firewall on both computers before using File Transfer.
Step 1:Make sure the two computers are installed with the Wi-Fi Share utility and have File Transfer enabled. On the desktop of the source computer, right-click the Wi-Fi Share icon in the notification area and select Mode Choice > File Transfer. Then select Manage Wi-Fi Share to open the Wi-Fi Share Manager.
Step 2:The Wi-Fi Share Manager will display the other computer with File Transfer enabled (the target computer).
Step 3:Go the directory where the file/folder that you want to share is located. Drag the file/folder to the target computer displayed on the Wi-Fi Share Manager.

- 7 -
English
Step 4:When asked whether to send the file/folder to the target computer, click Yes. The TX light will be on when the file/data is being sent.
Step 5:The confirmation message will also appear on the target computer, asking whether to accept the file/folder from the source computer. Click Yes to confirm. You must respond in 15 seconds. The RX light will be on when the file/data is being received.
Step 6:The data will be automatically stored to a folder in the My Documents\AirFileDownloads directory in the target computer, which is named according to the receiving time. To directly access this directory later, you can also right-click the Wi-Fi Share icon in the notification area and select Local Shared Directory.
C. WiFiIn this mode, the Wi-Fi/Bluetooth card is set as a normal wireless LAN card and needs to connect to a wireless access point to get Internet connection.

- 8 -
Engl
ish 2-3 Using the Cloud Station Utility
The Cloud Station utility allows GIGABYTE’s iOS APPs to communicate, share resources, and control your desktop PC systems. Two GIGABYTE’s unique iOS APPs are available now: EasyTune Touch and PictureView, both of which can be downloaded from the Apple store for free.
EasyTune Touch:EasyTune Touch is a simple and easy-to-use application that allows users to remotely control their system through Apple devices, including iPhone and iPAD. Detailed functions are as follows:
Options DescriptionsOption DescriptionTuner Allows you to change CPU/memory
frequency and voltage settings. System Information Displays the system information,
including the CPU, motherboard, and memory.
Hardware Monitor Allows you to monitor hardware temperature, voltage, and fan speed.
Remote Control Allows you to reboot or shut down your computer.
Quick Boost Provides you with 3 levels of automatic system tuning.
Connection Selects how iPhone/iPad will connect to your computer.
PictureView:The PictureView application is designed to allow users to quickly and effortlessly share photographs from their iOS device directly to their computer. By simply selecting a photo from the iOS device’s picture library, the user will then be instantly able to see it on their PC desktop.
System Requirements: • Windows 8/7 • i-Tunes • iPhone 5, iPhone 4, iPhone 3, and iPad series (iPhone 3 and iPad series only support Wi-Fi connection)

- 9 -
English
Three ways of connection:Before using EasyTune Touch and PictureView, use one of the three ways below to connect your Apple devices to the target computer: Wi-Fi, Bluetooth, and USB connections. iPhone 3 and iPad series only support Wi-Fi connection and iPhone 4 series supports all of the three connections. Below we use iPhone 4 as the demonstration Apple device. (Make sure i-Tunes is installed first.)
A. Wi-Fi Connection:Make sure your iPhone and computer are using the same network connection. Step 1: Make sure your computer is connected to a network connection.
After the Cloud Station utility is installed, the Cloud Station icon will appear in the notification area. You can right-click this icon and select Always run on next reboot to launch this utility each time you reboot the computer. To use EasyTune Touch and PictureView on your iPhone/iPad, you must launch the Cloud Station utility on your computer first.
Using the Cloud Station:
Step 2: On your iPhone, go to Settings>Wi-Fi and turn on the Wi-Fi function. Then choose the same network connection that your computer is currently using.

- 10 -
Engl
ish Using EasyTune Touch
Step 1: Go to the main menu of the EasyTune Touch application on your iPhone. Select Connection.
Step 2:On the Connection page, select Wifi. iPhone will begin to search for the computer using the same network connection. When the computer is displayed, select it. Then return to the main menu of the EasyTune Touch application. Now you are able to use the EasyTune Touch functions to remotely control the target computer via the iPhone or check hardware information.
Step 1: Go to the main screen of the PictureView application. In the photo gallery, select Connect.
Step 2: On the Connection page, select Wifi. iPhone will begin to search for the computer using the same network connection. When the computer is displayed, select it. Then return to photo gallery.
Using PictureView

- 11 -
English
B. BlueTooth Connection:Step 1: On your iPhone, go to Settings > Personal Hotspot and turn on this function. Then go to Settings > General > Bluetooth to turn Bluetooth on.
Step 2: Now you have to pair the iPhone with your computer. In the operating system of your computer, go to Control Panel > Devices and Printers. Select Add a device. Your computer will look for Bluetooth devices and display them on the screen. When the iPhone is displayed, select it and click Next.
Step 3: Click the photo you want to share and your photo will be shown instantly on the desktop of the target computer.

- 12 -
Engl
ish Step 3:
A pairing code will appear on the screen. Click Next. You iPhone will display a message with the pairing code for you to confirm as well (refer to the next screenshot).
Step 4:When the iPhone displays the pairing code, press Pair to confirm. After the pairing is successful, your iPhone will show that it has been connected to your computer.
Step 5: Your computer will show that the iPhone has been added to your computer successfully. Click Close to return to the Control Panel > Devices and Printers window.
Step 6: Look for your iPhone device, right-click it, and select Connect using > Access Point to complete the configuration.
Now, you are ready to use EasyTune Touch or PictureView. Refer to the instructions on configuration Wi-Fi connection and select Bluetooth connection.

- 13 -
English
C. USB Connection:
Step 1: On your iPhone, go to Settings > Personal Hotspot to turn on this function.
Step 2:Connect your iPhone to your computer using the iPhone USB cable.
Step 3:After the iPhone is connected to your computer, go to Control Panel > Network and Sharing Center > Change adapter settings. Make sure Apple Mobile Device Ethernet is present. If not, re-check the connection.
Now, you are ready to use EasyTune Touch or PictureView. Refer to the instructions on configuration Wi-Fi connection and select USB connection.


GC-WB867D-IGC-WB867D使用手冊
- 2 -
繁
體
中
文
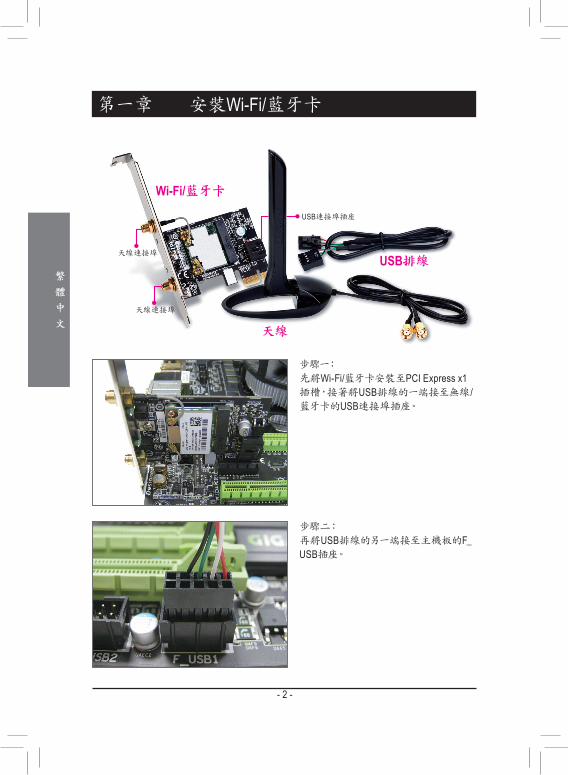
天線連接埠
天線連接埠
Wi-Fi/藍牙卡
USB連接埠插座
天線
USB排線
步驟一:先將Wi-Fi/藍牙卡安裝至PCI Express x1 插槽,接著將USB排線的一端接至無線/藍牙卡的USB連接埠插座。
步驟二:再將USB排線的另一端接至主機板的F_USB插座。
第一章 安裝Wi-Fi/藍牙卡

- 3 -
繁
體
中
文
步驟三:將天線鎖至Wi-Fi/藍牙卡的天線連接埠。
步驟四:完成安裝後將天線移至收訊良好處。

- 4 -
繁
體
中
文
2-1 安裝驅動程式及工具安裝完Wi-Fi/藍牙卡後,請至作業系統安裝相關驅動程式及工具。請將所附的光碟片放入電腦,待自動安裝畫面出現後,按畫面指示依序安裝所有列出的驅動程式及工具。
2-2 使用Wi-Fi Share工具程式Wi-Fi Share工具程式讓您可以選擇此Wi-Fi/藍牙卡要以何種的模式運作。首先,可以將它設定成一個虛擬無線存取點(Hotspot),讓具備Wi-Fi功能的電腦或行動裝置可以透過此虛擬無線存取點上網。第二,您可以使用此工具程式與不同電腦間進行檔案分享(F i l e Transfer),只要將檔案拉至同樣安裝Wi-Fi Share工具桯式的電腦即可進行檔案傳遞。最後,您當然也可以單純將它設為一般的無線網卡來使用(WiFi)。
Wi-Fi Share 工具程式僅支援Windows 8/7作業系統。
初次使用時,請在「開始」畫面點擊「W i -Fi Share Manager」圖示(Windows 8)或從「開始\所有程式」(Windows 7)開啟Wi-Fi Share M a n a g e r,之後您會在通知區域看到W i-F i Share圖示 。請在此圖示按滑鼠右鍵以顯示更多設定選項。
選項說明
選項 說明
Manage Wi-Fi Share 開啟Wi-Fi Share ManagerLocal Share Directory 直接進入File Transfer功能存放分享檔案的路徑Mode Choice 選擇要設定的模式
Setting 依照所選擇的模式做進一步設定 Reset Router 使用Wi-Fi Share有問題時,可選擇此項目重新設定
Wi-Fi ShareLive Update 線上更新Wi-Fi ShareHelp 開啟說明檔 About 顯示Wi-Fi Share版本Exit 離開Wi-Fi Share
第二章 安裝驅動程式及工具

- 5 -
繁
體
中
文
選擇模式
Wi-Fi Share工具程式提供以下三種模式:
A. HotspotHotspot將您的電腦設定成一個虛擬的無線存取點。詳細設定請參考以下說明:
步驟一:請在通知區域的Wi-Fi Share圖示 按滑鼠右鍵並且選擇「Mode Choice > Hotspot」,將您的電腦虛擬成無線存取點。接下來選擇「Setting」。
步驟二:當「Wi-Fi Share Set t ings」設定畫面出現後, 從「Shared Connect ion」清單選擇您所要分享已連線至網際網路的的網路連線,再按「Save」。畫面中的「Password」為安全性金鑰,您可自行更改或是保留預設值,若日後有電腦需透過此網路連線上網時,就必須先輸入此安全性金鑰才有權限。
設定您的電腦:
設定欲透過虛擬無線存取點上網的電腦:
步驟一:在該電腦通知區域的「網際網路存取」圖示按左鍵。當「目前連線到」清單出現後,選擇虛擬無線存取點,並且按「連線」。
步驟二:當「連線到網路」對話框出現時,輸入虛擬無線存取點所分享出來的網路連線的安全性金鑰再按「確定」。

- 6 -
繁
體
中
文
步驟三:連線完成後,「目前連線到」清單會顯示這台電腦已經透過該虛擬無線存取點連線至網路。
B. File Transfer可讓2台同時啟動File Transfer的電腦互相傳遞檔案。請注意,使用此模式時,請先將防火牆關閉。
步驟一:請確認要互相分享檔案的電腦皆已安裝W i-Fi Share工具並且啟用File Transfer。在欲分享檔案的電腦,找到桌面通知區域內Wi-Fi Share圖示 ,按滑鼠右鍵選擇「Mode Cho ice > Fi le Transfer」。接下來選擇「Manage Wi-Fi Share」,開啟「Wi-Fi Share Manager」。
步驟二:「Wi-Fi Share Manager」會顯示同樣開啟File Transfer的另一台電腦名稱(欲分享檔案目的地)。
步驟三:請到您要分享的檔案或資料夾的路徑。接著將該檔案或資料夾拖曳至「W i-F i S h a r e Manager」畫面所列出的目的地電腦上。
- 7 -
繁
體
中
文
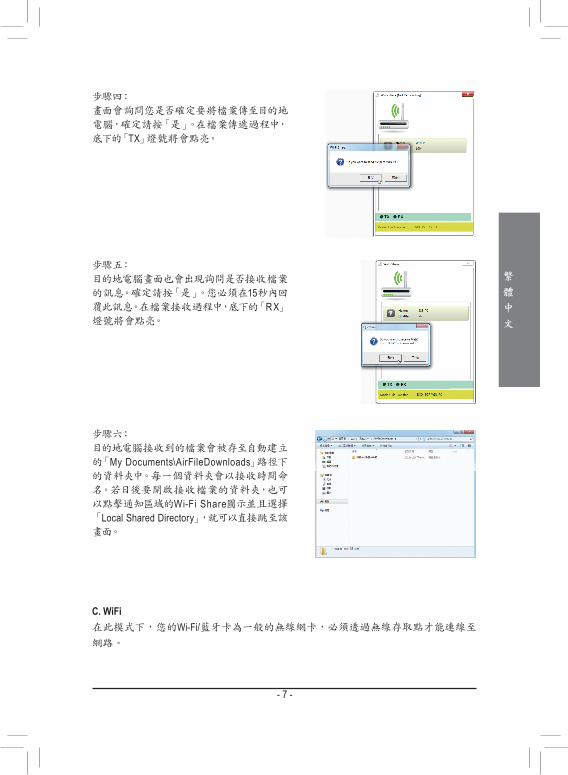
步驟四:畫面會詢問您是否確定要將檔案傳至目的地電腦,確定請按「是」。在檔案傳遞過程中,底下的「TX」燈號將會點亮。
步驟五:目的地電腦畫面也會出現詢問是否接收檔案的訊息。確定請按「是」。您必須在15秒內回覆此訊息。在檔案接收過程中,底下的「RX」燈號將會點亮。
步驟六:目的地電腦接收到的檔案會被存至自動建立的「My Documents\AirFileDownloads」路徑下的資料夾中。每一個資料夾會以接收時間命名。若日後要開啟接收檔案的資料夾,也可以點擊通知區域的Wi-Fi Share圖示並且選擇「Local Shared Directory」,就可以直接跳至該畫面。
C. WiFi在此模式下,您的Wi-Fi/藍牙卡為一般的無線網卡,必須透過無線存取點才能連線至網路。
- 8 -
繁
體
中
文
2-3 使用Cloud Station工具程式Cloud Station工具程式可讓技嘉所開發出的iOS應用程式與您的電腦系統進行溝通、分享資源及遠端監控等功能。目前可使用的的應用程式分別是EasyTune Touch及PictureView,可以從Apple Store免費下載。
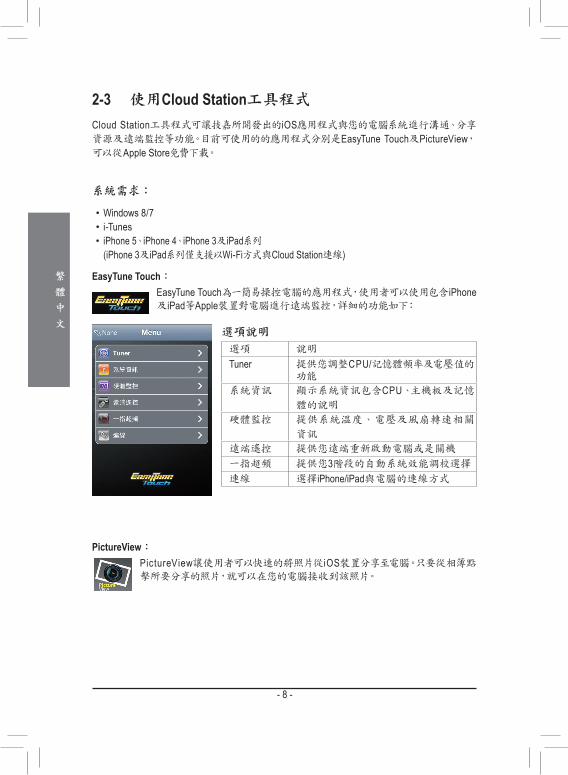
EasyTune Touch:EasyTune Touch為一簡易操控電腦的應用程式,使用者可以使用包含iPhone及iPad等Apple裝置對電腦進行遠端監控,詳細的功能如下:
選項說明
選項 說明
Tuner 提供您調整CPU/記憶體頻率及電壓值的功能
系統資訊 顯示系統資訊包含CPU、主機板及記憶體的說明
硬體監控 提供系統溫度、電壓及風扇轉速相關
資訊
遠端遙控 提供您遠端重新啟動電腦或是關機
一指超頻 提供您3階段的自動系統效能調校選擇連線 選擇iPhone/iPad與電腦的連線方式
PictureView:PictureView讓使用者可以快速的將照片從iOS裝置分享至電腦。只要從相簿點擊所要分享的照片,就可以在您的電腦接收到該照片。
系統需求:
• Windows 8/7 • i-Tunes • iPhone 5、iPhone 4、iPhone 3及iPad系列(iPhone 3及iPad系列僅支援以Wi-Fi方式與Cloud Station連線)
- 9 -
繁
體
中
文
三種連線方式:
開始使用EasyTune Touch及PictureView之前,您可以使用以下三種方式其中一種讓您的電腦與Apple裝置進行連結:Wi-Fi、Bluetooth及USB連接線。iPhone 3及iPad系列僅支援以Wi-Fi方式連線,iPhone 4/5系列則3種連線方式皆可支援。以下我們使用iPhone 4為示範機型。(請先確認您的電腦已安裝i-Tunes。)
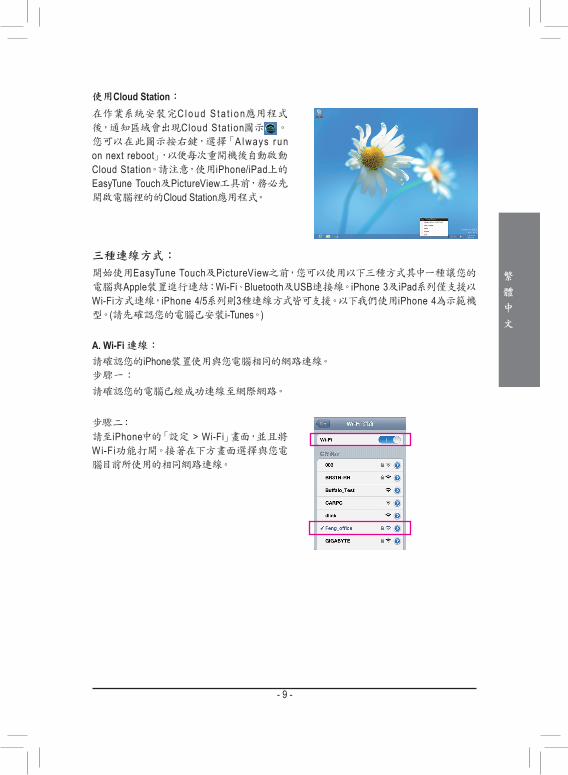
在作業系統安裝完C l o u d S t a t i o n應用程式後,通知區域會出現Cloud Stat ion圖示 。您可以在此圖示按右鍵,選擇「A lways r un on next reboot」,以便每次重開機後自動啟動Cloud Station。請注意,使用iPhone/iPad上的EasyTune Touch及PictureView工具前,務必先開啟電腦裡的的Cloud Station應用程式。
使用Cloud Station:
A. Wi-Fi 連線:請確認您的iPhone裝置使用與您電腦相同的網路連線。步驟一: 請確認您的電腦已經成功連線至網際網路。
步驟二:請至iPhone中的「設定 > Wi-Fi」畫面,並且將Wi-Fi功能打開。接著在下方畫面選擇與您電腦目前所使用的相同網路連線。
- 10 -
繁
體
中
文
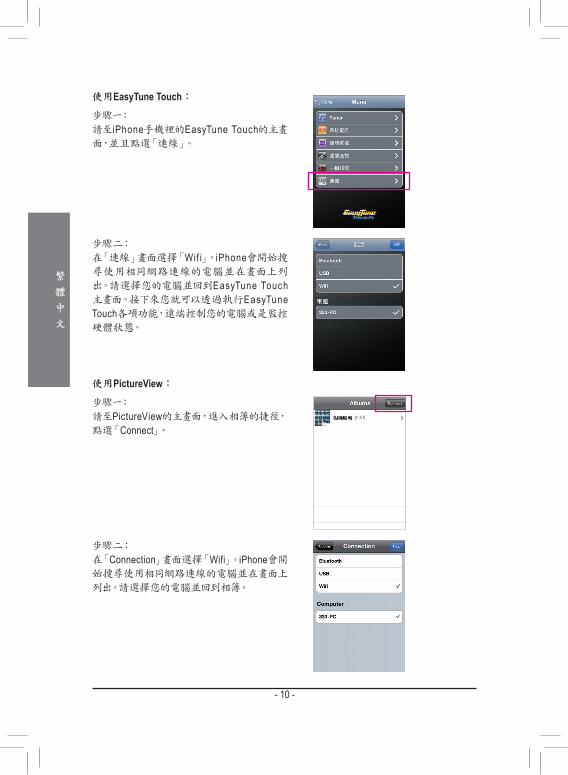
步驟一:請至iPhone手機裡的EasyTune Touch的主畫面,並且點選「連線」。
步驟二: 在「連線」畫面選擇「Wif i」。iPhone會開始搜尋使用相同網路連線的電腦並在畫面上列出。請選擇您的電腦並回到EasyTune Touch主畫面。接下來您就可以透過執行EasyTune Touch各項功能,遠端控制您的電腦或是監控硬體狀態。
使用EasyTune Touch:
步驟一:請至PictureView的主畫面,進入相簿的捷徑,點選「Connect」。
步驟二: 在「Connection」畫面選擇「Wifi」。iPhone會開始搜尋使用相同網路連線的電腦並在畫面上列出。請選擇您的電腦並回到相簿。
使用PictureView:

- 11 -
繁
體
中
文
步驟三: 在相簿點擊您要分享至電腦的檔案,您就會在電腦的桌面上看到由手機分享出來的照片了。
步驟一:請至iPhone中的「設定 > 個人熱點」畫面將個人熱點功能打開。接著再至「設定 > 一般 > Bluetooth」畫面開啟藍牙功能。
步驟二:將您的電腦與iPhone進行配對。請至電腦作業系統的「控制台 > 裝置和列表機」畫面,選擇「新增裝置」。您的電腦會開始搜尋藍牙裝置並且顯示在畫面上。當您的iPhone被偵測到時,請點選它再按「下一步」。
B. 設定藍牙連線:
- 12 -
繁
體
中
文
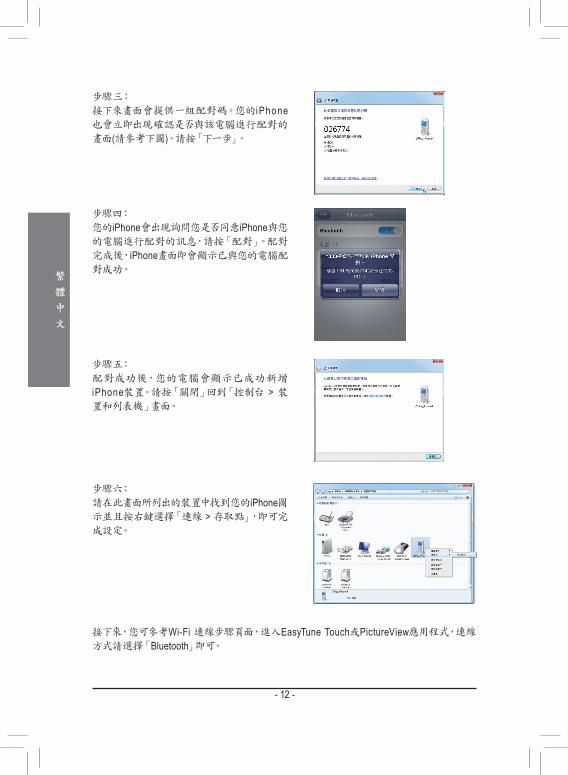
步驟三:接下來畫面會提供一組配對碼。您的iPhone也會立即出現確認是否與該電腦進行配對的畫面(請參考下圖)。請按「下一步」。
步驟四:您的iPhone會出現詢問您是否同意iPhone與您的電腦進行配對的訊息,請按「配對」。配對完成後,iPhone畫面即會顯示已與您的電腦配對成功。
步驟五:配對成功後,您的電腦會顯示已成功新增iPhone裝置。請按「關閉」回到「控制台 > 裝置和列表機」畫面。
步驟六:請在此畫面所列出的裝置中找到您的iPhone圖示並且按右鍵選擇「連線 > 存取點」,即可完成設定。
接下來,您可參考Wi-Fi 連線步驟頁面,進入EasyTune Touch或PictureView應用程式,連線方式請選擇「Bluetooth」即可。
- 13 -
繁
體
中
文
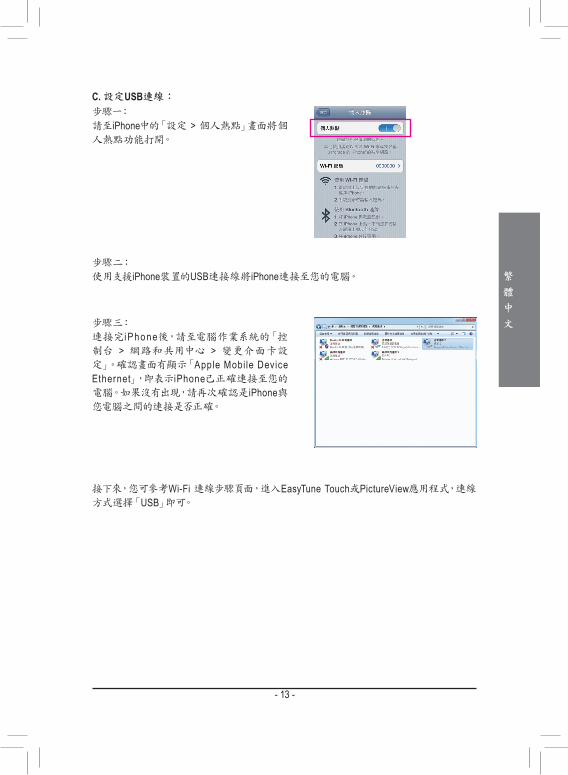
C. 設定USB連線:步驟一:請至iPhone中的「設定 > 個人熱點」畫面將個人熱點功能打開。
步驟二:使用支援iPhone裝置的USB連接線將iPhone連接至您的電腦。
步驟三:連接完i Phone後,請至電腦作業系統的「控制台 > 網路和共用中心 > 變更介面卡設定」。確認畫面有顯示「Apple Mobile Device Ethernet」,即表示iPhone已正確連接至您的電腦。如果沒有出現,請再次確認是iPhone與您電腦之間的連接是否正確。
接下來,您可參考Wi-Fi 連線步驟頁面,進入EasyTune Touch或PictureView應用程式,連線方式選擇「USB」即可。


GC-WB867D-IGC-WB867D
使用手册
- 2 -
简
体
中
文
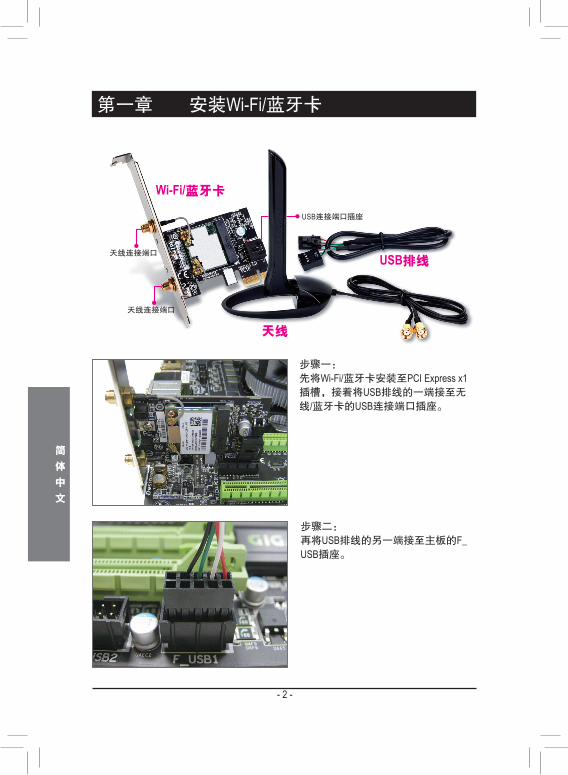
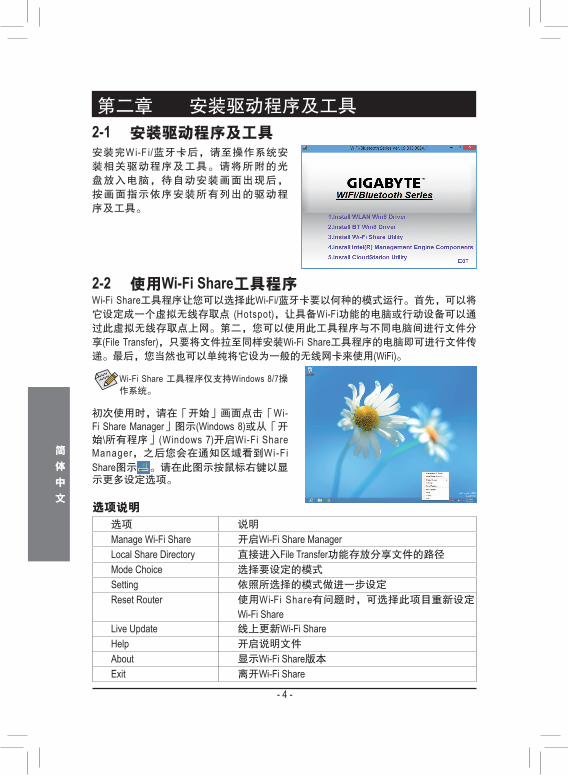
步骤一:先将Wi-Fi/蓝牙卡安装至PCI Express x1 插槽,接着将USB排线的一端接至无线/蓝牙卡的USB连接端口插座。
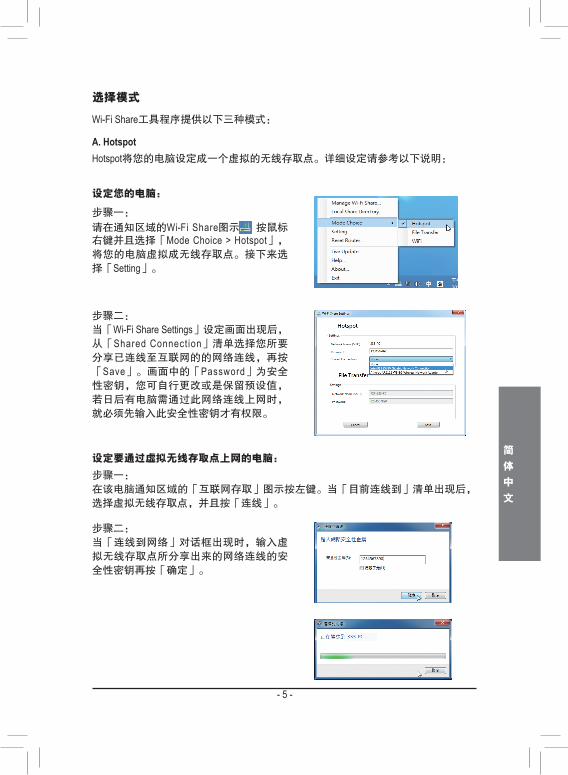
步骤二:再将USB排线的另一端接至主板的F_USB插座。
第一章 安装Wi-Fi/蓝牙卡
天线连接端口
天线连接端口
Wi-Fi/蓝牙卡
USB连接端口插座
天线
USB排线

- 3 -
简
体
中
文
步骤三:将天线锁至Wi-Fi/蓝牙卡的天线连接端口。
步骤四:完成安装后将天线移至收讯良好处。
- 4 -
简
体
中
文
第二章 安装驱动程序及工具2-1 安装驱动程序及工具安装完W i-F i/蓝牙卡后,请至操作系统安装相关驱动程序及工具。请将所附的光盘放入电脑,待自动安装画面出现后,按画面指示依序安装所有列出的驱动程序及工具。
2-2 使用Wi-Fi Share工具程序Wi-Fi Share工具程序让您可以选择此Wi-Fi/蓝牙卡要以何种的模式运行。首先,可以将它设定成一个虚拟无线存取点 (Hotspot),让具备Wi-Fi功能的电脑或行动设备可以通过此虚拟无线存取点上网。第二,您可以使用此工具程序与不同电脑间进行文件分享(File Transfer),只要将文件拉至同样安装Wi-Fi Share工具程序的电脑即可进行文件传递。最后,您当然也可以单纯将它设为一般的无线网卡来使用(WiFi)。
Wi-Fi Share 工具程序仅支持Windows 8/7操作系统。
选项说明
选项 说明
Manage Wi-Fi Share 开启Wi-Fi Share ManagerLocal Share Directory 直接进入File Transfer功能存放分享文件的路径
Mode Choice 选择要设定的模式
Setting 依照所选择的模式做进一步设定 Reset Router 使用Wi-Fi Share有问题时,可选择此项目重新设定
Wi-Fi ShareLive Update 线上更新Wi-Fi ShareHelp 开启说明文件 About 显示Wi-Fi Share版本
Exit 离开Wi-Fi Share
初次使用时,请在「开始」画面点击「Wi-Fi Share Manager」图示(Windows 8)或从「开始\所有程序」(Windows 7)开启Wi-Fi Share Manager,之后您会在通知区域看到Wi-Fi Share图示 。请在此图示按鼠标右键以显示更多设定选项。
- 5 -
简
体
中
文
选择模式
Wi-Fi Share工具程序提供以下三种模式:
A. HotspotHotspot将您的电脑设定成一个虚拟的无线存取点。详细设定请参考以下说明:
步骤一:
请在通知区域的Wi-Fi Share图示 按鼠标右键并且选择「Mode Choice > Hotspot」,将您的电脑虚拟成无线存取点。接下来选择「Setting」。
步骤二:当「Wi-Fi Share Settings」设定画面出现后, 从「Shared Connection」清单选择您所要分享已连线至互联网的的网络连线,再按「Save」。画面中的「Password」为安全性密钥,您可自行更改或是保留预设值,若日后有电脑需通过此网络连线上网时,就必须先输入此安全性密钥才有权限。
设定您的电脑:
设定要通过虚拟无线存取点上网的电脑:
步骤一:在该电脑通知区域的「互联网存取」图示按左键。当「目前连线到」清单出现后,选择虚拟无线存取点,并且按「连线」。
步骤二:当「连线到网络」对话框出现时,输入虚拟无线存取点所分享出来的网络连线的安全性密钥再按「确定」。

- 6 -
简
体
中
文
步骤三:连线完成后,「目前连线到」清单会显示这台电脑已经通过该虚拟无线存取点连线至网络。
B. File Transfer可让2台同时启动File Transfer的电脑互相传递文件。请注意,使用此模式时,请先将
防火墙关闭。
步骤一:请确认要互相分享文件的电脑皆已安装Wi-Fi Share工具并且启用File Transfer。在要分享文件的电脑,找到桌面通知区域内W i-F i S h a r e图示 ,按鼠标右键选择「Mode Choice > File Transfer」。接下来选择「Manage Wi-Fi Share」,开启「Wi-Fi Share Manager」。
步骤二:「Wi-Fi Share Manager」会显示同样开启File Transfer的另一台电脑名称(要分享文件目
的地)。
步骤三:请到您要分享的文件或文件夹的路径。接着将该文件或文件夹拖曳至「Wi-Fi Share Manager」画面所列出的目的地电脑上。

- 7 -
简
体
中
文
步骤四:画面会询问您是否确定要将文件传至目的地电脑,确定请按「是」。在文件传递过程中,底下的「TX」灯号将会点亮。
步骤五:目的地电脑画面也会出现询问是否接收文件的信息。确定请按「是」。您必须在15秒内回复此信息。在文件接收过程中,底下的「RX」灯号将会点亮。
步骤六:目的地电脑接收到的文件会被存至自动建立的「My Documents\AirFileDownloads」路径下的文件夹中。每一个文件夹会以接收时间命名。若日后要开启接收文件的文件夹,也可以点击通知区域的Wi-Fi Share图示 并且选择「Local Shared Directory」,就可以直接跳至该画面。
C. WiFi 在此模式下,您的Wi-Fi/蓝牙卡为一般的无线网卡,必须通过无线存取点才能连线至
网络。

- 8 -
简
体
中
文
2-3 使用Cloud Station工具程序
Cloud Station工具程序可让技嘉所开发出的iOS应用程序与您的电脑系统进行沟通、分享资源及远程监控等功能。目前可使用的的应用程序分别是EasyTune Touch及PictureView,可以从Apple Store免费下载。
EasyTune Touch:EasyTune Touch为一简易操控电脑的应用程序,使用者可以使用包含iPhone及iPad等Apple设备对电脑进行远程监控,详细的功能如下:
选项说明
选项 说明
Tuner 提供您调整CPU/内存频率及电压值的功能
系统信息 显示系统信息包含CPU、主板及内存的说明
硬盘监控 提供系统温度、电压及风扇转速相关信息
远程遥控 提供您远程重新启动电脑或是关机
一指超频 提供您3阶段的自动系统性能调校选择
连线 选择iPhone/iPad与电脑的连线方式
PictureView:PictureView让使用者可以快速的将照片从iOS设备分享至电脑。只要从相册点击所要分享的照片,就可以在您的电脑接收到该照片。
系统需求:
• Windows 8/7 • i-Tunes • iPhone 5、iPhone 4、iPhone 3及iPad系列 (iPhone 3及iPad系列仅支持以Wi-Fi方式与Cloud Station连线)

- 9 -
简
体
中
文
三种连线方式:
开始使用EasyTune Touch及PictureView之前,您可以使用以下三种方式其中一种让您
的电脑与Apple设备进行连结:Wi-Fi、Bluetooth及USB连接线。iPhone 3及iPad系列仅支
持以Wi-Fi方式连线,iPhone 4/5系列则3种连线方式皆可支持。以下我们使用iPhone 4为示范机型。(请先确认您的电脑已安装i-Tunes。)
在操作系统安装完Cloud Stat ion应用程序
后,通知区域会出现Cloud Station图示 。您可以在此图示按右键,选择「Always run on next reboot」,以便每次重开机后自动启
动Cloud Station。请注意,使用iPhone/iPad上的EasyTune Touch及PictureView工具前,务必先开启电脑里的Cloud Station应用程序。
使用Cloud Station:
A. Wi-Fi 连线:
请确认您的iPhone设备使用与您电脑相同的网络连线。
步骤一: 请确认您的电脑已经成功连线至互联网。
步骤二:
请至iPhone中的「设定 > Wi-Fi」画面,并且
将Wi-Fi功能打开。接着在下方画面选择与
您电脑目前所使用的相同网络连线。

- 10 -
简
体
中
文
步骤一:
请至iPhone手机里的EasyTune Touch的主画
面,并且点选「连线」。
步骤二: 在「连线」画面选择「Wifi」。iPhone会开
始搜寻使用相同网络连线的电脑并在画面
上列出。请选择您的电脑并回到EasyTune Touch主画面。接下来您就可以通过执行
EasyTune Touch各项功能,远程控制您的电
脑或是监控硬盘状态。
使用EasyTune Touch:
步骤一:
请至PictureView的主画面,进入相册的捷
径,点选「Connect」。
步骤二: 在「Connection」画面选择「Wifi」。iPhone会开始搜寻使用相同网络连线的电脑并在画
面上列出。请选择您的电脑并回到相册。
使用PictureView:

- 11 -
简
体
中
文
步骤三: 在相册点击您要分享至电脑的文件,您
就会在电脑的桌面上看到由手机分享出
来的照片了。
步骤一:
请至iPhone中的「设定 > 个人热点」画面
将个人热点功能打开。接着再至「设定 > 一般 > Bluetooth」画面开启蓝牙功能。
步骤二:
将您的电脑与iPhone进行配对。请至电脑
操作系统的「控制面板 > 设备和列表机」
画面,选择「新增设备」。您的电脑会开
始搜寻蓝牙设备并且显示在画面上。当您
的iPhone被检测到时,请点选它再按「下
一步」。
B. 设定蓝牙连线:

- 12 -
简
体
中
文
步骤三:
接下来画面会提供一组配对码。您的iPhone也会立即出现确认是否与该电脑进行配对
的画面(请参考下图)。请按「下一步」。
步骤四:
您的iPhone会出现询问您是否同意iPhone与您的电脑进行配对的信息,请按「配
对」。配对完成后,iPhone画面即会显示
已与您的电脑配对成功。
步骤五:
配对成功后,您的电脑会显示已成功新增
iPhone设备。请按「关闭」回到「控制面
板 > 设备和列表机」画面。
步骤六:
请在此画面所列出的设备中找到您的
iPhone图示并且按右键选择「连线 > 存取
点」,即可完成设定。
接下来,您可参考Wi-Fi 连线步骤页面,进入EasyTune Touch或PictureView应用程序,
连线方式请选择「Bluetooth」即可。

- 13 -
简
体
中
文
C. 设定USB连线:
步骤一:
请至iPhone中的「设定 > 个人热点」画面
将个人热点功能打开。
步骤二:
使用支持iPhone设备的USB连接线将iPhone连接至您的电脑。
步骤三:
连接完iPhone后,请至电脑操作系统的
「控制面板 > 网络和共用中心 > 变更适
配卡设定」。确认画面有显示「A p p l e Mobile Device Ethernet」,即表示iPhone已正确连接至您的电脑。如果没有出现,
请再次确认是iPhone与您电脑之间的连接
是否正确。
接下来,您可参考Wi-Fi 连线步骤页面,进入EasyTune Touch或PictureView应用程序,
连线方式选择「USB」即可。


GC-WB867D-IGC-WB867D
ユーザーズマニュアル

- 2 -
日本語
アンテナ コネクター
アンテナ コネクター
Wi-Fi/Bluetoothカード
USBコネクター
アンテナ
USBケーブル
ステップ 1:Wi-Fi/Bluetooth カードを PCI Express x1 スロットに装着します。 USB ケーブルの一方の端を Wi-Fi/Bluetooth カードの USB コネクターに接続します。
ステップ 2:USB ケーブルのもう一方の端をマザーボードの F_USB コネクターに接続します。
第 1 章 Wi-Fi/Bluetoothカードの取り付け
- 3 -
日本語
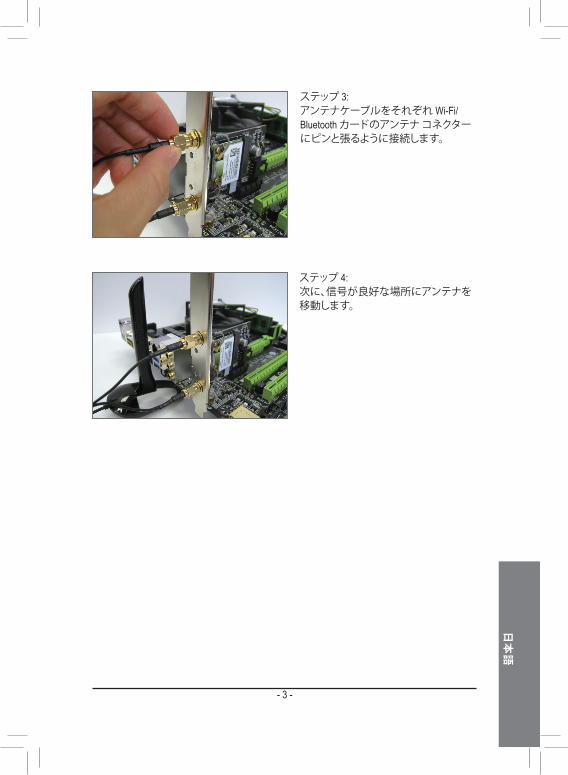
ステップ 4:次に、信号が良好な場所にアンテナを移動します。
ステップ 3: アンテナケーブルをそれぞれ Wi-Fi/Bluetooth カードのアンテナ コネクターにピンと張るように接続します。

- 4 -
日本語
Wi-Fi Share UtilityはWindows 8/7のみでサポートしています。
Wi-Fi/Bluetoothカードの取り付け後、ドライバとオペレーティングシステムのユーティリティをインストールします。付属のドライバディスクを挿入し、自動実行画面が表示されたら、リストされている項目をすべてインストールします。オンスクリーンの指示に従って表示されたドライバとユーティリティを順番にインストールします。
2-1 ドライバとユーティリティをインストールする
2-2 Wi-Fi Share Utilityを使用する
最初にWi-Fi Shareを使用する際は、スタート画面(Windows 8)あるいはStart\All Applications (Windows 7)のWi-Fi Share Managerのアイコンをクリックします。次に、設定オプションを表示するために通知エリアのWifi-Shareアイコン を右クリックしてください。オプションの説明オプション 説明Manage Wi-Fi Share Wi-Fi Share Managerを開きますLocal Share Directory 共有ファイルがあるディレクトリに移動します(File
Transfer)Mode Choice 操作するモードを選択しますSetting 選択したモードによって詳細設定を行います Reset Router Wi-Fi Share UtilityをリセットしますLive Update Wi-Fi ShareをオンラインでアップデートしますHelp ヘルプファイルを表示しますAbout Wi-Fi Shareのバージョンを表示しますExit Wi-Fi Shareを終了します
Wi-Fi Share Utilityにより、Wi-Fi/Bluetooth カードの動作方法を設定できます。まず、お使いのコンピューターを仮想無線アクセスポイント(Hotspot)にします。これにより、WiFi 対応コンピューターまたは携帯デバイスが仮想無線アクセスポイントを通してインターネットにアクセスできるようになります。2 番目に、お使いのコンピューターから対象のコンピューターにデータをドラッグすることで、お使いのコンピューターが他のコンピューターとデータ共有するよう構成することができます(File Transfer)。3 番目に、まさに通常の無線 LAN カードとして使用できます(WiFi)。
第 2 章 ドライバとユーティリティをインストールする

- 5 -
日本語
モード選択Wi-Fi Share には、ユーザーが選択する次の3つのモードがあります。
A. HotspotHotspotでは、お使いのコンピューターを仮想の無線アクセスポイント (WAP) にします。詳細構成は、以下のステップを参照してください。
ステップ 1:通知エリアで Wi-Fi Shareアイコン を右クリックしてから、Mode Choice > Hotspotを選択することで、お使いのコンピューターを仮想の無線 APにします。次にSettingを選択します。
ステップ 2:Wi-Fi Share Settings ダイアログボックスが表示されたら、Share Connectionリストから共有する現在稼働中のネットワーク接続を選択します。続いてSaveをクリックします。Passwordは、他のコンピューターが仮想無線APを通してインターネットにアクセスする場合に必要なネットワークのセキュリティキーを表します。既定のパスワードを保持するかまたは新規作成します。
コンピューターの設定:
仮想無線APを通してインターネットにアクセスするコンピューターを構成します:ステップ 1:通知エリアにある Internet Access アイコンを左クリックします。Currently connected to リストが表示されたら、接続する仮想無線 AP を選択して Connect をクリックします。
ステップ 2:Connect to a Network ダイアログボックスが表示されたら、仮想無線 AP が共有するネットワーク接続のセキュリティキーを入力してから OK をクリックします。

- 6 -
日本語
ステップ 3:接続したら、Currently connected to リストに、現在このコンピューターが仮想無線 AP が共有しているネットワーク接続を使用中であることが表示されます。
B. File TransferFile Transfer では、File Transfer の2台のコンピューターでファイルの相互共有を有効にすることができます。注: File Transferを使用する前に、必ず両方のコンピューターのファイアウォールをオフにしてください。
ステップ 1:2台のコンピューターにWi-Fi Share Utility がインストール済みで、Wi-Fi Share Modeが有効であることを確認してください。接続元のコンピューターのデスクトップで、通知エリアにある Wi-Fi Shareアイコン を右クリックして、Mode Choice > File Transferを選択します。次に、Manage Wi-Fi Shareを選択して Wi-Fi Share Managerを開きます。
ステップ 2:Wi-Fi Share Manager は、File Transfer が有効な他方のコンピューターを表示します (対象コンピューター)。
ステップ 3:共有するファイル/フォルダが位置するディレクトリに移動します。Wi-Fi Share Manager に表示された対象コンピューターにファイルまたはフォルダをドラッグします。
- 7 -
日本語
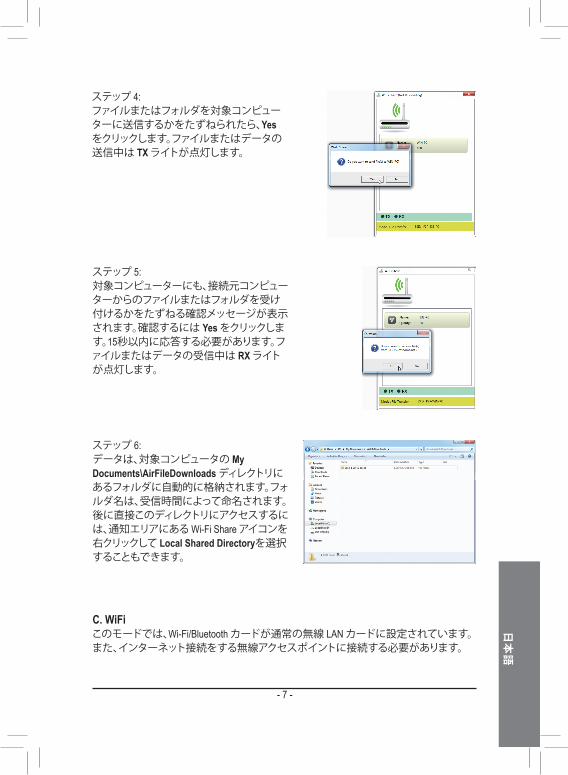
ステップ 4:ファイルまたはフォルダを対象コンピューターに送信するかをたずねられたら、Yes をクリックします。ファイルまたはデータの送信中は TX ライトが点灯します。
ステップ 5:対象コンピューターにも、接続元コンピューターからのファイルまたはフォルダを受け付けるかをたずねる確認メッセージが表示されます。確認するには Yes をクリックします。15秒以内に応答する必要があります。ファイルまたはデータの受信中は RX ライトが点灯します。
ステップ 6:データは、対象コンピュータの My Documents\AirFileDownloads ディレクトリにあるフォルダに自動的に格納されます。フォルダ名は、受信時間によって命名されます。後に直接このディレクトリにアクセスするには、通知エリアにある Wi-Fi Share アイコンを右クリックして Local Shared Directoryを選択することもできます。
C. WiFiこのモードでは、Wi-Fi/Bluetooth カードが通常の無線 LAN カードに設定されています。また、インターネット接続をする無線アクセスポイントに接続する必要があります。
- 8 -
日本語
2-3 Cloud Station Utilityを使用するCloud Station utility により、GIGABYTE の iOS APP は通信、リソース共有、およびお使いのデスクトップ PC システムの制御を行えるようになります。2つの GIGABYTE 固有の iOS APP、EasyTune Touch と PictureView が入手可能です。いずれも Apple Store から無料でダウンロードできます。
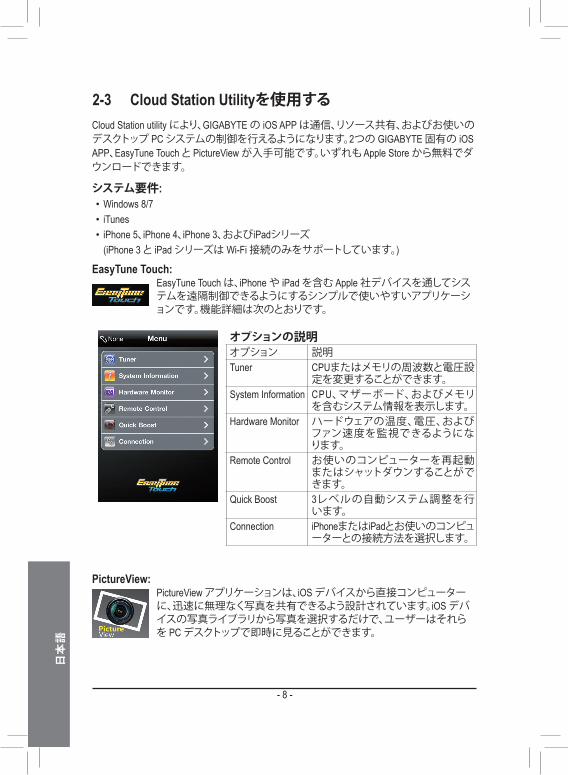
EasyTune Touch: EasyTune Touch は、iPhone や iPad を含む Apple 社デバイスを通してシステムを遠隔制御できるようにするシンプルで使いやすいアプリケーションです。機能詳細は次のとおりです。
オプションの説明オプション 説明Tuner CPUまたはメモリの周波数と電圧設
定を変更することができます。System Information CPU、マザーボード、およびメモリ
を含むシステム情報を表示します。Hardware Monitor ハードウェアの温度、電圧、および
ファン速度を監視できるようになります。
Remote Control お使いのコンピューターを再起動またはシャットダウンすることができます。
Quick Boost 3レベルの自動システム調整を行います。
Connection iPhoneまたはiPadとお使いのコンピューターとの接続方法を選択します。
PictureView:PictureView アプリケーションは、iOS デバイスから直接コンピューターに、迅速に無理なく写真を共有できるよう設計されています。iOS デバイスの写真ライブラリから写真を選択するだけで、ユーザーはそれらを PC デスクトップで即時に見ることができます。
システム要件: • Windows 8/7 • iTunes • iPhone 5、iPhone 4、iPhone 3、およびiPadシリーズ (iPhone 3 と iPad シリーズは Wi-Fi 接続のみをサポートしています。)

- 9 -
日本語
3つの接続方法:EasyTune Touch と PictureView を使用する前に、3つの方法 (Wi-Fi、Bluetooth、および USB接続)のうち1つを用いてお使いのAppleデバイスを対象コンピューターに接続します。iPhone 3 と iPad シリーズは Wi-Fi 接続のみをサポートし、iPhone 4 シリーズは3つの接続すべてをサポートしています。以下では iPhone 4 を Apple のデモデバイスとして使用します。(必ず先に iTunes をインストールしてください。)
A. Wi-Fi 接続:iPhone とコンピューターが同じネットワーク接続を用いていることをご確認ください。ステップ 1:コンピューターがネットワークに接続されていることをご確認ください。
Cloud Station Utility のインストール後、Cloud Station アイコン が通知エリアに表示されます。このアイコンを右クリックし、Always run on next reboot を選択することで、コンピューターを再起動するたびにこのユーティリティが起動するようにします。iPhone または iPad で EasyTune TouchとPictureView を使用するには、先にコンピューターで Cloud Station Utility を起動する必要があります。
Cloud Stationを使用する:
ステップ 2:iPhoneで、Settings > Wi-Fi に進み、Wi-Fi 機能をオンにします。次に、現在コンピューターが使用しているネットワーク接続と同じネットワーク接続を選択します。

- 10 -
日本語
EasyTune Touchを使用するステップ 1:お使いの iPhoneで、EasyTune Touch のメインメニューに移動します。Connection を選択します。
ステップ 2:Connection ページで Wifi を選択します。 iPhone は、同じネットワーク接続を用いてコンピューターの検索を開始します。コンピューターが表示されたら、それを選択します。EasyTune Touch アプリケーションのメインメニューに戻ります。これで、EasyTune Touch機能を使用して iPhone 経由で対象コンピューターを遠隔制御したり、ハードウェア情報をチェックすることができます。
ステップ 1:PictureView アプリケーションのメインメニューに進みます。フォトギャラリーで Connect を選択します。
ステップ 2:Connection ページで Wifi を選択します。 iPhoneは、同じネットワーク接続を用いてコンピューターの検索を開始します。コンピューターが表示されたら、それを選択します。次にフォトギャラリーに戻ります。
PictureView を使用する

- 11 -
日本語
B. BlueTooth 接続:ステップ 1:iPhoneで、Settings > Personal Hotspot に進み、この機能をオンにします。続いて Settings > General > Bluetooth へ進み、Bluetooth をオンにします。
ステップ 2:ここで iPhone とコンピューターをペアにする必要があります。コンピューターのオペレーティングシステムで、Control Panel > Devices and Printers に進みます。Add a device を選択します。コンピューターは Bluetooth デバイスを探し、画面上に表示します。iPhoneが表示されたら、それを選択してNextをクリックします。
ステップ 3:共有する写真をクリックすると、対象コンピューターのデスクトップにリアルタイムに表示されます。

- 12 -
日本語
ステップ 3: ペアリングコードが画面上に表示されます。 Next をクリックします。 iPhone にも、確認のためペアリングコード付きメッセージが表示されます (次のスクリーンショット参照)。
ステップ 4:iPhone がペアリングコードを表示したら、Pair を押して確認します。ペアリングが成功すると、iPhone はコンピューターに接続したことを表示します。
ステップ 5: コンピューターでは、iPhone がコンピューターに正常に追加されたことが表示されます。 Close をクリックして Control Panel > Devices and Printers 画面に戻ります。
ステップ 6: iPhone デバイスを探し、右クリックして Connect using > Access Point を選択して構成を完了します。
これで EasyTune Touch または PictureView を使用する準備ができました。 構成の Wi-Fi 接続の使用説明を参照し、Bluetooth 接続を選択します。
- 13 -
日本語
C. USB 接続:
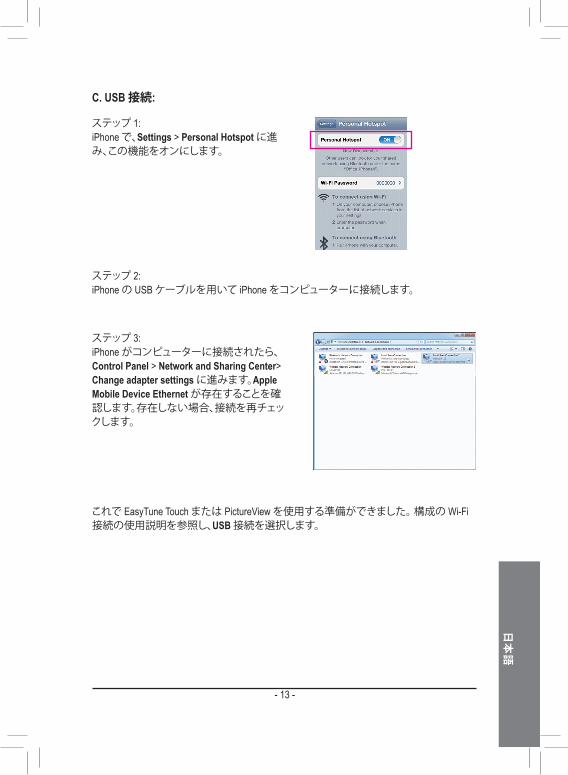
ステップ 1: iPhone で、Settings > Personal Hotspot に進み、この機能をオンにします。
ステップ 2:iPhone の USB ケーブルを用いて iPhone をコンピューターに接続します。
ステップ 3:iPhone がコンピューターに接続されたら、 Control Panel > Network and Sharing Center> Change adapter settings に進みます。Apple Mobile Device Ethernet が存在することを確認します。存在しない場合、接続を再チェックします。
これで EasyTune Touch または PictureView を使用する準備ができました。 構成の Wi-Fi 接続の使用説明を参照し、USB 接続を選択します。


FCC Notice (U.S.A. Only)This equipment generates, uses, and can radiate radio frequency energy and, if not installed and used in accordance with the instructions, may cause harmful interference to radio communications. However, there is no guarantee that interference will not occur in a particular installation. If this equipment does cause harmful interference to radio or television reception, which can be determined by turning the equipment off and on, the user is encouraged to try to correct the interference by one or more of the following measures:
• Reorient or relocate the receiving antenna. • Increase the separation between the equipment and receiver. • Connect the equipment into an outlet on a circuit different from that to which the receiver is connected. • Consult a dealer or experienced TV/radio technician for help.
Properly shielded and grounded cables and connectors must be used in order to meet FCC emission limits. Neither the Dealer nor the Manufacturer are responsible for any radio or television interference caused by using other than recommended cables and connectors or by unauthorized changes or modifications to this equipment. Unauthorized changes or modifications could void the user’s authority to operate the equipment.
European Community Directive R&TTE Directive Compliance Statement:This equipment complies with all the requirements and other relevant provisions of Directive 1999/5/EC of the European Parliament and the Council of March 9, 1999 on Radio Equipment and Telecommunication Terminal Equipment (R&TTE).This equipment is suitable for home and office use in all the European Community Member States and EFTA Member States.
The low band 5.15 -5.35 GHz is for indoor use only.
France:Pour la France métropolitaine2.400 - 2.4835 GHz (Canaux 1à 13) autorisé en usage intérieur2.400 - 2.454 GHz (canaux 1 à 7) autorisé en usage extérieurPour la Guyane et la Réunion2.400 - 2.4835 GHz (Canaux 1à 13) autorisé en usage intérieur.2.420 - 2.4835 GHz (canaux 5 à 13) autorisé en usage extérieur
Italy:The use of these equipments is regulated by:1. D.L.gs 1.8.2003, n. 259, article 104 (activity subject to general authorization) for outdoor use and article
105 (free use) for indoor use, in both cases for private use.2. D.M. 28.5.03, for supply to public of RLAN access to networks and telecom services.L’uso degli apparati è regolamentato da:1. D.L.gs 1.8.2003, n. 259, articoli 104 (attività soggette ad autorizzazione generale) se utilizzati al di fuori
del proprio fondo e 105 (libero uso) se utilizzati entro il proprio fondo, in entrambi i casi per uso private.2. D.M. 28.5.03, per la fornitura al pubblico dell’accesso R-LAN alle reti e ai servizi di telecomunicazioni.

Taiwan NCC Wireless Statements / 無線設備警告聲明:低功率電波輻射性電機管理辦法
第十二條: 經型式認證合格之低功率射頻電機,非經許可,公司、商號或使用者均不得擅自變更頻
率、加大功率或變更原設計之特性及功能。
第十四條: 低功率射頻電機之使用不得影響飛航安全及干擾合法通信;經發現有干擾現象時,應立
即停用,並改善至無干擾時方得繼續使用。
前項合法通信,指依電信法規定作業之無線電通信。
低功率射頻電機須忍受合法通信或工業、科學及醫療用電波輻射性電機設備之干擾。
低功率射頻電機技術規範
4.7: 在5.25-5.35秭赫頻帶內操作之無線資訊傳輸設備,限於室內使用。
Korea KCC NCC Wireless Statement:5,25GHz - 5,35 GHz 대역을 사용하는 무선 장치는 실내에서만 사용하도록 제한됩니다。
Japan Wireless Statement:5.2GHz帯 ~ 5.3GHz帯: 屋内のみの使用。