Garageband Soundtrack Lesson - Music Teachers Scotland · ! 4!...
16
1 S1S3 Curriculum for Excellence Music Course Composing Skills Producing a Movie Soundtrack – Part 2 Producing Your Own Movie Soundtrack Step 1 Step one is to find the movie or video clip that you’re going to use. Youtube is the most obvious source for gaining access to short movie clips which are excellent for this type of project. When you are first staring out, you really don’t want to attempt anything longer than around 3 minutes. First, you have to find a way of getting the video clip from youtube onto your computer hard drive. A simple search for ‘how to download youtube videos’ on Google will lead to a number of simple step by step explanations of how this can be done. A good piece of software is iSkysoft. Once you download and run the application, a ‘download’ button appears beside any youtube video that you are watching. Click on this button and you’ll download the video to your hard drive in the youtube ‘flv’ format. Some music programs such as Apple’s Garageband don’t use ‘flv’ so you will have to find a way on converting your downloaded video to another format, such as MP4. The iSkysoft application can convert the ‘flv’ video into ‘MP4’ but you need to purchase the full version to use the convert video function. Fortunately, there are a number of free resources where this can be done. A good free method is to use a web based system. Web based systems mean you don’t have to download any software onto your computer. You simply follow the instructions on the website. A good resource is www.onlineconvert.com. Once on the homepage, you go to ‘Video convertor’ and select MP4 from the dropdown menu. A new page will open up and in the middle of this page you will see a ‘Browse’ button. Click this and find the video ‘flv’ file you downloaded from youtube. Select the flv file from your computer’s hard drive and it will then appear beside the ‘Browse’ button. Now go down to the bottom of the page (don’t worry about the various option settings) and click ‘Convert file’. It might take time, but the website will then convert the flv file into MP4. Once the conversion process is finished, you will be given the option of saving the new MP4 video file to your hard disk. Depending on your computer settings, the file
Transcript of Garageband Soundtrack Lesson - Music Teachers Scotland · ! 4!...
1
S1-‐S3 Curriculum for Excellence Music Course
Composing Skills
Producing a Movie Soundtrack – Part 2
Producing Your Own Movie Soundtrack Step 1 Step one is to find the movie or video clip that you’re going to use. Youtube is the most obvious source for gaining access to short movie clips which are excellent for this type of project. When you are first staring out, you really don’t want to attempt anything longer than around 3 minutes. First, you have to find a way of getting the video clip from youtube onto your computer hard drive. A simple search for ‘how to download youtube videos’ on Google will lead to a number of simple step by step explanations of how this can be done. A good piece of software is iSkysoft. Once you download and run the application, a ‘download’ button appears beside any youtube video that you are watching. Click on this button and you’ll download the video to your hard drive in the youtube ‘flv’ format. Some music programs such as Apple’s Garageband don’t use ‘flv’ so you will have to find a way on converting your downloaded video to another format, such as MP4. The iSkysoft application can convert the ‘flv’ video into ‘MP4’ but you need to purchase the full version to use the convert video function. Fortunately, there are a number of free resources where this can be done. A good free method is to use a web based system. Web based systems mean you don’t have to download any software onto your computer. You simply follow the instructions on the website. A good resource is www.online-‐convert.com. Once on the homepage, you go to ‘Video convertor’ and select MP4 from the dropdown menu. A new page will open up and in the middle of this page you will see a ‘Browse’ button. Click this and find the video ‘flv’ file you downloaded from youtube. Select the flv file from your computer’s hard drive and it will then appear beside the ‘Browse’ button. Now go down to the bottom of the page (don’t worry about the various option settings) and click ‘Convert file’. It might take time, but the website will then convert the flv file into MP4. Once the conversion process is finished, you will be given the option of saving the new MP4 video file to your hard disk. Depending on your computer settings, the file
2
might automatically be saved to your ‘downloads’ folder. For simplicity, I usually just save the file to my computer’s desktop. On the page containing the ‘Browse’ and ‘Convert file’ buttons you will also notice that ‘online convert’ offers you the option of cutting and pasting the youtube URL of the video. This is actually the easiest method of getting an MP4 video file downloaded onto your hard drive. However, I have found this not to work with some youtube videos but it is another option for you to consider. It might work OK for you. Simply highlight the URL of the video on youtube and copy and paste this URL into the box that says ‘Or enter URL of the file you want to convert to MP4’ on the online convert webpage. Then, click the ‘Convert file’ button and the website will convert the file for you. Step 1 is now complete. You have an MP4 video file ready to use on your computer’s desktop. Step 2 Now you need to import this MP4 file into a piece of music software that’s capable of playing movie files. For mac users, the two most popular pieces of software are Garageband and Logic. As Garageband is a free application that comes with any new mac, this tutorial is going to use this piece of software. Drag your mouse to the mac’s ‘Doc’ (usually at the bottom of the screen) and click on the electric guitar icon. This launches Garageband. Choose ‘new project’ and from the list that says Piano, Electric Guitar, Loops, Keyboard Collection, Acoustic Instrument, Songwriting, Podcast select the ‘Movie’ one at the end (it has a movie director’s clipboard icon). Garageband will then ask you to name your new project and locate where you want to store this on your hard drive. (Just leave the ‘tempo’, ‘key’ and other options as these don’t need to be altered at this time.) Give your project a name, choose where you want it to be stored and click ‘create’. A new movie project for will be created for you to begin. On the top right hand side of the screen you should see something that says ‘Movie Track’. To the right of this, you will see a time counter starting at 00.00. This is known as the timeline. You are going to drag your MP4 movie file onto this timeline, where it says ‘drag movie here’. If the Garageband program is taking up all of your computer’s screen, you will have to reduce this slightly so you can see the MP4 movie file that is on your desktop. All you have to do it take your mouse to the bottom right hand corner of the Garageband screen (click on the bottom right hand corner of the brown
3
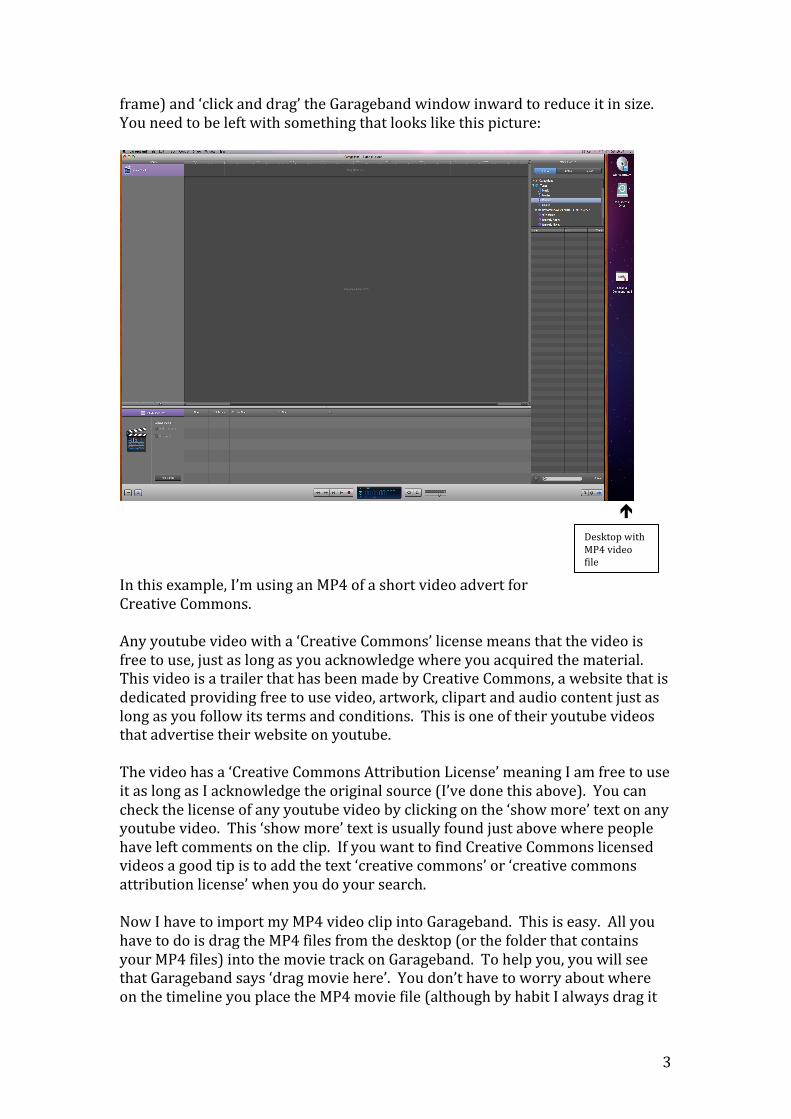
frame) and ‘click and drag’ the Garageband window inward to reduce it in size. You need to be left with something that looks like this picture:
é
In this example, I’m using an MP4 of a short video advert for Creative Commons. Any youtube video with a ‘Creative Commons’ license means that the video is free to use, just as long as you acknowledge where you acquired the material. This video is a trailer that has been made by Creative Commons, a website that is dedicated providing free to use video, artwork, clipart and audio content just as long as you follow its terms and conditions. This is one of their youtube videos that advertise their website on youtube. The video has a ‘Creative Commons Attribution License’ meaning I am free to use it as long as I acknowledge the original source (I’ve done this above). You can check the license of any youtube video by clicking on the ‘show more’ text on any youtube video. This ‘show more’ text is usually found just above where people have left comments on the clip. If you want to find Creative Commons licensed videos a good tip is to add the text ‘creative commons’ or ‘creative commons attribution license’ when you do your search. Now I have to import my MP4 video clip into Garageband. This is easy. All you have to do is drag the MP4 files from the desktop (or the folder that contains your MP4 files) into the movie track on Garageband. To help you, you will see that Garageband says ‘drag movie here’. You don’t have to worry about where on the timeline you place the MP4 movie file (although by habit I always drag it
Desktop with MP4 video file
4
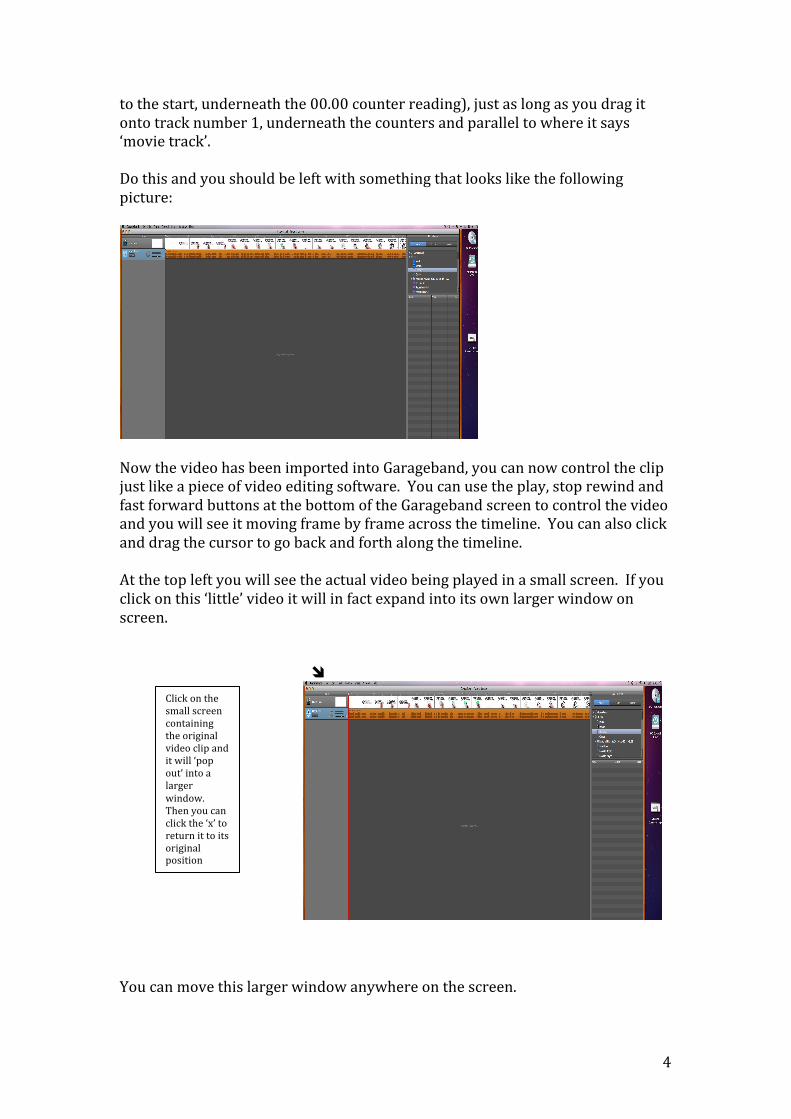
to the start, underneath the 00.00 counter reading), just as long as you drag it onto track number 1, underneath the counters and parallel to where it says ‘movie track’. Do this and you should be left with something that looks like the following picture:
Now the video has been imported into Garageband, you can now control the clip just like a piece of video editing software. You can use the play, stop rewind and fast forward buttons at the bottom of the Garageband screen to control the video and you will see it moving frame by frame across the timeline. You can also click and drag the cursor to go back and forth along the timeline. At the top left you will see the actual video being played in a small screen. If you click on this ‘little’ video it will in fact expand into its own larger window on screen. î
You can move this larger window anywhere on the screen.
Click on the small screen containing the original video clip and it will ‘pop out’ into a larger window. Then you can click the ‘x’ to return it to its original position

5
If you press the play button at the bottom of the screen you will hear the video’s audio track. We need to mute this if we are going to replace it with our own version. You also see that you now in fact have two tracks in Garageband, one called ‘Movie Track’ and underneath this ‘Movie Sound. Well, simply click the speaker icon on the movie sound track and this will mute the original audio.
é
Click on this speaker icon to ‘mute’ the video’s audio track. Now we have a video with no sound. Perfect. Step 3 The next step is to begin thinking about adding a new soundtrack to the video. You can of course compose an original piece of music and play this underneath the video, using a USB music keyboard. However, this is a fairly advanced method and would form the basis for an entirely new unit of work. This unit is concerned with making use of pre-‐recorded samples of music. Garageband (and most other music programs) call these ‘loops’. So, the first stage is to find out how we can access Garageband’s range of different loops, have a listen to these and then start to think about which loops will suit our video clip. On the top right of the Garageband window you should see something called the ‘Media Browser’.
é Do you see where this arrow is pointing? There are 3 buttons at the bottom right hand corner of the Garageband window and the arrow is pointing to the first one. It looks like this:
The first button from the left is the ‘loop’ button.
The Media Browser
6
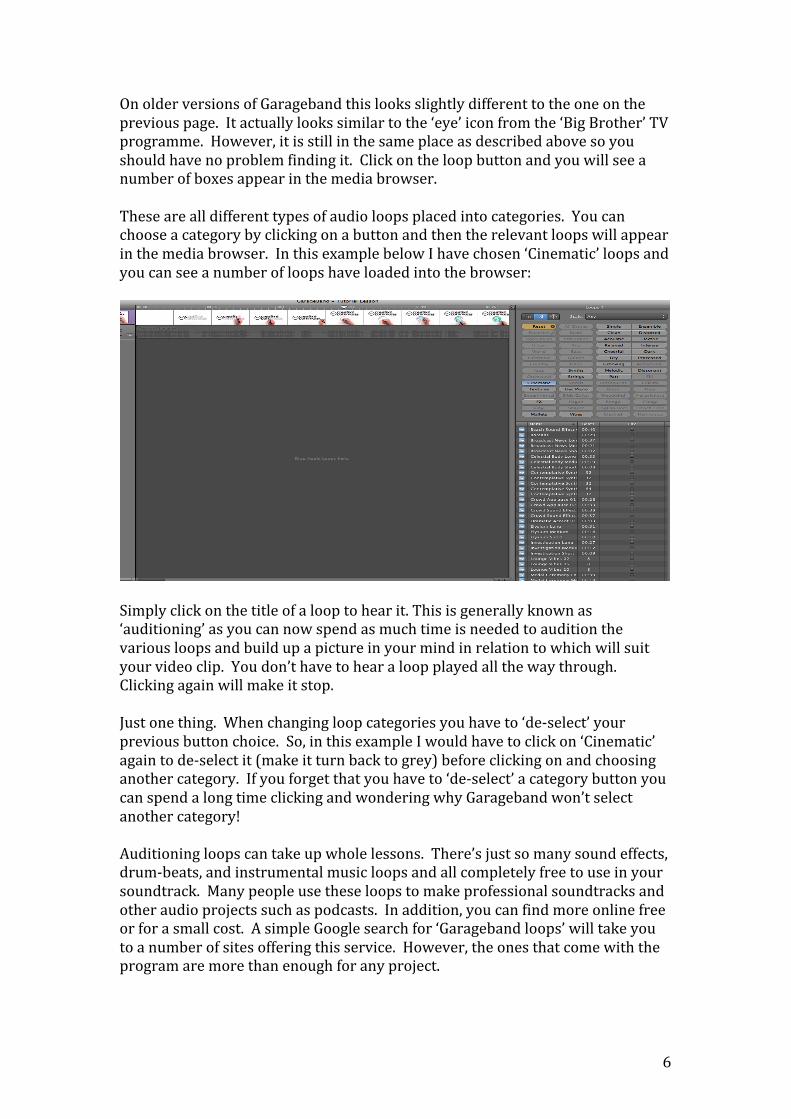
On older versions of Garageband this looks slightly different to the one on the previous page. It actually looks similar to the ‘eye’ icon from the ‘Big Brother’ TV programme. However, it is still in the same place as described above so you should have no problem finding it. Click on the loop button and you will see a number of boxes appear in the media browser. These are all different types of audio loops placed into categories. You can choose a category by clicking on a button and then the relevant loops will appear in the media browser. In this example below I have chosen ‘Cinematic’ loops and you can see a number of loops have loaded into the browser:
Simply click on the title of a loop to hear it. This is generally known as ‘auditioning’ as you can now spend as much time is needed to audition the various loops and build up a picture in your mind in relation to which will suit your video clip. You don’t have to hear a loop played all the way through. Clicking again will make it stop. Just one thing. When changing loop categories you have to ‘de-‐select’ your previous button choice. So, in this example I would have to click on ‘Cinematic’ again to de-‐select it (make it turn back to grey) before clicking on and choosing another category. If you forget that you have to ‘de-‐select’ a category button you can spend a long time clicking and wondering why Garageband won’t select another category! Auditioning loops can take up whole lessons. There’s just so many sound effects, drum-‐beats, and instrumental music loops and all completely free to use in your soundtrack. Many people use these loops to make professional soundtracks and other audio projects such as podcasts. In addition, you can find more online free or for a small cost. A simple Google search for ‘Garageband loops’ will take you to a number of sites offering this service. However, the ones that come with the program are more than enough for any project.
7
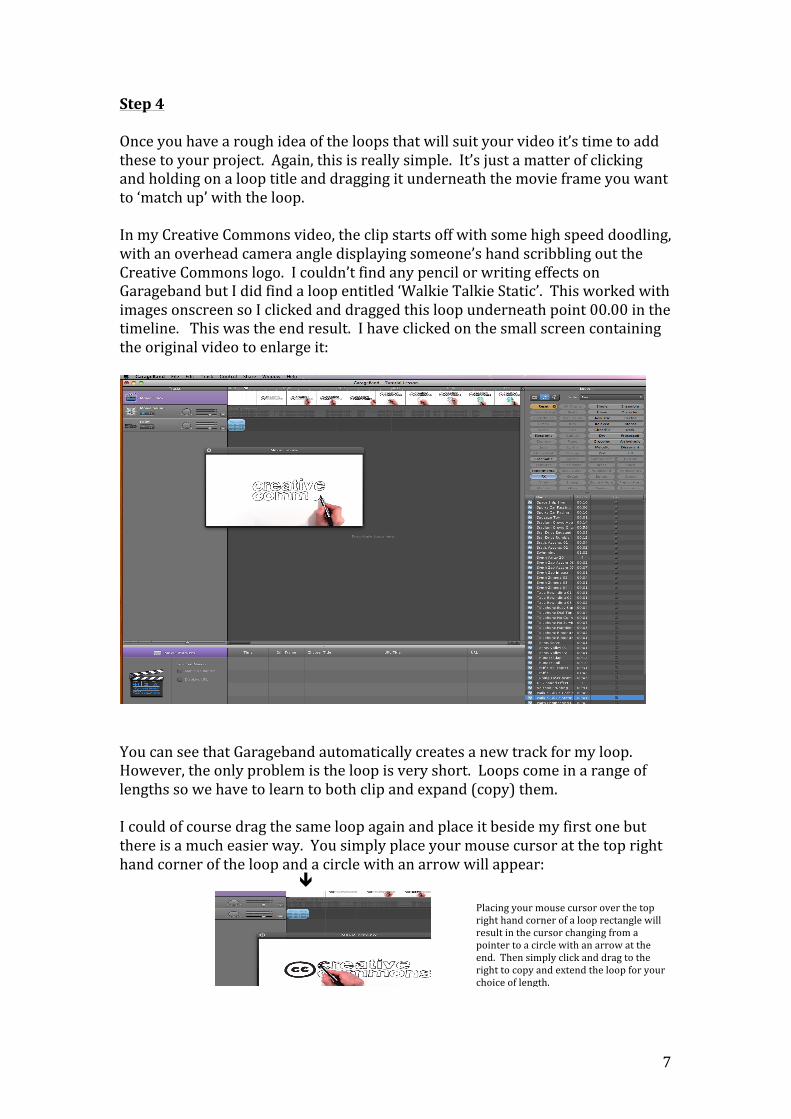
Step 4 Once you have a rough idea of the loops that will suit your video it’s time to add these to your project. Again, this is really simple. It’s just a matter of clicking and holding on a loop title and dragging it underneath the movie frame you want to ‘match up’ with the loop. In my Creative Commons video, the clip starts off with some high speed doodling, with an overhead camera angle displaying someone’s hand scribbling out the Creative Commons logo. I couldn’t find any pencil or writing effects on Garageband but I did find a loop entitled ‘Walkie Talkie Static’. This worked with images onscreen so I clicked and dragged this loop underneath point 00.00 in the timeline. This was the end result. I have clicked on the small screen containing the original video to enlarge it:
You can see that Garageband automatically creates a new track for my loop. However, the only problem is the loop is very short. Loops come in a range of lengths so we have to learn to both clip and expand (copy) them. I could of course drag the same loop again and place it beside my first one but there is a much easier way. You simply place your mouse cursor at the top right hand corner of the loop and a circle with an arrow will appear: ê
Placing your mouse cursor over the top right hand corner of a loop rectangle will result in the cursor changing from a pointer to a circle with an arrow at the end. Then simply click and drag to the right to copy and extend the loop for your choice of length.
8
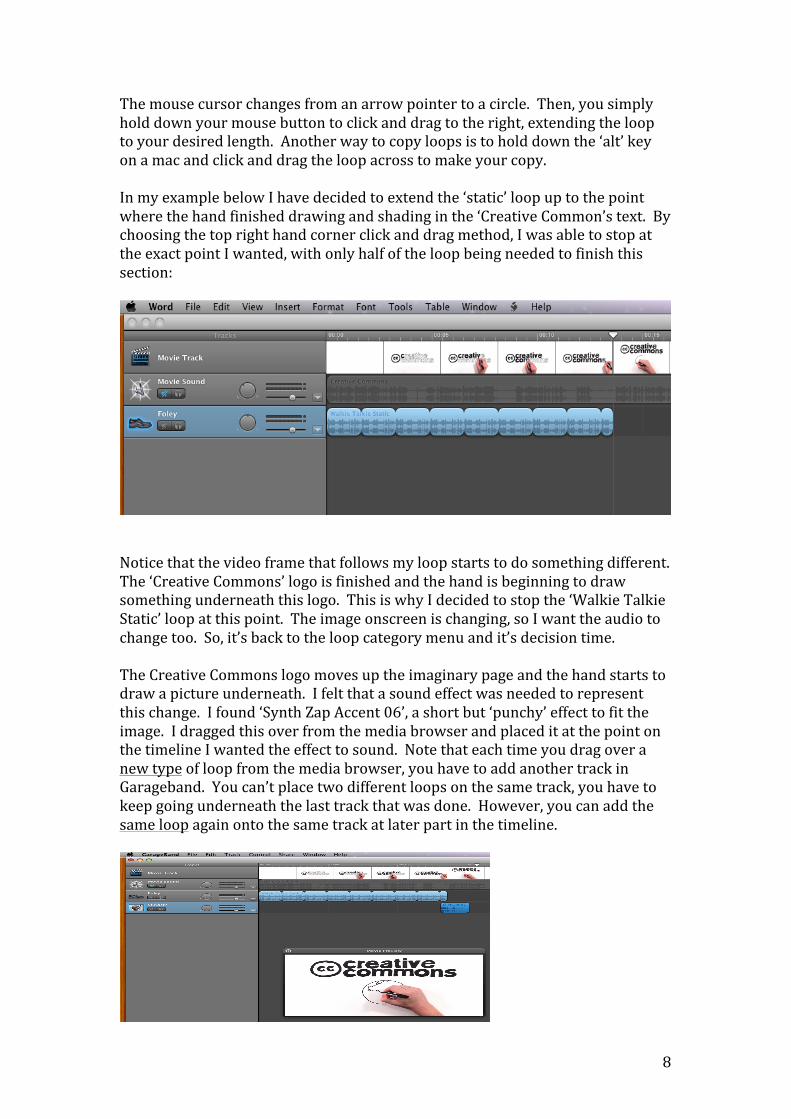
The mouse cursor changes from an arrow pointer to a circle. Then, you simply hold down your mouse button to click and drag to the right, extending the loop to your desired length. Another way to copy loops is to hold down the ‘alt’ key on a mac and click and drag the loop across to make your copy. In my example below I have decided to extend the ‘static’ loop up to the point where the hand finished drawing and shading in the ‘Creative Common’s text. By choosing the top right hand corner click and drag method, I was able to stop at the exact point I wanted, with only half of the loop being needed to finish this section:
Notice that the video frame that follows my loop starts to do something different. The ‘Creative Commons’ logo is finished and the hand is beginning to draw something underneath this logo. This is why I decided to stop the ‘Walkie Talkie Static’ loop at this point. The image onscreen is changing, so I want the audio to change too. So, it’s back to the loop category menu and it’s decision time. The Creative Commons logo moves up the imaginary page and the hand starts to draw a picture underneath. I felt that a sound effect was needed to represent this change. I found ‘Synth Zap Accent 06’, a short but ‘punchy’ effect to fit the image. I dragged this over from the media browser and placed it at the point on the timeline I wanted the effect to sound. Note that each time you drag over a new type of loop from the media browser, you have to add another track in Garageband. You can’t place two different loops on the same track, you have to keep going underneath the last track that was done. However, you can add the same loop again onto the same track at later part in the timeline.
9
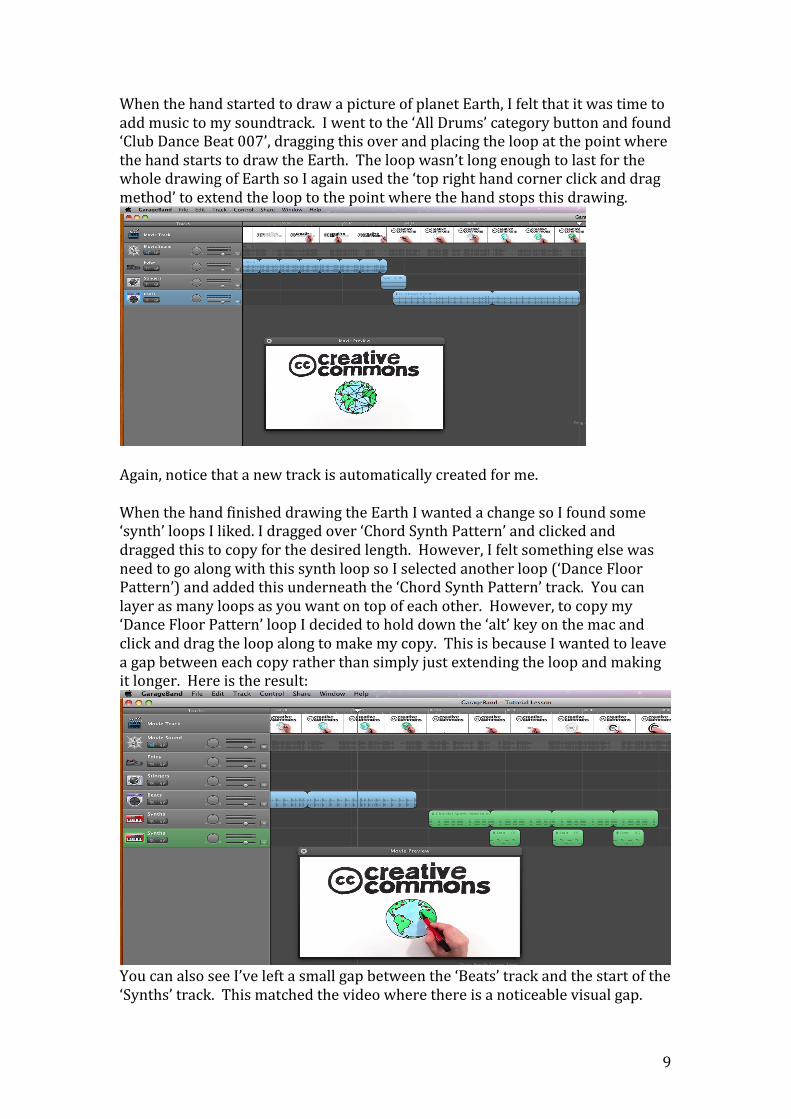
When the hand started to draw a picture of planet Earth, I felt that it was time to add music to my soundtrack. I went to the ‘All Drums’ category button and found ‘Club Dance Beat 007’, dragging this over and placing the loop at the point where the hand starts to draw the Earth. The loop wasn’t long enough to last for the whole drawing of Earth so I again used the ‘top right hand corner click and drag method’ to extend the loop to the point where the hand stops this drawing.
Again, notice that a new track is automatically created for me. When the hand finished drawing the Earth I wanted a change so I found some ‘synth’ loops I liked. I dragged over ‘Chord Synth Pattern’ and clicked and dragged this to copy for the desired length. However, I felt something else was need to go along with this synth loop so I selected another loop (‘Dance Floor Pattern’) and added this underneath the ‘Chord Synth Pattern’ track. You can layer as many loops as you want on top of each other. However, to copy my ‘Dance Floor Pattern’ loop I decided to hold down the ‘alt’ key on the mac and click and drag the loop along to make my copy. This is because I wanted to leave a gap between each copy rather than simply just extending the loop and making it longer. Here is the result:
You can also see I’ve left a small gap between the ‘Beats’ track and the start of the ‘Synths’ track. This matched the video where there is a noticeable visual gap.
10
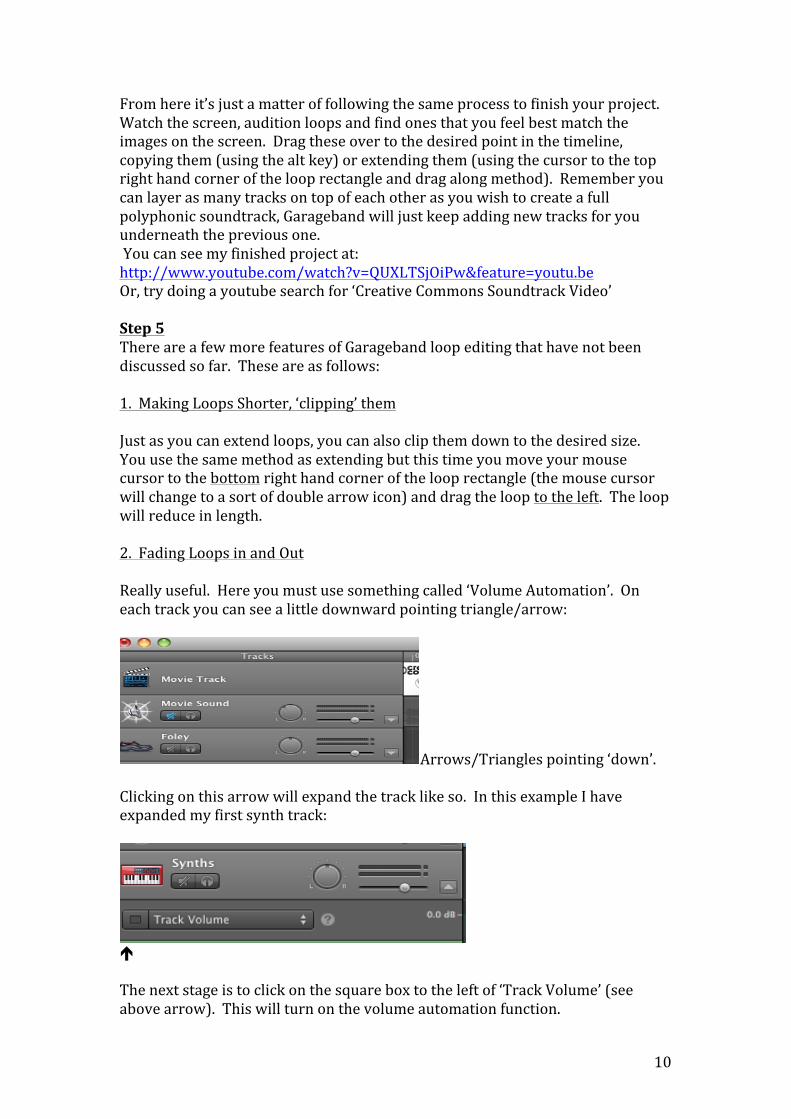
From here it’s just a matter of following the same process to finish your project. Watch the screen, audition loops and find ones that you feel best match the images on the screen. Drag these over to the desired point in the timeline, copying them (using the alt key) or extending them (using the cursor to the top right hand corner of the loop rectangle and drag along method). Remember you can layer as many tracks on top of each other as you wish to create a full polyphonic soundtrack, Garageband will just keep adding new tracks for you underneath the previous one. You can see my finished project at: http://www.youtube.com/watch?v=QUXLTSjOiPw&feature=youtu.be Or, try doing a youtube search for ‘Creative Commons Soundtrack Video’ Step 5 There are a few more features of Garageband loop editing that have not been discussed so far. These are as follows: 1. Making Loops Shorter, ‘clipping’ them Just as you can extend loops, you can also clip them down to the desired size. You use the same method as extending but this time you move your mouse cursor to the bottom right hand corner of the loop rectangle (the mouse cursor will change to a sort of double arrow icon) and drag the loop to the left. The loop will reduce in length. 2. Fading Loops in and Out Really useful. Here you must use something called ‘Volume Automation’. On each track you can see a little downward pointing triangle/arrow:
Arrows/Triangles pointing ‘down’. Clicking on this arrow will expand the track like so. In this example I have expanded my first synth track:
é The next stage is to click on the square box to the left of ‘Track Volume’ (see above arrow). This will turn on the volume automation function.

11
You will now see there is a decibel line (dB line) underneath your track. This can be used to control the track’s volume:
The ‘dot’ on the line represents the start of my loop. I’m going to add a ‘fade in’. First I need to click on the dB line at the point where I want the ‘fade in’ to end, i.e. the loudest point. I want this at the very end point of the first loop rectangle so I click on the line at this point. Another ‘dot’ appears like so:
Now I need to go back to the first dot and drag this downwards. This creates a line like so:
Now my synth tack will ‘fade in’ gradually. You can use automation to make changes to other features of Garageband such as panning. However, getting to grips with volume automation is enough for this unit of work. 3. Using Effects Just like any other Digital Audio Workstation (DAW), Garageband has a range of electronic effects that can be added to each track. You can add effects such as reverb, compression and delay. However, I often find that the imported loops don’t really need effects. It is though an option so let’s see how it’s done. First, click on a track to select and highlight. In this example I’m going to add an effect to my second synth part so I click on this track in the left hand column to highlight this and the track is now selected:
éSecond, go to the bottom left hand corner of Garageband and find the a button with 3 options. The first of these was the ‘loop’
Click on the track to highlight, or select
12
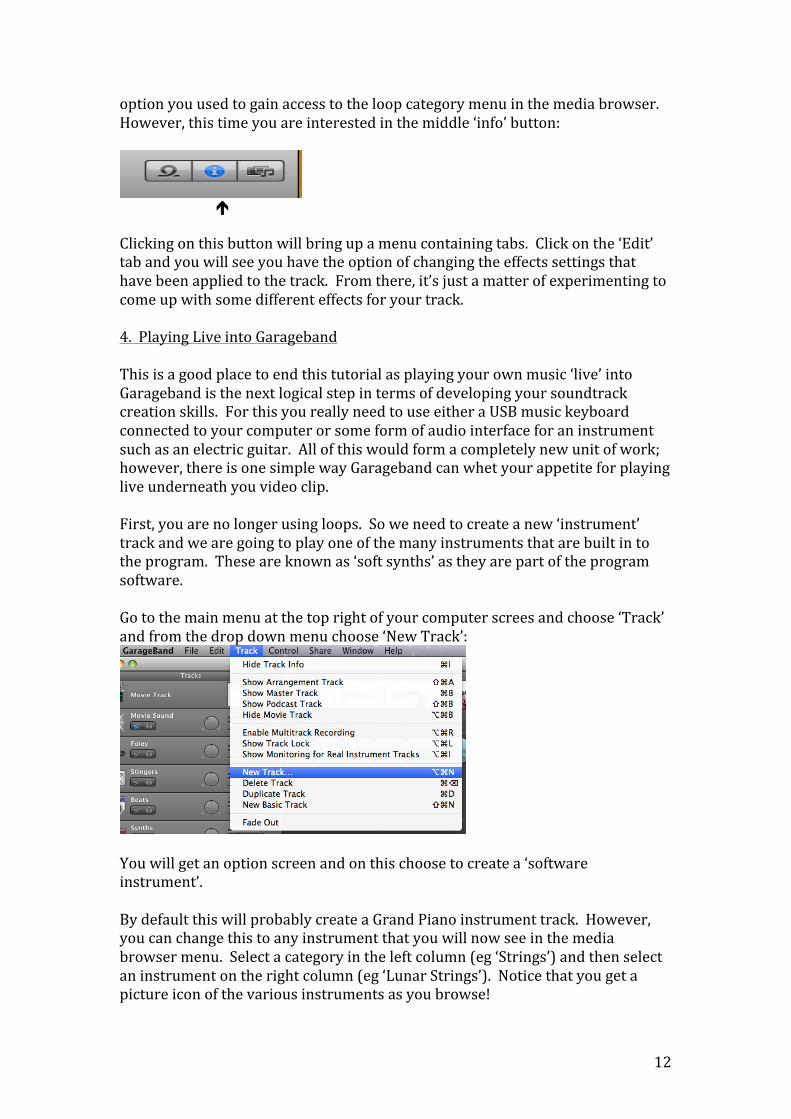
option you used to gain access to the loop category menu in the media browser. However, this time you are interested in the middle ‘info’ button:
é Clicking on this button will bring up a menu containing tabs. Click on the ‘Edit’ tab and you will see you have the option of changing the effects settings that have been applied to the track. From there, it’s just a matter of experimenting to come up with some different effects for your track. 4. Playing Live into Garageband This is a good place to end this tutorial as playing your own music ‘live’ into Garageband is the next logical step in terms of developing your soundtrack creation skills. For this you really need to use either a USB music keyboard connected to your computer or some form of audio interface for an instrument such as an electric guitar. All of this would form a completely new unit of work; however, there is one simple way Garageband can whet your appetite for playing live underneath you video clip. First, you are no longer using loops. So we need to create a new ‘instrument’ track and we are going to play one of the many instruments that are built in to the program. These are known as ‘soft synths’ as they are part of the program software. Go to the main menu at the top right of your computer screes and choose ‘Track’ and from the drop down menu choose ‘New Track’:
You will get an option screen and on this choose to create a ‘software instrument’. By default this will probably create a Grand Piano instrument track. However, you can change this to any instrument that you will now see in the media browser menu. Select a category in the left column (eg ‘Strings’) and then select an instrument on the right column (eg ‘Lunar Strings’). Notice that you get a picture icon of the various instruments as you browse!
13
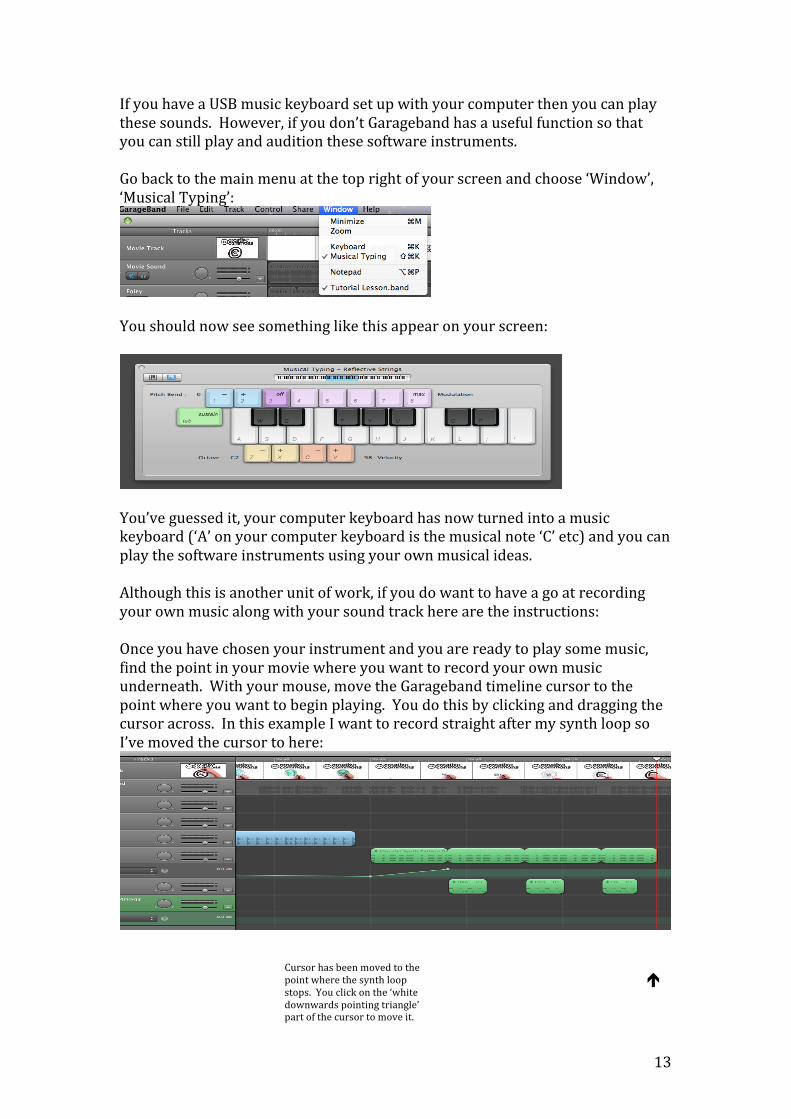
If you have a USB music keyboard set up with your computer then you can play these sounds. However, if you don’t Garageband has a useful function so that you can still play and audition these software instruments. Go back to the main menu at the top right of your screen and choose ‘Window’, ‘Musical Typing’:
You should now see something like this appear on your screen:
You’ve guessed it, your computer keyboard has now turned into a music keyboard (‘A’ on your computer keyboard is the musical note ‘C’ etc) and you can play the software instruments using your own musical ideas. Although this is another unit of work, if you do want to have a go at recording your own music along with your sound track here are the instructions: Once you have chosen your instrument and you are ready to play some music, find the point in your movie where you want to record your own music underneath. With your mouse, move the Garageband timeline cursor to the point where you want to begin playing. You do this by clicking and dragging the cursor across. In this example I want to record straight after my synth loop so I’ve moved the cursor to here:
é
Cursor has been moved to the point where the synth loop stops. You click on the ‘white downwards pointing triangle’ part of the cursor to move it.
14
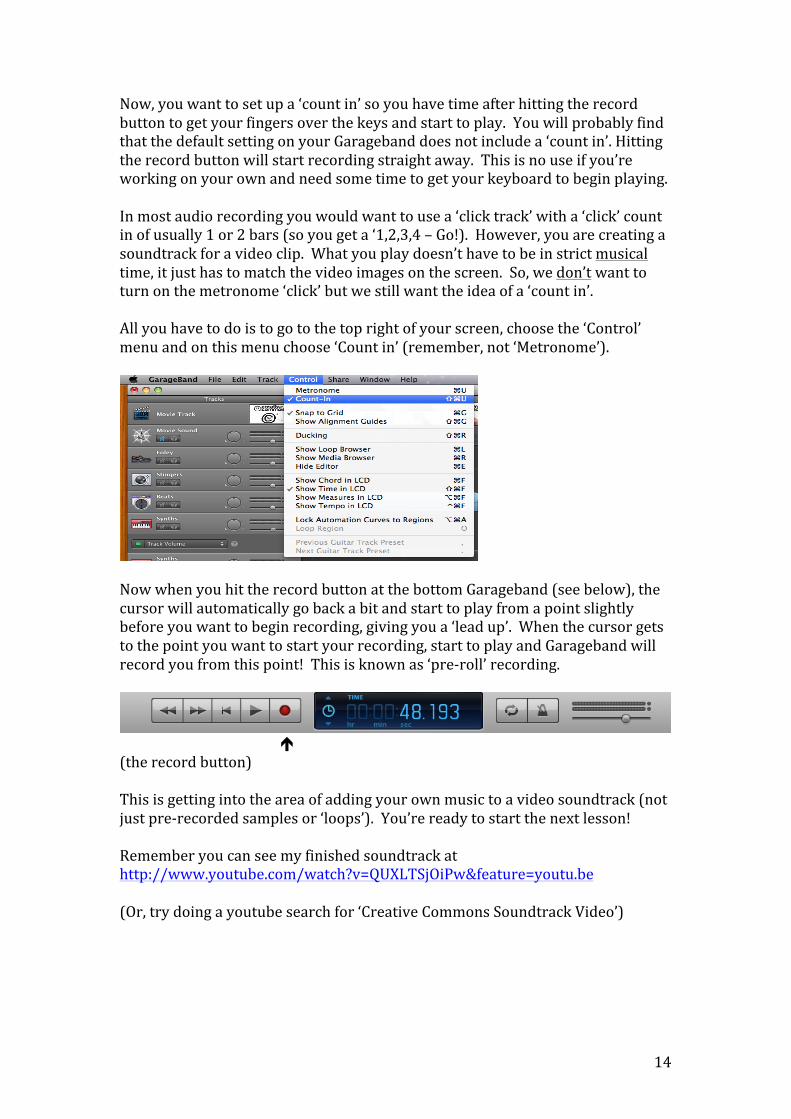
Now, you want to set up a ‘count in’ so you have time after hitting the record button to get your fingers over the keys and start to play. You will probably find that the default setting on your Garageband does not include a ‘count in’. Hitting the record button will start recording straight away. This is no use if you’re working on your own and need some time to get your keyboard to begin playing. In most audio recording you would want to use a ‘click track’ with a ‘click’ count in of usually 1 or 2 bars (so you get a ‘1,2,3,4 – Go!). However, you are creating a soundtrack for a video clip. What you play doesn’t have to be in strict musical time, it just has to match the video images on the screen. So, we don’t want to turn on the metronome ‘click’ but we still want the idea of a ‘count in’. All you have to do is to go to the top right of your screen, choose the ‘Control’ menu and on this menu choose ‘Count in’ (remember, not ‘Metronome’).
Now when you hit the record button at the bottom Garageband (see below), the cursor will automatically go back a bit and start to play from a point slightly before you want to begin recording, giving you a ‘lead up’. When the cursor gets to the point you want to start your recording, start to play and Garageband will record you from this point! This is known as ‘pre-‐roll’ recording.
é (the record button) This is getting into the area of adding your own music to a video soundtrack (not just pre-‐recorded samples or ‘loops’). You’re ready to start the next lesson! Remember you can see my finished soundtrack at http://www.youtube.com/watch?v=QUXLTSjOiPw&feature=youtu.be (Or, try doing a youtube search for ‘Creative Commons Soundtrack Video’)
15
Curriculum for Excellence Third and Fourth Experiences and Outcomes In This Unit If pupils are given an opportunity to present their video soundtracks to the class or other audiences, then the following Expressive Arts Es & Os can be experienced: CfE Third Level Expressive Arts Es & Os “I have used the skills I have developed in the expressive arts to contribute to a public presentation/performance.” EXA 3-‐01a “I have experienced the energy and excitement of being part of an audience for other people’s presentations/performances.” EXA 3-‐01b CfE Fourth Level Es & Os “I have experienced the energy and excitement of presenting/performing for different audiences.” EXA 4-‐01a In addition, this unit has the potential to cover the following music specific Es & Os: CfE Third Level Music Es & Os “I can use my voice, musical instruments or music technology to improvise or compose with melody, rhythm, harmony, timbre and structure.” EXA 3-‐17a “I have listened to a range of music and can identify features and concepts. I can give constructive comments on my own and others’ work, including the work of professionals.” EXA 3-‐19a CfE Fourth Level Music Es & Os “I can use my chosen vocal skills to improvise and compose, showing developing style and sophistication.” EXA 4-‐17a “I can use music technology to compose, record and produce music and to enhance performance.” EXA 4-‐17b “Having developed my ideas from a range of stimuli, I can create and present compositions using a broad range of musical concepts and ideas.” EXA 4-‐18a “Having reflected on my personal experiences, including participation and engagement with professionals, I can listen to a wide range of music and identify and analyse technical aspects, make informed judgments and express personal opinions on my own and others’ work.” EXA 4-‐19a

16