Game Programming Primer - Randy Gaul Programming Primer . Introduction Goal of this Article. The...
44
Game Programming Primer Introduction Goal of this Article The Hobbyist Professional Programming Memory intensive Computation intensive Prerequisites Variables, Keywords and Identifiers Basic formatted input/output Control structures Arrays Functions Pointers Structures Classes Quick Refresher Stack and Heap Bits and Bytes Arrays Second class type Sizeof Pointers Address of Indirection Pass by value References Pointers and Arrays Pointer arithmetic Pointer to pointer Preprocessor #define #include #ifdef, #endif, #undef Compiling and Linking
Transcript of Game Programming Primer - Randy Gaul Programming Primer . Introduction Goal of this Article. The...
Game Programming Primer
Introduction Goal of this Article The Hobbyist Professional Programming Memory intensive Computation intensive
Prerequisites Variables, Keywords and Identifiers Basic formatted input/output Control structures Arrays Functions Pointers Structures Classes
Quick Refresher Stack and Heap Bits and Bytes Arrays
Second class type Sizeof
Pointers Address of Indirection Pass by value References Pointers and Arrays Pointer arithmetic Pointer to pointer
Preprocessor #define #include #ifdef, #endif, #undef
Compiling and Linking
Code Organization for Large Projects Coupling Source files Header files
Macros Prototypes Multiple Include protection Circular inclusion Forward Declarations
Extern Data structures and program design
Linked lists Ordered list
Array std::vector
Hash table Messaging
Game Engine Architecture Overview Systems
Main Loop Display Input Memory Management
Object Management Game logic
Physics AI
Component Based Design Component Based Game Objects Factory Data driven composition
Additional isolated topics Finite State Machines ActionList Improved Messaging Generic programming Bitmasks User Interface by Sean Reilly
Game User Interface From Scratch Preexisting Library
Editor User Interface In-Game
External External with Game Embedded
Serialization Dump the Bytes Streams What to Serialize Serializing Pointers
Optimization for C++ Games Delayed Construction Pre and Post Increment Initializer List Preallocate Objects
Reflection: Type MetaData Example Engine
Introduction Hello! My name is Randy Gaul, and I am a computer science student. I study at DigiPen Institute of Technology, and am majoring in Real-Time Interactive Simulation (a fancy way of saying game programming). I’d like to share my know-how in the ways of game programming as a profession for anyone interested in learning. I encourage anyone interested in programming or creating games, no matter how little knowledge you have in either topic, to check out this article.
Goal of this Article Before my studies at university I had spent a good deal of time trying to learn what it is like to create a piece of useful software from scratch. I spent many hours studying the basics of programming such as control structures, program design and even abstract data types. I however was hardpressed to find any high-level information on how to piece together the smaller tools of programming in order to make a project of my own. This article aims at piecing together a lot various topics and information by providing high-level descriptions and explanations of how everything works together to form a game, from a more broad perspective. There will be very little actual code examples throughout the article, and this is intentional; by providing a higher level summary I can keep the article concise (I can’t write an entire novel inside of a single article!). In doing so I can summarize and present many explanations and concepts that are essential to understand in order to progress as a programmer in a very clear and unified manner. I’d like for even non-programmers to be able to skim through the article and find interest in the ideas and concepts presented. In a way you can expect this entire article to be a firehose of information. If a reader hasn’t be introduced to many of the concepts presented here, he will surely return again and again as much information will not be fully gleaned in a single read-through.
The Hobbyist There’s a type of game programming that can be done purely as a hobby. This usually involves a single person or a very small group of people developing a video game in their own spare time. Middleware is a term used to describe a tool that is used to create or connect a software project together. Middleware such as FMOD for a sound system or Box2D for physics can be used to allow a developer to cut drastic chunks of work needed to get a project up and running. Hobbyists in the sense of what I’m trying to refer to don’t usually have professional level skills in game development, and simply create games for fun. Tools for creating games in a manner like this are quite plentiful; here’s a few:
● Pygame ● Flash ● Game Maker ● XNA ● Other pre-created engines or libraries
○ Unity ○ Box2D ○ SDL ○ SFML
Tools like these can be wonderful for creating games, but this article isn’t dedicated to this area of game programming. I intend to write about how to start programming with the intentions of programming as a profession.
Professional Programming As a professional programmer one should strive to understand as much as possible as to how a computer works, and how they can leverage a programming language to solve problems efficiently. As such, writing a game as a professional programmer revolves around the use of C/C++. This is because C++ lets you get as close to the hardware as realistically possible, thus granting lots of control over how the program runs; many things in C and C++ are hidden away from the developer and in turn make them slower. Having slow code isn’t acceptable for high performance real-time applications such as games. C++ is integral for anyone that wishes to have a career in the video games industry as a professional developer, especially if you want to have the best chances at success when you first start attempting to get a job as a game programmer. Real-time applications, like video games, need to run in a highly efficient manner, and as such require skills of the programmer that may be important in other areas of Computer Science. As I myself am studying to become a professional software engineer, this Know-How is geared towards an audience interested in learning about game programming as a professional, not only as a hobbyist. For the rest of the article I will be referring to development of video games as a profession.
Memory intensive Video games are very memory intensive. They can easily require a lot of memory, and as such will usually benefit from efficient use of memory. Efficient memory usage can let a game have more content and assets on the screen at a given time, or allow for more advanced features than the hardware would otherwise allow. For example the SNES had a very hard time scaling and rotating images in real-time with some of its hardware, and as such most snes games don’t do these two things. However with the addition of a specialized GPU chip in the SNES, some games were able to make interesting use of such a feature (Yoshi’s Island comes to mind). In order to get the most out of the limited powers of the SNES very tight memory management had to be employed. So what is memory management? Memory management is the handling computer memory. This includes allocation and deallocation. Many situations involving memory management become very non-trivial, and as such it’s an area of study that is crucial for anyone interested in professional software engineering, especially in game development.
Computation intensive Besides being memory intensive, real-time simulations have the requirement of having very efficient algorithms and computations. In mathematics there’s no sense whatsoever of efficiency in solving problems, however each operation done on a computer has a cost. It’s up to the programmer to find the most efficient ways to solve problems. This efficiency requirement is due to video games needing to be run at a speed that is not only playable but fun.
Prerequisites There’s some prerequisite knowledge required in order to apply the concepts presented within this article. However I’ve attempted to structure the article such that a lack of basic programming knowledge shouldn’t hinder the reader too much in understanding the overall ideas. I’ll quickly list off the various prerequisites required to to start actually applying the concepts yourself, and in the next section will provide a quick reference to understanding some of the “problem areas” a lot of programmers come across. Though I do cover some of the more advanced areas of basic programming, I will not be writing a comprehensive guide to learning C and C++. Comprehensive books on both C and C++ are required for anyone interested in becoming a professional game programmer. Luckily I have two wonderful books that are pretty much my bibles when it comes to both C and C++. The first book is on C programming by K.N. King: C Programming: A Modern Approach 2nd Ed. Here’s a brief description of the book as seen on Amazon:
Professor King's spiral approach made it accessible to a broad range of readers, from beginners to more advanced students. With adoptions at over 225 colleges, the first
edition was one of the leading C textbooks of the last ten years. The second edition maintains all the book's popular features and brings it up to date with coverage of the C99 standard. The new edition also adds a significant number of exercises and longer programming projects, and includes extensive revisions and updates. - Amazon.com
C Programming: A Modern Approach is definitely the best C book for learning all of the preliminaries shown in this entire article. This book also covers a lot of the topics in great detail from my A Quick Refresher section. Though I do link to many free alternatives, be warned that when I first started learning programming nothing could ever compare to this book.
The second book I have to recommend is C++ Primer, the latest edition. Here’s an excerpt from Amazon.com about the book:
If you are new to C++ programming, C++ Primer Plus, Fifth Edition is a friendly and easy-to-use self-study guide. You will cover the latest and most useful language enhancements, the Standard Template Library and ways to streamline object-oriented programming with C++. This guide also illustrates how to handle input and output, make programs perform repetitive tasks, manipulate data, hide information, use functions and build flexible, easily modifiable programs. With the help of this book, you will:
○ Learn C++ programming from the ground up. ○ Learn through real-world, hands-on examples. ○ Experiment with concepts, including classes, inheritance, templates and
exceptions. ○ Reinforce knowledge gained through end-of-chapter review questions and
practice programming exercises. ○ C++ Primer Plus, Fifth Edition makes learning and using important object-
oriented programming concepts understandable. Choose this classic to learn the fundamentals and more of C++ programming.
Reading both of these books and studying them inside out is something any programmer needs to do if they wish to create their own game from scratch in C++. There’s just no replacement for lots of studying and lots of practice. This entire article isn’t intended to be a replacement for such studying, but merely a primer to. Get the books. Read the books. Study and breathe the books; they will provide with the foundation to carry your career for the rest of your life if you put in the effort to do so.
Variables, Keywords and Identifiers Every programming language has both keywords and identifiers, and all programming languages I’ve used have some form of what a variable is, except for Assembly. Understanding of what each of these three things are, and how they are used in programming should be acquired through research and practice.
Note: some languages have “typeless” variables, or variables without a specific type. Python and Lua both employ typeless variables, whereas C and C++ enforce strict typing. Strict typing, aka explicit typing, incurs less overhead upon the machine; converting from one data type to another often requires a modification of the bits of memory that a variable is represented. This modification of bits has some overhead.
Basic formatted input/output Input and output to stdin, stdout, and file input/output should all be understood by the reader. These forms of input and output are useful for debugging, logging information, presenting information to users, storing data within files on-disk, and for retrieving data from files on disk. These topics are quite simple, and luckily many people for many years have written much documentation on them. Some terms in which to start google searching related to this topic are: printf, cout, cin, scanf, fstream, stdio.h, iostream.
Control structures A control structure is a bit of code helps determine what code will next be executed and when, once it itself is executed. There are a few different types of control structures that all programmers should know, and these control structures are generally features of most every programming language. Looping, and logical if, then else statements are control structures.
Arrays An array is a chunk of variables stacked right next to each other in memory. A variable within an array is referred to as an element.. Each variable is of the same type of data, and so the offset of each element can be known given the size of the array in number of elements due to this. This allows random access to any part of an array, without needing to travel along the array to find a given value. The random access of arrays is what makes them so fast and efficient.
Functions A function can be thought of as a type of control structure. A function is a chunk of code that be executed by a single piece of code somewhere else. For example mathematical equations can be thought of as functions: they take some form of input and present some form of output. A function in programming takes some information, runs operations, and then optionally returns information.
Pointers A basic understanding of what a pointer is in C/C++ and how they can be used will not be explained here. There’s a never-ending supply of references for the basics of pointers online, and I’m sure many people have explained it as good as I ever can, or better.
In short, a pointer holds the memory address of a location in memory, and stores information about the type of data that resides at that location. This allows for the passing around of the location of data, rather than passing around and copying the data itself (as passing around data that is very large and copying it from one location to another has massive overhead).
Structures A structure is a way storing pieces of data together within a single named package. This allows different types of data to be grouped together to form a new type of data.
Classes Classes are a very large topic, so I’ll try my best to summarize what they are. A class in C++ is a structure with additional functionality. A class has language support for storing functions that modify itself, and in this way the data inside a structure will have clearly defined operations that it can perform upon itself. Classes are a construct of Object Oriented programming.
Quick Refresher This section is an attempt to clear up a lot of problem areas that myself and other programmers might have when just starting out in programming. These topics need to be understood in a strong manner in order to become an effective software engineer with C/C++. When I was first beginning I never came across most of the information I’ll try to present here, however the information would have been very valuable given I had earlier access to it. Hopefully it can be of help for others in a similar situation.
Stack and Heap For quite a while I didn’t have a solid concept of what the stack and heap are in C/C++. I feel it’s important to have a clear understanding of both, as knowing the differences between both is essential for basic memory management. The stack is a location of memory assigned to a process (program running) when it starts. The stack is managed automatically, and is used to store things like global and local variables. Whenever a variable or array is declared within the scope of the program, it resides within the stack. Stack memory is very time-efficient to use, as it has been pre-allocated by the run-time upon program start. The heap is memory is a large location of memory that dynamic memory can be requested from. A program can request any amount of memory from the operating system, and the OS will then search the heap for a chunk of empty memory of the specified size. In this way the memory that a program uses can change during run-time, whereas the stack is of a fixed size. Allocating
dynamic memory requires the OS to search for an empty chunk, and this incurs a lot of overhead. It should be noted that if a chunk of memory is allocated from the heap, it can act in a similar way to the stack. The programmer can allocate dynamic memory, and use it to provide smaller and more frequent allocations. These smaller and more frequent allocations require much less overhead than requesting them directly from the OS, as the programmer can make optimizations within their own dynamic stack that the run-time does not.
Bits and Bytes All memory is in the form of bits. A bit stores one of two things: the number zero or one. A byte is a collection of 8 adjacent bites. By using each bit to count in binary, a range from 0 to 255 can be achieved with a single byte. An entire computer is composed of transistors and bits! There’s an immense amount of detail involved in how computers work on the machine level, so much so that I can’t write much about it right here right now. Luckily Charlze Petzold already has. Any programmer that wants to have a proper understanding of computers and computer hardware (which is anyone interested in game programming professionally) needs to read this book: CODE The Hidden Language of Computer Hardware and Software. This book was a required reading at my university, and the details of how a computer works from the ground up is something that allows me to feel very confident in my understanding of computer science.
Arrays Rather than providing a comprehensive documentation of arrays, I’ll attempt to cover a few specific areas that are rather murky for early programmers.
Second class type Arrays in C and C++ are second class data types. This means that they don’t have all the functionality of first class types such as ints or chars. This fact means there are some interesting behaviors of arrays. Arrays cannot be passed around from one location to another directly. If attempted, the name of an array will be converted to a pointer to the first element in the array. This incurs a loss of information, as a pointer stores information about location and type, whereas an array stores location of first element, type of the elements and number of elements. This “feature” of C and C++ can actually be viewed as a “language bug”.
Sizeof The sizeof keyword is an operator. The way it works is very simple and a quick google search will give more information than ever needed on it. However when used with arrays it can be a little quirky.
An array in C and C++, as I said in the previous section, stores data about the size of each element, type of the element, location in memory and the number of elements. This allows the sizeof operator to intelligently calculate the number of bytes of memory of all the elements of an array combined. However this information can be lost if the array is converted to a pointer, and taking sizeof on a pointer is generally only 4 bytes of information.
Pointers
Address of The & operator is called the reference operator. I however always refer to it as “the address of”. If you remember to call the & operator “the address of” it suddenly makes code very readable in a simple and intuitive way. Using the address of operator on something returns the address to the location in memory that the something resides within.
Indirection The * operator is the indirection operator. When used on a pointer it retrieves the value at the address the pointer holds. Very simple. This operator is called the Dereference operator, though I like to read it as “the content of”, or “content at location”.
Pass by value Whenever data is passed around there is overhead involved in copying data from one location to another. Data passed to a function incurs overhead. Instead of passing large pieces of data around themselves, passing a smaller pointer to that data will often be much faster, as copying 4 bytes of pointer data is very fast compared to a large piece of data. In this way the location of pieces of data can be used as “identifiers” to retrieve the data. You can think of this as passing around a key to a treasure chest. Whoever holds the key has access to the treasure inside, and it then becomes easy to transfer ownership of the treasure; you just pass around the key. However a chest full of treasure isn’t going to be passed around itself very often because of how heavy it is.
References References are an addition introduced with C++. References confused me for the longest time, as I just couldn’t understand exactly how they are implemented. As it turns out references can be explained as pointers with a few rules. Think of a reference as the exact same thing as a pointer: it holds a location in memory and type information of what resides at that location. However a reference is constant. A pointer’s address can be changed at any time (unless it is const), but a reference’s address will not be changed once it is initially set. Furthermore a reference cannot be uninitialized. When a reference is created it must also be immediately initialized.
Other than this the only difference between references and pointers (that I am aware of) is syntax rules.
Pointers and Arrays An array’s name can be converted to a pointer implicitly to the first element implicitly within code. This means that at any time the name of an array can be treated the exact same as a pointer to the first element. This makes passing an array around impossible in C and C++; instead you must pass a pointer to an element in the array and perform pointer arithmetic to traverse all the other elements. This brings us to our next section.
Pointer arithmetic Adding an integer to a pointer offsets that pointer by the number of bytes equal to to number being treated as the number of elements to offset. Example: int a = 10; int *p = a; p += 5; // p now holds the address of a + 5 * sizeof( int ) In the above example p is offset by 5 times 4, which is 20 bytes. When you subtract two pointers from each other, the result is the number of elements between the two pointers, not the number of bytes. Knowing these facts can let you loop through an array very easily with a single pointer, given you know how to stop your loop: const char *words[] = { “This”, “is”, “an”, “array”, “of”, “words.”, 0 } for(; *words; ++words) printf( “%s”, *words ); // Output: This is an array of words. The above code snippet prints the array of strings, and stops when it hits the last element of zero. This works in a very simple way. words is a pointer to an array of strings. Incrementing words with the preincrement operator results in offsetting the words pointer by the size of a char pointer. Dereferencing words will result in a const pointer to a character (also known as a string), and can be printed in printf as such. Once the content of words (*words) is at the last element, the result will be zero thus ending the for loop.
Pointer to pointer Having a pointer to a pointer is valid C code. Doing such a thing is commonly useful when dealing with arrays. As I’ve said many times, the name of an array can be treated as identical to a pointer to the first element. So, if you need an array of arrays, you can use a pointer to a pointer. This is actually the technique used from the code snippet from the last section.
Preprocessor The preprocessor is a part of the compiler the processes the text of source code into an intermediary format just before compilation. The preprocessor expands all macros, and operates on all preprocessor directives (which will be talked about momentarily). Understanding how the preprocessor works lets a programmer use it as a tool, and effective use of the preprocessor is something I wished I had learned when I first started programming.
#define #define is a preprocessor directive. This means it’s a command that the preprocessor will come across and perform a particular operation upon. The #define directive allows the programmer to specify that a certain piece of text (technically a certain token, not piece of text, as a token is delimited by certain characters in C/C++ code like whitespace), no matter where it is placed within the code, will be replaced by a chunk of replacement code. This allows the programmer to tweak multiple locations of code by modifying a single entry point of the #define directive. Effective use of the #define directive makes modifying and maintaining code easier. Here’s a quick example showing good use of the #define directive to create a preprocessor “variable”. #define NUM_MAX 256 // Code snippet ... int anArray[NUM_MAX] = { 0 }; PopulateArray( anArray, NUM_MAX ); // fill array with data for(int i = 0; i < NUM_MAX; ++i) { printf( "%d\n", anArray[i] ); // print data in array } // Clear all data in the array for(int i = 0; i < NUM_MAX; ++i) { anArray[i] = 0; } Now the programmer can swap the value of the NUM_MAX macro whenever this value needs to be tweaked. This is much easier than modifying a bunch of code to tweak a single value by hand. The #define directive can also be parameterized. See the appendix for additional information, within the The C-Style Macro section.
#include The #include directive tells the preprocessor to take the entire contents of a file and do a literal copy/paste of the contents to the spot where the #include directive is located.
#ifdef, #endif, #undef #ifdef is used to check and see if a particular definition created with the #define macro exists yet during the preprocessing stage. If the macro does not exist, all code between the #ifdef and matching #endif directive omitted. This allows for inclusion protection. Refer to multiple include protection section for further details. #undef can be used to undefine a previously defined definition. This is useful when some header file you have to use (perhaps Windows.h) defines something. If you really want to use that identifier you can actually just use #undef to free the identifier up for your own use.
Compiling and Linking Compiling is an act a compiler does upon code. First C/C++ code is translated into assembly. From here it is then translated into machine code, and placed into an exe file. Linking is an act the Linker performs (usually right after compiling). It takes the compiled machine code and hooks up all the function definitions to their references throughout the code. It also links all global variable declarations to their definitions. In short it replaces all references to “things” in your code with actual memory addresses. If a particular “thing” reference, such as a function or global variable does not have a matching definition, then the linker will output a specific linker error. Understanding the difference between compiling and linking allows a programmer to have an easier time determining what errors a compiler or linking present mean, and in turn allows the programmer to more quickly find solutions to those errors.
Code Organization for Large Projects Having proper code organization for really large projects is actually something I’ve just finally come to full-grips with. As a project gets larger and larger, having a strong sense of exactly how a program should be structured into multiple files will help save a lot of time.
Coupling Coupling in computer science is the amount by which one section of code relies on another section of code in order to function properly. As a programmer you want to try to make sure that
each individual function and set of functionality you write is as independent from everything else as possible. Imagine you have three functions, and each one relies directly on the others. Assume they allow you to fly (somehow :P). So you have three functions that let you fly, yay! However now lets assume you want your buddy to fly too. Well, your three functions are coupled to you and each other, but you buddy only needs two of those functions! Now you have to copy/paste and modify two of your functions to get your buddy too fly. It would have been much more efficient if your flying functionality was written so that it could be reused in the future. If you as a programmer decouple the “flying” code from yourself and even decoupling the three flying functions from each other, you might have not needed to modify any code at all in order to get your buddy to fly.
Source files Source files are either .C or .CPP files. Source files are where definitions go, and occasionally forward declarations (forward declarations are described a few sections below). Definitions for global variables, static variables, functions, and class functions (methods) go within .CPP files. A single file should only contain definitions of functions that behave to solve a common task. As a rule of thumb no file should go over 2000 lines of code. Splitting functions into separate source files based on common behavior allows a developer to easily sift through files by name and find what function they are searching for. It also minimizes the amount of time a person must spend scrolling up and down a file in order to find a particular function. In order for functions to call functions within other files, header files come into play.
Header files A header file is used to declare various things such as functions, variables, classes, structures, etc. A header file should not ever contain any implementation (unless it is of templated code, which will be mentioned shortly). The purpose of a header file is to show how things are used. For example a header file can contain function prototypes that correspond to a particular C file. The header is then providing information that allows other source files to see what goes into a particular function, and what comes out. This allows other source files to use functions within another source file, without actually having direct access to that source. The Prototypes section of this article goes into this in more detail. A header file is included into a source file with the #include preprocessor directive. The same thing goes for class and structure declarations. A header file should contain a declaration of what a specific type of structure or class looks like, and the source file contains implementation of that particular data type.
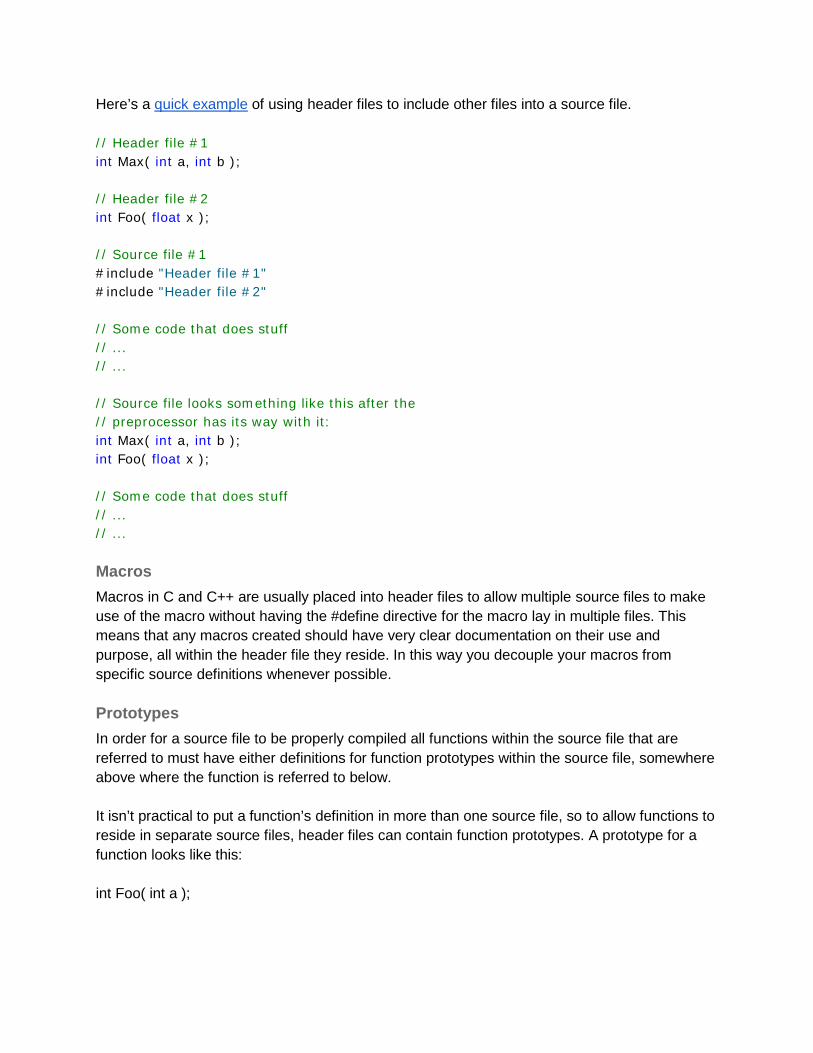
Here’s a quick example of using header files to include other files into a source file. // Header file #1 int Max( int a, int b ); // Header file #2 int Foo( float x ); // Source file #1 #include "Header file #1" #include "Header file #2" // Some code that does stuff // ... // ... // Source file looks something like this after the // preprocessor has its way with it: int Max( int a, int b ); int Foo( float x ); // Some code that does stuff // ... // ...
Macros Macros in C and C++ are usually placed into header files to allow multiple source files to make use of the macro without having the #define directive for the macro lay in multiple files. This means that any macros created should have very clear documentation on their use and purpose, all within the header file they reside. In this way you decouple your macros from specific source definitions whenever possible.
Prototypes In order for a source file to be properly compiled all functions within the source file that are referred to must have either definitions for function prototypes within the source file, somewhere above where the function is referred to below. It isn’t practical to put a function’s definition in more than one source file, so to allow functions to reside in separate source files, header files can contain function prototypes. A prototype for a function looks like this: int Foo( int a );
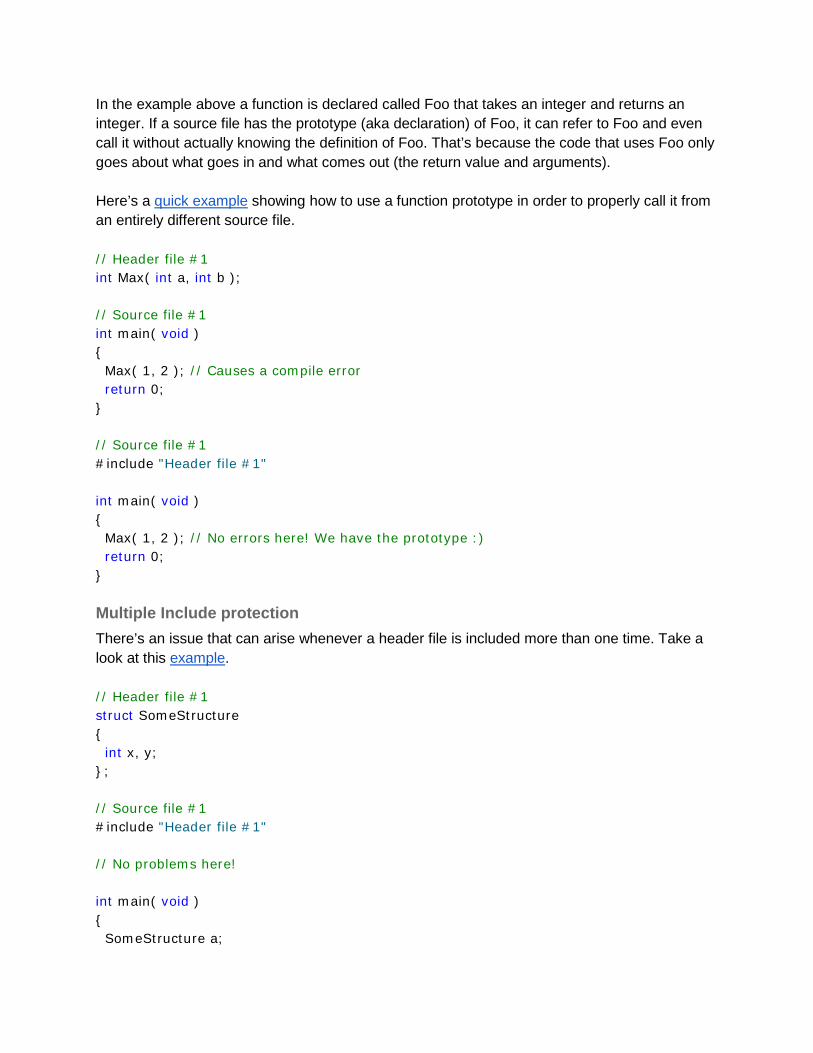
In the example above a function is declared called Foo that takes an integer and returns an integer. If a source file has the prototype (aka declaration) of Foo, it can refer to Foo and even call it without actually knowing the definition of Foo. That’s because the code that uses Foo only goes about what goes in and what comes out (the return value and arguments). Here’s a quick example showing how to use a function prototype in order to properly call it from an entirely different source file. // Header file #1 int Max( int a, int b ); // Source file #1 int main( void ) { Max( 1, 2 ); // Causes a compile error return 0; } // Source file #1 #include "Header file #1" int main( void ) { Max( 1, 2 ); // No errors here! We have the prototype :) return 0; }
Multiple Include protection There’s an issue that can arise whenever a header file is included more than one time. Take a look at this example. // Header file #1 struct SomeStructure { int x, y; }; // Source file #1 #include "Header file #1" // No problems here! int main( void ) { SomeStructure a;
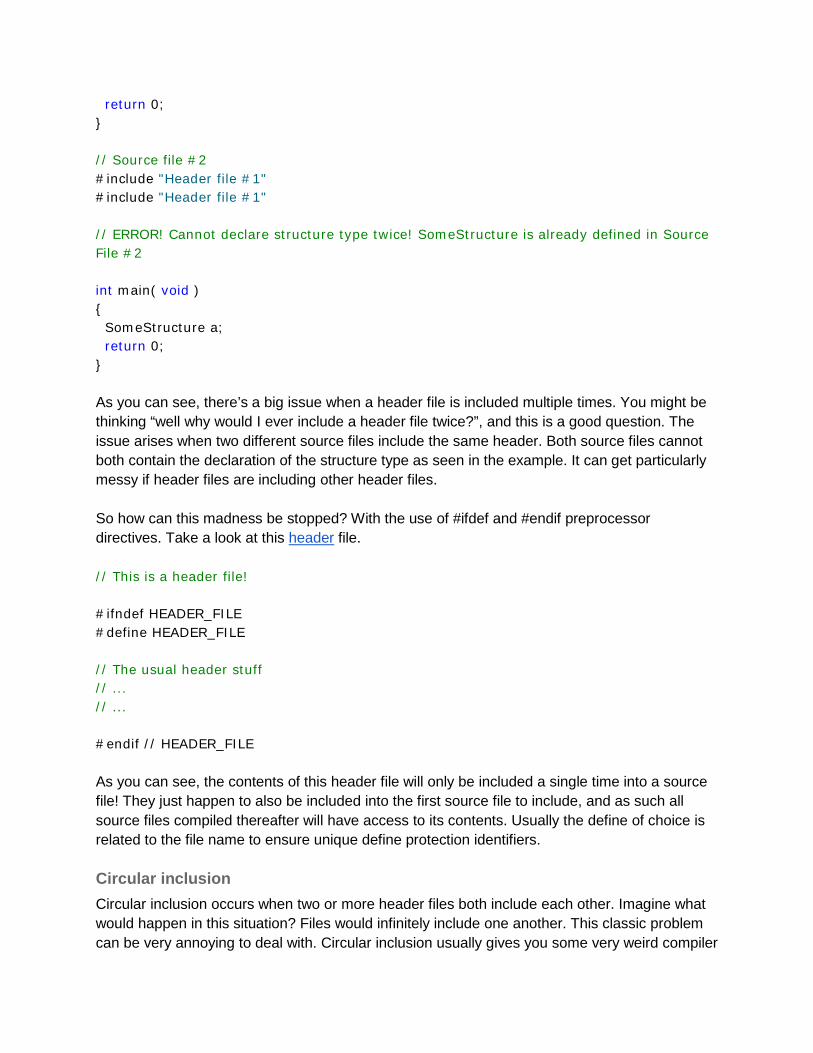
return 0; } // Source file #2 #include "Header file #1" #include "Header file #1" // ERROR! Cannot declare structure type twice! SomeStructure is already defined in Source File #2 int main( void ) { SomeStructure a; return 0; } As you can see, there’s a big issue when a header file is included multiple times. You might be thinking “well why would I ever include a header file twice?”, and this is a good question. The issue arises when two different source files include the same header. Both source files cannot both contain the declaration of the structure type as seen in the example. It can get particularly messy if header files are including other header files. So how can this madness be stopped? With the use of #ifdef and #endif preprocessor directives. Take a look at this header file. // This is a header file! #ifndef HEADER_FILE #define HEADER_FILE // The usual header stuff // ... // ... #endif // HEADER_FILE As you can see, the contents of this header file will only be included a single time into a source file! They just happen to also be included into the first source file to include, and as such all source files compiled thereafter will have access to its contents. Usually the define of choice is related to the file name to ensure unique define protection identifiers.
Circular inclusion Circular inclusion occurs when two or more header files both include each other. Imagine what would happen in this situation? Files would infinitely include one another. This classic problem can be very annoying to deal with. Circular inclusion usually gives you some very weird compiler
errors, and can be very annoying to deal with. The best solution to circular inclusion is to avoid it altogether. Forward declarations and smart header file design are your weapons of choice. See the next section for details.
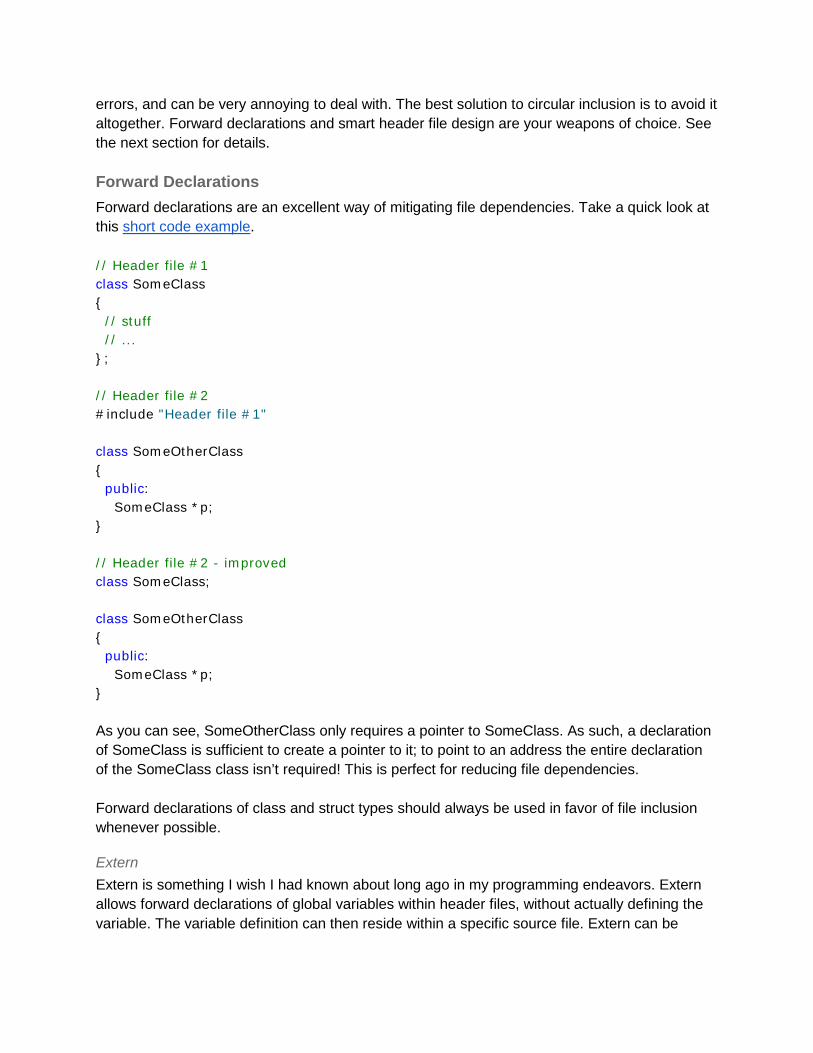
Forward Declarations Forward declarations are an excellent way of mitigating file dependencies. Take a quick look at this short code example. // Header file #1 class SomeClass { // stuff // ... }; // Header file #2 #include "Header file #1" class SomeOtherClass { public: SomeClass *p; } // Header file #2 - improved class SomeClass; class SomeOtherClass { public: SomeClass *p; } As you can see, SomeOtherClass only requires a pointer to SomeClass. As such, a declaration of SomeClass is sufficient to create a pointer to it; to point to an address the entire declaration of the SomeClass class isn’t required! This is perfect for reducing file dependencies. Forward declarations of class and struct types should always be used in favor of file inclusion whenever possible.
Extern Extern is something I wish I had known about long ago in my programming endeavors. Extern allows forward declarations of global variables within header files, without actually defining the variable. The variable definition can then reside within a specific source file. Extern can be
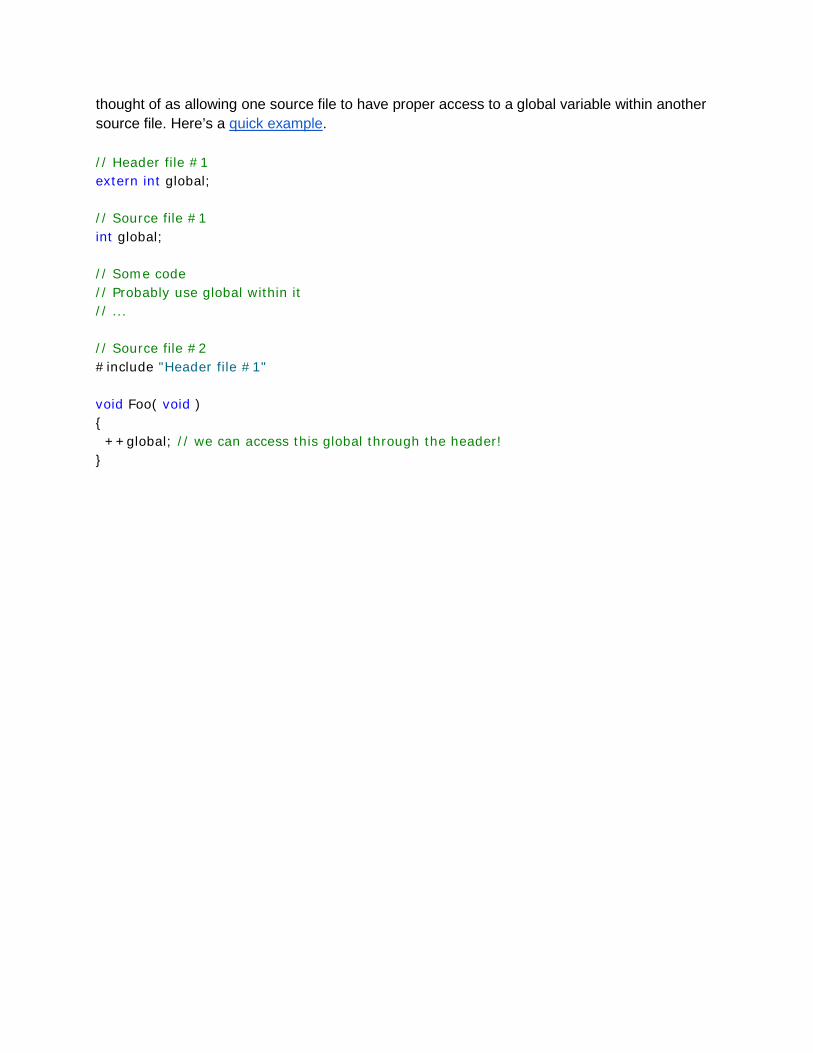
thought of as allowing one source file to have proper access to a global variable within another source file. Here’s a quick example. // Header file #1 extern int global; // Source file #1 int global; // Some code // Probably use global within it // ... // Source file #2 #include "Header file #1" void Foo( void ) { ++global; // we can access this global through the header! }
Data structures and program design There are a few data structures in particular that every game programmer should know about. I won’t be going very deeply into the details of how to implement each of the sections here, instead I’ll be focussing on a high-level summary followed by an important explanation of how and why they are useful, and how best to utilize each to solve particular problems.
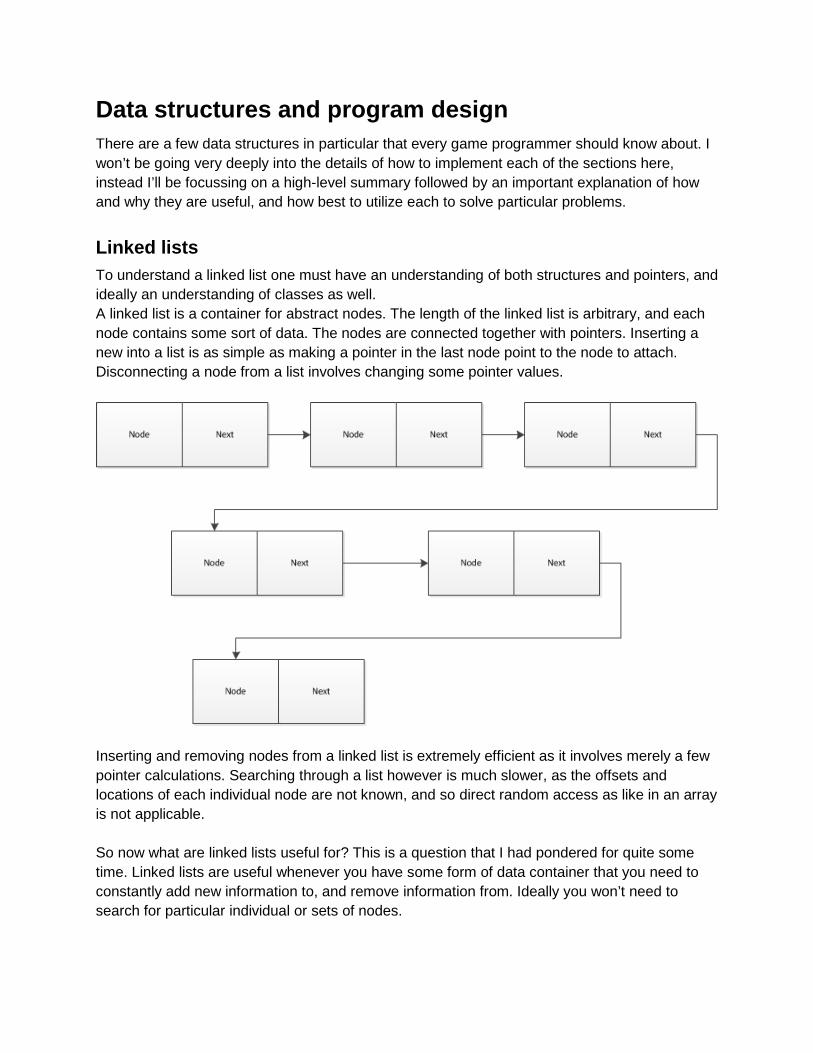
Linked lists To understand a linked list one must have an understanding of both structures and pointers, and ideally an understanding of classes as well. A linked list is a container for abstract nodes. The length of the linked list is arbitrary, and each node contains some sort of data. The nodes are connected together with pointers. Inserting a new into a list is as simple as making a pointer in the last node point to the node to attach. Disconnecting a node from a list involves changing some pointer values.
Inserting and removing nodes from a linked list is extremely efficient as it involves merely a few pointer calculations. Searching through a list however is much slower, as the offsets and locations of each individual node are not known, and so direct random access as like in an array is not applicable. So now what are linked lists useful for? This is a question that I had pondered for quite some time. Linked lists are useful whenever you have some form of data container that you need to constantly add new information to, and remove information from. Ideally you won’t need to search for particular individual or sets of nodes.
A great example of when to use a linked list is to store game objects. A game object usually doesn’t need to be searched for through a linked list (other methods such as a hash table can be used); it just needs to exist. Every game loop the linked list can be traversed, and update functionality can be called on each game object in linear fashion (though not in a particular order, unless the linked list is an ordered list). Game objects can be created on the fly easily, and little overhead is involved in insertion into a list. Game objects can also be easily removed from the list whenever needed. Linked lists can also be perfect for some form of undo functionality. How do you think programs store information regarding the actions a user performs, in order to create some sort of undo button? A linked list can be perfect for this situation, and can be made to support an arbitrary amount of actions; this would be substantially more difficult to do with an array, as an array would require messy algorithms re-allocation once the array limit is reached. Each action can be stored as data within a single node. To perform undo, the inverse of each action can be performed while traversing the list in reverse order.
Ordered list An ordered list is a linked list in which the nodes are ordered depending on what data they contain. To have a list be ordered one of two things must happen: an ordering algorithm is ran on the list; nodes are inserted into the list at the appropriate location. Often times a linked list doesn’t require an expensive sorting algorithm as nodes will never be moved around from one position in the list to another, and as such can simply be inserted into the correct location. If each node is placed into the correct location (perhaps by comparing integers of the node to place to each node in the list until a correct spot is found) then the list will always be in correct order. This allows the programmer to ensure that specific nodes are found first whenever traversing the list. Imagine you have a list of game objects, and some of them need to be drawn. You traverse the list and once you find a game object that needs to be drawn, you order it to be drawn. Then you look at your screen to find that some objects are drawn over top of others. Blasphemy! An ordered list can easily solve this problem: as objects are inserted they can have a zOrder data member (just an integer), allowing them to be drawn before or after other objects. This is a form of zOrdering.
Array An array is very useful for speed of access. An array provides random access to it’s elements by performing some pointer calculations; this provides a constant lookup time for arrays of arbitrary length. The only issue is that arrays must be indexed by an integer in order for the pointer calculations to work properly. These properties make arrays ideal for storing data of known quantities that need to be constantly accessed. In a way an array provides strengths that are the weaknesses of the linked list, and vice versa.
An example of usage for an array is to store level files. A level file can be loaded from a file on disk, and before populating the level the dimensions of the level can be read from file. These dimensions can be used to create an array of a specific size, and then it can be populating with information from the file on disk. This array can then be accessed very efficiently to any position within it.
std::vector The standard vector is a very useful all-purpose container that functions like an array. At its heart the vector actually is simply just an array, except the vector has a lot of member functions to perform operations on the array. The vector has the capability to grow and shrink, and automatically does so once it requires additional space to insert new data. Growing a vector is a bit simpler than shrinking one, but growing can be horrendously slow; to grow an array you must allocate new space, copy the old contents of the old array and place them within the new space, and then delete the old space. As you can see if growing and shrinking are common operations on some sort of data, an array or vector is probably not ideal.
Hash table A hash table is a form of an array where a particular index maps to a specific element. The index can be an arbitrary type of data, not only an integer. This allows very convenient syntax such as: IMAGE_MAP[“image name”]; // Retrieves an image by string identifier In the example above the “image name” is what is called a key. A key in a hash table is an index that maps to a particular element in the array. The key itself is converted into an integer index using a special hash function. Here’s an example (albeit simple) hash function for converting a string into an integer: unsigned SimpleHash( const char *key, unsigned tableSize ) { unsigned hash; while(*key) { hash += *key; ++key; } return hash % tableSize; } Hash functions can be used to generate keys from any arbitrary data, not just strings.
With any hash table resolving collisions is important. When creating a hash table it is assumed that each individual key is unique. If you do not have some form of unique keys get some. If you cannot, then you cannot use a hash table. Although each key is unique it is not guaranteed that each key maps to a unique index. When two keys map to the same location this is called a collision. Taking care of this collision is what is called collision resolution. There are two main forms of collision resolution: linear probing and chaining. Hash tables are ideal for storing data just like an array, except when the index of a particular type of data isn’t a known integer. For example storing art assets for a particular project is a perfect time to use a hash table: art assets can then be retrieved with the hash function like so: Asset *FindAsset( const char *key ) { unsigned index = StringHash( key ); return ART_ASSETS[index]; } A simple macro can be used instead of the function above: #define FIND_ASSET( key ) \ ART_ASSETS[ StringHash( (key) ) ] I fell in love with hash tables for a particular project, and ended up using them great affect to name just about everything in this project: by utilizing an efficiently written hash table arrays can be indexed by string identifier instead of integer or enumeration. This allows a programmer to write rather readable code without magic numbers, without incurring much computational overhead. Here’s a link to the particular project.
Messaging This section can very easily go on and on forever, so I’ll do my best to keep it concise. Messaging solves the problem of passing information around within your code in a loosely coupled manner. The simplest form of messaging is a function call. By calling a function you pass it information through the function’s parameters, and it communicates back in the form of a return value. However in order to directly call a function you need that functions signature, which requires some sort of inclusion, perhaps a header file. By utilizing messaging one can cut into the amount of dependencies from one code section to another dramatically. A message object is a single structure or class that holds a type identifier and some sort of data payload. The identifier lets any piece of code know what sort of message the message actually is. This lets code ignore messages that have identifiers it does not understand.
The simplest form of passing message objects around is with switches and enumerations. A message can be sent to a dispatcher, which consists of a switch statement that switches on the messages identifier (ID). If a matching ID is found, some form of action can be taken. If a matching ID is not found the message can safely be ignored. This means that new message types can be added at any time without conflicting with any pre-existing code, thus limiting upkeep cost of the messaging system to a minimum.
Game Engine Architecture Game engine architecture (and project architecture in general) seems to be a commonly misunderstood and overlooked area of expertise. Before I talk about architecture I need to define what a game engine is. Simply put a game engine is a collection of functionality to allow a game to run. Game engines are not always general purpose, and much of the time game engines that focus on generalization lack what is needed to make a successful an immersive game. As such most game engines are very specific to the game that they are used to create. For example the Source engine by Valve is used (to my knowledge) for first person view games, namely shooters. Now lets talk about architecture. Here is what architecture is defined as, as defined by my professor Chris Peters:
Architecture is the organizational structure of a system, including its decomposition into parts, their connectivity, interaction mechanisms, and the guiding principles and decisions that you use in the design of the system. - Chris Peters
What this is saying that good architecture makes it as easy and simple as possible to develop whatever type of functionality is required for your project. I bolded the word simple because it’s much too often overlooked. Architecture is simplicity. An overly complex solution is the sign of a bad architect! The best solution is often the simplest one. A project’s architecture should aim to embrace change: the whole point of developing a project is to create a product. That product will often times change over the course of development, and so a strong architecture will embrace this change. I talked briefly about embracing change when mentioning messaging and in other topics such as coupling. In a way much of this article is actually about good architecture. The best book for a beginning architect I can recommend is C++ for Game Programmers by Noel Llopis. This book covers a wonderful collection of topics, and can bring a standard newcomer to game programming who is familiar with the basics of C++ to a level of competency strong enough to create their own well-structured engine architecture. A must have for anyone interested in creating their own game engines in C++ from scratch (something ever CS student needs to do if they want the best chances at great game dev jobs straight from school).
Overview Within the next few sections I’m going to attempt to bring everything together. How can all the previous information be used and connected together to form the architecture of game engine? I must inform the reader now that there is no single True Way to create a game engine. The methods proposed here but a single solution.
Systems An engine is a collection of systems. Each system performs a specific type of task. There are two types of systems: Systems and Game Logic Systems. Systems deal with hardware related tasks or non-game logic tasks such as input, graphics, framerate control (timestep), memory management, audio management, and game state management. Game logic components include physics, AI, environment, other object interaction. This section will attempt to describe each briefly.
Main Loop The main loop of a game is the loop that runs the rest of the game. I’ve seen some pretty crazy main loops in novice developers’ projects, and hopefully this section will help rid of some future ones. For this section I will point the reader to a previously written article by myself. Feel free to refer to it as you wish. I won’t be going into implementation details like in the article, though I will describe the overall idea here. Lets talk about the Game State Manager (GSM). A game state manager is a method of creating a highly organized main game loop, which is generalized to the point that it can apply to any situation without pre-runtime modification of code. The game should always be in a state during runtime. That state could be the main menu, a pause screen, or a specific level or scenario. A state is divided up into multiple categories, and these categories are generalized enough to apply to every state the game can be in. Once a GSM is constructed the main loop should never need to be modified again. New states can be added at any time, and new states will not conflict with any previous written ones thus making for a highly decoupled and flexible design.
Display The displaying of a project on a screen is handled by the Graphics system. A graphics systems should handle loading of all graphic related assets, store those assets in memory, and render them to the screen. Some frameworks and/or libraries for graphics functionality is listed here (feel free to google them to find out more!):
● DirectX
● OpenGL ● SDL
It may be tempting to start your graphics system by reading an image from disk each time you want to draw it on screen. This is horribly slow as disk access is one of the slowest operations on a computer. Instead you’ll want to load any assets into memory, and then draw them from memory. It’s important to realize that there should only be one instance of an asset in memory at any given time; there’s no reason to have two copies of identical data if all you’re doing is rendering it onto the screen (read access to the asset in memory). Thus, each object in your code should not store the entire asset’s data within itself. Instead you want to store a pointer (or handle) to an asset. This way all objects that require a particular image can all refer to the same image in memory, thus making efficient use of memory. An object can hand the graphics system it’s pointer and let the graphics system handle rendering it on screen. This is the overall idea of the basics a graphics system is required to perform.
Input The input system should keep track of what sort of input is coming from the player. Reading input directly from hardware is a bad idea; instead you’ll want to have all input related requests be handled by the input manager. This allows code to be written with a single dependency on the input manager, rather than the hardware under which the code is running. The input manager can handle the specific details of gather input from various types of operating systems or hardware specifications. The types of input an input management system should track include: keystrokes (key pressed and key released), mouse movement, mouse clicks, and a history of keys pressed.
Memory Management Managing memory in a simple and intelligent manner can be a daunting task at first. However with a couple simple techniques the task itself can be whittled down into smaller easier to take care of pieces. The type of memory management I’m referring to is that of dynamic memory management. Whenever memory is requested to place new data, this memory must be manually cleaned up by the developer. Knowing when and how to delete previously allocated data is important. For every allocation of memory there is a matching deallocation (or freeing) of said memory. In order to match up deallocations to allocations, allocated memory requires an owner. Whenever memory is allocated the location of that dynamic memory needs to be stored somewhere, so that later on that location can be used to free the memory within it. Owners of allocated data need to store these addresses in some sort of container.
For a game engine it’s good practice to pretty much never use raw calls to new and delete, especially when creating entire game objects. Not only are new and delete (as well as malloc and free) too slow for many game requirements, they also provide no semblance of who owns the object and when it is to be deleted.
Object Management In the game engine I’m currently developing, new and delete calls are almost exclusively reserved for the creation of game objects. The rest of the program’s memory is stored on the stack. All the major systems are stored on the stack. Game Objects in your engine should probably be the focal point of allocation and deallocation (aside from asset loading and unloading). This calls for some specialized code to handle the “owning” of game objects. This will be covered in greater detail within the Factory section of Component Based Design.
Game logic Game logic systems are completely isolated from the other systems. Game logic systems are what construct the rules and interactions of your game, and should not be coupled whatsoever to tasks such as manually gathering input, or manually rendering images. The game logic systems should focus purely on their respective tasks in order to keep their code base as decoupled from other functionalities as possible, thusly encouraging code reuse, and clean/simple architecture.
Physics The physics system handles all movement of game objects, as well as collision and collision resolution. Most every game has some form of physics simulation, even if it’s as simple as moving an image from one location to another over a span of time. The best game physics book would be the orange one Real-Time Collision Detection. There are tons of algorithms that are really difficult if not impossible to find on the internet here. Also if you do manage find some on the internet they’re likely done wrong or inefficiently. Do yourself a favor and get the book. Here’s a post I wrote a little while back on: Basic 2D Vector Physics. Here’s another one on: Basic 2D Collisions. If you’re interested in some implementation details of basic physics, these two articles are the ones for you. Once you wetted your feet be sure to grab the orange book mentioned above!
AI Artificial intelligence is the application of algorithms and logic that give an illusion of intelligence through interactivity with the player. AI is usually performed within a game engine by a central Game Logic system. This game logic system provides functionality for individual game objects to draw upon and use to control their own behavior. For example a game object might require a “patrolling” behavior in which it walks to the left, then walks to right, and repeats. The game object itself shouldn’t have any ad-hoc code that controls

its movement. Instead think of the game object as a bucket of data. This bucket of data then hands its data to the AI system. The AI system can then determine from the information what actions to take. This allows the programmer to centralize all AI related behaviors into a generalized and centralized packet of code. In our patrolling example, the game object can pass to the AI system its position and an identifier determining what behavior to execute (perhaps an enumeration or string ID). The AI system can then see the ID and know it matches to patrolling behavior, and then update the game object’s position appropriately.
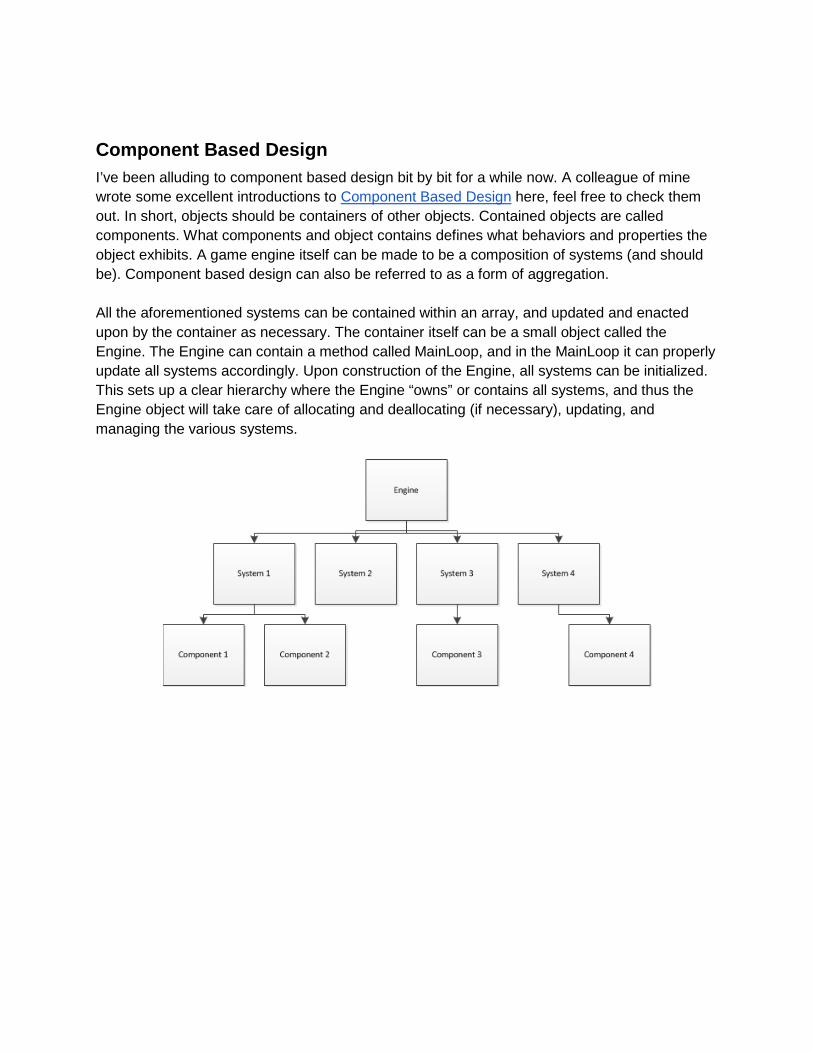
Component Based Design I’ve been alluding to component based design bit by bit for a while now. A colleague of mine wrote some excellent introductions to Component Based Design here, feel free to check them out. In short, objects should be containers of other objects. Contained objects are called components. What components and object contains defines what behaviors and properties the object exhibits. A game engine itself can be made to be a composition of systems (and should be). Component based design can also be referred to as a form of aggregation. All the aforementioned systems can be contained within an array, and updated and enacted upon by the container as necessary. The container itself can be a small object called the Engine. The Engine can contain a method called MainLoop, and in the MainLoop it can properly update all systems accordingly. Upon construction of the Engine, all systems can be initialized. This sets up a clear hierarchy where the Engine “owns” or contains all systems, and thus the Engine object will take care of allocating and deallocating (if necessary), updating, and managing the various systems.
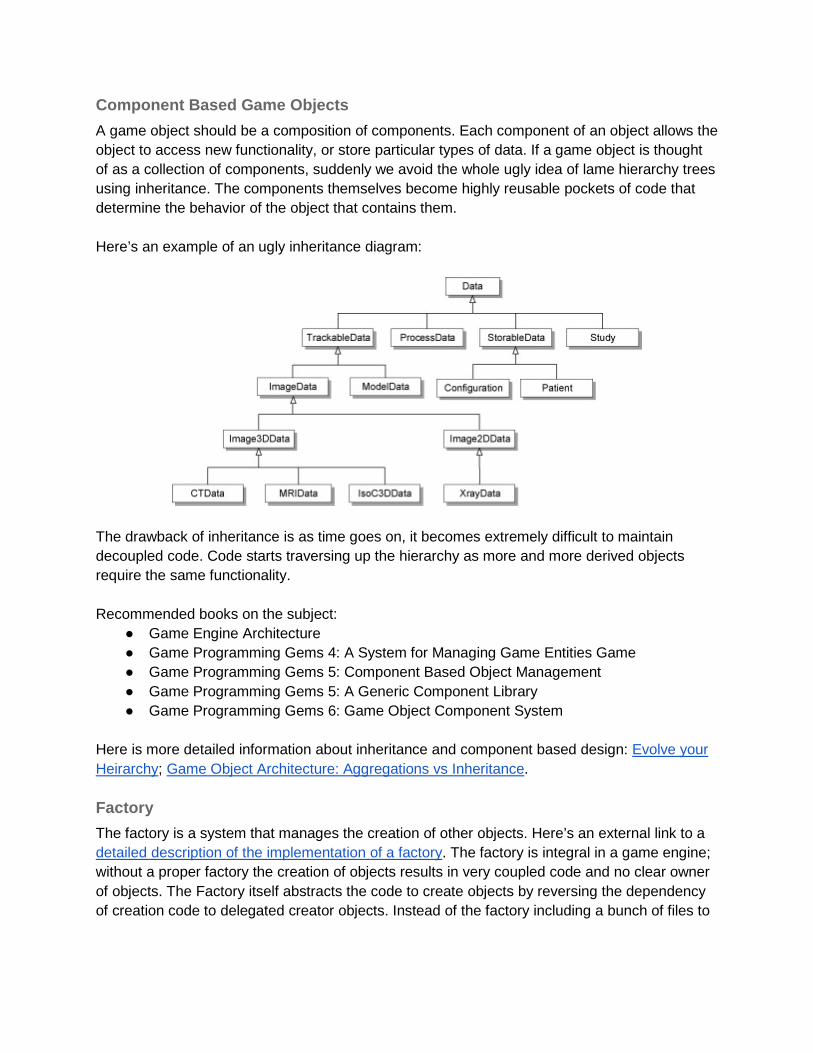
Component Based Game Objects A game object should be a composition of components. Each component of an object allows the object to access new functionality, or store particular types of data. If a game object is thought of as a collection of components, suddenly we avoid the whole ugly idea of lame hierarchy trees using inheritance. The components themselves become highly reusable pockets of code that determine the behavior of the object that contains them. Here’s an example of an ugly inheritance diagram:
The drawback of inheritance is as time goes on, it becomes extremely difficult to maintain decoupled code. Code starts traversing up the hierarchy as more and more derived objects require the same functionality. Recommended books on the subject:
● Game Engine Architecture ● Game Programming Gems 4: A System for Managing Game Entities Game ● Game Programming Gems 5: Component Based Object Management ● Game Programming Gems 5: A Generic Component Library ● Game Programming Gems 6: Game Object Component System
Here is more detailed information about inheritance and component based design: Evolve your Heirarchy; Game Object Architecture: Aggregations vs Inheritance.
Factory The factory is a system that manages the creation of other objects. Here’s an external link to a detailed description of the implementation of a factory. The factory is integral in a game engine; without a proper factory the creation of objects results in very coupled code and no clear owner of objects. The Factory itself abstracts the code to create objects by reversing the dependency of creation code to delegated creator objects. Instead of the factory including a bunch of files to
create different types of objects, different types of objects can include the factory and tell it how to construct itself.
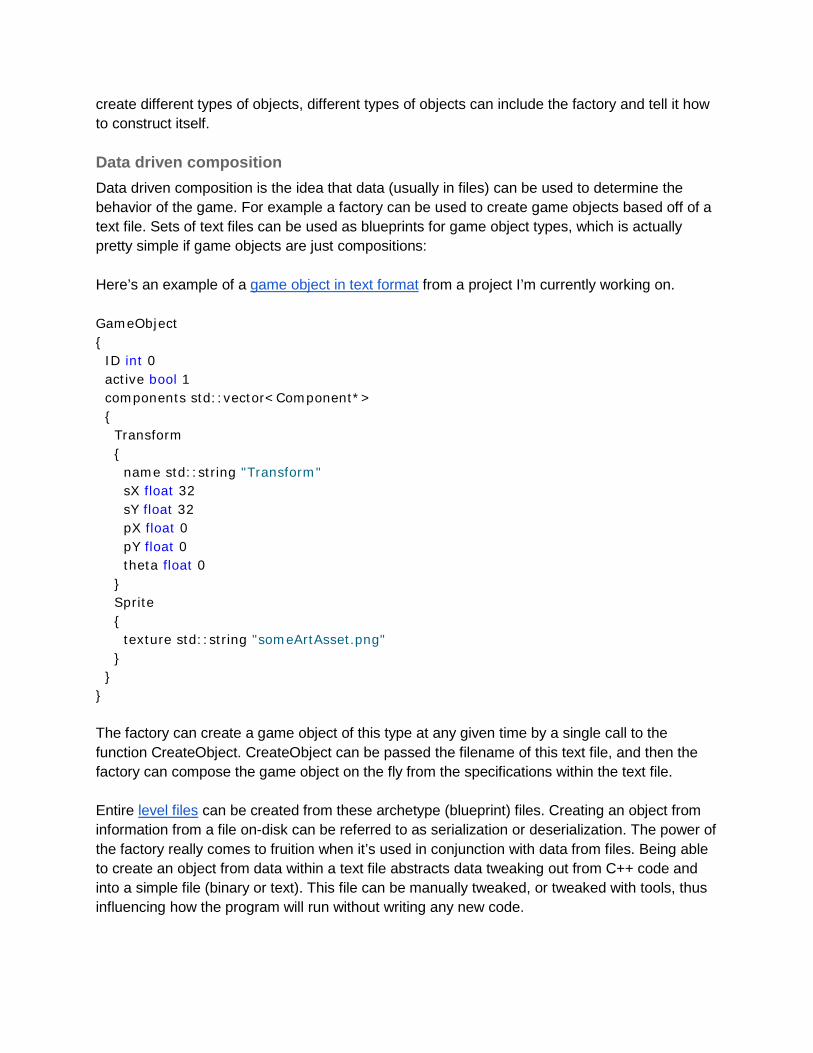
Data driven composition Data driven composition is the idea that data (usually in files) can be used to determine the behavior of the game. For example a factory can be used to create game objects based off of a text file. Sets of text files can be used as blueprints for game object types, which is actually pretty simple if game objects are just compositions: Here’s an example of a game object in text format from a project I’m currently working on. GameObject { ID int 0 active bool 1 components std::vector<Component*> { Transform { name std::string "Transform" sX float 32 sY float 32 pX float 0 pY float 0 theta float 0 } Sprite { texture std::string "someArtAsset.png" } } } The factory can create a game object of this type at any given time by a single call to the function CreateObject. CreateObject can be passed the filename of this text file, and then the factory can compose the game object on the fly from the specifications within the text file. Entire level files can be created from these archetype (blueprint) files. Creating an object from information from a file on-disk can be referred to as serialization or deserialization. The power of the factory really comes to fruition when it’s used in conjunction with data from files. Being able to create an object from data within a text file abstracts data tweaking out from C++ code and into a simple file (binary or text). This file can be manually tweaked, or tweaked with tools, thus influencing how the program will run without writing any new code.

Additional isolated topics
Finite State Machines The most common and simplest of all AI programming techniques is the finite state machine (FSM). A state machine is a way of creating a specific type of behavior based around organizing blocks of AI code into states. These states are generally very independent from one another, and an object with a FSM is always in one of the AI states. Swapping from state to state lets the object change its behavior, perhaps from walk left to jump right. FSMs are generally used for very simplistic enemies, such as patrolling enemies in 2D action platformers.
Here’s an example FSM in C++ code. void Enemy::Update( state State ) { switch( State ) { case Attack: if(FindPlayer( )) AttackPlayer( ); else enemyState = Patrol; return; case Patrol: PatrolWalk( ); if(FindPlayer( )) enemyState = Attack; return;

case Die: DisplayDeath( ); SetEnemyToInactive( ); return; } } In this example you can see that the enemy’s state will swap back and forth between patrolling and attacking the player continually, until the enemy’s state is somehow set to the Die state. Finite state machines can be great for simple AI, though are very brittle. Adding a new state to a state machine often times requires refactoring of other pre-existing states, and state machines are usually very specific to the single object that they are intended to run on.
ActionList Action lists are a different way of handling AI compared to that of state machines. The concept is that you have a linked list of actions to perform in sequence. There’s a single update function that updates the first action in the list. If this first action is “blocking”, then updating is stopped until the next call to update. If the first action is “non-blocking”, the next action in the list has update called on it, and so on. This way you can easily create complex behavior or algorithms on-the-fly, as opposed to writing brittle state machines, or some other method. Here’s a long video on the details of implementing such a system. Here are the slides associated with the video. Lastly, here’s one more link on action list implementation details.
Improved Messaging A more advanced form of messaging can map the message identifiers to specific operations to perform. This can be achieved with a hash table; a message’s ID can be hashed to an index rather than running a switch statement upon it. Polling can be a big issue when using messages. For example say a game object needs to know when a particular key is pressed. This object might send a message to the input section of code within a project asking if this key is pressed, every single time the object itself is updated. This form of constantly checking the status of something is called a polling, and is very inefficient. An optimization to messaging is to allow some form of interrupt callback to be used whenever something happens. Imagine polling as constantly asking if something has happened: “Did it happen yet? No. Did it happen yet? No. Did it happen yet? No”. This can be akin to kids in the backseat asking their parents “Are we there yet? Are we there yet?” It’s annoying. Instead the parents will say “We’ll let you know when we get there”. The same idea can be applied to messaging in the form of what is called listeners and subscribers.
In the parent child relationship in the car example, the children subscribe to the parents in order to hear about when they “get there”. In this way the children don’t do any actions at all until the parent informs them to. To implement this in code an object will give the input access to itself, and the input section of code can then store that access information (perhaps the access information is an ID to the object, or a delegate to one of it’s methods) in a container. Then when the input recieves a keystroke it can traverse the container and inform everyone that “subscribed” that the key had been pressed. This a type of interrupt callback routine that can be known as the observer pattern. Here’s a long video on the implementation details of messaging systems.
Generic programming Generic programming is style of programming that is typeless, as in the type of data to be used is not determined at the time the code was written. In C++ this is achieved with templating. In C there’s a couple different methods for achieving generic programming. Templating in C++ revolves around generating code around abstract types. A great example of an effective use of generic programming is in the implementation of abstract data types like linked lists or vectors. It would be horrendously annoying to write multiple definitions of linked lists revolving around supporting different types of data. Using templates you can let the compiler generate all the code for you. Here’s a very simple example of a templated function used to find the smaller value between two parameters of type T. Every single time the Min function is used with a specific type for T the compiler’s templater will generate a new function specifically for use of Min with that type. The compiler will not generate any code from the Min function if it is never used. This way the code generated from templates is proportional to the amount of different types that require code generation from the template itself.
Bitmasks A bitmask in C is usually used with an integer, and is a way of storing data into the separate bits. Bitfields can be achieved with structures, however I’ll be talking only about integer bitmasks. By storing information into a particular bit, very efficient memory usage can be employed in order to store boolean properties within a single integer. I won’t be doing an overview of the different bitwise operators, however an absolutely excellent chapter on low-level programming and the bitwise operators resides within: C Programming: A Modern Approach 2nd Ed.

Here’s a few common operations relating to bitmasks: ● Setting a bit
○ number |= 1 << x; ● Clearing a bit
○ number &= ~(1 << x); ● Toggling a bit
○ number ^= 1 << x; ● Checking a bit
○ bit = number & (1 << x); By using these operations information can easily be stored and manipulated within an integer. Here’s a code example using a char instead of int (for brevity). As you can see creating combinations of bit properties is really simple from the programmer’s perspective.
User Interface by Sean Reilly User Interface (UI) is the means by which the user and computer system interact. In games this is accomplished via the use of interactive on-screen elements such as menus and buttons, as well as visual indicators such as health bars, point/ammo displays and mini-maps.
Game User Interface When it comes to creating a game user interface there are two main options: build a custom UI framework from scratch or use a preexisting library.
From Scratch The key to creating a custom user interface library is keeping it simple. Remember, you are writing a game, not the next version of HTML. The majority of independent games get by using fixed size layouts with some images, text, and rectangular buttons. Even AAA games such as Diablo III get by with completely static UIs. At a minimum, all you need is the ability to detect whether or not the mouse cursor is within the bounds of an image or rectangle and call a function if the mouse is pressed.
Preexisting Library If you are unsatisfied with the rigidity or lack of features a custom UI provides, the following is a list of user interface libraries which can be embedded into your game. Each of these libraries has varying levels of integration difficulty, but in exchange will provide you with the flexibility and customization needed to create a powerful and unique interface. Preexisting UI Libraries: Crazy Eddie's GUI (CEGUI) LibRocket Chromium Embedded Framework (CEF)
Editor User Interface Creating a user interface for an editor is not the same as creating a user interface for a game. You should worry less about having something that looks nice, and more about having something familiar, robust, and easy to use. The three main types of game editors are in-game, external, and external with the game fully or partially embedded.
In-Game An in-game editor is one which uses the your game's UI to create an on-screen editing environment. Pros: Easy to implement. The editor can simply be a heavily modified game menu using your existing UI framework. It also becomes simple to ship the editor with the game as it is already integrated. Cons: Inflexible. You will likely be limited in terms of editing tools and screen real estate. Chances are you will be using a static layout and tools will be hidden or cluttered around the screen. In-Game Editor UI Library: AntTweakBar
External A tool which is completely independent from the game. It has no communication whatsoever and is used to create maps and other assets which are exported as files and loaded into the game. Pros: Easy to work on while the game engine is still in development since it doesn't rely on the game itself. Can be written in any language. Cons: No in-game editing or switching between play and edit modes. Cannot use engine libraries if the editor is written in a different language.
External with Game Embedded A tool which shares engine libraries and is capable of running the game from within the editing environment. The Starcraft II and Torchlight editors are good examples of this approach. Pros: Since you are using the game's engine, you gain the ability to quickly switch between edit and play modes. Additionally, sharing libraries between the editor and game provides the capability to trigger game events, instantiate objects, load levels, and do anything else that could normally be done in-game without having to duplicate any work. Cons: Difficult to maintain. Any changes made to the game itself can adversely affect the editor and vise versa. External UI Frameworks: wxWidgets Qt Windows Forms Windows Presentation Foundation
Serialization Serializing an object is the act of placing information about the object into a file representation. Later an identical or similar object can be constructed from the information within the file, and this can be called deserialization. Serializing objects is a non-trivial matter, as explained momentarily.
Dump the Bytes In order to get an object into a file, you may want to just simply dump all of its bytes straight into a file. This solution isn’t nearly good enough. What are the values of pointers going to mean on deserialization? How can you tell the difference in data from one type of object to another? What if an object on-creation needs to run its constructor? Not all objects are C-like structures that just hold data; they often need operations performed on them when they are constructed, and just simply loading/unloading bytes won’t perform these operations.
Streams First we must talk about where to write and read data from. Streams are one solution and actually the only one I know of. A stream object is an object that can have data written and read from it. The standard library for C++ provides some excellent stream objects that will allow us to accomplish exactly what is needed, and I recommend using them. In particular fstream and stringstream were useful to me when I wrote serialization code recently. By reading and writing to stream we introduce another level of indirection: first we manipulate a stream, and the stream manipulates a file. In this way the stream can be abstract. We can write our serialization code that writes to a stream of any kind, whether it be intended for a file or networking, or anything. The stream can handle the details of sending or storing data, and we don’t want to couple our serialization code to a specific type of I/O.
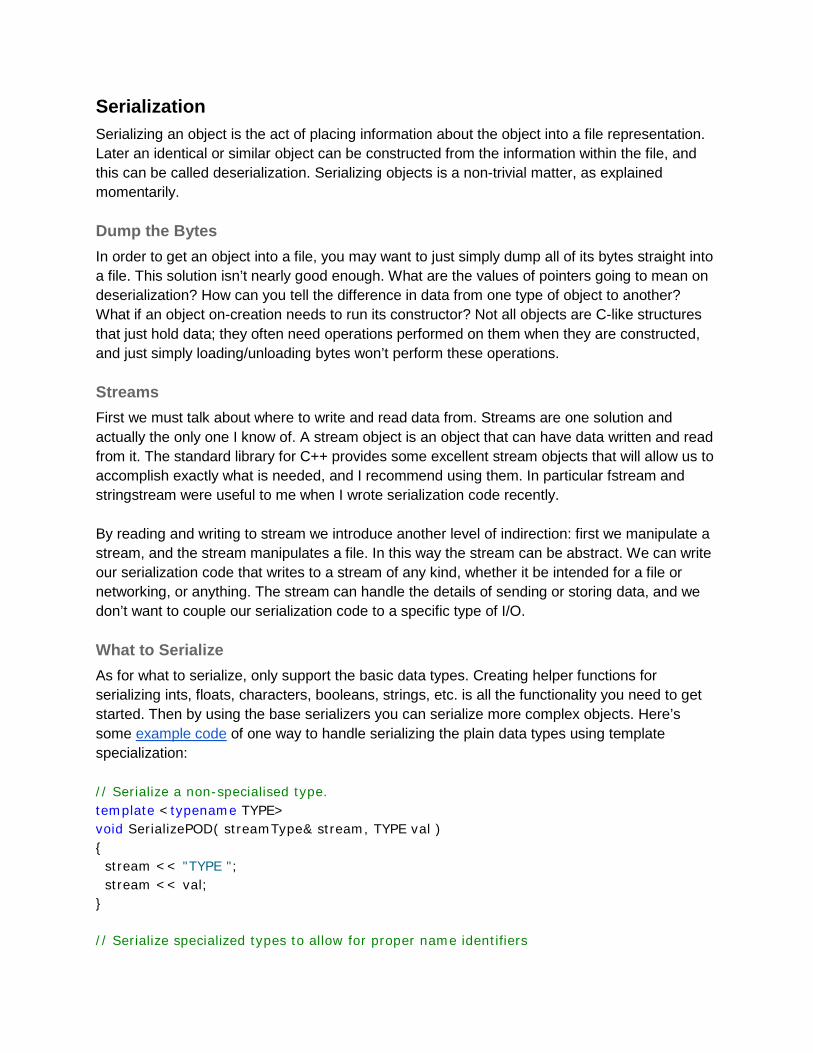
What to Serialize As for what to serialize, only support the basic data types. Creating helper functions for serializing ints, floats, characters, booleans, strings, etc. is all the functionality you need to get started. Then by using the base serializers you can serialize more complex objects. Here’s some example code of one way to handle serializing the plain data types using template specialization: // Serialize a non-specialised type. template <typename TYPE> void SerializePOD( streamType& stream, TYPE val ) { stream << "TYPE "; stream << val; } // Serialize specialized types to allow for proper name identifiers
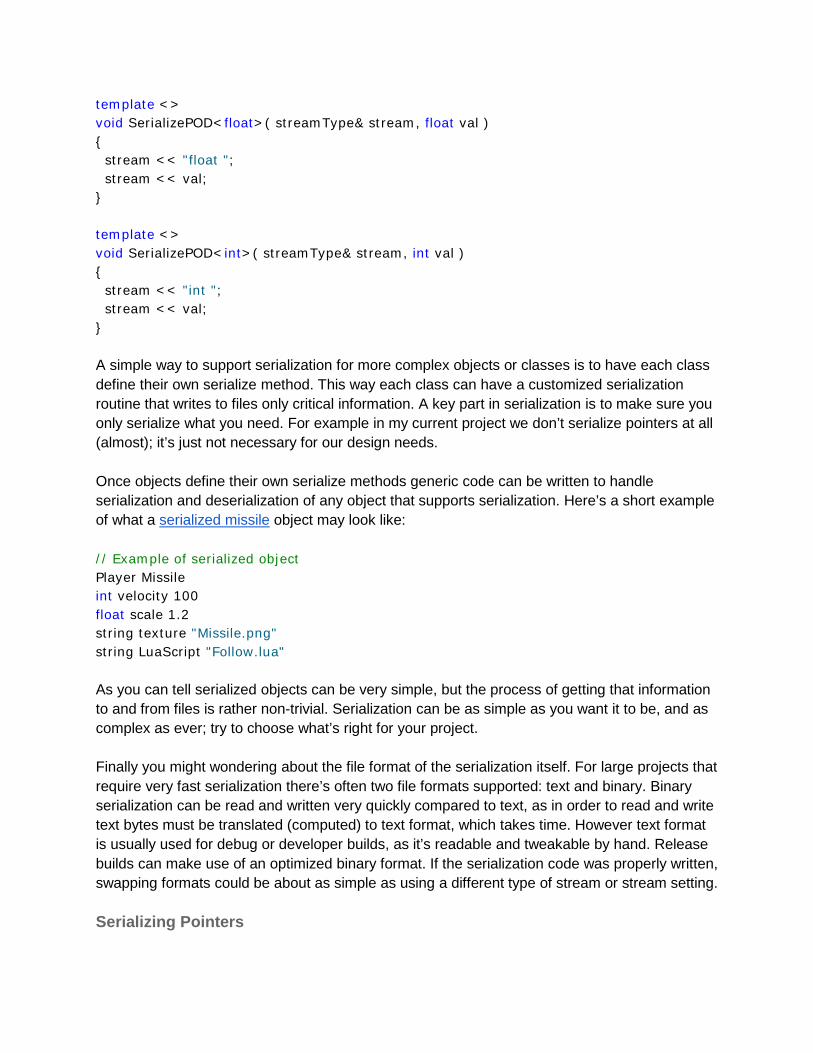
template <> void SerializePOD<float>( streamType& stream, float val ) { stream << "float "; stream << val; } template <> void SerializePOD<int>( streamType& stream, int val ) { stream << "int "; stream << val; } A simple way to support serialization for more complex objects or classes is to have each class define their own serialize method. This way each class can have a customized serialization routine that writes to files only critical information. A key part in serialization is to make sure you only serialize what you need. For example in my current project we don’t serialize pointers at all (almost); it’s just not necessary for our design needs. Once objects define their own serialize methods generic code can be written to handle serialization and deserialization of any object that supports serialization. Here’s a short example of what a serialized missile object may look like: // Example of serialized object Player Missile int velocity 100 float scale 1.2 string texture "Missile.png" string LuaScript "Follow.lua" As you can tell serialized objects can be very simple, but the process of getting that information to and from files is rather non-trivial. Serialization can be as simple as you want it to be, and as complex as ever; try to choose what’s right for your project. Finally you might wondering about the file format of the serialization itself. For large projects that require very fast serialization there’s often two file formats supported: text and binary. Binary serialization can be read and written very quickly compared to text, as in order to read and write text bytes must be translated (computed) to text format, which takes time. However text format is usually used for debug or developer builds, as it’s readable and tweakable by hand. Release builds can make use of an optimized binary format. If the serialization code was properly written, swapping formats could be about as simple as using a different type of stream or stream setting.
Serializing Pointers
As for serializing pointers, I’ll throw the description of the idea out very quickly and let the reader pick up the pieces. One way to tackle serialization of pointers is to use another level of indirection. First it’s assumed that all serialized pointers will point to serialized data (otherwise the data is lost on program end, defeating the purpose). When serializing a pointer use the address it holds and treat it as a unique identifier, also known as a key, that maps to a new location. This new location will be created on deserialization and all pointers will use their old address as a key to map to the new location. The data in the locations themselves will act as the “values” in a key to value table (or dictionary) that is stored in the serialized file. To summarize: upon serialization all pointers you wish to serialize have the contents at their locations serialized in a table (perhaps a hash table), and the keys to each index in this table is the address the object resided in just before serialization. By using the address as a key it ensures that each entry into the table has a unique identifier. Upon deserialization the table is deserialized, and the old keys (old addresses) are then mapped to new memory locations of the newly constructed objects. Then all the other objects that refer to the table with address indices can be mapped to the new memory locations upon deserialization.
Optimization for C++ Games There are a few different simple guidelines that one can follow to ensure their code isn’t running sub-optimally. I’ll point out the common low-hanging ones that I’m familiar with.
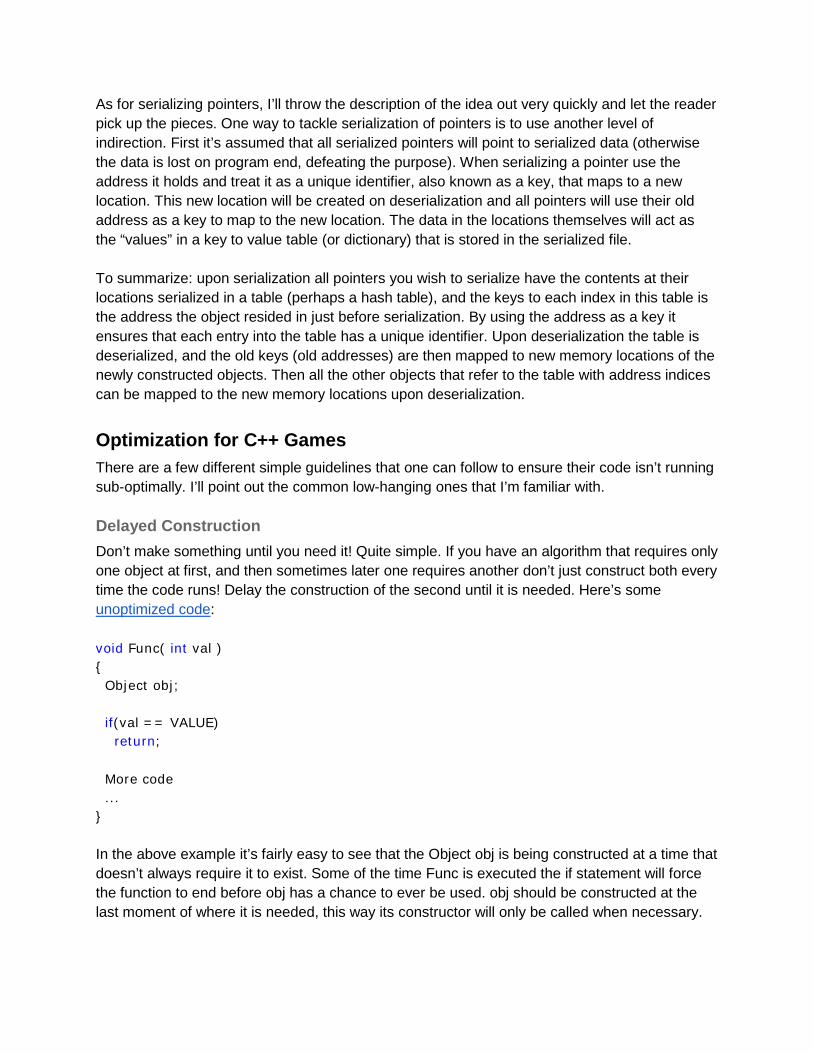
Delayed Construction Don’t make something until you need it! Quite simple. If you have an algorithm that requires only one object at first, and then sometimes later one requires another don’t just construct both every time the code runs! Delay the construction of the second until it is needed. Here’s some unoptimized code: void Func( int val ) { Object obj; if(val == VALUE) return; More code ... } In the above example it’s fairly easy to see that the Object obj is being constructed at a time that doesn’t always require it to exist. Some of the time Func is executed the if statement will force the function to end before obj has a chance to ever be used. obj should be constructed at the last moment of where it is needed, this way its constructor will only be called when necessary.

Pre and Post Increment Post increment should be avoided in favor of pre increment whenever possible. Post increment creates copies of user-defined types whereas post increment does not. Here’s an example in code to show the difference: void Func( container& data ) { userDefined i = initVal; userDefined j = i++; // Unnecessary copy created } void Func( container& data ) { userDefined i = initVal; userDefined j = ++i; // No un-optimized copies being created }
Initializer List Using an initializer list, although awkward looking, is actually faster in C++03 than using code within a constructor to initialize values. This is due to how the compiler works. With an initializer list the compiler is able to reduce the amount of instructions necessary to set an object up, where if we place initialization code into the body of the constructor instead, assignment instructions must be called that might have been avoided if in the initializer list. // Object construction and value initialization can happen at once here. Object::Object( std::string& name, int val ) : Name( name ), hp( val ) { } // Will require additional assignment operations after object construction. Object::Object( std::string& name, int val ) { Name = name; hp = val; }
Preallocate Objects A simple optimization to a game can be to pre-allocate an array of objects for use throughout the games duration. This is great for things like particle systems where object recycling comes in handy. Imagine a particle system spawning thousands of the same particle every second. If each object is allocated and deallocated individually the overhead incurred from memory handling will be overwhelming. A simple solution is to use a pre-allocated or stack array of particles. Whenever a new particle is needed an empty slot can be searched for and used. When a particle needs to be “deleted” it can be deactivated and its memory marked as “empty”.

In this way no memory allocation or deallocation is being performed, instead memory is being efficiently reused. A further optimization to pre-allocating arrays of objects like this is to keep track of which slots are open and empty so that no search for an empty slot needs to occur. This can reduce the amount of time spent searching for empty slots to be used for additional objects. Of course the drawback to this method is that there are a limited number of slots available as the memory isn’t dynamic. There are ways around this limitation but are out of scope for this section.
Reflection: Type MetaData I was slightly hesitant in including this section because of how vast of a topic it is. I decided to include it in that I’ll compromise by mainly describing what reflection in C++ is, while linking to other external sources for implementation details. Reflection (aka MetaData) in a programming language grants the programmer access to the various types of data being manipulated in a program. By having access to this information very generic code can be written, and often times entire tools can be generated for user-defined types, simply by inserting a newly created user defined type into a reflection system. In my current project as I write this I’m using a MetaData system that allows for the following interesting features:
● Variant and RefVariant objects ○ Variant is an object that holds MetaData information and a void * ○ Refvariant is a Variant that performs shallow copies on the void *
● Automated serialization ● Automated Lua object binding ● Automated Lua function binding ● Advanced debugging information and type checking
A MetaData system can also allow for:
● Simple factories for object creation ● Versionable serialization ● Simple editor support
○ Automatically generated property grids ● More I don’t know about!
Hopefully you’ve been convinced that a strong MetaData system can provide some valuable features. So how does it work? The implementations I’m familiar with involve either manually entering in type data, or with some sort of code preprocessor that scans C++ code before compilation and inserts data into some sort of database.
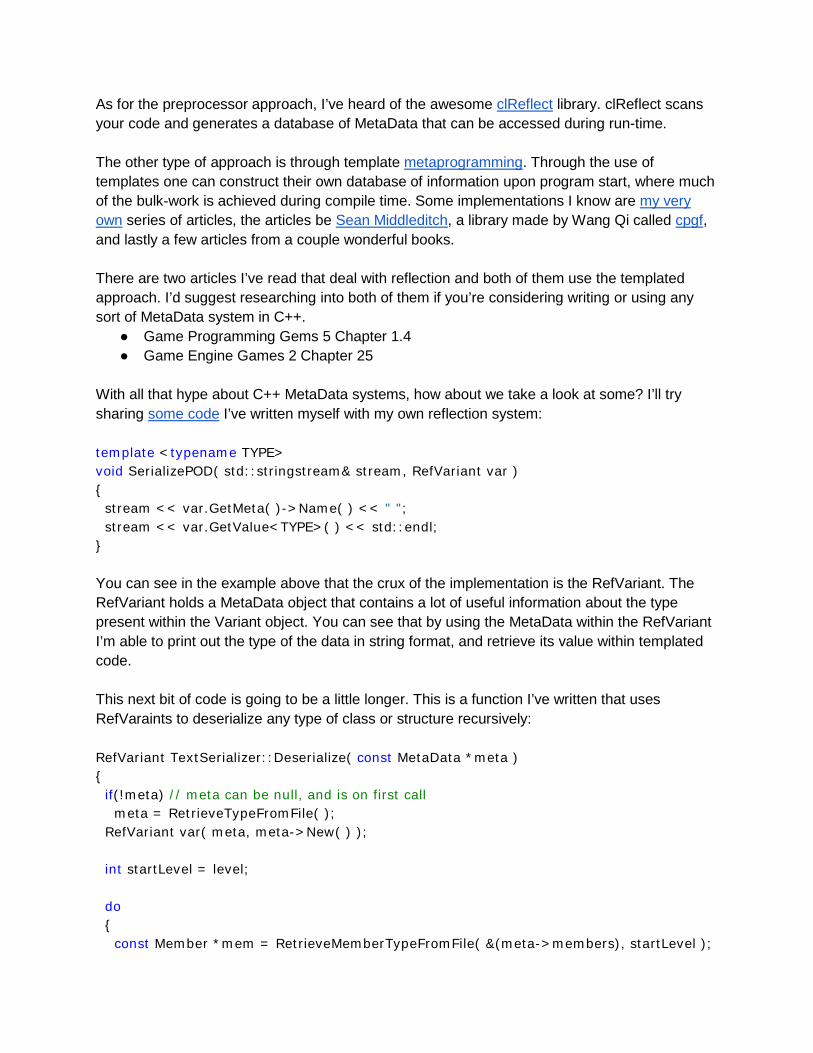
As for the preprocessor approach, I’ve heard of the awesome clReflect library. clReflect scans your code and generates a database of MetaData that can be accessed during run-time. The other type of approach is through template metaprogramming. Through the use of templates one can construct their own database of information upon program start, where much of the bulk-work is achieved during compile time. Some implementations I know are my very own series of articles, the articles be Sean Middleditch, a library made by Wang Qi called cpgf, and lastly a few articles from a couple wonderful books. There are two articles I’ve read that deal with reflection and both of them use the templated approach. I’d suggest researching into both of them if you’re considering writing or using any sort of MetaData system in C++.
● Game Programming Gems 5 Chapter 1.4 ● Game Engine Games 2 Chapter 25
With all that hype about C++ MetaData systems, how about we take a look at some? I’ll try sharing some code I’ve written myself with my own reflection system: template <typename TYPE> void SerializePOD( std::stringstream& stream, RefVariant var ) { stream << var.GetMeta( )->Name( ) << " "; stream << var.GetValue<TYPE>( ) << std::endl; } You can see in the example above that the crux of the implementation is the RefVariant. The RefVariant holds a MetaData object that contains a lot of useful information about the type present within the Variant object. You can see that by using the MetaData within the RefVariant I’m able to print out the type of the data in string format, and retrieve its value within templated code. This next bit of code is going to be a little longer. This is a function I’ve written that uses RefVaraints to deserialize any type of class or structure recursively: RefVariant TextSerializer::Deserialize( const MetaData *meta ) { if(!meta) // meta can be null, and is on first call meta = RetrieveTypeFromFile( ); RefVariant var( meta, meta->New( ) ); int startLevel = level; do { const Member *mem = RetrieveMemberTypeFromFile( &(meta->members), startLevel );
if(mem) { RefVariant member; if(mem->Meta( )->HasMembers( )) member = mem->Meta( )->Deserialize( ); else member = mem->Meta( )->Deserialize( mem->Meta( ) ); member.GetMeta( )->Copy( PtrAdd( var.GetData( ), mem->offset ), member.GetData( ) ); member.Delete( ); } } while(level > startLevel); return var; } You can see here that this code is very generic; it will work for any type of class or structure registered within the MetaData system! It works by traversing a data table that represents a class type, where that data table stores other data tables that represent the class members. The MetaData information allows for generic Copy, Deserialize, offset locations, Delete, and other useful functionality that allow generic code like above. Hopefully by now you’re interested in learning more about reflection within C++, and if you are interested feel free to check out any of the various resources I’ve discussed within this section.
Example Engine At the end of the day it would be wonderful to provide some sort of example code for people to see with their own eyes. Luckily I have a pretty simple project called AsciiEngine. You can read all about it in the link here. AsciiEngine is a game engine written in C (sorry not C++!) for Windows XP, Vista, and Win7 that allows the user to easily create and display images within a Windows console. The engine also automates the tedious task of customizing aspects of the console, such as a font or palette color. Take a look at some of the features of AsciiEngine that you might be able to learn something from (it might seem like a lot, but I’m just good at making it sound better than it is haha):
● Complete game loop ○ Game loop integrated into Game State Manager via function pointers
● Game State Manager ○ Allows for easy management/creation/deletion of game states
● Functioning framerate controller ○ Allows the setting of framerate with a #define macro ○ Prevents large timesteps from passing through the program with a cap
● Various console related functions for easy customization of the console window ● Complete graphics functions set for drawing 2D images

● Input template complete for simple keystroke detection and mouse event handling ○ Easily customizeable to include more functionality
● Complete and very simple PRNG ● Simple image format that allows for variable size ● Integrated hash table for storing images
○ Allows for an optimized lookup, e.g.: TableLookup( “ImageName” ) ○ Extremely simple creation/deletion of images
● Implementation of my simple 2D collision library ● Implementation of my simple 2D vector library ● Highly organised object manager using the factory pattern
○ Allows for easy creation/handling/deletion of game objects ○ Incredibly simple to create new object types
● Implemented my Tile mapping — Binary Collision library ● Image editor ● File output ● Automatic image file loading and parsing ● Messaging system Object to object + global messaging system ● Component base game object system (now renamed to game entity) ● New button class for easy UI creation ● Integration of generic Hash Table and Linked Lists ● Simple serialization and deserialization support.