
GAME BASICS - gf9gamesbrigandsbrowncoats.gf9games.com/FAQ/Firefly_Adventures_Rulebook_… · time...
20
Transcript of GAME BASICS - gf9gamesbrigandsbrowncoats.gf9games.com/FAQ/Firefly_Adventures_Rulebook_… · time...


GAME BASICSFirefly Adventures is a cooperative, mission based, skirmish level game where the players need to use their different skills and abilities together to succeed. When you play Firefly Adventures, you’ll follow one of the Job Briefings, which determines what your Crew needs to accomplish, how they might succeed and how long they have to work.Some Jobs are easier and faster, some are longer and more involved. What type of Job you want to tackle is up to you. You can work a single Job or a play a story of multiple Jobs. In a Story, you’ll use the credits you earn from one Job to equip the Crew for the next Job. Each Job will detail how to set-up the map for that Job, how long the Timeline should be and how much you’ll be paid for completing the Job.
GAME CONTENTS6 MAP TILES Double-sided map tiles may be arranged in different configurations to create different shaped play areas.
10 BUILDINGS Three-dimensional buildings bring the game board to life and allow for easy line of sight determination. Each building has a number printed on its walls for fast map placement.
5 CREW CARDSEach member of the Crew has their own card, detailing what Actions are available to them. A Hero can either act “Casual” or “Heroic.” Depending on how they are acting, they have a different set of available Actions.
5 CASUAL & 5 HEROIC CREW MINIATURES Each Crew Member has a gray Casual Miniature and a green Heroic Miniature. When the Crew is Acting Casual, use the gray figure. When a Crew Member is Acting Heroic, use the green figure.
4 JOBSThe driving force of the game, each Job lays out what the Crew of Serenity needs to accomplish and special rules for that Job. Visit the Firefly Adventures website for more!
6 TIMELINE SEGMENTS Firefly Adventures uses a Timeline to track how much time the Crew has to complete a Job. Different Actions take different amounts of time. Each Character on the map has their own Time Marker, which tracks how much time they have spent so far. As your Crew moves, shoots and attempts Challenges, you’ll advance their Time Marker up the Timeline.
30 TECH CHALLENGE CARDSWhen a Job calls on a Hero to undertake a technology-driven Challenge, draw a Tech Challenge card to see what exactly needs to be done.
30 NEGOTIATION CHALLENGE CARDS Whether it’s threats, seduction, bribery or general flim-flam, if a Hero needs to talk their way out of a situation, they’ll draw a Negotiation Challenge Card.
10 GOON CARDS & MINIATURESFirefly Adventures - Brigands & Browncoats contains 10 different Goons: 5 Cowboys and 5 Thugs. Each miniature is paired with a unique card. Each Goon’s card lists their special rule.
40 EQUIPMENT CARDSA variety of guns, explosives and other tools the Crew use to accomplish their missions. If you’re playing a series of Jobs, Crew may keep their Equipment to use in the next Job.
1
FRONTIER MODEL B
800
May Shoot at Goons next to Crew. Missed Shots wound the adjacent Crew.

TOKENSFirefly Adventures uses a variety of tokens in the course of the Job. Not every Job will use every token. Each Job Briefing will detail which tokens are needed.
BODY TOKENS When the Crew defeat a Goon, the Goon miniature is removed from the board and replaced with a Body Token. Visible Bodies may Alert other Goons or reduce your Reward.
CARGO CRATE TOKENS Valuable cargo and other items will need to be transported, recovered, or liberated from their current owners. Crew may find credits or Equipment in Cargo Crates, show on the back of the tokens.
GOON STARTING LOCATIONS These tokens mark where on the map the Goons begin the game. In the course of a Job, Goons may return to their starting position.
INTEL TOKENS Intel may be bought, earned, or stolen - depending on the situation. Some Challenges will have opportunities to take Intel Tokens. Intel Tokens may be used in different ways, depending on the Job.
LOCKED TOKENS Not everyone in the ‘Verse is exactly trustworthy. Some folks depend on a loaded gun to protect what’s theirs, some on a sturdy lock. You’ll face locked doors in some Jobs. The back of the Locked Tokens shows what’s required to open the door. Any door without a Locked Token next to it is considered open.
M.U.L.E. Whether it’s loaded with contraband or Crew beating a hasty retreat, it’s dependable transportation from one misdeed to another. The M.U.L.E. will often be the starting and/or ending point of a Job.The M.U.L.E does not block line of sight.
CHALLENGE TOKENS Jobs involve numerous obstacles which the Crew have to overcome. Challenge Tokens mark where on the map the Challenge takes place.
NUMBERED TOKENS Brigands & Browncoats includes Numbered Tokens, 1-10. These may be used to track locations, difficulty or other Job events.
OBJECTIVE TOKENS Objective Tokens are sometimes used to mark places of interest on a map, things which need to be investigated, or other Job events.
PATROL MARKERSGoons aren’t always just sittin’ back, watchin’ the ‘Verse stroll by. Sometimes they’re on Patrol, moving about, lookin’ for trouble. Patrol Markers are placed on the map to define a Patrol route.
TERMINALS The Cortex is the network that connects the far-flung plants and moons of the ‘Verse. Whether it’s transferring credits, accessing records, or infiltrating security systems, a Cortex Terminal is likely your first stop.
REWARD MARKER While Working a Job, your Crew’s Reward may go up or down. Place the Reward Marker on top of the pile of credits you’ll earn if the Job is a Success.
WOUNDS & DOWNED CREW CARD Crew and Goons can each suffer a certain number of Wounds before they’re Downed.
When a Crew Member is Downed, place a Downed Actions card on their Crew card. These are the only Actions a Downed Crew may take.When a Goon is Downed, replace their miniature with a Body Token.
2
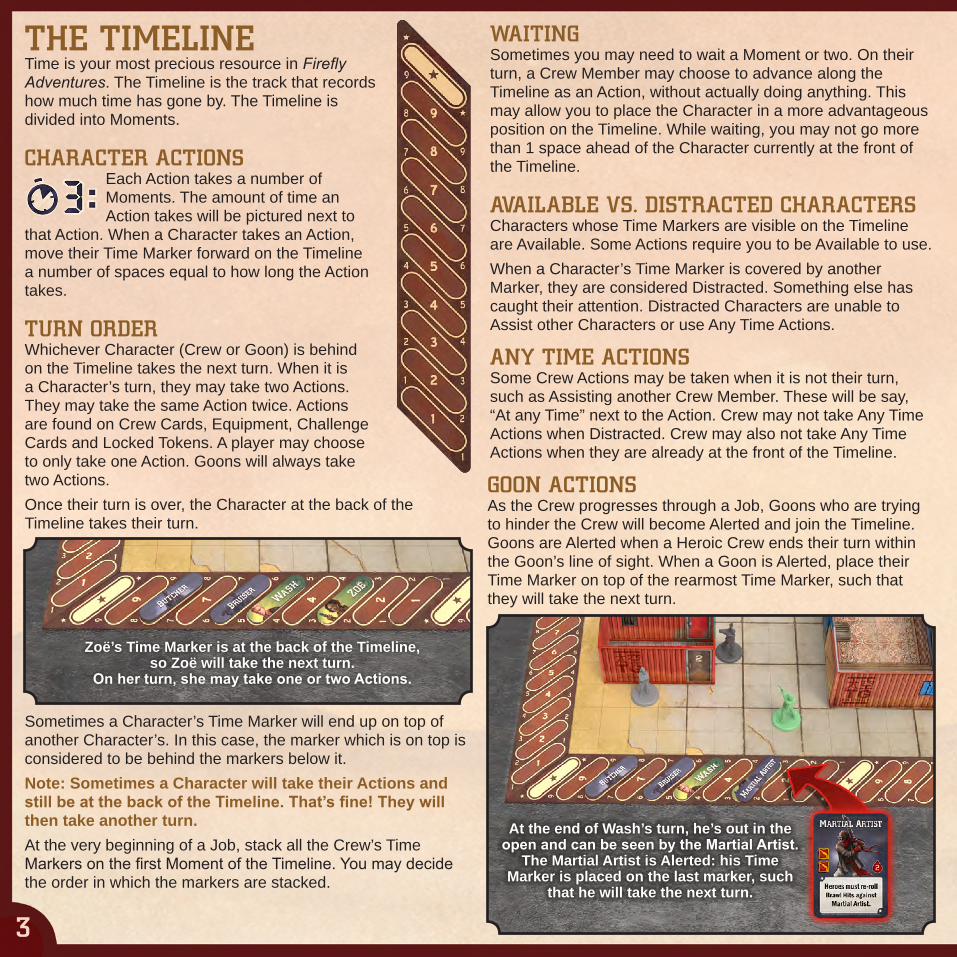
THE TIMELINE Time is your most precious resource in Firefly Adventures. The Timeline is the track that records how much time has gone by. The Timeline is divided into Moments.
CHARACTER ACTIONS Each Action takes a number of Moments. The amount of time an Action takes will be pictured next to
that Action. When a Character takes an Action, move their Time Marker forward on the Timeline a number of spaces equal to how long the Action takes.
TURN ORDER Whichever Character (Crew or Goon) is behind on the Timeline takes the next turn. When it is a Character’s turn, they may take two Actions. They may take the same Action twice. Actions are found on Crew Cards, Equipment, Challenge Cards and Locked Tokens. A player may choose to only take one Action. Goons will always take two Actions. Once their turn is over, the Character at the back of the Timeline takes their turn.
Sometimes a Character’s Time Marker will end up on top of another Character’s. In this case, the marker which is on top is considered to be behind the markers below it.Note: Sometimes a Character will take their Actions and still be at the back of the Timeline. That’s fine! They will then take another turn.At the very beginning of a Job, stack all the Crew’s Time Markers on the first Moment of the Timeline. You may decide the order in which the markers are stacked.
WAITING Sometimes you may need to wait a Moment or two. On their turn, a Crew Member may choose to advance along the Timeline as an Action, without actually doing anything. This may allow you to place the Character in a more advantageous position on the Timeline. While waiting, you may not go more than 1 space ahead of the Character currently at the front of the Timeline.
AVAILABLE VS. DISTRACTED CHARACTERS Characters whose Time Markers are visible on the Timeline are Available. Some Actions require you to be Available to use.When a Character’s Time Marker is covered by another Marker, they are considered Distracted. Something else has caught their attention. Distracted Characters are unable to Assist other Characters or use Any Time Actions.
ANY TIME ACTIONS Some Crew Actions may be taken when it is not their turn, such as Assisting another Crew Member. These will be say, “At any Time” next to the Action. Crew may not take Any Time Actions when Distracted. Crew may also not take Any Time Actions when they are already at the front of the Timeline.
GOON ACTIONS As the Crew progresses through a Job, Goons who are trying to hinder the Crew will become Alerted and join the Timeline. Goons are Alerted when a Heroic Crew ends their turn within the Goon’s line of sight. When a Goon is Alerted, place their Time Marker on top of the rearmost Time Marker, such that they will take the next turn.
3
Zoë’s Time Marker is at the back of the Timeline, so Zoë will take the next turn.
On her turn, she may take one or two Actions.
At the end of Wash’s turn, he’s out in the open and can be seen by the Martial Artist.
The Martial Artist is Alerted: his Time Marker is placed on the last marker, such
that he will take the next turn.

SKILLS & SKILL TESTS Throughout their adventures, the Crew will have to rely on their Skills to get paid. There are three types of Skills: Fight, Tech and Negotiate. You can find Skill Points on both Crew and Equipment Cards. Skill Tests appear on Challenge Cards. Some Jobs may require Skill Tests to advance the Job.
FIGHT Fight Skill is useful when resolving conflicts with violence. Whether a bare knuckle Brawl or open gunplay, enough Fight Skill will get you through.
TECH Tech Skill comes into play when facing challenges ranging from breaching security systems or hacking computers to cracking a vault.
NEGOTIATE Negotiate Skill will help you talk your way out of trouble or into more profit. Hoodwinking the local muscle or dealing with angry business partners all come under the header of the Negotiate Skill.
SKILL TESTS Skill Tests are written as a Skill icon, followed by a number of dice and a number. The Icon tells you which Skill you’re using for the Test, the number of dice pictured is how many dice you’ll roll in the attempt and the number next to the dice is the target number. To make a Skill Test, roll the number of dice pictured and add all your available Skill Points of the appropriate type to your dice’s total. If your dice roll plus your Skill is equal to or higher than the Skill Test’s Target, it’s a Success. If it’s lower, it’s a Failure.Example: In the above Test, you would roll a single die (D6) and add your Tech Skill Points to determine your total. If the total is 6 or less you’ve failed the Test. With a total of 7 or more you have succeeded. All Tests are resolved in a similar fashion regardless of the Skill on which it is based. Like the Tech Test pictured above, some Skill Tests will also have a Type, written below the Test. Some Equipment will give you bonuses to certain types of Test.
BRIBERY Not everyone is on the up and up. Some Negotiate Tests will say “Bribery” below their number. Before you attempt the Test, you may choose to pay Bribes. For every $100 you pay the bank, add +1 to your Test’s total.
THRILLIN’ HEROICS & DISGRUNTLED DICE The Verse is unpredictable and unforgiving. Sometimes you manage to pull off a feat that you had no right to. Other times, Lady Luck’ll throw sand in your eye.
The dice in Firefly Adventures have a Firefly in place of the 6. When you roll a Firefly, you’re engaged in some Thrillin’ Heroics. For each Firefly rolled, you may roll an additional bonus die and add it to your results. Each Firefly rolled adds 6 to the Test result.
Example 1: Mal is attempting a one die Fight Test, to Shoot. He needs a total of 9 on his roll. He rolls a Firefly! He rolls his bonus Thrillin’ Heroics die and rolls a 4: now he’s hit!
Example 2: Zoë is now Shooting, with a gun that allows her to roll 2 dice. She needs a roll of 8 to hit. Zoë rolls a 3 and a Firefly. With a total of 9, Zoë has already hit, so she opts not to roll a third die.
The opposite sides of the dice have a Disgruntled Icon instead of a 1. If you roll more Disgruntled Faces than Heroic dice, things have gone awry and you fail the Test. Disgruntled faces never add to the dice’s total.
Example 3: Mal Shoots again, at a closer target. This time, he rolls a Disgruntled face: Failure! Regardless of how many points of Fight Skill he has, he has failed to hit.
Even if you if have enough Skill to pass a Test without rolling at all, you must always roll at least one die. You may roll fewer than allowed. If you roll an equal amount of Heroic and Disgruntled Dice, you may still pass the Test.
Example 4: Zoë takes another shot and rolls one Heroic and one Disgruntled die. She rolls her bonus die and gets a 4. She now has 1 Disgruntled die, 1 Heroic die and a total of 10. Since her Heroic dice aren’t outnumbered by her Disgruntled dice, she hits her target again.
7SABOTAGE
8BRIBERY
4

CREW CARDS Each Member of the Crew has a unique Crew Card which lists all the Actions available to them on their turn. Each Crew card is double sided: Casual & Heroic. Depending on whether the Crew is Action Casual or Acting Heroic, they’ll have a different list of possible Actions.
A Character can switch from Acting Casual to Acting Heroic at any time, but switching from Heroic to Casual is an Action that takes a few Moments.
Some Crew may be able to take Actions in Casual mode that others cannot. Similarly, there are Actions that can only be taken while Acting Heroic.
HEROIC VS. CASUAL ACTIONS Some Actions on Challenge Cards and Equipment are marked with the Independents’ Star and Stripes. These are Heroic Actions and any Crew making or assisting a Heroic Action must be Acting Heroic. Casual Actions may be taken while Acting Casual or Heroic.
ACTION BOOSTS Some Actions on a Character’s card are marked with a plus sign. These are Action Boosts, which improve another Action being taken, at the cost of taking more time. Boosts do not count as a separate Action and may only be used once per Action.
This Boost of Kaylee’s adds a die to a Tech Test, and increases the amount of time that Tech Test takes by 2 Moments.
WOUNDS Crew have their Wounds listed on their Heroic side. Once Wounded, a Character must Act Heroic, until they’re fully healed. You can’t casually bleed all over the place!
The number of Wounds pictured on their Card is the number of Wounds they can receive before being Downed.
DOWNED CREW When a Crew Member is reduced to zero health, that Character has been Downed. Place a “Downed” status card over their Heroic Actions. They’ll need to Heal some Wounds before they can Get Back on their Feet. While Downed, they only Actions they may take are those listed on the Downed card. Once a Crew Member heals at least one of their Wounds, they may then take the Action to Get Back on their Feet, removing the Downed card. After removing the Downed Status Card, they are still going to be Acting Heroic. Goons generally do not target Downed Crew.Healing a Downed Crew counts as a Heroic Action, if done in sight of a Goon.
5
Even though Zoë is Acting Casual, Healing a Downed Character is a Heroic Action when done in sight of a Goon.
Zoë will need to Act Heroic to heal Wash.

EQUIPMENT CARDS From Medical Kits to Grenades, There is a plethora of items which improve your chances of completing a Job. The right Equipment can make up for a Crew Member’s shortcomings, or may enhance their natural-born talent.
TIMED EQUIPMENT ACTIONS Some pieces of Equipment will have Timed Actions listed on their card. These Actions add to the possible Actions a Crew Member may take on their turn. Taking an Action on an Equipment Card counts as one of that Crew’s two Actions. Any Equipment’s abilities that don’t require spending time do not count towards a Characters two Action per turn.
CARRYING EQUIPMENT Crew may carry up to four pieces of Equipment. This can be any mix of Weapons, Clothing or other doo-dads.
Over the course of playing the game, if a Crew Member acquires more than four pieces of Equipment, they’ll have to leave some of it back in their bunk to be used later, or give it to another Crew Member.
FIREARMS VS. MELEE WEAPONS Some Gear and Actions refer to Firearms or Melee Weapons. Any piece of Equipment with a Shoot Action is a Firearm. Any piece of Equipment with a Brawl Action is a Melee Weapon. Both Firearms and Melee Weapons are considered “weapons.”
EXHAUSTING & REFRESHING GEAR Some Gear requires you to “Exhaust” the Gear to use it. To Exhaust a card, flip it face down. Exhausted Gear may not be used for the remainder of the game, unless some Event or Action allows you to “Refresh” it. To Refresh a card, flip it face up. If you’re playing a series of Jobs as a Storyline, all cards are Refreshed in between Jobs.
BUYING EQUIPMENT At the start of each Job, the Crew has a chance to buy new Equipment. How the Crew decides to divvy up their credits is up to them. You may want to divide the Credits equally among the Crew, or buy the Equipment the Crew agrees will be the most useful to the Job. See the rules for Working a Job, on page 15, for more details.
EXCHANGING EQUIPMENT On their turn, Crew standing next to another Crew may give or receive Equipment from each other. This takes 1 Moment of time for each Character. This does not count as an Action. You may give a Character multiple pieces of Equipment at the same time.
6

ATTEMPTING CHALLENGES Crew Members may be called upon to attempt Challenges by the Job. The Job’s description will say when and where the Challenges occur. When a Crew Member attempts a Challenge, draw a card from the appropriate Challenge Deck.
CHALLENGE CARDS Challenge Cards have two different Actions to choose from, at the top of the card, both of which will require a Skill Test. The Crew attempting the Challenge may choose either Skill Test. These will vary between Casual and Heroic, quick or long, or may even be different types of Tests.
Attempting a Challenge will always mean taking one of the Actions listed on the card and counts as one of the Crew Member’s two Actions. After choosing which Test to attempt, move the Crew Member forward on the Timeline the listed number of Moments, then roll the Skill Test.
Once you draw a Challenge Card, you must attempt one of the two Actions on the Card. You may not draw a Challenge Card if you’ve used all your turn’s Actions.
CHALLENGE RESULTSFailing a Challenge may result in the Goons on the board moving, Goons initiating combat, new Goons being placed, the timer being advanced, the Reward being reduced, etc. A Failure result may move a Crew Member further forward on the Timeline, even if they’re in the lead or their turn is now over.
After failing a Challenge, discard the card. That strategy has failed and you’ll have to try another tact. If the Job requires or allows you to attempt a Challenge again, draw another new Challenge.
Succeeding in a Challenge may have bonuses in addition to clearing the card: moving Goons, going back to Acting Casual, or moving Time Markers backwards.
MOVEMENT Every Character has a Movement Action on both sides of their card, showing a number of Arrow-filled squares. Characters may use movement to move themselves or objects.
MOVE A SQUARE A Movement Action allows a Character to move a
certain number of squares, as pictured on the Character Card. Characters may move straight or diagonally. Characters may move through other Characters of the same type: Thugs can move through Thugs, Crew can move through Crew, etc.
MOVE A HEAVY OBJECT Crew may also use a square of movement to move
Heavy Objects which are next to them. Movable Heavy Objects include Downed Crew and Bodies. Goons may not be moved, unless otherwise stated.
When you move a Heavy Object, you may move it from any square next to you to any other square next to you. Moving a Heavy Object uses up 1 square of the Crew’s Movement, as if they had moved themselves 1 square.
DOORS Any Character standing next to a door with a Locked Token may Investigate the door: flip the token over to see what it takes to open the door. Sometimes it will be open, sometimes it will be locked and require a Skill Test and another Action to open the door. You may not Investigate a door a Goon is standing next to. Any door without a token next to it is open.
OPEN A LOCKED DOOR Characters may use an Action to attempt the Skill Test required to open a locked door. Some tokens picture Heroic Actions, some Casual. If the Skill Test is successfully passed, the door is open: remove the token. It does not take a square of movement to move through a door.
7
67HACKING
OR
Just Got into Town Here from Osiris Academy
With a square of Movement, a Character can move a Heavy Object next to them to any other square next to them.
Useful for hiding bodies!

BULLETS & BRAWN In Firefly Adventures, avoiding a fight is often the best way to stay alive. Sometimes trouble’s gonna find you regardless, so you’ll want to be prepared for the violence of the worst sort. There are two types of Fight Actions: Shoot & Brawl. Which way you want to solve problems will be up to you.
Crew and Goons will be slingin’ lead in Firefly Adventures. To Shoot, a Character uses a Shoot Action. Shoot Actions are found on Equipment. You have to be holding a gun to Shoot!Each Shoot Action will have a number of dice pictured, next to a Fight Skill Icon. The Target Number of the Skill Test is equal to the distance the shooter is from their target.
When Shooting, roll the number of dice pictured in the Shoot Action and add the Character’s Fight Skill, plus any Fight Skill on the weapon they’re Shooting. Do not add Fight Skill from other weapons. A pistol in your belt don’t do you any good when firing a Sniper Rifle! If the total of the dice result plus the Fight Skill is equal to or greater than the distance to the target, it’s a successful hit and the target takes a Wound.
CLOSE QUARTERS You may not Shoot at a target that is right next to you. Once they’re that close, Brawling is your only option.
SHOOTING INTO A CROWD You may not Shoot at a target next to a fellow Crew Member. You may Shoot past and through fellow Crew Members who are not next to any Goons (hit the deck!).
Sometimes things get crowded, sometimes you don’t want gunfire waking up every low-life in shouting distance. Whether it’s fists, knives, or somethin’ fancier, sometimes ol’ fashioned fisticuffs are the answer.Crew and Goons with a Brawl Action on their Character Card or Equipment may Brawl with a Character standing next to them. Some Crew may be quicker or slower at Brawling; move the Brawling Character forward on the Timeline the number of Moments pictured next to their Brawl Action. All Characters and Goons may defend themselves in a Brawl, whether or not they have the Brawl Action on their Card. Defending yourself in a Brawl does not move you forward on the Timeline.In a Brawl, both the combatants roll a die and add the Fight Skill on their Character Card. Whichever total is higher deals a Wound to their opponent. If the totals are equal, both Characters take a Wound. If either Character rolls a Disgruntled Face (Failure!), they don’t deal a Wound, regardless of what their total is. If both combatants dice are Disgruntled, neither player takes a Wound.
EQUIPMENT IN BRAWLS You may add the Fight Skill from two melee Weapons to your Brawl roll. Any Equipment with a Brawl Action is a Melee Weapon.
BRAWLING IN A CROWD During Brawls with more than two Characters, a Crew with the Assist Action on their card may Assist, as with any Skill Test. If a Goon is next to multiple Crew, the Crew may choose which Crew is being targeted.
BREAKING AWAY FROM GOONS When a Crew Member is standing next to a Goon, they may not be able to move away without getting hurt. When standing next to a Goon, Crew must Brawl with the Goon first. If the Crew wins the Brawl with a higher Test total, they may choose to move the number of squares pictured on their card’s Movement Action, instead of inflicting a Wound. This move does not count as an additional Action and does not use any additional time, beyond the time spent to take the Brawl Action. Any Crew may elect to move instead of inflicting a Wound if they win a defensive Brawl. Available Crew next to the Brawl may Assist, as in a normal Brawl.
8
Mal is six squares away from the Cowboy, so his Fight Test will need a total of six to hit.
ADDITIONAL CREW ACTIONS In addition to Attempting Challenges, Moving, Shooting and Brawling, Crew have a variety of other abilities that may not be used as often but can be crucial to the success of the Job.
HEAL Some Characters have the ability to heal Wounds. To heal a Wound, you must be standing next to the Wounded Character. You may heal a Character multiple times during a turn.
Healing counts as a Heroic Action when in sight of a Goon.
A Downed Crew Member must be healed before they can take Actions other than waiting or healing themselves.
REROLL Some Crew and Equipment allows you to reroll a Test or die, as an Add-On Action. Unless otherwise stated, the reroll may only be used by the Character taking the reroll Action and an Action may only be used once to reroll a Test.
You may reroll the same die or Test multiple times, if you have multiple Actions or Equipment which allow a reroll.. This may be an option if you have an Action to reroll a Test and also have some sort of Equipment which allows a reroll, or another Character has an Any Time Action which allows a reroll.
If an ability allows you to reroll a “Test” you must reroll all the dice of the Test. If an ability allows you to reroll a “die,” then you may reroll a single die from a multiple dice Test.
ADD DIE TO TEST Some Actions allow a Crew to add a die or Skills to a roll. This needs to be done before rolling the Test. You may not add a die to a Test after rolling. These are always Add-On Actions, which increase the amount of time the Skill Test requires. Example: Kaylee is attempting a Tech Test and has an Action Boost which adds a die to the Test, for an +2 Moments of Time. The unmodified Tech Test takes 3 Moments of Time, so now the Test will move Kaylee forward 5 on the Timeline. Because the Boost’s +2 Time is added to the Test’s Time, it is not a separate Action. If Kaylee takes another Tech Test with her second Action, she could use her Boost ability again.
ACT CASUAL All the Crew have “Act Casual” as a Heroic Action. You must be Out of Sight of all Goons and be unhurt to go back to Acting Casual. To Act Casual, flip the Crew Card and swap your Crew miniature for the Casual pose.
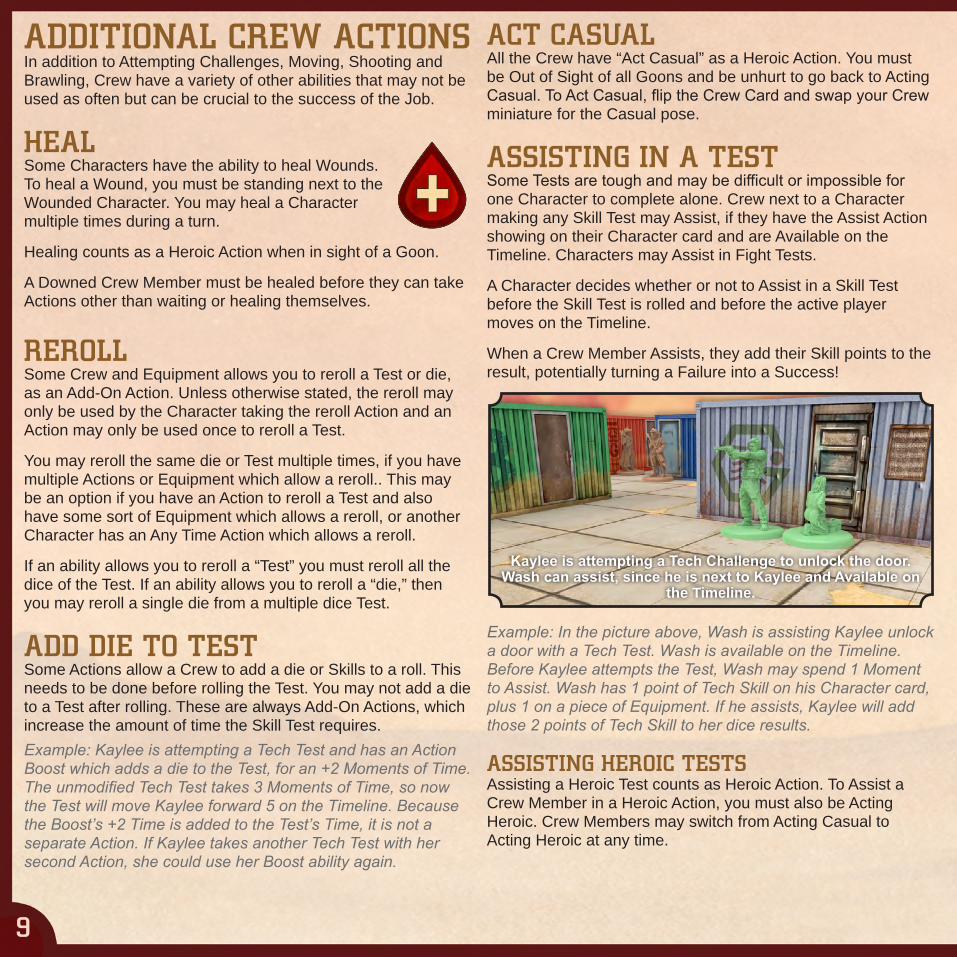
ASSISTING IN A TEST Some Tests are tough and may be difficult or impossible for one Character to complete alone. Crew next to a Character making any Skill Test may Assist, if they have the Assist Action showing on their Character card and are Available on the Timeline. Characters may Assist in Fight Tests.
A Character decides whether or not to Assist in a Skill Test before the Skill Test is rolled and before the active player moves on the Timeline.
When a Crew Member Assists, they add their Skill points to the result, potentially turning a Failure into a Success!
Example: In the picture above, Wash is assisting Kaylee unlock a door with a Tech Test. Wash is available on the Timeline. Before Kaylee attempts the Test, Wash may spend 1 Moment to Assist. Wash has 1 point of Tech Skill on his Character card, plus 1 on a piece of Equipment. If he assists, Kaylee will add those 2 points of Tech Skill to her dice results.
ASSISTING HEROIC TESTS Assisting a Heroic Test counts as Heroic Action. To Assist a Crew Member in a Heroic Action, you must also be Acting Heroic. Crew Members may switch from Acting Casual to Acting Heroic at any time.
9
Kaylee is attempting a Tech Challenge to unlock the door. Wash can assist, since he is next to Kaylee and Available on
the Timeline.

COWBOY ACTIONS Cowboys’ Actions are a little more nuanced. If a Cowboy is more than 6 squares away from their nearest opponent, they will move. End their movement such that they are in a position to Shoot, if possible.
If a Cowboy can see a target, they will Shoot with their second Action, regardless of distance.
A Cowboy that is within 6 squares but not next to their target will Shoot with their first and second Action.
Cowboys only Brawl when they are next to a Crew Member.
INDIVIDUAL GOON CARDS There are also individual Goon Character cards which give you a special rule for each individual Goon.
Each card pictures one of the unique Cowboy or Thug miniatures. The individual Goons cards give each Goon a special rule, a different amount of Fight Skill and Wounds. Some Goons may be better fighters, may move faster or do more damage.
Optional Starting Rule: For your first couple games, do not use the individual Goons and just treat all Goons as having 1 point of Fight Skill and 2 Wounds.
GOONS Goons are your opponents: the not-so-savory folks set to ruin your plans. There are two different types of Goons in Brigands & Browncoats: Thugs & Cowboys. Thugs are the sort of fellow you might encounter guarding a high-muckety-muck’s back door, armed with a billy club or other implement of close quarter destruction. Cowboys are packing a variety of firearms and prefer to settle their differences with an exchange of gunfire.
GOONS’ CHARACTER CARDS Like Crew, Goons have a Character card that has their rules and Actions. Goons Character cards are divided into two parts: an Action Card and an individual Card.
GOON ACTION CARDS Each type of Goon has an Action card. The Action card lists what Actions that type of Goon will take when it is their turn. Like Crew, Goons take two Actions on their turn. For each of their Actions, Goons will attempt to take the first Action listed on their Action card. If that isn’t possible, they will take their second Action, and so on.
THUG ACTIONS Thugs are fairly straightforward. If possible, they will spend 2 Moments to Brawl with an opponent as their first and second Action. If it’s not possible to Brawl, then the Thug will spend 3 Moments to move as an Action. The rules for exactly how and where Goons Move are on the next page.
10
The Thug farther away will have to use both Actions to Move towards Mal. The Thug closer to Mal will move with his first
Action, then will be able to Brawl with his second Action.
The Cowboy closer to Mal is in range and doesn’t need to move. He’ll Shoot at Mal with his first and second Action. The Cowboy who is farther away will move 3 with his first
Action, then Shoot with his second Action. Even after moving, the Cowboy is still 7 squares away - a difficult shot!

GOON MOVEMENT Goons will always move towards the nearest Heroic Crew they can see. When moving Goons, move them via the most direct route.
If a Goon cannot see a Heroic Crew, they will move towards the nearest Heroic Crew on the map.
BACK TO WAITING If there are no Heroic Crew on the map, Goons will move towards the nearest unoccupied Goon Starting position. These will be marked on each Job’s map. If there are no Heroic Crew on the board, a Goon who begins their turn at a Goon starting Location will go back to Waiting. Take their marker off the Timeline, heal all their Wounds and end their turn.
ALERTING GOONS Most of the time, Goons will start somewhere on the map, but are Waiting. They’re just standing around, twiddling their Goon thumbs, ready for something to hit the fan. They’re paying attention to the area around them, but they’re not doing anything. Before being Alerted, the Goons’ Time Markers will not be on the Timeline and they will not be taking Actions. Place their Time Markers on their individual cards.
Once some suspicious Characters come their way and start making mischief, Goons will be Alerted. If the Job goes well, they may not ever become alert and active.
At the end of each Crew Member’s turn, any Waiting Goon who can see a Heroic Crew or Body Token will be Alerted. When a Waiting Goon is Alerted, place their Time Marker on the Timeline, such that the newly Alerted Goon will take the next turn. This Goon is now Active and will continue to take turns when their Time Marker is last in the Timeline.
When Multiple Waiting Goons are Alerted by the same Crew Member, Action, or Event place their Time Markers such that the Goon closer to the Character or event which Alerted them goes first. Any new Goon who appears mid-Job will be Alerted.
LEAVING BODIES BEHIND When a Goon takes enough Wounds to disable them, take the Goon miniature off the map and replace it with a Body Token. Bodies can be moved as an object and will Alert Goons who can see them. You may move over Bodies but not end a movement on top of a Body.
WOUNDING WAITING GOONS Sometimes a Goon will be waiting, minding their own business, and someone will have the temerity to hit, Shoot or otherwise injure them! Any Waiting Goon who takes a Wound is Alerted.
11
The Cowboy moves towards Wash, the closest Heroic Crew Member he can see. Kaylee is closer, but Out of Sight inside
the building.
If Wash ducks around a corner, the Cowboy now can’t see any Heroic Characters, so will move towards the nearest
Heroic Crew Member - they have sharp ears! Wash Shoots and kills a Goon, leaving a Body behind.
Even though the Cowboy around the corner can’t see Wash, he will be Alerted because he can see the Body!

GOON SHOOTING Goons will Shoot at the nearest Heroic Crew they can see. This may not be the easier Crew for them to hit.
GOON BRAWLING Goons Brawl just like Crew. They also need to be next to their target. Crew defending against a Goon’s Brawl Action do not move forward on the Timeline.
SELFISH GOONS Goons do not Assist each other in Shooting or Brawling.
Goons are also willing to Shoot into a Brawl. If a Goon Shoots into a Brawl and fails because they roll a Disgruntled die, then they’ve missed their target and hit a Character next to their target. If there is more than one Character next to their target, randomly determine which other Brawler is hit.
GOONS ARE NO DUMMIES When working a Job, try to have the Goons take their Actions in a way that feels “smart.” For example, if a Cowboy needs to move away to Shoot, have them move to Cover, if possible. If a Thug is the same distance away from two Crew, have them move towards the one with fewer Wounds remaining.
The goal of the game is to succeed, while being challenged. Moving the Goons to make it easier for the Crew isn’t in the spirit of the game. If you are ever in doubt about how a Goon’s Actions should play out, the person playing the Crew Member at the front of the Timeline makes the final decision.
12
The Cowboy has moved towards Wash and takes a shot, since Wash is the closest Heroic Crew Member he can see.
Mal’s in trouble! Both Goons are in a position to Brawl with him on their next turn.
When possible, move Goons such that they’re in an advantageous position. Here, the Goon has ended his
move in cover, from Jayne.
Both Mal and Jayne are the same distance away. The Cowboy should choose to Shoot at the Crew who is
easier to hit, or the Crew who poses the greater threat.
GAME MAP Each Job includes of map of the area in which the Job takes place. The Jobs’ maps will direct you how to set up the buildings and how to orient their doors.
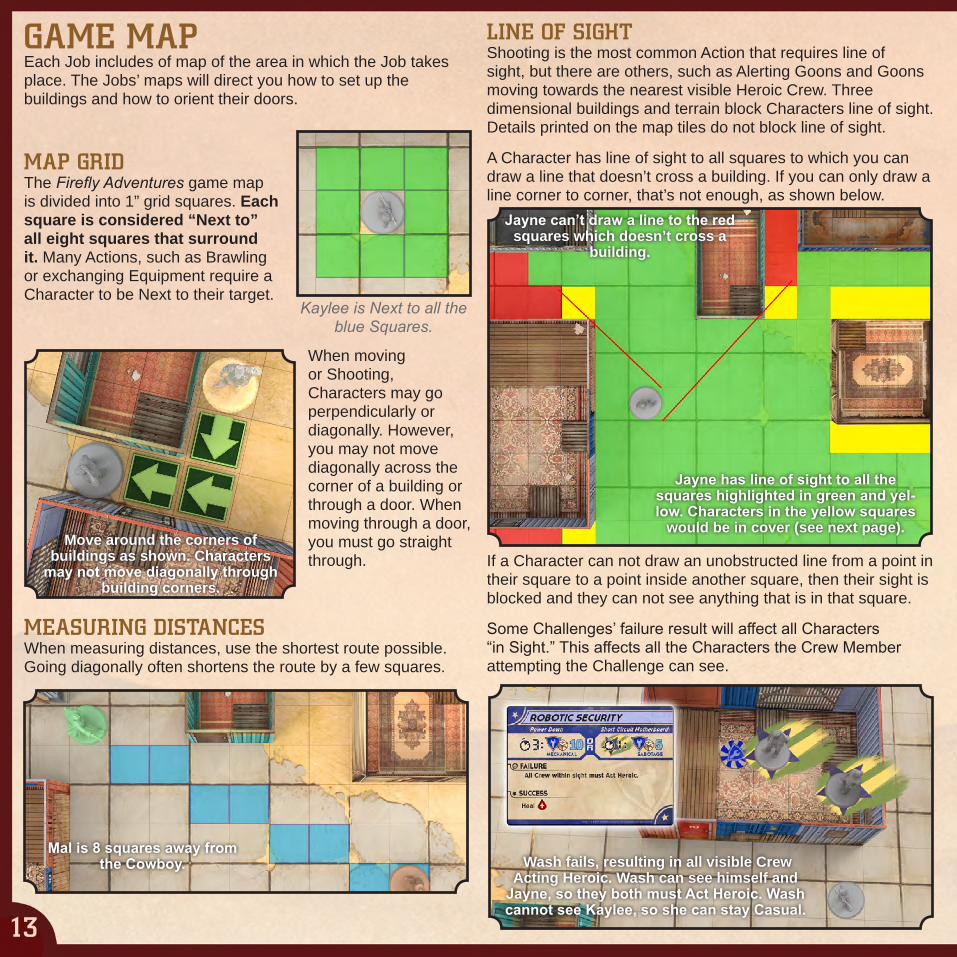
MAP GRID The Firefly Adventures game map is divided into 1” grid squares. Each square is considered “Next to” all eight squares that surround it. Many Actions, such as Brawling or exchanging Equipment require a Character to be Next to their target.
When moving or Shooting, Characters may go perpendicularly or diagonally. However, you may not move diagonally across the corner of a building or through a door. When moving through a door, you must go straight through.
MEASURING DISTANCES When measuring distances, use the shortest route possible. Going diagonally often shortens the route by a few squares.
LINE OF SIGHT Shooting is the most common Action that requires line of sight, but there are others, such as Alerting Goons and Goons moving towards the nearest visible Heroic Crew. Three dimensional buildings and terrain block Characters line of sight. Details printed on the map tiles do not block line of sight.
A Character has line of sight to all squares to which you can draw a line that doesn’t cross a building. If you can only draw a line corner to corner, that’s not enough, as shown below.
If a Character can not draw an unobstructed line from a point in their square to a point inside another square, then their sight is blocked and they can not see anything that is in that square.
Some Challenges’ failure result will affect all Characters “in Sight.” This affects all the Characters the Crew Member attempting the Challenge can see.
13
Move around the corners of buildings as shown. Characters
may not move diagonally through building corners.
Kaylee is Next to all the blue Squares.
Mal is 8 squares away from the Cowboy.
Jayne has line of sight to all the squares highlighted in green and yel-low. Characters in the yellow squares
would be in cover (see next page).
Wash fails, resulting in all visible Crew Acting Heroic. Wash can see himself and
Jayne, so they both must Act Heroic. Wash cannot see Kaylee, so she can stay Casual.
Jayne can’t draw a line to the red squares which doesn’t cross a
building.
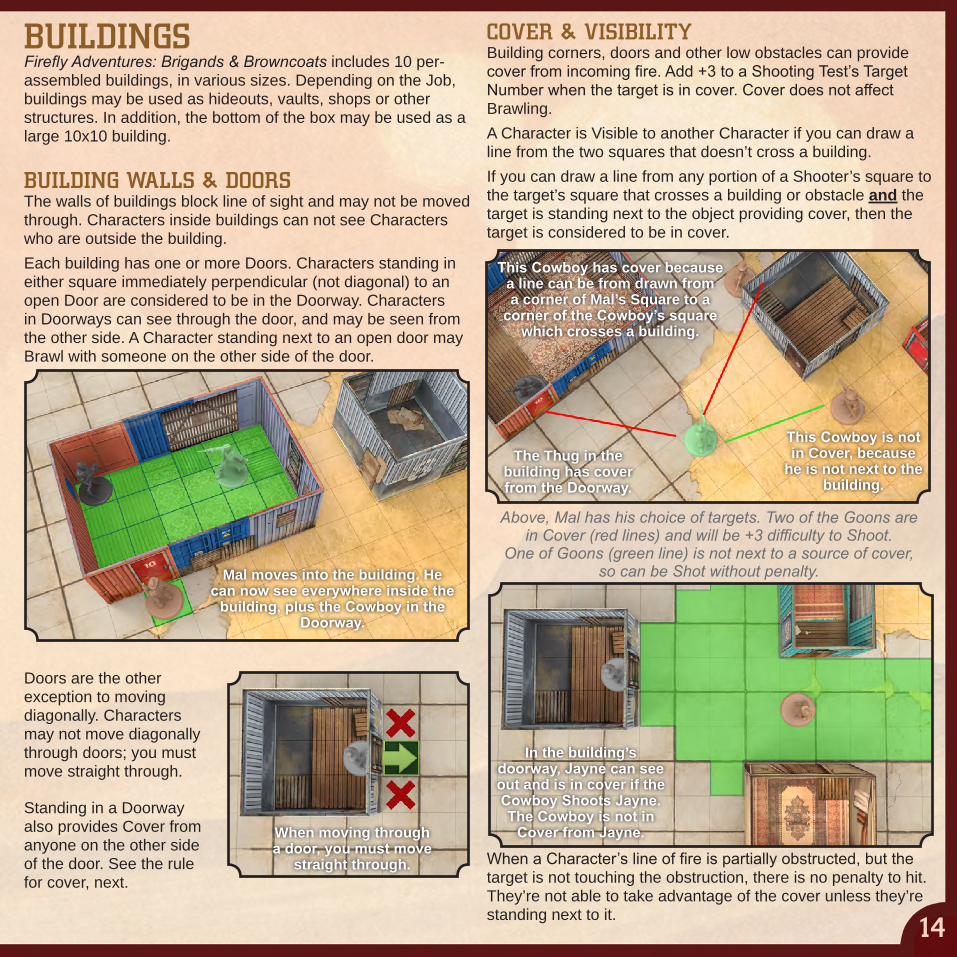
COVER & VISIBILITY Building corners, doors and other low obstacles can provide cover from incoming fire. Add +3 to a Shooting Test’s Target Number when the target is in cover. Cover does not affect Brawling.A Character is Visible to another Character if you can draw a line from the two squares that doesn’t cross a building.If you can draw a line from any portion of a Shooter’s square to the target’s square that crosses a building or obstacle and the target is standing next to the object providing cover, then the target is considered to be in cover.
When a Character’s line of fire is partially obstructed, but the target is not touching the obstruction, there is no penalty to hit. They’re not able to take advantage of the cover unless they’re standing next to it.
BUILDINGS Firefly Adventures: Brigands & Browncoats includes 10 per-assembled buildings, in various sizes. Depending on the Job, buildings may be used as hideouts, vaults, shops or other structures. In addition, the bottom of the box may be used as a large 10x10 building.
BUILDING WALLS & DOORS The walls of buildings block line of sight and may not be moved through. Characters inside buildings can not see Characters who are outside the building. Each building has one or more Doors. Characters standing in either square immediately perpendicular (not diagonal) to an open Door are considered to be in the Doorway. Characters in Doorways can see through the door, and may be seen from the other side. A Character standing next to an open door may Brawl with someone on the other side of the door.
Doors are the other exception to moving diagonally. Characters may not move diagonally through doors; you must move straight through.
Standing in a Doorway also provides Cover from anyone on the other side of the door. See the rule for cover, next.
14
Mal moves into the building. He can now see everywhere inside the
building, plus the Cowboy in the Doorway.
In the building’s doorway, Jayne can see out and is in cover if the Cowboy Shoots Jayne. The Cowboy is not in
Cover from Jayne.When moving through a door, you must move
straight through.
Above, Mal has his choice of targets. Two of the Goons are in Cover (red lines) and will be +3 difficulty to Shoot.
One of Goons (green line) is not next to a source of cover, so can be Shot without penalty.
The Thug in the building has cover from the Doorway.
This Cowboy has cover because a line can be from drawn from a corner of Mal’s Square to a
corner of the Cowboy’s square which crosses a building.
This Cowboy is not in Cover, because
he is not next to the building.

JOBS Each Job has it’s own goals and rewards. You may have to steal a sensitive piece of tech, rescue a hostage, smuggle some goods through an Alliance checkpoint, etc. There will be a number of steps to completing each Job, as detailed on the Job.In all cases, rules in the Job descriptions take precedence over rules in the rulebook.
ONE-OFF JOBS VS. STORYLINES You can Play Firefly Adventures’ Jobs as one-off games or as part of a Storyline. When playing a One-off Job, start the Crew with $3000 to buy their Equipment for the Job.
JOB TIME Each Job will list an amount of time you have to complete the Job, for a given number of Crew (usually five). If you’re playing that Job with fewer than the recommended number of Crew, add a Timeline Segment for each missing Crew.
JOB SET UP Each Job describes how to set up the map and buildings, where to place Goons and any other items. Place the Reward, as appropriate, under the Reward Marker.
EQUIPPING THE CREW FOR A JOBAfter choosing which Job to Work, before the Job begins, deal out five Equipment Cards. These pieces of Equipment are what’s available to buy. When you purchase an Equipment Card, replace it with a new card.
You may pay $200 to discard all five cards and deal out five new cards. In addition, Crew may sell Equipment they have for half of what they paid for it, rounded up to the nearest $100.
Once you’ve bought everything your Crew needs (or wants), it’s time to start the Job. Divide any remaining credits among the Crew working the Mission, however you’d like. Crew must
be carrying credits to use those credits in Challenges or Bribery attempts.
CRATES & SAFES Scattered about the map of a Job may be various Crates or Safes which could contain credits, valuable Equipment or other Rewards. Crates are unlocked. To open a Crate, a Character must be standing next to it: flip over the token to see what the Crate contains.If the Crate contains credits, take them from the bank. They may be used immediately for Bribes or other events. Place the Crate Token with the rest of the Job’s Reward and add the value of the Crate when measuring the success of the Job.If the back of the Crate Token pictures the Equipment symbol, take the top card from the Equipment deck, for free.
Safes are locked and will have a Locked Token next to them detailing how to open it, like a Locked Door. Like Crates, Safe Tokens may be flipped over to see what they contain, after they are opened.
TIME’S UP If the Job is not completed in the given time, it’s a Bust. Can’t get paid if the Job’s a Bust... you don’t get paid the Reward. If you happened to find any Equipment or credits lyin’ about, those are yours to keep.
GETTING PAID Every Job has different criteria for success. If you complete the Job successfully, the Crew gets Paid the Reward, as defined by the Job. Some Jobs’ Reward will increase if the Job is finished quickly. Some Jobs may have penalties for missteps.
MEASURES OF SUCCESS After you complete the Job and figure out your Reward, consult the Measures of Success to see how you stack up: Did you crawl away like a bug? Did you pull off a Big Score? When playing a series of interconnected Jobs as a Story, you’ll use the Rewards from one Job to fund your next adventure
15

JOB SPECIAL RULES There are a number of different Special Rules which may be in affect during different Jobs. These are included on each Job. There are a few that are used in a number of different Jobs and are explained in more detail, below.
PATROL Sometimes Goons are patrolling an area, rather than just standing around. The Job’s Set Up map will describe how to set up the Patrol Route, usually using the numbered Patrol Markers. The Patrol Markers have a pointed side which points towards the next Patrol point.
When playing with the Patrol rules, place the Patrol Time Marker on the Timeline, as specified by the Job. When the Patrol Time Marker is the last on the Timeline, all Goons currently on Patrol will take two Move Actions, towards the next marker on the Patrol route. After moving the Patrolling Goons, advance the Patrol marker forward the number of Moments it takes that type of Goon to move twice (i.e. 6 for Goons, 4 for Cowboys).
Goons who are Alerted, with their own Time Marker on the Timeline, are no longer on Patrol and will not make a Patrol move.
INTEL TOKENS In the course of working a Job, the Crew may find or stumble across key pieces of information, intelligence or tips that may improve their chances of successfully completing the Job.
Most Jobs specify how Intel Tokens may be received and used. Any Intel Tokens the Crew has at the end of Job my be carried over and used in the next Job they attempt.
ALARMS Most folks don’t leave their valuables right out in the open, ripe for the taking. Security Systems are just one of the obstacles the Crew will have to reckon with while Working a Job.
16
Like Patrol, there is an Alarm Time Marker. In Jobs where the Crew has to contend with an Alarm of some sort, the Job will direct you to place the Alarm Time Marker on the Timeline. At some point in the Job, the Alarm Time Marker may be moved forward or backward on the Timeline.
When a Crew Member ends their turn on or ahead of the Alarm Time Marker, the Alarm has been triggered. Check the Job Briefing to see what happens next.
GOON REINFORCEMENTS When things go wrong, Goons will sometimes call in additional muscle to deal with the problem. When a Job or a Challenge calls to place a new Goon, place the new Goon on a square at the edge of the map, as close as possible to the event or Character who caused the reinforcements to arrive.
Choose the reinforcements from an unused Goon whose type is already in play. If the Job calls for reinforcements and all the Goons are already on the table, Alert the nearest waiting Goon instead.
TIMELINE EVENTS
The ‘Verse ain’t always predictable. Sometimes things outside your control conspire to get in the way of your credits.
Each section of the Timeline has a star on the tenth space.
For each star, the first time a Crew Member ends their turn on or beyond the star, roll a die and look on the Job’s Events to see what’s happened.
These random events may be good, bad or worse. Whatever happens, your Crew will need to be prepared.

PLAYING A STORY When playing a Storyline, you’ll link multiple Jobs together. Your goal is to earn enough credits to get your name out of the muck and live like respectable folks.
The goal when playing a Storyline is to reach $10,000 over the course of 3 Jobs. As a crew, you’ll need to work a series of Jobs until you reach that goal or go Bust.
SEED MONEY When playing a Storyline, start the Crew with $2000 before the Storyline begins. After that, any other credits you need will have to be earned.
GET PAID Depending on the success of the Job, you and your Crew will earn some combination of credits and Intel. Credits can be saved toward your ultimate goal, or can be spent on more, better Equipment to bring to the next Job.As a Crew, all the players will need to agree how to divvy up the credits, how many to spend and how many to save.
KEEP FLYING After finishing a Job, refresh all exhausted cards and heal all Crew’s Wounds. Decide which 5 Crew will work the next Job, if you have more than 5 Crew available.
EQUIPMENT MAINTENANCE Crew keep all previous purchased Equipment - you’ll be able to carry it into the next Job. Remember, each Crew Member may only carry four pieces of Equipment during a Job. Crew may exchange Equipment with each other between Jobs.
I’LL BE IN MY BUNK Any Character who ended the previous Job Downed will have to sit out the next Job, recovering from their injuries.
17
FINDING NEW WORK There’s a lot of folk livin’ on the raggedy edge, hoping for a leg up. Unlawful work isn’t just posted on the local bulletin board. You’ll need information about your next Job from a reliable source - but good information doesn’t come cheap. Before starting each Job after your first Job, you’ll need to either spend $500 credits or an Intel Token to be able to continue working. If you don’t have $500 credits or an Intel Token after Working a Job, the Crew’s failed to make ends meet and keep flyin’. You’ll have to start over and try again another day.
MAKE A NAME FOR YOURSELFAs you play the Jobs multiple times, keep a list your Crew’s previous Rewards. Each time you play a Job, see if you can beat your previous record.
Visit GF9games.com for more Jobs!

GAMES WITH 1-4 PLAYERSWhen playing with 5 Players, each player controls one of the Crew - everything’s shiny. When playing with fewer than 5 players, there’s a couple ways to handle it. Remember to adjust the Timeline according to the number of Crew working the Job.
ONE PLAYER This one’s easy: decide how many Crew you’d like to attempt the Job with and you will control them all.
TWO PLAYERS Jobs designed for five Crew can be difficult to complete with only two Crew Members. With two players, it’s usually better to have each player control two Crew and to increase the Timeline by one Segment.
THREE PLAYERS With three players, you can either attempt the Job with three Crew and increase the Timeline by two Segments or have some of the players control multiple Crew. For example, if you know you’re attempting a Job where there isn’t a lot of technical know-how needed, you could have one person play Kaylee and another Crew.
FOUR PLAYERS Playing a Job with four Crew and increasing the Timeline by one Segment is a good option for four people, giving everyone equal amounts of playing time.
PLAYING AS GOONS In any Job, a player can also take the role of the Goons’ Boss. This can provide a greater challenge for the Crew than if the Goons act according to their normal rules.
When a person is playing as the Goons’ Boss, there are few differences in how the Goons work.
ALL ALERT, ALL THE TIME All the Goons used in a Job start the Game Alerted. Place all the Goon’s Time markers on the 5 of the Timeline.
ANY ACTION When it is a Goon’s turn to go, the Boss may have that Goon take any combination of two Actions listed on the Goon’s card. The normal rules for the order in which the Actions need to be taken do not apply.
ANY TARGET When taking a Goon’s turn, the Boss may choose to Move and Shoot in any direction, not just at the closest Crew. Goons may not Brawl or Shoot Casual Crew.
ANY PLACE When the Job calls for new Goons to be placed on the map, the Boss may place the new Goon anywhere that is Out of Sight of all the Crew, or at the map’s edge.
18

PLAYTESTERSJason Buyaki, Mark Honeycutt, Sally Honeycutt, Leonard Landrey, Stuart Lapwood, Jeff Lindsay,
Matthew Maggitti, Lonnie Mullins, Tim Oswalt, Richard Roe, Phil Petry, Brian Sayman, Andrew Smith, Brian Sullivan, Dean Webb, Lizzie Willick, William Yowell
GAME DESIGNSean Sweigart
Aaron Dill
GRAPHIC DESIGNKatie Dillon
APPROVALS COORDINATORPeter Przekop
ADDITIONAL WRITINGAndrew Haught
DESIGN DIRECTORJohn Kovaleski
PRODUCERSPeter Simunovich
John-Paul Brisigotti
3D DESIGNCharles Woods
ACKNOWLEDGMENTSJudy HuangJulie Holmes
Special Thanks to all the Battlefront Staff who provided feedback and
playtesting
GAME CREDITS
Game Design © Gale Force Nine 2017.
Firefly™& © 2017 Twentieth Century Fox Film Corporation. All rights reserved. Gale Force Nine is a Battlefront Group Company.
www.fireflyboardgame.com
www.GF9.com
TURN SUMMARY
LAST NEXT: The Character at the back of the Timeline takes the next turn.
TAKE ACTION: On their turn, a Character may take two of the Actions listed on their Character Card.
SPEND TIME: After taking an Action, move the Character’s Time Marker forward the number of Moments pictured to the left of the Action.
THREAT CHECK: At the end of each Crew’s turn, check to see if any Goons have been Alerted, either because they took Wounds or because they can now see a Heroic Crew.
LIFE IN THE ‘VERSEA few key points to remember:
࿏On your turn, you may take the same Action twice.
࿏Actions listed on Equipment Cards count towards a Character’s two Actions on their turn.
࿏Goons always take two Actions.
࿏ Instead of taking an Action, you may wait, advancing your Time Marker as far as you’d like (as long as you don’t go more than one Moment past the Character in the lead).
࿏Characters may only Assist or use abilities which spend time if they are Available. Characters are Available when their Time Markers are not covered.