G37 AND Q60 CONVERTIBLES; RETRACTABLE HARD … · 12. After 5 minutes, separate the battery cables,...
16
1/16 Classification: Reference: Date: BT14-020 ITB14-030 July 7, 2014 G37 AND Q60 CONVERTIBLES; RETRACTABLE HARD TOP INITIALIZATION SERVICE INFORMATION APPLIED VEHICLES: 2009-2013 G37 Convertible (V36) 2014-2015 Q60 Convertible (V36) SERVICE INFORMATION If the battery becomes disconnected or discharged while the retractable hard top is in any position other than fully closed or fully retracted, the retractable hard top control may stop operating and the following DTCs will be stored: B1707 and B1708. Other retractable hard top related DTCs may also be found stored. To restore operation: (1) close the roof fully manually; (2) erase the DTC(s); and (3) perform hard top control unit initialization. This bulletin provides the procedures to restore retractable hard top control operation. Infiniti Bulletins are intended for use by qualified technicians, not 'do-it-yourselfers'. Qualified technicians are properly trained individuals who have the equipment, tools, safety instruction, and know-how to do a job properly and safely. NOTE: If you believe that a described condition may apply to a particular vehicle, DO NOT assume that it does. See your Infiniti dealer to determine if this applies to your vehicle.
Transcript of G37 AND Q60 CONVERTIBLES; RETRACTABLE HARD … · 12. After 5 minutes, separate the battery cables,...
1/16
Classification: Reference: Date:
BT14-020 ITB14-030 July 7, 2014
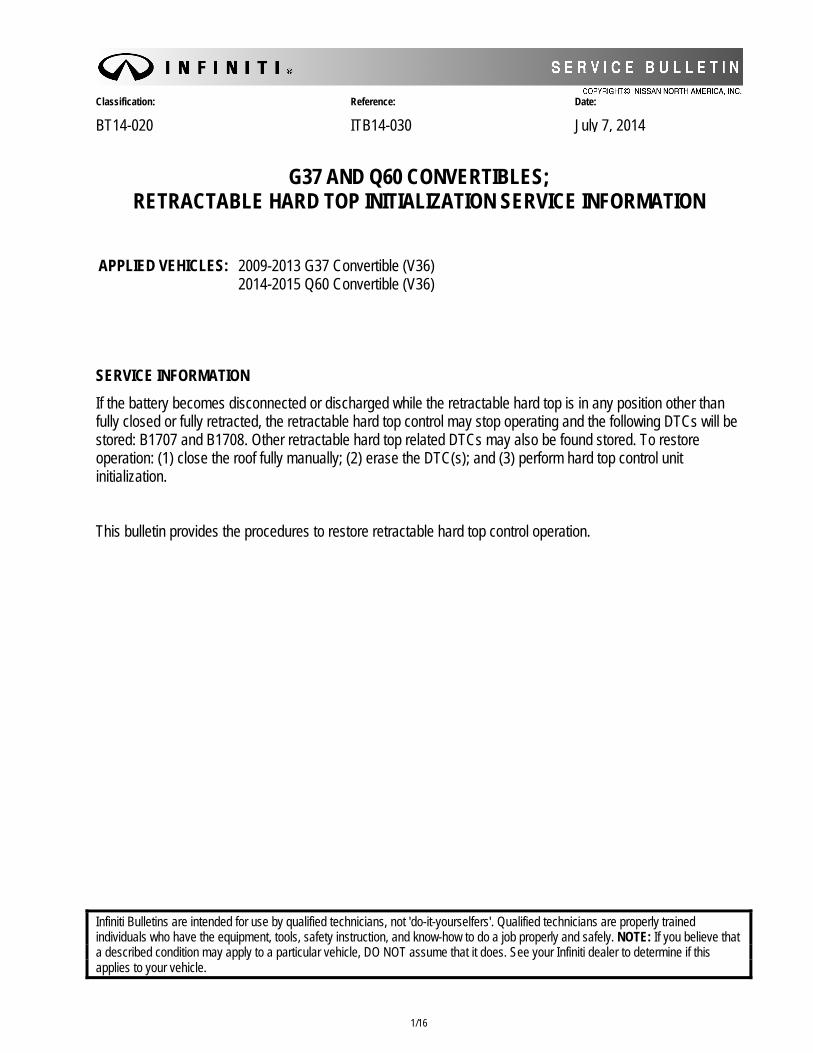
G37 AND Q60 CONVERTIBLES; RETRACTABLE HARD TOP INITIALIZATION SERVICE INFORMATION
APPLIED VEHICLES: 2009-2013 G37 Convertible (V36) 2014-2015 Q60 Convertible (V36)
SERVICE INFORMATION
If the battery becomes disconnected or discharged while the retractable hard top is in any position other than fully closed or fully retracted, the retractable hard top control may stop operating and the following DTCs will be stored: B1707 and B1708. Other retractable hard top related DTCs may also be found stored. To restore operation: (1) close the roof fully manually; (2) erase the DTC(s); and (3) perform hard top control unit initialization. This bulletin provides the procedures to restore retractable hard top control operation.
Infiniti Bulletins are intended for use by qualified technicians, not 'do-it-yourselfers'. Qualified technicians are properly trained individuals who have the equipment, tools, safety instruction, and know-how to do a job properly and safely. NOTE: If you believe that a described condition may apply to a particular vehicle, DO NOT assume that it does. See your Infiniti dealer to determine if this applies to your vehicle.
SERVICE PROCEDURE
NOTE: Before starting the service procedure, make sure the battery is sufficiently charged and both battery cables are connected.
CAUTION: Use of the Work Support feature in this bulletin may result in the retractable hard top functioning out of sequence. If interference conditions occur with the parcel shelf, flipper doors, and trunk/roof latches, damage may occur. 1. Connect the GR-8 (Battery and Electrical Diagnostic Station) or suitable battery charger to the vehicle
battery, and then set at low charge.
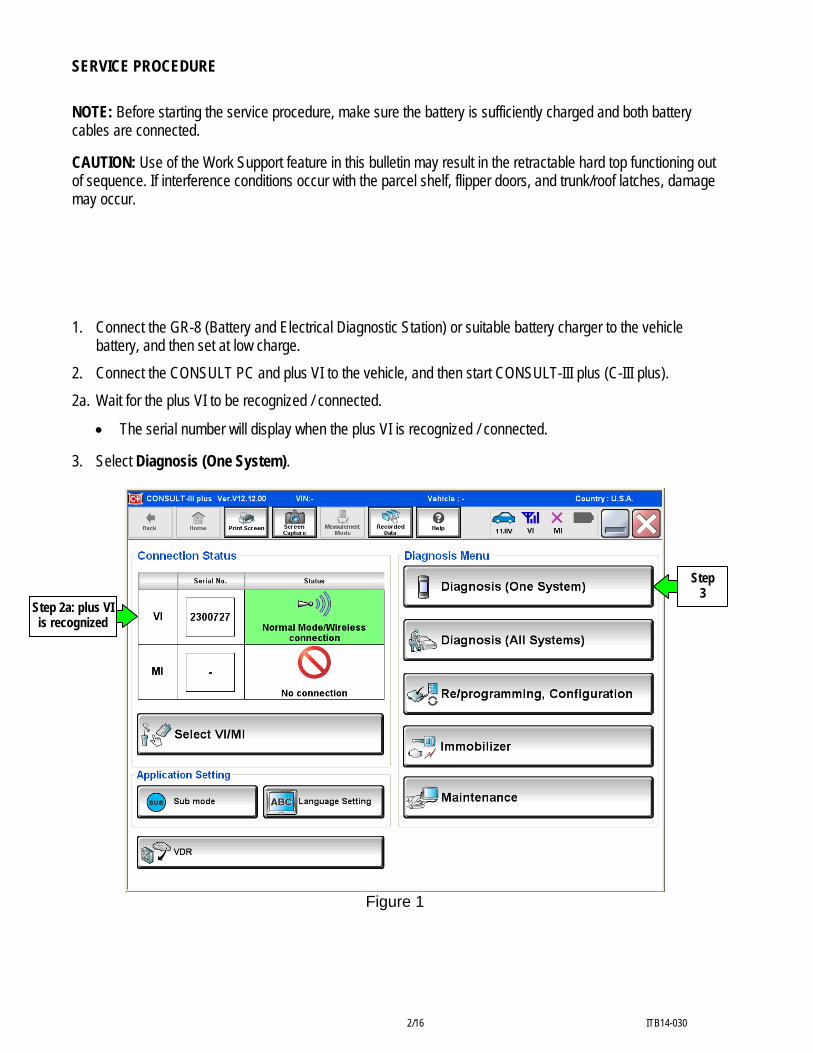
2. Connect the CONSULT PC and plus VI to the vehicle, and then start CONSULT-III plus (C-III plus).
2a. Wait for the plus VI to be recognized / connected.
The serial number will display when the plus VI is recognized / connected.
3. Select Diagnosis (One System).
Step 3
Step 2a: plus VI is recognized
Figure 1
2/16 ITB14-030
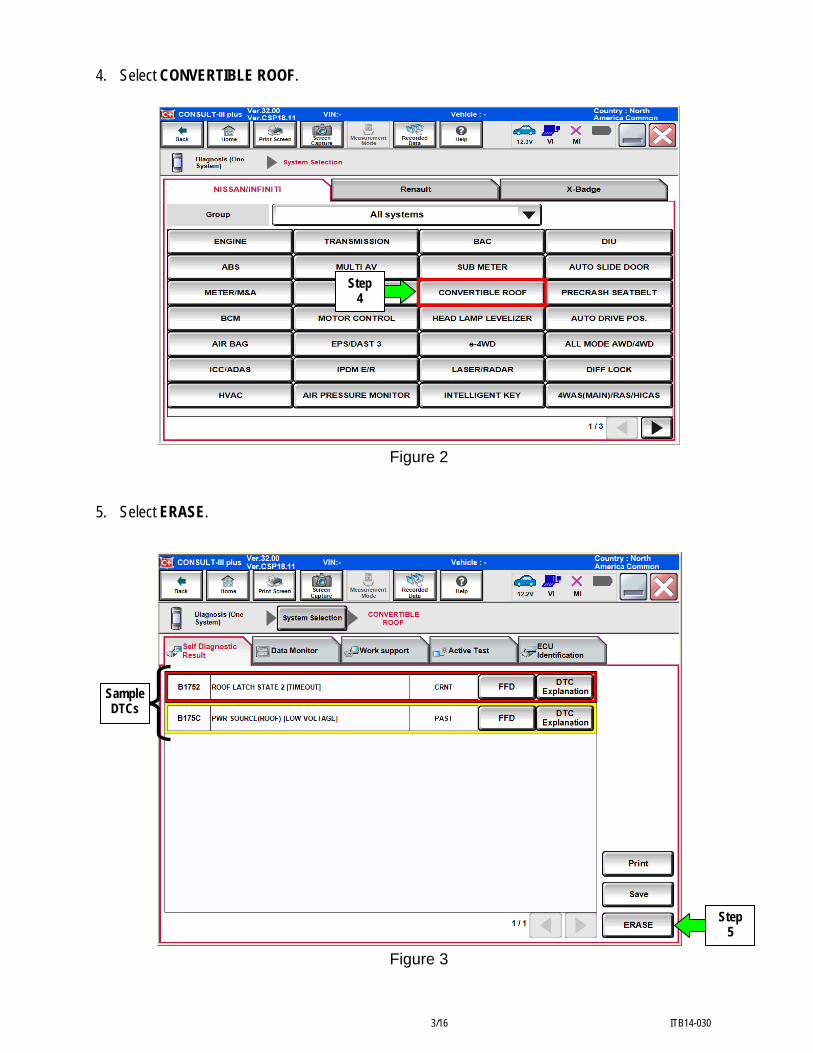
4. Select CONVERTIBLE ROOF.
Figure 2
Step 4
Figure 2
5. Select ERASE.
Sample DTCs
Step 5
Figure 3
3/16 ITB14-030
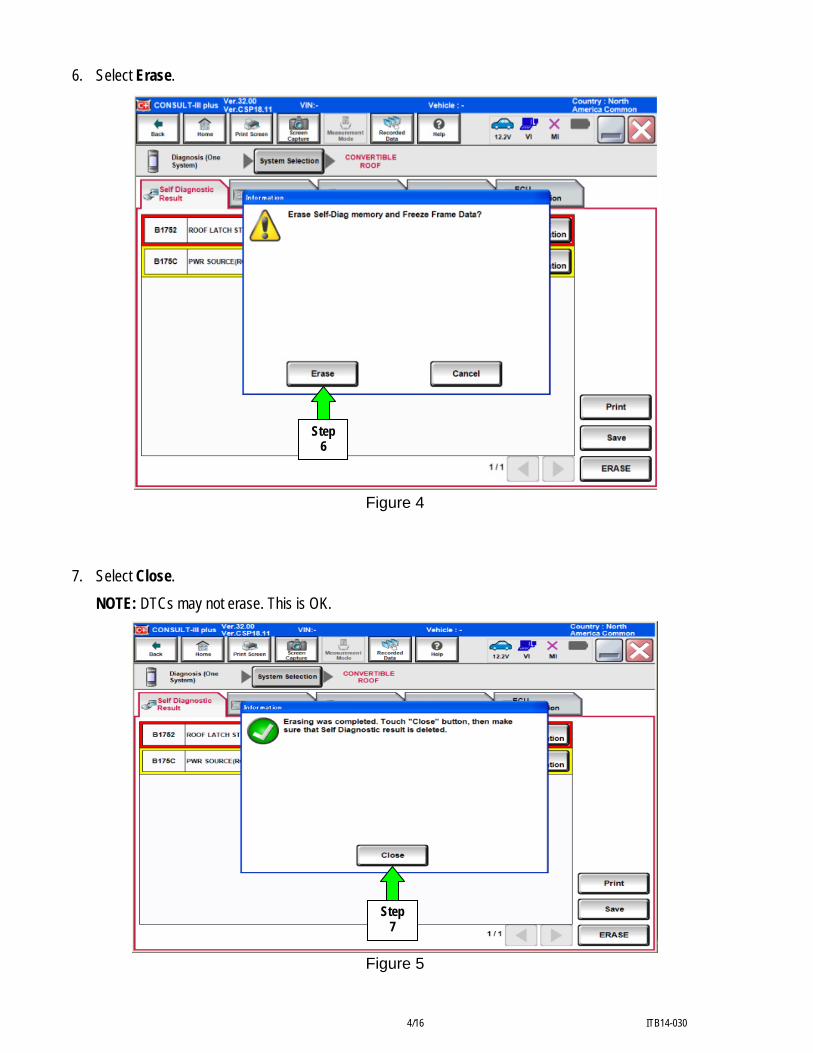
6. Select Erase.
Step 5
Step 6
Figure 4
7. Select Close.
NOTE: DTCs may not erase. This is OK.
Step 7
Figure 5
4/16 ITB14-030
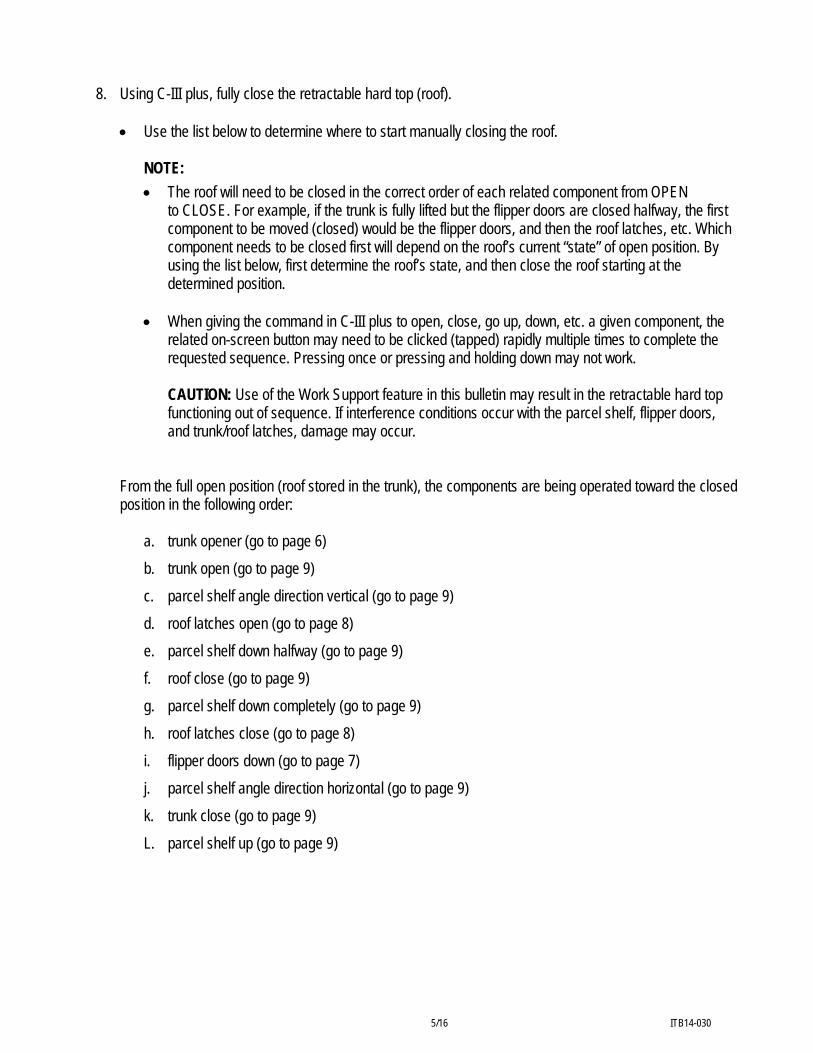
8. Using C-III plus, fully close the retractable hard top (roof).
Use the list below to determine where to start manually closing the roof.
NOTE:
The roof will need to be closed in the correct order of each related component from OPEN to CLOSE. For example, if the trunk is fully lifted but the flipper doors are closed halfway, the first component to be moved (closed) would be the flipper doors, and then the roof latches, etc. Which component needs to be closed first will depend on the roof’s current “state” of open position. By using the list below, first determine the roof’s state, and then close the roof starting at the determined position.
When giving the command in C-III plus to open, close, go up, down, etc. a given component, the
related on-screen button may need to be clicked (tapped) rapidly multiple times to complete the requested sequence. Pressing once or pressing and holding down may not work.
CAUTION: Use of the Work Support feature in this bulletin may result in the retractable hard top functioning out of sequence. If interference conditions occur with the parcel shelf, flipper doors, and trunk/roof latches, damage may occur.
From the full open position (roof stored in the trunk), the components are being operated toward the closed position in the following order:
a. trunk opener (go to page 6)
b. trunk open (go to page 9)
c. parcel shelf angle direction vertical (go to page 9)
d. roof latches open (go to page 8)
e. parcel shelf down halfway (go to page 9)
f. roof close (go to page 9)
g. parcel shelf down completely (go to page 9)
h. roof latches close (go to page 8)
i. flipper doors down (go to page 7)
j. parcel shelf angle direction horizontal (go to page 9)
k. trunk close (go to page 9)
L. parcel shelf up (go to page 9)
5/16 ITB14-030
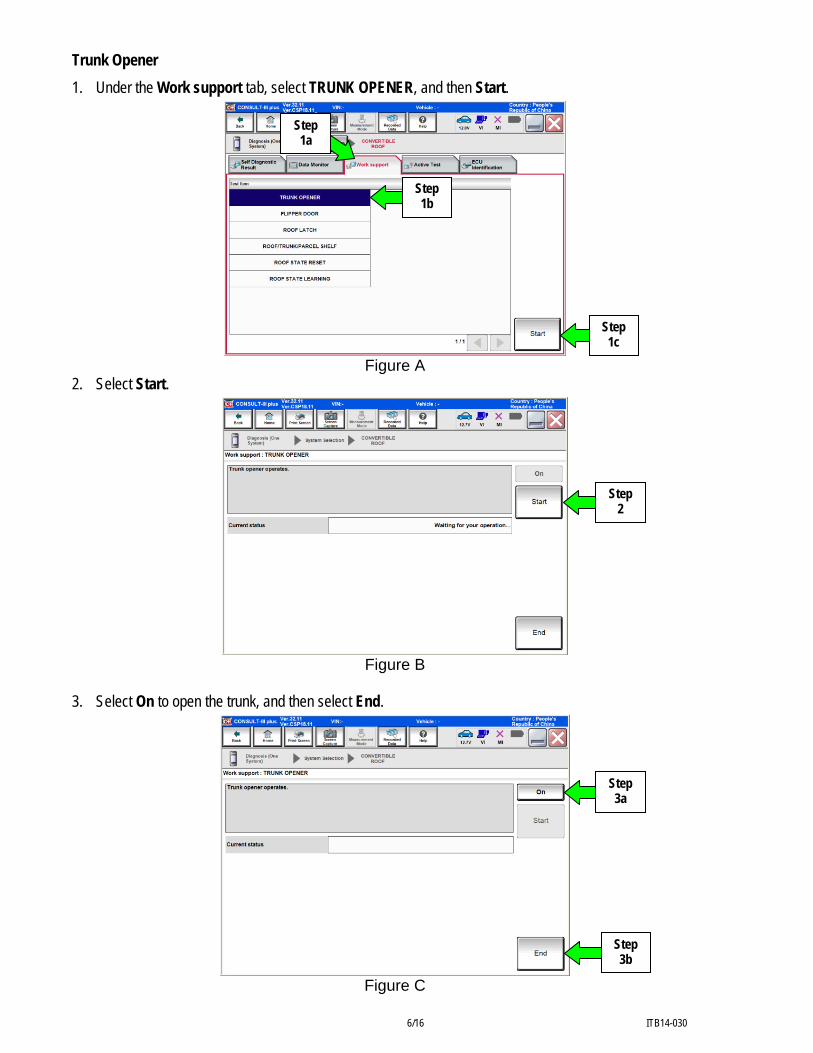
Trunk Opener
1. Under the Work support tab, select TRUNK OPENER, and then Start.
Figure A
Step 1b
Step 1a
Step 1c
2. Select Start.
Step 2
Figure B
3. Select On to open the trunk, and then select End.
Step 3a
Step 3b
Figure C
6/16 ITB14-030
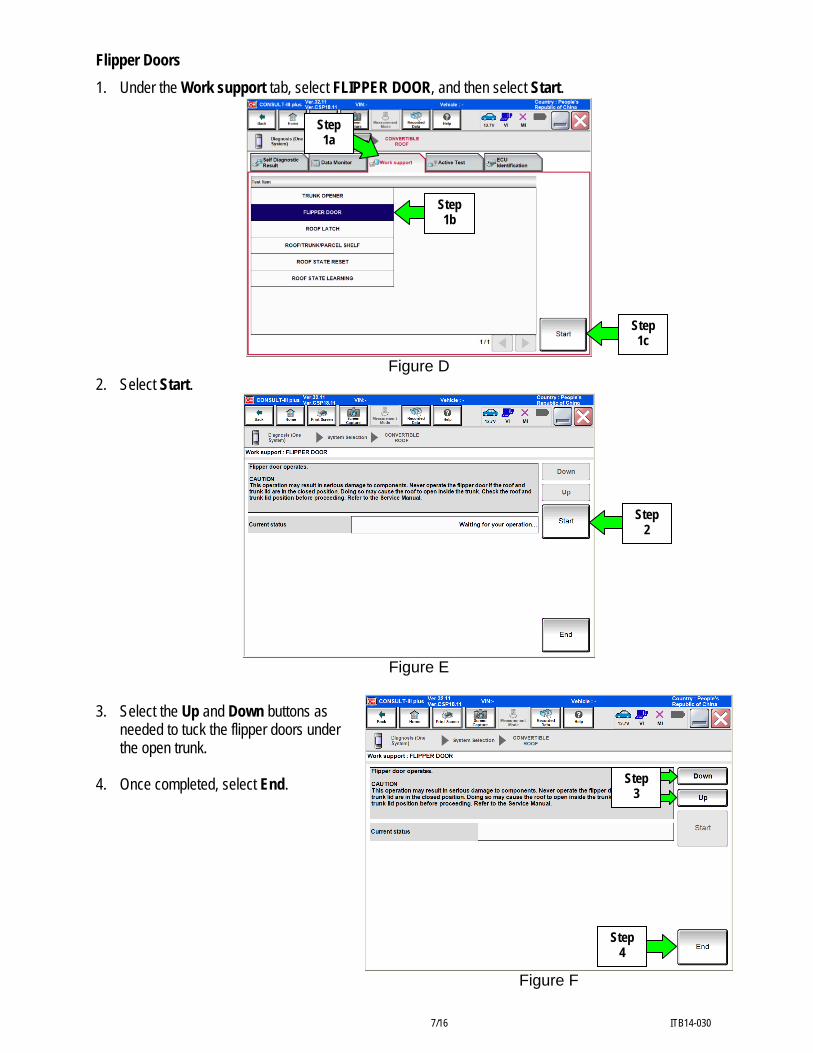
Flipper Doors
1. Under the Work support tab, select FLIPPER DOOR, and then select Start.
Figure D
Step 1b
Step 1a
Step 1c
2. Select Start.
Figure E
Step 3
Step 2
Step 4
3. Select the Up and Down buttons as needed to tuck the flipper doors under the open trunk.
4. Once completed, select End.
Figure F
7/16 ITB14-030
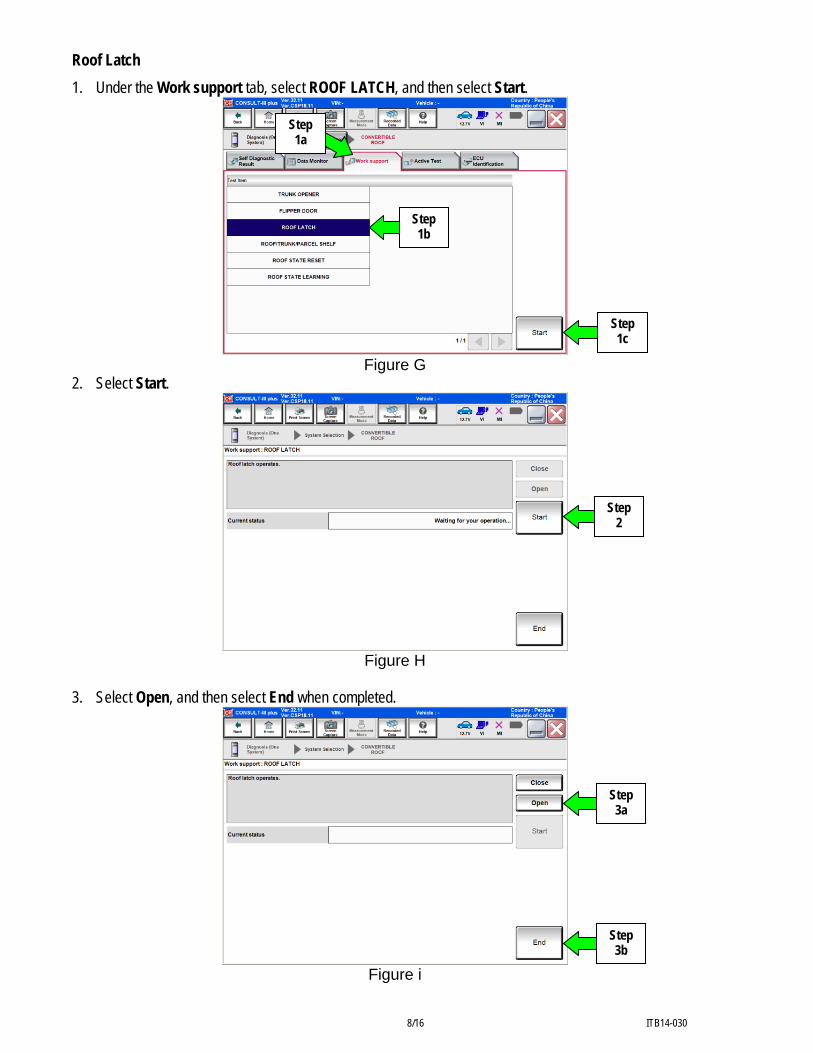
Roof Latch
1. Under the Work support tab, select ROOF LATCH, and then select Start.
Figure G
Step 1c
Step 1b
Step 1a
2. Select Start.
Step 2
Figure H 3. Select Open, and then select End when completed.
Step 3a
Step 3b
Figure i
8/16 ITB14-030

Roof/Trunk/Parcel Shelf
1. Under the Work support tab, select ROOF/TRUNK/PARCEL SHELF, and then select Start.
Figure J
Step 1a
Step 1b
Step 1c
2. Select Next.
Figure K
Step 2
Step 3
After closing the trunk, the roof will be fully closed.
3. Operate the components in the order given below:
Parcel angle direction : PS(ROTA):VERT/HORI
Parcel Up/Down : PS(DRAW):UP/DOWN
Roof Close/Open : ROOF:OPEN/CLOSE
Trunk Close/Open : TRUNK:OPEN/CLOSE 4. When completed, select End.
Figure L
Step 4
9/16 ITB14-030

9. Once the roof is fully closed, select the Self Diagnostic Result tab, check for stored roof related DTCs.
If DTCs are found stored in “CRNT” (current), go to step 10 below.
If DTCs are found stored in “PAST” or no DTCs found, go to page 11, step 14.
DTC status
Sample DTCs
Step 9
Figure 6
10. Turn the ignition OFF, disconnect the battery charger, and then disconnect both battery cables from the battery, negative cable first.
11. Touch the cable ends together for five (5) minutes.
Keep the cable ends touching by taping or clamping them together.
CAUTION: Cover the battery posts with plastic caps or other suitable insulation to keep the battery from shorting.
12. After 5 minutes, separate the battery cables, and then connect them to the battery, positive cable first.
13. Connect the battery charger, set at low charge, and then turn the ignition ON.
10/16 ITB14-030
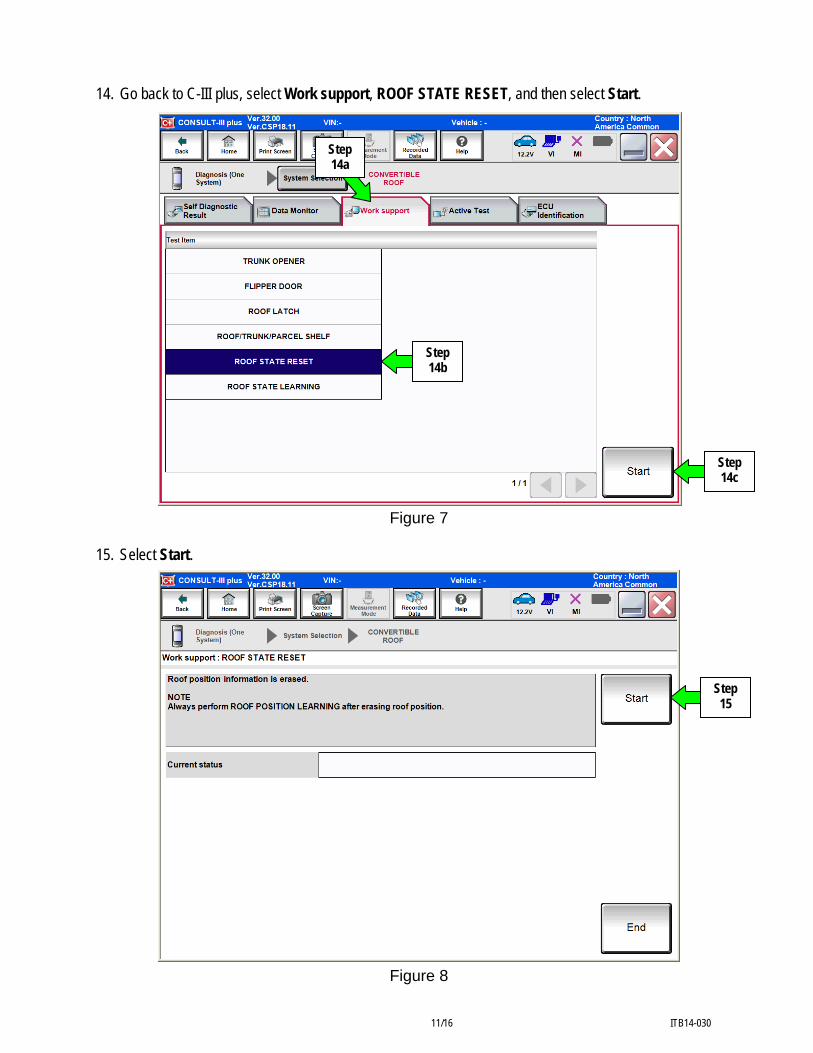
14. Go back to C-III plus, select Work support, ROOF STATE RESET, and then select Start.
Step 14c
Step 14b
Step 14a
Figure 7 15. Select Start.
Step 15
Figure 8
11/16 ITB14-030
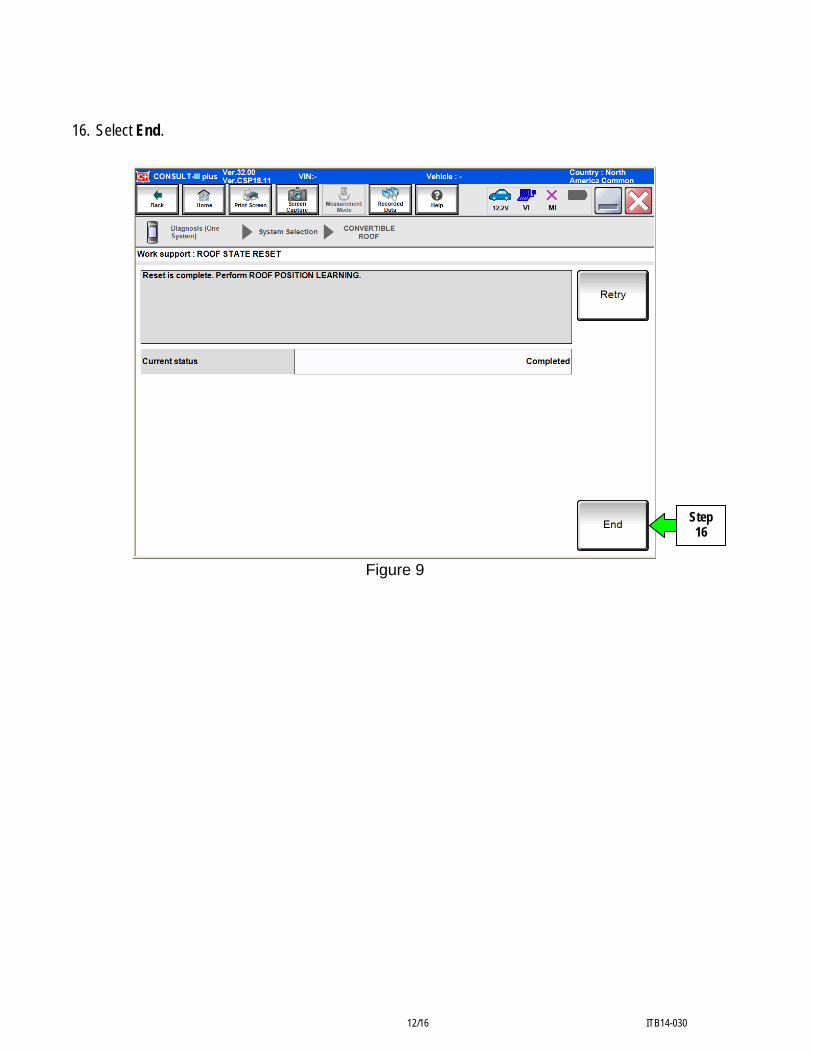
16. Select End.
Step 16
Figure 9
12/16 ITB14-030
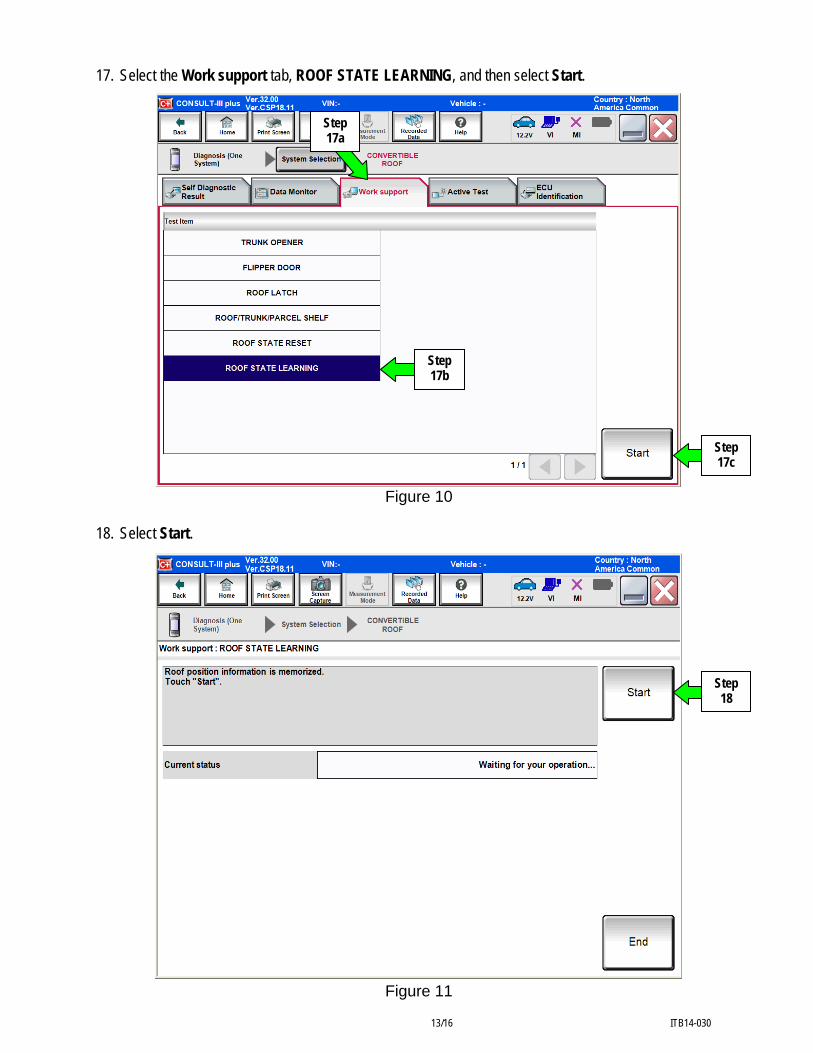
17. Select the Work support tab, ROOF STATE LEARNING, and then select Start.
Step 17b
Step 17a
Step 17c
Figure 10 18. Select Start.
Step 18
Figure 11
13/16 ITB14-030
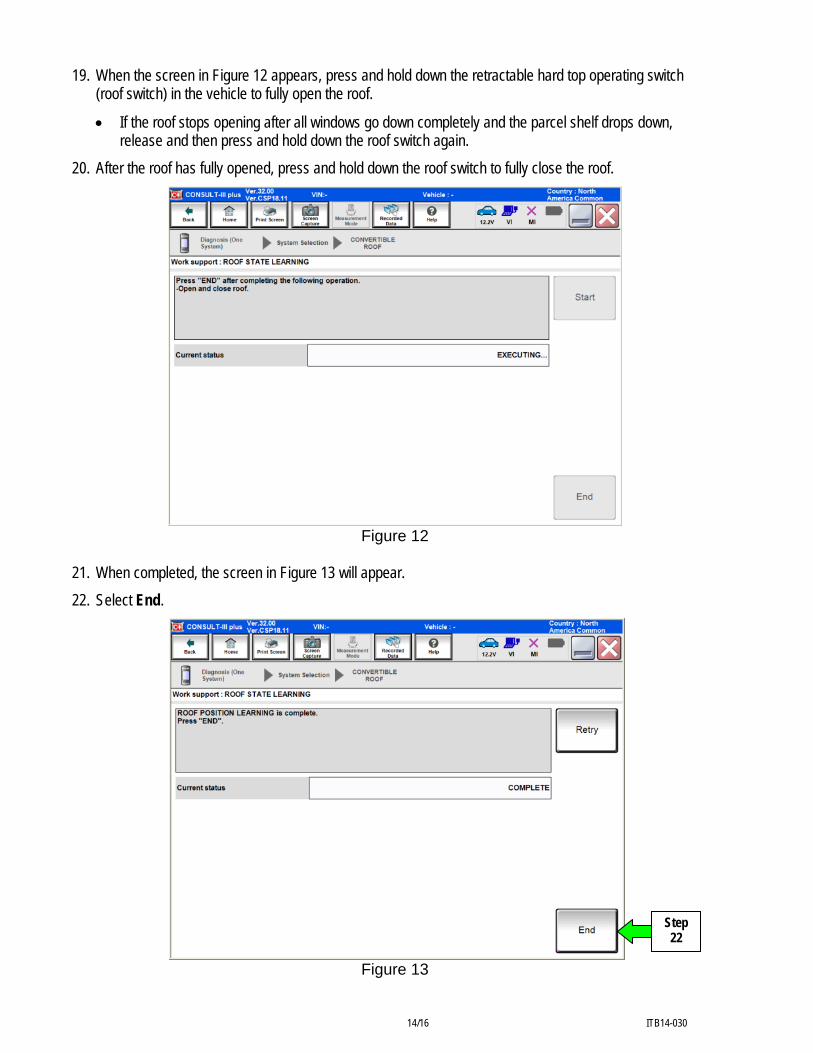
19. When the screen in Figure 12 appears, press and hold down the retractable hard top operating switch
(roof switch) in the vehicle to fully open the roof.
If the roof stops opening after all windows go down completely and the parcel shelf drops down, release and then press and hold down the roof switch again.
20. After the roof has fully opened, press and hold down the roof switch to fully close the roof.
Figure 12
21. When completed, the screen in Figure 13 will appear.
22. Select End.
Step 22
Figure 13
14/16 ITB14-030
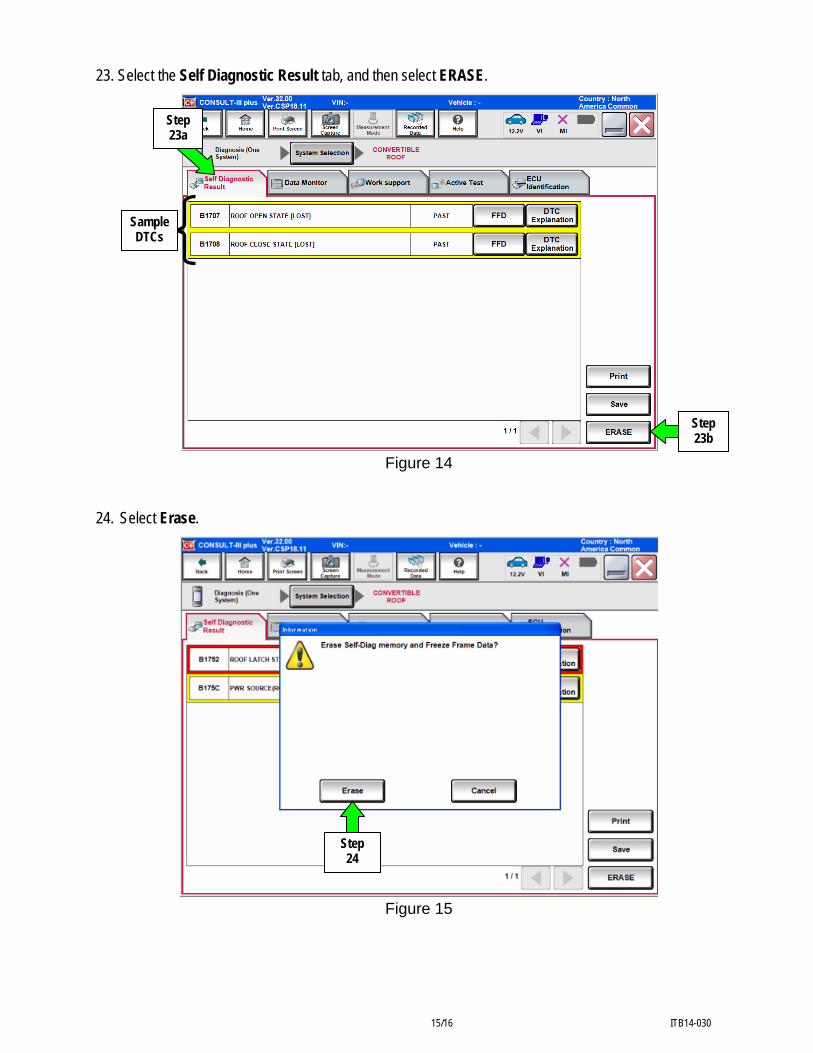
23. Select the Self Diagnostic Result tab, and then select ERASE.
Figure 14
Step 23b
Step 23a
Sample DTCs
24. Select Erase.
Step 24
Figure 15
15/16 ITB14-030
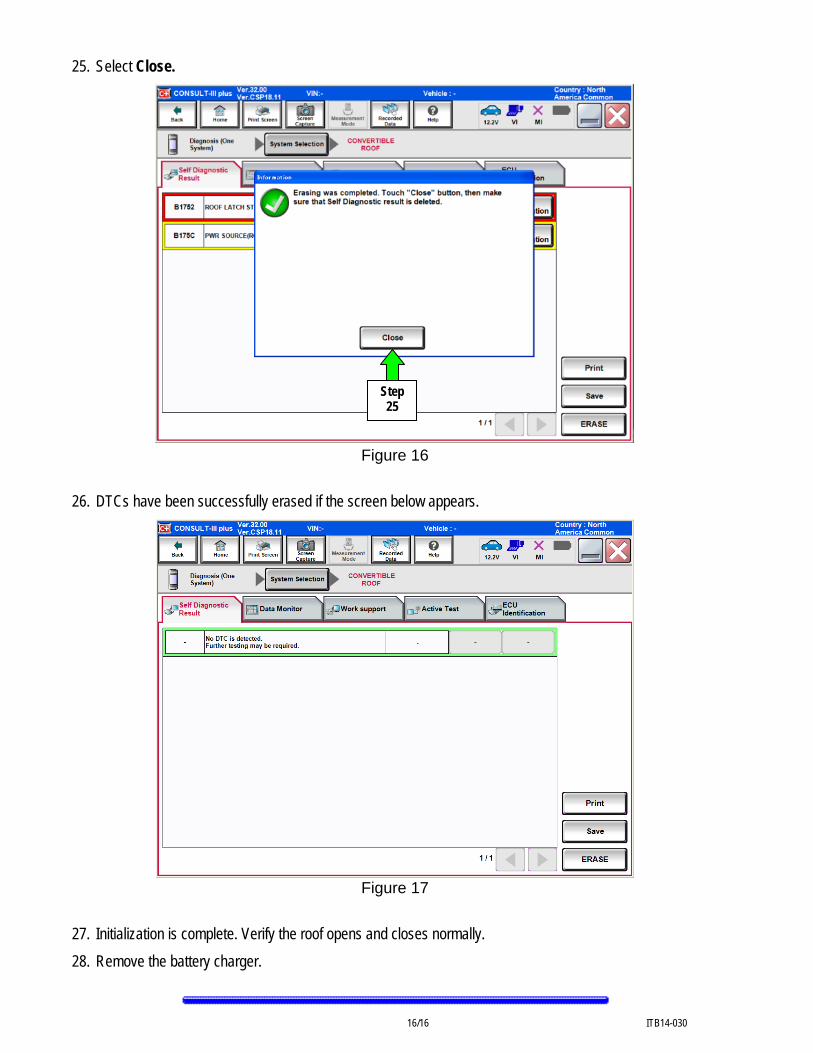
25. Select Close.
Step 25
Figure 16
26. DTCs have been successfully erased if the screen below appears.
Figure 17
27. Initialization is complete. Verify the roof opens and closes normally.
28. Remove the battery charger.
16/16 ITB14-030