FUN DRAWING WITH MATHEMATICS (LEVEL 3)
15
EAA welcomes feedback on its projects in order to improve, please use this link: https://forms.gle/LGAP9k17fMyJrKJN7 1 FUN DRAWING WITH MATHEMATICS (LEVEL 3) Description Learners use Mathematics to develop some drawing techniques, and then use their products to create puzzles to entertain the family. Leading Question How can Mathematics awaken the artist within me and help me improve my drawing skills? Total Time Required ~5 hours over 3 days Supplies Required Paper and pencil, (optional: removable stickers like sticky notes). Learning Outcomes - Using grids for graphing and estimating areas - Practicing geometric reflection and simple rotation of 2-d shapes - Constructing complex drawings using grids and transformations Previous Learning - 2 dimensional shapes and angles - Locating points on a coordinate grid DAY 1 Today you will how to use drawing and mathematics together. Suggested Duration Activity and Description 5 minutes ● Introduce the project’s leading question: How can Mathematics awaken the artist within you and help you improve your drawing skills? ● And ask: have you ever used Mathematics in drawing? How? 30 minutes ● Let’s start by reviewing the grid graph, and using ordered pairs (x,y) to represent points on a grid. ● In this pair: x, or the first number in the ordered pair, represents how many steps across (horizontal, or sideways) we move from the Origin point; y, or the second number, represents how many steps we go upwards (vertical).
Transcript of FUN DRAWING WITH MATHEMATICS (LEVEL 3)
EAA welcomes feedback on its projects in order to improve, please use this link:
https://forms.gle/LGAP9k17fMyJrKJN7
1
FUN DRAWING WITH MATHEMATICS (LEVEL 3)
Description Learners use Mathematics to develop some drawing techniques, and
then use their products to create puzzles to entertain the family.
Leading
Question
How can Mathematics awaken the artist within me and help me
improve my drawing skills?
Total Time
Required
~5 hours over 3 days
Supplies
Required
Paper and pencil, (optional: removable stickers like sticky notes).
Learning
Outcomes
- Using grids for graphing and estimating areas - Practicing geometric reflection and simple rotation of 2-d shapes
- Constructing complex drawings using grids and transformations
Previous
Learning
- 2 dimensional shapes and angles - Locating points on a coordinate grid
DAY 1
Today you will how to use drawing and mathematics together.
Suggested
Duration
Activity and Description
5 minutes ● Introduce the project’s leading question: How can Mathematics
awaken the artist within you and help you improve your drawing
skills?
● And ask: have you ever used Mathematics in drawing? How?
30 minutes ● Let’s start by reviewing the grid graph, and using ordered pairs
(x,y) to represent points on a grid.
● In this pair:
x, or the first number in the ordered pair, represents how
many steps across (horizontal, or sideways) we move from
the Origin point;
y, or the second number, represents how many steps we go
upwards (vertical).

EAA welcomes feedback on its projects in order to improve, please use this link:
https://forms.gle/LGAP9k17fMyJrKJN7
2
Therefore, this ordered pair (x,y) tells us the location of a
certain point on a grid.
● Solve question 1 on day 1 worksheet.
30 minutes ● An area is the measure of surface that a shape occupies. This
can be easily found on a grid by counting the number of unit
squares that are inside the shape. Some shapes may have
half squares, or smaller parts of squares, so you can use
some estimation to find their area approximately.
● Solve question 2 on day 1 worksheet.
DAY 2
Today you will learn about reflection and rotation in mathematics.
Suggested
Duration
Activity and Description
10 minutes ● A shape undergoing Reflection is simply when the shape
changes to its mirror image. In the example below, the dashed
line is called the axis of Reflection (or mirror line).
The figure below is symmetrical, so reflecting one half will complete the figure:

EAA welcomes feedback on its projects in order to improve, please use this link:
https://forms.gle/LGAP9k17fMyJrKJN7
3
30 minutes ● In Day 2 worksheet, complete the reflections in Question 1, and
then explain your solution to a parent or adult.
● Assessment criteria:
- The learner uses a mix of imagination, and physical means
to verify responses. (by placing the sheet against an actual
mirror to see how the reflected shape looks)
- The ability to explain or defend their answers
20 minutes ● Another kind of Transformation is Rotation
● Let’s start with a simple activity.
- Stand up facing one side of the room.
- While standing in the same position, make one full rotation
to go back to the initial position.
- What angle have you covered in this rotation? (it is 360
degrees, or a full circle).
- Now make a 180-degree rotation. This is a half-circle; it
makes you face the opposite direction in the room.
- How about a 90-degree rotation?
If you are facing East (where the sun rises), a 90-degree
rotation can make you either facing North or South.
- (Optional: In order to make a general agreement, mathematicians agree that a rotation is usually done counterclockwise, that is opposite to the clock rotation movement. So, if you are facing east, a rotation of 90 degrees will make you face North. Rotating from East to South is a 270-degree rotation).
• An example of Rotation is the difference between when a door
is closed versus when it is open

EAA welcomes feedback on its projects in order to improve, please use this link:
https://forms.gle/LGAP9k17fMyJrKJN7
4
• A rotation is defined by an origin and an angle
- Stand facing on wall in the room and rotate by 90 degrees.
Where are you facing now?
- See the diagram below 2 examples of rotation: The origin of
rotation must be defined.
20 minutes ● Solve number 2 on the worksheet, and then explain your
solution to a parent or adult.
● Assessment criteria:
- The learner uses a mix of imagination, and physical means
to verify responses (by putting the pencil on the Origin of
rotation, and turn the whole sheet around the origin shows
where the rotated shape will be)
- Depth of understanding through the confidence in explaining
and defending their answer
15 minutes ● Learners are asked reflection questions:
Describe Reflection in your own words
What does Reflection change in an object? (size, color)
Describe Rotation in your own words
What does Rotation change in an object? (colors size, weight)
DAY 3
Today you will use grids and reflections to make your drawing skills better! .
Suggested
Duration
Activity and Description

EAA welcomes feedback on its projects in order to improve, please use this link:
https://forms.gle/LGAP9k17fMyJrKJN7
5
10 minutes ● Many artists have used grids in drawing throughout history, see
the below examples from ancient Egyptians (more than 4000
years ago), or Renaissance artists (more than 500 years ago).
Source: https://prezi.com/eijrwmwhvgrg/grid-drawing-for-6th-grade/

EAA welcomes feedback on its projects in order to improve, please use this link:
https://forms.gle/LGAP9k17fMyJrKJN7
6
30 minutes ● Let’s start with an example: see this image of a teapot (called
the UTAH teapot)
● First try to draw this teapot on a piece of paper. (The learner
takes 5-10 minutes to draw the teapot).
● Now let’s use the grid technique and try again.
- Place the teapot through a grid and mark the main points of
the shape (see demonstration below).
● Now try to draw the pot again using the dots.

EAA welcomes feedback on its projects in order to improve, please use this link:
https://forms.gle/LGAP9k17fMyJrKJN7
7
5 minutes ● Questions to reflection on:
To what extent has the grid technique improved your
drawing? Do you think it is easier to draw using a grid? What
objects would you like to try drawing using this grid
technique?
20 minutes ● Solve problem 1 on the Day 3 Worksheet
20 minutes ● Solve problem 2 on the Day 3 Worksheet
30 minutes ● There are some objects that we call ‘Symmetrical.’ This means
that one half of the object is a mirror image of the other half.
● Is a circle symmetrical? What about a square? How about the
human body?
● Try to use the grid technique and Reflections to draw the
ladybird image in Question 3 of Day 3 worksheet.
5 minutes ● Hang the drawings you completed today on a wall in the house.
ASSESSMENT CRITERIA
● The accuracy of drawings compared to the original images.
● The rate of progress in terms of becoming faster at using the techniques.
ADDITIONAL ENRICHMENT ACTIVITIES
• Make another copy of the ladybird drawing, and cut it into square pieces, then challenge
your family members to arrange the puzzle.
• Learners are challenged to choose a symmetric shape from the house, trace it into a
grid, and make 2 copies of it. Then cut the 2 drawings into smaller square puzzle pieces
and arrange a competition amongst 2 groups of family members to complete the puzzle
in a shorter period of time.
• Learners use a grid to draw an image or an object of their choice. Once done, they may
display it on a wall in the house.
MODIFICATIONS TO SIMPLIFY
For a simpler version, learners may skip Question 2 on day 2 and problem 3 of day 3.

EAA welcomes feedback on its projects in order to improve, please use this link:
https://forms.gle/LGAP9k17fMyJrKJN7
8
DAY 1 WORKSHEET
1. On the grid below, plot the points A(1,1), B(4,1), C(4,4) and D(1,4).
a. What is the shape ABCD? Connect the points A to B, B to C, C to D, and D to A.
-
b. Plot the points E(2,5), F(4,5), G(4,7). Connect the points E to F, F to G, and G to E.
What is the shape EFG?
c. Plot the points H(5,5), I(10,5), & J(10,7). Connect the dots H to I, I to J, and J to I.
What is the shape HIJ?
2. a. Find the area of the shape ABCD, by counting the number of area units, or grid
squares, it encloses.
- b. Find the area of shape EFG. (hint: the answer is a whole number).
c. Can you find the area of shape HIJ?
Probably it will be easier if you add a point K(5,7). HIJK is a rectangle.
First count the number of area units inside HIJK;
Then the area of HIJ is half of that.

EAA welcomes feedback on its projects in order to improve, please use this link:
https://forms.gle/LGAP9k17fMyJrKJN7
9
3. On the grid below
a. Draw the points A(3,2), B(9,2), C(9,7), D(7,5) and E(3,9).
b. Connect the points: A to B, B to C, C to D, D to E, and E to A.
c. Can you calculate the area of shape ABCDE?
- Hint: Add two points: F(9,5), and G(3,5). The area of ABCDE can be found by adding
the areas of 3 shapes:
- Area of rectangle ABFG + Area of triangle CDF + Area of triangle DEG.

EAA welcomes feedback on its projects in order to improve, please use this link:
https://forms.gle/LGAP9k17fMyJrKJN7
10
DAY 2 WORKSHEET
1. Draw the reflection of the shapes using the dashed line as Axis of Reflection (source:
https://www.helpingwithmath.com/printables/worksheets/geometry/4g3-symmetry02.htm)
Hint: The reflection of each point will be the same number of squares to the other side of
the mirror line.

EAA welcomes feedback on its projects in order to improve, please use this link:
https://forms.gle/LGAP9k17fMyJrKJN7
11
2. Draw the rotated shape around the origin (red dot), and with the respective angle:
180 degrees counter clock-wise
180 degrees clock-wise
90 degrees counterclockwise
90 degrees counterclockwise

EAA welcomes feedback on its projects in order to improve, please use this link:
https://forms.gle/LGAP9k17fMyJrKJN7
12
90 degrees counterclockwise
DAY 3 WORKSHEET
1. Here is a picture from the backyard of the Museum of Islamic Art in Qatar.
a. Using the grid and points below, try to trace the arches.

EAA welcomes feedback on its projects in order to improve, please use this link:
https://forms.gle/LGAP9k17fMyJrKJN7
13
b. After drawing the arches, use the red line as an axis of reflection, and draw the
reflection of the arches.
2. Here is another picture of the Museum of Islamic Art with its reflection in the water. Use
the grid below to draw the reflection of the museum.

EAA welcomes feedback on its projects in order to improve, please use this link:
https://forms.gle/LGAP9k17fMyJrKJN7
14
Hint: first mark the main
corner points of the
museum structure,
then make the reflection of
each point, and lastly
connect them to get
the trace of the museum
building’s reflection.
0 1 2 3 4 5 6 7 8 9
1
2
3
4
5
Axis of reflection
EAA welcomes feedback on its projects in order to improve, please use this link:
https://forms.gle/LGAP9k17fMyJrKJN7
15
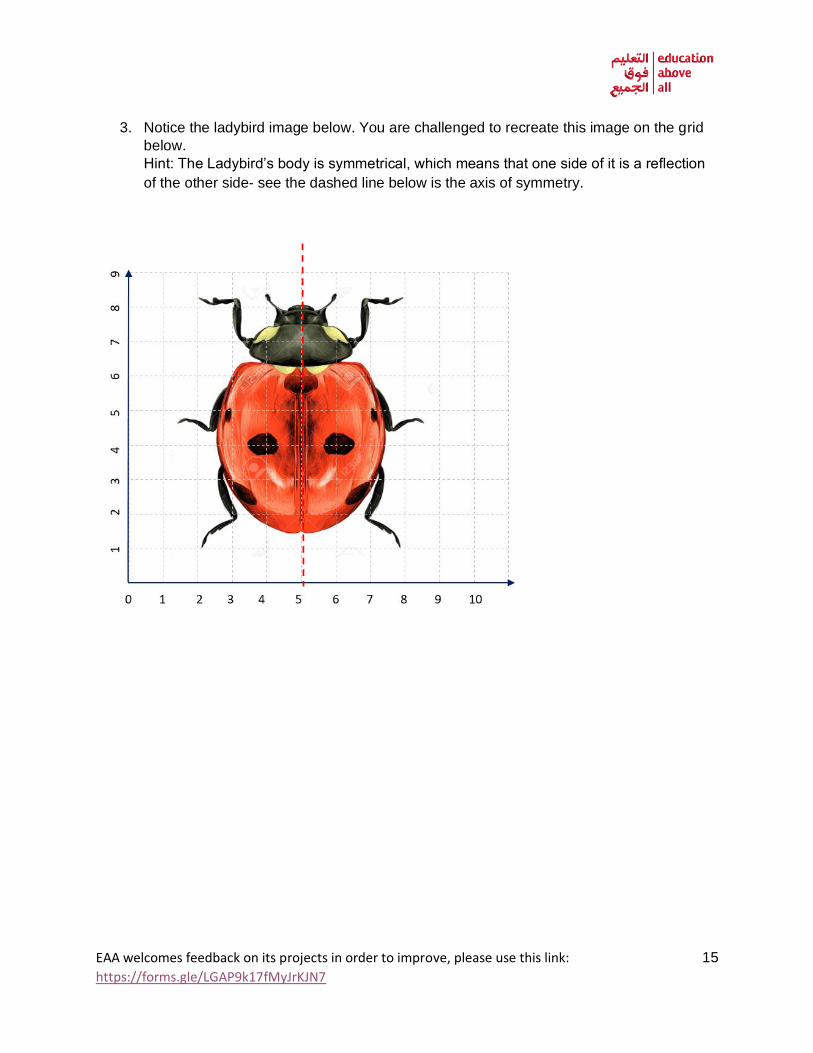
3. Notice the ladybird image below. You are challenged to recreate this image on the grid
below.
Hint: The Ladybird’s body is symmetrical, which means that one side of it is a reflection
of the other side- see the dashed line below is the axis of symmetry.