
FTTH OPTICAL POWER METER - PROMAX · simultaneously optical attenuation for GPON networks (1310 nm,...
40
PROLITE-63 FTTH OPTICAL POWER METER - 0 MI2003 -
Transcript of FTTH OPTICAL POWER METER - PROMAX · simultaneously optical attenuation for GPON networks (1310 nm,...
PROLITE-63
FTTH OPTICAL POWER METER
- 0 MI2003 -


SAFETY NOTES Read the user’s manual before using the equipment, mainly "SAFETY RULES" paragraph.
The symbol on the equipment means "SEE USER’S MANUAL". In this manual may also appear as a Caution or Warning symbol. WARNING AND CAUTION statements may appear in this manual to avoid injury hazard or damage to this product or other property.
USER MANUAL VERSION
Version Date Firmware Version 2.0 January 2014 1.04
Software Version 1.03


January 2014
SAFETY RULES * The safety could not be assured if the instructions for use are not closely
followed. * The external DC charger is Class I equipment. For safety reasons plug it to a supply
line with the corresponding ground terminal.
Use the mains adapter in Over-Voltage Category II installations and Pollution Degree 1 environments. It is for INDOOR USE.
* When using some of the following accessories use only the specified ones to
ensure safety. Power adapter. Car cigarette lighter adapter. Mains cord. * Observe all specified ratings both of supply and measurement. * Use this instrument under the specified environmental conditions. * The user is not authorised to manipulate inside the instrument:
Any change on the equipment should be carried out by qualified personnel. * Follow the cleaning instructions described in the Maintenance paragraph.

* Symbols related with safety:
Descriptive Examples of Over-Voltage Categories Cat I Low voltage installations isolated from the mains. Cat II Portable domestic installations. Cat III Fixed domestic installations. Cat IV Industrial installations.
January 2014

January 2014
TABLE OF CONTENTS 1 INTRODUCTION........................................................................................... 1
1.1 Description ....................................................................................... 1 2 INSTALATION.............................................................................................. 2
2.1 Power Supply.................................................................................... 2 2.1.1 Operation Using the Mains Adapter................................................... 2 2.1.2 Operation Using the Battery ............................................................ 2 2.1.3 Battery Charging ........................................................................... 2 2.1.4 Recommendations using the battery ................................................. 3
3 OPERATING INSTRUCTIONS .......................................................................... 4 3.1 Descriptions of Controls and Elements .................................................. 4 3.2 Operating Instructions........................................................................ 5 3.2.1 SETUP Mode.................................................................................. 6 3.2.2 OPTICAL POWER METER Function (OPM) ........................................... 7 3.2.3 OPTICAL LOSS TEST SET Function.................................................... 9 3.2.4 THRESHOLD CONFIGURATION Mode................................................11 3.2.5 LOGGER Function..........................................................................12 3.3 Connecting to a computer..................................................................14
4 CONTROL SOFTWARE PROLITE-63.................................................................15 4.1 Description ......................................................................................15 4.2 Hardware and software Requirements .................................................15 4.3 Installation ......................................................................................16 4.3.1 Software Installation .....................................................................16 4.4 LEGAL CONDITIONS..........................................................................16 4.4.1 Connection between PROLITE-63 and PC...........................................17
5 INSTRUCTIONS FOR USING THE CONTROL SOFTWARE ....................................19 5.1 Start...............................................................................................19 5.2 Main window....................................................................................21 5.3 Menu bar.........................................................................................23 5.3.1 File .............................................................................................23 5.3.2 Loggers .......................................................................................24 5.3.3 Editors ........................................................................................24 5.3.4 Language ....................................................................................25 5.3.5 Upgrade ......................................................................................25 5.3.6 Help............................................................................................25
6 SPECIFICATIONS ........................................................................................26 7 MAINTENANCE ...........................................................................................28
7.1 Instructions for returning by mail........................................................28 7.2 Maintenance instructions ...................................................................28 7.2.1 Cleaning the cover. .......................................................................28 7.2.2 Not replaceable fuses by user .........................................................29
APPENDIX A: APPLICATION NOTE .....................................................................30

January 2014

January 2014 1
FTTH TESTER & OPM PROLITE-63
1 INTRODUCTION
1.1 Description
The PROLITE-63 is a high-performance optical power meter for optical fibre networks, which features high-speed testing and is prized for its quality, value and reliability. Its internal microprocessor and linear amplifier technology ensures high precision.
It is a compact and lightweight instrument, easy to carry thanks to its small size and unique features such high-speed tests on optical fibre systems, either single-mode or multi-mode, and display results on its LCD. Its quality, performance, reliability and security make it an alternative to other equipments in its class.
Under the situation of laboratory LANs, WANs and CATV as well as long distance optical networks, the Optical Power Meter together with a PROLITE-105 stabilized laser source, can be used to identify optic fibre, measure simultaneously optical attenuation for GPON networks (1310 nm, 1490 nm and 1550 nm), verify continuity and evaluate fibre link transmission quality.
It also has a logger function that stores up to 100 measurements per function. They can be reviewed later or transferred to a PC. It has an USB connector to connect to a computer and then you can obtain reports, print it or update firmware.
The design of the PROLITE-63 is adapted for fieldwork: it is compact and resistant to adverse conditions. Backlight LCD and contrast control provides an excellent visibility for reading the results. A hard-plastic case, perfectly adapted, protects the instrument from hitting or accidental falling and facilitates holding it. The Li-Ion battery is rechargeable and provides a long operation time.
In conclusion, the PROLITE-63 is the ideal tool for any installation of optic fibre, because is ergonomically designed, robust, easy to use and economical. It has all the functions needed to make an installation of optical fibre.
2 INSTALATION
2.1 Power Supply
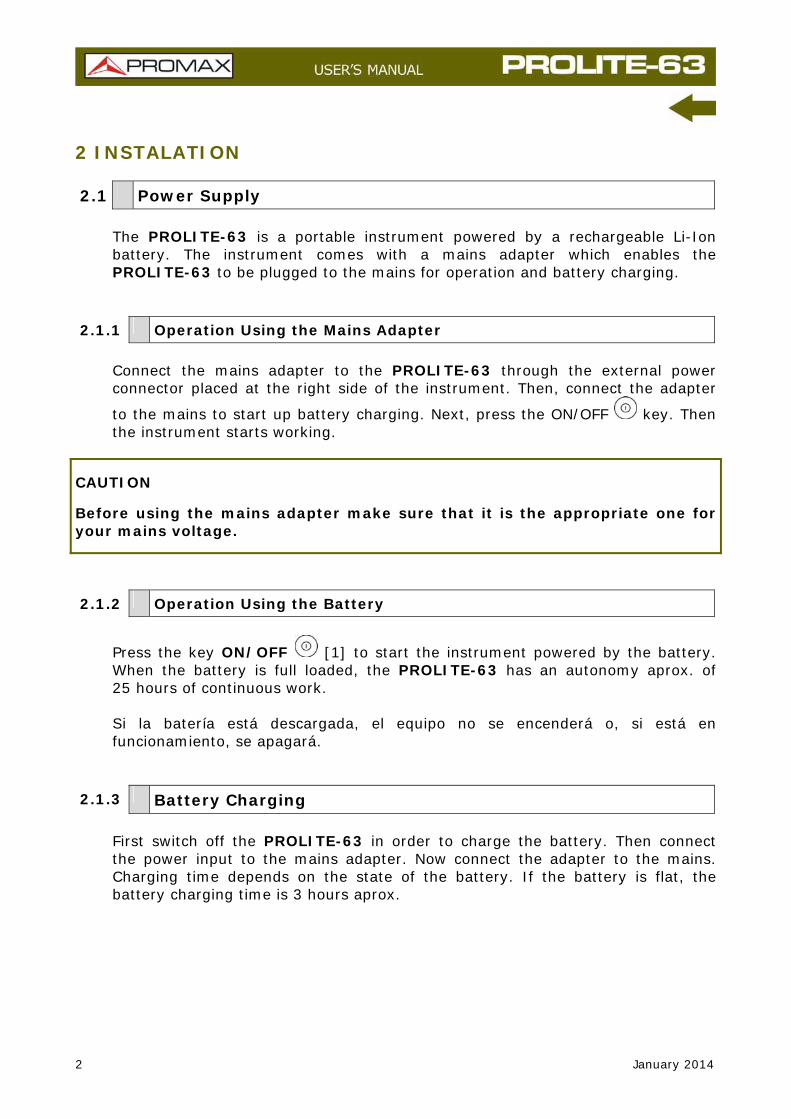
The PROLITE-63 is a portable instrument powered by a rechargeable Li-Ion battery. The instrument comes with a mains adapter which enables the PROLITE-63 to be plugged to the mains for operation and battery charging.
2.1.1 Operation Using the Mains Adapter
Connect the mains adapter to the PROLITE-63 through the external power connector placed at the right side of the instrument. Then, connect the adapter
to the mains to start up battery charging. Next, press the ON/OFF key. Then the instrument starts working.
CAUTION
Before using the mains adapter make sure that it is the appropriate one for your mains voltage.
2.1.2 Operation Using the Battery
Press the key ON/OFF [1] to start the instrument powered by the battery. When the battery is full loaded, the PROLITE-63 has an autonomy aprox. of 25 hours of continuous work.
Si la batería está descargada, el equipo no se encenderá o, si está en funcionamiento, se apagará.
2.1.3 Battery Charging
First switch off the PROLITE-63 in order to charge the battery. Then connect the power input to the mains adapter. Now connect the adapter to the mains. Charging time depends on the state of the battery. If the battery is flat, the battery charging time is 3 hours aprox.
2 January 2014

January 2014 3
2.1.4 Recommendations using the battery
If anticipating a long period of inactivity for your instrument, it is advisable to store it with the battery fully charged and at temperatures below 25 °C.
It is also advisable in these cases to carry out a cycle of charging/discharging and a subsequent half charge (i.e. 50 %) every 3 months.

3 OPERATING INSTRUCTIONS
3.1 Descriptions of Controls and Elements
Front Panel
Figure 1.
1 Signal detection LED:
COLOURS: GREEN (value within thresholds).
RED (value below threshold).
ORANGE (value above threshold).
2 CURSOR keys with several functions according to the screen:
Main Menu Screen: It moves the cursor over the functions.
Function Screen: It shows the available values in the selected field.
Attenuation Test/OPM Screen: It captures a value to use as a reference by pressing both key simultaneously.
3 SELECTION key with several functions according to the screen:
Main Menu Screen: It gets into the slected options.
Function Screen: It moves between the editable fields.
Configuration Screen: It enters/quits the editable field.
4 January 2014

January 2014 5
3.2 Operating Instructions
Main functions of the PROLITE-63 are accesible through the main menu, which
you can access at by pressing the button CONFIG :
Figure 2. MENU screen.
► OPTICAL POWER METER (OPM):
It measures optical power at the input in the whole infrared band (1100-1700) and allows you to take a reference value to measure from it.
► OPTICAL LOSS TEST SET:
It measures the attenuation for GPON networks by identificating modulation of 270 Hz for 1310 nm, 1 kHz for 1490 nm and 2 kHz for 1550 nm.
► THRESHOLD CONFIGURATION
It allows you to configure up to 10 different pairs of threshold values.
► SETUP
It allows you to configure some parameters such as language, time, data, contrast, etc.
To access any of these menus, press the button CONFIG to access the main
menu and then press UP or DOWN until your option is selected. Now
press CONFIG or SEL .

3.2.1 SETUP Mode
This menu allows you to edit some basic parameters such as time, hour and language among others.
To access the SETUP menu:
Press the button CONFIG .
Press or [5] until pointing at SETUP.
Press CONFIG [2] or SEL [4] to get into the SETUP menu.
It shows a screen with some parameters to configurate the system (Fig. 3).
Figure 3. SETUP Screen.
To edit the status or change a parameter value:
Press or to move along the menu.
Place the arrow pointing at the parameter to modify and press SEL .
The arrow moves next to the parameter value. Now you can change it using
or . When editing date and time, press SEL to move to the next field.
Once edited, press again SEL to get out of the parameter edition.
Press CONFIG to get out from the SETUP menu and back to the main menu.
6 January 2014
January 2014 7
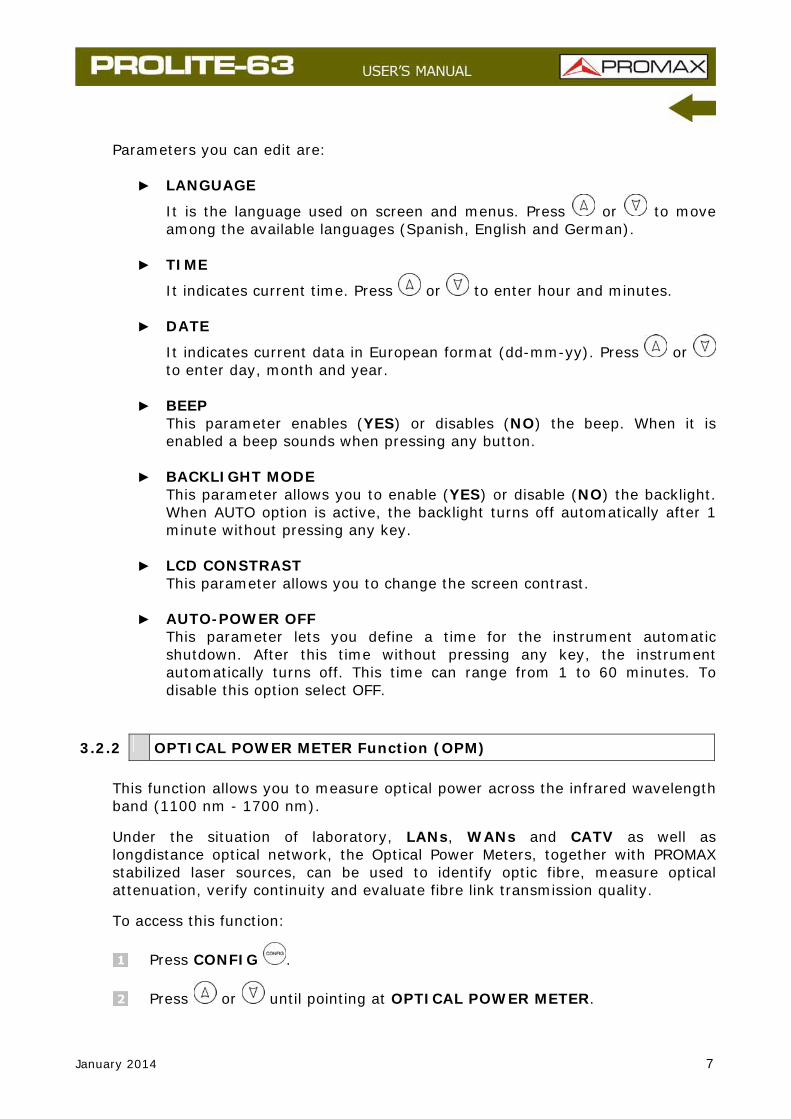
Parameters you can edit are:
► LANGUAGE
It is the language used on screen and menus. Press or to move among the available languages (Spanish, English and German).
► TIME
It indicates current time. Press or to enter hour and minutes.
► DATE
It indicates current data in European format (dd-mm-yy). Press or to enter day, month and year.
► BEEP
This parameter enables (YES) or disables (NO) the beep. When it is enabled a beep sounds when pressing any button.
► BACKLIGHT MODE
This parameter allows you to enable (YES) or disable (NO) the backlight. When AUTO option is active, the backlight turns off automatically after 1 minute without pressing any key.
► LCD CONSTRAST
This parameter allows you to change the screen contrast.
► AUTO-POWER OFF This parameter lets you define a time for the instrument automatic shutdown. After this time without pressing any key, the instrument automatically turns off. This time can range from 1 to 60 minutes. To disable this option select OFF.
3.2.2 OPTICAL POWER METER Function (OPM)
This function allows you to measure optical power across the infrared wavelength band (1100 nm - 1700 nm).
Under the situation of laboratory, LANs, WANs and CATV as well as longdistance optical network, the Optical Power Meters, together with PROMAX stabilized laser sources, can be used to identify optic fibre, measure optical attenuation, verify continuity and evaluate fibre link transmission quality.
To access this function:
Press CONFIG .
Press or until pointing at OPTICAL POWER METER.

Press SEL or CONFIG to get into this function (see figure below).
Figure 4. OPTICAL POWER METER.
Next are described each one of the fields on screen:
Wavelenght at which it is measuring. Available wavelenght are 1310, 1490, 1550 and 1625 nm.
Reference value from which is calculated the relative losses. Reference value can be changed.
Modulation frequency.
Graphical representation of the power.
Selected threshold group of values. Threshold values are grouped and saved on the memory of the instrument, then later they can be selected in order to the quality criterium to meet.
Lower threshold value.
Maximal power value recommended for the selected wavelenght.
Upper threshold value.
Signal status with respect to threshold values. Three status are possible: LOW, PASS, HIGH.
Relative signal losses (attenuattion) at the selected wavelenght. It is in dB. It is equal to:
ATTEN = Ref (dBm) - POT (dBm)
8 January 2014

January 2014 9
Absolute optical signal power at the selected wavelenght. Absolute measurement mode represents the absolute signal power value in dBm (dB referred to 1 mW). Power measure is right only when the measured input
It is an arrow which indicates if the value exceeds (arrow pointing up) or does not arrive (arrow pointing down) to the minimum levels in order to be graphically represented.
To navigate through the editable fields on the screen press SEL . The selected field changes to shaded.
To edit the wavelenght or the threshold group, select it and press or .
To capture a new reference value, select the current reference value and press
both keys and simultenously.
To make or consult a logger refer to the section LOGGER Function.
3.2.3 OPTICAL LOSS TEST SET Function
This function measures signals emitted by a test source (e.g. PROLITE-105). It measures the attenuation for GPON networks by identificating modulation of 270 Hz for 1310 nm, 1 kHz for 1490 nm and 2 kHz for 1550 nm. It should be used in combination with a PROLITE-105. It shows on screen absolute measures, relative measures and measurement with respect to the threshold value.
To access this function:
Press CONFIG .
Press or until pointing at OPTICAL LOSS TEST SET.
Press SEL or CONFIG to get into this function (see figure below).
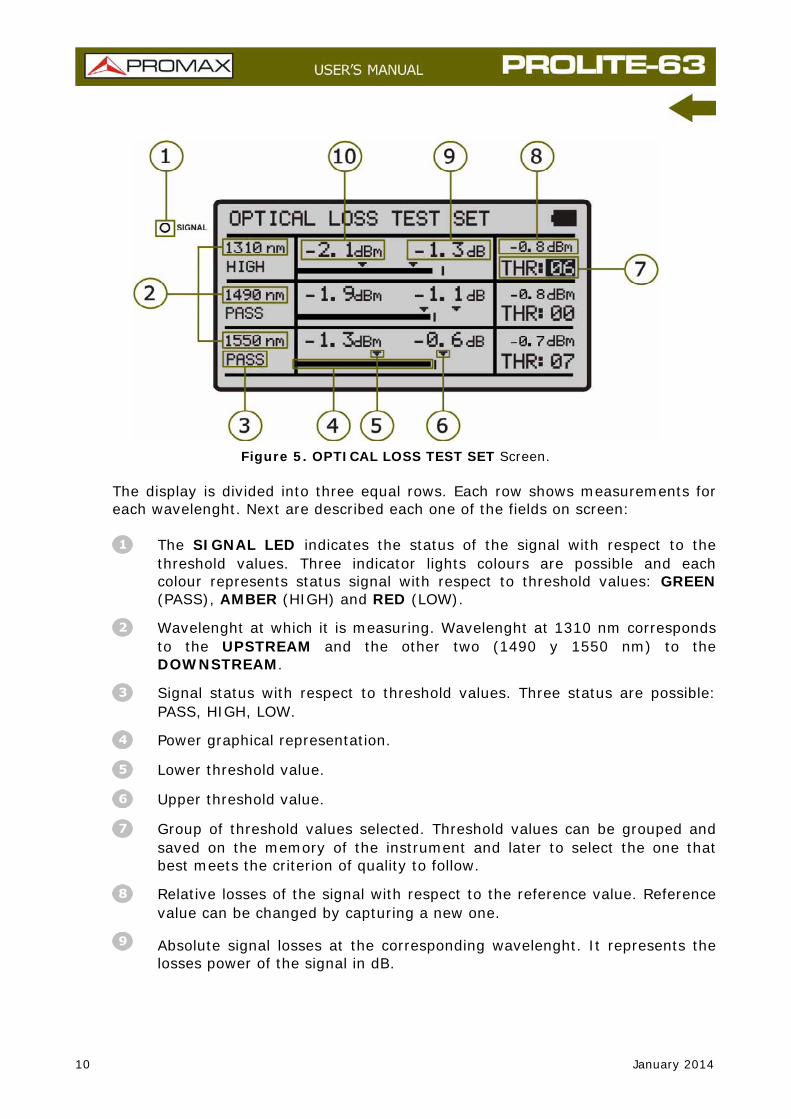
Figure 5. OPTICAL LOSS TEST SET Screen.
The display is divided into three equal rows. Each row shows measurements for each wavelenght. Next are described each one of the fields on screen:
The SIGNAL LED indicates the status of the signal with respect to the
threshold values. Three indicator lights colours are possible and each colour represents status signal with respect to threshold values: GREEN (PASS), AMBER (HIGH) and RED (LOW).
Wavelenght at which it is measuring. Wavelenght at 1310 nm corresponds to the UPSTREAM and the other two (1490 y 1550 nm) to the DOWNSTREAM.
Signal status with respect to threshold values. Three status are possible: PASS, HIGH, LOW.
Power graphical representation.
Lower threshold value.
Upper threshold value.
Group of threshold values selected. Threshold values can be grouped and saved on the memory of the instrument and later to select the one that best meets the criterion of quality to follow.
Relative losses of the signal with respect to the reference value. Reference value can be changed by capturing a new one.
Absolute signal losses at the corresponding wavelenght. It represents the losses power of the signal in dB.
10 January 2014
January 2014 11
Absolute optical power of the signal at the corresponding wavelenght. Absolute measurement mode is the absolute power of signal in dBm (dB referred to 1mW).
To navigate through the editable fields on the screen press SEL . The selected field changes to shaded.
To edit a threshold group of values, select it and press or .
To capture a new reference value, select the current reference value and press
both keys and simultenously.
To make or consult a logger refer to the section LOGGER Function.
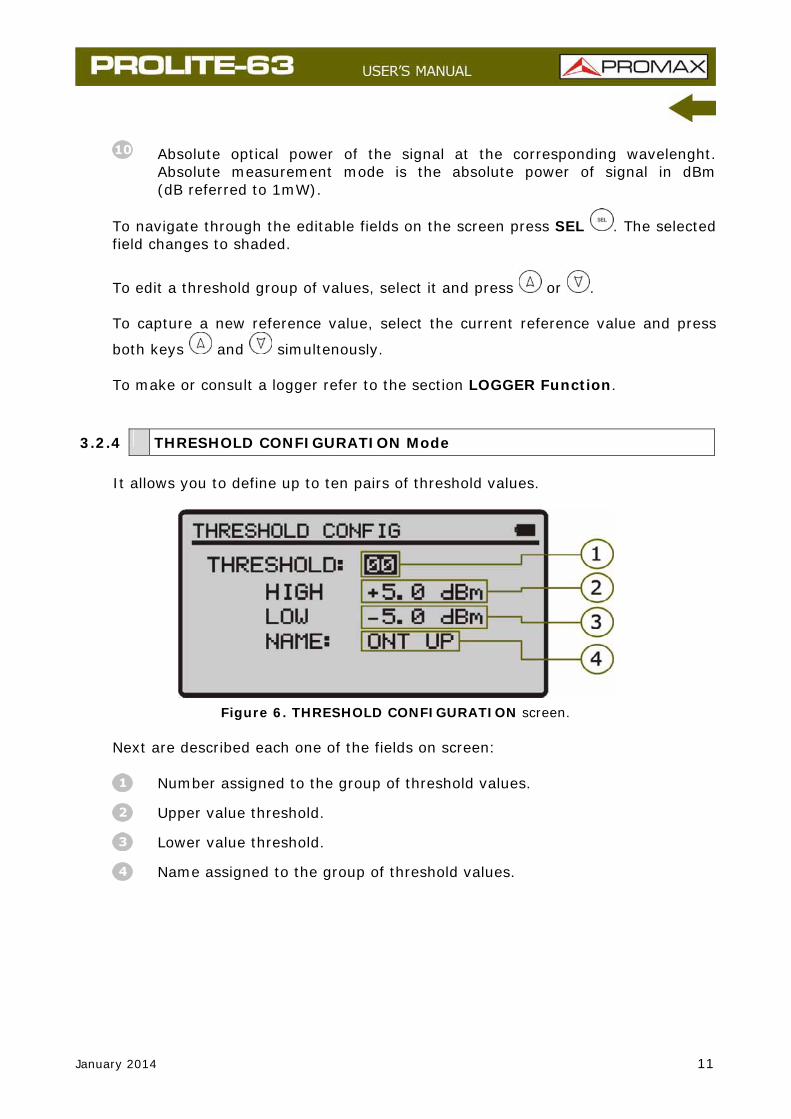
3.2.4 THRESHOLD CONFIGURATION Mode
It allows you to define up to ten pairs of threshold values.
Figure 6. THRESHOLD CONFIGURATION screen.
Next are described each one of the fields on screen:
Number assigned to the group of threshold values.
Upper value threshold.
Lower value threshold.
Name assigned to the group of threshold values.
To modify the threshold values:
Press SEL to move along the parameters.
To change a parameter, it must be shaded. Once it is shaded it can be modified by using the arrows.
Once changes are made, press again SEL to get out from editing the parameter.
To get out from the configuration mode and back to the main menu press
CONFIG .
3.2.5 LOGGER Function
LOGGER function takes data and save them on the memory, so they can be viewed or downloaded on a computer.
Each funtion has its own logger memory up to 99 loggers par function.
To access the LOGGER Function:
From the function you are press STO/RCL .
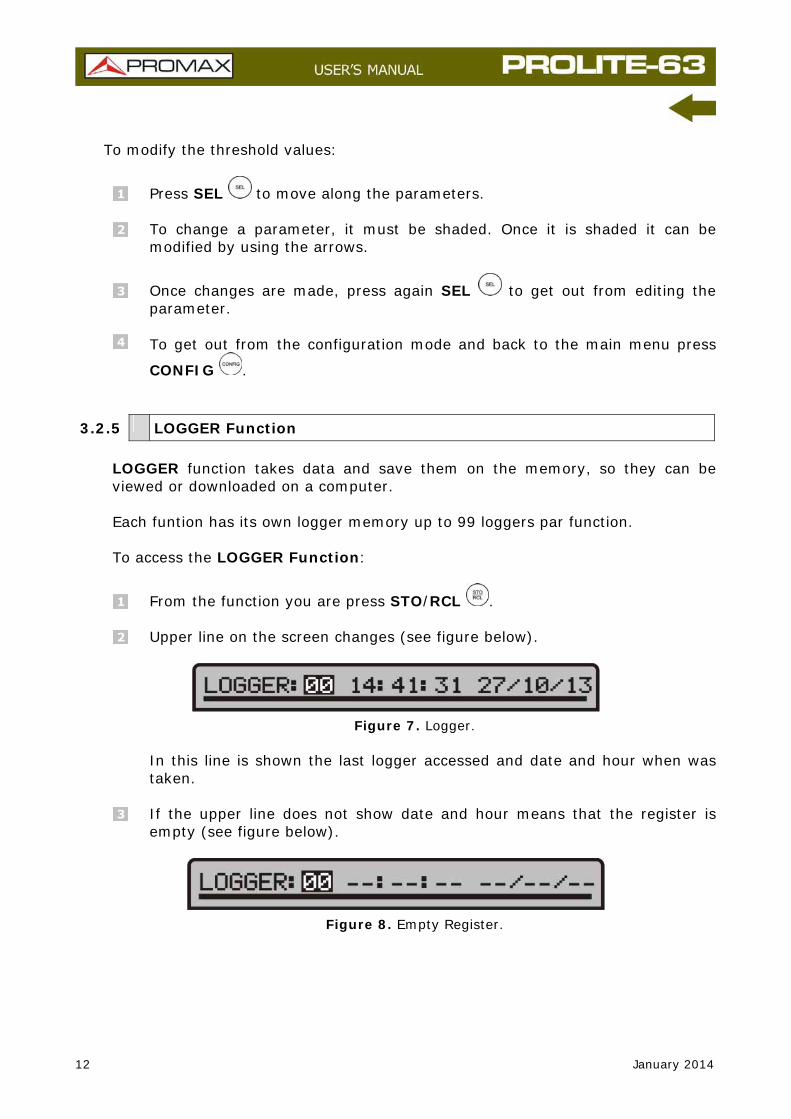
Upper line on the screen changes (see figure below).
Figure 7. Logger.
In this line is shown the last logger accessed and date and hour when was taken.
If the upper line does not show date and hour means that the register is
empty (see figure below).
Figure 8. Empty Register.
12 January 2014
January 2014 13
To move between loggers press or .
To take a logger press again STO/RCL . Then the message “Saving Logger” appears on screen and the logger is updated with the current date and hour.
To consult a logger, press SEL . From this screen you can move between
registers by pressing or . If you move to an empty logger it appears the message “No data”.
To return to the function screen, press STO/RCL or SEL .
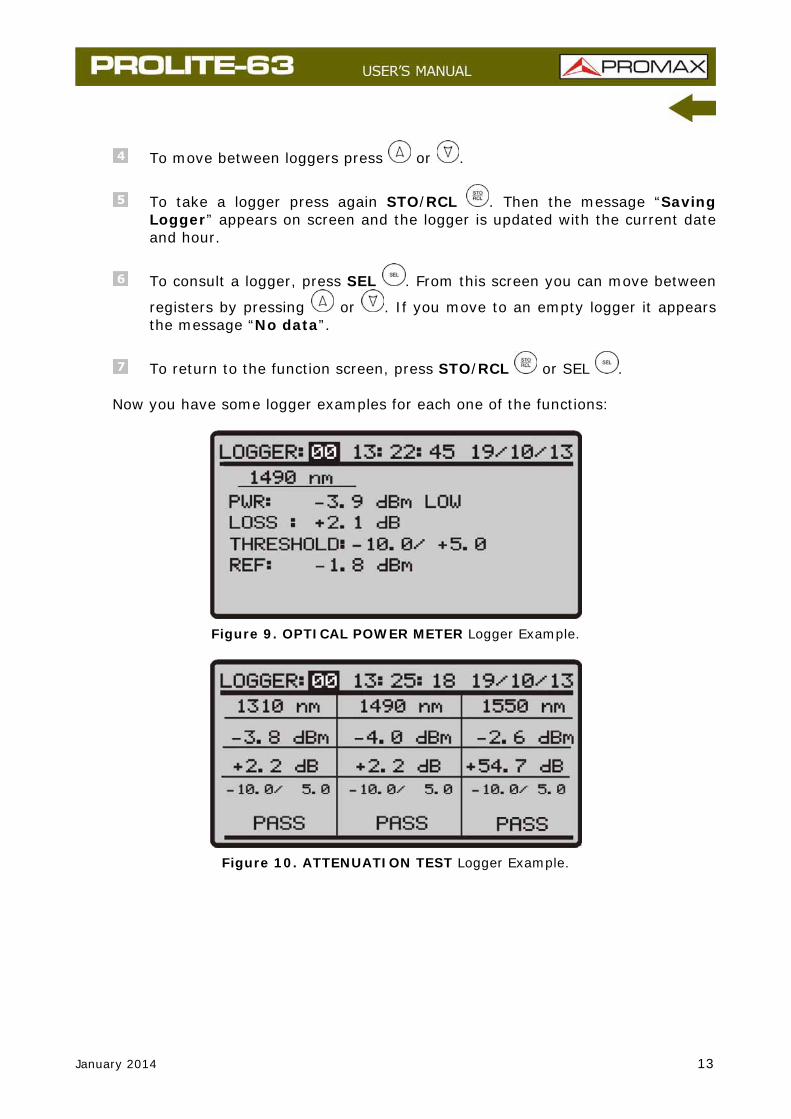
Now you have some logger examples for each one of the functions:
Figure 9. OPTICAL POWER METER Logger Example.
Figure 10. ATTENUATION TEST Logger Example.

3.3 Connecting to a computer
This instrument allows you to be connected to a personal computer via USB in order to download registers and to update firmware.
For more information see next chapter about PROLITE-63 control software.
14 January 2014

January 2014 15
4 CONTROL SOFTWARE PROLITE-63
4.1 Description
This software is an application that allows a computer and the instrument PROLITE-63 to communicate.
It allows you to download and view dataloggers from the instrument and configure some other parameters. It also allows upgrading the instrument.
4.2 Hardware and software Requirements
In order to use the program, your computer system need to meet the next requerements:
Hardware Requirements
Minimal Configuration:
• IBM Computer compatible Pentium or higher.
• 10 Mbytes of available space on the hard drive.
• Mouse.
• USB port available.
Software Requirements
This software runs under Windows® Operative System.

4.3 Installation
4.3.1 Software Installation
The installation file for the PL-63 Control software is contained in a CD-ROM supplied with the instrument. Before proceeding to install the program, read the following instructions.
Insert the installation CD into the CD-ROM drive of your computer.
Double click on the file which is into the folder “SOFTWARE” of the CD-ROM.
The install wizard will start automatically, which will help you during the installation process.
4. The installation program creates, by default, a new directory in C:\Program Files\PROMAX\PROLITE-63, where it copies all files of the application. It also puts a shortcut on the desktopand on the menu Start \ Program.
Double click on the shortcut icon PROLITE-63 on the desktop to run the program.
In the section “Operation Instructions” is explained in detail the program operation.
4.4 LEGAL CONDITIONS
Read the contract carefully in its entirety before you install the program. Installing the program means that you have accepted the following terms and conditions.
SUBJECT. The subject matter of this Contract is the grant to the end user
by PROMAX ELECTRONICA, S. L. a non-exclusive and non-transferrable personal license to use this version of the program for an indefinite period of time.
LICENCE. The Licence of Use granted hereby refers exclusively to the end
user, who shall be considered legitimised to use the program only.
OWNERSHIP OF THE SOFTWARE. The end user acknowledges that the program referred to in this Contract is the exclusive property of PROMAX ELECTRONICA, S. L. The end user may only acquire the personal and non-transferrable right to use the software that is the subject matter of this Contract for the purposes herein expressed.
16 January 2014

January 2014 17
Since the program granted is protected by industrial and intellectual copyright, infringements by the user of these aforementioned obligations will give rise to the corresponding liabilities in accordance with the legislation in force.
RESOLUTION. The licence or authorisation of use is granted for an indefinite period of time. However, in the event of non-compliance by the end user with any of the clauses hereof, the Contract may as of right be terminated without any legal formality.
EXPLANATORY PROVISION. Notwithstanding the accuracy of the software granted, PROMAX ELECTRONICA, S.L. is fully exempt of liability for consequences arising from any possible omission existing in the program or from improper use by the end user of any of the information it contains and generates. Nor can PROMAX ELECTRONICA, S.L. be held liable for the suitability or accuracy of the data obtained for particular purposes or functions, since the only obligation of the latter, under this Contract, is the provision of means and not of results.
FINAL CLAUSE. The use of this software referred to herein signifies the tacit and unconditional acceptance of its conditions.
JURISDICTION. Both parties, explicitly waiving any rights that may correspond to them, agree to submit all controversies that may arise from this Contract to the jurisdiction and competence of the Judges ad Courts of Barcelona.
4.4.1 Connection between PROLITE-63 and PC
The connection between PROLITE-63 and PC is done via the data transmission cable USB (mini – USB) supplied with the instrument.
Connect the USB connector to a free USB port of your PC. Connect the cable to the mini-USB port of the PROMAX instrument.
Figure 11. Connection between PROLITE-63 and PC.
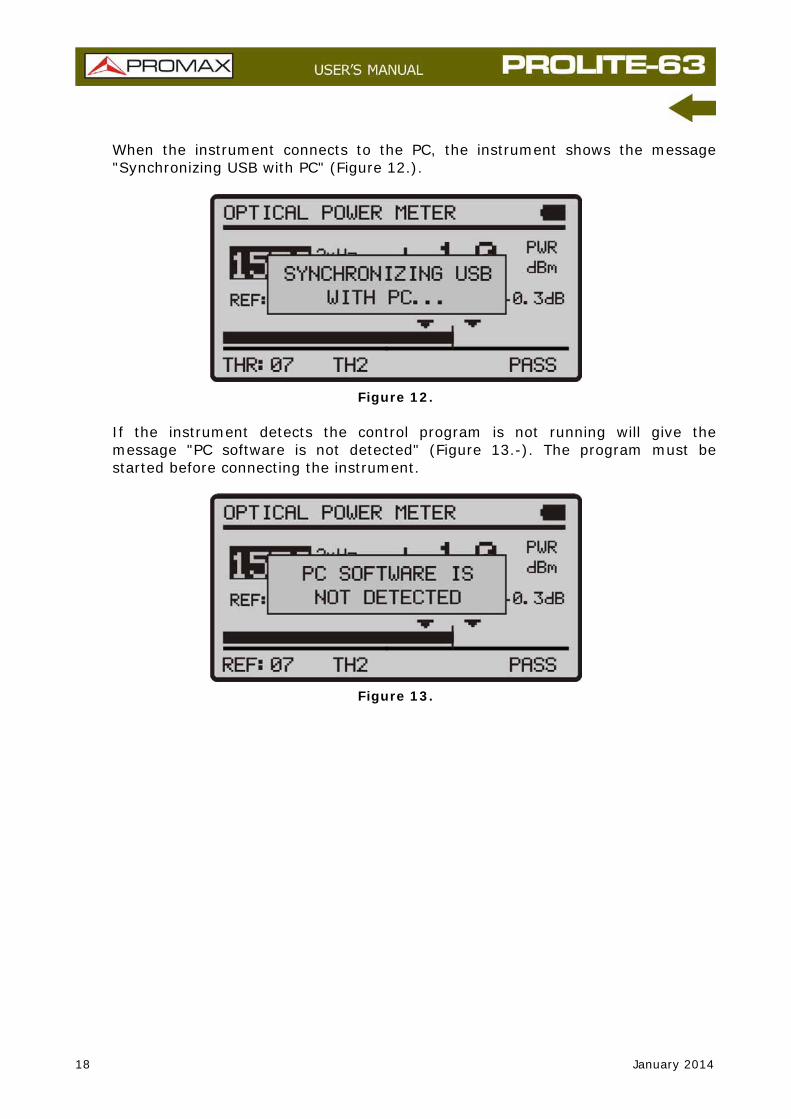
When the instrument connects to the PC, the instrument shows the message "Synchronizing USB with PC" (Figure 12.).
Figure 12.
If the instrument detects the control program is not running will give the message "PC software is not detected" (Figure 13.-). The program must be started before connecting the instrument.
Figure 13.
18 January 2014
January 2014 19
5 INSTRUCTIONS FOR USING THE CONTROL SOFTWARE
5.1 Start
Follow next steps in order to start using the PROLITE-63 Control Software:
Check the PROLITE-63 is ON.
Check connection between PROLITE-63 and computer.
Run the program by double clicking on the icon PROLITE-63 which is located on the desktop.
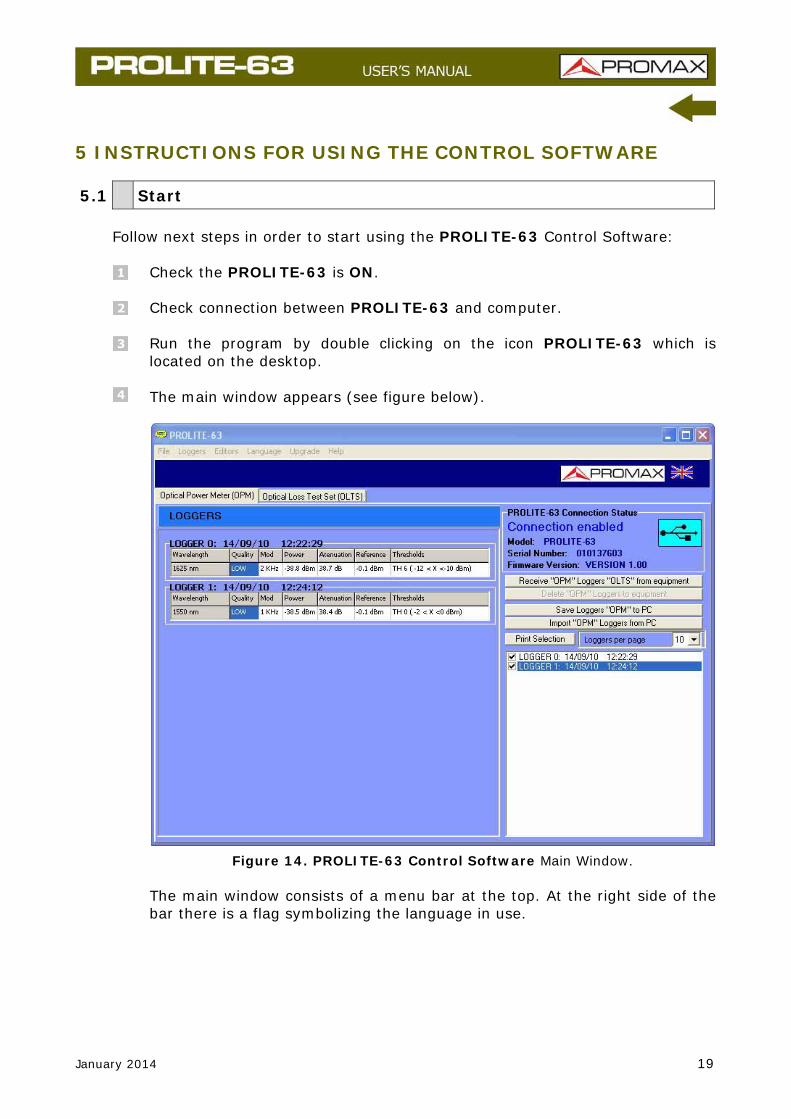
The main window appears (see figure below).
Figure 14. PROLITE-63 Control Software Main Window.
The main window consists of a menu bar at the top. At the right side of the bar there is a flag symbolizing the language in use.

Below de menu bar appears the “Logger” window with 2 tabs corresponding to each one of the available functions in the instrument. This window shows logger data you want to watch.
At the right side of the “Logger” window there is a box that reports about the connection status. Below this box there are a series of buttons that allow you to perform various operations with loggers..
5. When the instrument PROLITE-63 is identified at the USB port, it shows
on screen some data about it such serial number and model.
LEGAL NOTICE In any case PROMAX ELECTRONICA, S.L. responsible for data loss or other damages that may cause this program directly or indirectly. Although we put our efforts in developing a useful and reliable product, it is understood that the use of the program and data and information generated with it are the sole responsibility of the user.
20 January 2014

January 2014 21
5.2 Main window
The main window, as shown in the figure below, has several different areas which are detailed next:
Figure 15. Main window.
Menu Bar
There are the menus of the program (See section 6.3).
Language in use
It shows the flag identifying the selected language.
Active function selection tab
There are four tabs corresponding to each one of the two functions that are available at the program. They are: Optical Power Meter and Optical Loss Test Set. When clicking on one of these tabs, you access a window where you can view the loggers function.
Connection Status
It shows data corresponding to the model, serial number and firmware. Only when the connection is succesful (see figure below):
Figure 16. Connection enabled.

If the connection fails you see next figure:
Figure 17. Connection disabled.
Logger Display Window
It appears data loggers that have been selected at the Logger Selection Window.
Logger Options
It shows all the options you can do with loggers. To perform any of this options you have just to click on it. They are:
Receive loggers from the equipment: It transfers the selected loggers at the active
function from the instrument to the computer.
Delete loggers from the equipment: It deletes on the equipment the loggers selected
at the active function.
Save Loggers to PC: It saves the selected loggers in a file. A navigation window pops up, where you can select the folder where you want to save the file. The file has an extension associated to the selected function.
Import Logres from PC: Importa un fichero de registro desde el PC. El
programa abre una ventana de navegación donde se selecciona la carpeta donde se encuentra el fichero. El fichero tendrá la extensión asociada a la función activa en ese momento.
Logger printing options.
This area contains two options:
Print Selection: It open the printing window in order to print the loggers selected at the selection window.
Loggers per page: You can select how many loggers you want per page at printing.
22 January 2014

January 2014 23
Loggers selection Window
It appears all loggers loaded from the instrument or from the PC. If you want to view, print or make any operation on them you have to check the box next to the logger.
5.3 Menu bar
Menu bar has these options:
► File:
It contains the option to get out the program.
► Loggers:
It access to the 2 available options in the instrument.
► Editors:
It contains the option to edit upper and lower threshold values of each group.
► Language:
It contains the options to select the language in use at the program.
► Upgrade:
It contains the options to update the firmware of the instrument and to put the clock right.
► Help:
It contains the help information, contact details and version.
On the next sections each one of these menus are explained.
5.3.1 File
This menu contains the Close option.
The Close option closes the program (without confirmation).
5.3.2 Loggers
Options of this menu are:
► Optical Loss Test Set (OLTS).
► Optical Power Meter (OPM).
When clicking on any of these options, you active the window corresponding to that option, so you can carry out different actions on this function, such as import data, view loggers, make reports, etc. This option is equal to click on the tab corresponding to the option you want to activate.
5.3.3 Editors
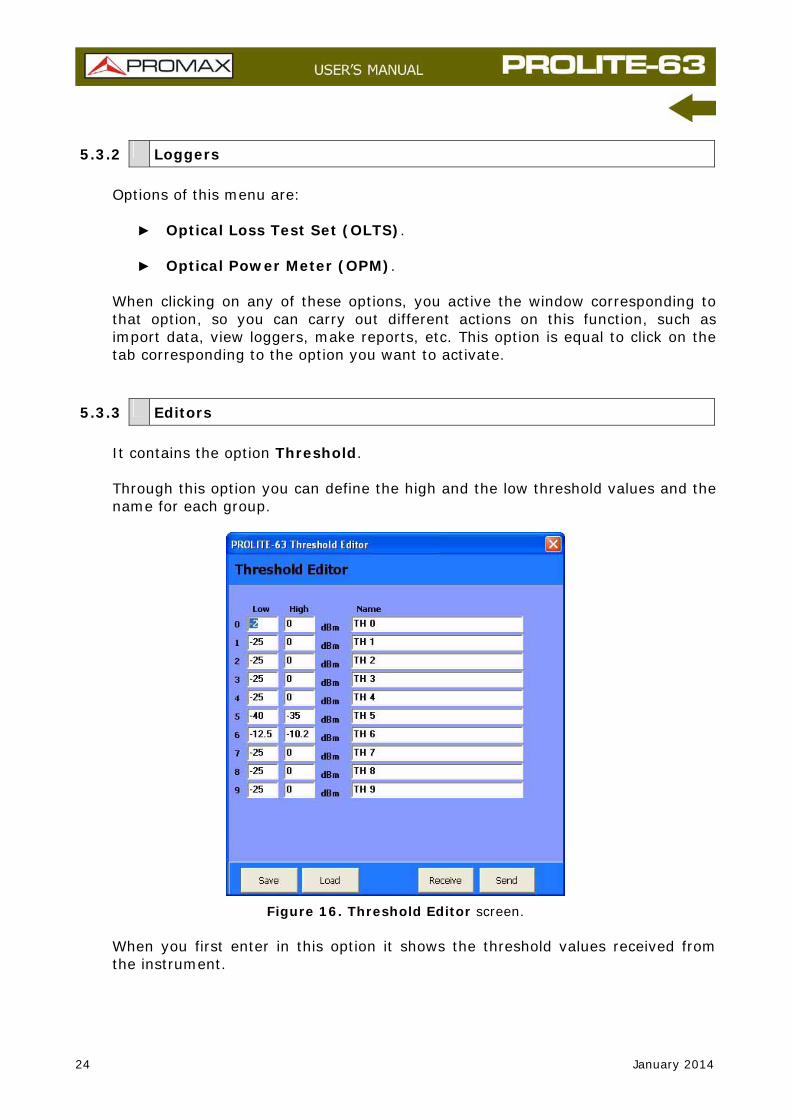
It contains the option Threshold.
Through this option you can define the high and the low threshold values and the name for each group.
Figure 16. Threshold Editor screen.
When you first enter in this option it shows the threshold values received from the instrument.
24 January 2014

January 2014 25
Values can be modified by clicking on the corresponding box and writing the new value. To save them click on the option Save. To load a group of values click on the option Load and select a file.
To send new values to the instrument click on the option Send.
To receive values from the instrument click on the option Receive.
5.3.4 Language
It allows you to select between Spanish, English or Catalan.
The active language is identified by a flag at the right side of the tool bar.
5.3.5 Upgrade
The Upgrade menu has two options:
The Firmware option allows you to update the firmware of the instrument PROLITE-63 through upgrading files that can be obtained from the PROMAX webpage. Clicking on this option you open a navegation window in order to select the upgrading file (with extension “*.P63”) used to upgrade the instrument.
The option Set to Time allows you to synchronise time from the computer to the instrument.
VERY IMPORTANT
Before proceeding with the upgrade to verify that the battery is charged PROMAX. PROMAX not disconnect the USB port while you are upgrading.
5.3.6 Help
The menu Help contains two optons:
The option Contents presents information about the program.
The option About PROLITE-63 presents information about the version and contact details.
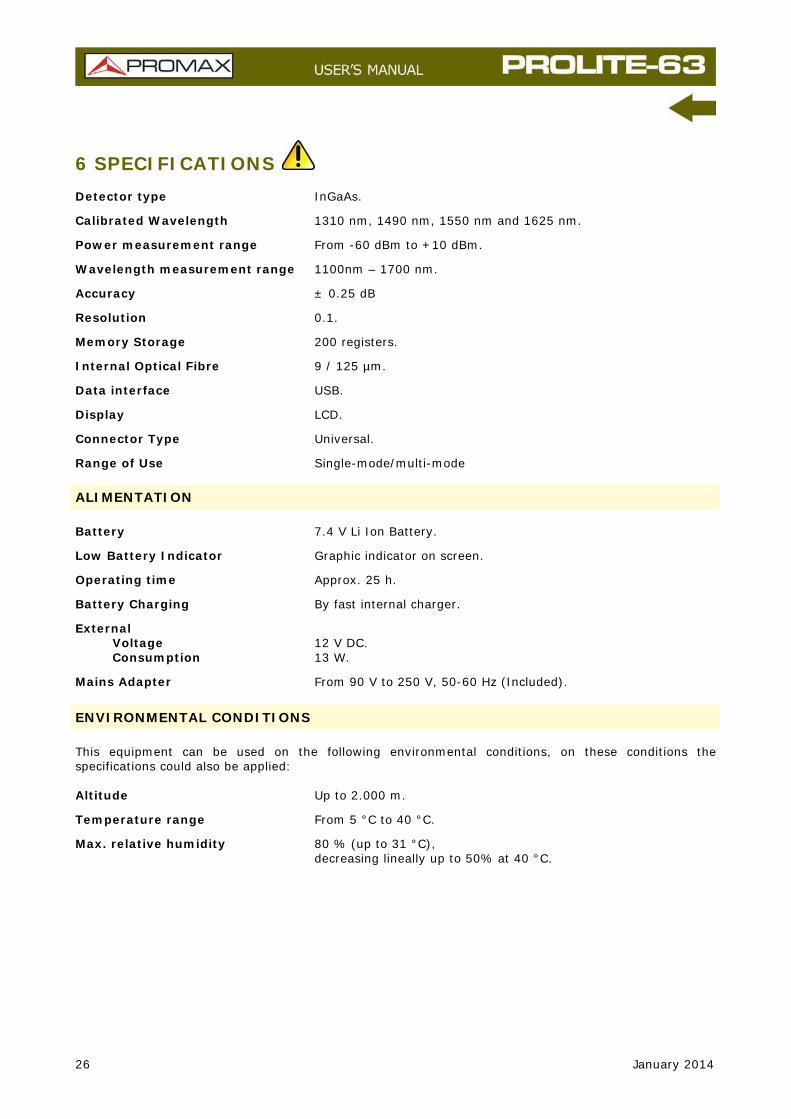
6 SPECIFICATIONS Detector type InGaAs.
Calibrated Wavelength 1310 nm, 1490 nm, 1550 nm and 1625 nm.
Power measurement range From -60 dBm to +10 dBm.
Wavelength measurement range 1100nm – 1700 nm.
Accuracy ± 0.25 dB
Resolution 0.1.
Memory Storage 200 registers.
Internal Optical Fibre 9 / 125 µm.
Data interface USB.
Display LCD.
Connector Type Universal.
Range of Use Single-mode/multi-mode
ALIMENTATION Battery 7.4 V Li Ion Battery.
Low Battery Indicator Graphic indicator on screen.
Operating time Approx. 25 h.
Battery Charging By fast internal charger.
External Voltage 12 V DC. Consumption 13 W.
Mains Adapter From 90 V to 250 V, 50-60 Hz (Included).
ENVIRONMENTAL CONDITIONS This equipment can be used on the following environmental conditions, on these conditions the specifications could also be applied: Altitude Up to 2.000 m.
Temperature range From 5 °C to 40 °C.
Max. relative humidity 80 % (up to 31 °C), decreasing lineally up to 50% at 40 °C.
26 January 2014

January 2014 27
MECHANICAL FEATURES
Dimensions 180 (W) x 95 (H) x 50 (D) mm.
Weight 459 g (battery and safety case included).
INCLUDED ACCESORIES 1x AL-101B Network adapter 90 - 250 V AC. 1x AA-12 Feeder cable car. 1x DC-272 Protective cover. 1x CA-05 Mains cord CEE-7. 1x CC-41 Data Transfer Cable USB to PC.
Wrist Strap.
CD-ROM PROLITE-63.
Adaptor's Kit (SC, FC and ST) 1x DG0136 Guide Reference rapide.
OPTIONAL ACCESORIES 1x DC-270 Transport suitcase.
RECOMMENDATIONS ABOUT THE PACKING It is recommended to keep all the packing material in order to return the instrument, if necessary, to the Technical service.

7 MAINTENANCE
This part of the manual describes the maintenance procedures and the location of faults.
7.1 Instructions for returning by mail
Instruments returned to repair or calibrate, either within or out of the guarantee period, should be send with the following information: Name of the Company, name of the contact person, address, phone number, receipt (in the case of coverage under guarantee) and a description of the problem or the service required.
7.2 Maintenance instructions
The maintenance steps to follow by the user consist of cleaning the cover and changing the battery. All other operations must be carried out by authorised agents or by qualified personnel.
7.2.1 Cleaning the cover.
CAUTION
Do not use scented hydrocarbons or chlorized solvents. Such products may attack the plastics used in the construction of the cover.
The cover should be cleaned by means of a light solution of detergent and water applied with a soft cloth. Dry thoroughly before using the system again.
CAUTION To clean the contacts, use a dry cloth. Do not use a wet or damp cloth. CAUTION Do not use for the cleaning of the front panel and particularly the viewfinders, alcohol or its derivatives, these products can attack the mechanical properties of the materials and diminish their useful time of life.
28 January 2014

January 2014 29
7.2.2 Not replaceable fuses by user
F001: FUS 2,5 A T 125 V F002: FUS 7 A T 125 V
APPENDIX A: APPLICATION NOTE AUTOMATIC MEASUREMENT OF THE OPTICAL ATTENUATION FOR A FIBRE NETWORK AT WAVELENGTHS: l=1310 NM, l=1490 NM AND l=1550 NM.
Next it is described the procedure to take attenuation measurements for an optical communications network at the wavelengths of 1310 nm, 1490 nm and 1550 nm by using the PROLITE-63 and the automatic mode of the PROLITE-105.
The attenuation or losses in a cable or optical device corresponds to the difference between the input coupled power and the output obtained power.
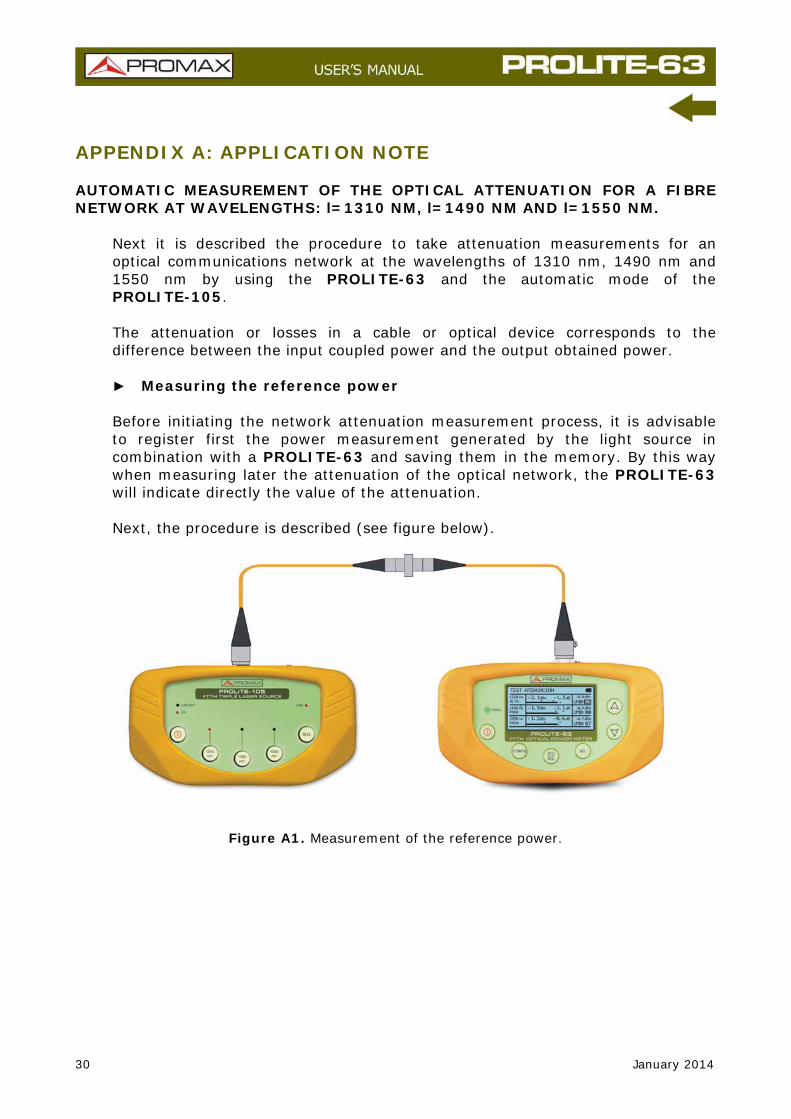
► Measuring the reference power
Before initiating the network attenuation measurement process, it is advisable to register first the power measurement generated by the light source in combination with a PROLITE-63 and saving them in the memory. By this way when measuring later the attenuation of the optical network, the PROLITE-63 will indicate directly the value of the attenuation.
Next, the procedure is described (see figure below).
Figure A1. Measurement of the reference power.
30 January 2014

January 2014 31
Connect the light source to the power level meter by means of an optical fibre patch cord, joined by a SC adaptor.
Configure the PROLITE-63 to measure only at the wavelengths: 1310 nm,
1490 nm and 1550 nm, by means of the function ATTENUATION TEST (see that section on the PROLITE-63 user’s manual).
Select the 1310 nm output of the PROLITE-105 and take the reference
value of the power at this wavelength with the PROLITE-63.
Repeat the previous process for the wavelength at 1490 nm and 1550 nm.
► Attenuation measurement in the optical communications network
Next the procedure to take the measurement is described (see figure).
Figure A2. Attenuation measurement in the optical communications network.
Connect the PROLITE-105 to the transmission node from the optical communications network that is desired to verify.
Activate the SEQ key of the PROLITE-105. The source will sequentially
generate wavelengths at 1310 nm, 1490 nm and 1550 nm.
Connect the PROLITE-63 to the reception node from the optical communications network.
To know the real value of that measurement you must select the
wavelength at 1310 nm on the optical meter. Then select the wavelenght at 1490 nm and 1550 nm to know the real value at these wavelengths.

PROMAX ELECTRONICA, S. L. Francesc Moragas, 71-75 08907 L’HOSPITALET DE LLOBREGAT (Barcelona) SPAIN Tel. : 93 184 77 00 * Tel. Intl. : (+34) 93 184 77 02 Fax : 93 338 11 26 * Fax Intl. : (+34) 93 338 11 26 http://www.promaxelectronics.com e-mail: [email protected]