From all at CarAdvice.com.au, happy Father’s Day!...
5
Step 1 Beginning with the windows, fold the tabs horizontal, and then fold the entire piece at each corner as shown. Note that the area below the side windows is not intended to be folded. Step 2 Moving onto the body, cleanly bend the margins and tabs highlighted here in red, and then curl the sections marked in green to create the 911’s famously curvaceous front fenders. Step 3 Now we’ll join the windows to the body and roof, finally giving the 911 some shape. To make this tricky process as simple as possible, fold and glue the sections in the order indicated. Step 4 Onto another tricky step (you’ll be detecting a pattern soon...), the nose. With the lights folded up and the bumper sections curved around, glue the tabs and bumper together as highlighted here in red. 3A: special hint! Here you can see a cross section of how the windows, roof and body come together, as viewed from the front. Have you ever dreamed of owning the legendary Porsche 911 Carrera RS 2.7 but can’t quite scrape together the nearly one million dollars you’d need to buy one? We’ve put together a little something to help you get by. For this job, you’ll need some sharp scissors or a craft blade, along with a glue stick and some nimble fingers. From all at CarAdvice.com.au, happy Father’s Day!
Transcript of From all at CarAdvice.com.au, happy Father’s Day!...

Step 1Beginning with the windows, fold the tabs horizontal, and then fold the entirepiece at each corner as shown. Note that the area below the side windows isnot intended to be folded.
Step 2Moving onto the body, cleanly bend the margins and tabs highlighted here inred, and then curl the sections marked in green to create the 911’s famouslycurvaceous front fenders.
Step 3Now we’ll join the windows to the body and roof, finally giving the 911 someshape. To make this tricky process as simple as possible, fold and glue the sections in the order indicated.
Step 4Onto another tricky step (you’ll be detecting a pattern soon...), the nose. With the lights folded up and the bumper sections curved around, glue the tabsand bumper together as highlighted here in red.
3A: special hint! Here you can see a cross section of how the windows, roof and body cometogether, as viewed from the front.
Have you ever dreamed of owning the legendary Porsche 911 Carrera RS 2.7 but can’t quite scrape together the nearly one million dollars you’d need to buy one? We’ve put together a little something to help you get by.
For this job, you’ll need some sharp scissors or a craft blade, along with a glue stick and some nimble fingers.
From all at CarAdvice.com.au, happy Father’s Day!
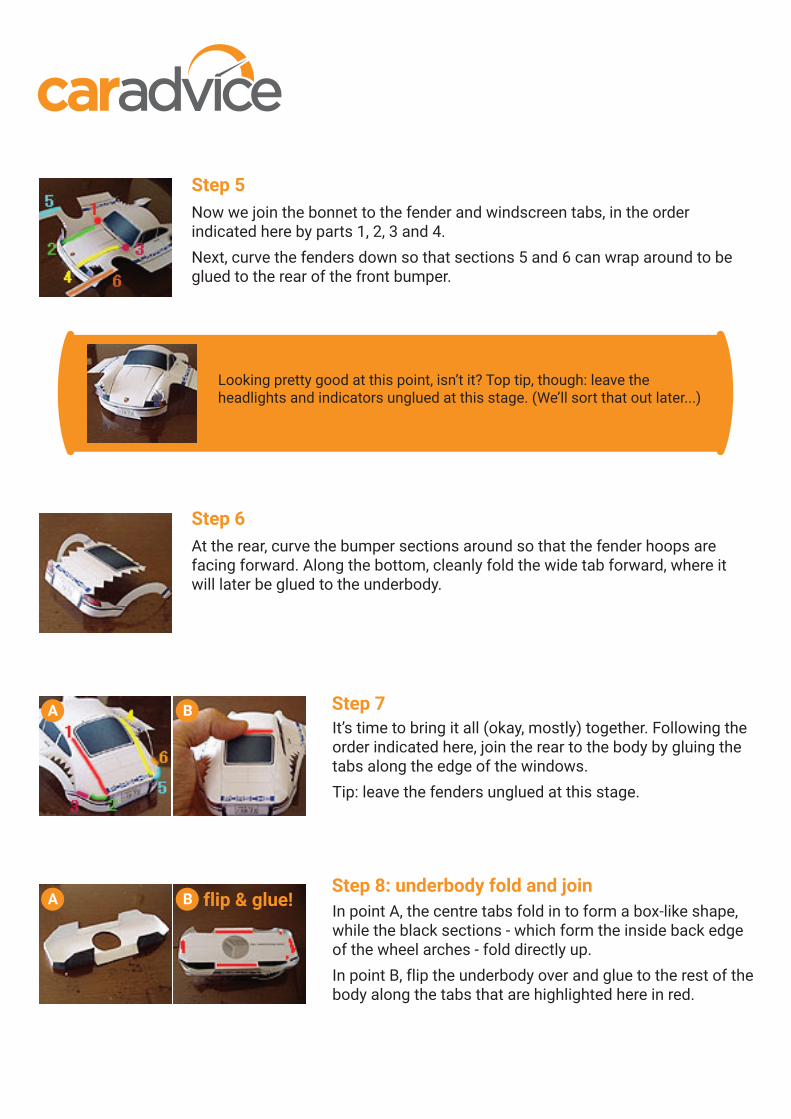
Step 5Now we join the bonnet to the fender and windscreen tabs, in the orderindicated here by parts 1, 2, 3 and 4. Next, curve the fenders down so that sections 5 and 6 can wrap around to beglued to the rear of the front bumper.
Step 6At the rear, curve the bumper sections around so that the fender hoops arefacing forward. Along the bottom, cleanly fold the wide tab forward, where itwill later be glued to the underbody.
Step 7
5A: special hint! Looking pretty good at this point, isn’t it? Top tip, though: leave the headlights and indicators unglued at this stage. (We’ll sort that out later...)
It’s time to bring it all (okay, mostly) together. Following the order indicated here, join the rear to the body by gluing the tabs along the edge of the windows. Tip: leave the fenders unglued at this stage.
Step 8: underbody fold and joinIn point A, the centre tabs fold in to form a box-like shape, while the black sections - which form the inside back edge of the wheel arches - fold directly up. In point B, flip the underbody over and glue to the rest of the body along the tabs that are highlighted here in red.
A B
A B
flip & glue!
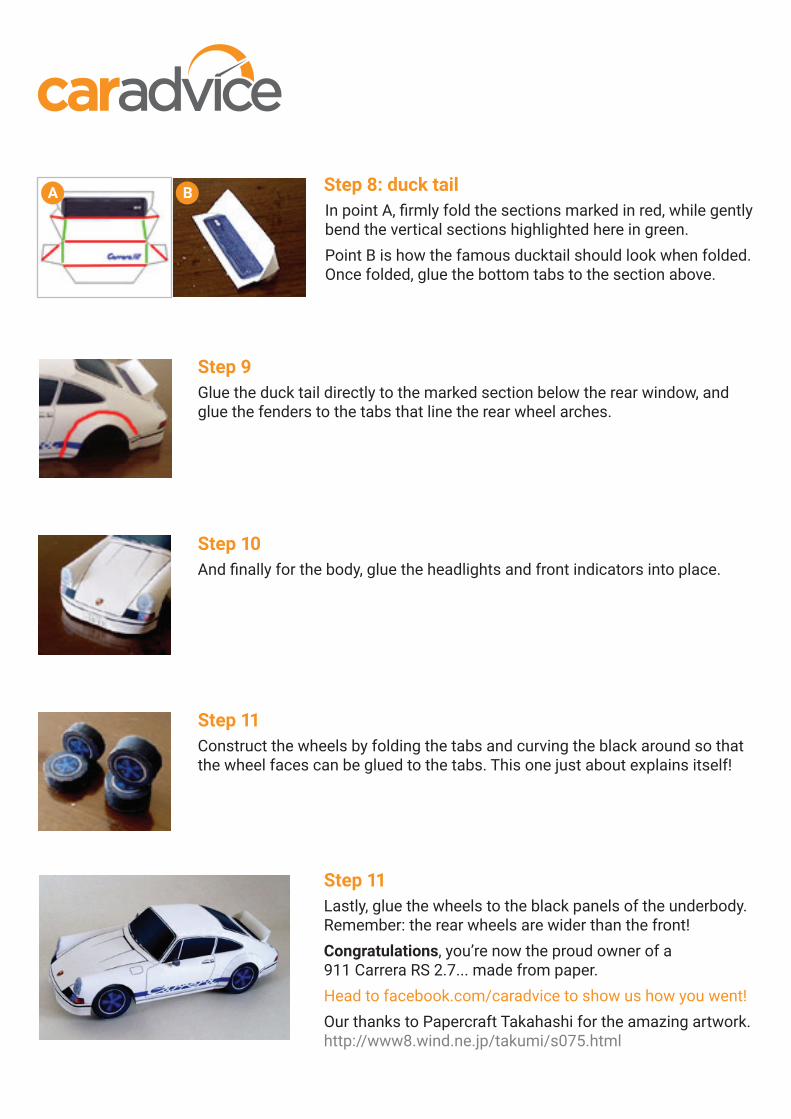
Step 8: duck tailIn point A, firmly fold the sections marked in red, while gently bend the vertical sections highlighted here in green.Point B is how the famous ducktail should look when folded. Once folded, glue the bottom tabs to the section above.
A B
Step 9Glue the duck tail directly to the marked section below the rear window, and glue the fenders to the tabs that line the rear wheel arches.
Step 10And finally for the body, glue the headlights and front indicators into place.
Step 11Construct the wheels by folding the tabs and curving the black around so that the wheel faces can be glued to the tabs. This one just about explains itself!
Step 11Lastly, glue the wheels to the black panels of the underbody. Remember: the rear wheels are wider than the front!Congratulations, you’re now the proud owner of a 911 Carrera RS 2.7... made from paper.Head to facebook.com/caradvice to show us how you went!Our thanks to Papercraft Takahashi for the amazing artwork.http://www8.wind.ne.jp/takumi/s075.html