friend zz - i.sears.com
23
Transcript of friend zz - i.sears.com


zzUJmuJM,olJ.UJdl
Please note that there is a weightlimitation for this product. lf youweigh more than 250lbs.(113.5 kg.) it is notrecommended that you usethis product. Serious injurymay occur if the user'sweight exceeds the limitshown here. This product is notintended to support users whoseweight exceeds this limit.
Gather your tools
Before starting the assembly ofyour unit, make sure that you havegathered all the necessary tools youmay require to assemble the unitproperly. Having allof the necessaryequipment at hand will save time andmake the assembly quick and hassle-free.
Clear your work area
Make sure that you have clearedaway a large enough space toproperly assemble the unit. Makesure space is free from anything thatmay cause injury during assembly.After the unit is fully assembled,make sure there is a comfortableamount of free area around the unitfor unobstructed operation.
lnvite a friend
Assembly can be made much saferand easier with the help of anotherindividual. lnvite a friend to help withthe assembly of your new exerciseequipment. lt is not only safe, butfun!
-2-

o.luFo
Warning
Before using this product, pleaseconsult your personal physician fora complete physical examination.Frequent and strenuous exerciseshould be approved by your doctor.lf any discomfort should result fromyour use of this product, stopexercising and consult your doctor.Proper usage of this product isessential. Please read your manualcarefully before exercisipg.
Please keep all children away fromthe equipment during use and whenequipment is unattended.
Always wear appropriate clothing,including athletic shoes, whenexercising. Do not wear looseclothing that could become caughtduring exercising.
Make sure that all bolts and nuts aretightened when equipment is in use.Periodic maintenance is required onall exercise equipment to keep it ingood condition.
Before beginning
How you begin your exerciseprogram depends on your physicalcondition. lf you have been inactivefor several years, or are severelyoverweight, you must starl slowlyand increase your time gradually, afew minutes per week.
lnitially you may be able to exerciseonly for a few minutes in your targetzone. However, your aerobic fitnesswill improve over the next six to eightweeks. Don't be discouraged if ittakes longer. lt's important to workat your own pace. Ultimately, you'llbe able to exercise continuously for30 minutes. And the better youraerobic fitness, the harder you willhave to work to stay in your targetzone. But remember these essentials:
>Contact your physician beforestarting a workout or trainingprogram. Have your doctor reviewyour training and diet programs toadvise you of a workout routine youshould adopt,
>Begin your training program slowlywith realistic goals that have beenset by you and your doctor.
>Supplement your program withsome type of aerobic exercise suchas walking, jogging, swimming,dancing and/or bicycling.
Monitor your pulse frequently. lf youdo not have an electronic heart ratemonitor, have your physician showyou the proper way to manually checkyour pulse by using your wrist orneck. Establish your target heart ratebased on your age andcondition.
>Drink plenty of fluids durin! thecourse of your routine. You mustreplace the water content lost fromexcessive exercising to avoiddehydration. Avoid drinking largeamounts of cold liquids. Fluids shouldbe at room temperature whenconsumed.
The Surgeon Generalhas determined that lack
of physical activity isdetrimental to your health.
-3-

F&I(,,
7othI
EA
=oo
Er your convenience, we haveidentified the hardware used inthe assembly of this product.This chart is provided to help youidentify those items that may beunfamiliar to you.
31Washer M8(11 Pieces)
51Washer M10(28 Pieces)
29Nut M8
(3 Pieces)
o65
Washer M12(2 Pieces)/a\I30
Nut M10(14 Pieces)
-^rto)
64Nut M12('1 Piece)
25Bolt M10 x 20mm
IBolt M10 x 200mm
(2 Pieces)
Bolt M8 x 38mm(8 Pieces)
63Bolt M10 x 55mm
(2 Pieces)
24Boit M10 x 75mm
(2 Pieces)
Bolt M12 x 80mm(1 Piece)
Bolt M10 x 100mm(4 Pieces)

FtrT(J
zoo-u,
I=oo
For your convenience, we haveidentified the hardware used inthe assembly of this product.This chart is provided to help youidentify those items that may beunfamiliar to you.
1,1
Foam 23 x 85 x 150mm
36Bushing
(2 Fieces)
Knob M10 x 55mm( 3 Pieces)
35 39Knob M10 x 75mm
(2 Pieces)
5 /-\10x90mm I )1 Piece) ..Y) /
,/ t/va" -"C."
Pin(
44Spring Lock(3 Pieces)
45Lock Pin(1 Piece)
59Hook
(2 Pieces)
^--=---\(r=----\\\t-'-_---.-----.---.-, /
---_______"_-_r/
123| | Barbell Safety Lock (Right)ll _ (1 Piece)\uv
19Pin 10 x 45mm 26
Pin 10 x 115mm

IlTt"p r,trlf;l Connect the Upright Cross Bar (2)tolfl notn Uprisht sianinions (1) usins'thelil 75mm Support Plates (40), Washers<l tst), Bolts (28)and Locknuts (30).
I Make sure the upright cross barI connects into the two lowest holes in
I each upright stanchions.
I OnfU hand tighten the bolts at this time.
I Do not use wrenches.
I
I
Itmtl|tryI
I
L-6-

Connect the Cross Frame (3) to theUpright Cross Bar (2) and secure usingthe 60mm Support Plate (37), Bolts (24),Locknuts (30) and Washers (51).
Make sure that the pivot shaft for theback pad is located on the top side ofthe Cross Frame (3). The cross frameshould extend out from the oppositeside of the stanchions that have thelonger part of the base legs.
Only hand tighten the bolts at this time.Do not use wrenches.
T SHAFT

Connect the Le! Lift Support Bar (4) tothe Cross Frame (3) and secure usingthe Bolts (25), Washers (S) and Locknuts(30).
Only hand tighten the bolts at this time.Do not use wrenches.
-B-

Step 4:
Connect the Bushings (36) to the LegLift (9). Connect the Leg Lift (9) to theLeg Lift Support Bar (4) using the Bolt(41), Locknut (64) and Washers (65).
Firmly tighten the bolt but do not overtighten as this is the pivot for the leg lift
-9-

IlG"p s,trl
fr I :: :; *:#",',' H: fl?;J :? :'"[^'L rx"",gl ""
Les Lift (e).
| *or", There is a choice of two holeI locations so you may adjust the crossI bars to whichever position is mostI comfortable for you.
| ,,,0" one Foam Padding (11 ) onto each
|
""0 "tthe three Cross Bars (10).
lru
l-I
L-1 0-

Step 6:
Attach the two Back Support Bars (14)and two Seat Support Bars (33) to thepivot shaft on the Cross Frame (3) usingthe Bolts (B), Washers (51) and Locknuts(30).
Be sure that seat Elevation Bracket (42)is mounted between the Seat SupportBars (33) and that the Back Elevation3ar (27) is mounted between the BackSupport Bars (14).
Attach the Padded Back (13)to the BackSupport Bars (14) and Padded Seat(12) to the Seat Support Bar (33) usingthe Bolts (15) and Washers (31).
PIVOT SHAFT

6t)rq
-12-

Step 8:
Attach the T Bar (7) to the bracket onthe Leg Lift (9) using the Pin (19).
Slide the Olympic Sleeve (43) onto theLeg Lift (9)and secure using the SpringLock (44).
Firmly tlghten all fasteners at thistlme.
s{s
-1 3-
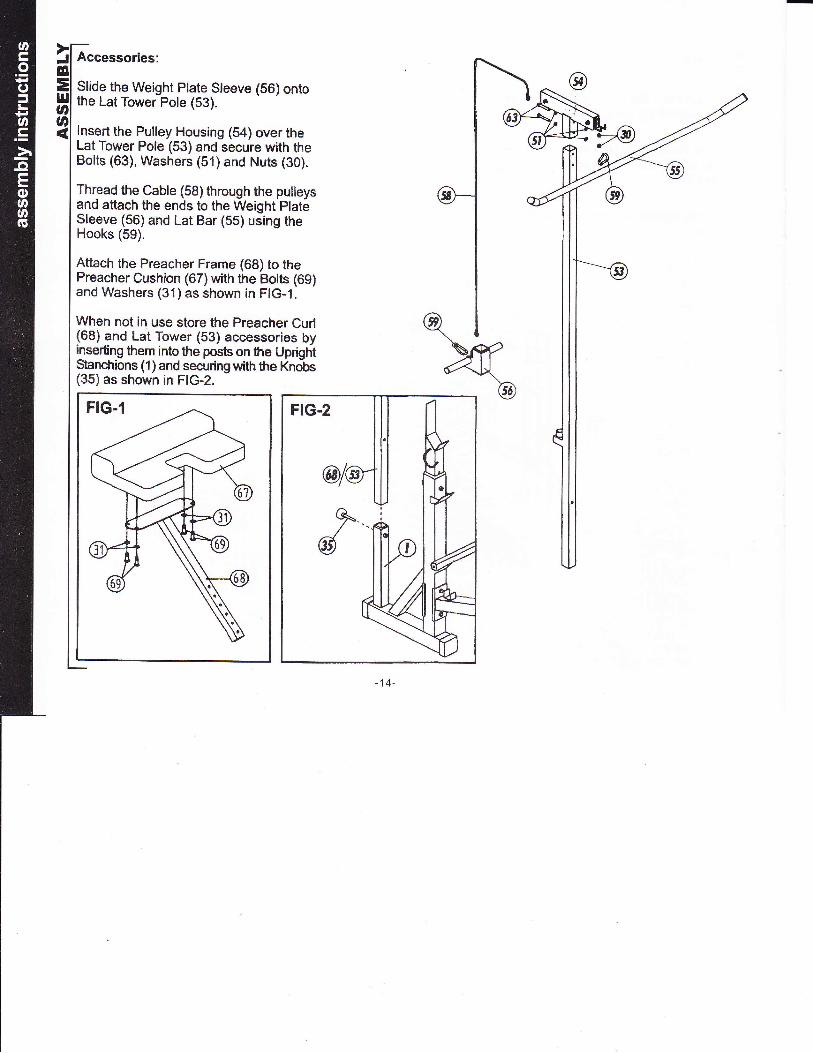
Accessories:
Slide the Weight Plate Sleeve (56)ontothe Lat Tower Pole (53).
lnsert the Pulley Housing (54) over theLat Tower Pole (53) and secure with theBolts (63), Washers (51) and Nuts (30).
Thread the Cable (58)through the pulleysand attach the ends to the Weight Plat6Sleeve (56) and Lat Bar (55) using theHooks (59).
Aftach the Preacher Frame (68) to thePreacher Cushion (67) with the Botts (69)and Washers (31) as shown in FIG-1.
When not in use store the Preacher Curl(68) and Lat Tower (53) accessories byhserting them into the posts on the UprigtitStanchions (1) and seanring with the Knobs(35) as shown in FIG-2.

oE(uzIhEtoII
=Itl(,zF2ooEllt
=oFo3tJoz
FzEtr
3
Warranty Coverage: Phoenix Health andFitness, lnc. ("Phoenix Health andFitness') wanants to the original purchaserthat each new product to be free fromdefecb in workmanship and malerial, undernormal use and conditions.
Period of C.rverage: The Wananty onthis product runs for a period of NINETY(90) days from the date of your purchaseand includes all parts and materials.
ll is recommended that the Original Receiptbe kept with the product manual.
Remedy Provided by Phoenix Healthand Fitness: Phoenix Health and Filnesswill provide a replacernent part free ofcharge if a defect is found during theWarranty period. You must pay anycharges for shipping and handling outsideof the Continental United States and forlabor, You may select any reputableservice center lo install any replacementpart.
Parts repaired or replaced pursuant to thisWananty shall be wananted for lheunexpired portion of the Wananty applyingto the original producl. Any technicaladvice furnished before or after deliveryin regard to the use or applicalion ofPhoenix Health and Fihess products isfumished without charge and on the basisthat it represenls Phoenix Health andFitness' best judgment under thecircumstances but that the advice is usedat your sole risk.
Procedure for Obtalning Your RemedyUnder Thls Warranty: ln the event youdiscover a defect in this product, pleasephone our Customer Service Departmentat 1 (888)535.8637 between the hours of8:00 a.m. and 4:00 p.m. (Pacific StandardTime). You may order your freereplacement part at that time, and you may
obtain assistance from our CustomerSeMce professionals. Partswill be shippedto you within one hundred eighly (180)days of your notification to our CustomerService Department of your Warrantyclaim. To help us assisl you, please havethe following information ready:
. Model name or number from the coverof the manual;. Serial number located on the frame ofthe unit; and. The part description and the ordernumber.
Llmitations on Warran$r: This Warrantydoes not apply to you if you havepurchased this product for resale, ThisWarranty does not @ver any problems,damages or failures that are caused byaccident, improper assembly, failure toobserve cautionary labels on the product,failure to operate tho product conectly,abuse or freight damage. Phoenix Healthand Fitness does not wanant against anydamage or defects that may result ftomrepair or alterations made to the productby a repair facility,
This Wananty shallterminate if you sellor otherwise transfer this produc't. ThisWanan$ does not apply to any produc'tshipped or handled outside of the UnitedStates. This Wananty does not apply ifthe product is used for rential or commercialuse, Consequential and incidentaldamages ar€ not recoverable under thisWananty. (Some states do not allow theexclusion or limitiation of incidental orconsequential damages, so lhe abovelimitation or erclusion may not apply toyou.)
THIS WARRANW IS EXPRESSLY INLIEU OF ALL OTHER EXPRESSWARMNTIES. ALL ]MPLIEDWARMNTIES, INCLUDING
-1 5-
WARRANTIES OF MERCHANTABI LITYOR FITNESS FORANY PARTICULARPURPOSE, ARE LIMITED IN DURATIONTO ONE (1) YEAR FROM THEEF FECTIVE DATE OF THIS WARRANTY.PHOENIX HEALTH AND FITNESS ISNOT LIABLE FOR CONSEOUENTIAL ORINCIDENTAL DAMAGES RESULTINGFROM ANY DEFECT IN PARTS NORFORANY BREACH OF EXPRESS ORIMPLIED WARMNTIES. PHOENIXHEALTH AND FITNESS' SOLE LIABILIryUNDER THIS WARRANTY IS LIMITEDTO THE TERMS DESCRIBED IN THISFORM.
THIS WARMNTY GIVES YOU SPECIFICLEGAL RIGHTS, AND YOU MAY ALSOHAVE OTHER RIGHTS WHICH VARYFROM STATE TO STATE.
For asslstance with assembly or toorder replacement pilrts, simply call ourCustomer Service Department, at1 .888.535.8637, Monday hroushFriday, 8:00am until 4:00pm, Pacilic time(excluding holidays). To help us assistyou, please have the follodng informationready:
. Model name or number from the coverof the manual;. Sorial number locatod on the frame ofthe unit; and. The part description and order number.
Or you may fax your order to:
Phoenix Health & Fihess, lnc. at1.562.903.8558
lf unit is no longer under warranty call forshipping and handling, pricing and taxes(if applicable).

uJzoNFut(9EFtr3o
4t9z-o6EUTxut
Finding your pulse
To..make sure your heart is beatingin ib trarget zone, you'll need to knoihow to monitor your heart rate. Theeasiest way is to feelthe pulse inthe carotid artery on either side ofyour neck, between the windpipeand the large neck muscles. Count
Aerobic exercise is anysustained activity that sends oxygento your muscles via your heart andlungs. lt will improve the fitness ofyour lungs and heart your body's
the number of beats in ten seconds,then multiply by six. This gives youthe number of beats per minute.
How fast should your heart beatduring aerobic exercise? Fastenough to reach and stiay in its
most important muscle. Aerobicfitness is promoted by any activitythal uses your large muscle groups- anns, legs or buttocks, for example.Your heart beats quickly and you
"target zone," a range of beats perminute that is largely determined byyour age and physical condition. Todetermine your tiarget zone, consultthe chart we have provided.
breath deeply. An aerobic exerciseshould be part of your entire exerciseroutine.
-16-

F4.|JlllJ(Jo3=
The exercise routine that isparformed on this product willdevelop both upper and lorcr bodymuscle groups. These musclegroups are shown on the chartbelow.
Trapeziuf
Anterior Deltoid
Pectoralis Major
* Senatus Anterior***-*- Bicep
AMominals
- Sartorius
Posterior Deltoid
**Tricep
" - Latissimus Dorsi
"-*-Gluteals
-Hamstrings
*--Gastrocnemius

oz&
Etr
=
A successful exercise programconsists of a warm-up, aerobicexercise, and a cool-down. Do theentire program at least two andpreferably three times a week, restingfor a day between workouts. Afterseveral months, you can increaseyour workouts to four or five timesper week.
Warming up is an important part ofyourworkout, and should begin everysession. lt prepares your body formore strenuous exercise by heatingup and stretching out your muscles,increasing your circulation and pulserate, and delivering more oxygen toyour muscles. At the end of yourworkout, repeat these exercises toreduce sore muscle problems. Wesuggest the following warm-up andcool-down exercises:
lnner Thigh StretchSit with the soles of your feet togetherwith your knees pointing outward. pullyour feet as close into your groin aspossible. Gently push your kneestowards the floor. Hold for 15 counts.
Hamstring StretchSit with your right leg extended. Rest the soleof your left foot against your right inner thigh.
Stretch toward your toe as far as possible.Hold for 15 counts. Relax and then repeat
with left leg extended.
Head RollRotate your head to the right for one count,feeling the stretch up the lefi side of yourneck. Next, rotate your head back for onecount, stretching your chin to the ceilingand letting your mouth open. Rotate yourhead to the left for one count, and finally,drop your head to your chest for one count.

Shoulder LiftLifi your right shoulder up tcn,rardyour ear for one count. Then lift
your left shoulder up for onecount as you lower your right
shoulder.Galf-Achilles Stretch
Lean against a wallwith your left leg infront of the right and your arms forward.Keep your right leg straight and the lefifoot on the floor; then bend the left legand lean fonruard by moving your hipstoward the wall. Hold, then repeat on
the other side for 15 counts.
Side StretchOpen your arms to the side and continuelifiing them until they are over your head.Reach your right arm as far upwardtoward the ceiling as you can for onecount. Feelthe stretch up your right side.t'lbpeat this action with your left arm.
Toe TouchSlowly bend fonvard fromyour waist, letting your backand shoulders relax as youstretch toward your toes.Reach down as far as you canand hold for 15 counts.
-19-

NUMBER QUANTITY ORDER
H8600-01H8600-02H8600-03H8600-04H8600-05H8600-06H8600-07H8600-08H8600-09H8600-10H8600-11H8600-12H8600-13H8600-14H8600-15H8600-16H8600-17H8600-18H8600-19H8600-20HB600-21H8600-22H8600-23H8600-24H8600-25H8600-26H8600-27H8600-28H8600-29H8600-30H8600-31H8600-32H8600-33H8600-34H8600-35H8600-36H8600-37H8600-38H8600-39H8600-40H8600-41H860042H8600-43H860044H8600{5
NUMBER21
1
1
1
21
21
361
1
2I1
341
I1
1
1
221
1
431612225221
8221
1
331
1
2345678I101112131415161718192021222324252627zil2930313233u3536373839404142434445
DESCRIPTION
Upright StanchionUpright Cross BarCross FrameLeg Lifi Support BarPin M10 x 90mm
+,SSn Upright
Bolt M10 x 200mmLeg LiftLeq Lift Cross BarFoEm Paddinq M23 x 85 x 150mmPadded Seat -Padded Back SupportBack Support BarM8 x 38mmElevation Bar50 x 50mm Endcap75 x 75mm EndcapPin M10 x 45mm25mm DIA EndcapLeg Lift BumperBarbell Safetv Lock(Rioht)Barbell Safet! LocklLeft) 'Ml0 x 75mm'BoltM10 x 20mm BoltPin M10 x 115mmStiabilizer BarM10 x 100mm BoltLocknut for M8 BoltLocknutfor M10 BoltWasher 22mm DlAfor M8 BoltPlastic BushinoSeat Support 6arPlastic SoacerKnob M10 x 55mmBushingBracket 60 x 60mm25x25mm EndcapKnob M10 x 75mhBracket 75 x 75mmM12 x 80mm BoltSeat Elevation BracketOlympic Sleeve 175mm LongSpring l-ockLock Pin
-20-

NUMBER DESCRIPTION
Washer M6Screw M6Cap 20 x 40mmEndCapM10 NutWasher M10T Bar tubeLat Tower PolePulley HousingLat BarWeight Plate SleeveWasher M8CableHookHandlebar GripPullevPullel Bolt M10 x 45mmPulle! Housing Bolt M10 x 55mmNut M12Washer M12CushionPreacher CushionPreacher FrameBolt MB x 20
QUANTITY ORDER NUMBERH8600-46H8600-47H8600-48H8600-49H8600-50H8600-51H8600,52H8600-53H8600-54H8600-55H8600-56.1H8600-57H8600-581H8600-59H8600-60H8600-61H8600-62H8600-63H8600-64H8600-65H8600-66H8600-67H8600-68H8600-69
1
1
321
281
II1
1
21
242221
21
1
1
2
46474B495051525354555657585960616263646566676869
azI
-21-

v+4:6d -I