FreeBSD10.0-RELEASE:Basesystemto DesktopEnvironmentfreebsdworld.gr/files/install10-us.pdf ·...
29
FreeBSD 10.0-RELEASE: Base system to Desktop Environment Manolis Kiagias, MSc 01/06/2014
Transcript of FreeBSD10.0-RELEASE:Basesystemto DesktopEnvironmentfreebsdworld.gr/files/install10-us.pdf ·...

FreeBSD 10.0-RELEASE: Base system toDesktop Environment
Manolis Kiagias, MSc
01/06/2014

2
3
Copyright ©2009 – 2014 Manolis KiagiasThis Work is provided under the terms of the License:
Attribution-NonCommercial-ShareAlike 4.0 InternationalThe complete text of this license is available here:
http://creativecommons.org/licenses/by-nc-sa/4.0/
You are free to:
Share – copy and redistribute the material in any medium or formatAdapt – remix, transform, and build upon the materialThe licensor cannot revoke these freedoms as long as you follow the license terms.
Under the following terms:
Attribution—You must give approprate credit provide a linkto license, and indicate if changes were made. You may do soin any reasonable manner, but not in any way that suggests thelicensor endorses you or your use.NonCommercial – You may not use the material for commer-cial purposes.ShareAlike – If you remix, transform, or build upon thematerial,you must distribute your contributions under the same license asthe original.No additional restrictions – You may not apply legal terms ortechnological measures that legally restrict others from doinganything the license permits.
Notices:
You do not have to comply with the license for elements of the material in the publicdomain or where your use is permitted by an applicable exception or limitation.No warranties are given. The license may not give you all the permissions neces-sary for your intended use. For example, other rights such as publicity, privacy, ormoral rights may limit how you use the material.

4
CONTENTS 5
Contents1 Installing FreeBSD 10.0-RELEASE 6
2 Updating the Base System 17
3 Installing the pkg Command 18
4 Installing Basic Command Line Tools 194.1 Setting Up Sudo . . . . . . . . . . . . . . . . . . . . . . . . . . . 194.2 Configuring the Bash Shell . . . . . . . . . . . . . . . . . . . . . 204.3 Changing the Shell of the User . . . . . . . . . . . . . . . . . . . 21
5 Installing and Setting Up a Graphic Environment 225.1 Installing the Xorg Server . . . . . . . . . . . . . . . . . . . . . . 225.2 Installing a GUI Environment . . . . . . . . . . . . . . . . . . . . 245.3 Shutdown and Restart for the Standard User . . . . . . . . . . . . 255.4 Optional: Switching Keyboard Layouts . . . . . . . . . . . . . . . 255.5 Installing the Slim Login Manager . . . . . . . . . . . . . . . . . 26
6 Installing Additional Applications 266.1 Installing Media Players, Browsers and Productivity Apps . . . . . 266.2 Installing the Java Plugin . . . . . . . . . . . . . . . . . . . . . . 276.3 Installing the Flash Plugin . . . . . . . . . . . . . . . . . . . . . . 27
7 Updating the Installed Applications 28
8 Further Reading 29
6 Installing FreeBSD 10.0-RELEASE
1 Installing FreeBSD 10.0-RELEASE
Before beginning the installation of an operating system, the BIOS has to be adjustedto boot from the intended installation media. Most of the newer PC hardware havethe ability to boot off USB devices such as flash drives as well as from CD/DVDdrives.
FreeBSD comes in different versions for 32 and 64bit PC architectures as well asmany others. Typically, the 32bit version is intended for systems utilising a PentiumIV or lower grade CPU and the 64bit version for more modern processors such asthe Core2/Core4 and the newer i3, i5, i7 and Pentium families.
While FreeBSD is available both on CD and DVD, the DVD version is not requiredfor this install. The DVD contains ready-made packages that are also available on-line.
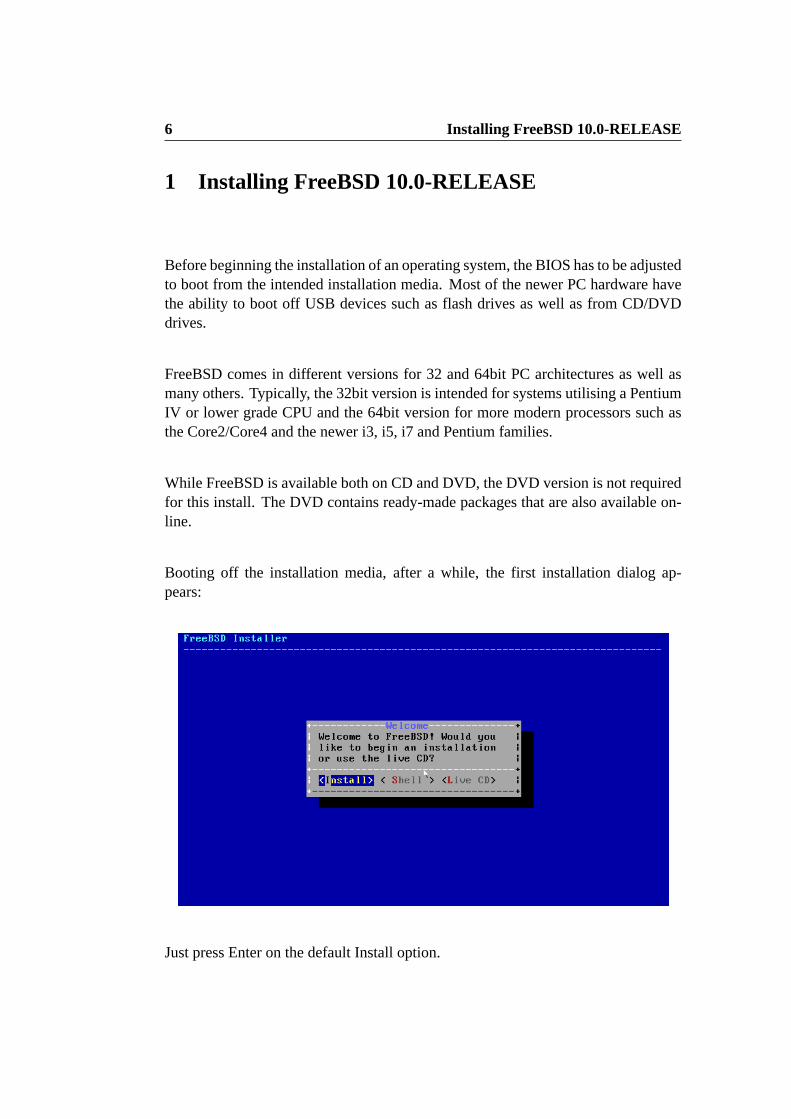
Booting off the installation media, after a while, the first installation dialog ap-pears:
Just press Enter on the default Install option.

7
Select the desired keyboard layout. This is not a critical setting for a desktop systemas it will not affect your GUI settings. If a layout does not seem to match yourkeyboard/language, just select the US layout.
During the installation process, use the arrow keys to move between options. Usethe SPACE bar to mark any checkboxes. Move between different dialog parts (suchas the main dialog and the OK / Cancel buttons) using the TAB button.
After selecting the keyboard layout, just press ENTER on this dialog to confirmit.
8 Installing FreeBSD 10.0-RELEASE
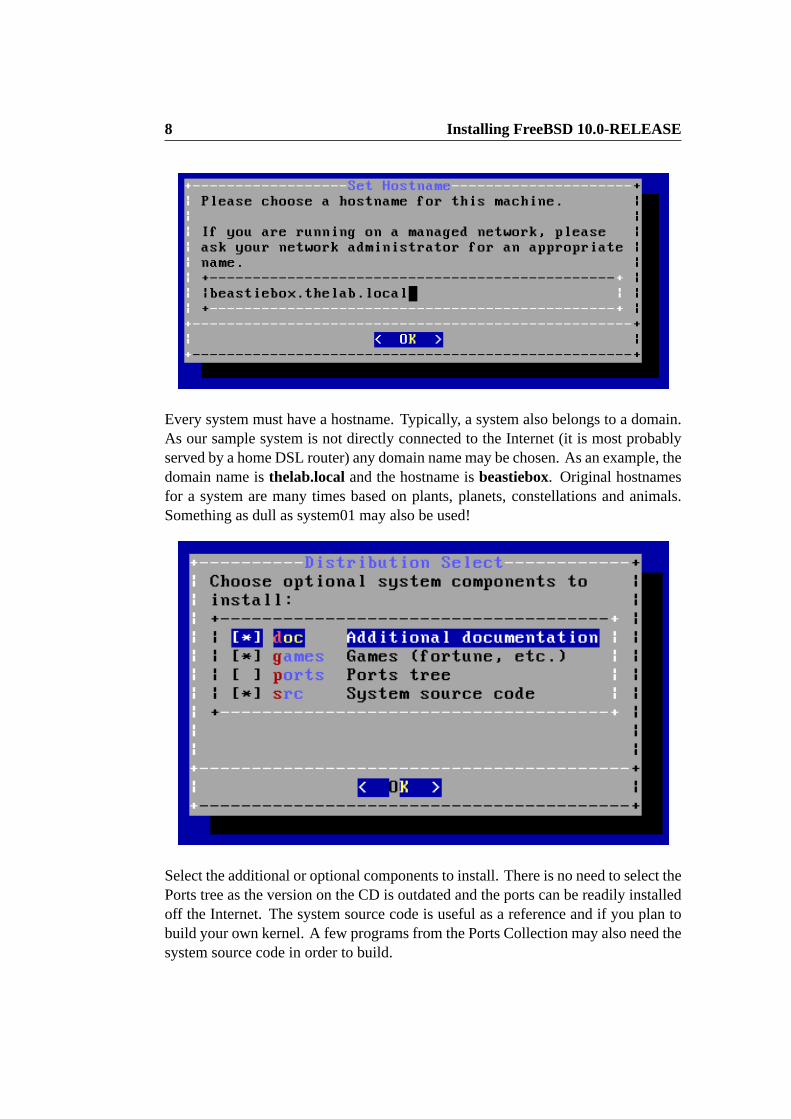
Every system must have a hostname. Typically, a system also belongs to a domain.As our sample system is not directly connected to the Internet (it is most probablyserved by a home DSL router) any domain name may be chosen. As an example, thedomain name is thelab.local and the hostname is beastiebox. Original hostnamesfor a system are many times based on plants, planets, constellations and animals.Something as dull as system01 may also be used!
Select the additional or optional components to install. There is no need to select thePorts tree as the version on the CD is outdated and the ports can be readily installedoff the Internet. The system source code is useful as a reference and if you plan tobuild your own kernel. A few programs from the Ports Collection may also need thesystem source code in order to build.
9
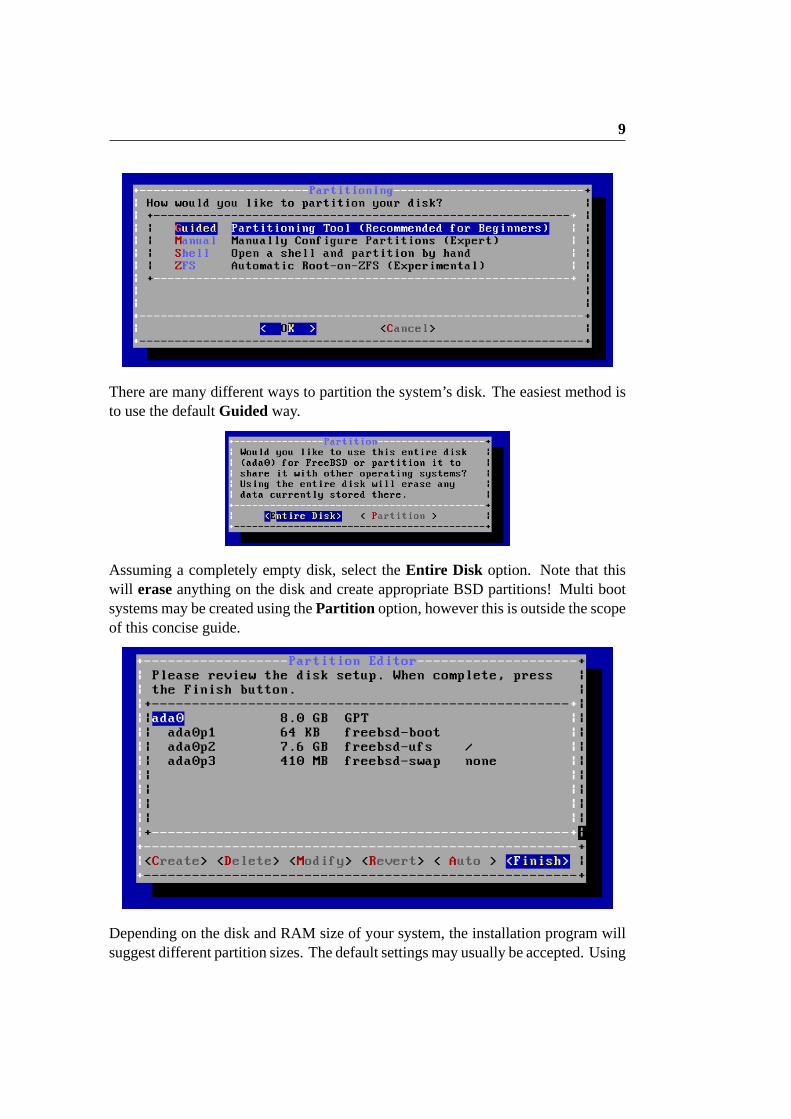
There are many different ways to partition the system’s disk. The easiest method isto use the default Guided way.
Assuming a completely empty disk, select the Entire Disk option. Note that thiswill erase anything on the disk and create appropriate BSD partitions! Multi bootsystems may be created using the Partition option, however this is outside the scopeof this concise guide.
Depending on the disk and RAM size of your system, the installation program willsuggest different partition sizes. The default settings may usually be accepted. Using
10 Installing FreeBSD 10.0-RELEASE
the options in this dialog the sizes may be customised or additional partitions maybe created. Sometimes it is useful to shrink the size of the root partition (marked as“/”) and create a separate partition for /home. For this sample installation, simplyselect Finish.
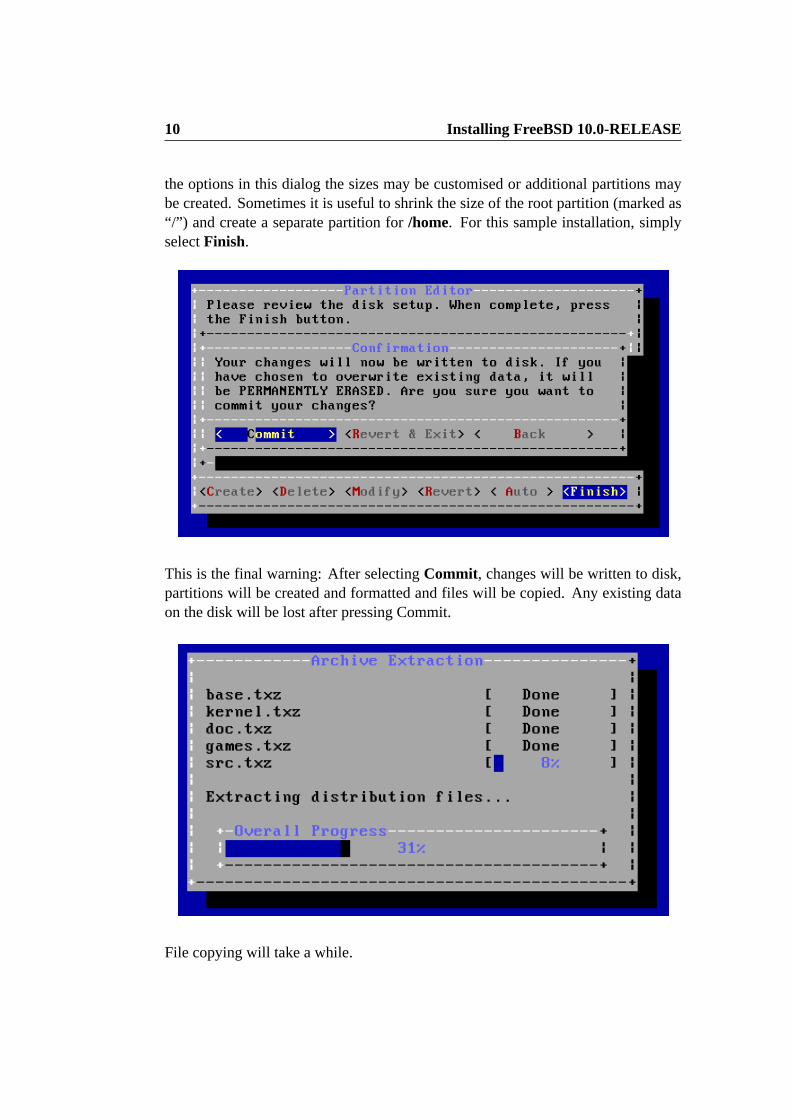
This is the final warning: After selecting Commit, changes will be written to disk,partitions will be created and formatted and files will be copied. Any existing dataon the disk will be lost after pressing Commit.
File copying will take a while.
11
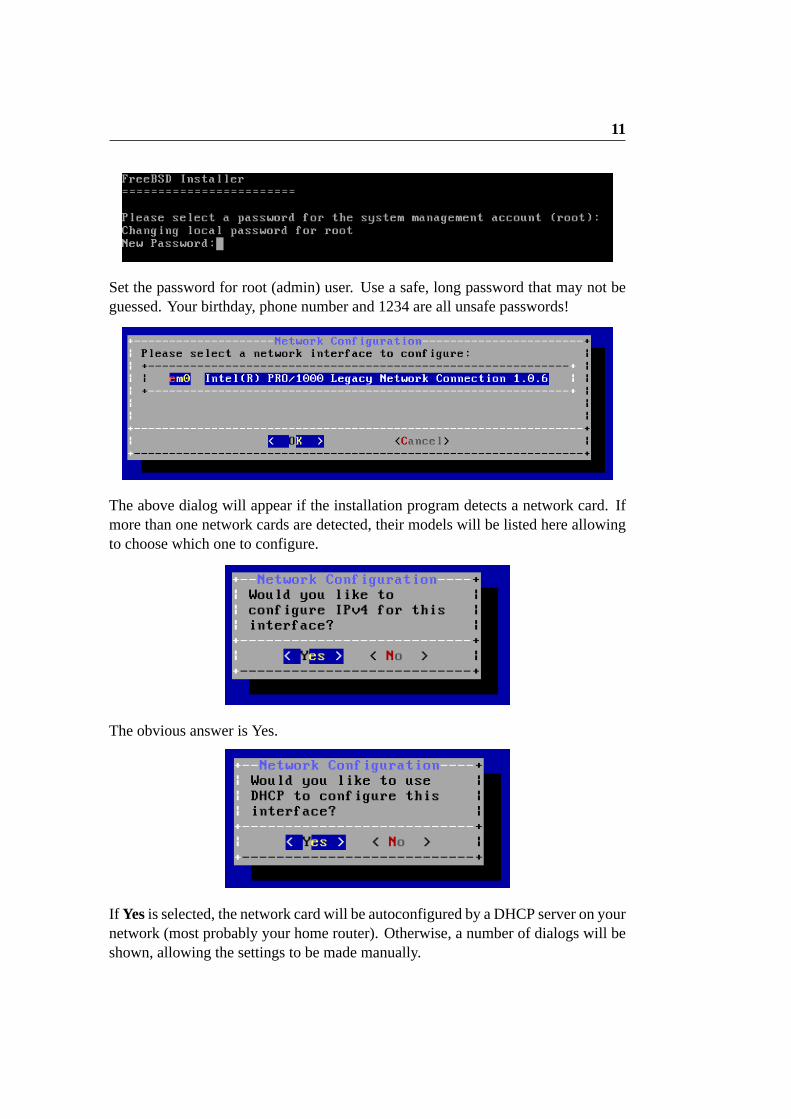
Set the password for root (admin) user. Use a safe, long password that may not beguessed. Your birthday, phone number and 1234 are all unsafe passwords!
The above dialog will appear if the installation program detects a network card. Ifmore than one network cards are detected, their models will be listed here allowingto choose which one to configure.
The obvious answer is Yes.
IfYes is selected, the network card will be autoconfigured by a DHCP server on yournetwork (most probably your home router). Otherwise, a number of dialogs will beshown, allowing the settings to be made manually.
12 Installing FreeBSD 10.0-RELEASE
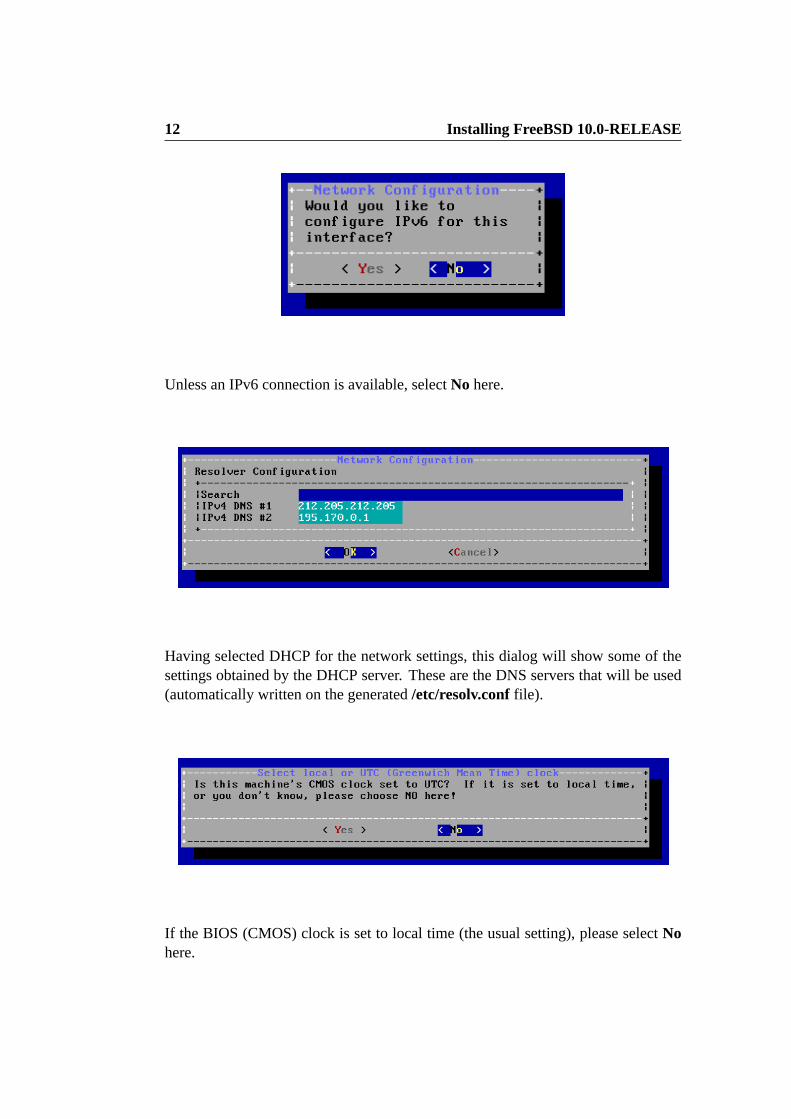
Unless an IPv6 connection is available, select No here.
Having selected DHCP for the network settings, this dialog will show some of thesettings obtained by the DHCP server. These are the DNS servers that will be used(automatically written on the generated /etc/resolv.conf file).
If the BIOS (CMOS) clock is set to local time (the usual setting), please select Nohere.
13
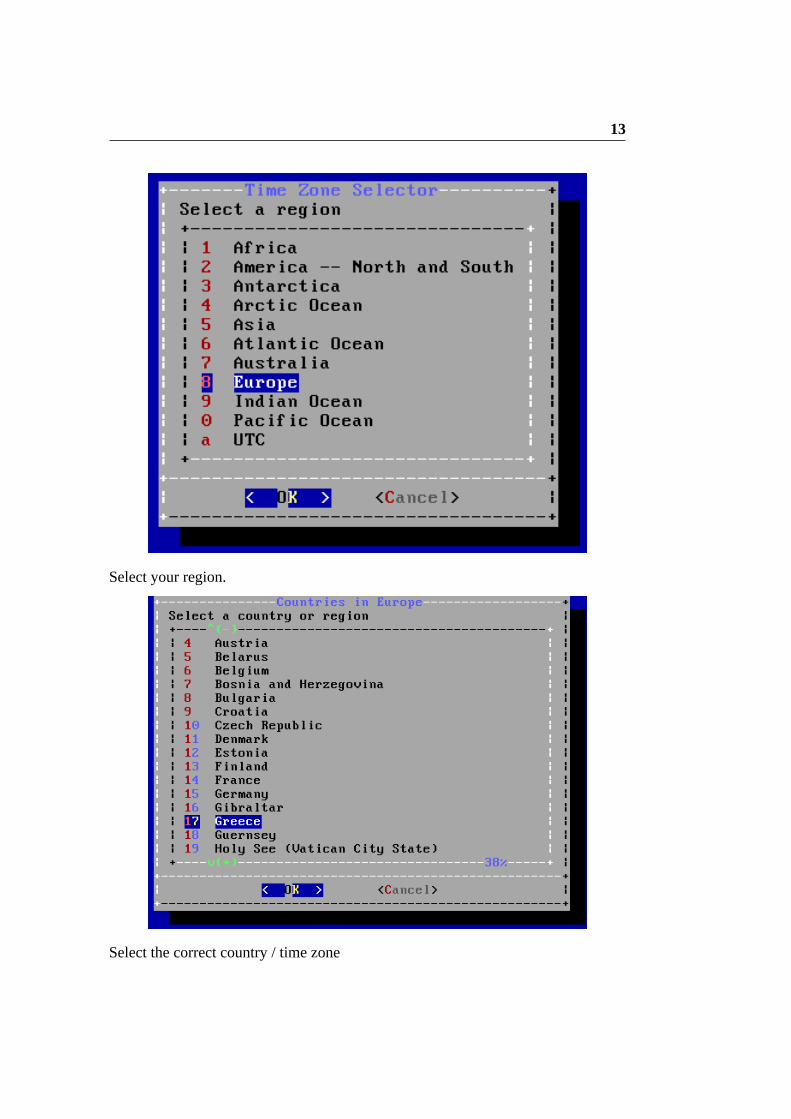
Select your region.
Select the correct country / time zone
14 Installing FreeBSD 10.0-RELEASE
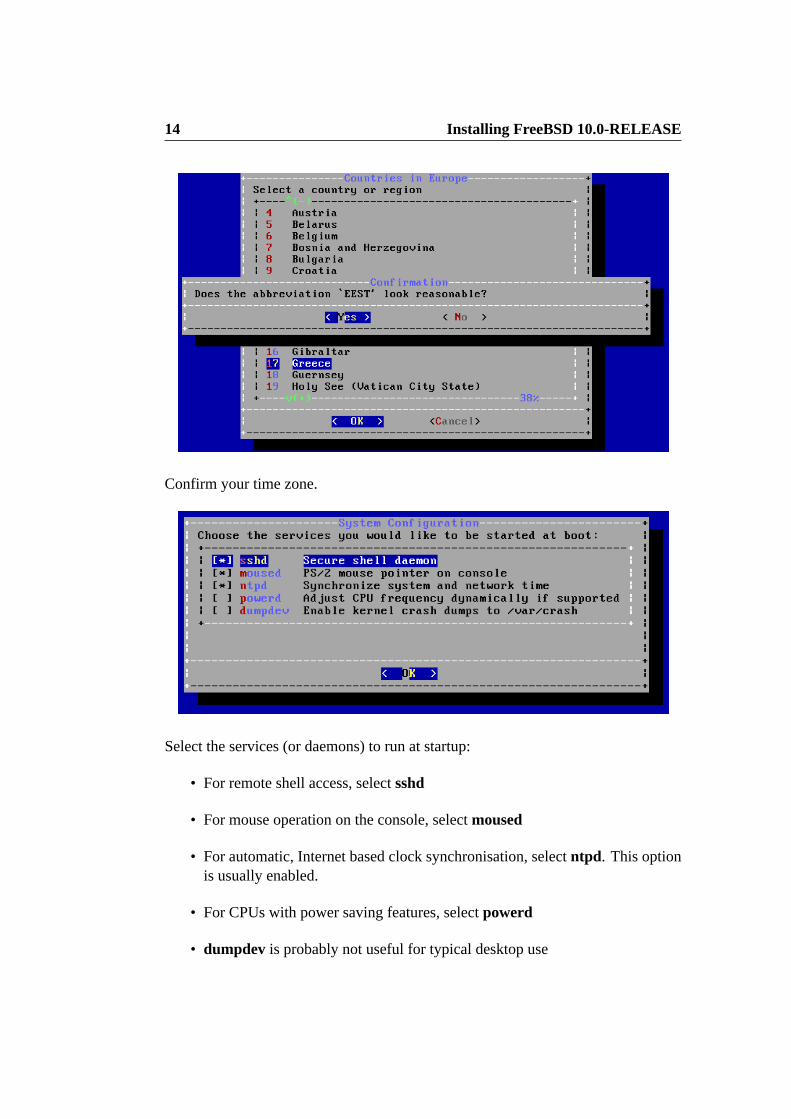
Confirm your time zone.
Select the services (or daemons) to run at startup:
• For remote shell access, select sshd
• For mouse operation on the console, selectmoused
• For automatic, Internet based clock synchronisation, select ntpd. This optionis usually enabled.
• For CPUs with power saving features, select powerd
• dumpdev is probably not useful for typical desktop use
15
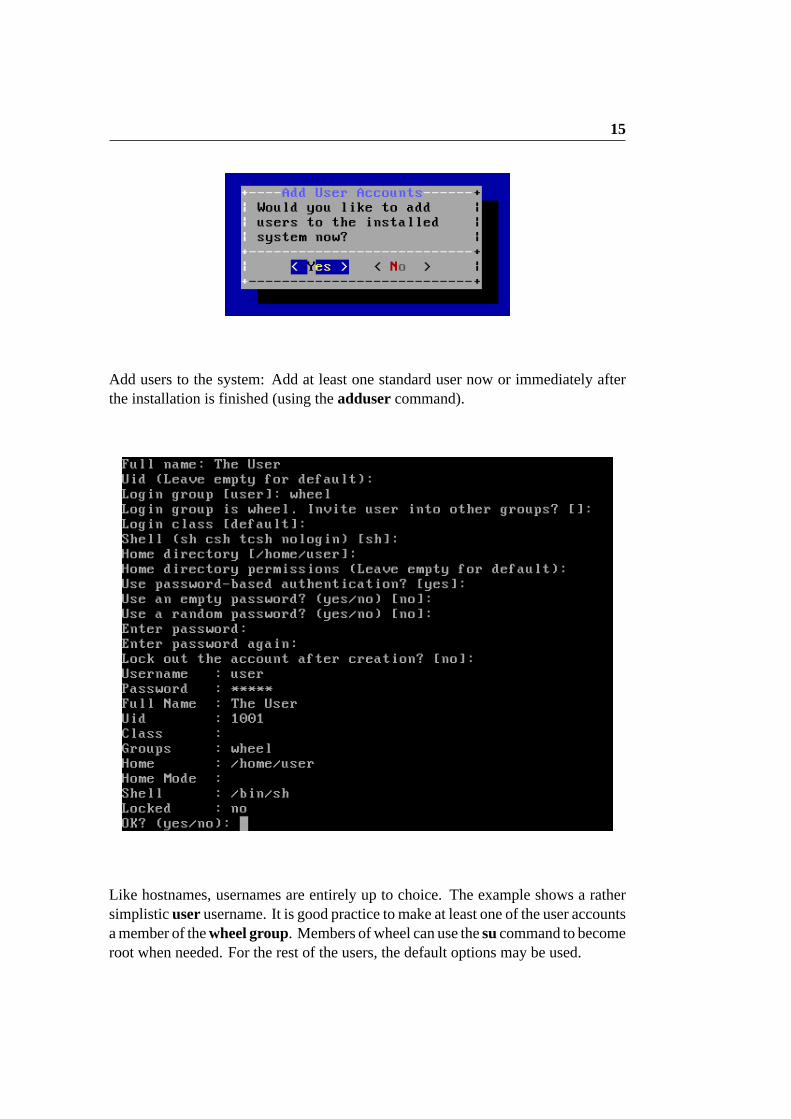
Add users to the system: Add at least one standard user now or immediately afterthe installation is finished (using the adduser command).
Like hostnames, usernames are entirely up to choice. The example shows a rathersimplistic user username. It is good practice to make at least one of the user accountsamember of thewheel group. Members of wheel can use the su command to becomeroot when needed. For the rest of the users, the default options may be used.
16 Installing FreeBSD 10.0-RELEASE
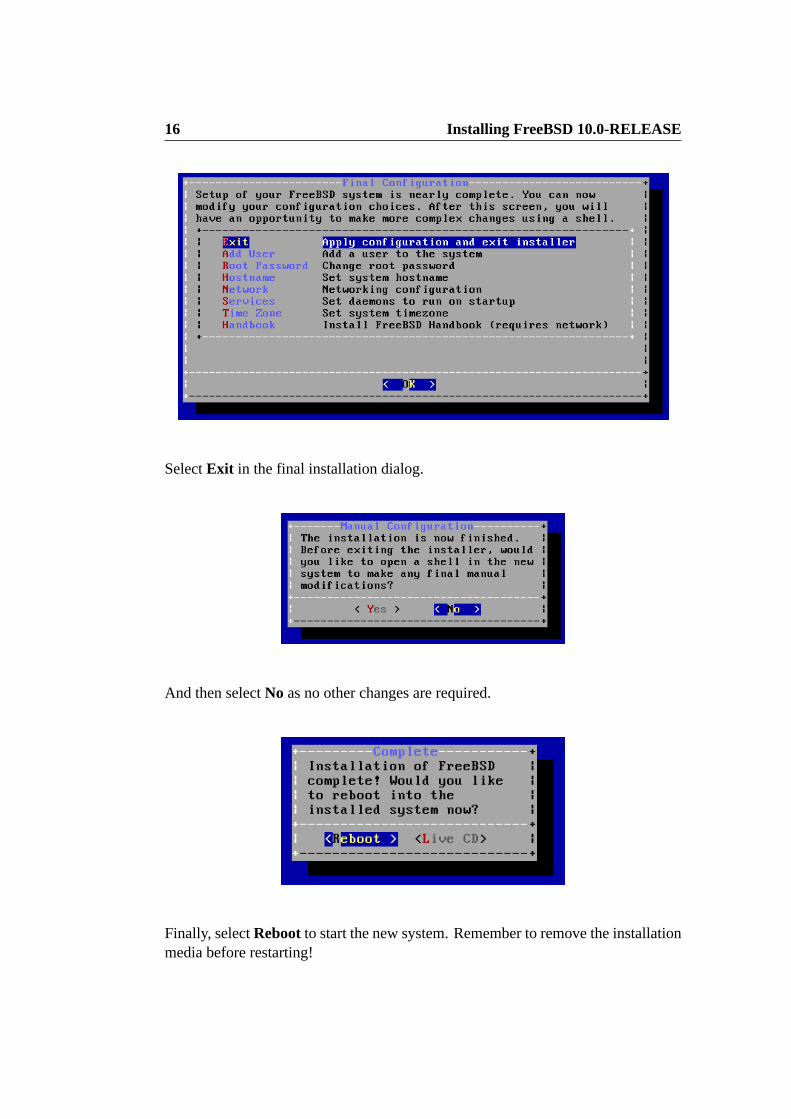
Select Exit in the final installation dialog.
And then select No as no other changes are required.
Finally, select Reboot to start the new system. Remember to remove the installationmedia before restarting!
17
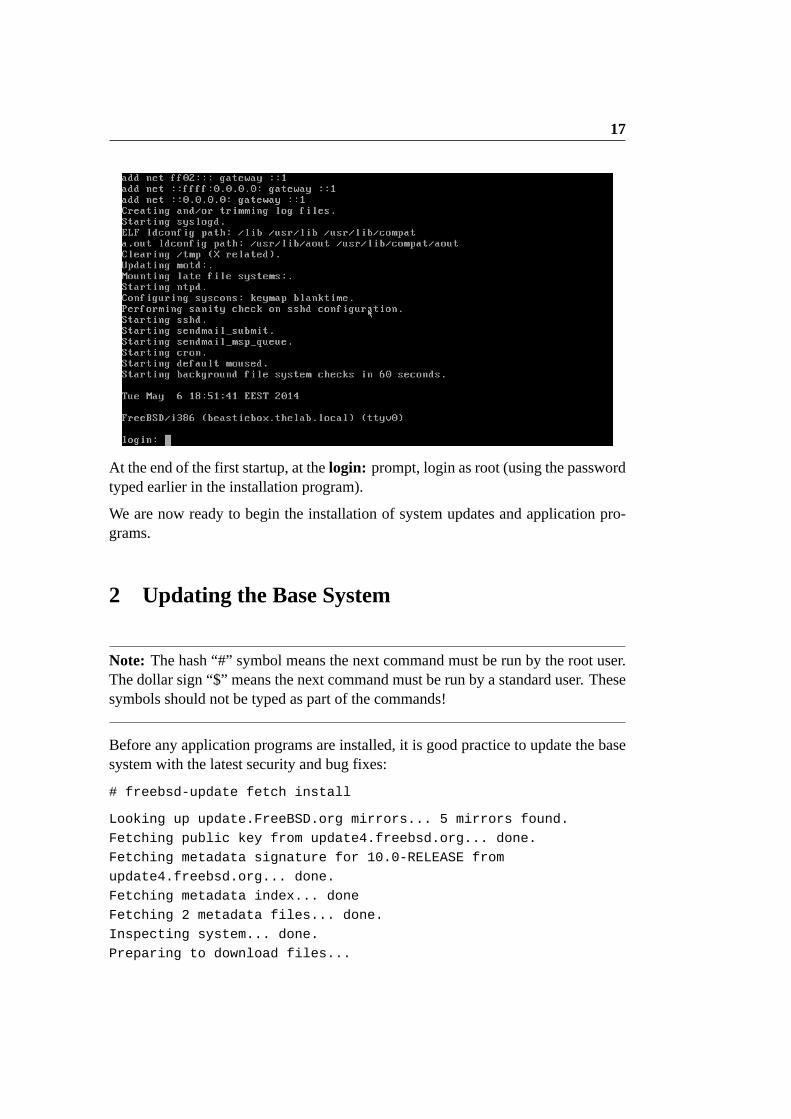
At the end of the first startup, at the login: prompt, login as root (using the passwordtyped earlier in the installation program).
We are now ready to begin the installation of system updates and application pro-grams.
2 Updating the Base System
Note: The hash “#” symbol means the next command must be run by the root user.The dollar sign “$” means the next command must be run by a standard user. Thesesymbols should not be typed as part of the commands!
Before any application programs are installed, it is good practice to update the basesystem with the latest security and bug fixes:
# freebsd-update fetch install
Looking up update.FreeBSD.org mirrors... 5 mirrors found.
Fetching public key from update4.freebsd.org... done.
Fetching metadata signature for 10.0-RELEASE from
update4.freebsd.org... done.
Fetching metadata index... done
Fetching 2 metadata files... done.
Inspecting system... done.
Preparing to download files...
18 Installing the pkg Command
The following files will be updated as part of updating to 10.0-
RELEASE-p2:
/bin/freebsd-version
/boot/kernel/kernel
...
Installing updates... done.
Many security updates contain fixes to the kernel. Reboot the system after this in-stallation:
# shutdown -r now
After the reboot is complete, login again as root.
3 Installing the pkg Command
Startingwith FreeBSD10.0-RELEASE, the default packagemanagementwas switchedto a completely new system called pkgng. This allows to easily install updated ver-sions of software packages directly from the FreeBSD Project servers, without theneed for lengthy source builds. Ready made packages are ideal for desktop systemswhere a lot of complex and large programs are needed for a functional GUI. Thetraditional installation method through the Ports Collection is also available (can beused for the few programs where packages are not available).
To begin with the pkgng system, first bootstrap it’s basic command:
# pkg
The package management tool is not yet installed on your system.
Do you want to fetch and install it now? [y/N]: y
Installing pkg-1.2.7_2... done
Update the database of available packages:
# pkg update
Updating repository catalogue
digests.txz 100% 1067KB 533.4KB/s 1.0MB/s 00:02
packagesite.txz 100% 4898KB 979.5KB/s 1.4MB/s 00:05
Incremental update completed, 22804 packages processed:
0 packages updated, 0 removed and 22804 added.
4.1 Setting Up Sudo 19
4 Installing Basic Command Line Tools
Some basic tools for the command line are:
Program Descriptionbash The Bash shell is very common in Linux.
It will be used for standard useraccounts (not for root!)
screen Screen is a useful utility when a sessionneeds to be left active with the userlogging out and reconnecting to it from adifferent terminal
zip, unzip, unrar Utilities to deal with compressed archivessudo A utility to run commands as root from a user account
To install all of the above, simply type:
# pkg install bash screen sudo zip unzip unrar
Updating repository catalogue
The following 7 packages will be installed:
...
Proceed with installing packages [y/N]: y
4.1 Setting Up Sudo
To allow a user to issue commands as root, an initial setup of the sudo commandhas to be performed using the visudo utility. When visudo is executed, an editor isopened (typical vi) with the sudo configuration file already loaded. To temporar-ily set another, easier, editor for visudo, change the EDITOR environment vari-able:
# setenv EDITOR ee
Execute the visudo command:
# visudo
Remove the comment symbol (#) from the wheel line:
# %wheel = ALL (ALL) ALL
so it becomes:
%wheel = ALL (ALL) ALL
20 Installing Basic Command Line Tools
This change will allow everyone in the wheel group to issue commands as root. Ifthis is not desirable, individual usernames may be added like this:
nikos = ALL (ALL) ALL
Save the file (if using ee, press ESCAPE, Leave Editor and Save). Sudo allows morecomplex configurations where a user may have limited root abilities, however thisis beyond the scope of our setup.
To test sudo functionality, logout out from the root account and login again as thestandard user created during setup (which should belong to the wheel group). Issuea simple (harmless) command:
$ sudo ls
The system will execute the command after first asking the user password.
4.2 Configuring the Bash Shell
The Bash shell needs a few additional configuration steps before it becomes fullyfunctional. After the installation of the bash package these steps appear briefly onthe screen. When installing packages in a batch, it is easy to miss these instruc-tions.
A line has to be added to the /etc/fstab file:
fdesc /dev/fd fdescfs rw 0 0
Use the ee (or vi) editor to edit the file (e.g. ee /etc/fstab) and add it. In the fstab filethe following lines are typical:
# Device Mountpoint FStype Options Dump Pass#
/dev/ada0p2 / ufs rw 1 1
/dev/ada0p3 none swap sw 0 0
The first line is a comment describing each column.
The second line is used to mount the root filesystem (/) during startup:
/dev/ada0p2 The second partition of the disk/ The mount pointufs The filesystem used, actually UFS2 (Unix Filesystem 2)rw Mount options, where rw means read-write
The dump and pass options are not of immediate interest (pass shows the order thefilesystem will be checked during startup).
The second line designates the swap partition. If there are more filesystems, there
4.3 Changing the Shell of the User 21
will be an entry for each of them. For now, just add the line mentioned above to theend of the file.
The new filesystem will be automatically mounted at the next system startup. Thesystem does not have to be restarted however. Simply type:
# mount -a
and the just added filesystem will be mounted and ready to use.
4.3 Changing the Shell of the User
Since bash is installed, it may be desirable to change the user’s shell from /bin/shto it. Bash is the default shell in most Linux distributions and there is a certain userfamiliarity with it.
Don’t change the shell of the root user!
Login as a standard user and execute:
$ chsh -s bash
Bash has two primary configuration files: .profile and .bashrc. All files beginningwith a dot (dotfiles in UNIX speak) are hidden. The .profile file already exists andneeds a simple change, but .bashrc must be created from scratch.
For convenience, ready versions of both files are available and may be downloadedand installed as follows:
$ fetch http://www.freebsdworld.gr/files/dotfiles-us.zip
Unzip the files:
$ unzip dotfiles-us.zip
Logout and login again to see the difference.
The .profile file is loaded every time the user logs in. The .bashrc file is loadedwhen a non-login shell is started. A non-login shell is started when the user startsbash manually or by opening a graphic terminal in a GUI environment. Both filescontain settings for the shell and the user’s environment. It is convenient to put mostsettings in .bashrc and have this file loaded in both login and non-login shells. Forthis purpose, the following lines have been added to the end of .profile:
if [ -f ~/.bashrc ]; then
source ~/.bashrc
fi
In .bashrc, lines like:

22 Installing and Setting Up a Graphic Environment
export LANG=en_US.UTF-8
set environment variables for the user. The shell remembers these settings andmakesthem available to programs that request their values. For example, the line above setsthe system language for the user to US English, while the line below sets the defaulteditor to ee:
export EDITOR=ee
When a program requests an editor to open a file, the easy editor (ee) will be used.
There are also alias lines like the following:
alias ls=’ls -G’
When the user executes the ls command, ls -G will be the one actually executed.The -G parameter in ls is used to enable colour coded files and directories in theoutput.
Finally, the line:
PS1=...
changes the prompt of the shell and is responsible for the blue colour and the extrainfo appearing in front of the ’$’ sign.
Have a look at the rest of the lines in .bashrc by opening it using ee.
5 Installing and SettingUp aGraphic Environment
Installation of a GUI consists of the following steps:
• Installing Xorg server
• Installing the desired GUI
• Setting up Xorg server
• Testing the GUI
• Optionally installing a keyboard layout switching solution (if the user needsto switch between two languages/layouts)
• Optionally installing a login manager so the system starts by default to a GUI
• Installing additional GUI programs formedia playback, Internet browsing, etc.
5.1 Installing the Xorg Server
This is very simple. As root:
5.1 Installing the Xorg Server 23
# pkg install xorg
For a VirtualBox installation, install the additions as well:
# pkg install virtualbox-ose-additions
Install some extra fonts:
# pkg install liberation-fonts-ttf urwfonts-ttf freefont-ttf
Edit /etc/rc.conf and add the following lines:
dbus_enable=”YES”
hald_enable=”YES”
The rc.conf file is one of the most important FreeBSD configuration files. It containsthe network, hostname and console settings. It also contains lines describing theservices (or daemons) to be started at system startup as well as some of their optionalparameters. For every service that starts when the system is booted, there is a linelike the following:
<servicename>_enable=”YES”
The order of appearance of these lines in rc.conf is not important. The FreeBSDstartup system will always start system services in the correct order (for example,taking care to start services that need the network after the network connection isestablished).
For a VirtualBox installation, also add the following lines:
vboxguest_enable=”YES”
vboxservice_enable=”YES”
and execute the command:
# pw groupmod wheel -m username
if the standard user account is not already in the wheel group.
Now reboot the system, and after it comes up again, as root, execute:
# X -configure
This creates a configuration file for Xorg, called xorg.conf.new which needs to bemoved to its final position:
# mv xorg.conf.new /etc/X11/xorg.conf
For a VirtualBox installation edit the file using ee and find the line:
Driver ”vesa”
change it to:
Driver ”vboxvideo”
24 Installing and Setting Up a Graphic Environment
5.2 Installing a GUI Environment
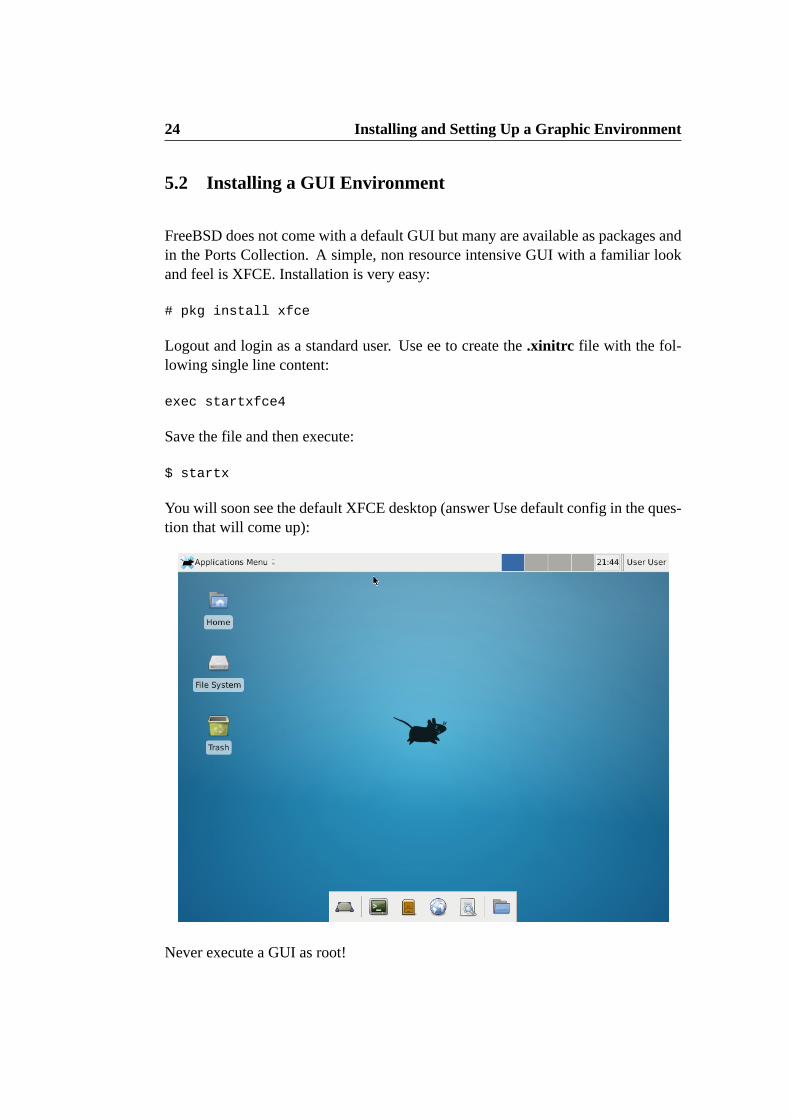
FreeBSD does not come with a default GUI but many are available as packages andin the Ports Collection. A simple, non resource intensive GUI with a familiar lookand feel is XFCE. Installation is very easy:
# pkg install xfce
Logout and login as a standard user. Use ee to create the .xinitrc file with the fol-lowing single line content:
exec startxfce4
Save the file and then execute:
$ startx
You will soon see the default XFCE desktop (answer Use default config in the ques-tion that will come up):
Never execute a GUI as root!
5.3 Shutdown and Restart for the Standard User 25
5.3 Shutdown and Restart for the Standard User
While XFCE provides options to shutdown / restart the system in the logout options,these remain inactive: in FreeBSD normally only the root user or a user belonging tothe operators groupmay shutdown or restart a system. In a desktop system however itmay be desirable for a standard user to be able to shutdown or restart the workstation.This problem may be solved by changing some policykit settings:
Exit the GUI and login as root. Create the appropriate directory:
# cd /usr/local/etc/polkit-1
# mkdir -p localauthority/50-local.d
# cd localauthority/50-local.d
Download the settings file:
# fetch http://www.freebsdworld.gr/files/shutdown.pkla
The settings provided in the above file allow everyone in the wheel group to shut-down or restart the system. Use ee to edit the file and change this setting to yourliking.
Restart the system (shutdown -r now). In the next GUI session notice the shutdownand restart options are now active.
5.4 Optional: Switching Keyboard Layouts
Switching keyboard layouts is useful for people usingmore than one language. Thereare many ways to setup layout switching. For many years this function was providedby a few settings in xorg.conf but lately this method has been deprecated and is nowignored. A new method is provided by creating a special fdi file to be read by thehal daemon. As root:
# cd /usr/local/etc/hal/fdi/policy
# fetch http://www.freebsdworld.gr/files/keyboard.fdi
Hal needs to be restarted to read this file:
# service hald restart
or simply restart the system (shutdown -r now).
As provided, this file can be used to switch between English and Greek layouts usingthe ALT+SHIFT combination. Edit the file to change the alternate layout to the oneof your choice.
26 Installing Additional Applications
5.5 Installing the Slim Login Manager
Using a login manager, your system can start up directly to the GUI environment,replacing the console login with a graphical one. A simple and easy to configurelogin manager is slim:
# pkg install slim
To activate it, add the following line to /etc/rc.conf:
slim_enable=”YES”
When slim is used, the user does not login on the console and the settings usuallyconfigured by the shell startup files (.profile and .bashrc) are not used.
We will install a new version of .xinitrc that merges some of the shell’s startup set-tings to this file. For convenience you may download this directly. Login as a stan-dard user and type:
$ cd
$ fetch http://www.freebsdworld.gr/files/xinitrc-us.zip
$ unzip xinitrc.zip
Replace the existing file when asked.
Reboot your system. At the end of the startup a graphical login screen appears. Loginas a standard user to get to the desktop. Switching back to the console is possible bypressing CTRL+ATL+F1.
6 Installing Additional Applications
The FreeBSD package repository contains a vast selection of applications ready tobe installed. To get started, install some commonly used ones. Now that the systemstarts directly to the GUI, use the terminal emulator (ApplicationsMenu => TerminalEmulator):
$ su -
Password: .....
6.1 InstallingMedia Players, Browsers andProductivityApps
Firefox and Chromium are commonly installed programs for web browsing. Formedia playback, vlc and mplayer support most of the video and audio files:

6.2 Installing the Java Plugin 27
# pkg install firefox chromium mplayer vlc
If the system will be used for office productivity, the LibreOffice suite of programsmay also be installed:
# pkg install libreoffice
Note: Sudo may be used to run these commands as a standard user: sudo pkg installetc
Use ee to add the following line to the file /boot/loader.conf (the filemay be empty):
sem_load=”YES”
This line is necessary in order for Firefox to render HTML5 pages correctly. ForChromium, add the following line to /etc/sysctl.conf:
kern.ipc.shm_allow_removed=1
The system will need to be restarted for the changes to take effect.
6.2 Installing the Java Plugin
To install the Java plugin for Firefox and Chromium:
# pkg install icedtea-web
The following line will have to be added to /etc/fstab:
proc /proc procfs rw 0 0
Then, execute:
# mount -a
As a standard user, execute:
$ ln -s /usr/local/lib/IcedTeaPlugin.so ~/.mozilla/plugins/
The plugin should then work in both Firefox and Chromium.
6.3 Installing the Flash Plugin
To install the Flash plugin, the following additional programs are needed:
• nspluginwrapper
• Linux compatibility layer - will be installed automatically as a dependencyfor the plugin
28 Updating the Installed Applications
• Flash plugin from the Ports Collection as there is no ready package for it dueto licensing restrictions
Install nspluginwrapper:
# pkg install nspluginwrapper
The linux compatibility layer needs the following line to be added to /etc/rc.conf:
linux_enable=”YES”
This line will automatically load a required kernel module during startup. To load itimmediately:
# kldload linux
To install the actual plugin, fetch and extract the Ports Collection:
# portsnap fetch extract
Add the following line to /etc/make.conf (file may be empty):
WITH_PKGNG=YES
Install from the port:
# cd /usr/ports/www/linux-f10-flashplugin11
# make install clean
After the installation is complete, there is a step to be executed by every standarduser on the system:
$ nspluginwrapper -v -a -i
If the plugin is ever updated to a newer version, every standard user should exe-cute:
$ nspluginwrapper -v -a -u
Since the Ports Collection is now installed, install some additional fonts for bettercompatibility with web pages:
# cd /usr/ports/x11-fonts/webfonts
# make install clean
7 Updating the Installed Applications
To keep the applications updated to the latest versions, it is recommended to executethe following two commands periodically:
# pkg update

29
# pkg upgrade
After an upgrade, additional messages about steps to be taken may be shown. Beprepared to make any changes to configuration files as requested.
To find additional packages for installation, try using part of the package or programname in a pkg search command:
# pkg search programname
8 Further Reading
The FreeBSD Handbook is an invaluable source of information on the FreeBSDOperating System. While this article guided you to a functional FreeBSD desktop,the Handbook contains a lot more information on how your system ticks and whatelse it can do. Start reading it here:
http://www.freebsd.org/doc/en/books/handbook
Happy FreeBSDing!