Free Printable
8
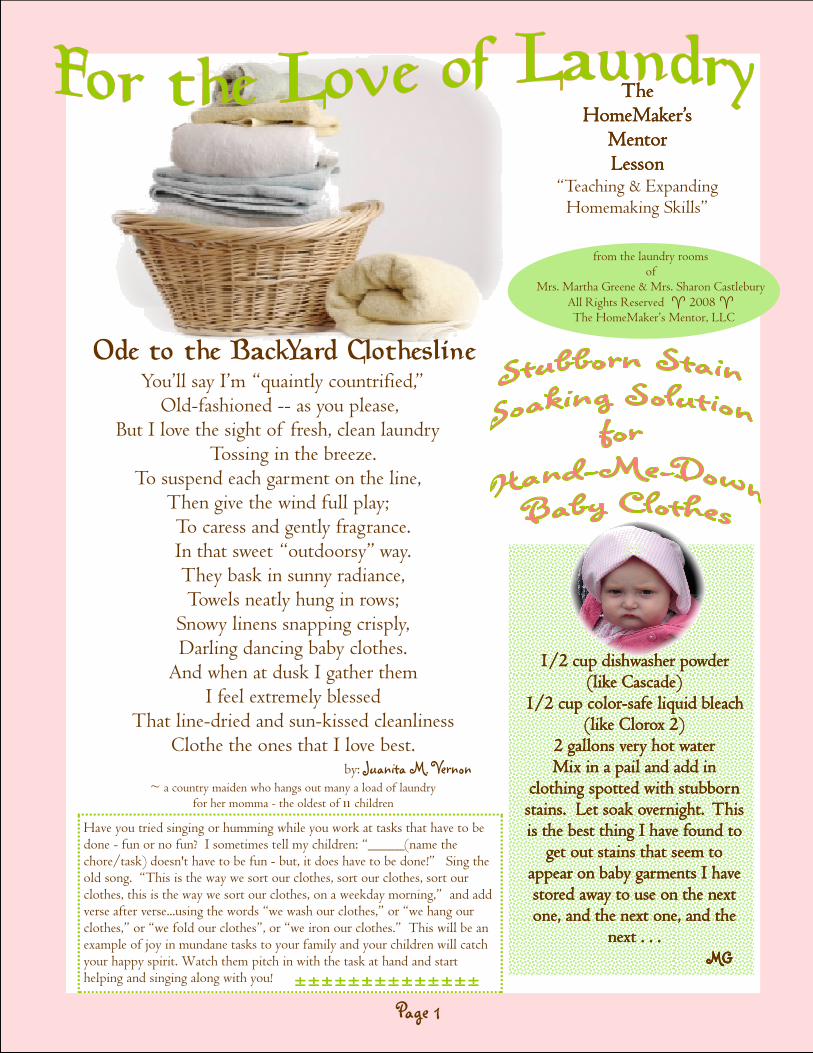
The The The The HomeMaker’s HomeMaker’s HomeMaker’s HomeMaker’s Mentor Mentor Mentor Mentor Lesson Lesson Lesson Lesson “Teaching & Expanding Homemaking Skills” from the laundry rooms of Mrs. Martha Greene & Mrs. Sharon Castlebury All Rights Reserved 2008 The HomeMaker’s Mentor, LLC Page 1 Ode to the BackYard Clothesline You’ll say I’m “quaintly countrified,” Old-fashioned -- as you please, But I love the sight of fresh, clean laundry Tossing in the breeze. To suspend each garment on the line, Then give the wind full play; To caress and gently fragrance. In that sweet “outdoorsy” way. They bask in sunny radiance, Towels neatly hung in rows; Snowy linens snapping crisply, Darling dancing baby clothes. And when at dusk I gather them I feel extremely blessed That line-dried and sun-kissed cleanliness Clothe the ones that I love best. by: Juanita M. Vernon ~ a country maiden who hangs out many a load of laundry for her momma - the oldest of children 1/2 cup dishwasher powder 1/2 cup dishwasher powder 1/2 cup dishwasher powder 1/2 cup dishwasher powder (like Cascade) (like Cascade) (like Cascade) (like Cascade) 1/2 cup color 1/2 cup color 1/2 cup color 1/2 cup color-safe liquid bleach safe liquid bleach safe liquid bleach safe liquid bleach (like Clorox 2) (like Clorox 2) (like Clorox 2) (like Clorox 2) 2 gallons very hot water 2 gallons very hot water 2 gallons very hot water 2 gallons very hot water Mix in a pail and add in Mix in a pail and add in Mix in a pail and add in Mix in a pail and add in clothing spotted with stubborn clothing spotted with stubborn clothing spotted with stubborn clothing spotted with stubborn stains. Let soak overnight. This stains. Let soak overnight. This stains. Let soak overnight. This stains. Let soak overnight. This is the best thing I have found to is the best thing I have found to is the best thing I have found to is the best thing I have found to get out stains that seem to get out stains that seem to get out stains that seem to get out stains that seem to appear on baby garments I have appear on baby garments I have appear on baby garments I have appear on baby garments I have stored away to use on the next stored away to use on the next stored away to use on the next stored away to use on the next one, and the next one, and the one, and the next one, and the one, and the next one, and the one, and the next one, and the next . . . next . . . next . . . next . . . MG MG MG MG Have you tried singing or humming while you work at tasks that have to be done - fun or no fun? I sometimes tell my children: “_____(name the chore/task) doesn't have to be fun - but, it does have to be done!” Sing the old song. “This is the way we sort our clothes, sort our clothes, sort our clothes, this is the way we sort our clothes, on a weekday morning,” and add verse after verse...using the words “we wash our clothes,” or “we hang our clothes,” or “we fold our clothes”, or “we iron our clothes.” This will be an example of joy in mundane tasks to your family and your children will catch your happy spirit. Watch them pitch in with the task at hand and start helping and singing along with you!
-
Upload
sis-marita-x -
Category
Documents
-
view
226 -
download
1
description
Laundry Tips
Transcript of Free Printable
The The The The HomeMaker’s HomeMaker’s HomeMaker’s HomeMaker’s
Mentor Mentor Mentor Mentor Lesson Lesson Lesson Lesson
“Teaching & Expanding Homemaking Skills”
from the laundry rooms of
Mrs. Martha Greene & Mrs. Sharon Castlebury All Rights Reserved � 2008 �
The HomeMaker’s Mentor, LLC
Page 1
Ode to the BackYard Clothesline You’ll say I’m “quaintly countrified,”
Old-fashioned -- as you please, But I love the sight of fresh, clean laundry
Tossing in the breeze. To suspend each garment on the line,
Then give the wind full play; To caress and gently fragrance. In that sweet “outdoorsy” way. They bask in sunny radiance, Towels neatly hung in rows;
Snowy linens snapping crisply, Darling dancing baby clothes.
And when at dusk I gather them I feel extremely blessed
That line-dried and sun-kissed cleanliness Clothe the ones that I love best.
by: Juanita M. Vernon ~ a country maiden who hangs out many a load of laundry
for her momma - the oldest of children
1/2 cup dishwasher powder 1/2 cup dishwasher powder 1/2 cup dishwasher powder 1/2 cup dishwasher powder (like Cascade)(like Cascade)(like Cascade)(like Cascade)
1/2 cup color1/2 cup color1/2 cup color1/2 cup color----safe liquid bleach safe liquid bleach safe liquid bleach safe liquid bleach (like Clorox 2)(like Clorox 2)(like Clorox 2)(like Clorox 2)
2 gallons very hot water2 gallons very hot water2 gallons very hot water2 gallons very hot water Mix in a pail and add in Mix in a pail and add in Mix in a pail and add in Mix in a pail and add in
clothing spotted with stubborn clothing spotted with stubborn clothing spotted with stubborn clothing spotted with stubborn stains. Let soak overnight. This stains. Let soak overnight. This stains. Let soak overnight. This stains. Let soak overnight. This is the best thing I have found to is the best thing I have found to is the best thing I have found to is the best thing I have found to
get out stains that seem to get out stains that seem to get out stains that seem to get out stains that seem to appear on baby garments I have appear on baby garments I have appear on baby garments I have appear on baby garments I have stored away to use on the next stored away to use on the next stored away to use on the next stored away to use on the next one, and the next one, and the one, and the next one, and the one, and the next one, and the one, and the next one, and the
next . . . next . . . next . . . next . . . MGMGMGMG
Have you tried singing or humming while you work at tasks that have to be done - fun or no fun? I sometimes tell my children: “_____(name the chore/task) doesn't have to be fun - but, it does have to be done!” Sing the old song. “This is the way we sort our clothes, sort our clothes, sort our clothes, this is the way we sort our clothes, on a weekday morning,” and add verse after verse...using the words “we wash our clothes,” or “we hang our clothes,” or “we fold our clothes”, or “we iron our clothes.” This will be an example of joy in mundane tasks to your family and your children will catch your happy spirit. Watch them pitch in with the task at hand and start helping and singing along with you!
The HomeMaker’s Mentor Lesson The HomeMaker’s Mentor Lesson The HomeMaker’s Mentor Lesson The HomeMaker’s Mentor Lesson “Teaching & Expanding Homemaking Skills”
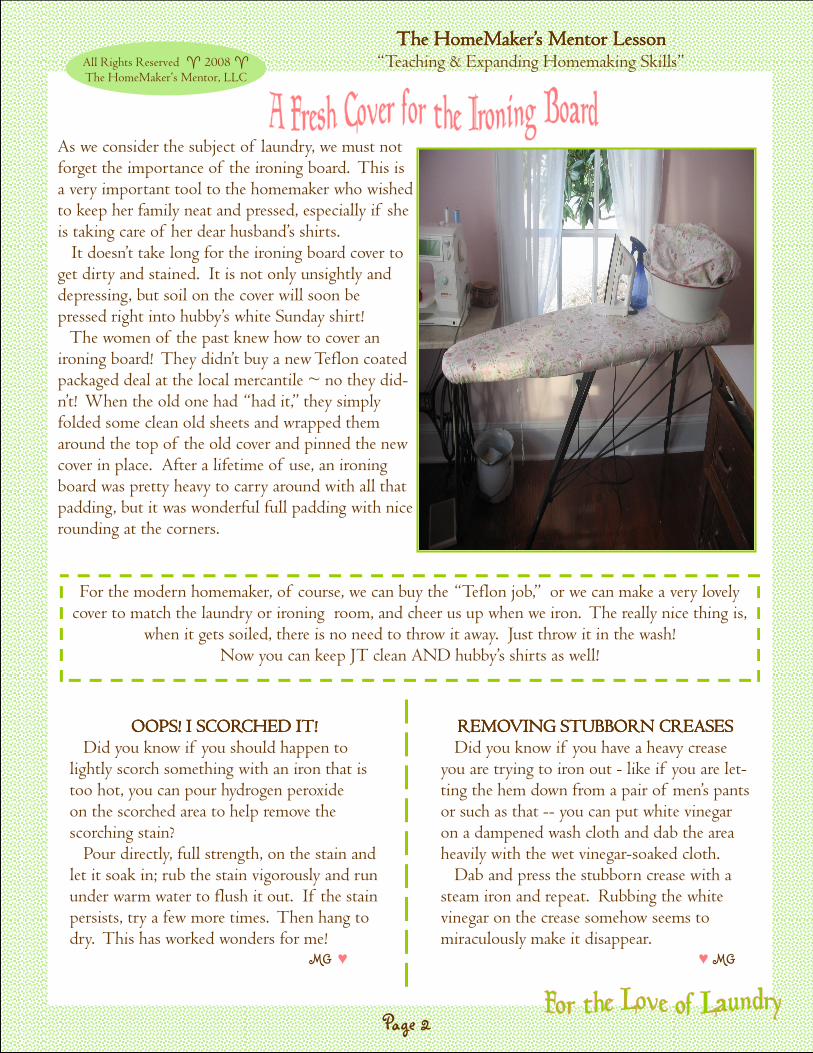
As we consider the subject of laundry, we must not forget the importance of the ironing board. This is a very important tool to the homemaker who wished to keep her family neat and pressed, especially if she is taking care of her dear husband’s shirts. It doesn’t take long for the ironing board cover to get dirty and stained. It is not only unsightly and depressing, but soil on the cover will soon be pressed right into hubby’s white Sunday shirt! The women of the past knew how to cover an ironing board! They didn’t buy a new Teflon coated packaged deal at the local mercantile ~ no they did-n’t! When the old one had “had it,” they simply folded some clean old sheets and wrapped them around the top of the old cover and pinned the new cover in place. After a lifetime of use, an ironing board was pretty heavy to carry around with all that padding, but it was wonderful full padding with nice rounding at the corners.
For the modern homemaker, of course, we can buy the “Teflon job,” or we can make a very lovely cover to match the laundry or ironing room, and cheer us up when we iron. The really nice thing is,
when it gets soiled, there is no need to throw it away. Just throw it in the wash! Now you can keep JT clean AND hubby’s shirts as well!
Page 2
OOPS! I SCORCHED IT!OOPS! I SCORCHED IT!OOPS! I SCORCHED IT!OOPS! I SCORCHED IT! Did you know if you should happen to lightly scorch something with an iron that is too hot, you can pour hydrogen peroxide on the scorched area to help remove the scorching stain? Pour directly, full strength, on the stain and let it soak in; rub the stain vigorously and run under warm water to flush it out. If the stain persists, try a few more times. Then hang to dry. This has worked wonders for me! MG ♥
REMOVING STUBBORN CREASESREMOVING STUBBORN CREASESREMOVING STUBBORN CREASESREMOVING STUBBORN CREASES Did you know if you have a heavy crease you are trying to iron out - like if you are let-ting the hem down from a pair of men’s pants or such as that -- you can put white vinegar on a dampened wash cloth and dab the area heavily with the wet vinegar-soaked cloth. Dab and press the stubborn crease with a steam iron and repeat. Rubbing the white vinegar on the crease somehow seems to miraculously make it disappear.
♥ MG
All Rights Reserved � 2008 � The HomeMaker’s Mentor, LLC
The HomeMaker’s Mentor Lesson The HomeMaker’s Mentor Lesson The HomeMaker’s Mentor Lesson The HomeMaker’s Mentor Lesson “Teaching & Expanding Homemaking Skills” All Rights Reserved � 2008 �
The HomeMaker’s Mentor, LLC
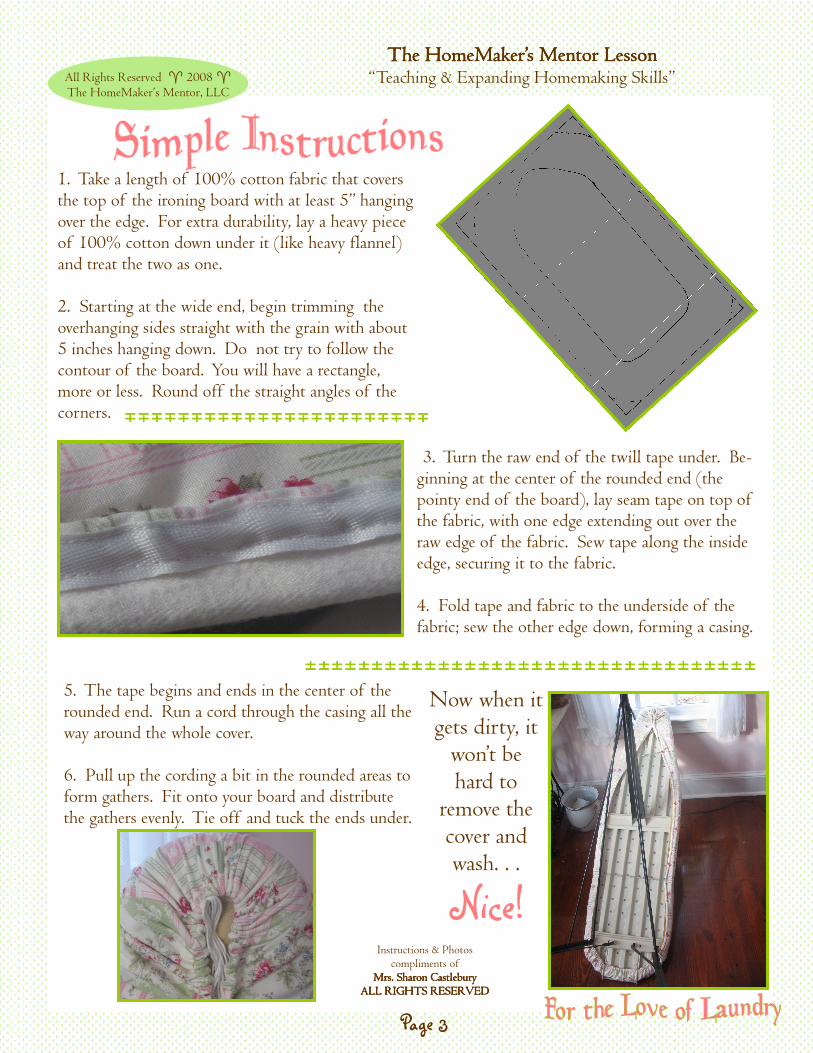
3. Turn the raw end of the twill tape under. Be-ginning at the center of the rounded end (the pointy end of the board), lay seam tape on top of the fabric, with one edge extending out over the raw edge of the fabric. Sew tape along the inside edge, securing it to the fabric. 4. Fold tape and fabric to the underside of the fabric; sew the other edge down, forming a casing.
1. Take a length of 100% cotton fabric that covers the top of the ironing board with at least 5” hanging over the edge. For extra durability, lay a heavy piece of 100% cotton down under it (like heavy flannel) and treat the two as one. 2. Starting at the wide end, begin trimming the overhanging sides straight with the grain with about 5 inches hanging down. Do not try to follow the contour of the board. You will have a rectangle, more or less. Round off the straight angles of the corners.
5. The tape begins and ends in the center of the rounded end. Run a cord through the casing all the way around the whole cover. 6. Pull up the cording a bit in the rounded areas to form gathers. Fit onto your board and distribute the gathers evenly. Tie off and tuck the ends under.
Now when it gets dirty, it
won’t be hard to
remove the cover and wash. . .
Nice! Instructions & Photos
compliments of Mrs. Sharon CastleburyMrs. Sharon CastleburyMrs. Sharon CastleburyMrs. Sharon Castlebury
ALL RIGHTS RESERVEDALL RIGHTS RESERVEDALL RIGHTS RESERVEDALL RIGHTS RESERVED
Page 3
The HomeMaker’s Mentor Lesson The HomeMaker’s Mentor Lesson The HomeMaker’s Mentor Lesson The HomeMaker’s Mentor Lesson “Teaching & Expanding Homemaking Skills”
All Rights Reserved � 2008 � Lesson by ©2008 Martha Greene
Sharon was inspired to have her handy
boys build her clothesline after
seeing a picture of one that sparked her fancy in a magazine.
Instructions & Photos compliments of
Mrs. Sharon CastleburyMrs. Sharon CastleburyMrs. Sharon CastleburyMrs. Sharon Castlebury ALL RIGHTS RESERVEDALL RIGHTS RESERVEDALL RIGHTS RESERVEDALL RIGHTS RESERVED
We began with hand-cut cedar logs, found on the property. Your husband may be able to cut these from someone’s land, because cedars have a way of growing freely in many parts of the country. If this is not an option, use pressure-treated wood purchased at the local lumber yard.
The cross pieces were from pressure-treated
wood boards.
Page 4
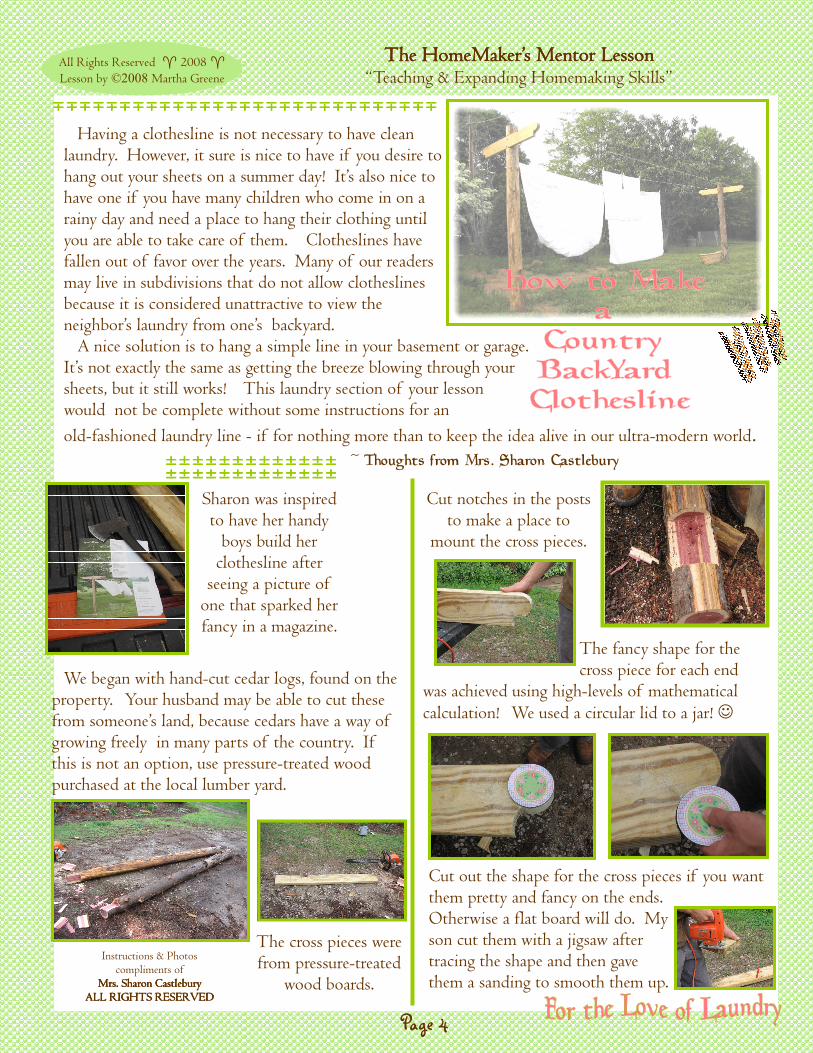
Cut notches in the posts to make a place to
mount the cross pieces.
The fancy shape for the cross piece for each end
was achieved using high-levels of mathematical calculation! We used a circular lid to a jar! ☺
Cut out the shape for the cross pieces if you want them pretty and fancy on the ends. Otherwise a flat board will do. My son cut them with a jigsaw after tracing the shape and then gave them a sanding to smooth them up.
Having a clothesline is not necessary to have clean laundry. However, it sure is nice to have if you desire to hang out your sheets on a summer day! It’s also nice to have one if you have many children who come in on a rainy day and need a place to hang their clothing until you are able to take care of them. Clotheslines have fallen out of favor over the years. Many of our readers may live in subdivisions that do not allow clotheslines because it is considered unattractive to view the neighbor’s laundry from one’s backyard. A nice solution is to hang a simple line in your basement or garage. It’s not exactly the same as getting the breeze blowing through your sheets, but it still works! This laundry section of your lesson would not be complete without some instructions for an
old-fashioned laundry line - if for nothing more than to keep the idea alive in our ultra-modern world. ~ Thoughts from Mrs. Sharon Castlebury
The HomeMaker’s Mentor Lesson The HomeMaker’s Mentor Lesson The HomeMaker’s Mentor Lesson The HomeMaker’s Mentor Lesson “Teaching & Expanding Homemaking Skills”
All Rights Reserved © 2008 Martha Greene
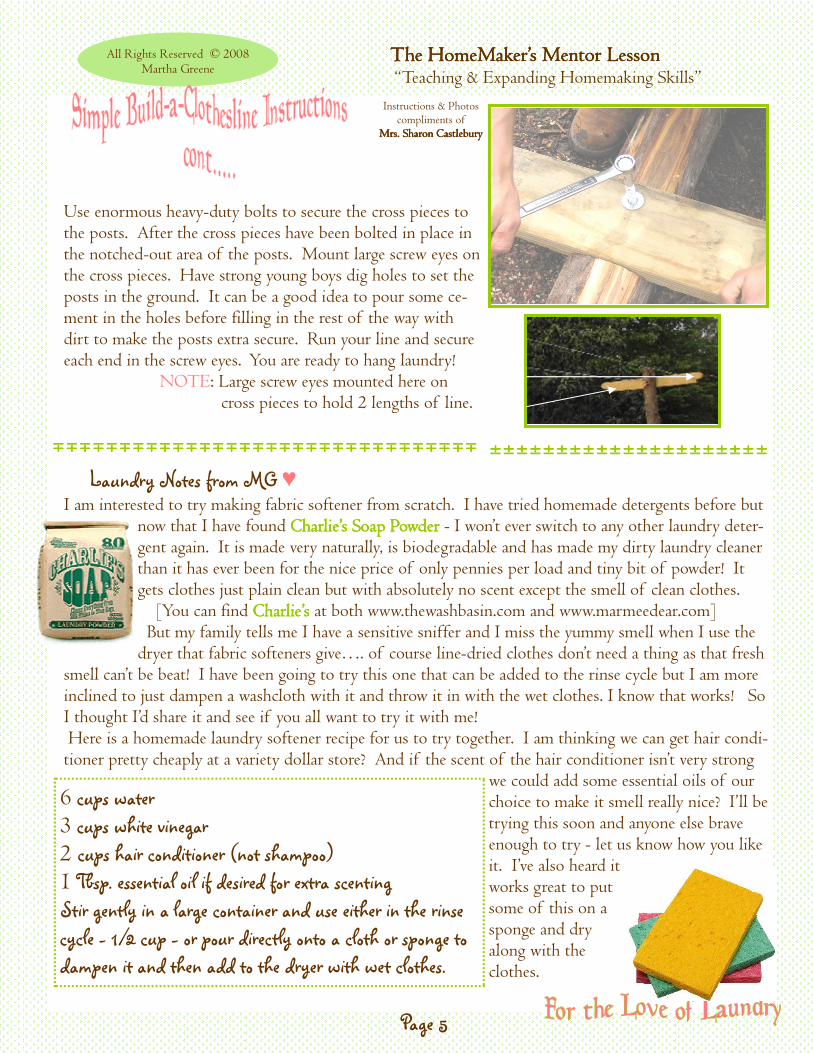
Use enormous heavy-duty bolts to secure the cross pieces to the posts. After the cross pieces have been bolted in place in the notched-out area of the posts. Mount large screw eyes on the cross pieces. Have strong young boys dig holes to set the posts in the ground. It can be a good idea to pour some ce-ment in the holes before filling in the rest of the way with dirt to make the posts extra secure. Run your line and secure each end in the screw eyes. You are ready to hang laundry! NOTE: Large screw eyes mounted here on cross pieces to hold 2 lengths of line.
Instructions & Photos compliments of
Mrs. Sharon CastleburyMrs. Sharon CastleburyMrs. Sharon CastleburyMrs. Sharon Castlebury
Laundry Notes from MG ♥ I am interested to try making fabric softener from scratch. I have tried homemade detergents before but
now that I have found Charlie’s Soap Powder Charlie’s Soap Powder Charlie’s Soap Powder Charlie’s Soap Powder - I won’t ever switch to any other laundry deter-gent again. It is made very naturally, is biodegradable and has made my dirty laundry cleaner than it has ever been for the nice price of only pennies per load and tiny bit of powder! It gets clothes just plain clean but with absolutely no scent except the smell of clean clothes. [You can find Charlie’sCharlie’sCharlie’sCharlie’s at both www.thewashbasin.com and www.marmeedear.com] But my family tells me I have a sensitive sniffer and I miss the yummy smell when I use the dryer that fabric softeners give…. of course line-dried clothes don’t need a thing as that fresh
smell can’t be beat! I have been going to try this one that can be added to the rinse cycle but I am more inclined to just dampen a washcloth with it and throw it in with the wet clothes. I know that works! So I thought I’d share it and see if you all want to try it with me! Here is a homemade laundry softener recipe for us to try together. I am thinking we can get hair condi-tioner pretty cheaply at a variety dollar store? And if the scent of the hair conditioner isn’t very strong
we could add some essential oils of our choice to make it smell really nice? I’ll be trying this soon and anyone else brave enough to try - let us know how you like it. I’ve also heard it works great to put some of this on a sponge and dry along with the clothes.
6 cups water 3 cups white vinegar 2 cups hair conditioner (not shampoo) 1 Tbsp. essential oil if desired for extra scenting Stir gently in a large container and use either in the rinse cycle - 1/2 cup - or pour directly onto a cloth or sponge to dampen it and then add to the dryer with wet clothes.
Page 5
The HomeMaker’s Mentor Lesson The HomeMaker’s Mentor Lesson The HomeMaker’s Mentor Lesson The HomeMaker’s Mentor Lesson “Teaching & Expanding Homemaking Skills”
©2008 Martha Greene for The HomeMaker’s Mentor
Page 6
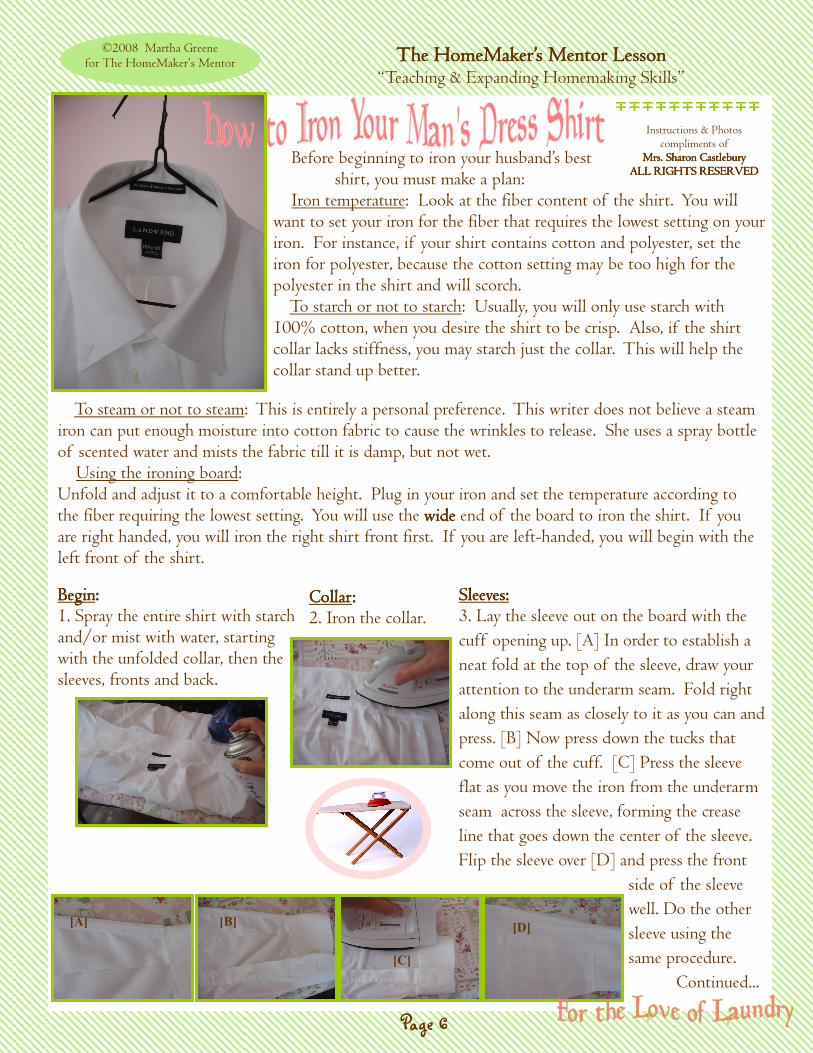
Before beginning to iron your husband’s best shirt, you must make a plan: Iron temperature: Look at the fiber content of the shirt. You will want to set your iron for the fiber that requires the lowest setting on your iron. For instance, if your shirt contains cotton and polyester, set the iron for polyester, because the cotton setting may be too high for the polyester in the shirt and will scorch. To starch or not to starch: Usually, you will only use starch with 100% cotton, when you desire the shirt to be crisp. Also, if the shirt collar lacks stiffness, you may starch just the collar. This will help the collar stand up better.
Instructions & Photos compliments of
Mrs. Sharon CastleburyMrs. Sharon CastleburyMrs. Sharon CastleburyMrs. Sharon Castlebury ALL RIGHTS RESERVEDALL RIGHTS RESERVEDALL RIGHTS RESERVEDALL RIGHTS RESERVED
To steam or not to steam: This is entirely a personal preference. This writer does not believe a steam iron can put enough moisture into cotton fabric to cause the wrinkles to release. She uses a spray bottle of scented water and mists the fabric till it is damp, but not wet. Using the ironing board: Unfold and adjust it to a comfortable height. Plug in your iron and set the temperature according to the fiber requiring the lowest setting. You will use the widewidewidewide end of the board to iron the shirt. If you are right handed, you will iron the right shirt front first. If you are left-handed, you will begin with the left front of the shirt.
BeginBeginBeginBegin:::: 1. Spray the entire shirt with starch and/or mist with water, starting with the unfolded collar, then the sleeves, fronts and back.
CollarCollarCollarCollar:::: 2. Iron the collar.
Sleeves:Sleeves:Sleeves:Sleeves: 3. Lay the sleeve out on the board with the
cuff opening up. [A] In order to establish a
neat fold at the top of the sleeve, draw your
attention to the underarm seam. Fold right
along this seam as closely to it as you can and
press. [B] Now press down the tucks that
come out of the cuff. [C] Press the sleeve
flat as you move the iron from the underarm
seam across the sleeve, forming the crease
line that goes down the center of the sleeve.
Flip the sleeve over [D] and press the front
side of the sleeve
well. Do the other
sleeve using the
same procedure.
Continued...
[D] [A] [B]
[C]
The HomeMaker’s Mentor Lesson The HomeMaker’s Mentor Lesson The HomeMaker’s Mentor Lesson The HomeMaker’s Mentor Lesson “Teaching & Expanding Homemaking Skills”
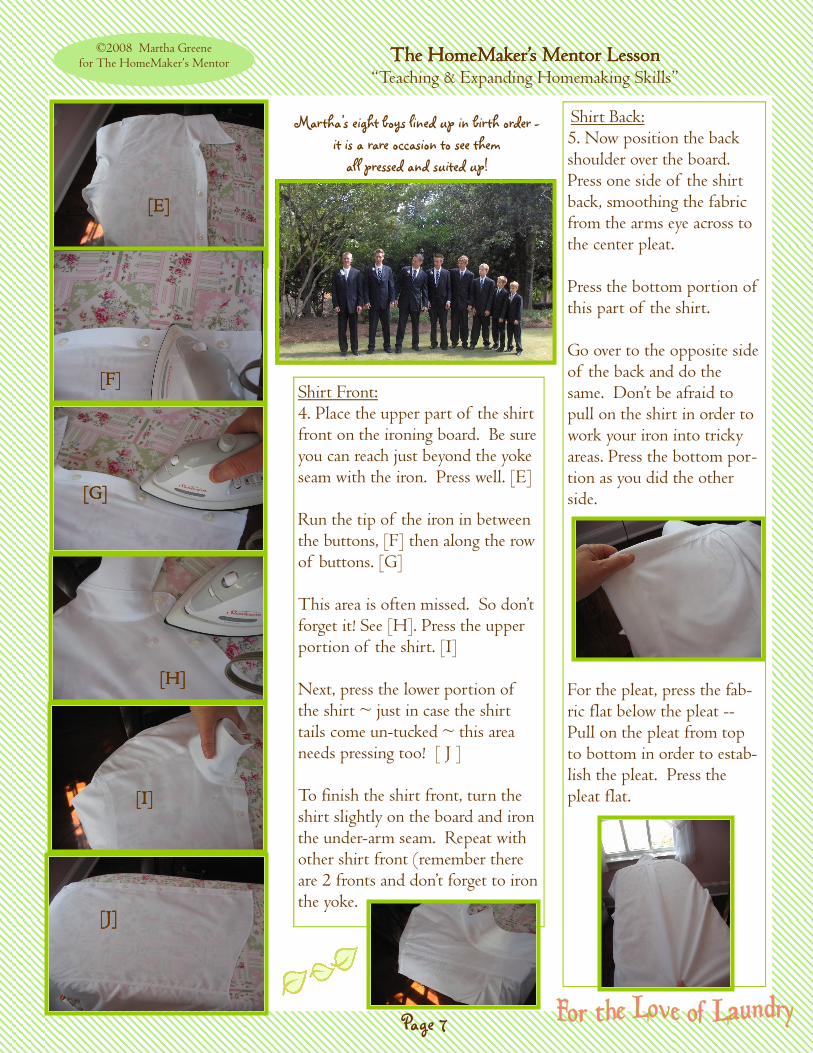
[E][E][E][E]
[F][F][F][F]
[G][G][G][G]
[H][H][H][H]
[I][I][I][I]
[J][J][J][J]
Martha’s eight boys lined up in bir th order - it is a rare occasion to see them all pressed and suited up!
Shirt Back: 5. Now position the back shoulder over the board. Press one side of the shirt back, smoothing the fabric from the arms eye across to the center pleat. Press the bottom portion of this part of the shirt. Go over to the opposite side of the back and do the same. Don’t be afraid to pull on the shirt in order to work your iron into tricky areas. Press the bottom por-tion as you did the other side.
For the pleat, press the fab-ric flat below the pleat -- Pull on the pleat from top to bottom in order to estab-lish the pleat. Press the pleat flat.
Shirt Front: 4. Place the upper part of the shirt front on the ironing board. Be sure you can reach just beyond the yoke seam with the iron. Press well. [E] Run the tip of the iron in between the buttons, [F] then along the row of buttons. [G] This area is often missed. So don’t forget it! See [H]. Press the upper portion of the shirt. [I] Next, press the lower portion of the shirt ~ just in case the shirt tails come un-tucked ~ this area needs pressing too! [ J ] To finish the shirt front, turn the shirt slightly on the board and iron the under-arm seam. Repeat with other shirt front (remember there are 2 fronts and don’t forget to iron the yoke.
Page 7
©2008 Martha Greene for The HomeMaker’s Mentor
The HomeMaker’s Mentor Lesson The HomeMaker’s Mentor Lesson The HomeMaker’s Mentor Lesson The HomeMaker’s Mentor Lesson “Teaching & Expanding Homemaking Skills”
Page 8
Finishing: Hang the shirt up neatly onto the hanger. Fold the collar over. Avoid pressing the collar down, as this tends to break the fibers along this fold line. Be sure to keep the shirts hanging with the center back of the collar high on the hanger. This helps the shirt to hang properly so that wrinkles are avoided in the body of the shirt.
WASH DAY CHOWDER WASH DAY CHOWDER WASH DAY CHOWDER WASH DAY CHOWDER In a small soup pot put in: 1/4 lb. of bacon snipped in small pieces and fry until crisp. While bacon fries, peel and dice up 4 potatoes. Let stand in salted water until ready to use. Cut 1 small onion chopped fine and cook until soft in bacon drippings. Add in: 1 can tomato sauce (12 oz. size) 1 can whole kernel corn with juice The diced potatoes, [drain off water first] 2 tsp. salt 1/4 tsp. black pepper 1/2 tsp. paprika 3 cups boiling water Cook and simmer until potatoes are soft and then add in 1 cup evaporated milk. Heat through but do not boil. Serve in large soup bowls with bran muffins and jam. I make this recipe in a large soup pot and quadruple it! We love it to the last drop!
I’ll have to close this lesson saying that laundry is not a task that any of us just adores to do! But it all comes down to attitude or perspective - right? Just think about all the wonderful conveniences we have to help us in our tasks. My great-grandmother used a wringer washer and hung everything on the line - snow, sleet, rain, or shine! The house was no doubt strung about with clothing from every hook and cranny on rainy weeks. We have running water and hot water heaters. Think about it, ladies - it is a true blessing that we don’t have to haul water. We have just been reading “The Yearling” aloud (again!) and Ma Baxter would have done near anything to have a well outside her home. Instead they hauled water by the bucket full from the water hole and hiked to the ole hole on a regular basis to do the laundry. We are truly blessed. Our grandmothers spent ALL day on washin’ day -- that is how many recipes came to be known as“Wash Day Soup” as they had to get supper on early since their day was filled with washing and “biling” [boiling] the water in the pots, etc. It doesn’t take our entire day to get it all done - though my laundry mountains seem endless….so I share with you in closing my recipe affectionately called “Wash Day Chowder” - good and comforting at the end of any day.
©2008 Martha Greene for The HomeMaker’s Mentor