FREE 12X16 Storage Shed Plan by Howtobuildashed · DISCLAIMER Howtobuildashed.org is here to help...
9
Copyright © 2017 All Rights Reserved. Use of this PDF file constitutes acceptance of the Howtobuildashed.org User Terms and Privacy Policy. 12'X16' GABLE SHED PLAN FREE STREAMLINED VERSION Supported & Recommended by our Friends & Partners: 2017 RATE C U S T O M E R S A T I S F A C T I O N C U S T O M E R S A T I S F A C T I O N 98,6%
Transcript of FREE 12X16 Storage Shed Plan by Howtobuildashed · DISCLAIMER Howtobuildashed.org is here to help...
Copyright © 2017 All Rights Reserved. Use of this PDF file constitutes acceptance of the Howtobuildashed.org User Terms and Privacy Policy.
12'X16'GABLE SHED PLANFREE STREAMLINED VERSION
Supported & Recommended by our Friends & Partners:
2017
RATE
CU
STOMER SATISFACTION
CU
STOMER SATISFACTION
98,6%

DIFFERENCES BETWEEN OUR FREE & PREMIUM PLANS
FREE 12'x16' PLAN• Basic schematics
• Basic angles
• Basic measurements
• Basic layouts
• Simplified instructions
PREMIUM 12'x16' PLAN• 30+ detailed 3D schematics
• Views from all angles
• Measurements for every part
• Full layouts for every step
• Step-by-step assembly instructions
• Full material / shopping list
• Full cutting list
• PRO-TIPS for every section
• Mobile / Tablet ready
• Designed for newbies and pro's
VS.
LEARN MORE ABOUT OUR PREMIUM 12'X16' SHED PLAN
2Copyright © 2017 All Rights Reserved. Use of this PDF file constitutes acceptance of the Howtobuildashed.org User Terms and Privacy Policy.

DISCLAIMER
Howtobuildashed.org is here to help and assist the DIYer. All information / advice is free to use. The information / advice is for general guidance only and whilst every effort is made to ensure that it is correct, it should not be relied upon as accurate. The information / advice contained within this document is intended for persons of no less than 18 years of age. Use of the information / advice contained within this document is at your own risk. It is the sole responsibility of any person(s) using the information / advice contained within this document that their level of competence is appropriate for the task they want to complete. All users of information / advice contained within this document should have all work checked / tested by a professional qualified trades person where applicable. You should be aware of current regulations on buildings, gas, water and electrical works (i.e. Part P) if you have any doubts we would advise you to research further information or contact the appropriate professional body.
LIABILITYHowtobuildashed.org and individuals associated with the document through ownership and contribution will not accept any liability for any loss, damage, injury or negligence direct or indirect from use of the information / advice contained within this document. Any dispute arising from use of this document or disclaimer will be decided by the US courts under the relevant US law.
COPYRIGHTThe contents of these and other pages (graphics, text and arrangement) are owned unless otherwise noted by Howtobuildashed.org and no part of this document may be reproduced without written permission of the owners Howtobuildashed.org Information may be stored on computer for personal use only, not for presentation or publication.
3Copyright © 2017 All Rights Reserved. Use of this PDF file constitutes acceptance of the Howtobuildashed.org User Terms and Privacy Policy.

Copy
BASIC OVERVIEW AND DIMENSIONS
This 12’ x 16’ shed has a spacious 7’ 12” x 3’ 8” door frame and a 3’ x 3’ window on the front wall. You will
buy the door and window separately and follow the manufacturer’s instructions to install them. The side of
the shed is also home to a 3’ x 3’ window. Together, these windows let more than enough natural light into
the shed for your storage needs. The back wall of the shed and the right wall of the shed are finished solid
with T1-11 siding.
1
6' 4.5"
17' 6.5"
3'16' 1"
FRONT VIEW DOOR
4right © 2017 All Rights Reserved. Use of this PDF file constitutes acceptance of the Howtobuildashed.org User Terms and Privacy Policy.
NOTE
Use old doors and windows to save money. Follow manufacturer’s instructions to accurately install the doors and windows.
12' 1"
3'
SIDE VIEW WINDOW
12' 2.5"
3'

5Copyright © 2017 All Rights Reserved. Use of this PDF file constitutes acceptance of the Howtobuildashed.org User Terms and Privacy Policy.
FOUNDATION AND FLOOR
The first stage to building your 12’ x 16’ shed is to build the foundation. The foundation supports the shed walls so it
is absolutely crucial you get it right. It will be constructed from pressure-treated timber and tongue and groove
plywood. As the name of this shed suggests, the foundation is to measure 12’ x 16’. You will build your foundation as
per the illustration above, being careful to space the floor skids and joists equally.
2
NOTE
Buy per-designed joists and skids if you are new to building sheds. This way, you will reduce the chances of any complications in sizing and spacing.
3/4" Tongue and Groove Plywood
FLOORFOUNDATION BASE
16'
4x4 PRESSURE TREATED
SKID
12'

6Copyright © 2017 All Rights Reserved. Use of this PDF file constitutes acceptance of the Howtobuildashed.org User Terms and Privacy Policy.
WALL STRUCTURES
The next step to building your 12’ x 16’ shed is to construct the wall frames. Illustrated above are the frames for the
front wall and the back wall. For this, you will use no less than thirty pieces of timber to include wall studs, cripple
studs, headers and plates. You will nail the timber and the frames together using 3 ½” galvanized nails. Both the
front wall and back wall are to measure 16’ wide and 7’ 6” tall not including the top plate. Once constructed, you will
finish the frames with T1-11 siding.
3
NOTE
Add self-adhering flashing on the bottom edges of the windows before installing T1-11.
7' 6"
16'
FRONT WALL
15' 4"
16'
BACK WALL
16'
7' 6"
15' 4"
16'

7Copyright © 2017 All Rights Reserved. Use of this PDF file constitutes acceptance of the Howtobuildashed.org User Terms and Privacy Policy.
WALL STRUCTURES
The side walls are less time-intensive to build than the front wall and back wall due to their smaller footprint.
The right wall is to house a window though so this will take a little longer to build than the left wall. Both walls
are to measure 12’ wide at the bottom plate. Once you have built your wall frames, you will nail T1-11 siding
onto them. You will nail this directly into the wall studs and other points of contact. The T1-11 siding should
run 1 ½” past the bottom plate and be flush with the top plate and this applies to all shed walls.
4
NOTE
Make sure the edges of T1-11 do not overlap each other as this will compromise the functioning and appearance of the T1-11.
7' 6"
12'
11' 4"
11' 4"
RIGHT WALL
7' 6"
12'
11' 4"
11' 4"
LEFT WALL
8Copyright © 2017 All Rights Reserved. Use of this PDF file constitutes acceptance of the Howtobuildashed.org User Terms and Privacy Policy.
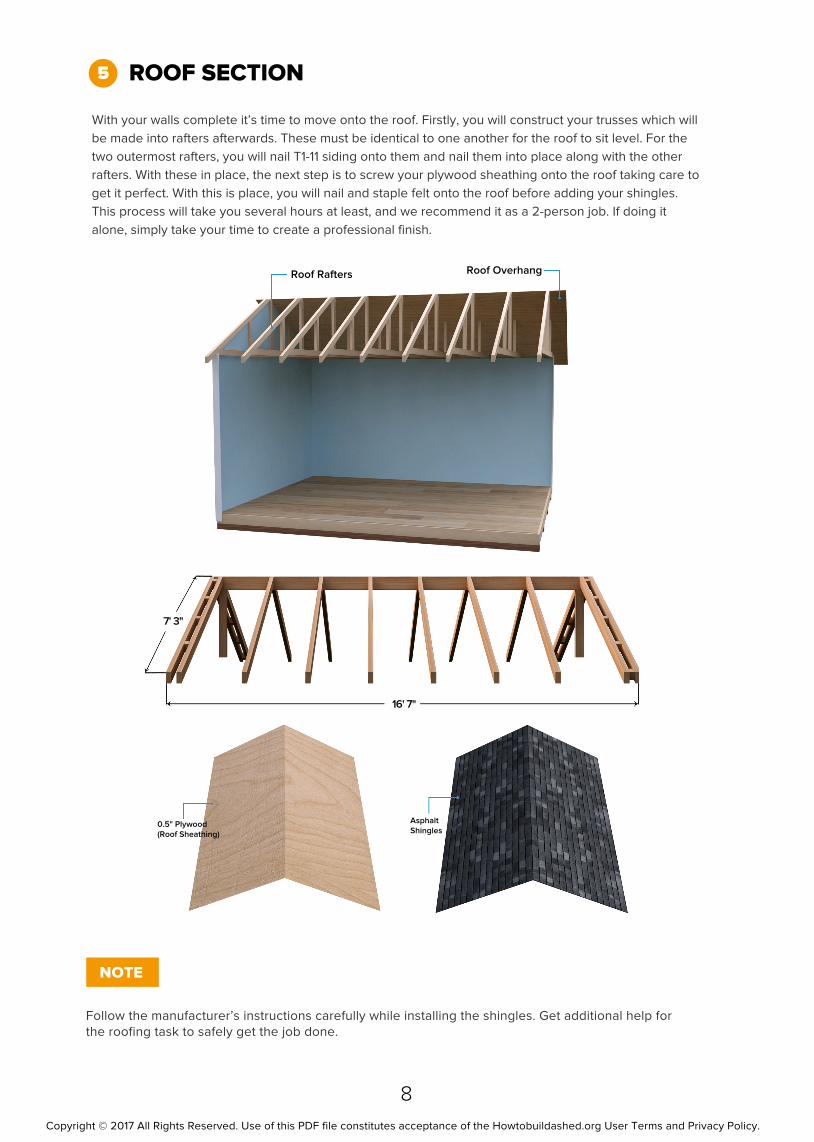
ROOF SECTION
With your walls complete it’s time to move onto the roof. Firstly, you will construct your trusses which will
be made into rafters afterwards. These must be identical to one another for the roof to sit level. For the
two outermost rafters, you will nail T1-11 siding onto them and nail them into place along with the other
rafters. With these in place, the next step is to screw your plywood sheathing onto the roof taking care to
get it perfect. With this is place, you will nail and staple felt onto the roof before adding your shingles.
This process will take you several hours at least, and we recommend it as a 2-person job. If doing it
alone, simply take your time to create a professional finish.
5
NOTE
Follow the manufacturer’s instructions carefully while installing the shingles. Get additional help for the roofing task to safely get the job done.
Roof Rafters Roof Overhang
7' 3"
16' 7"
0.5" Plywood(Roof Sheathing)
Asphalt Shingles
Copyright © 2017 All Rights Reserved. Use of this PDF file constitutes acceptance of the Howtobuildashed.org User Terms and Privacy Policy.
PREMIUM PLAN INCLUDES:• 30+ detailed 3D schematics
• Views from all angles
• Measurements for every part
• Full layouts for every step
• Step-by-step assembly instructions
• Full material / shopping list
• Full cutting list
• PRO-TIPS for every section
• Mobile / Tablet ready
• Designed for newbies and pro's
Supported & Recommended by our Friends & Partners:
2017
Wait no more! Click here to learn more about our premium 12'x16' shed plan and start building
your shed today!
RATE
CU
STOMER SATISFACTION
CU
STOMER SATISFACTION
98,6%