
FOUR INCH CORRUGATED BINS OPERATOR’S · PDF fileForm 15-04 – 15-09 ... Canadian...
56
Part Number: ENM-18887-TW R1 Revised: Nov/12 Read this manual before using product. Failure to follow instructions and safety precautions can result in serious injury, death, or property damage. Keep manual for future reference. FOUR INCH CORRUGATED BINS OPERATOR’S MANUAL ORIGINAL INSTRUCTIONS Stiffened 18-05 – 18-16 21-05 – 21-18 24-05 – 24-20 27-05 – 27-22 30-05 – 30-24 33-05 – 33-24 36-05 – 36-24 42-05 – 42-24 48-05 – 48-24 60-05 – 60-24 Foundation Form 15-04 – 15-09 18-04 – 18-09 21-04 – 21-09 24-04 – 24-09 27-04 – 27-09 30-04 – 30-09 33-04 – 33-09 36-04 – 36-09 42-04 – 42-09 48-04 – 48-09 Unstiffened 15-04 – 15-10 18-04 – 18-10 21-04 – 21-10 24-04 – 24-10 27-04 – 27-10 30-04 – 30-10 33-04 – 33-10 36-04 – 36-10 42-04 – 42-10 48-04 – 48-10 Hopper 15-04 – 15-09 18-04 – 18-09 21-04 – 21-09 24-04 – 24-09 27-04 – 27-09 STIFFENED, UNSTIFFENED, FOUNDATION FORM, & HOPPER BINS
Transcript of FOUR INCH CORRUGATED BINS OPERATOR’S · PDF fileForm 15-04 – 15-09 ... Canadian...

FOUR INCH CORRUGATED BINS OPERATOR’S MANUAL
ORIGINAL INSTRUCTIONS
Stiffened 18-05 – 18-16 21-05 – 21-18 24-05 – 24-20 27-05 – 27-22 30-05 – 30-24 33-05 – 33-24 36-05 – 36-24 42-05 – 42-24 48-05 – 48-24 60-05 – 60-24
Foundation Form
15-04 – 15-09 18-04 – 18-09 21-04 – 21-09 24-04 – 24-09 27-04 – 27-09 30-04 – 30-09 33-04 – 33-09 36-04 – 36-09 42-04 – 42-09 48-04 – 48-09
Unstiffened 15-04 – 15-10 18-04 – 18-10 21-04 – 21-10 24-04 – 24-10 27-04 – 27-10 30-04 – 30-10 33-04 – 33-10 36-04 – 36-10 42-04 – 42-10 48-04 – 48-10
Hopper 15-04 – 15-09 18-04 – 18-09 21-04 – 21-09 24-04 – 24-09 27-04 – 27-09
STIFFENED, UNSTIFFENED, FOUNDATION FORM, & HOPPER BINS
Part Number: ENM-18887-TW R1
Revised: Nov/12
Read this manual before using product. Failure to follow instructions and safety precautions can result in serious injury, death, or property damage. Keep manual for future reference.

This product has been designed and constructed according to general engineering standardsa. Other local regulations may apply and must be followed by the operator. We strongly recommend that all personnel associated with this equipment be trained in the correct operational and safety procedures required for this product. Periodic reviews of this manual with all employees should be standard practice. For your convenience, we include this sign-off sheet so you can record your periodic reviews.
a. Standards include organizations such as the American Society of Agricultural and Biological Engineers, American National Standards Institute, Canadian Standards Association, International Organization for Standardization, and/or others.
Date Employee Signature Employer Signature

TABLE OF CONTENTS
TWISTER - FOUR INCH CORRUGATED STIFFENED, UNSTIFFENED, FOUNDATION FORM, & HOPPER BINS
1. Introduction .......................................................................................................................... 51.1. General Description and Intended Purpose ............................................................. 5
1.1.1. Site Selection.............................................................................................. 71.1.2. Bin Upgrade................................................................................................ 81.1.3. Bin Site Expansion ..................................................................................... 81.1.4. Future/Additional Sidewall and Roof Loading............................................. 8
2. Safety .................................................................................................................................... 92.1. General Safety ....................................................................................................... 10
2.1.1. Lockout and Tagout Procedures .............................................................. 102.2. Operational Safety.................................................................................................. 112.3. Maintenance Safety................................................................................................ 142.4. Safety Decals ......................................................................................................... 15
2.4.1. Decal Installation ...................................................................................... 152.4.2. Safety Decal Locations............................................................................. 15
3. Operation ............................................................................................................................ 193.1. Pre-Filling Checklist................................................................................................ 193.2. Filling Bin................................................................................................................ 203.3. Storage................................................................................................................... 22
3.3.1. Inspecting Stored Grain............................................................................ 223.3.2. Drying and Aerating Stored Grain (When Equipped) ............................... 233.3.3. Stirring Machines...................................................................................... 24
3.4. Emptying Bin .......................................................................................................... 243.4.1. Emptying From the Bin Door .................................................................... 243.4.2. Emptying Hopper Bins.............................................................................. 243.4.3. Emptying Using a Bin Unload and Sweep (When Equipped)................... 243.4.4. Sidedraw Option ....................................................................................... 29
3.5. Cleanout ................................................................................................................. 29
4. Maintenance ....................................................................................................................... 314.1. General Maintenance Procedures.......................................................................... 31
4.1.1. Grain Bin................................................................................................... 31
5. Troubleshooting ................................................................................................................. 355.1. Grain Bin ................................................................................................................ 355.2. Bin Unload.............................................................................................................. 38
6. Appendix............................................................................................................................. 416.1. Grain Drying and Aeration Tips .............................................................................. 41
7. Specifications..................................................................................................................... 45
Limited Warranty ..................................................................................................................... 55
ENM-18887-TW R1 3

TWISTER - FOUR INCH CORRUGATED
STIFFENED, UNSTIFFENED, FOUNDATION FORM, & HOPPER BINS
4 ENM-18887-TW R1

TWISTER - FOUR INCH CORRUGATED 1. INTRODUCTION
STIFFENED, UNSTIFFENED, FOUNDATION FORM, & HOPPER BINS 1.1. GENERAL DESCRIPTION AND INTENDED PURPOSE
1. IntroductionThank you for purchasing a Twister bin. Before using, please read this manual and understand the various features of the equipment and precautions for efficient and safe operation.
Keep this manual handy for frequent reference and to review with new personnel. A sign-off form is supplied on the inside front cover to record your safety reviews. Call your local distributor or dealer if you need assistance or additional information.
This manual should be regarded as part of the equipment. Suppliers are advised to retain documentary evidence that this manual was provided with the product.
1.1. GENERAL DESCRIPTION AND INTENDED PURPOSE
Table 1.1 Bin Features
Number Feature
1 Filler cap and roof peak support: may include filler cap adaptor (33’ and 36’ bins), or compression ring (42’, 48’, and 60’ bins)
2 Roof rings
3 Roof ladder
4 Inspection hatch sheet
5 Vent sheet(s)
6 Roof sheet ribs (and roof rib stiffeners on applicable models)
7 Roof ring angle sections (under roof sheet)
8 Top sidewall ladder platform
9 Roof eave birdstops
10 Top sidewall ladder and safety cage
11 Sidewall wind ring(s) (Stiffened bins only)
12 Sidewall stiffeners and stiffener splice plates (Stiffened bins only)
13 Middle sidewall ladder platform
14 Standard sidewall sheets (different gauges, according to tier)
15 Bottom sidewall ladder and safety cage
16 Door short side sheet
17 Door
18 Door bottom cut-out sheet (with aeration and foundation punching options)
19 Bottom tier sheets (with aeration and foundation punching options)
20 Bin unload
21 Stiffener baseplates (stiffened bins only), base angle sections, anchor bolts
22 Foundation
ENM-18887-TW R1 5

1. INTRODUCTION TWISTER - FOUR INCH CORRUGATED
1.1. GENERAL DESCRIPTION AND INTENDED PURPOSE STIFFENED, UNSTIFFENED, FOUNDATION FORM, & HOPPER BINS
Figure 1.1 Typical Twister Bin (Stiffened Model Shown)
The following discusses intended uses for your bin:
• It is generally assumed that grain will be stored in the bin, however, other materials meeting criteria below are acceptable.
• Bins are designed for grain storage and allow loading and unloading of free
flowing, non-corrosive granular material up to 55lb/ft3 (880kg/m3).
1 2
12
10
8
3 45
67
11
13
15
1617 16
18 19
14
9
2122
20
6 ENM-18887-TW R1

TWISTER - FOUR INCH CORRUGATED 1. INTRODUCTION
STIFFENED, UNSTIFFENED, FOUNDATION FORM, & HOPPER BINS 1.1. GENERAL DESCRIPTION AND INTENDED PURPOSE
• Material is intended to be unloaded from the center with a bin unload auger, from the bin door with a portable auger placed as close as possible to the center of the bin, or under the hopper bottom, depending on your model. Refer to Operation Section.
• Bins can be loaded by a portable grain auger or conveyor, or other grain han-dling system (where design permits) through the filler cap, directed toward the center of the bin. Refer to “Specifications” on page 45
• Treated material/grain can be stored if it is not corrosive; check with your local supplier.
• Material can be stored in warm or cold environments, however stored grain may require special conditioning to prevent spoiling.
• See also Table 1.2 for specific intended uses for your bin.
The following are unacceptable misuses of the bin. Damage caused by such misuses is not covered by warranty. Edwards does not accept any liability arising out of these or any other misuses:
• Storing material other than free flowing, noncorrosive, granular material.• Storing fertilizer inside the bin; fertilizer is corrosive and will damage the gal-
vanized coating. • Entering the bin while loading or unloading its contents, or to break up
crusted material. Refer to “Operational Safety” on page 11.• If equipped with a bin unload, unloading material from any location other than
the center of the bin, except as described in “Emptying Using a Bin Unload and Sweep (When Equipped)” on page 24.
• Filling bin through the inspection hatch or directing material away from bin center.
• Overfilling the bin such that there is outward pressure on the roof sheets.• Unauthorized modifications of the equipment.• Unloading material in any way not described in this manual.• If equipped with a sidedraw, using in a manner other than described in “Side-
draw Option” on page 29.
1.1.1. SITE SELECTION
Selection of an appropriate site is a very important step prior to assembling a Twister grain bin. The following must be adhered to when choosing a bin site:
• Choose a firm, level, well-drained site, preferably at the top of a small hill or incline so that snow/water cannot collect near the grain bin.
Table 1.2 Grain Bin Usage
Type Dry StorageStirring Machine
Natural Air Drying
Aeration Side Draw
Stiffened w/upgradeUnstiffened Commercial w/upgradeHopper w/upgradeFoundation Form
ENM-18887-TW R1 7
1. INTRODUCTION TWISTER - FOUR INCH CORRUGATED
1.1. GENERAL DESCRIPTION AND INTENDED PURPOSE STIFFENED, UNSTIFFENED, FOUNDATION FORM, & HOPPER BINS
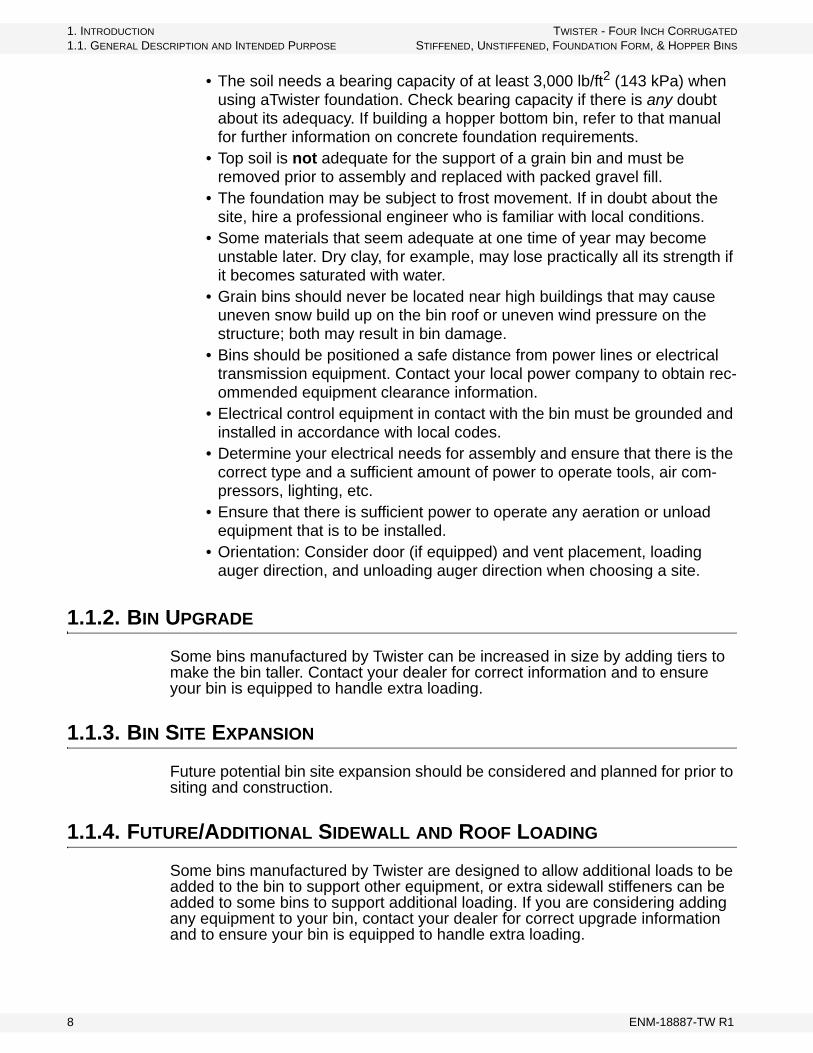
• The soil needs a bearing capacity of at least 3,000 lb/ft2 (143 kPa) when using aTwister foundation. Check bearing capacity if there is any doubt about its adequacy. If building a hopper bottom bin, refer to that manual for further information on concrete foundation requirements.
• Top soil is not adequate for the support of a grain bin and must be removed prior to assembly and replaced with packed gravel fill.
• The foundation may be subject to frost movement. If in doubt about the site, hire a professional engineer who is familiar with local conditions.
• Some materials that seem adequate at one time of year may become unstable later. Dry clay, for example, may lose practically all its strength if it becomes saturated with water.
• Grain bins should never be located near high buildings that may cause uneven snow build up on the bin roof or uneven wind pressure on the structure; both may result in bin damage.
• Bins should be positioned a safe distance from power lines or electrical transmission equipment. Contact your local power company to obtain rec-ommended equipment clearance information.
• Electrical control equipment in contact with the bin must be grounded and installed in accordance with local codes.
• Determine your electrical needs for assembly and ensure that there is the correct type and a sufficient amount of power to operate tools, air com-pressors, lighting, etc.
• Ensure that there is sufficient power to operate any aeration or unload equipment that is to be installed.
• Orientation: Consider door (if equipped) and vent placement, loading auger direction, and unloading auger direction when choosing a site.
1.1.2. BIN UPGRADE
Some bins manufactured by Twister can be increased in size by adding tiers to make the bin taller. Contact your dealer for correct information and to ensure your bin is equipped to handle extra loading.
1.1.3. BIN SITE EXPANSION
Future potential bin site expansion should be considered and planned for prior to siting and construction.
1.1.4. FUTURE/ADDITIONAL SIDEWALL AND ROOF LOADING
Some bins manufactured by Twister are designed to allow additional loads to be added to the bin to support other equipment, or extra sidewall stiffeners can be added to some bins to support additional loading. If you are considering adding any equipment to your bin, contact your dealer for correct upgrade information and to ensure your bin is equipped to handle extra loading.
8 ENM-18887-TW R1

TWISTER - FOUR INCH CORRUGATED 2. SAFETY
STIFFENED, UNSTIFFENED, FOUNDATION FORM, & HOPPER BINS
2. SafetyThe Safety Alert symbol to the left identifies important safety messages on the product and in the manual. When you see this symbol, be alert to the possibil-ity of personal injury or death. Follow the instructions in the safety messages. Why is SAFETY important to you?
• Accidents disable and kill.• Accidents cost.• Accidents can be avoided.
SIGNAL WORDS
Note the use of the signal words DANGER, WARNING, CAUTION, and NOTICE with the safety messages. The appropriate signal word for each message has been selected using the definitions below as a guideline.
DANGER
Indicates an imminently hazardous situation that, if not avoided, will result in serious injury or death.
WARNING
Indicates a hazardous situation that, if not avoided, could result in serious injury or death.
CAUTION
Indicates a hazardous situation that, if not avoided, may result in minor or moderate injury.
NOTICE
Indicates a potentially hazardous situation that, if not avoided, may result in property damage.
ENM-18887-TW R1 9

2. SAFETY TWISTER - FOUR INCH CORRUGATED
2.1. GENERAL SAFETY STIFFENED, UNSTIFFENED, FOUNDATION FORM, & HOPPER BINS
2.1. GENERAL SAFETY
Important: This general safety section includes instructions that apply to all safety practices. Any instructions specific to a certain safety practice (e.g., Operational Safety), can be found in the appropriate section. Always read the complete instructional sections and not just these safety summaries before doing anything with the equipment.
YOU are responsible for the SAFE use and maintenance of your equipment. YOU must ensure that you and anyone else who is going to work around the equipment understands all procedures and related SAFETY information contained in this manual.
Remember, YOU are the key to safety. Good safety practices not only protect you, but also the people around you. Make these practices a working part of your safety program.
• It is the equipment owner, operator, and maintenance personnel's responsi-bility to read and understand ALL safety instructions, safety decals, and man-uals and follow them when assembling, operating, or maintaining the equipment. All accidents can be avoided.
• Equipment owners must give instructions and review the information initially and annually with all personnel before allowing them to operate this product. Untrained users/operators expose themselves and bystanders to possible serious injury or death.
• Use this equipment for its intended purposes only.• Do not modify the equipment in any way without written permission from the
manufacturer. Unauthorized modification may impair the function and/or safety, and could affect the life of the equipment. Any unauthorized modifica-tion of the equipment voids the warranty.
• Do not allow any unauthorized person in the work area.
2.1.1. LOCKOUT AND TAGOUT PROCEDURES
To minimize possibility of serious injury or death to workers from hazardous energy release (for example, when restarting the equipment) and prevent worker deaths from all forms of hazardous energy release, follow all lockout and tagout procedures when installing and servicing equipment. Ensure that lockout and tagout procedures are adhered to. For example:
• De-energize, block, and dissipate all sources of hazardous energy.• Lock out and/or tag out all forms of hazardous energy.• Ensure that only 1 key exists for each assigned lock, and that you are the
only one that holds that key.• After verifying all energy sources are de-energized, service or installation
may be performed. • Ensure that all personnel are clear before turning on power to equipment.
For more information on occupational safety practices, contact your local health and safety organization.
10 ENM-18887-TW R1

TWISTER - FOUR INCH CORRUGATED 2. SAFETY
STIFFENED, UNSTIFFENED, FOUNDATION FORM, & HOPPER BINS 2.2. OPERATIONAL SAFETY
2.2. OPERATIONAL SAFETY
Operational and Maintenance Safety means using common sense and knowing and observing the proper precautions.
• Have another person nearby who can shut down equipment in case of acci-dent. It is good practice to always work with at least one other person.
• Do not operate equipment with any guard removed.• Keep body, hair, and clothing away from all moving parts.• Do not climb ladder if damaged, wet, icy, greasy, or slippery. Remove slippery
materials on platforms, rungs and gripping surfaces.• Do not use the ladder until all bolts are fastened and secured.• Consult a qualified electrician to ensure the bin is properly grounded.• When ascending/descending a ladder, maintain good balance by having at
least two feet and one hand or two hands and one foot on ladder at all times.• Use required safety harnesses and climbing equipment. Consult local safety
authorities.• Perform maintenance during normal daylight hours or with equivalent ambi-
ent lighting. • Use bin for free-flowing grains only.
• Never overfill bin. Grain should never come into contact with or place pres-sure on roof sheets.
• When filling, use top filler cap and direct grain to center of bin. Do not fill from inspection hatch; this will cause uneven loading and could cause the bin to collapse.
• Unload grain only as described in the operation section of this manual. • Lock bin door (where equipped) and close/lock all other access doors when
not in use.• Never enter a bin when loading or unloading grain. • Never enter a bin if you don’t know its unloading history. Grain may form a
bridge above a void space below, causing potential for entrapment.• Always try to solve problems without entering a bin from the inspection hatch
or filler cap. It takes more than 1000 lb (4.5kN) of force to remove someone buried below the surface of grain. Entering the bin while unloading grain will cause serious injury or death. Refer to Figure 2.3.
• Although entering the bin from the roof or inspection hatch is never recom-mended, if you must enter the bin in an emergency:
• Stop the unloading process if the bin is being unloaded and lock out / tag out power before entering the bin, refer to “Lockout and Tagout Proce-dures” on page 10.
• Always wear a dust-filtering respirator when entering the bin. Grain dust, spores, and inadequate oxygen can cause death in grain bins. Persistent exposure may cause “farmer’s lung,” which can eventually be fatal.
• Have body harness tethered to a lifeline controlled by two others outside the bin. One worker should be able to see inside worker through the inspection hatch. If there is an accident, one worker can focus on the vic-tim while the other goes/calls for help.
ENM-18887-TW R1 11

2. SAFETY TWISTER - FOUR INCH CORRUGATED
2.2. OPERATIONAL SAFETY STIFFENED, UNSTIFFENED, FOUNDATION FORM, & HOPPER BINS
• In the event that you are trapped in the grain bin as it is unloading, move as quickly as possible toward the bin wall; keep yourself elevated above the grain mass by walking on the flowing mass while staying as close as possible to the bin wall.
Important: If you ignore the safety precautions above and enter the bin, you could die from being submerged in grain.
THERE ARE 3 COMMON WAYS A PERSON GETS SUBMERGED IN GRAIN:
1. Collapse of bridged grain: • Grain can “bridge” across a bin, creating an empty air space below. A per-
son can easily break through this bridge and become trapped, risking suf-focation.
• To identify bridged grain, look for a funnel shape on the surface of the grain after having removed some of the grain. If surface is undisturbed, the grain has bridged and formed a crust.
• Never walk on the grain crust—the crust rarely becomes strong enough to support the weight of a person. See Figure 2.1.
• To remove bridge, try breaking the bridge from the inspection hatch or filler cap. Use a pole to hit the surface, securing it with a rope in case it is dropped. Be aware that chunks of crusted grain can move down to the auger and limit flow.
Figure 2.1 Bridged Grain Collapse
12 ENM-18887-TW R1

TWISTER - FOUR INCH CORRUGATED 2. SAFETY
STIFFENED, UNSTIFFENED, FOUNDATION FORM, & HOPPER BINS 2.2. OPERATIONAL SAFETY
2. Collapse of a vertical wall of grain: • Vertical walls of grain are created when the bin is partially empty. Poking
at the wall can make the grain avalanche and submerge a person.• Do not enter bin to break down grain that has set up. Break grain mass
from top of bin outside. See Figure 2.2.
Figure 2.2 Vertical Wall Collapse
3. Entrapment in flowing grain: • Grain flows in a funnel-shaped path to the unload auger, portable grain
auger, hopper, or any other unloading system. This vortex of grain behaves very much like a water drain. Velocity increases as grain flows from the bin wall at the top of the grain mass into a small vertical column at the center of the bin. See Figure 2.3.
• Flowing grain will not support the weight of a person. Submersion hap-pens within seconds.
ENM-18887-TW R1 13
2. SAFETY TWISTER - FOUR INCH CORRUGATED
2.2. OPERATIONAL SAFETY STIFFENED, UNSTIFFENED, FOUNDATION FORM, & HOPPER BINS
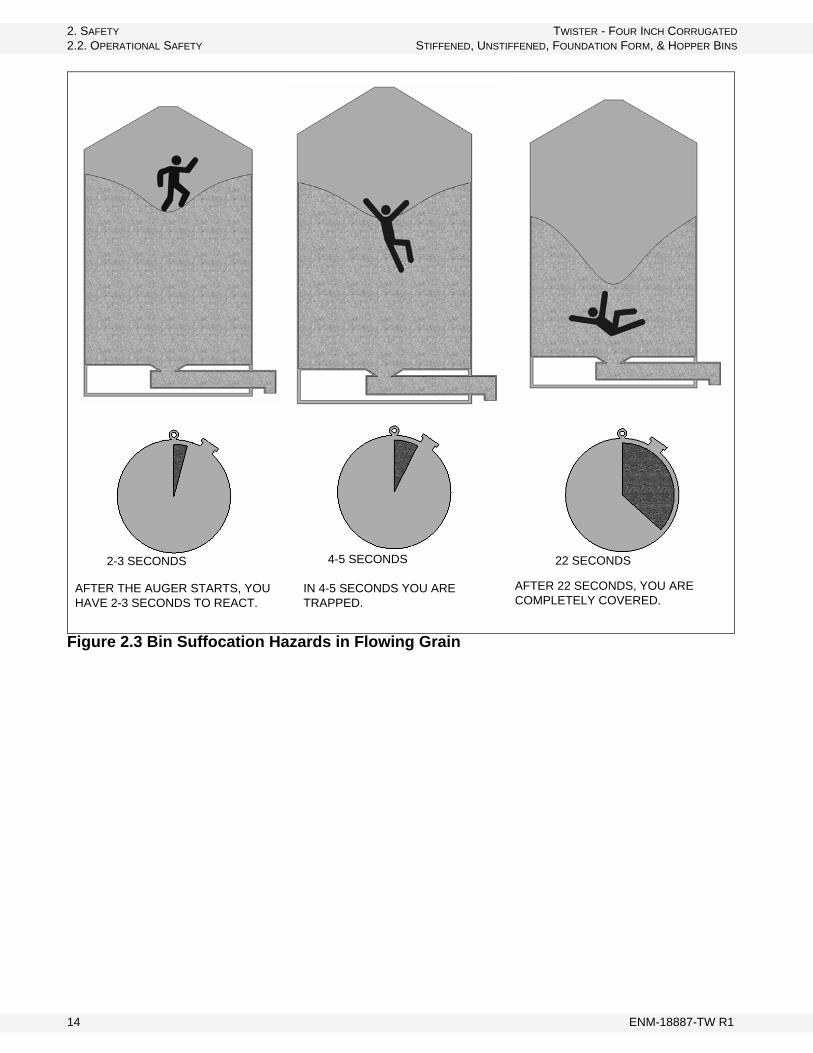
Figure 2.3 Bin Suffocation Hazards in Flowing Grain
2-3 SECONDS 22 SECONDS4-5 SECONDS
AFTER THE AUGER STARTS, YOU HAVE 2-3 SECONDS TO REACT.
IN 4-5 SECONDS YOU ARE TRAPPED.
AFTER 22 SECONDS, YOU ARE COMPLETELY COVERED.
14 ENM-18887-TW R1

TWISTER - FOUR INCH CORRUGATED 2. SAFETY
STIFFENED, UNSTIFFENED, FOUNDATION FORM, & HOPPER BINS 2.3. MAINTENANCE SAFETY
2.3. MAINTENANCE SAFETY
When performing maintenance, understand and observe the following precau-tions:
• Do not replace or substitute bolts, nuts, or other hardware that is of lesser quality than the hardware supplied. Consult your dealer for proper replace-ments.
• After maintenance is completed, replace and secure all safety guards, safety devices, service doors, and cleanout covers.
• Keep records of the regular and annual inspection and maintenance.
2.4. SAFETY DECALS
• Keep safety decals clean and legible at all times.• Replace safety decals that are missing or have become illegible. See decal
location figures that follow.• Replaced parts must display the same decal(s) as the original part.• Safety decals are available from your distributor, dealer, or factory.
2.4.1. DECAL INSTALLATION
1. Decal area must be clean and dry, with a temperature above 50°F (10°C).2. Decide on the exact position before you remove the backing paper.3. Align the decal over the specified area and carefully press the small portion
with the exposed sticky backing in place.4. Slowly peel back the remaining paper and carefully smooth the remaining
portion of the decal in place.5. Small air pockets can be pierced with a pin and smoothed out using the sign
backing paper.
2.4.2. SAFETY DECAL LOCATIONS
Replicas of the safety decals that are attached to the equipment are shown in the figure(s) that follow. Proper safety procedures require that you familiarize yourself with the various safety decals and the areas or particular functions that the decals apply to, as well as the safety precautions that must be taken to avoid serious injury, death, or damage.
ENM-18887-TW R1 15

2. SAFETY TWISTER - FOUR INCH CORRUGATED
2.4. SAFETY DECALS STIFFENED, UNSTIFFENED, FOUNDATION FORM, & HOPPER BINS
Figure 2.4 North American Safety Decal Locations (Flat Bottom Bins)
PART NUMBER 601-2446
PART NUMBER 601-2562
PART NUMBER 601-2447(BESIDE INSPECTION HATCH)
PART NUMBER 601-2445
PART NUMBER 601-2441
PART NUMBER 601-2561
16 ENM-18887-TW R1

TWISTER - FOUR INCH CORRUGATED 2. SAFETY
STIFFENED, UNSTIFFENED, FOUNDATION FORM, & HOPPER BINS 2.4. SAFETY DECALS
Figure 2.5 International Safety Decal Locations
Safety Decal Definition
601-2976 Falling Hazard, use safety harnesses and climbing equipment.
601-2977 Read operation manual before using equipment.
601-2978To prevent serious injury or death from bin collapse when equipped with an unloading system, center hopper must be opened first to empty bin (where equipped).
601-2979To prevent serious injury or death from suffocation, keep out of bin when loading or unloading grain from bin.
601-2980To prevent serious injury or death when equipped with unload augers, keep away from rotating auger flighting.
PART NUMBER 601-2977
PART NUMBER 601-2980
PART NUMBER 601-2979(BESIDE INSPECTION HATCH)
PART NUMBER 601-2976
PART NUMBER 601-2978
ENM-18887-TW R1 17

2. SAFETY TWISTER - FOUR INCH CORRUGATED
2.4. SAFETY DECALS STIFFENED, UNSTIFFENED, FOUNDATION FORM, & HOPPER BINS
18 ENM-18887-TW R1

TWISTER - FOUR INCH CORRUGATED 3. OPERATION
STIFFENED, UNSTIFFENED, FOUNDATION FORM, & HOPPER BINS 3.1. PRE-FILLING CHECKLIST
3. Operation
Bins are available in various combinations. In most cases, the following instruc-tions will apply to all bins. Where information varies, additional instructions will be included and are indicated with an arrow.
3.1. PRE-FILLING CHECKLIST
Before filling each time, the operator must confirm the following:
GRAIN BIN
• Confirm that no one is in the work area or inside of the bin, refer to “Opera-tional Safety” on page 11.
• Ensure working areas surrounding the bin are clean and clear of clutter.• Check that bin is clean (see Section 3.5.) and free of moisture prior to filling.• Ensure maintenance has been performed (see Section 4.)
• Hopper Bins: Make sure slide gate and manhole are closed.
• Flat Bottom Bins: If equipped with sweep, make sure sweep is over the bin unload intermediate hoppers and gates and is free to move around the bin.
• Flat Bottom Bins: Make sure gates are closed on bin unload (if equipped). Close inner door and chute properly, and ensure panels are locked.
• Ensure grain bin is properly anchored to foundation. Anchor nuts should be finger tight against surface plus half turn with a wrench.
• Ladders, handrails, platforms, stairways, and steps are securely in place.• All bolts are in place and securely tightened.• Any temperature cables must be fastened to floor or anchored to concrete
using breakable string (fishing line). Absolutely no weights or plates should be attached to the bottom of the temperature cables which could overload roof.
Warning: Before continuing, ensure you have read and understand the relevant information in the safety section. Safety information is provided to help prevent serious injury, death, or property damage.
WARNING
Do not enter the bin while filling, storing, or removing grain! You risk partial or complete submergence, and you may get trapped and suffocate in the bin.
NOTICE
Attaching weights to temperature cables can damage the bin roof and is not covered by warranty.
ENM-18887-TW R1 19

3. OPERATION TWISTER - FOUR INCH CORRUGATED
3.2. FILLING BIN STIFFENED, UNSTIFFENED, FOUNDATION FORM, & HOPPER BINS
BIN UNLOAD AND SWEEP (WHERE EQUIPPED)
• All fasteners are secure.• Drive belt(s) are not frayed or damaged.• Drive belt(s) are properly adjusted and aligned.• Intake area and discharge spout are free of obstructions.• Inspect tube supports (where applicable) frequently.• Proper maintenance has been performed. See Maintenance section.• All safety guards are in place and secure.
3.2. FILLING BIN
1. Confirm bin is located a safe distance away from power lines. Do not use if there is a chance of any loading or unloading equipment contacting power lines.
Complete the step below unless otherwise advised of an alternative procedure by a soils engineer. For example, in cases where the soil may not have a load bearing capacity adequate for the grain bin as described in the concrete form assembly.
2. For the initial fill:a. If bin height is not greater than its
diameter, initial fill can be completed as desired. Bins that are taller than their diameter should be filled in two stages. The first stage should be filled to the height of the bin’s diameter, see Figure 3.1. Allow 10 days for settling to occur and then complete filling the bin. See Table 3.1 for applicable bins. For example, a 42-14 bin (42’ or 12.8 m diameter, 14 tiers in height) should be filled to a height of 42’ for the first stage, and the second stage should be completed 10 days later.
Table 3.1 Stiffened, Unstiffened, and Foundation Form Bin Models
Hopper Bin Models
15-05 – 15-0918-05 – 18-1621-06 – 21-1824-07 – 24-2027-08 – 27-2230-09 – 30-2433-10 – 33-2436-11 – 36-2442-12 – 42-2448-14 – 48-2460-17 – 60-24
15-03 – 15-0918-04 – 18-0921-05 – 21-0924-06 – 24-0927-06 – 27-09
Important:
20 ENM-18887-TW R1
TWISTER - FOUR INCH CORRUGATED 3. OPERATION
STIFFENED, UNSTIFFENED, FOUNDATION FORM, & HOPPER BINS 3.2. FILLING BIN
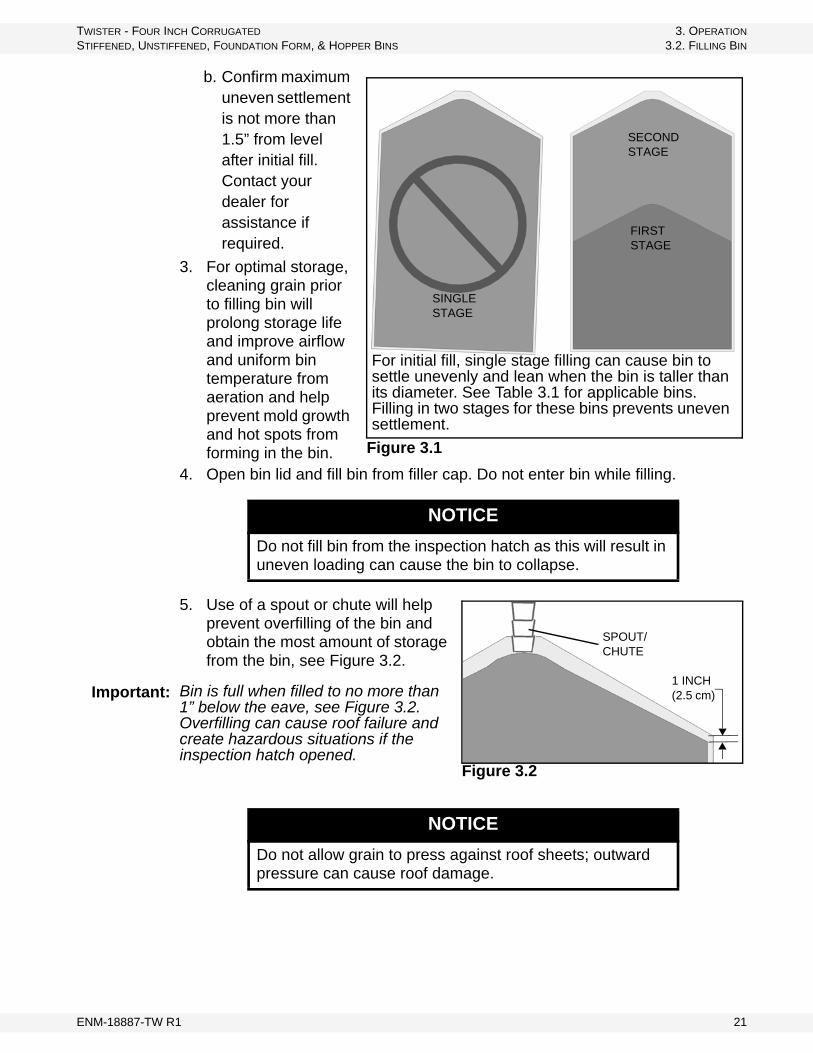
b. Confirm maximum uneven settlement is not more than 1.5” from level after initial fill. Contact your dealer for assistance if required.
3. For optimal storage, cleaning grain prior to filling bin will prolong storage life and improve airflow and uniform bin temperature from aeration and help prevent mold growth and hot spots from forming in the bin.
4. Open bin lid and fill bin from filler cap. Do not enter bin while filling.
5. Use of a spout or chute will help prevent overfilling of the bin and obtain the most amount of storage from the bin, see Figure 3.2.
Bin is full when filled to no more than 1” below the eave, see Figure 3.2. Overfilling can cause roof failure and create hazardous situations if the inspection hatch opened.
NOTICE
Do not fill bin from the inspection hatch as this will result in uneven loading can cause the bin to collapse.
NOTICE
Do not allow grain to press against roof sheets; outward pressure can cause roof damage.
SINGLE STAGE
SECOND STAGE
For initial fill, single stage filling can cause bin to settle unevenly and lean when the bin is taller than its diameter. See Table 3.1 for applicable bins. Filling in two stages for these bins prevents uneven settlement.
Figure 3.1
FIRST STAGE
SPOUT/CHUTE
Figure 3.2
1 INCH(2.5 cm)Important:
ENM-18887-TW R1 21

3. OPERATION TWISTER - FOUR INCH CORRUGATED
3.3. STORAGE STIFFENED, UNSTIFFENED, FOUNDATION FORM, & HOPPER BINS
6. Grain will store better when level than peaked, a grain spreader will do this automatically or can be done by unloading some grain from the center of the bin and refilling.
7. Close lid after filling.
8. Flat Bottom Bins: Attach a padlock to the bin door for security and to prevent unauthorized entry. Ensure that all other access points are inaccessible, especially to children.
9. Lock out the bin ladder to prevent unauthorized entry.
3.3. STORAGE
3.3.1. INSPECTING STORED GRAIN
Inspect grain quality regularly. Grain should be stored in the bin at a moisture content that will not cause the grain to heat and eventually spoil. This safe moisture content is different for each type of grain. It is also influenced by factors such as grain temperature, humidity and temperature conditions of the region, variety, and maturity of the grain. Information on these safe moisture contents is available from local agricultural offices.
Wet grain that exceeds its safe storage period should not be placed in a bin without a natural air drying system.
WARNING
Opening the inspection hatch on an overfilled bin can cause grain to spill out, creating a potential falling hazard resulting in serious injury or death.
Why does grain store better when level?
• Grain mass is level allowing aeration to be more uniform.• Fines are removed which tend to accumulate at the bin center, improving
airflow.• Fines are redistributed, which will help prevent spoilage and mold prob-
NOTICE
Bins are designed to be filled with dry, free-flowing grain only. Use of other materials can cause damage to the bin.
NOTICE
Storage of spoiled grain can damage galvanized coating. Check grain quality regularly.
22 ENM-18887-TW R1

TWISTER - FOUR INCH CORRUGATED 3. OPERATION
STIFFENED, UNSTIFFENED, FOUNDATION FORM, & HOPPER BINS 3.3. STORAGE
When grain is placed in the bin under excessive moisture conditions, it is important to provide adequate amounts of air. The amount of air required to safely store the grain can vary drastically depending on whether aeration (cooling) or drying (heating) of the grain is desired.
Moisture testing should be used to determine when the grain is dry.
Grain temperature should be checked every two weeks of storage. Crusting can develop on the top of the grain mass when grain has not been aerated to a uniform temperature.
Re-lock door after inspecting to keep others from entering the bin. If you have to enter the bin while grain is being stored, refer to “Operational Safety” on page 11 for important safety instructions.
3.3.2. DRYING AND AERATING STORED GRAIN (WHEN EQUIPPED)
Note: If your bin was not purchased with a fan and/or heater and you wish to add one to your bin, consult your dealer to help select a properly sized fan and/or heater and roof venting requirements.
1. Bin must be filled as described in “Filling Bin” on page 20 with grain below the eave to allow proper aeration or drying.
2. Make sure that roof vents and fan are open and appropriately sized for your bin. Consult dealer if you are unsure.
3. If equipped with an aeration fan, start air flow through the grain as soon as the ducts are covered with grain when filling. If equipped with natural air drying, start air flow once the bin is filled to at least half of the bin's diameter above the floor. Once started, to prevent crusted grain, air flow through the grain bin must be maintained until the bin reaches the desired moisture content if drying or reaches the desired temperature if aerating the bin.
4. When using a supplemental heater, do not apply too much heat to the bin as this will over dry the grain. Refer to your supplemental heater manual.
5. Check grain mass has a uniform temperature throughout. If equipped with temperature sensors, these will assist in determining uniform temperature.
6. Consult your fan and/or heater operation manual for further details on proper drying/aerating procedures.
7. Do not use fan and/or heater or discontinue use if weather conditions cause icing of the roof vents.
8. See also “Grain Drying and Aeration Tips” on page 41 for further information.
NOTICE
When equipped with fan, to prevent roof and/or bin damage:• Install adequate roof venting, consult dealer.• Ensure all roof vents are open and unobstructed.• Discontinue use of aeration fan if roof vents become
obstructed with ice or bin is overfilled with grain placing outward pressure on the roof sheets.
ENM-18887-TW R1 23

3. OPERATION TWISTER - FOUR INCH CORRUGATED
3.4. EMPTYING BIN STIFFENED, UNSTIFFENED, FOUNDATION FORM, & HOPPER BINS
3.3.3. STIRRING MACHINES
Check with your dealer for information on stirring machines. This equipment places excess loads on bin walls which may or may not be intended for your particular bin.
3.4. EMPTYING BIN
3.4.1. EMPTYING FROM THE BIN DOOR
Note: The following section applies only to bins equipped with auger chute doors. Do not modify or attempt to unload from the door if bin was not originally supplied with a door equipped for unloading.
1. Open outer door.2. Place auger in chute and push as close to center of bin as possible. After
starting the auger, adjust its position if possible to ensure it is centered in the bin.
3. Never enter bin while emptying; refer to “Operational Safety” on page 11.4. Clean bin after emptying to remove all old material.
3.4.2. EMPTYING HOPPER BINS
1. Center unloading equipment under slide gate. Start the unloading equipment, then open the slide gate by turning the slide gate handle.
2. Never enter the bin while emptying, refer to “Operational Safety” on page 11.3. Clean bin after emptying to remove all old material, see Section 3.5.
3.4.3. EMPTYING USING A BIN UNLOAD AND SWEEP (WHEN EQUIPPED)
BIN UNLOAD DRIVE & LOCKOUT PROCEDURE
Drive Type Before Operation Lockout
Electric Motor Before starting motor, ensure
• motor is properly grounded• pulley guards are in place
and secure
The electric motor should be equipped with a main power disconnect switch capable of being locked in the off-position only. The switch should be in the locked position during shutdown or whenever maintenance is performed on the auger.
If reset is required, disconnect all power before resetting motor.
24 ENM-18887-TW R1

TWISTER - FOUR INCH CORRUGATED 3. OPERATION
STIFFENED, UNSTIFFENED, FOUNDATION FORM, & HOPPER BINS 3.4. EMPTYING BIN
INITIAL START-UP AND BREAK-IN
1. Complete the pre-filling “Pre-Filling Checklist” on page 19 at the beginning of this section.
2. Disengage sweep gearbox (push gearbox shift handle towards bin wall to disengage sweep).
3. Close all hopper gates (both center and intermediate hoppers).
4. Start system.5. Never enter bin while
emptying; refer to “Operational Safety” on page 11.
6. Open center hopper slightly. Ensure product flows out of discharge end at a constant rate.
7. For the first 30 minutes, check that the underfloor auger functions without excessive vibration.
WARNING
To avoid the risk of a bin collapse, center hopper must be opened first to empty bin and should be the only hopper gate open.
INTERMEDIATE HOPPER CONTROL
GEARBOX SHIFT HANDLEE-SUMP
HANDLE(OPTIONAL)
CENTER HOPPER CONTROL
Figure 3.3
ENM-18887-TW R1 25
3. OPERATION TWISTER - FOUR INCH CORRUGATED
3.4. EMPTYING BIN STIFFENED, UNSTIFFENED, FOUNDATION FORM, & HOPPER BINS
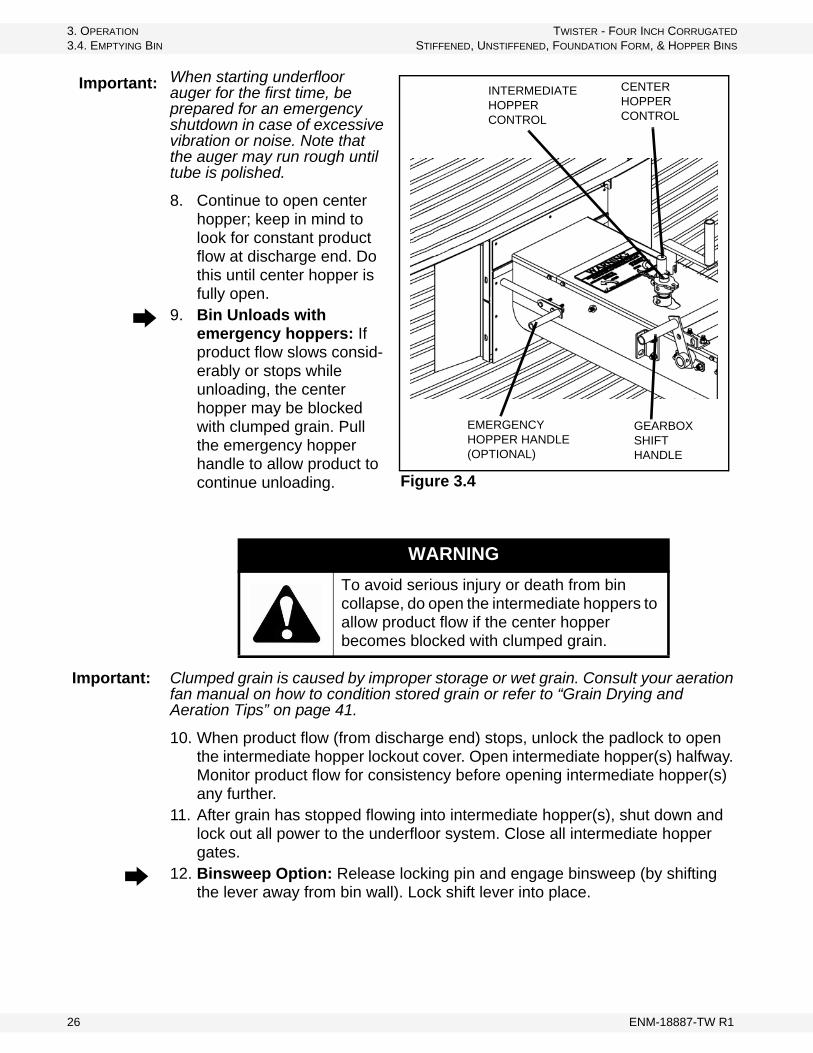
When starting underfloor auger for the first time, be prepared for an emergency shutdown in case of excessive vibration or noise. Note that the auger may run rough until tube is polished.
8. Continue to open center hopper; keep in mind to look for constant product flow at discharge end. Do this until center hopper is fully open.
9. Bin Unloads with emergency hoppers: If product flow slows consid-erably or stops while unloading, the center hopper may be blocked with clumped grain. Pull the emergency hopper handle to allow product to continue unloading.
Important: Clumped grain is caused by improper storage or wet grain. Consult your aeration fan manual on how to condition stored grain or refer to “Grain Drying and Aeration Tips” on page 41.
10. When product flow (from discharge end) stops, unlock the padlock to open the intermediate hopper lockout cover. Open intermediate hopper(s) halfway. Monitor product flow for consistency before opening intermediate hopper(s) any further.
11. After grain has stopped flowing into intermediate hopper(s), shut down and lock out all power to the underfloor system. Close all intermediate hopper gates.
12. Binsweep Option: Release locking pin and engage binsweep (by shifting the lever away from bin wall). Lock shift lever into place.
WARNING
To avoid serious injury or death from bin collapse, do open the intermediate hoppers to allow product flow if the center hopper becomes blocked with clumped grain.
GEARBOX SHIFT HANDLE
INTERMEDIATE HOPPER CONTROL
CENTER HOPPER CONTROL
EMERGENCY HOPPER HANDLE(OPTIONAL)
Figure 3.4
Important:
26 ENM-18887-TW R1
TWISTER - FOUR INCH CORRUGATED 3. OPERATION
STIFFENED, UNSTIFFENED, FOUNDATION FORM, & HOPPER BINS 3.4. EMPTYING BIN
a. Start system.
b. Make sure center hopper is fully open, and maintain a constant product flow.
c. When product flow stops and bin is clean, allow binsweep to travel around bin so that it lines up over top of the intermediate hoppers and underfloor auger.
13. Upon completion of initial run, shut down bin unload system. Refer to “Normal Shutdown” on page 28 for more information.
14. Lock out motor and conduct a complete inspection of bin unload system following the checklist at the beginning of this chapter.
After the initial start up and inspection, the bin unload system should be shut down and inspected at least three times during the first 10 hours of operation.
Keep operation of empty underfloor auger to a minimum, as this results in excessive wear.
Once bin unload system is broken in, the checklist should be a part of the daily routine before operating the system.
Figure 3.5
WARNING
To avoid serious injury or death, do not enter bin while equipment is running.
NOTICE
Failure to place the binsweep over the intermediate hoppers and underfloor auger could result in damage to the unload system the next time the binsweep is operated.
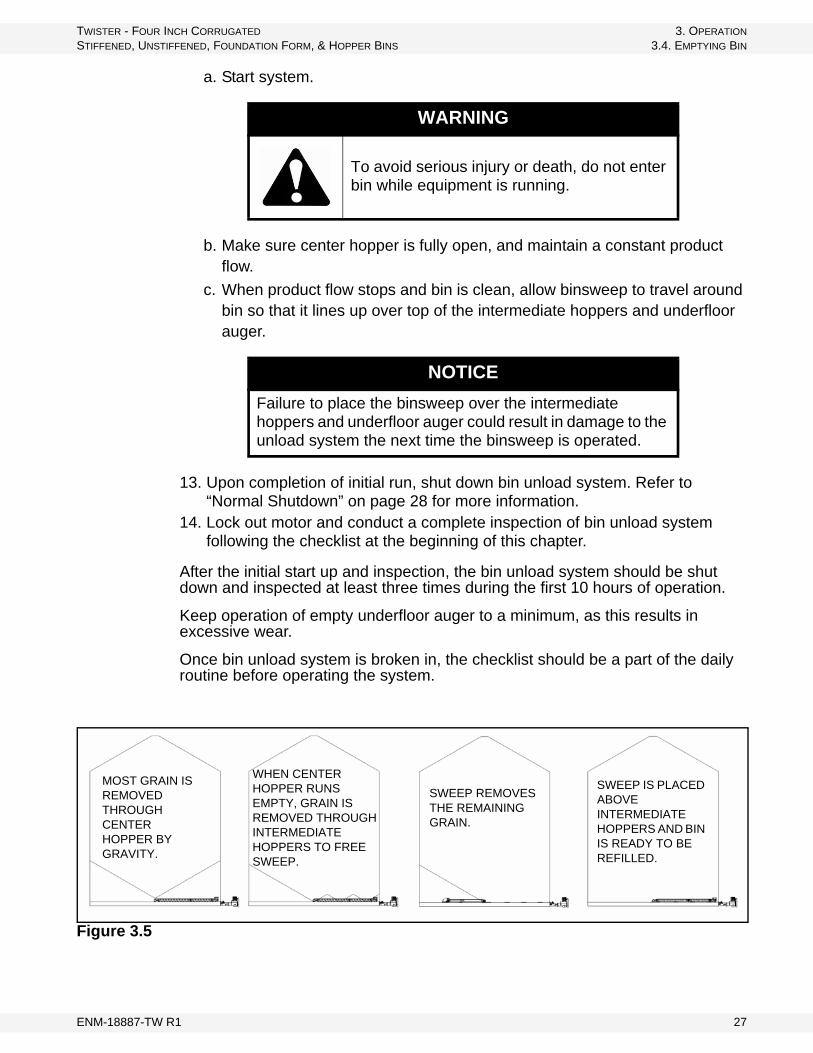
MOST GRAIN IS REMOVED THROUGH CENTER HOPPER BY GRAVITY.
WHEN CENTER HOPPER RUNS EMPTY, GRAIN IS REMOVED THROUGH INTERMEDIATE HOPPERS TO FREE SWEEP.
SWEEP REMOVES THE REMAINING GRAIN.
SWEEP IS PLACED ABOVE INTERMEDIATE HOPPERS AND BIN IS READY TO BE REFILLED.
ENM-18887-TW R1 27

3. OPERATION TWISTER - FOUR INCH CORRUGATED
3.4. EMPTYING BIN STIFFENED, UNSTIFFENED, FOUNDATION FORM, & HOPPER BINS
OPERATING WITH A FULL LOAD
1. Monitor the bin unload during operation for abnormal noises or vibrations.2. Shut off all power before making adjustments, servicing, or clearing the
machine.
EMERGENCY SHUTDOWN / FULL-TUBE RESTART:
1. If the bin unload is shut down for an emergency or during the unloading procedure, lock out motor before correcting the problem.
• If the problem is plugging, clear as much of the grain as possible using a piece of wood, vacuum, or other tool before restarting auger. Do not reach in and use your hands. (See “Bin Unload Drive & Lockout Proce-dure” on page 24.)
2. Once obstruction is clear, disengage sweep (if applicable). Remove locking pin, shift lever towards bin wall, and lock into place.
3. Close all intermediate hopper gates and close center hopper gate.4. Restart bin unload system and follow steps to feed grain to finish unloading
your bin.
NORMAL SHUTDOWN
1. Once auger is clear, stop motor and lock out power.Note: Remember that the flighting rpm on augers equipped with electric motors is not
adjustable except with a change of pulley size.
2. Clean entire work area.
DANGER
Rotating Flighting Hazard!
To prevent death or serious injury:• Keep away from rotating auger flighting.• Do not remove or modify auger flighting
guards, doors, or covers. Keep in good working order. Have replaced if damaged.
• Do not operate the auger without all guards, doors, and covers in place.
• Never touch the auger flighting. Use a stick or other tool to remove an obstruc-tion or clean out.
• Shut off and lock out power to adjust, ser-vice, or clean.
NOTICE
Starting the auger under load may result in damage to unit. Be sure there is no blockage.
28 ENM-18887-TW R1

TWISTER - FOUR INCH CORRUGATED 3. OPERATION
STIFFENED, UNSTIFFENED, FOUNDATION FORM, & HOPPER BINS 3.5. CLEANOUT
3. Manually clean out grain from bin unload with a piece of wood, vacuum cleaner, or other tool. Do not use hands.
4. Clean bin (see Section 3.5.) after emptying to remove old material.5. If unload system fails, do not cut holes in the bin sidewall to unload. Contact
your local dealer for correct procedures.
3.4.4. SIDEDRAW OPTION
Note: A sidedraw can be used to empty some bins (when equipped). If your bin was not purchased with a sidedraw, contact your local dealer if you are considering adding one. Depending on the bin, it may or may not have been designed or intended for sidedraw use.
1. Use only one sidedraw at a time (when equipped with more than one).2. The bin can be unloaded safely with the center hopper or other method at the
same time as unloading with the sidedraw. Refer to Figure 3.6.3. Never enter bin while emptying; refer to “Operational Safety” on page 11.4. After unloading from the sidedraw(s), bin must be unloaded from center until
an inverted cone is formed so that it can be reloaded safely.
3.5. CLEANOUT
Important: Bin must be cleaned thoroughly to lessen the risk of fire, insect infestation, and mold growth.
1. Use a wire or stiff brush to clean bin sidewalls of thin layers of crusted grain.2. Remove all of the old grain and fines/dust.3. Clean bin floor using a grain vac or shop vac.
WARNING
Re-filling the bin without an inverted cone can result in bin damage or collapse.
ENM-18887-TW R1 29

3. OPERATION TWISTER - FOUR INCH CORRUGATED
3.5. CLEANOUT STIFFENED, UNSTIFFENED, FOUNDATION FORM, & HOPPER BINS
Figure 3.6
STEP 1: EMPTY USING ONE SIDEDRAW, FOLLOWED BY SECOND SIDEDRAW (IF EQUIPPED).
STEP 2: CORE GRAIN TO AN INVERTED CONE USING CENTER HOPPER.
NOTE: DO NOT REFILL BIN WITHOUT CORING THE GRAIN AS SHOWN IN STEP 2 OR DAMAGE TO THE BIN MAY RESULT.
STEP 3: REFILL BIN AS DESIRED.
30 ENM-18887-TW R1

TWISTER - FOUR INCH CORRUGATED 4. MAINTENANCE
STIFFENED, UNSTIFFENED, FOUNDATION FORM, & HOPPER BINS 4.1. GENERAL MAINTENANCE PROCEDURES
4. Maintenance
4.1. GENERAL MAINTENANCE PROCEDURES
Note: Use only genuine Twister replacement parts or equivalent. Replacement parts such as intake guards and pulley guards must meet ASABE standards or serious injury may result. Use of unauthorized parts will void warranty. If in doubt, contact Twister or your Twister dealer. Do not modify any bin unload system compo-nents.
4.1.1. GRAIN BIN
Your grain bin requires only minimal maintenance. The following maintenance is recommended to help keep your bin in peak condition over its service life.
Warning: Before continuing, ensure you have read and understand the relevant information in the safety section. Safety information is provided to help prevent serious injury, death, or property damage.
Area Maintenance Frequency
Stiffeners and Sidewall
Check for gaps between stiffeners, buckling of stiffeners or sidewall, stiffener contact on supports/floor, concrete level, and missing, loose, or broken bolts/nuts. Repair as neces-sary.Do not replace or substitute bolts, nuts, or other hardware that is of lesser quality than the hardware supplied. Consult your dealer for proper replacements.
Annually or more often with frequent load-ing and unload-ing.
Inside grain bin If grain becomes “caked,” the bin should be cleaned. After unloading.
Inside and outside of grain bin
Check for signs of moisture leaks and reseal area. Annually
Check for Rust: It is normal for galvanized steel to fade or darken over time. However, any rust spots should be treated immediately to prevent spreading and further damage. • White rust should be removed by applying a cleaning
product such as white vinegar and washed away with water.
• Remove red rust with a wire brush, then clean the surface and paint with a rust-inhibiting or zinc rich paint.
• If rust develops on the bin ladder or a load bearing part of the bin, the part should be replaced.
Annually
If cracks start appearing in the bin floor, or foundation, contact your dealer for ways of repairing this before it becomes an issue.
Periodically, but not more than annually
Inspect all major ladder components for rust, corrosion and deterioration. Consult your dealer for proper replacement of damaged components.
Annually
ENM-18887-TW R1 31

4. MAINTENANCE TWISTER - FOUR INCH CORRUGATED
4.1. GENERAL MAINTENANCE PROCEDURES STIFFENED, UNSTIFFENED, FOUNDATION FORM, & HOPPER BINS
4.1.2. BIN UNLOAD
Proper maintenance habits on the bin unload mean a longer life, better efficiency, and safer operation. Please follow the guidelines below. See also Figure 4.1.
Area Maintenance Frequency
General While auger is in use, observe the checklist in Section 3.1. Daily
GeneralCheck all operating, lifting, and transport components. Replace damaged or worn parts before using auger.
For replacement instructions, see Assembly Section.
Prior to fill-ing bin.
Transition Box (Optional on Tube Unloads)*Remember to support incline discharge before removing or replacing any parts inside the transition box.
Open access door. Check that u-joint is working properly (has free range of motion).
Prior to fill-ing bin.
Inspect flighting and bushing mount. Ensure set screws are tight.
Prior to fill-ing bin.
Lubricate u-joint and bushing mount.Every 8 hours of operation
Rack and Pinion System
Ensure opening and closing of gate system.Prior to fill-ing bin.
Inspect bushing, chain, and sprocket. Lubricate.Every 8 hours of operation
E-Sump, Center and Intermediate Hoppers
Ensure safety mesh is installed.Prior to fill-ing bin.
Ensure slide gates open and close properly without interfer-ence (replace gate rollers if necessary).
Prior to fill-ing bin.
Binsweep Option
Gear-boxes
Check lower gearbox shift handle for proper engagement / disengagement.
Prior to fill-ing bin.
Maintain oil level at half full (center of cross shaft). Gearbox should be level when checking or refilling. Use EP90 Lube Oil when filling gearboxes.
Prior to fill-ing bin.
Universal Joint
Lubricate grease fitting in the u-joint. Check set screws and retighten if necessary.
Every 8 hours of operation
Drive Belt Replace-ment
Belt Tension
• Move motor base to its loosest position. • Remove old belt and replace with new one.• Check pulley alignment and adjust if required by laying a
straight edge across the pulley faces. Use pulley hub to move pulley to required position for alignment. Tighten the hub set screws to secure pulley to shaft.
• Move the motor base to set drive belt tension and check by pushing on center of belt span with a force of approx-imately 5 lb. The belts will deflect 1/4”–1/2” when prop-erly tensioned.
When belt is worn out.
32 ENM-18887-TW R1

TWISTER - FOUR INCH CORRUGATED 4. MAINTENANCE
STIFFENED, UNSTIFFENED, FOUNDATION FORM, & HOPPER BINS 4.1. GENERAL MAINTENANCE PROCEDURES
Figure 4.1 Maintenance of a typical Bin Unload System
UN
IVE
RS
AL
JOIN
T -
GR
EA
SE
E
VE
RY
8 H
OU
RS
OF
OP
ER
AT
ION
.
RO
LLE
R B
EA
RIN
G -
GR
EA
SE
E
VE
RY
8 H
OU
RS
OF
OP
ER
AT
ION
.
DR
IVE
BE
LTS
- C
HE
CK
P
ER
IOD
ICA
LLY
. A
DJU
ST
T
EN
SIO
N W
HE
N N
EE
DE
D.
OP
TIO
NA
L:
UN
IVE
RS
AL
JOIN
T A
ND
BU
SH
ING
M
OU
NT
- G
RE
AS
E E
VE
RY
8
HO
UR
S O
F O
PE
RA
TIO
N.
GE
AR
BO
XE
S -
MA
INT
AIN
OIL
LE
VE
L A
T
HA
LF F
ULL
(C
EN
TE
R O
F C
RO
SS
SH
AF
T).
ENM-18887-TW R1 33

4. MAINTENANCE TWISTER - FOUR INCH CORRUGATED
4.1. GENERAL MAINTENANCE PROCEDURES STIFFENED, UNSTIFFENED, FOUNDATION FORM, & HOPPER BINS
34 ENM-18887-TW R1

TWISTER - FOUR INCH CORRUGATED 5. TROUBLESHOOTING
STIFFENED, UNSTIFFENED, FOUNDATION FORM, & HOPPER BINS 5.1. GRAIN BIN
5. TroubleshootingIf you encounter a problem that is difficult to solve, even after having read through this troubleshooting section, please contact your local Twister dealer or distributor. Before you contact them, please have this operation manual and the serial number from your machine.
5.1. GRAIN BIN
Problem Cause Solution
Safety Concerns
Entrapment or partial entrapment in flowing grain
Emergency entry proce-dures not adhered to.
Shut down unloading system immediately, call local emergency services for help, and refer to Safety Section.
Storage Problems
Spoiled Grain, odor from grain
Improper or no operation of aeration or drying fan or supplemental heater.
Bin not cleaned prior to filling.
Remove grain from bin and separate spoiled grain, reload into bin and condition grain, refer to Operation and Appendix Sections.
Dry grain (if equipped with natural air drying system). See Operation and Appendix Sections.
Poor airflow through grain mass
Too much dust or fine material in stored grain.
Moldy or caked grain mass above floor or in bin.
Aeration or drying fan under-powered.
Run aeration or drying fan for longer or remove center portion of grain from bin (fine material and dust tend to accumulate at the bin center) and use a grain cleaner to remove dust and fine material. Repeat if necessary.
Remove moldy or caked grain, only reload grain in good condition.
Refer to Appendix Section, Grain Drying and Aeration Tips and consult dealer.
Crusting or sticking grain at top of grain mass
Grain not continuously aerated or dried to uniform temperature or moisture content.
Aerate or dry grain, refer to Operation and Appendix Sections.
ENM-18887-TW R1 35

5. TROUBLESHOOTING TWISTER - FOUR INCH CORRUGATED
5.1. GRAIN BIN STIFFENED, UNSTIFFENED, FOUNDATION FORM, & HOPPER BINS
Uneven temperature throughout grain mass
Moisture content possibly too high.
Aerate grain, refer to Operation and Appendix Sections.
Grain not drying or aeration fan not getting grain to a uniform temperature
Bin filled past eave height or putting outward pressure on roof sheets.
Aeration or drying fan/heater undersized or outdoor temperature and humidity not adequate.
Remove grain until optimal grain height is reached. Refer to Operation Section.
Refer to Appendix Section, and consult dealer.
Grain over-dried at bottom of bin or throughout bin
Supplemental heater operated for too long (where equipped).
See Operation and Appendix Sections.
Unknown grain conditions at bin center
Unable to check grain condition, no temperature cables and too far to sample.
Remove some grain from center of bin and check quality.
Unloading Problems
Grain not flowing well when unloading
Clumped grain blocking center hopper.
Open emergency hopper if equipped or break up grain mass. Do not open interme-diate hoppers. See Operation Section.
Steep wall of grain along bin sidewall
Improper storage or poor conditioning.
DO NOT enter bin. Break up grain mass from above with a pole or other tool, see Safety Section. See Operation Section for prevention.
Grain is not forming a funnel shape when unloading when viewed from inspection hatch or filler cap
Storage of high moisture grain has formed crusted grain which has bridged across the bin creating an empty air space below.
DO NOT enter bin. Break up crusted grain from above with a pole or other tool, see Safety Section.
Roof Problems
Roof vents icing Air temperature too cold to aerate or dry grain.
Discontinue use of fan.
Roof sheets bowed outward Bin is overfull, grain pushing outward.
Inadequate number of roof vents.
Remove grain to achieve correct height, refer to Operation Section.
Consult dealer.
Condensation on underside of roof
Grain temperature much warmer than outdoor temper-ature.
Aerate or dry until temper-ature of exhaust air is equal to outdoor air temperature or increase number of roof vents.
Problem Cause Solution
36 ENM-18887-TW R1
TWISTER - FOUR INCH CORRUGATED 5. TROUBLESHOOTING
STIFFENED, UNSTIFFENED, FOUNDATION FORM, & HOPPER BINS 5.1. GRAIN BIN
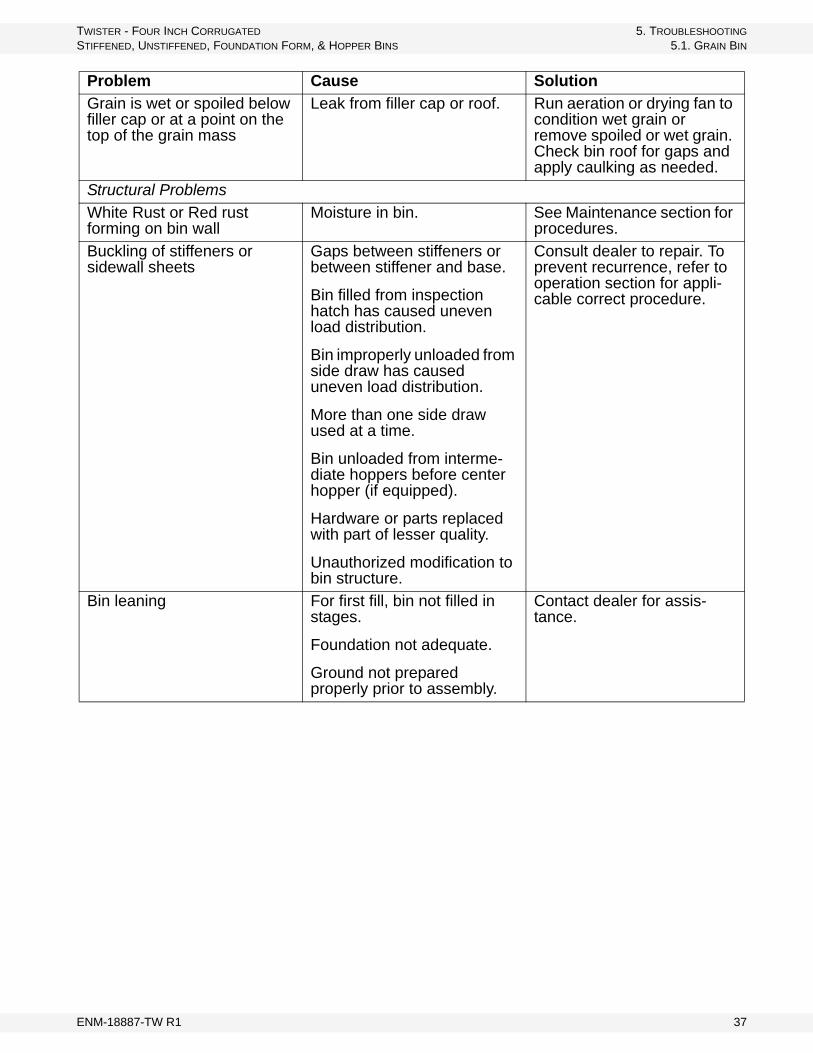
Grain is wet or spoiled below filler cap or at a point on the top of the grain mass
Leak from filler cap or roof. Run aeration or drying fan to condition wet grain or remove spoiled or wet grain. Check bin roof for gaps and apply caulking as needed.
Structural Problems
White Rust or Red rust forming on bin wall
Moisture in bin. See Maintenance section for procedures.
Buckling of stiffeners or sidewall sheets
Gaps between stiffeners or between stiffener and base.
Bin filled from inspection hatch has caused uneven load distribution.
Bin improperly unloaded from side draw has caused uneven load distribution.
More than one side draw used at a time.
Bin unloaded from interme-diate hoppers before center hopper (if equipped).
Hardware or parts replaced with part of lesser quality.
Unauthorized modification to bin structure.
Consult dealer to repair. To prevent recurrence, refer to operation section for appli-cable correct procedure.
Bin leaning For first fill, bin not filled in stages.
Foundation not adequate.
Ground not prepared properly prior to assembly.
Contact dealer for assis-tance.
Problem Cause Solution
ENM-18887-TW R1 37

5. TROUBLESHOOTING TWISTER - FOUR INCH CORRUGATED
5.2. BIN UNLOAD STIFFENED, UNSTIFFENED, FOUNDATION FORM, & HOPPER BINS
5.2. BIN UNLOAD
WARNING
Fully disengage and lock out sweep before attempting any modifications or repairs.
Problem Cause Solution
Gearbox won’t engage Gearbox shift adjust bolt is not adjusted correctly.
Adjust bolt.Flighting needs to be turned so that the gears can mesh appro-priately.
Gearbox won’t stay engaged
Lock pin not in place.
Gearbox shift adjust bolt is not adjusted correctly.
Obstruction in sweep.
Secure lock pin into place.
Adjust bolt.
Remove obstruction.
Hopper slide gates are difficult to open
Hopper rollers are damaged.
Obstruction in hopper.
Slide gate interference with aeration floor planking.
Control rods are binding (hoppers not level to each other).
Repair rollers.
Remove obstruction.
Level intermediate hoppers to each other.
Level intermediate hoppers to each other.
Sweep will not function Underfloor auger not engaging lower gearbox stub.
Shift gearbox is not engaged.
Obstruction in sweep.
Ensure underfloor auger flighting is fully meshing with quick attach couple on lower gearbox.
Engage it.
Remove obstruction.
Underfloor auger plugs when initially starting the sweep
Intermediate hoppers aren’t closed.
Obstruction in underfloor auger.
Close intermediate hoppers.
Remove obstruction.
Sweep drive wheel doesn’t function when sweep is activated
Key or pin sheared or missing in drive wheel housing.
Chain isn’t adjusted correctly inside drive wheel housing.
Replace damaged part.
Adjust chain correctly.
38 ENM-18887-TW R1

TWISTER - FOUR INCH CORRUGATED 5. TROUBLESHOOTING
STIFFENED, UNSTIFFENED, FOUNDATION FORM, & HOPPER BINS 5.2. BIN UNLOAD
Sweep stops travelling around the bin
Sweep isn’t adjusted correctly and is hitting a high spot in the aeration floor.
Sweep drive wheel isn’t fully functioning correctly (chain slipping, key missing etc...)
Obstruction in sweep.
Adjust sweep in 2 places: Drive wheel and upper gearbox plate.
Check to ensure chain is functional and that all keys / roll pins are in place
Remove obstruction.
Sweep drive wheel contacts bin wall
Center hopper not centered during installation.
Shorten sweep section to allow it to travel all the way around bin.
Poor product flow from sweep
Sweep flighting is not timed correctly.
Obstruction in sweep.
Damaged or bent flighting.
Remove bolts, rotate flighting to next set of holes and replace bolts.
Remove obstruction.
Bend flighting back to original shape. If this doesn’t work, replace flighting.
Underfloor auger is not able to move the grain that the sweep is dumping into the center hopper
Obstruction in center hopper.
Intermediate hoppers are open, flooding the underfloor auger.
Flighting not timed correctly on the underfloor auger.
Remove obstruction.
Close intermediate hoppers.
Pull out underfloor flighting, ensure that it is timed correctly. (Flighting must make a continuous spiral).
Grain is flowing over backboard of sweep
This is normal, and grain will be swept up on the second pass of the sweep
No solution needed. Part of normal operation.
Underfloor system stops when moving product
Electric motor belts not tight enough.
Electric motor is not large enough to power entire system.
Obstruction in underfloor auger.
Tighten belts.
Replace electric motor with a larger model.
Remove obstruction.
Sweep will not turn or is noisy
Check flights to ensure they’re not catching.
Cut the flights back so that there is a 1/4” clearance from hanger.
Sweep is knocking Gearbox adjustment incorrect. Check to ensure adjustment is correct and is fully engaged.
Belt is moving, motor is running, but sweep and underfloor auger not moving
Set screws and key ways on pulleys not installed or too loose.
Disengage system and check set screws and key ways to ensure they’re installed and tight.
Problem Cause Solution
ENM-18887-TW R1 39

5. TROUBLESHOOTING TWISTER - FOUR INCH CORRUGATED
5.2. BIN UNLOAD STIFFENED, UNSTIFFENED, FOUNDATION FORM, & HOPPER BINS
Sweep engaged, under-floor auger and motor running, but sweep flight and/or upper gearbox not turning
Under floor gearbox shift linkage is out of adjustment.
Sheared bolt and key way in gearbox coupler.
Roll pin and key way in center well sheared on the lower gearbox drive stub shaft.
Sheared roll pin in gearbox shaft where it is attached to u-joint at the beginning of the sweep flight (key way may be missing).
Adjust shift linkages to fully engage sweep (see Sweep Owner’s Manual).
Replace key way and bolts and check coupler for cracks.
Replace key way and roll pin.
Replace key way and roll pin and install set screw tighten.
Sweep is making a loud, distinct “squeak” noise
Center flighting tube rubbing on nylon carrier bushing.
Loosen all 4 bolts on center gearbox and tap hanger bracket with a hammer to adjust and provide adequate clearance between bushing and center tube.
Sweep engaged and running, but not advancing
Sweep catching on Tek screws (backboard or gearbox).
Backboard catching on the floor.
Rubber on wheel worn down.
Grain condition wet, hard-packed, moldy.
End wheel gearbox contacting bin wall and/or bolts in bin wall.
Ensure Tek screws are fully screwed down.
Ensure backboard clearance is 1/4” -1/2”. Tighten set screws.
Replace with new rubber drive wheels.
Sweep will perform poorly if grain is out of condition.
Cut obstructive bolt ends off.Use sweep adjustments.
Problem Cause Solution
40 ENM-18887-TW R1

TWISTER - FOUR INCH CORRUGATED 6. APPENDIX
STIFFENED, UNSTIFFENED, FOUNDATION FORM, & HOPPER BINS 6.1. GRAIN DRYING AND AERATION TIPS
6. Appendix
6.1. GRAIN DRYING AND AERATION TIPS
• WHAT IS THE DIFFERENCE BETWEEN AERATION, NATURAL AIR DRY-ING, AND GRAIN DRYING WITH A SUPPLEMENTAL HEATER? Aeration is used to control and provide uniform temperature for a grain mass. Natural air drying is generally used for farm bins and is a method of drying grain without using supplemental heat and is recommended at 1cfm per bushel of grain. Grain drying refers to adding supplemental heat to lower the moisture content of a grain mass at a flow rate of greater than 1cfm per bushel of grain. All three methods will help extend storage life for grain and prevent spoilage.
• HOW MUCH POWER DO I NEED TO DRY GRAIN? When natural air drying or when grain drying with a supplemental heater you need roughly 1HP for every 1000BU of grain. When aerating, you need roughly 1HP for every 10,000BU of grain. These are approximations only as the height of grain influ-ences the required power as well. Consult your local dealer to accurately size a fan.
• WHEN CAN I BEGIN TO HARVEST? With a complete natural air drying sys-tem in place, crops can be taken off above normal moisture content (exam-ple: wheat 18%–20%). Under warm, low, relative humidity conditions you should see 3/4–1% of drying taking place per day. This allows a 7–10 day advance on harvest time as well as more harvesting hours per day.
Note: Natural air drying should be used as a management tool and not as a late harvest emergency drying system. If late harvest conditions are cool and damp (conditions less than 10°C (50°F))natural air drying will be slow and adding supplemental heat is much more effective.
• AT WHAT TEMPERATURE DOES NATURAL AIR DRYING BEGIN? Grain drying begins at 10°C (50°F). Anything less than 10°C means the air is too cold and can only hold a small amount of moisture; therefore, moisture removal from grain will be very slow.
• WHEN SHOULD I START MY FAN FOR NATURAL AIR DRYING? In order to create a uniform drying front, the bin must be filled to the height of at least half of the bin's diameter above the system. (Example: A 14' diameter bin needs to have a minimum of 7' of grain above the system). The best uniform drying front can be produced by filling your bin and then turning on the fan. Turning your fan on too soon can cause uneven drying and negative results.
• WHEN SHOULD I START MY FAN FOR AERATION? The aeration fan should be started as soon as the aeration ducts are covered with grain when filling. Once started, to prevent crusted grain, air flow through the grain bin must be maintained until the bin reaches the desired temperature.
ENM-18887-TW R1 41
6. APPENDIX TWISTER - FOUR INCH CORRUGATED
6.1. GRAIN DRYING AND AERATION TIPS STIFFENED, UNSTIFFENED, FOUNDATION FORM, & HOPPER BINS
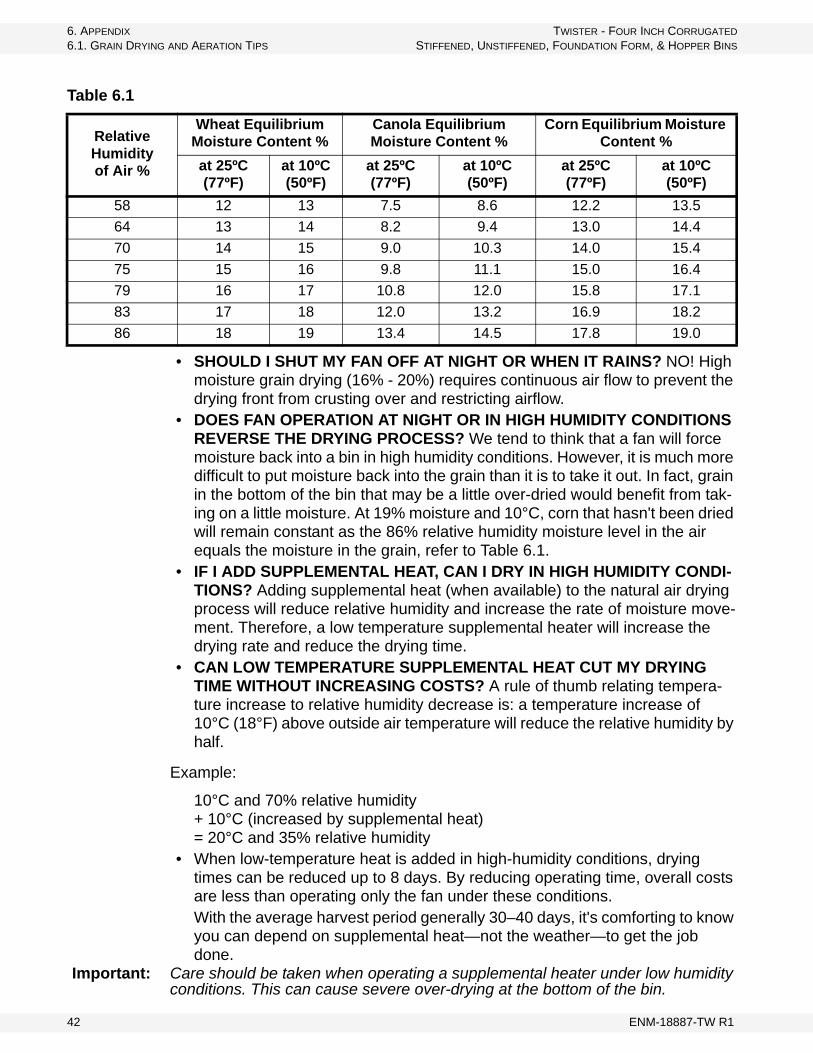
• SHOULD I SHUT MY FAN OFF AT NIGHT OR WHEN IT RAINS? NO! High moisture grain drying (16% - 20%) requires continuous air flow to prevent the drying front from crusting over and restricting airflow.
• DOES FAN OPERATION AT NIGHT OR IN HIGH HUMIDITY CONDITIONS REVERSE THE DRYING PROCESS? We tend to think that a fan will force moisture back into a bin in high humidity conditions. However, it is much more difficult to put moisture back into the grain than it is to take it out. In fact, grain in the bottom of the bin that may be a little over-dried would benefit from tak-ing on a little moisture. At 19% moisture and 10°C, corn that hasn't been dried will remain constant as the 86% relative humidity moisture level in the air equals the moisture in the grain, refer to Table 6.1.
• IF I ADD SUPPLEMENTAL HEAT, CAN I DRY IN HIGH HUMIDITY CONDI-TIONS? Adding supplemental heat (when available) to the natural air drying process will reduce relative humidity and increase the rate of moisture move-ment. Therefore, a low temperature supplemental heater will increase the drying rate and reduce the drying time.
• CAN LOW TEMPERATURE SUPPLEMENTAL HEAT CUT MY DRYING TIME WITHOUT INCREASING COSTS? A rule of thumb relating tempera-ture increase to relative humidity decrease is: a temperature increase of 10°C (18°F) above outside air temperature will reduce the relative humidity by half.
Example:
10°C and 70% relative humidity + 10°C (increased by supplemental heat) = 20°C and 35% relative humidity
• When low-temperature heat is added in high-humidity conditions, drying times can be reduced up to 8 days. By reducing operating time, overall costs are less than operating only the fan under these conditions.With the average harvest period generally 30–40 days, it's comforting to know you can depend on supplemental heat—not the weather—to get the job done.
Important: Care should be taken when operating a supplemental heater under low humidity conditions. This can cause severe over-drying at the bottom of the bin.
Table 6.1
Relative Humidityof Air %
Wheat Equilibrium Moisture Content %
Canola Equilibrium Moisture Content %
Corn Equilibrium Moisture Content %
at 25ºC (77ºF)
at 10ºC (50ºF)
at 25ºC (77ºF)
at 10ºC (50ºF)
at 25ºC (77ºF)
at 10ºC (50ºF)
58 12 13 7.5 8.6 12.2 13.5
64 13 14 8.2 9.4 13.0 14.4
70 14 15 9.0 10.3 14.0 15.4
75 15 16 9.8 11.1 15.0 16.4
79 16 17 10.8 12.0 15.8 17.1
83 17 18 12.0 13.2 16.9 18.2
86 18 19 13.4 14.5 17.8 19.0
42 ENM-18887-TW R1

TWISTER - FOUR INCH CORRUGATED 6. APPENDIX
STIFFENED, UNSTIFFENED, FOUNDATION FORM, & HOPPER BINS 6.1. GRAIN DRYING AND AERATION TIPS
• HOW DO I KNOW WHEN MY GRAIN IS DRY? Approximate drying chart based on a complete Aeration System:
Note: If you add 1 or 2 loads of grain at 18% moisture into the bin, assume the bin to be at 18% average moisture—don't reduce the average if some loads are at a lower percentage.
Note: Do not count the first day in the drying process; it takes 14–16 hours for the bin to equalize its temperature.
• WHEN NATURAL AIR DRYING OR WHEN USING SUPPLEMENTAL HEAT, WHEN SHOULD I SHUT MY FAN OFF? When bin samples show the grain is dry, turn off the fan.
WHEN NATURAL AIR DRYING, WHAT CAN I DO WHEN THE AIR TEMPER-ATURE DOES NOT REACH 10°C?There are a couple of options available at this point:
a. You can dry the grain in a grain dryer and then cool it down with the bin fan to maximize the grain dryer daily output.
b. You can wait until the outside air temperature falls to -5 to -10°C and then run the fan for 24–48 hours to cool the entire grain mass to a storage state (see charts that follow). Once spring conditions return, you can resume the natural air drying process.
Approximate Condition Approximate Drying %
Ideal warm days / dry conditions 1% per day
Warm days & cool nights 1/2% per day
Cool days & cool damp nights 1/4% per day
Cold days & cold nights 0% per day
Warm days & cool nights (supplemental heat added)
3/4% per day
ENM-18887-TW R1 43

6. APPENDIX TWISTER - FOUR INCH CORRUGATED
6.1. GRAIN DRYING AND AERATION TIPS STIFFENED, UNSTIFFENED, FOUNDATION FORM, & HOPPER BINS
Figure 6.1 Grain Drying Charts
44 ENM-18887-TW R1
TWISTER - FOUR INCH CORRUGATED 7. SPECIFICATIONS
STIFFENED, UNSTIFFENED, FOUNDATION FORM, & HOPPER BINS
7. Specifications
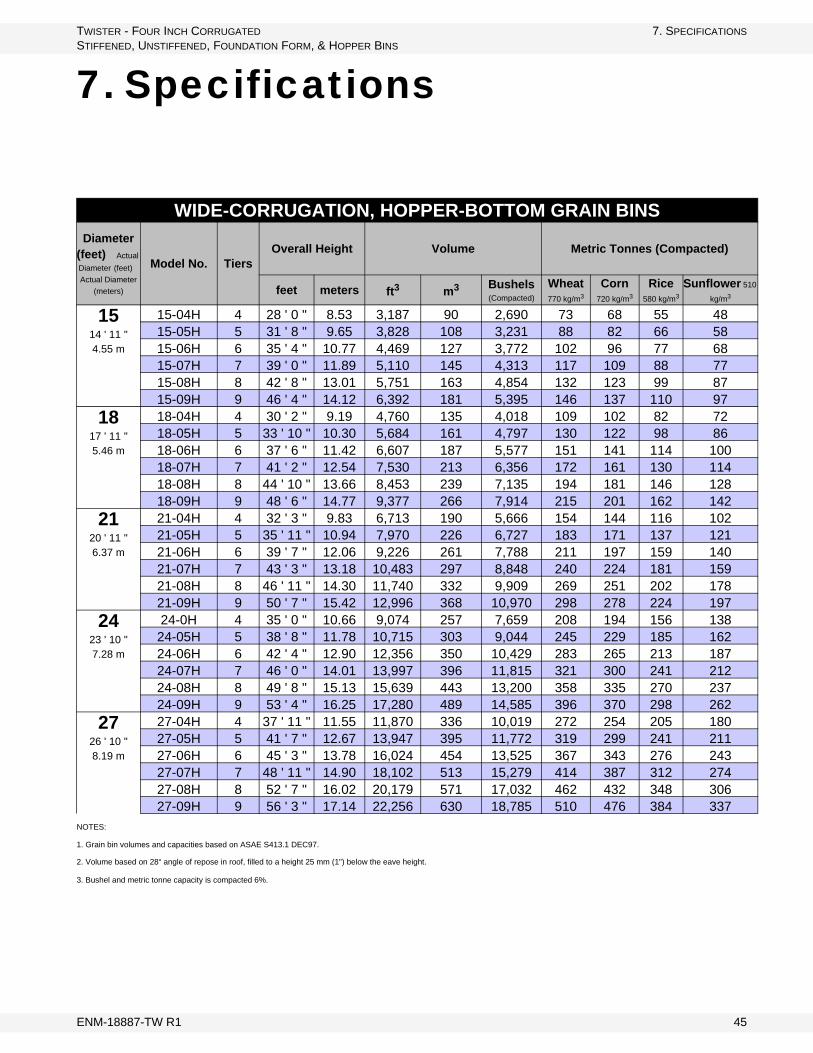
WIDE-CORRUGATION, HOPPER-BOTTOM GRAIN BINSDiameter
(feet) Actual
Diameter (feet)
Actual Diameter
(meters)
Model No. TiersOverall Height Volume Metric Tonnes (Compacted)
feet meters ft3 m3 Bushels (Compacted)
Wheat 770 kg/m3
Corn 720 kg/m3
Rice 580 kg/m3
Sunflower 510
kg/m3
1514 ' 11 "4.55 m
15-04H 4 28 ' 0 " 8.53 3,187 90 2,690 73 68 55 4815-05H 5 31 ' 8 " 9.65 3,828 108 3,231 88 82 66 5815-06H 6 35 ' 4 " 10.77 4,469 127 3,772 102 96 77 6815-07H 7 39 ' 0 " 11.89 5,110 145 4,313 117 109 88 7715-08H 8 42 ' 8 " 13.01 5,751 163 4,854 132 123 99 8715-09H 9 46 ' 4 " 14.12 6,392 181 5,395 146 137 110 97
1817 ' 11 "5.46 m
18-04H 4 30 ' 2 " 9.19 4,760 135 4,018 109 102 82 7218-05H 5 33 ' 10 " 10.30 5,684 161 4,797 130 122 98 8618-06H 6 37 ' 6 " 11.42 6,607 187 5,577 151 141 114 10018-07H 7 41 ' 2 " 12.54 7,530 213 6,356 172 161 130 11418-08H 8 44 ' 10 " 13.66 8,453 239 7,135 194 181 146 12818-09H 9 48 ' 6 " 14.77 9,377 266 7,914 215 201 162 142
2120 ' 11 "6.37 m
21-04H 4 32 ' 3 " 9.83 6,713 190 5,666 154 144 116 10221-05H 5 35 ' 11 " 10.94 7,970 226 6,727 183 171 137 12121-06H 6 39 ' 7 " 12.06 9,226 261 7,788 211 197 159 14021-07H 7 43 ' 3 " 13.18 10,483 297 8,848 240 224 181 15921-08H 8 46 ' 11 " 14.30 11,740 332 9,909 269 251 202 17821-09H 9 50 ' 7 " 15.42 12,996 368 10,970 298 278 224 197
2423 ' 10 "7.28 m
24-0H 4 35 ' 0 " 10.66 9,074 257 7,659 208 194 156 13824-05H 5 38 ' 8 " 11.78 10,715 303 9,044 245 229 185 16224-06H 6 42 ' 4 " 12.90 12,356 350 10,429 283 265 213 18724-07H 7 46 ' 0 " 14.01 13,997 396 11,815 321 300 241 21224-08H 8 49 ' 8 " 15.13 15,639 443 13,200 358 335 270 23724-09H 9 53 ' 4 " 16.25 17,280 489 14,585 396 370 298 262
2726 ' 10 "8.19 m
27-04H 4 37 ' 11 " 11.55 11,870 336 10,019 272 254 205 18027-05H 5 41 ' 7 " 12.67 13,947 395 11,772 319 299 241 21127-06H 6 45 ' 3 " 13.78 16,024 454 13,525 367 343 276 24327-07H 7 48 ' 11 " 14.90 18,102 513 15,279 414 387 312 27427-08H 8 52 ' 7 " 16.02 20,179 571 17,032 462 432 348 30627-09H 9 56 ' 3 " 17.14 22,256 630 18,785 510 476 384 337
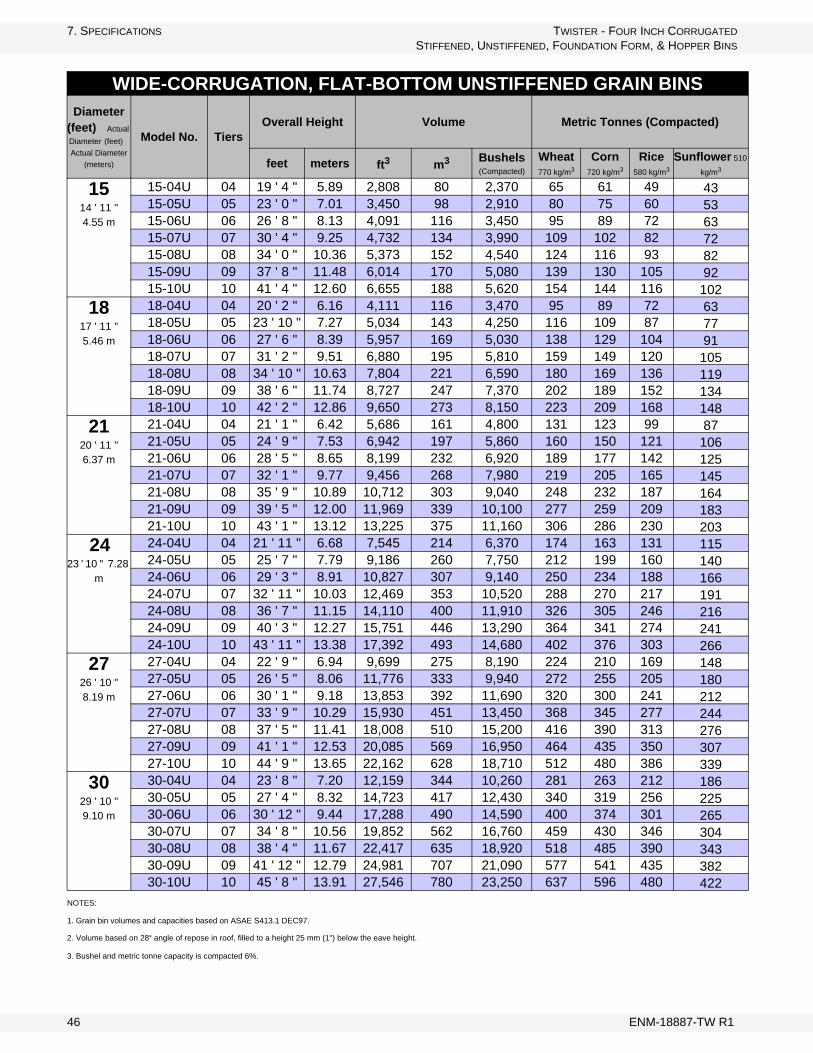
NOTES:
1. Grain bin volumes and capacities based on ASAE S413.1 DEC97.
2. Volume based on 28° angle of repose in roof, filled to a height 25 mm (1") below the eave height.
3. Bushel and metric tonne capacity is compacted 6%.
ENM-18887-TW R1 45
7. SPECIFICATIONS TWISTER - FOUR INCH CORRUGATED
STIFFENED, UNSTIFFENED, FOUNDATION FORM, & HOPPER BINS
WIDE-CORRUGATION, FLAT-BOTTOM UNSTIFFENED GRAIN BINSDiameter
(feet) Actual
Diameter (feet)
Actual Diameter
(meters)
Model No. TiersOverall Height Volume Metric Tonnes (Compacted)
feet meters ft3 m3 Bushels (Compacted)
Wheat 770 kg/m3
Corn 720 kg/m3
Rice 580 kg/m3
Sunflower 510
kg/m3
1514 ' 11 "4.55 m
15-04U 04 19 ' 4 " 5.89 2,808 80 2,370 65 61 49 4315-05U 05 23 ' 0 " 7.01 3,450 98 2,910 80 75 60 5315-06U 06 26 ' 8 " 8.13 4,091 116 3,450 95 89 72 6315-07U 07 30 ' 4 " 9.25 4,732 134 3,990 109 102 82 7215-08U 08 34 ' 0 " 10.36 5,373 152 4,540 124 116 93 8215-09U 09 37 ' 8 " 11.48 6,014 170 5,080 139 130 105 9215-10U 10 41 ' 4 " 12.60 6,655 188 5,620 154 144 116 102
1817 ' 11 "5.46 m
18-04U 04 20 ' 2 " 6.16 4,111 116 3,470 95 89 72 6318-05U 05 23 ' 10 " 7.27 5,034 143 4,250 116 109 87 7718-06U 06 27 ' 6 " 8.39 5,957 169 5,030 138 129 104 9118-07U 07 31 ' 2 " 9.51 6,880 195 5,810 159 149 120 10518-08U 08 34 ' 10 " 10.63 7,804 221 6,590 180 169 136 11918-09U 09 38 ' 6 " 11.74 8,727 247 7,370 202 189 152 13418-10U 10 42 ' 2 " 12.86 9,650 273 8,150 223 209 168 148
2120 ' 11 "6.37 m
21-04U 04 21 ' 1 " 6.42 5,686 161 4,800 131 123 99 8721-05U 05 24 ' 9 " 7.53 6,942 197 5,860 160 150 121 10621-06U 06 28 ' 5 " 8.65 8,199 232 6,920 189 177 142 12521-07U 07 32 ' 1 " 9.77 9,456 268 7,980 219 205 165 14521-08U 08 35 ' 9 " 10.89 10,712 303 9,040 248 232 187 16421-09U 09 39 ' 5 " 12.00 11,969 339 10,100 277 259 209 18321-10U 10 43 ' 1 " 13.12 13,225 375 11,160 306 286 230 203
24 23 ' 10 " 7.28
m
24-04U 04 21 ' 11 " 6.68 7,545 214 6,370 174 163 131 11524-05U 05 25 ' 7 " 7.79 9,186 260 7,750 212 199 160 14024-06U 06 29 ' 3 " 8.91 10,827 307 9,140 250 234 188 16624-07U 07 32 ' 11 " 10.03 12,469 353 10,520 288 270 217 19124-08U 08 36 ' 7 " 11.15 14,110 400 11,910 326 305 246 21624-09U 09 40 ' 3 " 12.27 15,751 446 13,290 364 341 274 24124-10U 10 43 ' 11 " 13.38 17,392 493 14,680 402 376 303 266
2726 ' 10 "8.19 m
27-04U 04 22 ' 9 " 6.94 9,699 275 8,190 224 210 169 14827-05U 05 26 ' 5 " 8.06 11,776 333 9,940 272 255 205 18027-06U 06 30 ' 1 " 9.18 13,853 392 11,690 320 300 241 21227-07U 07 33 ' 9 " 10.29 15,930 451 13,450 368 345 277 24427-08U 08 37 ' 5 " 11.41 18,008 510 15,200 416 390 313 27627-09U 09 41 ' 1 " 12.53 20,085 569 16,950 464 435 350 30727-10U 10 44 ' 9 " 13.65 22,162 628 18,710 512 480 386 339
3029 ' 10 "9.10 m
30-04U 04 23 ' 8 " 7.20 12,159 344 10,260 281 263 212 18630-05U 05 27 ' 4 " 8.32 14,723 417 12,430 340 319 256 22530-06U 06 30 ' 12 " 9.44 17,288 490 14,590 400 374 301 26530-07U 07 34 ' 8 " 10.56 19,852 562 16,760 459 430 346 30430-08U 08 38 ' 4 " 11.67 22,417 635 18,920 518 485 390 34330-09U 09 41 ' 12 " 12.79 24,981 707 21,090 577 541 435 38230-10U 10 45 ' 8 " 13.91 27,546 780 23,250 637 596 480 422
NOTES:
1. Grain bin volumes and capacities based on ASAE S413.1 DEC97.
2. Volume based on 28° angle of repose in roof, filled to a height 25 mm (1") below the eave height.
3. Bushel and metric tonne capacity is compacted 6%.
46 ENM-18887-TW R1
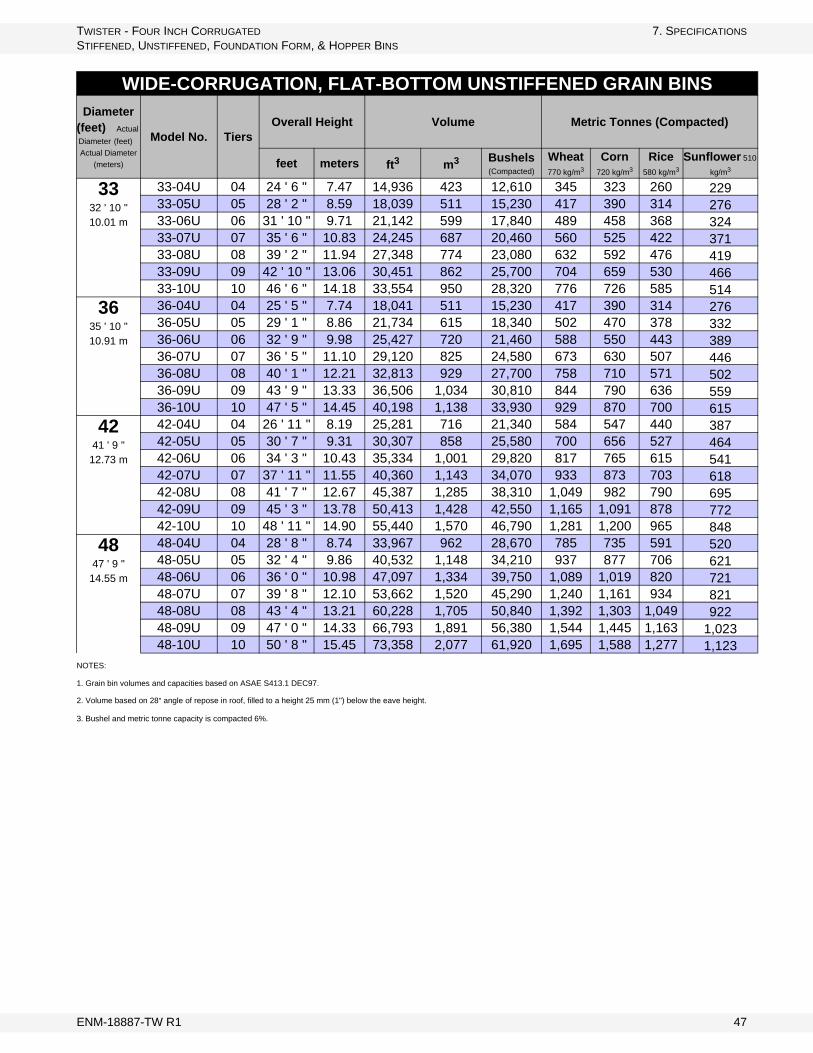
TWISTER - FOUR INCH CORRUGATED 7. SPECIFICATIONS
STIFFENED, UNSTIFFENED, FOUNDATION FORM, & HOPPER BINS
WIDE-CORRUGATION, FLAT-BOTTOM UNSTIFFENED GRAIN BINSDiameter
(feet) Actual
Diameter (feet)
Actual Diameter
(meters)
Model No. TiersOverall Height Volume Metric Tonnes (Compacted)
feet meters ft3 m3 Bushels (Compacted)
Wheat 770 kg/m3
Corn 720 kg/m3
Rice 580 kg/m3
Sunflower 510
kg/m3
3332 ' 10 "10.01 m
33-04U 04 24 ' 6 " 7.47 14,936 423 12,610 345 323 260 22933-05U 05 28 ' 2 " 8.59 18,039 511 15,230 417 390 314 27633-06U 06 31 ' 10 " 9.71 21,142 599 17,840 489 458 368 32433-07U 07 35 ' 6 " 10.83 24,245 687 20,460 560 525 422 37133-08U 08 39 ' 2 " 11.94 27,348 774 23,080 632 592 476 41933-09U 09 42 ' 10 " 13.06 30,451 862 25,700 704 659 530 46633-10U 10 46 ' 6 " 14.18 33,554 950 28,320 776 726 585 514
3635 ' 10 "10.91 m
36-04U 04 25 ' 5 " 7.74 18,041 511 15,230 417 390 314 27636-05U 05 29 ' 1 " 8.86 21,734 615 18,340 502 470 378 33236-06U 06 32 ' 9 " 9.98 25,427 720 21,460 588 550 443 38936-07U 07 36 ' 5 " 11.10 29,120 825 24,580 673 630 507 44636-08U 08 40 ' 1 " 12.21 32,813 929 27,700 758 710 571 50236-09U 09 43 ' 9 " 13.33 36,506 1,034 30,810 844 790 636 55936-10U 10 47 ' 5 " 14.45 40,198 1,138 33,930 929 870 700 615
4241 ' 9 "
12.73 m
42-04U 04 26 ' 11 " 8.19 25,281 716 21,340 584 547 440 38742-05U 05 30 ' 7 " 9.31 30,307 858 25,580 700 656 527 46442-06U 06 34 ' 3 " 10.43 35,334 1,001 29,820 817 765 615 54142-07U 07 37 ' 11 " 11.55 40,360 1,143 34,070 933 873 703 61842-08U 08 41 ' 7 " 12.67 45,387 1,285 38,310 1,049 982 790 69542-09U 09 45 ' 3 " 13.78 50,413 1,428 42,550 1,165 1,091 878 77242-10U 10 48 ' 11 " 14.90 55,440 1,570 46,790 1,281 1,200 965 848
4847 ' 9 "
14.55 m
48-04U 04 28 ' 8 " 8.74 33,967 962 28,670 785 735 591 52048-05U 05 32 ' 4 " 9.86 40,532 1,148 34,210 937 877 706 62148-06U 06 36 ' 0 " 10.98 47,097 1,334 39,750 1,089 1,019 820 72148-07U 07 39 ' 8 " 12.10 53,662 1,520 45,290 1,240 1,161 934 82148-08U 08 43 ' 4 " 13.21 60,228 1,705 50,840 1,392 1,303 1,049 92248-09U 09 47 ' 0 " 14.33 66,793 1,891 56,380 1,544 1,445 1,163 1,02348-10U 10 50 ' 8 " 15.45 73,358 2,077 61,920 1,695 1,588 1,277 1,123
NOTES:
1. Grain bin volumes and capacities based on ASAE S413.1 DEC97.
2. Volume based on 28° angle of repose in roof, filled to a height 25 mm (1") below the eave height.
3. Bushel and metric tonne capacity is compacted 6%.
ENM-18887-TW R1 47

7. SPECIFICATIONS TWISTER - FOUR INCH CORRUGATED
STIFFENED, UNSTIFFENED, FOUNDATION FORM, & HOPPER BINS
WIDE-CORRUGATION, FLAT-BOTTOM STIFFENED GRAIN BINSDiameter
(feet) Actual
Diameter (feet)
Actual Diameter
(meters)
Model No. TiersOverall Height Volume Metric Tonnes (Compacted)
feet meters ft3 m3 Bushels (Compacted)
Wheat 770 kg/m3
Corn 720 kg/m3
Rice 580 kg/m3
Sunflower 510
kg/m3
1817 ' 11 "5.46 m
` 5 23 ' 11 " 7.29 5,050 143 4,300 117 109 88 7718-06S 6 27 ' 7 " 8.41 5,973 169 5,090 138 129 104 9118-07S 7 31 ' 3 " 9.53 6,896 195 5,880 159 149 120 10518-08S 8 34 ' 11 " 10.65 7,819 221 6,660 181 169 136 12018-09S 9 38 ' 7 " 11.76 8,743 248 7,450 202 189 152 13418-10S 10 42 ' 3 " 12.88 9,666 274 8,240 223 209 168 14818-11S 11 45 ' 11 " 14.00 10,589 300 9,020 245 229 185 16218-12S 12 49 ' 7 " 15.12 11,512 326 9,810 266 249 200 17618-13S 13 53 ' 3 " 16.23 12,436 352 10,600 287 269 216 19018-14S 14 56 ' 11 " 17.35 13,359 378 11,380 309 289 233 20518-15S 15 60 ' 7 " 18.47 14,282 404 12,170 330 309 249 21918-16S 16 64 ' 3 " 19.59 15,205 431 12,960 351 329 264 232
2120 ' 11 "6.37 m
21-05S 5 24 ' 9 " 7.55 6,964 197 5,930 161 151 121 10721-06S 6 28 ' 5 " 8.67 8,220 233 7,000 190 178 143 12621-07S 7 32 ' 1 " 9.79 9,477 268 8,080 219 205 165 14521-08S 8 35 ' 9 " 10.91 10,734 304 9,150 248 232 187 16421-09S 9 39 ' 5 " 12.02 11,990 340 10,220 277 259 209 18421-10S 10 43 ' 1 " 13.14 13,247 375 11,290 306 287 231 20321-11S 11 46 ' 9 " 14.26 14,504 411 12,360 335 314 252 22221-12S 12 50 ' 5 " 15.38 15,760 446 13,430 364 341 274 24121-13S 13 54 ' 1 " 16.49 17,017 482 14,500 393 368 296 26021-14S 14 57 ' 9 " 17.61 18,273 517 15,570 422 395 318 28021-15S 15 61 ' 5 " 18.73 19,530 553 16,640 451 423 340 29921-16S 16 65 ' 1 " 19.85 20,787 589 17,710 480 450 362 31821-17S 17 68 ' 9 " 20.96 22,043 624 18,780 509 477 384 33721-18S 18 72 ' 5 " 22.08 23,300 660 19,850 539 504 406 357
2423 ' 10 "7.28 m
24-05S 5 25 ' 8 " 7.81 9,214 261 7,850 213 199 160 14124-06S 6 29 ' 4 " 8.93 10,855 307 9,250 251 235 189 16624-07S 7 32 ' 12 " 10.05 12,497 354 10,650 289 270 218 19124-08S 8 36 ' 8 " 11.17 14,138 400 12,050 327 306 246 21624-09S 9 40 ' 4 " 12.28 15,779 447 13,450 365 341 275 24224-10S 10 43 ' 12 " 13.40 17,420 493 14,840 403 377 303 26724-11S 11 47 ' 8 " 14.52 19,062 540 16,240 441 413 332 29224-12S 12 51 ' 4 " 15.64 20,703 586 17,640 478 448 360 31724-13S 13 54 ' 12 " 16.75 22,344 633 19,040 516 484 389 34224-14S 14 58 ' 8 " 17.87 23,986 679 20,440 554 519 418 36724-15S 15 62 ' 4 " 18.99 25,627 726 21,840 592 555 446 39224-16S 16 65 ' 12 " 20.11 27,268 772 23,230 630 590 475 41724-17S 17 69 ' 8 " 21.22 28,909 819 24,630 668 626 503 44324-18S 18 73 ' 4 " 22.34 30,551 865 26,030 706 661 532 46824-19S 19 76 ' 12 " 23.46 32,192 912 27,430 744 697 560 49324-20S 20 80 ' 8 " 24.58 33,833 958 28,830 782 732 589 518
NOTES:
1. Grain bin volumes and capacities based on ASAE S413.1 DEC97.
2. Volume based on 28° angle of repose in roof, filled to a height 25 mm (1") below the eave height.
3. Bushel and metric tonne capacity is compacted 6%.
48 ENM-18887-TW R1

TWISTER - FOUR INCH CORRUGATED 7. SPECIFICATIONS
STIFFENED, UNSTIFFENED, FOUNDATION FORM, & HOPPER BINS
WIDE-CORRUGATION, FLAT-BOTTOM STIFFENED GRAIN BINSDiameter
(feet) Actual
Diameter (feet)
Actual Diameter
(meters)
Model No. TiersOverall Height Volume Metric Tonnes (Compacted)
feet meters ft3 m3 Bushels (Compacted)
Wheat 770 kg/m3
Corn 720 kg/m3
Rice 580 kg/m3
Sunflower 510
kg/m3
2726 ' 10 "8.19 m
27-05S 5 26 ' 6 " 8.08 11,811 334 10,060 273 256 206 18127-06S 6 30 ' 2 " 9.19 13,889 393 11,830 321 301 242 21327-07S 7 33 ' 10 " 10.31 15,966 452 13,600 369 346 278 24427-08S 8 37 ' 6 " 11.43 18,043 511 15,370 417 390 314 27627-09S 9 41 ' 2 " 12.55 20,120 570 17,140 465 435 350 30827-10S 10 44 ' 10 " 13.67 22,198 629 18,910 513 480 386 34027-11S 11 48 ' 6 " 14.78 24,275 687 20,680 561 525 423 37227-12S 12 52 ' 2 " 15.90 26,352 746 22,450 609 570 459 40327-13S 13 55 ' 10 " 17.02 28,429 805 24,220 657 615 495 43527-14S 14 59 ' 6 " 18.14 30,507 864 25,990 705 660 531 46727-15S 15 63 ' 2 " 19.25 32,584 923 27,760 753 705 567 49927-16S 16 66 ' 10 " 20.37 34,661 981 29,530 801 750 603 53127-17S 17 70 ' 6 " 21.49 36,738 1,040 31,300 849 795 640 56227-18S 18 74 ' 2 " 22.61 38,816 1,099 33,070 897 840 676 59427-19S 19 77 ' 10 " 23.72 40,893 1,158 34,840 945 885 712 62627-20S 20 81 ' 6 " 24.84 42,970 1,217 36,610 993 930 748 65827-21S 21 85 ' 2 " 25.96 45,047 1,276 38,380 1,041 975 784 69027-22S 22 88 ' 10 " 27.08 47,125 1,334 40,150 1,089 1,020 820 721
3029 ' 10 "9.10 m
30-05S 5 27 ' 4 " 8.34 14,767 418 12,580 341 320 257 22630-06S 6 31 ' 0 " 9.46 17,331 491 14,770 401 375 302 26530-07S 7 34 ' 8 " 10.58 19,896 563 16,950 460 431 346 30530-08S 8 38 ' 4 " 11.69 22,460 636 19,140 519 486 391 34430-09S 9 42 ' 0 " 12.81 25,025 709 21,320 578 542 436 38330-10S 10 45 ' 8 " 13.93 27,589 781 23,510 638 597 480 42230-11S 11 49 ' 4 " 15.05 30,154 854 25,690 697 653 525 46230-12S 12 53 ' 0 " 16.16 32,718 926 27,880 756 708 570 50130-13S 13 56 ' 8 " 17.28 35,283 999 30,060 815 764 614 54030-14S 14 60 ' 4 " 18.40 37,847 1,072 32,250 875 819 659 57930-15S 15 64 ' 0 " 19.52 40,412 1,144 34,430 934 875 704 61930-16S 16 67 ' 8 " 20.63 42,976 1,217 36,620 993 930 748 65830-17S 17 71 ' 4 " 21.75 45,541 1,290 38,800 1,053 986 793 69730-18S 18 75 ' 0 " 22.87 48,105 1,362 40,990 1,112 1,041 837 73630-19S 19 78 ' 8 " 23.99 50,670 1,435 43,180 1,171 1,097 882 77630-20S 20 82 ' 4 " 25.10 53,234 1,507 45,360 1,230 1,152 927 81530-21S 21 86 ' 0 " 26.22 55,799 1,580 47,550 1,290 1,208 971 85430-22S 22 89 ' 8 " 27.34 58,363 1,653 49,730 1,349 1,263 1,016 89330-23S 23 93 ' 4 " 28.46 60,928 1,725 51,920 1,408 1,319 1,061 93330-24S 24 97 ' 0 " 29.58 63,493 1,798 54,100 1,467 1,374 1,105 972
NOTES:
1. Grain bin volumes and capacities based on ASAE S413.1 DEC97.
2. Volume based on 28° angle of repose in roof, filled to a height 25 mm (1") below the eave height.
3. Bushel and metric tonne capacity is compacted 6%.
ENM-18887-TW R1 49

7. SPECIFICATIONS TWISTER - FOUR INCH CORRUGATED
STIFFENED, UNSTIFFENED, FOUNDATION FORM, & HOPPER BINS
WIDE-CORRUGATION, FLAT-BOTTOM STIFFENED GRAIN BINSDiameter
(feet) Actual
Diameter (feet)
Actual Diameter
(meters)
Model No. TiersOverall Height Volume Metric Tonnes (Compacted)
feet meters ft3 m3 Bushels (Compacted)
Wheat 770 kg/m3
Corn 720 kg/m3
Rice 580 kg/m3
Sunflower 510
kg/m3
3332 ' 10 "10.01 m
33-05S 5 28 ' 3 " 8.61 18,092 512 15,420 418 392 315 27733-06S 6 31 ' 11 " 9.73 21,195 600 18,060 490 459 369 32433-07S 7 35 ' 7 " 10.85 24,298 688 20,700 562 526 423 37233-08S 8 39 ' 3 " 11.96 27,401 776 23,350 633 593 477 41933-09S 9 42 ' 11 " 13.08 30,504 864 25,990 705 660 531 46733-10S 10 46 ' 7 " 14.20 33,607 952 28,640 777 727 585 51433-11S 11 50 ' 3 " 15.32 36,710 1,040 31,280 848 794 639 56233-12S 12 53 ' 11 " 16.43 39,813 1,127 33,920 920 862 693 60933-13S 13 57 ' 7 " 17.55 42,916 1,215 36,570 992 929 747 65733-14S 14 61 ' 3 " 18.67 46,019 1,303 39,210 1,064 996 801 70433-15S 15 64 ' 11 " 19.79 49,122 1,391 41,860 1,135 1,063 855 75233-16S 16 68 ' 7 " 20.90 52,225 1,479 44,500 1,207 1,130 909 79933-17S 17 72 ' 3 " 22.02 55,328 1,567 47,140 1,279 1,197 963 84733-18S 18 75 ' 11 " 23.14 58,431 1,655 49,790 1,350 1,265 1,017 89433-19S 19 79 ' 7 " 24.26 61,534 1,742 52,430 1,422 1,332 1,071 94233-20S 20 83 ' 3 " 25.37 64,638 1,830 55,080 1,494 1,399 1,125 98933-21S 21 86 ' 11 " 26.49 67,741 1,918 57,720 1,566 1,466 1,179 1,03733-22S 22 90 ' 7 " 27.61 70,844 2,006 60,370 1,637 1,533 1,233 1,08433-23S 23 94 ' 3 " 28.73 73,947 2,094 63,010 1,709 1,600 1,287 1,13233-24S 24 97 ' 11 " 29.85 77,050 2,182 65,650 1,781 1,667 1,341 1,179
3635 ' 10 "10.91 m
36-05S 5 29 ' 2 " 8.88 21,797 617 18,570 504 472 379 33436-06S 6 32 ' 10 " 10.00 25,490 722 21,720 589 552 444 39036-07S 7 36 ' 6 " 11.12 29,183 826 24,870 674 632 508 44736-08S 8 40 ' 2 " 12.23 32,876 931 28,010 760 711 572 50336-09S 9 43 ' 10 " 13.35 36,569 1,036 31,160 845 791 637 56036-10S 10 47 ' 6 " 14.47 40,261 1,140 34,310 931 871 701 61636-11S 11 51 ' 2 " 15.59 43,954 1,245 37,450 1,016 951 765 67336-12S 12 54 ' 10 " 16.70 47,647 1,349 40,600 1,101 1,031 829 72936-13S 13 58 ' 6 " 17.82 51,340 1,454 43,750 1,187 1,111 894 78636-14S 14 62 ' 2 " 18.94 55,033 1,558 46,890 1,272 1,191 958 84236-15S 15 65 ' 10 " 20.06 58,726 1,663 50,040 1,357 1,271 1,022 89936-16S 16 69 ' 6 " 21.17 62,419 1,768 53,190 1,443 1,351 1,087 95636-17S 17 73 ' 2 " 22.29 66,112 1,872 56,330 1,528 1,431 1,151 1,01236-18S 18 76 ' 10 " 23.41 69,805 1,977 59,480 1,613 1,511 1,215 1,06936-19S 19 80 ' 6 " 24.53 73,497 2,081 62,630 1,699 1,591 1,280 1,12536-20S 20 84 ' 2 " 25.64 77,190 2,186 65,770 1,784 1,671 1,344 1,18236-21S 21 87 ' 10 " 26.76 80,883 2,290 68,920 1,869 1,750 1,408 1,23836-22S 22 91 ' 6 " 27.88 84,576 2,395 72,070 1,955 1,830 1,472 1,29536-23S 23 95 ' 2 " 29.00 88,269 2,499 75,210 2,040 1,910 1,537 1,35136-24S 24 98 ' 10 " 30.11 91,962 2,604 78,360 2,125 1,990 1,601 1,408
NOTES:
1. Grain bin volumes and capacities based on ASAE S413.1 DEC97.
2. Volume based on 28° angle of repose in roof, filled to a height 25 mm (1") below the eave height.
3. Bushel and metric tonne capacity is compacted 6%.
50 ENM-18887-TW R1

TWISTER - FOUR INCH CORRUGATED 7. SPECIFICATIONS
STIFFENED, UNSTIFFENED, FOUNDATION FORM, & HOPPER BINS
WIDE-CORRUGATION, FLAT-BOTTOM STIFFENED GRAIN BINSDiameter
(feet) Actual
Diameter (feet)
Actual Diameter
(meters)
Model No. TiersOverall Height Volume Metric Tonnes (Compacted)
feet meters ft3 m3 Bushels (Compacted)
Wheat 770 kg/m3
Corn 720 kg/m3
Rice 580 kg/m3
Sunflower 510
kg/m3
4241 ' 9 "
12.73 m
42-05S 5 30 ' 7 " 9.33 30,393 861 25,900 702 658 529 46542-06S 6 34 ' 3 " 10.45 35,420 1,003 30,180 819 767 617 54242-07S 7 37 ' 11 " 11.57 40,446 1,145 34,460 935 875 704 61942-08S 8 41 ' 7 " 12.68 45,472 1,288 38,750 1,051 984 792 69642-09S 9 45 ' 3 " 13.80 50,499 1,430 43,030 1,167 1,093 879 77342-10S 10 48 ' 11 " 14.92 55,525 1,572 47,310 1,283 1,202 967 85042-11S 11 52 ' 7 " 16.04 60,552 1,715 51,600 1,399 1,310 1,054 92742-12S 12 56 ' 3 " 17.15 65,578 1,857 55,880 1,516 1,419 1,142 1,00442-13S 13 59 ' 11 " 18.27 70,605 1,999 60,160 1,632 1,528 1,229 1,08142-14S 14 63 ' 7 " 19.39 75,631 2,142 64,440 1,748 1,637 1,317 1,15842-15S 15 67 ' 3 " 20.51 80,657 2,284 68,730 1,864 1,746 1,404 1,23542-16S 16 70 ' 11 " 21.62 85,684 2,426 73,010 1,980 1,854 1,492 1,31242-17S 17 74 ' 7 " 22.74 90,710 2,569 77,290 2,097 1,963 1,579 1,38942-18S 18 78 ' 3 " 23.86 95,737 2,711 81,580 2,213 2,072 1,667 1,46642-19S 19 81 ' 11 " 24.98 100,763 2,853 85,860 2,329 2,181 1,754 1,54242-20S 20 85 ' 7 " 26.10 105,790 2,996 90,140 2,445 2,289 1,842 1,61942-21S 21 89 ' 3 " 27.21 110,816 3,138 94,430 2,561 2,398 1,929 1,69642-22S 22 92 ' 11 " 28.33 115,843 3,280 98,710 2,677 2,507 2,017 1,77342-23S 23 96 ' 7 " 29.45 120,869 3,423 102,990 2,794 2,616 2,104 1,85042-24S 24 100 ' 3 " 30.57 125,895 3,565 107,270 2,910 2,725 2,192 1,927
4847 ' 9 "
14.55 m
48-05S 5 32 ' 5 " 9.88 40,644 1,151 34,630 939 880 708 62248-06S 6 36 ' 1 " 11.00 47,209 1,337 40,230 1,091 1,022 822 72348-07S 7 39 ' 9 " 12.12 53,774 1,523 45,820 1,243 1,164 936 82348-08S 8 43 ' 5 " 13.23 60,340 1,709 51,410 1,395 1,306 1,050 92448-09S 9 47 ' 1 " 14.35 66,905 1,895 57,010 1,546 1,448 1,165 1,02448-10S 10 50 ' 9 " 15.47 73,470 2,080 62,600 1,698 1,590 1,279 1,12548-11S 11 54 ' 5 " 16.59 80,035 2,266 68,200 1,850 1,732 1,393 1,22548-12S 12 58 ' 1 " 17.70 86,600 2,452 73,790 2,002 1,874 1,508 1,32648-13S 13 61 ' 9 " 18.82 93,165 2,638 79,390 2,153 2,016 1,622 1,42648-14S 14 65 ' 5 " 19.94 99,730 2,824 84,980 2,305 2,158 1,736 1,52748-15S 15 69 ' 1 " 21.06 106,296 3,010 90,570 2,457 2,300 1,851 1,62748-16S 16 72 ' 9 " 22.17 112,861 3,196 96,170 2,608 2,442 1,965 1,72848-17S 17 76 ' 5 " 23.29 119,426 3,382 101,760 2,760 2,585 2,079 1,82848-18S 18 80 ' 1 " 24.41 125,991 3,568 107,360 2,912 2,727 2,193 1,92948-19S 19 83 ' 9 " 25.53 132,556 3,754 112,950 3,064 2,869 2,308 2,02948-20S 20 87 ' 5 " 26.64 139,121 3,939 118,540 3,215 3,011 2,422 2,13048-21S 21 91 ' 1 " 27.76 145,686 4,125 124,140 3,367 3,153 2,536 2,23048-22S 22 94 ' 9 " 28.88 152,252 4,311 129,730 3,519 3,295 2,651 2,33148-23S 23 98 ' 5 " 30.00 158,817 4,497 135,330 3,671 3,437 2,765 2,43148-24S 24 102 ' 1 " 31.12 165,382 4,683 140,920 3,822 3,579 2,879 2,532
NOTES:
1. Grain bin volumes and capacities based on ASAE S413.1 DEC97.
2. Volume based on 28° angle of repose in roof, filled to a height 25 mm (1") below the eave height.
3. Bushel and metric tonne capacity is compacted 6%.
ENM-18887-TW R1 51

7. SPECIFICATIONS TWISTER - FOUR INCH CORRUGATED
STIFFENED, UNSTIFFENED, FOUNDATION FORM, & HOPPER BINS
WIDE-CORRUGATION, FLAT-BOTTOM STIFFENED GRAIN BINSDiameter
(feet) Actual
Diameter (feet)
Actual Diameter
(meters)
Model No. TiersOverall Height Volume Metric Tonnes (Compacted)
feet meters ft3 m3 Bushels (Compacted)
Wheat 770 kg/m3
Corn 720 kg/m3
Rice 580 kg/m3
Sunflower 510
kg/m3
6059 ' 8 "
18.19 m
60-05S 5 35 ' 11 " 10.96 66,466 1,882 56,630 1,536 1,438 1,157 1,01760-06S 6 39 ' 7 " 12.07 76,724 2,173 65,380 1,773 1,660 1,336 1,17460-07S 7 43 ' 3 " 13.19 86,982 2,463 74,120 2,010 1,882 1,514 1,33260-08S 8 46 ' 11 " 14.31 97,240 2,754 82,860 2,247 2,104 1,693 1,48960-09S 9 50 ' 7 " 15.43 107,498 3,044 91,600 2,485 2,326 1,871 1,64660-10S 10 54 ' 3 " 16.54 117,756 3,334 100,340 2,722 2,548 2,050 1,80360-11S 11 57 ' 11 " 17.66 128,014 3,625 109,080 2,959 2,770 2,229 1,96060-12S 12 61 ' 7 " 18.78 138,272 3,915 117,820 3,196 2,992 2,407 2,11760-13S 13 65 ' 3 " 19.90 148,530 4,206 126,560 3,433 3,214 2,586 2,27460-14S 14 68 ' 11 " 21.01 158,788 4,496 135,300 3,670 3,436 2,764 2,43160-15S 15 72 ' 7 " 22.13 169,046 4,787 144,040 3,907 3,658 2,943 2,58860-16S 16 76 ' 3 " 23.25 179,304 5,077 152,780 4,144 3,880 3,122 2,74560-17S 17 79 ' 11 " 24.37 189,562 5,368 161,520 4,381 4,102 3,300 2,90260-18S 18 83 ' 7 " 25.48 199,820 5,658 170,260 4,618 4,324 3,479 3,05960-19S 19 87 ' 3 " 26.60 210,078 5,949 179,010 4,855 4,546 3,657 3,21660-20S 20 90 ' 11 " 27.72 220,336 6,239 187,750 5,092 4,768 3,836 3,37360-21S 21 94 ' 7 " 28.84 230,594 6,530 196,490 5,330 4,990 4,014 3,53060-22S 22 98 ' 3 " 29.95 240,852 6,820 205,230 5,567 5,212 4,193 3,68760-23S 23 101 ' 11 " 31.07 251,110 7,111 213,970 5,804 5,434 4,372 3,84460-24S 24 105 ' 7 " 32.19 261,368 7,401 222,710 6,041 5,656 4,550 4,001
NOTES:
1. Grain bin volumes and capacities based on ASAE S413.1 DEC97.
2. Volume based on 28° angle of repose in roof, filled to a height 25 mm (1") below the eave height.
3. Bushel and metric tonne capacity is compacted 6%.
52 ENM-18887-TW R1

TWISTER - FOUR INCH CORRUGATED 7. SPECIFICATIONS
STIFFENED, UNSTIFFENED, FOUNDATION FORM, & HOPPER BINS
WIDE-CORRUGATION, FLAT-BOTTOM COMMERCIAL GRAIN BINSDiameter
(feet) Actual
Diameter (feet)
Actual Diameter
(meters)
Model No. TiersOverall Height Volume Metric Tonnes (Compacted)
feet meters ft3 m3 Bushels (Compacted)
Wheat 770 kg/m3
Corn 720 kg/m3
Rice 580 kg/m3
Sunflower 510
kg/m3
4847 ' 9 "
14.55 m
48-09C 9 45 ' 4 " 13.83 66,905 1,895 57,010 1,546 1,448 1,165 1,02448-10C 10 49 ' 0 " 14.94 73,470 2,080 62,600 1,698 1,590 1,279 1,12548-11C 11 52 ' 8 " 16.06 80,035 2,266 68,200 1,850 1,732 1,393 1,22548-12C 12 56 ' 4 " 17.18 86,600 2,452 73,790 2,002 1,874 1,508 1,32648-13C 13 60 ' 0 " 18.30 93,165 2,638 79,390 2,153 2,016 1,622 1,42648-14C 14 63 ' 8 " 19.42 99,730 2,824 84,980 2,305 2,158 1,736 1,52748-15C 15 67 ' 4 " 20.53 106,296 3,010 90,570 2,457 2,300 1,851 1,62748-16C 16 71 ' 0 " 21.65 112,861 3,196 96,170 2,608 2,442 1,965 1,72848-17C 17 74 ' 8 " 22.77 119,426 3,382 101,760 2,760 2,585 2,079 1,82848-18C 18 78 ' 4 " 23.89 125,991 3,568 107,360 2,912 2,727 2,193 1,92948-19C 19 82 ' 0 " 25.00 132,556 3,754 112,950 3,064 2,869 2,308 2,02948-20C 20 85 ' 8 " 26.12 139,121 3,939 118,540 3,215 3,011 2,422 2,13048-21C 21 89 ' 4 " 27.24 145,686 4,125 124,140 3,367 3,153 2,536 2,23048-22C 22 93 ' 0 " 28.36 152,252 4,311 129,730 3,519 3,295 2,651 2,33148-23C 23 96 ' 8 " 29.47 158,817 4,497 135,330 3,671 3,437 2,765 2,43148-24C 24 100 ' 4 " 30.59 165,382 4,683 140,920 3,822 3,579 2,879 2,53248-25C 25 104 ' 0 " 31.71 171,947 4,869 146,510 3,974 3,721 2,993 2,63248-26C 26 107 ' 8 " 32.83 178,512 5,055 152,110 4,126 3,863 3,108 2,733
6059 ' 8 "
18.19 m
60-09C 9 48 ' 8 " 14.84 107,498 3,044 91,600 2,485 2,326 1,871 1,64660-10C 10 52 ' 4 " 15.96 117,756 3,334 100,340 2,722 2,548 2,050 1,80360-11C 11 56 ' 0 " 17.08 128,014 3,625 109,080 2,959 2,770 2,229 1,96060-12C 12 59 ' 8 " 18.20 138,272 3,915 117,820 3,196 2,992 2,407 2,11760-13C 13 63 ' 4 " 19.31 148,530 4,206 126,560 3,433 3,214 2,586 2,27460-14C 14 67 ' 0 " 20.43 158,788 4,496 135,300 3,670 3,436 2,764 2,43160-15C 15 70 ' 8 " 21.55 169,046 4,787 144,040 3,907 3,658 2,943 2,58860-16C 16 74 ' 4 " 22.67 179,304 5,077 152,780 4,144 3,880 3,122 2,74560-17C 17 78 ' 0 " 23.78 189,562 5,368 161,520 4,381 4,102 3,300 2,90260-18C 18 81 ' 8 " 24.90 199,820 5,658 170,260 4,618 4,324 3,479 3,05960-19C 19 85 ' 4 " 26.02 210,078 5,949 179,010 4,855 4,546 3,657 3,21660-20C 20 89 ' 0 " 27.14 220,336 6,239 187,750 5,092 4,768 3,836 3,37360-21C 21 92 ' 8 " 28.25 230,594 6,530 196,490 5,330 4,990 4,014 3,53060-22C 22 96 ' 4 " 29.37 240,852 6,820 205,230 5,567 5,212 4,193 3,68760-23C 23 100 ' 0 " 30.49 251,110 7,111 213,970 5,804 5,434 4,372 3,84460-24C 24 103 ' 8 " 31.61 261,368 7,401 222,710 6,041 5,656 4,550 4,00160-25C 25 107 ' 4 " 32.72 271,626 7,692 231,450 6,278 5,878 4,729 4,15860-26C 26 111 ' 0 " 33.84 281,884 7,982 240,190 6,515 6,100 4,907 4,315
NOTES:
1. Grain bin volumes and capacities based on ASAE S413.1 DEC97.
2. Volume based on 28° angle of repose in roof, filled to a height 25 mm (1") below the eave height.
3. Bushel and metric tonne capacity is compacted 6%.
ENM-18887-TW R1 53
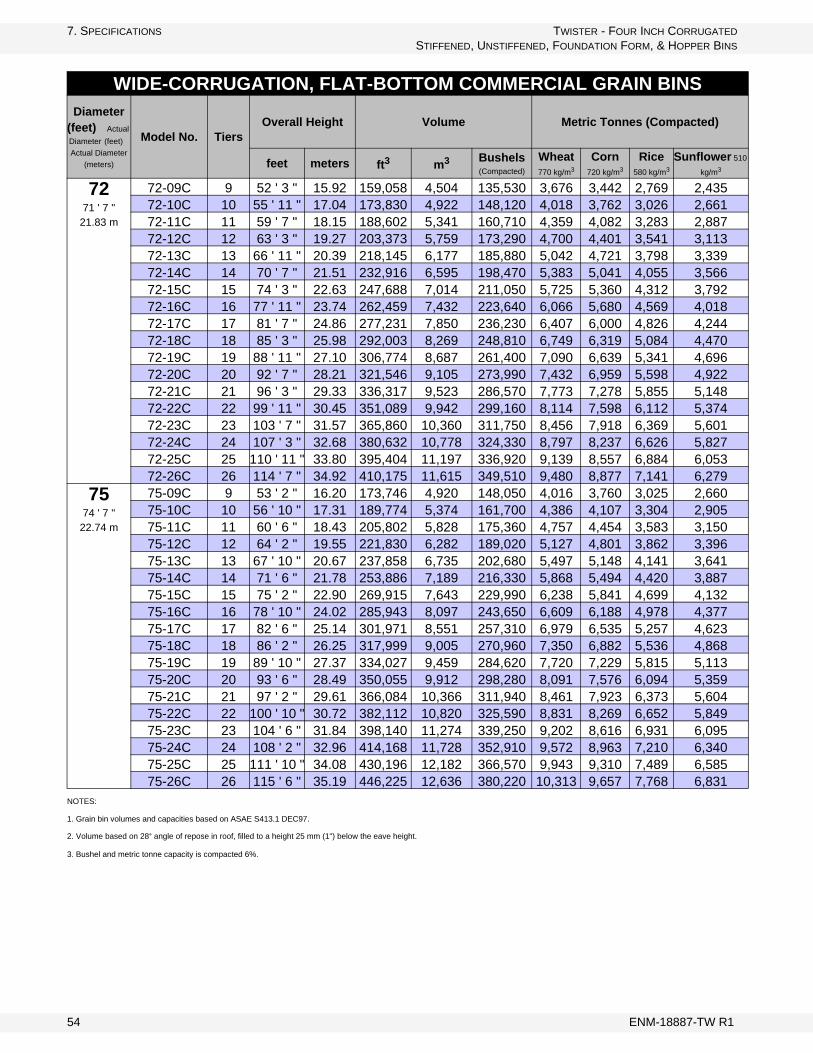
7. SPECIFICATIONS TWISTER - FOUR INCH CORRUGATED
STIFFENED, UNSTIFFENED, FOUNDATION FORM, & HOPPER BINS
WIDE-CORRUGATION, FLAT-BOTTOM COMMERCIAL GRAIN BINSDiameter
(feet) Actual
Diameter (feet)
Actual Diameter
(meters)
Model No. TiersOverall Height Volume Metric Tonnes (Compacted)
feet meters ft3 m3 Bushels (Compacted)
Wheat 770 kg/m3
Corn 720 kg/m3
Rice 580 kg/m3
Sunflower 510
kg/m3
7271 ' 7 "
21.83 m
72-09C 9 52 ' 3 " 15.92 159,058 4,504 135,530 3,676 3,442 2,769 2,43572-10C 10 55 ' 11 " 17.04 173,830 4,922 148,120 4,018 3,762 3,026 2,66172-11C 11 59 ' 7 " 18.15 188,602 5,341 160,710 4,359 4,082 3,283 2,88772-12C 12 63 ' 3 " 19.27 203,373 5,759 173,290 4,700 4,401 3,541 3,11372-13C 13 66 ' 11 " 20.39 218,145 6,177 185,880 5,042 4,721 3,798 3,33972-14C 14 70 ' 7 " 21.51 232,916 6,595 198,470 5,383 5,041 4,055 3,56672-15C 15 74 ' 3 " 22.63 247,688 7,014 211,050 5,725 5,360 4,312 3,79272-16C 16 77 ' 11 " 23.74 262,459 7,432 223,640 6,066 5,680 4,569 4,01872-17C 17 81 ' 7 " 24.86 277,231 7,850 236,230 6,407 6,000 4,826 4,24472-18C 18 85 ' 3 " 25.98 292,003 8,269 248,810 6,749 6,319 5,084 4,47072-19C 19 88 ' 11 " 27.10 306,774 8,687 261,400 7,090 6,639 5,341 4,69672-20C 20 92 ' 7 " 28.21 321,546 9,105 273,990 7,432 6,959 5,598 4,92272-21C 21 96 ' 3 " 29.33 336,317 9,523 286,570 7,773 7,278 5,855 5,14872-22C 22 99 ' 11 " 30.45 351,089 9,942 299,160 8,114 7,598 6,112 5,37472-23C 23 103 ' 7 " 31.57 365,860 10,360 311,750 8,456 7,918 6,369 5,60172-24C 24 107 ' 3 " 32.68 380,632 10,778 324,330 8,797 8,237 6,626 5,82772-25C 25 110 ' 11 " 33.80 395,404 11,197 336,920 9,139 8,557 6,884 6,05372-26C 26 114 ' 7 " 34.92 410,175 11,615 349,510 9,480 8,877 7,141 6,279
7574 ' 7 "
22.74 m
75-09C 9 53 ' 2 " 16.20 173,746 4,920 148,050 4,016 3,760 3,025 2,66075-10C 10 56 ' 10 " 17.31 189,774 5,374 161,700 4,386 4,107 3,304 2,90575-11C 11 60 ' 6 " 18.43 205,802 5,828 175,360 4,757 4,454 3,583 3,15075-12C 12 64 ' 2 " 19.55 221,830 6,282 189,020 5,127 4,801 3,862 3,39675-13C 13 67 ' 10 " 20.67 237,858 6,735 202,680 5,497 5,148 4,141 3,64175-14C 14 71 ' 6 " 21.78 253,886 7,189 216,330 5,868 5,494 4,420 3,88775-15C 15 75 ' 2 " 22.90 269,915 7,643 229,990 6,238 5,841 4,699 4,13275-16C 16 78 ' 10 " 24.02 285,943 8,097 243,650 6,609 6,188 4,978 4,37775-17C 17 82 ' 6 " 25.14 301,971 8,551 257,310 6,979 6,535 5,257 4,62375-18C 18 86 ' 2 " 26.25 317,999 9,005 270,960 7,350 6,882 5,536 4,86875-19C 19 89 ' 10 " 27.37 334,027 9,459 284,620 7,720 7,229 5,815 5,11375-20C 20 93 ' 6 " 28.49 350,055 9,912 298,280 8,091 7,576 6,094 5,35975-21C 21 97 ' 2 " 29.61 366,084 10,366 311,940 8,461 7,923 6,373 5,60475-22C 22 100 ' 10 " 30.72 382,112 10,820 325,590 8,831 8,269 6,652 5,84975-23C 23 104 ' 6 " 31.84 398,140 11,274 339,250 9,202 8,616 6,931 6,09575-24C 24 108 ' 2 " 32.96 414,168 11,728 352,910 9,572 8,963 7,210 6,34075-25C 25 111 ' 10 " 34.08 430,196 12,182 366,570 9,943 9,310 7,489 6,58575-26C 26 115 ' 6 " 35.19 446,225 12,636 380,220 10,313 9,657 7,768 6,831
NOTES:
1. Grain bin volumes and capacities based on ASAE S413.1 DEC97.
2. Volume based on 28° angle of repose in roof, filled to a height 25 mm (1") below the eave height.
3. Bushel and metric tonne capacity is compacted 6%.
54 ENM-18887-TW R1

LIMITED WARRANTYThis warranty relates to any new grain bin (the “Product”) sold by Edwards Group (which is a trading name or division of Ag Growth Industries Partnership, referred to herein as the “Seller”) and applies only to the first user of the Product (meaning a purchaser directly from the Seller or from an authorized dealer or distributor of the Product, referred to herein as the “Buyer”).
This warranty shall only be effective if properly registered with the Seller in accordance with information provided to the Buyer at the time of sale.
1.The Seller warrants to the Buyer that the Product is free from defects in material and workmanship under normal and rea-sonable use.
2.This warranty applies only to defects in materials and workmanship and not to damage incurred in shipping or handling, or damage due to causes beyond the control of the Seller such as lightning, fire, flood, wind, earthquake, excessive volt-age, mechanical shock, water damage, or damage arising out of abuse, alteration, improper assembly, improper installa-tion, improper maintenance or improper repair of the Product.
3.This warranty is void if: a) the Product has not been installed and operated in accordance with the instructions provided by the Seller; b) all components of the grain bin system are not original equipment as supplied by the Seller; c) the installa-tion was not done by an authorized dealer or certified representative of the Seller; d) damage to or malfunction or failure of the Product is due to misuse, abuse, negligence of the Buyer, alteration, accident or lack of proper maintenance; or e) the grain bin system is used for the storage of something other than grain or feed.
3.The warranty period for the Product shall be FIVE (5) years from delivery of the Product to the Buyer and initial installation by or for the Buyer. This five year warranty shall only apply to structural elements of the Product. All other parts are covered by a one (1) year warranty period. Painted parts are only warranted for one year against surface rust. In the event that any part of the Product is manufactured and sold to the Seller by a third party vendor, such part is only war-ranted to the extent of the warranty given by the third party vendor to the Seller.
4.The obligations set forth in this warranty are conditional upon the Buyer promptly notifying the Seller of any defect and, if required, promptly making the Product available for correction. The Seller shall be given reasonable opportunity to investi-gate all claims and no Product shall be returned to the Seller until after inspection and approval by the Seller and receipt by the Buyer of written shipping instructions from the Seller, with transportation charges prepaid.
5.If a defect is found by the Seller to exist within the applicable warranty period, the Seller will, at its sole option, (a) repair or replace the Product or such part free of charge, FOS the factory of manufacture, or (b) refund to the Buyer, the original purchase price, in lieu or such repair or replacement. Labour costs associated with the replacement or repair of the Prod-uct are not covered by the Seller. The Seller shall replace or attempt to repair and return the Product or such part within 4 weeks of receipt of notice of the defect from the Buyer.
6.The total liability of the Seller on any claim, whether in contract, tort or otherwise, arising out of, connected with, or result-ing from the manufacture, sale, delivery, repair, replacement or use of the Product or any part thereof shall not exceed the price paid for the Product and the Seller shall not be liable for any special indirect, incidental or consequential damages caused by reason of the installation, modification, use, repair, maintenance or mechanical failure of the Product.
7.The Seller warrants that the use of the Product does not infringe upon the patents, copyrights, trade secrets or other intel-lectual property rights of others.
8.Notwithstanding anything contained herein to the contrary, the foregoing is the Buyer’s sole and exclusive remedy for breach of warranty by the Seller in respect of the Product. The Seller, for itself, its agents, contractors, employees and for any parent or subsidiary of the Seller, expressly disclaims all warranties, either express or implied, written or oral, including implied warranties of merchantability or fitness for a particular purpose and undertakes no obligation with respect to the conformity of the Product except as set out in the purchase agreement, if any.
9.The foregoing warranty is the entire warranty of the Seller. The Seller neither assumes, nor authorizes any other person purporting to act on its behalf to modify or to change this warranty, nor to assume for it any other warranty or liability con-cerning the Product.
WARRANTY VOID IF NOT REGISTERED
Twister is a Division of Ag Growth Industries Partnership
Part of Ag Growth International Inc. Group
215 Barons Street
Nobleford, Alberta, Canada T0L 1S0
Phone: (403) 320-5585
Fax: (888) 320-5669
Toll Free: (800) 565-2840 (Canada & USA)
website: www.twister.ca
email: [email protected]
© Ag Growth Industries Partnership 2012
Printed in Canada