Formatting your CE Manuscript Using MS Word 2010
19
1 Formatting your Capstone Project Spring 2011 Formatting your CE Manuscript Using MS Word 2010 Table of Contents default fonts ...................................................................................................................................... 2 styles ............................................................................................................................................. 3 the format for paragraphs in the text............................................................................................... 5 the Page Layout ................................................................................................................................ 6 page numbering ................................................................................................................................ 8 references ......................................................................................................................................... 9 citations in the text ....................................................................................................................... 9 footnotes or endnotes ................................................................................................................ 10 bibliography .................................................................................................................................... 12 headings and tables of contents ..................................................................................................... 14 updating page numbers .............................................................................................................. 15 Appendix. ........................................................................................................................................ 16 adding a portrait page number to a landscape page ..................................................................... 16 Adapted from information for writers of dissertations and theses at UMass Amherst provided by Software Support in the Office of Information Technologies Elisa Campbell
-
Upload
truongquynh -
Category
Documents
-
view
229 -
download
0
Transcript of Formatting your CE Manuscript Using MS Word 2010
1 Formatting your Capstone Project Spring 2011
FormattingyourCEManuscriptUsingMSWord2010
TableofContentsdefault fonts ...................................................................................................................................... 2
styles ............................................................................................................................................. 3
the format for paragraphs in the text ............................................................................................... 5
the Page Layout ................................................................................................................................ 6
page numbering ................................................................................................................................ 8
references ......................................................................................................................................... 9
citations in the text ....................................................................................................................... 9
footnotes or endnotes ................................................................................................................ 10
bibliography .................................................................................................................................... 12
headings and tables of contents ..................................................................................................... 14
updating page numbers .............................................................................................................. 15
Appendix. ........................................................................................................................................ 16
adding a portrait page number to a landscape page ..................................................................... 16
Adapted from information for writers of dissertations and theses at UMass Amherst provided by Software Support in the Office of Information Technologies Elisa Campbell
2 Formatting your Capstone Project Spring 2011
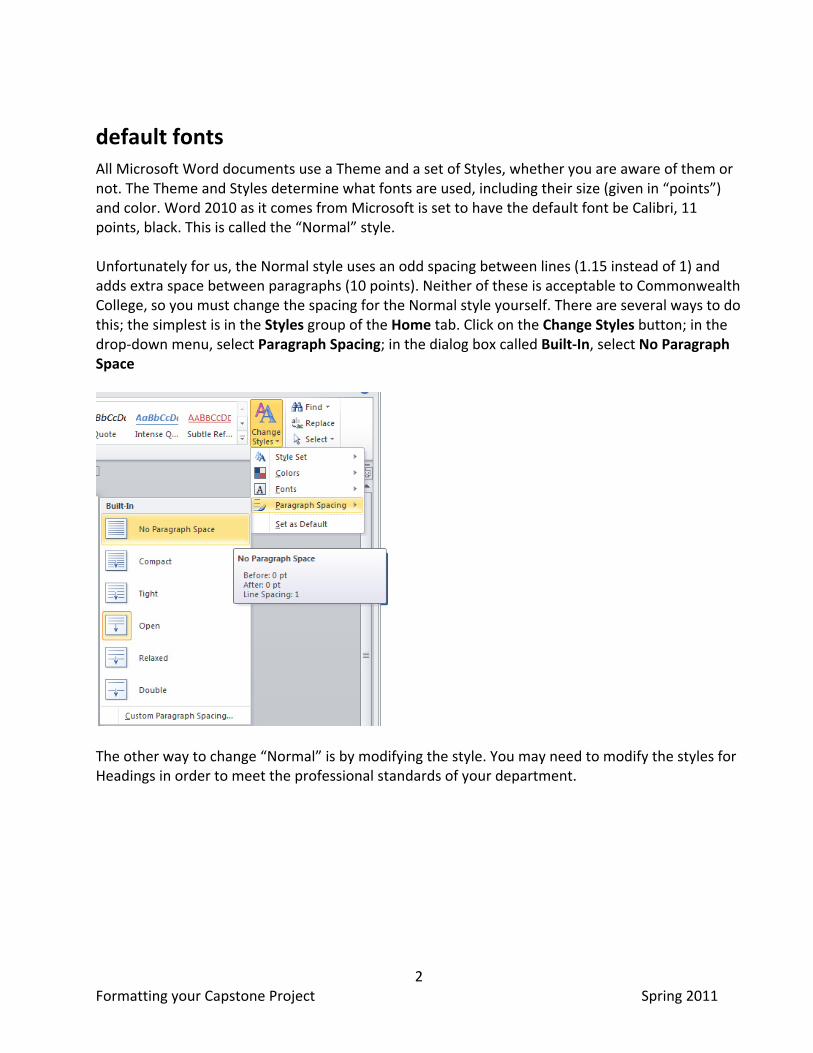
default fonts All Microsoft Word documents use a Theme and a set of Styles, whether you are aware of them or not. The Theme and Styles determine what fonts are used, including their size (given in “points”) and color. Word 2010 as it comes from Microsoft is set to have the default font be Calibri, 11 points, black. This is called the “Normal” style. Unfortunately for us, the Normal style uses an odd spacing between lines (1.15 instead of 1) and adds extra space between paragraphs (10 points). Neither of these is acceptable to Commonwealth College, so you must change the spacing for the Normal style yourself. There are several ways to do this; the simplest is in the Styles group of the Home tab. Click on the Change Styles button; in the drop‐down menu, select Paragraph Spacing; in the dialog box called Built‐In, select No Paragraph Space
The other way to change “Normal” is by modifying the style. You may need to modify the styles for Headings in order to meet the professional standards of your department.

3 Formatting your Capstone Project Spring 2011
styles
how styles are defined
You can see which styles are used and what they are called by looking in the Home tab; to see all of the style names at once, click on the “styles dialog box launcher” (the downward‐pointing arrow to the right of the word “Styles”).
to change a style
In the list of styles as shown on the previous page, select the style you want to change; click on the little arrow pointing down (or right‐click); when Word brings up a list of choices, choose Modify.

4 Formatting your Capstone Project Spring 2011
Word then displays a screen where you can modify the Font or the Format of the style. Format includes tab setting and paragraph characteristics, as well as other things we don’t use in theses.
5 Formatting your Capstone Project Spring 2011
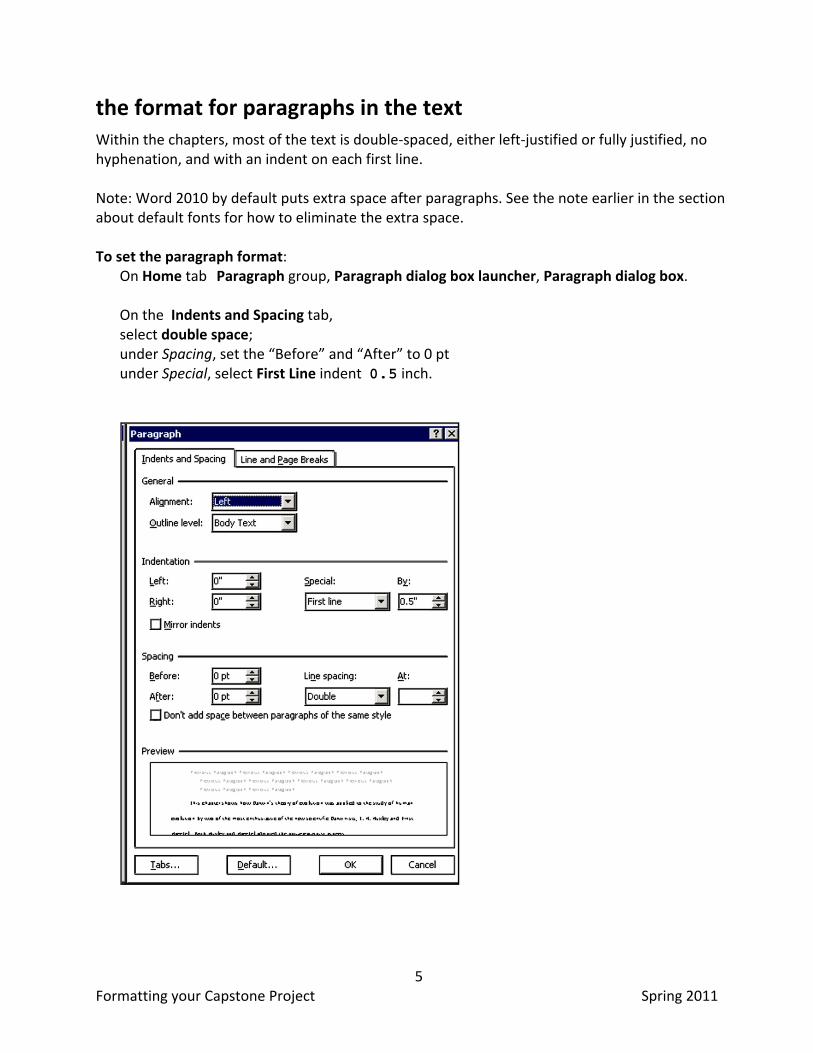
the format for paragraphs in the text Within the chapters, most of the text is double‐spaced, either left‐justified or fully justified, no hyphenation, and with an indent on each first line. Note: Word 2010 by default puts extra space after paragraphs. See the note earlier in the section about default fonts for how to eliminate the extra space. To set the paragraph format:
On Home tab Paragraph group, Paragraph dialog box launcher, Paragraph dialog box. On the Indents and Spacing tab, select double space; under Spacing, set the “Before” and “After” to 0 pt under Special, select First Line indent 0.5 inch.

6 Formatting your Capstone Project Spring 2011
the Page Layout On the Page Layout tab, Page Setup group, choose Margins:
At Margins, hold your cursor down on the arrow; when the Margins dialog box opens, move your cursor to the bottom to Custom Margins:

7 Formatting your Capstone Project Spring 2011
On the Page Setup dialog box, the margins should be 1 inch on each side.
Be sure that Apply To: is set to Whole Document. Or that you set these margins in all sections of your document (except for Landscape‐oriented pages).

8 Formatting your Capstone Project Spring 2011
page numbering Word puts page numbers in the Footer (between the bottom of the text and the bottom of the piece of paper. Set the page numbering by going to Insert tab, Header & Footer group; click Page Number. Our example shows putting the page number in the center of the Footer: choose Bottom of Page and then choose Plain Number 2.
The font for page numbers is not based on the Normal style. If you change the Normal style, change the Page Number style as well. If you have pages in landscape orientation, see the appendix on adding a portrait page number.

9 Formatting your Capstone Project Spring 2011
references Word can do: (1) citations in the text; (2) footnotes at the bottoms of pages; (3) endnotes at the end of the entire document; (4) or endnotes at the end of each chapter. However, if you have any pages in landscape orientation (wider than they are tall), Word cannot automatically put the notes at the end of individual chapters or at the end of the dissertation (before the Bibliography) because the Section Break for the landscape page(s) causes Word to put the endnotes there. You can use footnotes that are numbered sequentially throughout the document.
citations in the text
Word’s “citation” feature: on the References tab, Citations & Bibliography group, click on Insert Citation. Word opens a gallery in which you choose whether to enter a placeholder or bibliographical information.
If you choose to enter a placeholder, you can come back later and fill in the bibliographical information. If you choose to enter the information now, Word opens a dialog box in which you enter the bibliographical information ‐‐
10 Formatting your Capstone Project Spring 2011
and inserts the citation in the text of the chapter:
footnotes or endnotes
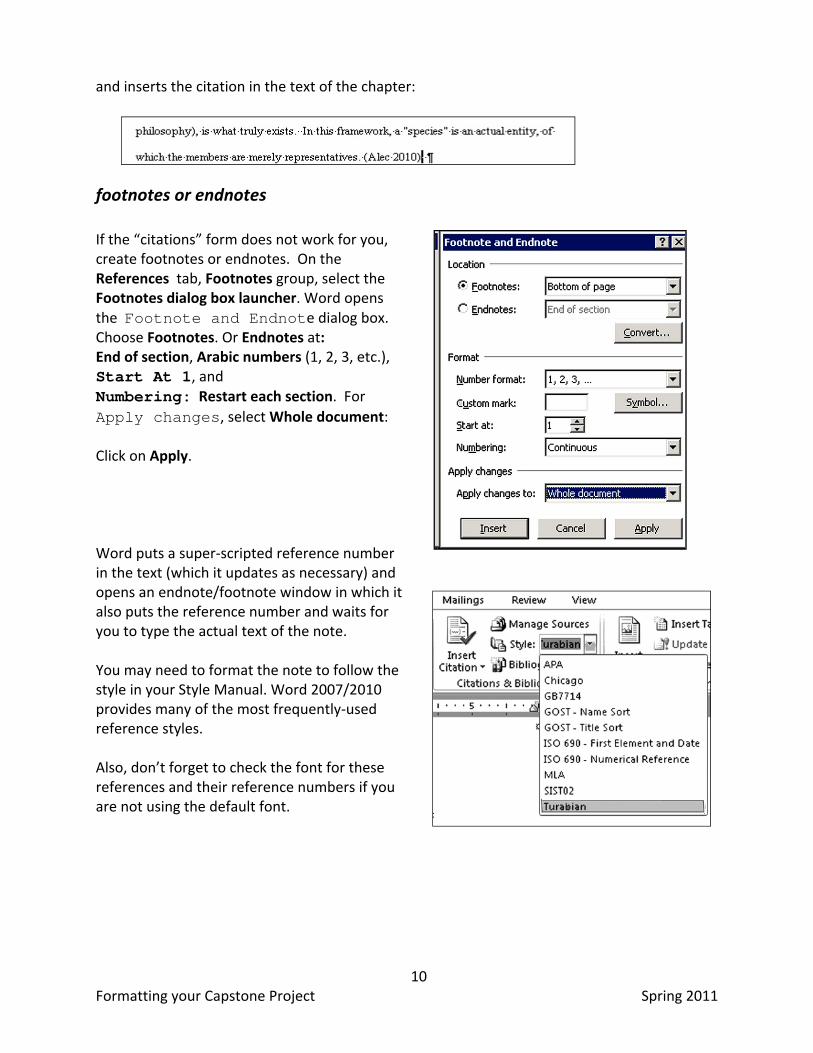
If the “citations” form does not work for you, create footnotes or endnotes. On the References tab, Footnotes group, select the Footnotes dialog box launcher. Word opens the Footnote and Endnote dialog box. Choose Footnotes. Or Endnotes at: End of section, Arabic numbers (1, 2, 3, etc.), Start At 1, and Numbering: Restart each section. For Apply changes, select Whole document: Click on Apply. Word puts a super‐scripted reference number in the text (which it updates as necessary) and opens an endnote/footnote window in which it also puts the reference number and waits for you to type the actual text of the note. You may need to format the note to follow the style in your Style Manual. Word 2007/2010 provides many of the most frequently‐used reference styles. Also, don’t forget to check the font for these references and their reference numbers if you are not using the default font.
11 Formatting your Capstone Project Spring 2011
endnote placement
Word puts the notes at the end of the current section. To put notes at the ends of chapters, end each chapter with a Section Break. Insert a Page Break at the end of the text in the chapter (before the Section Break) so that notes begin printing on a new page, not on the last page of text. Then replace the default “note separator” (see below). To put notes at the end of the thesis or dissertation, insert a Page Break between each chapter, and insert a Section Break before the Bibliography.
note separators
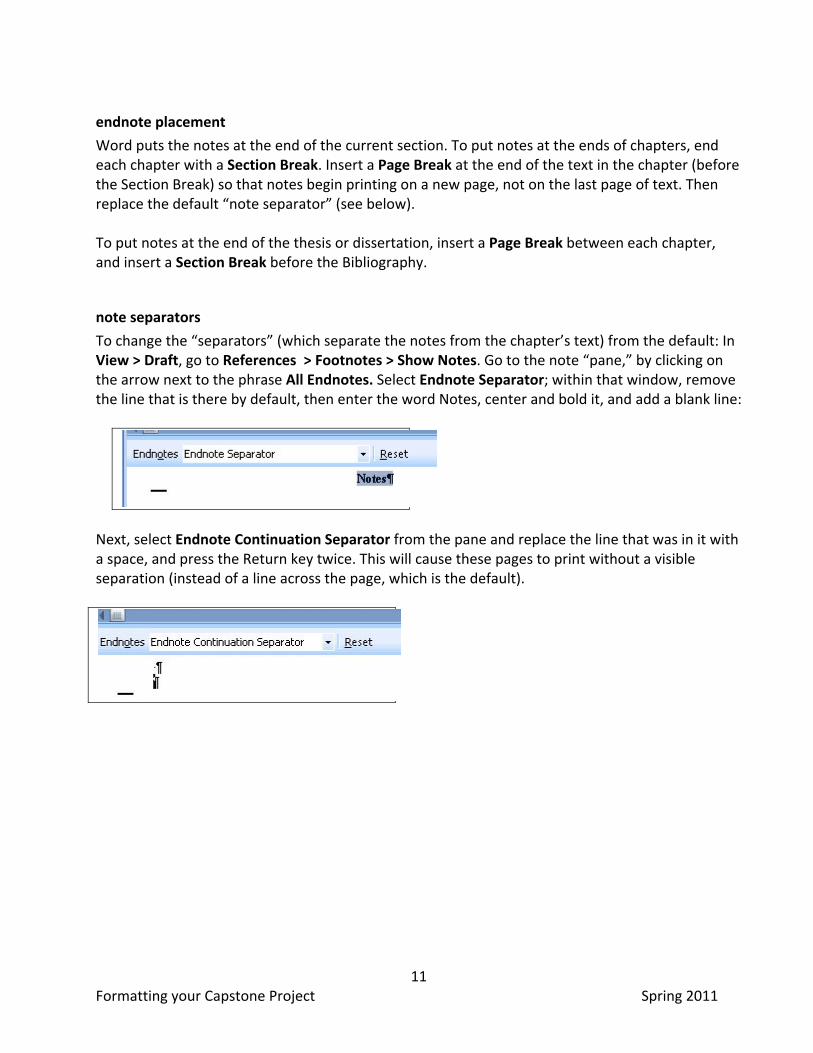
To change the “separators” (which separate the notes from the chapter’s text) from the default: In View > Draft, go to References > Footnotes > Show Notes. Go to the note “pane,” by clicking on the arrow next to the phrase All Endnotes. Select Endnote Separator; within that window, remove the line that is there by default, then enter the word Notes, center and bold it, and add a blank line:
Next, select Endnote Continuation Separator from the pane and replace the line that was in it with a space, and press the Return key twice. This will cause these pages to print without a visible separation (instead of a line across the page, which is the default).

12 Formatting your Capstone Project Spring 2011
bibliography The format of your Bibliography is determined by the Style Manual you are using. Word 2007/2010 has built‐in styles for many of the most‐frequently used bibliography styles, which can create an alphabetized list from the information in citations. If you used citations for references, you can use that to build the bibliography. In the References tab, Citations and Bibliography group, select the Style and Bibliography. From the drop‐down menu, select Bibliography:
Word inserts a bibliography based on the citations you have entered and format for the style you selected. Note that the title is upper‐lower case, and it is not in the Heading 1 style; you will use Word to create your Table of Contents, the title must also be in the Heading 1 style.
13 Formatting your Capstone Project Spring 2011
paragraph formatting
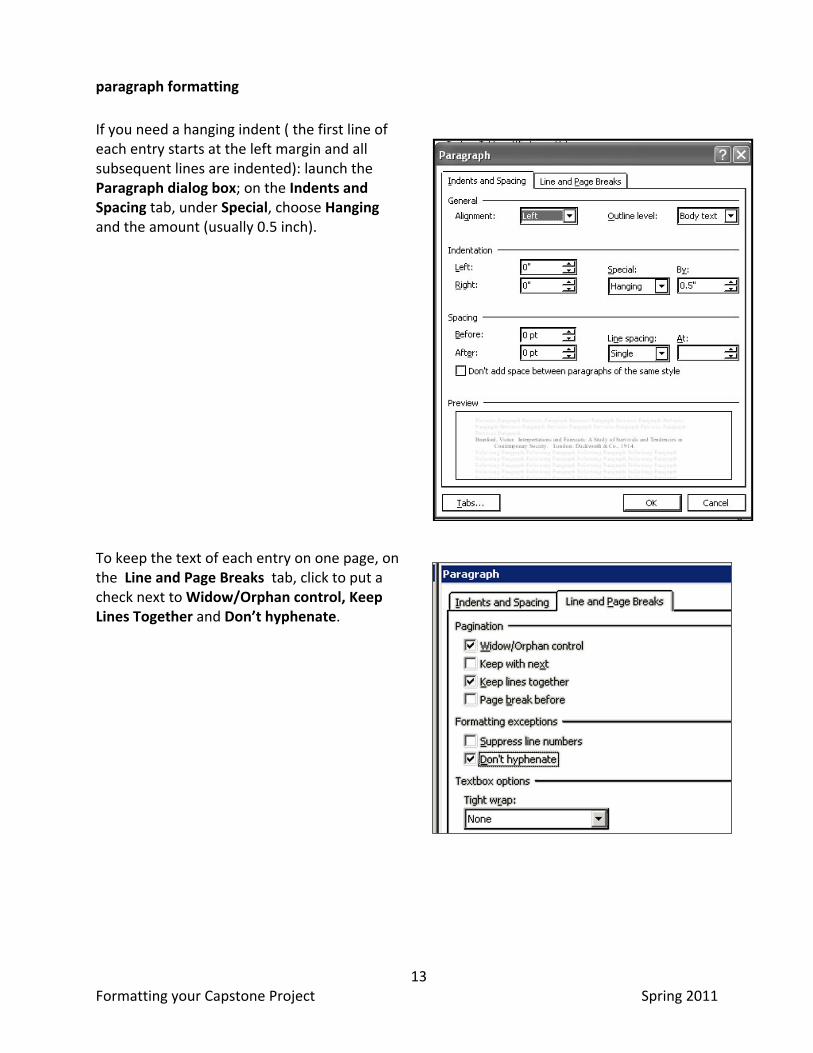
If you need a hanging indent ( the first line of each entry starts at the left margin and all subsequent lines are indented): launch the Paragraph dialog box; on the Indents and Spacing tab, under Special, choose Hanging and the amount (usually 0.5 inch). To keep the text of each entry on one page, on the Line and Page Breaks tab, click to put a check next to Widow/Orphan control, Keep Lines Together and Don’t hyphenate.
14 Formatting your Capstone Project Spring 2011
headings and tables of contents You can use Word’s Heading styles to standardize the chapter titles and subsection headings in your document. Word can also make a Table of Contents from those styles. In the default style set, Heading 1 is blue; if that is not acceptable, you can either modify the style or skip to Heading 2, which is Calibri 18 point and black (as in this document) or Heading 3 which is Calibri 14 point and black. Or, you can check thru Microsoft’s various “Style Sets” (available from the Home tab, Styles group, Change Styles icon).
. create the table of contents
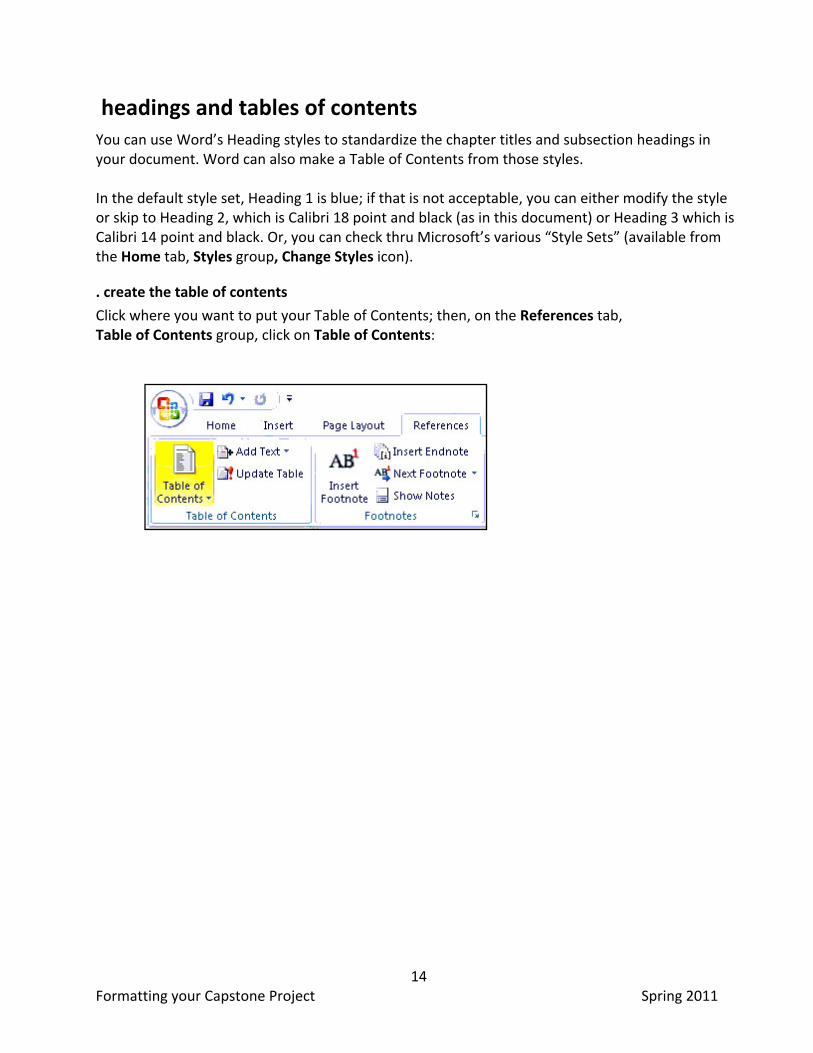
Click where you want to put your Table of Contents; then, on the References tab, Table of Contents group, click on Table of Contents:

15 Formatting your Capstone Project Spring 2011
If you have no more than 3 levels of headings, you can use the first of the built‐in Tables of Contents.
updating page numbers
If, later on, you need to update the page numbers in the ToC without changing the words or their formatting, on the References tab, Table of Contents group, click Update Table; choose Update page numbers only.

16 Formatting your Capstone Project Spring 2011
Appendix.
adding a portrait page number to a landscape page If you have landscape‐oriented pages (pages wider than they are tall) you have to put portrait‐oriented page numbers them. It may be possible to put the table or figure on the page in portrait orientation and then rotate the object; that’s the easiest method. If that doesn’t work, make a section for the landscape page(s).
insert Section Breaks
1. At the end of the page of text (the
portrait page), on the Page Layout tab, Page Setup group, select Breaks, then select Section Breaks / Next Page. Insert a Section Breaks / Next Page after the landscape page (or pages) and before the next portrait page
2. In View > Print Layout with the
insertion point in each Section in turn, under the Insert tab, Header & Footer group, click Header. If you do not yet have a Header in that section, choose the Blank header. If you already have a Header, choose Edit Header.
3. Under the Header & Footer Tools
ribbon, if Link to Previous has an orange box around it, click on it to break the “Same as Previous” link between headers. Repeat for Headers and Footers in the landscape section and the portrait section after it. The example shows the document before you click to break the link.

17 Formatting your Capstone Project Spring 2011
put in the page numbers
1. In the Insert menu, select Page Number
and from the options presented, select Page Margins; then choose Vertical, Left.
2. Word inserts the word Page and the
page number in the left margin, near the bottom. That is not acceptable, so we have to modify it. First, click on the text to select it as a text block.
3. Above the ribbon, select Text Box Tools.
On the left end of the new ribbon, find the icon for changing the orientation of the text and click on it until the page number in the text block is tipped so the top of the number is near the text on the page.
18 Formatting your Capstone Project Spring 2011
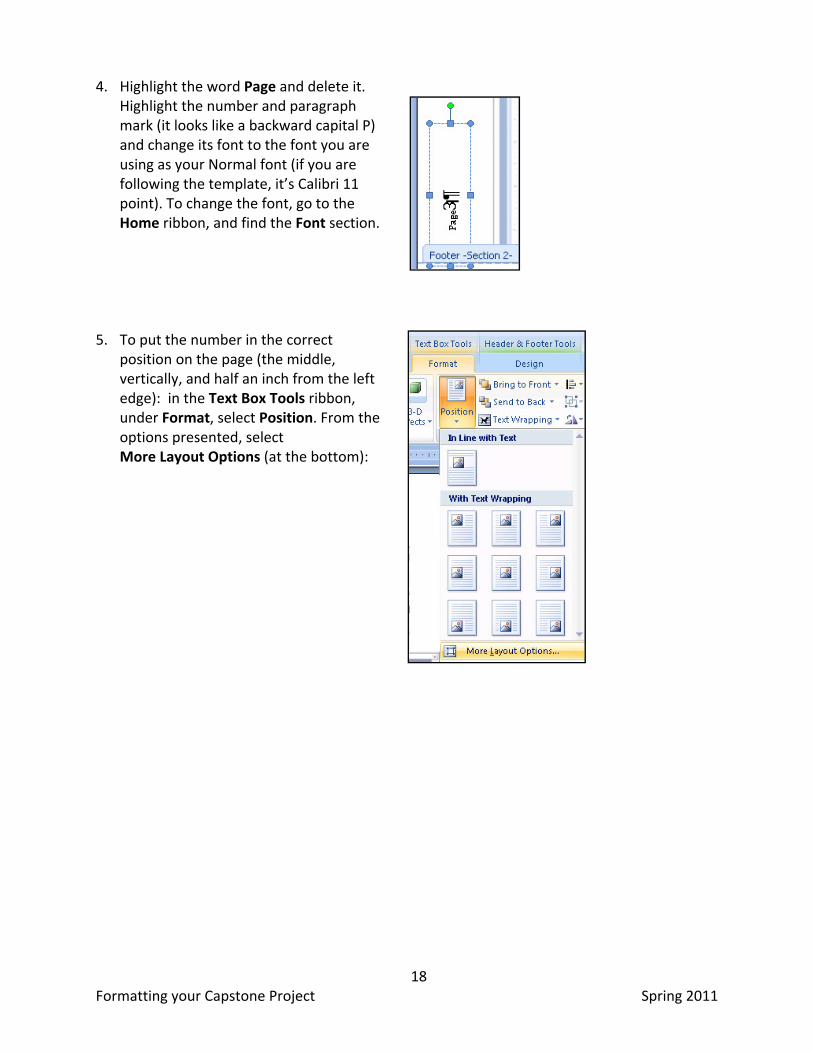
4. Highlight the word Page and delete it. Highlight the number and paragraph mark (it looks like a backward capital P) and change its font to the font you are using as your Normal font (if you are following the template, it’s Calibri 11 point). To change the font, go to the Home ribbon, and find the Font section.
5. To put the number in the correct
position on the page (the middle, vertically, and half an inch from the left edge): in the Text Box Tools ribbon, under Format, select Position. From the options presented, select More Layout Options (at the bottom):

19 Formatting your Capstone Project Spring 2011
6. Word presents a screen on which you enter information to tell it where to put the text box.
You will have to check to be sure the number ends up in the same place as it is on the portrait‐orientation pages. I suggest you start with the numbers I used, which are: Horizontal: Absolute position 0.5 inch from the Page Vertical: Absolute position 4.4 inches on the Page (from the top of the page).