May: Picnics and Food Safety Brittany Lawrance RD, CSO, LDN, CNSC

Page 1
Forewords Chris After years of being a guitar and banjo teacher, there comes a time in your life when you think you can write a tutor book better than the ones you are using. For better or for worse, I feel that the time has come. So from Andy and myself here goes. Andy What makes this book different is that it is aimed at people who have never played a stringed instument before. Most books go through the basics so fast you are left with the choice of practicing one ot two tunes for months or getting so out of yor depth you give up. By the time you finish this book you should be ready to start on a range of others. Chris asked me to collaborate on this book for a number of reasons. Firstly, I am his longest standing banjo pupil, and much of the advice given here stems from our work together over the years. Secondly, I can give a pupil’s perspective on the advice Chris gives, and possibly suggest a few alternative approaches that have worked for me. Thirdly I’m the one with a word processor! Chris is the qualified music teacher, and he has written most of the book, and arranged most of the tunes. My job has been mostly as editor, and to add comments where needed.

2
HEAD
ROLLER
TUNING KEY NUT
5th STRING KEY
POSITION DOT NECK
TENSION BRACKET
ARM REST
STRINGS
TAILPIECE
RIM
DRUM HEAD
BRIDGE
Draw a picture of your own banjo and label the parts. Memorise the parts, so that you can follow the instructions in the book with ease.
FRET WIRES

page 3
INTRODUCTION
Chris: Think of this book as a companion to the CD that comes with it. I want you to learn to use your ears. The book is there to save you taking notes, and for the diagrams and written music. After the first few pages of introduction, work from the CD using the book only for reference. The pieces in this book are just preliminary sketches. They should first be learnt as accurately as possible, then after they have been memorised, the TAB should be disregarded and the tune developed into your own style. DON’T BE AFRAID TO IMPROVISE. Remember, “there is no such thing as a mistake, only good or bad improvisation.” Andy: Improvisation seems impossible when you start playing, and my advice would be not to waste time worrying about it. If once you have learnt a tune, you play it without referring back to the TAB, you will find that after a few months you have introduced a number of changes without knowing it. If when you are playing you hit a note which you know is wrong, but still sounds good, keep it in. Eventually you will get a feel for which wrong notes to try. There is a theory of how to improvise, but learn to play first. Chris: This book is written in tablature, because this is how you will find most published banjo music. Tablature and the techniques you will need are explained as they appear in the pieces you are learning to play. This means that if you can get straight on to the music, whatever your current ability. Reference material appears at the back of the book for ease of reference. Andy: I have found and used a number of tutor books over the last five years, and most seem to take an age before they get round to letting you have a go at playing. This book is designed to get you to the music as fast as possible - you can get started on the first few tunes before you even need to start worrying about TAB. About playing the banjo Chris: Right from the start you want to think of playing the banjo - practice sounds too much like hard work. Playing can be interpreted in two ways - PLAY as a toy or game. PLAY as in playing an instrument - either way it should be fun! I once heard a teacher say to his pupil “I don’t want you to practice, I just want you to pick it up once or twice a day and play it.” Try putting the banjo somewhere prominent, for example in your bed room or on an instrument stand. Every time you go into your bed room, strum your fingers across the strings. Treat it like a new pet. Pick it up and dust it, even try cuddling it. Try playing a few notes. Get used to that unusual banjo sound. Try to get some unusual sounds from your banjo. Strum your banjo behind the bridge. Try strumming the banjo behind the nut. (If you are not sure where they are, look them up on the banjo diagram). Slide your finger up and down the string as you play it. Let the banjo grow on you and after a while the sound should become addictive.

page 4
If you can invest the time, start by playing the banjo for fifteen minutes every day, say for example just before supper in the evening. You can play for longer if you want to. After a while you should develop your own playing routine. You may wish to keep a diary or record of how much you play every day. Keep a short list of three or four things you want to improve on each day. Always remember to play your pieces SLOWLY. Play in short phrases, “take short bits of the cake”. If you play slowly you will give yourself more time to relax and enjoy the banjo. Speed will come later when you have memorised your pieces and become more experienced. Andy: Both Chris and I keep our banjos hanging on the living room wall. This keeps them in view, as a reminder to take them down and play them, but they are less likely to be bashed by vacuum cleaners than if they are on a stand. Besides - banjos look nice! You can buy hangers from most music shops, but make sure the hooks are long enough for the backward facing pegs on most banjos. I made mine from doweling mounted in a wooden block and Chris uses a wire loop and a small wall hook. As a family man with a full time job and plenty of other interests, I find that the thought of a long practice session can put you off playing at all. The best advice I have come across is from Pete Wernick in his banjo tutor. He says that while you should aim to practice every day, you should be prepared to take the banjo down and give it one or two strums and put it back if that's all you have time for. That way you don’t start feeling guilty about missing a day, and start avoiding the banjo altogether. - Besides once you have got the banjo down you usually find you have time for a quick tune after all!

page 5
GETTING STARTED
Pick up the banjo and hold it as demonstrated on the cover of the book. If you need to tune the banjo, listen to track 2, and read page 32. With the index finger of the right hand pick the strings individually, starting with the short string 5 then the wound string 4 then 3, 2 and 1.
Listen to the explanation (track three)
Try singing the notes as you play them. Now try the same again, but this time sing the note names - Growing Dinosaurs Get Bigger Daily 5 4 3 2 1
Memorise
Growing Dinosaurs Get Bigger Daily
I

page 6
PLAYING G AND D7
INTRODUCING CHORD DIAGRAMS To use a chord diagram, you need
to know the numbers for your left hand fingers. This is the Open G chord. No strings
are fretted to play this chord. Pick the open strings individually, then strum the G chord.
Listen to the explanation (track four)
Chord Diagram -D7
This is a D7 Left hand fingered Chord. Pinch the first finger just behind the first fret, on the second string. As you maintain the pressure with the left hand, pick the second string with a finger of the right hand to make the
sound.
Listen to the explanation (track five) Now pinch the second finger of the left hand just behind the second fret on the third string. Play that with the right hand. Rest the right hand thumb on the short 5 string. Press down on both the second and third strings at the same time. strum across the four full-length strings with you right index finger.
Listen to the explanation (track six)
Now play the open G four times - GGGG. Then the D7 four times D7D7D7D7 Listen to the demonstration (track seven) Memorise the G and D7 chords You are now ready to play your first tune!

page 7
SKIP TO MY LOU
This is a very simple piece to start off with. It uses the two chords you have learnt - G and
D7. Play one chord to each bar. Listen to the explanation (track eight)
Bar Line G G Lou Lou Skip to my Lou D7 D7 Lou Lou Skip to my Lou G G Lou Lou Skip to my Lou D7 G Double bar end Skip to my Lou my Dar - ling 1 As you get more confident in your playing, think of the words as you play. 2 Try saying the words as you play (Rap style). 3 When you've got it sussed out sing and play. 4 Try two strums to the bar, and then four strums.
Practice until you can play the tune from memory. Practice along with track nine.
Andy: Unless you learn this piece very quickly, you will be tired of it before you have it memorised. To avoid this move on once you have the chord changes reasonably smooth, and can say the words along with the tune without getting your fingers in knots. Don’t leave it altogether though - keep playing it every day until you have it perfectly. By then you will have learnt new techniques like thumb-scratch or double-thumbing. Try playing this tune using the new techniques as you get the hang of them - who said improvising is difficult?

page 8
HUSH LITTLE BABY
This is a well known lullaby, collected by Alan Lomax from Annie Brewer, Montomart, approx. 1937. Once again, form a foundation by strumming one chord to a bar. G D7 Hush little baby Don’t say a word, D7 G Papa's going to buy you a Mocking - bird, and G D7 If that mocking - bird don’t sing D7 G Papa's going to buy you a diamond ring As in “Skip to my Lou”, try saying or singing the words as you get more confident.
Always remember to memorise your pieces, as this will impress your friends and relatives. Also it makes it more fun.
Listen to the explanation (track ten) Practice with track eleven
You may want to try playing some of the tune, but if you feel you are not ready yet it doesn’t matter - come back and try it later.

page 9
The first note is “0” - open (unfretted) 4th (wound) string. Rest the right hand thumb on the 5th (short) string and pick the note with the index finger.
Listen to the explanation (track twelve)
The second note is “0” - open second string. Play it using the same right hand method, thumb on 5th string, pick with index finger. The third note is the same as the second. Try putting the three notes together. This time I have written them out in tablature the lines on the stave represent the strings on the banjo, the numbers represent the frets. In this example all the strings are played open, so all the numbers are 0. T A B Hush lit - tle

page 10
Now try playing the first phrase. In this book each phrase end is marked with a comma: Phrases are usually more than one bar long. BAR BAR End of phrase T A B Hush Lit - tle Ba - by Don’t say a word
Listen to the explanation (track thirteen)
Try working out the rest of the tune for yourself by ear - it’s easier than you think! Chris plays the whole tune on track fourteen to help with this

page 11
AMAZING GRACE
The words to this were written by John Newton 1725-1807. The tune is anonymous, but probably has its origins in Scottish secular music. In spite of, or perhaps because of, Newton’s career in the slave trade before he was “saved”, this song is also popular in Gospel churches. This piece has three beats to the bar (waltz time). Practise the rhythm along with the recording:
Listen to the explanation (track fifteen) Clap out the rhythm, making sure the pauses are the right length - they are just as
important as the beats you sound. 1 2 3 1 2 3 1 2 3 : This tune uses the chords of G and D7 that you know, plus the C chord, which is new. This time we want to start making the rhythm more interesting by adding some up beats. Brush the right hand index finger up and down across the strings in open G: Your right hand thumb should still be resting on the string. Now try a basic scratch in 3 time.

page 12
The C Chord: First finger on string - play it- Listen to the
Second finger on string - play it explanation
Third finger on string - play it (track sixteen)
Now lay all the fingers down at the same time and use the basic scratch in 3 time.
Listen to the explanation of the tune (track seventeen)
Note: The “A-A” at the start of the song comes before the first strum.
G G C G A - A maz - ing Grace, How sweet the sound That G G D7 D7 G G saved a wretch like me— I once was lost, but C G G D7 G G now I’m found, Was blind, but Now I see If you have any problems with the new 3 beat rhythm, go back to the simple “One in a bar” strum. Work from this to a simple 3 down strokes to the bar, and then try bringing in the up strokes.
Try playing along with track seventeen, then - strum along in time with the melody (track nineteen) When you can sing and play this from memory, and can accompany both backing and the melody you are ready to move on.

page 13
Amazing Grace - melody To start, put the banjo down. Before playing the melody, you need to have the rhythm clearly in your head. Clap out the rhythm as you either say or sing the words. Keep at this until your clapping is smooth and accurate. Try clapping along with the recorded melody at track nine to be sure you are getting it right. I have shown the end of each phase with a comma - try playing a phrase at a time then join them together. Play the tune with the right hand index (i) and middle (m) fingers.
A - A maz - ing Grace, How sweet the sound That
Saved A wretch like me - 2 , 3 1 , 2 I once was
lost but Now I’m found, Was blind, but
now I see 2 , 3 1 , 2
Listen to the explanation (track eighteen) and try playing along with track nineteen Remember count the numbers out loud to keep time in between the words.

page 14
Note Lengths By now you have probably realised that notes are not all the same length. If you are going to use tablature to learn a tune, you will need to learn how the different note lengths are written. The longest note you need to worry about is the length of one bar in 4:4 time. It is
written as a number on the TAB line with no tail at all:
Listen to the explanation (track twenty) Clap along to the beat until you get the feel of it.
The next note is half this length, and is written as two stemmed notes tied together:
halve the note length again and you get a quarter note, written as single stemmed note:
To halve the note length again to get eighth notes, join the vertical stems with horizontal tails: Chris: Try not to worry about the maths - all you need to recognise is short notes and longer ones - your ears will tell you the rest. Remember - the birds singing in the trees don’t read music!
TIMING Chris: I wrote a short note on timing to go here, but Andy said it only made sense if you already knew about it! I don’t want you to spend time on this at the moment. I want you to concentrate on using your ears to tell you when you’ve got the note lengths right. Andy: I agree with Chris that you can get tied up in theory and never learn anything that helps you play well. I do think though that you should have some idea of whether you are supposed to be playing a short or a long note when you see the TAB.
tie

page 15
BLOOD ON THE SADDLE Here’s another old favourite of mine. This piece is attributed to the singing of Ed Badeaux. I was first attracted to this by the “off the wall” lyrics. Once again it uses 3 beats in a bar (waltz time). This can be played with a simple basic 3 down strums per bar, or using up beats to add a little more colour. Start with one strum of G as intro:
G G G
There was blood on the Sad - dle and C G C Blood on the Ground and a Great Big G D7 G Pud - dle of Blood all a - round
Listen to the explanation (track twenty one) and practice along with track twenty two.

page 16
SUMMARY OF BASIC SCRATCH From now on the basic strum patterns, with or without up beats will be known as basic scratch and abbreviated to B.S.
Listen to the examples of B.S. (track twenty-three)
page 17
PROGRESS CHART You can easily feel that you are not making any progress while you are learning - each tune can seem as hard to learn as the last. This is mostly because each tune is teaching you something new. Just to convince you that you are making progress, here is a list of the things you should be able to do by the time you reach this page. There is another progress chart on page 28 for the rest of the book For each item on the list enter the date when you can first do it, and the date when you can do it automatically. Be honest, but remember you should never expect to be perfect - you will still have more to learn if you spend your whole life studying! You’ve done really well if you can put an entry in most of the the “manage slowly” boxes. Stick with it, the more you learn, the more fun you will have!
Skill
Page
Can Manage Slowly
Can manage Easily
Know how to hold your banjo 34
Know the names of the parts of the banjo 2
Know the string numbers 6
Know how to read a chord diagram 6
Know the numbers of the left hand fingers 6
Know the G and D7 chords 6
Can play Skip to my Lou (basic scratch) with the music
7
Can play Skip to my Lou without the music 7
Play and sing Hush Little Baby 8
Explain what is meant by an “open string” 9
Put your fingers on the right strings at the right frets when using tablature
9
Play the tune to Hush Little Baby 10
Understand what a phrase is 10
Clap in 3:4 (waltz) time 11
Can play up beats 11
Can play basic scratch in 3:4 (waltz) time
Use this chart to record your progress and check on anything you have missed. If your teacher has told you to skip something, that’s fine, they know you better than we do!

page 18
CRIPPLE CREEK Andy: If you only ever learn one tune on the banjo, this should be it! Almost every banjo player plays this tune, and there are almost as many versions as there are players. Chris: This time we are going to play the tune and the rhythm with the index finger -
Exciting stuff, ain't it! Listen to the explanation (track tewnty four). “A” part (We’ll tell you what this means shortly)
= Pick out tune. = Brush index finger down.
Is that right hand thumb still resting on the the 5th string? - Caught you out Ha! Practice along with track twenty five Now we can go on to the “B” part

page 19
To play the B part of this tune you need to learn the slide. Listen to the example (track twenty six)
Hold the second finger down on the third string. Pick the string once with the right hand, and while the note is sounding slide your right hand second finger up to the fourth fret without releasing the pressure on the string. Have you got it? - remember the whole sound is made without releasing pressure on the string. It’s finger lickin’ good ain’t it? Andy: I have a bad habit of playing slides and hammers too quickly, which gives a rather Scottish sound. This is fine if it is what you want, but for that authentic Western sound, hesitate slightly between picking the string and starting the slide. Listen to the recording again, and make sure your slide sounds the same. Now try playing the B part to Cripple Creek: B Part
Have you got it? If you have, well done. If not don’t worry. Keep trying and eventually you will grow used to it. Remember to play this slowly accuracy is more important than speed at this point. Once you are happy with both the A and B parts, put them together in the arrangement AABBA - that is play the A part twice, the B part twice then finish with the A part once. This is the standard arrangement for most Old Time and Bluegrass music, and is generally referred to as AABBA. (Not a reference to an ageing Swedish pop group!).
Practice along with track twenty seven

page 20
PICK SCRATCH
This new style uses the thumb (T) and index finger (i) of the right hand. Listen to the explanation - (track 28) Notice how the thumb adds a bass to the index finger rhythm.
1 Using the open G chord, rest the thumb on the fourth (wound) string.
2 Play the fourth string with the thumb
3 Brush across the top three strings with index finger.
The beats should be evenly spaced, with the single notes and the strums taking the same amount of time. Walking Blues - using Pick scratch This was one of the first guitar tunes I learnt from my first guitar teacher, Heather Wells. One of the reasons I like playing it so much is that the words are so daft. If you want to change the words, go ahead. There have been hundreds of variations of this tune.

Page 21
WALKING BLUES
Down in the holler Sittin’ on a log Finger on the trigger and my eye on a
hog, I
Thought I heard a chicken sneeze Only the rooster Saying his prayers
Thanking the Lord for the Hens up stairs. In this one it doesn’t matter if you have a bad singing voice. It is customary to say the words - if you can manage a Southern drawl even better! Listen to the explanation (track 29), practice with track 30 and memorise

Page 22
CHORDS AND KEYS So far you have been playing in the Key of G. The main chords in G are G, C and D7. You can work out the “Three chord trick” for any key using the 1,4,5,8 Method. Call the Key Chord 1 and count up to identify the 4th, 5th and 8th chords in the sequence: G,A,B,C,D7 ,E,F,G (Don’t worry about why we use D7 instead of D - it’s partly because it’s
1,2,3,4,5, 6,7,8 an easier chord to play - we’ll come back to this in later books). REMEMBER- when you are using the 3 chord trick always start and end with the key chord.
Now we are going to try playing in the key of C. First we have to work out what chords we will need: C,D,E,F,G,A,B,C 1,2,3,4,5,6,7,8 OK, so we can work out that we only need to learn one new chord - F - that’s a stroke of luck isn’t it! The F Chord
This is the first chord shape that uses your fourth (little) finger and you will probably find this difficult at first. The only advice is don’t give up, and don’t be satisfied until you can get a nice, clean sound.
Listen to the explanation (track 31)
Use the example below to practice the chord changes until you can get them all quickly cleanly and reliably. This is the Walking Blues again, this time in the key of C. It would be too easy to just change the chords, so this time I want you to play both the fourth and third strings with your thumb (double thumbing). This will take more concentration at first, but I’m sure you will agree that it sounds more interesting once you’ve got the hang of it.

Page 23
WALKING BLUES - IN C
Listen to the explanation on track 32 and practice with track 33
Have you memorised the words? Can you say the words and play?
Alternative last bar

Page 24
CAMPTOWN RACES This Old-time number was first published in 1850 and was made famous by the Christie Minstrels. It is also known as the sailor shanty,”Sacramento”. Two for the price of one - can't be bad!. This is another example of pick scratch, but this piece has a few tricks of its own for you to
watch out for: Listen to the explanation on track thirty four
Right hand 1 Try playing Basic Scratch to start with. Once you are comfortable.... 2 Start using alternating thumb (the way it is written). Once this gets too easy.... 3 Try changing some of the down strums to down/up or just up. Once you’ve got this
cracked.... 4 Play it your on way! Left hand 1 This is in the key of C. 2 Keep the chord shapes on all the time you are playing - even if you are only playing
individual notes. 3 When you start playing the melody (page 26), watch out for “ C5 “ to
play all the 5th fret notes, lay your index finger across strings 1 to 4 and hold down. This is explained in more detail under Bar Chords on page 27.
Practice playing along with track thirty five, and with the melody on track thirty seven

Page 25
CAMPTOWN RACES
The Camptown lad-ies sing this song Doo Dah Doo Dah The
Camp-town race track’s five miles long Oh, Doo Dah Day —— I
come down there with my hat caved in Doo Dah Doo Dah I
go back home with a pocket full of tin, Oh, Doo Dah Day! Chorus
G’wine to run all night G’wine to run all the Day, I’ll
bet my money on the Bob-tail nag, Some-body bet on the Bay!

Page 26
CAMPTOWN RACES - MELODY Just when you thought you’d made it - here comes the tune!
Rest thumb on the 5th string, use index & middle right - hand fingers. Watch for the ties - remember all the tied bits are played as one long note. If in doubt listen to the recording (track 17)
The “missing” note is the one by itself at the start of the
Listen to the explanation on track 36 and practice playing along with track 37

page27
BAR CHORDS As you know, the banjo is tuned to open G. This means that when you strum it without fretting any strings you play a G chord. It also means that if you fret all four strings (except the fifth) at the same fret you will always get a chord. As these chords are made by using one finger as a bar across all the strings they are called bar chords. We will start with two chords you already know - C and D. C chord (bar 5) D chord (bar 7)
Listen to the explanation (track 38)
Unlike earlier chord diagrams, the fingers used are not marked. This is because all the strings are fretted with the same finger. For the C Chord, lay your first (index) finger over strings 1 to 4. place your thumb under the space between frets 4 and 5 and pinch. Play the strings one at a time and make sure they are all sounding cleanly; if not, adjust your position until they do. This may seem difficult at first, but stick with it. Once you get the hang of it this is the quickest and easiest chord shape to do. To play the D Chord, do exactly the same as for C, but at the seventh fret rather than the fifth.

page28
PROGRESS CHART
We hope by now you do believe you’ve learnt something! Just to give you an idea of how far you have come, here is a list of the things you should be able to do by the time you finish the book. Look back at the chart on page 17 and update that at the same time. For each item on the list enter the date when you can first do it, and the date when it you can do it automatically. Be honest, but remember you should never expect to be perfect - you will still have more to learn if you spend your whole life studying! If you have stayed with the course this far, you can be proud of youself. Getting to the stage where you can play a few tunes takes perserverence. It’s up to you how much further you go, but you already know enough to have fun with your banjo, from now on it’s how to play more and better.
Skill
Page
Can Manage Slowly
Can manage Easily
Play the C Chord cleanly 12
Play Amazing Grace using 3 beats to the bar 12
Sing and play Amazing Grace from memory 13
Clap out whole, half, quarter and eighth notes 14
Play Blood on the Saddle, 3 beats to the bar 15
Sing and play Blood on the Saddle from memory 15
Can play basic scratch in 4 beats to the bar 16
Can play basic scratch in 3 beats to the bar 16
Can slide notes while playing 19
Can play Cripple Creek from memory 19
Can play pick scratch 20
Can play & sing Walking Blues in G 21
Can play the F Chord cleanly 22
Can play & sing Walking Blues in C 23
Can play Capmtown Races in Pick scratch 25
Can play the melody to Camptown Races 26
Can play the bar 5 C Chord 27
Can play the bar 7 D Chord 27
Can play Leaving of Liverpool 30

page29
Take up the
We aim to end each book with a challenging piece. If you find it too hard don’t worry about it, just shelve it for later, and you will grow into it later. Do have a bash at it though - even if you only try in basic scratch
The Leaving of Liverpool Now on to the tune. This can be played entirely with your right hand index finger, but use your middle finger as well if you find this easier. For most of the tune you can rest your thumb on the fifth string as before, but you play the fifth string once,at the start of the chorus. You can just move your thumb out of the way and play this note with your finger, or try playing note with your thumb. Make sure the finger making the seventh fret bar isn’t touching the fifth string when you play this note. This tune is a good illustration of why it is worth knowing the same chord in different positions - it lets you put much more expression into the tune than you can get using the bottom of the neck chords by themselves - try it for yourself and see! As always, start with simple strums and work up to the full arrangement.


page30
Listen to the explanation on track 39 and practice along with track 40
You probably noticed the tablature doesn’t look quite the same as before. This is because it has been produced using a tablature writing programme. The only real differences are: • The time signature at the start: 4/4. For now we are only interested in the top 4, which
tells us we are playing 4 beats to the bar. • The arrows beside the strums. These simply show the direction of the strum. The letters at the start of the lines show the tuning being used, in this case open G, the same as the rest of the book - remember Growing Dinosaurs Get Bigger Daily? Once you have mastered this tune, you can let slip to your guitar-playing friends that you are using bar chords - they will be impressed, because they are much harder on the guitar! This is a great tune for office do’s. I have rewritten the words for an office closing party (The Leaving of Dunstable), but you could also use it for retirements (The leaving of Fred Bloggs)... you form your own judgement on how rude to be! If you are playing to a large crowd you may want to try using a plectrum (sorry Chris!). This arrangement will work perfectly well for this, and you’ll get a lot more volume.
page 31

page 32
USEFUL TIPS
CHANGING YOUR STRINGS If you have never done this, it is best to get someone to show you. Your local music shop will usually be happy to change the strings for you when you buy a new set. If you have a teacher, they will show you. It is difficult to describe because the attachments, particularly on the tail piece (see diagram on page 2 ) vary tremendously. If you have to do this yourself, take off one string at a time, paying attention to how it is attached, particularly at the tail piece. Replace the string and tighten it until it gets back into tune (see below). Don’t leave too much slack in the string between the tailpiece and the peg before tightening or it will take forever to tighten and will look untidy. If you leave too little slack the string won’t hold on the tuning peg at the head end. I leave a long end sticking out from the tuning peg until I am sure that the string is holding properly, and then cut off the excess. If you change one string at a time you will always have the other four strings to check against to make sure you attach it correctly. TUNING THE BANJO
Listen to the explanation on track 2 Again, this is best left to someone with experience. It is very easy to over-tighten a
string until it snaps if you are unused to tuning - Andy once managed to snap the thickest string on a bass guitar while attempting to tune it! If your teacher is giving you a lesson every week, the banjo should not get too far out of tune between times. Again you can seek help from a music shop if you don’t have a teacher. If you have no outside help, use an electronic tuner. You can get good tuners for less than £20, and the price is still falling. Go to a shop that has a reasonable selection and get them to demonstrate. This means that you will leave the shop with a tuner you know how to operate and a banjo that is in tune. For a banjo, you will need a chromatic tuner - one that will tune to any note. Guitar tuners are only slightly cheaper and will cause you increasing difficulties as you use more different tunings on the banjo. Andy: Chris would advise you to use a tuner with a needle that moves in from the left to indicate how close to in tune you are. I have had some bad experience with cheap tuners with mechanical needles and use a tuner that uses a series of small lights to indicate the tuning. If you are buying a tuner try it out in the shop and make sure that the display stays steady on its final reading long enough for you to be sure of that reading. The best reasonably priced tuner I have seen uses a very clear LCD needle display, that was very easy to read and dwelt on its

page 33
final reading for around a second. While the banjo is still in tune practice with the tuner. If any of the strings are slightly out try to bring them back into tune. First try tuning one string by ear. If you have an in-tune guitar, the second third and fourth strings of the banjo are tuned the same as the same strings on a guitar. If not, tune the strings by reference to each other as described. Thinner strings tend to go out more quickly, so start your tuning by reference to the thickest (fourth) string. To tune the third string to the fourth, fret the fourth (D) string on the fifth fret, which gives the same note as the open third (G) string in standard G tuning. Try and get as close as you can without using the tuner, as this will in time train your ear. TIP: If the note doesn't change when you turn the tuning peg, make sure you are turning the peg for the string you are playing. This is the commonest and easiest mistake to make, and can result in you getting the banjo completely out of tune. Also make sure you haven't left a capo on, as this will cause problems too. Once you have reached the stage where you think the string is in tune, or you can’t tell whether to tighten or slacken the string, switch on the tuner. Make sure it is close enough to the banjo to respond instantly to the string being plucked. If it says your tuning is miles out, first check that you are tuning to the right note, (below) and that you don’t have a capo on. Don’t be disheartened if you didn't get close by ear, this is something that only comes with practice. Many professional musicians use electronic tuners on stage, so don’t feel it’s cheating. From here it is just a case of watching the tuner while you turn the (correct) tuning peg. Use small movements and make sure of the tuner reading between each adjustment. Once you have one string in tune, move on to the next. Fret positions for tuning by ear In G tuning the open notes are, starting with the short fifth string, GDGBD - remember, Growing Dinosaurs Grow Bigger Daily. First string - D tune to second string, 3rd fret Second string - B tune to third string, 4th fret Third string - G tune to fourth string, 5th fret Fourth string - D use this as the reference as it is most likely to be in tune Fifth string - G tune to first string, fifth fret
page 34
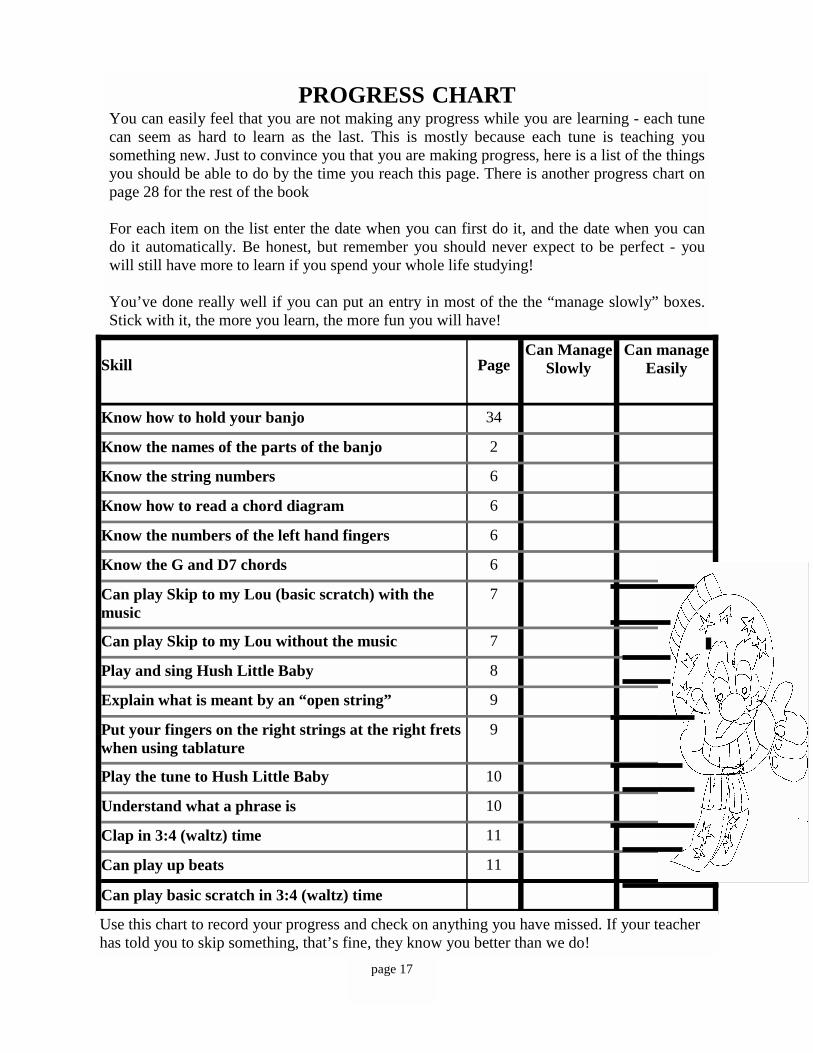
HOW TO HOLD THE BANJO To start with, play sitting down. Standing up is more difficult, and you don’t need the added complication at this stage. Take a look at the cover picture. This illustrates the two possible positions for holding the banjo. The body can either be settled between the legs (Chris) or rested on the right leg (Andy). It is more stable between the legs, but resting on your right leg brings the end of the neck closer. Choose whichever position suits you best. You will notice that we are both wearing the banjo straps. This helps stabilise the banjo on your lap, and fights the tendency of the neck to drop while playing. Left hand position The other important consideration is your left hand. If you are playing in open G (page 6), you only need to support the neck, but for any other chord you will be holding down strings too. Using the C chord (page 12) as an example, place the pad at the end of your thumb in the middle of the back if the neck, below the fingers that are holding down the chord.
Do not: ♦ Rest the neck of the banjo in the crook of your thumb. This feels comfortable, but puts
strain on the joint at the base of your thumb, and you run a high risk of long-term damage to the joint. Arthritis takes a lot of the fun out of playing!
♦ Support the neck with the base of your thumb. This puts the strain on the joint at the base
of your hand, and can cause joint problems too. Both of these positions will also restrict the reach of your fingers across the fretboard, which can really slow you down when you graduate to more fancy playing.
You must also ensure that the fingers on the left hand are pointing straight at the fret board from the last joint, which should be a right angle bend.

page 35
Right hand position There are a number of right hand techniques you will need to master as you develop your playing skills, but for this book you need only one. Rest your thumb on the 5th (short) string and keep the rest of your fingers in the air over the remaining strings. To strum (scratch), run your fingers down and up over the strings. To pick, rest your finger briefly on the string you want to sound and pull upwards, catching the string with your nail to get a clear note.
A SHORT NOTE ABOUT PICKS If Chris had his way this note would just say “Don’t use picks yet”. When I first started going to festivals and talking to other banjo players, I got all sorts of conflicting advice on picks, so I think we should explain a little more. Finger picks make strumming difficult, and at this stage, when you are learning to hold down chord shapes cleanly, strumming is essential. Once you have mastered the basics, you will have to decide the style of playing you want to take up. If you want to play Old Time, fingers will give that softer feel, while if you opt for Bluegrass, picks will be needed to get an authentic sound. For now, the only concern is the thumb. If you can sound the strings clearly with your thumb unaided, a pick will only be a nuisance. If, like me, you have problems with this, a thumb pick may be the answer. Thumb picks have problems of their own. It is hard to balance the sound between the notes played with your soft fingers and the hard pick. You will also spend a lot of time disentangling the pick from the strings, particularly once you start playing the third and fourth strings with your thumb. This is a subject we will return to in more detail in later books, so don’t worry about it too much for now

page 36
A SHORT HISTORY OF THE BANJO There is a picture in Thebes Egypt, some six thousand years old, of two girls playing an early relative of the banjo. Archaeologists tell us that the ancient Egyptians had orchestras of up to six hundred of these instruments, which are thought to be similar to the Medieval Rebec, which ultimately developed into the violin. Negro slaves brought this primitive instrument into America from North West Africa. Its closest relatives can still be found in Arabia and some parts of Africa. They are made from a tortoise shell or gourd sound box, with a goat skin stretched over it, making a body similar to a drum. Projecting out from the body is a round stick, holding gut strings on simple tuning pegs. In 1785 Thomas Jefferson called the instrument bought to America by the Negro slaves “the banjar”. It had now developed to use four or five strings, but was still fretless. So the banjo came about by an entirely different route from the guitar, which evolved from the Indian Sitar. Joel Sweeney (1810 to 1860) is credited with adding a the fourth (wound) full-length string between the third string and the short drone string to make the five-string banjo. He helped to popularise the instrument by playing the banjo in Black and White Minstrel Bands in the theatres and music halls of the period. He is mainly responsible for introducing the banjo to a white audience - including Queen Victoria, at a Royal Variety Concert during a short stay in London. The early musicians often could neither read nor write, and so the music was passed on by example. In fact very little music was written for the banjo before the late eighteen hundreds. The tuning of the banjo in its early days tended to be left to the individual. It would be taken from the notes of any open chord that came to mind. The fretless banjo was used up until the nineteen twenties. By this time the banjo had a standard tuning of GDGBD, although even today the banjo is far more frequently re-tuned than the guitar, particularly for Old Time playing. Through the eighteen hundreds the banjo was extremely popular both in America and England, but the nineteen hundreds brought in the age of Jazz, and with it the invention of the shorter necked four stringed tenor banjo. This instrument had thicker strings and was loud enough to compete with the other instruments in the Jazz band. By the nineteen thirties, the popularity of the banjo had declined to such an extent that the five string banjo had almost become extinct. It was kept alive due to the stubbornness, determination and love of a small group of people living in the Southern Mountain regions of America, together with the Country and Western bands playing in Tennessee and at the Grand Ole Opray Music Hall. The revival was brought about mostly by one individual, Earl Scruggs. In the nineteen forties he invented a style of right handed finger pickin’ that is now known as “Scruggs style”. His style of playing soon spread, and within two years the banjo regained its popularity. It now starred in the bluegrass bands that still play across much of the world. The Old Time style however owes much more to those stubborn mountain men who kept the banjo alive during its lean years. I would like to acknowledge my debt to Pete Seeger, who recorded so much of the old time music that might otherwise have been lost forever, and who was a great inspiration to me when I first started playing the banjo. His tutor book did a great deal to get me and many others playing old time music.

page 37
SKIP TO MY LOU 1st verse & chorus Lou, Lou, skip to my Lou Lou, Lou, skip to my Lou Lou, Lou Skip to my Lou Skip to my Lou my Darling Lost my partner what’ll I do (3 times) Skip to my Lou my Darling I’ll get another one prettier than you (3 times) Skip to my Lou my Darling. (Chorus) Little red wagon, painted blue (3 times) Skip to my Lou my Darling (Chorus) Flies in the Buttermilk, two by two (3 times) Skip to my Lou my Darling (Chorus) Flies in the sugar bowl, shoo shoo shoo (3 times) Skip to my Lou my Darling (Chorus) Going to Texas two by two (3 times) Skip to my Lou my Darling (Chorus) Cat’s in the cream jar, what’ll I do? (3 times) Skip to my Lou my Darling (Chorus) You may know other verses, or make up your own!
HUSH LITTLE BABY Hush Little baby, don’t say a word Papa's going to buy you a Mocking bird, And if that Mocking bird don’t sing, Papa's going to buy you a diamond ring. And if that diamond ring turns brass, Papa's going to buy you a looking glass And if that looking glass gets broke, Papa's going to buy you a Billy goat.
And if that billy goat don’t pull, Papa's going to buy you a cart and bull And if that cart and bull turn over, Papa's going to buy you a dog named Rover And if that dog named rover don’t bark, Papa's going to but you a horse and cart. And if that cart and horse fall down, You’ll still be the sweetest baby in town.

page 38
AMAZING GRACE Amazing Grace, how sweet the sound, That saved a wretch like me. I once was lost, but now I’m found, Was blind, but now I see. 'Twas Grace that taught my heart to fear, And Grace my fear relieved. How precious did that Grace appear, The hour I first believed. Through many dangers, toils and snares, We have already come. ‘Twas Grace that bought us safe thus far, And Grace will lead us home When we’ve been there ten thousand years, Bright shining as the sun. We’ve no less days to sing God’s praise, Than when we first begun
BLOOD ON THE SADDLE There was blood on the saddle, And blood on the ground, And a great big puddle Of blood all around. The cowboy lay in it, All bloody and red; His hoss fell on him, And bashed in his head.
Pity the poor cowboy, All bloody with gore; He ain’t gonna punch no cows no more. There was blood on the saddle, And blood on the ground, And a great big puddle Of blood all around.

page 39
CRIPPLE CREEK We taught you this tune as an instrumental, as that’s the way it is usually played. Here is one of many sets of words that go with the tune. Verse (A part) I’ve got a girl at the head of the Creek, Goin’ down to see her ‘bout the middle of the week. Kiss her on the lips, sweet as ant wine, Wraps herself around me like a sweet pertater vine. Chorus (B part) Goin’ down to Cripple Creek, goin’ at a run, Goin’ down to Cripple Creek to have a little fun. Goin’ down to Cripple Creek, goin' in a whirl Goin’ down to Cripple Creek to see my girl. I went down to Cripple Creek, To see what them girls have to eat Got so drunk, fell against the wall, Old corn likker is the cause of it all. (Chorus) Cripple Creek’s wide and Cripple Creek’s deep, I’ll cross Cripple Creek before I sleep. Roads are rocky and the hillside’s muddy, I’m so drunk I can’t stand steady (Chorus and A part once to finish)
WALKING BLUES Down in the holler, sittin’ on a log, Finger on the trigger and my eye on a hog. I thought I heard a chicken sneeze, Only the rooster saying his prayers, Thanking the lord for the hens upstairs. Make up your own extra verses for this - see how long you can keep going before you repeat yourself.

page 40
CAMPTOWN RACES The Camptown ladies sing this song, Doo Dah, Doo Dah, The Camptown race-track’s five miles long Oh, Doo Dah Day. I come down there with my hat caved in, Doo Dah, Doo Dah, I go back home with a pocket full of tin, Doo Dah, Doo Dah, Chorus G’win to run all night, G’win to run all the day I’ll bet my money on the Bob-tail nag, Some-body bet on the bay. The long-tail filly and the big black hoss, Doo Dah, Doo Dah, They fly the track and they both cut across Oh, Doo Dah Day. The blind hoss stickin’ in a big mudhole Doo Dah, Doo Dah, Can’t touch bottom with a ten-foot pole Oh, Doo Dah Day. (Chorus) Old muley cow come onto the track Doo Dah, Doo Dah, The bobtail fling her over his back Oh, Doo Dah Day. They fly along like a railroad car Doo Dah, Doo Dah, Runnin' a race with a shooting star Oh, Doo Dah Day. (Chorus) See them flying on a ten-mile heat Doo Dah, Doo Dah, Round the race track then repeat Oh, Doo Dah Day. I win my money on the bob-tail nag Doo Dah, Doo Dah, keep my money in an old tow bag Oh, Doo Dah Day. (Chorus)
The Leaving of Liverpool Farewell to Princes Landing stage, River Mersey fare thee well. I am bound for California, a place that I know quite well Chorus So fare thee well my own true love, when I return united we shall be. It’s not the leaving of Liverpool that grieves me, but my darling when I think of thee I have shipped on a Yankee clipper ship, Davey Crocket is her name Dan Burgess is the captain of her and they say that she’s a floating shame (Chorus)
I have sailed with Burgess once before and I reckon I know him well. If a man is a sailor then he’ll get along, if he’s not then he’s sure in hell. (Chorus) Oh the sun is on the harbour, love and I wish that I could remain. For I know it will be a long, long time before I see you again. (Chorus)
page 41
USEFUL ADDRESSES The British Bluegrass Music Association is the best source of information about Bluegrass festivals, picking sessions and other events in the UK. It has a network of area reps who will always be happy to introduce you to the local Bluegrass scene and direct you to local banjo teachers and
shops. The quarterly publication British Bluegrass News contains information on festivals, local events and CD reviews. For further information contact: Phill Morley Membership secretary, tel 01492 533011, Freepost BBMA, or visit the BBMA website at BritishBluegrass.com.
Friends of American Old Timey Music and Dance. If you are more interested in old- time music, FOAOTMAD is the organisation to contact. Write to Eve Morris, Membership Secretary, FOAOTMAD, 64 Alma Terrace, York YO10 4DJ, tel. 01904 632674. Their quarterly magazine covers news on the Old Timey scene in the UK.
For mail-order strings, picks, books videos, CDs etc. contact Frets Old and new 294 Longmore Lane, Fazakerly, Liverpool L9 6DG for a catalogue. Alternatively ring them on 0151 474 6343. You can also see Dave and Chris at the Frets stall at most Bluegrass Festivals.
When you have finished this book, we recomend you try out Phill Morely’s Bluegrass Banjo Lessons - each lesson comes with tab and audio tape/CD and teaches you a couple of tunes. These are graded to form a course that will have you playing over 20 tunes increasing in difficulty and interest as your playing improves. Contact Phill on 01245 264450, e mail phill@bluegrass uk.com

page 42
This book is the copyright of Chris Lawrance and Andy Nixon.
Illustrations provided by Stephen and Iain Nixon