Forestry Contest Manual
67
Stevens County Forestry Contest Instruction Manual for Teachers and Students SPONSORED BY: Stevens County Conservation District 232 Williams Lake Colville, WA 99114 (509) 685-0937 ext. 3 Revised 2013
Transcript of Forestry Contest Manual
Stevens County
Forestry Contest
Instruction Manual for Teachers and Students
SPONSORED BY:
Stevens County Conservation District 232 Williams Lake
Colville, WA 99114 (509) 685-0937 ext. 3
Revised 2013

SUPPORTERS OF THE STEVENS COUNTY FORESTRY CONTEST
The Following provide financial and/or technical support:
Arden Tree Farms Berrigan Forestry Boise Washington Region Bureau of Indian Affairs Clark’s Allsports Columbia Cedar Colville Small Engine Service Forest Capital Partners Natural Resources Conservation Service (NRCS) Northeast Washington Hoo Hoo Club Retired individuals: Al Lang, Bob Olson, Claudia Michalke, Gary Nielsen, Jay Berube, Jim Gleaton, John Riddlington, Lee Hedrick, Larmie Edwards, Mick Lewis, and Paul Moore Society of American Foresters Spokane County Conservation District Springdale Lumber Stevens County Conservation District (SCCD) Stimson Lumber United States Forest Service (USFS) Upper Columbia Timbermens Association Vaagen Brothers Lumber Washington Association of Conservation Districts (WACD) Washington Department of Natural Resources (DNR) Williamson Consulting Women in Timber
Page 2 of 67
Stevens County
Forestry Contest
Table of Contents Introduction ……….…………………………..………………. 3 Chain saw & Trouble Shooting ……………………………….. 9 Compass Reading& Pacing …………….………………………… 21 Log Scaling ………………………………………………… 25 Forestry Issues ………………………….……………….………... 28 Map Reading/Legal Descriptions ..……………………………. 29 Noxious Weeds ………………………………..………………. 42 Slope Determination …………………………………………... 43 Timber Stand Improvement ……………………..…………….. 46 Timber Cruising …………………………………….…………. 50 Tool Identification ……………………………..……………… 54 Tree Disorder ………………………..…………………..…….. 60 Tree & Plant Identification ……………….…….……………... 64

Page 3 of 67
Stevens County
Forestry Contest
History In July 1978, Glenn Engbretson, Agricultural teacher at Northport High School, requested Stevens County Conservation District to organize a forestry contest for high school students. He worked with Browny Lalich, SCS Forester in Colville, and Clark Hedrick, SCCD Forestry Committee Chairman, to develop the contest events. Ron McClellan, SCS District Conservationist in Colville suggested the District hold a workshop prior to the contest to train the Vo-Ag teachers so they would have the background information and resource materials to prepare their students for participation in the forestry contest. The training was conducted in Colville on Saturday, March 4, 1979; in attendance were the following high school teachers. Keith Balance, Kettle Falls; Jerry Belzer; Chewelah; Royce Beardsley, Colville; Mel Addington, Wellpinit and Jay Ashley of Hunters. The training was provided by SCS foresters, DNR, SCCD, and Lee Hedrick and Paul Christian representing the Northeast Washington Hoo-Hoo Club. The training for teachers continued through the mid 1980’s. Larmie Edwards, DNR and Lee Hedrick assisted with the first training and every contest and training workshop since 1979. Ninety-two students from 6 schools participated in the first Stevens County Conservation District Forestry Contest held at Douglas Falls Park north of Colville on April 26, 1979. This was the first forestry contest in Washington State. Participating agencies, organizations, and individuals helped to make the event a success. In 2004 the forestry program was dropped from the Colville High School curriculum. This didn’t set well with some people in the forestry community. In August 2005, the Northeast Washington Hoo-Hoo Club and retired SCCD District Administrator, Claudia Michalke, who has been active from the beginning in organizing the local forestry contest, met with the Colville school superintendent and the high school principal to try and reinstate the forestry program. The Colville School District was in favor of restarting the program and, once again, Claudia Michalke, Floyd Pitts, Larmie Edwards, and the Hoo-Hoo Club, who was instrumental in getting the program started in 1979, orchestrated a group of volunteers from the forestry industry to teach all the different skills needed to educate our youth in a forestry class. Stevens County Forestry Contest is an annual event always scheduled for the third Thursday in April. The contest is open to all schools in Eastern Washington.

Page 4 of 67
Past and Present Winning High Schools:
April 2013 Score Individual Score 1st Colville 1913 Colton Vining 483 2nd Kettle Falls 1570 Ryan Matheny 480 3rd Wenatchee 1525 Jacob Morris 444 April 2012 Score Individual Score 1st Colville 1716 Clayton Vining, Colville 2nd Chelan 1583 Jake Straub, Chelan 3rd Inchelium 1427 Shawn Hess, Chelan April 2011 Score Individual Score 1st Colville 1916.75 Jared Attridge, Deer Park 418 2nd Chewelah 1643 Mariah Lentz, Colville 408.75 3rd Deer Park 1578.25 Cole Holbert, Chewelah 365.75 April 2010 Score Individual Score 1st Colville 2838 Randy Harbolt, Colville 629 2nd Wenatchee 2222 Kevin Halvorson, Wenatchee 582 3rd Deer Park 2113 Kelly Ledgerwood, Colville 574 April 2009 Score Individual Score 1st Wenatchee 1687 Jelena Kenworthy, Colville 467 2nd Colville 1660 Alec Wood, Wenatchee 417 3rd Deer Park 1518 Ryan Attridge, Deer Park 411
April 2008 Score Individual Score 1st. Colville 1975 Jelena Kentworthy, Colville 506 2nd Inchelium 1757 Cedar Hincke, Colville 487 3rd Kettle Falls 1374 Trevor Thompson, Colville 465 April 2007 Score Individual Score 1st. Colville 1885 Travis Eller, Colville 494 2nd Inchelium 1627 Cedar Hincke, Colville 469 3rd Deer Park 1334 Mark Gronlund, Inchelium 447 April 2006 Score Individual Score 1st. Colville 1816 Andy Pond, Colville 641 2nd.Inchelium 1598 Cody Heathman, Colville 568 3rd. Wenatchee 1452 Jason Palmer, Deer Park 557

Page 5 of 67
April 2005 Score Individual score 1st Chelan 2667 Josh Robison, Chelan 535 2nd. Inchelium 2235 Cedric Easley, Chelan 517 3rd. Kettle Falls 1921 Jason Sharp, Chelan 516 April 2004 Score Individual Score 1st. Wenatchee 1730 Andy Pond, Colville 451 2nd. Chelan 1696 Brandt Appell, Weatchee 441 3rd. Colville 1624 Tom Moore, Chelan 433 April 2003 Score Individual Score 1st. Wenatchee 1730 Brandon Baskin, Colville 374 2nd. Colville 1506 Matt Harum, Wenatchee 361 3rd. Deer Park 1451 Josh Krieg, Springdale 358 April 2002 Score Individual Score 1st Wenatchee 2178 Brandon Estes, Kettle Falls 585 2nd. Kettle Falls 2127 Patty Delabarre, Wenatchee 579 Only two schools participated. Heidi Steigert, Kettle Falls 525 April 2001 Score Individual Score 1st. Kettle Falls 2636 Andy Drake, Kettle Falls 596 2nd. Wenatchee 2573 Shawn Elliott, Wenatchee 520 3rd. Colville 2343 Wyatt Humphrey, Colville 512 April 2000 Score Individual Score 1st. Kettle Falls 3045 Matt Gridner, Colville 670 2nd. Wenatchee 2998 Andy Drake, Kettle Falls 651 3rd. Colville 2742 Josh Schuyleman, Wenatchee 644 April 1999 Score Individual Score 1st. Kettle Falls 2721 Jake Grinolds, Kettle Falls 577 2nd. Wenatchee 2703 Shaun Fuller, Kettle Falls 568 3rd. Colville 2620 Matt Gridner, Colville 561 April 1998 Score Individual Score 1st. Kettle Falls 2392 Shay Dickey, Kettle Falls 491 2nd. Wenatchee 2351 Nate Schuyleman, Wenatchee 481 3rd. Colville 2118 Jason Heinz, Wenatchee 476 April 1997 Score Individual Score 1st. Kettle Falls 2703 Byron Richart, Kettle Falls 584 2nd. Colville 2628 Jake Prater, Colville 571 3rd. Deer Park 2219 Trina Kroiss, Colville 559
Page 6 of 67
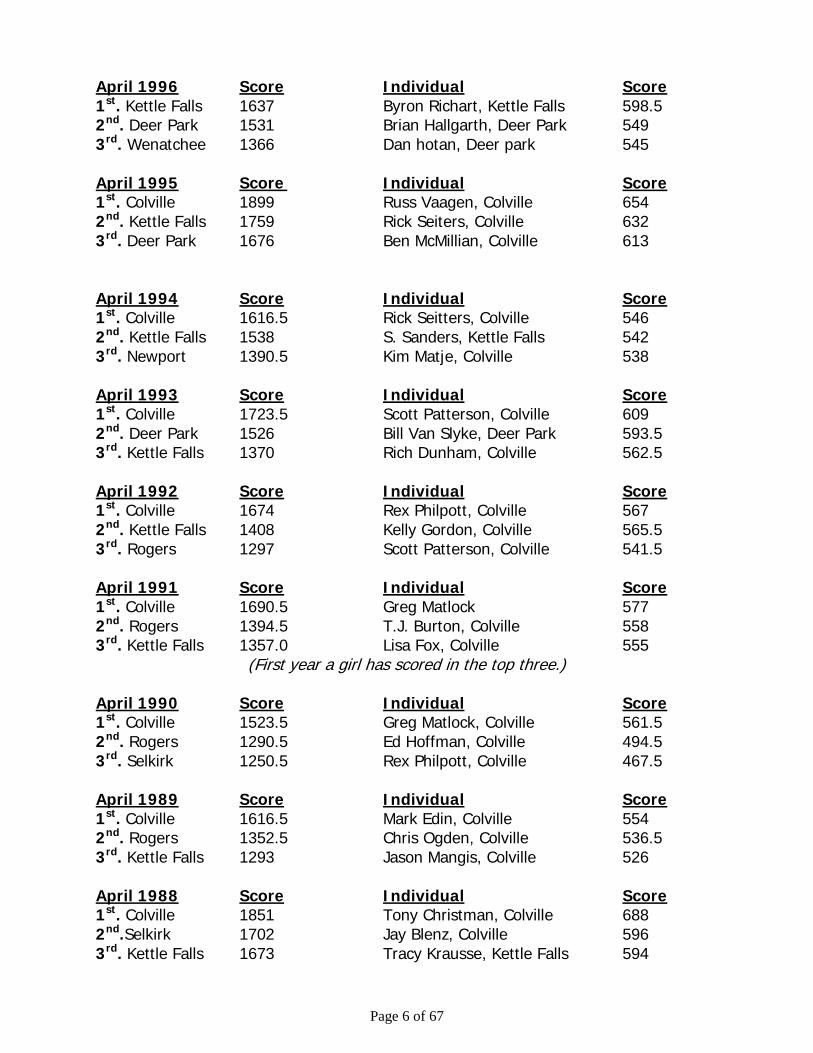
April 1996 Score Individual Score 1st. Kettle Falls 1637 Byron Richart, Kettle Falls 598.5 2nd. Deer Park 1531 Brian Hallgarth, Deer Park 549 3rd. Wenatchee 1366 Dan hotan, Deer park 545 April 1995 Score Individual Score 1st. Colville 1899 Russ Vaagen, Colville 654 2nd. Kettle Falls 1759 Rick Seiters, Colville 632 3rd. Deer Park 1676 Ben McMillian, Colville 613 April 1994 Score Individual Score 1st. Colville 1616.5 Rick Seitters, Colville 546 2nd. Kettle Falls 1538 S. Sanders, Kettle Falls 542 3rd. Newport 1390.5 Kim Matje, Colville 538 April 1993 Score Individual Score 1st. Colville 1723.5 Scott Patterson, Colville 609 2nd. Deer Park 1526 Bill Van Slyke, Deer Park 593.5 3rd. Kettle Falls 1370 Rich Dunham, Colville 562.5 April 1992 Score Individual Score 1st. Colville 1674 Rex Philpott, Colville 567 2nd. Kettle Falls 1408 Kelly Gordon, Colville 565.5 3rd. Rogers 1297 Scott Patterson, Colville 541.5 April 1991 Score Individual Score 1st. Colville 1690.5 Greg Matlock 577 2nd. Rogers 1394.5 T.J. Burton, Colville 558 3rd. Kettle Falls 1357.0 Lisa Fox, Colville 555
(First year a girl has scored in the top three.) April 1990 Score Individual Score 1st. Colville 1523.5 Greg Matlock, Colville 561.5 2nd. Rogers 1290.5 Ed Hoffman, Colville 494.5 3rd. Selkirk 1250.5 Rex Philpott, Colville 467.5 April 1989 Score Individual Score 1st. Colville 1616.5 Mark Edin, Colville 554 2nd. Rogers 1352.5 Chris Ogden, Colville 536.5 3rd. Kettle Falls 1293 Jason Mangis, Colville 526 April 1988 Score Individual Score 1st. Colville 1851 Tony Christman, Colville 688 2nd.Selkirk 1702 Jay Blenz, Colville 596 3rd. Kettle Falls 1673 Tracy Krausse, Kettle Falls 594

Page 7 of 67
April 1987 Score Individual Score 1st. Selkirk 2319 Brian Smith, Selkirk 534 2nd.Colville 1926 Steve Alsept, Selkirk 479 3rd. Kettle Falls 1906 Travis Kissinger, Selkirk 457 April 1986 Individual 1st. Colville Wayne Leaman, Colville 2nd. Selkirk G.J. Pearce, Colville 3rd. Deer Park Brian smith, Selkirk April 1985 Score Individual Score 1st. Colville 2404 Todd Strobel, Colville 539 2nd. Rogers 1978 Jeff Goff, Colville 519 3rd. Mead 1944 Ed Fochtman, Colville 499 April 1984 Individual 1st. Colville Kevin Thompson, Colville 2nd. Chewelah Roger Curran, Chewelah 3rd. Rogers Todd Strobel, Colville April 1983 Individual 1st. Colville Gene Leaman, Colville 2nd. Chewelah Maurice Hemple, Deer Park 3rd. Deer Park Mike Ziegweed, Deer Park April 1982 Score Individual Score 1st. Colville 2467.5 Glen Jensen, Colville 509 2nd. Kettle Falls 2286 Marty Enquist, Colville 503.5 3rd. Chewelah 2286 Pat Alsobrook, Kettle Falls 501 April 1981 Score Individual Score 1st. Colville 2384 Marty Heggan, Colville 564 2nd. Kettle Falls 2347 Jeff Jackson, Chewelah 541 3rd. Chewelah 2236.5 Dennis Tarbert, Kettle Falls 529 April 1980 Individual Score 1st. Colville Girnus, Chewelah 544 2nd. Chewelah Finley, Kettle Falls 521 3rd. Kettle Falls Flatter, Chewelah 508 April 1980 Individual 1st. Kettle Falls Tracy Vining, Kettle Falls 2nd. Colville Kelly Carr, Kettle Falls 3rd. Chewelah Mark Bakken, Chewelah
Page 8 of 67
The first Washington State FFA Forestry Contest was held at Kamiaak Butte near Pullman, Washington on June 15, 1979, and was organized by WSU Extension. Subsequently, the state contest was moved to Pack Forest in Western Washington. In 1993 the contest was held at Fan Lake near Deer Park in Eastern Washington and under the direction of the Natural Resources Conservation Service. The contest rotates each year between Eastern and Western Washington. The state contest is generally held the last days of April or the first couple days of May. The principal objective of the contest is to introduce young people to forest management and to encourage the wise use or conservation of our natural resources. It is hoped that by learning these skills the individual will possess a higher degree of understanding and knowledge about our forests, which will lead to better managed and more productive forests for future generations. The forestry contest also provides an opportunity for interaction between students and professional foresters and conservationists. The concept of natural resource professionals meeting and teaching students allows a unique opportunity for a young person to explore career opportunities in the field of forestry. The Stevens County Forestry Contest is open to high school aged students. The contest is not limited to school sponsored teams. FFA, 4-H, Boy Scouts, Girl Scouts, and other youth organizations are encouraged to participate.
How the Contest Works Students compete as a team and individually. At the contest schools/organizations are combined into groups. The groups compete in events with the Issues event attended by a pre-selected team of 4 or 5 students who represent their school. Rules: During each event no talking, cheating or littering is allowed. Students and teachers need to be courteous to each other and respectful of event volunteers and organizers. Tie Breaker: Teachers determine on site. The purpose of the manual is to assist instructors in teaching practical forestry skills that are required for competition in the events at the forestry contest.

Page 9 of 67
CHAIN SAW OPERATION Introduction Chain saw operators need to know how to:
● Match the saw to the job ● Evaluate working conditions ● Perform basic cuts ● Work within the saw’s limitations ● Identify dangerous problem trees ● Do routine saw maintenance
● Dress with proper clothing for the job ● “Size up” a tree ● “Fell a tree” (cut it down) ● “Limb” (remove limbs from a trunk) ● Make trunk cuts ● Recognize and sharpen a dull chain ● Avoid “kickback” (jumping backwards as the chain at the top of the guide bar is
snagged) ● Use safe operating techniques (starting, cutting position, refueling, clean work
area) The best source of knowledge about the size of chain saw required is an experienced, knowledgeable dealer. To choose the proper saw, you need some idea about the amount and type of cutting you will be doing. Large chain saws, weighing over 15 pounds with long bars, are best used for professional, heavy cutting of large wood and in felling operations. A medium size saw, generally having a total weight of 10 to 15 pounds and a cutting bar from 12 to 18 inches in length is good for light cutting, and bucking and limbing. A small lightweight saw, usually weighing less than 10 pounds with a cutting bar length of 10 or 12 inches, is best suited for cutting small trees and pruning. If too small a saw is used continually for tough jobs, the operator will tend to overexert. Similarly, use of a heavy saw for light work may result in excessive fatigue. When you’re overtired, accidents can occur. Several factors affect the safe operation of a chain saw. Among these are the weather, the work, the saw, and the operator.
A chain saw should match the task you want it to do. That is a basic principle of chain saw safety.
Page 10 of 67
The Weather Wind can create very serious hazards when cutting down trees. Sudden gusts may cause a tree to fall in an unexpected direction. Avoid cutting large trees on windy days, or use these days for limbing or bucking. Rain, snow and ice can cause a loss of good footing. Always wear proper protective clothing, and work slowly and carefully.
The Work Inexperienced operators should not start by felling trees. Make trial cuts to become accustomed to a chain saw’s cutting and handling characteristics. Cut small logs supported off the ground so that the chain will not strike the ground. Let the chain do the cutting. Extra pressure does not need to be applied. Don’t try to cut trees with a diameter greater than the length of the chain saw guide bar. This requires special techniques. You can be seriously injured if the saw makes a kickback. Certain trees are dangerous. Lumberjacks use some of the following expressions to identify problems trees:
Widowmaker – A tree with broken or dead limbs or a dead tree “hung up” in another tree. A limb doesn’t have to be very big or high in a tree to be capable of causing serious injury if it falls on a person. Spring pole – A sapling that is bent and held under tension by another tree. If the spring pole is cut or the other tree is removed from it, the sapling can snap up with a tremendous force and seriously injure someone nearby. Schoolmarm – A tree with a prominent fork in the trunk making it difficult to predict which way it will fall.
The Saw The noise and vibration of a chain saw can cause hearing loss, fatigue and swelling of the hands, commonly known as white fingers disease. Buy a saw that runs with minimum vibration (some saws are equipped with anti-vibration mounts) and good vibration-absorbing grips.

Page 11 of 67
Proper Maintenance is also essential. This includes sharp teeth, correct chain tension, proper lubrication and well-tuned engine. Most routine maintenance can be accomplished by following the owner’s manual recommendations. Unless you are mechanically inclined, consult a saw dealer when serious mechanical problems arise. Every owner should have a good tool kit to help assure continued operation of his saw. The kit should contain:
A few extra labeled cans or a plastic bottle (with attached pouring nozzle) of chain oil.
Wrenches to fit all nuts and lugs on the saw Screwdriver Round file and guide for touching up the chain Flat file and depth gauge to file the depth guides Small brush (1/2 inch) to clean away sawdust and wood chips from around the
gas cap and cooling fins Extra sparkplug Owner’s manual (wrapped in a plastic bag) Cleaning rags
If you are going to do a lot of cutting, take along an extra chain as a spare. Alternating chains every day will greatly prolong the life of the sprocket upon which they run.

Page 12 of 67
Some additional backup equipment is essential. In most national forests, the law requires you to carry an axe, bucket and a shovel in all vehicles that enter the forest from May 31 through October 31. A 3-gallon pressure type garden sprayer with a medium spray tip makes a good extinguisher for forest conditions. Dry chemical class AB extinguishers are also good. An approved functional spark-arresting screen for the saw’s muffler is also a must.
The Operator Felling and cutting timber is hard work. Operators should be in good physical condition and able to withstand heavy work periods. Persons who become exhausted easily may be potential accident victims. Don’t hesitate to take frequent rest breaks.
Operating Techniques Mixing Fuel: Mix fuel according to instructions in the owner’s manual. Store and transport fuel in a properly labeled, heavy gauge (26 gauge or heavier) metal gasoline container. Keep the chain and bar well lubricated when cutting; make certain the oiler device (manual or automatic) is functioning. The oiler is both a safety device and a means of reducing bar wear. Refueling: When refueling the engine use a funnel or flexible nozzle to avoid spillage. If you do spill fuel on the engine, thoroughly clean the engine before starting. Refuel the engine with the saw on the ground and in an area cleared of combustible materials. Under no circumstances should you smoke while refueling.
Proper clothing is a must. Wear warm comfortable trim-fitting clothing that allows easy movements. Use light non-slip gloves and good gripping boots or shoes. Protective leggings or chaps and shoes with steel toes will provide additional safety. Safety goggles or eyeglasses with safety lenses help prevent possible eye injury from flying wood chips or sticks. A good safety hard hat may prevent serious head injury from falling branches or limbs. Earplugs or acoustic muffs are essential because of a saw’s high noise level. If your ears ring for an extended time after the saw is used, hearing damage may have occurred.
Page 13 of 67
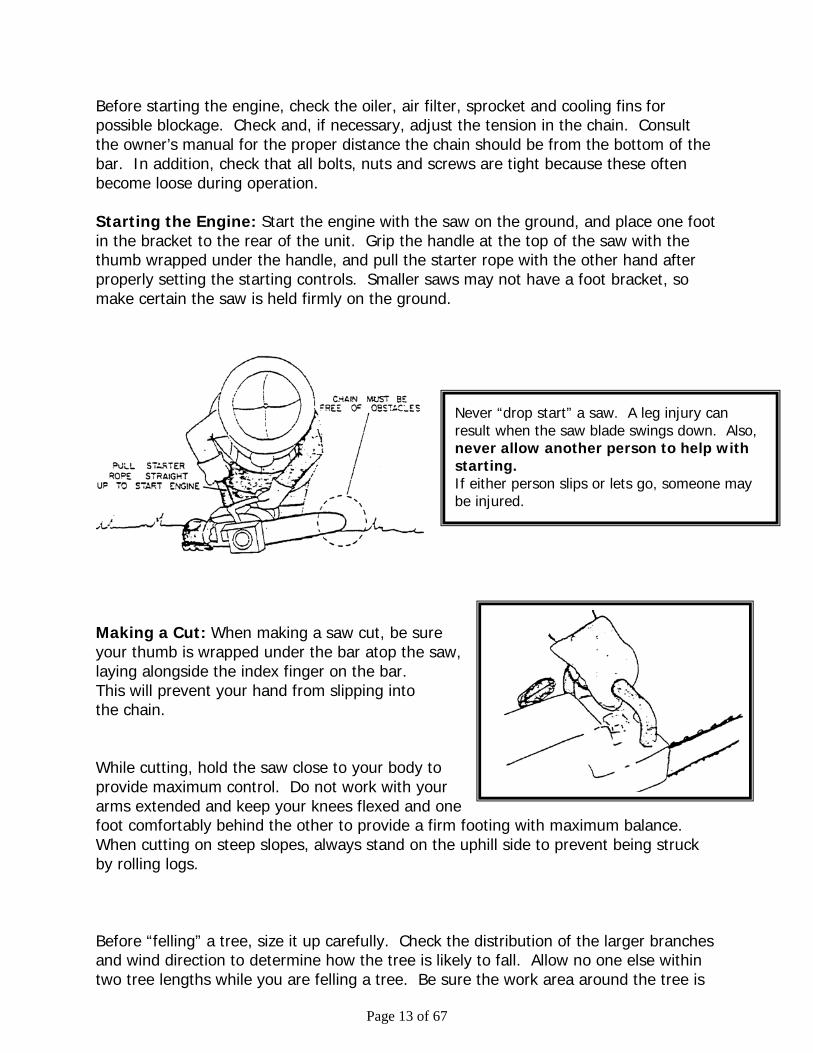
Before starting the engine, check the oiler, air filter, sprocket and cooling fins for possible blockage. Check and, if necessary, adjust the tension in the chain. Consult the owner’s manual for the proper distance the chain should be from the bottom of the bar. In addition, check that all bolts, nuts and screws are tight because these often become loose during operation. Starting the Engine: Start the engine with the saw on the ground, and place one foot in the bracket to the rear of the unit. Grip the handle at the top of the saw with the thumb wrapped under the handle, and pull the starter rope with the other hand after properly setting the starting controls. Smaller saws may not have a foot bracket, so make certain the saw is held firmly on the ground.
Making a Cut: When making a saw cut, be sure your thumb is wrapped under the bar atop the saw, laying alongside the index finger on the bar. This will prevent your hand from slipping into the chain. While cutting, hold the saw close to your body to provide maximum control. Do not work with your arms extended and keep your knees flexed and one foot comfortably behind the other to provide a firm footing with maximum balance. When cutting on steep slopes, always stand on the uphill side to prevent being struck by rolling logs. Before “felling” a tree, size it up carefully. Check the distribution of the larger branches and wind direction to determine how the tree is likely to fall. Allow no one else within two tree lengths while you are felling a tree. Be sure the work area around the tree is
Never “drop start” a saw. A leg injury can result when the saw blade swings down. Also, never allow another person to help with starting. If either person slips or lets go, someone may be injured.

Page 14 of 67
cleared of underbrush or obstacles that could be tripped over. Clear an escape path 45 degrees opposite the direction the tree will fall. Examine the tree for loose or dead limbs before felling. If they appear to be a hazard, remove them before felling the tree.
When changing your locations carry the chain saw with the blade to the rear and with the hot muffler away from your body. Never carry a chain saw on your shoulder or with the chain in motion. Make certain the chain stops rotating around the bar when the throttle control trigger is released. If you are moving any distance, or if you let the saw down, stop the engine. When you have completed cutting, shut off the saw, and do not move out of the immediate cutting area with the saw running. If you’re not going to use the saw for a while, place a chain cover over the guide bar to prevent the chain from snagging or becoming damaged by other objects.
Page 15 of 67
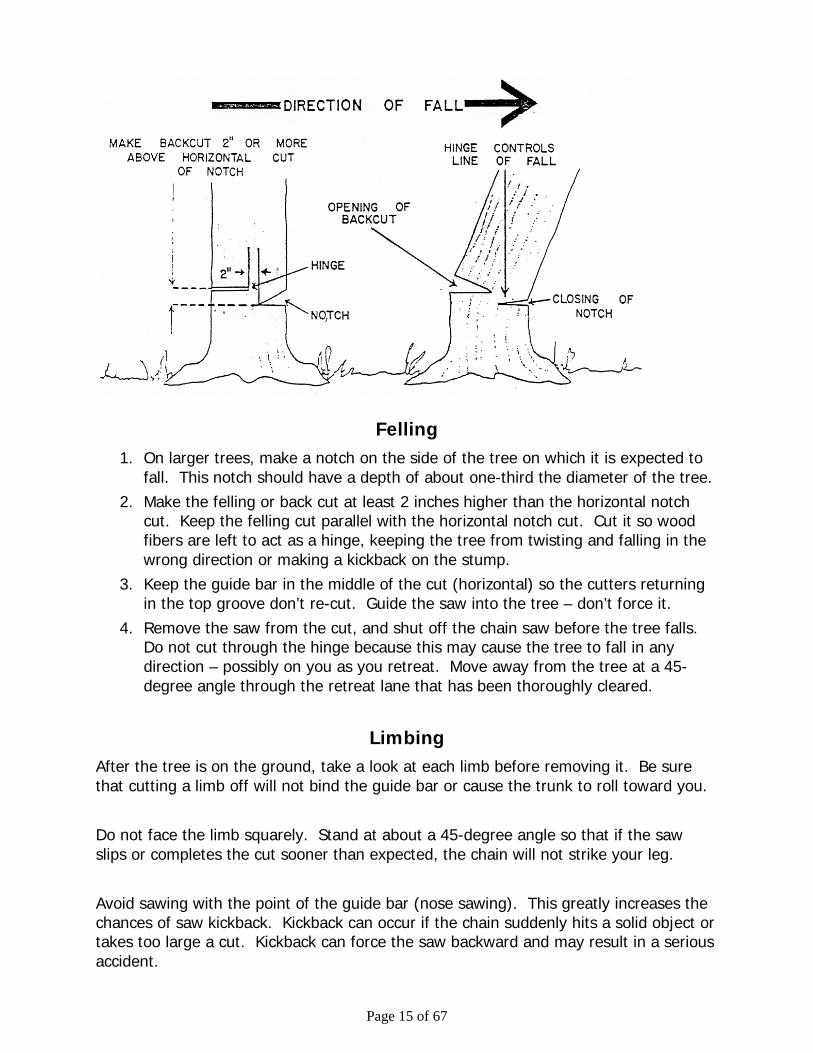
Felling 1. On larger trees, make a notch on the side of the tree on which it is expected to
fall. This notch should have a depth of about one-third the diameter of the tree. 2. Make the felling or back cut at least 2 inches higher than the horizontal notch
cut. Keep the felling cut parallel with the horizontal notch cut. Cut it so wood fibers are left to act as a hinge, keeping the tree from twisting and falling in the wrong direction or making a kickback on the stump.
3. Keep the guide bar in the middle of the cut (horizontal) so the cutters returning in the top groove don’t re-cut. Guide the saw into the tree – don’t force it.
4. Remove the saw from the cut, and shut off the chain saw before the tree falls. Do not cut through the hinge because this may cause the tree to fall in any direction – possibly on you as you retreat. Move away from the tree at a 45-degree angle through the retreat lane that has been thoroughly cleared.
Limbing
After the tree is on the ground, take a look at each limb before removing it. Be sure that cutting a limb off will not bind the guide bar or cause the trunk to roll toward you. Do not face the limb squarely. Stand at about a 45-degree angle so that if the saw slips or completes the cut sooner than expected, the chain will not strike your leg. Avoid sawing with the point of the guide bar (nose sawing). This greatly increases the chances of saw kickback. Kickback can occur if the chain suddenly hits a solid object or takes too large a cut. Kickback can force the saw backward and may result in a serious accident.

Page 16 of 67
Kickback can be prevented by: • Holding the saw firmly with both hands. • Gripping the top handle with the thumb around it • Using a saw equipped with a chain-brake or kickback guard • Watching for twigs that can snag the chain • Not pinching the bar while in the log cut • Sawing with the lower part of the bar, close to the bumper, not on the top near
the nose • Maintaining high saw speed when entering or leaving a cut in the wood • Keeping the chain saw chain sharp • Not reaching above shoulder height to cut – the chain is too close to your face in
this position. Many newer models of chain saws are equipped with a safety tip, a chain brake or a special chain, all of which are anti-kickback features. Ask the dealer to explain how these help reduce kickback. Look for anti-kickback features on any new or used saw you are considering buying. Never make cuts with the saw between your legs or straddling the limb to be cut. Always be aware of the direction the chain will go if it breaks, and keep people clear of this area. Stand on the opposite side of the trunk from the limb you are cutting. This gives your legs additional protection. While limbing or cutting the trunk (bucking), make sure the chain does not hit the ground. An operator can cut 40 trees and not do the damage to the chain that striking the ground one time can do.
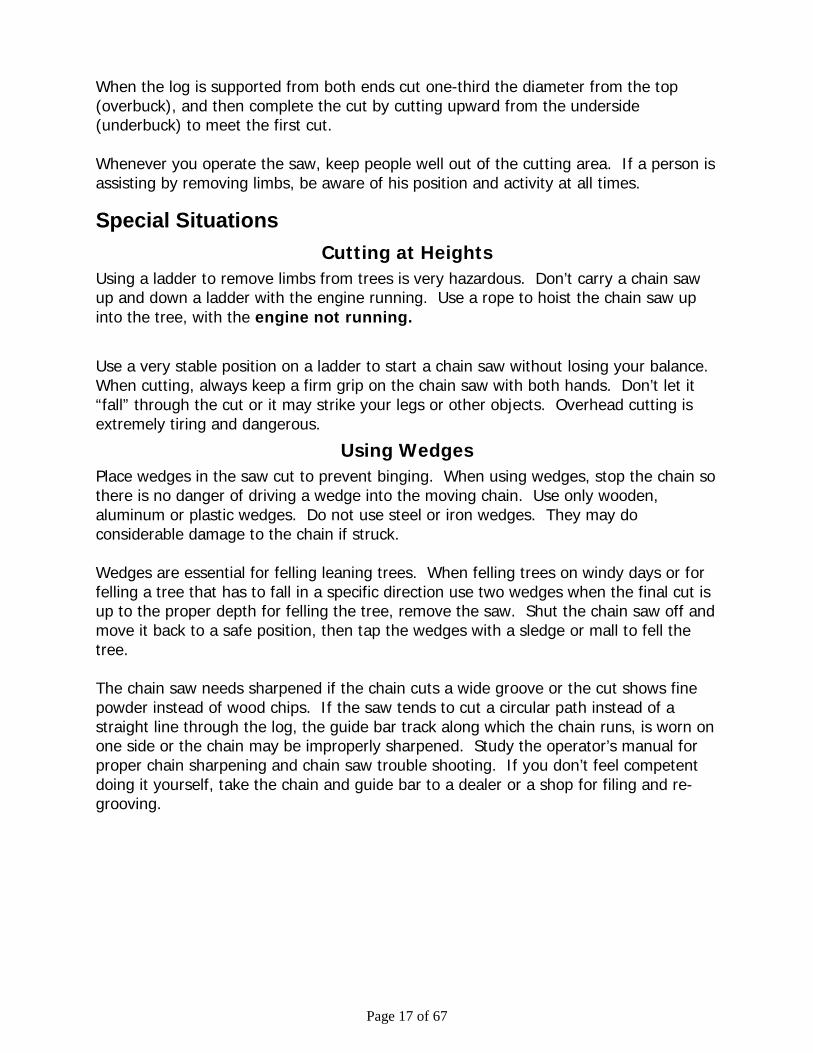
Bucking If the trunk is supported along its entire length make cuts from the top (called over bucking) one-third the diameter of the log deep, the length of the trunk. When this is completed, roll the trunk over and make the final cuts. This prevents pinching the guide bar and chain.
Once the log is supported on one end make the first cut (undercut) one-third the diameter. Then complete from the topside by over-bucking the upper two-thirds to meet the underbuck.
Page 17 of 67
When the log is supported from both ends cut one-third the diameter from the top (overbuck), and then complete the cut by cutting upward from the underside (underbuck) to meet the first cut. Whenever you operate the saw, keep people well out of the cutting area. If a person is assisting by removing limbs, be aware of his position and activity at all times.
Special Situations Cutting at Heights
Using a ladder to remove limbs from trees is very hazardous. Don’t carry a chain saw up and down a ladder with the engine running. Use a rope to hoist the chain saw up into the tree, with the engine not running. Use a very stable position on a ladder to start a chain saw without losing your balance. When cutting, always keep a firm grip on the chain saw with both hands. Don’t let it “fall” through the cut or it may strike your legs or other objects. Overhead cutting is extremely tiring and dangerous.
Using Wedges Place wedges in the saw cut to prevent binging. When using wedges, stop the chain so there is no danger of driving a wedge into the moving chain. Use only wooden, aluminum or plastic wedges. Do not use steel or iron wedges. They may do considerable damage to the chain if struck. Wedges are essential for felling leaning trees. When felling trees on windy days or for felling a tree that has to fall in a specific direction use two wedges when the final cut is up to the proper depth for felling the tree, remove the saw. Shut the chain saw off and move it back to a safe position, then tap the wedges with a sledge or mall to fell the tree. The chain saw needs sharpened if the chain cuts a wide groove or the cut shows fine powder instead of wood chips. If the saw tends to cut a circular path instead of a straight line through the log, the guide bar track along which the chain runs, is worn on one side or the chain may be improperly sharpened. Study the operator’s manual for proper chain sharpening and chain saw trouble shooting. If you don’t feel competent doing it yourself, take the chain and guide bar to a dealer or a shop for filing and re-grooving.

Page 18 of 67
Buying a Chain Saw When buying a chain saw, consider these safety features:
• Anti-kickback device – Most new saws have this important safety feature. • Vibration and noise characteristics – Look for noise and vibration reduction
features on new and used saws. • Throttle interlock – This device prevents accidental throttle advance. Also, a
high engine idle latch allows the operator to start the engine while holding the saw firmly on the ground.
• Chain saw sized for the job – The correct bar length and engine size (power) will reduce operator fatigue.
Gasohol and Small Engines According to a major small engine manufacturer, using gasohol as a fuel source for small engines is not currently recommended because of possible damage to certain gaskets, seals, hoses and packings. Also, overall engine life was reported to be severely decreased when gasohol was used as fuel.* Be sure to check with an authorized dealer or contact the manufacturer of your particular brand of small engine concerning the advisability of using gasohol as a gasoline substitute. _________________________ *Tecumseh Research Laboratory, Ann Arbor, Michigan
Chain Saw Safety If you have plans to use a chain saw for whatever purpose, logging, land clearing, firewood, etc., you should consider utilizing the following equipment:
• Eye protection • Head protection • Hand protection • Foot protection • Saw chaps
Safety Devices
All power saws should be equipped with the following mechanical safety features:
A. Chain brakes, stops chain in kickback situation. B. Vibration dampened handles reduces stress on arms, shoulders, and back. C. Anti-kickback chain reduces kickbacks. D. Throttle interlock prevents acceleration E. Safety features should never be altered or removed.

Page 19 of 67
Factors to Consider When Felling a Tree: 1. Direction of wind 5. Other 2. Natural Lean of trees 6. Direction of Fall 3. Large Branches 7. Escape Routes 4. Skidding Directions 8. Trunk Rot

Page 20 of 67
Safety Pointers to Consider 1. Handle and carry the saw in a manner to protect yourself and others. 2. Recognize danger zones; keep a safe distance, 2 to 3 tree lengths away
from other parties during the cutting process. 3. Remain alert to danger trees (snags, widow makers, etc.). 4. Keep the saw properly maintained and know the limitations. 5. Be sure safety equipment on the saw is functional (chain brake, spark
arrestor, etc.) 6. Never work alone. Accidents do occur without warning. 7. Refuel the saw a safe distance from fires or other ignition sources. 8. Check chain brake. 9. Keep a firm grip on the saw using both hands keep both feet firmly
planted on the ground. 10. Keep felling aids handy and nearby, axe, wedges, etc.
Chain Saw Maintenance 1. Keep chain sharp. 2. Keep bar groove clean, check periodically. 3. Maintain proper chain tension, (prevent chain from coming off). 4. Use proper gas and oil mixture. 5. Utilize safety approved gas can. 6. Whenever possible use anti kickback chain. 7. Check air filter regularly, loose bolts, nuts, etc. 8. Use extreme caution, when moving from cut to cut and shut off saw. A
lot of unnecessary injuries occur from the operator falling on a running saw.
9. Match saw chain to your project. 10. Follow technical tips and manufacturer’s specifications.

Page 21 of 67
COMPASS READING & PACING Two basic forestry skills that are practiced almost daily by foresters are using a compass and pacing.
COMPASS READING The essential parts of a compass include a magnet, usually in the form of a needle, which is balanced on a jeweled bearing or pivot, a graduated circle with 360º of azimuth or four 90º quadrants indicating the four cardinal directions of North (0º), East (90º), South (180º), and West (270º). These components are housed in a box or frame (called the base plate on some kinds of compasses) that have a sighting device used to aim at the objective. While all compasses contain these items, they are combined in such a myriad of designs as to make a generalized description difficult.
Common Type of Compass used by Foresters Silva Compass
Foresters generally use a compass that has a rectangular base plate with a graduated dial that houses the needle and can be rotated, and a hinged mirror that is used for sighting. The compass is fast to use, particularly on straight cruise lines, and is sufficiently accurate for most forestry applications. This type of compass is filled with liquid to dampen the quivering of the needle. A screw in the circle can be turned to set the declination on the arrow, thus permitting the running of true bearing (declination is the variation between true north and magnetic north). The dial is graduated to 2º and estimated to 1º. With the compass aimed at the objective, the dial
THERE ARE THREE BASIC PARTS OF THE SILVA COMPASS
1. Compass Needle The magnetic needle is attracted by the magnetic North Pole
of the earth. The red end points North and the white end South. 2. Compass Housing or Graduated Dial The compass housing is a dial that is
graduated into the 360º of a circle. The compass housing can be rotated on the base plate. Each mark on the housing represents 2º. The bearing is read in degrees at the index pointer. The four principal directions are also indicated; North (0º and 360º), South (180º), East (90º), and West (270º). The orienting arrow is the black arrow that appears on the bottom of the housing.
3. Base Plate The base plate, along with the sighting mirror, points out the
objective or the line of travel.

Page 22 of 67
is turned until the north arrow within the dial is aligned parallel with the needle. The azimuth or bearing is read at the index mark. The sighting and aligning is done while observing the compass in a mirror on the inside of the hinged cover. ◊ Definition: An azimuth or bearing is the direction or degree reading from one
object to another. For example, to go from Point A to Point B at an azimuth of 90º means that starting at Point A, you must travel due East (90º) to reach Point B.
Foresters use compasses in many ways. Obtaining bearings from a map, taking bearings on the ground, giving directions, plotting locations on a map and on the ground, and laying out timber sale boundaries or roads are examples of forestry related uses for the compass. The compass portion of the Forestry Contest will involve determining an azimuth from one object to another object. Therefore, taking an azimuth will be the only procedure discussed in this text. You may want to refer to one of the compass publications to learn the other procedures.
Taking an Azimuth
1. Face the object you are aiming at.
2. Holding the compass level at eye level and at arm’s length, look at the dial of the compass through the mirror.
3. Next, line up your objective through the peep sight on the compass.
4. While looking at the dial through the mirror and continuing to hold the compass level, turn the compass dial (housing) until the orienting arrow (the arrow on the bottom of the dial) is lined up with the compass needle.
5. Double-check that. . .
you kept the compass base plate level throughout this operation, you are still sighting on the objective through the peep sight, and the needle and the orienting arrow are lined up exactly.
6. Make adjustments as necessary. 7. Finally, read the azimuth at the index pointer or line-of-travel pointer (the
little triangle on the base plate by the hinge). Pacing Pacing is the technique of measuring distances by knowing the length of your pace and counting the number of paces you take. Each two steps is a pace. It is easier and more accurate to count the number of paces rather than individual steps.

Page 23 of 67
Determining the Length of Pace Each person’s average length of pace is different. To determine your own average length of pace, measure 100 feet on level ground using a tape measure. Using a normal stride, walk the distance, counting the number of paces. If you start with your right foot, count one pace every time your left foot touches the ground. Record the number of paces and repeat the procedure two more times. Then take the average of the three pace counts. This is your average number of paces for 100 feet. Now, divide your average number of paces into 100 feet to determine your average length of pace.
Once you know your average length of pace, you can calculate the distance from one point to another by pacing. To determine the distance between points, count the number of paces and multiply by the length of your pace.
Example: First walk 21 paces Second walk 19 paces Third walk 20 paces 60 paces divided by 3 = 20 paces for 100 ft. Now determine your average length of pace: 100 feet divided by 20 paces = 5 feet per pace
Example:
A__________________ _25 paces_ __________________B
25 paces x 5 feet/pace = 125 feet from Point A to Point B

Page 24 of 67
Combining Compass Reading and Pacing The compass reading and pacing portion of the forestry contest will combine both skills. Here is a sample layout of a compass course:
Stations Compass Azimuth Measure Distance
1 – 2 90° 250 feet (50 paces x 5 feet)
2 – 3 225° 200 feet (40 paces x 5 feet)
3 – 1 315° 225 feet (45 paces x 5 feet)
(Assuming your average pace is 5 feet)
Page 25 of 67
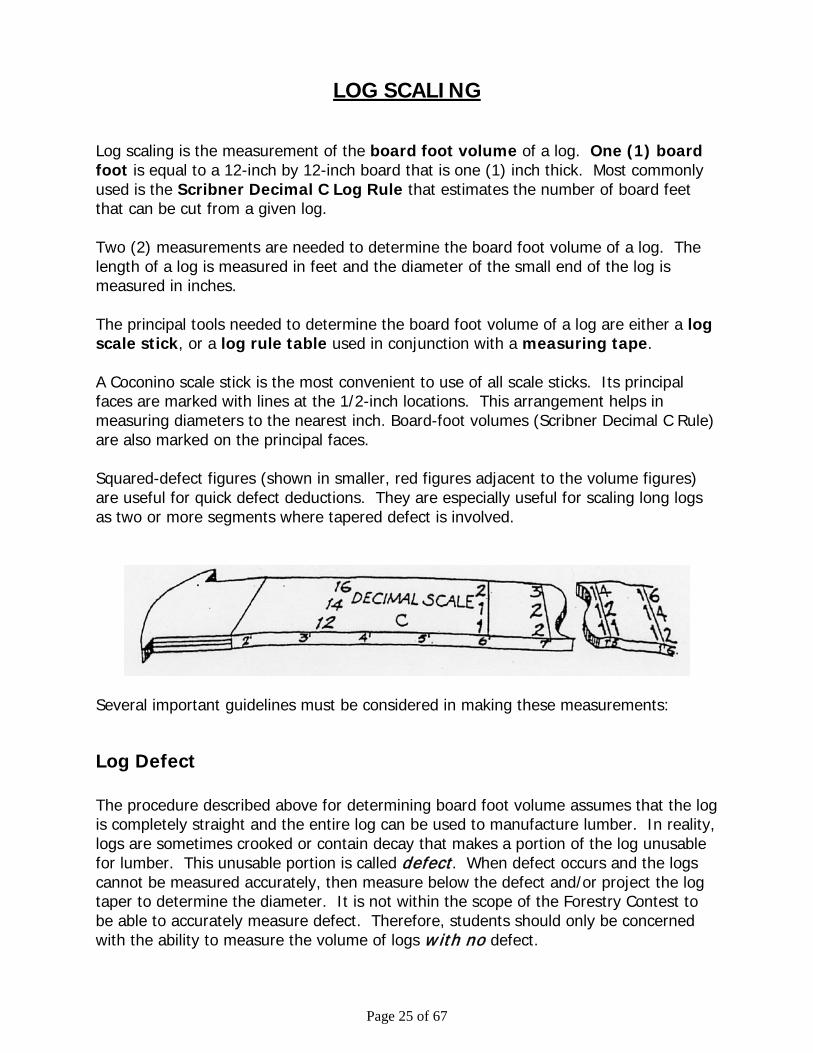
LOG SCALING Log scaling is the measurement of the board foot volume of a log. One (1) board foot is equal to a 12-inch by 12-inch board that is one (1) inch thick. Most commonly used is the Scribner Decimal C Log Rule that estimates the number of board feet that can be cut from a given log. Two (2) measurements are needed to determine the board foot volume of a log. The length of a log is measured in feet and the diameter of the small end of the log is measured in inches. The principal tools needed to determine the board foot volume of a log are either a log scale stick, or a log rule table used in conjunction with a measuring tape. A Coconino scale stick is the most convenient to use of all scale sticks. Its principal faces are marked with lines at the 1/2-inch locations. This arrangement helps in measuring diameters to the nearest inch. Board-foot volumes (Scribner Decimal C Rule) are also marked on the principal faces. Squared-defect figures (shown in smaller, red figures adjacent to the volume figures) are useful for quick defect deductions. They are especially useful for scaling long logs as two or more segments where tapered defect is involved.
Several important guidelines must be considered in making these measurements:
Log Defect The procedure described above for determining board foot volume assumes that the log is completely straight and the entire log can be used to manufacture lumber. In reality, logs are sometimes crooked or contain decay that makes a portion of the log unusable for lumber. This unusable portion is called defect. When defect occurs and the logs cannot be measured accurately, then measure below the defect and/or project the log taper to determine the diameter. It is not within the scope of the Forestry Contest to be able to accurately measure defect. Therefore, students should only be concerned with the ability to measure the volume of logs w ith no defect.

Page 26 of 67
Saw logs (except for “peelers”) are measured in even two (2) foot lengths up to a maximum scaling length of 20 feet. For longer lengths (23’ to 40’), the logs are scaled either as two segments of equal length (e.g. 32’ = 16’ + 16’) or as two unequal segments with the butt segment the longer by two feet (e.g. 26’ = 12’ top + 14’ butt segments). The most common lengths are 8’, 16’, and 32’ (although a log could be 10’, 12’, etc.). Extra inches are added to the length of a log for trim allowance. In other words, a 16 foot log will not be exactly 16 feet long. Trim will vary according to sawmill specifications, but 6 inches per segment is standard. To measure a log’s diameter inside of bark, a log scale stick or simply a yardstick can be used to measure the d.i.b. at the small end of the log. The log length is usually measured using a logger’s tape, but any measuring tape can be used. However, a logger’s tape is faster and more convenient.
Measuring the Diameter of a Log
• Remember to measure the diameter of the small end of the log.
The diameter of the log is always measured inside the bark (actual wood fiber). The measurement is called “diameter inside of bark” or d.i.b.
Example: A 16’ foot log may actually measure 16’6”.

Page 27 of 67
The ends of all logs are not circular. On oval-shaped logs, the diameter is determined by averaging the short measurement and long measurement, taken at 90 degrees from the short measurement. Both measurements are taken through the true center (not the pith) of the log. After measuring d.i.b (at the small end) and log length, refer to a Scribner Decimal C Log Rule Table to calculate the board foot volume of the log. A Scribner Decimal C Log Rule Table is illustrated in the following table:
Page 28 of 67
FORESTRY ISSUES
Forestry Issues is a team activity. Prior to the day of the contest, each team is given three forestry issues, which of only one will be used by the judges. On a rotation, each team will have fifteen minutes to discuss the issue among them. The team will then have an additional fifteen minutes to respond to the following questions the judges use to score the team.
1. Introduction - worth a total of 15 points for accurately answered statements. • Statement of the issue • Issue was defined
2. Pro view point - worth a total of 15 points for accurately answered questions. • What are the facts? • What are the benefits? • Conclusions
3. Con view point - worth a total of 15 points for accurately answered questions. • What are the facts? • What are the risks? • Conclusion
4. Conclusion - worth a total of 15 points for accurately answered statements. • Summarize the pros • Summarize the cons • Concluding remarks
5. Poise/Personality – worth a total of 10 points.
6. Questions – worth a total of 30 points.
7. 5 point deduct for person not participating.
The top three teams with the highest score in Forestry Issues will be awarded ribbons.

Page 29 of 67
LEGAL DESCRIPTIONS & MAP READING
Foresters use various maps while planning and carrying out their daily activities. The map reading portion of the Forestry Contest will involve learning the following map skills:
• Identifying standard map symbols • Finding a location from location markers and legal descriptions • Identifying features on a topographic map • Giving legal descriptions of map features
Map Symbols The student will be expected to identify standard map symbols on a United States Geological map. The symbols will be selected from the following list:
MAN-MADE STRUCTURES
Page 30 of 67
Types of Map The two types of maps most frequently used by foresters are:
1. Planimetric Map shows detail in a flat, 2-dimensional plane. The United States Forest Service Visitors Map is a good example of a planimetric map.
2. Topographic Map shows features such as streams, mountain peaks, roads and trails. The map is usually color-coded to show various ownerships and is scaled at ½ inch per mile.
The United States Geological Survey (USGS) map is a topographic map, and shows the third dimension (3-D), or depth, as well as showing a high degree of detail in the flat (2-D) plane. The usual scale is 2½ inches per mile. The difference in elevation is shown by the use of contour lines.
A contour line is an imaginary level line on the ground that connects all points of equal elevation. A contour line on a map indicates the elevation of that line above sea level. The vertical distance between two adjacent contours is known as the contour interval. Contour intervals that are commonly used on maps are 20, 40, 80, 100 feet.
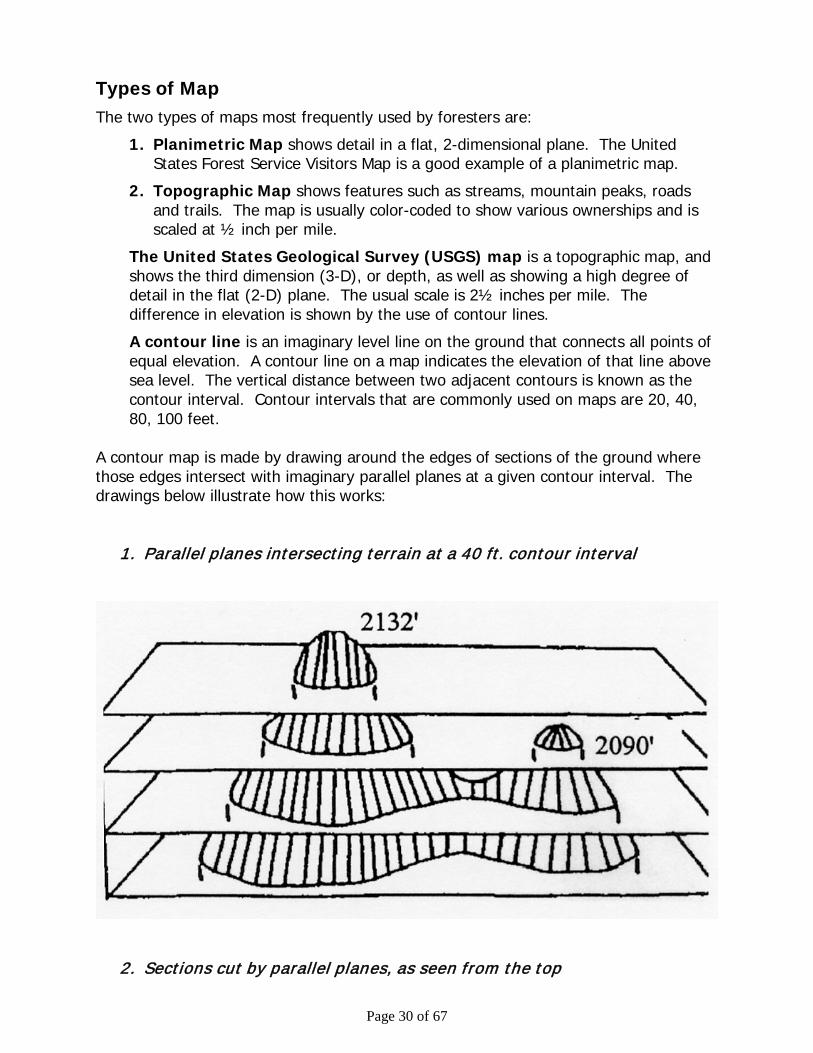
A contour map is made by drawing around the edges of sections of the ground where those edges intersect with imaginary parallel planes at a given contour interval. The drawings below illustrate how this works:
1. Parallel planes intersecting terrain at a 40 ft. contour interval
2. Sections cut by parallel planes, as seen from the top
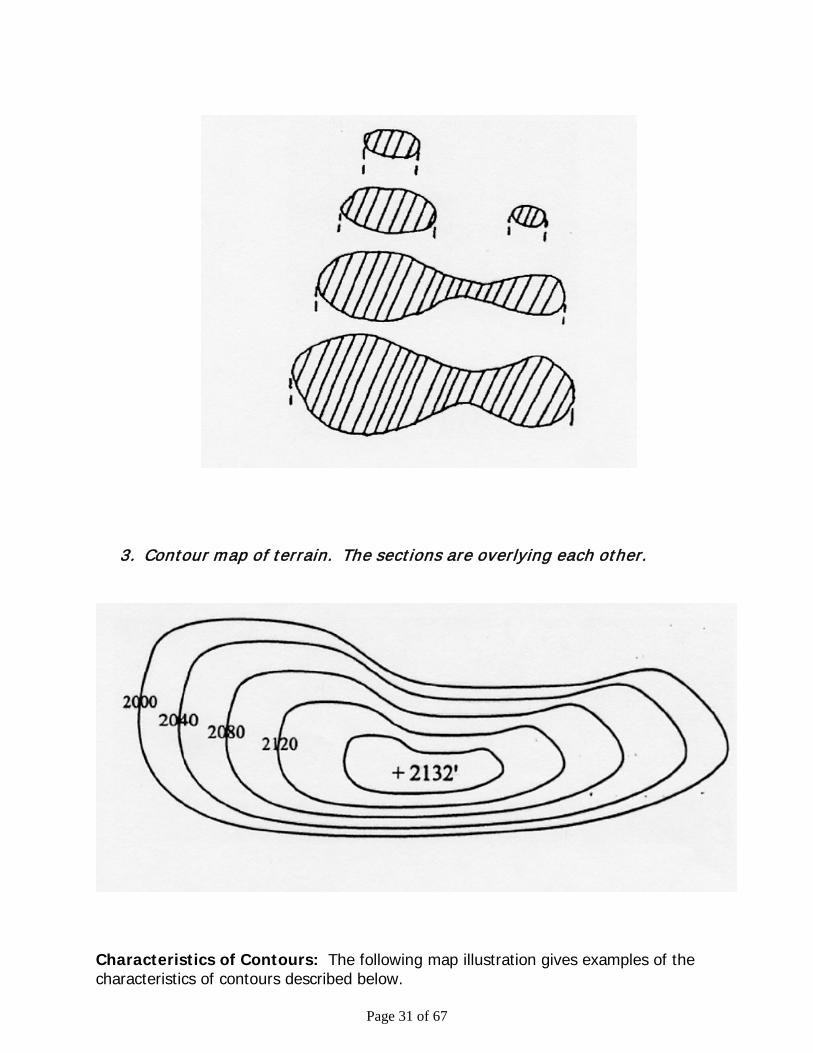
Page 31 of 67
3. Contour map of terrain. The sections are overlying each other.
Characteristics of Contours: The following map illustration gives examples of the characteristics of contours described below.
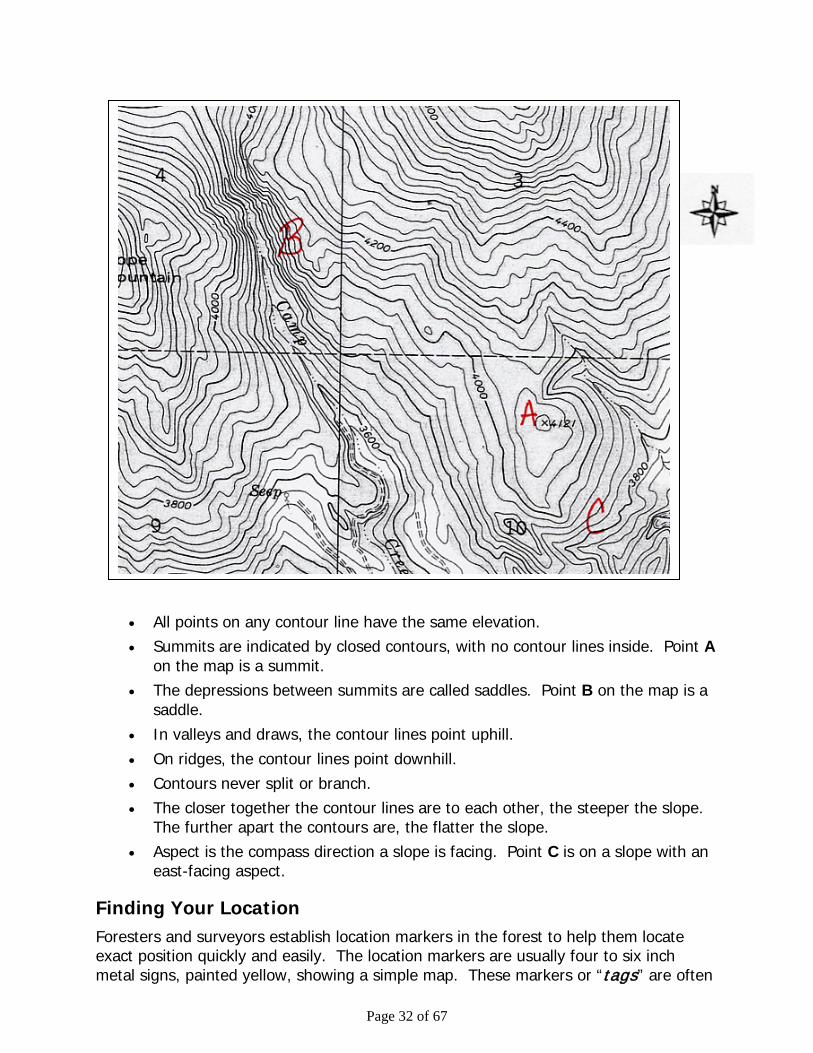
Page 32 of 67
• All points on any contour line have the same elevation. • Summits are indicated by closed contours, with no contour lines inside. Point A
on the map is a summit. • The depressions between summits are called saddles. Point B on the map is a
saddle. • In valleys and draws, the contour lines point uphill. • On ridges, the contour lines point downhill. • Contours never split or branch. • The closer together the contour lines are to each other, the steeper the slope.
The further apart the contours are, the flatter the slope. • Aspect is the compass direction a slope is facing. Point C is on a slope with an
east-facing aspect.
Finding Your Location Foresters and surveyors establish location markers in the forest to help them locate exact position quickly and easily. The location markers are usually four to six inch metal signs, painted yellow, showing a simple map. These markers or “tags” are often

Page 33 of 67
situated alongside roads and are nailed to a tree or post. A small nail or tack indicates the exact location of the marker. Therefore, it is easy to pinpoint your exact position by comparing the tag location to a map of the area. The following illustrations show two typical location tags: To better understand the use of location tags, a brief explanation of land surveying is necessary. A land survey consists of a series of parallel lines that form a grid over the state. The land survey starts at a point called the “initial point.” An east-west line is established from this point and is called the “Base Line.” The north-south line is established and is called the “Principal Meridian (PM). The illustration below shows the initial point, the Base Line, the Principal meridian and their relative positions in the State of Washington and Idaho.
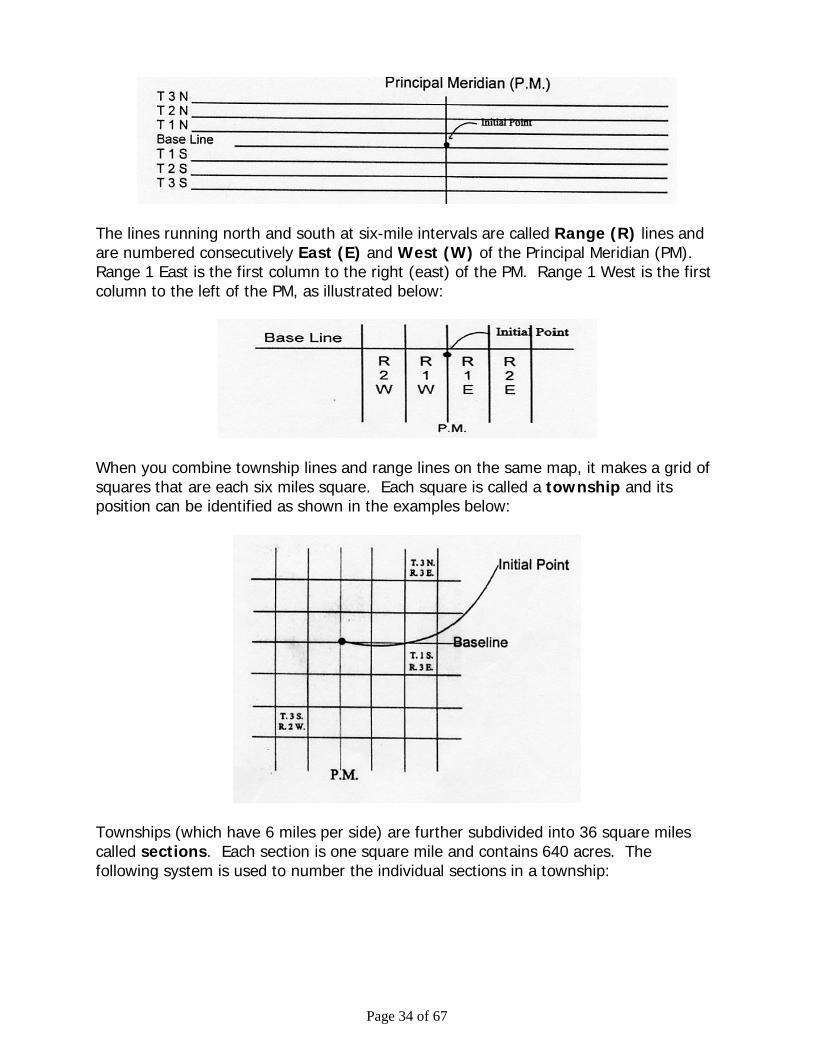
The state is subdivided by lines running at six-mile intervals, both parallel to the Base Line and to the Principal Meridian. The lines running east and west are called Township (T) lines and are numbered consecutively North (N) and South (S) of the Base Line. The first line north of the Base Line is Township 1 North (T.1 N.) and the first line south of the Base Line is Township 1 South (T. 1 S.), as illustrated below:
Page 34 of 67
The lines running north and south at six-mile intervals are called Range (R) lines and are numbered consecutively East (E) and West (W) of the Principal Meridian (PM). Range 1 East is the first column to the right (east) of the PM. Range 1 West is the first column to the left of the PM, as illustrated below:
When you combine township lines and range lines on the same map, it makes a grid of squares that are each six miles square. Each square is called a township and its position can be identified as shown in the examples below:
Townships (which have 6 miles per side) are further subdivided into 36 square miles called sections. Each section is one square mile and contains 640 acres. The following system is used to number the individual sections in a township:

Page 35 of 67
Legal descriptions are used to describe the exact location of townships, sections and even features such as mountain peaks or roads. The example below gives the legal description for a section of land as shown on the accompanying map: When looking closely at either a U.S. Forest Service map or a USGS map, there is a superimposed grid of sections and townships. Sometimes it is difficult to see these lines due to physical features, names, and ownership lines. Section numbers 1 through 36 are usually found in the middle of a section, while township numbers are listed vertically along the map’s margin and range numbers are listed horizontally across the top and bottom margins of the map.
Example:

Page 36 of 67
To give a legal description of the location of a feature within a section, you can subdivide the section into halves or quarters. For example, to pinpoint the location of a loop of road in Section 16, T.2N., R.3E. (Diagram A)
If Section 16 is divided into quarters, notice that the road is located in the northeast quarter of the section (Diagram B). Then, if dividing the northeast quarter into quarter, notice that the road is located in the southeast quarter of the northeast quarters of the section (Diagram C). The legal description of the road loop would be written:
Southeast quarter of the Northeast quarter, Section 16, Township 2 North, Range 3 East
The abbreviation would read: SE¼ NE¼ Sec. 16 T2N R3E
Reverting back to the location marker, see the example below on how it can be used to determine the exact location in the forest.

Page 37 of 67
With practice, a person will easily be able to determine their exact location if they have a map of the area and finds a location marker. It is suggested that contest participants obtain a U.S. Forest Service Visitor Map and familiarize themselves with the layout of the sections and townships, and practice writing legal descriptions for map features.
Example: When driving along a forest road and seeing location tag like this:
Then, by looking at a map, it can be determined that the location is on the section corner between sections 13,14, 23, and 24 (see X on the map below).

Page 38 of 67
Scribner Board Foot Scaling Tables
Diameter in inches d.i.b. 4” 5” 6” 7” 8” 9” 10” 11” 12” 13” 14” 15” 16” 17” 18” 19” 20” Length Scribner value in board feet X 10 8' 1 1 1 1 1 2 3 3 4 5 6 7 8 9 11 12 14 10' 1 1 1 1 2 2 3 4 5 6 7 9 10 12 13 15 17 12' 1 1 1 2 2 3 4 4 6 7 9 11 12 14 16 18 21 14' 1 1 2 2 2 3 4 5 7 8 10 12 14 16 19 21 24 16' 1 2 2 3 3 4 6 7 8 10 11 14 16 18 21 24 28 18' 1 2 2 3 3 4 6 8 9 11 13 16 18 21 24 27 31 20' 1 2 2 3 4 5 7 8 10 12 14 18 20 23 27 30 35 22' 2 2 3 3 5 6 7 10 12 15 18 21 24 28 31 36 40 24' 2 2 3 4 5 7 8 10 13 16 20 23 26 30 34 39 44 26' 2 3 3 4 5 7 9 11 14 17 21 25 28 33 37 42 48 28' 2 3 4 4 5 7 9 12 15 18 22 26 30 35 40 45 51 30' 3 3 5 5 6 9 11 13 17 19 24 28 32 37 43 49 54 32' 2" 3 5 5 7 9 11 14 17 19 24 27 32 37 42 49 54 61 1" 3 4 5 6 7 10 13 15 18 21 25 30 34 39 45 52 58 34' 2" 3 5 5 7 9 12 15 18 21 26 29 35 40 45 52 58 66 1" 3 4 5 6 7 10 14 16 19 23 27 32 37 42 48 55 62 36' 2" 3 5 5 7 9 12 15 19 22 27 31 37 42 48 55 61 69 1" 3 4 5 6 7 10 14 17 20 24 29 34 39 45 51 58 65 38' 2" 3 5 6 8 10 12 16 20 23 29 33 39 45 51 59 65 73 1" 3 4 5 7 8 11 14 18 21 25 31 36 41 48 54 62 69 40' 2" 3 5 6 8 11 13 17 20 24 30 34 41 47 53 62 68 77 1" 3 4 5 7 9 12 15 18 22 26 32 38 43 50 57 65 73 (2" TAPER per segment) ALL SPECIE EXCEPT LARCH AND LPP 32' & OVER (1" TAPER per segment) LARCH & LPP 32' & OVER 1 segment logs with less than 4" of trim scale next 2' increment lower 2 segment logs with less than 10" of trim scale next 2' increment lower 3 segment logs with less than 16" of trim scale next 2' increment lower THREE SEGMENT SCALING TABLES

Page 39 of 67
DIAMETER IN INCHES Length 4 5 6 7 8 9 10 11 12 13 14 15 16 17 18 19 20
Scribner value in board feet X 10 42'
2" 5 6 8 10 13 16 21 25 31 36 43 49 57 64 72 81 88 1" 4 5 6 7 9 12 16 20 25 30 36 42 49 56 64 72 80
44' 2" 6 7 10 12 14 18 22 27 33 38 45 52 61 67 76 86 95 1" 4 6 7 8 11 14 16 22 26 32 38 44 51 59 68 75 84
46' 2" 6 8 11 13 16 20 23 29 34 40 47 54 63 70 80 89 97 1" 5 6 8 9 12 16 19 23 28 33 40 46 53 61 71 79 87
48' 2" 6 9 11 14 17 21 25 31 35 42 48 56 65 72 82 92 101 1" 5 7 8 10 13 17 21 25 29 35 41 48 55 63 73 82 91
50' 2" 6 9 11 15 18 22 27 33 37 45 51 59 68 76 87 96 106 1" 5 7 8 10 13 18 22 26 31 37 43 51 58 66 76 86 96
52' 2" 6 9 11 15 18 23 28 34 39 47 53 62 71 79 91 100 111 1" 5 7 8 10 13 18 23 27 32 39 45 53 61 69 79 89 100
54' 2" 6 9 11 15 18 23 28 35 40 48 55 64 73 81 91 101 114 1" 5 7 8 10 13 18 23 28 33 40 47 55 63 72 82 92 103
56' 2" 7 10 12 15 19 24 29 37 42 50 58 67 77 86 97 108 119 1" 5 7 9 11 14 19 24 29 34 42 49 57 66 75 86 96 107
(2" TAPER per segment) ALL SPECIE EXCEPT LARCH AND LPP 32' & OVER (1" TAPERper segment ) LARCH & LPP 32' & OVER 3 segment butt logs are measured 4' above the butt
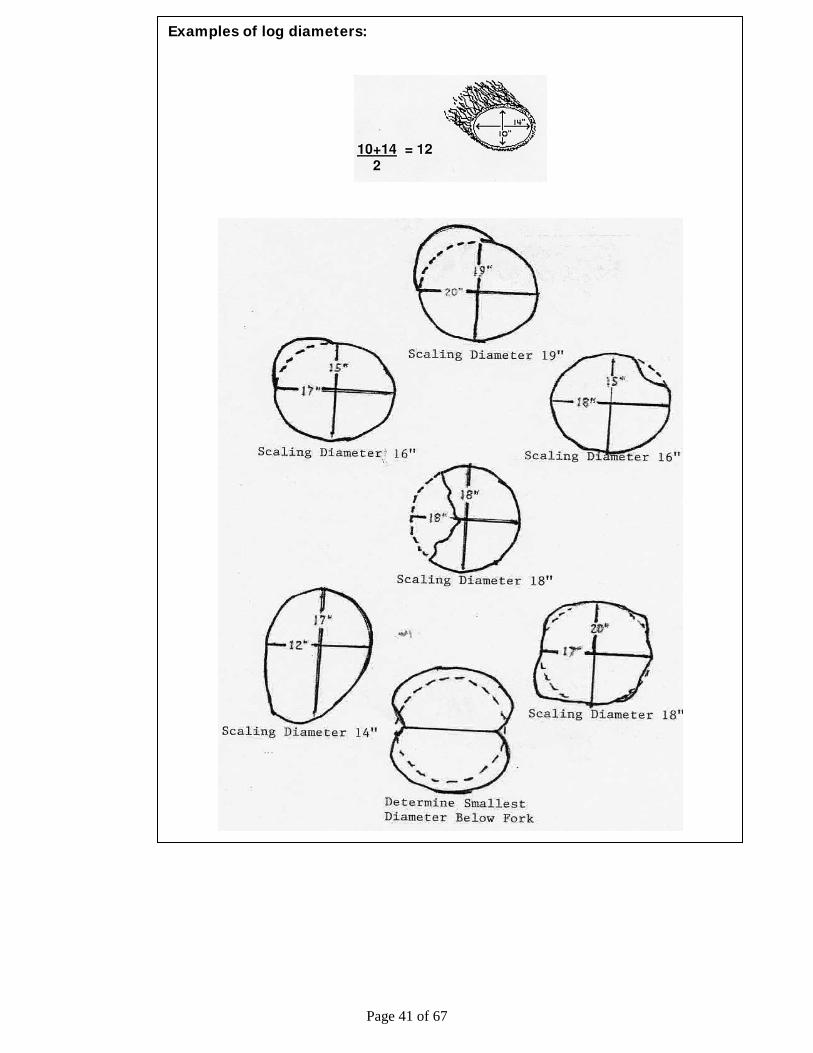
The following illustrations are an example of log diameters.
• Add the two readings together and divide by 2 to get the average. If the average falls on the ½”, then round down.
• If both readings fall on the ½”, round one up and one down before averaging. • If only one reading is exactly on the ½”, round up before averaging.
Page 40 of 67
Note: The log table shown on the previous page is a Scribner Decimal C Table. This means that all board foot volumes shown in the table should be multiplied by ten (10). Therefore, in the above example, 6 x 10 = 60 board feet in a log with a 10-inch d.i.b. and 16 feet in length. A simple way to calculate board foot volumes using the Decimal C log rule is to add a zero (0) to all the board foot volumes given in the table.
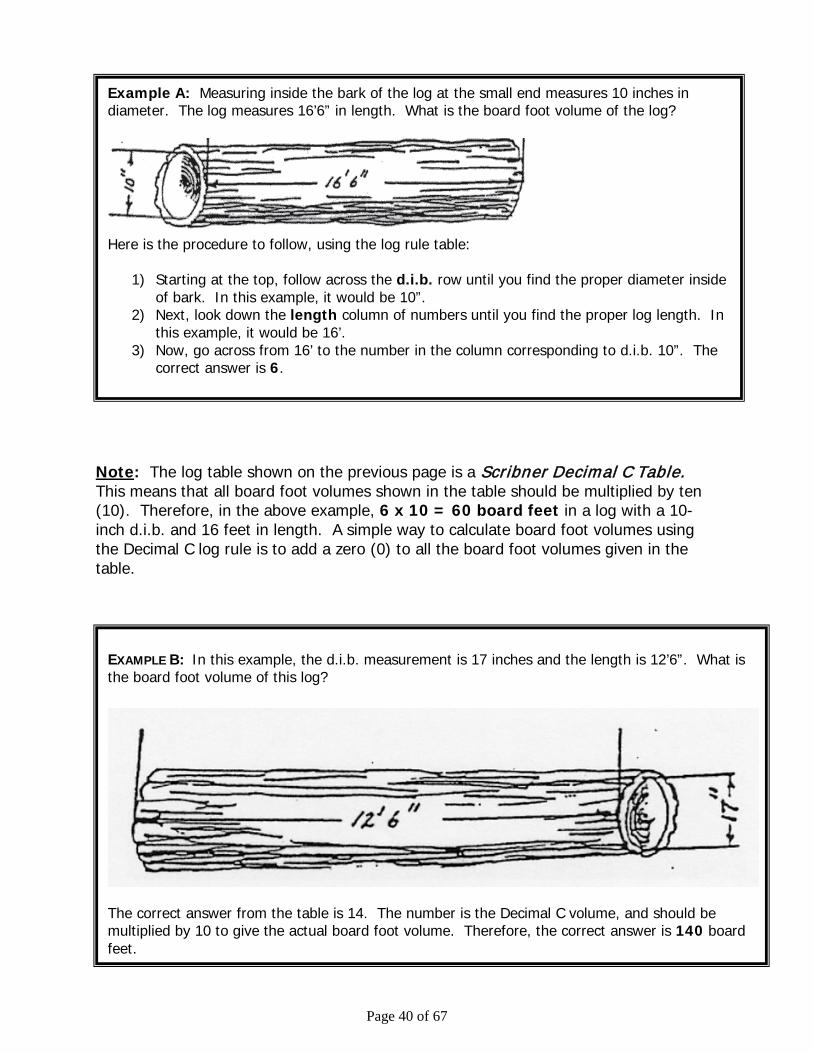
Example A: Measuring inside the bark of the log at the small end measures 10 inches in diameter. The log measures 16’6” in length. What is the board foot volume of the log?
Here is the procedure to follow, using the log rule table:
1) Starting at the top, follow across the d.i.b. row until you find the proper diameter inside of bark. In this example, it would be 10”.
2) Next, look down the length column of numbers until you find the proper log length. In this example, it would be 16’.
3) Now, go across from 16’ to the number in the column corresponding to d.i.b. 10”. The correct answer is 6.
EXAMPLE B: In this example, the d.i.b. measurement is 17 inches and the length is 12’6”. What is the board foot volume of this log?
The correct answer from the table is 14. The number is the Decimal C volume, and should be multiplied by 10 to give the actual board foot volume. Therefore, the correct answer is 140 board feet.
Page 41 of 67
Examples of log diameters:

Page 42 of 67
NOXIOUS WEEDS Noxious Weeds are non-native plants introduced to Washington State, either deliberately or accidentally through human activities. Because of their aggressive growth and lack of natural enemies in Washington State, these plants can be highly destructive, competitive, or difficult to control. These exotic species can be damaging to our economy and natural resources, as they:
● Reduce crop yields ● Destroy plant and animal habitat ● Reduce recreational opportunities (e.g., fishing, hunting, swimming, and hiking) ● Clog waterways ● Decrease land values ● Possibly poison humans and livestock. To help protect the State’s resources and economy, the Washington State Noxious Weed Control Board adopts a State Noxious Weed List each year. This list classifies weeds in three major classes, A, B and C, based on the stage of invasion of each species and the seriousness of the threat each poses to Washington State. There are four classifications of noxious weeds.
1. Class “A” weeds. Noxious weeds not native to the state that are of limited distribution or are unrecorded in the state and pose a serious threat to the state.
2. Class “B Designate” weeds. Noxious weeds whose populations in a region or
area are such that all seed production can be prevented within a calendar year.
3. Class “B” weeds. Noxious weeds not native to the state that are of limited distribution or are unrecorded in a region of the state and that pose a serious threat to that region.
4. Class “C” weeds. Any noxious weed listed by the Washington State Noxious
Weed Control Board and/or the County Noxious Weed Control Board as adopted following a public hearing on an annual basis.
This classification system is designed to:
● Prevent small infestations from expanding by eradicating them when they are first detected
● Restrict already established weed populations to regions of the state where they occur and prevent their movement to non-infested areas
● Allow flexibility of weed control at the local level for weeds that are already widespread
Page 43 of 67
Noxious Weed Control Noxious weed control means to prevent all seed production in a growing season. Developing a basic weed control strategy begins with:
1. Identifying the Weed 2. Determining what makes it a problem. For example:
Toxicity to Humans and Livestock is one of the most common problems. Poisonous plants can cause loss of life, serious health problems, and costly animal care services. Toxic weeds in feeds are an animal’s nightmare.
Allelopathy: Some noxious weeds produce chemicals that inhibit growth or even kill adjacent plants. Weeds with this ability are said to be allelopathic.
3. Determining why it’s hard to control. The reasons can include:
Life Cycle: It’s important to know whether the weed is perennial, biennial or annual. A perennial weed is likely to be the most difficult and costly to manage. Biennial and annual weeds have a shorter life, making them vulnerable to more control options than perennials. Ability to Reproduce and Spread by seeds, rhizomes, roots or other parts. The quantity of seeds produced annually per plant and the life of those seeds in the environment are very important factors. Weeds that produce hundreds or thousands of seeds per plant each year create the need for years of expensive management. Some weeds produce a few seeds that may survive in the environment for 60 years or more, making it nearly impossible to totally eliminate them.
Some perennial weeds can sprout from cut-up plants parts, so cultivating, mowing or pulling can actually increase their populations and rate of spread. Cutting or burning some weeds stimulates the roots to sprout more seed producing stalks.
Control Methods All the factors listed above must be considered when developing a management plan for weed control. In addition, we must keep in mind that each plant species will express its own particular characteristics in relation to its environment. Much like people, the reactions of individual plants of a single species will vary under various conditions. Thus, depending on climate or other variations in growing conditions, the same weeds often must be managed in different ways in different areas. A good weed control plan involves using more than one strategy and more than one control method. The control methods selected must be affordable while preserving or

Page 44 of 67
helping to create the desired environment. The most common methods for weed control include: ● Cultural and organic control methods such as fertilization, irrigation and
planting crops to compete with the weeds
● Mechanical control methods such as tilling, hoeing, pulling, mowing, burning, or mulching
● Biological control methods such as insect or plant pathogens and livestock grazing
● Chemical control methods involving herbicides
● IVM – Integrated Vegetation Management plan
Stevens County Noxious Weed Control Board For more information go to www.co.stevens.wa.us/weedboard/
Complete list of Washington’s noxious weeds Log on to www.nwcb.wa.gov/links.htm to locate the state or county lists of noxious weeds.

Page 45 of 67
SLOPE DETERMINATION
A clinometer is a tool used to measure slope. To use the clinometer, hold it up to your eye (with lanyard ring below the lens opening). Keeping both eyes open, simultaneously look through the lens and alongside the clinometer’s housing to the target. By an optical illusion, the horizontal sighting line will appear to project outside the clinometer’s housing. Place the projected sighting line on your target and read the adjacent scale.
Example of Clinometer Use:
The task is to measure the percent of slope on an up or down hill grade using the percent (%) scale of the clinometer. (100 feet is the most convenient baseline distance if using the percent scale on the clinometer.) Back 100 feet away from the tree and sight the tree approximately to your eye height, parallel along the slope. Then, follow the directions at the top of this page on how to manually use the clinometer.

Page 46 of 67
TIMBER STAND IMPROVEMENT (TSI) Silviculture
Silviculture, according to the Society of American Foresters dictionary, is “The art and science of controlling the establishment, growth, composition, health, and quality of forests and woodlands to meet diverse needs and values of landowners and society on a sustainable basis”. Foresters practice silviculture to improve tree growth, forest health, timber quality, economic return and other values over the long term. The primary silviculture tool for managing forests is cutting trees, whether through a stand regeneration cut, where trees are left for seed sources (or seedlings are planted afterward), or a thinning, where trees are cut to make more room for the remaining trees. A thinning may be commercial, where logs are taken to the mill, or pre-commercial where sapling trees are cut. If silivultural treatments are done properly, they can:
⇒ Reduce insect, disease and other forest health problems
⇒ Improve the genetic quality of natural regeneration
⇒ Shorten the time until next harvest
⇒ Produce higher value trees in the next harvest
⇒ Improve wildlife habitat and other forest values
In planning a stand regeneration cut or thinning, people sometimes focus mainly on the dollar value of the trees removed. To plan for the future forest, the quality of trees left in the stand must be considered foremost. The choice of individual leave trees depends somewhat on the desired spacing and which species are best adapted to the site. However, many other factors must also be taken into consideration, including the following:
Forest Genetics Choosing high quality leave trees is critical to the future health and quality of a forest stand. Foresters use three guiding principals to select the best quality leave trees:
1. Trees that will be structurally stronger and produce the highest quality of wood before the next harvest.
2. Trees that will produce the most wood before the next harvest. 3. Trees that will pass on desirable genetic characteristics to their offspring
(naturally regenerating seedlings)
Page 47 of 67
Trees are distinguished by their genotype (their “DNA”) and their phenotype (the combined expression of genotype and environment, which results in a tree’s observable characteristics). It is often difficult to determine whether a tree’s characteristics are due to genotype or environment. For example, a tree may have a forked top because of genetics or porcupines, or both. Leave trees can only be chosen on the basis of what can be seen – their phenotype. It doesn’t necessarily matter whether the characteristics are primarily due to environment or to genotype. Even if a tree has poor characteristics due primarily to its environment, it should be cut to create more space to allow the growth of adjacent superior trees to increase.
Tree Health Many insects, diseases and animals can damage trees. Most are a natural part of the forest, at least to some degree, but sometimes these organisms damage more trees than is desirable. Unfortunately, a favorable environment for these damaging organisms to increase in population beyond normal levels is often inadvertently created. For example, forest fire exclusion is one of the primary underlying causes of forest insect and disease epidemics. This is because ground fires tend to kill the understory tree species that are susceptible to these damaging organisms. Stand replacing fires also helped regenerate species that were more resistant to insects and disease. Removing trees with evidence of insect or disease damage can sometimes help to “disinfect” a forest by reducing the abundance of the detrimental organism (such as dwarf mistletoe). Even if harvesting is unlikely to reduce infection or infestation, removing damaged trees creates more growing space for healthier, more desirable trees. Also, when leaving trees which were not as affected by damaging organisms, it may be promoting genetically inherited pest resistance.
Successive partial harvests made without considering leave tree quality often erode the genetic quality of forest trees.
Example: Remove trees with: ~Witches brooms from dwarf mistletoe ~Conks, seams and other evidence of stem decay fungi ~Tops broken by porcupines, wind or other causes ~Excessive bark scarring or other mechanical damage ~Thin crowns, flat tops or other indicators of poor growth and vigor
Page 48 of 67
Growth Rate Leaving high quality trees provides the best growth rates and quality (and, therefore, stronger trees and higher value timber) before the next harvest. These trees will also pass on their desirable inherited characteristics to their seedling offspring. To pick the most robust leave trees, trees with the following characteristics should be favored: 40-60% crown ratio – The crown ratio is the portion of the tree with living branches. A 50% crown ratio means that fifty percent of the tree’s total height has living branches coming from it. Trees with smaller crowns are less able to take advantage of the growing space provided in thinning. Healthy foliage – Leave trees should have abundant needles with good color in their needles. Long leader or internodes – Every year, pines and fir grow a new set of horizontal branches called a whorl. The places these branches emanate from are called nodes, and the distance between them is referred to as internodes. An internode usually represents one year of height growth. Longer internodes indicate better height growth. Point tops – If the treetop can be seen, is it “pointy” or rounded in shape? Trees with pointy tops are generally more actively growing in height. As a conifer gets older, height growth slows and the top becomes rounded or flat. Bark characteristics – Tree diameter does not necessarily indicate age. A small diameter tree with bark that looks like one of its 100+ year old cousins is likely to be a slow-growing tree. For example, old ponderosa pine bark is platy and yellow, while younger ponderosa bark tends to be black.
Growth Quality Favoring trees with better form promotes a higher return for the next harvest, because logs will have more merchantable volume. These trees also pass on these characteristics (to the degree that they were inherited) to the new tree seedlings (their offspring).
Favor trees with the following growth form characteristics (2):
BRANCHES BOLE (TRUNK) Medium sized Straight Not too dense (broomed) or thin crown No forks Not too heavy branching (e.g. open grown) No crook No ramicorn branching No sweep No sharp branch angles No major doglegs
Page 49 of 67
Instructor’s Guide:
PRACTICING TSI FOR THE FORESTRY CONTEST Foresters use an almost artistic weighing of all the criteria given above when choosing leave trees. They make thousands of side-by-side comparisons between adjacent trees to decide which trees best satisfy the most critical criteria for the site. The following exercise provides contestants an opportunity to evaluate and rate four trees of varying quality (based only on form). The instructor should choose and flag out sets of four trees that:
● Can all be seen from one spot
● Are all the same species For advanced groups, choose different species to integrate species site adaptation into this exercise. However, at first it is necessary to limit some criteria to help participants focus on individual tree characteristics, rather than site or stand characteristics.
● Are all the same age class The purpose of limiting practice to even-aged stands is to help contestants to focus on individual characteristics of trees that have been competing in an even-aged stand. Most forest stands in the Inland Northwest are even-aged, from regeneration after fires. Later, to promote discussion in advanced groups, you could select stands with multiple age-classes and talk about the relative ability of different species to “release”, given their silvics and the site, etc. (Note: The forestry contest never gets to this level.)
● Provide a diversity of individual tree characteristics to consider based on all the criteria discussed in the chapter. Try to include a range of tree quality. Consider flagging a number of different sets of trees to allow for practice on specific characteristics, especially those that may be difficult to understand. (Example: One set could be composed of relatively equal, high quality trees except for degree of sweep or some other individual characteristic.)
Have the participants rank the four trees in a set, then lead a discussion about why some trees are better than others.
Page 50 of 67
TIMBER CRUISING
Timber cruising is the method that foresters use to determine the board foot volume of a standing tree and the amount of timber in a forested tract. Two basic tree measurements are required in order to measure the board foot content of a standing tree. The diameter of the tree is measured at 4½ feet above the ground. This is called the “diameter at breast height” and is commonly referred to as d.b.h. The height of a tree includes the total height from ground level up to the top of the tree. After determining the diameter at breast height and the total height of the tree, then a Board Foot Volume Table is used to compute the board foot volume. THREE STEPS INVOLVED IN CALCULATING THE BOARD FOOT VOLUME OF A TREE
1. Measuring Tree Diameter at Breast Height
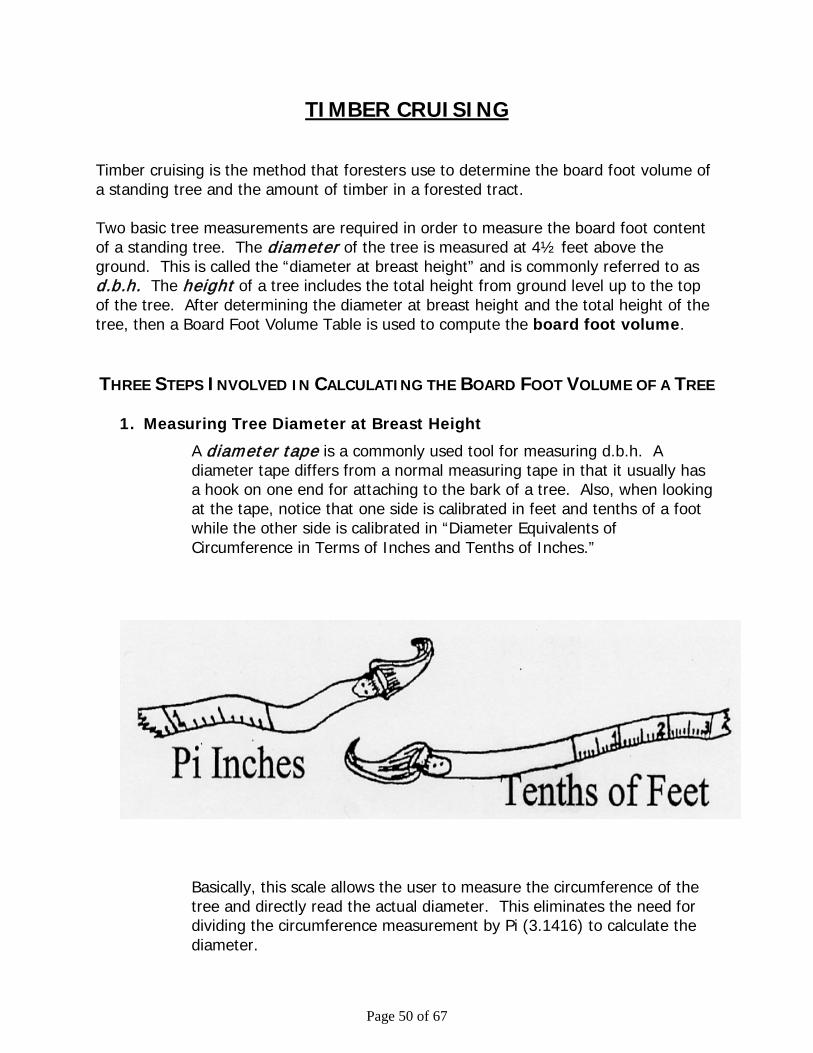
A diameter tape is a commonly used tool for measuring d.b.h. A diameter tape differs from a normal measuring tape in that it usually has a hook on one end for attaching to the bark of a tree. Also, when looking at the tape, notice that one side is calibrated in feet and tenths of a foot while the other side is calibrated in “Diameter Equivalents of Circumference in Terms of Inches and Tenths of Inches.”
Basically, this scale allows the user to measure the circumference of the tree and directly read the actual diameter. This eliminates the need for dividing the circumference measurement by Pi (3.1416) to calculate the diameter.
Page 51 of 67
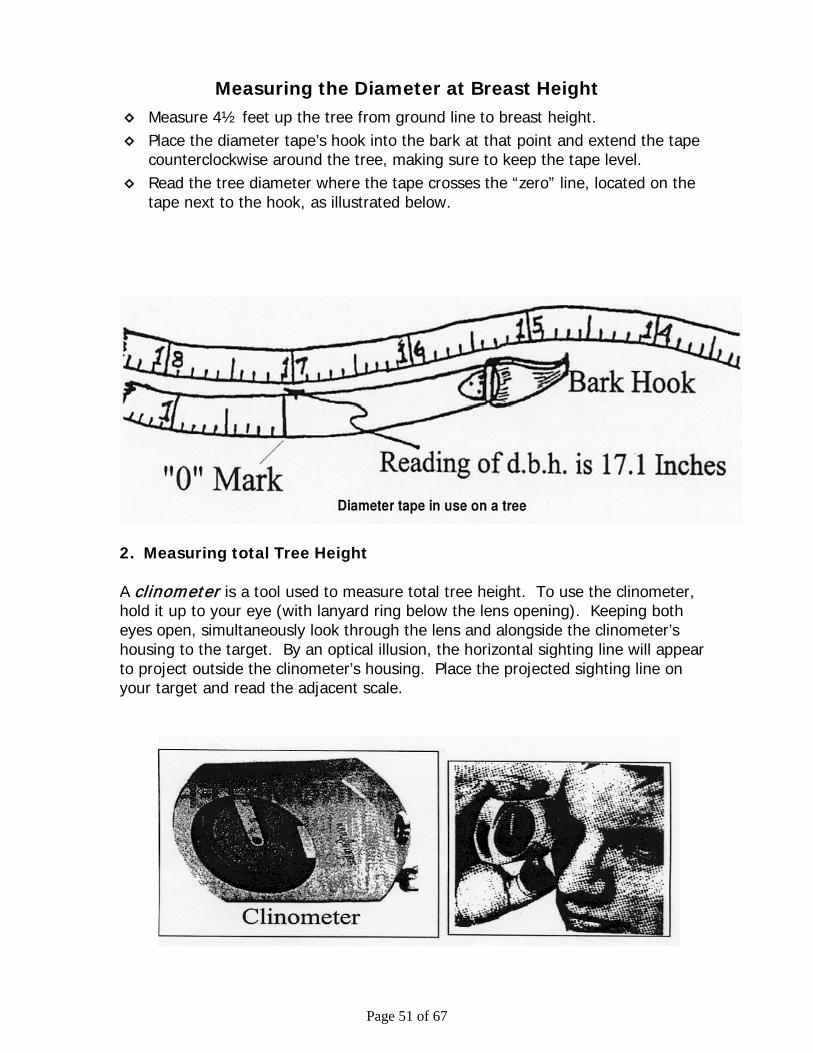
Measuring the Diameter at Breast Height ◊ Measure 4½ feet up the tree from ground line to breast height. ◊ Place the diameter tape’s hook into the bark at that point and extend the tape
counterclockwise around the tree, making sure to keep the tape level. ◊ Read the tree diameter where the tape crosses the “zero” line, located on the
tape next to the hook, as illustrated below.
2. Measuring total Tree Height A clinometer is a tool used to measure total tree height. To use the clinometer, hold it up to your eye (with lanyard ring below the lens opening). Keeping both eyes open, simultaneously look through the lens and alongside the clinometer’s housing to the target. By an optical illusion, the horizontal sighting line will appear to project outside the clinometer’s housing. Place the projected sighting line on your target and read the adjacent scale.
Page 52 of 67
When measuring a tree in dense underbrush, where it is difficult or impossible to see the top or base of the tree at 100 feet, use the degree of slope scale (the other scale on the clinometer). To measure tree height using the degree of slope scale, use the same procedure described in the example above, except stand only 66 feet away from the tree (instead of 100 ft.) and read the degree of slope on the clinometer (instead of the percent scale).
Tip #1 - Rounding Tree Heights:
3. Determining Board Foot Volume
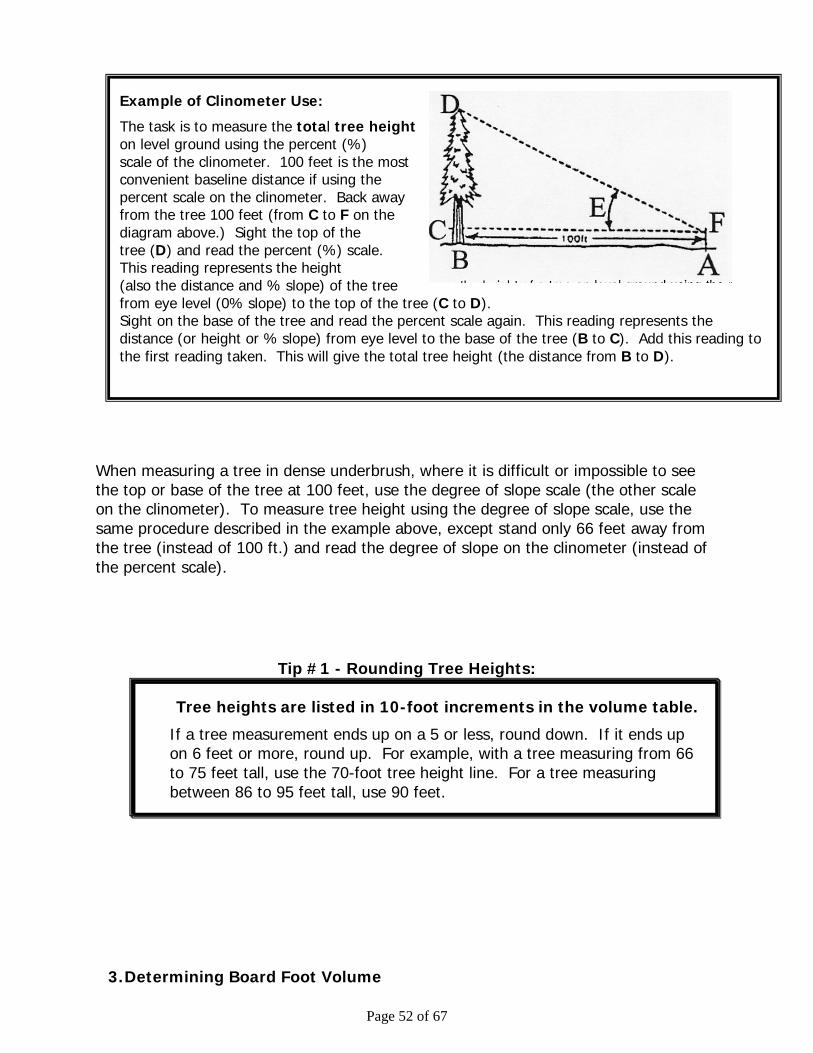
Example of Clinometer Use:
The task is to measure the total tree height on level ground using the percent (%) scale of the clinometer. 100 feet is the most convenient baseline distance if using the percent scale on the clinometer. Back away from the tree 100 feet (from C to F on the diagram above.) Sight the top of the tree (D) and read the percent (%) scale. This reading represents the height (also the distance and % slope) of the tree from eye level (0% slope) to the top of the tree (C to D). Sight on the base of the tree and read the percent scale again. This reading represents the distance (or height or % slope) from eye level to the base of the tree (B to C). Add this reading to the first reading taken. This will give the total tree height (the distance from B to D).
Tree heights are listed in 10-foot increments in the volume table.
If a tree measurement ends up on a 5 or less, round down. If it ends up on 6 feet or more, round up. For example, with a tree measuring from 66 to 75 feet tall, use the 70-foot tree height line. For a tree measuring between 86 to 95 feet tall, use 90 feet.

Page 53 of 67
A volume table gives the number of board feet in a tree. This is an estimate of the amount of lumber that can be cut from an individual tree. Here is an example of the board foot volume table that will be used in the forestry contest:
Scribner Board Foot Volume Table d.b.h Total Tree Height
(inches) 50 60 70 80 90 100 110 120 12 30 50 70 90 100 120 140 160 14 50 70 100 130 160 180 200 220 16 100 140 170 200 240 260 300 18 170 220 260 290 330 370 20 210 260 310 360 400 440 22 310 370 420 470 520 24 430 490 540 610 26 490 550 630 690 28 640 710 780 30 710 790 880
To use the table, look down the d.b.h. column (on the left side) to find the d.b.h. (to the nearest 2 inches) of the tree measured. Look across the tree height line to find the height (to the nearest ten feet) of the tree measured. Follow down the column – the point where it intersects with the d.b.h. row is the board foot volume of the tree.
Tip #2 – Rounding Diameters:
Tip #2 – Rounding Diameters:
TOOL IDENTIFICATION
Example:
A tree has a d.b.h. of 20 inches and a total height of 100. Read down the d.b.h. column to “20” and then read across the tree height line to “100.” This tree has a board foot volume of 360 board feet. How many board feet would be contained in a tree that measures 14 inches d.b.h. and is 70 feet tall?*
D.B.H. is given in 2-inch increments in the volume table.
The standard practice for rounding diameters is as follows: ◊ A tree in the 12-inch diameter class will be between 11.1 inches and 13.0 inches
in diameter. ◊ A 14-inch diameter class tree will be between 13.1 inches and 15.0 inches and
so on.

Page 54 of 67
TOOL IDENTIFICATION
The objective of the contest is to familiarize students with some of the basic commonly used tools and instruments in the forestry profession. The tools that are used in the contest have been divided into 6 categories according to their purpose. The categories include tools used for:
a) Cruising b) Measuring distance & direction c) Tree planting d) Safety e) Cutting wood/brush f) Miscellaneous
The best way for a student to learn to identify the tools is to have a forester display them in a “hands on” demonstration. As an aid for those who cannot participate in a demonstration, pictures provided by two forestry supply catalog companies* are included at the end of the chapter. The following is a list of tools to be identified in the contest:
● Tools used for cruising:
Biltmore stick Abney level Realaskop Caliper Diameter tape Clinometer Wedge prism Increment borer Cruiser’s vest Logger’s tape
● Tools used for measuring distance & direction:
GPS unit Hand compass Hip chain Range Finder

Page 55 of 67
● Tools used for tree planting and cutting wood/brush:
Hoedad Planting spade/shovel Planting bar Sandvic – Swedish Brush Ax Chainsaw Pulaski
● Tools used for safety:
Caulk (Cork) Boots Chaps Hard hat Leather gloves Safety glasses
● Miscellaneous tools:
Drip Torch Plastic flagging Tree Marking Gun Pocket stereoscope Staple hammer Fire weather kit *Forestry Supply web sites used as sources for pictures:
Federal Highway Administration website www.fhwa.dot.gov/encironment/Fspubs/05232810 Ben Meadows Co.
www.benmeadows.com Forestry Suppliers, Inc. www.forestry-suppliers.com

Page 56 of 67
Tools used for CRUISING
Abney Level Clinometer
Logger’s Tape Wedge Prism Relaskop
Increment Bor Caliper Diameter Tape

Page 57 of 67
Tools used for MEASURING DISTANCE and DIRECTIONS
Hip Chain
Fiberglass Measuring Tape GPS Unit
Altimeter Hand Compass

Page 58 of 67
Tools used for TREE PLANTING and CUTTING WOOD/BRUSH
Hoedad (tree planting hoe) Planting Spade
Planting Bar Chainsaw
Pulaski Sandvik

Page 59 of 67
MISCELLANEOUS TOOLS
Plastic Flagging Tree Marking Gun Drip Torch
Pocket Stereoscope Staple Hammer
Fire Weather Kit
Page 60 of 67
TREE DISORDER
Determining a tree’s health is an important part of caring for a forest. Some tree health problems may be confined to an individual tree, but problems that occur on many trees within a forest may indicate an unhealthy forest. An understanding of the relationship between tree health and forest health is important in making management decisions, because to permanently improve forest health, a broad range of management actions over a long period of time is often necessary. To assess the health of a tree, use a logical, three-step approach. Start by looking for abnormalities and damage. If anything is found, look for additional signs and symptoms, and then use all these clues to help determine the type of damage, and finally, identify a specific causal agent.
A. LOCATE ANY DAMAGE Look over the tree for damage such as scars, holes, discolored needles, missing bark, fine sawdust in bark crevices or around the base of the tree, unusual swellings or growths, or pitch flow. A very important clue is to stand back and look at the top of the tree. Is it dead, off-color, fading, or does it have an unusual crop of small cones? Compare the growth of the top leader to nearby trees of the same size and species to assess current growth. Short growth or other crown problems are evidence that the tree is not getting sufficient nutrients to maintain normal health. Look for a pattern of damage. Does the damage involve the whole tree or only a certain side or height or age of needles? Be sure to check adjacent trees for similar problems. Is the damage only on a certain size of the tree? Are other species damaged, too? Also, look at the surrounding environment. Is the damage limited to depressions, ridge tops, southern exposures, etc.?
B. DETERMINE THE TYPE OF DAMAGE There are five general causes of damage, including:
1. Insect: Insects can be identified by the presence of the insect itself or more often by its damage. Look for fine sawdust in bark crevices or around the tree base, small holes in the bark, grooves or tunnels under the bark or in the trunk of the tree, small masses of pitch (“pitch tubes”) on the trunk, and chewing or webbing on needles.
2. Disease: Diseases are sometimes harder to identify than insects. Look for
discoloration or browning of foliage, pitch flow or sap oozing from the bark. Unusual growths, swellings, or decay, or the fruiting bodies of fungi called conks.
3. Animal: Animals usually damage trees by chewing, rubbing or breaking branches, while birds peck holes in them.

Page 61 of 67
4. Mechanical: Mechanical damage is the result of equipment in the forest. Look
for torn or missing bark and broken or scraped branches.
5. Environmental: Environmental damage is the result of weather, fire, or chemicals in the environment. Look for damage across a broad area on many trees of different sizes and often on many different species including shrubs.
C. IDENTIFYING THE SPECIFIC AGENT THAT CAUSED THE DAMAGE Insects: Three major types of insects damage trees, including:
1. Bark beetle bore through the bark of trees where adults lay their eggs and larvae feed, grow and mature in the inner bark. This activity girdles the tree, which usually kills it, although some trees may survive if the attacks are limited (e.g. “strip attacks”). Each type of bark beetle has a distinctive egg gallery. Look for sawdust and/or pitch tubes in bark crevices or on the ground around the tree or galleries under the bark on the trunks of dead and dying trees. Sometimes only the tops of trees are killed.
2. Defoliators feed on the leaves or underside of needles. Some larvae mine buds
and old needles of trees. After several years of severe defoliation, branches may die back, and top kill may occur. When defoliator populations are high, tree mortality can occur or trees can become susceptible to other insects or diseases. Look for chewed needles or leaves. Look for larvae, pupae, webbing and cocoons or egg masses.
3. Wood Borers infest weakened, dead, or recently felled trees. Wood borers can
kill live trees (occasionally) when populations are high. The larvae mine first into the cambium of the trunk, branches or roots of the tree, and then bore into the wood. Look for round or oval-shaped holes and tunnels through the wood. These may be either tightly packed with fine boring dust or loosely packed with coarse boring dust.
Note: Often trees are damaged by one of these five factors and are then attacked by insects or disease, which may mask the original cause of damage. It is also common to find multiple problems on the same tree, because an already weakened tree is more susceptible to insects and diseases.

Page 62 of 67
Diseases: There are five broad categories of diseases:
1. Root Disease, which is caused by fungi and can be recognized by the distinctive decay or fruiting bodies they produce. Young trees of all species are attacked. Douglas-fir and grand fir remain highly susceptible for life but many species become less susceptible with age. Trees of all sizes can be attacked. As root disease spreads through the root system, it slowly starves the tree (this usually takes several years for large trees). Root diseases generally spread from tree to tree via direct root contacts, which often results in a “pocket” or “center” of dead and dying trees. Trees with root disease often have shortened terminal growth, with rounded crowns. They may also have thin, off-colored (yellowish) crowns and a stress cone crop. Often, pitch will ooze through the bark at the base of the tree. Roots on w indthrow n trees may appear stubbed or callused over.
2. Dwarf Mistletoe is a small parasitic plant that attacks live trees. They produce small plants on infected branches that vary in size from one to several inches and may be yellow to purple to brown or olive green in color. Infections are most common in the lower portion of trees and often stimulate unusual branch growth, resulting in dense clusters of branches called “witches brooms.” Top kill or “dieback” is common as the nutrients are siphoned off by infections in the lower crown. Severe infections will reduce tree height and diameter growth. Trees are rarely killed but may be seriously deformed. Bark beetles sometimes attack trees weakened by dwarf mistletoe infections. Look for witches brooms, swelling on stems and branches, and small dwarf mistletoe plants in the branches.
3. Decay is fungi that recycle wood. They are usually identified by the kind of decay they produce or by the fruiting bodies conks produced on the trunk of infected trees. Most decays can be found on several different tree species, although some have a very narrow host range. They are extremely important in recycling dead and down trees, but some decays become a problem in live trees where they cause defect in work and weaknesses that predispose trees to failure. Trees with decay are used as nesting sites for many animal species, including birds, bats and many small mammals.
Contest Tip: Only Douglas-fir, western larch, ponderosa pine, and lodgepole pine are attacked by dwarf mistletoes in the Inland Northwest.
Page 63 of 67
4. Fungal diseases that attack the cambium layer and cause a deformity in the trunk or branches cause cankers. Most canker-causing fungi occur on a very limited number of hosts. As cankers grow, they can girdle and kill trees or branches. Look for flagging (dead branches with brown or red needles on them, deformities in the trunk or branches, or areas of severe pitching.
5. Foliage Blights or Needlecasts are diseases caused by a group of fungi that
attack the foliage of live trees. Most of these fungi are very host-specific (i.e. each fungus attacks only one kind of tree). They usually attack either the current season of foliage or older foliage, but not both, so trees are rarely killed. Most of these diseases are strongly favored by moist climatic conditions so some trees in a stand may be severely infected while adjacent trees have little or no infection due to minor differences in site conditions. Look for yellowing, browning or loss of foliage, especially in the lower crown where moisture conditions are generally more favorable for these fungi.
Animals Animals cause various kinds of damage to trees, depending on the type of animal that caused the damage. For example, many browsing animals, such as deer or moose, will chew the top or branches off. Bears sometimes damage or even girdle cedar and larch trees by peeling off strips of bark to feed on the underlying cambium. Woodpeckers flake bark off to reach insects underneath, but the birds because little, if any, damage compared to the insects infesting the tree. Woodpeckers also excavate nesting holes in the boles of trees, but again, the “damage” is secondary to the decay that was already present.
Mechanical Mechanical damage is man-caused: The use of equipment such as
skidders, saws, trucks, and etc. can cause bark injury, broken branches, broken tops and boles on small trees, scraped branches, and other injuries.
Environmental Environmental damage includes snow or wind breakage, lightning, frost injury, winter desiccation, and drought. It can be difficult to distinguish environmental damage from other kinds of damage. Determining environmental damage will often amount to eliminating other possible causes of damage by the lack of symptoms (e.g. no cankers, no insects, no galleries, no decay, and no mechanical damage).
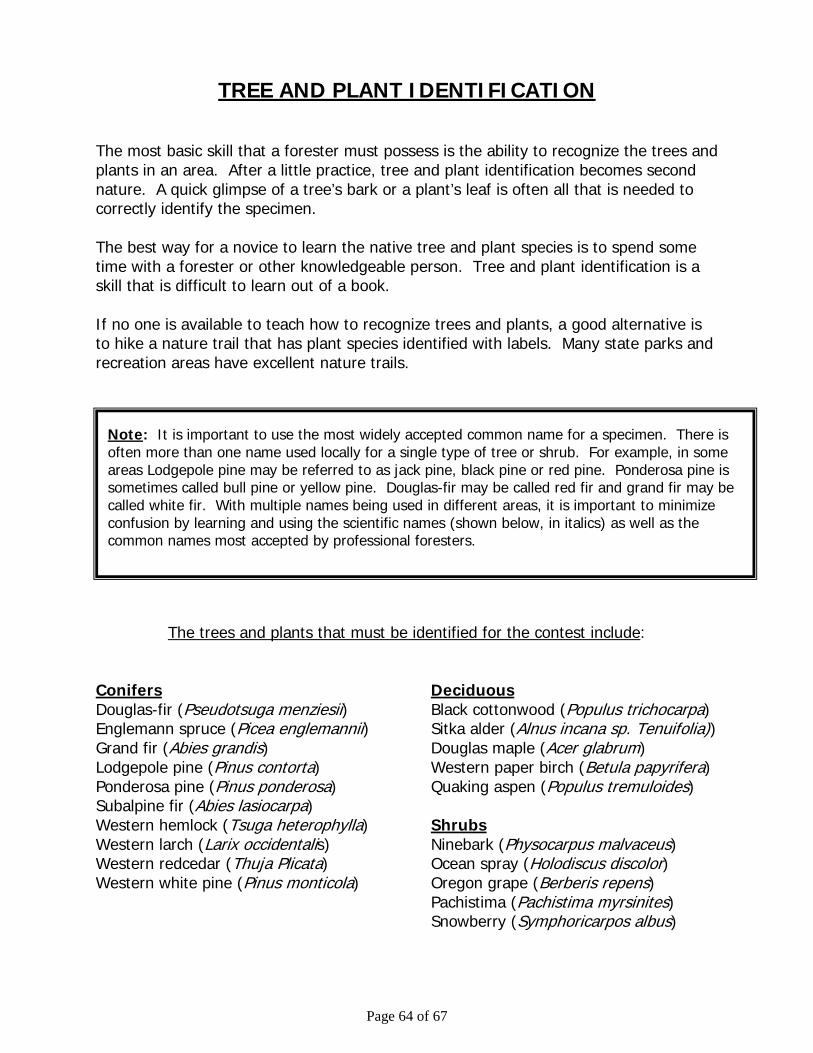
Page 64 of 67
TREE AND PLANT IDENTIFICATION The most basic skill that a forester must possess is the ability to recognize the trees and plants in an area. After a little practice, tree and plant identification becomes second nature. A quick glimpse of a tree’s bark or a plant’s leaf is often all that is needed to correctly identify the specimen. The best way for a novice to learn the native tree and plant species is to spend some time with a forester or other knowledgeable person. Tree and plant identification is a skill that is difficult to learn out of a book. If no one is available to teach how to recognize trees and plants, a good alternative is to hike a nature trail that has plant species identified with labels. Many state parks and recreation areas have excellent nature trails.
The trees and plants that must be identified for the contest include: Conifers Deciduous Douglas-fir (Pseudotsuga menziesii) Black cottonwood (Populus trichocarpa) Englemann spruce (Picea englemannii) Sitka alder (Alnus incana sp. Tenuifolia)) Grand fir (Abies grandis) Douglas maple (Acer glabrum) Lodgepole pine (Pinus contorta) Western paper birch (Betula papyrifera) Ponderosa pine (Pinus ponderosa) Quaking aspen (Populus tremuloides) Subalpine fir (Abies lasiocarpa) Western hemlock (Tsuga heterophylla) Shrubs Western larch (Larix occidentalis) Ninebark (Physocarpus malvaceus) Western redcedar (Thuja Plicata) Ocean spray (Holodiscus discolor) Western white pine (Pinus monticola) Oregon grape (Berberis repens) Pachistima (Pachistima myrsinites) Snowberry (Symphoricarpos albus)
Note: It is important to use the most widely accepted common name for a specimen. There is often more than one name used locally for a single type of tree or shrub. For example, in some areas Lodgepole pine may be referred to as jack pine, black pine or red pine. Ponderosa pine is sometimes called bull pine or yellow pine. Douglas-fir may be called red fir and grand fir may be called white fir. With multiple names being used in different areas, it is important to minimize confusion by learning and using the scientific names (shown below, in italics) as well as the common names most accepted by professional foresters.
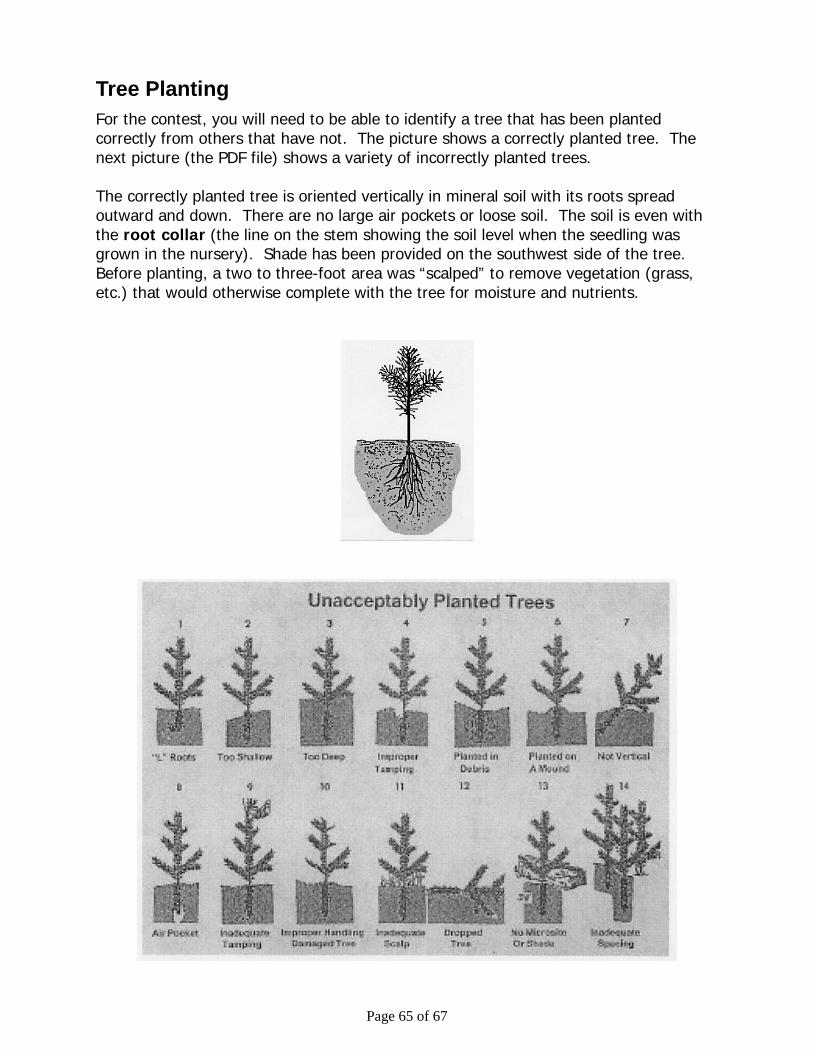
Page 65 of 67
Tree Planting For the contest, you will need to be able to identify a tree that has been planted correctly from others that have not. The picture shows a correctly planted tree. The next picture (the PDF file) shows a variety of incorrectly planted trees. The correctly planted tree is oriented vertically in mineral soil with its roots spread outward and down. There are no large air pockets or loose soil. The soil is even with the root collar (the line on the stem showing the soil level when the seedling was grown in the nursery). Shade has been provided on the southwest side of the tree. Before planting, a two to three-foot area was “scalped” to remove vegetation (grass, etc.) that would otherwise complete with the tree for moisture and nutrients.

Page 66 of 67
APPENDIX A One of the objectives of the Stevens County Forestry Contest is to provide opportunities for students to meet with and learn from professional foresters and other natural resource management professionals. Often, these people are very willing to help a team prepare and train for the contest. The nearest offices of the Stevens County Conservation District, the Natural Resources Conservation Service, the Cooperative Extension, and the United States Forest Service Ranger Districts are all excellent sources of assistance. Foresters who work with local forest products industries are another possible source of assistance. Help is readily available, so don’t hesitate to call. The following websites give excellent references. NatureServe http://www.natureserve.org/explorer/servlet/NatureServe?init=Species Dept. of Ag http://plants.usda.gov/ Steps to access the U.S. Forest Service Scaling Handbook on the Internet, using the Google search engine.
• Type in “forest service handbooks.” • Click on #1 Forest Service Handbooks, service wide issuances • Click item #2 – 2000 National Forest Resource Management • Click 2409.11.10 – “Chapter 10” Theory and Principals of Scaling.
The handbook is approximately 30 pages long.