For Creative Minds - arbordalepublishing.com · For Creative Minds Simple Machines Simple machines...
4
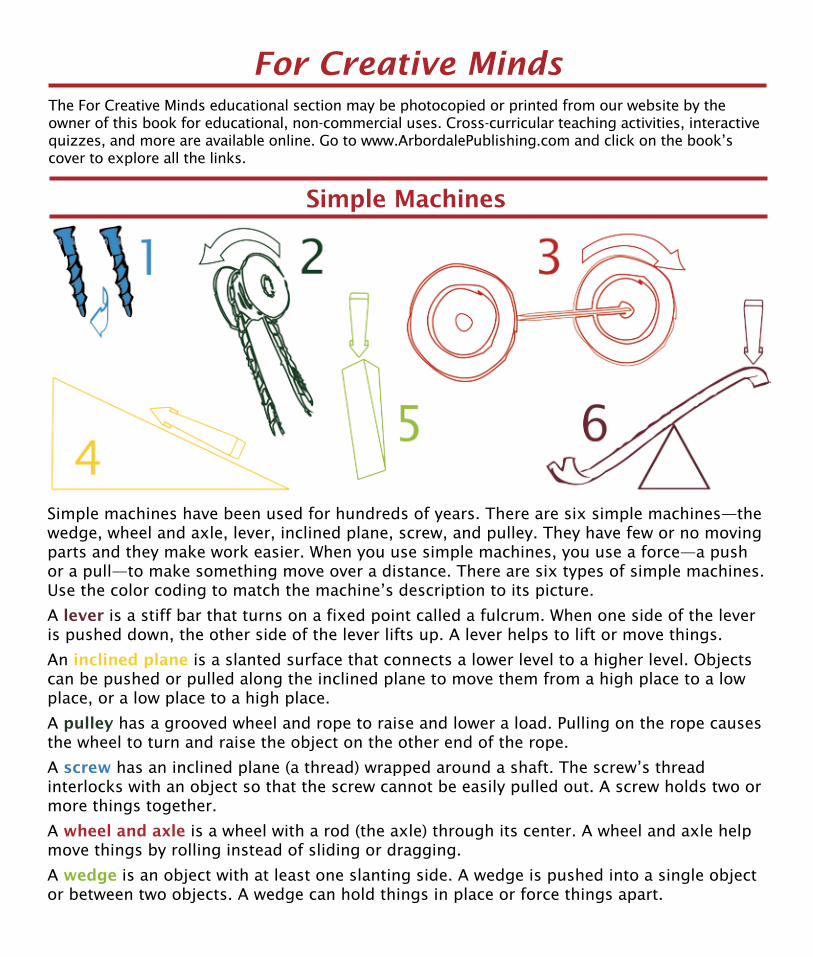
The For Creative Minds educational section may be photocopied or printed from our website by the owner of this book for educational, non-commercial uses. Cross-curricular teaching activities, interactive quizzes, and more are available online. Go to www.ArbordalePublishing.com and click on the book’s cover to explore all the links. For Creative Minds Simple Machines Simple machines have been used for hundreds of years. There are six simple machines—the wedge, wheel and axle, lever, inclined plane, screw, and pulley. They have few or no moving parts and they make work easier. When you use simple machines, you use a force—a push or a pull—to make something move over a distance. There are six types of simple machines. Use the color coding to match the machine’s description to its picture. A lever is a stiff bar that turns on a fixed point called a fulcrum. When one side of the lever is pushed down, the other side of the lever lifts up. A lever helps to lift or move things. An inclined plane is a slanted surface that connects a lower level to a higher level. Objects can be pushed or pulled along the inclined plane to move them from a high place to a low place, or a low place to a high place. A pulley has a grooved wheel and rope to raise and lower a load. Pulling on the rope causes the wheel to turn and raise the object on the other end of the rope. A screw has an inclined plane (a thread) wrapped around a shaft. The screw’s thread interlocks with an object so that the screw cannot be easily pulled out. A screw holds two or more things together. A wheel and axle is a wheel with a rod (the axle) through its center. A wheel and axle help move things by rolling instead of sliding or dragging. A wedge is an object with at least one slanting side. A wedge is pushed into a single object or between two objects. A wedge can hold things in place or force things apart.
Transcript of For Creative Minds - arbordalepublishing.com · For Creative Minds Simple Machines Simple machines...
The For Creative Minds educational section may be photocopied or printed from our website by the owner of this book for educational, non-commercial uses. Cross-curricular teaching activities, interactive quizzes, and more are available online. Go to www.ArbordalePublishing.com and click on the book’s cover to explore all the links.
For Creative Minds
Simple Machines
Simple machines have been used for hundreds of years. There are six simple machines—the wedge, wheel and axle, lever, inclined plane, screw, and pulley. They have few or no moving parts and they make work easier. When you use simple machines, you use a force—a push or a pull—to make something move over a distance. There are six types of simple machines. Use the color coding to match the machine’s description to its picture.
A lever is a stiff bar that turns on a fixed point called a fulcrum. When one side of the lever is pushed down, the other side of the lever lifts up. A lever helps to lift or move things.
An inclined plane is a slanted surface that connects a lower level to a higher level. Objects can be pushed or pulled along the inclined plane to move them from a high place to a low place, or a low place to a high place.
A pulley has a grooved wheel and rope to raise and lower a load. Pulling on the rope causes the wheel to turn and raise the object on the other end of the rope.
A screw has an inclined plane (a thread) wrapped around a shaft. The screw’s thread interlocks with an object so that the screw cannot be easily pulled out. A screw holds two or more things together.
A wheel and axle is a wheel with a rod (the axle) through its center. A wheel and axle help move things by rolling instead of sliding or dragging.
A wedge is an object with at least one slanting side. A wedge is pushed into a single object or between two objects. A wedge can hold things in place or force things apart.
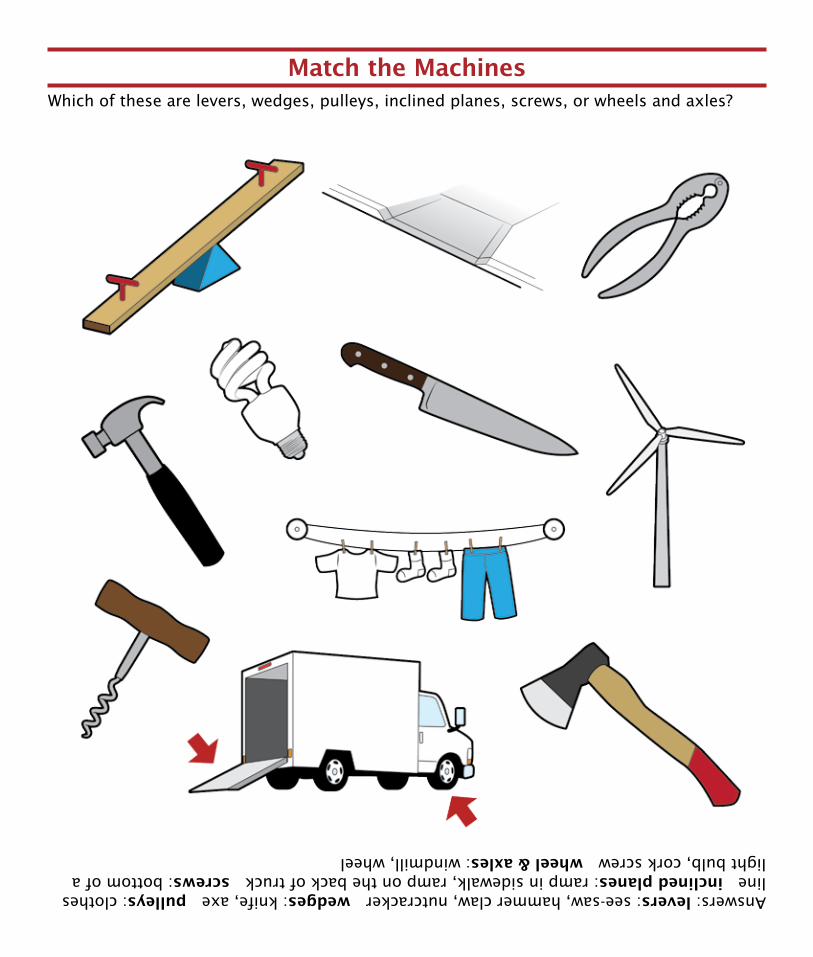
Which of these are levers, wedges, pulleys, inclined planes, screws, or wheels and axles?
Match the MachinesAnswers: levers: see-saw, hammer claw, nutcracker wedges: knife, axe pulleys: clothes line inclined planes: ramp in sidewalk, ramp on the back of truck screws: bottom of a light bulb, cork screw wheel & axles: windmill, wheel

Measuring Tools
In addition to the simple machines, Kathleen and her grandfather used measuring tools when building the fort. Which tool would you use to measure the following:
1. Kathleen used screws every six inches (15 cm). Which measuring tool do you think she used? Why?
2. Grandpa cut wood into 5-foot sections (1.5 m). Which measuring tool do you think he used? Why?
3. Grandpa measured a 35 degree angle on a board. Which measuring tool would he use? Why?
4. Kathleen measured one of Grandpa’s boards. It was exactly 36 inches long. Which measuring tool did she use? Why?
5. Grandpa had some extra wood. Kathleen asked her Grandpa to cut four circles out of the wood. Which tool would Grandpa use to measure the circles? Why?
Answers: 1: ruler, 2: measuring tape, 3: protractor, 4: yard stick, 5: compass
yard stick
protractor
compass
ruler
measuring tape
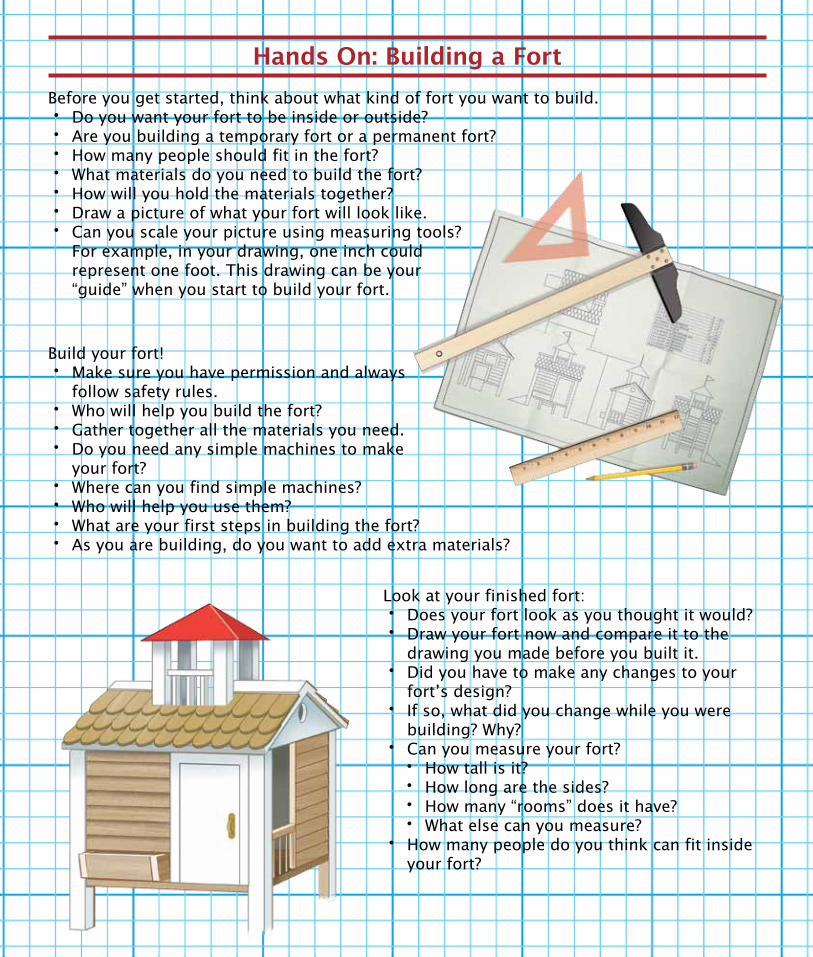
Hands On: Building a Fort
Before you get started, think about what kind of fort you want to build. •Do you want your fort to be inside or outside?•Are you building a temporary fort or a permanent fort?•How many people should fit in the fort?•What materials do you need to build the fort?•How will you hold the materials together?•Draw a picture of what your fort will look like. •Can you scale your picture using measuring tools?
For example, in your drawing, one inch could represent one foot. This drawing can be your “guide” when you start to build your fort.
Build your fort!•Make sure you have permission and always
follow safety rules. •Who will help you build the fort? •Gather together all the materials you need.•Do you need any simple machines to make
your fort?•Where can you find simple machines? •Who will help you use them?•What are your first steps in building the fort? •As you are building, do you want to add extra materials?
Look at your finished fort:•Does your fort look as you thought it would? •Draw your fort now and compare it to the
drawing you made before you built it.•Did you have to make any changes to your
fort’s design? •If so, what did you change while you were
building? Why? •Can you measure your fort? •How tall is it? •How long are the sides? •How many “rooms” does it have? •What else can you measure?
•How many people do you think can fit inside your fort?