CAEM GP7 Pallet Rack Shelving System – for industrial sand warehouse storage rack
Food Storage Multi-Unit Rack
Page 1 of 19
© 2011 waterstoragerack.blogspot.com 02/22/2011
waterst
orage
rack.b
logsp
ot.co
m

Summary
We had a need to store 8 large 55 gallon water drums. We initially stored them vertically, which made it
hard to change the water, and if we had been in an emergency situation where we needed the water,
would have made it difficult to remove the water for use.
In trying to solve this problem, I ran across a website that discussed storing barrels horizontally:
http://www.theideadoor.com/index.php?option=com_content&view=article&id=252&Itemid=306
Using the information provided by that site, I devised an expansion of that idea that would serve to
store our 8 barrels (actually 7), as well as potentially store our growing stockpile of #10 food storage
cans.
Changes from Original Design
The original design accomodated only 2 barrels. Base on where I wanted the racks located, I would be
unable to create additional shelving above them without framing in some walls. This seemed to be
ineffective from a cost standpoint. As a result, I decided that the best way to utilize that dead space
above the racks was to extend the racks vertically. Initially the idea was to add 3 shelves above the
water barrels, to provide some storage. It was then determined that with a slight angle to the shelve,
the cans on the shelves could roll forward, much like a standard can rotator. Because of the weight of
the #10 cans, I didn’t want the clunking around that a typical rotator entails. As such, these racks are
only “rotators” in the sense that you can put new stock in the back and pull old stock from the front.
The units described here have a capacity of 3 shelves, but by elongating the vertical supports (A), you
can add more shelves. Each shelf, as designed here, can hold 18 #10 cans. Our racks ended up with 4
shelves each, or 16 total shelves. We can therefore store 288 cans.
Another design change was to elongate the barrel space. The initial design called for a 21” spacer
support. I added an additional 4”. This was to provide greater support to the can shelves that would be
used.
I also deviated from the original design in that I omitted the “feet”. This was to fit more vertical space
for shelves, and to provide a larger surface area to distribute the weight of the rack on the floor.
Materials
Each rack requires the following parts (not all parts have corresponding drawings):
• (A) 4 – 2x4x80* – vertical rack supports
• (B) 4 – 2x4x27 – rack facing supports
• (C) 4 – 2x4x25 – rack depth supports
• (E) 2 – 2x4x31 ½” – rack feet
Page 2 of 19
© 2011 waterstoragerack.blogspot.com 02/22/2011
waterst
orage
rack.b
logsp
ot.co
m

• (D) 4 – 27x6x3/4” (plywood) – barrel support holsters
• (BASE SUPPORT) 2 – 24x28x3/4” (plywood) – additional support
• (SHELVING) 3 – 35x25x3/4” (plywood) – can shelving
• (FURRING) 6 – 1x2x35” – furring strip to support can shelves
• (ROLL STOPPER) 3 – 1x2x24” – facing strip to stop cans from rolling off shelves
• 6 – 24” lengths of metal drywall corner pieces – this is used to create lanes for the cans
* The length of these boards depends on the final height that you want. Our basement could only
handle a roughly 80” height, however if you could handle a higher rack, then you could conceivable
follow the same pattern for shelving and add an additional 1 to 2 shelves
When cutting the wood, there will unfortunately be waste. I found that I was able to cut the necessary
2x4 pieces from a total of eight 96” timbers. However, if you can get your hands on longer boards, then
there will obviously be much less waste. (And in my case, I used the “waste” for other projects so it
really wasn’t waste.) For the plywood I found that it took 2 full 4’x8’ sheets to get the necessary pieces.
Again, there was some “waste.”
One point to consider is that when building multiple racks, the “waste” will be much less. I built 4 at the
same time when I built ours. It took roughly 2 days to build and install them all.
Construction
When constructing the racks I used 2 ½” deck screws mostly. In some places I used 1 5/8” deck screws.
In many cases I also predrilled pilot holes. While this did increase the time of assembly, it ensured that
minimal wood splitting would occur.
Rack Assembly
1. Cut all materials prior to assembly.
2. Cut the notches into the appropriate upright supports (A). I used a jigsaw to help with the
cutting, though other tools might prove to be just as effective.
3. Assemble the front and back support stands by connecting 2 (A) pieces with the corresponding
(B) pieces.
4. Screw (D) over the (B) supports. Ensure that the low point of the arc is flush with the top of the
(B) support.
5. Attach the front and back using (C) supports.
6. Attach the (E) feet to the rack.
7. Attach the (BASE SUPPORT) pieces across the sides of the rack, generally in such a way that the
center of the (BASE SUPPORT) pieces aligns with where the top of the bottom barrel would be.
In my drawing I have not included these pieces, as they obscure some of the construction.
8. Attach (FURRING) to supports (A). I found that starting the bottom furring at 57” from the floor
and then going up 7” for each additional (FURRING) was sufficient. To provide an angle, the rear
Page 3 of 19
© 2011 waterstoragerack.blogspot.com 02/22/2011
waterst
orage
rack.b
logsp
ot.co
m

of each (FURRING) was raise 1 ½” from level. I also started the (FURRING) about 1 ½” from the
front the (A) support, to give room to add the (ROLL STOPPER).
9. Attach the (ROLL STOPPER) pieces. These are placed on top of the (FURRING) pieces, and placed
with the 2” portion of the wood vertical.
10. Attach the dry wall corner pieces to the shelving and then slide the shelves into place on top of
the (FURRING). There is generally no need to screw down the shelves as the weight of the #10
cans should hold the shelves down.
Installing hose bibs (faucet)
Each barrel will have two bungs, or caps. One bung should have threads in the center hole. If neither
bung has threads on the inside hole, then stop here. You may purchase the correct bung from online
suppliers such as Emergency Essentials or Honeyville.
1. Remove the center backing of the bung. This must be done on the bung with threads in the
center. Be careful not to damage or remove any of the existing threads.
2. Install the bung into the barrel. No Teflon tape should be used, as the bung should have a
rubber gasket around it. The bung should be tightened with a bung wrench. This can be
purchased for a few dollars from the above mentioned suppliers.
3. Screw in the ¾” hose bib into the bung, having wrapped the hose bib threads with Teflon tape.
Tighten the bib until it is pointing down
a. I used right angle bibs on the upper barrels and obtuse (45 degree) bibs on the bottom
barrels, for each of attacking a hose. If I did it again, I’d have used obtuse bibs on all
barrels.
4. Fill the barrel with water. Water should be rotated regularly (6 to 9 months), in most cases.
Notes on Durability
In calculating how much this entire rack would weigh, and if our cement basement would support it, we
used the following assumptions:
• Cured concrete strength: 4000 pounds per square inch (psi)
• Total weight of a loaded rack: 1300 lbs
• Surface area contacting cement (roughly): 156 sq inches
This all resulted in an average of 9 psi, well within the range that our cement could handle. As for the
wood itself, I let it cure for about a month in our dry Colorado climate. This helped to remove all
moisture from the wood. The racks were assembled in the fall of 2009, and as of this writing (Spring
2011) we have had no problems.
I’ve seen reports of similar racks and the barrels failing due to the weight of the water putting pressure
on the side of the barrel. Our barrels have not had that problem. If that is a problem, additional support
could easily be added horizontally across each barrel area.
Page 4 of 19
© 2011 waterstoragerack.blogspot.com 02/22/2011
waterst
orage
rack.b
logsp
ot.co
m
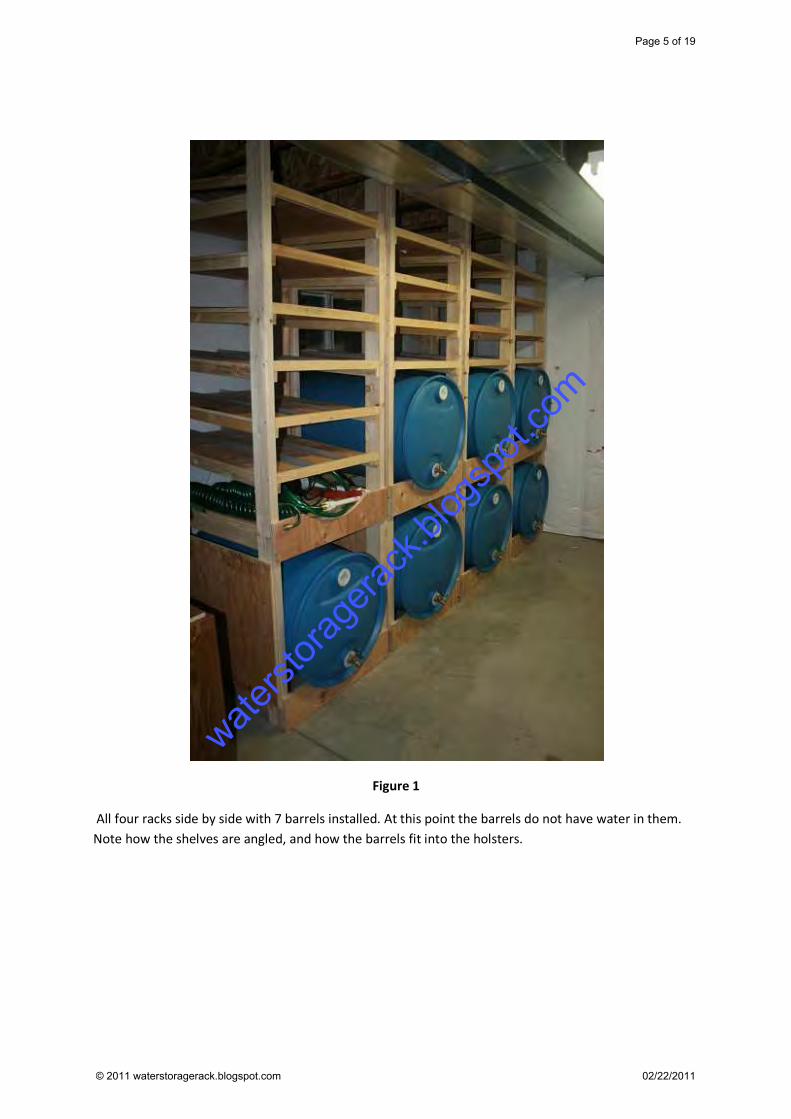
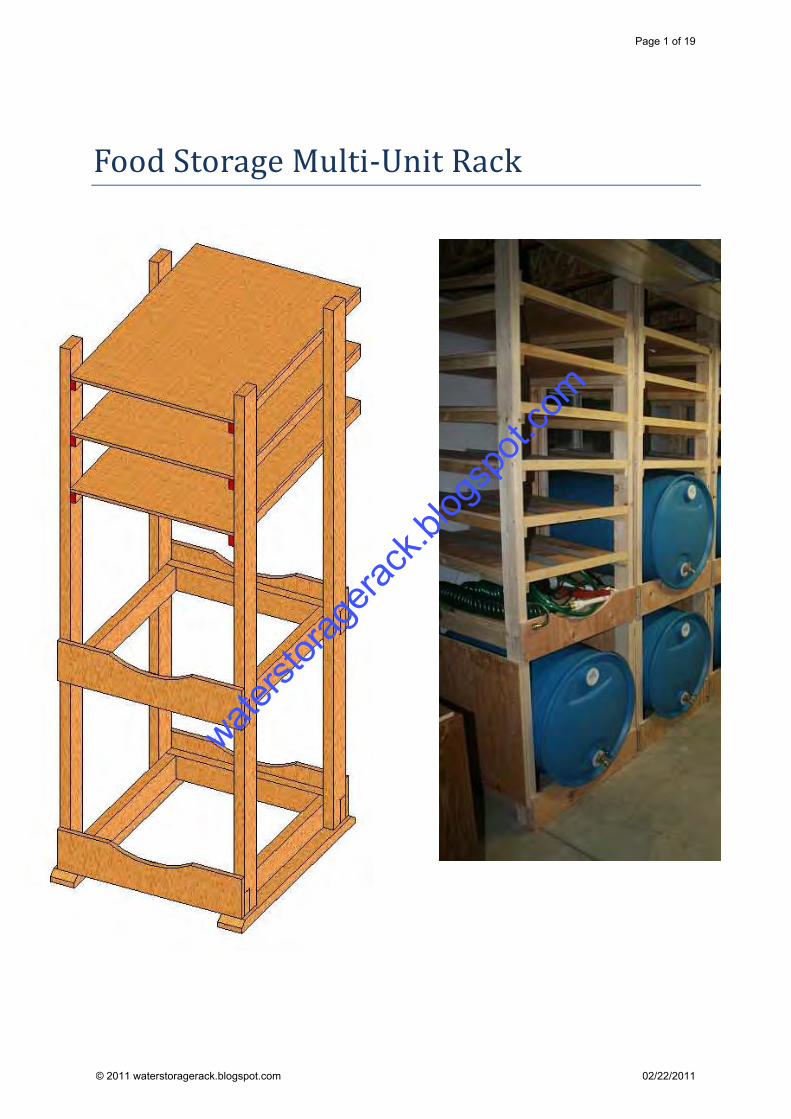
Figure 1
All four racks side by side with 7 barrels installed. At this point the barrels do not have water in them.
Note how the shelves are angled, and how the barrels fit into the holsters.
Page 5 of 19
© 2011 waterstoragerack.blogspot.com 02/22/2011
waterst
orage
rack.b
logsp
ot.co
m

Figure 2
Close up of can shelf, including ROLL STOPPER and drywall corner pieces used to define lanes for can
rows. I used a staple gun to tack down the corner pieces.
Figure 3
Close up of hose bib installation. Note the use of Teflon tape where the bib was screwed into the bung
cap. Be careful with the bungs, as the can be cracked if the bib is tightened too much.
Page 6 of 19
© 2011 waterstoragerack.blogspot.com 02/22/2011
waterst
orage
rack.b
logsp
ot.co
m

Figure 4
Showing the layout of the shelves, including placement of the ROLL STOPPER. When cans are placed in
each lane the bottom of the next shelf up should help the can not roll out the side of the shelf. Note that
at the top of the unit an small 2x1/2” furring strip was added to the side to ensure the top cans do not
roll out the side of the top shelf.
Page 7 of 19
© 2011 waterstoragerack.blogspot.com 02/22/2011
waterst
orage
rack.b
logsp
ot.co
m

Figure 5
Fully assembled and loaded racks. Since installing the racks, I have added white board strips to the front
of each row. On these strips we’ve written what each row contains and how many are in that row.
Ideally we’d also write the date of the oldest item in that row.
Page 8 of 19
© 2011 waterstoragerack.blogspot.com 02/22/2011
waterst
orage
rack.b
logsp
ot.co
m

57"
80"
7"
7"
Barrel Rack
Fully AssembledPage 9 of 19
© 2011 waterstoragerack.blogspot.com 02/22/2011
waterst
orage
rack.b
logsp
ot.co
m

57"
80"
7"
7"
Barrel RackRight Profile
Page 10 of 19
© 2011 waterstoragerack.blogspot.com 02/22/2011
waterst
orage
rack.b
logsp
ot.co
m

Barrel Rack
No Shelves InstalledPage 11 of 19
© 2011 waterstoragerack.blogspot.com 02/22/2011
waterst
orage
rack.b
logsp
ot.co
m

57"
7"
7"
80"
Barrel Rack
No Shelves InstalledPage 12 of 19
© 2011 waterstoragerack.blogspot.com 02/22/2011
waterst
orage
rack.b
logsp
ot.co
m

78.50
25.00
3.50
1.50
Vertical Uprights2"x4" stock
4 per barrel rackPage 13 of 19
© 2011 waterstoragerack.blogspot.com 02/22/2011
waterst
orage
rack.b
logsp
ot.co
m

27.00
Horizontal Slot Cross Beams
2"x4" stock
4 per barrel rackPage 14 of 19
© 2011 waterstoragerack.blogspot.com 02/22/2011
waterst
orage
rack.b
logsp
ot.co
m
25.00
Horizontal Cross Braces
2"x4" stock
4 per barrel rackPage 15 of 19
© 2011 waterstoragerack.blogspot.com 02/22/2011
waterst
orage
rack.b
logsp
ot.co
m

7.50
6.00
27.00
7.50
R12.00
Barrel Cradle
3/4" plywood
4 per barrel rackPage 16 of 19
© 2011 waterstoragerack.blogspot.com 02/22/2011wate
rstora
gerac
k.blog
spot.
com

31.50
29.50
1.00
.75
Barrel Rack Skid
2"x4" stock
2 per barrel rackPage 17 of 19
© 2011 waterstoragerack.blogspot.com 02/22/2011wate
rstora
gerac
k.blog
spot.
com

35.00
1.50
2.45°
Can Shelf Furring Support1"x2" stock
6 per barrel rackPage 18 of 19
© 2011 waterstoragerack.blogspot.com 02/22/2011wate
rstora
gerac
k.blog
spot.
com
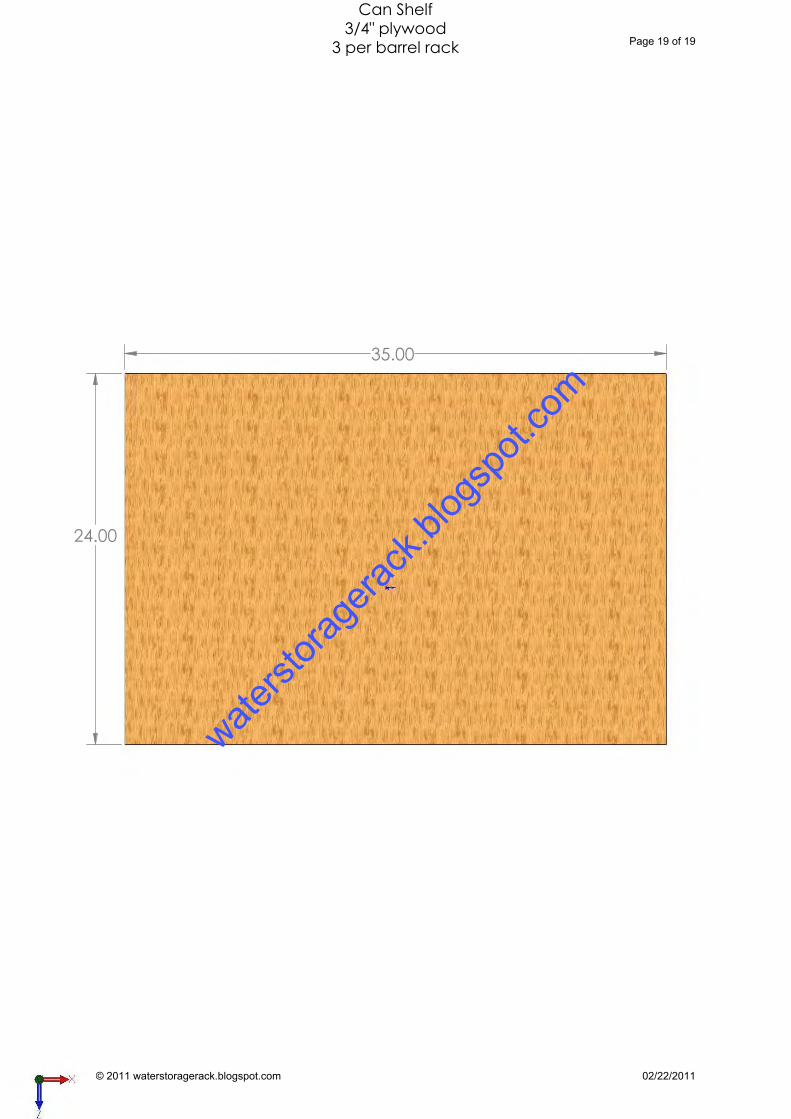
24.00
35.00
Can Shelf
3/4" plywood
3 per barrel rackPage 19 of 19
© 2011 waterstoragerack.blogspot.com 02/22/2011
waterst
orage
rack.b
logsp
ot.co
m