food and Biology experiments benedict's solution - Trionó · PDF fileBiology...
15
Biology experiments Mandatory experiment: to examine plant cells under a light microscope. Place some onion tissue on a slide. Cover with iodine stain. Leave for a minute. Examine with the microscope, using the different lenses. Mandatory experiment; To test for the presence of starch. iodine (red) food sample 1. Place a small quantity of the food which you want to test into a test tube. 2. Add 2 drops of iodine indicator. 3. If starch is present in the food sample it will turn blue/ black. 4. Repeat for different food samples Mandatory experiment; To test for the presence of glucose. boiling water food and benedict's solution 1. Place a small quantity of the food which you want to test into a test tube. 2. Cover with Benedict’s solution (blue). 3. Place the test tube into boiling water. 4. If glucose is present in the food sample the solution will turn from blue to brick red. 5. Repeat for different food samples. Onion cells
Transcript of food and Biology experiments benedict's solution - Trionó · PDF fileBiology...

Biology experiments
Mandatory experiment: to examine plant
cells under a light microscope.
Place some onion tissue on a slide.
Cover with iodine stain.
Leave for a minute.
Examine with the microscope, using
the different lenses.
Mandatory experiment; To test for
the presence of starch.
iodine
(red)
food sample
1. Place a small quantity of the
food which you want to test into
a test tube.
2. Add 2 drops of iodine indicator.
3. If starch is present in the food
sample it will turn blue/ black.
4. Repeat for different food
samples
Mandatory experiment; To test for
the presence of glucose.
boiling water
food and
benedict's solution
1. Place a small quantity of the
food which you want to test into
a test tube.
2. Cover with Benedict’s solution
(blue).
3. Place the test tube into boiling
water.
4. If glucose is present in the food
sample the solution will turn
from blue to brick red.
5. Repeat for different food
samples.
Onion
cells

Mandatory experiment; To test for
the presence of protein (the Biuret
test).
1. Add a small amount of the food to
be tested to a test tube.
2. Add an equal amount of Biuret’s
reagent.
3. Shake the test tube. If a
permanent violet colour develops
in the mixture protein is present.
Mandatory experiment; To test for
the presence of fat in a food sample.
1. Crush a sample of the food against
a piece of brown paper.
2. If a permanent translucent spot is
left on the paper then fat is
present in the food sample.
Mandatory experiment; To investigate
the conversion of chemical energy in
food to heat energy.
Procedure;
Materials needed, a crisp, test tube, water,
thermometer, measuring cylinder, retort
stand, white coat and goggles.
We held the rice cake with a tongs and set it
on fire. Then we held the burning rice under
a test tube of water and heated the water
with it. We measured the rise in
temperature of the water with the
thermometer.
Mandatory experiment; To show the
action of amylase enzyme on starch.
water at 37oC
A B
Starch only Starch and amylase
enzyme
1. In test tube A put starch only.
2. In test tube B put some starch
and a few drops of amylase
enzyme solution.
3. Place both in a beaker of warm
water. The enzyme works best in
warm conditions.
4. After 10 minutes, take out a small
amount of A and B and test them
with iodine solution.
5. ‘A’ will turn blue/ black due to the
presence of starch.
6. ‘B’ will not change the colour of
the iodine because the enzyme has

converted all of the starch to
maltose.
7. Test both test tubes with
Benedict’s solution.
8. A shows no reaction to it.
9. B changes the blue benedict’s
solution to brick red. This shows
that test tube B now contains
sugar. This must be due to the
presence of the enzyme.
Mandatory experiment; To
demonstrate that expired air has more
carbon dioxide than inhaled air.
A
B
limewater
Expired air
Blow through ‘A’.
This forces the air that you
exhale to pass through the
limewater.
Time how long it takes for the
limewater to turn milky-white.
Inspired air
Suck air through ‘B’.
This forces the inhaled air to
bubble through the limewater
before it enters your lungs.
Time how long it takes to turn the
limewater milky-white.
Results and conclusions
The exhaled air turns the limewater in
seconds while the inhaled air takes
several minutes. Therefore, we can
conclude that exhaled air contains more
carbon dioxide.
Mandatory experiment; To show that
starch is produced by a photosynthesising
plant
Leaves make glucose in photosynthesis but
store it as starch. If we can show the
presence of starch in the leaf we can
demonstrate that photosynthesis has taken
place.
Place a leaf in boiling water. This
softens the leaf cells and makes it
easier to take out the chlorophyll
from the leaf.
1
2
3
45 6
7
8
9
1 10
2
3
45 6
7
8
9
11
boiling
water
hot plate
leaf

Place the leaf into boiling alcohol.
This removes the chlorophyll from
the leaf.
1
2
3
45 6
7
8
9
1 10
2
3
45 6
7
8
9
11
boiling
water
hot plate
leaf
boiling
alcohol
Place the leaf back into boiling water.
This re-softens the leaf.
The leaf is placed on a dish and
covered with iodine. If starch is
present then the leaf will go blue
black in colour.
Experiment; To show that water, oxygen
and heat are needed for germination
Set up the apparatus as shown below.
The seeds in A will germinate
because they have warmth, oxygen
and water.
The seeds in B will not germinate
because they are lacking water.
The seeds in C will not germinate
because they are lacking oxygen
(boiled water has no oxygen)
The seeds in D will not germinate
because they are too cold.

Experiment; To show the presence of
micro-organisms in the air and soil.
Set up the apparatus as shown above.
Allow the three dishes to sit upside-
down in a warm room for two days.
Examine the plates.
Record your results.
A should remain clear.
B and C should have lots of bacterial
and fungal colonies growing on the
plates, showing that soil and air
contain micro-organisms.
Bacterial colonies appear as shiny
dots of liquid on the plates and
fungal colonies appear as fluffy or
powdery growths.
Title of experiment 9(a); To study a local
habitat
Description of the habitat; The ground
behind the school.
Map;
Weather conditions; Dry, sunny, no wind.
Soil temperature; 150C in the sun, 110C in
shade.
Wind direction; no wind
Light intensity; bright and sunny.
Petri dish +
Sterile agar
Petri dish +
sterile agar
Opened for
10 minutes
Petri dish +
Sterile agar
Sprinkled
A B C
Chemistry experiments
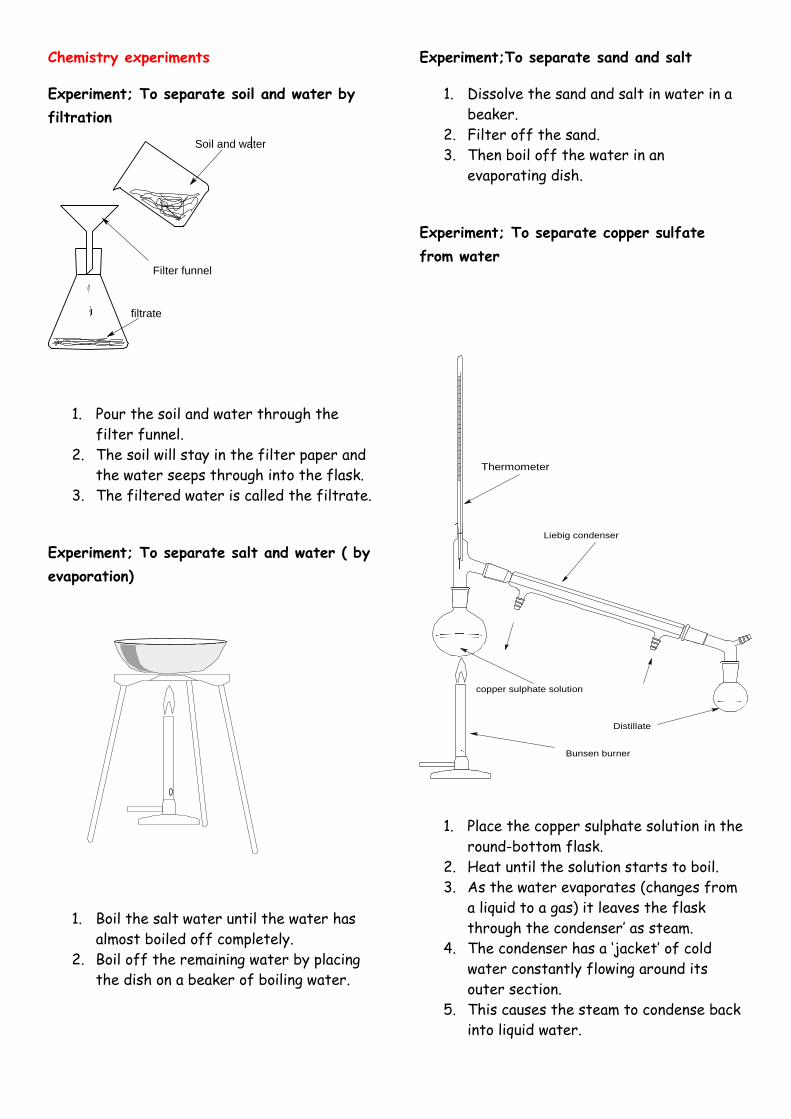
Experiment; To separate soil and water by
filtration
Filter funnel
filtrate
Soil and water
1. Pour the soil and water through the
filter funnel.
2. The soil will stay in the filter paper and
the water seeps through into the flask.
3. The filtered water is called the filtrate.
Experiment; To separate salt and water ( by
evaporation)
1. Boil the salt water until the water has
almost boiled off completely.
2. Boil off the remaining water by placing
the dish on a beaker of boiling water.
Experiment;To separate sand and salt
1. Dissolve the sand and salt in water in a
beaker.
2. Filter off the sand.
3. Then boil off the water in an
evaporating dish.
Experiment; To separate copper sulfate
from water
Liebig condenser
Distillate
Bunsen burner
Thermometer
copper sulphate solution
1. Place the copper sulphate solution in the
round-bottom flask.
2. Heat until the solution starts to boil.
3. As the water evaporates (changes from
a liquid to a gas) it leaves the flask
through the condenser’ as steam.
4. The condenser has a ‘jacket’ of cold
water constantly flowing around its
outer section.
5. This causes the steam to condense back
into liquid water.
6. The water collected in the flask on the
right is called the distillate.
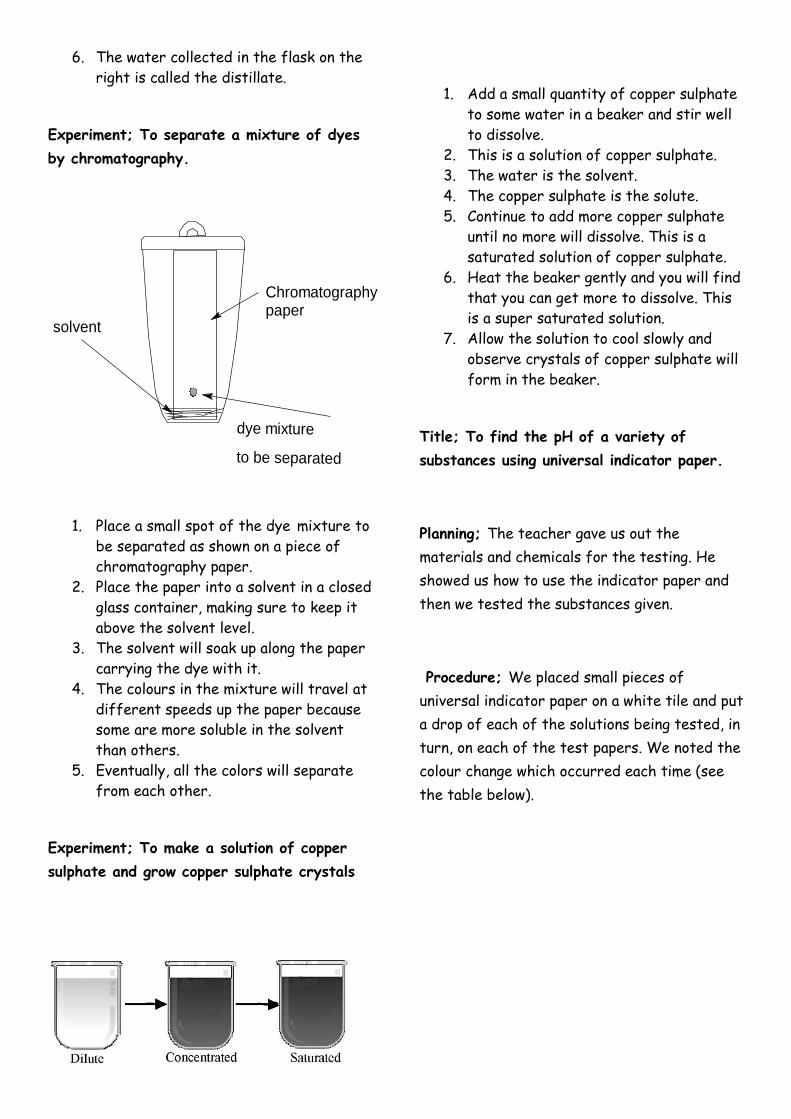
Experiment; To separate a mixture of dyes
by chromatography.
Chromatography paper
dye mixture
to be separated
solvent
1. Place a small spot of the dye mixture to
be separated as shown on a piece of
chromatography paper.
2. Place the paper into a solvent in a closed
glass container, making sure to keep it
above the solvent level.
3. The solvent will soak up along the paper
carrying the dye with it.
4. The colours in the mixture will travel at
different speeds up the paper because
some are more soluble in the solvent
than others.
5. Eventually, all the colors will separate
from each other.
Experiment; To make a solution of copper
sulphate and grow copper sulphate crystals
1. Add a small quantity of copper sulphate
to some water in a beaker and stir well
to dissolve.
2. This is a solution of copper sulphate.
3. The water is the solvent.
4. The copper sulphate is the solute.
5. Continue to add more copper sulphate
until no more will dissolve. This is a
saturated solution of copper sulphate.
6. Heat the beaker gently and you will find
that you can get more to dissolve. This
is a super saturated solution.
7. Allow the solution to cool slowly and
observe crystals of copper sulphate will
form in the beaker.
Title; To find the pH of a variety of
substances using universal indicator paper.
Planning; The teacher gave us out the
materials and chemicals for the testing. He
showed us how to use the indicator paper and
then we tested the substances given.
Procedure; We placed small pieces of
universal indicator paper on a white tile and put
a drop of each of the solutions being tested, in
turn, on each of the test papers. We noted the
colour change which occurred each time (see
the table below).

Conclusions: Many household substances are
either acids or bases. The pH of these tells
you how strong or weak they are.
Title; To show that the percentage of
oxygen in the air is 21%.
Procedure
• The alcohol uses up all the oxygen in
burning and the flame goes out.
• Water rushes in from outside to fill the
space which the oxygen had taken up.
• The water rises from 0 to 20ml. This
means that the volume of oxygen in the
container was 20ml.
Conclusion;
• Air contains 20% oxygen.
Title; To show the presence of carbon
dioxide in the air.
Result & conclusion
The limewater will go milky white. This proves
that there is carbon dioxide in the air.
Title of experiment; To show the presence
of water vapour in the air
Substance pH
HCl 1
NaOH 13
H2SO4 1
Orange 4
Lemon 4
Window cleaner 8
Tooth paste 8
Vinegar 4
Saliva 8

Procedure
• Water vapour in the air will condense
into water on the side of the test tube.
• After a while it will drip onto the
copper sulphate turning it blue in colour.
• This colour change is proof of the
presence of water (in air).
Title; To prepare a sample of oxygen gas
Procedure
• Set up the apparatus as shown in the
diagram above.
• Release the hydrogen peroxide into the
conical flask.
• A reaction takes place which liberates
oxygen gas.
• The gas is collected over water.
• Several test tubes of the gas may be
collected at a time and tested.
Title; To prepare a sample of carbon dioxide
gas and test it
• Set up the apparatus as shown in the
diagram above.
• Release the hydrochloric acid into the
conical flask.
• A reaction takes place which liberates
carbon dioxide gas.
• The gas is collected over water.
• Several test tubes of the gas may be
collected at a time and capped.
• Bubble the gas directly through a test
tube of limewater. It should turn milky
white. This is the test for carbon
dioxide gas.
• Bubble the gas directly through a test
tube of blue litmus solution. It should
turn red. This shows that carbon
dioxide gas is an acid.
• Dip a lighting splint into a beaker of
the gas. The splint will go out. Carbon
dioxide does not support combustion.
Title; To show the presence of dissolved
solids in water

Procedure
• Weigh a beaker on an electronic balance
and record the result.
• Pour 50ml of water into the beaker and
heat it until all of it has evaporated.
• Allow it to cool and reweigh the beaker.
Record the result.
Results and calculations
• Mass of beaker (start) = 133.39g
• Mass of beaker (end) = 134.11g
• Mass of solids = 0.72g
Title; To test samples of water for
hardness
Procedure
Add a drop of soap solution to all three
samples of water.
Shake the test tubes and record which of the
samples produce the most suds.
Title; To titrate hydrochloric acid (HCl) and
sodium hydroxide (NaOH) and prepare a
sample of sodium chloride (NaCl)
Procedure
• We placed 10 ml of NaOH in the conical
flask using a pipette.
• We filled the burette with HCl.
• We put 2 drops of indicator into the
base.
• It turned YELLOW.
• We added acid into the base until it
changed from YELLOW to PINK.
• At this point all the base is neutralised.
We noted how much acid was needed.
• We carried out the procedure again
without the indicator and added the
right amount of acid.
• Then we boiled off all of the water to
leave only salt (NaCl).
Title of experiment; To demonstrate that
oxygen and water are necessary for rusting

• The nails in ‘A’ rust very badly within
two days. This is because they have
both oxygen and water.
• The nails in ‘B’ do not rust, because they
have no oxygen.
• The nails in ‘C’ do not rust, because they
have no water.
Title; To investigate the reaction between
HCl and metals and to test for hydrogen
gas.
Procedure
• Take a small piece of magnesium and
place it in a test tube of hydrochloric
acid.
• Hold your thumb against the mouth of
the test tube until you feel pressure.
• Remove your thumb quickly and place a
match at the opening of the test tube.
Results and conclusions; The hydrogen gas
which had collected in the test tube lights with
a loud pop. This is the test for the presence of
hydrogen gas.

Mandatory Physics Experiments
Mandatory experiment: To find the
density of a regular rectangular block
Find the mass of the block with an
electronic balance.
Find the volume by multiplying
l x b x h.
)volume(cm
mass(g)Density
3
Mandatory experiment: To density of an
irregular shaped object, such as a stone.
Find the mass of the stone with an
electronic balance.
Find the volume with an overflow can
or graduated cylinder.
)volume(cm
mass(g)Density
3
Mandatory experiment: To find the
density of a liquid (water)
Find the volume of the water by
reading the side of the graduated
cylinder.
To find the mass of the water make
two measurements, (i) Get the mass
of the graduated cylinder. (ii) Get
the mass of the graduated cylinder
and the water.
)volume(cm
mass(g)Density
3
Mandatory experiment: To investigate
Hooke’s law of spiral springs
Set up the apparatus as shown.
Measure the length of the spring and
pan before any weights are added.
Now add a weight to the pan.
Measure the extension of the spring
with the metre stick.
Repeat the procedure by adding more
weights and recording the extension
each time.
Record your results in a table, as shown.
Weight
(N)
Extension
(cm)
Now draw a graph of Extension versus weight placed on the spring.
The graph should look like this,
Block
10.5g
10.5g
Weights
Pan
Spring
Metre
stick

The graph is a straight line through
(0,0). This means that the extension is directly proportional to the force applied to it.
Mandatory experiment: To show that solids
expand when heated.
Put the ball through the hoop, to check
that it fits through the hoop.
Heat the ball for 30 seconds with a Bunsen
burner.
Try to fit the ball through now.
It cannot be done.
The solid metal ball has expanded with the
heat.
Mandatory experiment: To show that liquids
expand when heated
Heat the flask as shown.
The water will expand up the tube.
The water level in the tube will fall if
the flask is cooled, as it will contract.
Mandatory experiment: To show that gases
expand when heated
Heat the flask as shown.
The air in the flask will expand out
through the top of the tube.
If the tube is held under the water, the
expanded air can be seen bubbling out.
If the flask is allowed to cool, the air in
the flask will contract and water will be
sucked into the flask.
Mandatory experiment: To compare the
conductivity of various metals
Set up the apparatus as shown.
A thumbtack is attached with wax to
each of four metal strips with wax.
A Bunsen flame is placed at ‘x’ and the
four strips are heated evenly.
The thumbtack which falls first
indicates the best conductor.
0 0
Weight on the spring
Extension
(cm)
Flask
filled
Heat
Wooden ring
Metal
s
x

Mandatory experiment: To show that water
is a poor conductor.
Fill a test tube with water.
Hold an ice cube at the bottom and
heat the mouth with a Bunsen burner.
The water at the mouth of the test
tube will be boiling but ice cube will
not melt for a long time.
This is because the water is a poor
conductor.
Mandatory experiment: To show convection
in water
Heat the water as shown.
The hot water rises as a convection
current and the dye goes with it.
The dye makes the convection current
visible.
Mandatory experiment: To show convection
in a gas
The candle creates an updraft
(convection current) of hot air.
The hot air rises and leaves through the
chimney on the left.
Cold air is drawn in from outside,
through the chimney on the right, to
replace it.
This creates a convection current.
The smoke allows this current to be
seen by an observer.
Mandatory experiment: Light travels in
straight lines.
Set up the apparatus as shown.
The ray box emits a beam of light.
Place a ruler beside the beam to prove
that it is straight.
Bunsen
Dye
Coloured
water
rises
Box with glass front
Smoke
Candle
Ruler
Light beam Ray
box

Mandatory experiment: To show that light
can be reflected.
Set up the apparatus as shown.
The ray box emits a beam of light.
Place a small mirror in front of the
beam.
The direction of the beam will change.
The light beam has been reflected.
Mandatory experiment: To demonstrate the
use of a simple periscope.
Mirror 1 reflects the light to mirror which
then reflects the light to the observer’s eye.
The net result is that an observer can see over
other objects.
Experiment: To show the magnetic field of a
bar magnet using iron filings.
Place a bar magnet on a bench.
Cover it with a sheet of paper.
Sprinkle iron filings over the sheet.
The filings will line up along the
magnetic field lines.
The magnetic field of the magnet has
become ‘visible’ (see diagram).
Mirror Light beam Ray box