Folding a Kawasaki Rose final -...
23
Folding a Kawasaki Rose Wayne Liu 2010
Transcript of Folding a Kawasaki Rose final -...

Folding a Kawasaki Rose
Wayne Liu 2010

Folding a Kawasaki Rose
© Liu 2010 2
Table of Contents
INTRODUCTION ......................................................................................................................................... 3 WHY A KAWASAKI ROSE? ............................................................................................................................................... 3 SHOULD I USE ORIGAMI PAPER? .................................................................................................................................... 3
WHAT YOU WILL NEED ........................................................................................................................... 4 HOW TO FOLLOW THE INSTRUCTIONS ............................................................................................... 4 HOW TO MAKE A FOLD ........................................................................................................................... 5 MAKING A KAWASAKI ROSE .................................................................................................................. 6
A. THE CREASE (~20 MINUTES) .............................................................................................................................. 6 B. THE TWIST (~5 MINUTES) ............................................................................................................................... 14 C. THE PULL (~25 MINUTES) ............................................................................................................................... 16
AFTERTHOUGHTS ................................................................................................................................... 23 HELP! .......................................................................................................................................................................... 23 AMBITIOUS? ................................................................................................................................................................ 23
Folding a Kawasaki Rose
© Liu 2010 3
Introduction
Why a Kawasaki Rose? Do you wish to leave a lasting impression on someone with a flower that never wilts?
Do you wish to decorate a room with something traditional and beautiful?
While many kinds of origami flowers exist, a Kawasaki Rose is an innovative origami rose created by a man named Toshikazu Kawasaki. The rose’ is a seamless flower whose pedals appear to actually curl out from the center of the flower.
The project is fairly lengthy (~50 minutes). But no worries! You can stop and take a break at nearly any point – and resume at your leisure. Since this is origami we are talking about, the folds will stay where they are.
Should I Use Origami Paper? Origami paper is highly recommended for any origami project, especially this one. Origami paper is easier to fold, and retains creases better than regular photocopier paper. Origami paper is inexpensive (around $5 for 50 sheets of 6x6) and can be found easily in your local crafts store, or in online locations such as Amazon.com.
For the Kawasaki rose, I recommend square origami paper (kami style) that has a solid color on a single side. There is an optional rose base that can be done for the rose (instructions for the base not included, refer to the Ambitious? Section) If you wish to make a base with a color that is different from the rose, you should purchase a package that contains multiple colors or patterns to choose from.
For this set of instructions, I used 6” by 6” origami paper for the rose. This makes a decent sized rose that is roughly the size of a real rose. If you want to make a larger rose, you can use up to 10” by 10” origami with the same instructions with no problems.
For more information on different kinds of origami paper, visit the online Origami Resource Center1.
1 Origami Resource Center: http://www.origami-‐resource-‐center.com/origami-‐paper.html

Folding a Kawasaki Rose
© Liu 2010 4
What You Will Need � One 6”x6” origami paper (kami style)
� A flat surface to fold on
How to Follow The Instructions • The “colored side” means the side that you want the outside of your rose to
be. This side will be the color of your rose. The “white side” will be the side that will be hidden on the inside of the rose. You may not have a white side or a colored side for your paper, but this is how I will refer to them in these instructions.
• If you are using a paper that is the same on both sides, please mark each side so you know which side is “colored” and which side is “white”.
• A “dashed line” is a mountain fold, that is, a fold that is pointing up towards you. A “dotted line” is a valley fold, that is, a fold that is pointing away from you. These notations will only occur when it is important, such as to mark new folds.
Folding a Kawasaki Rose
© Liu 2010 5
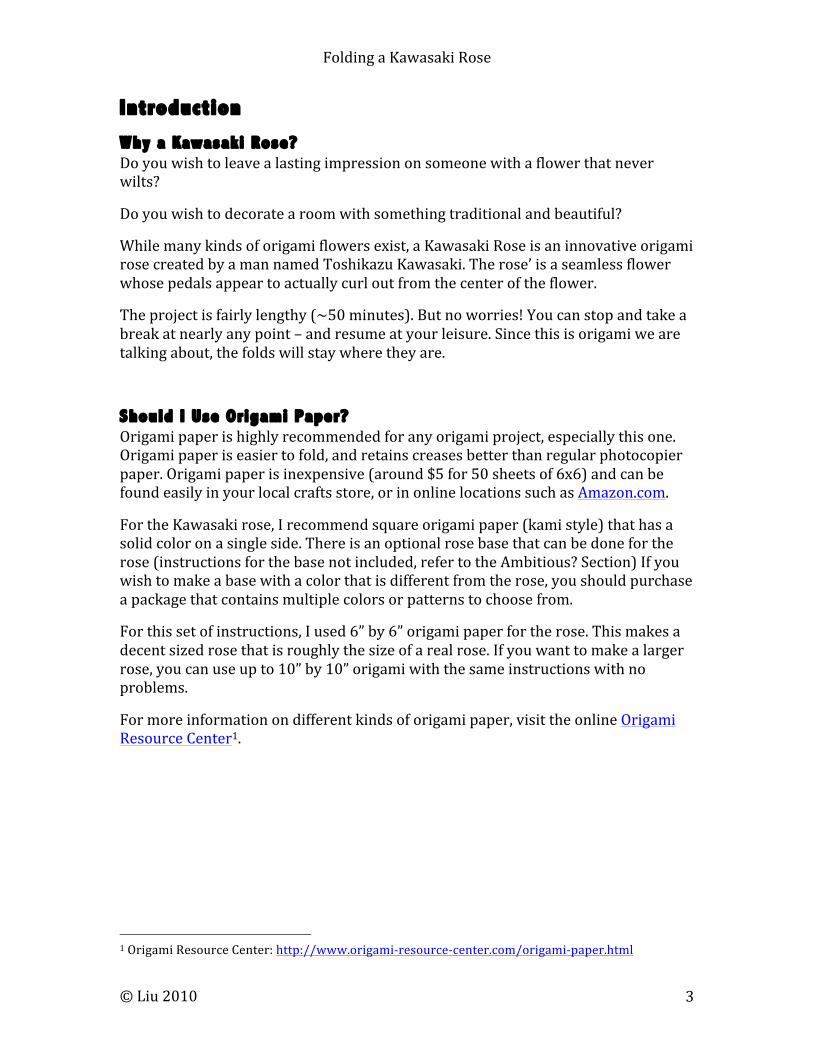
• The “measurement line” is where your fold should begin and end. Stop where the arrow stops! Some folds can only be folded to a certain point in the middle of the paper.
How to Make a Fold 1. Make sure your work area is flat and clean. 2. Carefully make the fold, as exact as possible, and smooth over gently with
fingers. Your crease should be light. Applying too much force at this point may result in a crooked fold, or even worse, a tear.
3. If possible, smooth over the fold again with fingernails or fingertips. In the end, you want a fold that is crisp.
CAUTION:
To avoid painful paper cuts, be careful around the paper’s edges.
Folding a Kawasaki Rose
© Liu 2010 6
MAKING A KAWASAKI ROSE
A. The Crease (~20 minutes)
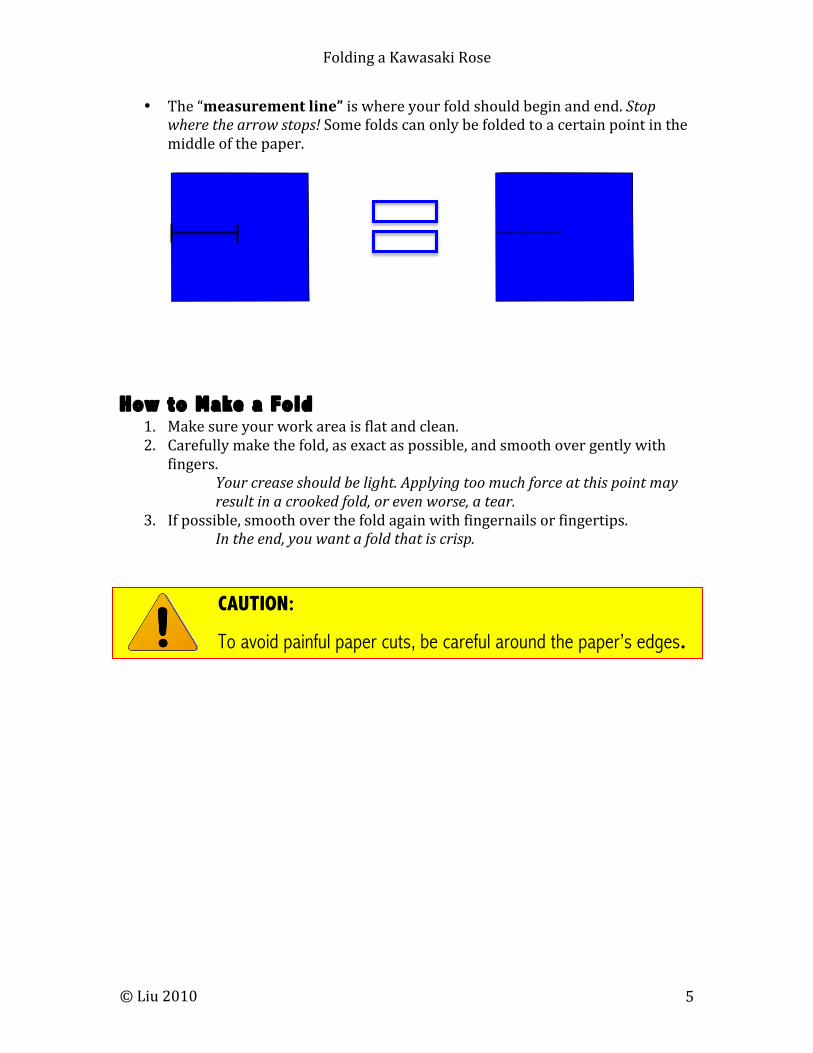
1. With the white side up, make a valley fold horizontally, and unfold.
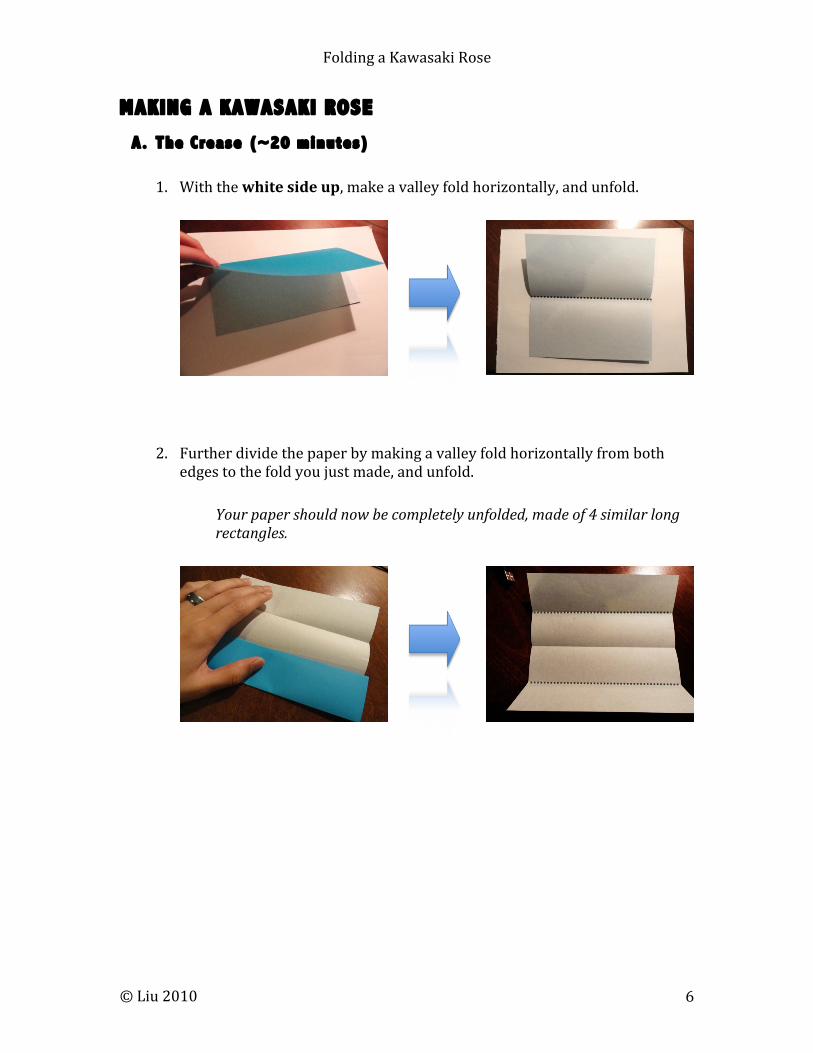
2. Further divide the paper by making a valley fold horizontally from both edges to the fold you just made, and unfold.
Your paper should now be completely unfolded, made of 4 similar long rectangles.
Folding a Kawasaki Rose
© Liu 2010 7
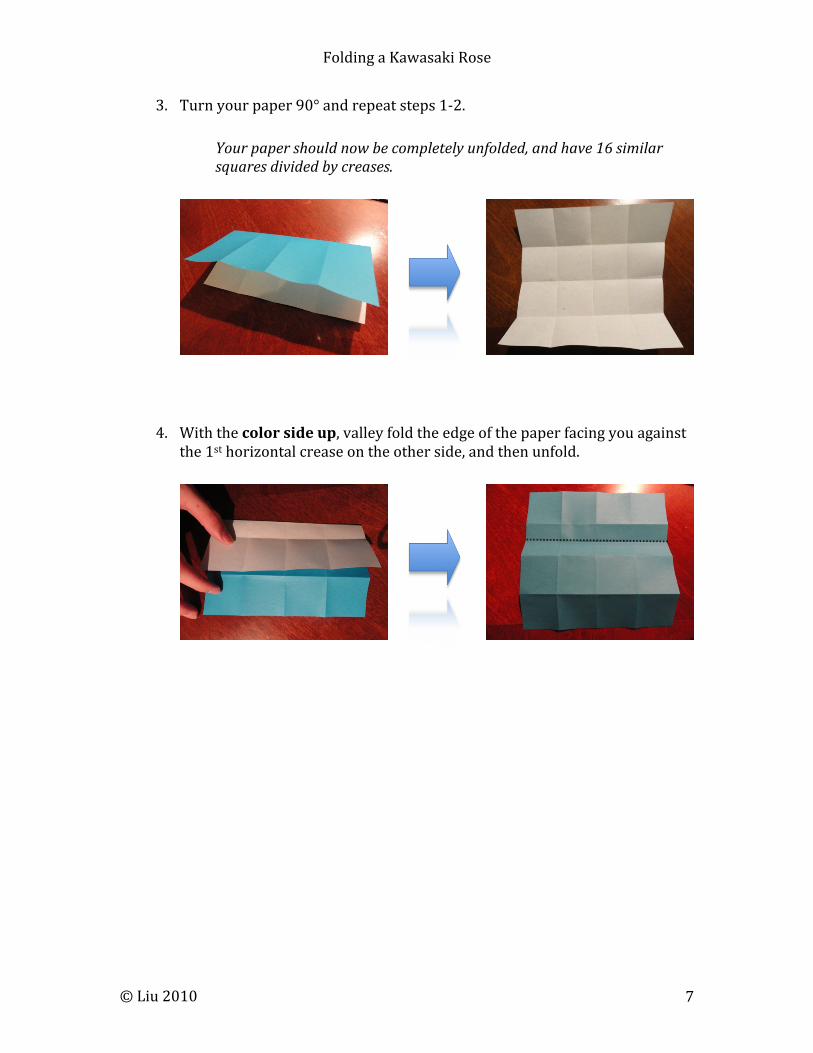
3. Turn your paper 90° and repeat steps 1-‐2.
Your paper should now be completely unfolded, and have 16 similar squares divided by creases.
4. With the color side up, valley fold the edge of the paper facing you against the 1st horizontal crease on the other side, and then unfold.

Folding a Kawasaki Rose
© Liu 2010 8
5. Repeat step 4 with each of the three remaining sides by rotating 90°each time.
Your paper should now be completely unfolded, with 5 creases running horizontally and 5 creases running vertically.
6. Still with the color side up, Find the four centermost squares. Lift the horizontal plane it’s on with the existing creases.
Folding a Kawasaki Rose
© Liu 2010 9
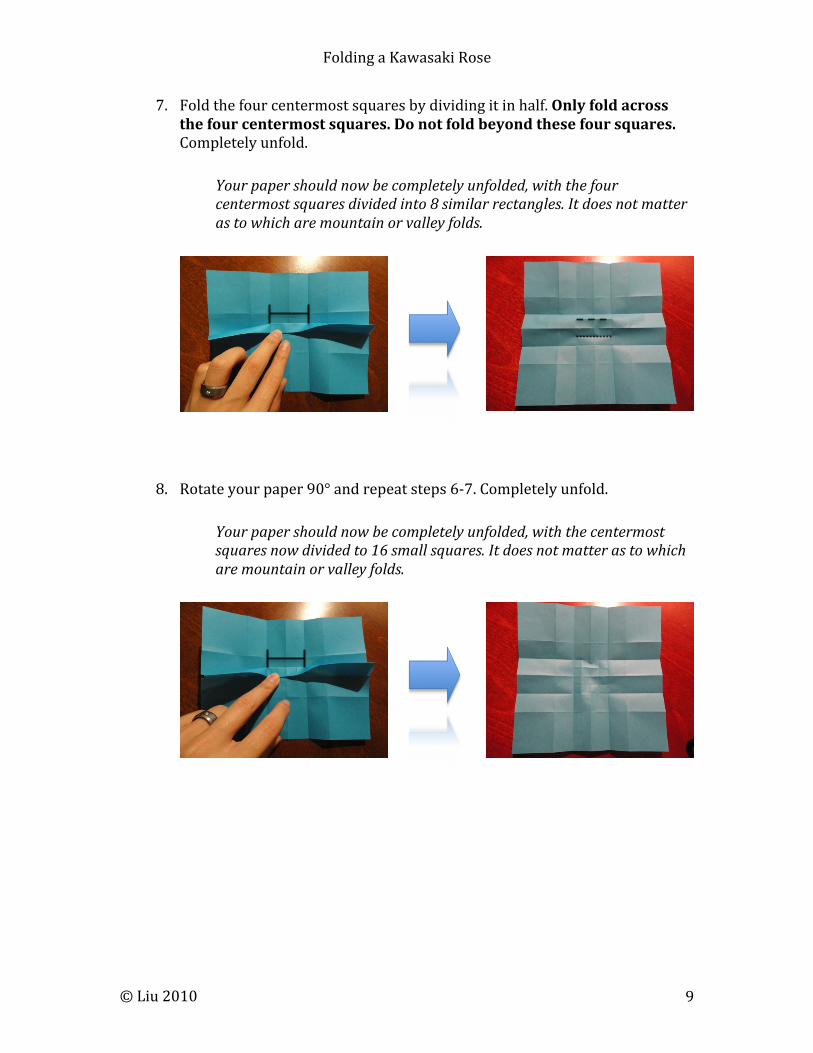
7. Fold the four centermost squares by dividing it in half. Only fold across the four centermost squares. Do not fold beyond these four squares. Completely unfold.
Your paper should now be completely unfolded, with the four centermost squares divided into 8 similar rectangles. It does not matter as to which are mountain or valley folds.
8. Rotate your paper 90° and repeat steps 6-‐7. Completely unfold.
Your paper should now be completely unfolded, with the centermost squares now divided to 16 small squares. It does not matter as to which are mountain or valley folds.
Folding a Kawasaki Rose
© Liu 2010 10
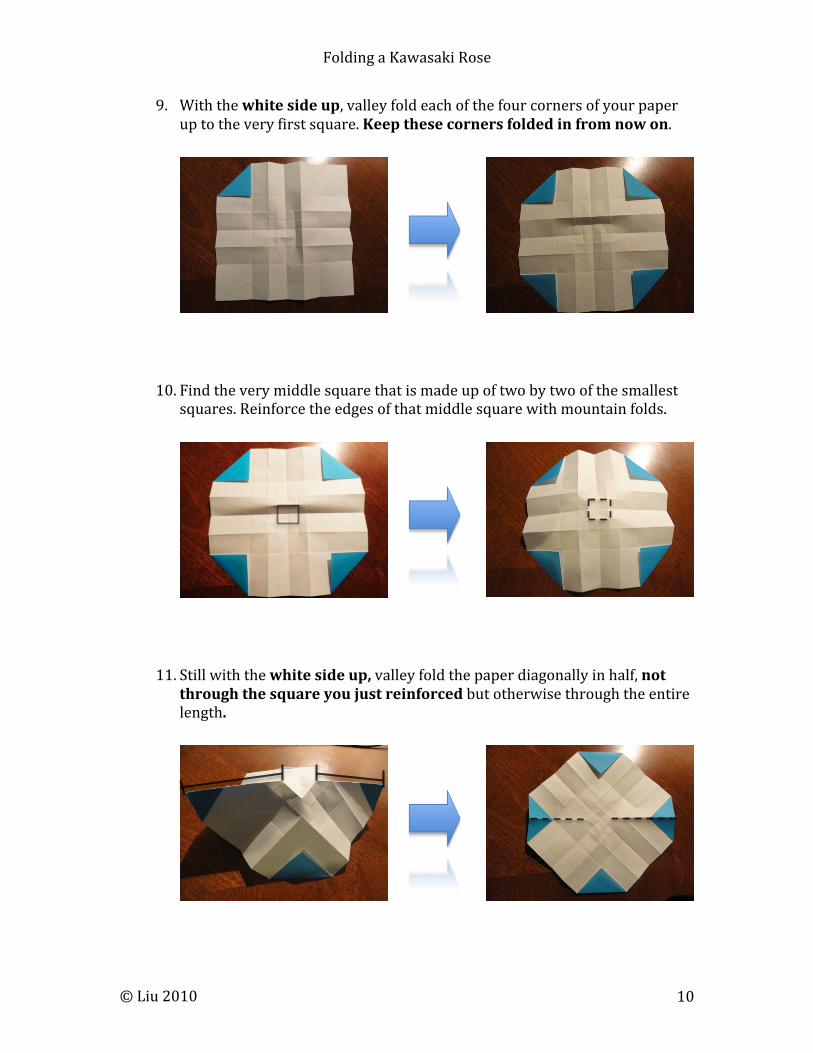
9. With the white side up, valley fold each of the four corners of your paper up to the very first square. Keep these corners folded in from now on.
10. Find the very middle square that is made up of two by two of the smallest squares. Reinforce the edges of that middle square with mountain folds.
11. Still with the white side up, valley fold the paper diagonally in half, not through the square you just reinforced but otherwise through the entire length.

Folding a Kawasaki Rose
© Liu 2010 11
12. Turn the paper 90° and repeat step 11.
13. Turn the color side up. Valley fold only the left half the left folded in corner to the diagonal crease running across the middle of the paper. Fold only from the left edge to the middle – do not fold the right.
14. Repeat step 13 three times by turning the page by 90° each time.

Folding a Kawasaki Rose
© Liu 2010 12
15. Turn the white side up. Valley fold only the left half, from the folded-‐in corner nearest to you and to where the right and left edges of the fold is against the other two folded-‐in corners. Again, fold only from the left edge to the middle – do not fold the right.
16. Repeat step 15 three times by turning the page by 90° each time.
17. Fold only the right half of the nearest folded-‐in corner to the crease you made in step 15 and 16 so the fold is at the tip of the corner. Again, fold only from the right edge to the center – do not fold the left. These steps will be critical for the “twist” coming up.

Folding a Kawasaki Rose
© Liu 2010 13
18. Repeat step 17 three times by turning the page by 90° each time.
19. Still with the white side up, fold only the left half of the nearest folded-‐in corner to the tip of the triangle of the folded-‐in corner on the opposite side. Again, fold only from the left edge to the center, do not fold to the right.
20. Repeat step 19 three times by turning the page by 90° each time.

Folding a Kawasaki Rose
© Liu 2010 14
21. The creasing is done! Congratulations, you may now take a break or proceed to the next section, “The Twist.”
B. The Twist (~5 minutes)
1. With the white side up, reinforce the existing folds that lead to the center four small squares.
2. Fold each of the folds you just reinforced to the right on the existing creases immediately next to it. Only fold all the way near the edges of the paper. This will be awkward so make sure you stay on existing creases.
3. Check both the bottom and the top of the paper to make sure you are on existing creases. If not, make it so.

Folding a Kawasaki Rose
© Liu 2010 15
4. Now do the twist. Essentially, you are trying to “twist” and “flatten” the center four squares against the paper. This might be difficult so be slow and patient. The trick is to make sure that the crease that is under the center crease leading to the squares is completely folded.
You should now have the center 4 squares twisted, the paper now with a vague flower-‐like semblance. The center 4 squares will be the top of your flower.
5. That was the twist! You are done with the hardest part. Take a break, and finish your flower in the next section, “The Pull.”

Folding a Kawasaki Rose
© Liu 2010 16
C. The Pull (~25 minutes)
1. With the color side up, pull the nearest corner open to the first existing mountain fold. Do not make any new folds.
2. With the pulled-‐open part facing you, fold in the left corner along the mountain folds.
3. Still with the pulled-‐open part facing you, take the left corner of the square on the pulled-‐open part and valley fold it to the upper right corner of the square. This is a new fold. Keep these folded.
Folding a Kawasaki Rose
© Liu 2010 17
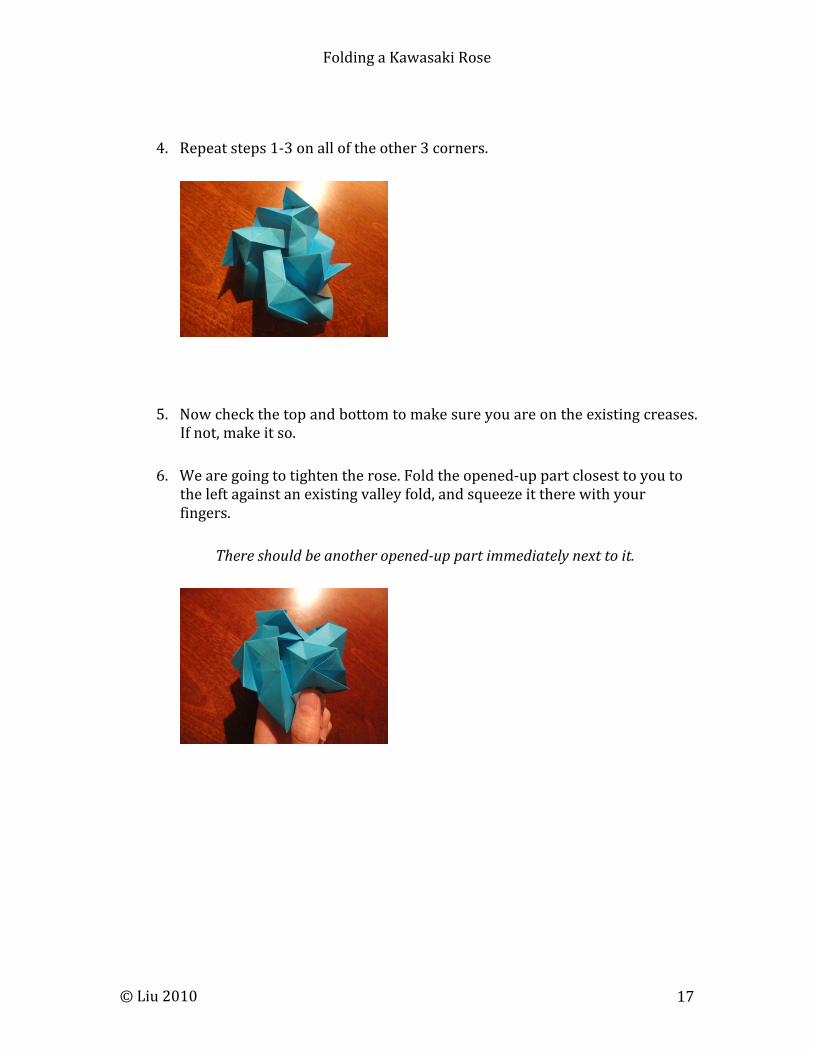
4. Repeat steps 1-‐3 on all of the other 3 corners.
5. Now check the top and bottom to make sure you are on the existing creases. If not, make it so.
6. We are going to tighten the rose. Fold the opened-‐up part closest to you to the left against an existing valley fold, and squeeze it there with your fingers.
There should be another opened-‐up part immediately next to it.

Folding a Kawasaki Rose
© Liu 2010 18
7. Fold the opened-‐up part to the right and over where your fingers are squeezing. Fold over the flap that is extending over to lock these two parts together.
8. Lock every single opened-‐up part together by repeating steps 6-‐7. This may be tricky, so take your time and make sure to stay on existing creases. You may need to use your fingers to hold a few parts in place to lock the others. Keep holding on to them after you are done.
You should now have something that looks very much like a flower with four pointy bits on the bottom. These pointy bits will be the bottom of your flower.

Folding a Kawasaki Rose
© Liu 2010 19
9. Being closing up the bottom by gently folding one of the pointy bits in to the bottom with a very gentle crease. A hard crease at this point will make your flower look unnatural. Use your fingers to keep it down.
10. Fold the pointy bit to the left of the one you just folded in on top of it, and the one after that on top of them all. You should be holding them in place.
There should still be one pointy bit sticking up.

Folding a Kawasaki Rose
© Liu 2010 20
11. Tuck the last pointy bit into the fold one you folded in, while having it go over the third one you folded in.
The bottom of your flower should now be closed up nicely, and stay closed without your fingers holding it down.
12. Turn your flower so the top is on top. Open up the flaps that are going into the center.
13. Now gently pull them out from the center and spread them, like pedals. Be gentle, you do not want to tear anything at this point.

Folding a Kawasaki Rose
© Liu 2010 21
14. Use your fingers to smoothen the pedals, and make them look round and full. Ease any crumples in the paper and do your best to make the pedals stay on existing creases.
15. We are not done yet. Gently pull out the triangle flaps on the side and curl them out slightly to make your rose look even better. Again, you don’t want to rip anything at this point.
16. And we are done! Do a final smoothening to make sure your rose is puffy and fresh. You may now brandish the Kawasaki rose to your next social gathering.
There is an optional Kawasaki rose base that can be made. Please refer to the section “Ambitious?”

Folding a Kawasaki Rose
© Liu 2010 22

Folding a Kawasaki Rose
© Liu 2010 23
Afterthoughts
Help! • Making a wrong fold in this project is not the end of the world, but it may make the rest of the project more difficult. Just make sure you have the correct fold, and with enough patience, you should be fine.
• If you are lost, just retrace to a step you remember doing. If you did it correctly, the crease will still be there!
• If you are stuck at any part, please feel free to look for tutorials YouTube (part 12 and part 23) demonstrating how to do the Kawasaki Rose. While many other videos and tutorials are easily found, different individuals may do the rose slightly differently. Therefore, the links I have provided most closely follow the instructions in the booklet.
Ambitious? • You can make a rose base for the Kawasaki Rose you just made. The base will require origami paper that is one quarter the size of the one you used for the rose and should take only about 10 to 15 minutes. You can simply quarter and cut a paper that you already have. You can use this instructional video4, though many others can be found by using the search term “Kawasaki Rose Base.”
• More creative individuals may probably be able to conjure up more unique ideals, such as putting the rose on a homemade stem, making rose bunches or wreaths, and so on.
2 Part 1: http://www.youtube.com/watch?v=pLubZ94jy1E&feature=related 3 Part 2: http://www.youtube.com/watch?v=8jwtSYPbvSU&feature=related 4 Kawasaki Rose Base: http://www.metacafe.com/watch/687880/ rose_base_kawasaki/