Florida Department of Environmental Protection … Form to Request a PIN for Application...
98
Florida Department of Environmental Protection Division of Air Resource Management Electronic Permit Submittal and Processing Long Form Applicant’s Documentation Updated: August 11, 2011 Version: 2010-1e
Transcript of Florida Department of Environmental Protection … Form to Request a PIN for Application...

Florida Department of Environmental Protection Division of Air Resource Management
Electronic Permit Submittal and Processing Long Form
Applicant’s Documentation
Updated: August 11, 2011 Version: 2010-1e

ii 4/11/2011
Contents
Version History...................................................................................................... 1 Getting Started ...................................................................................................... 2
Logging In ............................................................................................................. 3 New Users to the System .................................................................................. 4
Set Up An Account: ....................................................................................... 4 Help for New User Account Registration ........................................................... 5 User Login Name/ Password ............................................................................. 7
Registered Users ............................................................................................... 7 Change DEP Division of Air Password ....................................................... 7
Forget Your Password ....................................................................................... 8 How to Use EPSAP Long Form ............................................................................ 9
Select a Current Long Form Permit Application .............................................. 10
Search for Unsubmitted Applications ........................................................... 10
Select a Submitted Long Form Permit Application .......................................... 10 Search for Submitted Applications ............................................................... 10
Start a New Long Form Permit Application ..................................................... 11 ARMS Facility Search Option Form ............................................................. 12 ARMS Facility Search Results Page ............................................................ 13
Create a New facility .................................................................................... 14 EPSAP Main Menu ............................................................................................. 15
Section I: Application Menu ............................................................................. 16 To Delete an Application .............................................................................. 16 Assign/Remove Edit Rights to this Application ............................................ 17
To assign edit rights ................................................................................. 17 To remove edit rights ............................................................................... 18
Transfer Ownership of this Application ........................................................ 18 Application Sections .................................................................................... 19
Application Purpose ................................................................................. 19 Scope of Application ................................................................................ 21
Emission Unit Permit Type Form .......................................................... 22 Application Contact Information ............................................................... 22
Owner/Authorized Representative Information ......................................... 24 Responsible Official (RO) Information ...................................................... 25
No Responsible Officials Found ........................................................... 25 Responsible Official Found ................................................................... 27
Professional Engineer Information ........................................................... 28
To delete the Professional Engineer ..................................................... 29 Section II: Facility Menu .................................................................................. 30
Facility Identification .................................................................................... 30 Facility Location and Type ........................................................................... 31 Facility Contact ............................................................................................ 33 Facility Regulatory Classifications ............................................................... 33 Facility Pollutants ......................................................................................... 34 Facility Additional Information ...................................................................... 35
Additional Requirements for All Permit Applications ................................ 36

iii 4/11/2011
Additional Requirements for Air Construction Permit Applications; FESOP Applications; Title V Air Operation Permit; Acid Rain or CAIR; and other Facility Information ................................................................................... 37
Section III: Emission Unit List/ Search Menu ................................................... 38 Add New EU ................................................................................................ 39 Duplicate Emission Unit ............................................................................... 40
Replace Emissions Unit ........................................................................... 42 Replace Point Descriptions ................................................................... 43
Replace Pollutant Allowables ............................................................... 45 Replace Continuous Monitors ............................................................... 46
Delete This EU ............................................................................................. 47 EU Sections ................................................................................................. 48
EU Description and Detail Information ..................................................... 49
Control Equipment/Methods ..................................................................... 49
Operating Capacity and Schedule ............................................................ 50
Point (Stack/Vent) Information ................................................................. 51
Segment (Process/Fuel) Information ........................................................ 52 EU Pollutant Information .......................................................................... 54 Allowable Emissions ................................................................................ 55
Visible Emissions Information .................................................................. 56 Continuous Monitor Information ............................................................... 57
EU Additional Information......................................................................... 58 Additional Requirements for All Permit Applications ............................. 59 Additional Requirements for Title V Air Operation Permit, Air Construction Permit Applications, and other Facility Information .......... 60 Delete Attachments .............................................................................. 61
Edit for Sufficiency ........................................................................................... 62
Upload Menu ................................................................................................... 64
To Upload Electronic Files ........................................................................... 64 To Delete Attachments ............................................................................. 66
View Uploaded EU Files/ Uploaded Facility Files ........................................ 67
View/Update Attachments............................................................................ 67 Submit This Application ................................................................................... 68
Professional Engineer Submittal .................................................................. 69 Professional Engineer Verification ........................................................... 69
Professional Engineer Signature Document ......................................... 70
Professional Engineer Certification .......................................................... 72 Withdraw PE Approval ............................................................................. 73 Final Signature File Authentication Code ................................................. 74
Owner/Authorized Representative or Responsible Official Submittal .......... 75
Owner/Authorized Representative Statement .......................................... 77 Responsible Official Statement ................................................................ 78 Air Permit Application Verification of Submittal ........................................ 80 Owner/ Authorized Representative or Responsible Official Confirmation E-Mail .......................................................................................................... 81 Application Owner Confirmation E-Mail .................................................... 82

iv 4/11/2011
Professional Engineer Confirmation E-Mail .............................................. 83
Print Instructions for DEP Form No. 62-210.900(1) ......................................... 84 Application Detail Report ................................................................................. 84
Attachment Report .......................................................................................... 85 Print Fee Calculation Page .............................................................................. 86 Print Form to Request a PIN for Application Submittal .................................... 88 Change Your EPSAP Password ...................................................................... 89 Update Your EPSAP User Account Information .............................................. 90
Index ................................................................................................................... 93

1 4/11/2011
Version History
Date Author Name
Version Description
7/20/2011 Brandon Porter
2010-1e Updated email screen shot
8/11/2011 Elizabeth Walker
2010-1e Updated text for “Owner/Authorized Representative or Responsible Official Submittal”

2 4/11/2011
Getting Started
Welcome to the Electronic Permit Submittal and Processing (EPSAP) application. This web based application is designed to save work for the applicant while helping the department maintain an accurate database of permitted facilities. This is accomplished by allowing the currently stored information required for the completion of the application to be imported from the department's Air Resources Management System (ARMS) database into EPSAP. Once the import is complete, the applicant needs only to correct any inaccuracies that are found.
Electronic Permit Submittal and Processing site is best viewed using Microsoft
Internet Explorer 5.5 with service pack 2 or higher. To check whether your version is 5.5 with service pack 2 or higher, select Help from the tool bar. Then select About Internet Explorer from the pull down menu.
Web Address: http://www.dep.state.fl.us/air/emission/epsap/.
DARM Application Support Desk Information:
Contact the DARM Application Support Desk at (850) 717-9000 or [email protected] to notify the Department regarding any problems with EPSAP or its supporting documentation.

3 4/11/2011
Logging In
To begin a Permit Application in EPSAP the user must first log in. The EPSAP Login security box is separated into five sections, the Username/ Password/Form New Users to the System, Registered Users, and the Forget Your Password sections.

4 4/11/2011
New Users to the System
Set Up An Account:
To set up an account with EPSAP, click on the “Click here to register an account” hyperlink on the EPSAP Login page.
1. Choose a username. Note: Enter up to 30 characters (letters or numbers) with no embedded spaces. If this username is assigned as the PE, RO or AR this information will be prefilled on the application forms.
2. Enter your First name, Last name, Job Title, Name of Organization or Firm, Telephone number, and Mailing address in the fields provided. Note: Fax Number is optional.
3. Enter a valid E-mail address. Note: Your password will be e-mailed to this address.
4. For users that are Professional Engineers, enter your valid PE number in the PE Number field. Note: Certain permits require a Professional Engineer‟s account to submit the application.
5. Select a security question and enter an answer that you will be able to remember. Note: This will be used for security reasons if you need to call our help desk to assist us in verifying your identity.

5 4/11/2011
6. Click the Submit button to save or Cancel to abandon.
Help for New User Account Registration

6 4/11/2011
EPSAP PIN Request Form
This screen is the first place within EPSAP where the signing party can print out the EPSAP PIN Request Form. It can also be printed from two other locations within EPSAP.
The signing party must print out the EPSAP PIN Request Form sign, date and mail to the DARM Application Support Desk using the address listed on the page.

7 4/11/2011
User Login Name/ Password
To Log in, enter your user login name and password, then click Submit or press Enter on your keyboard. Note: If you have registered in EPSAP Long Form application, your user login name and password are the same for EPSAP Non-Title V Form.
Registered Users
The Registered Users section is for those users who have already registered in EPSAP and need to update their password or Email information. Note: If you registered using the Long Form Application you do not have to register again. Also when you change information in Non-Title V, you change information in the Long Form application as well.
Change DEP Division of Air Password
To change your password, click the Click here to change your password hyperlink. Note: your password can be changed at the log in screen as well as inside of the application.
1. Fill in your Username, Old Password, New Password and the repeat of your New Password.
2. Click the Submit button to save or Cancel to abandon.
Once the submit button is press, a confirmation message that your password has been successfully changed appears. Click the OK button to verify message.

8 4/11/2011
Forget Your Password
If you forget your password you have the option to either call the DARM Application Support Desk at 850-717-9000 or send an email by clicking the email address provided. By clicking the email link, an email opens using your email provider with pre-filled information needed for DARM Application Support Desk to reset your password. Note: When emailing your request allow 24 hours for it to be reset. If your request is on a Saturday or Sunday, your password will be reset on the next business day.
EPSAP Buttons and Menu
This button is used to Add New information.
This button is used to continue to the next page.
This button is used to cancel out of that particular screen.
This button is used to submit your information.
This button is used to update your information.
This button is used to continue to the next page.
This button is for navigating to the next page within the same frame
This button is for navigating to the previous page within the same frame
This button is for navigating to the last record.
This button is for navigating to the first record.
This is a radio button. Click inside circle to indicate choice.
This is a check box. Click inside box to check the box.

9 4/11/2011
How to Use EPSAP Long Form
Choose an Option Below: Update Your EPSAP Account Information Allows user to update or change
their personal information. Note: this information will be changed in Non-Title V applications as well.
Select a Current Long Form Permit Application This option allows the user to work on an unsubmitted application or one returned to the user by the permitting authority.
Select a Submitted Long Form Permit Application This option allows the user to view a previously submitted application or upload electronic attachments.
Start a New Long Form Permit Application This option is used to start a New Long Form Permit Application.
Print Form to Request a PIN for Application Submittal This option navigates to the Personal Identification form (PIN). Note: This option is also located on the EPSAP Main Menu page.
Logoff EPSAP This option is used to Logoff EPSAP.

10 4/11/2011
Select a Current Long Form Permit Application
To review or work on a current application, click on the “Select a Current Long Form Permit Application” option on the EPSAP Welcome Page. A list of all current applications that you are working on will be listed on this page. Select the desired application by clicking on that record.
Search for Unsubmitted Applications
1. Select the search criteria radio button to indicate which value to query on. 2. Fill in the application information to be searched. 3. Click the Search button to search the list of existing applications (or
Cancel to return).
Select a Submitted Long Form Permit Application
To review or work on a submitted application, click the “Select a Select a Submitted Long Form Permit Application” option on the EPSAP Welcome Page. A list of all
submitted applications will be listed. Select the desired application by clicking on that record. If your application is not listed, enter your search criteria in the field provided.
Search for Submitted Applications
1. Select the search criteria radio button to indicate which value to query on 2. Go to the field above it and enter the criteria in the search box 3. Click on the Search button to search the list of existing applications or
Cancel to return.

11 4/11/2011
Start a New Long Form Permit Application
1. Enter a unique application name in the box provided. Note: Try to assign a meaningful name that you will remember so that you will be able to identify it when you returned to this application.
2. Click the radio button that describes the purpose of your application, then click the Submit button to continue or Cancel to abandon.
Note: Professional engineer certification is not required if applying for an initial federally enforceable state air operation permit (FESOP), provided all emissions units and pollutant emitting activities to be covered under the FESOP are currently covered under one or more existing state air operation permits.
Note: By checking one of the above two boxes under “Air Construction Permit and Revised/Renewal Title V Air Operation Permit (Concurrent Processing) you, the applicant, are requesting concurrent processing pursuant to Rule 62-213.405, F.A.C. In such case, you must also check the box requesting that the department waive the processing time requirements of the air construction permit to accommodate the processing time frames of the Title V air operation permit.

12 4/11/2011
ARMS Facility Search Option Form
To start a new Long Form Permit Application, click the text that says “or Click Here to Add a New facility” link next to the arrow or use one of the 6 search options to select the facility. Note: Option 6 may take a while to download because it is searching through the entire Air Resource Management System (ARMS) database.
Option 1: Search for this Facility ID: Enter the facility ID number.
Option 2: Search for this Facility Owner/Company Name: Enter the Owner/Company name of the facility.
Option 3: Search for this Facility Site Name: Enter the Site Name of the facility.
Option 4: Search for this Facility Street Address: Enter the street address where the facility is located.
Option 5: Search for this Facility City: Enter the city where the facility is located
Option 6: Select From the Complete List of ARMS Facilities. This option searches the entire list of Non-TitleV facilities in the Air Resource Management System database.
To search using the option radio buttons:
1. Click on the radio button associated with your chosen search option. Enter the search criteria next to the search option field.
2. Click the Search button to display a list of facilities meeting the search criteria.

13 4/11/2011
ARMS Facility Search Results Page
To Download a Facility:
To download a facility, click on the desired facility hyperlink. A message will be displayed to verify that the correct facility was chosen. Click OK and the facility will be downloaded.
If your facility is not shown, you have the option to perform another search by clicking the Perform Another Search button or Cancel to abandon search.
Chosen Search Option

14 4/11/2011
Create a New facility
1. To create a new facility, click the red arrow or the text that says “Click Here to Add a New Facility” to navigate to the Facility Identification Form.
2. Input the facility information in the blocks provided as follows.
Owner/Company Name: Enter the Name of the Owner/Company
Site Name: Enter the name of the Site where the facility is located. Note: This could be the same name a the Owner/Company
Description of Location: Enter a detailed description of the location of the facility. Street Address: Enter the Street Address City: Enter the City where the facility is located County: Enter the County where the facility is located Zip: Enter the zip code. Relocatable? Answer Yes of No to answer the question as to whether or not
the facility is a Relocatable. Facility Comment: Enter any comments in regards to the facility.
Note: Information with asterisks is required fields.
3. Click Insert to save or Cancel to abandon.
4. The message “Note: The data in this application is secure and cannot be viewed by the permitting authority until the application is submitted for review” box appears. Click Ok to verify message.

15 4/11/2011
EPSAP Main Menu
The EPSAP Main Menu screen allows the user to navigate to the section of the application. This includes Application Menu, Facility Menu, Emissions Unit List, and Edit for Sufficiency, Upload Menu, Print General Instructions, Application Detail Report, Request PIN and Change your EPSAP Password.
Application Menu – Section I of Application This option navigates to the Application Information for the facility.
Facility Menu – Section II of Application This option navigates to the facility information, such as contact information, requested emission cap, etc.
Emission Unit List/Search – This option navigates to the emission unit Section III of Application information.
Edit for Sufficiency This option will perform a check of the application for sufficiency.
Upload Menu This option is used to upload electronic documents and/or view electronic documents that have already been uploaded.
Application Detail Report This option generates a report that allows you to print your application detailed information. Note: this printed copy is for your records only and is not intended to replace the electronic submission.
Print General Instructions This option allows the user to view EPSAP Long Form General Instructions.
Print Attachments Report This option allows the user to view a list of attachments.
Print Form to Request a PIN for Application This option navigates to the Personal Submittal Identification request form. The Professional
Engineer, Responsible Official, and Owner/Authorized Representative must have a PIN for Application Submittal. Note: This option is also located on the main page.
Update Your EPSAP User Account Allows user to update or change their personal Information information including their password. Note: this
information will be changed in Non-Title V application as well.
Change Your EPSAP Password This option allows you to change your EPSAP Password.

16 4/11/2011
Section I: Application Menu
The application menu section is for the general information about the application
Button Options:
Return to Main Menu This button navigates back to the EPSAP Main Menu.
Delete This Application This button deletes the current application. Note: Only the application owner sees this button.
Assign/Remove Edit Rights to this Application This button allows the user to determine who should have edit rights to the application. A list of currently registered EPSAP users is listed to assist you. Note: Only the application owner sees this button.
Transfer Ownership of this Application This button transfers the ownership of the application. Note: Only the application owner sees this button.
To Delete an Application
1) Click the Delete This Application button. The message box “Are you sure you want to delete this application?” appears.
2) Click Ok to continue or click Cancel to abandon
When you click Ok to delete, the message “Your Application was Successfully Deleted” appear.

17 4/11/2011
Assign/Remove Edit Rights to this Application
To assign edit rights
1. Click the “Assign/Remove Edit Rights to this Application button. A list of EPSAP user names is listed.
2. Click on the name of the user to be added. Note: If the desired name is not listed, then there is a possibility that that user does not have an EPSAP Account. If you find this in error, you can search for the user in the database.
3. Click the Update button to save changes. To add another user, click the “Click Here to Search for EPSAP Users to Assign” text to return to the EPSAP User List/ Search page. Note: After the name has been selected, the name will no longer be listed on the search page.
4. When all users have been assigned to have edit rights, click Return to Application Menu button.

18 4/11/2011
To remove edit rights
5. Select User(s) to Remove in the Box then Click the Update Button. Note: Press the 'CTRL' key and left click to select/deselect multiple users
Transfer Ownership of this Application
The Transfer Ownership option allows the owner of the current application to transfer responsibility for this application to another registered EPSAP user.
1. To select a user to resume ownership of the application click on the drop down box and select a username.
2. Press the Update button to save the changes.
After the transfer of ownership, the application will no longer be accessible to the original owner unless the original owner is also assigned as a signatory on the application. The new owner will have edit rights to the application.

19 4/11/2011
Application Sections
Application Purpose This section explains the purpose of the application
Scope of Application This section is for entering the scope of application to identify Units (EU) to be included in the permit request.
Application Contact Information This section is for entering the application contact information.
Owner/Authorized Representative Information This section is for entering the owner/authorized representative information.
Responsible Official Information This section is for entering the responsible official information.
Professional Engineer Information This section is for entering the professional engineer information.
Application Purpose
1) Click Purpose of Application to navigate to the Application Purpose Form.
2) Enter any comment that may help the reviewer of your application. Note: all comment areas are optional fields.
3) To change the Purpose of your application, click the red arrow or the text that says “Click Here to Change the Purpose of Application” text.

20 4/11/2011
4) Click the radio button that describes the purpose of your application, and then click the Update button to continue or Cancel to abandon and return to the Application Menu.
Note: Professional engineer certification is not required if applying for an initial federally enforceable state air operation permit (FESOP), provided all emissions units and pollutant emitting activities to be covered under the FESOP are currently covered under one or more existing state air operation permits.
Note: If the purpose of the application is either, Air Construction Permit and Revise /Renewal Title V Air Operation Permit (Concurrent Processing) you, the applicant, are requesting concurrent processing pursuant to Rule 62-213.405, F.A.C. In such case, you must also check the box requesting that the department waive the processing time requirements of the air construction permit to accommodate the processing time frames of the Title V air operation permit.

21 4/11/2011
Scope of Application
The Scope of Application page is for the identification of the Emission Units (EU) to be included in the permit request.
To Add EU’s to the scope:
1. Add Emission Units to the Scope of Application by clicking in the check box beside the desired emission units.
2. Click on the Update button. A new web page will appear that displays the emission units included in the scope.
3. Click on an emission unit to navigate to the Permit Type page.

22 4/11/2011
Emission Unit Permit Type Form
After the selection of the emission unit that has been defined in the scope of application has been made you will be navigated to the Emission Unit Permit Type Form.
1. Select a Permit Type from the list of permit types by clicking on the list box and highlighting the desired Permit Type.
2. Click on the Update button to save the information. A web page will display that indicates that the update was successful.
3. Click the Return to Scope of Application List to return to the list of Emission Units included in the scope to add Permit Types to other emission units.
4. Click Cancel to return to the Application Menu to continue filling out the Application section.
Application Contact Information
From the Application Menu, click on Application Contact Information to provide the name, address, phone, fax and Email for the primary contact for the current application.

23 4/11/2011
1. Enter the required information in the appropriate fields. Note: Fields marked with double red asterisks (**) are required.
2. Click the Update button to save changes. A new page will display the new information.
3. Click the Return to Application Menu button to return to the application menu.

24 4/11/2011
Owner/Authorized Representative Information
From the Application Menu, click on Owner/Authorized Representative Information to provide the name, address, phone, fax and Email for the Owner or the Authorized Representative for the current application.
1. Enter the required information in the fields. Note: Fields marked with double red asterisks (**) are required.
2. Click the Update button to save changes. 3. Click the Return to Application Menu button to return to the application
menu and continue the application.

25 4/11/2011
Responsible Official (RO) Information
From the Application Menu, click on the Responsible Official Information to provide the name, address, phone, fax and Email for the Responsible Official for the current application.
No Responsible Officials Found
1. Click the Add New button.
2. Enter the Responsible Official login name. If you do not know or the Responsible Official does not have a user login name at this time, click the red arrow next to “Click Here If You Do Not Know the RO‟s EPSAP User Login Name” to add the Responsible Official‟s information. Note: you must update the RO‟s login name before the PE can submit.

26 4/11/2011
3. Update the required information fields. If there is more than one Responsible Official for this facility, this page allows you to add them, noting that the signing RO must have an email address recorded. Note: Fields marked with double red asterisks (**) are required fields.
4. Click the Update button to save changes. 5. Click the Return to Application Menu button to return to the application
menu or click the Return to Responsible Official List button to return to that list.

27 4/11/2011
Responsible Official Found
1. Click on the name of the desired Responsible Official. Note: If the desired name is not listed, click the Add New button and follow the instructions for No Responsible Official Found.
2. Update the required information fields. Note: Fields marked with double red asterisks (**) are required fields.
3. Click the Update button to save changes. 4. Click the Return to Application Menu button to return to the application
menu.

28 4/11/2011
Professional Engineer Information
From the Application Menu, click on the Professional Engineer Information to provide the name, address, phone, fax and Email for the Professional Engineer for the current application.
1. Click the red arrow next to “Click Here to Assign a Professional Engineer” to navigate to the Professional Engineer Assignment page.
2. Select the desired Professional Engineer by clicking the down arrow. 3. Click the Update button. Note: Professional Engineers must first be
registered with an EPSAP account in order for their names to be listed.

29 4/11/2011
4. This form is pre-filled from the initial user account information. Fields marked with double red asterisks (**) are required. If information is incorrect on this page, you must go to the “Update User Account Information.
5. Click the Return to Application Menu button to return to the application menu.
To delete the Professional Engineer
1. Click Professional Engineer Information from the Application Menu. 2. Click the red arrow next to “Click Here to Delete this Professional
Engineer and Assign Another One.”
3. Click the Delete button. The message “Are you sure you want to delete this PE” will appear.
4. Click OK to confirm the deletion of the Professional Engineer. 5. Click the Return to Application Menu button to return to the Application
Menu.

30 4/11/2011
Section II: Facility Menu
Facility Identification Information This section is for entering the facility information.
Facility Location and Type This section is for entering the Location of the facility and the identification of the type of facility.
Facility Contact This section is for entering the application contact information.
Facility Regulatory Classifications This section is for identifying the classification of the facility.
Facility Pollutants This section is for entering the types of pollution the facility is emitting.
Facility Additional Information This section is for entering additional information about the facility.
Facility Identification
1. Enter the required information fields. Note: Fields marked with double red asterisks (**) are required fields.
2. Click the Update button to save changes. 3. Click the Return to Facility Menu button to return to the application
menu.

31 4/11/2011
Facility Location and Type
Facility UTM Coordinates Enter the facility UTM Coordinates: Zone, East and North in Kilometers
Facility Latitude Enter the Latitude coordinates for the facility. Note: It is not necessary to enter UTM Coordinates and Latitude/ Longitude. Enter the coordinates that are most accurate.
Facility Longitude Enter the Longitude coordinates for the facility. Note: It is not necessary to enter UTM Coordinates and Latitude/ Longitude. Enter the coordinates that are most accurate.
Facility SIC Codes Enter the SIC Code by either pressing the Add/Edit or Clear button. Note: If you have changed or added any information on this page, you must click the Updated button to save your changes before editing the facility SIC codes.

32 4/11/2011
ARMS Facility Codes
1. Choose one of the following to identify your search criteria and sort order 2. Select the search criteria radio button to indicate which value to query on. 3. Fill in the application information to be searched. 4. Click the Search button to search database of SIC codes or Cancel to return.
Governmental Facility Code Select the appropriate Governmental Facility Code by clicking the down arrow.
Facility Status Select the appropriate Facility Status by clicking the down arrow.
Facility Major Group SIC Select the appropriate Governmental Facility Code by clicking the down arrow.
1. Click the Update button to save changes. 2. Click the Return to Facility Menu button to return to the facility menu. Note:
Fields marked with double red asterisks (**) are required fields.
33 4/11/2011
Facility Contact
1. Update the required information fields. Note: Fields marked with double red asterisks (**) are required fields.
2. Click the Update button to save changes. 3. Click the Return to Facility Menu button to return to the facility menu.
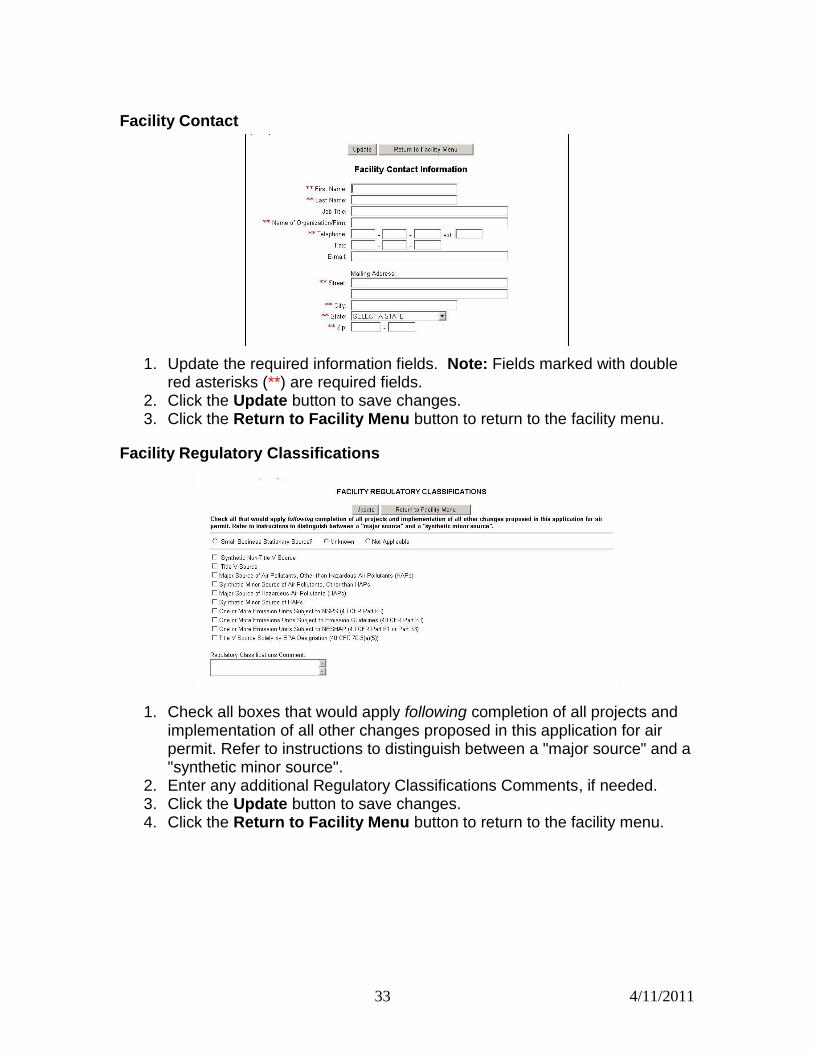
Facility Regulatory Classifications
1. Check all boxes that would apply following completion of all projects and implementation of all other changes proposed in this application for air permit. Refer to instructions to distinguish between a "major source" and a "synthetic minor source".
2. Enter any additional Regulatory Classifications Comments, if needed. 3. Click the Update button to save changes. 4. Click the Return to Facility Menu button to return to the facility menu.

34 4/11/2011
Facility Pollutants
1. Click on the name of the Pollutant to be updated. Note: If the pollutant is not listed, click the Add New Pollutant button to add a new pollutant.
2. Fill in all appropriate information. 3. Click the Update button to save changes. 4. Click the Return to Pollutant List button to return to update another
pollutant or click the Return to Facility Menu button to return to the facility menu.
Note: if there is Currently No Emission Units Emitting the selected Pollutant a verifying message will appear.

35 4/11/2011
Facility Additional Information
Facility Additional Information page is the first step in attaching facility information file. To do this you must indicate what type of file(s) you are sending or attaching in the five sections provided; Additional Requirements for All Permit Applications, Additional Requirements for Air Construction Permit Applications, Additional Requirements for FESOP Applications, Additional Requirements for Title V Air Operation Permit Applications, and Other Information Regarding this Facility. After indicating the name and type of file the attachment will be, you must then go to the upload menu to upload the file. Note: the EU section is also an area that attachments can be added.

36 4/11/2011
Additional Requirements for All Permit Applications
In the additional requirements for all permit applications section the listed items are required for all permit applications, except Title V air operation permit revision applications if this information was submitted to the department within the previous five years and would not be altered as a result of the revision being sought. When attaching documents, there is a 4MB limit per upload and there may be limitation to the types of files that the permitting office can view. Files created with newer versions of Autocad for example may not be viewable by the permitting office. If you have any questions about the files you are uploading, call the permitting office or the DARM Application Support Desk to discuss submittal options.
1. If the information has been previously submitted, place a check in the previously submitted box, enter the date submitted and click the Update button. If not, leave the previously submitted box empty.
2. Click on the desired description hyperlink to be uploaded. Note: this form can be used for the attachment of electronic documents or to indicate the existence of hard-copy documents to be sent via mail.
3. Choose either Option 1 Electronic File to be uploaded or Option 2 Hard-Copy document(s). Note: Option 2 requirements for Title V air operation permit, permit revision, or permit renewal applications or concurrent processing of air construction permit and Title V air operation permit revision or renewal applications, include the signed certification by the application responsible official.
4. Enter the attachment description or comment. Note: this helps to identify the information to be uploaded. The attachment can be uploaded at this time or after all of the attachments have been identified.
5. Click Update to save changes, then the Return to Facility Additional Information List button to return.

37 4/11/2011
Additional Requirements for Air Construction Permit Applications; FESOP Applications; Title V Air Operation Permit; Acid Rain or CAIR; and other Facility Information
1) Click the box indicating whether or not the item is applicable, enter
previously submitted dates if needed, and click the Update button. Note: once the attachment is attached No will become Yes.
2) Click on the desired description hyperlink to be uploaded. Note: this form can be used for the attachment of electronic documents or to indicate the existence of hard-copy documents to be sent via mail.
3) Choose either Option 1 Electronic File to be uploaded or Option 2 Hard-Copy document(s) or file to be mailed. Note: Option 2 requirements for Title V air operation permit, permit revision, or permit renewal applications or concurrent processing of air construction permit and Title V air operation permit revision or renewal applications, include the a signed certification by the application responsible official.
4) Enter the attachment description or comment. Note: this helps to identify the information to be uploaded. The attachment can be uploaded at this time or after all of the attachments have been identified. If all of the attachments have been identified, click the Go to Upload Menu and follow the Upload instructions.
5) Click Update to save changes, then the Return to Facility Additional Information List button to return.
Note: You will be prompted to upload electronic files after you submit your application. Also if the attachment applies to other EU(s), you may list the EU(s) in the comment field, or add the attachment separately to each applicable Emission Unit. See “Upload Attachment” sections for further instructions on how to upload electronic files.

38 4/11/2011
Section III: Emission Unit List/ Search Menu
1. Click on the name of the Emission Unit to be updated or deleted. Note: If the pollutant is not listed, click the Add New EU button to add a new emission unit.
Button Options:
Add New EU This button allows the user to add a new emission unit.
Duplicate This EU This button is for the duplication of the emission unit the user is working on. Note: This prevents the user from retyping similar emission unit information.
Delete This EU This button will delete the current emission unit information from the database.
Go to EU List This button returns the user to the emission unit list.
Return to Main Menu This button returns the user to the Main Menu.

39 4/11/2011
Add New EU
1. Click the Add New EU button on the Emission Unit Menu. 2. Fill in all appropriate information. 3. Click the Update button to save changes. 4. Click the Return to Main Menu button to return to the main menu.

40 4/11/2011
Duplicate Emission Unit
Emissions unit records that contain similar data can be duplicated to save data entry time. The duplicate emissions unit selection allows for the duplication of emissions unit‟s data either as an additional emission unit, or by replacing existing emissions unit information. Once this task is performed simply update the information in the unit that is different from the duplicated unit. Option 1: Create a New EU that is a Duplicate of this EU
1. Select the desired Emissions Unit from the “Emissions Unit List/Search” page.
2. Click Duplicate Data button.
3. Click “Option 1” radio button and enter a description for the new emissions unit then click Continue.

41 4/11/2011
4. This step created a duplicate emissions unit. Note: if the duplicate emissions unit is not included in the scope of application, it will automatically be added when you change or add information.

42 4/11/2011
Replace Emissions Unit
The Emissions Unit Replace option has added functionality that allows a review of similar data during the replacement of one emission unit‟s data into another. For instance, if you replace the data in emission unit 2 with the data from emission unit 1 and the pollutant information is similar, you will be prompted to compare the data and match the data that can be overwritten. If none of the data matches (i.e., the EUs don‟t share similar pollutant data) all of the information from Unit 1 will be added to unit 2.
Option 2: Select an EU from the List Below to Replace the Data in this EU
1. After selecting the desired Emissions Unit from the “Emissions Unit List/Search” page, click “Option 2” radio button.
2. Select an existing emission unit to replace by clicking the drop down arrow and selecting the desired emissions unit then click Continue button.
3. Click Ok to continue with the replace EU function. Note: This step may be started on one date or time and finished at a later date or time as long as it‟s done before you submit.

43 4/11/2011
Replace Point Descriptions
Instructions are available on the Replacing Descriptions page to help with accomplishing the task of replacing EU data. Note: These instructions can be hidden by clicking the “Hide Instructions” hyperlink. To re-open them, click “Show Instructions” hyperlink.
Hide Instructions

44 4/11/2011
To copy EU information from one EU to the other, click and hold any mouse button and drag items from the left-hand column to the right-hand column. This will drop the copied EU into the EU being replaced column. Note: As you drag an item over the items in the right-hand column, the title bar of each item will light up if a match is permitted.
When the copied EU information is accepted as a replacement the replaced information is listed in the Matched Items column next to the replaced EU data.
Click the Replace Data button to continue.
Click the Continue to Replacement of Pollutant Allowables button to continue. Note: this step can be completed at a later date and/or time.
45 4/11/2011
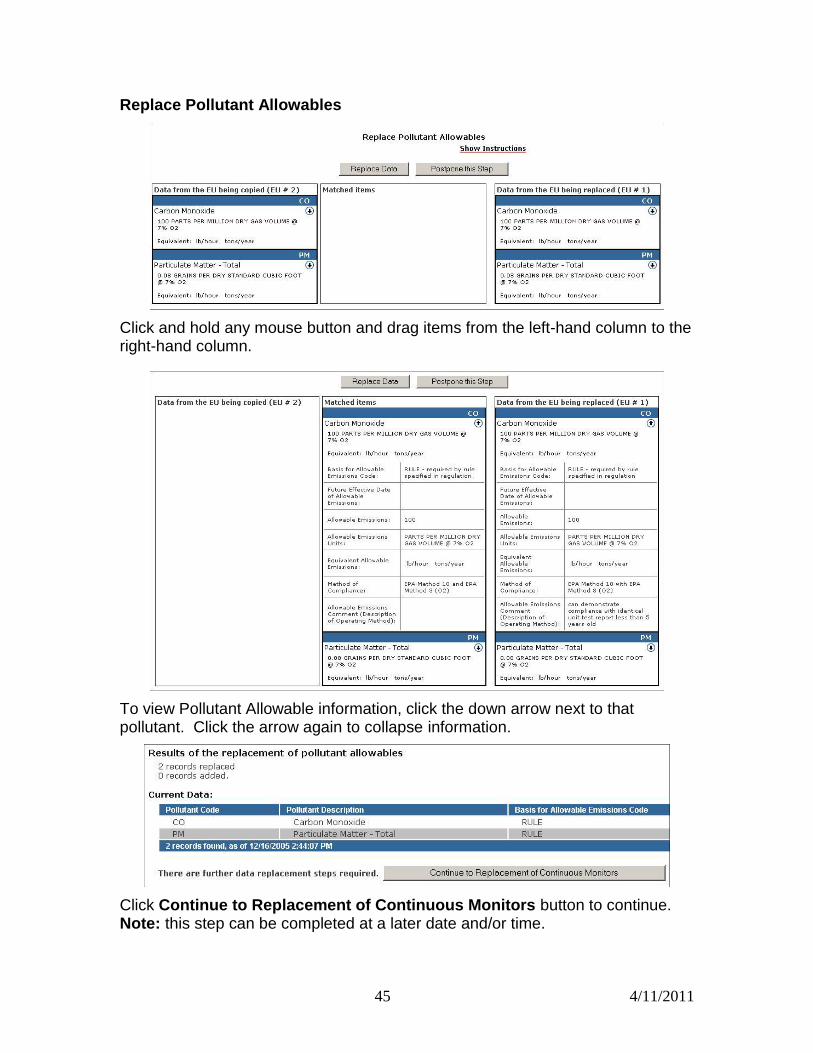
Replace Pollutant Allowables
Click and hold any mouse button and drag items from the left-hand column to the right-hand column.
To view Pollutant Allowable information, click the down arrow next to that pollutant. Click the arrow again to collapse information.
Click Continue to Replacement of Continuous Monitors button to continue. Note: this step can be completed at a later date and/or time.

46 4/11/2011
Replace Continuous Monitors
To view Continuous Monitors information, click the down arrow next to that monitor. Click the arrow again to collapse information.
Click Return to EU Menu button to navigate back to the Emissions Unit Menu, thus completing the replace function.

47 4/11/2011
Delete This EU
1. To delete added emission unit, click the Emissions Unit to be deleted. Note: you can only delete added EU‟s
2. Click the Delete This EU button on the Emissions Unit Menu. 3. Click the Delete button or click the Return to Main Menu button
to return to the main menu to cancel deletion.

48 4/11/2011
EU Sections
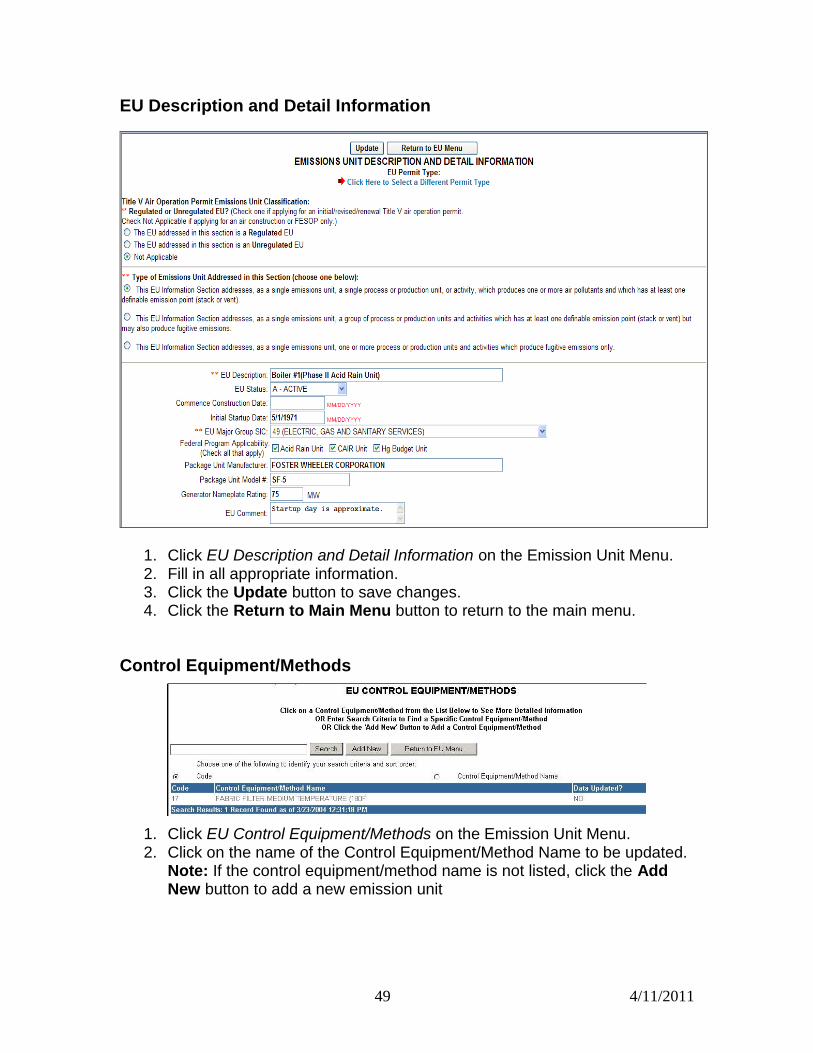
EU Description and Detail Information This section describes the Emission Unit Addressed. This is the based form and all subsequent forms describe the Emissions Unit in this form.
Control Equipment/Methods This section identifies the control devices or method codes for the emissions unit.
Operating Capacity and Schedule This section has the Operating Capacity and Schedule for the Emission Unit.
Point (Stack/Vent) Information This section is for the entering the Point (Stack/Vent) Information.
Segment (Process/Fuel) Information This section is for entering the Segment (Process/Fuel) Information.
EU Pollutant Information This section is for entering the Pollutant information.
Allowable Emissions This section is for entering the Allowable Emissions information.
Visible Emissions Information This section is for entering the Visible Emissions information.
Continuous Monitor Information This section is for entering the Continuous Monitor information.
EU Additional Information This section is for entering EU Additional Information.
49 4/11/2011
EU Description and Detail Information
1. Click EU Description and Detail Information on the Emission Unit Menu. 2. Fill in all appropriate information. 3. Click the Update button to save changes. 4. Click the Return to Main Menu button to return to the main menu.
Control Equipment/Methods
1. Click EU Control Equipment/Methods on the Emission Unit Menu. 2. Click on the name of the Control Equipment/Method Name to be updated.
Note: If the control equipment/method name is not listed, click the Add New button to add a new emission unit

50 4/11/2011
3. Fill in all appropriate information. 4. Click the Update button to save changes, Add New button to add a new
EU Control Equipment or the Cancel button to cancel.
Operating Capacity and Schedule
1. Click EU Operating Capacity and Schedule on the Emission Unit Menu. 2. Fill in all appropriate information. 3. Click the Update button to save changes, or the Return to EU Menu
button to return to the emission unit menu.

51 4/11/2011
Point (Stack/Vent) Information
4. Click EU Point (Stack/Vent) Information Form on the Emission Unit Menu. 5. Fill in all appropriate information. 6. Click the Update button to save changes, or the Return to EU Menu
button to return to the emission unit menu.

52 4/11/2011
Segment (Process/Fuel) Information
1. Click on the name of the SCC Code, Valid, or Data Updated to be updated. Note: If the SCC Code is not listed, click the Add New Segment button to add.
2. Fill in all appropriate information. 3. To navigate to each segment, click the arrow buttons under the
Segment Navigation heading. 4. Click the Update button to save changes, or the Return to Segment
List, or Return to EU Menu buttons to return.
To Add a New Segment 1. Click the Add New button.
2. Use either 1-4 search options method to search for new segment.

53 4/11/2011
3. Click on the name of the SCC Code to be added. Note: If the SCC Code is not listed, click the Perform Another Search button to add.
4. Fill in all appropriate information. 5. Click the Update button to save changes, or the Return to Segment
List, or Return to EU Menu buttons to return.

54 4/11/2011
EU Pollutant Information
1. Click on the name of the Pollutant Code to be updated. Note: If the Pollutant Code is not listed, click the Add New Pollutant button to add.
2. Fill in all appropriate information. 3. Click the arrow buttons under the Pollutant Navigation heading to
navigate to each segment.

55 4/11/2011
4. Click the Update button to save changes, or the Add New Pollutant button to add or Return to Segment List, or Return to EU Menu buttons to return.
Allowable Emissions
1. Click on the name of the Pollutant Code to be updated. Note: If the Pollutant Code is not listed, click the Add New button to add.
2. Fill in all appropriate information. 3. To navigate the previous section, click the red arrow next to “Click Here to
View/Edit Potential/Estimated Fugitive Emissions Information for this Pollutant”.
4. Click the Update button to save changes, or the Add New button to add or Return to Allowable Emissions List, or Return to EU Menu buttons to return.

56 4/11/2011
Visible Emissions Information
1. Click on the name of the Subtype to be updated. Note: If the Subtype is not listed, click the Add New button to add.
2. Fill in all appropriate information. 3. Click the Update button to save changes, or the Add New button to add
or Return to Visible Emissions List, or Return to EU Menu buttons to return.
Note: To select the method of compliance. Press 'CTRL' Key + Click to select or deselect multiple methods

57 4/11/2011
Continuous Monitor Information
1. Click on the name of the Parameter Code to be updated. Note: If the Parameter Code is not listed, click the Add New button to add.
2. Fill in all appropriate information. 3. Click the Update button to save changes, or the Add New button to add
or Return to Continuous Monitor List, or Return to EU Menu buttons to return.

58 4/11/2011
EU Additional Information
EU Additional Information page is the first step in attaching EU information file. To do this you must indicate what type of file(s) you are sending or attaching in the four sections provided; Additional Requirements for All Permit Applications, Additional Requirements for Air Construction Permit Applications, Additional Requirements for Title V Air Operation Permit Applications, and Other Information Regarding this EU. After indicating the name and type of file the attachment will be, you must then go to the upload menu to upload the file. Note: the Facility section is also an area that attachments can be added.

59 4/11/2011
Additional Requirements for All Permit Applications
When attaching documents, there is a 4MB limit per upload and there may be limitation to the types of files that the permitting office can view. Files created with newer versions of Autocad for example may not be viewable by the permitting office. If you have any questions about the files you are uploading, call the permitting office or the DARM Application Support Desk to discuss submittal options.
1. Click the box indicating whether or not the item is applicable, enter previously submitted dates if needed, and click the Update button. Note: once the attachment is attached No will become Yes.
2) Click on the desired description hyperlink to be edited. Note: this form can be used for the attachment of electronic documents or to indicate the existence of hard-copy documents to be sent via mail.
3) Choose either Option 1 Electronic File to be uploaded or Option 2 Hard-Copy document(s). Note: Option 2 requirements for Title V air operation permit, permit revision, or permit renewal applications or concurrent processing of air construction permit and Title V air operation permit revision or renewal applications, include the a signed certification by the application responsible official.
4) Enter the attachment description or comment. Note: this helps to identify the information to be uploaded. The attachment can be uploaded at this time or after all of the attachments have been identified.
5) Click Update to save changes, then the Return to Facility Additional Information List button to return. Note: If all of the attachments have been identified, click the Go to Upload Menu and follow the Upload instructions
See “Upload Attachment” sections for instructions on how to upload electronic files.

60 4/11/2011
Additional Requirements for Title V Air Operation Permit, Air Construction Permit Applications, and other Facility Information
1. Click the box indicating whether or not the item is applicable. Note: once the attachment is attached No will become Yes.
2. Click on the desired description hyperlink to be edited. Note: this form can be used for the attachment of electronic documents or to indicate the existence of hard-copy documents to be sent via mail.
3. Choose either Option 1 Electronic File to be uploaded or Option 2 Hard-Copy document(s). Note: Option 2 requirements for Title V air operation permit, permit revision, or permit renewal applications or concurrent processing of air construction permit and Title V air operation permit revision or renewal applications, include the a signed certification by the application responsible official.
4. Enter the attachment description or comment. Note: this helps to identify the information to be uploaded. The attachment can be uploaded at this time or after all of the attachments have been identified. If all of the attachments have been identified, click the Go to Upload Menu and follow the Upload instructions.
5. Click Update to save changes, then the Return to Facility Additional Information List button to return.
Note: If the information has been previously submitted for Acid Rain Part Application, place a check in the previously submitted box and enter the date submitted. If not, leave the previously submitted box empty. See “Upload Attachment” sections for instructions on how to upload electronic files.

61 4/11/2011
Delete Attachments
1. Click on the desired description hyperlink to be edited. Note: this form can be used for the attachment of electronic documents or to indicate the existence of hard-copy documents to be sent via mail.
2. Choose either Option 1 Electronic File to be uploaded or Option 2 Hard-Copy document(s) or file to be mailed. Note: Option 2 requirements for Title V air operation permit, permit revision, or permit renewal applications or concurrent processing of air construction permit and Title V air operation permit revision or renewal applications, include the a signed certification by the application responsible official.
3. Enter the attachment description or comment. Note: this helps to identify the information to be uploaded. The attachment can be uploaded at this time or after all of the attachments have been identified. If all of the attachments have been identified, click the Go to Upload Menu and follow the Upload instructions.
4. Click Update to save changes, then the Return to Facility Additional Information List button to return.

62 4/11/2011
Edit for Sufficiency
After the information for the Permit has been entered, it is now time for the Edit for Sufficiency check. This option will perform a check of the application for missing or incomplete data. Note: this section is here to help complete the application. This does not prevent the submission of the application.
1. Click the Edit for Sufficiency hyperlink to navigate to the page that shows all Emission Units that are in the Scope of Application with the amount of the Processing Fee.
2. Click Continue Sufficiency Edit to continue with the sufficiency check or Return to Main Menu button to return to the main menu. Note: To view the Emission Units‟ information, click the on the EU hyperlink.
3. When the Continue Sufficiency Edit button is clicked a confirmation message appears. Click OK to confirm the edit of sufficiency.

63 4/11/2011
4. Click the Suggested Solution for the missed data to navigate to that page.
5. Fill in missed data then click Update. To return to the problem list, click Return to Problem List button.
6. The corrected information is no longer listed on the Application Problem List. Repeat these steps until this list is cleared then click the Return to Main Menu button.

64 4/11/2011
Upload Menu
To view or update uploaded electronic documents, click the Upload Menu hyperlink.
Note: to be able to upload or view uploaded documents you must have checked the attachment box(s) in the Facility Additional Information and/or the Emission Unit Additional Information section.
To Upload Electronic Files
1. Click the Upload EU Files or the Upload Facility Files button. Note: previously flagged files to be uploaded from the additional information pages are listed here.

65 4/11/2011
2. Click the Browse button to select the file path of the file to be uploaded. 3. Select file to be uploaded then click Open. 4. Click the Upload Facility Files or Upload EU Files button.
5. Click Return to Upload Menu to return.

66 4/11/2011
To Delete Attachments
1. Go to the Facility Additional Information or the Emission Unit Additional Information section.
2. Go to the section where the file to be deleted is located. 3. Click on the hyperlink of that section.
4. Select the file to be deleted
5. Click the Delete button.

67 4/11/2011
View Uploaded EU Files/ Uploaded Facility Files
1) Click the View Uploaded EU Files or the View Uploaded Facility
Files button.
2) Click the Return to Upload Menu button. Note: this is only for viewing purposes. To update delete attachment, follow the delete attachment instructions
3) Under the heading Uploaded Document Name, click on the hyperlink of the file to be viewed. Note: changes made here do not change your original file.
4) Click the Return to Main Menu button to return to EPSAP main menu.
View/Update Attachments
1) Click the View Uploaded EU Files or the View Uploaded Facility Files button.
2) This page is for viewing only. To delete an attachment, follow the delete attachment instructions. Click the Return to Upload Menu button to return.
3) Click the Return to Main Menu button to return to EPSAP main menu.

68 4/11/2011
Submit This Application
To submit an Application using EPSAP, the signing party(s) must have a Personal Identification Number (PIN) to represent their signature. To receive a personal identification number, the PIN Request form must be filled out and sent to DARM Application Support Desk. See EPSAP PIN Request Form section of this document.
Note: The Professional Engineer and the Responsible Official or Owner/Authorize Representative is the only users to see the Submit option.
1. Click the Submit This Application hyperlink.
2. Click the Continue Application Submission button or the Return to Main Menu button to return to the main menu.
3. Click OK to launch edit for sufficiency check.

69 4/11/2011
Note: the PE must submit before the Responsible Official (RO).
4. Click the Continue button to continue with the submittal process or click the Return to Main Menu button to return to the main menu. Note: It is not necessary to correct all suggested problems listed on the Application Problem list page to complete the submittal process. If you choose to correct the suggested solutions, click on the problem hyperlink, correct the problem, click update then return to this section.
Professional Engineer Submittal
Professional Engineer Verification
5. Print the PE Signature Document by clicking step #1 on the Professional Engineer Verification page.

70 4/11/2011
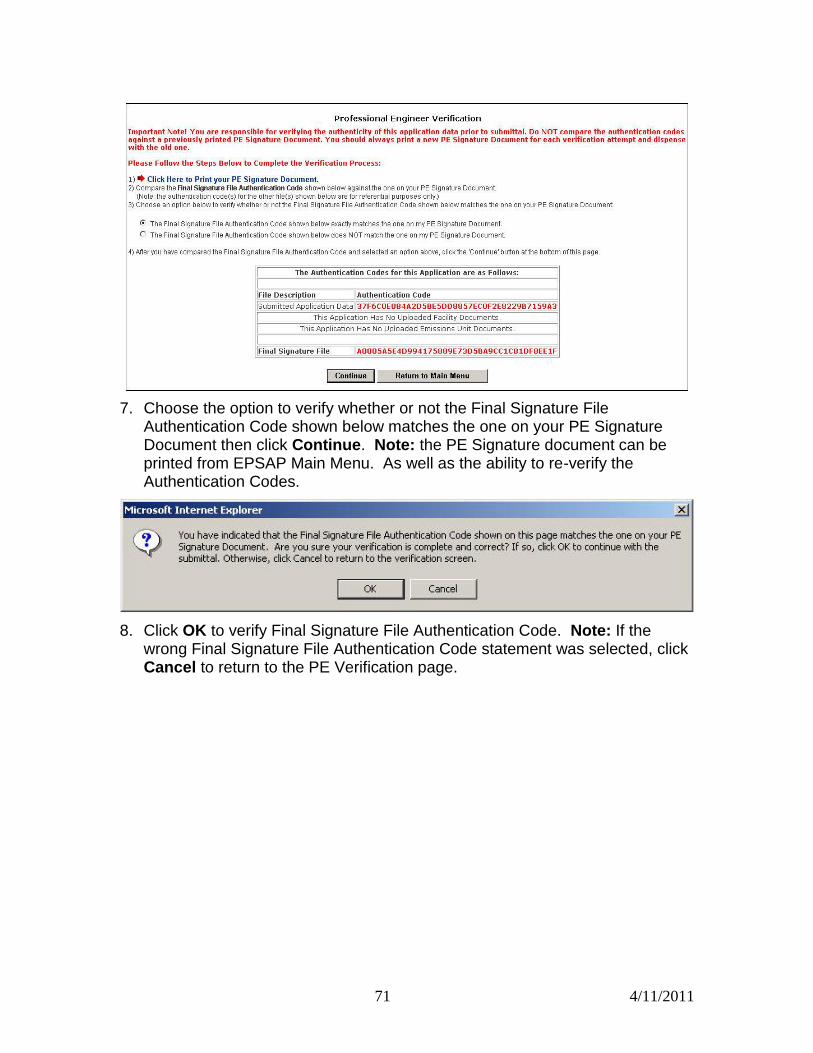
Professional Engineer Signature Document
6. Compare the authentication codes on the printed copy to the authentication codes on the screen. Note: The PE is responsible for verifying the authenticity of this application data prior to submittal. Do not compare the authentication codes against a previously printed PE Signature Document.
71 4/11/2011
7. Choose the option to verify whether or not the Final Signature File Authentication Code shown below matches the one on your PE Signature Document then click Continue. Note: the PE Signature document can be printed from EPSAP Main Menu. As well as the ability to re-verify the Authentication Codes.
8. Click OK to verify Final Signature File Authentication Code. Note: If the wrong Final Signature File Authentication Code statement was selected, click Cancel to return to the PE Verification page.

72 4/11/2011
Professional Engineer Certification
9. The professional engineer (PE) must read the Professional Engineer
Certification statement and enter in their Username, PIN (Personal Identification Number) and Password to certify that the information in the application is correct. Click the Submit button to submit or the Cancel button to cancel. Note: Following the submittal, the Owner/Authorized

73 4/11/2011
Representative (AR) or Responsible Official (RO) will be sent an e-mail notification that the application is now ready for their review. When the AR or RO submits the application, the PE will be sent an e-mail notifying the PE to send in their sealed PE Signature Document. This document must be mailed in to the permitting authority in order to satisfy the statutory requirements of electronically certifying engineering documents, as specified in Rule 61G15-23.003, Florida Administrative Code. If the PE Signature Document is not received in the permitting office, a request will be made for this document with an incompleteness letter soliciting submittal of any items necessary, but not included in the original submittal. Do not send in the PE Signature Document prior to the submittal of the application by the AR or RO as they may request that the PE make changes to the application prior to submission. If the PE does make changes to the current version of the application, the PE will be required to verify the application data again and re-print the PE Signature Document for the application. Only the most recently generated PE Signature Document should be mailed in.
10. Click OK button and be returned to EPSAP Main Menu. As the Professional Engineer you will be navigated back to the EPSAP Main Menu so that you can work on additional applications if needed.
Withdraw PE Approval
Professional Engineer Submittal
To make changes to the application after it has been submitted, the PE can withdraw the application by clicking on the statement “Click here to withdraw PE approval and submittal of this application and return it to „Updateable‟ status.” A notifying email will be sent to the AR/RO that the PE has withdrawn the submitted application.

74 4/11/2011
Final Signature File Authentication Code
When the AR or RO submits the application, the PE will be sent an e-mail notifying the PE to send in their sealed PE Signature Document.
1. To complete this task the PE must open EPSAP, click “Confirm Final Signature File Authentication Code” hyperlink on EPSAP Main Menu to confirm that the application was not changed
2. Print the PE Signature document, sign, date and mail in to the permitting
authority. Once this task has been done, an email will be sent to the AR/RO and PE confirming that the application has been submitted.
Note: if the File Authentication code was not changed, the PE does not have to re-print the PE Signature document.
Confirm Final Signature File Authentication Code
Print PE Signature

75 4/11/2011
Owner/Authorized Representative or Responsible Official Submittal
When an application has been electronically signed by the PE, an email message similar to the one displayed above is sent to the next signatory (the Owner Authorized Representative or a Responsible Official) indicating that the application is ready for submittal to the permitting authority.
To perform the final submittal, the signatory will log in to EPSAP and select the “Current Applications” to find and select the application to be submitted. Then follow these steps to submit to the permitting authority:

76 4/11/2011
1. To submit the application, click the Submit This Application hyperlink.
2. Click the Continue Application Submission button or the Return to Main Menu button to return to the main menu.

77 4/11/2011
3. Click OK.
Note: the PE must submit before the AR or RO
4. Click the Continue button to continue with the submittal process or click the Return to Main Menu button to return to the main menu. Note: It is not necessary to correct all suggested problems listed on the Application Problem list page to complete the submittal process. If you choose to correct the suggested solutions, click on the problem hyperlink, correct the problem, click update then return to this section.
Owner/Authorized Representative Statement

78 4/11/2011
Responsible Official Statement
5. The Owner/Authorized Representative (AR) or Responsible Official (RO) must read the Certification statement and enter their Username, PIN and Password to certify that the information in the application is correct. Click the Submit button to submit or the Cancel button to cancel. Note: after the AR/RO submits, an email is sent notifying the PE to verify the final authentication code and to mail the PE Signature Document to the permitting authority.

79 4/11/2011
Select a Permit Office from the drop-down selection box or select an Air Permit Source Type by clicking an appropriate radio box. Note: the County is pre-filled and read-only; however, Marion County will be required to select one of the following counties: Marion – East of I-75 or Marion – West of I-75.
5. Click the Submit button to continue the submittal process.
6. When the message “We recommend that you print this page for your records as a verification of your application submittal” message appear, click OK to confirm and print the Air Permit Application Verification of Submittal page. Note: after the RO submits, an email is sent notifying the PE to verify the final authentication code and to mail the PE Signature Document to the permitting authority.

80 4/11/2011
Air Permit Application Verification of Submittal
The Air Permit Application Verification of Submittal page confirms that your application has been submitted and to which office the application has been submitted along with that person‟s name. Also located on this page is a link to the Application Detail Report page where you can print and or save the information that has been submitted. If you have questions regarding your submitted application, contact the office written on your application Air Permit Application Verification of Submittal page and refer to the application number in your inquiry. Note: after submittal you are able to print the Fee Calculation page and Submitted Application. The printed Submitted Application is for the applicant‟s records only and is not intended to replace the electronic submission.
Submittal Confirmation Email
A series of confirmation email messages will be sent once the application has been submitted by the Professional Engineer, Owner/Authorized Representative or Responsible Official. This email gives the status of the application as well as the information on whom to contact in regards to the submitted application.
Note: The application data and electronic certifications will have been sent to the permitting office, but the application will not be considered “Received” unless any required permit fees are submitted with the application.
Date & Time of Submission Unique Application Number
Permitting Office
Submitted Application Report
Print Calculation Page

81 4/11/2011
Owner/ Authorized Representative or Responsible Official Confirmation E-Mail
The Owner/ Authorized Representative or Responsible Official confirmation email lists the primary and secondary contacts along with pertinent information about the application.

82 4/11/2011
Application Owner Confirmation E-Mail
The Application Owner will also receive a confirmation email which will lists primary and secondary contacts along with pertinent information.

83 4/11/2011
Professional Engineer Confirmation E-Mail
The email message that the PE receives after the AR/RO submits, reminds them to sign, seal and mail in their PE Signature Document. This email also lists primary and secondary contacts along with the address of the permitting office to send the PE Signature Document.

84 4/11/2011
Print Instructions for DEP Form No. 62-210.900(1)
This option allows you to print out the instructions for the filing of a Long Form application. These instructions are from the Long Form application and are not a part of the user documentation.
Application Detail Report
1. Click the Application Detail Report hyperlink. Note: this printable copy is for your records only and is not intended to replace the electronic submission.
2. Click the Print Report button to print or click the Save Report button to save. To close the report, close the window.

85 4/11/2011
Attachment Report
Note: attachments are attached in the Facility and EU Additional Information sections.
This report lists all attachments in your application.

86 4/11/2011
Print Fee Calculation Page
The Fee Calculation Page option only appears when permit fees are required, such as Air construction permits and Initial federally enforceable state air operation permits (FESOP).
1) Click the Print Fee Calculation Page hyperlink. Note: this page should be mailed to DEP, along with applicable fees.
2) Click OK to acknowledge the Fee Calculation page instructions.

87 4/11/2011
3) Fill in all appropriate fields. Note: Submit any required permit application fee, which you must calculate according to 62-4.050(4), F.A.C. Contact the appropriate Permitting Office if you have any questions. If you have questions regarding rule 62-4.050(4), F.A.C., click the text hyperlink to read the rule.
4) Click the Print button at the bottom of page to print.
5) To return to EPSAP main menu, click the back button in your browser.

88 4/11/2011
Print Form to Request a PIN for Application Submittal
1. Click the Print Form to Request a PIN for Application Submittal hyperlink located on EPSAP‟s Main menu page.
2. Print Form. 3. Sign and date form. 4. Mail to: DARM Application Support Desk
Department of Environmental Protection 2600 Blair Stone Road MS 5500 Tallahassee Florida 32399-2400

89 4/11/2011
Change Your EPSAP Password
To change your EPSAP password, click the Change your EPSAP Password hyperlink. Note: your password can be changed at the log in screen as well as inside of the application.
1. Fill in your Username, Old Password, New Password and the repeat of your New Password.
2. Click the Submit button to save or Cancel to abandon.
Once the submit button is press, a confirmation message that your password has been successfully changed appears. Click the OK button to verify message.

90 4/11/2011
Update Your EPSAP User Account Information
To update your account information, click on “Update Your EPSAP User Account Information” hyperlink from either EPSAP Home page or Main Menu page. When you update your PE Number your ability to submit an application will be suspended until you send the Help Desk a new PIN Request form. Note: Information marked with two red **asterisks are required information Click Update to save changes.

91 4/11/2011
Viewing Submitted Applications
After the application has been submitted to the permitting authority, the user is not able to view or update the application in the Current Long Form Permit Application section. To view the submitted application the user must click on the Select a Submitted Long Form Application hyperlink.
The read-only application can be viewed by clicking on the Print Submitted Application hyperlink. Note: to make updates to the application, contact the

92 4/11/2011
permitting office to have them release the application back to the user. When the application is returned to the applicant there will be a dash 2 (-2) behind the application number which indicates that it is the second version and will be located in the Current Long Form Permit Application section.
The Submitted Application Report gives the submitted application information in the form of a hard-copy application. The printed Submitted Application is for the applicant‟s records only and is not intended to replace the electronic submission.

93 4/11/2011
Index
A
Add a New Segment, 51 Add EU’s to the scope, 20
Add New EU, 38 add new facilities, 33 adding Professional Engineer Information, 27 Application Contact Information, 21 Application Detail Report
Reports, 82 Application Menu, 15 Application Owner Confirmation E-Mail, 80
assign edit rights, 16 Assign/Remove Edit Rights, 16 Attachment Report
Reports, 83
C
Certification Statements Authorized Representative, 74
Change EPSAP Password, 6 Confirmation Email
Submit, 78
Contact the EPSAP Help Desk, 1 Continuous Monitor Information, 56 Create a new facility, 13
D
Delete an Application, 15 Delete Attachment
Attachments, 65 Delete Attachments, 60
Delete Emission Units, 46 delete the Professional Engineer from
Application, 28 Download a Facility, 12
Duplicate Emission Unit, 39
E
Edit for Sufficiency, 61 Emission Unit List/ Search Menu, 37 Entering Application Purpose, 18 EU Additional Information, 57
Attachments, 57 EU Description and Detail Information, 48 EU Pollutant Information, 53 EU Sections, 47
F
Facility Contact, 32 Facility Identification, 29 Facility Location and Type, 30 Facility Major Group SIC, 31
Forget Your Password, 7
G
Governmental Facility Code, 31
H
Help Desk Information, 1
L
Log In to EPSAP, 2 Login Name/ Password, 6
N
Navigational Tools, 7 Negate PE Approval, 72 New Users, 3
O
Operating Capacity and Schedule, 49 Option 1 Create a Duplicate EU, 39 Option 2 Replace the Data in EU, 41 Owner/ Authorized Representative or
Responsible Official Confirmation E-Mail,
79 Owner/Authorized Representative Information, 23 Owner/Authorized Representative Statement, 75,
76 Owner/Authorized Representative Submittal, 74
P
PE Confirmation E-Mail, 81
Personal Identification Number Submittal Authorized Representative, 74
Point (Stack/Vent) Information, 50 Print Fee Calculation Page, 84 Professional Engineer Certification
Submit, 71 Professional Engineer Signature Document, 69 Professional Engineer Submittal, 68 Professional Engineer Verification, 68
R
remove edit rights, 17 Replace Continuous Monitors, 45 Replace Emissions Unit, 41 Replace Point Descriptions, 42 Replace Pollutant Allowables, 44 Request a PIN for Application Submittal, 86 Responsible Official (RO) Information, 24
S
Search for submitted applications, 9

94 4/11/2011
Search for unsubmitted applications, 9 Segment (Process/Fuel) Information, 51 Set Up An Account, 3 Start a New Long Form Permit Application, 10 Submit This Application, 67
T
Transfer Ownership of this Application, 17
U
Update Your EPSAP User Account Information, 88
Upload Electronic Files
Attachments, 63 Upload Menu
Attachments, 63
V
Verification of Submittal Submit, 78
View Uploaded EU Files/ Uploaded Facility Files Attachments, 66
View/Update Attachments, 66 Viewing Submitted Applications, 89 Visible Emissions Information, 55