Floor Care Chart 2013 New Brand Floor Care Chart Sep 2009
1
POLISH STRIPPING ITEMS REQUIRED: SAFETY WEAR AND SIGNS 2 MOPS AND 2 MOP BUCKETS SWEEPER MOP OR BRUSH SCRUBBING MACHINE AND STRIPPING PAD WET PICK UP (if available) EDGING TOOL CLOTH NEUTRALISER MEASURE A Put on safety wear. B Place safety signs. C Put water into bucket. D Dispense correct measure of polish stripper. E Add polish stripper slowly to water in bucket to avoid splashing. A Ensure adequate ventilation. B Sweep floor. C Mop solution onto floor. D Leave solution on floor for 5 minutes, allowing it to work. A Adjust machine handle to safe comfortable working height. B Scrub floor thoroughly until all polish is removed. C Use edging tool for edges and corners. D Remove slurry with wet pick- up or mop. A Rinse well with clean, cold water. B Remove with wet pick up or mop. C Wipe skirting board with damp cloth to remove splashes. D Check floor is neutral ph. Repeat above if necessary. A Put on safety wear. B Place safety signs. C Ensure floor is clean and dry. D Pour Polish into bucket or tray. E Use plastic liner to protect bucket. A Put on safety wear. B Place safety signs. C Sweep floor. D If heavily soiled, mop with maintainer or neutral detergent. E Rinse and allow to dry. A Dilute maintainer as per label instructions into mop bucket (water first). B Mop solution onto floor, rinse and allow to dry. C Dry burnish with machine and appropriate pad to help remove scuff marks and enhance finish. D Mop sweep floor if machine does not have a vacuum attachment. ALWAYS check machinery for loose parts, cable, plug before using. ALWAYS replace cap on container and never leave any chemicals unattended especially where children can reach them. When a product is to be diluted for spray application, ensure the spray bottle is correctly labelled. ALWAYS use protective safety wear and sensible footwear. WHEN FINISHED • Wash and clean all equipment used • Wipe down machinery and cable • Return all items to storeroom • Always ensure caps on chemical containers are secure • Ensure storeroom is locked upon leaving ISSUED WITHOUT PREJUDICE ALWAYS read, understand and adhere to label instructions and dilution rates, before using any chemical. NEVER MIX CHEMICALS. Take care when handling and diluting products A Dilute maintainer in spray bottle as per label instructions. B Adjust handle of the high speed burnishing machine to safe, comfortable working height. C Spray fine mist onto floor. D Burnish with machine and appropriate pad to remove scuff marks and enhance finish. E Mop sweep floor if machine does not have a vacuum attachment. A Place mop/applicator into polish. B Lightly squeeze surplus from mop/applicator. C Spread polish thinly and evenly in NORTH to SOUTH direction. D Leave 6” gap at floor edge (this will avoid build up) E Leave to dry thoroughly, approximately 30 minutes. A Apply further coat of polish thinly and evenly at right angles to first, i.e. WEST to EAST over total floor area. B Leave to dry thoroughly, approximately 30 minutes. C The floor may require more than the normal 2 coats of polish, depending on age, porosity of floor and the system being worked. D Never put unused polish back in container. 6” POLISH APPLICATION ITEMS REQUIRED: SAFETY WEAR AND SIGNS CLEAN MOP OR POLISH APPLICATOR MOP BUCKET OR TRAY MAINTENANCE ITEMS REQUIRED: SAFETY WEAR AND SIGNS SWEEPER MOP OR BRUSH HIGH SPEED MACHINE CLEANING/ BURNISHING PAD BUCKET AND CLEAN MOP SPRAY BOTTLE MEASURE SAFETY FIRST FOR: VINYL, THERMOPLASTIC, RUBBER, LINOLEUM, COMPOSITION, ASPHALT, TERRAZZO, SEALED WOOD & SEALED CORK FLOOR SURFACES. Professional Floor Care
Transcript of Floor Care Chart 2013 New Brand Floor Care Chart Sep 2009
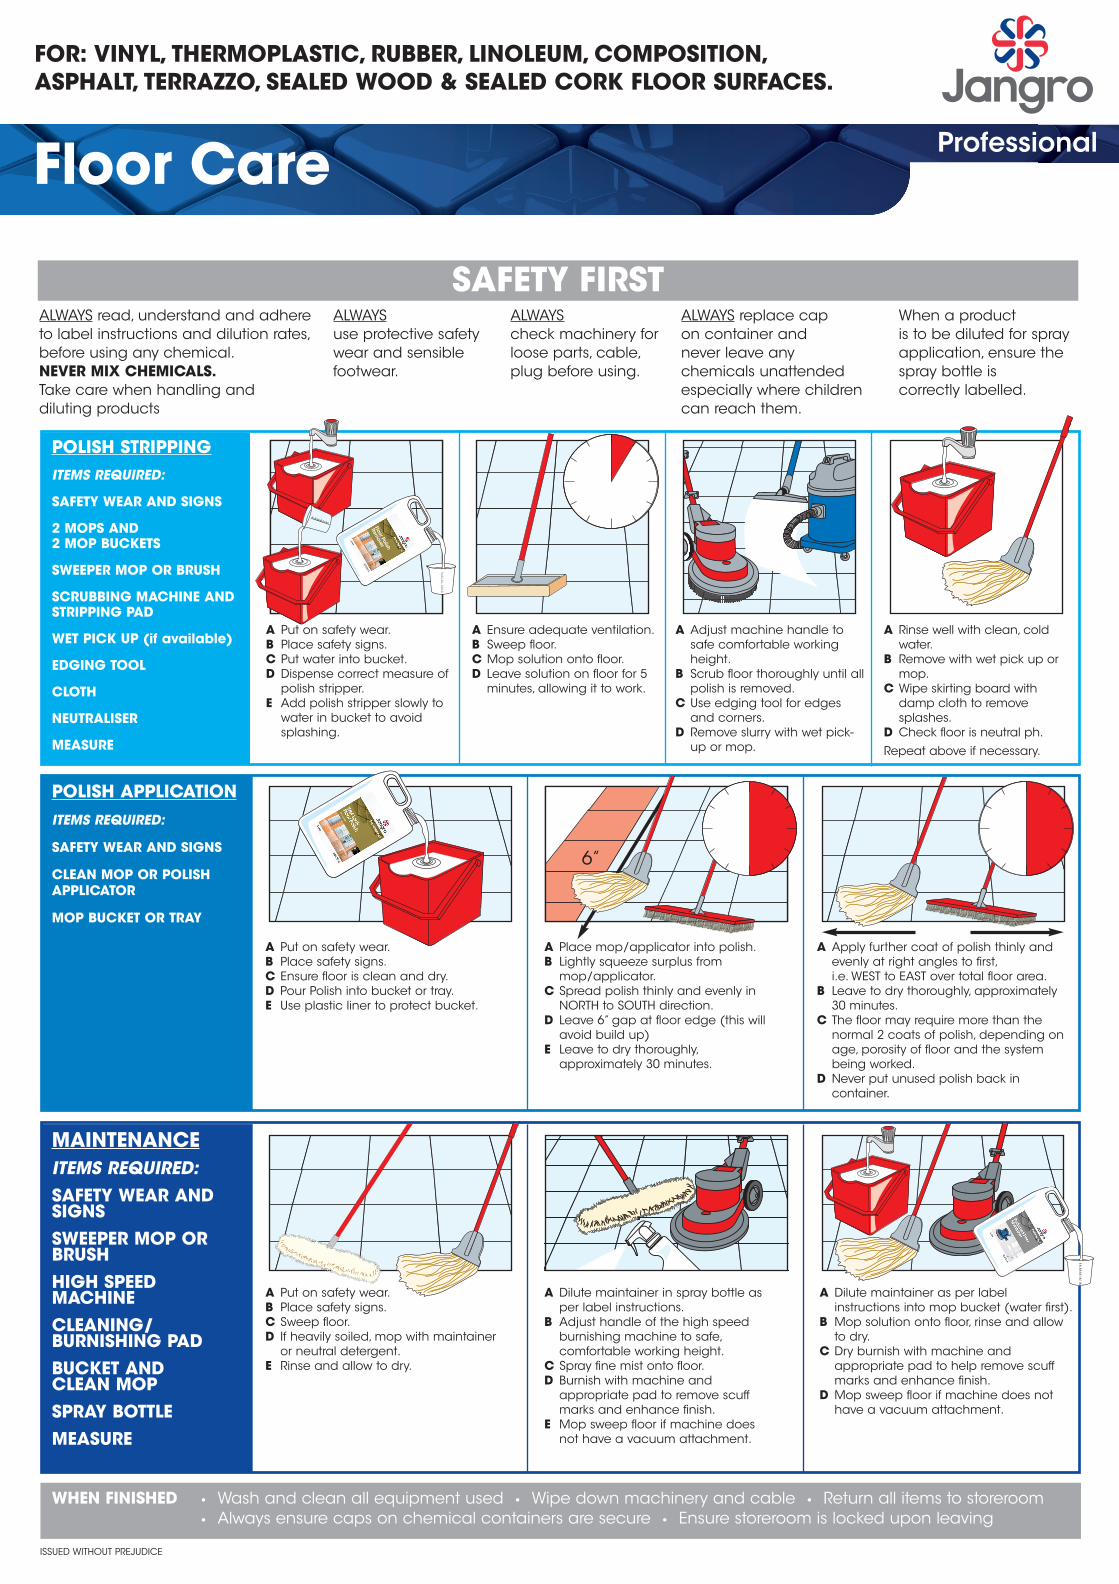
POLISH STRIPPINGITEMS REQUIRED:
SAFETY WEAR AND SIGNS
2 MOPS AND 2 MOP BUCKETS
SWEEPER MOP OR BRUSH
SCRUBBING MACHINE ANDSTRIPPING PAD
WET PICK UP (if available)
EDGING TOOL
CLOTH
NEUTRALISER
MEASURE
A Put on safety wear.B Place safety signs.C Put water into bucket.D Dispense correct measure of
polish stripper.E Add polish stripper slowly to
water in bucket to avoidsplashing.
A Ensure adequate ventilation.B Sweep floor.C Mop solution onto floor.D Leave solution on floor for 5
minutes, allowing it to work.
A Adjust machine handle tosafe comfortable workingheight.
B Scrub floor thoroughly until allpolish is removed.
C Use edging tool for edgesand corners.
D Remove slurry with wet pick-up or mop.
A Rinse well with clean, coldwater.
B Remove with wet pick up ormop.
C Wipe skirting board withdamp cloth to removesplashes.
D Check floor is neutral ph.
Repeat above if necessary.
A Put on safety wear.B Place safety signs.C Ensure floor is clean and dry.D Pour Polish into bucket or tray.E Use plastic liner to protect bucket.
A Put on safety wear.B Place safety signs.C Sweep floor.D If heavily soiled, mop with maintainer
or neutral detergent.E Rinse and allow to dry.
A Dilute maintainer as per label instructions into mop bucket (water first).
B Mop solution onto floor, rinse and allowto dry.
C Dry burnish with machine andappropriate pad to help remove scuffmarks and enhance finish.
D Mop sweep floor if machine does nothave a vacuum attachment.
ALWAYScheck machinery forloose parts, cable,plug before using.
ALWAYS replace cap on container and never leave anychemicals unattendedespecially where childrencan reach them.
When a product is to be diluted for sprayapplication, ensure the spray bottle is correctly labelled.
ALWAYSuse protective safetywear and sensiblefootwear.
WHEN FINISHED • Wash and clean all equipment used • Wipe down machinery and cable • Return all items to storeroom• Always ensure caps on chemical containers are secure • Ensure storeroom is locked upon leaving
ISSUED WITHOUT PREJUDICE
ALWAYS read, understand and adhere to label instructions and dilution rates,before using any chemical.NEVER MIX CHEMICALS.Take care when handling and diluting products
A Dilute maintainer in spray bottle asper label instructions.
B Adjust handle of the high speedburnishing machine to safe,comfortable working height.
C Spray fine mist onto floor.D Burnish with machine and
appropriate pad to remove scuffmarks and enhance finish.
E Mop sweep floor if machine doesnot have a vacuum attachment.
A Place mop/applicator into polish.B Lightly squeeze surplus from
mop/applicator.C Spread polish thinly and evenly in
NORTH to SOUTH direction.D Leave 6” gap at floor edge (this will
avoid build up)E Leave to dry thoroughly,
approximately 30 minutes.
A Apply further coat of polish thinly andevenly at right angles to first, i.e. WEST to EAST over total floor area.
B Leave to dry thoroughly, approximately 30 minutes.
C The floor may require more than thenormal 2 coats of polish, depending onage, porosity of floor and the systembeing worked.
D Never put unused polish back incontainer.
6”
POLISH APPLICATIONITEMS REQUIRED:
SAFETY WEAR AND SIGNS
CLEAN MOP OR POLISHAPPLICATOR
MOP BUCKET OR TRAY
MAINTENANCEITEMS REQUIRED:SAFETY WEAR ANDSIGNSSWEEPER MOP ORBRUSHHIGH SPEEDMACHINECLEANING/BURNISHING PADBUCKET AND CLEAN MOPSPRAY BOTTLEMEASURE
SAFETY FIRST
FOR: VINYL, THERMOPLASTIC, RUBBER, LINOLEUM, COMPOSITION,ASPHALT, TERRAZZO, SEALED WOOD & SEALED CORK FLOOR SURFACES.
ProfessionalFloor Care