FLOATING HEXAGON SHELF
7
FLOATING HEXAGON SHELF BUILD IT WITH ROCKLER PROJECT PLAN BUILD QUESTIONS? Go to www.rockler.com or call 800-279-4441 63446 1/2 x 24 x 30 – Baltic Birch Plywood (3) 59434 I-Semble Heavy-Duty Blind Shelf Supports (2) 62744 I-Semble Blind Shelf Support Drilling Guide All items subject to changes in availability. Stock # Item 55227 9/16'' Brad Point Drill Bit 54702 21/64'' Black Oxide Drill Bit 43877 Guide Bushing, 3/8”O.D.x 9/32” I.D. x 5/16”L 90022 ¼” D x1” H x ¼” Shank Rockler Straight, 2 Flute Bit
Transcript of FLOATING HEXAGON SHELF

FLOATING HEXAGON SHELF
BUILD IT WITHROCKLER PROJECT PLAN
BUILD QUESTIONS? Go to www.rockler.com or call 800-279-4441
63446 1/2 x 24 x 30 – Baltic Birch Plywood (3) 59434 I-Semble Heavy-Duty Blind Shelf
Supports (2)62744 I-Semble Blind Shelf Support Drilling
Guide
All items subject to changes in availability.
Stock # Item55227 9/16'' Brad Point Drill Bit54702 21/64'' Black Oxide Drill Bit43877 Guide Bushing, 3/8”O.D.x 9/32” I.D. x 5/16”L90022 ¼” D x1” H x ¼” Shank Rockler Straight, 2
Flute Bit

HEXAGON FLOATING SHELVES
MATERIAL LISTT x W x L
1 Hexagon Segment (6)* 1/2" x 5-3/4" x 5-1/2"
* Number of segments needed to make one hexagon. Multiply the number of hexagons you will include in your project to calculate the total number of segments you will need. In this example we used eight hexagons, which means we needed a total of 48 segments.
Complete Shelf Project - Shown from backside to expose mortises for support brackets.
Hexagon Segment Detail
5-1/2"
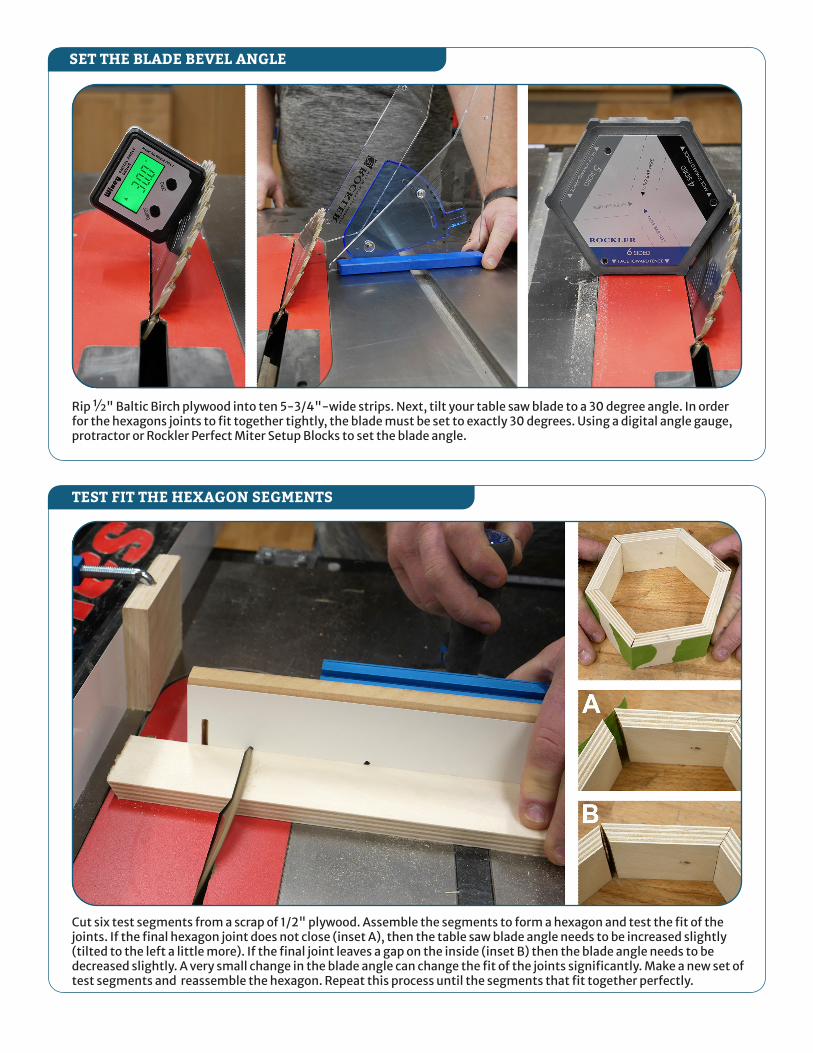
Rip ½" Baltic Birch plywood into ten 5-3/4"-wide strips. Next, tilt your table saw blade to a 30 degree angle. In order for the hexagons joints to fit together tightly, the blade must be set to exactly 30 degrees. Using a digital angle gauge, protractor or Rockler Perfect Miter Setup Blocks to set the blade angle.
Cut six test segments from a scrap of 1/2" plywood. Assemble the segments to form a hexagon and test the fit of the joints. If the final hexagon joint does not close (inset A), then the table saw blade angle needs to be increased slightly (tilted to the left a little more). If the final joint leaves a gap on the inside (inset B) then the blade angle needs to be decreased slightly. A very small change in the blade angle can change the fit of the joints significantly. Make a new set of test segments and reassemble the hexagon. Repeat this process until the segments that fit together perfectly.
TEST FIT THE HEXAGON SEGMENTS
SET THE BLADE BEVEL ANGLE
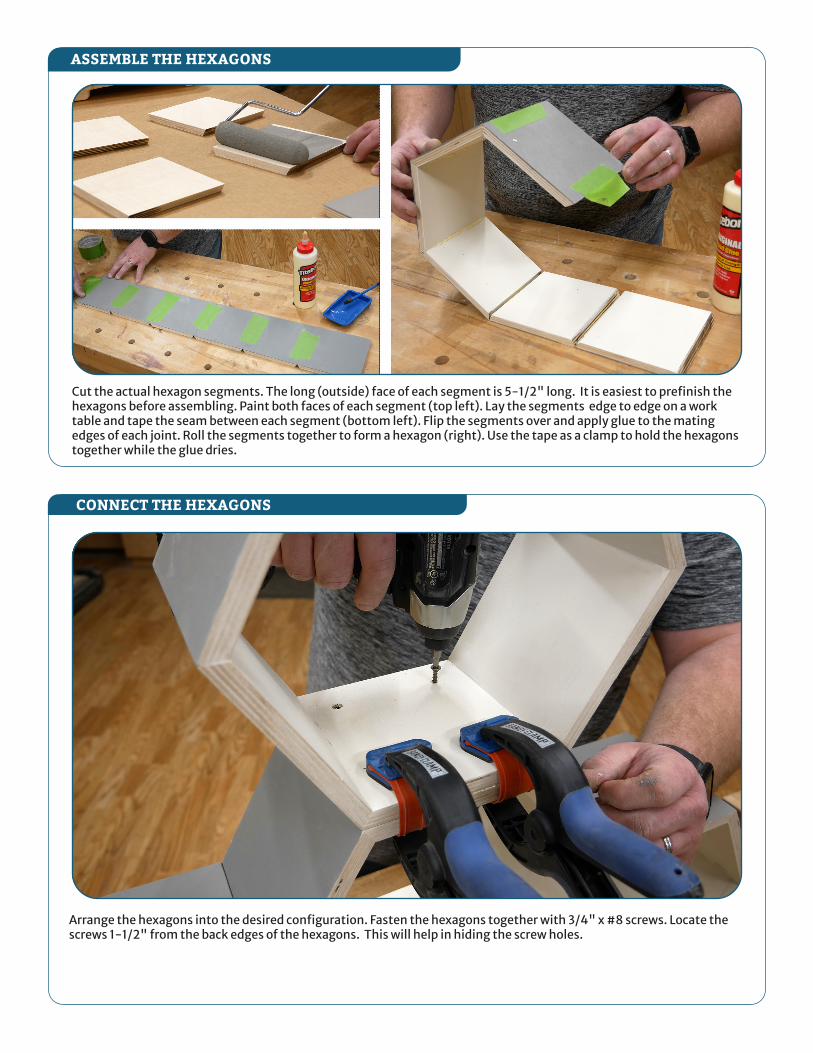
ASSEMBLE THE HEXAGONS
Cut the actual hexagon segments. The long (outside) face of each segment is 5-1/2" long. It is easiest to prefinish the hexagons before assembling. Paint both faces of each segment (top left). Lay the segments edge to edge on a work table and tape the seam between each segment (bottom left). Flip the segments over and apply glue to the mating edges of each joint. Roll the segments together to form a hexagon (right). Use the tape as a clamp to hold the hexagons together while the glue dries.
Arrange the hexagons into the desired configuration. Fasten the hexagons together with 3/4" x #8 screws. Locate the screws 1-1/2" from the back edges of the hexagons. This will help in hiding the screw holes.
CONNECT THE HEXAGONS

FIND STUDS AND MARK THE BRACKET LOCATIONS
Locate the wall studs where you plan to hang the shelves. Measure the distance between the wall stud centers. Mark the stud centers on the back of the hexagon shelves where the brackets will be installed. These marks will be the center of the brackets.
Refer to the Heavy-Duty Blind Shelf Supports (59434) manual for complete installation instructions. The first step of installing the shelf brackets is to drill the bracket post hole in the shelf. Use the I-Semble Blind Shelf Support Drilling Guide (62744) to drill 9/16" hole to a depth of 4-7/8" on each of the stud center markings. Use tape to help identify the correct depth.
DRILL BRACKET POST HOLES

ROUTER MORTISING JIG
The easiest and most accurate way to form the mortise for the shelf bracket is to make a guide jig for your router. The jig is made from 3/4"-thick plywood. The base of the jig is 3/4" x 6"-wide x 20"-long. The two support blocks are 3/4" x 2"-wide x 4-1/2"-long. Use this illustration to lay out the slot and location of the support blocks.
Mark vertical and horizontal center lines on the top face of the jig base piece. Then mark the ends of the mortise at 2-5/16" on each side of center line. Drill end holes on each mark with 7/8” drill bit and cut between the holes with a jigsaw. Attach two support blocks (4-1/2” W x 2” L) on the jig. Attach each block with screws from above 7/16” from the horizontal center line. This will allow the jig to easily slip over the hexagon sides.
MAKING THE JIG
Router Mortising Jig Layout

ROUT MORTISES
Center the jig over the support bracket location and clamping it to the shelf. Using a router with 3/8"-diameter guide bushing and a 1/4"-diameter straight cutting bit. Plunge router into the jig opening to create a 3/4"-wide x 4-1/2"-long mortise to a depth of 9/16". Test the fit of the bracket (inset). It should be flush with the edge of the shelf.
Use the I-Semble Blind Shelf Support Drilling Guide (62744) to drill a 21/62"-diameter hole in the center of each stud (left). Attach the wall side of the shelf bracket to the wall by sliding the small end into the wall and attaching to the wall with supplied screws. Attach the shelf part of the wall bracket to the wall part. Adjust so that the post is level (right). Slide the shelf onto the bracket post. Follow the bracket instructions for more detailed installation and adjustment instructions. Find a download version athttps://www.rockler.com/i-semble-heavy-duty-blind-shelf support .
INSTALL SUPPORT BRACKET AND MOUNT ON WALL