FLAVIA I DISHWASHERS - flavia-dishwasher.com · Keep your manual for the entire service life of the...
36
UK Use and handling instructions SPN Insrucciones de uso у mantenimiento GER Gebrauchsanweisung und wartung FRA Mode d’emploi et d’entretien ITA Instruzioni per I’uso e la manutenzione POR Instrucoes de uso e manutencao RUS Инструкция по применению FLAVIA I DISHWASHERS DESKTOP-MOUNTED COMPACT-SIZE DISHWASHERS TD 55 VENETA P5 GR TD 55 VENETA P5 WH
Transcript of FLAVIA I DISHWASHERS - flavia-dishwasher.com · Keep your manual for the entire service life of the...
UK UseandhandlinginstructionsSPN InsruccionesdeusoуmantenimientoGER GebrauchsanweisungundwartungFRA Moded’emploietd’entretienITA InstruzioniperI’usoelamanutenzionePOR InstrucoesdeusoemanutencaoRUS Инструкцияпоприменению
FLAVIAIDISHWASHERS
DESKTOP-MOUNTEDCOMPACT-SIZEDISHWASHERS
TD55VENETAP5GRTD55VENETAP5WH
Operation and installation manualWarranty service conditions
DISHWASHERS
Dearcustomer!
Thank you for purchasing a “FLAVIA” product. We hope, this appliance will meet yourexpectationsandbecomeareliableassistantofyoursinyourkitchen.Forcorrectandsafeoperationoftheappliance,pleasecarefullyreadallthechaptersinthepresentmanual.Keepyourmanualfortheentireservicelifeoftheproductyouhavepurchased.
Readingthefirstpartofthemanual,youwill learnsomeimportantconditionstoensuresafeoperationoftheappliance.Tokeepyourapplianceingoodconditionforalongtime,weofferyoualotofhelpfuladvicesontheproductcareandcleaning.Inthemanualyoucanfindsomehintsonenergysaving.
Onthelastpagesofthemanualyoucanalsoreadrecommendationswhichwillhelpyouremoveminorfailures,ifany,duringoperationofyourappliance.
Yournewapplianceismadeofhigh-qualitymaterialsandfullyconformstoanystandardoftheEuropeanEconomicCommunity.
Themanufacturerreservestherighttomakechangestotheproductdesigninordertoimproveitsperformance.Ourhouseholdappliancesaresubjecttocontinualimprovement,theperformanceisenhanced,andtheirdesignisupdated.Therefore,figuresandsymbolsinthemanualmaydifferfromthoseforthemodelyouhavepurchased.
Serialnumberexplanation:1406376200013
Themanufacturingdateisintheserialnumberoftheproduct.Theserialnumberisontheinternallabelwhichisonthesideofthedishwasherdoor
TMFlaviaFLAVIALIMITED,HongKong,Admiraltydistrict,89,Queensway,LippoCenterTower2,2107
Operation and installation manual Operation and installation manual
DISHWASHERS
1
Warranty service conditions
CONTENTS
Safetyhintsandstatements.............................................................................. 2Scopeofsupply............................................................................................... 3Briefoperatingmanual...................................................................................... 4Controlpanel................................................................................................... 6Dishwasherdesign.......................................................................................... 7Tableofoperatingmodes.................................................................................. 9Watersoftener.................................................................................................10Detergentagent..............................................................................................12Rinsingagent..................................................................................................13Puttingdishesintothedishwasher....................................................................15Turningontheappliance..................................................................................16Startingawashingcycle..................................................................................16Howtocancelorchangeawashingprogram.....................................................16Uponwashing.................................................................................................16Forgottoputaplate?.......................................................................................16Filtersystem...................................................................................................17Dishwashercare..............................................................................................17Cleaningofmovablenozzles............................................................................18Filtercleaning..................................................................................................18Doorcleaning.................................................................................................19Descaling.......................................................................................................19Installationprocedure..................................................................................... 20Watersupplyconnection................................................................................. 22Electricalconnections.................................................................................... 22Universaladapterconnection.......................................................................... 23Hintsontroubleshooting..................................................................................24Whatyoumaynotwashusingthisdishwasher.................................................. 27Technicaldata............................................................................................... 28Endoflifedisposal.......................................................................................... 29
TheproducthasbeenmanufacturedinlinewithEuropeanstandardsandisCE,TUV,ISO9001andEACcertified.
Themanufacturerreservestherighttomakechangestotheproductdesigninordertoimproveitsperformance.
Operation and installation manual
DISHWASHERS
2
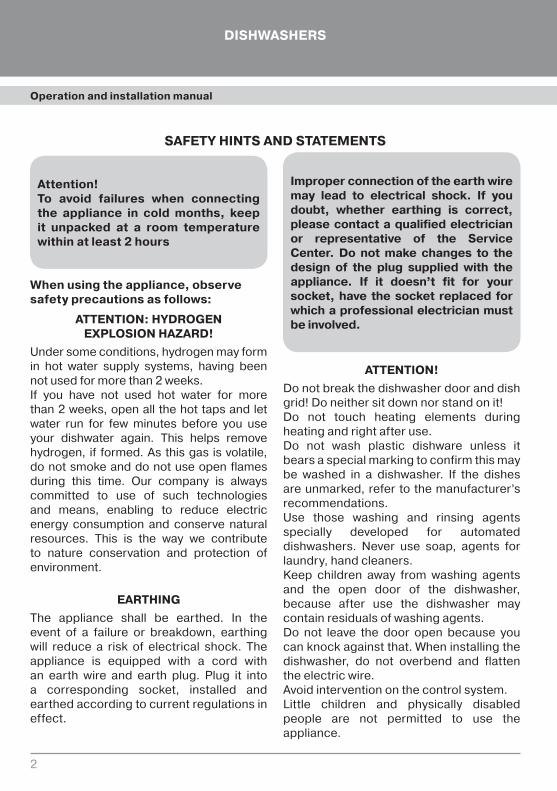
Attention!To avoid failures when connectingthe appliance in cold months, keepit unpacked at a room temperaturewithinatleast2hours
Whenusingtheappliance,observesafetyprecautionsasfollows:
ATTENTION:HYDROGENEXPLOSIONHAZARD!
Undersomeconditions,hydrogenmayformin hot water supply systems, having beennotusedformorethan2weeks.If you have not used hot water for morethan2weeks,openall thehot tapsand letwater run for few minutes before you useyour dishwater again. This helps removehydrogen, if formed. As this gas is volatile,donotsmokeanddonotuseopen flamesduring this time. Our company is alwayscommitted to use of such technologiesand means, enabling to reduce electricenergy consumption and conserve naturalresources. This is the way we contributeto nature conservation and protection ofenvironment.
EARTHING
The appliance shall be earthed. In theevent of a failure or breakdown, earthingwill reduce a risk of electrical shock. Theappliance is equipped with a cord withan earth wire and earth plug. Plug it intoa corresponding socket, installed andearthedaccordingtocurrentregulationsineffect.
Improperconnectionoftheearthwiremay lead to electrical shock. If youdoubt, whether earthing is correct,please contact a qualified electricianor representative of the ServiceCenter. Do not make changes to thedesign of the plug supplied with theappliance. If it doesn’t fit for yoursocket, have the socket replaced forwhichaprofessionalelectricianmustbeinvolved.
ATTENTION!
Donotbreakthedishwasherdooranddishgrid!Doneithersitdownnorstandonit!Do not touch heating elements duringheatingandrightafteruse.Do not wash plastic dishware unless itbearsaspecialmarkingtoconfirmthismaybe washed in a dishwasher. If the dishesareunmarked,refer tothemanufacturer’srecommendations.Use those washing and rinsing agentsspecially developed for automateddishwashers. Never use soap, agents forlaundry,handcleaners.Keep children away from washing agentsand the open door of the dishwasher,because after use the dishwasher maycontainresidualsofwashingagents.Do not leave the door open because youcanknockagainstthat.Wheninstallingthedishwasher, do not overbend and flattentheelectricwire.Avoidinterventiononthecontrolsystem.Little children and physically disabledpeople are not permitted to use theappliance.
SAFETYHINTSANDSTATEMENTS
Operation and installation manual Operation and installation manual
DISHWASHERS
3
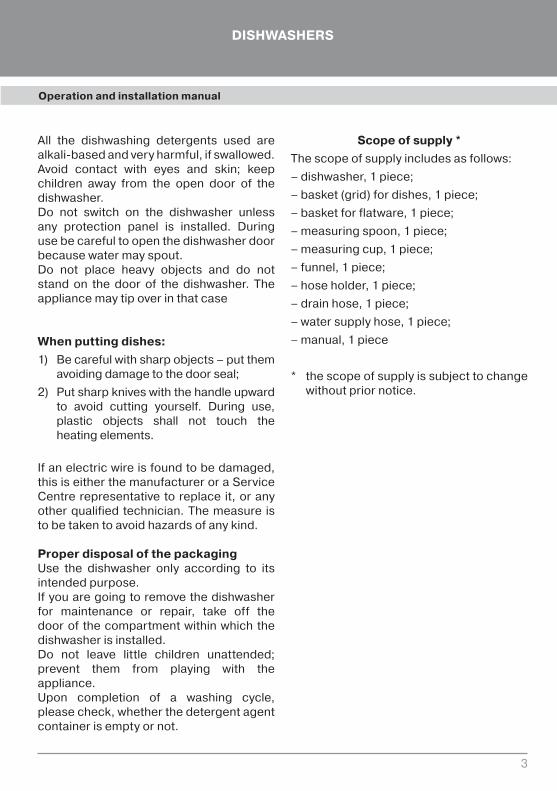
All the dishwashing detergents used arealkali-basedandveryharmful,ifswallowed.Avoid contact with eyes and skin; keepchildren away from the open door of thedishwasher.Do not switch on the dishwasher unlessany protection panel is installed. Duringusebecarefultoopenthedishwasherdoorbecausewatermayspout.Do not place heavy objects and do notstand on the door of the dishwasher. Theappliancemaytipoverinthatcase
Whenputtingdishes:
1) Becarefulwithsharpobjects–putthemavoidingdamagetothedoorseal;
2) Putsharpkniveswiththehandleupwardto avoid cutting yourself. During use,plastic objects shall not touch theheatingelements.
Ifanelectricwireisfoundtobedamaged,thisiseitherthemanufactureroraServiceCentre representative to replace it,oranyotherqualified technician.Themeasure istobetakentoavoidhazardsofanykind.
ProperdisposalofthepackagingUse the dishwasher only according to itsintendedpurpose.Ifyouaregoingtoremovethedishwasherfor maintenance or repair, take off thedoorof thecompartmentwithinwhich thedishwasherisinstalled.Do not leave little children unattended;prevent them from playing with theappliance.Upon completion of a washing cycle,pleasecheck,whetherthedetergentagentcontainerisemptyornot.
Scopeofsupply*
Thescopeofsupplyincludesasfollows:
–dishwasher,1piece;
–basket(grid)fordishes,1piece;
–basketforflatware,1piece;
–measuringspoon,1piece;
–measuringcup,1piece;
–funnel,1piece;
–hoseholder,1piece;
–drainhose,1piece;
–watersupplyhose,1piece;
–manual,1piece
* thescopeofsupplyissubjecttochangewithoutpriornotice.

Operation and installation manual
DISHWASHERS
4
Turnonyourdishwasher Openthedoor.PresstheON/OFFbutton
Fillthedoserwiththedishwashingdetergent
Section“A”:eachnewwashingcycleSection“B”:prewashingonly
Checktheleveloftherinsingagentused.Addit,asrequired
“C”indicatoronthedoserorelectronicindicatorlightonthecontrolpanel
Checkthesaltlevel Usetheelectronicindicatorlightonthecontrolpanelorcheckanamountofsaltonthebasisofanumberofwashingcycles.
Putyourdish-orflatwareintocorrespondingbaskets
Clearawaylargerfoodresidues.Then,removeburnedfoodresiduesaftertheyhavegotsoftened.Afterthatputyourdishwareintobasketscorresponding.
Selectadesiredwashingprogram Selectitusingthe“P”button.
Startingawashingcycle Openthewatercock,pressSTART/PAUSE.Yourdishwasherstartstooperatein10seconds.
BRIEFOPERATINGMANUAL
Operation and installation manual Operation and installation manual
DISHWASHERS
5
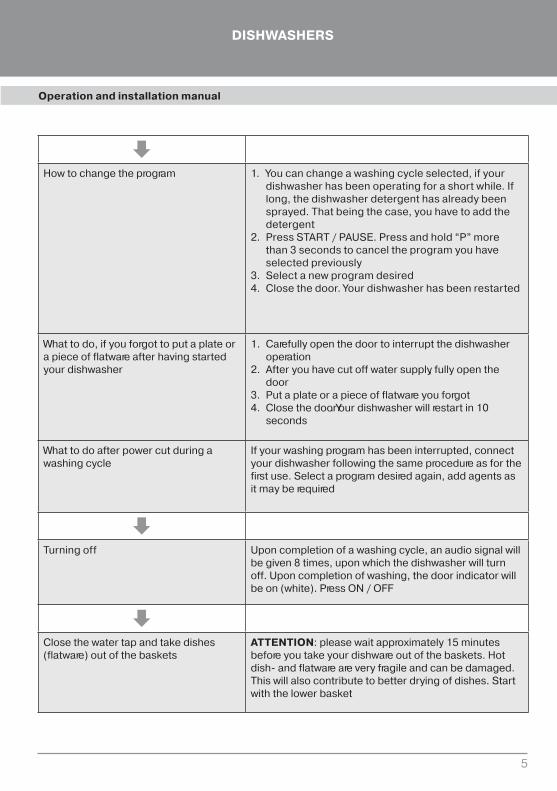
Howtochangetheprogram 1. Youcanchangeawashingcycleselected,ifyourdishwasherhasbeenoperatingforashortwhile.Iflong,thedishwasherdetergenthasalreadybeensprayed.Thatbeingthecase,youhavetoaddthedetergent
2. PressSTART/PAUSE.Pressandhold“P”morethan3secondstocanceltheprogramyouhaveselectedpreviously
3. Selectanewprogramdesired4. Closethedoor.Yourdishwasherhasbeenrestarted
Whattodo,ifyouforgottoputaplateorapieceofflatwareafterhavingstartedyourdishwasher
1. Carefullyopenthedoortointerruptthedishwasheroperation
2. Afteryouhavecutoffwatersupply,fullyopenthedoor
3. Putaplateorapieceofflatwareyouforgot4. Closethedoor.Yourdishwasherwillrestartin10
seconds
Whattodoafterpowercutduringawashingcycle
Ifyourwashingprogramhasbeeninterrupted,connectyourdishwasherfollowingthesameprocedureasforthefirstuse.Selectaprogramdesiredagain,addagentsasitmayberequired
Turningoff Uponcompletionofawashingcycle,anaudiosignalwillbegiven8times,uponwhichthedishwasherwillturnoff.Uponcompletionofwashing,thedoorindicatorwillbeon(white).PressON/OFF
Closethewatertapandtakedishes(flatware)outofthebaskets
ATTENTION:pleasewaitapproximately15minutesbeforeyoutakeyourdishwareoutofthebaskets.Hotdish-andflatwareareveryfragileandcanbedamaged.Thiswillalsocontributetobetterdryingofdishes.Startwiththelowerbasket

Operation and installation manual
DISHWASHERS
6
ThecontrolpanelisshowninFig.1,withposi-tionshavingfunctionsasfollows:
1. ON/OFFbutton
2. Delayed washing button (possible delaytimesare2,4and8hours)
3. Rinsing agent indicator light (it is on, ifthedoserisempty;thatbeingacase,youhavetoaddtherinsingagent)
4. Salt indicator light (water softening sys-tem):ifthelightison,pleaseaddsomesaltintothesaltcontainer
5. Indicatorlight“Watercockclosed”
6. Delayedwashingindicatorlights
7. PROGRAM SELECTION buttons. Witheachpressingyougotothenextprogram
8. START/PAUSE
9. Program indicator lights (individual foreachprogram).
Fig.1
ATTENTION!
Toensureproperoperationofyourdishwasher,carefullyreadthewholemanualbeforeitsfirstuse.
CONTROLPANEL
Operation and installation manual Operation and installation manual
DISHWASHERS
7
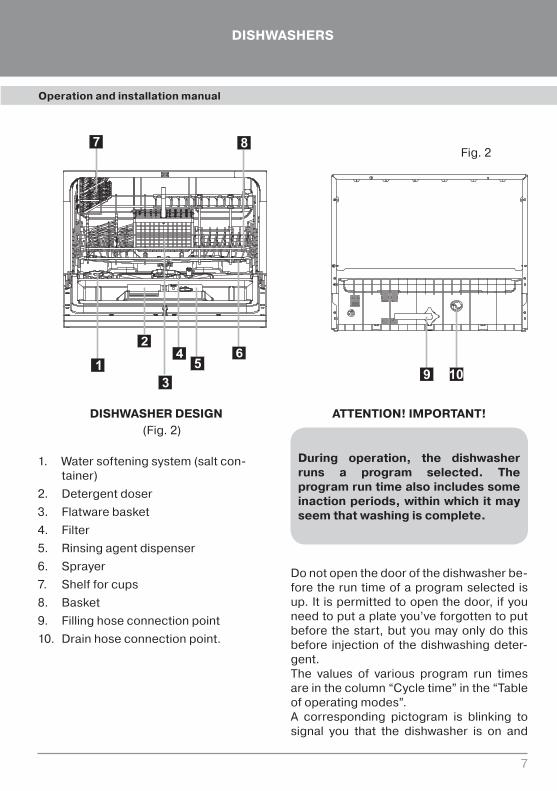
DISHWASHERDESIGN(Fig.2)
1. Watersofteningsystem(saltcon-tainer)
2. Detergentdoser
3. Flatwarebasket
4. Filter
5. Rinsingagentdispenser
6. Sprayer
7. Shelfforcups
8. Basket
9. Fillinghoseconnectionpoint
10. Drainhoseconnectionpoint.
ATTENTION!IMPORTANT!
During operation, the dishwasherruns a program selected. Theprogramruntimealsoincludessomeinaction periods, within which it mayseemthatwashingiscomplete.
Donotopenthedoorofthedishwasherbe-fore therun timeofaprogramselected isup. It ispermitted toopenthedoor, ifyouneedtoputaplateyou’veforgottentoputbefore the start, but you may only do thisbefore injection of the dishwashing deter-gent.The values of various program run timesareinthecolumn“Cycletime”inthe“Tableofoperatingmodes”.A corresponding pictogram is blinking tosignal you that the dishwasher is on and
Fig.2
Operation and installation manual
DISHWASHERS
8
runsaprogramyouhaveselected(blinkingduringthewholecycle–Position9,Fig.1).Asoundsignalinformsyouoftheprogramrun completion; the signal is given withinapproximately 8 seconds. The indicatorlightofaprogramselected isoff(Position9,Fig.1).
Should you, for some reason or another,have missed the sound signal to informyouoftheprogramruncompletion,priortoopeningthedoor,makesurethatthepro-gramrunhasbeencompleted.Lookatthepictogram: it must not be blinking, but beoff (Fig. 1). Press Button 1 on the controlpanel(Fig.1)toturnofftheappliance,openthedoorandtakeoutcleandishware.
Should you accidentally have openedthedoorpriortotheprogramruncom-pletion,closeitatoncewithoutpress-inganybuttonsandwaittilltheprogramruntimeisover.
IMPORTANTRECOMMENDATION!To avoid unforeseen events uponwashing cycle completion, shut offthewatercocktosupplywatertothedishwasher
Operation and installation manual Operation and installation manual
DISHWASHERS
9
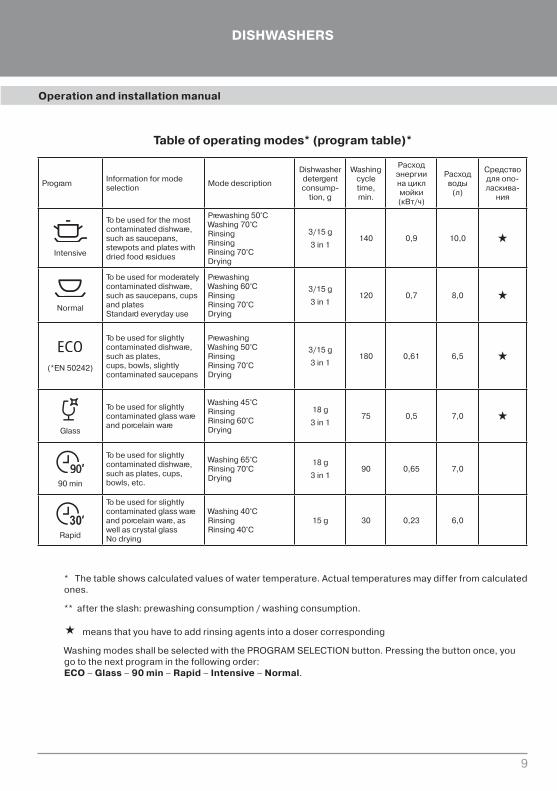
Tableofoperatingmodes*(programtable)*
ProgramInformationformodeselection
Modedescription
Dishwasherdetergentconsump-
tion,g
Washingcycletime,min.
Расходэнергиинациклмойки(кВт/ч)
Расходводы
(л)
Средстводляопо-ласкива-
ния
Intensive
Tobeusedforthemostcontaminateddishware,suchassaucepans,stewpotsandplateswithdriedfoodresidues
Prewashing50°CWashing70°CRinsingRinsingRinsing70°CDrying
3/15g
3in1140 0,9 10,0 «
Normal
Tobeusedformoderatelycontaminateddishware,suchassaucepans,cupsandplatesStandardeverydayuse
PrewashingWashing60°CRinsingRinsing70°CDrying
3/15g
3in1120 0,7 8,0 «
(*EN50242)
Tobeusedforslightlycontaminateddishware,suchasplates,cups,bowls,slightlycontaminatedsaucepans
PrewashingWashing50°CRinsingRinsing70°CDrying
3/15g
3in1180 0,61 6,5 «
Glass
Tobeusedforslightlycontaminatedglasswareandporcelainware
Washing45°CRinsingRinsing60°CDrying
18g
3in175 0,5 7,0 «
90min
Tobeusedforslightlycontaminateddishware,suchasplates,cups,bowls,etc.
Washing65°CRinsing70°CDrying
18g
3in190 0,65 7,0
Rapid
Tobeusedforslightlycontaminatedglasswareandporcelainware,aswellascrystalglassNodrying
Washing40°CRinsingRinsing40°C
15g 30 0,23 6,0
*Thetableshowscalculatedvaluesofwatertemperature.Actualtemperaturesmaydifferfromcalculatedones.
**aftertheslash:prewashingconsumption/washingconsumption.
«meansthatyouhavetoaddrinsingagentsintoadosercorresponding
WashingmodesshallbeselectedwiththePROGRAMSELECTIONbutton.Pressingthebuttononce,yougotothenextprograminthefollowingorder:ECO–Glass–90min–Rapid–Intensive–Normal.

Operation and installation manual
DISHWASHERS
10
WATERSOFTENER
There are two methods to soften water:either with a water softener, or a washingagent.Waterhardnessvaluesmayvaryfromplacetoplace.Ifyourdishwasheruseshardwa-ter,thismayleadtoformationofscaleanddepositsondishes.The appliance is equipped with a specialsoftener to use salt, specially developedforremovaloflimeandmineralsfromwater.
HOWTOCHARGESALTINTOTHESOFTENER
Make sure to always use salts meant fordishwashersonly.Thesaltcontainerisbeneaththelowergrid.Thewaytofillitinisasfollows:
1. Remove the lower basket, unscrew thesaltcontainercovertoremovethat.
2. Ifyoufillinthecontainerforthefirsttime,fillitwithwater(1l).
3. Insertthefunnelend(included)intotheopening,chargeapproximately1.5kgofsalt.Itisnormal,ifsomewaterflowsoutofthecontainer.
4. Carefullyscrewinthecover.
NOTE:
1. The salt container should be refilled,whenthe“S”pictogram(upperleftcor-nerofthecontrolpanel:Figure1,Pos.4)startstoilluminate.Evenifthecontainerisproperlyfilled,thepictogrammaystillilluminate until salt is dissolved com-pletely.
2. Ifyouhavespilledthesalt,youcanwashitout,usingthe“Rapid”program
SALTCONSUMPTIONCONTROL
Thedishwasherenablestoadjustsaltcon-sumption, depending upon water hard-ness,tooptimizeitinthewayasfollows:
1. Press the ON / OFF button, close thedoor.
2. Pressandhold(within60sec)START/PAUSE.
3. On the front panel, program indicatorswillflash,correspondingtosettingsH1,H2,H3,H4,H5andH6.DefaultsettingisH3.
4. Using START / PAUSE, set a desiredvalue of salt consumption, dependingupon water hardness (refer to “Waterhardnesstable”).
5. Settings are completed automatically,in5sec.
Thesesettingsarerequiredeachtimeyoudisconnectthedishwasherfromthemains.
Youmaybe informedofwaterhardness in

Operation and installation manual Operation and installation manual
DISHWASHERS
11
yourlocationatlocalauthoritiesoruponalabresearchofawatersample.
Waterhardness Settings Programindicatorlightwhichison(controlpanel)
odH1) mmol/l2)
0–5 0–0,9 1 Н1Rapid
6_11 1,0–2,0 2 Н290Min
12–17 2,1–3,0 3* Н390Min,Rapid
18–22 3,1–4,0 4 Н4Glass
23–34 4,1–6,1 5 Н5Glass,Rapid
35–45 6,2–8,0 6 Н6Glass,90Min
1)WaterhardnessMUinGermany2)InternationallyacceptedMUofwaterhardness*factorysetting
Operation and installation manual
DISHWASHERS
12
DISHWASHINGDETERGENTS
ATTENTION!Detergentsareverycaustic!Keepthemawayfromchildren!
The doser must be filled in before start ofeach washing cycle, according to instruc-tions from the “Table of operation modes”.Your dishwasher consumes less rinsingagents and dishwashing agents, as op-posed to conventional appliances of thatkind.Foranormal(standard)washingcycle,atablespoonofthedishwashingdetergentwouldbeenough.Forheavilycontaminateddishwareyoushouldusealargerquantityofthedishwashingdetergent.Alwaysaddthedishwashing detergent right before wash-ing, otherwise it may get soaked, withoutdissolvingcompletely.
Properuseofdetergents
Use special dishwashing detergents only.Keep them in a dry place. Charge the de-tergentpowderintothedoserrightbeforeyoustartwashing.
Tableteddishwashingdetergents
Tableted dishwashing detergents of dif-ferent manufacturers have different dis-solution rates. Due to this, during shortprograms, tablets may not dissolve com-
pletely. As a consequence, this would re-duce their cleaning ability. Tableted dish-washing detergents are better used forintensivewashingmodesandthatistoen-suretheircompletedissolution.
Detergentconsumption
IF WATER USED IS TOO HARD, YOUMAY AVOID FORMATION OF SCALESANDDEPOSITS,ADDINGAWASHINGAGENT!
An amount of the dishwashing detergentused may vary, depending upon waterhardness.Tobeinformedofthisvalue,pleasecontactthe local department of water resources.For harder water you will need a largeramountofthedishwashingdetergent.Keepinmindthatyoushouldselectanappropri-ateamount,slightlychanging itwithsmallportions,untilyoufindaproperdosageac-cordingtowaterhardnessinyourlocation.
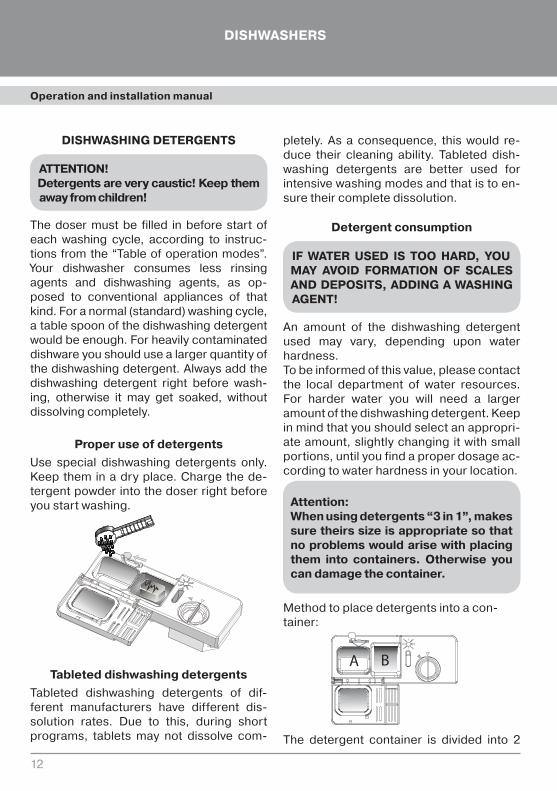
Attention:Whenusingdetergents“3in1”,makessuretheirssizeisappropriatesothatnoproblemswouldarisewithplacingthem into containers. Otherwise youcandamagethecontainer.
Methodtoplacedetergentsintoacon-tainer:
The detergent container is divided into 2

Operation and installation manual Operation and installation manual
DISHWASHERS
13
sections,“A”and“B”,correspondingly.
“A”isforplacingadetergentusedforwash-ing;“B”isforplacingadetergentusedforprewashing.
Therearethreetypesofdetergents:1. Detergents to contain phosphates and
chlorine.2. Detergents tocontainphosphates,but
nochlorine.3. Detergents to contain neither phos-
phates,norchlorine.
As a rule, new, powder-type detergentscontainnophosphates.Therefore,theydonot provide for water softening thanks topresenceofphosphates.Thatbeingacase,itisstronglyrecommendedtoaddsaltwithwaterhardnesstoonlymake6dH.Useofdetergentswithnophosphatesinhardwa-terleadstoformationofwhitestainsuponsurfacesofdishwareandglasses/cups.
Youshouldaddmoredetergenttoachievebetterwashingresults.Detergentswithnochlorine only provide for slight whitening.Usingthesedetergents, it is impossibletoremovestrongstainsandspotsofcolor.Inthiscaseyouhavetoselectaprogramwithhighertemperatures.
RINSINGAGENT
Thisistobeusedatthelaststagetoavoidfor-mationofdropmarksondishes.Thisalsoim-provesdrying,enablingwaterto“runoff”thesurfaceofdishes.
Your dishwasher uses liquid rinsing agents.Therinsingagentdoserisinside,closetothatofthedishwashingdetergent.Tofillinthedos-er,openthecoverandfillinwater,tillthelevelindicatorturnsblack.
• Toopenthedosercover,turnittotheleft(“Open”position)andremoveit.
• Fillinthedoserwithyourinsingagent.Donotoverfill!
• Closethecover,turningittotheright.
Donotoverfillthedoser,foritmayresultinex-cessivesoaping.Ifyouspillsome,wipeitwithasoftcloth.Priortoopeningthedoor,donotforgettoscrewthecover.
Rinsingagentdoseradjustment
Within the last rinsing cycle, a certainamountof therinsingagent isused.Simi-lartouseofthedishwashingdetergent,anamountoftherinsingagentdependsuponwaterhardness.Ifyouusetoomuchrinsing

Operation and installation manual
DISHWASHERS
14
agent, thismay lead toexcessive foamingandoccurrenceofstainsonyourdishware.Ifwaterinyourlocationissoft,youwillneednorinsingagent.But ifyoustillneedthat,dilute it with a corresponding amount ofwater.
The doser has 6 positions. Always startwithPosition2.Ifthedishesdryoutbadly,if there are drop marks on them, increasean amount of the rinsing agent, switch-ingtoPosition3.Continueto increasetheamount,tilltherearenodropmarksonyourdishes.WerecommendusingPosition4.
Howtofillinthedoserwiththerinsingagent
Ifthecontrolpaneldoesnotincludearinsingagentlevelcontrollamp,youcancalculatearequiredamountoftherinsingagent inthefollowing way. The doser has a liquid levelindicator. The black spot decreases in sizewith the liquid volume decrease. The levelbelow1/4isnotpermitted.
Dependinguponconsumptionoftherins-ingagent, theblackspotdecreases insize(seethefigure):
Full
3/4
1/2
1/4–refillingrequired
Empty

Operation and installation manual Operation and installation manual
DISHWASHERS
15
PUTTINGINDISHES
Your dishwasher can place 6 sets of dish-andflatware.Beforeputting them into thedishwasher, remove any residues of food.No rinsing is required before putting theflat-anddishwareintothedishwasher.
Saucepans,soupplates,bowlsandsalad-dishes must be placed bottom up. Do notoverchargeyourdishwasher.
The flat- and dishware shall not interferewithfreerotationofwatersprayers.Someglasses can lose its polish upon severalwashingcycles,pleasebearitinmind.
The figure below shows how it is recom-mendedtoplacetheflat-anddishwareintothedishwasher.
1. Cups2. Smallbowls3. Glasses
4. Saucers5. Servingdish6. Ovalplates7. Plates8. Soupplates9. Dessertplates10. Basketforflatware11. Tablespoons
Basketforflatware
The flatware shall be placed into the bas-ket,withtheirhandlesdown.Belowisoneofthewaystoproperlyplacepiecesofflat-ware.
Tablespoons
Forks
Dessert spoons
Tea spoon
Knives
Salad spoons
Sauce spoons
Serving forks
ATTENTION! Avoid any pieces offlatwaretoprotrudefromthebasketbottom.
Operation and installation manual
DISHWASHERS
16
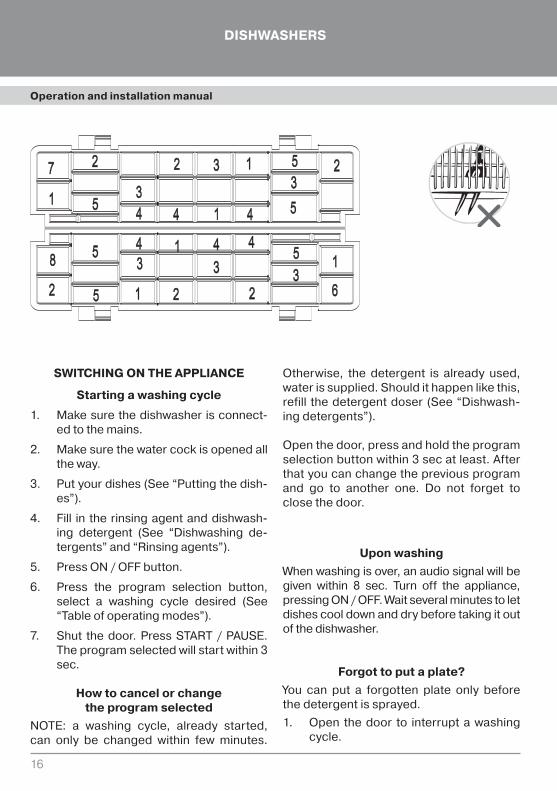
SWITCHINGONTHEAPPLIANCE
Startingawashingcycle
1. Makesurethedishwasher isconnect-edtothemains.
2. Makesurethewatercockisopenedalltheway.
3. Putyourdishes(See“Puttingthedish-es”).
4. Fill in the rinsing agent and dishwash-ing detergent (See “Dishwashing de-tergents”and“Rinsingagents”).
5. PressON/OFFbutton.
6. Press the program selection button,select a washing cycle desired (See“Tableofoperatingmodes”).
7. Shut the door. Press START / PAUSE.Theprogramselectedwillstartwithin3sec.
Howtocancelorchangetheprogramselected
NOTE: a washing cycle, already started,can only be changed within few minutes.
Otherwise, the detergent is already used,waterissupplied.Shouldithappenlikethis,refill thedetergentdoser(See“Dishwash-ingdetergents”).
Openthedoor,pressandholdtheprogramselectionbuttonwithin3secatleast.Afterthatyoucanchangethepreviousprogramand go to another one. Do not forget toclosethedoor.
Uponwashing
Whenwashingisover,anaudiosignalwillbegiven within 8 sec. Turn off the appliance,pressingON/OFF.Waitseveralminutestoletdishescooldownanddrybeforetakingitoutofthedishwasher.
Forgottoputaplate?
You can put a forgotten plate only beforethedetergentissprayed.
1. Open the door to interrupt a washingcycle.
Operation and installation manual Operation and installation manual
DISHWASHERS
17
2. Youcanfullyopenthedoorwhenwaternozzlesstopoperating.
3. Puttheplate.4. Closethedoor.In10secyourdishwash-
erwillrestart.
ATTENTION!Becarefulwhenopeningthedoorwiththedishwasheroperatingbecause you can be exposed to hotwater!
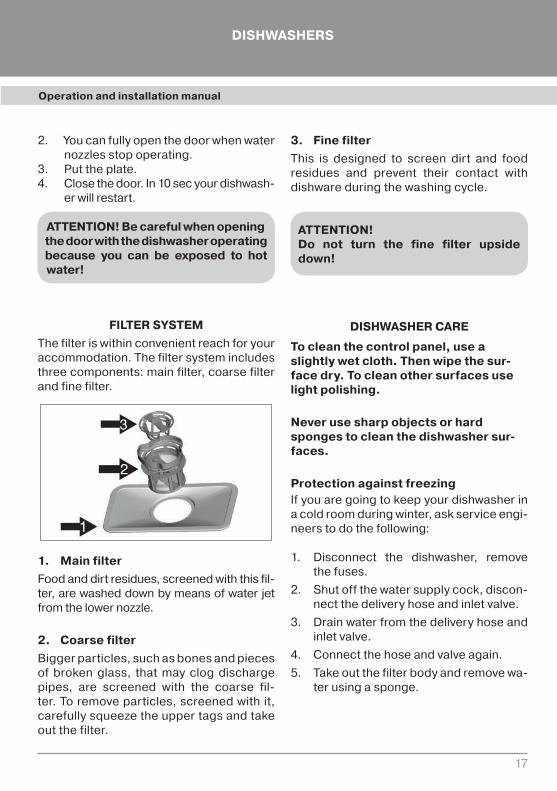
FILTERSYSTEM
Thefilteriswithinconvenientreachforyouraccommodation.Thefiltersystemincludesthreecomponents:mainfilter,coarsefilterandfinefilter.
1. Mainfilter
Foodanddirtresidues,screenedwiththisfil-ter,arewasheddownbymeansofwaterjetfromthelowernozzle.
2. Coarsefilter
Biggerparticles,suchasbonesandpiecesof broken glass, that may clog dischargepipes, are screened with the coarse fil-ter.Toremoveparticles,screenedwithit,carefullysqueezetheuppertagsandtakeoutthefilter.
3. Finefilter
This is designed to screen dirt and foodresidues and prevent their contact withdishwareduringthewashingcycle.
ATTENTION!Do not turn the fine filter upsidedown!
DISHWASHERCARE
Tocleanthecontrolpanel,useaslightlywetcloth.Thenwipethesur-facedry.Tocleanothersurfacesuselightpolishing.
Neverusesharpobjectsorhardspongestocleanthedishwashersur-faces.
ProtectionagainstfreezingIfyouaregoingtokeepyourdishwasherinacoldroomduringwinter,askserviceengi-neerstodothefollowing:
1. Disconnect the dishwasher, removethefuses.
2. Shutoffthewatersupplycock,discon-nectthedeliveryhoseandinletvalve.
3. Drainwaterfromthedeliveryhoseandinletvalve.
4. Connectthehoseandvalveagain.
5. Takeoutthefilterbodyandremovewa-terusingasponge.
Operation and installation manual
DISHWASHERS
18
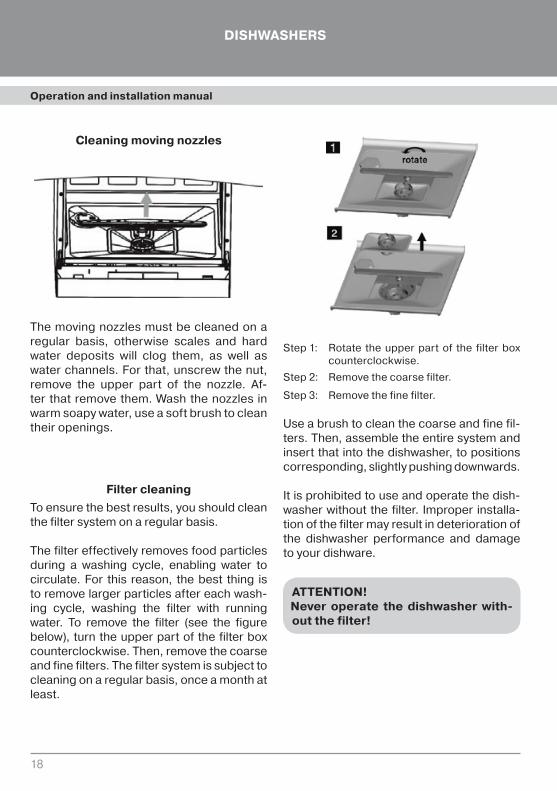
Cleaningmovingnozzles
Themovingnozzlesmustbecleanedonaregular basis, otherwise scales and hardwater deposits will clog them, as well aswaterchannels.Forthat,unscrewthenut,remove the upper part of the nozzle. Af-ter that removethem.Washthenozzles inwarmsoapywater,useasoftbrushtocleantheiropenings.
Filtercleaning
Toensurethebestresults,youshouldcleanthefiltersystemonaregularbasis.
Thefiltereffectivelyremovesfoodparticlesduring a washing cycle, enabling water tocirculate. For this reason, the best thing istoremovelargerparticlesaftereachwash-ing cycle, washing the filter with runningwater. To remove the filter (see the figurebelow), turntheupperpartof thefilterboxcounterclockwise.Then,removethecoarseandfinefilters.Thefiltersystemissubjecttocleaningonaregularbasis,onceamonthatleast.
Step1: Rotate the upper part of the filter boxcounterclockwise.
Step2: Removethecoarsefilter.
Step3: Removethefinefilter.
Useabrushtocleanthecoarseandfinefil-ters.Then,assembletheentiresystemandinsertthat intothedishwasher,topositionscorresponding,slightlypushingdownwards.
Itisprohibitedtouseandoperatethedish-washerwithout the filter. Improper installa-tionofthefiltermayresultindeteriorationofthe dishwasher performance and damagetoyourdishware.
ATTENTION!Never operate the dishwasher with-outthefilter!

Operation and installation manual Operation and installation manual
DISHWASHERS
19
Cleaningthedoor
Tocleanthedooredges,youshoulduseapieceofsoftandwetcloth.
ATTENTION!Never use sprays to clean the doorpanel!Thiscandamagethelockandelectricalcomponents. It isalsonotpermittedtouseabrasivesandsomekinds of paper towels because theycan scratch the surface and leavemarksonit.
Dishwashercare
Aftereachwashingcycleshutoffthewatersupplycockandleavethedoorabitopentoremovemoistureandodors.Disconnectthe dishwasher. Always unplug the dish-washer before cleaning and maintenance!Do not risk! Never use any solvents andabrasives to clean exterior parts and rub-ber components of the dishwasher. Youbetteruseapieceofclothandwarmsoapywater.Toremovestainsonsurfacesuseapieceofcloth,waterandasmallamountofwhite vinegar, or a special cleaning agentdevelopedfordishwashers.
IfyougooffonholidayIfyouaregoingtobeawayonholiday,werecommend you to start a washing cyclewithout dishware. After that you have todisconnect the appliance, shut off watersupplyand leavethedoorabitopen.Thiswould keep the seals in proper conditionand prevent formation of odors inside theappliance.
MovingthedishwasherShouldyouneed tomove thedishwasher,try to keep it in a vertical position, or withthebackcoverdownwardsatleast.
Descaling
Descalingmustbecarriedoutinthefollow-ingway:
1. Start a normal washing cycle to haveyourdishwareclear.
2. Takeallthemetal-madedishware,flat-ware,saucepans,etc.outofyourdish-washer.
3. Donotaddanydetergent.
4. Fillin2cupsofvinegarintoabowlandplace it onto the lower grid within thedishwasher.
5. Select theNORMALwashingprogramandstartthat.
Ifthisdoesn’twork,trythesame,butuse1/4glassofcitricacidcrystalsinsteadofvinegar.
Operation and installation manual
DISHWASHERS
20
PLEASE CAREFULLY READ THEPRESENT MANUAL. THIS CONTAINSINFORMATION THAT WILL HELPYOU UNDERSTAND INSTALLATIONPROCEDURES AND FIND THE BESTPLACE TO INSTALL YOUR DISH-WASHER
INSTALLATIONPREPARATION
Thedishwashermustbe installed inclosevicinitytoavailablewatersupplypointsandwaterdrains,aswellasasocketforpowersupply.This place must be of sufficient size, withno objects to prevent the door from freeopeningandclosing.
INSTALLATIONPROCEDUREThe dishwasher may be placed upon aneven,oraligned(usingawaterleveloranyotherlevellinginstrument)surfacetomeettherequirementsasabove.
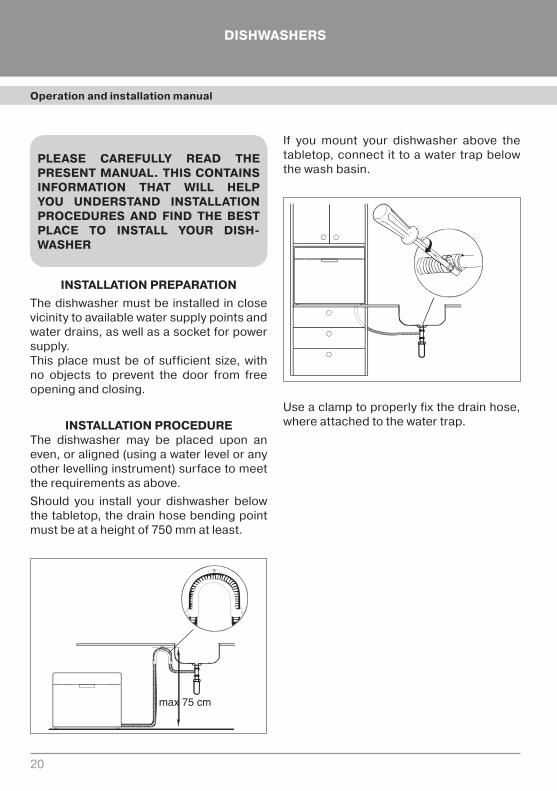
Should you install your dishwasher belowthetabletop,thedrainhosebendingpointmustbeataheightof750mmatleast.
If you mount your dishwasher above thetabletop,connect it toawater trapbelowthewashbasin.
Useaclamptoproperlyfixthedrainhose,whereattachedtothewatertrap.
Operation and installation manual Operation and installation manual
DISHWASHERS
21
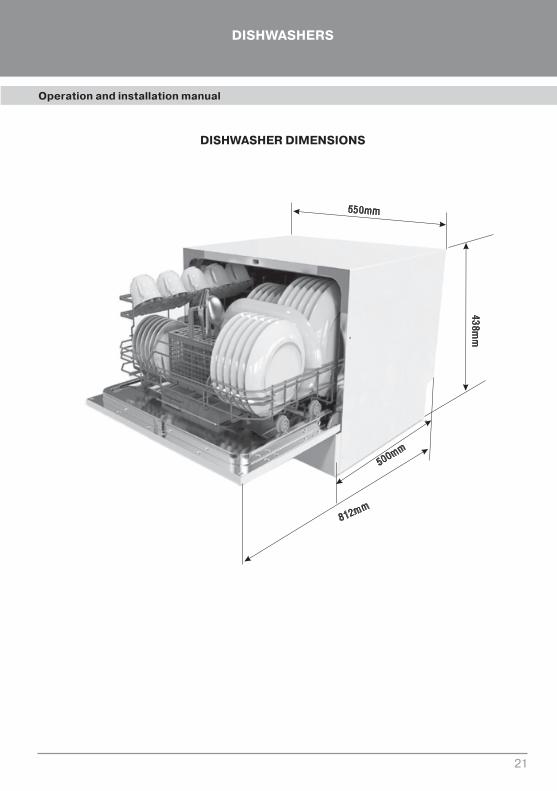
DISHWASHERDIMENSIONS

Operation and installation manual
DISHWASHERS
22
WATERSUPPLYCONNECTIONS
USEONLYNEWHOSESFORCONNEC-TION.NO REPEATED USE OF USED HOSESIS PERMITTED. WATER PRESSUREVALUESSHALLBEWITHIN0.04MPA–1MPA
ColdwatersupplyconnectionConnectthecoldwatersupplyhoseand
a 3/4" adapter, make sure it is tightenedproperly. If the hoses are new, or has notbeen used for a long time, let water drainand make sure it is clean and contains noimpurities. If you happen to ignore thisprecaution,theinletvalvemaybecloggedwhich would result in damage to yourdishwasher.
HotwatersupplyconnectionForoperationofyourdishwasher,hotwater(to be supplied from the central watersupply system) may also be used, unlessits temperature exceeds 60°C. This wouldenabletoreduceacycletimeby15minutesandslightlydeterioratewashingefficiency.
Hot and cold water supply connectionproceduresarethesame.
ELECTRICALCONNECTIONS
ATTENTION!NEVER USE EXTENION CABLESAND CONNECTING ADAPTERS FORTHIS APPLIANCE! UNDER NO CIR-CUMSTANCES DISCONNECT THEGROUNDPLUGFROMTHEWIRE
RequirementsforelectricalconnectionsPlease, look through the table to containpower values to find out voltage data andconnectyourdishwashertoapowersupplysource. Use a 15 A fuse. Use copper wiresonly!Itisrecommendedtouseatime-delayfuseandcircuitbreaker.Thesocketmustbeclosetotheappliance.
ATTENTION!Checktheearthingbeforeuse.
Make sure that the mains voltage valueconformstothatoneinthemanufacturer’splate.Plugin(thesocketmustbegrounded,too).Ifthesocketdoesn’tsuitfortheplug,you better replace the socket other thanuse any connecting adapters, becausethesemayoverheatandburn.
Operation and installation manual Operation and installation manual
DISHWASHERS
23
U-JOINTCONNECTION
HowtoconnectaU-jointThere is a new U-joint to be used to
connect the appliance to a water supplysource.
Water pressure values may range from0.04to1MPa.Ifthewaterpressureisbelowaminimumvalue,contactarepresentativeofyourservicecenter.
1. Pull the U-joint and all its hoses fromthe compartment on the rear wall ofthedishwasher.
2. Attach the U-joint to the water cock,using3/4"screws.
3. Turnthewatercockallthewaytoopenitbeforestartingthedishwasher.
HowtodisconnecttheU-jointfromtheadapter
1. Shutoffwatersupply.
2. Decrease water pressure, pressing thepressurereleasebutton.Thiswillpreventwatersplashing.
3. RemovetheU-jointfromthewatercock,squeezingtheclampontheupperpartoftheU-joint.
Howtodisconnectthedishwasher
1. Unplugthedishwasher.
2. Disconnect the U-joint from the cockadapter.
NOTE: upon completion of the lastrinsing, you may remove the U-jointandstoreit.

Operation and installation manual
DISHWASHERS
24
HINTS ON TROUBLESHOOTING
Problem Possible causes Remedies
The dishwasher is out of service
Blown fuse, or safety plugs off
Replace the fuse, switch on the safety plugs. Disconnect any other appliances that use the same socket
No power supply Make sure the dishwasher is connected to the mains. Make sure the dishwasher is properly plugged in.
Low water pressure Make sure all hoses are properly connected
The drain pump can’t be switched off
Overfill The system detects overfill. If any, the circulating pump is off, and the drain pump is on.
Noise Some natural noise Noise due to crushing of soft food residues, or noise originating from opening the doser cover.
Flatware is not fixed in the basket, or there is a very little subject inside it
Make sure all the dishware items are properly fixed within the basket.
Motor noise The dishwasher is used on rare occasions. If this is really the case, fill it in with water once a week and discharge it. This would keep the seals wet.
Soap suds in the settlement chamber
Improper detergent agent
Use specially developed agents only. If soap suds are detected, open the dishwasher and let them settle. Add 4.5 l cold water into the settlement chamber. Close the door, select one of the short pro-grams, start the dishwasher. Repeat the same as required.
Spilled rinsing agent Wipe it at once, if spilled.

Operation and installation manual Operation and installation manual
DISHWASHERS
25
Problem Possible causes Remedies
Settlement chamber stained
Detergent agent with color-ing matter used
Use detergent agents with no coloring matters.
Quickly flickerseconomy wash indicator
Overfill Check for leaks dish washer
Settlement chamber stained
Detergent agent with color-ing matter used
Use detergent agents with no coloring matters.
Wet dishware The rinsing agent doser is empty
Fill in the rinsing agent doser.
Dirty dishwareImproper program
Select another program for a more intensive washing
Grid improperly loadedMake sure larger dishware items do not interfere with operation of the moving nozzles.
Stains on glasses and flatware
1. Too hard water
2. Low temperature of inlet water
3. Dishwasher overload
4. Improper loading
5. Old or wet detergent agent
6. Rinsing agent doser empty
7. Improper dosage of deter-gent agent.
To remove stains on glass items do as follows:1. Take all metal dishware items out of the dish-
washer.
2. Do not add detergent agent.
3. Select the longest washing cycle.
4. Start the dishwasher; let it be in operation for 18 – 22 minutes longer than the standard cycle.
5. Open the door, pour 2 cups of white vinegar onto the dishwasher bottom.
6. Close the door, let the dishwasher complete the washing cycle. If this does not work with white vinegar, repeat the same, but use ¼ cup of citric acid crysta.
Glassware turbidity Soft water combined with a too large amount of deter-gent agent
Use a lesser amount of detergent agent (if water in your location is soft). Select the longest wash-ing cycle to wash the glassware.

Operation and installation manual
DISHWASHERS
26
Problem Possible causes Remedies
Yellow or brown film on surfaces inside the dishwasher
Tea or coffee stains Use ½ cup of whitener and 3 cups of water to manually remove the stains on surfaces inside the dishwasher.
ATTENTION!Wait 20 minutes after the dishwasher stops. Let it cool down before cleaning, otherwise you can burn yourself.
Films may form due to fer-rous deposits
You have to purchase a special water filter.
White slik onof internalsurfaces
Hard water and its minerals For cleaning, use a damp cloth and detergent for dishwashers. Wear rubber gloves. Never use any detergents other than those intended for dishwashers to avoid the occurrence of soapy foam.
The doser cover can’t be closed
Position OFF not selected Select OFF position, move the door lock to the left.
Detergent agent resi-dues in the doser
Dishware blocks the doserPlace the dishware in a proper way.
Vapors Normal occurrence Small amounts of vapors escape via an opening close to the door lock (during drying and water discharging).
Black or grey marks on dishware
Alu dishware was in contact with other dishware items
Use semi-abrasive agents to remove these marks.
Water remains at the bottom of settlement chamber
Normal occurrenceSome water at the bottom of the settlement chamber helps keep the seals wet.

Operation and installation manual Operation and installation manual
DISHWASHERS
27
Problem Possiblecauses Remedies
RAPIDindicatorlightquickflashing
Problemswithwatersupplytothedishwasher
Checkifthewatercockisopen.Checkifthehoseisbent.Checkifthedrainisclogged
RAPIDand90minindicatorlightquickflashing
Thedishwasherdoesn’theatupwatertoatemperaturerequired
Heatingelementdamagedordefective.
GLASSindicatorlightquickflashing
Overfill
Checkthedoorsealsofyourdishwasher.Checkwhetherthedishwasherisproperlylevelledhorizontally.Checkwhethertherinsingagentisoverfilled.Checkthequalityofthedishwasherdetergentbeingused.Avoidexcessivefoamformation.
Attention:shouldyoudetectoverfill,cutoffwatersupplybeforeyoucallthecustomerservice.Ifthetraybelowcontainssomewaterresultingfromoverfillorleakage,removewaterpriortostartingthedishwashernexttime.
Service(error)codes
Ifanyfailuresoccurduringoperation,theappliancewillinformyouoferrorcodes:
Problem Possible causes Remedies
Dishwasher leakage Doser overfilled, or rinsing agent spilled
Be careful, do not spill the rinsing agent. Its spill-age may result in excessive foam formation and overfill. If spilled, wipe it using a piece of cloth.
Dishwasher not levelled Level the dishwasher using a water level.
Operation and installation manual
DISHWASHERS
28
WHATYOUMAYNOTWASHINYOURDISHWASHER
– flat- and dishware made of wood(wholly or partially) because theircolorsmayfade,andthedishwaremayloseitsattractivelook;
– dishwarewithhandlesmadeofbronzeandhorns;
– fragile / decorative glassware andvases,ancientchinaware–automatedwashingmaydamage theirdecorativepaintings;
– plastic dishware, non-resistant to hotwater;
– copperandtin-ware,itemsmadeofaluandsilver;
– some kinds of glassware may losetransparency upon several washingcycles;
– never put objects made of absorbingmaterials into your dishwasher(sponges,towels,etc.);
WARNING: do not wash dishware ortable-ware contaminated with to-bacco ashes, wax, paints and lubri-cants(engineoil).

Operation and installation manual Operation and installation manual
DISHWASHERS
29
TECHNICALDATA
Belowisalistofthedishwashertechnicaldata(characteristics)inlinewithEU1059/2010:
Manufacturer FLAVIA
Model/descriptionTD55VenetaP5GRTD55VenetaP5WH
Numberofstandard-sizesetsofdishwaretobeplaced,max 6
EnergyEfficiencyClass(1) А+
Annualenergyconsumption(2) 174kW
Energyconsumptionperstandard(normal)washingcycle 0,61kW
Energyconsumptionwhenswitchedoff 0,45kW
Energyconsumptionwhenleftswitchedon 0,49kW
Annualwaterconsumption(3) 1820l
Классэффективностисушки(4) А
Dryingefficiencyclass ЕСО50С
Standardwashingcycle(5) 180min.
Noiselevel49dB(А)
relative1pW
Installation Compactandstand-alone
Build-inopportunities yes
Height 438mm
Width 550mm
Depth(withconnections) 500mm
POWERCONSUMPTION 1170–1380W
Ratedvoltage/ratedfrequency 220–240В~/50Hz
Waterpressure(waterflowpressure) 0,4–10bar(0,04–1MPa)
Notes:1. EfficiencyratingsrangefromA+++(highestefficiency)toD(lowestefficiency)2. Avalueofenergyconsumptiontomake‘174kW’isbasedupon280standardwashingcyclesayear.Actual
valuesdependuponutilizationrates.3. Avalueofwaterconsumptiontomake‘1820L”isbasedupon280standardwashingcyclesayear.Actual
valuesdependuponutilizationrates.4. RangingfromA(highestefficiency)toG(lowestefficiency)5. Theprogramsuitstowashmoderatelyornormallycontaminateddishwareandisconsideredthemost
efficientintermsoftotalenergyuseandwaterconsumptionforthistypeofdishware.
TheappliancemeetstherequirementsofEuropeannormsandDirectives,asineffectonthedayofdelivery:LVD2014/35/EU;EMC2014/30/EU;ERP2009/125/EC.Valuesabovehavebeenmeasuredinlinewithstandardsandunderspecifiedoperatingconditions.Actualresultsmaydifferduetoanamountofdishes,theircontamination,waterhardness,qualityofdetergents,etc.Anew,laterversionofthepresentmanualwillbechangedaccordingtotechnicalimprovementsoftheappliance,ifany.Appearanceoftheappliance,aswellasitscolorissubjecttochangewithoutpriornotice.
Warranty service conditionsOperation and installation manual
DISHWASHERS
30
ENDOFLIFEDISPOSALElectrical and electronical appliances of-tencontaincomponents,whichareofvalueeven upon the end of their service life. Atthe same time, the materials of these ap-pliancesalsomaycontainhazardoussub-stances required for operation and safetyof the equipment above. Inadequate han-dling of time-expired appliances or theirdisposal as domestic waste may be veryharmfulbothtohumanhealthandenviron-ment.Therefore, it isnotadvisable todis-posethemasdomesticwaste.
We recommend you to send time-expiredappliances to a licensed waste disposalandcollectionpoint.
Priortosendingyourappliancefordispos-al,keepitawayfromchildren.
While preparing the product for disposal,unplugit,makethecableandpluginoper-able(forwhichyoucancutit,forinstance),aswellasthedoorlock.Doingthis,youwillpreventanyfurtherunauthorizeduseofthedishwasherthatissubjecttofinaldisposal.
STORAGEKeep dry and away from sources of hightemperatures and direct sunlight. Avoidsuddenchangesintemperature.Unpackedstorageisnotpermitted.
TRANSPORTATIONFallingof theapplianceandanymechani-calimpactuponitduringtransportationareexpressly prohibited and therefore to beavoided.
SALESREGULATIONSThoseareestablishedbythemanufacturerand shall be in line with national and / orlocal legislationofacountry,whereappli-ancesarepurchased.

Warranty service conditions Warranty service conditions
DISHWASHERS
Operation and installation manual
Theproductsaresubject to freerepair, ifusedonlyforpersonal,familyorotherneeds,notre-latedtobusinessactivities,orsatisfyinghouse-holdrequirementsinanofficeofacompany,in-stitutionorenterprise.Theuseof theproductsfor purposes differing from above is deemedviolationoftheoperationregulations.
Thewarrantycertificateconfersa righton freerepairoftheproductwithin12monthsfromthepurchase date. Should you have any questionsregardingthemaintenanceservice,pleasecon-tacttheofficialrepresentativeofthebrand.Thecontactdetailsareon thewebsiteofourpart-nerkrona-steel.com.Withinthewarrantyperioddefective parts of the products are subject tofree repair or replacement with new ones. It isthe Service Center that has to decide whetherthe defective products shall be repaired or re-placed.
Theservicelifeoftheproductis7(seven)years.The service life starts on the purchase date. Ifit turns out to be impossible to determine thepurchasedate,theservicelifeshallstartonthemanufacturingdate,encodedintheproductse-rialnumberwhichisonthemanufacturer'splate.
Themanufacturer’splateavailabilityisanoblig-atory condition! Make sure it is available andkeepitfortheentireservicelifeoftheproduct.Ifitisnotavailable,itmayturnoutimpossibletodetermine the product model, manufacturingdate.Asaconsequence,arequestforafreere-pairmaybedeclined.
The free repair is only possible with a properlyand duly filled in warranty certificate, sale re-ceiptforaproductpurchased,otherdocumentsto confirm the warranty period of the productsubmittedforrepairsordiagnostics.
Whenbuyingaproduct,makesurethewarrantcertificate is duly filled in, contains no correc-tionsandbearsthepurchasedate,thestampof
asalesagencyandsignatureofasalesassistant(includingatear-offcard),modelandtheserialnumberoftheproduct.
Before you call a Service Center specialist,pleasecarefullyreadtheoperationregulations.Iftheproductturnsouttobenon-defectiveupondiagnostics performed by the specialist, theServiceCenterreservestherighttodemandanungrounded call payment from the customer,basinguponthecurrentpricelist.
Any complaints with regard to quality of thecomponents are subject to consideration onlyuponthequalityinspection(technicalconditioninspection)tobeconductedbyarepresentativeoftheauthorizedServiceCenter.
The manufacturer shall not be liable for anydamagetoacustomerorpropertyofacustomerandnotbeobligedtoperformfreerepairsontheoccurrenceofanyofthefollowing:
–documentsaremissingtoconfirmtherightforfreerepairs;
– repairs have not been performed by autho-rized persons, the product design has beenchanged, the product intervention is found,conflictingwiththeoperationregulations;
–theoperationregulationshavebeenviolated,statedintheproductmanual;
–installationregulationshavebeenviolated,asstatedintheproductmanual;
–theproducthasnotbeentimelyservicedandmaintained,astheproductmanualrequires;
– the product has been connected to a watersupply system, the water pressure of whichdiffers from values specified in the productmanual;
–thecomponentsandconsumableshavebeenreplaced(accessories,lightinglamps*,filters,
*Exceptbacklightlamps,unlessitsreplacementprocedureisdescribedintheoperationmanual.Itisonly
thereplacementprocedurethatisfree,notthelampitself.
Warranty service conditions
DISHWASHERS
remotecontroldevices,watersupply(withouttheaqua-stopsystem)/waterdrainhosesofdish-washing machines, accumulators, bat-teries,etc.,plasticpartshandledmanually;
– consumables have been used, of improperquality;
–defectsanddamageshavebeenfoundcausedbyextremeconditionsandforcemajeurecir-cumstances(fire,ActsofGod,etc.);
–impactofwaterandsolutionsuponmechani-calandelectricalcomponentsoftheproduct;
–negligentstorageand/ornegligenttranspor-tationhavebeenproved;
–damages(failures)of theequipment, itsmal-functionduetoanimals,insectsandproductsoftheirvitalfunctions;
–excessive scaling upon the heating elements(withhigherwaterhardnessproperprocess-ingisrequired,usingspecialpreparations);
–foreignmattersinsidethemachine;
–mechanicaldamagetotheproduct(scratches,cracks,spalls,etc.);
–lossofthesaleableconditionduetoimpactofchemicals;
–useofcleaning/detergentagents,non-con-formingtothetypeoftheproduct;
–thermal,mechanicalandotherdamageofthatkindthatappearedwhileinoperation;
– the product uninstallation by a specialist oftheServiceCenterturnsouttobeimpossible(complex uninstallation procedures are sub-jecttoreassignmenttothecompanythathasinstalledtheproduct);
–unintendeduseoftheproduct;
–thewarrantytermsandconditionshavebeenviolated,asstatedinthewarrantydocument.
The following is not subject to warrantyservices: adjustments, installation, clean-ingandconnection.

Warranty service conditions

www.flavia-dishwasher.com