
Flask-Assistant Documentation - Read the Docs 1.Initialized an Assistantobject with a Flask app and...
27
Flask-Assistant Documentation Release 0.0.9 Cam Sweeney May 02, 2018
Transcript of Flask-Assistant Documentation - Read the Docs 1.Initialized an Assistantobject with a Flask app and...

Flask-Assistant DocumentationRelease 0.0.9
Cam Sweeney
May 02, 2018

Contents
1 Features 3
2 A Minimal Assistant 52.1 Explanation . . . . . . . . . . . . . . . . . . . . . . . . . . . . . . . . . . . . . . . . . . . . . . . . 52.2 Table Of Contents . . . . . . . . . . . . . . . . . . . . . . . . . . . . . . . . . . . . . . . . . . . . 6
i

ii

Flask-Assistant Documentation, Release 0.0.9
A flask extension serving as an API.AI SDK to provide an easy way to create virtual assistants which may be integratedwith platforms such as Google Actions (Google Home).
Flask-Assistant allows you to focus on building the core business logic of conversational user interfaces while utilizingAPI.AI’s Natural Language Processing to interact with users.
Contents 1

Flask-Assistant Documentation, Release 0.0.9
2 Contents
CHAPTER 1
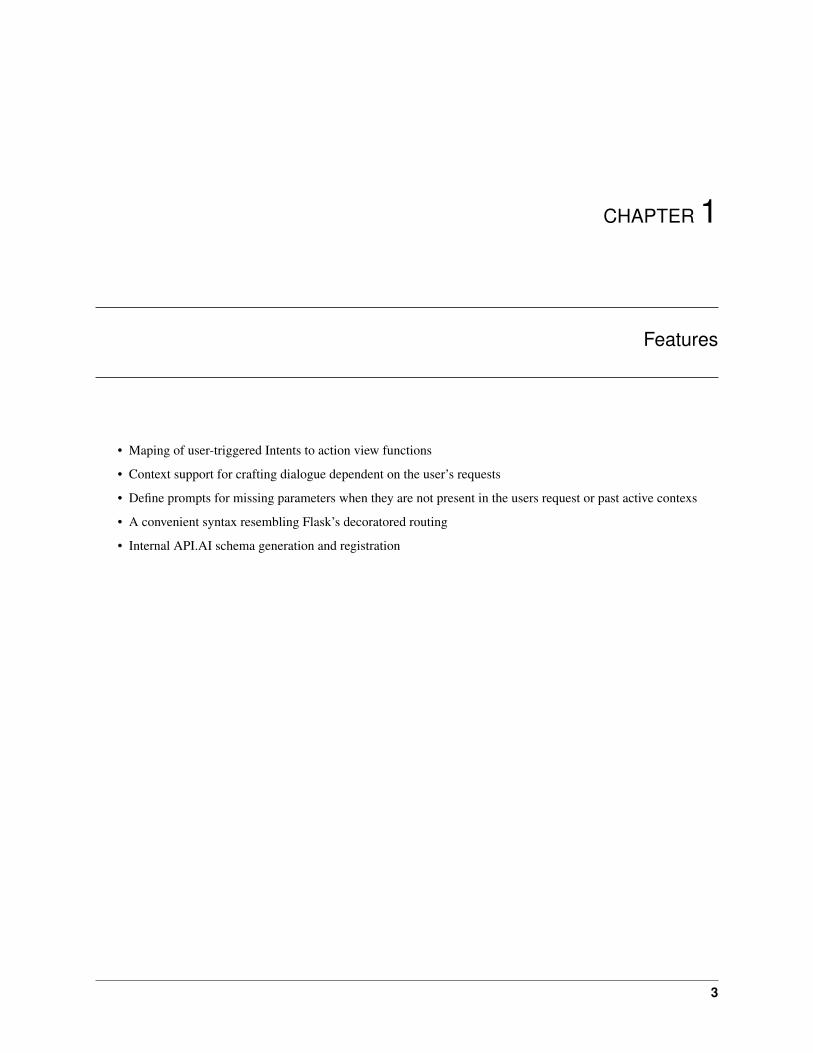
Features
• Maping of user-triggered Intents to action view functions
• Context support for crafting dialogue dependent on the user’s requests
• Define prompts for missing parameters when they are not present in the users request or past active contexs
• A convenient syntax resembling Flask’s decoratored routing
• Internal API.AI schema generation and registration
3

Flask-Assistant Documentation, Release 0.0.9
4 Chapter 1. Features
CHAPTER 2
A Minimal Assistant
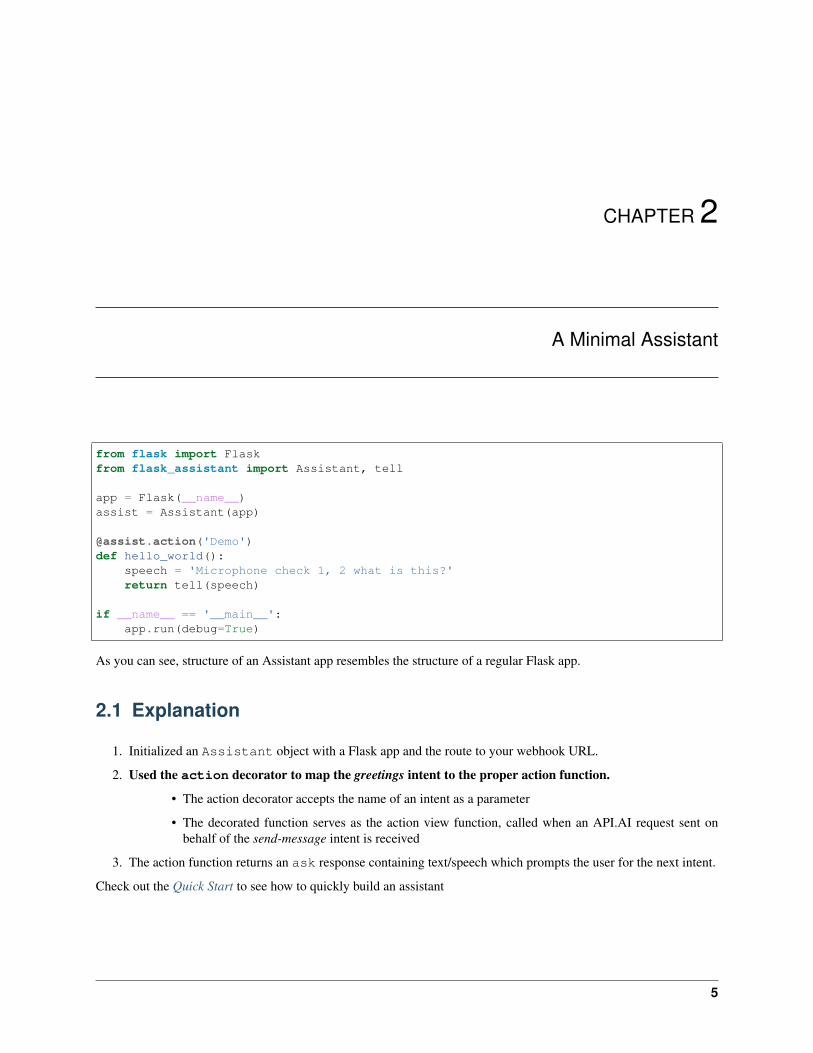
from flask import Flaskfrom flask_assistant import Assistant, tell
app = Flask(__name__)assist = Assistant(app)
@assist.action('Demo')def hello_world():
speech = 'Microphone check 1, 2 what is this?'return tell(speech)
if __name__ == '__main__':app.run(debug=True)
As you can see, structure of an Assistant app resembles the structure of a regular Flask app.
2.1 Explanation
1. Initialized an Assistant object with a Flask app and the route to your webhook URL.
2. Used the action decorator to map the greetings intent to the proper action function.
• The action decorator accepts the name of an intent as a parameter
• The decorated function serves as the action view function, called when an API.AI request sent onbehalf of the send-message intent is received
3. The action function returns an ask response containing text/speech which prompts the user for the next intent.
Check out the Quick Start to see how to quickly build an assistant
5

Flask-Assistant Documentation, Release 0.0.9
2.2 Table Of Contents
2.2.1 Quick Start
This page will provide a walk through of making a basic assistant
Installation
pip install flask-assistant
Setting Up the Project
Create a directory to serve as the app root (useful if auto-generating Intent schema)
mkdir my_assistantcd my_assistant
touch webhook.py
Server Setup
This example will use ngrok to quickly provide a public URL for the flask-assistant webhook. This is required forAPI.AI to communicate with the assistant app.
Make sure you have ngrok installed and start an http instance on port 5000.
• ./ngrok http 5000
A status message similiar to the one below will be shown.
ngrok by @inconshreveable→˓ (Ctrl+C to quit)
Session Status onlineVersion 2.1.18Region United States (us)Web Interface http://127.0.0.1:4040Forwarding http://1ba714e7.ngrok.io -> localhost:5000Forwarding https://1ba714e7.ngrok.io -> localhost:5000
Note the Forwarding https URL.
• https://1ba714e7.ngrok.io in the above example.
• This is the URL that will be used as the Webhook URL in the API.AI console as described below.
API.AI Setup
1. Sign in to the API.AI Console
2. Create a new Agent named “HelloWorld” and click save.
3. Click on Fullfillment in the left side menu and enable webhook.
6 Chapter 2. A Minimal Assistant

Flask-Assistant Documentation, Release 0.0.9
4. Provide the https URL from the ngrok status message as the webhook URL.
Note: You can create new intents and provide information about their action and parameters in the web interface andthey will still be matched to your assistant’s action function for the intent’s name.
However, it may often be simpler to define your intents directly from your assistant as will be shown here.
Create your Webhook
Create a directory to serve as the app root.
mkdir my_assistantcd my_assistant
Create a a new file for your assistant’s webhook
touch webhook.py
In your new webhook.py file:
from flask import Flaskfrom flask_assistant import Assistant, ask, tell
app = Flask(__name__)assist = Assistant(app, route='/')
@assist.action('greeting')def greet_and_start():
speech = "Hey! Are you male or female?"return ask(speech)
if __name__ == '__main__':app.run(debug=True)
Here, we have defined an action function to be called if the ‘greeting’ intent is matched. The action function returns aresponse to API.AI which greets the user and asks the user for their gender.
Now let’s define the action to be performed when the user provides their gender.
@assist.action("give-gender")def ask_for_color(gender):
if gender == 'male':gender_msg = 'Sup bro!'
else:gender_msg = 'Haay gurl!'
speech = gender_msg + ' What is your favorite color?'return ask(speech)
When the user gives their gender as a response to the greet_and_start action, it matches the give-gender intentand triggers the ask_for_color action.
The gender value will be parsed as an entity from the user’s phrase, identified as a parameter and passed to the actionfunction.
In order for the gender to be recognized by API.AI, we will need to define and register an entity with API.AI.
2.2. Table Of Contents 7

Flask-Assistant Documentation, Release 0.0.9
Before we define our entity, let’s first finish the webhook by defining the final action, which will occur after the userprovides their favorite color.
@assist.action('give-color', mapping={'color': 'sys.color'})def ask_for_season(color):
speech = 'Ok, {} is an okay color I guess'.format(color)return ask(speech)
Because this action requires the color parameter, a color entity needs to be defined within our API.AI agent. How-ever, there are a very large number of colors that we’d like our API.AI to recognize as a color entity.
Instead of defining our own color entity and all of the possible entries for the entity (as we will do with gender),we will utilize one of API.AI’s System Entities.
To do this we simply mapped the color parameter to the sys.color System Entity:
@assist.action('give-color', mapping={'color': 'sys.color'})
Now we do not need to provide any definition about the color entity, and API.AI will automaticlly recognize anycolor spoken by the user to be parsed as a sys.color entity.
Registering Schema
At this point our assistant app has three intents: greeting and give-gender and give-color. They aredefined with the action decorator, but how does API.AI know that these intents exist and how does it know whatthe user should say to match them?
Flask-assistant includes a command line utilty to automatically create and register required schema with API.AI.
Let’s walk through how to utilize the schema command.
Run the schema command
1. First obtain your agent’s Access Tokens from the API.AI Console.
2. Ensure you are in the same directory as your assistant and store your token as an environment variable
cd my_assistantexport DEV_ACCESS_TOKEN='YOUR DEV TOKEN'export CLIENT_ACCESS_TOKEN='YOUR CLIENT TOKEN'
3. Run the schema command
schema webhook.py
The schema command will then output the result of registering intents and entities.
With regards to the intent registration:
Generating intent schema...
Registering greeting intent{'status': {'errorType': 'success', 'code': 200}, 'id': 'be697c8a-539d-4905-81f2-→˓44032261f715'}
Registering give-gender intent{'status': {'errorType': 'success', 'code': 200}, 'id': '9759acde-d5f4-4552-940c-→˓884dbcd8c615'}
(continues on next page)
8 Chapter 2. A Minimal Assistant

Flask-Assistant Documentation, Release 0.0.9
(continued from previous page)
Writing schema json to file
Navigate to your agent’s Intents section within the API.AI Console. You will now see that the greeting,give-gender and give-color intents have been registered.
However, if you click on the give-gender intent, you’ll see an error pop-up message that the gender entity hasn’tbeen created. This is expected from the schema output message for the entities registration:
:: Generating entity schema. . .
Registering gender entity {‘timestamp’: ‘2017-02-01T06:09:03.489Z’, ‘id’: ‘0d7e278d-84e3-4ba8-a617-69e9b240d3b4’, ‘status’: {‘errorType’: ‘bad_request’, ‘code’: 400, ‘errorDetails’: “Error adding entity. Errorin entity ‘gender’. Entry value is empty, this entry will be skipped. . “, ‘errorID’: ‘21f62e16-4e07-405b-a201-e68f8930a88d’}}
To fix this, we’ll use the templates created from the schema command to provide more compelete schema.
Using the schema Templates
The schema command creates a new templates/ directory containing two YAML template skeletons:
user_says.yaml is used to:
• Define phrases a user will say to match specific intents
• Annotate parameters within the phrases as specific entity types
entities.yaml is used to:
• Define entities
• Provide entries (examples of the entity type) and their synonyms
Entity Template
Let’s edit templates/entities.yaml to provide the needed schema to register the gender entity.
Initially, the template will contain a simple declaration of the entity names, but will be missing the entities’ entries.
gender:--
Entries represent a mapping between a reference value and a group of synonyms. Let’s add the appropriate entries forthe gender entity.
gender:- male: ['man', 'boy', 'guy', 'dude']- female: ['woman', 'girl', 'gal']
Note: Any pre-built API.AI system entities (sys.color) will not be included in the template, as they are already definedwithin API.AI.
2.2. Table Of Contents 9

Flask-Assistant Documentation, Release 0.0.9
User Says Template
Now we will fill in the templates/user_says.yaml template to provide examples of what the user may say to trigger ourdefined intents.
After running the schema command, the User Says Template will include a section for each intent.
For example, the give-color intent will look like:
give-color:UserSays:--Annotations:--
To fill in the template, provide exmaples of what the user may say under UserSays and a mapping of paramatervalue to entity type under Annotations.
give-color:
UserSays:- my color is blue- Its blue- I like red- My favorite color is red- blue
Annotations:- blue: sys.color- red: sys.color
give-gender:
UserSays:- male- Im a female- girl
Annotations:- male: gender- female: gender- girl: gender
If the intent requires no parameters or you’d like API.AI to automatically annotate the phrase, simply exclude theAnnotations or leave it blank.
greeting:UserSays:- hi- hello- start- begin- launch
Now that the templates are filled out, run the schema command again to update exsting Intents schema and register thenewly defined gender entity.
10 Chapter 2. A Minimal Assistant

Flask-Assistant Documentation, Release 0.0.9
schema webhook.py
Testing the Assistant
Now that the schema has been registered with API.AI, we can make sure everything is working.
Add the following to set up logging so that we can see the API.AI request and flask-assistant response JSON.
import logginglogging.getLogger('flask_assistant').setLevel(logging.DEBUG)
python webhook.py
You can now interact with your assistant using the Try it now.. area on the right hand side of the API.AI Console.
Integrate with Actions on Google
With the webhook logic complete and the API.AI agent set up, you can now easily integrate with Actions on Google.This will allow you to preview and deploy your assistant on Google Home.
To integrate with Actions on Google, follow this simple guide from API.AI.
More info on how to integrate your assistant with various platforms can be found here.
2.2.2 Rendering Responses
Conversations are primarily driven by an Assistant’s response to the user. Responses not only present the user with theoutcome with of the tiggered action, but also control the dialogue by instigating the user to provide intents in a logicalmanner.
Flask-Assisant provides three primary response types as well as platform-specific rich message types.
Primary Types
The primary responses include ask, tell, and event. All rich messages extend the ask and tell constructs.
To import the repsonse types:
from flask_assistant import ask, tell, event, build_item
ask
To ask a question which expects a response from the user:
@assist.action('Kickit')def kick_it():
return ask('Can I kick it?')
2.2. Table Of Contents 11

Flask-Assistant Documentation, Release 0.0.9
tell
To return a text/speech response to the user and end the session:
@assist.action('Answer')def answer():
return tell('Yes you can!')
event
To invoke another intent directly and bypass an exchange with the user, an event can be triggered.
Assuming the intent “GoOnThen” contains an event named “first_verse”, triggering the “Begin” intent will providethe user with the question “‘Before this, did you really know what life was?”
@assist.action('GoOnThen')def first_verse():
return ask('Before this, did you really know what life was?')
@assist.action('Begin')def start_verse():
return event('first_verse')
Note: The name of an intent’s action function does not necessarily need to share the name of the intent’s event,though it may often make sense and provide a cleaner representation of dialogue structure.
Currently, Events must be defined within an Intent in the API.AI console. But support for event definitions is comingsoon
Rich Messages
In addidtion to the primary text/speech responses, Flask-Assistant plans to provide Rich Messages for various plat-forms.
Currently, Rich Messages are only support for Actions on Google.
Rich Messages for Actions on Google
By utlizing the following rich responses, an Assistant can easily integreate with Actions on Google and provide agreater experience on devices that support Google Assistant (Google Home and mobile phones).
To enable Actions on Google Integration:
app.config['ASSIST_ACTIONS_ON_GOOGLE'] = True
Displaying a Card
Use a Card to present the user with summaries or concise information, and to allow users to learn more if you choose(using a weblink).
• Image
12 Chapter 2. A Minimal Assistant

Flask-Assistant Documentation, Release 0.0.9
• Title
• Sub-title
• Text body
• Link
The only information required for a card is the text paramter which is used to fill the text body.
@assist.action('ShowCard')def show_card():
resp = ask("Here's an example of a card")
resp.card(text='The text to display',title='Card Title',img_url='http://example.com/image.png')
return resp
Suggesting Other Intents
Provide the user with a Suggestion Chip to hint at responses to continue or pivot the conversation. The suggestion textis sent as a query to API.AI when selected and therefore should match a User Says phrase for the intent to be triggered.
So given the following intents:
HelpIntent:UserSays:- Get Help- help
Restart:Usersays:- start over
GetArtistInfo:Usersays:- radiohead- violent femmes- the books
Annotations:- radiohead: artist- 'the books': artist
Provide suggestions for likely intents:
@assist.action('SuggestThings')def suggest_things():
return ask('What's up?').suggest('help', 'start over', 'radiohead')
Linking to External Resources
In addition to suggestion chips for guiding dialogue, link_out chips can be used to send the user to external URLS.
2.2. Table Of Contents 13
Flask-Assistant Documentation, Release 0.0.9
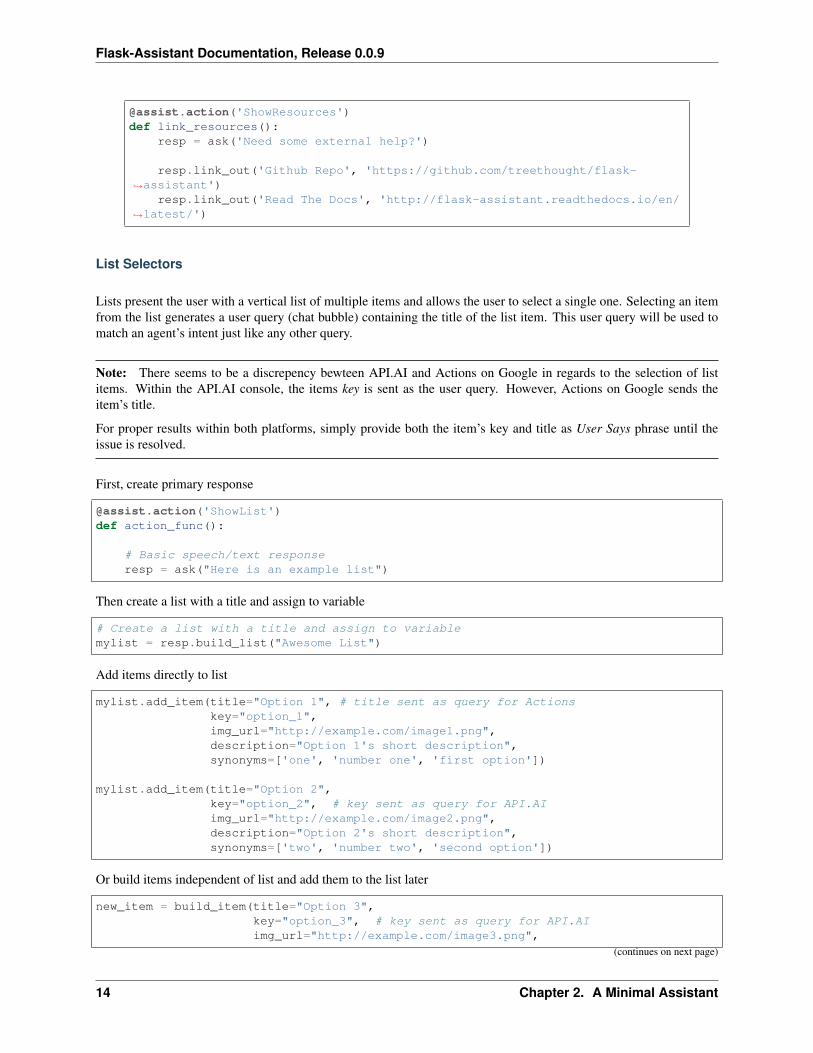
@assist.action('ShowResources')def link_resources():
resp = ask('Need some external help?')
resp.link_out('Github Repo', 'https://github.com/treethought/flask-→˓assistant')
resp.link_out('Read The Docs', 'http://flask-assistant.readthedocs.io/en/→˓latest/')
List Selectors
Lists present the user with a vertical list of multiple items and allows the user to select a single one. Selecting an itemfrom the list generates a user query (chat bubble) containing the title of the list item. This user query will be used tomatch an agent’s intent just like any other query.
Note: There seems to be a discrepency bewteen API.AI and Actions on Google in regards to the selection of listitems. Within the API.AI console, the items key is sent as the user query. However, Actions on Google sends theitem’s title.
For proper results within both platforms, simply provide both the item’s key and title as User Says phrase until theissue is resolved.
First, create primary response
@assist.action('ShowList')def action_func():
# Basic speech/text responseresp = ask("Here is an example list")
Then create a list with a title and assign to variable
# Create a list with a title and assign to variablemylist = resp.build_list("Awesome List")
Add items directly to list
mylist.add_item(title="Option 1", # title sent as query for Actionskey="option_1",img_url="http://example.com/image1.png",description="Option 1's short description",synonyms=['one', 'number one', 'first option'])
mylist.add_item(title="Option 2",key="option_2", # key sent as query for API.AIimg_url="http://example.com/image2.png",description="Option 2's short description",synonyms=['two', 'number two', 'second option'])
Or build items independent of list and add them to the list later
new_item = build_item(title="Option 3",key="option_3", # key sent as query for API.AIimg_url="http://example.com/image3.png",
(continues on next page)
14 Chapter 2. A Minimal Assistant

Flask-Assistant Documentation, Release 0.0.9
(continued from previous page)
description="Option 3's short description",synonyms=['three', 'number three', third option'])
mylist.include_items(new_item)
return mylist
Warning: Creating a list with build_list returns an instance of a new response class. Therfore the result is aserpeate object than the primary response used to call the build_list method.
The original primary response (ask/tell) object will not contain the list, and so the result should likely be assignedto a variable.
Carousels
Carousels scroll horizontally and allows for selecting one item. They are very similar to list items, but provide richercontent by providing multiple tiles resembling cards.
To build a carousel:
@assist.action('FlaskAssistantCarousel')def action_func():
resp = ask("Here's a basic carousel").build_carousel()
resp.add_item("Option 1 Title",key="option_1",description='Option 1's longer description,img_url="http://example.com/image1.png")
resp.add_item("Option 2 Title",key="option_2",description='Option 2's longer description,img_url="http://example.com/image2.png")
return resp
2.2.3 Accepting Parameters
Action functions can accept parameters, which will be parsed from the API.AI request as entities
For a parameter value to be parsed by API.AI’s NLP, it needs to relate to a defined entity. In other words, the name ofthe parameter must be the name of the entity it relates to.
Entities are defined:
• using YAML templates and the schema command
• within the API.AI console
• as existing API.AI System Entities
Each entity is composed of entries, which represent a mapping between a reference value and a group of synonyms.Entities will be the specific value passed to the action function.
2.2. Table Of Contents 15

Flask-Assistant Documentation, Release 0.0.9
Parameters for Custom Entities
Given an entity color defined with the following template:
color:- blue- red- green
An action function may accept a parameter referring to an entry (blue, red, green) of the color entity:
@assist.action('give-color')def echo_color(color):
speech = "Your favorite color is {}".format(color)return tell(speech)
Mapping Parameters to API.AI System Entities
Every parameter passed to an action function needs to correspond to a defined entity. These entities requiredefined entries in order to be parsed using NLP.
With the color example above, we defined three entries (blue, red, and green). To allow our assistant to accuratelyparse and handle all the possible colors a user might say, we would need to provide a great number of entries.
Instead of defining many entries for common entity concepts (color, names, addresses, etc), you can utilize API.AI’sSystem Entities.
To use system entities, simply provide a mapping of the parameter name to corresponding system entity:
@assist.action('give-color', mapping={'color': 'sys.color'})def echo_color(color):
speech = "Your favorite color is {}".format(color)return tell(speech)
And in the user_says template:
give-color:
UserSays:- My color is blue- I like red
Annotations:- blue: sys.color
No entity-template is needed for the sys.color entity, as it is already defined. API.AI will automatically recognize anycolor spoken by the user to be parsed as its sys.color entity, and flask-assistant will match the correct parametervalue to the color parameter.
Prompting for Parameters
When an action function accepts a parameter, it is required unless a default is provided.
If the parameter is not provided by the user, or was not defined in a previous context, the action function will not becalled.
This is where prompt_for() comes in handy.
16 Chapter 2. A Minimal Assistant

Flask-Assistant Documentation, Release 0.0.9
The prompt_for decorator is passed a parameter name and intent name, and is called if the intent’s action function’sparameters have not been supplied.
@assist.prompt_for('color', intent_name='give-color')def prompt_color(color):
speech = "Sorry I didn't catch that. What color did you say?"return ask(speech)
2.2.4 Using Context
Overview
Flask-assitant supports API.AI’s concept of contexts.
Contexts help to store and persist accessible information over multiple requests and define the “state” of the currentsession. You can create different contexts based on the actions your assistant performs and use the generated contextsto determine which intents may be triggered (and thus which actions may take place) in future requests.
The use of contexts allows for a more dynamic dialogue and is helpful for differentiating phrases which may be vagueor have different meanings depending on the user’s preferences or geographic location, the current page in an app, orthe topic of conversation.
Intents may require input contexts, and their actions may set output contexts.
Context Objects
Input Contexts
• Input contexts limit intents to be matched only when certain contexts are set.
• They essentially act as requirements for a particular intent’s action function to be called.
• They are received in every request from API.AI under a “contexts” element, and consist of any previouslydeclared output contexts
Output Contexts
• Output contexts are set by actions to share information across requests within a session and are received as InputContexts for future intents.
• If an input context is modified within in action, the changes will persist via a new output context.
In a REST-like fashion, all declared contexts are received in every request from API.AI and included in every responsefrom your assistant. Flask-assistant provides the context_manager to automatically handle this exchange andpreserve the state of the conversation.
Context Manager
The context_manager is used to declare, access, and modify context objects. It contains the input contextsrecieved from the API.AI request and appends any new or modified contexts to the flask-assistant response.
from flask_assistant import context_manager
Add a new context:
context_manager.add('context-name')
2.2. Table Of Contents 17
Flask-Assistant Documentation, Release 0.0.9
Retrieve a declared context:
my_context = context_manager.get('context-name')
Set a parameter value:
context_manager.set('context-name', 'param_name', value)
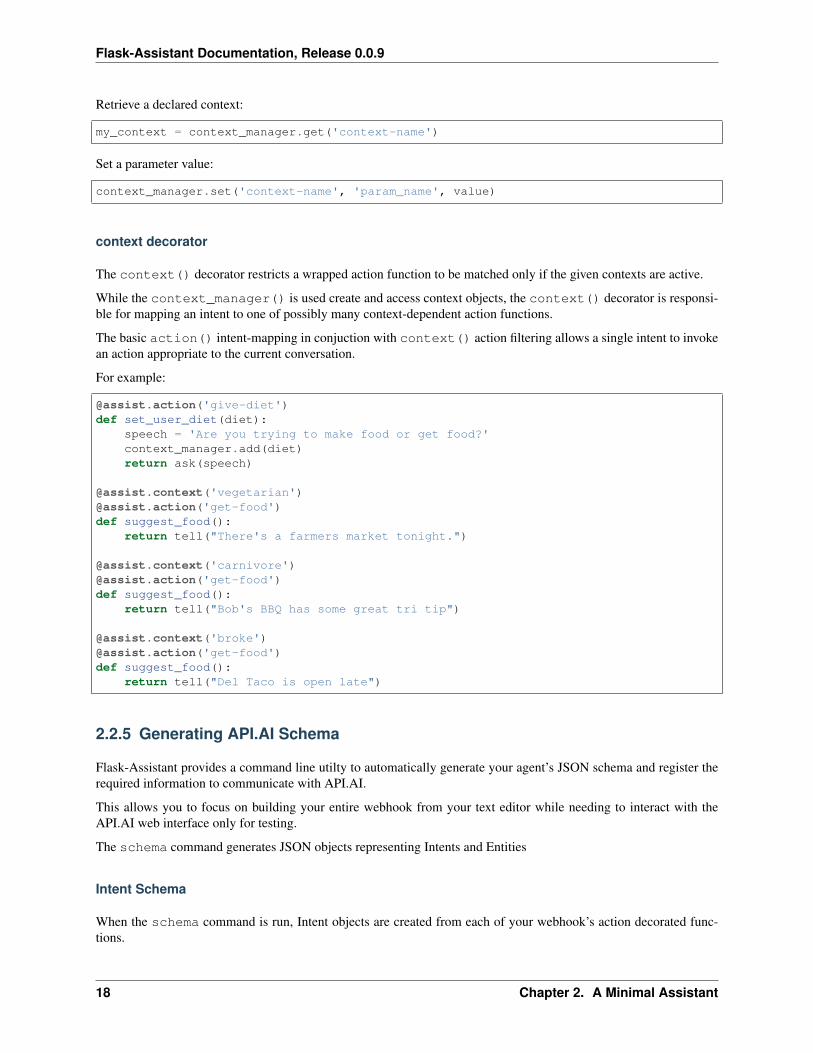
context decorator
The context() decorator restricts a wrapped action function to be matched only if the given contexts are active.
While the context_manager() is used create and access context objects, the context() decorator is responsi-ble for mapping an intent to one of possibly many context-dependent action functions.
The basic action() intent-mapping in conjuction with context() action filtering allows a single intent to invokean action appropriate to the current conversation.
For example:
@assist.action('give-diet')def set_user_diet(diet):
speech = 'Are you trying to make food or get food?'context_manager.add(diet)return ask(speech)
@assist.context('vegetarian')@assist.action('get-food')def suggest_food():
return tell("There's a farmers market tonight.")
@assist.context('carnivore')@assist.action('get-food')def suggest_food():
return tell("Bob's BBQ has some great tri tip")
@assist.context('broke')@assist.action('get-food')def suggest_food():
return tell("Del Taco is open late")
2.2.5 Generating API.AI Schema
Flask-Assistant provides a command line utilty to automatically generate your agent’s JSON schema and register therequired information to communicate with API.AI.
This allows you to focus on building your entire webhook from your text editor while needing to interact with theAPI.AI web interface only for testing.
The schema command generates JSON objects representing Intents and Entities
Intent Schema
When the schema command is run, Intent objects are created from each of your webhook’s action decorated func-tions.
18 Chapter 2. A Minimal Assistant

Flask-Assistant Documentation, Release 0.0.9
The following information is extracted from your webhook and is included in each intent object:
• Intent name - from the @action decorator
• Action name - the name of the wrapped action function
• Accepted parameters - action function’s accepted parameters including their default values and if they are re-quired
User Says Template
Additionally, a User Says template skeleton for each intent is created. The template will be located within the newlycreated templates directory.
This template is written in YAML, and each intent is represented by the following structure:
intent-name:UserSays:--Annotations:--
Using the template, you can include:
• Examples of phrases a user might say to trigger the intent
• Annotations as a mapping of paramater values to entity types.
To provide examples phrases, simply write a phrase using natural language
order-pizza-intent:
UserSays:- I want a small cheese pizza- large pepporoni pizza for delivery
You can then annotate parameter values within the phrase to their respective entity
order-pizza-intent:
UserSays:- I want a small cheese pizza- large pepperoni pizza for delivery
Annotations:- small: pizza-size- cheese: topping- pepperoni: topping- delivery: order-method
If the intent requires no parameters or you’d like API.AI to automaticcaly annotate the phrase, simply exclude theAnnotations or leave it blank.
Re-running the schema command will then update your agent’s Intents with the new user phrases, including theirannotations.
2.2. Table Of Contents 19
Flask-Assistant Documentation, Release 0.0.9
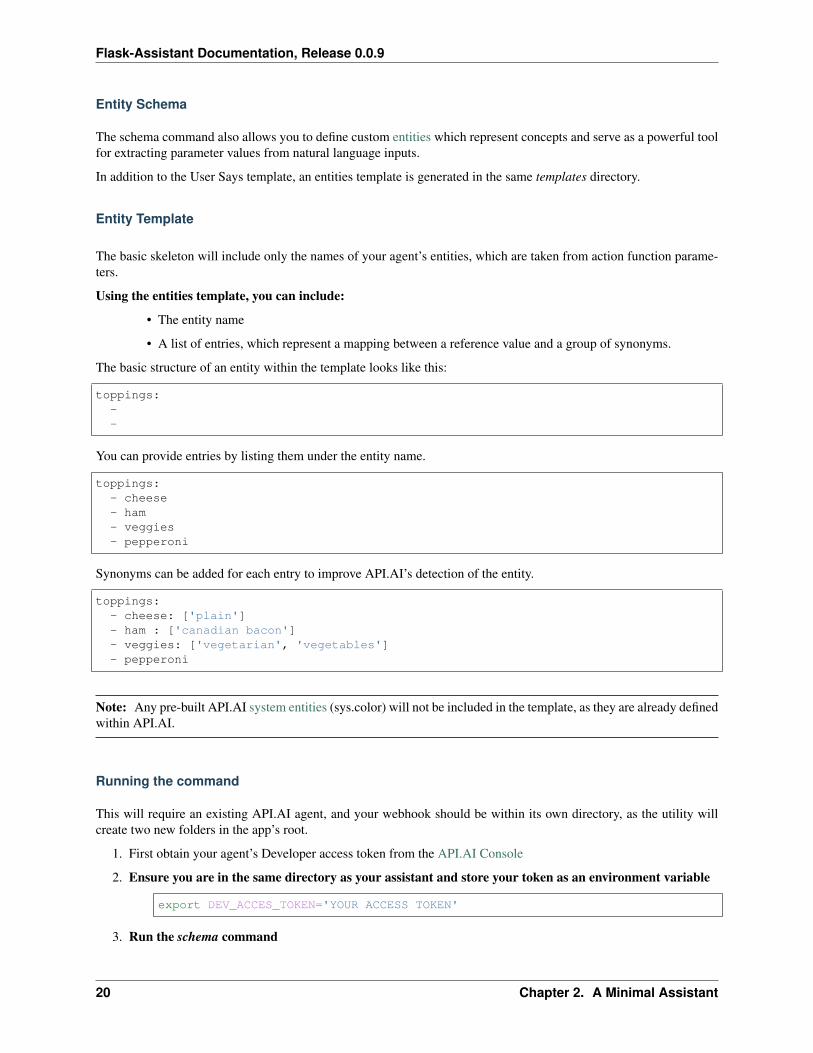
Entity Schema
The schema command also allows you to define custom entities which represent concepts and serve as a powerful toolfor extracting parameter values from natural language inputs.
In addition to the User Says template, an entities template is generated in the same templates directory.
Entity Template
The basic skeleton will include only the names of your agent’s entities, which are taken from action function parame-ters.
Using the entities template, you can include:
• The entity name
• A list of entries, which represent a mapping between a reference value and a group of synonyms.
The basic structure of an entity within the template looks like this:
toppings:--
You can provide entries by listing them under the entity name.
toppings:- cheese- ham- veggies- pepperoni
Synonyms can be added for each entry to improve API.AI’s detection of the entity.
toppings:- cheese: ['plain']- ham : ['canadian bacon']- veggies: ['vegetarian', 'vegetables']- pepperoni
Note: Any pre-built API.AI system entities (sys.color) will not be included in the template, as they are already definedwithin API.AI.
Running the command
This will require an existing API.AI agent, and your webhook should be within its own directory, as the utility willcreate two new folders in the app’s root.
1. First obtain your agent’s Developer access token from the API.AI Console
2. Ensure you are in the same directory as your assistant and store your token as an environment variable
export DEV_ACCES_TOKEN='YOUR ACCESS TOKEN'
3. Run the schema command
20 Chapter 2. A Minimal Assistant

Flask-Assistant Documentation, Release 0.0.9
schema my_assistant.py
This will generate a JSON object for each intent and entity used in your webhook as described above. The schemaobjects will be pushed to API.AI and create a new intent/entity or update the existing one if the object already exists.
You will see an output of status messages indicating if the registration was successful for each object.
You can view the JSON generated in the newly created schema directory.
2.2.6 Home Assistant Integration
Flask-Assistant includes a HassRemote interface to make requests to Home Assistant’s REST api. This allows yourAPI.AI agent to control and retrieve data about your IoT devices.
Integrating your assistant with Home Assistant is as easy as adding a method call to your action functions.
Using the HassRemote
First import and create an instance of the HassRemote.
from flask import Flaskfrom flask_assistant import Assistant, tellfrom flask_assistant.hass import HassRemote
app = Flask(__name__)assist = Assistant(app)hass = HassRemote('YOUR Home Assistant PASSWORD')
Sending Requests to Home Assistant
The HassRemote is a simple wrapper around Home Assistant’s own remote module. The remote module can be usedin the same way to control Home Assistant. HassRemote just provides a set of methods for commonly sent requestsspecific to entitiy domain. These methods will often accept the same paramter as the action function itself, allowingclean and more cohesive code within action functions.
Important: Each of these methods require the entity_id parameter. The name of this parameter should be the sameas the Home Assistant domain.
For example:
If you have a switch in your HA configuration with the name “switch.coffee_maker”, the name of the parameter shouldbe “switch”. This allows your entities to be properly defined within your entities.yaml template when generatingschema.
Controlling Lights
@assist.action('turn-on-light')def light_on(light, brightness=255):
speech = 'Turning on {} to {}'.format(light, brightness)hass.turn_on_light(light, brightness)
(continues on next page)
2.2. Table Of Contents 21

Flask-Assistant Documentation, Release 0.0.9
(continued from previous page)
return tell(speech)
@assist.action('turn-off-light')def light_off(light):
speech = 'Turning off {}'.format(light)hass.turn_off_light(light)return tell(speech)
Flip a Switch
@assist.action('toggle-switch')def toggle(switch):
speech = 'Toggling switch for {}'.format(switch)hass.switch(switch)return tell(speech)
@assist.action('switch-on')def switch_on(switch):
speech = 'Flipping on {} switch'.format(switch)hass.switch(switch, service='turn_on')return tell(speech)
Starting HA Scripts
@assist.action('start-script')def start(script):
speech = 'Running {}'.format('script.{}'.format(script))hass.start_script(script)return tell(speech)
Running Shell Commands
@assist.action('run-command')def run(shell_command):
speech = 'Running the {} shell command'.format(shell_command)hass.command(shell_command)return tell(speech)
Hass Entity Templates
Home Assistant devices used within action functions can easily be included in your entries template, and are automat-ically added with the when generating schema.
Although Home Assistant and API.AI both use the term entities, they are used in slightly different ways.
Home Assistant:
• uses the term entity to describe any device or service connected to HA.
• Each entity belongs to a domain (component).
22 Chapter 2. A Minimal Assistant

Flask-Assistant Documentation, Release 0.0.9
API.AI:
• Uses the term entity to describe a concept that is used within actions
• Each instance of the entity is called an entry, and may be the value of parameters required by actions
Therefore, the idea of a HA entity is similar to an API.AI entry.
So HA devices can be defined as entries under their domain, with their domain serving as the API.AI entity.
domain:- device1: [synonyms]- device2: [synonyms]
Template Examples
A Group of Lights:
light:- lamp_1: ['ceiling light', 'fan light', 'main light']- lamp_2: ['lamp', 'desk lamp']- lamp_3: ['bedroom light', 'room light', 'bedroom']- room: ['all lights', 'lights', 'room'] # a group within home assistant
Within Home Assistant lamp_2 would be identified as light.lamp_2 and room as light.→˓room
Switches
switch:- coffee_maker: ['coffee', 'brew', 'coffee machine']- playstation4: ['ps4', 'playstation']- stereo: ['sound', 'sound system']
Scripts
script:- flash_lights: ['flash', 'flash the lights', 'strobe']- party_mode: ['bump it up', 'start the party']
Shell Commands
shell_command:- playstation_netflix_start: ['netflix', 'netflix on the ps4']- playstation_overwatch_start: [overwatch]- playstation_gtav_start: [gta five, gta]
2.2. Table Of Contents 23