Flask Application Development Documentationuyar/fad/FlaskApplicationDevelopment.pdf · Flask...
50
Flask Application Development Documentation Release 1.1 H. Turgut Uyar Oct 14, 2016
Transcript of Flask Application Development Documentationuyar/fad/FlaskApplicationDevelopment.pdf · Flask...
Flask Application DevelopmentDocumentation
Release 1.1
H. Turgut Uyar
Oct 14, 2016


CONTENTS
1 Basics 31.1 Applications . . . . . . . . . . . . . . . . . . . . . . . . . . . . . . . . . . . . . . . . . . . . . . . 31.2 Dynamic Content . . . . . . . . . . . . . . . . . . . . . . . . . . . . . . . . . . . . . . . . . . . . . 51.3 Adding Links . . . . . . . . . . . . . . . . . . . . . . . . . . . . . . . . . . . . . . . . . . . . . . . 6
2 Application Structure 92.1 Base Templates . . . . . . . . . . . . . . . . . . . . . . . . . . . . . . . . . . . . . . . . . . . . . . 92.2 URL Generation . . . . . . . . . . . . . . . . . . . . . . . . . . . . . . . . . . . . . . . . . . . . . 102.3 Application Organization . . . . . . . . . . . . . . . . . . . . . . . . . . . . . . . . . . . . . . . . 12
3 Data Model 153.1 Model Classes . . . . . . . . . . . . . . . . . . . . . . . . . . . . . . . . . . . . . . . . . . . . . . 153.2 Control Flow in Templates . . . . . . . . . . . . . . . . . . . . . . . . . . . . . . . . . . . . . . . . 173.3 Parametric Routes . . . . . . . . . . . . . . . . . . . . . . . . . . . . . . . . . . . . . . . . . . . . 18
4 Forms 214.1 Posting Data . . . . . . . . . . . . . . . . . . . . . . . . . . . . . . . . . . . . . . . . . . . . . . . 214.2 Posting Lists . . . . . . . . . . . . . . . . . . . . . . . . . . . . . . . . . . . . . . . . . . . . . . . 244.3 Input Validation . . . . . . . . . . . . . . . . . . . . . . . . . . . . . . . . . . . . . . . . . . . . . 25
5 Logins 295.1 Storing Passwords . . . . . . . . . . . . . . . . . . . . . . . . . . . . . . . . . . . . . . . . . . . . 295.2 Login Management . . . . . . . . . . . . . . . . . . . . . . . . . . . . . . . . . . . . . . . . . . . . 30
6 Data Persistence 37
7 Solutions to Exercises 39
i
ii
Flask Application Development Documentation, Release 1.1
Author H. Turgut Uyar
Copyright © H. Turgut Uyar, 2015-2016.
License This work is licensed under a “Creative Commons Attribution-NonCommercial-ShareAlike 4.0International License”.
For more information, please visit:
https://creativecommons.org/licenses/by-nc-sa/4.0/
Note: You are free to:
• Share – copy and redistribute the material in any medium or format
• Adapt – remix, transform, and build upon the material
Under the following terms:
• Attribution – You must give appropriate credit, provide a link to the license, and indicate ifchanges were made.
• NonCommercial – You may not use the material for commercial purposes.
• ShareAlike – If you remix, transform, or build upon the material, you must distribute yourcontributions under the same license as the original.
Formats You can read this tutorial online at the following address:
http://web.itu.edu.tr/uyar/fad/
The document is also available in the following formats:
• Compressed HTML
You can download the code examples using the link below:
• Compressed Code
Releases v1.1 - October 2016
• Added more narrative.
• Updated examples.
• Used better application structuring practices.
• Added section on input validation.
• Added chapter on logins.
v1.0 - October 2015
This tutorial aims to demonstrate how to build an application using the Flask web framework. You can find moreinformation about the Flask project on its web site:
http://flask.pocoo.org/
CONTENTS 1
Flask Application Development Documentation, Release 1.1
2 CONTENTS
CHAPTER
ONE
BASICS
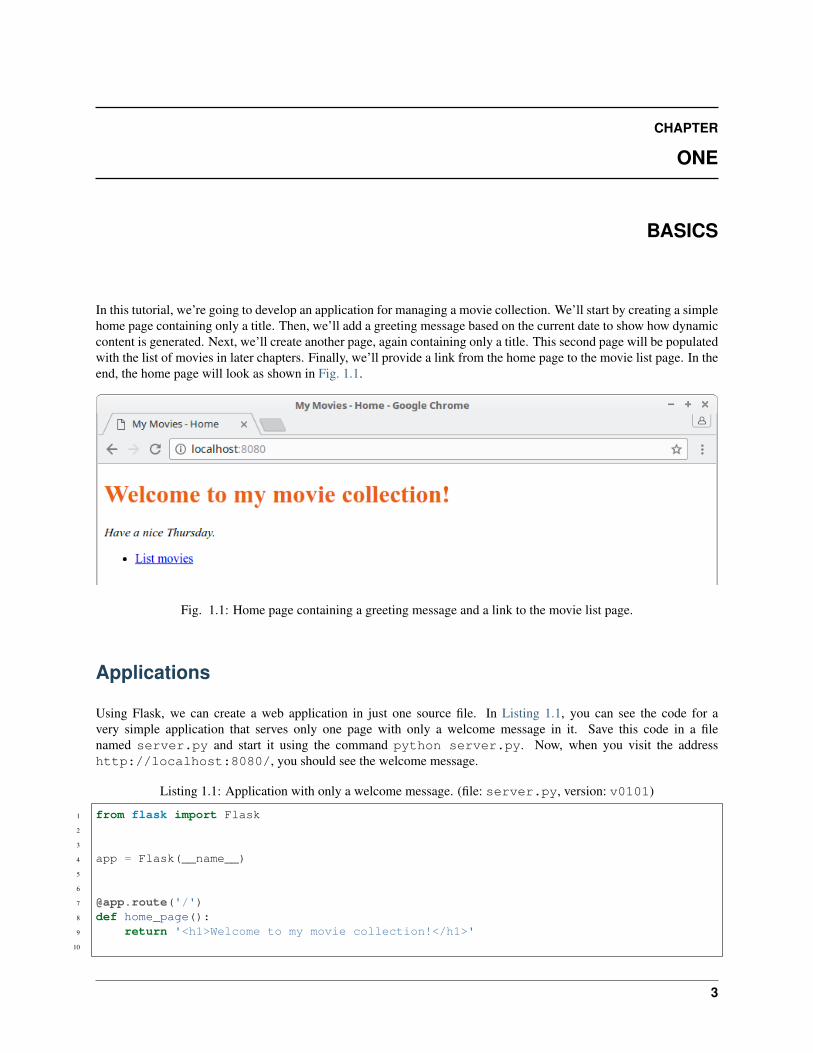
In this tutorial, we’re going to develop an application for managing a movie collection. We’ll start by creating a simplehome page containing only a title. Then, we’ll add a greeting message based on the current date to show how dynamiccontent is generated. Next, we’ll create another page, again containing only a title. This second page will be populatedwith the list of movies in later chapters. Finally, we’ll provide a link from the home page to the movie list page. In theend, the home page will look as shown in Fig. 1.1.
Fig. 1.1: Home page containing a greeting message and a link to the movie list page.
Applications
Using Flask, we can create a web application in just one source file. In Listing 1.1, you can see the code for avery simple application that serves only one page with only a welcome message in it. Save this code in a filenamed server.py and start it using the command python server.py. Now, when you visit the addresshttp://localhost:8080/, you should see the welcome message.
Listing 1.1: Application with only a welcome message. (file: server.py, version: v0101)
1 from flask import Flask2
3
4 app = Flask(__name__)5
6
7 @app.route('/')8 def home_page():9 return '<h1>Welcome to my movie collection!</h1>'
10
3

Flask Application Development Documentation, Release 1.1
11
12 if __name__ == '__main__':13 app.run(host='0.0.0.0', port=8080, debug=True)
Let’s go over this code line by line:
• Line 1: The Flask application class gets imported. Applications are instances of this class.
• Line 4: An application of this class gets instantiated.
• Line 13: The application gets started. The host parameter specifies that the server should be publicly availableand the port parameter specifies that it should run on port 8080. We also set the application to run in debugmode to get better feedback about errors.
Warning: Debug mode causes security problems. Therefore this mode should be enabled only duringdevelopment.
• Lines 7-9: A function is defined to handle requests to the home page. It simply returns a string containing thewelcome message. The route decorator registers the /URL with this function. So, whenever there is a requestto the / URL, this function will be invoked and its result will be sent back to the client as the response.
Tip: To learn the conventions about indentation, spacing and other style issues, read the Python Style Guide:
https://www.python.org/dev/peps/pep-0008/
Note that the request handler function returns a string that contains only an HTML element but not a full HTML page.We could write a full HTML string as the return value of the function as in:
return '<!DOCTYPE html><html><head>...<h1>Welcome...</body></html>'
But this would not only make the code less readable -since it would cause a very long line or span over multiple lines-,it would also be very difficult to maintain. The better way is to use a template which will contain the HTML code.Flask looks for template files in the templates folder, so we can create a file named home.html in that folder tocontain our home page template given in Listing 1.2.
Listing 1.2: Initial home page template. (file: templates/home.html, version: v0102)
1 <!DOCTYPE html>2 <html lang="en">3 <head>4 <meta charset="utf-8" />5 <title>My Movies - Home</title>6 <link rel="stylesheet" href="/static/style.css" />7 </head>8 <body>9 <h1>Welcome to my movie collection!</h1>
10 </body>11 </html>
Now, as shown in Listing 1.3, we can import a function for rendering templates (line 1) and the handler can call it torender the home page (line 9).
4 Chapter 1. Basics
Flask Application Development Documentation, Release 1.1
Listing 1.3: Application using a template. (file: server.py, version: v0102)
1 from flask import Flask, render_template2
3
4 app = Flask(__name__)5
6
7 @app.route('/')8 def home_page():9 return render_template('home.html')
10
11
12 if __name__ == '__main__':13 app.run(host='0.0.0.0', port=8080, debug=True)
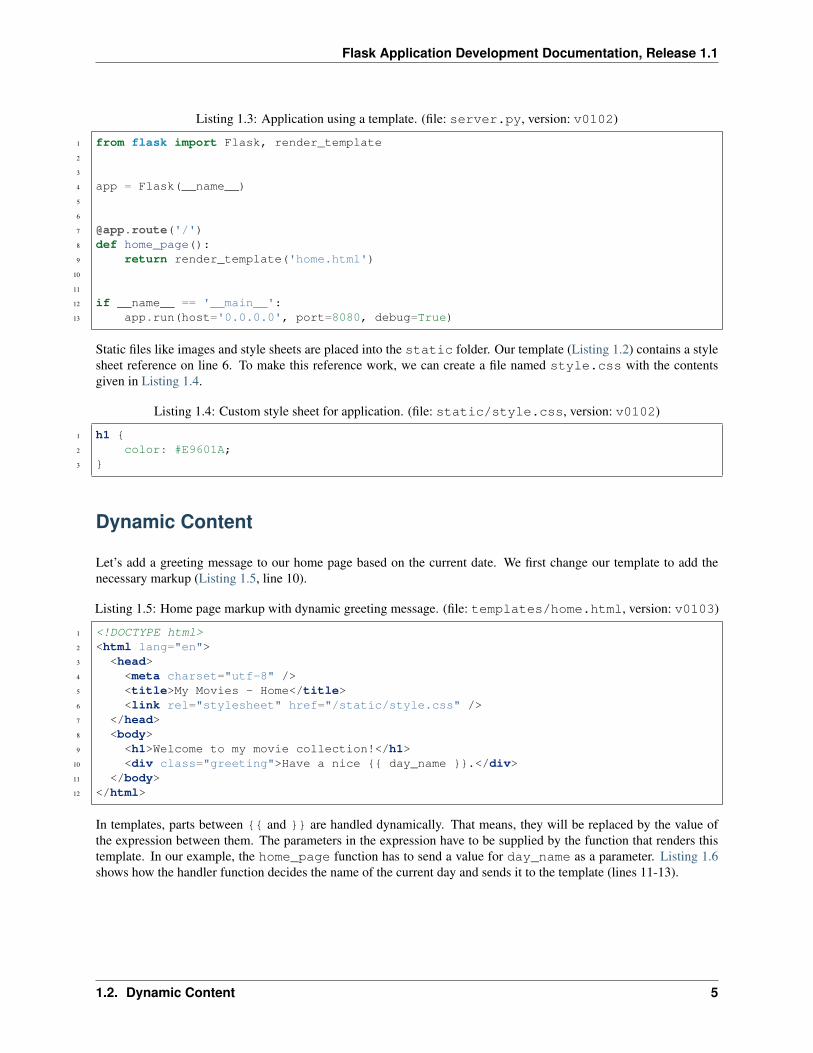
Static files like images and style sheets are placed into the static folder. Our template (Listing 1.2) contains a stylesheet reference on line 6. To make this reference work, we can create a file named style.css with the contentsgiven in Listing 1.4.
Listing 1.4: Custom style sheet for application. (file: static/style.css, version: v0102)
1 h1 {2 color: #E9601A;3 }
Dynamic Content
Let’s add a greeting message to our home page based on the current date. We first change our template to add thenecessary markup (Listing 1.5, line 10).
Listing 1.5: Home page markup with dynamic greeting message. (file: templates/home.html, version: v0103)
1 <!DOCTYPE html>2 <html lang="en">3 <head>4 <meta charset="utf-8" />5 <title>My Movies - Home</title>6 <link rel="stylesheet" href="/static/style.css" />7 </head>8 <body>9 <h1>Welcome to my movie collection!</h1>
10 <div class="greeting">Have a nice {{ day_name }}.</div>11 </body>12 </html>
In templates, parts between {{ and }} are handled dynamically. That means, they will be replaced by the value ofthe expression between them. The parameters in the expression have to be supplied by the function that renders thistemplate. In our example, the home_page function has to send a value for day_name as a parameter. Listing 1.6shows how the handler function decides the name of the current day and sends it to the template (lines 11-13).
1.2. Dynamic Content 5
Flask Application Development Documentation, Release 1.1
Listing 1.6: Handler function sending parameter. (file: server.py, version: v0103)
1 from flask import Flask, render_template2
3 from datetime import datetime4
5
6 app = Flask(__name__)7
8
9 @app.route('/')10 def home_page():11 now = datetime.now()12 day = now.strftime('%A')13 return render_template('home.html', day_name=day)14
15
16 if __name__ == '__main__':17 app.run(host='0.0.0.0', port=8080, debug=True)
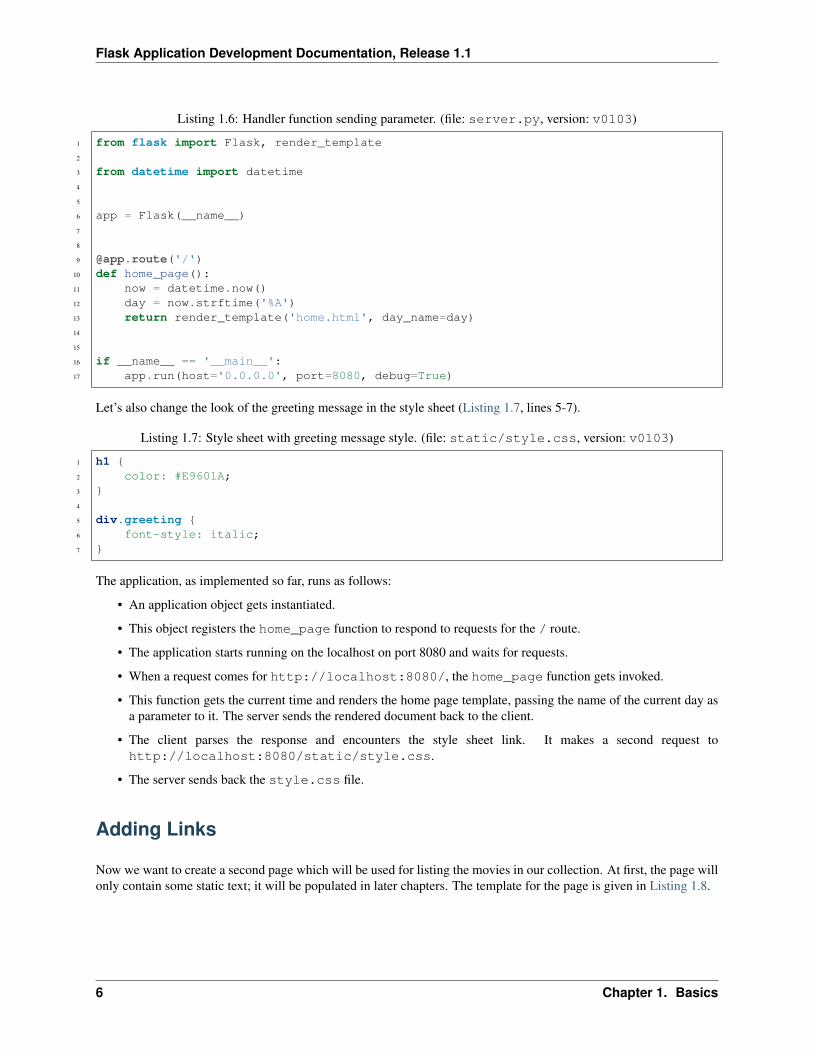
Let’s also change the look of the greeting message in the style sheet (Listing 1.7, lines 5-7).
Listing 1.7: Style sheet with greeting message style. (file: static/style.css, version: v0103)
1 h1 {2 color: #E9601A;3 }4
5 div.greeting {6 font-style: italic;7 }
The application, as implemented so far, runs as follows:
• An application object gets instantiated.
• This object registers the home_page function to respond to requests for the / route.
• The application starts running on the localhost on port 8080 and waits for requests.
• When a request comes for http://localhost:8080/, the home_page function gets invoked.
• This function gets the current time and renders the home page template, passing the name of the current day asa parameter to it. The server sends the rendered document back to the client.
• The client parses the response and encounters the style sheet link. It makes a second request tohttp://localhost:8080/static/style.css.
• The server sends back the style.css file.
Adding Links
Now we want to create a second page which will be used for listing the movies in our collection. At first, the page willonly contain some static text; it will be populated in later chapters. The template for the page is given in Listing 1.8.
6 Chapter 1. Basics
Flask Application Development Documentation, Release 1.1
Listing 1.8: Initial template for movie list page. (file: templates/movies.html, version: v0104)
1 <!DOCTYPE html>2 <html lang="en">3 <head>4 <meta charset="utf-8" />5 <title>My Movies - Movie List</title>6 <link rel="stylesheet" href="/static/style.css" />7 </head>8 <body>9 <h1>Movies</h1>
10 </body>11 </html>
Our application needs a handler function to respond to requests for this page. We register the movies_page functionto handle the /movies route (Listing 1.9, lines 16-18).
Listing 1.9: Application with a movie list page request handler. (file: server.py, version: v0104)
1 from flask import Flask, render_template2
3 from datetime import datetime4
5
6 app = Flask(__name__)7
8
9 @app.route('/')10 def home_page():11 now = datetime.now()12 day = now.strftime('%A')13 return render_template('home.html', day_name=day)14
15
16 @app.route('/movies')17 def movies_page():18 return render_template('movies.html')19
20
21 if __name__ == '__main__':22 app.run(host='0.0.0.0', port=8080, debug=True)
Our last step will be to provide a link from the home page to the movie list page. To achieve this, we just have tomodify the home page markup (Listing 1.10, lines 12-14)
Listing 1.10: Home page markup with link to movie list page. (file: templates/home.html, version: v0104)
1 <!DOCTYPE html>2 <html lang="en">3 <head>4 <meta charset="utf-8" />5 <title>My Movies - Home</title>6 <link rel="stylesheet" href="/static/style.css" />7 </head>8 <body>9 <h1>Welcome to my movie collection!</h1>
10 <div class="greeting">Have a nice {{ day_name }}.</div>
1.3. Adding Links 7

Flask Application Development Documentation, Release 1.1
11
12 <ul>13 <li><a href="/movies">List movies</a></li>14 </ul>15 </body>16 </html>
Exercise Add a link from the movie list page to the home page. (Solution)
8 Chapter 1. Basics

CHAPTER
TWO
APPLICATION STRUCTURE
The pages in a web application share some components such as headers, footers, and navigation panels. In this chapter,we’ll see how to implement such components without repeating code. We’ll create a base template that will containthe components that all pages in the application will include. See Fig. 2.1 for the screenshot of the resulting homepage.
Fig. 2.1: Home page containing navigation panel and footer.
Base Templates
Adding shared components to multiple pages in an application is a tedious and error-prone approach. We would liketo be able to specify these at one point and let pages get them from that single source. For instance, we want all ourpages to use the same footer that contains a copyright notice but we don’t want to add a footer component to everypage separately. Instead, we would like to add it to a base template and extend all pages from this base template.
We’ll put our base template into the layout.html file with the contents given in Listing 2.1.
Listing 2.1: Initial base template. (file: templates/layout.html, version: v0201)
1 <!DOCTYPE html>2 <html lang="en">3 <head>4 <meta charset="utf-8" />5 <title>My Movies - {% block title %}{% endblock %}</title>6 <link rel="stylesheet" href="/static/style.css" />7 </head>
9
Flask Application Development Documentation, Release 1.1
8 <body>9 {% block content %}{% endblock %}
10
11 <footer>12 © 2016, Kilgore Trout13 </footer>14 </body>15 </html>
The {% block ... %} and {% endblock %} directives mark the parts that will be filled in by the pages thatuse this base template. Since there can be more than one such block in a template, blocks have to be named so thatthey can be distinguished from each other. The name is the identifier that follows the block keyword in the openingdirective.
All remaining parts will be directly included. This means that there are two parts in this template that will be filled inby pages:
• The block named title marks the page title after the common prefix (line 5).
• The block named content marks the page content (line 9). But note that the footer is not part of the replacedblock, so it will be included in all pages (lines 11-13).
Now the home page template will extend this base template (Listing 2.2, line 1). The title block (line 2) will replacethe title slot in the layout, and the content block (lines between 3 and 10) will replace the content slot. Whenprocessed, this template will give the same markup as the previous one without the base template (Listing 1.10).
Listing 2.2: Home page template extending the base template. (file: templates/home.html, version: v0201)
1 {% extends "layout.html" %}2 {% block title %}Home{% endblock %}3 {% block content %}4 <h1>Welcome to my movie collection!</h1>5 <div class="greeting">Have a nice {{ day_name }}.</div>6
7 <ul>8 <li><a href="/movies">List movies</a></li>9 </ul>
10 {% endblock %}
Let’s also add the following rule to the style sheet to format the footer:
footer {text-align: center;font-size: 80%;
}
URL Generation
In our HTML markup we’ve used fixed URLs to link to pages: / for the home page, /movies forthe movies page, and /static/style.css for the style sheet. These URLs assume that all our URLsstart from the base of the server URL (http://localhost:8080). But in many cases -for example,if we want to run multiple applications on the same port–, we’ll want our application URLs to start froma subpath on the server, such as http://localhost:8080/mymovies. So we would want our URLsto be http://localhost:8080/mymovies/, http://localhost:8080/mymovies/movies, andhttp://localhost:8080/mymovies/static/style.css. But using fixed URLs wouldn’t work in thiscase because for example /movies would always link to http://localhost:8080/movies.
10 Chapter 2. Application Structure
Flask Application Development Documentation, Release 1.1
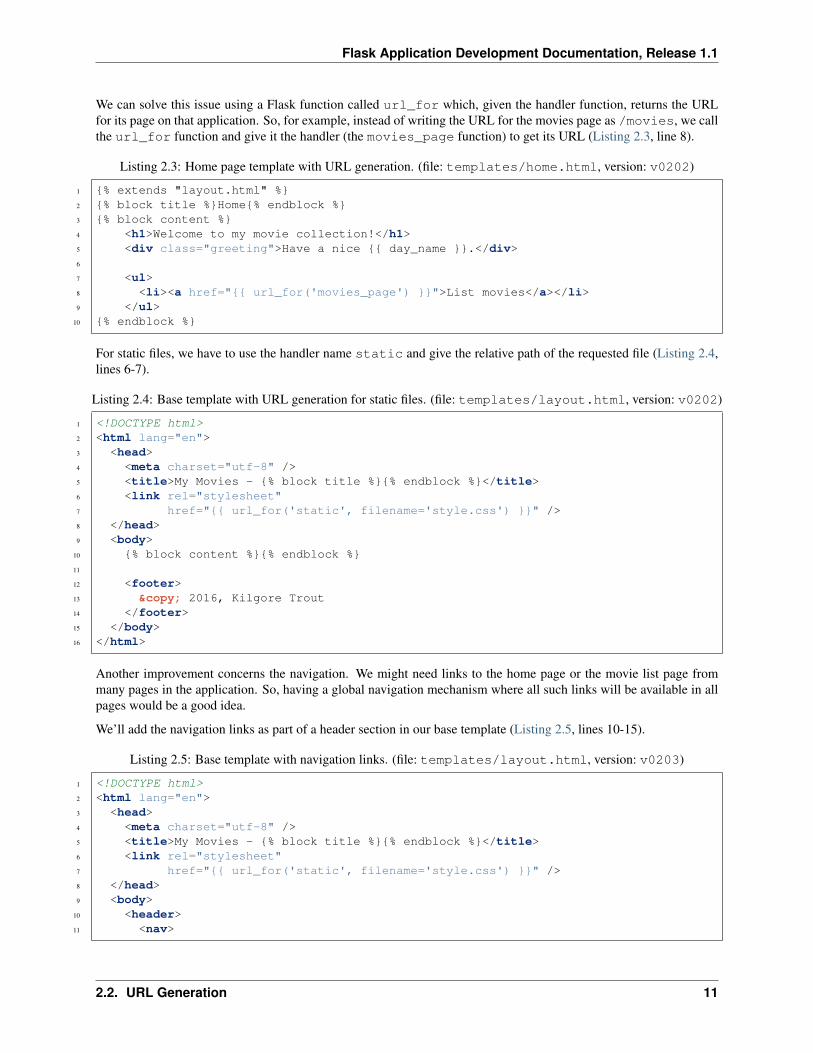
We can solve this issue using a Flask function called url_for which, given the handler function, returns the URLfor its page on that application. So, for example, instead of writing the URL for the movies page as /movies, we callthe url_for function and give it the handler (the movies_page function) to get its URL (Listing 2.3, line 8).
Listing 2.3: Home page template with URL generation. (file: templates/home.html, version: v0202)
1 {% extends "layout.html" %}2 {% block title %}Home{% endblock %}3 {% block content %}4 <h1>Welcome to my movie collection!</h1>5 <div class="greeting">Have a nice {{ day_name }}.</div>6
7 <ul>8 <li><a href="{{ url_for('movies_page') }}">List movies</a></li>9 </ul>
10 {% endblock %}
For static files, we have to use the handler name static and give the relative path of the requested file (Listing 2.4,lines 6-7).
Listing 2.4: Base template with URL generation for static files. (file: templates/layout.html, version: v0202)
1 <!DOCTYPE html>2 <html lang="en">3 <head>4 <meta charset="utf-8" />5 <title>My Movies - {% block title %}{% endblock %}</title>6 <link rel="stylesheet"7 href="{{ url_for('static', filename='style.css') }}" />8 </head>9 <body>
10 {% block content %}{% endblock %}11
12 <footer>13 © 2016, Kilgore Trout14 </footer>15 </body>16 </html>
Another improvement concerns the navigation. We might need links to the home page or the movie list page frommany pages in the application. So, having a global navigation mechanism where all such links will be available in allpages would be a good idea.
We’ll add the navigation links as part of a header section in our base template (Listing 2.5, lines 10-15).
Listing 2.5: Base template with navigation links. (file: templates/layout.html, version: v0203)
1 <!DOCTYPE html>2 <html lang="en">3 <head>4 <meta charset="utf-8" />5 <title>My Movies - {% block title %}{% endblock %}</title>6 <link rel="stylesheet"7 href="{{ url_for('static', filename='style.css') }}" />8 </head>9 <body>
10 <header>11 <nav>
2.2. URL Generation 11

Flask Application Development Documentation, Release 1.1
12 <li><a href="{{ url_for('home_page') }}">Home</a></li>13 <li><a href="{{ url_for('movies_page') }}">List movies</a></li>14 </nav>15 </header>16
17 {% block content %}{% endblock %}18
19 <footer>20 © 2016, Kilgore Trout21 </footer>22 </body>23 </html>
Now the home page doesn’t need to add the navigation links anymore (Listing 2.6).
Listing 2.6: Home page template that gets navigation links from base template. (file: templates/home.html,version: v0203)
1 --- ./code/v0202/templates/home.html2 +++ ./code/v0203/templates/home.html3 @@ -3,8 +3,4 @@4 {% block content %}5 <h1>Welcome to my movie collection!</h1>6 <div class="greeting">Have a nice {{ day_name }}.</div>7 -8 - <ul>9 - <li><a href="{{ url_for('movies_page') }}">List movies</a></li>
10 - </ul>11 {% endblock %}
Exercise Arrange the movie list page so that it will use the same navigation panel and footer. (Solution)
Exercise Add Bootstrap to your base template and arrange your pages to use it. (Solution)
Application Organization
When our project gets larger, we will want to separate the source code into multiple files. In our example, it would be agood idea to move the functions that handle page requests into another file. But note that, if we take the home_pageand movies_page functions into a different file and leave the global app variable in the original file, we will not beable to set up the routes anymore.
To solve this, we are going to use a Flask feature called “blueprints”. Blueprints are similar to applications in that theycan handle routes, but they need to be registered with an application before they can be used.
Let’s create a handlers.py file to contain our handler functions (Listing 2.7). Again, note that we now route for ablueprint instead of the app application object (lines 9 and 16).
Listing 2.7: Module for page request handler functions. (file: handlers.py, version: v0204)
1 from flask import Blueprint, render_template2
3 from datetime import datetime4
5
6 site = Blueprint('site', __name__)7
12 Chapter 2. Application Structure

Flask Application Development Documentation, Release 1.1
8
9 @site.route('/')10 def home_page():11 now = datetime.now()12 day = now.strftime('%A')13 return render_template('home.html', day_name=day)14
15
16 @site.route('/movies')17 def movies_page():18 return render_template('movies.html')
Next, we have to register this blueprint with our application object (Listing 2.8, line 8). We also create the applicationobject through a function so that the application setup will be easier to manage (lines 6-9):
Listing 2.8: Application created by a function. (file: server.py, version: v0204)
1 from flask import Flask2
3 from handlers import site4
5
6 def create_app():7 app = Flask(__name__)8 app.register_blueprint(site)9 return app
10
11
12 def main():13 app = create_app()14 app.run(host='0.0.0.0', port=8080, debug=True)15
16
17 if __name__ == '__main__':18 main()
Using a blueprint changes the way we generate URLs for page handler functions. Now function names have to beprefixed with the blueprint name, as in site.home_page instead of just home_page. So, the navigation links inthe base layout change:
--- ./code/v0203c/templates/layout.html+++ ./code/v0204/templates/layout.html@@ -28,10 +28,10 @@
<div id="navbar" class="collapse navbar-collapse"><ul class="nav navbar-nav"><li class="active">
- <a href="{{ url_for('home_page') }}">Home</a>+ <a href="{{ url_for('site.home_page') }}">Home</a>
</li><li>
- <a href="{{ url_for('movies_page') }}">List movies</a>+ <a href="{{ url_for('site.movies_page') }}">List movies</a>
</li></ul>
</div>
The url_for function call for the style sheet doesn’t change.
2.3. Application Organization 13
Flask Application Development Documentation, Release 1.1
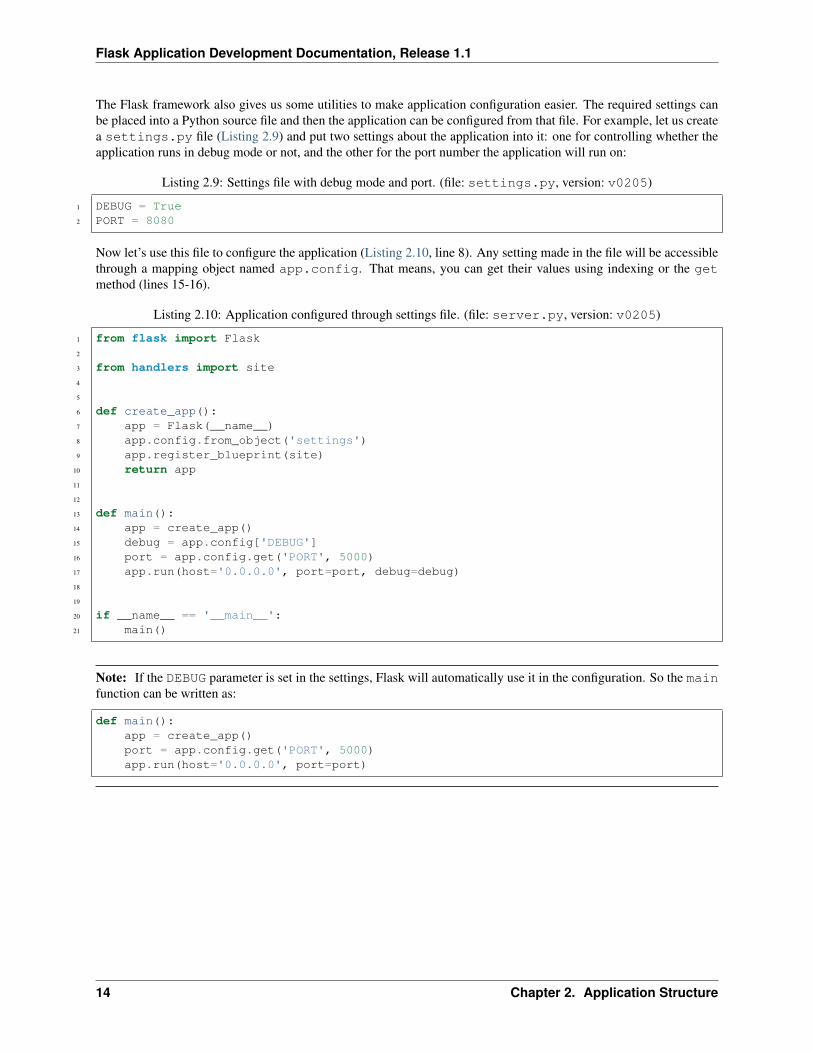
The Flask framework also gives us some utilities to make application configuration easier. The required settings canbe placed into a Python source file and then the application can be configured from that file. For example, let us createa settings.py file (Listing 2.9) and put two settings about the application into it: one for controlling whether theapplication runs in debug mode or not, and the other for the port number the application will run on:
Listing 2.9: Settings file with debug mode and port. (file: settings.py, version: v0205)
1 DEBUG = True2 PORT = 8080
Now let’s use this file to configure the application (Listing 2.10, line 8). Any setting made in the file will be accessiblethrough a mapping object named app.config. That means, you can get their values using indexing or the getmethod (lines 15-16).
Listing 2.10: Application configured through settings file. (file: server.py, version: v0205)
1 from flask import Flask2
3 from handlers import site4
5
6 def create_app():7 app = Flask(__name__)8 app.config.from_object('settings')9 app.register_blueprint(site)
10 return app11
12
13 def main():14 app = create_app()15 debug = app.config['DEBUG']16 port = app.config.get('PORT', 5000)17 app.run(host='0.0.0.0', port=port, debug=debug)18
19
20 if __name__ == '__main__':21 main()
Note: If the DEBUG parameter is set in the settings, Flask will automatically use it in the configuration. So the mainfunction can be written as:
def main():app = create_app()port = app.config.get('PORT', 5000)app.run(host='0.0.0.0', port=port)
14 Chapter 2. Application Structure

CHAPTER
THREE
DATA MODEL
In this chapter, we’ll create the Python classes in our data model, i.e. the classes for movies and movie collections.And then we’ll populate the movie list page with some test data. The resulting page will look as in Fig. 3.1. 1
Fig. 3.1: Movie list page populated with test data.
Model Classes
To represent movies in the application, we implement a simple Movie class (Listing 3.1). Initially, a movie has onlya title and a year.
Listing 3.1: Initial implementation of the movie model class. (file: movie.py, version: v0301)
1 class Movie:2 def __init__(self, title, year=None):3 self.title = title4 self.year = year
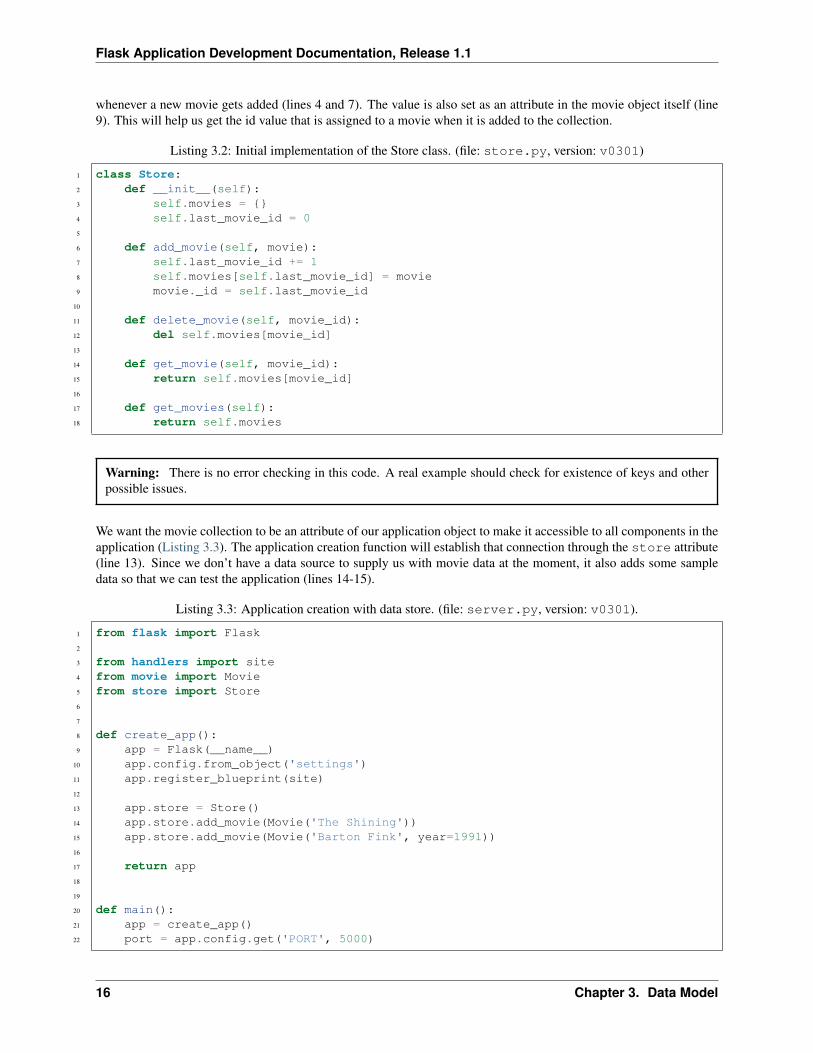
Next, we implement a class to represent a movie collection. It contains a dictionary of movie objects and some methodsfor interacting with it such as for adding or deleting movies (Listing 3.2). For every movie, it generates an id valuewhich it uses as the key into the dictionary for retrieval operations. The last used id value is stored and incremented
1 The screenshots after this point assume that the Bootstrap exercise in the previous chapter has been completed.
15
Flask Application Development Documentation, Release 1.1
whenever a new movie gets added (lines 4 and 7). The value is also set as an attribute in the movie object itself (line9). This will help us get the id value that is assigned to a movie when it is added to the collection.
Listing 3.2: Initial implementation of the Store class. (file: store.py, version: v0301)
1 class Store:2 def __init__(self):3 self.movies = {}4 self.last_movie_id = 05
6 def add_movie(self, movie):7 self.last_movie_id += 18 self.movies[self.last_movie_id] = movie9 movie._id = self.last_movie_id
10
11 def delete_movie(self, movie_id):12 del self.movies[movie_id]13
14 def get_movie(self, movie_id):15 return self.movies[movie_id]16
17 def get_movies(self):18 return self.movies
Warning: There is no error checking in this code. A real example should check for existence of keys and otherpossible issues.
We want the movie collection to be an attribute of our application object to make it accessible to all components in theapplication (Listing 3.3). The application creation function will establish that connection through the store attribute(line 13). Since we don’t have a data source to supply us with movie data at the moment, it also adds some sampledata so that we can test the application (lines 14-15).
Listing 3.3: Application creation with data store. (file: server.py, version: v0301).
1 from flask import Flask2
3 from handlers import site4 from movie import Movie5 from store import Store6
7
8 def create_app():9 app = Flask(__name__)
10 app.config.from_object('settings')11 app.register_blueprint(site)12
13 app.store = Store()14 app.store.add_movie(Movie('The Shining'))15 app.store.add_movie(Movie('Barton Fink', year=1991))16
17 return app18
19
20 def main():21 app = create_app()22 port = app.config.get('PORT', 5000)
16 Chapter 3. Data Model
Flask Application Development Documentation, Release 1.1
23 app.run(host='0.0.0.0', port=port)24
25
26 if __name__ == '__main__':27 main()
Control Flow in Templates
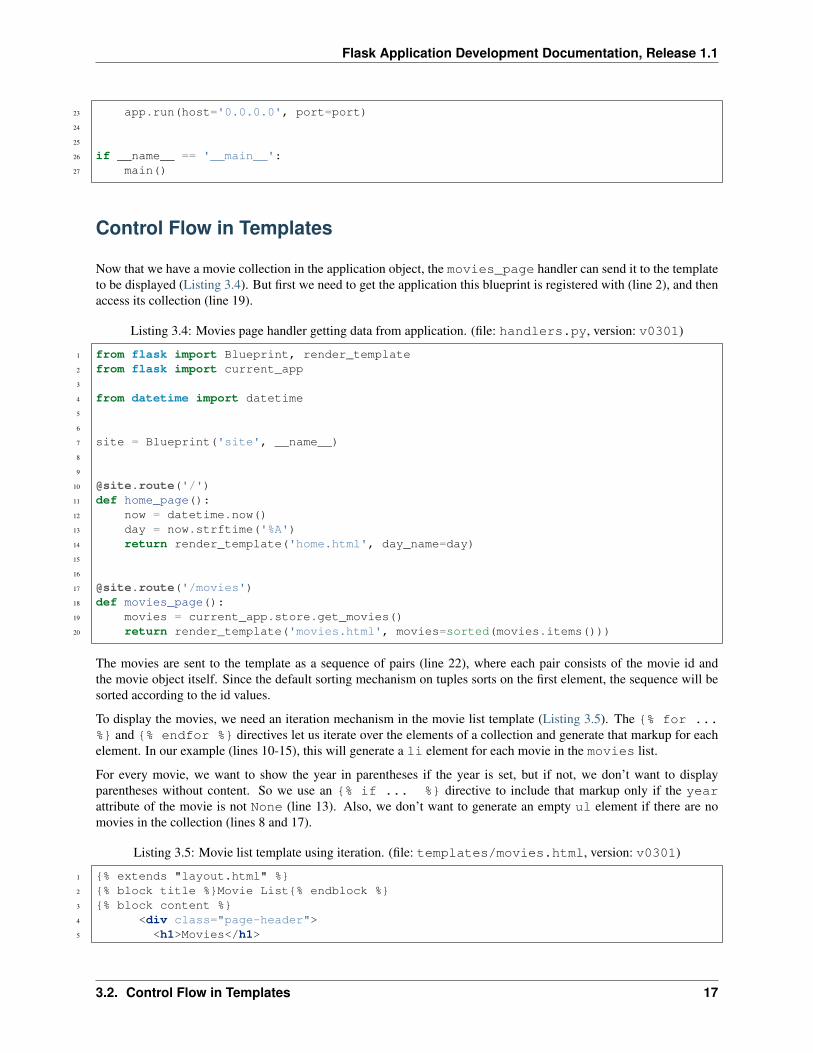
Now that we have a movie collection in the application object, the movies_page handler can send it to the templateto be displayed (Listing 3.4). But first we need to get the application this blueprint is registered with (line 2), and thenaccess its collection (line 19).
Listing 3.4: Movies page handler getting data from application. (file: handlers.py, version: v0301)
1 from flask import Blueprint, render_template2 from flask import current_app3
4 from datetime import datetime5
6
7 site = Blueprint('site', __name__)8
9
10 @site.route('/')11 def home_page():12 now = datetime.now()13 day = now.strftime('%A')14 return render_template('home.html', day_name=day)15
16
17 @site.route('/movies')18 def movies_page():19 movies = current_app.store.get_movies()20 return render_template('movies.html', movies=sorted(movies.items()))
The movies are sent to the template as a sequence of pairs (line 22), where each pair consists of the movie id andthe movie object itself. Since the default sorting mechanism on tuples sorts on the first element, the sequence will besorted according to the id values.
To display the movies, we need an iteration mechanism in the movie list template (Listing 3.5). The {% for ...%} and {% endfor %} directives let us iterate over the elements of a collection and generate that markup for eachelement. In our example (lines 10-15), this will generate a li element for each movie in the movies list.
For every movie, we want to show the year in parentheses if the year is set, but if not, we don’t want to displayparentheses without content. So we use an {% if ... %} directive to include that markup only if the yearattribute of the movie is not None (line 13). Also, we don’t want to generate an empty ul element if there are nomovies in the collection (lines 8 and 17).
Listing 3.5: Movie list template using iteration. (file: templates/movies.html, version: v0301)
1 {% extends "layout.html" %}2 {% block title %}Movie List{% endblock %}3 {% block content %}4 <div class="page-header">5 <h1>Movies</h1>
3.2. Control Flow in Templates 17

Flask Application Development Documentation, Release 1.1
6 </div>7
8 {% if movies %}9 <ul class="list-unstyled">
10 {% for movie_id, movie in movies %}11 <li>12 {{ movie.title }}13 {% if movie.year %} ({{ movie.year }}) {% endif %}14 </li>15 {% endfor %}16 </ul>17 {% endif %}18 {% endblock %}
Parametric Routes
Next, we want to add a page that will display a movie. To identify a movie in the collection, we will use its id value aspart of its URL. For example, the URL /movie/1 will refer to the movie with id 1 in the collection. The movie pagewill look like in Fig. 3.2.
Fig. 3.2: The movie display page.
Let’s start with the movie page template. Assuming it gets the movie object as a parameter named movie, the templatecode will be as in Listing 3.6.
Listing 3.6: Movie page template. (file: templates/movie.html, version: v0302)
1 {% extends "layout.html" %}2 {% block title %}Movie{% endblock %}3 {% block content %}4 <div class="page-header">5 <h1>{{ movie.title }}</h1>6 </div>7
8 {% if movie.year %}9 <div class="row">
10 <div class="col-sm-2">Year:</div>11 <div class="col-sm-10">{{ movie.year }}</div>12 </div>
18 Chapter 3. Data Model
Flask Application Development Documentation, Release 1.1
13 {% endif %}14 {% endblock %}
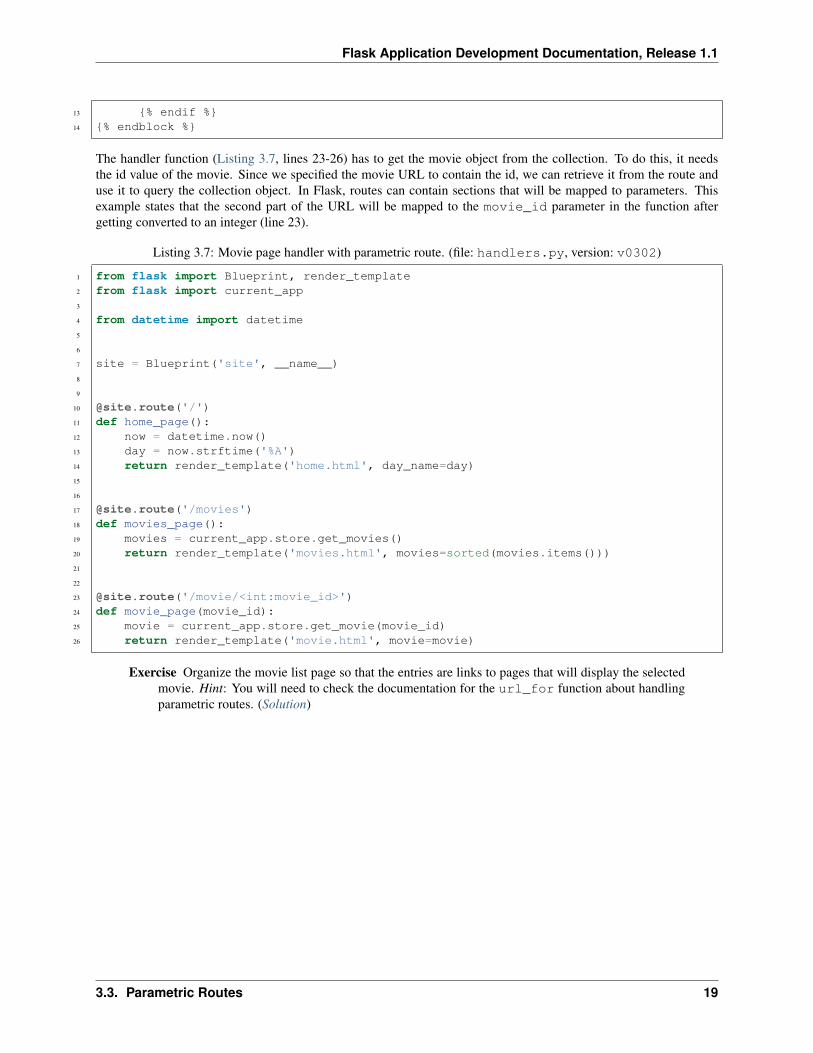
The handler function (Listing 3.7, lines 23-26) has to get the movie object from the collection. To do this, it needsthe id value of the movie. Since we specified the movie URL to contain the id, we can retrieve it from the route anduse it to query the collection object. In Flask, routes can contain sections that will be mapped to parameters. Thisexample states that the second part of the URL will be mapped to the movie_id parameter in the function aftergetting converted to an integer (line 23).
Listing 3.7: Movie page handler with parametric route. (file: handlers.py, version: v0302)
1 from flask import Blueprint, render_template2 from flask import current_app3
4 from datetime import datetime5
6
7 site = Blueprint('site', __name__)8
9
10 @site.route('/')11 def home_page():12 now = datetime.now()13 day = now.strftime('%A')14 return render_template('home.html', day_name=day)15
16
17 @site.route('/movies')18 def movies_page():19 movies = current_app.store.get_movies()20 return render_template('movies.html', movies=sorted(movies.items()))21
22
23 @site.route('/movie/<int:movie_id>')24 def movie_page(movie_id):25 movie = current_app.store.get_movie(movie_id)26 return render_template('movie.html', movie=movie)
Exercise Organize the movie list page so that the entries are links to pages that will display the selectedmovie. Hint: You will need to check the documentation for the url_for function about handlingparametric routes. (Solution)
3.3. Parametric Routes 19
Flask Application Development Documentation, Release 1.1
20 Chapter 3. Data Model
CHAPTER
FOUR
FORMS
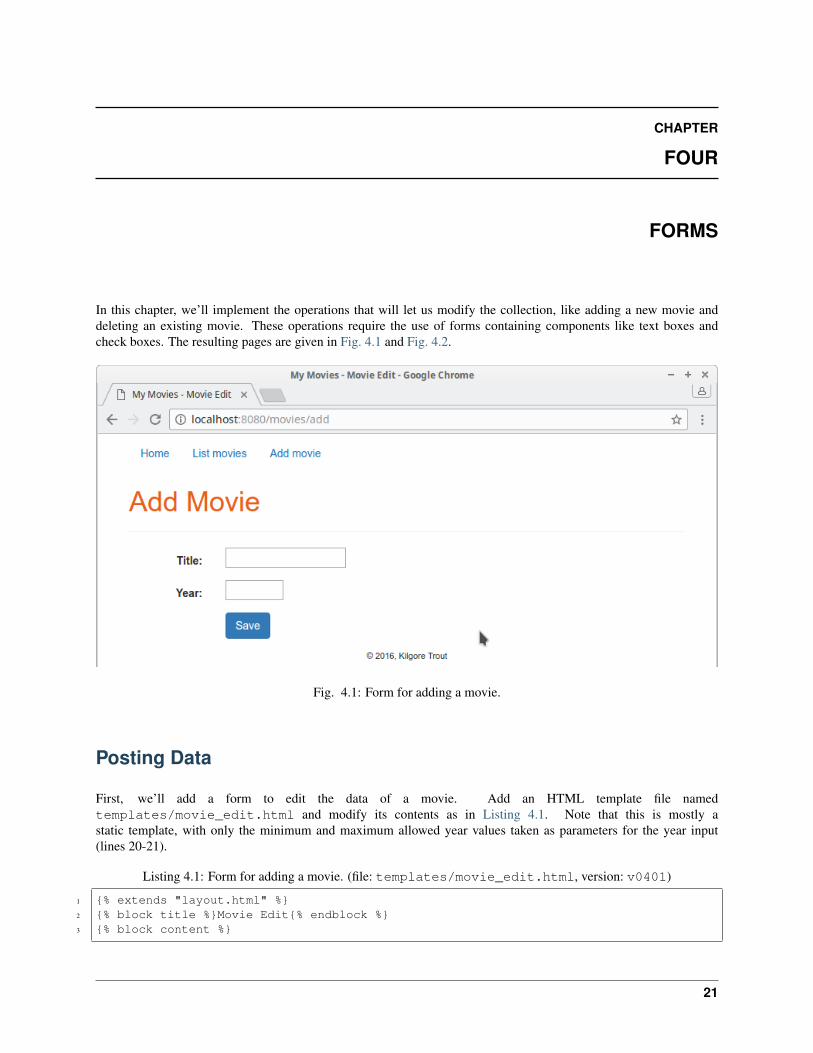
In this chapter, we’ll implement the operations that will let us modify the collection, like adding a new movie anddeleting an existing movie. These operations require the use of forms containing components like text boxes andcheck boxes. The resulting pages are given in Fig. 4.1 and Fig. 4.2.
Fig. 4.1: Form for adding a movie.
Posting Data
First, we’ll add a form to edit the data of a movie. Add an HTML template file namedtemplates/movie_edit.html and modify its contents as in Listing 4.1. Note that this is mostly astatic template, with only the minimum and maximum allowed year values taken as parameters for the year input(lines 20-21).
Listing 4.1: Form for adding a movie. (file: templates/movie_edit.html, version: v0401)
1 {% extends "layout.html" %}2 {% block title %}Movie Edit{% endblock %}3 {% block content %}
21
Flask Application Development Documentation, Release 1.1
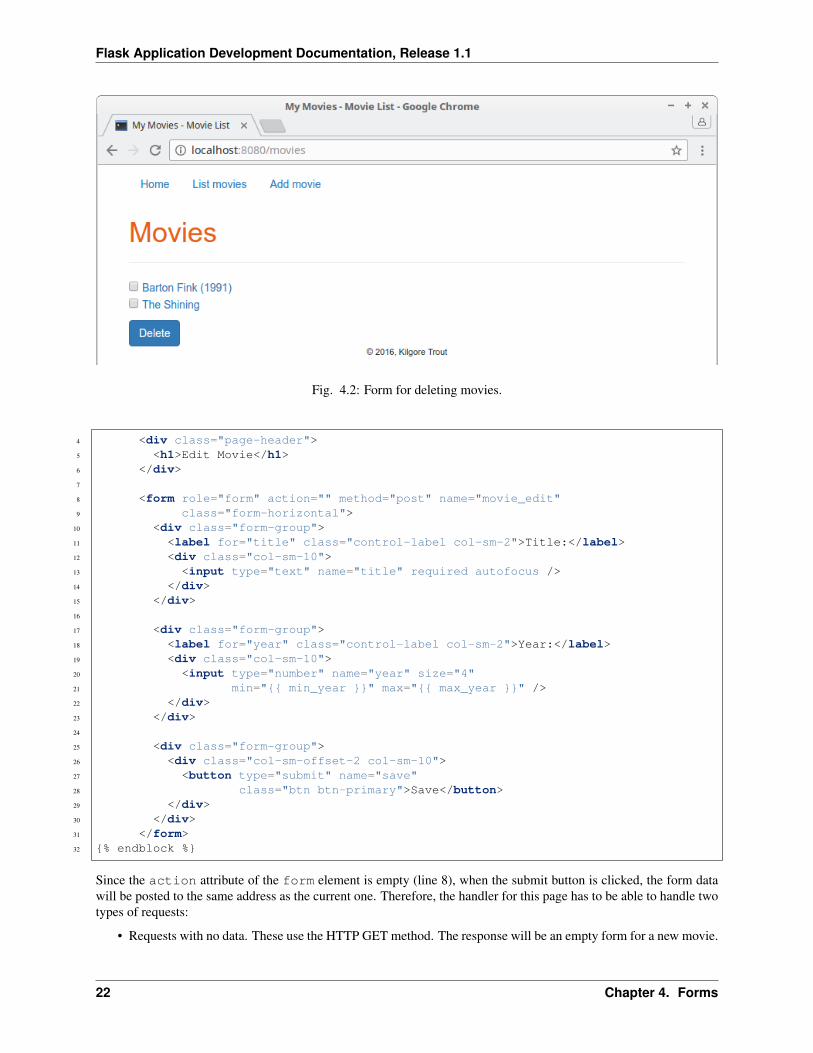
Fig. 4.2: Form for deleting movies.
4 <div class="page-header">5 <h1>Edit Movie</h1>6 </div>7
8 <form role="form" action="" method="post" name="movie_edit"9 class="form-horizontal">
10 <div class="form-group">11 <label for="title" class="control-label col-sm-2">Title:</label>12 <div class="col-sm-10">13 <input type="text" name="title" required autofocus />14 </div>15 </div>16
17 <div class="form-group">18 <label for="year" class="control-label col-sm-2">Year:</label>19 <div class="col-sm-10">20 <input type="number" name="year" size="4"21 min="{{ min_year }}" max="{{ max_year }}" />22 </div>23 </div>24
25 <div class="form-group">26 <div class="col-sm-offset-2 col-sm-10">27 <button type="submit" name="save"28 class="btn btn-primary">Save</button>29 </div>30 </div>31 </form>32 {% endblock %}
Since the action attribute of the form element is empty (line 8), when the submit button is clicked, the form datawill be posted to the same address as the current one. Therefore, the handler for this page has to be able to handle twotypes of requests:
• Requests with no data. These use the HTTP GET method. The response will be an empty form for a new movie.
22 Chapter 4. Forms
Flask Application Development Documentation, Release 1.1
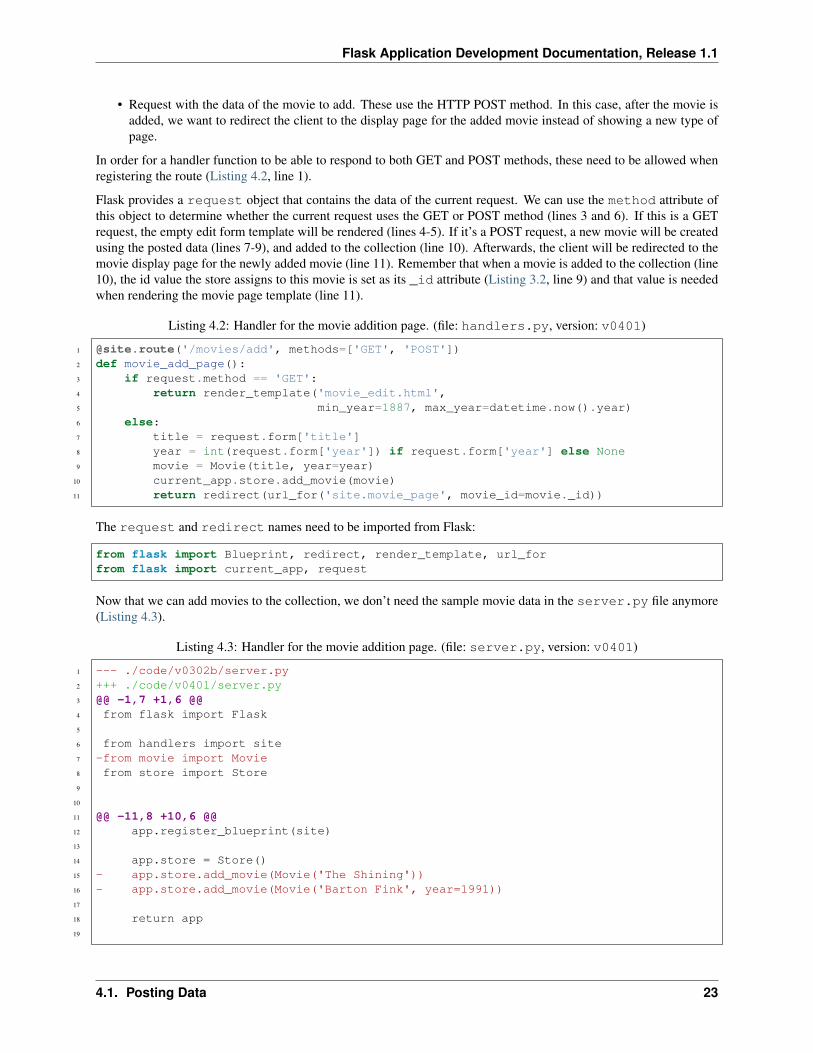
• Request with the data of the movie to add. These use the HTTP POST method. In this case, after the movie isadded, we want to redirect the client to the display page for the added movie instead of showing a new type ofpage.
In order for a handler function to be able to respond to both GET and POST methods, these need to be allowed whenregistering the route (Listing 4.2, line 1).
Flask provides a request object that contains the data of the current request. We can use the method attribute ofthis object to determine whether the current request uses the GET or POST method (lines 3 and 6). If this is a GETrequest, the empty edit form template will be rendered (lines 4-5). If it’s a POST request, a new movie will be createdusing the posted data (lines 7-9), and added to the collection (line 10). Afterwards, the client will be redirected to themovie display page for the newly added movie (line 11). Remember that when a movie is added to the collection (line10), the id value the store assigns to this movie is set as its _id attribute (Listing 3.2, line 9) and that value is neededwhen rendering the movie page template (line 11).
Listing 4.2: Handler for the movie addition page. (file: handlers.py, version: v0401)
1 @site.route('/movies/add', methods=['GET', 'POST'])2 def movie_add_page():3 if request.method == 'GET':4 return render_template('movie_edit.html',5 min_year=1887, max_year=datetime.now().year)6 else:7 title = request.form['title']8 year = int(request.form['year']) if request.form['year'] else None9 movie = Movie(title, year=year)
10 current_app.store.add_movie(movie)11 return redirect(url_for('site.movie_page', movie_id=movie._id))
The request and redirect names need to be imported from Flask:
from flask import Blueprint, redirect, render_template, url_forfrom flask import current_app, request
Now that we can add movies to the collection, we don’t need the sample movie data in the server.py file anymore(Listing 4.3).
Listing 4.3: Handler for the movie addition page. (file: server.py, version: v0401)
1 --- ./code/v0302b/server.py2 +++ ./code/v0401/server.py3 @@ -1,7 +1,6 @@4 from flask import Flask5
6 from handlers import site7 -from movie import Movie8 from store import Store9
10
11 @@ -11,8 +10,6 @@12 app.register_blueprint(site)13
14 app.store = Store()15 - app.store.add_movie(Movie('The Shining'))16 - app.store.add_movie(Movie('Barton Fink', year=1991))17
18 return app19
4.1. Posting Data 23

Flask Application Development Documentation, Release 1.1
To make this page accessible from other pages, we add a link to the global navigation panel (Listing 4.4, lines 9-11).
Listing 4.4: Navigation with link to movie addition page. (file: templates/layout.html, version: v0401)
1 <div id="navbar" class="collapse navbar-collapse">2 <ul class="nav navbar-nav">3 <li class="active">4 <a href="{{ url_for('site.home_page') }}">Home</a>5 </li>6 <li>7 <a href="{{ url_for('site.movies_page') }}">List movies</a>8 </li>9 <li>
10 <a href="{{ url_for('site.movie_add_page') }}">Add movie</a>11 </li>12 </ul>13 </div>
Posting Lists
Our next step is to delete movies from the collection. We will change the movie list page so that there will be a checkbox next to every movie. There will also be a delete button which, when clicked, will cause all checked movies to bedeleted. First, we change the template for the movie list page as in Listing 4.5.
Listing 4.5: Movie list template with check boxes for entries. (file: templates/movies.html, version: v0402)
1 {% extends "layout.html" %}2 {% block title %}Movie List{% endblock %}3 {% block content %}4 <div class="page-header">5 <h1>Movies</h1>6 </div>7
8 {% if movies %}9 <form role="form" action="" method="post" name="movies"
10 class="form-horizontal">11 <ul class="list-unstyled">12 {% for movie_id, movie in movies %}13 <li>14 <input type="checkbox" name="movie_ids" value="{{ movie_id }}" />15 <a href="{{ url_for('site.movie_page', movie_id=movie_id) }}">16 {{ movie.title }}17 {% if movie.year %} ({{ movie.year }}) {% endif %}18 </a>19 </li>20 {% endfor %}21 </ul>22
23 <button type="submit" name="delete"24 class="btn btn-primary">Delete</button>25 </form>26 {% endif %}27 {% endblock %}
Since this page is now going to be used to post data to the server, the elements are placed into a form (between lines9-10 and 25). The data will be posted to the same address, and the keys of the selected movies will be accumulated in
24 Chapter 4. Forms
Flask Application Development Documentation, Release 1.1
the movie_ids variable (line 14). And finally, there is the button element (lines 23-24).
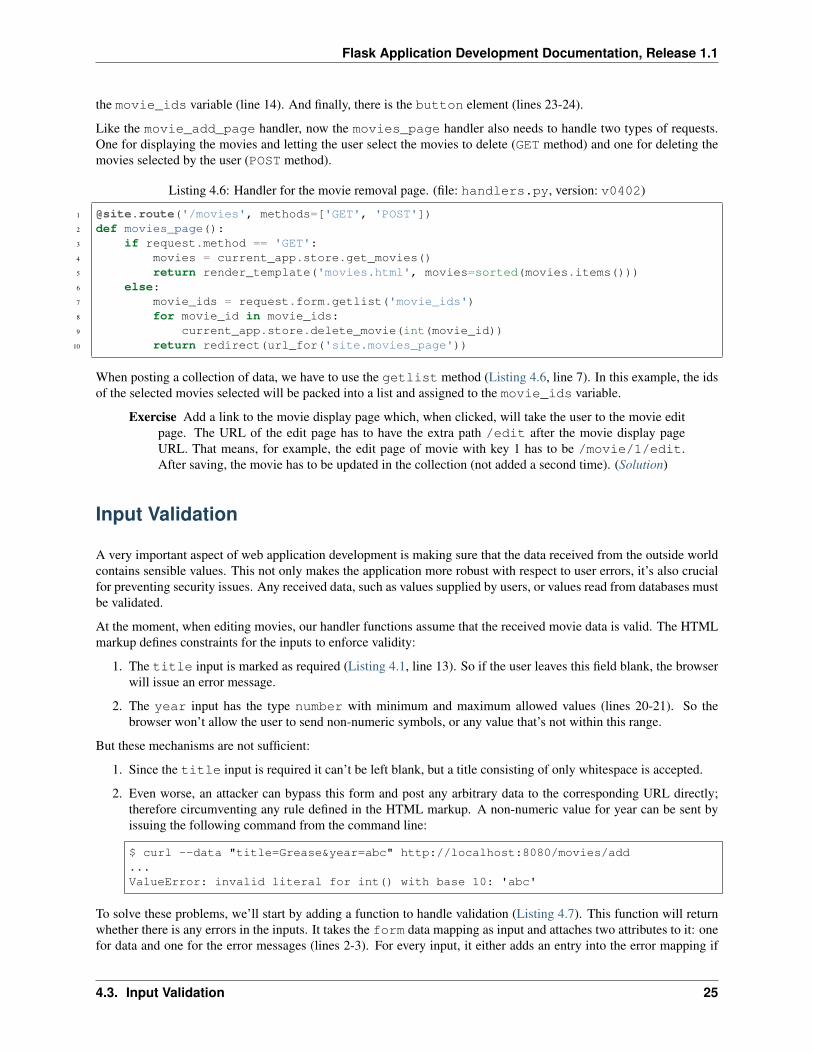
Like the movie_add_page handler, now the movies_page handler also needs to handle two types of requests.One for displaying the movies and letting the user select the movies to delete (GET method) and one for deleting themovies selected by the user (POST method).
Listing 4.6: Handler for the movie removal page. (file: handlers.py, version: v0402)
1 @site.route('/movies', methods=['GET', 'POST'])2 def movies_page():3 if request.method == 'GET':4 movies = current_app.store.get_movies()5 return render_template('movies.html', movies=sorted(movies.items()))6 else:7 movie_ids = request.form.getlist('movie_ids')8 for movie_id in movie_ids:9 current_app.store.delete_movie(int(movie_id))
10 return redirect(url_for('site.movies_page'))
When posting a collection of data, we have to use the getlist method (Listing 4.6, line 7). In this example, the idsof the selected movies selected will be packed into a list and assigned to the movie_ids variable.
Exercise Add a link to the movie display page which, when clicked, will take the user to the movie editpage. The URL of the edit page has to have the extra path /edit after the movie display pageURL. That means, for example, the edit page of movie with key 1 has to be /movie/1/edit.After saving, the movie has to be updated in the collection (not added a second time). (Solution)
Input Validation
A very important aspect of web application development is making sure that the data received from the outside worldcontains sensible values. This not only makes the application more robust with respect to user errors, it’s also crucialfor preventing security issues. Any received data, such as values supplied by users, or values read from databases mustbe validated.
At the moment, when editing movies, our handler functions assume that the received movie data is valid. The HTMLmarkup defines constraints for the inputs to enforce validity:
1. The title input is marked as required (Listing 4.1, line 13). So if the user leaves this field blank, the browserwill issue an error message.
2. The year input has the type number with minimum and maximum allowed values (lines 20-21). So thebrowser won’t allow the user to send non-numeric symbols, or any value that’s not within this range.
But these mechanisms are not sufficient:
1. Since the title input is required it can’t be left blank, but a title consisting of only whitespace is accepted.
2. Even worse, an attacker can bypass this form and post any arbitrary data to the corresponding URL directly;therefore circumventing any rule defined in the HTML markup. A non-numeric value for year can be sent byissuing the following command from the command line:
$ curl --data "title=Grease&year=abc" http://localhost:8080/movies/add...ValueError: invalid literal for int() with base 10: 'abc'
To solve these problems, we’ll start by adding a function to handle validation (Listing 4.7). This function will returnwhether there is any errors in the inputs. It takes the form data mapping as input and attaches two attributes to it: onefor data and one for the error messages (lines 2-3). For every input, it either adds an entry into the error mapping if
4.3. Input Validation 25

Flask Application Development Documentation, Release 1.1
the value is not validated (as in line 6 for title), or it adds an entry into the data mapping (as in lines 8 for title). Whenadding the data entry, it also does type conversion for the year input (lines 15 and 19). If all data is valid, errors willbe empty.
Listing 4.7: Movie data validator function. (file: handlers.py, version: v0403)
1 def validate_movie_data(form):2 form.data = {}3 form.errors = {}4
5 if len(form['title'].strip()) == 0:6 form.errors['title'] = 'Title can not be blank.'7 else:8 form.data['title'] = form['title']9
10 if not form['year']:11 form.data['year'] = None12 elif not form['year'].isdigit():13 form.errors['year'] = 'Year must consist of digits only.'14 else:15 year = int(form['year'])16 if (year < 1887) or (year > datetime.now().year):17 form.errors['year'] = 'Year not in valid range.'18 else:19 form.data['year'] = year20
21 return len(form.errors) == 0
Next, our movie addition page handler will call this function to validate the form it received (Listing 4.8, line 6). If theinputs are valid, the data for the new movie can now be taken from the data mapping (lines 8-9) that was attached tothe form by the validator. If the validator returns errors, the handler renders the movie edit form again (lines 14-15).By passing request.form to the template (through line 13), it sets the default values in the form so that the userwon’t have to enter all fields again. Note that, in the GET method case, the code follows the lines 4 and 14, doing thesame operations as before.
Listing 4.8: Movie addition with validation. (file: handlers.py, version: v0403)
1 @site.route('/movies/add', methods=['GET', 'POST'])2 def movie_add_page():3 if request.method == 'GET':4 form = {'title': '', 'year': ''}5 else:6 valid = validate_movie_data(request.form)7 if valid:8 title = request.form.data['title']9 year = request.form.data['year']
10 movie = Movie(title, year=year)11 current_app.store.add_movie(movie)12 return redirect(url_for('site.movie_page', movie_id=movie._id))13 form = request.form14 return render_template('movie_edit.html', form=form,15 min_year=1887, max_year=datetime.now().year)
Also remember that the validator attaches error messages to its form parameter and these messages can now be dis-played when the form is re-rendered after an invalid submission (Listing 4.9, lines 15-19 and 29-33).
26 Chapter 4. Forms

Flask Application Development Documentation, Release 1.1
Listing 4.9: Movie edit form with error messages. (file: templates/movie_edit.html, version: v0403)
1 {% extends "layout.html" %}2 {% block title %}Movie Edit{% endblock %}3 {% block content %}4 <div class="page-header">5 <h1>Edit Movie</h1>6 </div>7
8 <form role="form" action="" method="post" name="movie_edit"9 class="form-horizontal">
10 <div class="form-group">11 <label for="title" class="control-label col-sm-2">Title:</label>12 <div class="col-sm-10">13 <input type="text" name="title" required autofocus14 value="{{ form['title'] }}" />15 {% if 'title' in form.errors %}16 <div class="alert alert-danger">17 {{ form.errors['title'] }}18 </div>19 {% endif %}20 </div>21 </div>22
23 <div class="form-group">24 <label for="year" class="control-label col-sm-2">Year:</label>25 <div class="col-sm-10">26 <input type="number" name="year" size="4"27 min="{{ min_year }}" max="{{ max_year }}"28 value="{{ form['year'] }}" />29 {% if 'year' in form.errors %}30 <div class="alert alert-danger">31 {{ form.errors['year'] }}32 </div>33 {% endif %}34 </div>35 </div>36
37 <div class="form-group">38 <div class="col-sm-offset-2 col-sm-10">39 <button type="submit" name="save"40 class="btn btn-primary">Save</button>41 </div>42 </div>43 </form>44 {% endblock %}
And similar arrangements have to be made in the movie editing handler (Listing 4.10).
Listing 4.10: Movie editing with validation. (file: handlers.py, version: v0403)
1 @site.route('/movie/<int:movie_id>/edit', methods=['GET', 'POST'])2 def movie_edit_page(movie_id):3 movie = current_app.store.get_movie(movie_id)4 if request.method == 'GET':5 form = {'title': movie.title,6 'year': movie.year if movie.year else ''}7 else:
4.3. Input Validation 27

Flask Application Development Documentation, Release 1.1
8 valid = validate_movie_data(request.form)9 if valid:
10 movie.title = request.form.data['title']11 movie.year = request.form.data['year']12 current_app.store.update_movie(movie)13 return redirect(url_for('site.movie_page', movie_id=movie._id))14 form = request.form15 return render_template('movie_edit.html', form=form,16 min_year=1887, max_year=datetime.now().year)
Exercise Replace the input validation mechanism with an implementation that uses the Flask-WTF plu-gin. Also make use of its CSRF protection features. For handling number type inputs, use thewtforms_components package. (Solution)
28 Chapter 4. Forms
CHAPTER
FIVE
LOGINS
As our next step, we want to make sure that only authenticated users will be able to modify the collection. Sowe’ll need a way of logging users in to and out of our site. We’ll create two users: the normaluser (passwordnormaluserpw) will be able to edit existing movies, but only the admin (password adminpw) user will be able toadd or delete movies.
Storing Passwords
Applications should never store passwords in plain text. The correct way to store a password is after hashing it.The passlib package provides the necessary tools for storing passwords securely. After installing it, you can hash apassword as shown in an example Python session below:
>>> from passlib.apps import custom_app_context as pwd_context>>> password = 'adminpw'>>> hashed = pwd_context.encrypt(password)>>> hashed'$6$rounds=702382$2wkwLY3/D2qLgX7K$tAQC6L3G8D/GWHzx5FQIP/4.LtSNT/→˓q5KG0avCcf0MKsRucwUXCW.nhmjkpkVaSCbvb1QOQJz321fKZ0DxSJP/'
Later, when a user supplies a password, you can check whether it’s the correct password or not by verifying it againstthe hashed value:
>>> pwd_context.verify('admin_pw', hashed)False>>> pwd_context.verify('adminpw', hashed)True
Although the proper place to store hashed passwords would be a file or a database, for this example we’re going tostore them in the settings file as a map from usernames to passwords (Listing 5.1). The ADMIN_USERS setting liststhe usernames who have administrative privileges.
Listing 5.1: Setting for passwords. (file: settings.py, version: v0501)
1 DEBUG = True2 PORT = 80803 SECRET_KEY = 'secret'4 WTF_CSRF_ENABLED = True5
6 PASSWORDS = {7 'admin': '$6$rounds=702382$2wkwLY3/D2qLgX7K$tAQC6L3G8D/GWHzx5FQIP/4.LtSNT/
→˓q5KG0avCcf0MKsRucwUXCW.nhmjkpkVaSCbvb1QOQJz321fKZ0DxSJP/',8 'normaluser': '$6$rounds=627096$AscnqlDtN2bWotwE
→˓$2s38G2w3xupwFf7woYv8XTWvwYc9sBk7t0reSU0VLZhXQCd6FFjlkysWpy8eYL06SQGcMgFQfvuP2XRB/→˓BeTb.'
29

Flask Application Development Documentation, Release 1.1
9 }10
11 ADMIN_USERS = ['admin']
Login Management
For handling login management, we’ll use the Flask-Login plugin. This plugin requires us to implement a class forrepresenting users on our site (Listing 5.2). Our user data basically consists of a username and a password. Flask-Login assumes that there will be a unique string value for identifying each user. In most cases, this will be the stringvalue of the database id number for a user. In our example, we will use the username for this purpose. For detailsabout how Flask-Login represents users, check out its documentation.
Listing 5.2: Model class for users. (file: user.py, version: v0501)
1 from flask import current_app2 from flask_login import UserMixin3
4
5 class User(UserMixin):6 def __init__(self, username, password):7 self.username = username8 self.password = password9 self.active = True
10 self.is_admin = False11
12 def get_id(self):13 return self.username14
15 @property16 def is_active(self):17 return self.active18
19
20 def get_user(user_id):21 password = current_app.config['PASSWORDS'].get(user_id)22 user = User(user_id, password) if password else None23 if user is not None:24 user.is_admin = user.username in current_app.config['ADMIN_USERS']25 return user
We also implement a function that given a user’s id, returns the user object associated with that id (lines 20-25). It firstchecks whether there is a entry in the passwords map, and if so, creates the user object (lines 21-22). It also sets theis_admin property if the user is listed in the ADMIN_USERS settings (line 24).
To incorporate Flask-Login, we have to instantiate a LoginManager (lines 2 and 9) and add it to our application(line 22). If a visitor makes a request to a protected page without logging in, we can redirect the request to a loginpage by setting the login_view property of the login manager (line 23). And finally, a user loader function will beresponsible for creating a user object from the user id in the session (lines 6 and 12-14).
Listing 5.3: Application with login manager. (file: server.py, version: v0501)
1 from flask import Flask2 from flask_login import LoginManager3
4 from handlers import site
30 Chapter 5. Logins
Flask Application Development Documentation, Release 1.1
5 from store import Store6 from user import get_user7
8
9 lm = LoginManager()10
11
12 @lm.user_loader13 def load_user(user_id):14 return get_user(user_id)15
16
17 def create_app():18 app = Flask(__name__)19 app.config.from_object('settings')20 app.register_blueprint(site)21
22 lm.init_app(app)23 lm.login_view = 'site.login_page'24
25 app.store = Store()26
27 return app28
29
30 def main():31 app = create_app()32 port = app.config.get('PORT', 5000)33 app.run(host='0.0.0.0', port=port)34
35
36 if __name__ == '__main__':37 main()
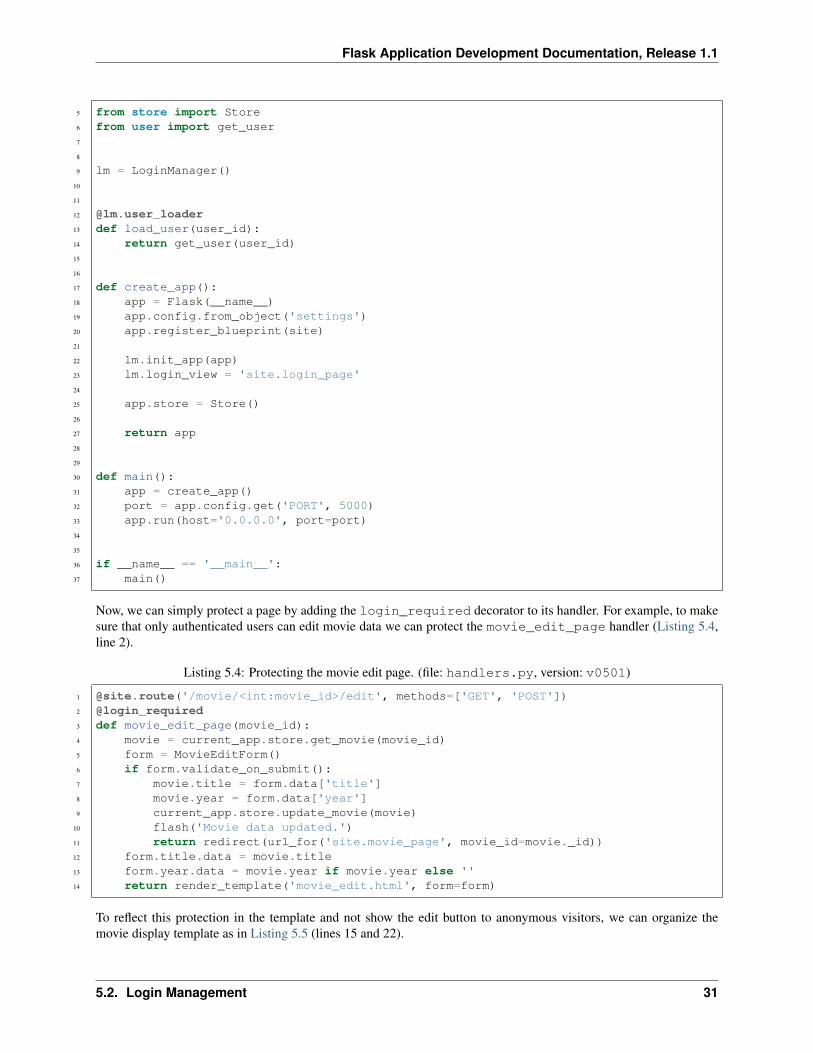
Now, we can simply protect a page by adding the login_required decorator to its handler. For example, to makesure that only authenticated users can edit movie data we can protect the movie_edit_page handler (Listing 5.4,line 2).
Listing 5.4: Protecting the movie edit page. (file: handlers.py, version: v0501)
1 @site.route('/movie/<int:movie_id>/edit', methods=['GET', 'POST'])2 @login_required3 def movie_edit_page(movie_id):4 movie = current_app.store.get_movie(movie_id)5 form = MovieEditForm()6 if form.validate_on_submit():7 movie.title = form.data['title']8 movie.year = form.data['year']9 current_app.store.update_movie(movie)
10 flash('Movie data updated.')11 return redirect(url_for('site.movie_page', movie_id=movie._id))12 form.title.data = movie.title13 form.year.data = movie.year if movie.year else ''14 return render_template('movie_edit.html', form=form)
To reflect this protection in the template and not show the edit button to anonymous visitors, we can organize themovie display template as in Listing 5.5 (lines 15 and 22).
5.2. Login Management 31

Flask Application Development Documentation, Release 1.1
Listing 5.5: Showing the edit button only to authenticated users. (file: templates/movie.html, version: v0501)
1 {% extends "layout.html" %}2 {% block title %}Movie{% endblock %}3 {% block content %}4 <div class="page-header">5 <h1>{{ movie.title }}</h1>6 </div>7
8 {% if movie.year %}9 <div class="row">
10 <div class="col-sm-2">Year:</div>11 <div class="col-sm-10">{{ movie.year }}</div>12 </div>13 {% endif %}14
15 {% if current_user.is_authenticated %}16 <div class="row">17 <div class="col-sm-2"></div>18 <div class="col-sm-10">19 <a href="{{ request.path }}/edit" class="btn btn-primary">Edit</a>20 </div>21 </div>22 {% endif %}23 {% endblock %}
Another feature provided by Flask is to easily display messages to logged-in users. The flash function registers amessage that the user will see on the next page (Listing 5.4, line 10). To display these messages, we have to add thenecessary markup to the base layout template (Listing 5.9, lines 64-66).
To prevent the normal user from adding or deleting movies, we can also add user role based protections to parts of thehandlers (Listing 5.6, lines 7-8 and 19-20). In this example, the abort function will cause an “Unauthorized” errordue to the 401 HTTP status code.
Listing 5.6: Protecting the movie add and delete operations. (file: handlers.py, version: v0501)
1 @site.route('/movies', methods=['GET', 'POST'])2 def movies_page():3 if request.method == 'GET':4 movies = current_app.store.get_movies()5 return render_template('movies.html', movies=sorted(movies.items()))6 else:7 if not current_user.is_admin:8 abort(401)9 movie_ids = request.form.getlist('movie_ids')
10 for movie_id in movie_ids:11 current_app.store.delete_movie(int(movie_id))12 flash('%d movies deleted.' % len(movie_ids))13 return redirect(url_for('site.movies_page'))14
15
16 @site.route('/movies/add', methods=['GET', 'POST'])17 @login_required18 def movie_add_page():19 if not current_user.is_admin:20 abort(401)21 form = MovieEditForm()
32 Chapter 5. Logins

Flask Application Development Documentation, Release 1.1
22 if form.validate_on_submit():23 title = form.data['title']24 year = form.data['year']25 movie = Movie(title, year=year)26 current_app.store.add_movie(movie)27 flash('Movie added.')28 return redirect(url_for('site.movie_page', movie_id=movie._id))29 return render_template('movie_edit.html', form=form)
We could also write the condition based on the username, as shown below. But role based protections are easier tomaintain.
if not current_user.username == 'admin':abort(401)
Again, we can reflect the changes in the template (Listing 5.7). Here, we’re not only hiding the delete button fromnon-administrative users (lines 25-28), we’re also hiding the check boxes (lines 14-16) because they wouldn’t makesense without a button.
Listing 5.7: Protecting the delete operation. (file: templates/movies.html, version: v0501)
1 {% extends "layout.html" %}2 {% block title %}Movie List{% endblock %}3 {% block content %}4 <div class="page-header">5 <h1>Movies</h1>6 </div>7
8 {% if movies %}9 <form role="form" action="" method="post" name="movies"
10 class="form-horizontal">11 <ul class="list-unstyled">12 {% for movie_id, movie in movies %}13 <li>14 {% if current_user.is_admin %}15 <input type="checkbox" name="movie_ids" value="{{ movie_id }}" />16 {% endif %}17 <a href="{{ url_for('site.movie_page', movie_id=movie_id) }}">18 {{ movie.title }}19 {% if movie.year %} ({{ movie.year }}) {% endif %}20 </a>21 </li>22 {% endfor %}23 </ul>24
25 {% if current_user.is_admin %}26 <button type="submit" name="delete"27 class="btn btn-primary">Delete</button>28 {% endif %}29 </form>30 {% endif %}31 {% endblock %}
Next, we’ll add the login page template (Listing 5.8). Note that this template requires an extra style sheet (lines 3-4),so we’ll put it into an extra header section (lines 2 and 5) that we define in the base layout (Listing 5.9, line 14).
5.2. Login Management 33

Flask Application Development Documentation, Release 1.1
Listing 5.8: Login page template. (file: templates/login.html, version: v0501)
1 {% extends "layout.html" %}2 {% block extra_head %}3 <link rel="stylesheet"4 href="{{ url_for('static', filename='signin.css') }}" />5 {% endblock %}6 {% block content %}7 <form role="form" action="" method="post" name="login"8 class="form-signin">9 {{ form.csrf_token }}
10
11 <h2 class="form-signin-heading">Sign in</h2>12
13 <div class="form-group">14 <label for="login-username" class="sr-only">Username:</label>15 {{ form.username(required=True, autofocus=True,16 id='login-username', class='form-control',17 placeholder='your username') }}18 {% for error in form.username.errors %}19 <span class="error">{{ error }}</span>20 {% endfor %}21 </div>22
23 <div class="form-group">24 <label for="login-password" class="sr-only">Password:</label>25 {{ form.password(id='login-password', class='form-control',26 placeholder='your password') }}27 {% for error in form.password.errors %}28 <span class="error">{{ error }}</span>29 {% endfor %}30 </div>31
32 <button type="submit"33 class="btn btn-lg btn-primary btn-block">Log in</button>34 </form>35 {% endblock %}
The full base layout template is given in Listing 5.9. Note the following changes:
• If the visitor is not logged in, a login link is displayed (lines 44-45).
• If the visitor is logged in, the username is displayed along with a logout link (lines 46-57).
• The menu item for adding movie is only shown to administrative users (lines 37-41).
Listing 5.9: Base layout with flashed messages. (file: templates/layout.html, version: v0501)
1 <!DOCTYPE html>2 <html lang="en">3 <head>4 <meta charset="utf-8" />5 <meta http-equiv="X-UA-Compatible" content="IE=edge" />6 <meta name="viewport" content="width=device-width, initial-scale=1" />7
8 <title>My Movies - {% block title %}{% endblock %}</title>9
10 <link rel="stylesheet"
34 Chapter 5. Logins
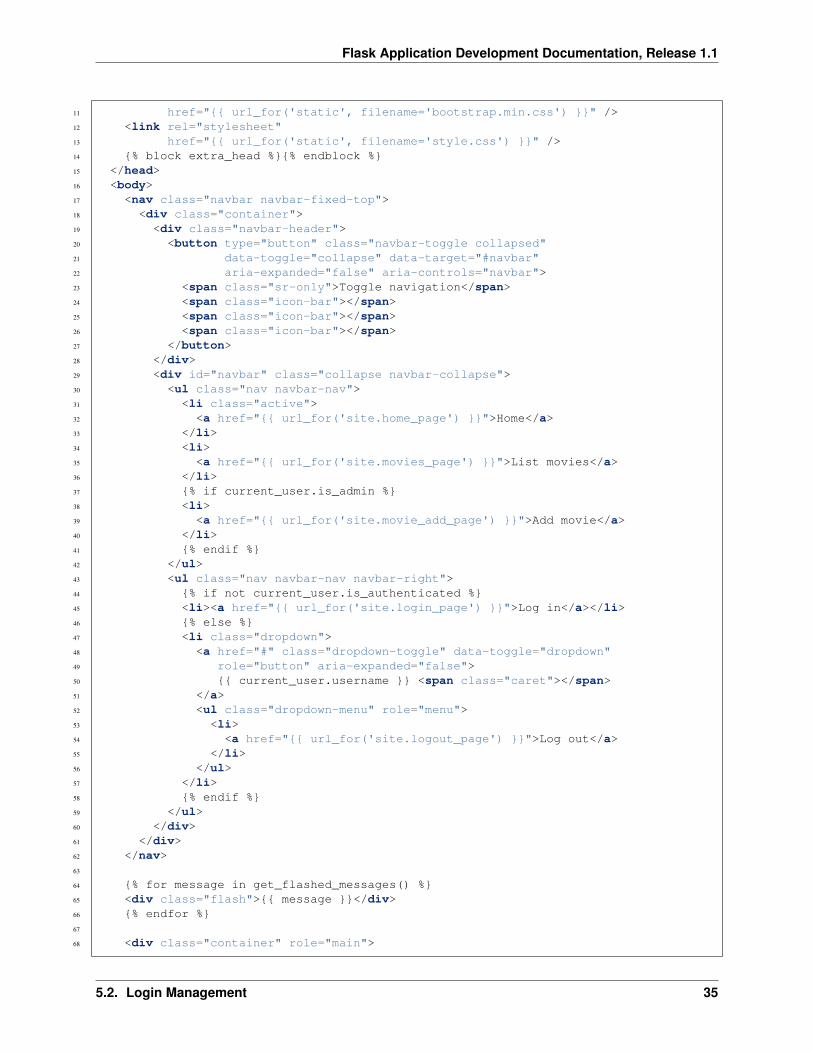
Flask Application Development Documentation, Release 1.1
11 href="{{ url_for('static', filename='bootstrap.min.css') }}" />12 <link rel="stylesheet"13 href="{{ url_for('static', filename='style.css') }}" />14 {% block extra_head %}{% endblock %}15 </head>16 <body>17 <nav class="navbar navbar-fixed-top">18 <div class="container">19 <div class="navbar-header">20 <button type="button" class="navbar-toggle collapsed"21 data-toggle="collapse" data-target="#navbar"22 aria-expanded="false" aria-controls="navbar">23 <span class="sr-only">Toggle navigation</span>24 <span class="icon-bar"></span>25 <span class="icon-bar"></span>26 <span class="icon-bar"></span>27 </button>28 </div>29 <div id="navbar" class="collapse navbar-collapse">30 <ul class="nav navbar-nav">31 <li class="active">32 <a href="{{ url_for('site.home_page') }}">Home</a>33 </li>34 <li>35 <a href="{{ url_for('site.movies_page') }}">List movies</a>36 </li>37 {% if current_user.is_admin %}38 <li>39 <a href="{{ url_for('site.movie_add_page') }}">Add movie</a>40 </li>41 {% endif %}42 </ul>43 <ul class="nav navbar-nav navbar-right">44 {% if not current_user.is_authenticated %}45 <li><a href="{{ url_for('site.login_page') }}">Log in</a></li>46 {% else %}47 <li class="dropdown">48 <a href="#" class="dropdown-toggle" data-toggle="dropdown"49 role="button" aria-expanded="false">50 {{ current_user.username }} <span class="caret"></span>51 </a>52 <ul class="dropdown-menu" role="menu">53 <li>54 <a href="{{ url_for('site.logout_page') }}">Log out</a>55 </li>56 </ul>57 </li>58 {% endif %}59 </ul>60 </div>61 </div>62 </nav>63
64 {% for message in get_flashed_messages() %}65 <div class="flash">{{ message }}</div>66 {% endfor %}67
68 <div class="container" role="main">
5.2. Login Management 35
Flask Application Development Documentation, Release 1.1
69 {% block content %}{% endblock %}70 </div>71
72 <footer>73 © 2016, Kilgore Trout74 </footer>75
76 <script src="{{ url_for('static', filename='jquery.min.js') }}"></script>77 <script src="{{ url_for('static', filename='bootstrap.min.js') }}"></script>78 </body>79 </html>
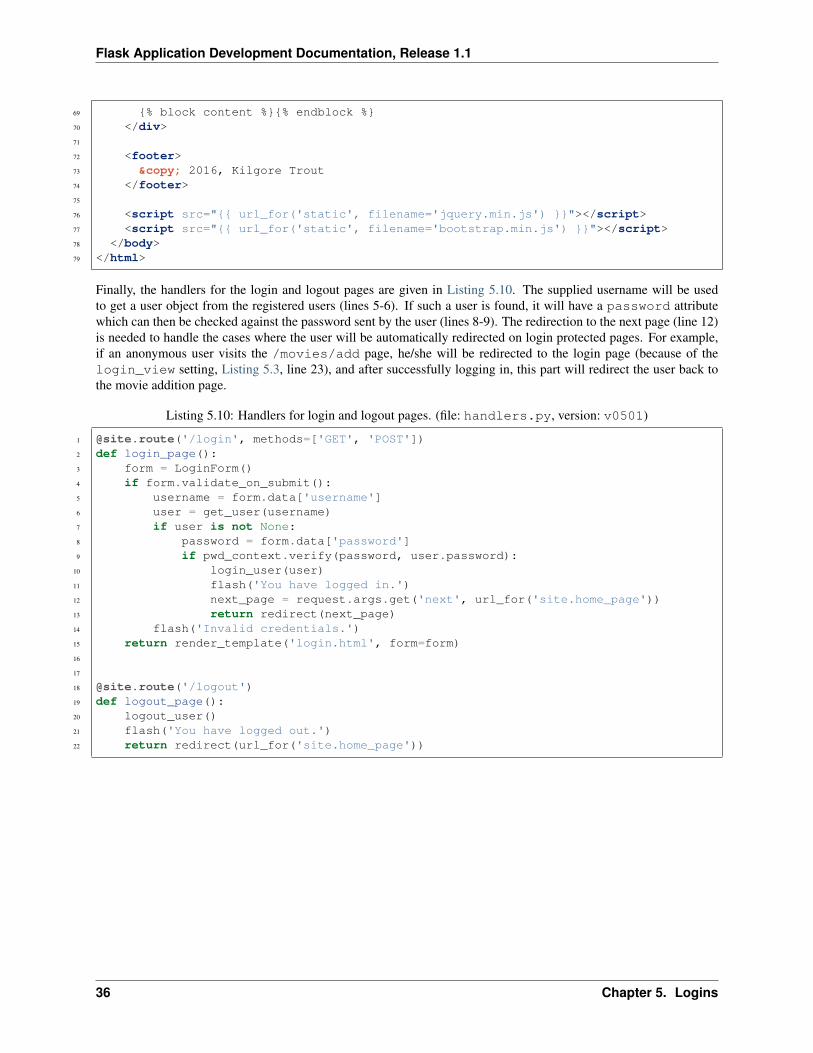
Finally, the handlers for the login and logout pages are given in Listing 5.10. The supplied username will be usedto get a user object from the registered users (lines 5-6). If such a user is found, it will have a password attributewhich can then be checked against the password sent by the user (lines 8-9). The redirection to the next page (line 12)is needed to handle the cases where the user will be automatically redirected on login protected pages. For example,if an anonymous user visits the /movies/add page, he/she will be redirected to the login page (because of thelogin_view setting, Listing 5.3, line 23), and after successfully logging in, this part will redirect the user back tothe movie addition page.
Listing 5.10: Handlers for login and logout pages. (file: handlers.py, version: v0501)
1 @site.route('/login', methods=['GET', 'POST'])2 def login_page():3 form = LoginForm()4 if form.validate_on_submit():5 username = form.data['username']6 user = get_user(username)7 if user is not None:8 password = form.data['password']9 if pwd_context.verify(password, user.password):
10 login_user(user)11 flash('You have logged in.')12 next_page = request.args.get('next', url_for('site.home_page'))13 return redirect(next_page)14 flash('Invalid credentials.')15 return render_template('login.html', form=form)16
17
18 @site.route('/logout')19 def logout_page():20 logout_user()21 flash('You have logged out.')22 return redirect(url_for('site.home_page'))
36 Chapter 5. Logins
CHAPTER
SIX
DATA PERSISTENCE
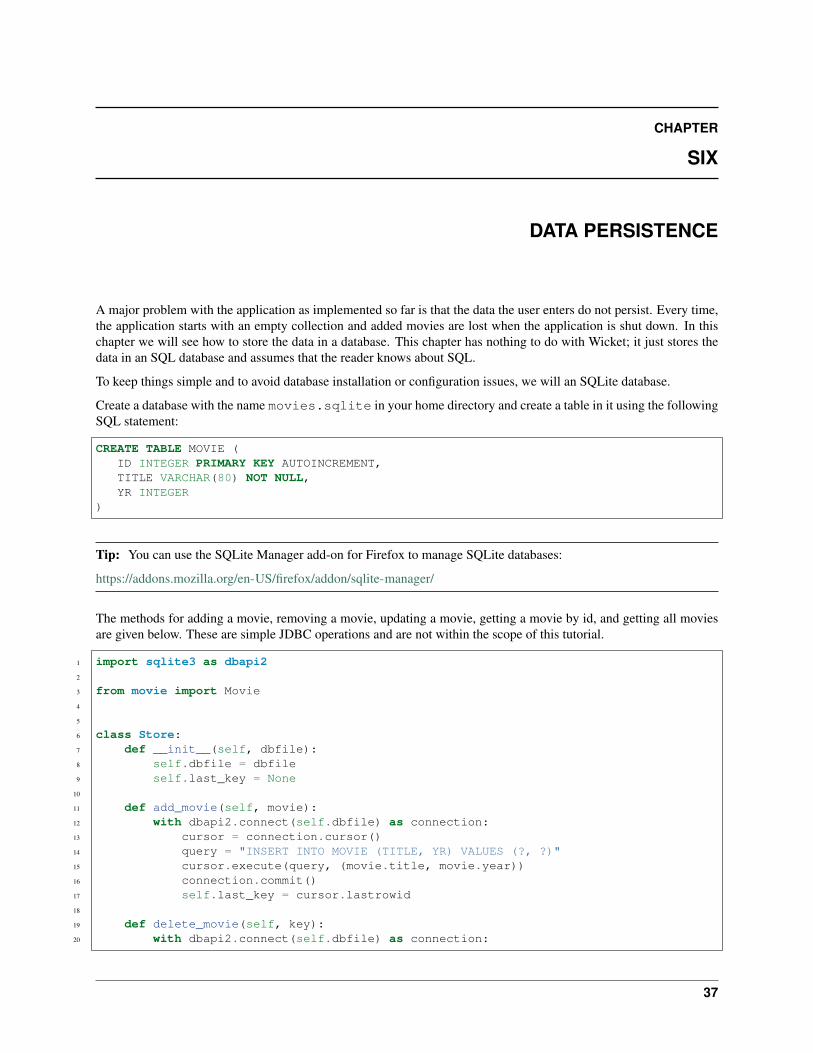
A major problem with the application as implemented so far is that the data the user enters do not persist. Every time,the application starts with an empty collection and added movies are lost when the application is shut down. In thischapter we will see how to store the data in a database. This chapter has nothing to do with Wicket; it just stores thedata in an SQL database and assumes that the reader knows about SQL.
To keep things simple and to avoid database installation or configuration issues, we will an SQLite database.
Create a database with the name movies.sqlite in your home directory and create a table in it using the followingSQL statement:
CREATE TABLE MOVIE (ID INTEGER PRIMARY KEY AUTOINCREMENT,TITLE VARCHAR(80) NOT NULL,YR INTEGER
)
Tip: You can use the SQLite Manager add-on for Firefox to manage SQLite databases:
https://addons.mozilla.org/en-US/firefox/addon/sqlite-manager/
The methods for adding a movie, removing a movie, updating a movie, getting a movie by id, and getting all moviesare given below. These are simple JDBC operations and are not within the scope of this tutorial.
1 import sqlite3 as dbapi22
3 from movie import Movie4
5
6 class Store:7 def __init__(self, dbfile):8 self.dbfile = dbfile9 self.last_key = None
10
11 def add_movie(self, movie):12 with dbapi2.connect(self.dbfile) as connection:13 cursor = connection.cursor()14 query = "INSERT INTO MOVIE (TITLE, YR) VALUES (?, ?)"15 cursor.execute(query, (movie.title, movie.year))16 connection.commit()17 self.last_key = cursor.lastrowid18
19 def delete_movie(self, key):20 with dbapi2.connect(self.dbfile) as connection:
37
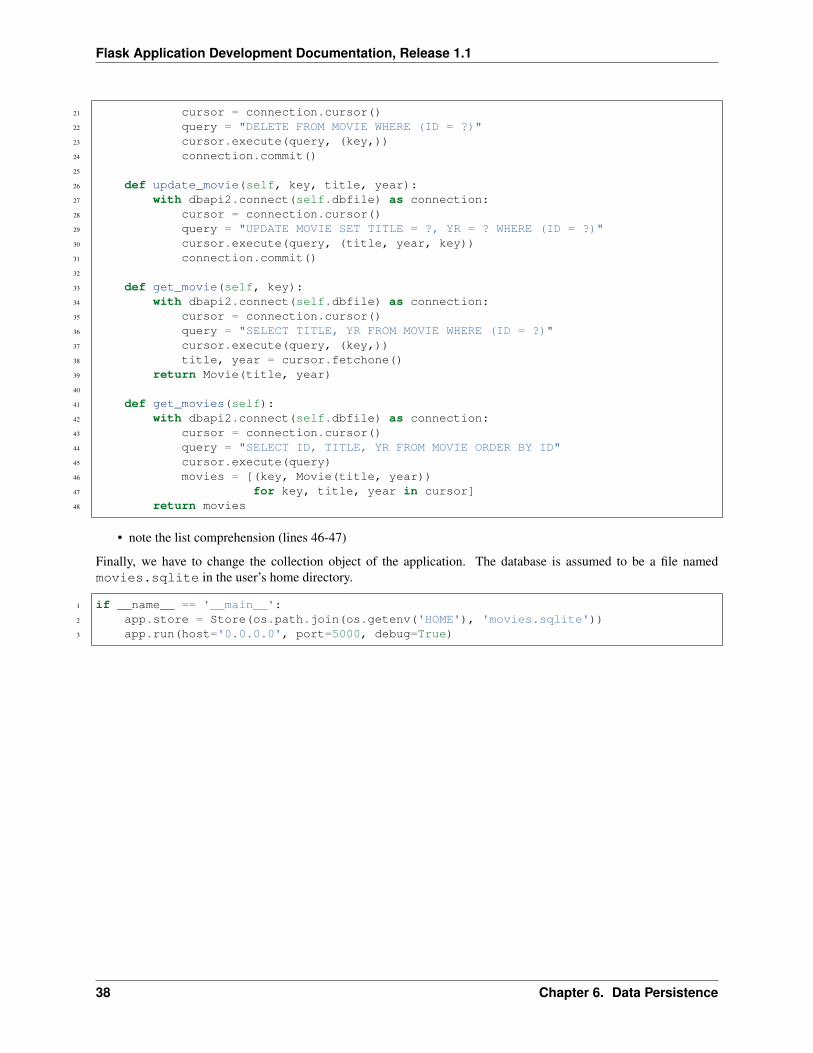
Flask Application Development Documentation, Release 1.1
21 cursor = connection.cursor()22 query = "DELETE FROM MOVIE WHERE (ID = ?)"23 cursor.execute(query, (key,))24 connection.commit()25
26 def update_movie(self, key, title, year):27 with dbapi2.connect(self.dbfile) as connection:28 cursor = connection.cursor()29 query = "UPDATE MOVIE SET TITLE = ?, YR = ? WHERE (ID = ?)"30 cursor.execute(query, (title, year, key))31 connection.commit()32
33 def get_movie(self, key):34 with dbapi2.connect(self.dbfile) as connection:35 cursor = connection.cursor()36 query = "SELECT TITLE, YR FROM MOVIE WHERE (ID = ?)"37 cursor.execute(query, (key,))38 title, year = cursor.fetchone()39 return Movie(title, year)40
41 def get_movies(self):42 with dbapi2.connect(self.dbfile) as connection:43 cursor = connection.cursor()44 query = "SELECT ID, TITLE, YR FROM MOVIE ORDER BY ID"45 cursor.execute(query)46 movies = [(key, Movie(title, year))47 for key, title, year in cursor]48 return movies
• note the list comprehension (lines 46-47)
Finally, we have to change the collection object of the application. The database is assumed to be a file namedmovies.sqlite in the user’s home directory.
1 if __name__ == '__main__':2 app.store = Store(os.path.join(os.getenv('HOME'), 'movies.sqlite'))3 app.run(host='0.0.0.0', port=5000, debug=True)
38 Chapter 6. Data Persistence

CHAPTER
SEVEN
SOLUTIONS TO EXERCISES
Chapter Basics
Exercise Add a link from the movie list page to the home page.
Listing 7.1: Movie list template with link to the home page (file: templates/movies.html, version: v0104b).
1 <!DOCTYPE html>2 <html lang="en">3 <head>4 <meta charset="utf-8" />5 <title>My Movies - Movie List</title>6 <link rel="stylesheet" href="/static/style.css" />7 </head>8 <body>9 <h1>Movies</h1>
10
11 <ul>12 <li><a href="/">Home</a></li>13 </ul>14 </body>15 </html>
Chapter Application Structure
Exercise Arrange the movie list page so that it will use the same navigation panel and footer.
Listing 7.2: Movie list template with navigation and footer. (file: templates/movies.html, version: v0203b)
1 {% extends "layout.html" %}2 {% block title %}Movie List{% endblock %}3 {% block content %}4 <h1>Movies</h1>5 {% endblock %}
Exercise Add Bootstrap to your base template and arrange your pages to use it.
Download bootstrap.min.css, bootstrap.min.js, and jquery.min.css, and put them into thestatic folder.
Listing 7.3: Base template using Bootstrap. (file: templates/layout.html, version: v0203c)
1 <!DOCTYPE html>2 <html lang="en">3 <head>4 <meta charset="utf-8" />
39

Flask Application Development Documentation, Release 1.1
5 <meta http-equiv="X-UA-Compatible" content="IE=edge" />6 <meta name="viewport" content="width=device-width, initial-scale=1" />7
8 <title>My Movies - {% block title %}{% endblock %}</title>9
10 <link rel="stylesheet"11 href="{{ url_for('static', filename='bootstrap.min.css') }}" />12 <link rel="stylesheet"13 href="{{ url_for('static', filename='style.css') }}" />14 </head>15 <body>16 <nav class="navbar navbar-fixed-top">17 <div class="container">18 <div class="navbar-header">19 <button type="button" class="navbar-toggle collapsed"20 data-toggle="collapse" data-target="#navbar"21 aria-expanded="false" aria-controls="navbar">22 <span class="sr-only">Toggle navigation</span>23 <span class="icon-bar"></span>24 <span class="icon-bar"></span>25 <span class="icon-bar"></span>26 </button>27 </div>28 <div id="navbar" class="collapse navbar-collapse">29 <ul class="nav navbar-nav">30 <li class="active">31 <a href="{{ url_for('home_page') }}">Home</a>32 </li>33 <li>34 <a href="{{ url_for('movies_page') }}">List movies</a>35 </li>36 </ul>37 </div>38 </div>39 </nav>40
41 <div class="container" role="main">42 {% block content %}{% endblock %}43 </div>44
45 <footer>46 © 2016, Kilgore Trout47 </footer>48
49 <script src="{{ url_for('static', filename='jquery.min.js') }}"></script>50 <script src="{{ url_for('static', filename='bootstrap.min.js') }}"></script>51 </body>52 </html>
Listing 7.4: Home page template using Bootstrap. (file: templates/home.html, version: v0203c)
1 {% extends "layout.html" %}2 {% block title %}Home{% endblock %}3 {% block content %}4 <div class="page-header">5 <h1>Welcome to my movie collection!</h1>6 </div>
40 Chapter 7. Solutions to Exercises

Flask Application Development Documentation, Release 1.1
7 <div class="greeting">Have a nice {{ day_name }}.</div>8 {% endblock %}
Listing 7.5: Movie list page template using Bootstrap. (file: templates/movies.html, version: v0203c)
1 {% extends "layout.html" %}2 {% block title %}Movie List{% endblock %}3 {% block content %}4 <div class="page-header">5 <h1>Movies</h1>6 </div>7 {% endblock %}
Listing 7.6: Style sheet adjustment for Bootstrap. (file: static/style.css, version: v0203c)
1 body {2 padding-top: 2em;3 }4
5 h1 {6 color: #E9601A;7 }8
9 div.greeting {10 font-style: italic;11 }12
13 footer {14 text-align: center;15 font-size: 80%;16 }
Chapter Data Model
Exercise Organize the movie list page so that the entries are links to pages that will display the selectedmovie.
Listing 7.7: Movie list page template with links to movie pages. (file: templates/movies.html, version:v0302b)
1 {% extends "layout.html" %}2 {% block title %}Movie List{% endblock %}3 {% block content %}4 <div class="page-header">5 <h1>Movies</h1>6 </div>7
8 {% if movies %}9 <ul class="list-unstyled">
10 {% for movie_id, movie in movies %}11 <li>12 <a href="{{ url_for('site.movie_page', movie_id=movie_id) }}">13 {{ movie.title }}14 {% if movie.year %} ({{ movie.year }}) {% endif %}15 </a>16 </li>17 {% endfor %}18 </ul>
41

Flask Application Development Documentation, Release 1.1
19 {% endif %}20 {% endblock %}
Chapter Forms
Exercise Add a link to the movie display page which, when clicked, will take the user to the movie editpage. After saving, the movie has to be updated in the collection (not added a second time).
Listing 7.8: Movie display template with link to edit page. (file: templates/movie.html, version: v0402b)
1 {% extends "layout.html" %}2 {% block title %}Movie{% endblock %}3 {% block content %}4 <div class="page-header">5 <h1>{{ movie.title }}</h1>6 </div>7
8 {% if movie.year %}9 <div class="row">
10 <div class="col-sm-2">Year:</div>11 <div class="col-sm-10">{{ movie.year }}</div>12 </div>13 {% endif %}14
15 <div class="row">16 <div class="col-sm-2"></div>17 <div class="col-sm-10">18 <a href="{{ request.path }}/edit" class="btn btn-primary">Edit</a>19 </div>20 </div>21 {% endblock %}
Listing 7.9: Movie edit form with default values. (file: templates/movie_edit.html, version: v0402b)
1 {% extends "layout.html" %}2 {% block title %}Movie Edit{% endblock %}3 {% block content %}4 <div class="page-header">5 <h1>Edit Movie</h1>6 </div>7
8 <form role="form" action="" method="post" name="movie_edit"9 class="form-horizontal">
10 <div class="form-group">11 <label for="title" class="control-label col-sm-2">Title:</label>12 <div class="col-sm-10">13 <input type="text" name="title" required autofocus14 value="{{ form['title'] }}" />15 </div>16 </div>17
18 <div class="form-group">19 <label for="year" class="control-label col-sm-2">Year:</label>20 <div class="col-sm-10">21 <input type="number" name="year" size="4"22 min="{{ min_year }}" max="{{ max_year }}"23 value="{{ form['year'] }}" />
42 Chapter 7. Solutions to Exercises
Flask Application Development Documentation, Release 1.1
24 </div>25 </div>26
27 <div class="form-group">28 <div class="col-sm-offset-2 col-sm-10">29 <button type="submit" name="save"30 class="btn btn-primary">Save</button>31 </div>32 </div>33 </form>34 {% endblock %}
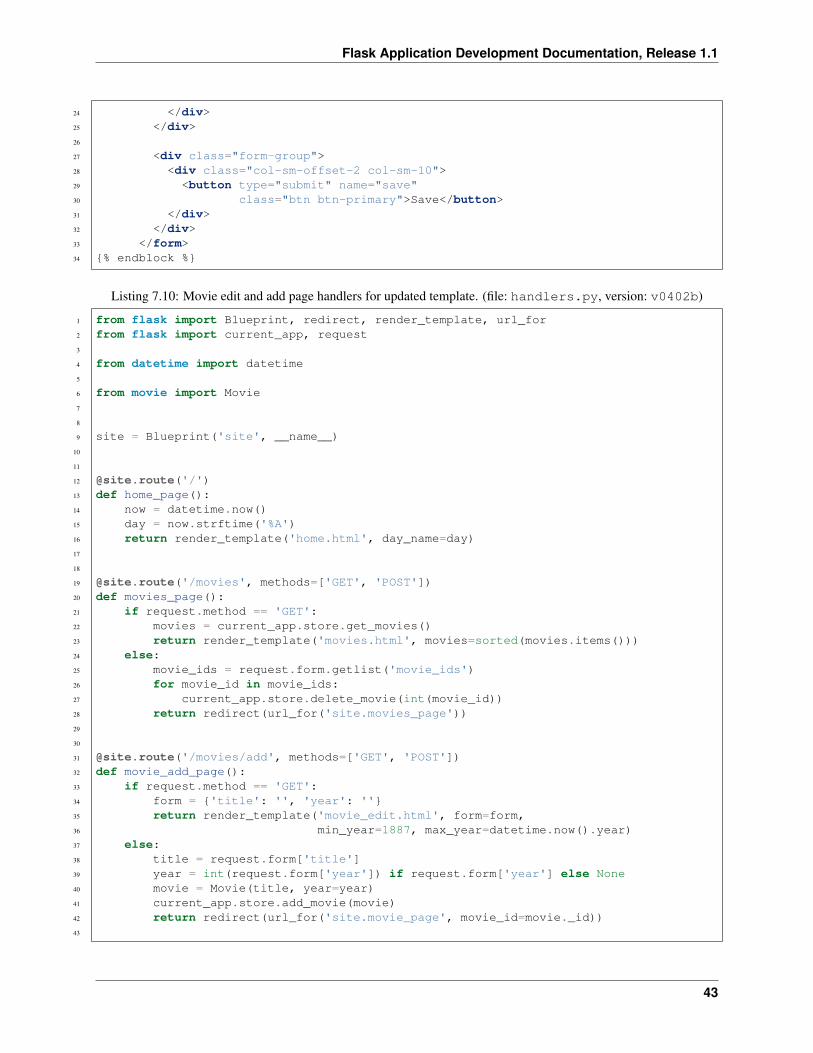
Listing 7.10: Movie edit and add page handlers for updated template. (file: handlers.py, version: v0402b)
1 from flask import Blueprint, redirect, render_template, url_for2 from flask import current_app, request3
4 from datetime import datetime5
6 from movie import Movie7
8
9 site = Blueprint('site', __name__)10
11
12 @site.route('/')13 def home_page():14 now = datetime.now()15 day = now.strftime('%A')16 return render_template('home.html', day_name=day)17
18
19 @site.route('/movies', methods=['GET', 'POST'])20 def movies_page():21 if request.method == 'GET':22 movies = current_app.store.get_movies()23 return render_template('movies.html', movies=sorted(movies.items()))24 else:25 movie_ids = request.form.getlist('movie_ids')26 for movie_id in movie_ids:27 current_app.store.delete_movie(int(movie_id))28 return redirect(url_for('site.movies_page'))29
30
31 @site.route('/movies/add', methods=['GET', 'POST'])32 def movie_add_page():33 if request.method == 'GET':34 form = {'title': '', 'year': ''}35 return render_template('movie_edit.html', form=form,36 min_year=1887, max_year=datetime.now().year)37 else:38 title = request.form['title']39 year = int(request.form['year']) if request.form['year'] else None40 movie = Movie(title, year=year)41 current_app.store.add_movie(movie)42 return redirect(url_for('site.movie_page', movie_id=movie._id))43
43
Flask Application Development Documentation, Release 1.1
44
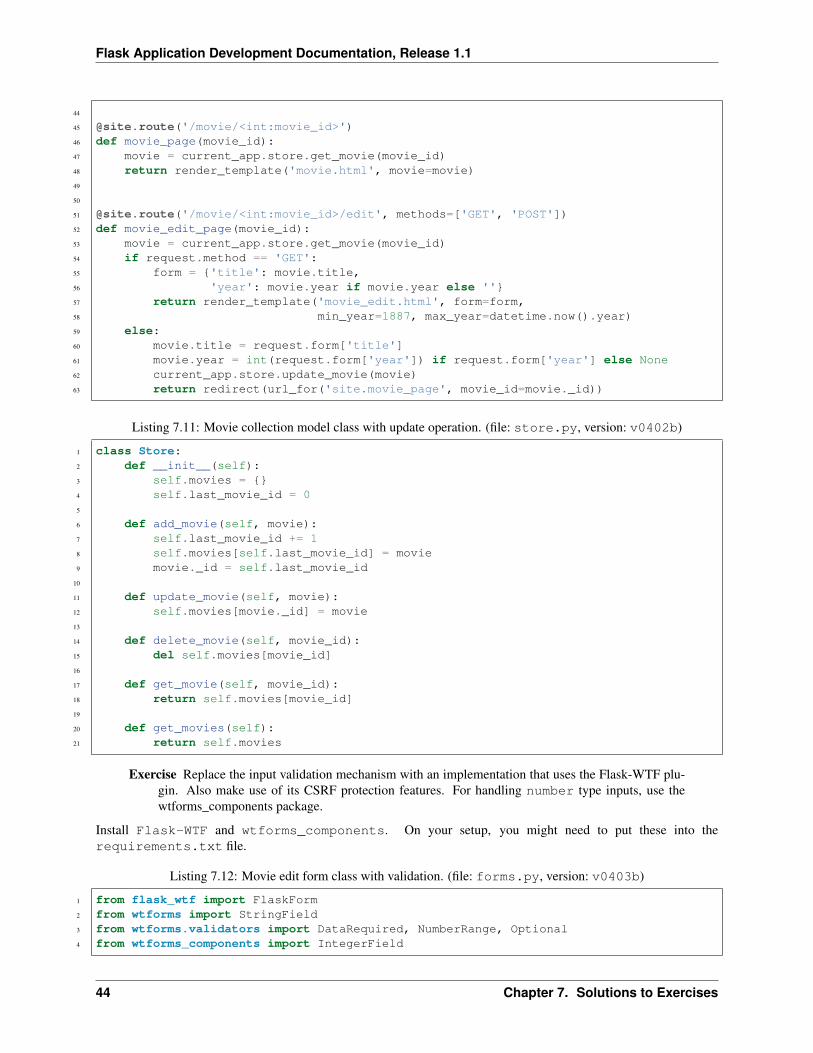
45 @site.route('/movie/<int:movie_id>')46 def movie_page(movie_id):47 movie = current_app.store.get_movie(movie_id)48 return render_template('movie.html', movie=movie)49
50
51 @site.route('/movie/<int:movie_id>/edit', methods=['GET', 'POST'])52 def movie_edit_page(movie_id):53 movie = current_app.store.get_movie(movie_id)54 if request.method == 'GET':55 form = {'title': movie.title,56 'year': movie.year if movie.year else ''}57 return render_template('movie_edit.html', form=form,58 min_year=1887, max_year=datetime.now().year)59 else:60 movie.title = request.form['title']61 movie.year = int(request.form['year']) if request.form['year'] else None62 current_app.store.update_movie(movie)63 return redirect(url_for('site.movie_page', movie_id=movie._id))
Listing 7.11: Movie collection model class with update operation. (file: store.py, version: v0402b)
1 class Store:2 def __init__(self):3 self.movies = {}4 self.last_movie_id = 05
6 def add_movie(self, movie):7 self.last_movie_id += 18 self.movies[self.last_movie_id] = movie9 movie._id = self.last_movie_id
10
11 def update_movie(self, movie):12 self.movies[movie._id] = movie13
14 def delete_movie(self, movie_id):15 del self.movies[movie_id]16
17 def get_movie(self, movie_id):18 return self.movies[movie_id]19
20 def get_movies(self):21 return self.movies
Exercise Replace the input validation mechanism with an implementation that uses the Flask-WTF plu-gin. Also make use of its CSRF protection features. For handling number type inputs, use thewtforms_components package.
Install Flask-WTF and wtforms_components. On your setup, you might need to put these into therequirements.txt file.
Listing 7.12: Movie edit form class with validation. (file: forms.py, version: v0403b)
1 from flask_wtf import FlaskForm2 from wtforms import StringField3 from wtforms.validators import DataRequired, NumberRange, Optional4 from wtforms_components import IntegerField
44 Chapter 7. Solutions to Exercises
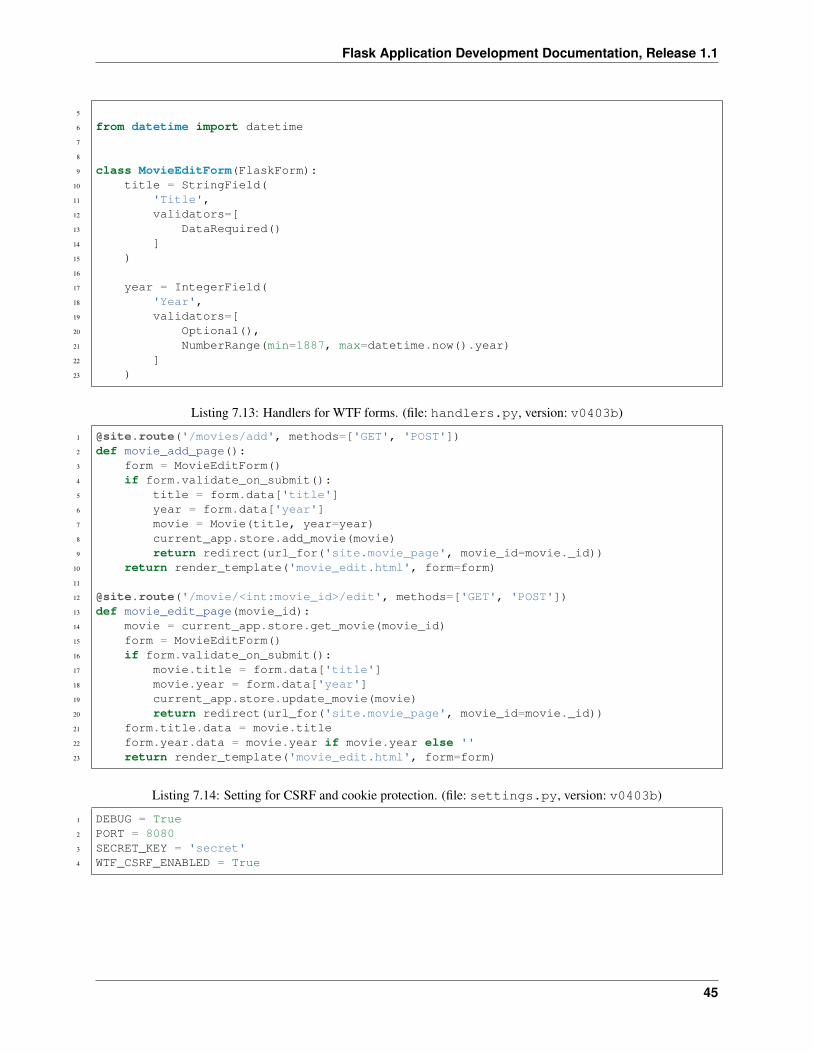
Flask Application Development Documentation, Release 1.1
5
6 from datetime import datetime7
8
9 class MovieEditForm(FlaskForm):10 title = StringField(11 'Title',12 validators=[13 DataRequired()14 ]15 )16
17 year = IntegerField(18 'Year',19 validators=[20 Optional(),21 NumberRange(min=1887, max=datetime.now().year)22 ]23 )
Listing 7.13: Handlers for WTF forms. (file: handlers.py, version: v0403b)
1 @site.route('/movies/add', methods=['GET', 'POST'])2 def movie_add_page():3 form = MovieEditForm()4 if form.validate_on_submit():5 title = form.data['title']6 year = form.data['year']7 movie = Movie(title, year=year)8 current_app.store.add_movie(movie)9 return redirect(url_for('site.movie_page', movie_id=movie._id))
10 return render_template('movie_edit.html', form=form)11
12 @site.route('/movie/<int:movie_id>/edit', methods=['GET', 'POST'])13 def movie_edit_page(movie_id):14 movie = current_app.store.get_movie(movie_id)15 form = MovieEditForm()16 if form.validate_on_submit():17 movie.title = form.data['title']18 movie.year = form.data['year']19 current_app.store.update_movie(movie)20 return redirect(url_for('site.movie_page', movie_id=movie._id))21 form.title.data = movie.title22 form.year.data = movie.year if movie.year else ''23 return render_template('movie_edit.html', form=form)
Listing 7.14: Setting for CSRF and cookie protection. (file: settings.py, version: v0403b)
1 DEBUG = True2 PORT = 80803 SECRET_KEY = 'secret'4 WTF_CSRF_ENABLED = True
45

Flask Application Development Documentation, Release 1.1
Listing 7.15: Movie editing template for WTF forms. (file: templates/movie_edit.html.py, ver-sion: v0403b)
1 {% extends "layout.html" %}2 {% block title %}Movie Edit{% endblock %}3 {% block content %}4 <div class="page-header">5 <h1>Edit Movie</h1>6 </div>7
8 <form role="form" action="" method="post" name="movie_edit"9 class="form-horizontal">
10 {{ form.csrf_token }}11
12 <div class="form-group">13 <label for="title" class="control-label col-sm-2">Title:</label>14 <div class="col-sm-10">15 {{ form.title(required=True, autofocus=True) }}16 {% for error in form.title.errors %}17 <div class="alert alert-danger">18 {{ error }}19 </div>20 {% endfor %}21 </div>22 </div>23
24 <div class="form-group">25 <label for="year" class="control-label col-sm-2">Year:</label>26 <div class="col-sm-10">27 {{ form.year(size='4') }}28 {% for error in form.year.errors %}29 <div class="alert alert-danger">30 {{ error }}31 </div>32 {% endfor %}33 </div>34 </div>35
36 <div class="form-group">37 <div class="col-sm-offset-2 col-sm-10">38 <button type="submit" name="save"39 class="btn btn-primary">Save</button>40 </div>41 </div>42 </form>43 {% endblock %}
46 Chapter 7. Solutions to Exercises