
Flashing GrowSpan Greenhouse • Ribbon Board 2-Layer Film ...
19
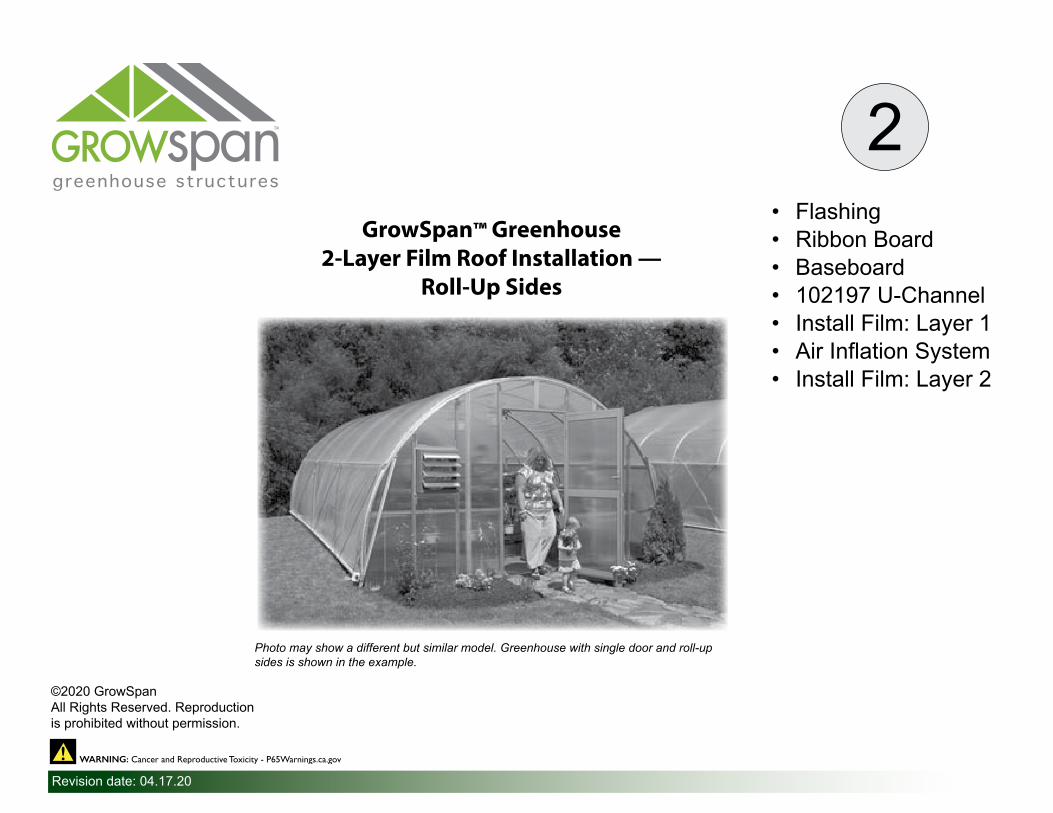
Revision date: 04.17.20 ©2020 GrowSpan All Rights Reserved. Reproduction is prohibited without permission. Photo may show a different but similar model. Greenhouse with single door and roll-up sides is shown in the example. 2 • Flashing • Ribbon Board • Baseboard • 102197 U-Channel • Install Film: Layer 1 • Air Inflation System • Install Film: Layer 2 GrowSpan™ Greenhouse 2-Layer Film Roof Installation — Roll-Up Sides
Transcript of Flashing GrowSpan Greenhouse • Ribbon Board 2-Layer Film ...
1Revision date: 04.17.20
©2020 GrowSpanAll Rights Reserved. Reproduction is prohibited without permission.
Photo may show a different but similar model. Greenhouse with single door and roll-up sides is shown in the example.
2• Flashing• Ribbon Board• Baseboard• 102197 U-Channel• Install Film: Layer 1• Air Inflation System• Install Film: Layer 2
GrowSpan™ Greenhouse2-Layer Film Roof Installation —
Roll-Up Sides

2 2-Layer Film Install Revision date: 04.17.20
READ THIS DOCUMENT BEFORE YOU BEGIN
These instructions include helpful hints and important information needed to safely install the roof cladding. Please read these instructions before you begin. If you have any questions during the assembly, contact Customer Service at 1-800-245-9881 for assistance.
SAFETY PRECAUTIONS
• Wear eye protection.
• Wear head protection.
• Wear gloves when handling metal tubes.
• Use a portable GFCI (Ground Fault Circuit Interrupter) when working with power tools and cords.
• Do not climb on greenhouse or framing during or after construction.
• Do not occupy greenhouse during high winds, tornadoes, or hurricanes.
• Provide adequate ventilation if structure is enclosed.
• Do not store hazardous materials in greenhouse.
• Provide proper ingress and egress to prevent entrapment.
Important InformationContents
Important Information ..................................................................................... 2Required Lumber — Customer-Supplied — Ribbon Boards .......................... 4Recommended — Customer-Supplied —Baseboards ................................... 5End Panel Installation Details & Foil Tape Install ........................................... 6Flashing (PGFLSAXXFCW0063) Installation ................................................. 7Mark Ribbon Board Location .......................................................................... 9Baseboards and Ribbon Boards..................................................................... 10U-Channel (102197) — End Rafters .............................................................. 11Side U-Channel Installation — Roll-Up Sides ................................................ 12Inspect Frame Before Film Installation ........................................................... 132-Layer Film Roof — Layer 1 (IR/AC) ............................................................ 14Inflation Fan Kit Installation ............................................................................ 172-Layer Film Roof — Layer 2 ......................................................................... 18Seal Greenhouse............................................................................................ 19
DOUBLE-LAYER FILM INSTALLATION
Greenhouses equipped with a double-layer film include a layer that is Infra Red (IR) Retention film.
IMPORTANT! During cover installation, install IR film first! Examine film and install it according to instructions printed on the film.
WEAR EYE PROTECTION
WHEN INSTALLING
SPRING WIRE!
WARNING: To prevent damage to cover and to prevent serious personal injury, DO NOT attempt to install main cover on windy or stormy days.

3Revision date: 04.17.20 2-Layer Film Install
Important Information
REQUIRED TOOLS
The following list identifies the main tools needed. Additional tools and supports may be needed depending on structure and location.
• Tape measure and marker; hammers and gloves.
• Clutched drill driver to drive Tek screws. (Cordless with extra batteries works best.) Do not use an impact driver to install Tek screws.
• Scissors (or utility knife); tin snips or wire cutters for wire spring.
• 1/4" or 5/16" drill bit; 1-3/8" hole saw bit.
• Hand tools; saw or grinder to cut aluminum flashing. Clamps to install u-channel flashing.
• Ladders, work platforms, and other machinery for lifting designed to work safely at building height. Rope for cover installation.
ASSEMBLY NOTE: Install Tek screws using a clutched drill driver running approximately 750 RPM while applying approximately 50 lbs of force.
Do not use an impact driver to install Tek screws!
PARTS
102198A U-Channel Spring
102197 Aluminum U-Channel
FA4482B Tek Screw
108553 Truss Head Screw
FAH008B (or FAH009B) & FALB01B Carriage Bolt & Hex Nut
FA4650 or FA4652 Wood Screws

4 2-Layer Film Install Revision date: 04.17.20
RIBBON BOARDS — CUSTOMER SUPPLIED (REQUIRED) — FOR ROLL-UP SIDE
Greenhouses equipped with roll-up side panels require a ribbon board. Materials for ribbon boards are not included and are supplied by customer. Examples below show ribbon board as attached to frame. IMPORTANT: Installation of customer-supplied ribbon board is described later in this guide. Do not install boards at this time.
Required Lumber — Customer-Supplied — Ribbon BoardsRIBBON BOARD HEIGHT: Consult main frame technical document to determine ribbon board height for your greenhouse.
ATTENTION: Fasteners to secure boards to building frame are included with building materials. Minimum lumber dimensions shown; wider boards can be used if desired. Counter sink holes for 1/4" carriage bolts if bolt length is too short for selected board thickness.
Ribbon Board
Baseboard
Actual frame may differ from example shown.
Diagram shows ribbon board attached for roll-up sides and film roof.
NOTE: Flashing and u-channel are not shown.
RIBBON BOARD FOR ROLL-UP SIDES
1/4" x 3-1/2" (FAH008B) or 1/4" x 4" (FAH009B) carriage bolts & 1/4" nuts (FALB01B).
Carriage bolt length depends on rafter pipe diameter.
Rafter
2" x 6" Board

5Revision date: 04.17.20 2-Layer Film Install
Recommended — Customer-Supplied —BaseboardsBASEBOARDS — CUSTOMER SUPPLIED (RECOMMENDED) — FOR ROLL-UP SIDES
Baseboards are optional, but recommended, for greenhouses with roll-up sides. Materials for baseboard are not included and are supplied by customer. Examples below show baseboard as attached to frame for a building with roll-up sides.
ATTENTION: Baseboards run the frame length along both sides at ground level. Installation of customer-supplied baseboard is described later in this guide. Do not install boards at this time.
ATTENTION: Fasteners to secure boards to building frame are included. Minimum lumber dimensions shown; wider boards can be used if desired. Counter sink holes for 1/4" carriage bolts if bolt length is too short for board thickness.
CURTAIN STABILIZER BAR KIT: If the curtain stabilizer bar kit was purchased for your greenhouse, consult the installation guide included with the kit before installing a baseboard.
2" x 6" Baseboard

6 2-Layer Film Install Revision date: 04.17.20
End Panel Installation Details & Foil Tape InstallEnd panels are rounded and follow contour of end rafter. (See diagram below.) If needed, cut end panels so top of end panels are flush with top of end rafter. Apply foil tape (DH8007) to cover all open cells after cutting and before flashing (if this has not been completed yet). U-channel flashing overlaps end panels to cover open cells at top. If end panels are prepared, continue with instructions on the next page. (Actual end wall with panel layout may differ from example shown. End panel preparation is the same.)
Cut panels to size and apply foil tape to cover open cells if this has not been completed yet.

7Revision date: 04.17.20 2-Layer Film Install
1
2
3
108553 Wafer Head Screws
Gather Parts and Tools:
• PGFLSAXXFCW0063 Flashing (8' long)
• 108553 Wafer Head Screws
• Clutched Drill Driver and Phillips Head Bit
• Tool to cut metal flashing.
• Tape Measure and Marker.
Complete these steps:
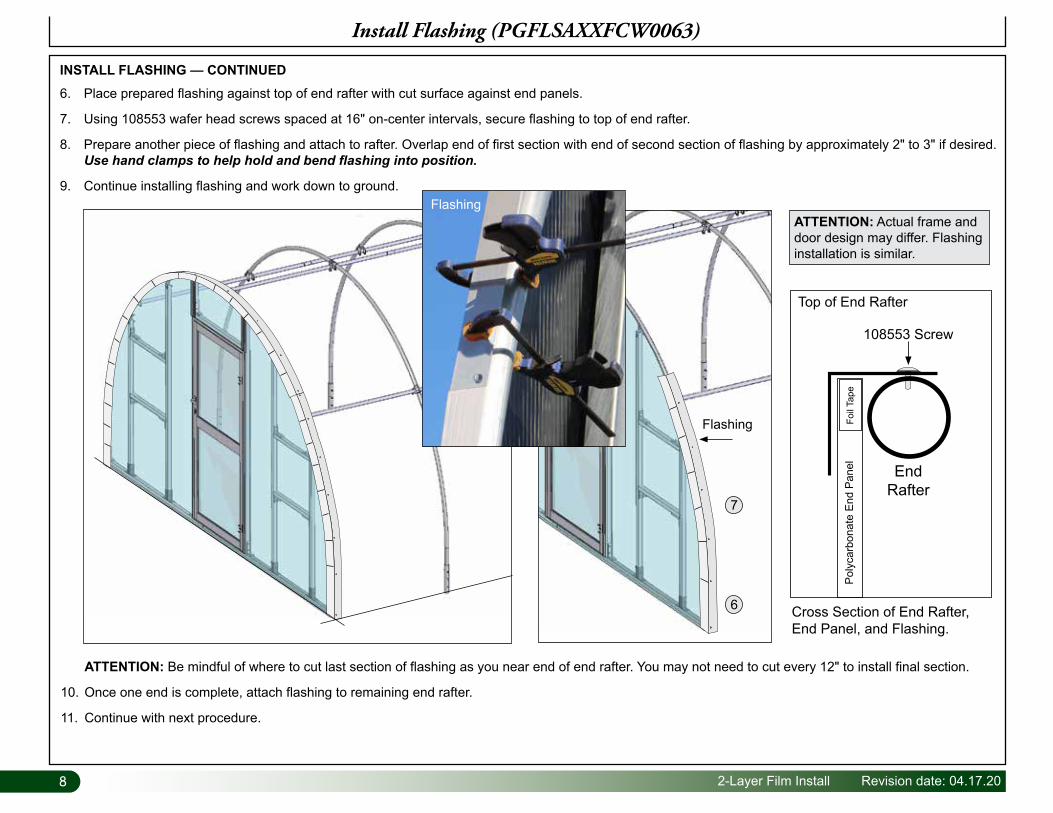
1. Take one section of PGFLSAXXFCW0063 flashing and place it in place on end rafter.
2. Mark flashing where rafter begins to bend. Place flashing on ground or work bench.
3. From first cut, mark remainder of flashing face at 12" on-center intervals.
Flashing (PGFLSAXXFCW0063) Installation
ATTENTION: To bend flashing more easily, decrease the on-center spacing of cut lines. Spacing between cuts depends on rafter. Cut as needed for desired results.
4. Using snips or a saw, cut flashing face to the bend in flashing. Flashing face is the part that overlaps tops of end panels.
12"
96"
PGFLSAXXFCW0063 Flashing
Bend
4
5. Repeat steps to cut flashing face to the flashing bend to make additional cuts.
8 2-Layer Film Install Revision date: 04.17.20
Install Flashing (PGFLSAXXFCW0063)
6. Place prepared flashing against top of end rafter with cut surface against end panels.
7. Using 108553 wafer head screws spaced at 16" on-center intervals, secure flashing to top of end rafter.
8. Prepare another piece of flashing and attach to rafter. Overlap end of first section with end of second section of flashing by approximately 2" to 3" if desired. Use hand clamps to help hold and bend flashing into position.
9. Continue installing flashing and work down to ground.
INSTALL FLASHING — CONTINUED
Flashing
6
7
Flashing
ATTENTION: Be mindful of where to cut last section of flashing as you near end of end rafter. You may not need to cut every 12" to install final section.
10. Once one end is complete, attach flashing to remaining end rafter.
11. Continue with next procedure.
Cross Section of End Rafter, End Panel, and Flashing.
Top of End Rafter
End Rafter
Poly
carb
onat
e En
d Pa
nel
Foil
Tape
108553 Screw
ATTENTION: Actual frame and door design may differ. Flashing installation is similar.

9Revision date: 04.17.20 2-Layer Film Install
Mark Ribbon Board LocationRibbon board runs along each frame side and serves as a mounting surface for side u-channel. Ribbon board is required for greenhouses that include roll-up sides.
Read through the information on this page and continue as instructed. Customer is responsible for supplying materials to construct a ribbon board (and baseboard if used) as described. Fasteners to secure ribbon boards (and baseboards) to frame are included. See ribbon board information earlier in this guide.
Complete these steps:
1. Using diagrams included in frame assembly Guide #1, mark ribbon board location on frame along each side at each end rafter. NOTE: When side panel is rolled up, sidewall opening is typically 48" to 54" depending on intended use and building size. Do not exceed 54".
2. Stretch a chalk line from end to end, verify it is level, and snap to mark top of ribbon board on each rafter tube along each side.
3. Continue by installing ribbon board and baseboard as described on next page.
Ribbon Board
Baseboard
Top of Ribbon Board
Maximum opening is 54" from bottom of ribbon board. Ground Level

10 2-Layer Film Install Revision date: 04.17.20
Ribbon Board
Baseboards and Ribbon BoardsATTENTION: Materials for baseboards and ribbon boards are supplied by customer.
INSTALL BASEBOARDS
ATTENTION: If you want to install a baseboard and the curtain stabilizer bar kit was purchased, consult instructions included with that kit for details. If you do not want to install the optional baseboard as described below, continue with the next page.
1. After flashing is prepared, attach baseboards to assembled frame. Use a drill and 5/16" drill bit to drill through rafter tubes and baseboards. Secure using 1/4" x 3-1/2" (FAH008B) or 1/4" x 4" (FAH009B) carriage bolts and FALB01B nuts. Review diagram below.
INSTALL RIBBON BOARDS
1. After flashing is installed, attach ribbon boards to assembled frame. Use a drill and 5/16" drill bit to drill through rafter tubes and ribbon board. Secure using 1/4" x 3-1/2" (FAH008B) or 1/4" x 4-1/2" (FAH009B) carriage bolts and FALB01B nuts. Review diagram below.
NOTE ABOUT SPLICING BASEBOARDS AND RIBBON BOARDS
Never attach two boards to same rafter. Instead, splice boards on the backside/inside between rafters. This results in a stronger, more dependable installation. Use a small piece of lumber that spans a few inches on each side of the splice. Secure using customer-supplied nails or wood screws. See diagram at the right. Inside greenhouse.
Outside greenhouse.
2. Continue with u-channel installation.
2. Continue by installing baseboards.
Ribbon Board
Baseboard
Sample Frame
Actual frame may differ in design.
Baseboard

11Revision date: 04.17.20 2-Layer Film Install
U-Channel (102197) — End RaftersAfter attaching ribbon boards and baseboards (if used), attach u-channel to top of each end rafter using FA4482B Tek screws spaced at 12" on-center.
Complete these steps:
1. Beginning at top of ribbon board along one side, attach the first section of 102197 u-channel using FA4482B Tek screws. NOTE: Align u-channel with center of end rafter and install over and through the installed flashing.
2. Continue to install u-channel up and over the end rafter down to remaining ribbon board. 102197 Aluminum
U-Channel
FA4482B Tek Screw
Baseboard
U-Channel
Ribbon Board
3. Cut additional sections of u-channel to install below ribbon board down to ground level or to top of baseboard.
4. Repeat for remaining end rafter.
5. Continue with next page.
U-Channel
Baseboard
U-Channel
U-Channel
Ribbon Board

12 2-Layer Film Install Revision date: 04.17.20
Complete these steps:
1. Attach u-channel to ribbon board using FA4650 wood screws spaced every 12". Mark and predrill holes through u-channel using a drill bit slightly larger than diameter of threaded shaft of wood screw. Review diagram.
INSTALL U-CHANNEL (102197) ALONG EACH SIDE — ROLL-UP SIDES
IMPORTANT: Do not use FA4482B Tek screws to attach u-channel to ribbon board; these will not hold. Use only wood screws.
2. Continue attaching u-channel and work toward other end of frame. U-channel to run level throughout installation.
3. Cut last section to required length so it is flush with outside edge of u-channel flashing that is attached to end rafter.
4. Repeat steps to install u-channel along remaining side.
5. Continue with film installation procedures.
Side U-Channel Installation — Roll-Up SidesGather parts:
• Aluminum U-channel (#102197)
• Wood screws (FA4650)
• 100443 Driver Bit
For Round Pro Greenhouses up to 38' Wide — Attach one (1) run of u-channel to ribbon board along each side using FA4650 wood screws.
12"
For Round Pro Greenhouse Widths
up to 38'.

13Revision date: 04.17.20 2-Layer Film Install
Inspect Frame Before Film InstallationTAPE SHARP EDGES AND CONNECTORS
Inspect frame for sharp edges that could damage cover film. File smooth or tape over them using the supplied duct tape.
Return to rafters and apply tape over connectors to better protect cover film and prolong film life once installed. Photo above shows one way to apply the tape. Rafter and frame shown above may differ from actual frame. Photo is used to illustrate how to apply tape.
Tape over fasteners to prevent damage to film. Never allow any fastener to directly contact film once installed. For best results, reposition fastener when possible.
Tape over connector

14 2-Layer Film Install Revision date: 04.17.20
2-Layer Film Roof — Layer 1 (IR/AC)INSTALL IR/AC FILM COVER
Continue with the following procedure. Greenhouse includes two film types. Install the IR/AC film first! Gather parts:
• Cover film and wire spring (#102198A)
• Ropes/straps long enough to reach over frame (provided by customer)
After attaching 102197 u-channel along sides and u-channel flashing to end rafters, install IR/AC cover film. Ropes or straps are typically used to pull main cover onto and over the frame.
Complete these steps:
1. Take film and position it along base at one side. Ensure IR/AC cover will pull over frame with correct surface positioned toward the soil.
NOTE: Unfold cover and locate edge. Cover ground if needed to protect film and to keep film clean and free of debris.
WARNING: To prevent damage to the cover and to prevent serious personal injury, DO NOT attempt to install the main cover on windy or stormy days.
WEAR EYE PROTECTION
WHEN INSTALLING
SPRING WIRE!
DOUBLE-LAYER FILM INSTALLATION
Greenhouses equipped with a double-layer film include a layer that is Infra Red (IR) Retention film; item 109094, 109095, 109096, 109097, or 109098. During cover installation, install IR/AC film first! Examine film and install it according to instructions printed on film.
Actual frame may differ from example shown.
ATTENTION: Depending on greenhouse size, the roll-up side panels may be part of the main cover, or they may be an individual panel cut from a separate roll of film.
Main cover film is typically cut two (2) feet longer than greenhouse (e.g., length is 48'; film roll is 50'). When choosing the correct film roll for cover, review documents included with shipment to identify the film. Roll out along frame and measure. Also, ensure you have selected the IR/AC film for your first layer. Install this film first and according to the instructions printed on film.

15Revision date: 04.17.20 2-Layer Film Install
IMPORTANT: To prevent damage to cover film during installation, use additional personnel and lifts as needed stationed inside frame.
4. Center side-to-side and end-to-end. NOTE — ROLL-UP PANELS: For small frames, roll-up panel is part of roof film. It is important to center cover on frame so each side has an equal amount of film hanging below ribbon boards before securing film to u-channel. Do not cut this film off! It is the roll-up portion of cover.
5. Once main cover is in place and centered, begin at peak at one end and install the 102198A wire spring into the 102197 u-channel. ATTENTION: Ensure enough film is present to lock into u-channel flashing. Typically, cover film is cut longer than required to cover frame end-to-end. For easier anchoring, allow approximately 10" to extend past end rafter as film is anchored. Remove ropes (if used) after film is secure.
6. Continue down both edges of first end rafter until film is secured.
7. Pull film toward other end and stretch gently to remove wrinkles.
2. Along film edge to pull over frame, tie rope (or strap) around a tennis ball, for example, and toss free end of rope over frame. See photo. Not required for small greenhouses; pull cover over by hand when possible. NOTE: Evenly space ropes along side. Number of ropes depends on building length; use additional ropes spaced evenly throughout length to prevent tearing cover when pulled onto frame.
3. After tying ropes to cover, throw free end of each rope over building and pull cover onto frame.
INSTALL COVER FILM (continued)
WEAR EYE PROTECTION
WHEN INSTALLING
SPRING WIRE!
Step 3
Step 5-7
2-Layer Film Roof — Layer 1 (IR/AC)
16 2-Layer Film Install Revision date: 04.17.20
INSTALL COVER FILM (continued) WEAR EYE PROTECTION
WHEN INSTALLING
SPRING WIRE!
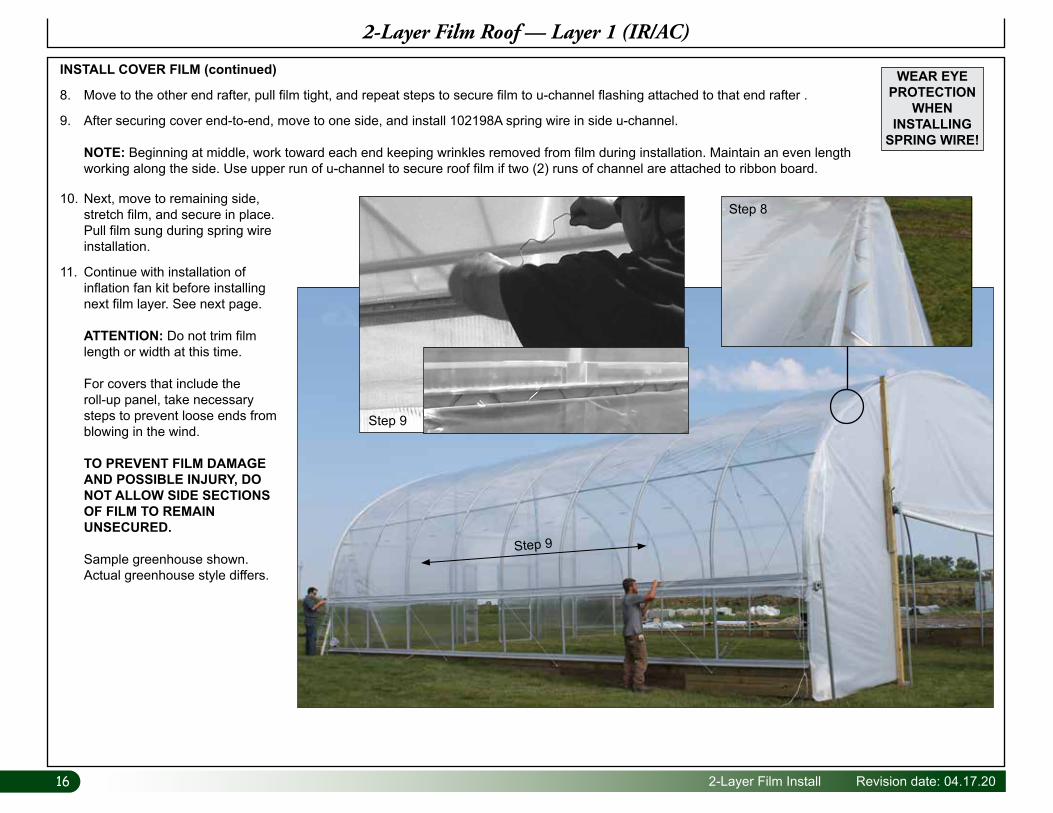
8. Move to the other end rafter, pull film tight, and repeat steps to secure film to u-channel flashing attached to that end rafter .
9. After securing cover end-to-end, move to one side, and install 102198A spring wire in side u-channel. NOTE: Beginning at middle, work toward each end keeping wrinkles removed from film during installation. Maintain an even length working along the side. Use upper run of u-channel to secure roof film if two (2) runs of channel are attached to ribbon board.
10. Next, move to remaining side, stretch film, and secure in place. Pull film sung during spring wire installation.
11. Continue with installation of inflation fan kit before installing next film layer. See next page. ATTENTION: Do not trim film length or width at this time. For covers that include the roll-up panel, take necessary steps to prevent loose ends from blowing in the wind. TO PREVENT FILM DAMAGE AND POSSIBLE INJURY, DO NOT ALLOW SIDE SECTIONS OF FILM TO REMAIN UNSECURED. Sample greenhouse shown. Actual greenhouse style differs.
Step 8
Step 9
Step 9
2-Layer Film Roof — Layer 1 (IR/AC)

17Revision date: 04.17.20 2-Layer Film Install
Inflation Fan Kit InstallationThe air inflation system assembly is quick and easy. Consult instructions included with kit for installation details. You will need a socket wrench set, utility knife, marker, and repair tape or heavy-duty duct tape to complete the steps. Actual frame may differ from what is shown in the example. Some larger buildings may include multiple inflation fan kits.
ATTENTION: Install all air inflation fan kit components before installing the second layer of film. Failure to do so will require partial removal of the second film to install fan kit components.
Locate the inflation fan kit (or kits) and install now according to instructions included with kit(s). Remember to test the air inflation systems before installing second layer of film.
ALL ELECTRICAL WIRING TO BE COMPLETED BY A QUALIFIED ELECTRICIAN ACCORDING TO ESTABLISHED STANDARDS AND CODES.

18 2-Layer Film Install Revision date: 04.17.20
Once air inflation kit (or kits) are installed, install remaining film for greenhouse. After installing second film layer, continue with installation of roll-up side components and panels (Guide #3). Complete these steps to install remaining film:
1. Repeat steps to install second layer of film. After pulling film onto frame, secure film by adding a second run of 102198A spring wire over first in the same channel. For greenhouses with two (2) runs of u-channel along each side, this is the upper run of channel. Lower run of u-channel is reserved for roll-up side panel. ATTENTION: Install second layer of film with either surface toward the soil. Do not damage first film layer during installation of second film.
2. After installing second layer of film, test inflation fan kit operation. Ensure entire roof section inflates when blower is running.
3. Continue with Guide #3 (Roll-Up Side Assembly).
WEAR EYE PROTECTION
WHEN INSTALLING
SPRING WIRE!
2-Layer Film Roof — Layer 2
Photo shows pulling second layer of film onto a sample greenhouse. (Actual greenhouse differs.) Procedure is similar for all film-covered frames with roll-up sides.
WARNING: To prevent damage to cover and to prevent serious personal injury, DO NOT attempt to install main cover on windy or stormy days.

19Revision date: 04.17.20 2-Layer Film Install
Seal GreenhouseAnytime after roof film installation, apply sealant to these areas:
• Around all doors
• Around accessory framing and accessories
• At joint where u-channel meets flashing for both end rafters
• All flashing joints
• Around intake for air inflation fan


