Flash Tutorial Knight Digital Media Center...
33
Knight Digital Media Center Multimedia Training Flash Tutorial By Jane Stevens, Scot Hacker, Tim Gnatek For updates and discussion on this tutorial, visit: http://multimedia.journalism.berkeley.edu/tutorials/webdesign/flash Introduction Flash is Macromedia's powerful vector-based animation tool. Flash is the defacto standard for Internet multimedia because it allows authors to create online multimedia presentations with minimum file sizes. With Flash, Web presentations can blend text and pictures with video and audio, interactive buttons, and animated charts and graphs. Flash is also becoming a rich ground for multimedia journalism, because its interactivity lends itself as a medium to non-linear, reader-directed storytelling. While Flash is used on the most advanced Internet media sites, basic uses, like generating animated slideshows, are fairly easy to learn. In this tutorial we take a two-pronged approach to learning Flash. First we look at basic shape drawing and animation tools and the workspace. Then we switch to a walkthrough on creating multimedia slideshows with video, audio and playback controls. Unlike most Flash tutorials, this one is aimed specifically at the needs of journalists, and does not dwell on drawing and animation techniques. This tutorial was written for Flash 8, so some of the procedures we describe may be slightly different if you have an older or newer version of Flash. Note: Downloadable examples in .fla format can be found on the last page of this tutorial. Flash Tutorial Flash Tutorial 1
-
Upload
truongkhanh -
Category
Documents
-
view
217 -
download
0
Transcript of Flash Tutorial Knight Digital Media Center...
Knight Digital Media Center Multimedia Training
Flash TutorialBy Jane Stevens, Scot Hacker, Tim Gnatek
For updates and discussion on this tutorial, visit:http://multimedia.journalism.berkeley.edu/tutorials/webdesign/flash
Introduction
Flash is Macromedia's powerful vector-based animation tool. Flash is the defacto standard for Internetmultimedia because it allows authors to create online multimedia presentations with minimum file sizes. WithFlash, Web presentations can blend text and pictures with video and audio, interactive buttons, and animatedcharts and graphs.
Flash is also becoming a rich ground for multimedia journalism, because its interactivity lends itself as amedium to non-linear, reader-directed storytelling.
While Flash is used on the most advanced Internet media sites, basic uses, like generating animatedslideshows, are fairly easy to learn.
In this tutorial we take a two-pronged approach to learning Flash. First we look at basic shape drawing andanimation tools and the workspace. Then we switch to a walkthrough on creating multimedia slideshows withvideo, audio and playback controls. Unlike most Flash tutorials, this one is aimed specifically at the needs ofjournalists, and does not dwell on drawing and animation techniques.
This tutorial was written for Flash 8, so some of the procedures we describe may be slightly different if youhave an older or newer version of Flash.
Note: Downloadable examples in .fla format can be found on the last page of this tutorial.
Flash Tutorial
Flash Tutorial 1
Getting Started: The Work Area
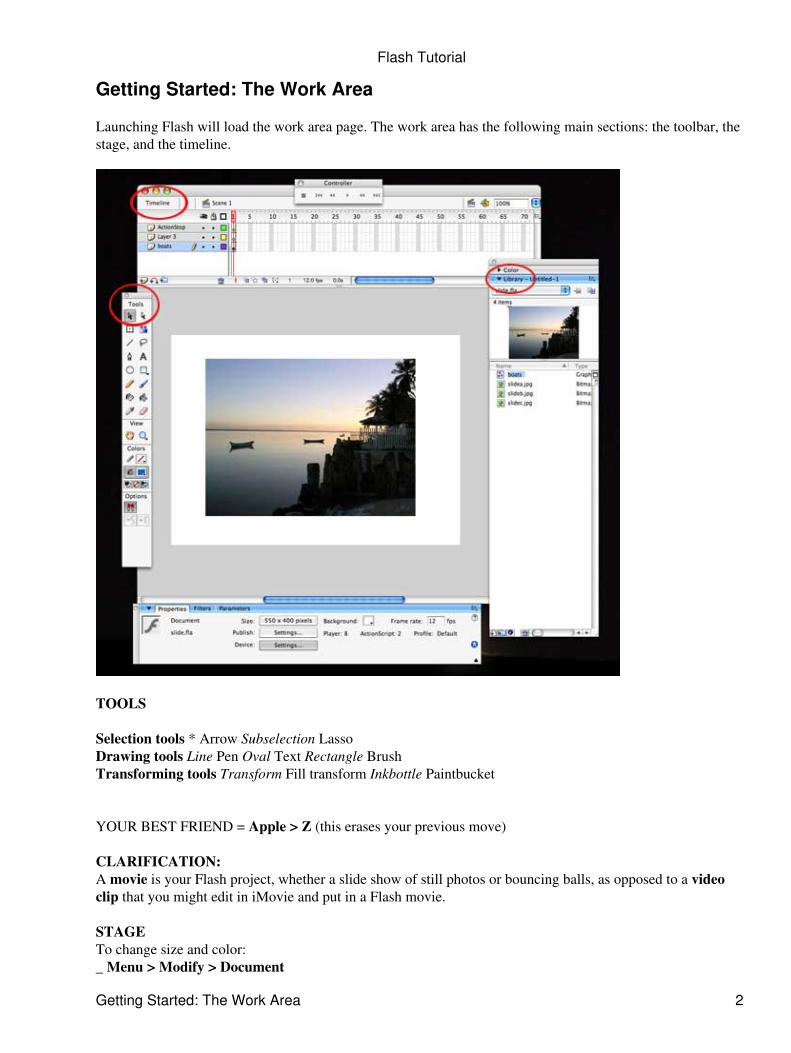
Launching Flash will load the work area page. The work area has the following main sections: the toolbar, thestage, and the timeline.
TOOLS
Selection tools * Arrow Subselection LassoDrawing tools Line Pen Oval Text Rectangle BrushTransforming tools Transform Fill transform Inkbottle Paintbucket
YOUR BEST FRIEND = Apple > Z (this erases your previous move)
CLARIFICATION:A movie is your Flash project, whether a slide show of still photos or bouncing balls, as opposed to a videoclip that you might edit in iMovie and put in a Flash movie.
STAGETo change size and color:_ Menu > Modify > Document
Flash Tutorial
Getting Started: The Work Area 2

In the Property Inspector: Change pixels in "size" and color in "background."
To change stage area view:Menu > View > View Work Areato toggle between looking at just the stage or seeing the space around the stage.
TIMELINEIt's divided into frames, like a video or animation, with 12 frames per second being the default [but change itto at least 15]. The rectangular red box is the playhead that you move to see changes on the Stage. Play yourmovie by hitting "Return"
LAYERSYou put the individual pictures of your project into separate layers. You can have as many layers as you want.You can: * Move the layers around: click on layer and drag above or below another layer Delete them: clickon layer and drag to or click on trash bin just under layer list Add more: click on left-most symbol (plus onpaper) just under layer list
Top right buttons over the Timeline: Edit scene or edit symbolSymbol Editing Mode: This is where you alter the "symbols" in your library
Main work area toggles between two modes:
The Stage, where you make your movie, and Editing symbols.
Windows (or palettes, located in the main horizontal menu bar):Make sure the "Properties", "Library" and "Toolbar" windows are open (find them on the menu in Window).
Flash Tutorial
Getting Started: The Work Area 3

Keyframes and Tweening
Or Five Easy Steps to Making a Photo Fade In and Out
Keyframes signify the beginnings and ends of changes in an image (the bounces of a ball, the fade-in of aphoto or a fade-out of a photo, etc.). Mark a frame as a keyframe when you want to start or end a change.Think of keyframes as the brackets, the starts and stops, the beginnings and ends - of a motion, a fade in, afade out, size increase, a size decrease, etc.
When you set two keyframes - one when a fade starts, another when it ends, Flash does its magic and figuresout the middle, the inbetween part. This is called TWEENING.
IMAGES: Use four jpgs [download them from this site here].
Open up Flash1. Stage dimensions = 700 x 500 pixels2. Background = white3. Frame rate = 15 fps4. Choose: File > Import to Library, browse to boats.jpg and open it. Boats.jpg ends up in yourLibrary.
5.
IMPORTANT NOTE: If you grab frames from iMovie or Final Cut Pro to use as still photos in Flash, firstsave them in a .pict file, then import them into Photoshop to change them to a .jpg. If you don't the picturewill be distorted and/or show the video interleaving lines. ALSO: Save all .jpgs for the Web (_File > Save forWeb_) before using them in Flash, otherwise they will be too large.
Before you can manipulate images in Flash, you have to change jpgs to symbols. Flash is very picky aboutthis.
Change a jpg to a Symbol6. Create a new layer (or if one exists with nothing in it, use that one) and name the layer "boats" bydouble-clicking in the layer and typing in "boats". Then select the empty keyframe (click in the first frame ofthe layer -- it contains an empty circle) and then click-and-drag boats.jpg from your library onto the stage.
Make sure boats.jpg is selected on the stage (a light blue square will appear along its outside border),and choose Modify>Convert to Symbol. A handy shortcut is F8 (Function key 8). In the highlightedbox, type boats. Make sure that "graphic" is selected from the choices below. Click "okay", and thejpg on the stage turns into a symbol. A symbol of boats.jpg appears in your library.
1.
[One way you can tell the image on the stage is a symbol is that there's a little circle in the middle of thephoto. And, in fact, when you select any of your symbols on the stage, they'll always have the little circle inthe middle.] You can check to make sure that symbol boats looks the same as boats.jpg by clicking on boatssymbol in your Library Window and seeing the image.
What you're going to do now is produce a Flash movie in which the photo fades in from Frames 1 to 10, staysunchanged from frame 10 to 20, and fades out from Frames 20 to 30.
Set the Keyframes8. Click on Frame 30, hit Insert > Timeline > Keyframe or hold down the mouse and select Insert Keyframefrom the dialog box (this is the end of the whole fading in, fading out Flash movie)
Flash Tutorial
Keyframes and Tweening 4

Click on Frame 31, hit Insert > Timeline > Blank Keyframe or hold down the mouse and select InsertBlank Keyframe from the dialog box (this is very important later, as it designates the end of thelayer's content and prevents Flash from filling in frames when you're copying layers).
1.
Click on Frame 10, hit Insert > Timeline > Keyframe or hold down the mouse and select InsertKeyframe from the dialog box (this is where the photo finishes fading in).
2.
Click on Frame 20, hit Insert > Timeline > Keyframe or hold down the mouse and select InsertKeyframe from the dialog box (this is where the photo starts fading out)
3.
Set the Fade12. This is where you apply the fade. Click on Frame 1, and then click on the photo on the screen. (Make sureyou've selected the arrow - Selection Tool -- in the Toolbar.) In the Property Inspector, in Color, choose"Alpha" (transparency) on the drop-down menu. Then change the percentage to "1 percent" - that means thephoto is transparent.
Click on Frame 10, then click on the photo. In the Property Inspector, in Color, choose "Alpha" on thedrop-down menu. Change the percentage to "99 percent". (Why 1 and 99 percent instead of 0 and100? Apparently, the transition is smoother.)
1.
Click on Frame 20 to make sure that the Alpha on the drop-down menu is at 99 percent.2. Then click on Frame 30, on the photo, and, in the Property Inspector, change the "Alpha" to "1percent".
3.
Set the Motion Tweens16. One more step. This is where you tell Flash how to do the fade - to set motion tweens between the firsttwo keyframes that bracket the first action to let Flash know that these are the frames in which it has to fill inthe action. This is how: Click on Frame 1, hold the mouse down, and when the menu pops up, choose "CreateMotion Tween". [Or, you can look in the Property Inspector for "Tween" and choose "Motion" from thedrop-down menu.] A thin solid arrow stretches between Frames 1 and 10, indicating a motion tween.
Since the photo doesn't change between Frames 10 and 20, you don't put a motion tween betweenFrames 10 and 20. You put one between Frames 20 and 30, where the photo starts to fade out. So,click on Frame 20, hold the mouse down, and when the menu pops up, choose "Create MotionTween."
1.
Hit return, and watch your movie!2.
One more important ruleONLY ONE SYMBOL ON A LAYER. That means that if you're moving one symbol on a layer, you can'tadd a symbol to a layer that already has a symbol and make it move independently of the symbol that wasthere first.
The truth about instancesFlash really works with INSTANCES of symbols. Instances is what you call a symbol after you've dragged itonto the Stage. Why is this important? Because you can do anything you want to this instance - shrink it,stretch it, make it disappear - and it doesn't do anything to the symbol from which it came. Which means youcan use the symbol as many times as you want.
So, to show you how you can use the same image again, repeat the exercise above, using the same image, butname it boats2 in the new layer. Then, once you've dragged boats onto the Stage in the new layer, make itsmaller or larger, whatever…just play.
Flash Tutorial
Keyframes and Tweening 5

Create a Slide Shows
In Six Easy Steps
Let's create a slide show using four jpgs: Boats.jpg, palm.jpg, town.jpg, and waterfall.jpg should be on thedesktop.
1. Open a new Flash file.2. Stage dimensions = 700 px x 500 px3. Background = white4. Frame rate = 15 fps5. Make sure your Library and Properties windows are open. (To open them, select Library and Propertiesfrom the Window menu.)
Import jpgs into Flash1. Choose: File > Import to Stage. Browse to and select the images, then click on "Open" to import them.They pop up on the Stage, but you only see one, because this photo is hiding all the other photos that aretucked into this same layer.
Choose View > Grid > Edit Grid. Make the grid 50 px by 50 px, and select "Show Grid".1. Click and drag the stack of photos so that they're 50 px in from the left side, and 100 pixels downfrom the top margin of the Stage.
2.
Make sure you've selected the frame that holds the photos and choose Modify> Timeline > Distributeto Layers. Each photo is put into its own layer, and each layer has the name of the jpg photo.
3.
Now you need to rearrange the order of the layers by clicking to the left on the name of a layer and moving itup or down. Move the first jpg - boats - to the bottom layer, palm to the second layer above it, then townabove that, then waterfall to the top layer.
Save your file.1.
Change the Images to Symbols6. Click on the first layer, boats.jpg. Choose Modify>Convert to Symbol. An good shortcut is F8 (Functionkey 8). In the highlighted box, type boats (and make sure graphic is selected).
Do the same with the next three jpgs, naming the symbol the same as the jpg - palm, town andwaterfall.
1.
Look in the Library window: you'll see the list of jpgs and symbols.2. Save your file.3.
Insert the Keyframes10. By this time, all your image symbols (let's just call them images from now on) should be piled on top ofone another on the Stage, and the Timeline has four layers with black dots in the first frame of each.
To make sure all the images are in the right position, click on the red bar at the top of Frame 1 in theTimeline. Select Apple Key > All. All the keyframes - the frames with the black dots in them - shouldturn black (because they're highlighted). Look in your Info window at the X and Y coordinates. Xshould be "50", since it's 50 pixels horizontally from the left margin. Y should be "100", since it's 100pixels vertically from the top margin.
1.
Now…highlight all the layers in Frame 30 by shift-clicking on the first one and shift-clicking on the2.
Flash Tutorial
Create a Slide Shows 6

last one.Choose Insert > Timeline > Keyframe. A good shortcut is to click on one of the highlighted frames,hold the mouse down, and select "Keyframe" from the menu that appears. Or click on a highlightedframe and choose F6.
3.
Highlight all the layers in Frame 31.4. Choose Insert > Timeline > Blank Keyframe (this is very important later, as it designates the end ofthe layer's content and prevents Flash from filling in frames when you're copying layers). A goodshortcut is to click on one of the highlighted frames, hold the mouse down, and select "BlankKeyframe" from the menu that appears. Or click on a highlighted frame and choose F7.
5.
Highlight all the layers in Frame 10 by clicking on the first one and shift-clicking on the last.6. Choose Insert > Timeline > Keyframe. Or select "Keyframe" from the shortcut menu. Or hit F6.7. Highlight all the layers in Frame 20.8. Choose Insert > Timeline > Keyframe. Or select "Keyframe" from the shortcut menu.9. Save your file.10.
Set the pattern of the fade21. In the next steps, you're going to set the pattern of fading in and out. Move the red bar to Frame 1 in theTimeline. Activate the Stage by clicking on the image.
Choose Edit > Select All. This selects all of the layers (and their symbols).1. In the Properties window, find Color. From the pull-down menu, choose Alpha, and set it to "1percent". All the images disappear.
2.
Move the red bar timeline indicator to Frame 10 of the Timeline. Choose Edit > Select All. Thisselects all of the symbols on the Stage.
3.
In the Properties window, pull down Alpha in the Color window, and set it to "99 percent". All theimages appear. [You can check each one by hiding the other layers - select the dot under the "eye"located at the top of the column of layers.]
4.
Move the red bar timeline indicator to Frame 20 of the Timeline. Choose Edit > Select All. Thisselects all of the symbols on the Stage.
5.
In the Properties window, pull down Alpha in the Color window, and set it to "99 percent".6. Move the red bar timeline indicator to Frame 30 of the Timeline. Choose Edit > Select All. Thisselects all of the symbols on the Stage.
7.
In the Properties window, pull down Alpha in the Color window, and set it to "1 percent".8. Save your file.9.
Set the tweens31. Highlight Frame 1 of all the layers -- click on the first one and shift-click on the last one. Then click andhold. In the menu that pops up, select Create Motion Tween.
Highlight Frame 20 of all the layers. Then click and hold OR click on the first one and shift-click onthe last one. In the menu that pops up, select Create Motion Tween.
1.
Save your file.2.
Move the frames to create the show34. At this point, all of the images are piled on top of one another, moving in lock step. Now you want toseparate them so that each one fades to the next. We'll do this by moving the images in the layers as blocks tospread them out.
So, click on the first frame (frame 1) of the palm layer, hold down the shift key and and then click on the lastframe (frame 31) of the waterfall layer. That will highlight the frames in all three of the top layers and allowyou to move them as a single block.
Flash Tutorial
Create a Slide Shows 7
Then click in the highlighted area and drag all the highlighted frames in all three layers as a block to the rightuntil the first keyframe of the block starts at frame 20. That is just above the keyframe in the boats layerwhere the boats photo starts fading out. Thus as the boats layer starts to fade out at frame 20, the layers abovestart to fade in.
Next, click on frame 20 of the town layer and shift-click on the last frame (frame 51) of the waterfalllayer. That will highlight the frames in the top two layers and allow you to move them as a singleblock.
1.
Then click in the highlighted area and drag all the highlighted frames in the two layers to the right so that thefirst keyframe of the block starts at frame 40. That is just above the keyframe in the palm layer where thepalm photo starts fading out. Thus as the palm layer starts to fade out at frame 40, the two layers above startto fade in.
Next, click on frame 40 of the waterfall layer and shift-click on the last frame (frame 71) of thewaterfall layer. That will highlight the frames in the waterfall layer and allow you to move them as asingle block.
1.
Then click in the highlighted area and drag all the highilghted frames in the waterfall layer to the right so thatthe first keyframe of the waterfall layer starts at frame 60. That is just above the keyframe in the town layerwhere the town photo starts fading out. Thus as the town layer starts to fade out at frame 60, the waterfalllayer above start to fade in.
Play your movie! And, if it works, save it.1.
Stop the Movie from Looping
At this point, if you exported or published your movie it would loop - that is it would play over and over againcontinuously without stopping.
If you want your movie to loop like this, then you're all set and you don't need to take the following steps.
If you don't want your movie to loop and instead want it to stop playing when it reaches the end, then takethese additional steps:
Add a layer at the top of your Flash file, and name it Actionstop.1. On this new layer in the last frame (the same number frame as the last frame of the picture you wantto see displayed at the end of your movie), insert a keyframe.
2.
Open the "Actions" Window by selecting in the menu Window > Development Panel > Actions. Inthis window, you'll see something like "Actionstop: Frame 91 ".
3.
"Actionstop" refers to the name of the new layer you just created. The frame number refers to the frame whereyou inserted your keyframe on this layer.
On the left go to Global Functions > Timeline Control > Stop and double-click on Stop. (or dragthe Stop icon over to the open screen of the Actions window on the right.) Close the ActionsWindow.
1.
You now should see a tiny a (which stands for Actionscript) in Frame 87 of the Actionstop layer (or the framenumber where you inserted the keyframe on this new layer). That's it!
Flash Tutorial
Create a Slide Shows 8

Testing Your Movie
You can test your movie by selecting in the menu Control > Test Movie (or press Apple key > Return key.Make sure when this test movie opens that you've deselected Loop in the test movie's Control > Loop.
Flash Tutorial
Create a Slide Shows 9

Frames
Just About All You Ever Wanted To Know
Frames in the Timeline
When the Timeline opens:
It displays one layer with hundreds of little boxes.• Each box corresponds to a single frame.• You can make those frames bigger or smaller by clicking the pop-up box at the end of the line offrame numbers (it has what looks like a little Frankenstein scar).
•
In the single layer, the first box is outlined in black and contains an empty circle. That first box is ablank keyframe.
•
The rest of the boxes are outlined in gray. Boxes with gray outlines are called "protoframes" - they'replaceholders. Every fifth protoframe is tinted gray; the rest are white.
•
A frame with an empty circle means it is a blank keyframe with nothing in it. Put something in it, andthe empty circle changes to a black circle, which indicates a keyframe.
•
An exercise that explains this:1. Open a new Flash document. This default Timeline appears - one layer and one blank keyframe in Frame 1.
Click on the gray protoframe for Frame 10.1. From the Insert menu, choose Timeline > Blank Keyframe (or hold down the mouse and selectBlank Keyframe from the menu). An empty rectangle appears in Frame 9, and a black line separatesFrame 9 from Frame 10. The rectangle indicates the last frame of content for the previous keyframe,and the black line shows where content from one keyframe ends and another begins. Notice that thegray-outlined protoframes 2 through 9 have been replaced with gray tick marks, and all the frames arewhite.
2.
Click on Frame 1 and, on the Stage, draw a ball (in the tools bar, select the circle tool). Notice that theempty circle in Frame 1 changes to a black circle, and Frames 1 through 9 - the in-between frames -are tinted gray. This means that Frame 1 has a keyframe with content, and the shading means that thecontent appears in all the frames from Frame 1 through Frame 9. The empty rectangle signals the lastframe that displays Frame 1's content. Frame 10 still has a blank keyframe that indicates it's empty.Click on it to see what happens on the Stage.
3.
Now, click on Frame 5 and insert a Blank Keyframe. This removes all the content from that frame,and all the frames in-between Frame 5 and Frame 10. This shows that when you insert a keyframe,you're changing what comes before and what comes after, not just the individual frame that you'veclicked on.
Note: There are two commands for creating keyframes. When you Insert a Blank Keyframe, youmake a keyframe that's empty so that you can change the contents of the Stage completely. When youinsert a Keyframe, it duplicates the content of the preceding keyframe.
4.
Click on Frame 3 and choose Insert > Timeline > Keyframe. The contents of Frame 1 are duplicatedin Frame 3. The empty rectangle in Frame 4 signals that it's the last frame in which the content fromthe previous keyframe in Frame 3 appears.
5.
Click on Frame 1 and delete the ball.6. Click on Frame 3. The ball's there. When you create a new keyframe as you did in Frame 3, thecontent becomes completely separate from the previous keyframe's content. What you do in Frame 1does not affect the content in Frame 3.
7.
Flash Tutorial
Frames 10

How to Add Frames
It's easy - and depends on whether you want to add a few frames, or a whole bunch of frames.
An Exercise that explains this:1. Open a new Flash file.
Insert a Keyframe in Frame 10. (Flash automatically inserts a Blank Keyframe, because there's nocontent in Frame 1.)
1.
Click on Frame 1, and draw a ball on the Stage.2. You want to increase this movie by one frame, so click on your arrow tool and then click on one ofthe in-between grey frames, and choose Insert > Timeline > Frame. The empty rectangle moves toFrame 10, and the empty circle moves to Frame 11, indicating that this movie clip grew by one frame.A short-cut is to hit F5 as many times as you want frames.
3.
Another way [useful for increasing a span by many frames at a time - say 10 or more -- rather thanjust a few]: Say you wanted this span to grow by five more frames. Click and drag five in-betweenframes (DON'T include a keyframe or blank keyframe).
4.
Choose Edit > Timeline > Copy Frames.5. Click outside the frames on the Timeline to deselect the frames you copied.6. Click on one of the in-between frames. Choose Edit > Timeline > Paste Frames. The span ofin-between frames is increased by five frames. If you want to add five more, just Edit > Timeline >Paste again. If you did this to one of a series of spans, for example, all the other spans would bepushed along the timeline. In other words, making one span grow doesn't decrease the length of theothers…it just shoves them along the timeline.
7.
Flash automatically inserts a keyframe at the insert point. If you don't want it, click on it and chooseModify > Timeline > Clear Keyframes.
8.
How to Delete Frames
Note: Flash has two ways to delete frames - Clear Keyframe and Remove Frames. They're a little confusing.The way to figure out which one to use is to ask yourself why you want to eliminate a frame.
If you want to eliminate a frame because you want to reduce the length of the movie, then select a frame, andchoose Edit > Timeline > Remove Frames, or Shift-F5.
If you want to remove the status of a keyframe (and therefore, its content), and keep the movie the samelength, then select a keyframe or blank keyframe and choose Modify > Timeline > Clear Keyframe (or holddown the mouse and select Clear Keyframe from the menu).
Clear Keyframe changes a keyframe or a blank keyframe into an in-between keyframe. It removes the contentit contained. The new in-between frame displays the content of the previous keyframe.
An Exercise that explains this:1. Open a new Flash file.
Insert a Keyframe in Frame 10.1. Click on Frame 1 and draw a ball on the Stage. All the frames between Frame 1 and 9 contain theball.
2.
Click on Frame 5 and insert a blank keyframe. Only the frames between Frame 1 and Frame 4 containthe ball now.
3.
Flash Tutorial
How to Add Frames 11
With Frame 5 still selected, draw a square on the Stage. Play the movie, and see a ball in the first fourframes, and a square in the next five frames.
4.
But you've decided that you don't want that square after all. You only want the ball to appear in all theframes. Click on Frame 5, then choose Edit > Timeline > Remove Frames. The keyframe doesn'tdisappear; the movie clip just shortens by one frame.
5.
So, click on Frame 5, then choose Modify > Timeline > Clear Keyframe (or hold down the mouseand select Clear Keyframe from the menu that appears)_. The keyframe and its content disappear, theframe becomes an ordinary in-between frame again, and picks up the content from the previouskeyframe (Frame 1).
6.
You can, of course shorten a movie clip by removing several frames at once by clicking and dragging over thein-between frames to be deleted, then choosing Edit > Timeline > Remove Frames. (You can't do this bychoosing Edit > Cut Frames - that just inserts a blank keyframe and a bunch of empty frames.)
You can also eliminate a particular graphic or image altogether by including the keyframe and all of itsassociated in-between frames by selecting them all and choosing Edit > Timeline > Remove Frames.
Flash Tutorial
How to Delete Frames 12

Adding Text to a Slideshow
In Four Easy Steps
The two most important things to remember about adding text to a slide show are:1. To put each text block on a separate layer.2. To make sure each text block is a symbol.
Make a Layer for Text3. Open the file in which you made your slide show.
Above the first layer that holds the first image, put another layer by clicking the layer icon at thebottom left of the Timeline window, and name it "Tocean".
1.
Make a Symbol for Text5. Choose Insert > New Symbol (or Apple-F8). The symbol-editing area opens and a property box opens.Name the symbol "Tocean", select "graphic" for behavior, and click "OK".
Choose the text tool (A) from the Tool Bar.1. Click on the symbol-editing area and start typing. You can change the color, font and size in theProperties window.
2.
If you want to import a block of text from a text-editing program, such as Word, here's how. Makesure you save the Word file (or whatever text-editing software you're using) as a Rich Text Format.Then copy the text.
3.
Before you paste the text into the Flash text symbol, position your cursor over the tiny round handleon the text field box. Then drag it sideways to an appropriate width. The tiny round handle turns intoa tiny square. That means you're ready to paste in the text you've copied from the text-editingprogram. So, just click inside the text field box and copy!
4.
Put Text into the Slide Show10. When you're finished, just click on Scene 1 at the top left of the Timeline, and you'll go back to the mainStage. From the Tool Bar, choose the Selection tool (the arrow at the top left).
When presenting photos and text in a story, it's more dynamic and easier to follow the story thread ifyou have the photos and text appearing sequentially. So, instead of putting the text in keyframes thatmatch the photo's keyframes, the text will start about 10 frames after the photo appears. In the layeryou created for the text - Tocean - click Frame 10 and insert a keyframe. Click on Frame 70 andinsert a keyframe. Click back into Frame 10, go into the Library and drag your Tocean text symbolonto the Stage. You can move it around by clicking on the symbol icon (a small circle in the middleof the text symbol) and dragging, or by using the arrow buttons on your keyboard.
1.
Using the same techniques you learned in creating a slideshow, add keyframes and adjust the alpha tomake it fade in and out.
2.
Adjust the Timing of the Fade-In13. You can adjust the timing of the fade-ins and -outs several ways. You can click on the first frame of thetext layer and shift-click on the last to select the entire span. Then drag it to the right or left and release it.
You can also click and drag the keyframes at the ends of spans to make them longer or shorter.1. You can also make segments longer by clicking into the segment you want to extend and pressing F5.2. You can make segments shorter by clicking into the segment you want to shrink and pressing3.
Flash Tutorial
Adding Text to a Slideshow 13

Shift-F5.
Flash Tutorial
Adding Text to a Slideshow 14

Add Audio to a Slide Show
In Two Easy Steps
Flash can import .aif, .wav, or mp3 digital audio files. Flash can do some editing, but it's best if you've editedthe audio in Pro Tools or some other audio editing program before importing it. You can do some basic audioediting in iMovie and export the files as .aif files.
If you import a large audio file, only use part of it and mute the rest, the exported Flash movie will stillcontain the entire audio file that you put there. That will make your exported Flash movie huge. Since you'llsometimes use sound from a video-editing program like Adobe Premiere, iMovie, or Final Cut Pro, you canexport only the audio from those files, and import them into Flash.
In this step, you'll learn how to import an audio file and do simple editing.
Import Audio
Find a 10-second audio file.1. Open a new Flash file.2. From the menu, choose File > Import to Library. Find your audio file and click OK.3. Add a new layer under your Actionstop layer. [It's usually best to put your audio files at the top of thestack of layers.] Name it Asound_ or whatever suits the audio file you chosen.
4.
Highlight Frame 1, and drag the .aif file onto the Stage or into the frame. The audio pattern will showup as a long waveform in the A_sound layer.
5.
Flash Tutorial
Add Audio to a Slide Show 15

In this layer, put key frames at the beginning and end of the audio file. In this case, there's already akeyframe in Frame 1, so put a key frame at around 147 seconds.
1.
In the Property Inspector, note that when the A_sound layer is selected, the name of the audio fileappears in the Sound box. Make sure that "stream" is selected in the Sync box. For sounds that playthroughout a Flash movie that will appear on the Web, select stream. [Event sounds are usually shortand accompany a button.] The file begins streaming right away instead of having to downloadcompletely before starting. Note also, at the bottom of the Property Inspector details about the audiofile: It's 22 kHz Mono 16 Bit 9.3 s 412.2 kB. [s = seconds, and the last number is the file size]
2.
Edit Audio
With the Asound layer selected, go into the Property Inspector and take a look at Effect. Fade Left toRight means that the sounds seems to move from the left to the right speaker; Fade Right to Left, theopposite. We're going to customize this audio, so select Custom. You can also click on Edit next tothe Effect drop-down menu. The audio wave forms pop up in a separate window.
1.
At the bottom right, near the Help button, are four symbols. The first two are zoom in and zoom out.The second two provide two different ways of looking at the waveform -- seconds or frames. Choosethe frames button. The numbers in between the two waveforms will change.
2.
You're going to change the volume of the audio so that, at about two seconds in, it decreases. It staysat decreased volume for a couple of seconds, and then increases until about two seconds from the end,where it begins to fade out. So, first scroll until you see frame 30.
3.
Flash Tutorial
Import Audio 16

At Frame 30, click on the thin straight line at the top of top waveform. An empty square box willappear on the lines in both waveforms.
4.
At Frame 32, click on the thin straight line again until a box appears, and drag it down below the topwaveform. Because this is stereo, you'll have to do the same for the bottom waveform. [If you didn'tclick on Frame 32, you'd have a gradual fade out from the beginning of the audio file to this point.Setting markers on Frame 32 decreases the audio volume over two frames.
5.
At Frame 60, click on one of the thin lines until boxes appear on both lines.1. At Frame 62, click on the top thin line until the box appears and drag the line back up to the top. Testthe audio changes by hitting the arrow at the lower left corner of the audio edit window.
2.
At Frame 115, click on the top thin line until boxes appear on both wave-form audio volume lines.3. At Frame 117, click on the top thin line until a box appears, and drag it down to the bottom of thewave form. Do the same for the other wave form.
4.
Test the changes by hitting the arrow button. If they're OK, close the window, click on Control >Rewind if the red bar isn't at Frame 1, and check out how the audio works with the images. Save yourfile.
5.
Note: You can only put in eight of these boxes, or audio changes. So, if you want more, it's best toedit the file in Pro Tools or some other audio editing file before importing it into Flash.
6.
Important Note: If you have a human voice in your Flash movie, when you export it, do the following: In theExport Flash Player window that pops up after you choose Export, find Audio Stream. There's a small "Set"button to the right of the export details. Click on it, and a Sound Settings window pops up. In the Bit Ratepull-down menu, choose 24 or 32 kbps. If you use the regular settings, the voices will come out tinny andweak. This increases your file size a tiny bit.
The same improvement can be obtained by selecting "Speech" from the Compression drop-down menu. Butthis increases the file size more.
Flash Tutorial
Edit Audio 17

Embed video
…In Four Easy Steps
In this tutorial, you'll learn how to integrate a video clip into the linear timeline of a Flash movie.
Create and save a video clip
Keep the clip size small - no larger than 400 x 300. Smaller sizes won't pixelate so much.1. Keep it short - no more than 20 to 30 seconds, more if REALLY compelling.2. Flash supports QuickTime, MPEG, AVI and DV formats.3. Create a new layer, and name it Vshark. Insert a keyframe where you want the video to start, andmake sure it's selected before you import your video.
4.
Import the video
From the File menu, choose Import Video. The Import Video dialogue box appears.1. Click CHOOSE to help you locate the clip.2. Click on the file once you've found it.3. Click CONTINUE once you have found it4. At Deployment screen5. Choose EMBED VIDEO IN SWF AND PLAY IN TIMELINE6. Click Continue7. At Embedding screen8. Choose EMBEDDED VIDEO9. Audio track INTEGRATED10. Click PLACE INSTANCE ON STAGE11. Click EXPAND TIMELINE IF NECESSARY12. Click EMBED THE ENTIRE VIDEO13. Click CONTINUE14. At Encoding Screen15. Choose FLASH 7 HIGH QUALITY16. Choose SHOW ADVANCED SETTINGS17. Choose Sorenson Spark18. At Frame Rate, double-click on SAME AS FLA19. At Data Rate, choose 48 kbs20. At Finish Video Import screen, choose FINISH21. Click on the video and choose FUNCTION > F8 to convert it to a symbol.22. When it asks you to name it, it's best to put a V before the name so you know it is video.23. A dialog bopx will open asking whether it's okay to add sufficient frames for the video. Make a noteof the number of frames. Click Yes.
24.
Test the video
If your video has audio, you won't hear it in the .fla file. If you want to hear it, do a text export --choose Control > Test Movie (or Apple > Return). If you have a human voice in the audio, it maysound tinny. When you export or publish the Flash movie, you can choose audio settings toaccommodate human speech.
1.
Flash Tutorial
Embed video 18

Export a File
In Three Easy Steps
Since your primary goal is to publish your Flash movies on the Web, you'll transform your .fla file to a .swffile. This compresses your .fla file, including any audio or video.
Set Publish settings:1. Open the Flash file you want to publish.
In the File menu, choose Publish Settings.1. At the top, click the Formats tab.2. Choose Flash (.swf) - and deselect any others that are selected (if you don't need html).3. Click the Flash tab.4. At Version, choose Flash 7.5. At Load order - choose Bottom Up6. At ActionScript version, choose ActionScript 2.07. Check Compress Movie.8. Don't worry about the JPEG Quality bar.9. At Audio Stream, click the small Set button to the right of Audio stream: MP3, 16 kbps, Mono.10. In the Sound Settings dialogue box that opens…11. at Compression, leave in MP312. at Preprocessing, check Convert stereo to mono13. at Bit Rate, choose 48 kbps14. at Quality, choose FAST15. if your audio is mostly human voices, and the audio isn't very good, in Compression, chooseSPEECH
16.
click OK17. Back in the Publish Settings dialogue box, click OK.18. Click Publish, and your .fla file will be compressed into a .swf file and put in the same folder as your.fla file.
19.
Flash Tutorial
Export a File 19
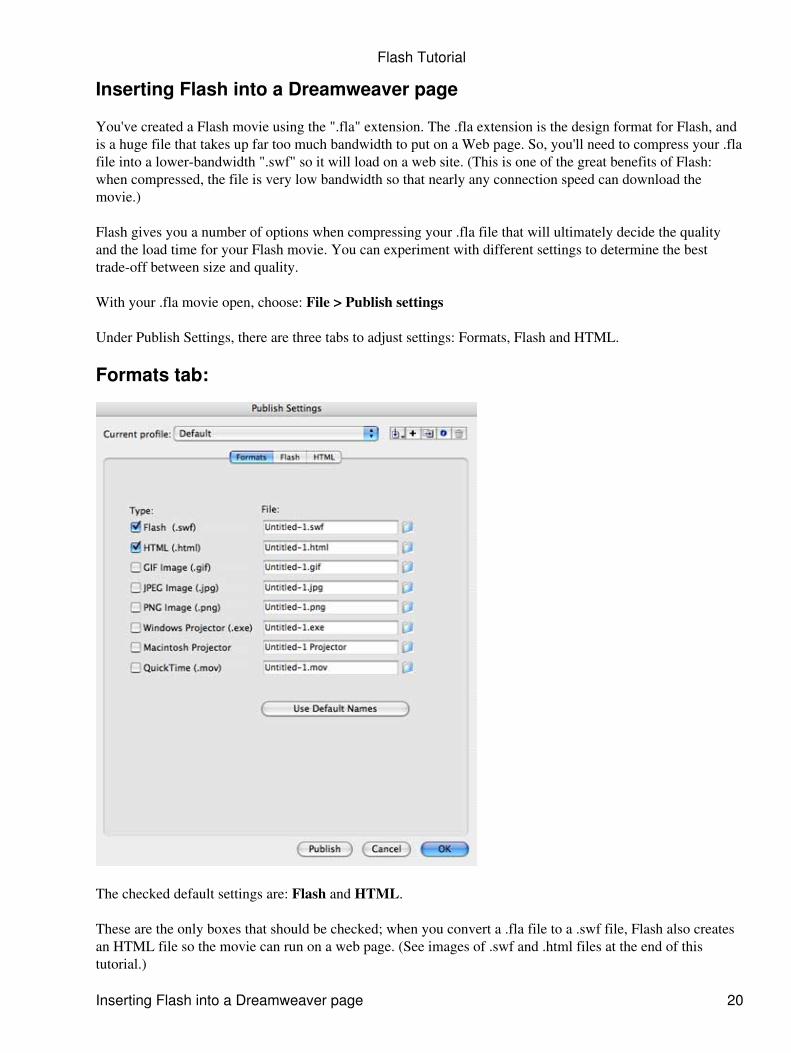
Inserting Flash into a Dreamweaver page
You've created a Flash movie using the ".fla" extension. The .fla extension is the design format for Flash, andis a huge file that takes up far too much bandwidth to put on a Web page. So, you'll need to compress your .flafile into a lower-bandwidth ".swf" so it will load on a web site. (This is one of the great benefits of Flash:when compressed, the file is very low bandwidth so that nearly any connection speed can download themovie.)
Flash gives you a number of options when compressing your .fla file that will ultimately decide the qualityand the load time for your Flash movie. You can experiment with different settings to determine the besttrade-off between size and quality.
With your .fla movie open, choose: File > Publish settings
Under Publish Settings, there are three tabs to adjust settings: Formats, Flash and HTML.
Formats tab:
The checked default settings are: Flash and HTML.
These are the only boxes that should be checked; when you convert a .fla file to a .swf file, Flash also createsan HTML file so the movie can run on a web page. (See images of .swf and .html files at the end of thistutorial.)
Flash Tutorial
Inserting Flash into a Dreamweaver page 20

Flash tab:
Version: Flash Player 6
Load order: Bottom up (this means the first image in the movie will be the one at the bottom of your .fla file.If you've built your movie opposite, use "top down.")
Options: Compress movie
JPEG quality: 50 percent is a good balance - it doesn't detract much from image quality on the Web. (Youcan experiment with the JPEG quality: the higher the quality, the slower the download time.)
Audio Stream and Audio Event:Note: There are two types of sounds in Flash: event sounds and stream sounds. An event sound mustdownload completely before it begins playing, and it continues playing until stopped (using an action script orthe control bar). It's mostly used for sounds of short duration that are applied to buttons. Stream sounds beginplaying as soon as enough data for the first few frames has been downloaded. They are usually longer soundfiles, such as background music, sound or interviews.
Use "Stream" if your movie includes audio for most of, or the entire track. Use "event" for shor-durationbutton sounds.
Flash Tutorial
Formats tab: 21

Click on "Set" to bring up the settings
Sound settings:
For MP3:
Preprocessing: Leave checked
Bit Rate: Check 16 kpbsNote: If you have a human voice in your Flash movie, choose 32 kbps. If you use the regular settings, thevoices will come out tinny and weak. This increases your file size a tiny bit. The same improvement can beobtained by selecting "Speech" from the Compression drop-down menu. But this increases the file size quite abit.
Quality: Check "Fast"
HTML tab:
Flash Tutorial
Flash tab: 22
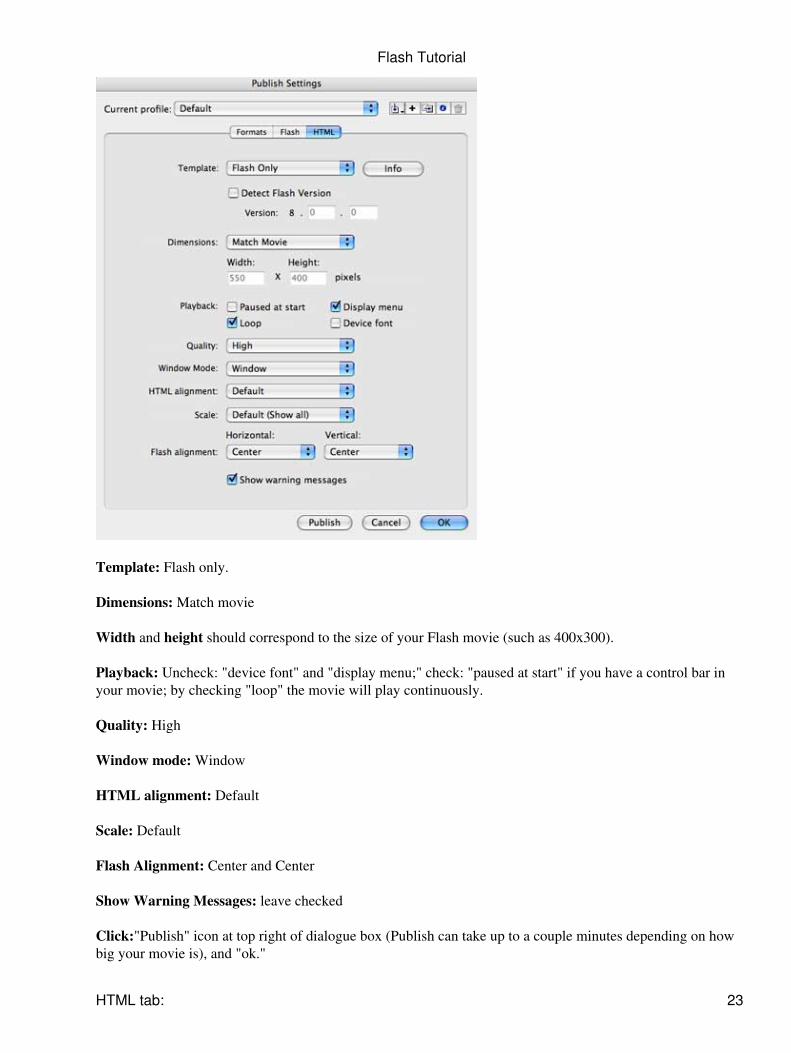
Template: Flash only.
Dimensions: Match movie
Width and height should correspond to the size of your Flash movie (such as 400x300).
Playback: Uncheck: "device font" and "display menu;" check: "paused at start" if you have a control bar inyour movie; by checking "loop" the movie will play continuously.
Quality: High
Window mode: Window
HTML alignment: Default
Scale: Default
Flash Alignment: Center and Center
Show Warning Messages: leave checked
Click:"Publish" icon at top right of dialogue box (Publish can take up to a couple minutes depending on howbig your movie is), and "ok."
Flash Tutorial
HTML tab: 23

Test movie in browser: Control > Test movie(Or, hold down the Command (Apple) key and return key at the same time)
[Note: Although you can test your Flash movie in a browser at any time, this does not set it for publish to alive web site.]
Now that your movie settings are adjusted for publish, you're ready to convert the .fla to a .swf file, click: File> Export Movie
In the dialogue box that comes up, name your .swf, save it to disk, and export as a Flash Movie.
If you want to go back to make any edits down the line, you will make them on the .fla file; the .swf filecannot be edited. This means that each time you make a change to the .fla you will need adjust settings andre-export as a new .swf (you can use the same naming conventions and copy over the out of date files). Bothof these files are necessary to insert the Flash movie into a Dreamweaver page. Make sure to leave both filesin the same folder where all your web content is stored.
Now you're ready to drop your .swf into a Dreamweaver page.
In Dreamweaver, navigate to: Insert > Media > Flash(Or, click on the red Flash icon on the Insert bar under "Com mon tab, which opens by default at top of theDreamweaver file.)
In the dialogue box that opens, navigate to your Flash .swf file, and choose it. Double click on the Flash .swffile to make it drop into the Dreamweaver page.
Size and position the Flash file (a gray box) with the drag and drop handles. Or, use the Properties dialoguebox: Window > Properties to adjust the width and height of your Flash movie.
Test Dreamweaver page (Hold down Command key ("apple key") and F12)
Save the associated HTML file in the same folder where you store your .swf file.
A Flash ".swf" and ".html" file (named, in this case, "about"):
Flash Tutorial
HTML tab: 24

See also: Inserting Flash into Web pages .
Flash Tutorial
HTML tab: 25

The Control Bar For Flash 6
In Three (or Four) Easy Steps
Set up the Control Bar File1. Open the Flash file mainStory.fla (if you don't have this file, download it now). This is your template to useas often as you like. Make a copy of it. (If it asks you to substitute fonts, do so.) Name that copy a version ofthe movie clip that you've finished editing. (If your movie clip is story.fla, you could name this storyend, forexample.)
Check the size and background color of the Stage in the template storyend. If this is not the size andbackground color that's on your movie, change it to match yours. If you want to stick with the sizethat you see, skip to Step 8.
1.
Change the Size of the Stage and Gray Bar3. So, say we're going to change the Stage size to 600 x 400 pixels to match the story.fla file, and change thebackground color to blue. Click on the Stage, and in the Property Inspector, change the pixels to 600 x 400,and the color to ice blue.
If you change the size of the Stage, you'll have to change the size of the graybar to match the size ofthe movie, and you will probably have to change its position on the Stage. (The graybar layer is in theInterface folder layer. As it is now, it moves from below the Stage to sit on the bottom of the Stage.(Hide the other layers and watch it by playing the movie.)
1.
So, click on the first keyframe in the "graybar" layer, and the graybar is highlighted in blue on theStage. Make sure your arrow tool is selected, change the dimensions to 600 x 20 pixels in the Infowindow, and move the gray bar so that the top of it touches the bottom of the blue Stage.
2.
In the second keyframe on the graybar layer, make sure the arrow is selected in your toolbar and thegray bar is outlined in blue, and change the dimensions to 600 x 20 pixels in the Info box. Then movethe gray bar so that its bottom edge rests on the blue Stage's bottom edge. Voila! Play the movie to seethat the gray bar now moves onto the blue Stage. Don't worry about the big red window that pops up.We're going to fix that next.
3.
Follow the same procedure to move the scrubber bar (the control buttons themselves) onto the graybarand the preloader onto the Stage. (Just move them - you won't have to resize them.)
4.
Turn Your Movie into a Symbol8. Open the movie that you've finished editing. You're going to turn it into a symbol - a movie clip symbol,and drop it in place of that big red window that popped up.
First, make sure that the Library windows for both movie clips are open and sitting one above theother, so that you can see them both.
1.
In your movie, make sure that you can see ALL the layers (make the timeline pane larger if you needto). Then Shift-Click on Frame 1 in Layer 1. Move the blue scrubber bar to the end of the movie, andShift-Click in the last layer of the last frame of the movie. (In essence, you're grabbing all the frames,and all the layers of this movie in a big rectangle of frames.) All the frames and all the layers of themovie turn black, meaning they're all selected.
2.
Choose Edit > Timeline > Copy Frames. NOTE: IF YOU HAVEN'T PUT A BLANK KEYFRAMEAT THE END OF THE FILLED FRAMES IN EACH LAYER, FLASH WILL FILL IN THEEMPTY FRAMES IN THE BLOCK WITH CONTENT, WHICH CAN SLOW THE MOVIE.
3.
Choose Insert > New Symbol. Name it placeholder_mc (and not anything else - this is VERYimportant), and choose Movie Clip for the type of symbol. The name placeholder_mc appears in your
4.
Flash Tutorial
The Control Bar For Flash 6 26

Library window.Select the first frame of the only layer that you see, and choose Edit > Timeline > Paste Frames. Allthe layers and all the frames of your movie appear in the Timeline. You won't need to do any more onthis file, but leave it open, because you need its Library window. Right now.
5.
In the Library window, select placeholder_mc symbol that you just created, and drag it into theLibrary window of your new file.
6.
Drop Your Movie into Control Bar Template15. Bring the control bar template file (storyend) to the front so that you can work on it now. In the slideshowlayer, click on Frame 20, where it says "place slideshow movie clip here". Choose Mondify > Timeline >Clear keyframe. The big red Stage disappears.
With this same Frame 20 still selected, choose Insert > Timeline > Blank keyframe. Then drag theplaceholder_mc symbol onto the stage and center it.
1.
This next step is CRITICAL! In the Property Inspector for this movie clip symbol, placeholder_mc,under Movie Clip, you'll see the words . (If you don't see the movie clip symbol's Property Inspectoropen, click on the stage where you put the symbol, and it'll appear.) Type in placeholdermc.
2.
Test the movie by choosing Control > Enable Simple Buttons, and then Control > Test Movie. Anexport window will appear, and then the movie will open in a test window. If you have designed themovie to start right away, it will. If you've designed it to start at the play button, it will start playingwhen you hit the play button.
3.
SAVE YOUR MOVIE!4.
Note: This control bar setup works if you are using Flash Version 6; it is not compatible with Flash Version 7.
Send an email to Russell Chun ([email protected]) to thank him for modifying this bit ofFlash for us. If you have a credits window, credit Andrew DeVigal ([email protected]) for the"Visual Edge Template Slideshow with Scrubber", and Russell Chun for modifications.
1.
Flash Tutorial
The Control Bar For Flash 6 27
Timeline in Action Script
In Three (or Four) Easy Steps
In this tutorial, you'll learn how to make a simple timeline -- a line with a series of buttons labeled withnumerical dates that you roll over to reveal text.
Make the Base Layer1. Open a new Flash file, make it 600 x 400 pixels, with a white background, and make sure the Library andInfo windows are open. Name this new file "Line".
Choose Insert > New Symbol, name it "timeline" and choose "Graphic" as the symbol type. Click OK.1. Select the rectangle tool and draw a red (stroke and fill) rectangle 600 pixels wide and 10 pixels high.(Just slap a rectangle on the screen, then choose the arrow tool, click on the rectangle twice to selectthe fill and stroke, then size it in the Info box.)
2.
Choose the text tool, change fill and stroke to black, and type these four dates across the bottom of theline: 1700, 1900, 1915, 1995. Space them equidistant from each other.
3.
Go back into Scene 1, drag the "timeline" symbol onto the Stage, center it, and name its layer "line".4.
Make the Buttons6. Now, choose Insert > New Symbol. Name it "yelbutton" and choose "Button" as the symbol type. ClickOK. In Layer 1 of the Flash Timeline, the "Up", "Over", "Down", and"Hit" frames appear.
In the toolbar, change the fill color to a yellow, and using the circle tool, draw a circle. (Just slap acircle on the screen, then choose the arrow tool, click on the circle twice to select the fill and stroke,then size it to be 20 pixels in diameter in the info box.)
1.
Then, insert keyframes in "Over", "Down", "Hit" - the easiest way is to drag the mouse or shift-clickacross all three to select them, then hold the mouse down until a menu appears and choose Convert toKeyframes. Or, select all three frames and choose Modify > Timeline > Convert to Keyframes. Thecircle is repeated in all the keyframes.
2.
Put the Buttons on the Line9. Above the Stage, click on Scene 1 to leave symbol-editing mode.
Add five more layers, and name them "1700", "1900", "1915","1995", and "actions".1. Highlight the "line" layer. Drag the yellow button symbol from the Library onto the Stage, and, above"1700", put it on top of the red line.
2.
Repeat three more times, putting a yellow marker over each date.3.
Tell the First Button What to Do13. Select the "line" layer. Click on the red scrubber bar that's sitting over Frame 1. Then go to the Stage andselect the 1700 button. A blue square will appear around the button. In the Properties Inspector, name theinstance of that button "1700".
From the Window menu, open the Actions menu. At the top of the window, you should see "Actionsfor 1700 (yelbutton)". This means that you're going to assign some actions to the 1700 instance of thesymbol yelbutton.
1.
Then go to Actions > Movie Control and double-click "on". In the Parameters box, deselect"Release". Select "Roll Over". The script changes to "on (Rollover)" in the scripting pane (bottomright).
2.
Flash Tutorial
Timeline in Action Script 28

Still in Actions>Movie Control, double-click "goto". In the Parameters window, change the "Go toand Play" button to the "Go to and Stop" button. (You really, really, really don't want Flash to play -you want it to go to a particular frame, which it will play, and screech to a halt.) Change the framenumber in the Frame drop-down window to "2".
3.
Click on number 3 in the scripting panel. (If you don't see numbers in the scripting pane, click on theboxed arrow above the pane on the right, and select "view line numbers".) Still in Actions>MovieControl, double-click "on", deselect "Roll Over", and select "Roll Out".
4.
Still in Actions > Movie Control, double-click "goto", select the "Go to and Stop" button, and leavethe Frame number at Frame 1. What you've told Flash to do is when you roll over the yellow buttonnamed 1700, go to Frame 2. And when you roll off the yellow button named 1700, go back to Frame1. The reason you're doing this will become clear in a moment.
5.
Tell the Second Button What to Do19. Go back to the Stage and click on the 1900 button. In the Properties Inspector, name the instance of thatbutton "1900".
In the Actions window, double-click "on" in Actions > Movie Control. Deselect "Release" and select"Roll Over". The script changes to "on (Rollover)" in the scripting window.
1.
Double-click "goto". In the Parameters window, change from the "Go to and Play" button to the "Goto and Stop" button. Change the frame number in the Frame drop-down window to "3".
2.
Double-click "on", deselect "Release", and select "Roll Out". Double-click "goto", select the "Go toand Stop" button, and leave the Frame number at Frame 1.
3.
Tell the Last Two Buttons What to Do23. Repeat steps 17, 18, 19, and 20 for the 1915 and 1995 buttons, but make sure you name their instances inthe Property Inspector, and make sure you change the frame number in the first "goto" script to Frame "4" for1915 and "5" for 1995.
Extend the Base Layer to Frame 2024. Still in the "line" layer, insert a keyframe in Frame 20. Now all the frames between one and 20 are thesame.
Test the Buttons, Stop the Movie at One25. Save the movie. You can do a simple test to see if your buttons are active by choosing Control > EnableSimple Buttons, and moving your mouse over the yellow buttons. The hand will appear. But you're notfinished yet. Before moving on to the next step, deselect Control > Enable Simple Buttons. (Those hands justget in the way.)
In the "actions" layer, click on Frame 1, and in the Actions panel, choose Actions > Movie Control,and then double-click on "stop". A small "a" appears in Frame 1. This tells Flash to stop on Frame 1as soon as it starts, rather than continue playing all the frames.
1.
Put Text with Each Button27. Click on layer "1700" and insert a blank keyframe in Frame 2. In the toolbar, select the text-editing tool("A") and on the Stage, above the 1700 button, type "16K to 20K sea otters in California". In the toolbar,select the arrow tool to position it above the 1700 button.
Click on layer "1900" and insert a blank keyframe in Frame 3. In the toolbar, select the text-editingtool and on the Stage, above the 1900 button, type "California sea otters though to be extinct". In thetoolbar, select the arrow tool to position it above the 1900 button.
1.
Flash Tutorial
Timeline in Action Script 29
Click on layer "1915" and insert a blank keyframe in Frame 4. In the toolbar, select the text-editingtool and on the Stage, above the 1915 button, type "50 sea otters found in Big Sur, CA". In thetoolbar, select the arrow tool to position it above the 1915 button.
2.
Click on layer "1995" and insert a blank keyframe in Frame 5. In the toolbar, select the text-editingtool and on the Stage, above the 1995 button, type "Sea otters hit 2,300, start slow decline". In thetoolbar, select the arrow tool to position it above the 1995 button.
3.
Save the movie. Now test it by choosing, from the Flash menu, Control > Enable Simple Buttons andControl > Test Movie. An export window will appear and disappear when the export is finished, and anew window will pop up.
4.
At the top of this new window is the file name, with attached swf. From View, choose "BandwidthProfiler", which adds a pane at the top about the file, such as the dimensions, frame rate, size, etc. Inthe pane at the bottom is your timeline. You can mouse over the dates to see the text appear anddisappear as you scripted.
5.
Extra Info: Link a Button to a URL:1. Create a button symbol, drag an instance from the library to the Stage and give it a name in the PropertyInspector.
Select the layer you've put the button into, then select the first frame of the main Timeline, and openthe Actions panel.
1.
Choose Objects > Movie > Button > Events > onRelease.2. In the Object field, enter the name of the button symbol. The onRelease event handler for the button iscreated.
3.
Choose Actions > Browser/Network > get URL. The getURL action is added to the onRelease eventhandler.
4.
In the URL field, enter the full address of a Web site.5. Leave the Expression checkbox unchecked.6. Export your Flash movie in Flash and html, and play it in either Flash Player or a browser. From theFlash player, a separate window opens for the url. In Dreamweaver, when you click the button youcreated, the Web site loads in the same window as your Flash movie. Click the back button in yourbrowser to return to your Flash movie.
7.
[From Macromedia Flash MX Advanced, by Russell Chun, pp. 192-193.]
Flash Tutorial
Timeline in Action Script 30

Sample Media
This page includes sample images, audio, and video you can use to start working with Flash. It also includessome sample .FLA files you can use to see how a working version of the tutorial is constructed.
Sample Images
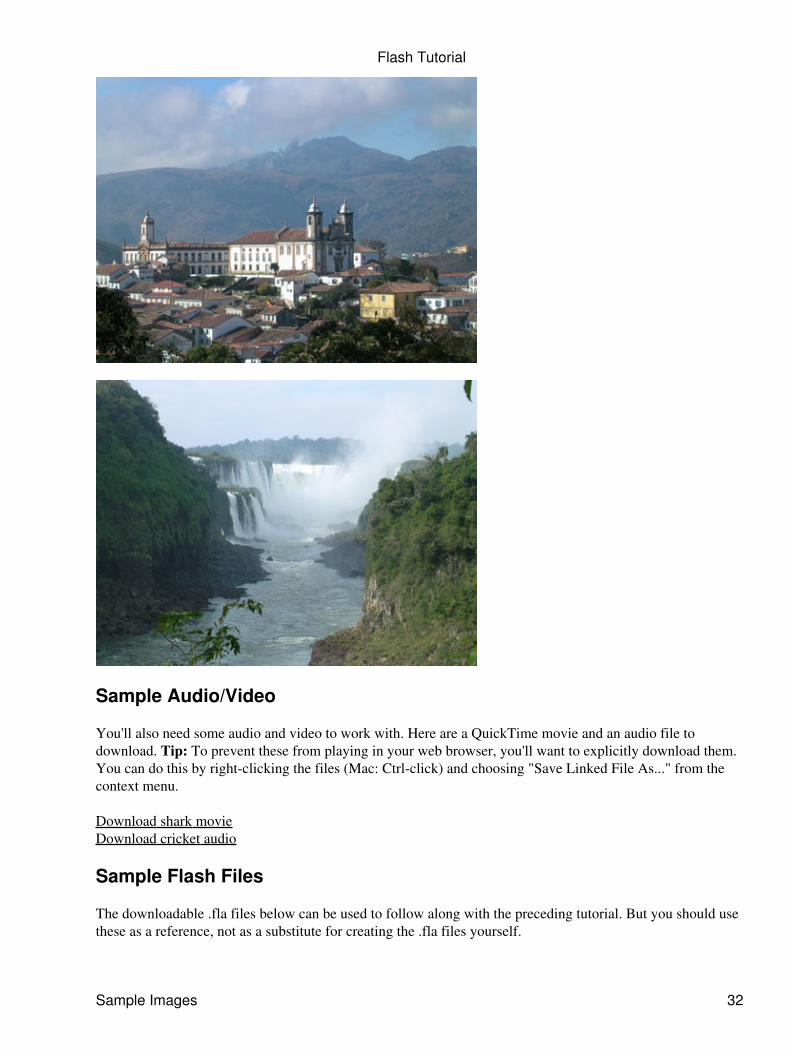
First, you need images to create a Flash movie. For this tutorial, you're going to create a slide show with atleast four jpg images.
If you don't already have four jpg images to use for the slide show, click on each of the images below anddrag them to your desktop. (With a double-click mouse you can also right click on the image and save it toyour computer.)
Flash Tutorial
Sample Media 31
Sample Audio/Video
You'll also need some audio and video to work with. Here are a QuickTime movie and an audio file todownload. Tip: To prevent these from playing in your web browser, you'll want to explicitly download them.You can do this by right-clicking the files (Mac: Ctrl-click) and choosing "Save Linked File As..." from thecontext menu.
Download shark movieDownload cricket audio
Sample Flash Files
The downloadable .fla files below can be used to follow along with the preceding tutorial. But you should usethese as a reference, not as a substitute for creating the .fla files yourself.
Flash Tutorial
Sample Images 32
Download slide show (.fla file)Download photos with text (.fla file)Download photos with text and audio (.fla file)Download photos with text, audio and video (.fla file)
Timeline sample (.fla file)
About this Tutorial
This tutorial was co-written by J-School graduate Tim Gnatek and Multimedia instructor Jane Stevens, withinput from Flash instructor Russell Chun and webmaster Scot Hacker.
Parts of this tutorial are reprinted from the book Macromedia Flash MX 2004 Advanced for Windows andMacintosh: Visual QuickPro Guide, by Russell Chun and Joe Garraffo, with permission from Russell Chun.
© The Regents of the University of California
Flash Tutorial
Sample Flash Files 33


![Dcrules of Kdmc[1]](https://static.fdocuments.us/doc/165x107/54fb2f614a7959434c8b49cd/dcrules-of-kdmc1.jpg)