Flash Module - Dalhousie Universityprof1106/gamedesign.pdf · statements in ActionScript and learn...
55
1 Flash Module Tutorial 1 0 Designing a Brick Breaker game The tutorials in the Flash module will take you from the beginning to the end of building a Brick Breaker game but, as with any programming work, you must begin with a plan in mind. This section provides an outline of the design for the game you will build. When you create your own game in the project section of this module, you will need to come up with your own design as well. Here is our basic design for the Brick Breaker game: a. Game Play Our game will consist of a paddle, bricks, and a ball. The paddle will bounce the ball and the ball will hit the bricks. Whenever a brick is hit, it will be destroyed. The player will play the game by controlling the movement of the paddle. b. Winning A player can win the game if they break all the bricks in all the game levels. There will be no second chances. c. Losing The player will lose the game if the ball hits the bottom (instead of the paddle) too many times. In the first level, the player will lose on the third time that the ball hits to bottom. d. Keeping Score We will award points (10) when the player breaks a brick with the ball and we will subtract points when the ball hits the bottom of the stage (-30). In this way, even if a player wins the game, they may be able to play again for a higher score. e. Levels This game will have two levels. In the first level, we will have one row of bricks across the top of the screen and one ball to hit them. In the second level, we will have two rows of bricks across the top and two balls for the player to control. Level 1: Level 2:
Transcript of Flash Module - Dalhousie Universityprof1106/gamedesign.pdf · statements in ActionScript and learn...

1
Flash Module
Tutorial 1 0 Designing a Brick Breaker game
The tutorials in the Flash module will take you from the beginning to the end of building a Brick Breaker game but, as with any programming work, you must begin with a plan in mind. This section provides an outline of the design for the game you will build. When you create your own game in the project section of this module, you will need to come up with your own design as well. Here is our basic design for the Brick Breaker game:
a. Game Play Our game will consist of a paddle, bricks, and a ball. The paddle will bounce the ball and the ball will hit the bricks. Whenever a brick is hit, it will be destroyed. The player will play the game by controlling the movement of the paddle.
b. Winning A player can win the game if they break all the bricks in all the game levels. There will be no second chances.
c. Losing The player will lose the game if the ball hits the bottom (instead of the paddle) too many times. In the first level, the player will lose on the third time that the ball hits to bottom.
d. Keeping Score We will award points (10) when the player breaks a brick with the ball and we will subtract points when the ball hits the bottom of the stage (-30). In this way, even if a player wins the game, they may be able to play again for a higher score.
e. Levels This game will have two levels. In the first level, we will have one row of bricks across the top of the screen and one ball to hit them. In the second level, we will have two rows of bricks across the top and two balls for the player to control. Level 1: Level 2:

2
Win Screen: Lose Screen:
We will also add some background music and sound effects to make the game more fun to play. You can try out a completed version of this game at: www.cs.dal.ca/~prof1106/flash.html The four tutorials in this module will divide up the project as follows: Tutorial 1: - Section 1: A Simple “Hello World” Program - Section 2: Making a Paddle that Moves Tutorial 2: - Section 3: Adding a Bouncing Ball - Section 4: Creating and Breaking Bricks
Tutorial 3: - Section 5: Winning and Losing - Section 6: Extra Features
o Part 1: Keeping Score o Part 2: Using Sound
Tutorial 4: - Section 7: Adding the Second Level
Have fun!

3
1 A Simple “Hello World” Program In this section, you will create a basic Flash program that prints “hello world” using ActionScript 3.0 code (the programming language for Flash). Through this, you’ll explore the role of trace statements in ActionScript and learn the purposes for the different file types used in Flash. You will use this program as the basis for this module’s Brick Breaker game.
a. In My Documents on the local computer, create a folder (for example, called brickBreaker) where you will store your Flash files. Do not use apostrophes in this folder name otherwise you will run into problems in Flash later. You will need to back-up your files somehow (either store them in a group member’s user directory on the server or on a usb key) because these file cannot be permanently stored in My Documents. If you attempt to work on files stored directly on the server, your project files may not be updated quickly enough and you may experience unexpected errors in your programs. Note: Remember to back-up your files regularly in case your computer freezes and you must reboot without saving recent changes. Also, ensure that up to date copies of your files are available to all group members so that one member missing class does not cause unnecessary difficulties for the others.
b. Open Flash. Choose to create a new ActionScript File in the initial dialog box.
c. Save this file as Main.as in the folder you created in part (a). This file will contain the ActionScript code for your program. You must use a capital M for this filename.

4
d. Set the workspace to Developer by selecting it from the list of workspace options from the
drop-down box at the top right corner of the Flash window. This arranges the panels & windows so that they are in the best organization for both coding in ActionScript and designing the visual aspects of your game.
e. Now create a new Flash File by choosing Flash File (Action Script 3.0) from the File > New menu.
Note: We are working with ActionScript 3.0 in this course. If you have used ActionScript 2.0 in the past, this knowledge will be useful but you’ll also need to be aware of the differences between the two versions. In brief, version 3.0 enforces a better object-oriented approach to programming. For a detailed description of the differences for specific commands, visit: www.adobe.com/livedocs/flex/201/langref/migration.html.
f. Save this file as brickBreaker.fla (or something along these lines) in the same folder. The extension “.fla” denotes a Flash file. The white box you see in the centre of the screen is called the stage. This is where all of the images and objects for your game will eventually be displayed.

5
g. In the Properties panel (on the right of your screen) enter Main in the “Class” field. As you have likely guessed, this will connect the Flash file with code from the Main.as file that you already created. The code in the Main.as file will be used to direct how the Flash file runs.
h. Switch to editing the Main.as file by selecting it in the file tab bar.
Enter the following code in the Main.as file: package { import flash.display.MovieClip; public class Main extends MovieClip { public function Main() { trace("Hello world!"); } } }
If this is one of your first experiences with programming, the code may look very foreign to you. For now, pay attention as you enter it because you will need to know how it works and even add some of your own in time. Don’t worry because it will become much clearer as your progress. Two things to be specifically aware of as you enter the code are: o Where curly braces are used. These divide the code into sections (framed by the
braces). The name of each section comes immediately before the opening brace. For example, public function Main() (or “the Main function” in everyday programming lingo) is the name of the section which contains the line trace(“Hello world!”);.
6
o The fact that Main is used as the name for the class and function sections. It is no coincidence that this is the same name as the file (Main.as). The function that shares the name of the class is also called the constructor and is the first section of code to be executed when the code in the main class is told to run. Because this file is linked to the brickBreaker.fla file, it will begin running as soon as the Flash program begins.
Note: As you enter the code, some words will be highlighted blue or green and some lines may be gray . Blue indicates that the words are recognized ActionScript code. Green identifies the portion as a segment of text within quotation marks. Gray lines are comments (which always begin with // or begin with /* and end with */). To adjust the colour settings, go to Edit > Preferences and choose ActionScript. Save the Main.as file. It is important to save files after you have edited them and before you test them. If you don’t, the most recent changes will not be used when the program runs. You can tell that a file has been edited but not saved if there is a star beside its name in the file tab bar. In the image below, Main.as has been modified but those changes have not been saved as indicated by the *.

7
i. Run the new program by pressing Ctrl + Enter or choosing Control > Test Movie from the menu. A new window filled with a blank white rectangle (exactly the same as the content of your Flash file’s stage) should now be displayed and “Hello world!” should be printed in the output panel in the lower portion of the main Flash program.
Question 1.1: The trace(“Hello world!”); line in your code is also called a trace statement. What does this trace statement in your code do? In other words, what connections do you see between what is written in the trace statement in your code and what happens when you run your program? Congratulations on making your first Flash program! Maybe you’re a little disappointed that it’s only a white box but don’t get too upset. The results of your work will only get more and more interesting.
j. Now close the brickBreaker.swf window that just opened and the Flash program. Go to your folder where the Main.as and brickBreaker.fla files were saved. Notice that a new file has been created: brickBreaker.swf. This is the compiled version of your Main.as file instructions plus the content in brickBreaker.fla. If you ever want to post your Flash game to a website or send it to friends, your .swf file will be the one to use for this purpose. Anyone who has a web browser (ex. Internet Explorer or Mozilla Firefox) with a Flash plug-in (this is fairly standard in web browsers these days) or owns the Flash program can run it. Double-click on the brickBreaker.swf file to run it without the .fla and .as files. Question 1.2: When you run your Flash program by double-clicking the file name in the folder instead of running it from within Adobe Flash, can you see the output of the trace statement? Think about how this might be useful to you in the future. We’ll take advantage of it further along in the tutorials.

8
k. Open the Main.as and brickBreaker.fla files in Flash again and make them a project by choosing Quick Project from the drop-down menu in the Project panel.
After doing this, you should see brickBreaker (or the name of your .fla file if this was not the name you chose) as the selected project in the drop-down menu and the files for this project displayed below (brickBreaker.fla, brickBreaker.swf, and Main.as). There should also be a checkmark to the right of the name of the .fla file in the file list. This indicates that this is the primary file in the project.
l. Congratulations! You’ve finished the first section of the Flash Module! Continue on to Section 2 to finish the first tutorial.
9
2 Making a Paddle that Moves In this section, you will create the paddle to be used by the game player to bounce the ball that will break the bricks. In the process, you’ll learn about Movie Clips: the name given to objects that you create and then can control with code, and the library where objects used in your game are stored.
a. If you haven’t already done so, open the brickBreaker.fla and Main.as files in Flash.
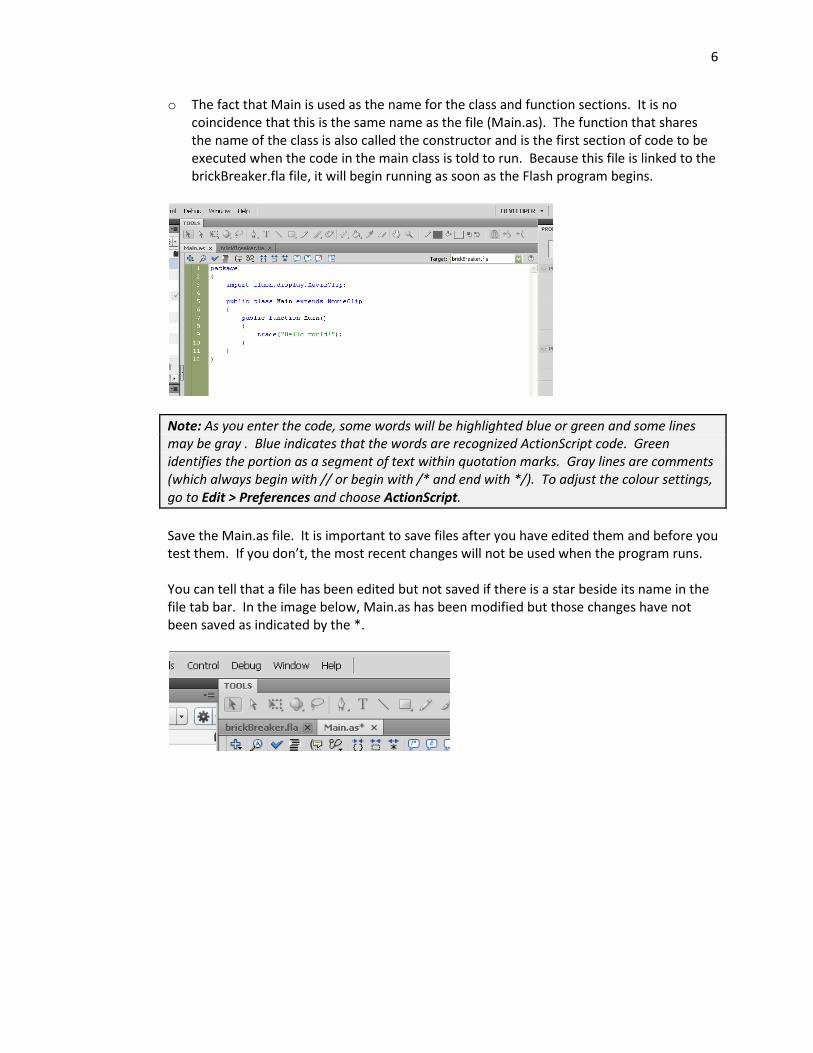
b. With the brickBreaker.fla file selected, choose Insert > New Symbol… from the menu. Type Paddle in the Name field, choose Movie Clip from the Type drop-down box, check the Export for ActionScript box, and ensure that the name Paddle is also entered in the Class field. (If the Export for ActionScript option is not visible to you, press the Advanced button to see this and other options.) Here, as is the case everywhere in your Flash project, capitalization is important. In other words, “paddle” is NOT the same as “Paddle”.
c. Press OK. A dialog box will appear stating that the class definition for Paddle could not be
found. Don’t worry - this is only a warning and, in this case, it is not a problem. Simply select OK here too.

10
d. This will bring you to the editing window for the Paddle object. Here we will define what the paddle will look like by drawing it. The “bread crumb trail” just below the file tab bar indicates that you are editing the Paddle. Right now it consists of two items: Scene 1 and Paddle with an icon for each. Each of these is a “crumb” in the trail that shows you where you started (Scene 1) and where you are now (the last item, Paddle, in the trail). The name, “bread crumb trail”, comes from the fairy tale of Hansel & Gretel who left a trail of bread crumbs in the forest so they would not get lost.
If you were to select Scene 1 from the trail, this would take you back to the main stage of brickBreaker.fla (the white rectangle).
Furthermore, notice that Paddle now appears as an item in the Library panel. Once you have designed the paddle, a small picture of it will be displayed in the area above the list of library elements in the panel.
e. The paddle will be a simple 130x10 rectangle. To draw this, choose the Rectangle Tool from the Tools panel (you can also do this by simply pressing R on your keyboard).
Under Fill and Stroke in the Properties panel, set the stroke to invisible by clicking on the stroke’s colour box and choosing the small white box with the red line through it from the top right corner of the colour dialog box that appears. Set the fill to the colour of your choice by clicking on its colour box and selecting a colour.

11
f. Now draw a rectangle. Don’t worry about the dimensions or position because you will adjust these later.
Notice that a picture of this paddle is now present in the Library panel.
g. Change the paddle’s dimensions to 130x10 by entering 130 as the W (width) property in the Properties panel and 10 as the H (height) property. The X, Y, W and H properties may not appear to be modifiable but, when you click on the numbers, a text box will appear and you will be able to enter the new value. If you cannot see these properties, click on the triangle beside the Position and Size section heading in the Properties panel to expand this section and reveal these properties.

12
h. You also need to position the paddle with respect to the crosshairs on the screen (the small black cross visible on the white background in the main drawing area). This will be important in order to easily use code to instruct the paddle where to be located on the stage. In this case, you will center the crosshairs on the paddle rectangle. Do this by setting the X property to -65 (-W/2) and the Y property to -5 (-H/2) in the Properties panel.
You should now see the paddle rectangle centered under the crosshairs.
i. You have now created the Paddle object. Select Scene 1 from the bread crumb trail to exit the Paddle editing area. Save your files and then run the game by pressing Ctrl + Enter. Notice that you still see nothing on the stage. This is because you have not placed the paddle on the stage. One option would be to put it on the blank stage visible in Scene 1. Although this would work, we also need to consider the long term plans for the game. The game is intended to have multiple levels. In order to not limit yourself to using the same Paddle object in every level, it would be better to create a Level 1 object that will be displayed on the stage for the duration of the first level. Then you can display the Paddle object on this Level 1 object. Because Paddle is in the library, this does not restrict you from using it in other levels also but it does allow you the freedom of not relying on this object if you wish.
j. Create the Level1 object by following the same first steps you took to create the Paddle. Select Insert > New Symbol… from the menu. Enter Level1 as the name of the new Movie Clip symbol and export it for ActionScript with the class name set to Level1. Then choose OK to finish.
Note: If you ever wish to change the settings for an object that has already been created, simply select Properties… from the pop-up menu that appears when you right-click on the name of this object in the Library panel.

13
k. To create the background for Level 1, create a rectangle (again with the stroke colour set to invisible and the fill set to the colour of your choice).
l. This background should fill the stage, therefore it must have a width and height equal to the stage’s width and height. To know what these values should be, select Scene 1 from the bread crumb trail. With the Selection Tool (the arrow tool furthest to the left on the Tools panel), click on the stage. You should now see the dimensions of the stage under the Size property in the Properties panel. The first number is the width and the second is the height. Write these numbers down to remember what the Level 1 background’s dimensions must be set to. Question 2.1: What is the width and height of the stage?
m. Double-click on Level1 in the Library panel to continue editing it. Using the same Selection Tool, select the rectangle which will form the background and set its W and H properties to the width and height of the stage.
n. As was the case for the Paddle, you must also think about the location of the crosshairs for Level 1. In this case, it is best for them to be at the top left corner of the rectangle because of the way coordinates are determined on the stage. We will discuss how stage coordinates are determined in detail later in the module. For now, set the X and Y properties to 0.
o. If, at this point, you can no longer see the entire rectangle that you created, select the Hand
Tool from the Tools panel (it is easy to find because it looks like a hand) and drag the rectangle until you can see all of it. Notice that this does not change the location of the crosshairs. (If you had attempted the same action using the Selection Tool, the crosshairs would have moved and you would have had to reset the X and Y properties.)
p. You now have a simple background for Level1 but it would be nice to have something a bit
more interesting. Below are instructions for drawing some clouds. You are free to add these or other graphics instead. Be careful not to let this take up too much of your time though.

14
q. First, choose the Oval Tool from the Tools panel by holding down the mouse button on the Rectangle Tool until other options appear. From these, choose the oval.
r. Set the stroke to invisible and the fill to white in the Properties panel. Ensure that Object
Drawing is off by making sure that the small Object Drawing button to the right of the Tools panel is not selected. (This button’s graphic is an oval framed by a rectangle.) Object Drawing keeps each element drawn distinct. With it off, overlapping objects are naturally merged. You will see the merging effect once you create a cloud shape.
s. Draw several (three is a good number) overlapping ovals on the background to make a cloud.

15
Note: If the ovals you draw do not appear, they might be being drawn under the background rectangle instead of on top of it. This is likely to occur if you made the background in with Object Drawing mode on. To fix this, choose the Selection Tool and right-click on the background. Select Break Apart from the menu that appears. Ovals drawn after this should appear on top of the rectangle.
t. Select the cloud with the Selection Tool. Notice that all three ovals have been merged. Notice also that, if you move the cloud, a white hole appears where the cloud was. This is because not only were the ovals merged to one another, they were also merged with the portion of the background behind them. This merging allows Flash to consume less memory when loading graphics. Instead of needing to store data for components that are not visible, only data is stored for what can be seen by the viewer.
u. There are several ways to create more clouds on the background. i. Draw each cloud individually.
ii. Copy the selected cloud and paste it on the background again several times. iii. Create a Graphic symbol of the cloud to be stored in the library. Then drag copies of
the cloud from the library to the background. Although the first two options might seem the most natural and perhaps fastest, the third has the advantage of reducing the memory requirements for the game even more. This is because Flash only needs to store the information about the cloud once. This is essentially a cloud class. Then instances of this class are created on the background. All the Flash needs to store for each of them are the properties that make them different from one another. In this case, this would be their X and Y coordinates.

16
v. To create a Cloud Graphic symbol in the library, ensure that the cloud is still selected. Right-click on it and select Convert to Symbol… from the drop-down menu. This will bring up the familiar symbol dialog box. This time, set the name to Cloud and the type to Graphic and choose OK. The Cloud should now appear in the library and it should be selected on the background with a blue bounding box and crosshairs in the centre.
w. To create more clouds, select Cloud in the Library panel and drag it onto the background. Notice that you can move these clouds around freely without any of the background being merged to them. This is because Graphic objects are not automatically merged to the other elements they touch.
x. This completes your game background. However, we still need to add the Paddle. Because you will be adding more game objects to the level later (the ball and bricks), it is best to keep these objects separate from the background of the layer. To do this, go to the Timeline panel at the bottom of the Flash window (it should be one of the tabs in the same section as the Compiler Errors panel and Output panel where “Hello world!” was printed earlier).

17
In this panel, you will see a timeline for Layer 1 with a black dot in the first box on its timeline. Each box on the timeline corresponds to a “frame”. The vertical red line on the timeline indicates the frame that you are looking at on the screen. The black dot on the first frame indicates that objects have been placed in this frame. A frame with a black dot is known as a “keyframe”. Note: For this game, you will not need to use more than one frame for your objects but it may be useful for other levels or games ideas that you have. For more information about the timeline and a good example of using multiple frames for an object, check out Foundation Game Design with Flash by Rex van der Spuy (pp.148-161).
y. Create a new layer for your game objects by pressing the New Layer button at the bottom
left corner of the Timeline panel. Now a new layer named Layer 2 should appear above Layer 1. Rename Layer 1 to background by double-clicking on the name of the layer and entering the new name. Notice that when you click on a layer, all the elements in that layer are highlighted. This quickly shows you which objects correspond to each layer.
z. Now lock the background layer so it cannot be edited (preventing you from accidentally deleting elements of it while you work on the new layer) by clicking on the dot in the column under the lock symbol and in the background layer row. This dot should then become a lock symbol also and, if this layer is highlighted, the pencil beside the name of the layer will now have a line through it, indicating that it cannot be edited.

18
Question 2.2: Check out the other timeline options. What does clicking on the dot in the column under the eye do? What can you do by clicking the coloured box for each layer?
You’ll find the menu for this panel at its top right corner ( ). Describe what two options on this menu do (apart from Help, Close, or Close Group).
aa. Rename Layer 2 to game parts. With this layer selected, drag and drop the paddle onto the bottom area of the Level1 scene. Notice that the first frame of the game parts layer now contains a black dot instead of a white dot.
bb. With the paddle still selected, look at the Properties panel. This information will be key in working with the paddle in the ActionScript code. Specifically take note of the following things:
i. The object can be given an instance name. Right now, this is not assigned so <Instance Name> fills the field.
ii. It is a Movie Clip, just as the Paddle we made earlier and placed in the library. iii. It is described as an “Instance of: Paddle”
These properties all help us understand how Flash is using an object-oriented approach. The Paddle that you created and placed in the library and exported to ActionScript with the name Paddle is the class. Now, this paddle that you have placed into Level1 is an instance of it (as the statement “Instance of: Paddle” indicates). The instance name of this paddle refers to it alone while the capitalized name Paddle refers to the general class. Enter paddle as this object’s instance name. Notice that, in this case, the name is not capitalized. Because case matters in Flash and ActionScript, Paddle and paddle will not be confused. Paddle is the class and paddle is an instance of that class. Now you can use the name paddle in your code to refer to this paddle in Level1. Question 2.3: How many instances of classes can you see on your Level1 object right now? Think about both the game parts and the background. Complete the following table:
Object Instance Name Instance Of 1 paddle Paddle 2 … …
Draw a picture of your Level1 and label each object with its corresponding number in the table. This way, your marker will know what objects you are referring to. If an object does not have an instance name, leave this blank in the table.

19
cc. The paddle looks a bit flat on the screen but you can change this by adding filters. With the paddle selected, in the Filters section of the Properties panel, click on the Add filter button in the bottom left corner. Select the Bevel option from the pop-up menu. Change the Blur X, Blur Y and Distance properties to 2 px. If you wish, adjust the Shadow and Highlight colours.
dd. Follow the same steps to add a Drop Shadow filter and again change the Blur X, Blur Y and Distance properties to 2 px.
ee. Now you are ready to add the code that adds Level1 to the stage to start the game. In the Main.as file, modify your code by adding the lines in bold below and removing lines from your code that are not included below. (For the remainder of these Flash tutorials, new code to be added will be in bold to show you where it should be placed in relation to the code you have already written.)
package { import flash.display.MovieClip; public class Main extends MovieClip { private var _gamePage:Level1; public function Main() { _gamePage = new Level1(); addChild(_gamePage); } } }
Take a moment to look at this code. You know from Section 1 that the instructions in the Main() function run immediately when you start the .swf file (this is when the trace statement printed “Hello world!” to the output). Above this function, you have created a variable called _gamePage. This variable’s type is Level1. (The underscore before the name reminds us that this variable is private. The full implications of this will become apparent in later tutorials.) The statement private var _gamePage:Level1; is called a variable declaration. In essence, it is an instruction to create a variable that will be used elsewhere in the code.

20
Inside the Main() function, the first instruction creates a new Level1 instance and assigns it to the _gamePage variable. This is a variable initialization. Even though _gamePage was created, it was not given a value at that point. This statement gives _gamePage its initial value (a new Level1 object). The next statement (addChild(_gamePage);) adds this instance to the stage (the object that is attached to the Main.as code). These three lines of code are the equivalent of you dragging a copy of Level1 from the library onto the stage and setting the instance name to _gamePage.
ff. Run the program. You should now see the Level1 game page on the screen. If you don’t, make sure you have saved all your files and then try running it again. The next steps will work towards getting the paddle to move back and forth across the screen following the mouse. Close your Flash game before continuing.
gg. You could add the code to move the paddle directly into the Main.as file. Although this is straightforward, it would become confusing later as you added more levels. The way this paddle moves is specific to the first level. That leaves you free to change everything (even how the paddle moves) in the later levels. Therefore, it is better to create an ActionScript file to store the code specific to Level1. This will be the code for the Level1 class. To make this file, select File > New… from the menu and choose ActionScript File. (Don’t confuse this with the Flash File (ActionScript 3.0) option. This is different and not what you want right now.) Save this file as Level1.as in the same folder as the other files for this game.
hh. Add the following code to this file:
package { import flash.display.MovieClip; import flash.events.Event; public class Level1 extends MovieClip { public function Level1() { addEventListener(Event.ADDED_TO_STAGE, onAddedToStage); } private function onAddedToStage(event:Event):void { // Add event listeners paddle.addEventListener(Event.ENTER_FRAME, movePaddle); // Remove event listeners removeEventListener(Event.ADDED_TO_STAGE, onAddedToStage); } private function movePaddle(event:Event):void { paddle.x = mouseX; } } }
21
This code is the first time you’ve used events in this game. Here you have added two events:
1. ADDED_TO_STAGE: This event occurs when an instance of this class is added to the stage. Because your instance, the _levelOne object, is added with the line addChild(levelOne) in the Main.as file, this is when this event occurs.
2. ENTER_FRAME: This event occurs every time the screen is refreshed. The frequency of this is controlled by the frames per second (fps) setting on the timeline.
When an event listener is set up, the occurrence of a specific event is attached to a function. In other words, after an event listener is added, the specified function is called each time the event occurs. For example, the movePaddle function will be called every time the screen is refreshed after the instance of Level1 has been added to the stage. When an event listener is removed, the specified function will no longer run when the event occurs. Removing event listeners once they are unnecessary is important otherwise your program may do unexpected and undesirable things. Note that, to use events, you must include a direction to import flash.events.Event at the beginning of your class. You must also create a function with the same name as the function that will be called when the event occurs. Therefore, the onAddedToStage and movePaddle functions were written. From the code in the movePaddle function, you can see that the x property of the paddle is set to the same value as the x location of the mouse (mouseX). Therefore, each time the screen refreshes, the paddle will move horizontally to match the location of the mouse. Because you set the crosshairs of the paddle to be in its very centre, the x and y properties of the paddle are the location of its centre. For this reason, it is the centre of the paddle that follows the mouse. When the new Level1 object is created (as is done in the first line of code in the Main function in Main.as) the code in the Level1 function runs. This code sets up an event listener that will run the onAddedToStage function when the Level1 object is added to the stage. This occurs at the addChild(_gamePage); line in Main.as. When this happens, the onAddedToStage function runs. It creates an event listener that calls the movePaddle function each time the screen is refreshed. It also removes the event listener for the ADDED_TO_STAGE event because there is no need to wait for this event anymore. It has already occurred. Each time a new frame is entered, the paddle is moved so that its horizontal center is the same as the mouse’s X position. At this point, that is all there is to your game.

22
ii. Run the game. Now the paddle moves! But it is a little jumpy. You can fix this by adjusting the frames per second setting as mentioned above. To do this, return to the brickBreaker.fla file and go to the Timeline panel. At the bottom, you should see the Frame Rate in blue followed by “fps”. Change this number to 30 and run the game again. The paddle movement should now be much smoother.
jj. There is one small problem with the way the paddle moves though. It does not stop when its edge reaches the edge of the stage. The next steps will add limits to the paddle movement. First we’ll use a trace statement to learn more about the problem. Add it to the code in Level1.as as shown below: … private function movePaddle(event:Event):void { paddle.x = mouseX; trace(paddle.x); } …
kk. Run the program again and observe the output of the trace statement.
Question 2.4: Where is the paddle when the trace statement outputs approximately 65? Where is it when the output is approximately 485? Why are these numbers significant? How do they relate to the width of the paddle and the width of the stage?
ll. Using your findings from Question 2.5, add the following code to the movePaddle function: … private function movePaddle(event:Event):void { paddle.x = mouseX; // if the mouse goes too far to the left if (mouseX < ***)
{ // keep the paddle on the stage // INSERT CODE HERE
} // if the mouse goes too far to the right if (mouseX > ***) { // keep the paddle on the stage // INSERT CODE HERE
} trace(paddle.x); } …

23
Replace the “// INSERT CODE HERE” lines and “***” locations with the appropriate code to keep the paddle on the stage. Keep in mind that you can use math operations in your code. For example, the instruction:
paddle.x = paddle.y *2;
would work (but is not correct). Also remember that, in statements such as the example above, whatever is to the left of the equals sign is being assigned to the value of whatever is on the right. Don’t be afraid to use variables (such as stage.stageWidth) instead of numbers. This helps to make your code more general and easier to understand. The following diagram may be useful:
Note: Even though 0 is at the top in the Y axis, stage.stageHeight is a positive number. In other words, positive is down in Flash (in general). Strange but true. Question 2.5: What code did you use to keep the paddle on the stage? Run the revised program. Question 2.6: What are the maximum and minimum values now printed by the trace statement?

24
Tutorial 2 3 Adding a Bouncing Ball
In this section, you will add a ball to your game. Eventually, this will be the ball that is used to break the bricks. You will add the ActionScript code necessary to make the ball bounce off all sides of the stage and also off of the moving paddle. In the process, you will learn how to set up the ball’s velocity and think about object coordinates even more. You will also learn about handling object collisions in order to determine the best way to handle bouncing the ball off the paddle.
a. As was the case for the paddle, the first step is design the ball’s appearance. To do this, in the brickBreaker.fla file, create a new MovieClip symbol called Ball and export it for ActionScript with the same name.
b. Draw a circle (with an invisible stroke and fill colour of your choice) to represent this ball and set its width and height to 10. Set the X and Y properties both to -5. Now you should have a small circle with the crosshairs positioned in its centre.
c. Open the Level1 object from the library and add an instance of the new Ball object to its
game parts layer by dragging it from the library (with the game parts layer highlighted on the Timeline). The exact location of this ball does not matter but it will be best if you place it somewhere near the centre.
d. Give this instance the name ball and add Bevel and Drop Shadow filters as you did for the
paddle. This is all that is required to design the visual aspects of the ball. The next steps determine how the ball moves.

25
e. The most important aspect of the ball’s movement is its velocity. To control this, set up two variables in the Level1.as file (one for x velocity and one for y velocity) as shown below. package { import flash.display.MovieClip; import flash.events.Event; public class Level1 extends MovieClip { // velocity variable declarations private var _vx:int; private var _vy:int; … private function onAddedToStage(event:Event):void { // velocity variable initializations
_vx = 5; _vy = 5; // Add event listeners paddle.addEventListener(Event.ENTER_FRAME, movePaddle); // Remove event listeners removeEventListener(Event.ADDED_TO_STAGE, onAddedToStage); } … } }
Remember what you learned in the previous tutorials. These statements are variable declarations and initializations. In this case, the type of these variables is int (short for integer). That means they can be negative or positive but not decimal numbers.
f. These two variables literally control how many pixels the ball will move on the stage each frame. To use them for this purpose, we must attach an event listener to the ball that will call a function to update the ball’s coordinates at each new frame. Do this as follows:

26
… private function onAddedToStage(event:Event):void { // velocity variable initializations _vx = 5; _vy = 5; // Add event listeners paddle.addEventListener(Event.ENTER_FRAME, movePaddle); ball.addEventListener(Event.ENTER_FRAME, moveBall); // Remove event listeners removeEventListener(Event.ADDED_TO_STAGE, onAddedToStage); } private function movePaddle(event:Event):void {
… } private function moveBall(event:Event):void { // move the ball in the x and y directions ball.x += _vx; ball.y += _vy; trace(ball.x, ball.y); } …
If you still have a trace statement in the movePaddle function that prints the x coordinate of the paddle, remove this line. Now run the program. The ball moves! Question 3.1: Using what you know from the trace statement’s output of the ball’s x and y coordinates and what you see on the screen when the game runs, provide a precise description of what happens to the ball. Note: This may be your first encounter with a statement of the form ball.x += _vx. If you continue to program, you will likely see statements like this often. It is simply a shortened version of writing ball.x = ball.x + _vx. In other words, it increases the value of the x property of ball by the amount stored in the _vx variable. You can subtract, multiply and divide in the same way.
g. Adding the code to make the ball bounce off the stage “walls” is the next step and it’s not too difficult. Add the lines given below but replace the *1*, *2*, *3*, and *4* portions with the appropriate code. For example, when the leftmost edge of the ball hits the left side of the stage, the ball should change direction (not when the ball’s centre hits the left of the stage). Once again, don’t be afraid to include variables such as ball.height or stage.stageWidth in the code that you write in these postions.

27
… private function moveBall(event:Event):void { // ball hits right of stage if (ball.x >= *1*) { ball.x = *1*; _vx *= -1; } // ball hits left of stage if (ball.x <= *2*) { ball.x = *2*; _vx *= -1; } // ball hits bottom of stage if (ball.y >= *3*) { ball.y = *3*; _vy *= -1; } // ball hits top of stage if (ball.y <= *4*) { ball.y = *4*; _vy *= -1; } // move the ball in the x and y directions ball.x += _vx; ball.y += _vy; trace(ball.x, ball.y); } …
Test the program. Yay! The ball bounces! Question 3.2: What code did you replace *1*, *2*, *3*, and *4* with in order to get the ball to bounce off the walls of the stage?
h. Detecting when the ball hits the paddle is a little more complex. First you will do this a simple way and then you will makes some improvements.
i. The hitTestObject method is the easiest way to test whether two objects on the stage have collided. This can be done either from the perspective of the ball (asking “did I hit the paddle?”) or the paddle (asking “did I hit the ball?”). We will use the hitTestObject from the perspective of the ball. To do this, add the following code to the beginning of the moveBall function:
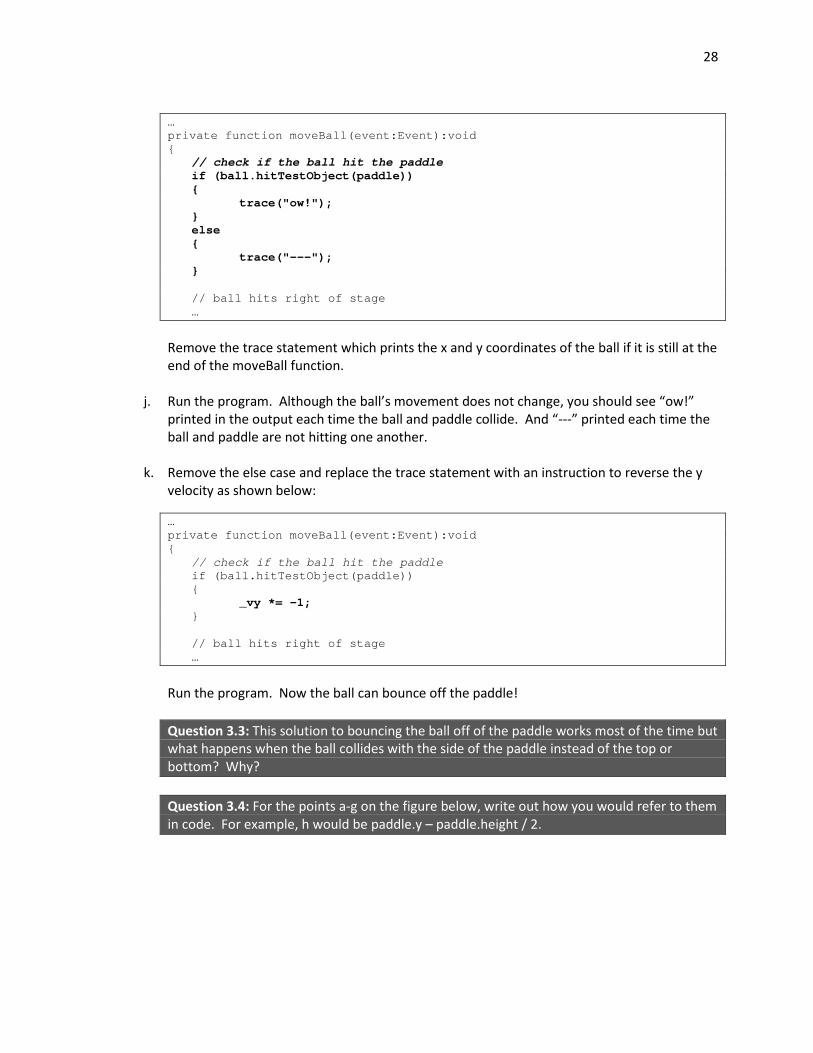
28
… private function moveBall(event:Event):void { // check if the ball hit the paddle if (ball.hitTestObject(paddle)) { trace("ow!"); } else
{ trace("---"); }
// ball hits right of stage
…
Remove the trace statement which prints the x and y coordinates of the ball if it is still at the end of the moveBall function.
j. Run the program. Although the ball’s movement does not change, you should see “ow!”
printed in the output each time the ball and paddle collide. And “---” printed each time the ball and paddle are not hitting one another.
k. Remove the else case and replace the trace statement with an instruction to reverse the y velocity as shown below:
… private function moveBall(event:Event):void { // check if the ball hit the paddle if (ball.hitTestObject(paddle)) { _vy *= -1; } // ball hits right of stage
… Run the program. Now the ball can bounce off the paddle! Question 3.3: This solution to bouncing the ball off of the paddle works most of the time but what happens when the ball collides with the side of the paddle instead of the top or bottom? Why? Question 3.4: For the points a-g on the figure below, write out how you would refer to them in code. For example, h would be paddle.y – paddle.height / 2.

29
l. To correct the way the ball bounces when it collides with the side of the paddle, we need to use a different type of collision detection: hitTestPoint instead of hitTestObject. For this, our basic question will be: “Is point (x,y) on the ball hitting the paddle?” There will be four basic cases. If the bottom of the ball is hitting the paddle, we will assume that the ball has hit the top of the paddle and the y velocity should be multiplied by negative one. The same should be done if the top of the ball has hit the paddle because it has likely come from the bottom. If the left of the ball hits the paddle, we will multiply the x velocity by negative one since the ball has hit the right of the paddle. Finally, if the right of the ball hits the paddle, it will bounce off the left of the paddle by multiplying the x velocity by negative one. To do this, replace the hitTestObject case with the following code in your moveBall function: … private function moveBall(event:Event):void { // check if the ball hit the paddle with... // top of ball if (paddle.hitTestPoint(ball.x, *c*, true)){ _vy *= -1; } // bottom of ball else if (paddle.hitTestPoint(ball.x, *d*, true)){ _vy *= -1; } // left of ball else if (paddle.hitTestPoint(*a*, ball.y, true)){ _vx *= -1; } // right of ball else if (paddle.hitTestPoint(*b*, ball.y, true)){ _vx *= -1; } // ball hits right of stage …

30
Replace *a*, *b*, *c*, and *d* with the values you found for a, b, c, and d on the chart in Question 3.5. Run the program. The ball should now bounce off the paddle from all directions!
m. Your work is almost complete. There is just one aspect to improve. Because the ball moves by 5 pixels each time, most times the ball will hit the paddle, it will actually overlap the paddle by several pixels. To make the ball bounce off the actual side of the paddle instead of changing directions but still being on top of the paddle for a short time, you can reset the position of the ball to be at the appropriate edge of the paddle before changing the velocity direction. To do this, add the following code: … private function moveBall(event:Event):void { // check if the ball hit the paddle with... // top of ball if (paddle.hitTestPoint(ball.x, ball.y - ball.height/2, true)){ ball.y = *g* + ball.height/2; _vy *= -1; } // bottom of ball else if (paddle.hitTestPoint(ball.x, ball.y + ball.height/2, true)){ ball.y = *h* - ball.height/2; _vy *= -1; } // left of ball else if (paddle.hitTestPoint(ball.x - ball.width/2, ball.y, true)){ ball.x = *e* + ball.width/2; _vx *= -1; } // right of ball else if (paddle.hitTestPoint(ball.x + ball.width/2, ball.y, true)){ ball.x = *f* - ball.width/2; _vx *= -1; } // ball hits right of stage …
Replace *e*, *f*, *g*, and *h* with the values you found for e, f, g, and h in the chart in Question 3.5. Run the program again. If you set the Frame Rate to a low number, the difference these lines of code make should be obvious. Question 3.5: Explain why it is necessary to add or subtract the ball width or height when resetting the ball’s x or y property to move the ball to the edge of the paddle.

31
4 Creating and Breaking Bricks In this section, you will make the bricks – the final component necessary for the Brick Breaker game. You will also add the code necessary to break the bricks. In doing so, you will learn more about loops and dynamically adding and removing objects to and from the game.
a. In the brickBreaker.fla file, design the brick by creating a new Movie Clip symbol named Brick and export it to ActionScript with the same name.
b. Draw a rectangle (again, with an invisible stroke and the fill colour of your choice). Set its dimensions to 55x20 and set the X and Y properties so that the crosshairs are positioned at the top left corner of the rectangle.
This is all that is necessary to create the brick design. You should now see Brick listed in the library.
Question 4.1: What values did you assign to the X and Y properties?
c. Placing the bricks on the stage when Level 1 starts is the next step. To do this, you need to
keep track of the number of bricks you want on the stage, each brick’s width, and the space required between them. With this knowledge, you can place all the bricks on the stage. Because it takes a number of steps to place the bricks, it is more organized to create a function just for this purpose. Here is how to do this in the Level1.as code:

32
… private function onAddedToStage(event:Event):void { // velocity variable initializations _vx = 5; _vy = 5; // call the placeBricks function to put the bricks on the stage placeBricks(); //Add event listeners ball.addEventListener(Event.ENTER_FRAME, moveBall); paddle.addEventListener(Event.ENTER_FRAME, movePaddle); //Remove event listener removeEventListener(Event.ADDED_TO_STAGE, onAddedToStage); } private function placeBricks():void { const BRICK_WIDTH:int = 55; const SPACE_FROM_TOP:int = 50; // calculate how many bricks will fit on the stage and // how much extra space will fit at the beginning and end of the row var numBricks:int = int(stage.stageWidth/BRICK_WIDTH); var space:int = (stage.stageWidth - BRICK_WIDTH * numBricks) / 2; // put as many bricks as possible in a row across the top of the stage for (var i:int = 0; i < numBricks; i++){ var brick:Brick = new Brick(); brick.width = BRICK_WIDTH; brick.x = i * BRICK_WIDTH; if (i == 0){ brick.x += space; } brick.y = SPACE_FROM_TOP; addChild(brick); } } …
Notice that:
1. We are using a “for loop” to put the bricks on the stage. The number of times that the instructions within the loop’s curly braces are executed is determined in the line of code immediately above them (for (var i:int = 0; i < numBricks; i++)). The integer variable i begins with a value of 0 (var i:int = 0) and increases by 1 (i++) each time the instructions are performed. When i is greater than or equal to the value stored in numBricks, the instructions will not be performed and the code following the loop will be executed. We know this because the code i < numBricks tells us that the loop instructions can only run when i is less than numBricks.

33
2. The constant BRICK_WIDTH is used to set determine how many bricks will fit across
the stage, how much space will be at the beginning and end of the row of bricks, and to set each brick’s width property. This will override the value you set in the W field of the Properties panel when you created the brick. Therefore, if you want to change width of the bricks, just change the value assigned to this constant. Constants, unlike variables, cannot change once they are set. Using them makes the code easier to maintain (you only have to change value you’d like to use for the brick’s width once in the code instead of 4 times if you use a constant) and easier to read (as is the case for SPACE_FROM_TOP). Note: Feel free to adjust values of these two constants to suit the look and feel of your game.
3. The value calculated for the number of bricks must be converted to an integer using the int(…) command. This is because stage.stageWidth is not an integer so the result of dividing it is also not naturally an integer.
4. After the number of bricks and the space at the beginning and end of the row are calculated, a loop is used to create each brick and position it on the stage.
Question 4.2: Which properties are the same for each brick? Which are different? Explain why.
5. Each brick is placed beside the next one with no space in between. There is only one special case where space is added – at the beginning of the row of bricks (which corresponds to i == 0). Here, we add ½ of the extra space left over after fitting the maximum number of bricks on the stage to the beginning of the row. Note that, in addition to using the i variable to control the number of times the code loops, it is also used within the loop instructions to determine the brick placement.
d. Run the game. At this point, the bricks placed on the stage will appear to be a solid bar at the top. Although they are individual bricks, our eyes cannot distinguish between them. To fix this problem, filters can be added just like they were added to the paddle and ball. Because the bricks are added to the stage dynamically, you will have to do this with code. That code will need to be added in two places in your Level1.as file indicated by the *1* and *2* in the code shown below:

34
package { import flash.display.MovieClip; import flash.events.Event; *1* public class Level1 extends MovieClip { … private function placeBricks():void { … for (var i:int = 0; i < numBricks; i++){ var brick:Brick = new Brick(); *2* brick.width = BRICK_WIDTH; brick.x = space + i * BRICK_WIDTH; brick.y = SPACE_FROM_TOP; addChild(brick); } } … } }
Add a Blur and Drop Shadow filter (each with the blurX, blurY and distance properties set to 2 pixels) to each brick by placing the appropriate code in the *1* and *2* locations marked above. You can find code to help you do this at:
- www.republicofcode.com/tutorials/flash/as3filters/ - www.adobe.com/livedocs/flash/9.0/ActionScriptLangRefV3/flash/filters/
package-detail.html Question 4.3: What code did you insert at points *1* and *2* in your Level1.as file in order to add the filters? Note that the code you use may be more than one line at each location. Note: Feel free to explore the effects you can obtain by setting other properties of these filters in your code. When you test your game, you should now be able to visually distinguish between the bricks.

35
e. To detect when the ball hits a brick, you need to add another event listener. This time, a listener will be added to each brick. The event it will listen for is when the game enters a new frame (as with the ball and paddle). When this event occurs, every brick’s event listener will call the same function (checkBrick). Question 4.4: What line of code must you add to Level1.as in order to add an event listener to each brick? Where must you add this line? Think about where in the code the bricks are mentioned Add the code as you described in your answer to Question 4.4.
f. Of course, in addition to the event listener, you must also add the checkBrick function itself. This code is given below: … private function placeBricks():void {
… } private function checkBrick(event:Event):void { var brick:Brick = event.target as Brick; *** } private function movePaddle(event:Event):void { … } …

36
Take note of the first line in this new function (var brick:Brick = event.target as Brick;). All of the bricks call this function when the screen is refreshed. This line allows the function to determine exactly which brick had the event occur that called the function this time. The key is in the target property of the event itself. This property stores a link to the object connected to the event. We can use the object in the function’s code by creating a variable in the function (brick) to contain it. Replace *** with the code to use a trace statement to print “hit brick!” to the output if the ball has hit the brick. Test the program to check your work. Question 4.5: What code did you use to do this? Note: The order of your functions does not actually matter. For example, the checkBrick function could be placed after the movePaddle function without causing any problems in how the code runs. However, the most important thing to remember is that you must not place one function inside another.
g. Destroying the bricks requires only a little more code. The line to do it is: removeChild(brick);
Place this line just below the trace statement that outputs “hit brick!” in the checkBrick function. Now run your game. When the ball hits the brick, it should now disappear.
h. Besides removing the brick from the stage, another thing happens in response to the brick being destroyed. When you run the game, you should see the text: ArgumentError: Error #2025: The supplied DisplayObject must be a child of the caller. at flash.display::DisplayObjectContainer/removeChild() at Level1/checkBrick() Something is wrong with how the code is executing. Our only hint is that it’s connected to the removeChild instruction we just added to the checkBrick function. We can deduce this from the “at” parts of the error statement. The problem is due to not removing the event listener before removing the brick from the level. As stated in an earlier tutorial, not removing event listeners after they become unnecessary can cause strange problems. Outputting this error is not as bad of a consequence as could result but we should still deal with the problem. To resolve this, add the following line of code directly above the removeChild(brick) instruction: brick.removeEventListener(Event.ENTER_FRAME, checkBrick);
Now the checkBrick function will not be called unnecessarily for bricks that have been removed from the stage.

37
i. At this point, the game is fairly easy. Often the ball goes up and, after hitting the first brick,
continues on to hit the top of the stage and then bounces off and hits another brick. Bouncing the ball off of the each brick after it is destroyed would add a bit more challenge to the game. To do this, copy the code you used to bounce the ball off the paddle and place it in the checkBrick function in the location of the *** in the code below. Replace all references to “paddle” with “brick” so that this code now works for the brick instead. … private function checkBrick(event:Event):void { var brick:Brick = event.target as Brick; *** … } …
Test the game to check your work.
j. In general, each time the ball hits a brick it should both bounce off of it and destroy it. However, sometimes the ball bounces off a brick but does not destroy it and sometimes it destroys it but does not appear to bounce off. This is because the code that tests whether the brick should be destroyed is separate from the code that checks whether the brick should bounce. To fix this, place a copy of the two lines of code used to remove the brick listener and remove the brick from the stage into each case that tests whether a side of the ball is hitting the brick. Remove the code you added in part (f) from the checkBrick function. Test the game again to ensure that you made the correct changes.

38
Tutorial 3 5 Winning and Losing
Most games aren’t much fun unless they can be won or lost. In this section, you will add the ability to win or lose to the game. In the process, you will learn how to add more scenes to the game, display text on the stage, and keep the player’s score.
a. The first step to making it possible to win or lose is to make it possible to tell this to the player. In the same way that you created the Level1 MovieClip, create a WinPage Movie Clip and a LosePage MovieClip. Both must have the same dimensions as the stage and must be exported for ActionScript with the names WinPage and LosePage, respectively. Leave room on each to add text to report the player’s score and to provide directions on how to restart the game. Ensure that the crosshairs are located in the top left corner of each.
b. A player wins when he/she breaks all the bricks with the ball. Therefore, you must keep track of the number of bricks still on the stage. When this reaches zero, we know that they player has won. To keep track of the number of bricks on the stage, do the following in the Level1.as file:
i. Add a variable declaration for the integer _currentBricks immediately below the declarations for _vx and _vy (at the very start of the Level1 class).
ii. At the very end of the placeBricks function (after the for loop), set the value of _currentBricks to numBricks. Your code shouldbe similar to the way the value of brick.y is set to SPACE_FROM_TOP in the same function.
iii. After each removeChild(brick) instruction in the checkBrick function, add an instruction to decrease the value of _currentBricks by 1. Figure out how to do this by looking at examples of similar operations in your code. For example, _vx *= -1; multiplies the value of _vx by -1 and ball.x += _vx; increases the value of _ball.x by _vx.
iv. At the very end of the checkBrick function, add a trace statement to output the value of _currentBricks. Recall how you used trace statements to output the value of paddle.x in Tutorial 1, Section 2, step ll and to output the values of ball.x and ball.y in Tutorial 2, Section 3, step f.
Run the game and watch the output value of _currentBricks as bricks are broken on the stage to ensure everything is working properly.
c. To be able to do something with this information, you must make some additions and
changes to the code in Main.as. The changes are shown below:
39
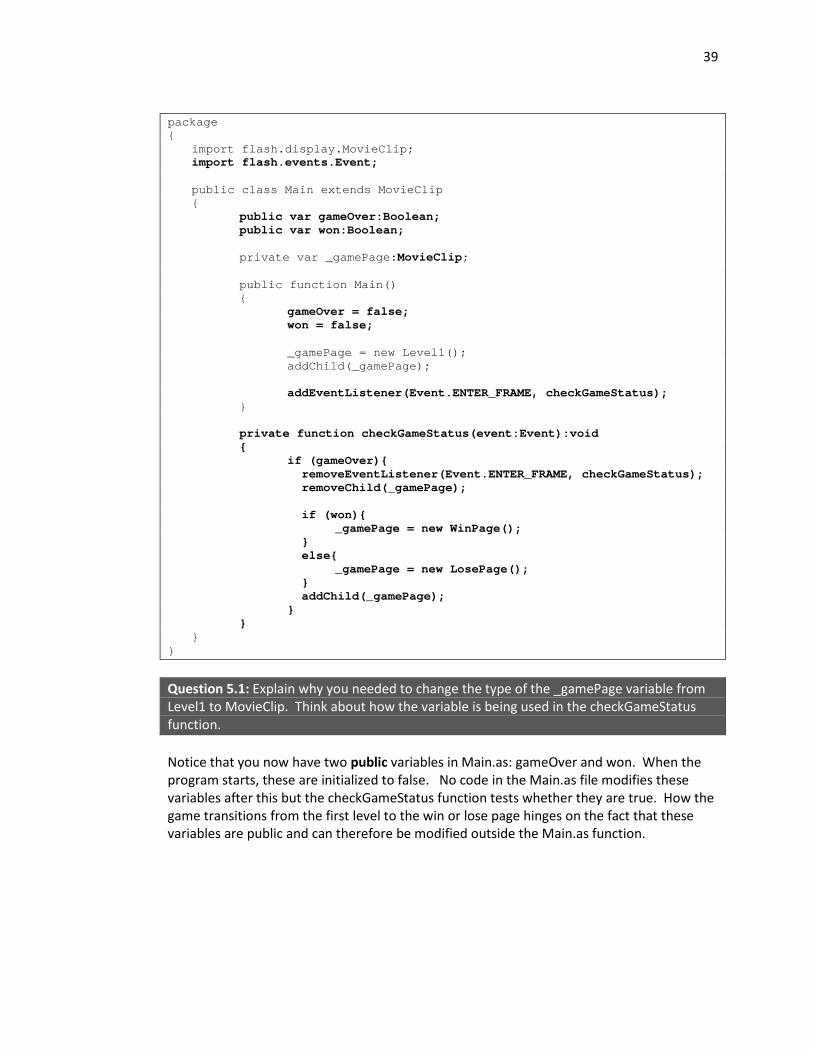
package { import flash.display.MovieClip; import flash.events.Event; public class Main extends MovieClip { public var gameOver:Boolean; public var won:Boolean; private var _gamePage:MovieClip; public function Main() { gameOver = false; won = false; _gamePage = new Level1(); addChild(_gamePage); addEventListener(Event.ENTER_FRAME, checkGameStatus); } private function checkGameStatus(event:Event):void { if (gameOver){ removeEventListener(Event.ENTER_FRAME, checkGameStatus); removeChild(_gamePage); if (won){ _gamePage = new WinPage(); } else{ _gamePage = new LosePage(); } addChild(_gamePage); } } } }
Question 5.1: Explain why you needed to change the type of the _gamePage variable from Level1 to MovieClip. Think about how the variable is being used in the checkGameStatus function. Notice that you now have two public variables in Main.as: gameOver and won. When the program starts, these are initialized to false. No code in the Main.as file modifies these variables after this but the checkGameStatus function tests whether they are true. How the game transitions from the first level to the win or lose page hinges on the fact that these variables are public and can therefore be modified outside the Main.as function.

40
d. You can now return to the Level1.as file and add the code that will allow the player to win the game. All that is required is to set the two public variables of Main.as (gameOver and won) to true if there are no bricks left in on the stage. The most logical location to do this in the code is at the end of the checkBrick function. The code below shows you how to do this: … private function checkBrick(event:Event):void { … if (_currentBricks == 0){ MovieClip(parent).won = true; MovieClip(parent).gameOver = true; } } …
Even though the won and gameOver variables are public, they still belong to the Main.as class. Therefore, you must access them in the code in this way. Because the instance of Level1 has been added as a child to the Main object, you are able to access it using the parent property of Level1. This parent property is available to you because Level1 extends the MovieClip class and therefore has all of the properties of a MovieClip. You have already used some of the other properties and methods that the MovieClip class has to offer: x, y, addChild(), removeChild(), hitTestObject() and hitTestPoint().
Question 5.2: Right click on the word MovieClip somewhere in your code and select View Help from the pop-up menu or enter MovieClip in the search box at the top right of the Flash window. The file describing the MovieClip class should appear. Using this information, answer the following questions: 1) Which class actually defines the parent property? 2) Describe another property available to MovieClip objects. What is its purpose? In
which class is it defined? Describe how you might use it in a game. (Do not describe a MovieClip property that is already used in the Brick Breaker game.)
3) Describe an event that can be detected by a MovieClip object. When is this event dispatched? What class provides its definition? Describe how you might use it in a game. (Do not describe an event that is already used in the Brick Breaker game.)
You may need to “Show Inherited Public Properties” and “Show Inherited Events” in order to answer these questions.
e. Run the game to test whether winning is now possible. You still need to clean up the game
by removing some event listeners. To do this, follow the following steps: i. Add an event listener in the onAddedToStage function that calls an
onRemovedFromStage function when the REMOVED_FROM_STAGE event occurs. ii. Create the onRemovedFromStage function and, in it, remove the event listeners
that are attached to the ball and the paddle (check the onAddedToStage function if you aren’t sure what these are). Remember to also remove the event listener that listens for the REMOVED_FROM_STAGE event.

41
f. Now that winning is possible, losing functionality must be implemented too. Recall that the player will lose when the ball hits the bottom of the stage (instead of being caught by the paddle) three times. To do this, you need to keep track of the number of times that the ball hits the bottom of the stage and set gameOver to true when it reaches three. Implementing this will require:
i. A variable to keep track of the number of hits (declared at the class level, not within a specific function).
ii. That this variable be initialized when the level begins. iii. That this variable is decreased / increased by 1 each time the ball hits the bottom. iv. That, after the variable is updated, it is immediately checked to determine whether
this means that the player has lost. v. You may also wish to declare a constant that contains the number of times the ball
must hit the bottom in order for the player to lose. Determine the code required to do this and add it to the appropriate locations in your ActionScript file(s). You do not need to add a new event listener or a new function. Simply find appropriate locations for each of these things in your current Level1.as code. Question 5.3: What type should the variable be that keeps track of the number of hits?
g. You should also clean up the brick event listeners by removing them if the Level1 object has
been removed from the stage. You can do this as follows: … private function checkBrick(event:Event):void { var brick:Brick = event.target as Brick; if (parent == null){ brick.removeEventListener(Event.ENTER_FRAME, checkBrick); removeChild(brick); } // check if the ball hit the brick with... …
Checking whether the parent of Level1 is null (i.e. the Level1 object is no longer a child of Main) is a simple way to determine that the level must be over. The parent property of Level1 becomes null when the removeChild instruction is executed in Main.as. If it is, there is obviously no need for the brick to be listening for an ENTER_FRAME event. Question 5.4: Why should this check occur at the beginning and not at the end of the checkBrick function? If you are not sure of the answer to this question, try moving this block of code around within the function and testing the program to find out what happens.
h. At this point, it becomes apparent that the only reason for the paddle is to prevent the ball from hitting the bottom of the stage. It would be more fun to play the game if the paddle could also be used to direct the ball. This is not hard to add. Simply add the following lines to the moveBall function:

42
… private function moveBall(event:Event):void { var ballPos:Number; var hitPercent:Number; … // bottom of ball else if (paddle.hitTestPoint(ball.x, ball.y + ball.height/2, true)){ // allow the paddle to aim the ball ballPos = ball.x - paddle.x; hitPercent = ballPos / (paddle.width * .5); _vx = hitPercent * 10;
// bounce the ball ball.y = *h* - ball.height/2; _vy *= -1; } …
Now the ball will bounce straight up if it hits the paddle in the centre, toward the left if it hits the left side of the top of the paddle and toward the right if it hits the right side of the top of the paddle.
i. We also want to allow the player to play the game again by pressing the spacebar once the
Winning or Losing page is displayed. Add a text box on your WinPage and LosePage to inform the player that this is how they can play again. It is most appropriate if this text box uses static (unchanging) text. Select this option from the drop-down box at the top of the Properties panel.
j. Now it is time to add the functionality to the Main.as code. To detect when any key has been pressed, you need do the following:
i. Import the flash.events.KeyboardEvent package. ii. After adding the Win / Lose page to the stage, add a listener to the stage that calls
the onKeyDown function when KeyboardEvent.KEY_DOWN occurs. The KEY_DOWN event will not be detected unless it is attached to the stage in the same way that the event listener for ENTER_FRAMCE (set up in the instruction paddle.addEventListener(Event.ENTER_FRAME, movePaddle);) is attached to the paddle.
iii. Create an onKeyDown function as follows: … private function onKeyDown(event:KeyboardEvent):void { trace(event.keyCode); } …
Question 5.5: Run the game and, at the Win or Lose page, press a variety of keys and watch the resulting output of the trace statement. List 5 keys and their corresponding keyCodes. Note that some keys may not cause a KEY_DOWN event to occur. Don’t worry about these.

43
Note: When running the program, you will now see a warning in the Compiler Errors panel (which shares the same space in the Flash window as the Output and Timeline panels). It is warning you that the you must use an event listener to listen for when a key has been pressed. Because this is exactly what you have done in your code, there is no need to worry about this.
k. One way to check if the spacebar was pressed is to test whether the event keyCode corresponds to the number you see printed to the output when the spacebar is pressed. A better way (that will help you remember which key you are interested in when re-reading your code later) is to use Keyboard.SPACE constant available to us in the flash.ui.Keyboard package. To do this, import this package in the Main.as file. Now you can check whether the spacebar was pressed inside the onKeyDown function. The next step will direct you in exactly how to do this.
l. The next challenge is to determine what exactly should be done when the spacebar is pressed. Obviously we want the game to restart. In terms of code, this means setting the gameOver and won variables back to false, removing the Win / Lose page, displaying the Level1 page again, and adding an event listener that will call the checkGameStatus function whenever a new frame is entered. With the exception of removing the Win / Lose page, all of these things are done when the game begins. The code for them has already been written in the Main constructor method. There is no reason to re-write this code but, in its current location, it cannot be called again. The solution to this dilemma is to create a new function called init and move all the code from within the Main constructor method to this function. Then simply call the init function from within the Main function and also when the spacebar is pressed. The code to do all of this will take this form:
… public function Main() { init(); } private function init() { gameOver = false; won = false; _gamePage = new Level1(); addChild(_gamePage); addEventListener(Event.ENTER_FRAME, checkGameStatus); } … private function onKeyDown(event:KeyboardEvent):void { if(event.keyCode == Keyboard.SPACE){ removeChild(_gamePage); init(); stage.removeEventListener(KeyboardEvent.KEY_DOWN, onKeyDown); } } …

44
Question 5.6: Now the game restarts immediately after you press the spacebar. It would be nicer if the player saw the Level 1 page but could decide when they wanted to start playing by pressing a key. What would you change in the program to implement this?

45
6 Extra Features You now have a working game but there’s room to make it more interesting. In this section, you will implement the ability to keep the player’s score, and add some background music and a sound that plays every time the ball hits the paddle. In the process, you will learn about dynamic vs. static text boxes, playing sound and type conversions. Part 1 : Keeping Score
a. Let’s start by keeping and displaying the player’s score as they play the first Level. To do this:
i. Declare a private integer variable named _score to store the player’s score at the beginning of the Level1 class (with the other declarations for variables used throughout the class).
ii. Declare two private constants – one which contains the amount of points the player gains by breaking a brick and one which contains the amount of points lost by the player when the ball hits the bottom of the stage.
iii. Initialize the score variable to be equal to 0 within the onAddedToStage function. iv. Every time that a brick is destroyed by the ball in the code, add a command to
increase the score by the points gained for breaking a brick. v. Every time the ball hits the bottom of the stage in the code, decrease the score by
the given number of points. vi. Add trace statements to output the score each time the value of this variable is
changed and test the game to ensure it works.
b. The score will be more useful, though, if the player can see it as they play. Obviously trace statements will not achieve this purpose. This is where dynamic text boxes come in. Unlike a static text box, a dynamic text box has an instance name and can be referred to within the code (in the same manner as the bricks, ball, and paddle). Its text property can be changed as the program runs. To use this tool to display the player’s score:
i. Open your Level1 MovieClip symbol from the library and add a text box in the location you would like the score to be displayed. The most logical place to display the score is at the top or bottom of the screen. Take note of the space between the tops of the bricks and the top of the stage if you wish to place it there. If you’d like to add other visual features such as a “Level 1” title at this point, go ahead. Give this textbox an instance name of score and select “Dynamic Text” from the drop down menu below the instance name.

46
Note: Although the score will begin at a low number, filling the textbox with a high number at design time will allow you to determine the dimensions it should be given.
ii. Now you can add the code to update the score textbox as the game runs. To do this, in the onAddedToStage function, add an event listener to the score textbox that calls the method updateScore each time a new frame is entered. Remember to also remove this event listener when the Level1 object is removed from the stage.
iii. Finally, add the updateScore function as follows: … private function onRemovedFromStage(event:Event):void { paddle.removeEventListener(Event.ENTER_FRAME, movePaddle); ball.removeEventListener(Event.ENTER_FRAME, moveBall); score.removeEventListener(Event.ENTER_FRAME, updateScore); removeEventListener(Event.REMOVED_FROM_STAGE, onRemovedFromStage); } private function updateScore(event:Event):void { score.text = _score.toString(); } private function placeBricks():void { …
Notice that the value of the _score variable must be converted to a String before being assigned to the text property of the score textbox. This is because _score is an integer and the text property is a String and a variable cannot be assigned data of a different data type. The toString() method allows us to easily convert integers to strings.

47
Note: This feature of ActionScript 3.0 (that variables cannot be assigned data of a type other than what they were originally declared to be) means that the language is known as strongly typed. Languages which allow variables to change types according to the data assigned to them are known as weakly typed. Question 6.1: Look up “Type Conversions” in the search box at the top right of the Flash window. From the “Adobe ActionScript 3.0 * Type Conversions” article, find the result of converting a Boolean to a Number, int or uint and the result of converting a Number, int or uint to a Boolean. How would you convert a Boolean value to an integer (int) value in ActionScript?
c. The player would also benefit from knowing their score at the end of the game. To do this,
you will need: i. A dynamic textbox on the WinPage MovieClip.
ii. A public variable(named score) in Main.as that contains the player’s score. iii. A line of code to update the text of the score textbox on the WinPage with the score
stored in the public Main.as score variable. iv. A line of code in Level1.as to set the score property of Main.as to the value of the
private _score variable when the game ends and the player wins. Refer to Section 5, step d if you are wondering how to do this.
Question 6.2: So far, you have used two types of textboxes, Static and Dynamic. The third type available in Flash is Input. Describe a situation where you would use this type of textbox. Write an example line of code that would do what you described.
Part 2 : Using Sound d. Playing sounds and music in Flash requires the use of two new objects: Sound and
SoundChannel. The easiest way to understand the purpose of each is to think about your CD or MP3 player. A Sound object is like your CD or MP3 file: it contains the music but, alone, it cannot make any noise. The SoundChannel is like your CD/MP3 player: it can play the music but it needs a CD or MP3 file to be worthwhile. To see how this works in practice, visit a website such as www.soundjay.com and select and download three sounds:
i. a sound effect to play when the ball hits the paddle, ii. a sound effect to play when the ball destroys a brick,
iii. and some background music to loop as the game is playing. Store these files in the same folder as your other files for the Brick Breaker game.
e. To access these files in your code, you next need to import them into your library. Once this is done, they will become specific extensions of the Sound class. To do this:
i. In the brickBreaker.fla file, select File > Import > Import to Library… from the menu. ii. Select the three sound files and press Open. They should now be listed in the library
with their file names.

48
Note: You can listen to the sound by pressing the small black play arrow at the top right corner of the area in the library panel where the waveform visual representation of the sound is displayed.
iii. The Linkage column in the Library panel provides the name of the class associated
with each object. These are what are used to create instances of these objects in the ActionScript code (the result of exporting each to ActionScript and assigning a class name). Because this field is blank for the sound files, they must also be exported before they can be used. Right click on each file name and select Properties… from the pop-up menu. For each sound, replace the name with an appropriate name that does not contain any periods (these are problematic in ActionScript code) and export it for ActionScript using the same new name as the class name.
f. Now that the sounds are in the library and exported for ActionScript, you are ready to add the code to play them during the game. In the Level1.as file, add the code to import the two necessary libraries (flash.media.Sound and flash.media.SoundChannel). Then declare the appropriate variables and initialize them as follows:

49
… import flash.media.Sound; import flash.media.SoundChannel; public class Level1 extends MovieClip { //Sound Clip variables private var _hitPaddle:HitPaddle; private var _breakBrick:BreakBrick; private var _backgroundMusic:BackgroundMusic; private var _ballSounds:SoundChannel; private var _musicPlayer:SoundChannel; //Velocity variable declarations private var _vx:int; private var _vy:int; … private function onAddedToStage(event:Event):void
{ //Sound variables _hitPaddle = new HitPaddle(); _breakBrick = new BreakBrick(); _backgroundMusic = new BackgroundMusic(); //velocity variable initializations _vx = 5; _vy = 5; …
Note: If you gave names other than HitPaddle, BreakBrick and BackgroundMusic to the sound files that you imported to the library, be sure to use those names in your code instead.
g. The format for code to play a sound, in general, is: _soundChannelVar = _soundVar.play();
The variable names “_soundChannelVar” and “_soundVar” are general variable names that you will replace with ones specific to your code. _soundChannelVar could be replaced with _ballSounds or _musicPlayer because these both have the type SoundChannel. _soundVar could be replaced with _hitPaddle, _breakBrick, or _backgroundMusic because these are all specific kinds of Sound objects. We know the three variables are types of Sound objects because they have the flash.media.Sound base class as shown in the properties window (see the image in step e, part iii). In the code in part (f), the _ballSounds SoundChannel is expected to play both _hitPaddle and _breakBrick sounds (depending on the situation) because both sounds should never play at the same time. The _musicPlayer SoundChannel will take care of playing the _backgroundMusic sound. Using lines of code in the format given above, set up the sounds to play at the appropriate occasions (for example, make the background music start when the level begins). Test your program to ensure everything works correctly.

50
Question 6.3: What problem may occur when the player takes a long time to complete the level? What problem may occur when the player finishes the game and then starts playing again by pressing the spacebar after the Win or Lose page was displayed?
h. To set the background music to repeat, you need to detect when the music has finished
playing and then start it again. This can be done using an event listener which listens for the SOUND_COMPLETE event. The function called when this event occurs then only needs to start the sound playing again. Implement this functionality and then test your game to ensure it works.
i. To stop the music when the level stops, you need to remove the event listener that you added in step (h) and also add the command:
_musicPlayer.stop(); Add these commands to the onRemovedFromStage function and test the game again. Congratulations! You have now completed the first level of the Brick Breaker game.

51
Tutorial 4 7 Adding the Second Level
The way in which this game has been designed makes it easy to add more levels. In this section, you will add a second level to the Brick Breaker game. This exercise will give you the skills to create your own multi-level game.
a. Recall that the second level of this game will have two layers of bricks instead of one and two bouncing balls. Because all other aspects are essentially the same, the easiest way to create the second level is to duplicate the first level. To do this, in the brickBreaker.fla file, right-click on the Level1 object in the Library panel and select Duplicate from the pop-up menu. Set the name of the MovieClip to Level2 and export it to ActionScript with the same name. Once created, you are free to modify the appearance of this new level. Just remember to add a second ball. Change the instance names of the two balls to ball1 and ball2. Note: To change the appearance of the level’s background, unlock the background layer and lock the game parts layer (or even make the game parts layer invisible by selecting the dot below the eye icon for that layer). Then change the colours of items, delete items and add new ones as you please. The stars in the image below were created by making a graphic symbol and drawing a rectangle within it and then (after selecting the Selection Tool) holding down the alt key while clicking on an edge and dragging it inward to create a new point. The graphic was then dragged and dropped onto the black background and the size of each instance of the star was adjusted using the Free Transform Tool (third from the left in the toolbox).

52
b. As you needed a Level1 class to control all the operations of the first level, so you will need a Level2 class to control the second level. However, the code required for this will also be much the same as was used in Level1. To reduce the amount of work required to code this new level, create a new ActionScript file named Level2.as and paste in all of the code from the Level1 file. There are, however, some things you will need to change. The steps to do this are described below.
c. You must change all references to “Level1” must be changed to “Level2”. Take a second to do this now.
d. Because you now have ball1 and ball2 to control, any code that refers to ball must be
changed. Outside of the moveBall function, this means that you will need to duplicate statements. For example, in the onAddedToStage function, you will now have two lines of code to add event listeners to ball1 and ball2 instead of only ball. The most painful part will be within the checkBrick function where you will need to duplicate the code used to check whether the ball has hit the brick. The final result will look like this:
… private function checkBrick(event:Event):void { … // check if ball1 hit the brick with... // top of ball if (brick.hitTestPoint(***)){ … } // bottom of ball else if (brick.hitTestPoint(***)){ … } ... // check if ball2 hit the brick with... // top of ball else if (brick.hitTestPoint(***)){ … } // bottom of ball … if (_currentBricks == 0){ MovieClip(parent).won = true; MovieClip(parent).score = _score; MovieClip(parent).gameOver = true; } } …
The catch is to add the ELSE before the if statement that checks whether the top of ball2 has hit the brick. In contrast, the moveBall function hardly needs to be changed at all. The event listeners added to both ball1 and ball2 can call the same function.

53
Question 7.1: What change must you need to make to the moveBall function to make it work for both balls? Hint: Take your inspiration from the first line of the checkBrick function. Implement these changes. To quickly check your work, begin the game at the second level by changing the line in the init function in the Main.as file to add an instance of Level2 to the stage at the beginning of the game instead of an instance of Level1.
e. Notice that both balls move in parallel. This is because they are controlled by the same velocity variables. When one ball bounces, the other must also. To change this, you can make the ball velocities properties of the balls themselves. To do this, you will no longer need the private _vx and _vy variables. Instead, in the onAddedToStage function, add the following code: … private function onAddedToStage(event:Event):void { //Sound variables _hitPaddle = new HitPaddle(); _breakBrick = new BreakBrick(); _backgroundMusic = new BackgroundMusic(); _musicPlayer = _backgroundMusic.play(); //Velocity properties ball1.vx = 5; ball1.vy = 5; ball2.vx = 5; ball2.vy = 5; …
In each location of the code that refers to _vx or _vy, change it to refer to the vx or vy property of ball1 or ball2. When it comes to modifying the moveBall function, you may need to do a little thinking to figure out how to go about it. Don’t be afraid to experiment. Test the game again. The balls should now move on their own. Note: Now the game is obviously more difficult to play. You may also wish to adjust how the player loses the game.
f. The final change that you need to make to the Level2.as code is to add the code that adds a second level of bricks to the stage. This can be done using a second loop within the current loop used to add bricks to the stage. This loop will track the row that the brick is to be placed on. Use this to determine the y property of the brick. Also double check to ensure that the _currentBricks value is still accurate. You may have to change how it is set. After making these modifications, test the game to ensure that it works as expected. Question 7.2: Explain the changes you made in the code to add the second layer of bricks.

54
g. Putting all the pieces of the two level game together requires changes to both the Level1.as file and the Main.as file. The game flow must be changed so that, instead of proceeding to the Win page after breaking all the bricks on Level1, the player proceeds to the next level. There are several ways to do this. The way that will be shown here requires that each level tell the Main class which level will come after it. In this approach, the Main class does not need to keep track of the current level. It only needs to monitor whether the game is over or not. To do this, add a public function to the Main.as that receives a MovieClip parameter and replaces the new level with this. The code for this is shown below:
… public function Main() { init(); } public function changeLevel(newLevel:MovieClip):void { removeChild(_gamePage); _gamePage = newLevel; addChild(newLevel); } … This function can now be called within Level1 instead of declaring the game won. Make the changes in the checkBrick function as follows: … private function checkBrick(event:Event):void { … if (_currentBricks == 0){ var nextLevel:Level2 = new Level2(); MovieClip(parent).score = _score; MovieClip(parent).changeLevel(nextLevel); } } …
Test these changes to ensure that everything works. Question 7.3: Once you play the game you will probably notice that, at level two, the score is reset to zero. It would be better if the player carried over the points they had been awarded in the previous level. What simple change is required in the Level2.as code to do this?
Congratulations! You’ve finished your Brick Breaker game!

55
References van der Spuy, R. (2009). Foundation Game Design with Flash. Berkeley, CA: friends of ED. Sun, K. (2008). Tutorial: Create a Brick Breaker Game in AS3. mr sun studios, Retrieved July 27, 2010,
from http://www.mrsunstudios.com/2008/07/tutorial-create-a-brick-breaker-game-in-as3/