
FL Howto Import Sound
4
Adobe Flash Professional Guide © 2012 Adobe Systems Incorporated How to import sound 1 This document requires Adobe Flash Professional CS6. Technical instructions may differ depending on your version. How to import sound In Adobe Flash Professional, you can import sounds and integrate them into the timelines of your main document and symbols. For example, you can enhance user experience by adding short sound clips or audio loops to navigation elements. You can also add music or narration audio and synchronize that sound with moving objects to help tell a story or explain a concept. Importing sound You can import the following sound file formats into Flash: • ASND Adobe Sound Document • WAV (Windows only) • AIFF (Mac OS only) • MP3 (Windows or Mac OS) If you have QuickTime 4 or later installed on your system, you can import these additional sound file formats: • AIFF (Windows or Mac OS) • Sound Designer II (Mac OS only) • Sound Only QuickTime Movies (Windows or Mac OS) • Sun AU (Windows or Mac OS) • System 7 Sounds (Mac OS only) • WAV (Windows or Mac OS) You can synchronize a sound to your movie in several ways by using the Sync pop-up menu in the Properties panel: When you import a sound file, it’s placed in the library. Then you can drag an instance (copy) of the sound onto the Stage. Sound files must be tied to keyframes. • Event: An event sound plays when the playhead reaches the first keyframe containing the sound. It plays in its entirety, independent of the timeline, even if the movie stops. If a different instance of the same sound is started, the sounds will overlap. • Start: The same as Event, except that if the sound is already playing, no new instance of the sound will begin playing. • Stop: Silences the specified sound. • Stream: Forces the movie to keep pace with the sound. If Flash can’t draw animation frames quickly enough, it skips frames. Unlike event sounds, stream sounds stop if the movie stops. Stream sounds can also produce a much smaller file size, although their quality tends to be poorer than event sounds.
-
Upload
williambobwallace -
Category
Documents
-
view
213 -
download
0
description
ds
Transcript of FL Howto Import Sound
Adobe Flash Professional Guide
How to import soundIn Adobe Flash Professional, you can import sounds and integrate them into the timelines of your main document and symbols. For example, you can enhance user experience by adding short sound clips or audio loops to navigation elements. You can also add music or narration audio and synchronize that sound with moving objects to help tell a story or explain a concept.
Importing sound
You can import the following sound file formats into Flash:
• ASND Adobe Sound Document
• WAV (Windows only)
• AIFF (Mac OS only)
• MP3 (Windows or Mac OS)
If you have QuickTime 4 or later installed on your system, you can import these additional sound file formats:
• AIFF (Windows or Mac OS)
• Sound Designer II (Mac OS only)
• Sound Only QuickTime Movies (Windows or Mac OS)
• Sun AU (Windows or Mac OS)
• System 7 Sounds (Mac OS only)
• WAV (Windows or Mac OS)
You can synchronize a sound to your movie in several ways by using the Sync pop-up menu in the Properties panel:
When you import a sound file, it’s placed in the library. Then you can drag an instance (copy) of the sound onto the Stage. Sound files must be tied to keyframes.
• Event: An event sound plays when the playhead reaches the first keyframe containing the sound. It plays in its entirety, independent of the timeline, even if the movie stops. If a different instance of the same sound is started, the sounds will overlap.
• Start: The same as Event, except that if the sound is already playing, no new instance of the sound will begin playing.
• Stop: Silences the specified sound.
• Stream: Forces the movie to keep pace with the sound. If Flash can’t draw animation frames quickly enough, it skips frames. Unlike event sounds, stream sounds stop if the movie stops. Stream sounds can also produce a much smaller file size, although their quality tends to be poorer than event sounds.
© 2012 Adobe Systems Incorporated How to import sound 1
This document requires Adobe Flash Professional CS6. Technical instructions may differ depending on your version.

Guide Adobe Flash Professional
2
Importing a Sound
You import sounds into the library, then drag them onto the Stage to add them to the timeline.
To import a sound:
1. Start Flash and open a document.
2. Insert a new layer.
3. Double-click the new layer name, and rename it Sound.
4. Select File > Import > Import To Library.
The Import To Library dialog box appears (Figure 1).
5. Locate a sound file, select it, and click Open (Windows) or Import To Library (Mac OS).
Note: You can download free music loops and sound effect clips at www.flashkit.com, for example.
6. Select frame 1 on the Sound layer.
7. Make sure the Library panel is open. (If not, select Window > Library.)
The sound appears in the Library panel. To preview the sound, you can select it and click the Play button in the preview (upper) pane of the Library panel (Figure 2).
8. Drag a sound file from the Library panel onto the Stage.
The Sound layer must contain enough frames to play the entire sound. For example, if your movie is set for 12 frames per second and your sound is 2 seconds long, the Sound layer must contain at least 24 frames. If you are adding sound to an existing movie, your movie might already be long enough to accommodate the sound.
9. If necessary, add frames to the Sound layer. To do this, click a frame down the timeline for the Sound layer, such as frame 24 for a 2-second movie at 12 fps, and select Insert > Frame.
The sound does not appear on the Stage but does appear on the timeline as a waveform (Figure 3).
Note: You can also press the F5 key to insert a frame and press Shift-F5 to delete a frame.
Figure 1 Import To Library dialog box
Figure 2 Library panel
Figure 3 Sound in the timeline
Play button
How to import sound © 2012 Adobe Systems Incorporated
This document requires Adobe Flash Professional CS6. Technical instructions may differ depending on your version.
Adobe Flash Professional Guide
Editing sound settings
In the Properties panel, you can change settings for the sound, including making the sound fade in and fade out.
To edit sound settings:
1. Continue where you left off in the previous task.
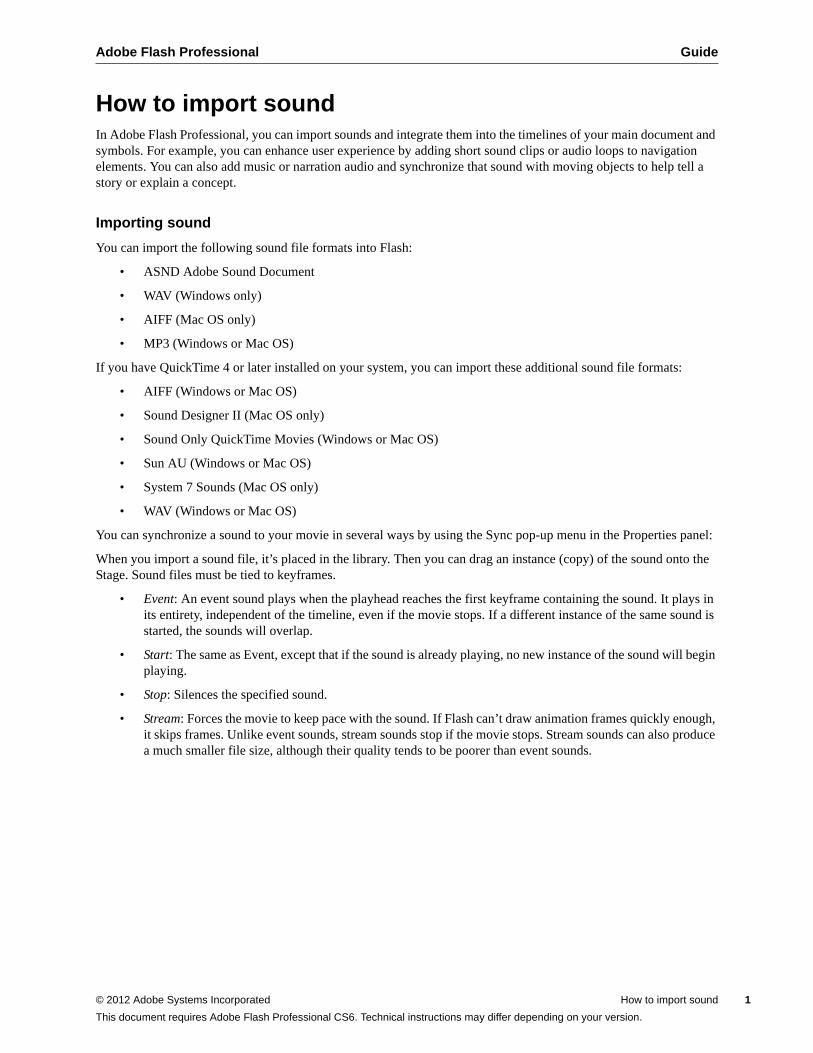
2. Select the first keyframe in the Sound layer and adjust the settings for the sound in the Properties panel (Figure 4).
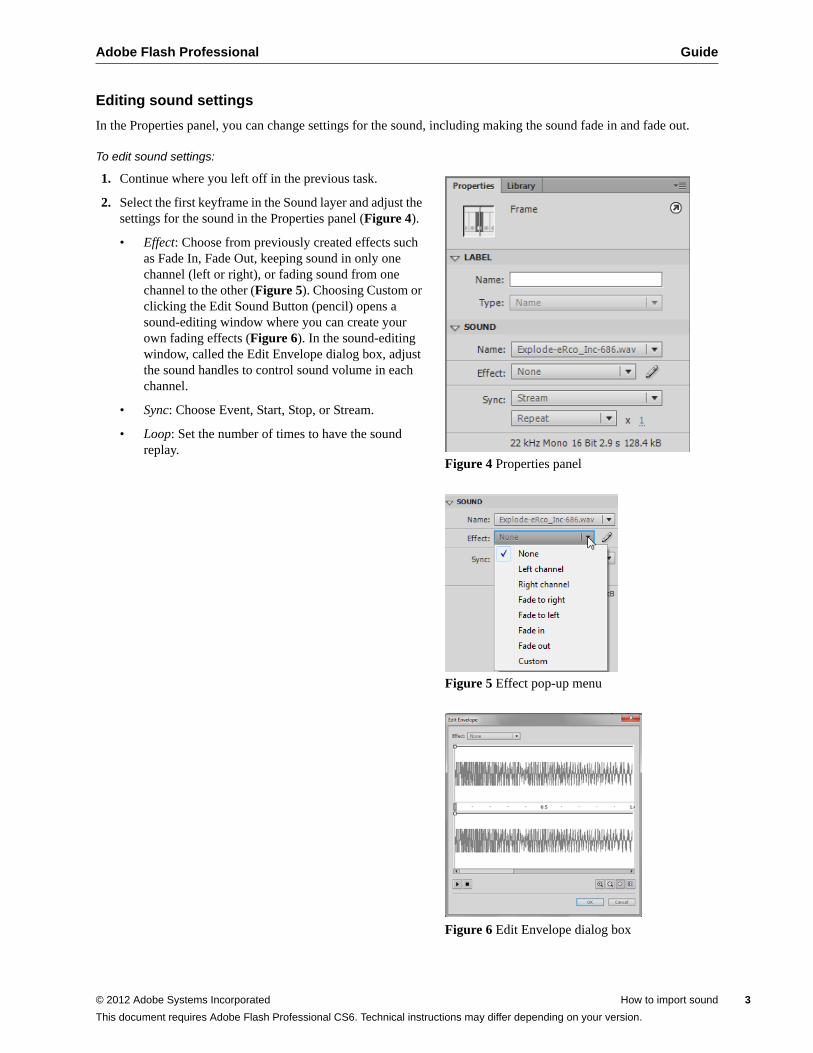
• Effect: Choose from previously created effects such as Fade In, Fade Out, keeping sound in only one channel (left or right), or fading sound from one channel to the other (Figure 5). Choosing Custom or clicking the Edit Sound Button (pencil) opens a sound-editing window where you can create your own fading effects (Figure 6). In the sound-editing window, called the Edit Envelope dialog box, adjust the sound handles to control sound volume in each channel.
• Sync: Choose Event, Start, Stop, or Stream.
• Loop: Set the number of times to have the sound replay.
Figure 4 Properties panel
Figure 5 Effect pop-up menu
Figure 6 Edit Envelope dialog box
© 2012 Adobe Systems Incorporated How to import sound 3
This document requires Adobe Flash Professional CS6. Technical instructions may differ depending on your version.
Guide Adobe Flash Professional
4
Sound compression
Sound files can drastically increase the file size of your movies. One way to control this is to set the compression for the sounds in Flash.
To compress sound:
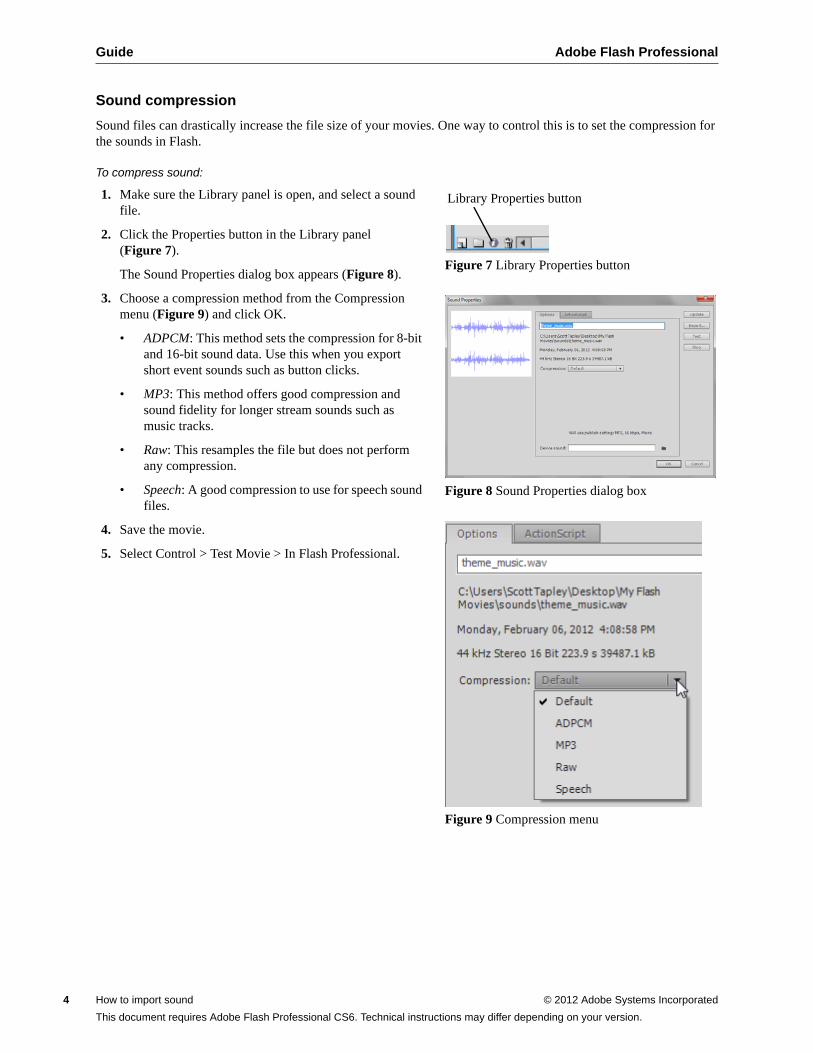
1. Make sure the Library panel is open, and select a sound file.
2. Click the Properties button in the Library panel (Figure 7).
The Sound Properties dialog box appears (Figure 8).
3. Choose a compression method from the Compression menu (Figure 9) and click OK.
• ADPCM: This method sets the compression for 8-bit and 16-bit sound data. Use this when you export short event sounds such as button clicks.
• MP3: This method offers good compression and sound fidelity for longer stream sounds such as music tracks.
• Raw: This resamples the file but does not perform any compression.
• Speech: A good compression to use for speech sound files.
4. Save the movie.
5. Select Control > Test Movie > In Flash Professional.
Figure 7 Library Properties button
Figure 8 Sound Properties dialog box
Figure 9 Compression menu
Library Properties button
How to import sound © 2012 Adobe Systems Incorporated
This document requires Adobe Flash Professional CS6. Technical instructions may differ depending on your version.