First published in the UK by Gambit Publications Ltd...
145
Transcript of First published in the UK by Gambit Publications Ltd...


First published in the UK by Gambit Publications Ltd 2007
Copyright © Efstratios Grivas 2007
The right of Efstratios Grivas to be identified as the author of this work has been asserted in accordance with the Copyright, Designs and Patents Act 1988.
All rights reserved. This book is sold subject to the condition that it shall not, by way of trade or otherwise, be lent, re-sold, hired out or otherwise circulated in any form of binding or cover other than that in which it is published and without a similar condition including this condition being imposed on the subsequent purchaser.
ISBN - 13: 978- 1-904600-68-8 ISBN - 10: 1-904600-68-9
DISTRIBUTION: Worldwide (except USA): Central Books Ltd, 99 Wallis Rd, London E9 5LN, England. Tel +44 (0)20 8986 4854 Fax +44 (0)20 8533 582 1. E-mail: [email protected]
Gambit Publications Ltd, 99 Wallis Rd, London E9 5LN, England. E-mail: [email protected] Website (regularly updated): www.gambitbooks.com
Edited by Graham Burgess Typeset by John Nunn Cover image by Wolff Morrow Printed in Great Britain by The Cromwell Press, Trowbridge, Wilts.
10 9 8 7 6 5 4 3 2 I
Gambit Publications Ltd Managing Director: Murray Chandler GM Chess Director: Dr John Nunn GM Editorial Director: Graham Burgess FM German Editor: Petra Nunn WPM Webmaster: Dr Helen Milligan WPM

Contents
Symbols 4 Introduction 5 Planning 7
Tests 1-75 9 Solutions 84
Evaluation Table 141
Index of Players 142 Index of Openings 143

Symbols
+ check ++ double check # checkmate !! brilliant move
good move !? interesting move ?! dubious move ? bad move ?? blunder +- White is winning ± White is much better ;!; White is slightly better
equal position 00 unclear position =+= Black is slightly better =+= Black is much better -+ Black is winning Ch championship 1-0 the game ends in a win for White 1/2-1/2 the game ends in a draw 0- 1 the game ends in a win for Black (n) nth match game (D) see next diagram
The mysterious symbol ;!;
What does this little chess sign (;!; or +) actually mean? Its implications are confusing for a lot of chess-players, who either are too happy to enjoy it or too disappointed to face it! The truth is, as nearly always, somewhere in the middle: ;!; is usually the normal consequence of a mutually well played opening. Naturally, this evaluation can be encountered in every phase of the game. Its obvious meaning is that the player that has this symbol assigned to him enjoys slightly better chances in the ensuing battle. His advantage is not in itself enough to guarantee victory, but he can afford the lUXury of making an inaccuracy, in which case the position is usually equalized. It also means that, if the defending side does not commit any mistakes (slight or serious) then the natural outcome of the game will be a draw. Should, however, the defending side fail to act appropriately and proceed with accuracy, then the evaluation of the position will move to ±, meaning that the goal of victory for the superior side is now closer.
So, that's the secret of this 'mysterious' symbol: the 'right' to an inaccuracy! Maybe this sounds a little bit paradoxical, but it is much closer to the truth than any other description. Try to understand it and benefit as much as possible from its almost mythical significance in the world of modem chess practice.

Introduction
This book offers training on a vital subject, the choice of the best available plan. As is commonly accepted in the chess world, a correct evaluation of the position, a strong plan
and an accurate execution are the three important factors that separate 'the man from the boy'. In a way, efficient training on the three above-mentioned concepts can help a chess-player mature and lead him to new successful paths.
With this book I have sought to provide a training guide that will be helpful mostly to players in the 1500-2200 range - corresponding to lower club level up to those with aspirations for a FIDE title. Of course, the book may well also be useful for players weaker than 1500, or for those stronger than 2200, but this is a decision these players should make for themselves!
Before we go on, I have to say that I do not really believe in ratings. I also find the entire paranoia that revolves around them pretty much irrelevant. The rating system is supposed to reflect a player's results during a specific period of time in the past. This has nothing to do with his future development and thus we should consider the rating scale as a tool of statistical value. What really counts is winning important tournaments and championships. Only this can guarantee a chessplayer his place in chess history. People remember great chess-players not because of their ratings, but because of their outstanding achievements.
But anyway, this is a book for training purposes and assessing the reader's approximate chess strength. It is essential to determine this strength, for knowing exactly where we stand and what we need to improve, in other words knowing ourselves, is a very serious step towards improving our chess skills.
The reader may wonder why most of the games in this book (50 out of 75) are mine. Well, this is a good question and has a good answer: I have been a 'part' of these games, as I played them, and I can present my thoughts during and after them. This is an important factor. It would be perhaps easier for an author to present well-known games played by top GMs. However, although that has the benefit of providing welcome variety, it is hard in such cases to know exactly what was going through the minds of the players, unless they have provided unusually revealing annotations. I have therefore opted for a combined approach: 50 examples from my practice and 25 of other, outstanding players.
How this Book Works
In this book there are 75 tests, each based around a game. The first 50 games are mine and are presented in chronological order, so the reader may detect a progression in my play. Starting from 1984 (the year in which I achieved the IM title), there is at least one game from each year, until the present day. The other 25 games come from my personal archives and are games that I really love and respect.
In each of these tests, the starting point is the first diagram. There is a judgement (evaluation) of the diagrammed position, which helps the reader to understand some important facts about the position itself. A presentation of three possible plans follows. Then the reader must judge which is the most valuable plan. The best plan receives a maximum of 20 or 30 points. The other, less good, plans normally receive some points, depending on their actual value. Some of the plans receive no points at all; they are just bad!
After finishing work on the 75 tests, the reader must take a good look at the solutions, where he can find the answers to each. In the solutions, the game is analysed until its end, so the reader can

6 MODERN CHESS PLANNING
better understand why the rewarded plan was the best in the position and how it worked out. In most cases, not much attention is paid to the inferior plans, as I think it is more important to examine and understand how the best plan suited the position. There are a few examples where the best available plan was overlooked, but still these are exceptions and the games were nevertheless quite interesting.
By this point, you will have received some very good training. But then, it will do no harm to measure your strength on this subject. The starting point will be 1000 rating points, to which you should add the total number of points awarded to your choices in the tests. The maximum is 1750 points (50x20 and 25x30), so a perfectly-scoring reader could reach up to 2750 rating points, a top-level GM's strength.
As one might notice from the table on page 14 1, expectations are a little higher than usual for the categories listed, as in this book the judgement of the position is given by the author beforehand, and this is a great help for the reader. A correct evaluation of any position is one of the most significant factors in chess, but that could be the subject for another book.
It must be mentioned that, before the games/tests, there is a short chapter, explaining why plans are so important in a chess game.
It is now time for you to train on that important chess concept, the plan. Have fun and train well!
Contributors and Helpers
Significant help in the preparation of this book was provided by Sotiris Logothetis, Vasilios Andronis, Efstathios Gazis and Thomas Michos. The tests were also kindly 'tested' by GM Stylianos Halkias, IM Anna-Maria Botsari, IM Nikolaos Gavrilakis, IM Robert Zysk, FM Antonios V ragoteris and Panayotis Drepaniotis. I would like to thank them all for their valuable help.
Bibliography
There is not much of a bibliography, as the 50 games come from my personal experience and practice. For the other 25 I used some valuable help from sources such as New In Chess and Informator.
Dedication
This book is dedicated to one of my most significant trainers, IM Dr Nikolay Minev (USA, exBulgarian, born 8th January 193 1). I would like to thank him for the way he taught me to understand and practice chess.
Efstratios Grivas Athens, February 2007

Planning
The most important element in modern chess practice is probably correct planning. The plan is associated with judgement and execution; all three are valuable concepts that cannot be separated and which, most of the time, determine the fate of our positions.
Nowadays, chess games between good players are full of small plans of different types and ideas, based on purely strategic and tactical motifs. The one who judges, plans and executes better than the opponent earns the right to win the game.
A closer examination of games played between strong players will prove that there is some harmony among their moves, some central idea that guides the movements of their forces. This is what we call a plan. A good chess-player refuses to act without any plan, even if this plan sometimes turns out to be mistaken in the long run.
First of all, it is important to identify the most important strategic and tactical elements of each particular position. According to the needs of that certain position, we should create our plan and stick to it. Games where only one plan is used are rarely seen these days. We are usually obliged to create several small plans, which of course are just parts of our main design: winning!
Many weak players are unable to construct a plan. This has nothing to do with intelligence, but just with basic education. Nowadays, with so many books, electronic help and trainers available, anything can be learned and, by constant practice, it can be understood and assimilated. Without basic education and knowledge we can't go very far. So, the first step is to understand the basic strategic and tactical elements that govern our royal game. Then, it is time to learn about judgement, planning and execution. If we do all of the above, we are ready to climb the chess Olympus.
Plans are necessary and can be found in every phase of a chess game. From the early opening until the late endgame, chess-players create the necessary plans, derived from such varied factors as the occupation of an important square to a violent attack. More usual are the plans we draw right after the end of the opening phase, but this is of course not the rule. Nowadays, with opening theory having gone very far, the choice of a certain opening very much depends on a plan we would like to use.
Some general advice could be presented to the reader as follows: 1. Notice and understand the {llain merits and disadvantages of each side (judgement). 2. Notice the immediate threats of both sides, but especially of your opponent! 3. Determine what is (are) the main, most significant target(s) and how the plan should be exe-
cuted. 4. Examine what will be the opponent's reaction to your plan. 5. Examine what your opponent's possible main plan is (can be) and how you should react to it. 6. If you can choose among two or more good plans, opt for the one that you think can bring
more benefits. 7. Follow your plan. Do not change it without a really good reason.
An important example of judgement, planning and execution follows. When I was quite young (many years ago!) I considered myself lucky to read a two-volume
chess encyclopedia, written by Greek IM Triantafyllos Siaperas. In one of these volumes I came across the following position (see diagram on next page):
lO ... .td7! A very deep move indeed, typical of the chess understanding of the great Cuban. He did not con
tinue with the natural developing move 1O ... e6, but instead preferred to withdraw his fS-bishop

8
B
MODERN CHESS PLANNING
Janowski - Capablanca New York 1916
back to d7. He preferred to place his bishop in an inferior (at first glance) square and to spend a tempo doing so! But why? Well, let's try to understand with the help of judgement: Black's doubled and isolated b-pawns must be considered as weaknesses, but in fact White cannot attack them, at least for the time being. Black's compensation for these 'weaknesses' is the semi-open a-file, on which he can apply some pressure. Sooner or later, White will have to play a3, creating some 'holes' on b3 and c4. Then Black can continue with ... ttJa5 and ... b5 (the reason for 1O ... SLd7!), creating the possibility of a ... b4 advance, or simply occupying the c4-square with his knight. White will not find it easy to kick this annoying knight away with an eventual b3, as then his a3-pawn will become weak. All in all, Black can aspire to gain the initiative on the queenside, and play on at least equal terms with his opponent. As it turned out, White failed to react adequately and lost a model game. My young eyes (and brain!) were really impressed by this 'strange' plan used by Black. From this moment I understood that, if I wanted to be a good chess-player, I should always plan. The rest of the game looked very easy, although of course White was quite 'helpful':
11 SLe2 e612 0-0 SLd6131:tfc1We7 14 SLc31:thcS l5 a3 ttJa5 16 ttJd2 f517 g3 b51S f3 ttJc4 19 SLxc4 bxc4 20 e4Wf7 21 e5 ? SLe7 22 f4 b5 23Wf2 �a4 24We31:tcaS 25 �abl h6 26 ttJf3 g5 27 ttJel1:tgS 2SWf3 gxf4 29 gxf41:taaS 30 ttJg21:tg4 311:tgl1:tagS 32 SLel b4 33 axb4 SLa4 341:tal SLc2 35 SLg3 SLe4+ 36Wf2 h5 371:ta7 SLxg2 3S1:txg2 h4 39 SLxh41:txg2+ 40 Wf31:txh2 41 SLxe7
1:th3+ 42 Wf21:tb3 43 SLg5+ Wg6 44 �e7 1:txb2+ 45 Wf3 1:taS 46 1:txe6+ Wh7 0-1

Test 1
TESTS
Efstratios Grivas - Vasilios Kotronias Karditsa 1984
9
1 d4lbf6 2 c4 e6 3lbf3 b6 4 g3 .ia6 5lbbd2 .ib4 6 'ilVc2 .ib7 7 .ig2 .ie4 8 'ilVdl .ixd2+ 9 .ixd2 0-0100-0 d611.ic3 'ile7 12 'ild2lbbd7 13 'ilVe3l:Ue8 14 l:tfdl.ib7 15 .ih3lbe4 16 .iel c5 17
.ig2lbdf6 18lbd2 cxd4 19 'ilVxd4 e5 20 'ilVd3lbc5 21 'ilVa3 .ixg2 22 Wxg2 'ilVb7+ 23 Wgl l:tad8 24lbn d5 25 cxd5lbxd5 26 lbe3lbe6 27lbxd5 l:txd5 28 l:txd5 'ilVxd5 29 'ilVa4 b5 30 'ilVdl 'ilVb7 31 .ic3lbg5 32 'ilVn 'ild5 33 a3 l::td8 34l:tc1 f5 35 .ib4lbe6 36 .ia5 l:tf8 37 l:tdllbd4 38 .ic3 l:td8 39 .ixd4 exd4 40 l:td3 'ilVa2 41 'ilVcl 'iVe6 42 'ilVdl f4 (D)
White to play
Judgement: After a colourless middlegame, White has exploited an inaccuracy by Black to obtain a superior endgame. This claim is based solely on White's better pawn-structure (weak isolated black d-pawn).
Planning: Choose one of the following three plans:
A: In such endgames it is essential to include the king in my winning efforts. As, for the time being, this is not possible due to the presence of queens, I should try to exchange them with 43 'iVb3. Black has nothing better than 43 ... 'iVxb3 44 l:txb3 fxg3 45 hxg3 a6, but then I can go on with 46 WfI. My king will be able to approach the centre and attack the black d4-pawn, as well as assist my rook. Moreover, it will prevent the invasion of the black rook on c2, pressurizing my pawns. Also, any possible tactical threats by Black are eliminated.
B: My advantage is obvious and I think that I can even win material with the very simple 43 l:txd4 l:txd4 44 'ilVxd4 fxg3 45 hxg3 'ilxe2 46 'ilVd5+ Wf8 47 'ila8+ 'ile8 48 'ilxa7. In this queen endgame my extra pawn will decide matters, even if it will take a long time. A possible continuation could be 48 ... 'ilVel+ 49 Wh2 'ilVe5 50 'ilVa8+ We7 5 1 'ilb7+ Wf6 52 b3, with the idea of creating an outside passed pawn.
c: Winning a pawn, as outlined in B, may be a good idea! But I think it is better to retain both major pieces on the board, so I should proceed with 43 e3 fxe3 44 fxe3 "iVe4 45 exd4 l:td5 46 'ild2. Then the battle will be long-lasting but one-sided.

10
Test 2
MODERN CHESS PLANNING
Efstratios Grivas - Aris Daniilidis Athens 1984
1 c4 e6 2 4Jf3 d5 3 d4 4Jf6 4 4Jc3 i..e7 5 i..g5 0-0 6 e3 b6 7l:tc1 i..b7 8 cxd5 exd5 9 i..d3 4Jbd7 10 0-0 h6 11 i..h4 c5 12 'iie2 4Je4 13 i..xe7 'iixe7 14 dxc5 4Jxc3 15 l:txc3 bxc5 16 i..a6 i..xa6 17 'iixa64Jf6 18l:tfc1 4Je4 19l:t3c2l:tfd8 20 'iid3l:td7 21 4Jd2 4Jxd2 22 �xd2 c4 23 l:tdl l:tad8 24 'iid4 f6 25 �n 'iie5 26 'iixe5 fxe5 (D)
White to play
Judgement: White consented to the exchange of queens, as he had accurately evaluated the resulting endgame as better for him. It is true that, at first sight, it seems like White can hardly claim an advantage, but a careful examination and a correct evaluation of the possibilities for both sides proves otherwise! What we need is good endgame knowledge and a productive plan.
Planning: Choose one of the following three plans:
A: It is obvious that a central break should be on my mind. It is also obvious that in such endgames king activity is important. So, I think I should start with 27 �e2 l:tb8 and only then 28 e4 d4 29 l:txc4 l:txb2+ 30 l:td2 l:txd2+ 3 1 �xd2. In this endgame I should have the better chances, as my rook will go to a5 and then, with the help of the f4 break, I can win material.
B: In contrast with the above-mentioned plan, I do not think that a central break is the solution to my 'problems'. But I think that by means of 27 b3 cxb3 28 axb3 �f7 29 l:ta2 l:tb8 30 l:td3 l:tb6 3 1 l:!.a5 �e6 32 �e2 I can exert some pressure on Black's pawns, with ideas like f4 and e4. In case of 32 ... d4 33 exd4 exd4 (33 ... l:txd4 34 l:te3) 34 f4 �f6 35 �f3 I would hold the advantage.
c: I think I can grab the advantage with a central break, starting with 27 e4 dxe4 28 l:txd7 l:txd7 29 l:txc4. Naturally, Black should invade my 2nd rank with 29 ... l:td2, but then I can play 30 l:txe4 l:txb2 3l l:ta4 l:tb7 32 l:ta5. In this position Black will face grave problems, as I can combine the activity of my king and rook to win material.

Test 3
TESTS
Efstratios Grivas - Spyridon Skembris Athens 1984
11
1 d4 lLlf6 2 c4 e6 3 lLlc3 i.b4 4 i.g5 h6 5 i.h4 cS 6 d5 i.xc3+ 7 bxc3 e5 8 'ilic2 d6 9 lLlf3 lLlbd7 10 e3 'ilie7 11 lLld2 g5 12 i.g3 lLlh5 13 i.e2 lLldf614 0-0 0-015 l:.ael �g7 16 i.d3 i.d7 17 h3 lLlg8 18 i.f5 �h8 19 i.g4 lLlg7 20 i.xd7 'ilixd7 21 f4 exf4 22 exf4 f5 23 fxg5 hxg5 24 lLlf3 'ilid8 (D)
White to play
Judgement: White has succeeded in creating play on the kingside. Black's king is vulnerable, as there are no pawns to protect it. Moreover, Black's pieces are not harmoniously placed, as they assist neither in defence nor in active play. Pawn weaknesses could matter in a possible endgame, but here we are still in the rniddlegame, where king safety and the initiative are more significant factors. White has a clear advantage but, of course, there is still some work to be done to convert it into a full point.
Planning: Choose one of the following three plans:
A: I should try to take advantage of the only open file, the e-file, doubling my rooks there. Then I shall penetrate into Black's position, creating dangerous threats. Black's defence would be problematic, as he must cover a lot of weak squares (g5, f5, e6, e7).
B: I should try to open more lines on the kingside. This can be achieved by attacking the vulnerable black g-pawn with 25 'ilid2. As 25 ... g4 is out of the question due to 26 lLlh4, Black should continue with 25 .. .f4 26 i.h2 lLlf5 (otherwise 27 g3 would be strong) 27 l:.e6, when my multiple threats, such as l:.fel, h4, g3, 'ilie2 and lLld2 (at the appropriate moment) will give me a decisive advantage.
c: As king safety is an important factor in such positions, I should open more files around the black king. In particular, opening the h-file would be important, as the black king will be greatly exposed on it. Thus, I should continue with 25 h4. Black doesn't seem to have a satisfactory answer: 25 .. .f4 26 lLlxg5, 25 ... g4 26 lLlg5 or 25 ... gxM 26 i.xh4.

Test 5
TESTS
Efstratios G rivas - Viswa nathan Ana nd World Junior Ch, Sharjah 1 985
13
1 d4 liJf6 2 c4 c5 3 d5 d6 4 liJc3 g6 5 e4 i.g7 6 i.e2 0-0 7 i.g5 e6 8 dxe6 i.xe6 9 h3 liJc6 10 liJf3 'iVb611 b3 liJd4 12 0-0 l:tfe813 i.e3 liJxe2+ 14 'iVxe2 'iVc6 (D)
White to play
Judgement: White controls more space and his pawn-structure is superior to Black's (the d6-pawn is a weakness and the dS-square a potential outpost for the white pieces) . On the other hand, Black has the bishop-pair and quite an active position. He can create central pressure and even prepare the . . . bS advance on the queenside. It seems that both sides can be satisfied with their potential, as well as their pluses and minuses. Therefore, the position should be judged as dynantically equal . At this particular moment, White should protect his e4-pawn, which is under attack.
Planning: Choose one of the following three plans:
A: I should protect my e-pawn with the active IS liJgS . Then I shall exchange my knight for Black's e6-bishop, protect my e4-pawn with f3 and then, by doubling rooks on the d-file, I obtain a comfortable plus. If Black tries to withdraw his bishop with I S . . . i.d7, then 1 6 'ii'f3 h6 1 7 liJdS hxgS 1 8 liJxf6+ i.xf6 1 9 'iVxf6 will secure the advantage.
B: I should protect my e-pawn with I S liJd2, regrouping my pieces. I should not be afraid of I S . . . liJg4 1 6 hxg4 i.xc3 l7 l:tad l l:tad8 1 8 gS , when I have a very slight but stable advantage. A more serious try for Black is I S . . . liJhS 1 6 l:tac l fS 1 7 exfS i.xfS 1 8 �f3 liJf6, with equal chances. I think that I cannot ask for more from my position, as I don' t believe I have any positional pluses.
c: Protecting my e-pawn with a knight move cannot result in an advantage. I should instead protect it with I S 'iVd3, improving my queen's position (getting away from the dangerous e-file) at the same time. My plan will be simple but effective: doubling rooks on the d-file and applying pressure on the weak d6-pawn (with a future iVc2) .

12
Test 4
MODERN CHESS PlANNING
Maia Ch iburdan idze - Efstratios G rivas Athens 1 984
1 e4 e5 2 ttJf3 ttJc6 3 i.b5 a64 i.a4 ttJf6 5 d4 exd4 6 0-0 i.e7 7 �el b5 8 e5 ttJxe5 9 ttJxe5 bxa410 'it'xd4 0-0 11 'it'xa4 (D)
Black to play
Judgement: White 's unambitious opening choice should in general satisfy Black, who seems to have reasonable chances. As both sides have not yet completed their development, we can only say that it is the correct choice of plan that will decide who (if anyone) will obtain the advantage. Of course, there are certain factors that characterize this particular position: White has a better pawnstructure, as the black a-pawn is isolated and those on c7 and d7 could easily become loose. On the other hand, Black has the bishop-pair and a potentially strong centre as compensation for his inferior pawn-structure. He may later make use of these factors by advancing his c- and d-pawns. In conclusion, the chances are even.
Planning: Choose one of the following three plans:
A: As 'normal ' development does not seem to lead to an advantage, I should think up something different. For example, it seems like a good idea to get my a8-rook into play first of all. So, I would continue with 1 l . . .�b8 (threatening " .�b4-h4) 1 2 a3 �b6 intending " .�e6; " .�e8, " .i.b7, and then advance my central pawns . This plan will give me the advantage.
B: Completing development as soon as possible must be the indicated course of action. I should proceed with 1 l . . .i.b7 1 2 ttJc3 d5 1 3 i.g5 ( 1 3 ttJc6 i.xc6 14 'it'xc6 'iYd6 15 'iYxd6 i.xd6 1 6 i.g5 i.b4 =) 1 3 " .'iYd6, when my position is fairly good.
C: Completing my development is of course my number one aim, but I should do so in a more active way, starting with 1 l . . .i.d6 1 2 ttJd3 ( 1 2 ttJd2 �e8 1 3 ttJdf3 00) 1 2" .i.b7 1 3 i.g5 h6 14 i.h4 c5. My bishops seem to be very well placed and I have reasonable possibilities of an attack in the future.

14
Test 6
MODERN CHESS PLANNING
M i ha i G h i nda - Efstratios G rivas Egio 1986
1 e4 e5 2 lLlf3 lLlc6 3 Ji.b5 a6 4 Ji.a4 lLlf6 5 0-0 lLlxe4 6 d4 b5 7 Ji.b 3 d5 8 dxe5 Ji.e6 9 Ji.e 3 Ji.e7 10 c3 lLlc5 1 1 Ji.c2 Ji.g4 12 lLlbd2 lLle6 13 �bl Ji.h5 14 a4 b4 15 as Ji.g6 16 Ji.xg6 hxg6 17 .l::tdl .l::tb8 18 c4 dx c4 19 lLlx c4 �c8 20 �e4 'iib7 2 1 'ilYg4 0-0 22 b 3 l:tbd8 2 3 h4 �b5 24 lLld4 lLlcxd4 25 Ji.xd4 �d7 26 Ji.e 3 .l::tfd8 27 g 3 .l::td 3 28 .l::tabl 'i{j'd5 2 9 .l::txd 3 'iYxd 3 30 .l::tb2 �c3 31 Ji.d2 �d 3 32 Ji.e 3 �c3 33 Ji.d2 'ik'd4 34 �xd4 lLlxd4 35 �n lLlc6 36 .l::tc2 .l::td 3 37 Ji.e 3 l:!.xb 3 38 �e2 ::' c3 39 .l::tx c3 bx c3 40 �d 3 Ji.b4 4 1 Ji.f4 lLlxa5 42 lLle 3 c6 43 lLldl �f8 44 Ji.g5 lLlb7 45 lLlx c3 lLlc5+ 46 �c4 i.x c3 47 �x c5 Ji.xe5 48 �x c6 Ji.c3 4 9 g4 (D)
Black to play
Judgement: Black has an extra outside passed pawn and his victory should be considered 'a matter of technique' . This is a typical 'book' endgame, meaning that knowledge should suffice either to win it or to save it, depending on the various possibilities available to the two sides.
Planning: Choose one of the following three plans:
A: I should keep my a-pawn alive until I am about to win something more important. My apawn is forcing the white king to keep an eye on it, allowing my own king to invade White's camp. When the time comes, I shall exchange it for one of White's kingside pawns, reaching a theoretically won position. I shall start with 49 . . . a5 .
B: White's king has been forced away from his kingside pawns. Thus, a good plan is to exchange my a-pawn for one of White's kingside ones and then attack the remaining ones with my king, which is much nearer that area than its counterpart. Therefore, it looks good to play 49 . . . Ji.d4 50 f3 Ji.f2 5 1 Ji.d2 Ji.xh4 52 �b6 �e7 53 �xa6 c;t>e6 54 �b5 �d5, and the second phase of my plan is ready to be executed.
C: I shall utilize the concept of the Plan A, but with a different procedure: 49 .. .f5 50 f3 �f7 5 1 �b6 a5 5 2 �b5 �e6 5 3 h5 gxh5 54 gxh5 �d5 .
Test 7
TESTS
Efstratios G rivas - Nikiforos Sideris Athens 1 987
15
1 d4 liJf6 2 c4 c5 3 d5 e6 4 liJc3 exd5 5 cxd5 d6 6 liJf3 g6 7 e4 i..g7 8 i..g5 h6 9 i..h4 0-0 10 liJd2 a6 11 a4 �e8 12 i..e2 liJbd7 13 0-0 g5 14 i..g 3 liJe5 15 iVc2 �b8 16 i..xe5 �xe5 17 liJc4 �e8 18 a5 liJg4 19 liJdl i..d4 20 liJde 3 liJf6 2 1 i..d 3 'fie7 (DJ
White to play
Judgement: White should be happy with the opening's outcome. He has gained a spatial advantage and a strong outpost for his knight on c4. Furthermore, Black's kingside (and his king in general) has been weakened, as the . . . gS advance created some weak squares (h6, fS) . On the other hand, Black's position seems solid and his bishop-pair should not be underestimated. White would love to employ the f4 advance, but this is probably a dream, as then his centre will collapse.
Planning: Choose one of the following three plans:
A: Black is not actually threatening my e4-pawn, as his own on d6 will also fall . But I have to think of how to improve my position. This can be done by centralizing another piece with 22 �ae l . Black might go 2 2 . . . liJg4 23 liJxg4 i..xg4 24 iVb3 i..d7 2S liJb6 l:tbd8, with slightly better chances for me due to my spatial advantage.
B: Black's strong d4-bishop must be exchanged. If I can succeed in that, then Black's kingside will be further weakened. Vacating the c2-square for my knight looks like a good idea, so I should play 22 ii' b3 "VJii c7 23 liJc2. Now Black can grab my e4-pawn, but after 23 . . . liJxe4 24 liJxd4 cxd4 2S �fe l i..fS 26 �a3 i..g6 27 liJb6 I feel that I would have more than sufficient compensation for Black's useless extra d4-pawn.
c: Black's weakened kingside should be my guiding light. If I could succeed in exchanging light-squared bishops, then I could place a monster (the e3-knight) on the fS-square . I think I can achieve this by jettisoning my irrelevant e4-pawn. By means of 22 eS dxeS (22 . . . i..xeS 23 i..fS i..d7 24 i..xd7 �xd7 2S "VJii d3 with sufficient compensation for the pawn) 23 i..fS my plan is realized and my compensation should be sufficient for just a pawn.

1 6 MODERN CHESS PLANNING
Test 8
H ristos Bousios - Efstratios G rivas Patra 1 988
1 d4 fS 2 lbc3 dS 31i. f4 a6 4 e 3 lbf6 S lbf3 e6 61i.e21i.d6 7 0-0 0-0 8 .l:!.cl lbc6 9 lbbl lbe7 10 c4 lbg6 1 1 g 3 c6 12 a 3 lbe4 13 b4 (D)
Black to play
Judgement: The game is in the late opening phase, where both players have more or less developed their pieces . White is creating pressure on the queenside with the help of his queenside pawns . In this particular system of the Dutch Defence, the Stonewall , the centre is generally blocked. Black has voluntarily surrendered the eS-square to White, but in return he can develop without facing any immediate threats. Black's knight manoeuvre ( . . . lbc6-e7-g6) seemed good, aiming for better control of the weak eS-square. As experience has taught us, Black should focus on the king side and, at some point, also on the centre. All in all, White should stand somewh at better, due to the spatial advantage he has acquired out of the opening.
Planning: Choose one of the following three plans:
A: I should try to generate a pawn-storm on the king side, but my knight on g6 is not helping. Thus, I should move it to f7, from where it will also control the weak eS-square and at the same time help the . . . gS advance. If White tries to avoid my . . . gS advance with a well-timed h4, then my plan should consist of the moves . . . g6, . . . h6 and only then . . . gS . For all these purposes my knight will stand excellently on f7 .
B: I should try to prepare the . . . eS advance. This could be done with moves such as . . .'VJlie 7, . . . 'it>h8, . . . dxc4, and only then . . . eS . There is not much that White can do against this plan, so I shall equalize without much effort.
c: I should try to generate immediate activity on the kingside. This can be done by 1 3 . . . lbxf4 1 4 exf4 ( 1 4 gxf4 gS) 1 4 . . . gS I S lbxgS lbxgS 1 6 fxgS f4 ( 1 6 . . .'iVxgS 1 7 f4) . The opening of the centre cannot be to my advantage, but this is compensated by my piece activity around the white king (two bishops plus the semi-open f- and g-files) .

Test 9
TESTS
Efstratios Gr ivas - Peta r Vel i kov Plovdiv 1988
1 7
1 e4 c5 2 c3 ttJ f6 3 e5 ttJd5 4 d4 cxd4 5 ttJ f3 d6 6 cxd4 e6 7 a 3 .td7 8 .td 3 .tc6 9 0-0 ttJd7 10 l:tel .te7 1 1 ttJbd2 dxe5 12 dxe5 ttJ c5 13 .to ttJ f4 14 l:te 3 0-0 15 �c2 l:tc8 16 b4 .ta4 17 �bl ttJd7 18 �e4 ttJd5 19 l:tel .tc2 20 'iVg4 .tf5 2 1 �g 3 a5 22 bxa5 ttJ c5 2 3 ttJd4 .tg6 24 ttJ c4 ttJe4 25 'iVb 3 .tc5 26 .tb2 ttJd c3 27 .tx c3 ttJx c3 28 ttJ c2 ttJe4 2 9 ttJ2e 3 �h4 30 g 3 �e7 31 .tg2 l:tc7 32 l:tadl h5 33 ttJd6 ttJx f2 34 'it'x f2 .tc2 35 �c3 .txdl 36 l:txdl f6 37 'it'e2 fxe5 38 ttJe4 .td4 39 �b4 �d7 40 �b 3 �e7 4 1 h4 g6 42 .th 3 l:tc6 43 l:tO .txe 3 44 l:tx f8+ 'it'x f8 45 'it'xe 3 'it'g7 46 'iVb4 �c7 (D)
White to play
Judgement: White has the advantage, as he has two (good) minor pieces against a (quite passive) rook. Unfortunately for Black, his extra pawn is of no importance, as it is isolated, weak and blockaded. Moreover, Black's e-pawns are more like weaknesses, as are his b- and g-pawns. Some attention must be paid to the white king's position, as its central presence offers Black some chances for counterplay.
Planning: Choose one of the following three plans:
A: I should attack the e-pawns, starting with the one on e5 . This can be done by manoeuvring my minor pieces (by .tfl and ttJd2-c4) towards that target and also involving my queen via b5 or c3 . Black will not be able to defend this weakness, which will eventually drop. Then I would go after the e6-pawn.
B: I should exchange my a5-pawn for Black's on b7. Then my a3-pawn will become passed, giving me an easy win. I can do that by playing .tfl -b5 and then a6. After the pawn exchange I shall play .td3 and advance my a-pawn.
C: I am sure that I would like to exchange queens at a favourable moment and then proceed with all my forces against the opponent' s b-pawn. But Black would never accept this trade, so I must force it by attacking the black king. By manoeuvring my pieces against the black g6-pawn (ttJg5, .tfl -d3 and �e4) I would be able either to exchange queens and easily win the endgame or deliver checkmate.
18
Test 1 0
MODERN CHESS PLANNING
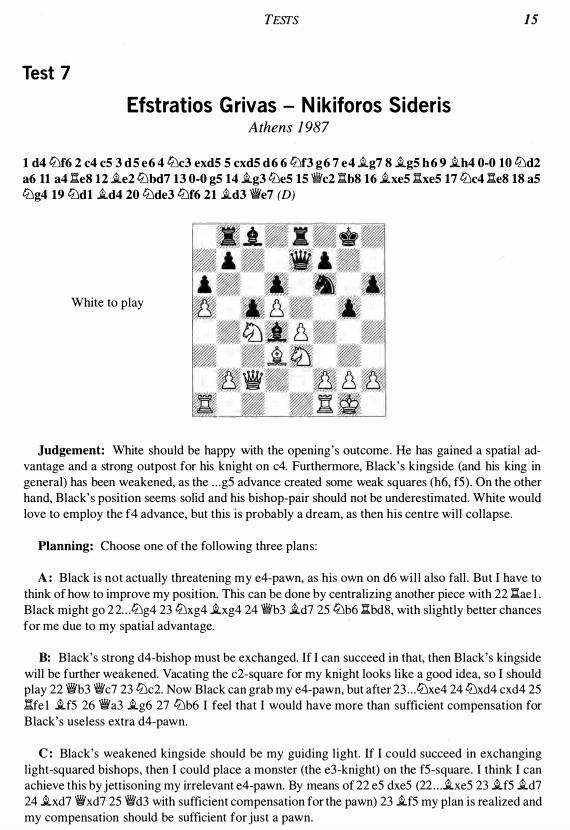
Efstratios G rivas - M iod rag Todorcevic European Team Ch, Haifa 1 989
1 g 3 g6 2 �g2 �g7 3 f4 cS 4 liJf3 liJc6 5 0-0 d6 6 d 3 e6 7 e4 liJge7 8 c3 0-0 9 �e 3 b6 10 d4 �b7 11 �f2 .l:!.c8 12 dx c5 bx c5 13 liJbd2 'il c7 14 .l:!.el .l:!.cd815 'iVa4 .l:!.fe8 16 .l:!.a c1 as 17 a3 .l:!.a8 18 liJc4 :ed8 19 .l:!.cdl liJc8 20 .l:!.d2 liJ6e7 2 1 'il c2 a4 22 liJe 3 liJb6 2 3 f5 liJc6 24 g4 liJe5 25 �g 3 liJbd7 26 .l:!.f2 .l:!.e8 27 liJxe5 liJxe5 28 f6 �h6 2 9 �f4 �x f4 30 .l:!.x f4 g5 31 .l:!.f2 c4 32 �d2 'iith8 33 :bl liJd 3 34 .l:!.ff 1 'il c5 35 'iithl liJf4 36 �f3 fII c7 37 liJg2 e5 (D)
White to play
Judgement: Although the game is approaching the 40th move, only a pair of minor pieces has been exchanged. Thus, we are still in the middlegame. Black seems to have control of the position and the deadly threat of . . . �d8, winning the important white f-pawn. White 's strategy seems to have failed, as he has acquired weaknesses on f6 and b2, while the e4-pawn is a target for the b7-bishop. Thus, he must seek to complicate the game, trying to break through to his only possible target, the black king. The proper evaluation of the position is based on whether White will manage to create counterplay.
Planning: Choose one of the following three plans:
A : I think that I should exchange on f4 with 38 liJxf4 gxf4 (38 . . . exf4 39 h4 �xe4 { 39 . . . h6? 40 hxg5 hxg5 41 'iVh2+ 'iitg8 42 �h6 +- } 40 �xe4 .l:!.xe4 41 hxg5 is a mess) 39 h4, protecting my weak f-pawn. Then I shall proceed with .l:!.bd l , with an unclear position.
B: I think I should attack the enemy d-pawn immediately with 38 1:f. bd l . After 38 . . . .l:!.ad8 (38 . . . 1:f. e6 39 h4 00) I should continue with 39 liJe3 (39 h4 is met by 39 . . . d5) and liJf5 , increasing the pressure on my target. The possible loss of the f6-pawn can be counterbalanced by capturing any of the weak black pawns (a4, c4 and d6).
c: Commencing activity on the kingside with 38 h4 must be the right plan. Black must be careful, as 38 . . . liJxg2 39 �xg2 gxh4 40 �h6 .l:!.g8 4 1 .l:!.f5 .l:!.g6 42 �xh4 seems pleasant for me and 38 . . . h6 39 hxg5 hxg5 40 liJxf4 gxf4 4 1 'ii'h2+ is even winning.

Test 1 1
TESTS
Draga n Ba rlov - Efstratios G rivas Zonal, Nea Makri 1 990
1 9
1 e4 eS 2 ttJ f3 ttJ c6 3 i.bS a6 4 i.a4 ttJ f6 S �e2 bS 6 i.b 3 i.cs 7 c3 0-0 8 0-0 h6 9 �dl l:te8 10 d 3 i.f8 1 1 a 3 d6 12 ttJbd2 ttJaS 13 i.a2 cS 14 ttJn i.e6 1S i.xe6 �xe6 16 ttJg 3 g6 17 �c2 dS 18 a4 b4 19 i.d2 'iYe8 20 nel bx c3 2 1 i.x c3 ttJ c6 22 l:te c1 (DJ
Black to play
Judgement: Both sides have long ago completed their development. White 's not very ambitious set-up and some 'mishandling' of the position have allowed Black to obtain more than his fair share of the centre. Black's central pawns are superior and his more harmoniously placed pieces apply greater control of that area. It must also be added that White is facing problems on the b-file, which can be useful only for Black. Therefore, Black holds a pleasant and stable advantage.
Planning: Choose one of the following three plans:
A: I should clarify matters in the centre by playing 22 . . . dxe4. After White's recapture (23 ttJxe4 ttJxe4 24 dxe4) I shall have the opportunity to continue at the appropriate moment with . . . ttJd4, forcing White to exchange the knight. Then, by playing . . . cxd4 I shall obtain a passed and wellprotected d-pawn, I shall provide my f8-bishop with more scope, and my rooks on the b- and c-files will have excellent options .
B: The b-file is quite important, so I should restrict all possible play on any other part of the board with 22 . . . d4, denying White any options in the centre and on the kingside. Then, by simply doubling rooks on the b-file and regrouping my pieces on the queen side, I shall have a strong grip on the advantage and chances to increase it, so this must be the right plan.
C: My plans should focus on the centre and the queenside, where I hold the advantage. As I do need to clarify all matters in the centre, I shall continue with 22 . . . ttJd4, forcing White to exchange my strong knight (23 'iVd l does not avoid this, in view of 23 . . . �b8) . After 23 i.xd4 cxd4 I shall have all the advantages of Plan A and the possibility of a later . . . dxe4 as 24 exd5 ttJxd5 in general favours me.

20
Test 12
MODERN CHESS PLANNING
Efstratios G rivas - Joh n Cooper Olympiad, Novi Sad 1 990
1 d4 liJf6 2 liJf3 g6 3 c4 i.g7 4 liJc3 0-0 S e4 d6 6 i.e2 eS 7 0-0 liJc6 8 dS liJe7 9 b4 liJhS 10 cS as 1 1 cxd6 cxd6 12 liJbS liJf4 13 i.x f4 ex f4 14 %:!. c1 axb4 ISlli'b 3 i.g4 16 .l:i.c7 liJc8 17 l:Ixb7 �aS 18 i.c4 i.x f3 19 gx f3 liJb6 (D)
White to play
Judgement: White seems to have created some pressure, as his rook is on the 7th rank and the black d6-pawn is weak. On the other hand, Black has succeeded in finding adequate counterplay on the a- and c-files and seems to have protected his weaknesses by tactical means (20 liJxd6 �c5) . The weak kingside pawns of each side (B and f4) do not seem to affect any future plan, as it is hard for either side to attack them. The position can be evaluated as dynamically equal, although much depends on the possibility of either side coming up with a strong plan.
Planning: Choose one of the following three plans:
A: I should keep up the pressure on the queenside and for this reason I need to avoid piece exchanges. Thus, I shall keep my bishop with 20 i.d3 i.e5 2 1i:t b 1 . Although there is not something that could change the evaluation of the position immediately, I feel that I should stand better.
B: I think that it is quite important to gain control of the c-file. So I should continue with 20 .l:i.c7, threatening among others liJxd6 or l:tc6. After the more or less forced variation 20 . . . liJxc4 2 1 'iWxc4 �xa2 2 2 �xb4 i.e5 (22 . . . .l:!.fb8 2 3 �xd6 l:txb5 24 �d7 �b2 2 5 �xf7+ 'it>h8 26 e5 'ViU xe5 ?? 27 .l:i.e7) 23 'iVc4 I should hold a tiny advantage, as I can put some pressure on the d6-pawn.
c: I shouldn' t care too much about my c4-bishop. It is more important to create immediate pressure with 20 l:tbl . Then, the exchanges that might occur ( . . . liJxc4 and . . . �xa2) would lead to an endgame where my knight will be a better piece than the black bishop, due to the blocked pawnchain. If I also succeed in doubling my rooks on the 7th rank, my advantage will increase.

Test 1 3
TESTS
Konsta nti nos Moutousis - Efstratios G rivas Athens 1 991
21
1 c4 g6 2 g 3 iLg7 3 d4 liJf6 4 iLg2 0-0 S liJc3 d6 6 liJf3 liJbd7 7 0-0 eS 8 e4 h6 9 h 3 liJh7 10 iLe 3 liJgSU dxeS liJxeS 12 liJxeS dxeS 13 'it>h2 liJe6 14 �xd8 .l:txd8 1S .l:tadl .l:te8 16 f4 ex f4 17 gx f4 c6 18 'it>hl (D)
Black to play
Judgement: Black has an easy game, as he has solved his main opening problems and his pieces are reasonably well placed. Of course, he should consider how to complete his development, especially that of the cS-bishop. White 's central pawns are not dangerous, as they cannot move without creating a hole. White holds a spatial advantage, but this does not matter so much as he is unable to utilize it, at least not during this phase of the game. Thus, this position must be approximately equal .
Planning: Choose one of the following three plans:
A: My pieces are occupying squares on just the first three ranks, so it is too early to think of fighting for the advantage. I should complete my development with . . . liJc7 and . . . iLe6. A possible continuation could be I S . . . liJc7 19 iLd4 iLe6 20 iLxg7 'it>xg7 21 b3 .l:tadS with an approximately equal game. Later, I can even apply pressure on the e4- and f4-pawns.
B: I can seek more than equality, as I can take advantage of White's 'exposed' centre by hitting it with I S .. .fS . If White replies with 1 9 eS?, then I can play 19 . . . gS 20 fxgS liJxgS , winning the eSpawn. After 19 exfS I can continue with my main idea: 19 . . . liJfS 20 iLgl iLxfS getting the advantage, which will be based on White 's shattered pawns on the kingside.
c: I think I should try to create an outpost on eS by playing I S . . . gS 1 9 fS liJfS and . . . liJd7 -eS . My strong knight will be placed on the excellent eS outpost, which will give me a certain advantage. Then, I can proceed with either an advance of my kingside pawns ( . . . hS and . . . g4) or by completing my development with . . . iLd7, . . . b6 and . . . .l:tadS.
22 MODERN CHESS PLANNING
Test 1 4
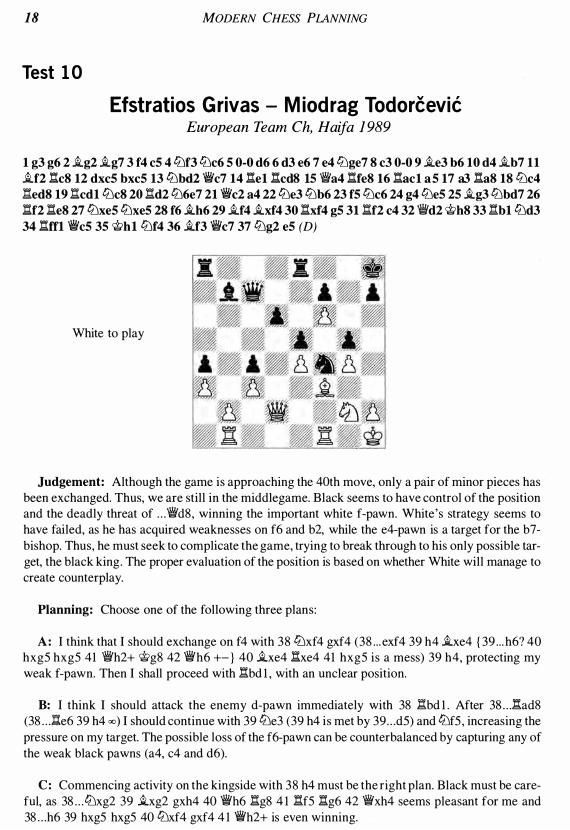
Efstratios G rivas - And reas Kofid is Komotini 1992
1 d4 tZJf6 2 c4 e6 3 tZJf3 dS 4 tZJc3 cS S cxdS cxd4 6 'i'xd4 exdS 7 .tgS .te7 8 e 3 tZJc6 9 .tbS 0-0 10 'i'a4 .te6 1 1 tZJd4 tZJxd4 12 �xd4 h6 13 .th4 gS 14 .tg 3 tZJe4 1S 0-0 tZJxg 3 16 hxg 3 .tf6 17 'iVb4 .te7 18 lWd4 .tf6 19 lWb4 .te7 20 'iVa4 'iVb6 2 1 nab! nad8 22 l:t fdl a6 2 3 .td 3 'iVb4 24 �xb4 .txb4 2S tZJe2 �g7 26 tZJd4 �f6 (D)
White to play
Judgement: There are two prevailing strategic elements, one for each side. White has acquired a better pawn-structure, in view of the weak isolated black d5-pawn. On the other hand, Black has gained the bishop-pair, retaining dynamic equality. Of course, in positions with isolated pawns, knights are important pieces, as they can blockade these pawns and operate under their cover.
Planning: Choose one of the following three plans:
A: I should regroup my pieces, gearing towards the isolated black d-pawn. For this purpose, placing my bishop on b3 would be the first step; then I should double rooks on the d-file or regroup my knight (tZJe2-c3) towards my main target. Black might get some counterplay on the h-file with . . . l:th8 and . . . h5-h4, but I do not believe that it would be adequate. So, I can proceed with 27 .tc2 h5 28 .tb3 lIh8 291I bcl .td6 30 tZJe2 h4 3 1 gxh4 gxh4 32 tZJc3, picking up the pawn.
B : Black's future initiative on the h-file, along with his bishop-pair, should worry me, as my counterplay against the isolated black pawn is not enough. Therefore, a prophylactic sequence like 27 .te2 nh8 28 .th5 seems appropriate. Then I can double my rooks on the d-file and, at the appropriate moment, I can regroup my minor pieces towards my target.
C: In all endgames the power of the king is of undisputed significance. What can be better than to move my king closer to the centre? At the same time, my rooks will be ready for some action down the half-open h-file or the open c-file. So, 27 �f1 l:th8 28 'it' e2 h5 29 nh l h4 30 gxh4 gxh4 3 1 nbc 1 is right.

Test 1 5
TESTS
Vas i ly Smyslov - Efstratios G rivas Rishon le Zion 1 993
23
1 e4 cS 2 tZJf3 tZJc6 3 i.bS d6 4 d4 cxd4 S �xd4 i.d7 6 i.x c6 bx c6 7 0-0 eS 8 �d 3 h6 9 c4 �c7 10 tZJc3 tZJf6U i.e 3 i.e6 12 �a c1 tZJd7 (D)
White to play
Judgement: Black tried a risky variation, which has resulted in him lagging behind in development. Of course, if he manages to castle without problems, then his bishop-pair along with his good centre will leave him perfectly satisfied. In order to evaluate the position it is important to calculate whether White can in some way profit from the time Black will need in order to castle. White seems better, as his development looks harmonious, but the appropriate plan will make all the difference in the evaluation.
Planning: Choose one of the following three plans:
A: I should complete my development with 13 �fd 1 . If Black tries the natural 13 . . . i.e7 I could continue with the tactical 14 tZJdS, achieving a pleasant advantage. If Black first removes his queen from the c-file ( 1 3 .. :�aS), then I can continue with 14 cS, breaking up Black's pawn-structure. All in all, Black will face grave problems.
B: As I do not see much in the centre, I think that I should try to play actively on the kingside, starting with 1 3 tZJh4. After 1 3 . . . i.e7 14 tZJfS i.xfS 1 5 exfS 0-0 1 6 tZJe4 my position is preferable, as I control all the light squares in the centre and my pieces occupy better posts than Black's .
c: I think it is important to take advantage of the undeveloped black kingside. It would be a nice idea to profit from the time that Black needs to finish his development, by trying to obtain some strong squares and open up the queenside. So, I should play the 1 3 b4 advance, planning bS, which will give me control over the dS-square after the elimination of the opponent's c-pawn. Later, I should concentrate on a cS breakthrough, which will complete my general plan.

24 MODERN CHESS PLANNING
Test 1 6
Efstratios G rivas - N i kolaos Ka lesis Budapest 1 994
1 d4ll'l f6 2 c4 e6 3ll'l f3 b6 4 g 3 �a6 5 'i!Vb 3 d5 6 cxd5 exd5 7 �g5 �e7 8ll'l c3 �b7 9 �x f6 �x f6 10 �g2 0-0 1 1 0-0 .l:!.e8 12 .l:!.felll'la6 13 .l:!.adl �d6 14 'i!Va4 .l:!.ad8 15 a 3 c5 16 e 3 'i!Vb8 17 'i!V c2 �c6 (D)
White to play
Judgement: A rather interesting and typical position has occurred. As the centre is blocked, Black cannot take advantage of his bishop-pair. In this type of position, knights seem to be more important than bishops, because they can defend and attack the centre at the same time. In contrast, the bishops can only defend and wait. In view of the above, White should have a slight plus.
Planning: Choose one of the following three plans:
A : As the indicated way of playing is to keep the centre closed, I should manoeuvre my knights against Black's centre. For this reason I should place them on f4 and c3, from where they will pressurize the black d5-pawn with maximum force. As my f3-knight does not really have any other promising options, it must be the one to place on c3 (ll'l d2-b1 -c3) . The other one will head for the f4-square (ll'l e2-f4). Positions resulting from a future . . . c4 or . . . cxd4 would be in my favour, as the centre will remain blocked.
B: I should create hanging pawns in the enemy camp and then try to attack them with my knights. So, a continuation such as 1 8 dxc5 bxc5 1 9l1'l a4, followed by .l:!.c 1 or b4, gives me reasonable chances to seize the initiative on the queenside.
c: At this particular moment my pieces are very well centralized. Therefore, it is a good moment to open up the centre and at the same time to eliminate the black bishop-pair. I should proceed with 1 8 e4 dxe4 1 9l1'l xe4 .l:!.xe4 20 .l:!.xe4 �xe4 2 1 'iYxe4, when my central activity and control of the weak light squares will give me a decent advantage. If further exchanges take place on the d4-square, then the endgame with bishop against knight will be in my favour.

Test 1 7
TESTS
Joh n Emms - Efstratios G rivas Kopavogur 1994
25
1 e4 c5 2 4.J f3 4.J c6 3 4.J c3 e5 4 .i.c4 d6 5 d 3 .i.e7 6 4.Jd2 4.J f6 7 4.J f1 .i.g4 8 f3 .i.e6 9 4.Je 3 0-0 100-0 .l:!.b8 1 1 a 3 4.Jd7 12 4.J cd5 .i.g5 13 c3 b5 14 .i.a2 4.Jb6 15 4.Jxb6 �xb6 16 b4 a5 17 bxa5 4.Jxa5 18 4.Jd5 .i.xd5 19 .i.xd5 .i.x cl 20 �x c1 (D)
Black to play
Judgement: Black has reacted precisely and has emerged from the opening phase with a perfectly acceptable position. His problems are now behind him, as he has created counterplay on the queen side and made some useful exchanges, neutralizing a possible attack on the f-file (after White's f4 advance) . His pawn-structure seems to be better as White's a-pawn is isolated, but this is compensated by the excellent placement of the d5-bishop. In conclusion, the position offers equal possibilities for the two sides.
Planning: Choose one of the following three plans:
A: My territory of action should be the queenside, where White's only real weakness lies : the a3-pawn. I should try to open more files in that sector of the board and transfer my pieces there, creating the necessary activity. I should start with 20 . . . c4, opening up some more lines and preparing an attack against the opponent's queenside pawns .
B: The white bishop on the d5-square is an annoying piece, so I should first of all try to minimize its power. For this purpose I should transfer my knight to e7 ( . . . 4.J c6-e7) and then continue with . . . 'il c7 and . . . c4. This should give me quite a pleasant position, as I can even try doubling my rooks on the a-file, aiming at the a3-pawn.
c: Before I employ my own active plans, I should take care of the pressure towards the f7-pawn that White can create with the natural f4 advance. Thus, I shall continue with 20 . . . �h8 2 1 f4 f6. Then I shall be ready to execute my plans on the queenside, involving . . . c4, . . . �c7 , or . . . 4.J c6-e7 and then . . . 'fic7, well as doubling rooks on the a-file.

26
Test 1 8
MODERN CHESS PLANNING
Efstratios G rivas - Soti r ios Porfi r iad is lraklion 1 994
1 d4 d5 2 c4 c6 3 4Jf3 4Jf6 4 4Jc3 a6 5 a4 e6 6 e 3 c5 7 cxd5 exd5 8 �e2 4Jc6 9 0-0 �d6 10 b 3 0-0 11 dx c5 �x c5 12 �a 3 �xa 3 13 1:.xa 3 �g4 14 h 3 �h5 15 4Jd4 �xe2 16 4Jdxe2 �d6 17 1:.a2 1:.fd8 18 1:.d2 �c5 19 �c2 d4 20 exd4 4Jxd4 2 1 4Jxd4 1:.xd4 22 4Je4 �x c2 2 3 4Jx f6+ gx f6 24 1:.x c2 1:.b4 25 1:.c3 a5 (D)
White to play
Judgement: After the compulsory exchanges that took place, White has retained a small plus, solely due to his better kingside structure: the black pawns on f6, f7 and h7 constitute permanent static weaknesses. If Black succeeds in exchanging the queenside pawns and a pair of rooks, even losing the f6-pawn in the process, the game will end in a draw. However, the ending with four rooks and pawns 3 :2, with weak black pawns on f7 and h7, is not a simple draw at all . We may say that White would have an approximately 40% chance of winning (and 60% drawing). Consequently, the evaluation of the position as slightly better is justified, as Black will have to defend carefully to achieve the draw.
Planning: Choose one of the following three plans:
A: It is important to activate my passive fl -rook immediately, as I shall need both my rooks to create pressure against the black kingside pawns . Therefore I shall start with 26 .l::td l , aiming to seize control of the 7th rank or simply to attack the f6-pawn.
B: Before activating my rooks, I should fix my opponent's pawn weaknesses on the kingside. This can be done with 26 1:.g3+ �h8 27 1:.f3 �g7 28 g4. Meanwhile, Black will be able to exchange the queen side pawns, but I shall still retain good winning chances. I should keep in mind that I must preserve both my rooks .
c: I should avoid the exchange of both of my queenside pawns, as it will then be more difficult to create winning chances . Thus, I should place one of my rooks in a passive position for the time being (26 1:.al ), as I need time to activate my king and my other rook. When I am ready, I shall also activate my passive rook.

Test 1 9
TESTS
Soti r ios Porfi r iad is - Efstratios G rivas lraklion 1 994
2 7
1 e4 c5 2 lLlf3 lLlc6 3 .ib5 e6 4 0-0 lLlge7 5 :lel a6 6 .ix c6 lLlx c6 7 c3 d5 8 exd5 'iWxd5 9 d4 .ie7l0 dx c5 'iWxdlU :lxdl .ix c5 12 lLlbd2 e5 13 lLle4 .ie7l4 h 3 .if5l5 lLld6+ .ixd6l6 :lxd6 �e7l7 :ldl (D)
Black to play
Judgement: White 's opening treatment was not ambitious, allowing Black to equalize easily. The opposite-coloured bishops do not give either side reason to hope for more than a draw. Further exchanges will confI rm this fact, but the difference in rating between the two players forces Black at least to try. Another positive fact for Black is that his king side majority is potentially more active than White's on the queen side. Objectively the position is equal .
Planning: Choose one of the following three plans:
A: One interesting idea is to disorganize White 's pieces . I should play 17 . . . .ic2, giving White a choice between the 'ugly ' 1 8 :l d2 and abandoning the d-fI le with 1 8 :l e 1 . In the latter case, I can try to double rooks on the d-fI le and then either advance my majority or employ a minority attack on the queen side, or even do both.
B : White's ' threat' of .ie3-b6 will secure him control of the d-fI le, so I should react immediately with 17 . . . :l hd8 1 8 .ie3 :l xd 1 + 1 9 :l xd 1 :l d8 . Of course then the draw would be quite near, but I do not see how I can do something more than that. Objectively the position is drawish, so I must live with that.
c: I should play on, avoiding further exchanges. First of all, I should deprive White's bishop of some important squares. I shall start with 1 7 . . . b6 1 8 .ie3 :l ab8, followed by .. .f6 and . . . gS/ . . . hS, expanding on the kingside. Ideas like . . . lLlaS-c4 and . . . .ie6 will always be there and, although my position does not seem to improve much, I have chances to take advantage of even the slightest mistake White may commit, due to my 'pressure' .

28
Test 2 0
MODERN CHESS PLANNING
Vlasti m i l Babula - Efstratios G rivas Olympiad, Moscow 1 994
1 d4 lbf6 2 c4 g6 3 lbc3 i.g7 4 e4 d6 S lbf3 0-0 6 i.e2 eS 7 dS as 8 i.gS h6 9 i.h4 lba6 10 lbd2 �e8 11 0-0 i.d7 12 .l:tbl lbh7 13 a 3 a4 14 lbbS i.xbSlS cxbs lbcS 16 f3 b6 17 i.f2 lbf6 18 i.x cs bx cS 19 b4 axb 3 20 b6 cxb6 2 1 .l:txb 3 (D)
Black to play
Judgement: A typical ' King's Indian' middlegame has arisen. White has sacrificed a pawn, trying to open files on the queenside, where he believes he should concentrate his efforts . Thus, White enjoys pressure on the queenside and the better bishop. However, the fact that he already has a clear plan is even more important. I would say that the position is unclear, but if Black does not find the correct plan, then it will be an easy day at the office for White.
Planning: Choose one of the following three plans:
A: First of all , I should try to keep my extra pawn on the queen side by means of 2 1 . . :iV b8 22 lbc4 lbd7 23 �bl Wic7 . Then I can double rooks on the a-file, where White 's only weakness, the a3-pawn, lies . I think I shall have sufficient counterplay down the a-file, plus an extra pawn.
B : I should do approximately the same as outlined in Plan A, but I shall also seek activity on the f-file. With 2 1 . . :ilt' d8 22 lbc4 .l:tb8 23 Wibl �c7 I shall be ready for the . . . f5 advance.
c: As White has already chosen the queen side as his main theatre of action, I should concentrate on the part of the board where most of my pieces are present, the kingside. The oppositecoloured bishops generally assist a potential attack and, in this particular position, as White is missing his dark-squared bishop, he has a lot of weaknesses on the dark squares. Therefore, I should conquer these squares by . . . Wie7-g5 , . . . lbh5-f4, . . . i.h6 and of course the thematic advance .. .f5 . Naturally, White will dominate the queen side, but if! d o the same o n the kingside, then m y threats will prove decisive, as my main target is his king.

Test 2 1
TESTS
Efstratios G rivas - Lorenc Rama Ilioupolis 1 995
29
1 d4 d5 2 c4 4Jc6 3 e 3 e5 4 cxd5 �xd5 5 4Jc3 �b4 6 �d2 �x c3 7 bx c3 �d6 8 4Je2 4Jf6 9 4Jg 3 0-0 10 �e2 4Je7 1 1 0-0 c5 (D)
White to play
Judgement: The opening phase is near its end. Both sides have already gained some advantages. White has the bishop-pair, while Black enjoys the healthier pawn-structure. Black has correctly attacked White's centre with his c- and e-pawns; trying to create some fundamental weaknesses. On the other hand, this might easily rebound, if White hits upon the appropriate plan.
Planning: Choose one of the following three plans:
A: Since my main weapon in this particular position is the bishop-pair, I should be happy to clarify the situation in the centre. An interesting pawn sacrifice can take place after 1 2 �f3 cxd4 1 3 cxd4 exd4 1 4 exd4 �xd4. After 1 5 �e3 �xd l 1 61H xd l followed by 1:i. ab l , I would definitely have serious compensation for the pawn, as my queenside pressure and the bishop-pair in an open position are of great significance.
B: As my centre is under attack, I should choose which capture is in my favour. I should opt for 1 2 dxc5 �xc5 1 3 e4. My pawn-structure is worse than Black's, but my two bishops (and especially the dark-squared one, which will be placed on e3), plus the semi-open b-file, will give me slightly better chances in the coming middlegame.
C: My thinking process should be exactly as Plan B , but I should choose the other capture. I should proceed with 1 2 dxe5, creating an unbalanced pawn-structure. Both sides would have a pawn-majority, each on a different side of the board, but I believe that mine (kingside) will prove more significant, as it can be activated far more easily. By pushing my e- and f-pawns and helped by my bishop-pair, I will ensure central control and attacking possibilities against the enemy king. So, I shall play 12 dxe5 �xe5 13 f3 4Jed5 14 �c 1 and so on.

30
Test 22
MODERN CHESS PLANNING
loa n n is Pa pa ioan nou - Efstratios G rivas lraklion 1 995
1 d4 tbf6 2 c4 g6 3 tbc3 iLg7 4 e4 d6 5 f3 a6 6 iLe 3 c6 7 iLd 3 b5 8 e5 tbfd7 9 f4 bx c4 10 iLx c4 tbb6 11 iLb 3 as 12 tbf3 0-0 13 0-0 iLa6 14 e6 f5 15 .l:!.el iLc4 16 tbg5 tba6 17 iLf2 iLxb 3 18 'iVxb 3 tbb4 19 'iVdl a4 20 g4 fxg4 2 1 tbf7 �e8 22 a 3 tb4d5 2 3 'ii'xg4 tbf6 24 'iVf3 (D)
Black to play
Judgement: White didn' t handle the opening correctly and has ended up in an unpleasant position with a lot of pawn weaknesses. His light squares will also eventually prove rather weak. So White correctly tried to play actively and generate an attack on the black king, as compensation for his structural disadvantages. On the other hand, Black has a pleasant advantage, in view of the above-mentioned factors . But he has to be on the alert, as his kingside seems to be a little bit cramped and he needs time to activate his pieces.
Planning: Choose one of the following three plans :
A : White's weaknesses can wait, while the f7-knight looks like a thorn in my side. The idea of sacrificing the exchange can prove quite .strong and sufficient for a healthy advantage. Thus I should prepare it, starting with 24 . . . tbbdS 2S fS .llxf7 26 exf7+ 'iVxf7 . My control over the whole board seems quite pleasant. A piece and a healthy pawn for a rook is not that high a price to pay.
B: Although White 's weaknesses seems to be numerous (b2, d4, f4, h2), only one of them is really important and accessible to my pieces. This is the pawn on f4, which in the meantime is ready to advance, creating attacking chances for White. So, I should first fix it and attack it, by means of 24 .. .l:taS . Then . .. .l:!.fS , . . . tbhS and . . . tbdS will follow, giving me a solid advantage.
c: Increasing control over the light squares and exchanging the strong f7-knight should be my main objectives. I should proceed with 24 . . . dS 2S fS tbc4 26 fxg6 hxg6 27 'iVg2 tbd6. Exchanges are in my favour, as they will eventually lead to an endgame that is good for me.

Test 23
TESTS
Konsta nti nos Prentos - Efstratios G rivas Greek Team Ch, Athens 1 996
31
1 e4 c5 2 liJf3 liJc6 3 d4 cxd4 4 liJxd4 'ili'b6 5 liJb 3 liJf6 6 liJc3 e6 7 .id 3 d6 8 0-0 a6 9 'it>hl .ie7 10 f4 'ili'c7 1 1 .id2 b5 12 'ili'f3 0-0 13 .l:.ae 1 (D)
Black to play
Judgement: This is a theoretical position in a variation of the 'Grivas Sicilian' , which is characterized by 4 . . . 'iIi'b6. An extremely complicated position has arisen, as is usual for this line, which requires, above al l , good calculation. White is ready to launch an attack on the kingside (and in the centre), but Black always seems to have adequate resources to retain the dynamic balance. Of course, finding the correct plan is more than a necessity ; it is absolutely the only way to survive!
Planning: Choose one of the following three plans:
A: The main factor in the position is White's intended activity on the kingside and in the centre. His d3-bishop might emerge as a very dangerous piece, as it is directed towards my king. So, the correct handling of this position requires my expansion on the other side of the board. I should proceed with 1 3 . . . b4 1 4 liJd l (or 1 4 liJe2) 1 4 . . . aS , preparing . . . a4 and . . . .ia6 to exchange off the dangerous white bishop. Then I think that I shall have created more than enough counterplay on the queenside, which shoul d be my main fiel d of action.
B : My main concern should be to complete my development and connect my rooks . So, I should play the natural 1 3 . . . .ib7 . White's best seems to be 1 4 'ili'h3, threatening I S eS . But then I can continue with the ' tactical ' 1 4 . . . l:tad8, defending against the threat ( I S eS dxeS 1 6 fxeS liJxeS 17 .if4 .id6 1 8 .ixeS .ixeS 1 9 l:txf6 l:txd3) and achieving an equal share of the chances after I S a4 b4 1 6 liJdl dS 17 eS liJe4, as already seen in many games.
C: I would agree with the thinking process of the previous plan, but instead of 14 . . . l:tad8 I prefer to defend against the deadly I S eS with 1 4 . . . g6. White can proceed I S eS ( I S fS is another possibility) I S . . . dxeS 1 6 fxeS liJd7 1 7 .if4 liJcxeS 1 8 'ili'g3 .id6 1 9 .ixbS axbS 20 liJxbS 'ili'b6 2 1 liJxd6 'ili'xd6 22 .ixeS , with an equal position.

32 MODERN CHESS PLANNING
Test 24
Efstratios G rivas - lIias Kou rkounakis Greek Team Ch, Athens 1996
1 d4 e6 2 liJf3 c5 3 g 3 liJf6 4 �g2 d5 5 c4 dx c4 6 'iVa4+ liJbd7 7 'iVx c4 a6 8 �c2 cxd4 9 liJxd4 �b4+ 10 �d2 "iie7 1 1 0-00-0 12 l:tdl liJb6 13 �xb4 �xb4 14 liJc3 liJc4 15 'iVb 3 'iVxb 3 16 axb 3 liJb6 17 b4 nb8 (D)
White to play
Judgement: A typical 'Catalan' middlegame has arisen. Black hasn' t handled the opening correctly, leaving White with the initiative and a slightly better position in general . The typical 'Catalan' monster (the g2-bishop) is again working full-time, controlling many squares on the long diagonal . White 's knights are well placed, his rook is already on dl and the other one is ready to work on the a-file. Although Black has fallen behind in development, his position does not have any real weaknesses, so White's advantage is not permanent and, with any (even minor) slip, it could disappear.
Planning: Choose one of the following three plans:
A : When all one's pieces are in good positions, it can sometimes be a problem, as they cannot be improved! But I think that my d4-knight is actually not very well placed, as it has no targets and also limits my dl -rook's activity on the d-file. So, I think that the manoeuvre liJb3-a5 would improve my position, as my knight will find a nice target on b7 and my d l -rook will be ready to invade Black's camp in the near future.
B: As my pieces are all on their best possible squares, I should improve my pawn-structure. I should proceed with 1 8 e4 e5 ( 1 8 . . . �d7 is out of the question due to 1 9 e5) 1 9 liJf5 �xf5 2 0 exf5 . Now my advantage is greater, as Black's rook is tied to the protection of the b-pawn, so I can calmly double rooks on the d-file.
c: It cannot be bad to blast open the a-file, where my rook already stands. With 18 b5 axb5 1 9 liJcxb5 ( 1 9 liJdxb5 �d7 2 0 liJd6 �c6) my position would further improve, a s my knight will land on the d6-square.

Test 2 5
TESTS
Efstratios G rivas - Angelos Vould is Greek rapid Ch, Athens 1 996
33
1 d4 liJf6 2 liJf3 g6 3 g 3 i..g7 4 i..g2 0-0 5 0-0 d6 6 a4 as 7 liJc3 d5 8 liJe5 c6 9 e4 dxe4 10 liJxe4 liJxe4 1 1 i..xe4 i..h 3 12 �el liJd7 13 liJxd7 'ii'xd7 14 i..e 3 �ad8 15 c3 i..g4 16 'ii'b 3 i..e6 17 'ii'c2 i..d5 18 i..xd5 cxd5 19 i..f4 �c8 (D)
White to play
Judgement: As a lot of pieces have been exchanged and no penn anent weakness has been established, it seems that Black has managed to equalize. On the other hand, Black no longer has the possibility of a minority attack on the queen side at his disposal, due to the fact that he has played . . . a5 . If the black a-pawn were on a7, then Black would have a strong and simple plan with . . . b6, . . . a6, . . . b5-b4, creating weaknesses in White 's camp. So, both sides are facing problems in finding an appropriate plan. But it seems that White has slightly greater freedom in finding play on either side of the board, and so he must hold a tiny plus.
Planning: Choose one of the following three plans:
A : I should concentrate on the centre, exchanging my 'bad' bishop (most of my pawns are on squares of the same colour as this piece) with 20 i..e5 i..xe5 (20 .. .f6 2 1 i..f4 creates weaknesses on the e-file) 2 11he5 e6 22 �ae l , intending h4-h5 . My advantage will be slight but stable, with practically with no risk involved.
B: I should find play on the queenside, where there are some fixed targets, such as the black pawns on a5 and b7 . Starting with 2()' 'ii'b3, I shall be able to regroup my forces with 'iV b6, �a3-b3 and, with the help of my very well placed f4-bishop (which controls the important b8- and c7-squares) I shall obtain excellent chances.
C: I should draw up a plan on the king side, playing 20 �d2 with ideas like i..h6, 'it>g2, h4-h5 and �h l . Black can do little to create counterplay, as a future advance with . . . b5 will only weaken his queen side, while I can easily defend mine with �e2. My kingside a ctivity will be more important than any Black can create.

34
Test 26
MODERN CHESS PLANNING
Ana r Al la hverd iev - Efstratios G rivas European Team Ch, Pula 1997
1 c4 g6 2 g 3 !iLg7 3 !iLg2 d6 4 lLlc3 e5 5 d3 C5 6 e 3 lLlC6 7 lLlge2 0-0 8 0-0 c6 9 b4 !iLe6 10 b5 d5 11 !iLa 3 �e8 12 �b 3 (D)
Black to play
Judgement: Here we � gaj n enter the game at a late opening phase. Both sides have tried to develop harmoniously, but with different ideas about their middlegame plans on their minds. White expects that his pressure on the queenside will prove effective, while Black is relying on his strong central pawns. Possibilities for retaining the equilibrium or gaining an advantage depend on the right choice of plan.
Planning: Choose one of the following three plans:
A: White's bishops are dominating a lot of squares. One of my ft rst intentions should be to restrain their power, by closing down the diagonals . I should start by restricting the g2-bishop with the natural 1 2 . . . e4. White has to clarify matters in the centre, so a response like 1 3 bxc6 bxc6 1 4 lLld4 ( 1 4 'iWb7 �d7 1 5 'iiY xa8 lLla6 1 6 'iVxe8+ �xe8 '+) 1 4 . . . dxc4 1 5 'ii'b7 lLlbd7 1 6 dxe4 fxe4 1 7 lLlxc6 �b6 1 8 .l::tabl looks reasonable and seems to offer equal chances i n a somewhat unclear position . As Black I can be happy with this outcome of the opening: I have at least neutralized White's standard tiny opening advantage.
B: I should retain the tension in the centre for as long as I can benefit from it. But I also think that I must take care of White 's threat of bxc6 and 'iiY b7. So, I need to get some breathing space on the queenside for my a8-rook. Therefore I would continue with 1 2 . . . a5 1 3 �ad l d4. My wellplaced pieces, along with my initiative in the centre, should give me a pleasant game.
C: I should not underestimate White's initiative on the queenside and I must first of all protect my weak spots (b7, c6 and d5) . If I can combine this kind of prophylaxis with active, positional or tactical threats, then my position should be quite acceptable. So, I should proceed with 1 2 . . . dxc4 1 3 dxc4 and now 1 3 . . . �c8 or 1 3 . . . e4 should retain the equilibrium.

Test 2 7
TESTS
Efstratios G rivas - Yu ri Pol uektov Limassol 1 997
35
1 d4 d5 2 c4 ttJ c6 3 cxd5 �xd5 4 e3 e5 5 ttJ c3 ii.b4 6 ii.d2 ii.x c3 7 bx c3 ttJge7 8 c4 'iVd6 9 d5 ttJd8 10 e4 c5 1 1 ttJe2 ii.d7 12 ttJg 3 g6 13 ii.d 3 f6 14 :bl h5 15 0-0 h4 16 ttJe2 g5 (D)
White to play
Judgement: Black chose an unusual opening set-up. He has decided to keep the position closed, neutralizing White's bishop-pair. He also has ideas like placing one of his knights on d6 and the other one on f4, which look very promising. Although White seems to be on top as he enjoys a well-protected passed pawn, the bishop-pair and a significant spatial advantage, there is the question of how to proceed.
Planning: Choose one of the following three plans:
A: As the kingside and the centre seem blocked, I should concentrate on the remaining flank. A continuation such as 1 7 ttJc3 a6 ( 1 7 . . . ttJg6 1 8 ttJb5 �b8 1 9 ii.e3 b6 20 ii.e2 ttJf4 2 1 ii.g4 ii.xg4 22 'iVxg4 a6 23 ttJc3 �d6 24 ttJa4 l:!.b8 25 :xb6 +-) 1 8 �b3 , with ideas like ii.e3 and ttJa4 to follow, should give me a clear advantage.
B: The semi-open b-file can and should be exploited. My rook is already placed on that file but of course I need more pieces transferred to that part of the board. I could also exchange the lightsquared bishops in order to weaken the light squares in Black's camp. A possible continuation could be 17 a4 ttJg6 1 8 a5 ttJf4 1 9 ii.c2 ttJxe2+ 20 �xe2 or 17 ii.c2 ttJg6 1 8 ii.a4, with a clear advantage in both lines.
c: My advantages are quite valuable and I should try to benefit from them in a direct way. A sacrifice like 1 7 f4 comes into consideration. After 1 7 . . . gxf4 1 8 ttJxf4 exf4 1 9 ii.xf4 'iVa6 20 e5 my bishops come to life, my passed pawn is ready to advance and the black king will come under fire . Of course I shall be a piece down, but all my remaining pieces will be active and ready to exploit the presence of the opponent's king in the centre. In view of the above, I think my compensation will be more than fine.

36
Test 28
MODERN CHESS PLANNING
Efstratios G rivas - Ni kolaos Gavri la kis Greek Ch, Athens 1 997
1 c4 e5 2 tiJc3 tiJc6 3 tiJf3 tiJf6 4 g3 g6 5 i.g2 i.g7 6 0-0 0-0 7 d4 exd4 8 tiJxd4 l:te8 9 tiJx c6 bx c6 10 'ilia4 a5 ll l:tdl 'ilie7 12 i.f4 l:ta7 13 a 3 'ilic5 14 l:td 3 tiJg4 15 l:tfl i.x c3 16 l:tx c3 l:txe2 17 l:tc2 l:te8 18 h 3 tiJf6 19 i.e 3 l:txe 3 20 fxe 3 'ilixe 3+ 2 1 �h2 tiJh5 22 l:tf3 'ilie5 (D)
White to play
Judgement: White has won the exchange for two pawns, resulting in approximate material equality. Black's poorly placed and uncoordinated pieces constitute his main problem. His rook and bishop are out of play, at least temporarily, and this fact might prove costly. On the other hand, White cannot hope to benefit from this in a potential endgame unless he can improve the coordination of his own pieces. So, it is important to coordinate and direct his pieces towards some specific target.
Planning: Choose one of the following three plans:
A: I should use the open b- and e- files to penetrate my opponent's camp. As his king is relatively unprotected, I shall have good chances to create mating threats . So, I shall start with 23 'ilib3, threatening 24 'iVbS. After the forced 23 . . . l:taS I can continue 24 l:te3 'ilif6 25 l:teS+ �g7 26 'ilVe3 , intending l:tf2, with a clear plus.
B: As in Plan A, I should penetrate my opponent's camp. But I think it is better to do it with 23 l:tcc3, intending l:tfe3. I can also transfer my queen to the kingside by means of c5 and 'iih4. This must give me a strong attack and I feel confident that it will be decisive.
c: I do not think that I can attack the black king, as my forces do not seem to be adequate in number and sufficiently well placed for that purpose. I think it would be better to add another small plus to my overall advantage, that of a passed pawn. This can be created with 23 b4 followed by c5 and bxa5 . This will be enough for a slow but sure win, as Black is lacking serious counterplay.

Test 29
TESTS
Efstratios G rivas - H ristos Bousios Gre�k Ch, Athens 1 997
3 7
1 d4 tZJf6 2 c4 d6 3 tZJc3 e5 4 tZJf3 exd4 5 tZJxd4 �d7 6 g 3 tZJc6 7 �g2 �e7 8 0-0 0-0 9 b 3 �c8 10 �el tZJxd4 1 1 �xd4 �c6 12 e4 tZJd7 13 �b2 �f6 14 �d2 �e8 15 �adl a5 16 f4 �x c3 17 �x c3 f6 (D)
White to play
Judgement: White's advantage is undisputed. He possesses the bishop-pair, a strong centre and a valuable spatial advantage. On the other hand Black's pieces are squeezed into his first three ranks, unable to create any active play. But although Black has a passive position, it is a tough nut to crack. Long manoeuvres with specific ideas are the way to exploit the advantage.
Planning: Choose one of the following three plans:
A: As in most similar cases, it is important to seize even more space, squeezing the opponent further. I should carry out a quick advance with a3 and b4, gaining control over the c5-square (denying it to Black's d7-knight) and then, at the appropriate moment, proceed with c5 or g4-g5 in order to give my b2-bishop maximum power.
B: I should always keep in mind that a successful e5 advance, opening up the position and releasing the power of the b2-bishop, will be in my favour. So, first of all I should reinforce my control of that critical square, by doubling rooks on the e-file. Then, slowly but surely, I would take control of c5 (by a3 and b4), further restraining the passive d7-knight, and, as a third step, I shall try to advance my kingside pawns (g4, h4 and g5), preparing the final attack against the black king.
c: My position looks quite strong and Black's pieces are not well coordinated. I think that I should seek a more complicated battle, starting with the 1 8 c5 advance/sacrifice. Black is forced to accept it with 1 8 . . . dxc5 (as 1 8 . . . tZJxc5 1 9 e5 fxe5 { 1 9 . . . �xg2 20 exf6 �e4 2 1 f7+ } 20 �xc6 bxc6 21 fxe5 looks more than good for me) but then I can play 19 �h3 with various threats, such as �c4+ and �f7, or �d3/d2, or just the thematic advance e5 .

38 MODERN CHESS PlANNING
Test 30
Sasa Vel ickovic - Efstratios G rivas Athens 1 998
1 e4 c5 2 lDc3 lDc6 3 lDge2 d6 4 g 3 g6 5 d4 .tg4 6 dx c5 dx c5 7 'fj'xd S+ .l:!.xd S S .te 3 .tf3 9 .l:!.gl lDf6 10 .tg2 .txg2 1l .l:!.xg2 b6 12 .l:!.dl .l:!.xdl + 13 �xdl .tg7 14 f3 lDd7 15 f4 0-0 16 �cl .l:!.d S I7 .l:!.gl (D)
Black to play
Judgement: White was not in an ambitious mood and chose a rather dull opening, trying just to retain the equilibrium. Consequently, it was an easy task for Black to obtain at least an equal position . However, since White has neither created any weaknesses in his pawn-structure nor misplaced any of his pieces, it is rather difficult for Black to drum up some kind of initiative or any strong positional threats.
Planning: Choose one of the following three plans :
A: Creating winning chances is not easily accomplished. But I think with l 7 . . . .td4 I should be able to improve my position, as White will be forced to exchange bishops with 1 8 .txd4 ( 1 8 �d2 lDf6 cannot be recommended to White) 1 8 . . . cxd4 1 9 lDd l . Then I can continue with 19 . . . e5 and later . . . lDc5 . My pawn-structure has been improved and my knight has found a strong base on c5, as it is not easy for White to play b4; it would create weaknesses in his queen side pawn-structure.
B: It's quite important to find an appropriate square for my d7-knight. I think that the solution should revolve around the important d4-square, so I would continue with 17 . . . lDd4 1 8 .l:!.d l lDb8 1 9 e5 lDbc6. Then my knights will b e very well placed, protecting each other. I can also break u p the centre with .. .f6 Iater. Although the position remains tough, I am on the right path and I feel that my initiative will grow.
c: I think that my position will not improve if I just manoeuvre quietly. I 'd rather improve their placement and attack White's centre with 1 7 . . . lDf6 1 8 h3 e5 . White must play 1 9 f5 lDd4 20 fxg6 lDxe2+ 2 1 lDxe2 lDxe4 22 gxf7+ �xf7 23 g4 and this should give me some initiative, as the unbalanced pawn-structure helps me in my winning efforts .

Test 3 1
TESTS
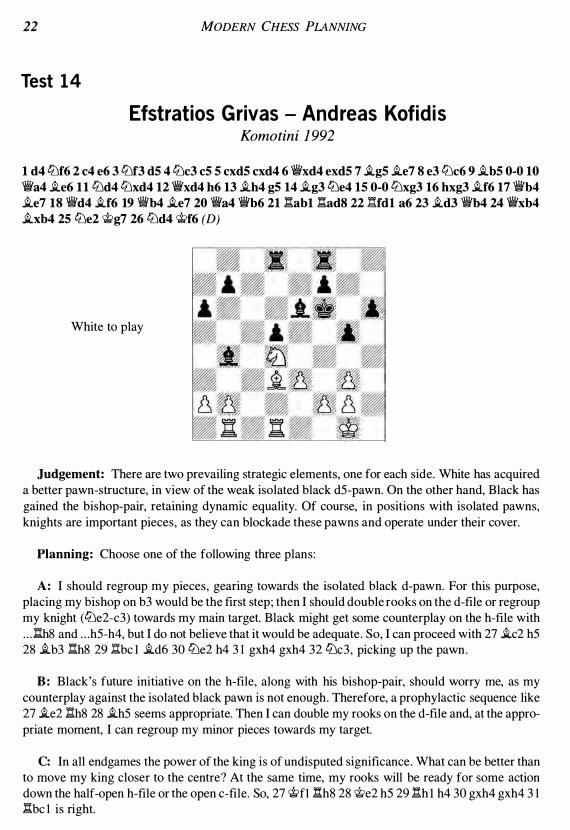
Ena m u l Hossa i n - Efstratios G rivas Olympiad, Elista 1998
1 e4 c5 2 ttJ f3 ttJ c6 3 ttJ c3 e5 4 iLc4 d6 5 d 3 iLe7 6 ttJd2 ttJ f6 7 h 3 iLe6 8 ttJn (D)
Black to play
39
Judgement: Although it's quite early to give a clear positional assessment, as both sides have hardly completed their development, there are some factors that cannot be ignored. Black has voluntarily accepted a weak square on d5 but it is not easy for White to benefit from it. The manoeuvre ttJd2-fl -e3, aimed directly at this square, loses valuable time, especially connected with the prophylactic h3. Pawn moves in the opening are very important and often leave their mark on the subsequent middlegame play and strategy. The position should offer equal chances in a complex middlegame, and the discovery of the most appropriate plan is necessary.
Planning: Choose one of the following three plans:
A: I should benefit from the loss of time involved in the ttJd2-fl -e3 manoeuvre. Therefore, I should open up the position as quickly as possible, continuing with 8 . . . d5 . After the exchanges that might occur on this square, I shall have rid myself of the square's weakness, and will have gained more space in the centre. By completing my development ( . . . 0-0 and bringing my rooks to the centre) my position will be more than fine.
B: I should proceed with my usual plan in this type of position, castling and then exchanging the dark-squared bishop with . . . ttJd7-b6 and . . . iLg5 . White would control the d5-square but this is not so serious . After some exchanges, my position will be solid enough.
c: As in Plan B , I would also choose a harmonious development, castling immediately and then proceeding to create counterplay on the queenside with .. JIb8, . . . a6 and . . . ttJd4, aiming basically for the . . . b5 advance. This will provide more space on the queenside, which will serve as compensation for the weakness of the d5-square. The plan with . . . ttJd7-b6 and . . . iLg5 will always be kept in mind.

40 MODERN CHESS PLANNING
Test 32
Efstratios G rivas - Vad i m Chernov Olympiad, Elista 1 998
1 d4 lbf6 2 c4 d6 3 lbc3 lbbd 7 4 e4 eS S ds lbcs 6 f3 as 7 i.e 3 i.e 7 8 'it'd2 0-0 9 lbge2 lbe8 10 lbc1 fS ll ex fS i.x fS 12 lbb 3 b6 13 lbx cs bx cS 14 i.d 3 i.h4+ IS g 3 i.xd 3 16 'it'xd 3 i.gS 17 0-0 i.xe 3+ 18 'it'xe 3 a4 19 1:4ael lbf6 20 'it'd 3 'it'd 7 2 1 'ii'c2 1:4tb8 22 1:4e2 1:4b4 2 3 lbe4 'it'fS 24 lbx f6+ 'it'x f6 2S f4 1:4f8 26 :UT2 'it'fS 2 7 fxeS 'it'x c2 28 1:4x c2 dxeS 2 9 :fe2 1:4fS 30 1:4ed2 1:4f6 31 1:4e2 1:4fS 32 :e 3 �f7 (D)
White to play
Judgement: The weaknesses in Black's pawn-structure (a4, c7, c5 and e5) appear - and are serious . As a result, White has the advantage. However, the problem of converting this advantage into victory remains complicated, as Black seems able to defend, as these weaknesses are not accessible to the white rooks .
Planning: Choose one of the following three plans :
A : I think that it is important to exchange one pair of rooks, as this will enable my king to be centralized. The procedure should be something like 33 �g2 �f6 34 1:4B 1:4xB 35 �xf3 �f5 36 g4+ �g5 37 �g3 h6 38 h4+ �f6 39 �f3 �e7 40 �e4 �d6, and now, with 41 �f5 I shall be able to exploit Black's pawn weaknesses.
B: I think that my rooks are rather passive and I cannot immediately attack Black' s pawn weaknesses in a useful manner. Therefore, I must use a logical but extraordinary idea: voluntarily relieving Black of an inaccessible weakness (a4) to enable my rooks to attack the others (c7, c5 and e5). After 33 b3 axb3 (33 . . . a3 34 1:4f2 �f6 35 g4 1:4xf2 36 �xf2) 34 axb3 I can continue with 35 1:4a2 and l:ta5 .
c: As my c2-rook is tied down to the protection of my pawns on c4 and b2, I should lighten its burden with 33 a3 . After 33 . . . 1:4b6 (33 . . . 1:4b3 34 1:4xb3 axb3 35 l:tc3) 34 l:tce2 �f6 35 �g2 I can try various ideas, such as exchanging a pair of rooks and activating my kingside pawns with g4 and h4. There is nothing forced, but I feel that my advantage will tell in the long run.

Test 33
TESTS
Efstratios G rivas - H risa nthos Pou ntzas Kalavrita 1 998
41
1 d4 liJf6 2 c4 e6 3 liJf3 cS 4 g 3 cxd4 S liJxd4 liJc6 6 i.g2 i.cs 7 liJb 3 i.e7 8 liJc3 d6 9 0-0 i.d7 10 i.f4 1\Vb8 (D)
White to play
Judgement: Black's opening play was not really up to par and he now seems to face grave problems . His light-squared bishop is not well developed (it should be placed on the long diagonal), his c6-knight should be on d7 and the bS-square is not (yet) covered with . . . a6. In sharp contrast, White has a menacing lead in development and much better placed pieces . Of course, all these privileges White enjoys are temporary advantages and can easily evaporate if not properly handled. So, true enough, White has the advantage, but only the right plan would confirm this and allow him to benefit from it.
Planning: Choose one of the following three plans :
A: Activity and initiative should be my main concern. As the d6-pawn seems to be quite weak, I should focus my efforts on that. I should proceed with l l liJbS . Black is limited to two answers : 1 1 . . .liJeS 1 2 liJaS i.xbS 1 3 cxbS dS 1 4 liJxb7 'iVxb7 I S i.xeS 1\VxbS 1 6 e4, or l 1 . . .eS 1 2 i.gS liJg8 ( 1 2 . . . a6 13 i.xf6 gxf6 1 4 liJc3 ±) 1 3 i.xe7 �xe7 14 'iVd2 a6 I S liJc3 . In both cases White should feel more than happy.
B: As I feel that there is nothing forced, I should strengthen my position further and gain more space with 1 1 e4. A possible continuation is 1 1 . . .0-0 1 2 \\Ve2 h6 1 3 �fd l �d8 14 �d2, doubling rooks on the d-file. Black cannot easily play . . . a6, as then liJa4 is strong. I believe that my advantage has increased.
c: To benefit from my advantages I should open up the position. This is best done with 1 1 cS . True, Black will get rid of one of his headaches, the d6-pawn, but this would hardly be an achievement, as my pieces could then plunder his suspicious position. Black should react with 1 1 . . .eS ( l 1 . . .liJeS 1 2 liJaS i.c8 1 3 i.xeS dxeS 14 c6) 1 2 cxd6 i.xd6 1 3 i.gS , but then I should be on top.

42
Test 34
MODERN CHESS PLANNING
Efstratios G rivas - Spyridon Ka pn is is Athens 1 999
1 d4 dS 2 c4 c6 3 lDc3 lDf6 4 e 3 e6 S lDf3 lDbd7 6 �c2 jLd6 7 a 3 0-0 8 jLd2 �e7 9 l:tdl a6 10 jLd 3 eS 1 1 dxeS lDxeS 12 lDxeS �xeS 13 cxdS cxdS (D)
White to play
Judgement: This is a typical position with an isolated queen's pawn. Black has accepted this potential endgame weakness, but as compensation he has achieved excellent piece development and generally must be satisfied with his middlegame possibilities . Well, from all the above we might think that White is in trouble! This is not true, as White has acquired an important target (the d5-pawn) and adequate development. But he has still to deal with the possible advance . . . d4 and in general seek exchanges.
Planning: Choose one of the following three plans:
A : It seems to be the best time for me to regroup my pieces, gaining control over important squares and diagonals . This is best done with 1 4 lDe2, preparing jLc3 and lDg3 . This manoeuvre does not only stop a potential . . . d4 advance, but also offers my pieces their best placement.
B: I think that my pieces are standing well and my main problem is to place my king in a safe location. At the same time I should be on the alert and not allow Black to achieve the . . . d4 advance, as then my advantage would evaporate. My idea should be to transfer my queen to the kingside, where it will protect my king and at the same make attacking gestures towards the black one. Therefore, I should play 1 4 �a4 and �h4.
C: As Black's pieces are well developed, I think that I should not have any real advantage. Moreover, concern for my king's safety should be a priority. To solve this problem I should continue with 14 f4 �e7 1 5 0-0, retaining equality. If Black plays 1 5 . . . jLc5 1 6 l:tde l jLd7 1 7 �h l I have no reason to complain.

Test 3 5
TESTS
Efstratios G rivas - Athanasios Ka rayia n n is Greek Team Ch, Kavala 1999
43
1 d4 d5 2 c4 tbc6 3 cxd5 �xd5 4 e 3 e5 5 tbc3 �b4 6 �d2 �x c3 7 bx c3 exd4 8 cxd4 tbf6 9 tbf3 0-0 10 �e2 tbe4 11 0-0 as 12 'iVc2 tbd6 13 l:Ifc1 h6 14 �el �d7 15 �b2 l:Ifc8 16 l:Ic5 'ilVe4 17 l:Ia cl 'tie8 18 tbe5 a4 19 tbx c6 a 3 20 'iVb4 bx c6 2 1 .ti.a5 tbb5 22 l:txa8 l:txa8 (D)
White to play
Judgement: White 's position is clearly preferable . The advantages of the bishop-pair and the better pawn-structure (the black pawns on c7, c6 and a3 are isolated and weak) give him good winning chances, in the near or distant future. In such positions, the side with the advantage usually has at his disposal more than one reasonable plan, and more than one pleasant move at each turn. A serious chess-player must nearly always choose the safest and most appropriate plan to crown his efforts .
Planning: Choose one of the following three plans:
A: The black c-pawns are weak but I am not sure that I shall be able to attack them effectively. I think I can transform my advantage into something completely different with the help of 23 d5 cxd5 24 �xb5 �x.b5 25 l:Ixc7, when I have a rook on the 7th rank and chances to create an attack aided by the opposite-coloured bishops with 'ilVd4 and �c3 .
B: I think that I should take the pawn offered with the simple 23 �xb5 cxb5 (23 . . . l:tb8 24 'ilVxa3) 24 J::!.xc7. I am one pawn up, my rook is well placed on the 7th rank and my d-pawn is already passed. These advantages should be enough to score the full point sooner or later.
C: My advantages are of a permanent nature and should remain so! I should not be in a hurry to win material, but first reinforce my position . A plan like �c5, �f3 and �b4 creates many problems for Black, who must then look out for the d5 advance at each turn.

44
Test 3 6
MODERN CHESS PLANNING
Artu r Yusu pov - Efstratios G rivas Greece vs Germany, Corfu 1 999
1 d4 4Jf6 2 4Jf3 g6 3 c4 i..g7 4 g 3 0-0 5 i..g 2 d6 6 0-0 4Jc6 7 d5 4Ja5 8 4Jbd 2 b5 9 cxb5 4Jxd5 10 �bl c5 1 1 bx c6 4Jx c6 12 4Jb 3 4Jb6 13 4Jfd4 4Jxd4 14 4Jxd4 d5 15 a4 (D)
Black to play
Judgement: Black's opening experiment seems to be a success, as he has obtained good pawn control over the centre and has developed without much trouble. That's a fair achievement in a game against a much stronger opponent, but it still can prove pointless if Black does not continue in appropriate fashion. White is trying to become active on the queenside ( I S a4) , as there is little point in him playing in the other two sectors of the board, which are Black's natural territory to develop his own plans.
Planning: Choose one of the following three plans:
A : White's threat is 16 as and 17 4Jc6, which will win material (my dS-pawn). I think I should strengthen my centre with I S . . . e6, which looks like a very natural reaction to White 's threat. Play can go on with 1 6 b3 ( 1 6 as 4Jc4) 1 6 . . . aS and I am ready for . . . i..b7 and . . . �c8, with at least equality.
B: I see the threat described in Plan A, but I think it is better to advance my e-pawn to eS, setting up a powerful centre. Alas, this cannot be done immediately : IS . . . eS 1 6 4Jb3 ( 1 6 4Jc6 "VJiic7 17 as 'ii'xc6 . 1 8 axb6 "VJiixb6 1 9 "VJiixdS =) 1 6 . . . i..e6 1 7 4JcS and White gains the bishop-pair, while IS . . . i..b7 1 6 as 4Jc8 17 a6 would be even worse. Instead, IS . . . �d7 should be the first step. The im-portant c6-square is sufficiently covered and I am ready for . . . eS and a later . . . i..b7. This idea will allow me to play for more than the half-point.
c: Stopping White's activity on the queenside should be my main concern. The natural reply I S . . . aS wouldn' t do any harm to my future plans, which consist of central occupation with . . . eS . I am not afraid of 1 6 4Jc6 "fkc7 1 7 i..xdS 4JxdS 1 8 'iVxdS i..b7 and the weak bS-square can be controlled by my c8-bishop.

Test 3 7
TESTS
Iva n Iva n isevic - Efstratios G rivas Khania 2000
45
1 d4 liJf6 2 c4 g6 3 liJc3 i..g7 4 e4 d6 S h 3 0-0 6 i..gS liJa6 7 i..d 3 eS S liJf3 exd4 9 liJxd4 liJcS 10 0-0 h6 11 i..c1 l1e S 12 11el c6 13 i..c2 dS 14 cxdS cxdS IS eS liJfe4 16 f3 liJx c3 17 bx c3 11xeS I S l1xeS i..xeS 19 i..xh6 'it'h4 20 'iVd2 ( D)
Black to play
Judgement: Black had an easy time in the opening, as White 's play was hardly annoying. As a result, he has achieved at least equal chances in a complex middlegame. White is weak on the kingside dark squares, his c3-pawn is not something to be proud of, and his c2-bishop lacks a future. Of course, Black's position also has some defects, such as his isolated d5-pawn (although this should hardly be called a 'weakness ' ) , but overall he should feel quite happy with his position.
Planning: Choose one of the following three plans:
A: I should immediately take advantage of the weak dark squares around the white king. Combining my queen and bishops by 20 .. .'iIVg3 2 1 i..e3 �h2+ 22 'it>f1 b6, with . . . i..a6+ to come, gives me an excellent attacking position, in which my chances are certainly much better than White 's .
B: I think I shouldn' t overestimate my position. Natural development with 20 . . . i..d7 21 i..g5 'iVh5 22 i..b3 i..c6 will result in an unclear position with equal chances. I should be satisfied with this, as I have succeeded in equalizing with the black pieces. That should the first step in the normal course of events.
c: I think that my position should offer me good possibilities of grabbing the initiative . First of all, I should decide on where to place my pieces . I think that my c5-knight, although excellently placed at first sight, is too far away from the weak white kingside and also blocks the c-file, where White's weak c3-pawn is situated. Improving that piece with 20 . . . liJe6 2 1 i..e3 liJf4 is an important first step. Then I can calmly bring the rest of my pieces into battle ( . . . i..d7, . . . l1c8) .

46
Test 38
MODERN CHESS PLANNING
Efstratios G rivas - Georgios Mastrokou kos Greek Team Ch, Athens 2001
1 d4 lLlf6 2 c4 g6 3 lLlc3 i.g7 4 e4 d6 5 lLlf3 0-0 6 h 3 e5 7 dxe5 dxe5 8 'iixd8 nxd8 9 i.g5 ne8 10 lLld5 lLlxd5 1 1 cxd5 c6 12 i.c4 cxd5 13 i.xd5 lLlc6 14 'It>e2 lLlb4 15 i.c4 i.e6 16 nh c1 lLlc6 17 i.e 3 f6 18 lLld2 �f7 19 i.b5 �e c8 20 i.x c6 nx c6 2 1 nx c6 bx c6 22 b 3 as 2 3 nc1 na6 24 a4 i.f8 25 lLlc4 l:ta8 26 i.d2 i.x c4+ 27 nx c4 na6 28 �d 3 �e6 2 9 nc2 i.d6 30 �c4 f5 31 f3 na7 (D)
White to play
Judgement: White's superiority seems unquestionable: he has the better pawn-structure, as the black pawns on a5 and c6 are isolated and weak; the white bishop is clearly stronger than its black counterpart, as it has ready-made targets (a5 and e5) ; the white king is also better placed. Still, the problem of converting the positional advantage to material gain remains. Which plan should (and can) White follow?
Planning: Choose one of the following three plans:
A : I should try to open a second front, in order to invade with my rook into Black's camp. This can only be done on the kingside, so I shall start with 32 h4, planning h5 and nc 1 -h I . If Black tries 32" .h5 then I can prepare the g4 advance with l:tc 1 -g 1 , exf5+ and g4.
B: My bishop needs a second target to operate successfully. This can only be Black's e5-pawn. So, I shall proceed with 32 exf5+ gxf5 33 g4, planning i.c3 and ne2, threatening among others i.xe5 and f4. The principle of two weaknesses will be my guide.
c: Although it seems strange at first, I must exchange the bishops and the black a-pawn, thus relinquishing two of my main advantages! But what will I gain in exchange for this concession? After these exchanges a rook ending will arise, where my outside passed a-pawn, with my rook correctly placed (behind the pawn) and the king ready to invade the enemy camp, will soon bring victory. So, I shall proceed with 32 na2 �d7 33 i.c3 �e6 34 b4, transforming my advantage.

Test 39
TESTS
Efstratios G rivas - Ni kolaos Ska l kotas Greek Team Ch, Athens 2001
4 7
1 d4 e6 2 liJf3 cS 3 g 3 b S 4 .i.g2 .i.b7 S 0-0 �b6 6 c3 liJf6 7 .i.gS liJe4 8 .i.e 3 liJa6 9 liJbd2 l:tc8 10 a4 liJxd2 1 1 1fVxd2 b4 12 l:tfdl dS (D)
White to play
Judgement: White has already completed his development and must think about his future plans. Black's expansion on the queenside seems menacing, although his pieces are not that well placed (the knight on a6 and bishop on b7). Of course, Black has to take care with his further development. Until that is completed, White seems to be in the driving seat, as he has the move and at least two tempi that Black will require. White must find the right plan if he wants to establish his advantage.
Planning: Choose one of the following three plans :
A: Black has fallen behind in development, as he gave a higher priority to quick queenside activity. I cannot say that my pieces are excellently placed, but, in order to benefit from all the above, I should open up the centre, taking advantage of the two moves (at least) that Black needs to complete his development ( ... .i.e7/d6 and ... 0-0) . 1 3 c4 is a good idea, clearing away all the central pawns at some point and thus reinforcing the power of the 'buried' g2-bishop. As Black cannot continue with 1 3 ... dxc4 14 dxc5 .i.xc5 1 5 �d7+ 'it>f8 1 6 liJe5 , I am sure that my position should be preferable.
B: I think that I should be active on the queenside and try to open some files there. In this case I could benefit from the badly placed black pieces. So, 1 3 a5 �b5 1 4 dxc5 .i.xc5 1 5 .i.xc5 �xc5 1 6 l:tdc l 0-0 1 7 liJe5 should give me the advantage, as my pieces are better placed and create threats ( 1 8 liJd7).
c: I have noticed that Black's kingside is lacking pieces, as nearly all of them are placed on the queenside. Thus, an expansion on the kingside seems to be the right policy, starting with 1 3 liJe5 c4 14 f4 f6 1 5 liJf3 .i.d6 1 6 g4. Then, by intending g5 , gxf6, 'it>h l and Itg l , I shall enjoy a pleasant initiative on the kingside and particularly against the black king.

48 MODERN CHESS PLANNING
Test 40
Peter Meister - Efstratios G rivas 2nd Bundesliga 200112
1 d4 lDf6 2 c4 g6 3 lDc3 i..g7 4 e4 d6 S f3 a6 6 i..e 3 c6 7 i..d 3 bS 8 lDge2 lDbd7 9 b 3 0-0 10 �d2 bx c4 1 1 bx c4 cS 12 0-0 cxd4 13 lDxd4 lDeS 14 i..e2 i..d7 Is lDdS lDc6 16 .l:tabl lDxd4 17 i..xd4 lDxdS 18 i..xg7 cJi;xg7 19 cxdS Wlc7 20 �d4+ f6 2 1 :fcl �a7 22 �xa7 .l:txa7 2 3 .l:tb6 (D)
Black to play
Judgement: A very interesting position, which at first glance seems to be favourable for White, due to his possession of the only open files (b- and c-). However, the battlefield is not restricted to the open files, but also includes the part of the board where Black has a natural pawn-break, i .e . . . . fS . But first of all, Black should deal with White 's threat to the a6-pawn. The chosen defence must be in accordance with his future plans and ideas in general. It should be mentioned that this position, without the bishops and Black's a-pawn, greatly resembles a drawish endgame typical of the Benko Gambit.
Planning: Choose one of the following three plans:
A : I think it is quite important to exchange one pair of rooks, in order to relieve White's pressure on the queenside. A line like 23 . . . .l:tc8 24 .l:txc8 i..xc8 2S a4 fS does not look bad, especially since I shall have succeeded in playing the important . . . fS advance. Then I shall move my king closer to the centre ( . . . cJi;f6-eS), with sufficient counterplay to keep the equilibrium.
B: I think I should not advance my a-pawn too far, and neither should I exchange a pair of rooks . Instead, it wouldn' t be bad to exchange the bishops with 23 . . . i..bS . White has a lot of options: 24 i..xbS axbS 2S .l:tc2 .l:tfa8 26 .l:txbS .l:txa2 = , 24 cJi;f2 fS 2S cJi;e3 co , 24 i..d l or 24 .l:tc2, but I believe that I can solve my problems in all cases.
C: I think I need both my rooks in play. One of them (the a7-rook) will defend and the other will operate down the f-file, which is about to be opened. So, I shall proceed 23 . .. aS 24 i..bS i..xbS 2S .l:txbS fS 26 a4 fxe4 27 fxe4 .l:tf4 28 �c4 cJi;f6, probably with roughly equal chances in an endgame that is difficult to evaluate.

Test 4 1
TESTS
Vad i m M i lov - Efstratios G rivas Rethymnon (rapid) 2002
49
1 d4 liJf6 2 c4 g6 3 liJc3 i.g7 4 e4 d6 5 i.e2 0-0 6 i.g5 liJa6 7 liJf3 e5 80-0 h6 9 i.e 3 �e8 10 dxe5 dxe5 1 1 liJd2 b6 12 �bl c6 13 b4 liJc7 14 c5 b5 15 a4 a6 16 .l:tal i.e6 17 �c2 �e7 18 h 3 h5 19 l:ta 3 a5 20 liJa2 i.xa2 2 1 �xa2 liJa6 22 �aal liJxb4 2 3 �b 3 .l:tfb8 24 �fcl bxa4 25 �xa4 �h7 26 �a 3 liJd7 27 liJc4 (D)
Black to play
Judgement: Black has won the a-pawn thanks to some fine play in the opening and a little help from his opponent! But White has reacted quite well after this unfortunate moment (losing the pawn) and has created dangerous counterplay, mainly on the queenside. His compensation also consists of the bishop-pair and some weak squares in Black's camp, notably d6 and b6. Also, the b4-knight seems to lack targets . Black should be careful not to find himself on the losing end.
Planning: Choose one of the following three plans:
A: As one of White 's advantages is the bishop-pair, I should seek an exchange with 27 . . . i.h6. True, I am returning my extra material after 28 i.xh6 �xh6 29 liJxa5 (29 �e3+ �g5 is fine for Black), but I think that after 29 . . . �a7 (doubling on the a-file) 30 �e3+ �g7 I shall have achieved a fine position.
B: My main concern should be to keep my extra material ; otherwise White will just stand better. Thus, a move like 27 . . . �d8 is essential . White can then play 28 liJb6 liJxb6 29 cxb6, but after 29 . . . i.f8 I should feel OK. White cannot regain the pawn with 28 liJxa5 , as he will not be able to unpin his knight.
C: White's initiative is really dangerous, but I think I can neutralize it with an exchange sacrifice. This can be effected by 27 . . . liJxc5 28 liJb6 (28 liJxa5 �xa5 29 �xa5 liJb3) 28 . . . liJe6 29 liJxa8 .l:txa8 . As compensation for the exchange, I shall have two passed pawns, plus the excellent d4-outpost for my knight. The fact that my pieces will come to life is even more important.

50
Test 42
MODERN CHESS PLANNING
Boris Avru kh - Efstratios G rivas Nikea 2003
1 d4 tDf6 2 e4 g6 3 tDe3 i..g7 4 e4 d6 5 tDf3 0-0 6 i..e2 e5 7 i..e 3 'V/!Ie7 8 dxe5 dxe5 9 tDd5 tDxd5 10 exd5 e6 1 1 d6 'V/!Id7 12 h4 b6 13 h5 i..a6 14 hxg6 hxg6 15 i..h6 i..xe2 16 i..xg7 �xg7 17 'iVd2 i..x f3 18 'iWh6+ �f6 19 'tlVx fS i..xe4 20 0-0-0 cS 2 1 l:th7 tDa6 22 'iWh6 'iW f5 2 3 f3 i..e6 24 'iVh4 + 'V/!Ig5+ 25 'V/!Ixg5+ �xg5 26 l:tx f7 l:td8 27 g 3 tDb4 28 a 3 tDd5 2 9 l:tel l:txd6 30 l:txe5+ �h6 31 1ha7 tDf6 32 g4 tDd7 33 l:te7 �g5 34 l:te7 �f6 35 l:te 3 tDe5 36 l:te8 (D)
Black to play
Judgement: After quite an interesting rniddlegame, where White lost his way in the jungle of various pleasant possibilities at his disposal, an'endgame has been reached. Black obviously holds the advantage, mainly on pure materialistic reasons: two active pieces for a rook and a pawn. Of course, there is always the problem of how to proceed - how to cash in the point. We often find that not all roads lead to Rome. Maybe some of them are shorter than others, while some may even lead in the wrong direction entirely.
Planning: Choose one of the following three plans:
A: I think it would be nice to 'balance' the material with 36 . . . tDxf3 37 l:txc6 l:txc6 38 l:txf3+ �gS . This balance concerns only the arithmetic value of the material, as the quality of my remaining pieces is much higher than White's . Soon my opponent's g-pawn will fall and I shall win the endgame.
B: White's king side pawns must be my target. So, first of all I should blockade them with 36 . . . gS . I think that White has nothing better than 37 �f8+ �g7 38 l:tfS tDf7 39 l:te7 l:tf6 40 l:te3 �g6, which should enable me to win without many problems.
c: I do not need to give back my extra material or blockade any pawns . I shall just defend against my opponent's annoying checks with the simple 36 . . . tDf7 37 f4 i..dS 38 l:tf8 c4. If now White goes 39 gS+ �fS 40 l:te7 �xf4 4 1 l:texf7+ i..xf7 42 l:txf7+ �xgS 43 l:tc7 �fS 44 l:txc4 gS, the resulting rook endgame should be winning.

Test 43
TESTS
Efstratios G rivas - U lf Andersson Internet (ICC blitz) 2004
51
1 d4 d5 2 c4 dx c4 3 lbf3 lbf6 4 e 3 e6 5 i.x c4 a6 6 0-0 cS 7 a 3 b5 8 i.a2 i.b7 9 �e2 cxd4 10 �dl lbc6 1 1 exd4 i.e7 12 lbc3 0-0 13 d5 exd5 14 lbxd5 lbxd5 15 i.xd5 'iIIc7 16 i.e 3 �a c8 17 �a c1 'iIIb8 18 b4 lbd8 19 i.a7 'fIxa7 20 Wixe7 Wib8 2 1 �x c8 Wlx c8 22 i.xb7 lbxb7 (D)
White to play
Judgement: White has emerged from the opening with a clear advantage. This advantage, although obvious, is based on concrete strategic elements. White 's queen has already invaded Black's camp, his rook is ready to help the queen and his knight can also prove dangerous . Black's knight is in a terrible situation and is his main headache. If, for example, it were standing on f6, then Black wouldn' t be so badly off. But this is not yet so, and it is up to White to find the way to convert his advantage into something more concrete, viz. material gain (23 Wid7 Wixd7 24 �xd7 �d8 25 lbe5 f6 = does not work) .
Planning: Choose one of the following three plans:
A: I think I should invade immediately with my rook on the 7th rank. After 23 �d7 lbd8 (23 . . . Wic 1 + 24 lbe l ) 24 �c7 Wif5 25 h3 lbe6 26 �a7 I shall be ready to win material, as my combined pressure (from queen and rook) on the 7th rank is too much for Black to handle.
B: Before anything else, I should create a bolt-hole for my king with 23 h3, after which I shall be able to invade the 7th rank. After 23 . . . lbd8 24 lbg5 �c2 25 Wixd8 (25 �xd8 'iIIc 1 + 26 'iith2 �f4+) 25 . . . h6 26 �d3 �xd3 27 �xd3 hxg5 28 �d6 I shall surely be on top.
C: Like in the previous plan, I should create some tuft for my king but with 23 h4 instead, threatening both 24 �d7 and 24 h5 followed by h6, eventually creating a strong post for the knight on g5 . What more can one ask from such a simple pawn move? Black must seek to improve the placement of the b7-knight as soon as possible, but even after 23 . . . lbd8 24 lbg5 lbe6 25 lbxe6 I should hold a serious endgame advantage.

52 MODERN CHESS PLANNING
Test 44
Efstratios G rivas - Alekper Sha khta khti nsky Athens 2004
1 d4 dS 2 c4 c6 3 ttJ c3 ttJ f6 4 ttJ f3 g6 S e 3 i..g7 6 i..d 3 0-0 7 0-0 ttJa6 8 cxdS cxdS 9 'ifb 3 e6 10 i..d2 �e8 1l �fcl i..f8 12 a 3 ttJd7 13 ttJbS ttJdb8 14 �c2 ttJ c6 1S �a c1 ttJab8 16 ttJ c3 a6 (D)
White to play
Judgement: White obviously stands much better, because he controls far more territory than his opponent. His pieces are harmoniously placed on the queen side and his rooks are ready to exploit the open c-file. In contrast, Black's pieces are squeezed together on his back rank (how about placing the c6-knight on h8?) and can hardly move. His position is not collapsing immediately, mostly thanks to his main defender, his well-supported knight on c6. So, as no position can be won without a reasonable plan, White should choose the most effective one.
Planning: Choose one of the following three plans:
A: Continuing the pressure on the queen side with 17 ttJa4 is the right attitude. After the more or less forced 1 7 . . . ttJd7 I should exchange some pieces to gain some entry squares, starting with 1 8 i..b4 i..xb4 ( 1 8 . . . i..g7 1 9 i..d6) 1 9 axb4, preparing ttJc5 and/or the b5 advance.
B: I do not think it is that easy to exploit the 'closed' c-file, as Black seems to defend against any invasions. When there are passive and badly placed pieces, the right way to exploit this is to open up the position. It is then that the quality of piece placement really matters. Therefore, I should continue with 17 e4, opening up the centre and trying to exploit, among other things, the weak dark squares around the black king. The weakness of the d4-pawn is irrelevant, as White 's 'compensation' will be tremendous.
c: I should increase the pressure on the queen side and therefore continue with �a2, b4, ttJa4-c5, 'ifb2 and a4. Then I will be ready to exploit the c-file, which will be opened after the b5 advance. I do not see any counterplay by Black coming any time soon, so I have the necessary time to work on my plan.

Test 45
TESTS
Efstratios G rivas - N i kolaos Ka lesis Greek Team Ch, Aghia Pelagia 2004
53
1 d4 lbf6 2 c4 e6 3 lbf3 .ib4 + 4 lbbd2 dS S a 3 .ie7 6 g 3 0-0 7 .ig2 b6 8 0-0 .ib7 9 cxdS .ixdS 10 'iW c2 lbbd7 1 1 e4 .ib7 12 eS lbdS 13 lbe4 h6 14 .l:te 1 cS IS dx cs lbx cs 16 lbx cs .ix cs 17 b4 i.e7 (D)
White to play
Judgement: White enjoys a small spatial advantage, mostly thanks to his e5-pawn. There are no pawn weaknesses for either side, and also no misplaced pieces. This makes the choice of the right plan even more complicated. White enjoys a slightly better position, but as there are no concrete targets, this advantage can easily evaporate.
Planning: Choose one of the following three plans:
A: I should concentrate on the queenside, where my pawns are well advanced. I shall start with 1 8 .id2 .l:tc8 1 9 'iWb2 and then a4-a5. Black's counterplay seems insufficient, as he doesn' t have any entry squares for his pieces, nor any active plan. My advantage will be slight but stable.
B: As my e5-pawn secures me more ground on the kingside, I should transfer my pieces to this part of the board, creating attacking chances. The black king seems inadequately protected, as the black knight cannot access the f6-square, nor can any other piece contribute to the defence. Moreover, the pawn on h6 is a potential target for a sacrifice. If Black tries to liberate his position with the .. .f5 advance, then the creation of a permanent pawn weakness on e6 will give me a clear positional target. So, I shall start with 1 8 'iWe4 and 'iWg4.
C: I think that the c6-square could be turned into a strong outpost, particularly for my f3-knight. For this purpose I must push my b-pawn to b5 and exchange the light-squared bishops. Then, with lbd4-c6 I shall have created an excellent basis for my plans on the queenside and in the centre. I shall start with 1 8 .ib2 .l:tc8 1 9 'iWd2 and then .l:tad 1 and lbd4, with strong pressure in the centre and on the queenside.

54
Test 46
MODERN CHESS PLANNING
l I ias Mastoras - Efstratios G rivas Greek Team Ch, Aghia Pelagia 2004
1 e4 cS 2 liJc3 e6 3 liJge2 liJc6 4 g 3 dS S exdS exdS 6 .lig2 d4 7 liJdS .lid6 8 d 3 liJge7 9 liJxe7 liJxe7 10 .lif4 liJg6 1 1 .lixd6 �xd6 12 0-0 0-0 13 �d2 .lid7 14 b 3 .lic6 IS liJf4 liJeS 16 f3 1Ue8 17 l:tael (D)
Black to play
Judgement: White's opening treatment was surely not a success. White made it clear that a draw was his main aim, but it is well known that if you want to split the point with a stronger player, you have to be active and force him in a worse position; you have to deliver the message that he might be in trouble! An equal position is bread and butter for the stronger player, as he can go on testing his opponent without too much risk. In the position above Black has achieved a significant advantage. His pieces are standing excellently, while White has to be on the alert. Still, Black must find an appropriate plan.
Planning: Choose one of the following three plans:
A: White has weakened his dark squares too much. I should benefit from this, utilizing the power of my queen. A continuation like 1 7 . . . �h6 (threatening 1 8 . . . liJg6) 1 8 'iVd l liJg6 1 9 liJxg6 hxg6 could be quite dangerous . After the possible 20 l:txe8+ l:txe8 2 1 l:tel l:te3 I would preserve my advantage, thanks to the outpost on e3 and the better minor piece.
B: As I cannot do much in the centre and on the kingside, I should focus on the queenside, where I can organize a breakthrough. Thus, I should proceed with 1 7 . . . a5 , planning . . . a4, . . . axb3 and an invasion by my rook. If White tries 1 8 a4, then after 1 8 . . . b5 1 9 axb5 .lixb5 I can still continue with . . . a4 and a later . . . c4.
C: Doubling rooks on the e-file is the right way to improve my position. White will not be able to oppose this with his own rooks, as he must cover the f3-square. After this simple and standard idea, I think that my position should improve and, although I do not see anything forced, the feeling is that I am on the right path.

Test 47
TESTS
Efstratios G rivas - Soti rios Logothetis Greek Team Ch, Ermioni Argolidas 2005
55
1 c4 e6 2 ttJ f3 dS 3 g 3 dx c4 4 �a4+ ttJd7 S �x c4 a6 6 i.g2 bS 7 �c2 i.b7 8 0-0 ttJg f6 9 b 3 cS 10 i.b2 i.e7 1 1 d 3 0-0 12 ttJbd2 �b6 13 �a c1 �a c8 14 �fdl �fd8 1S a 3 �a7 16 �bl �a8 17 �al ttJe8 18 �c2 i.f6 19 �d c1 i.xb2 20 �xb2 �c7 (D)
White to play
Judgement: White 's unambitious opening play has allowed Black to feel that he is near equality. Although White remains at a safe distance from the battlefield (on the three first ranks), his pieces have occupied their best possible squares. The semi-open c-file is in White 's favour, as his rooks apply constant pressure on the black c5-pawn. White should stand a tiny bit better.
Planning: Choose one of the following three plans:
A: Black's c-pawn is weak of course, but there is no chance to benefit from it , as I cannot attack it with greater force than Black can defend it with. So, I should forget about it and try to open some lines for my doubled rooks, benefiting from Black's queenside pawn-structure. I think that after 2 1 d4 �dc8 2 2 dxc5 ttJxc5 2 3 b4 ttJa4 24 'ii'b3 �xc2 2 5 �xc2 ttJf6 my pieces are standing a little bit better and, in a future endgame, Black's queen side pawns will be a target for my light-squared bishop.
B: The b4 advance should nearly always be on my mind. However, I think that this is not the appropriate moment to employ it, as I do not get anything special after the possible exchanges. I think that, before executing this advance, I must weaken Black's b-pawn. This is best done with 2 1 a4. If Black continues with ... b4 I shall gain the excellent outpost c4 for my knight, while if he just follows a waiting policy, then I shall proceed with axb5 and b4, creating a weak black b-pawn. This plan should give me a slight advantage.
c: I think that a type of minority attack with 2 1 b4 should be fine. After the pawn exchange (White's b-pawn for Black's c-pawn) I shall obtain a strong central majority. If I can advance it, I shall gain better chances all over the board, as a strong centre nearly always guarantees at least the initiative.

56
Test 48
MODERN CHESS PlANNING
Efstratios Gr ivas - Konsta nti nos I gnatiadis Athens 2006
1 d4 d5 2 c4 c6 3 lbf3 lbf6 4 lbc3 a6 5 a4 e6 6 e 3 lbbd7 7 �d 3 �b4 8 0-0 0-0 9 �d2 dx c4 10 �x c4 c5ll 'iVe2 cxd4 12 exd4 �a5 13 l:tfdl lbb6 14 �b 3 'iVh5 15 lbe4 �xd2 16 lbx f6+ gx f6 17 'iVxd2 l:td8 18 'iVf4 lbd5 19 �xd5 l:txd5 20 �x f6 �g6 2 1 �e7 f6 22 l:ta c1 �d7 2 3 l1c3 �f7 24 �b4 �c6 (D)
White to play
Judgement: White's energetic opening play was rewarded with a healthy extra pawn. Still, problems do exist and revolve around the issue of how to use or protect this pawn. Black's pieces are well-placed and ready to seek real compensation down the d- or g-file. A simple plan for Black is to double rooks on the d-file and then move his dS-rook to d6, in order to threaten " .�xf3 or " .eS . Another interesting plan for Black is to double rooks on the g-file, creating attacking possibilities against the white king. So, White should be on the alert, as his extra pawn is of no great value at this particular moment, with so many pieces on the board.
Planning: Choose one of the following three plans:
A : All my problems are caused by the bad placement of my knight. I should transfer it to c2 (and eventually to e3), from where it can protect my important extra d4-pawn without any danger of being exchanged. This manoeuvre also helps me cover the g-file with a potential l:tg3 . In case of 2S lbel l:tad8 26 lbc2 eS, then 27 l:tcd3 looks more than fine.
B: Exchanging pieces should be the right policy. A continuation like 2S l:tcS l:tad8 (2S " .l:txcs 26 dxcS �xf3 27 gxf3 would be fine) 26 l:txdS �xdS 27 'iVc3 would improve my position, and active ideas like lbd2-c4 and as come to mind.
c: As in Plan A, I should transfer my knight to a better square. That square is b3, from where my knight will play both a defensive and an offensive role, as it can sometimes jump to cS, applying pressure on the opponent' s b7 - and e6-pawns. I shall play 2s lbd2 l:tad8 26 lbb3, improving my position.

Test 49
TESTS
Efstratios G rivas - Konsta nti nos Fragiadakis Athens 2006
5 7
1 d4 tLlf6 2 c4 cS 3 d5 e5 4 tLlc3 d6 5 e 4 g6 6 tLlf3 i.g7 7 h 3 0-0 8 g4 a6 9 i.e 3 b5 10 cxb5 axb5 11 i.xb5 tLlxe4 12 tLlxe4 'iVa5+ 13 tLlc3 e4 14 tLld2 i.x c3 15 bx c3 'iVxb5 16 c4 'iVa5 17 i.h6 ne8 18 'iVc2 �a 3 19 'it>n f5 20 nel 'it>f7 2 1 'it>g2 tLld7 22 gx f5 gx f5 2 3 'it>h2 ng8 (D)
White to play
Judgement: This is a fairly complicated position, in which every move is significant. White seems to have the upper hand, as Black's king looks quite vulnerable. The presence of oppositecoloured bishops helps the creation of attacking chances for both sides. However, at this particular moment, only White can benefit from this fact, as Black is still undeveloped and most of his pieces are far away from the white king, in contrast to the white pieces. As the position contains a lot of tactics, only the discovery of the right plan can produce a correct evaluation.
Planning: Choose one of the following three plans:
A: I need to use the open g-file as an avenue for attack and should thus fight for it with 24 l:!.hg l . After the natural 24 . . . tLle5 25 nxg8 'it>xg8 2 6 ng l + tLlg6 27 i.f4 na6 2 8 �bl I can claim some initiative, although the position remains very complicated.
B: I should act fairly quickly, as otherwise Black will be able to cover his weak points. The tempting sacrifice 24 tLlxe4 looks strong, as after 24 . . .fxe4 25 'iVxe4 I cannot see any defence against my threats (e .g . , 25 . . . tLlf6 26 'iVe7+ 'it>g6 27 nhg l + +- or 25 . . . tLle5 26 �f4+ 'it>e8 27 !he5+ dxe5 28 �xe5+ 'it>d8 29 �f6+ 'it>d7 30 ne l +-).
c: I should try to break down Black's central pawns and open lines for my pieces with the strong 24 f3 . Combining ideas such as ne3 , nhg l and �d l should give me great attacking possibilities. Of course, it is not easy to calculate all the possible variations and Black will always have counterplay, but it seems that this is the right track.

58
Test 50
MODERN CHESS PLANNING
N i kolaos Gavri lakis - Efstratios G rivas Athens 2006
1 e4 cS 2 tiJc3 d6 3 f4 e6 4 tiJf3 tiJf6 S d 3 tiJc6 6 g 3 iLe7 7 iLg2 0-0 8 0-0 �b8 9 h 3 dS 10 eS tiJd7 11 'it>h2 bS 12 d4 b4 13 tiJe2 iLa6 14 :el (D)
Black to play
Judgement: At this early stage of the game, both players have already decided on their future fields of action. White will seek chances in the centre and on the kingside, while Black will have to make do with the remaining part of the board, the queen side. White has a small spatial advantage, mainly due to his e5-pawn, but in general Black should be happy with the opening's outcome. The position offers approximately even chances, and the player who thinks up and executes the more appropriate plans will come out on top. This is a difficult task, for both players!
Planning: Choose one of the following three plans :
A: I should continue the pressure in the centre with 14 . . . �b6, connecting my rooks at the same time. At a favourable moment I can open the c-file, before or after . . . .l:tfc8. I have the feeling that I already have something more serious on the queenside than White has on the kingside, so my chances cannot be worse.
B: I should clarify things immediately with 1 4 . . . cxd4. After 1 5 tiJexd4 tiJxd4 1 6 tiJxd4 'iVb6 1 7 iLe3 iLc5 1 8 �d2 �fc8 m y position will b e more than fine, a s I shall b e able to create a quick initiative on the queenside. In the near future, doubling rooks on the c-file, putting the c2-pawn under pressure, will be my main objective, giving me some advantage.
C: In a position of a closed or semi-closed character, knights are usually more important than bishops. Therefore the exchange 1 4 . . . iLxe2 seems good; in addition to the general reasoning in the previous sentence, there is the specific point that White cannot then establish a strong knight on the d4-square, while the black a-pawn is free to march (for example, all the way to a3 , creating a hole on the c3-square). Play could go on along the lines of 1 5 l:txe2 tiJxd4 1 6 tiJxd4 cxd4 1 7 'iVxd4 �b6.

TESTS 59
Test 5 1
Ed uard G ufeld - Lu bom i r Kava lek Student Olympiad, Marianske Lame 1962
1 e4 e5 2 ttJ f3 ttJ c6 3 ..tb5 ..tc5 4 c3 f5 5 d4 fxe4 6 ttJg5 ..tb6 7 d5 e 3 8 ttJe4 �h4 9 �f3 ttJ f6 10 ttJx f6+ gx f6 1 1 dx c6 ex f2 + 12 'it>dl dx c6 13 ..te2 (D)
Black to play
Judgement: A romantic variation has given rise to a position that is very difficult to evaluate. Black sacrificed a piece for some compensation, which consists of better development, a weak white king and, most important of all, a passed, well-protected pawn on f2. None of these advantages can be called long-term, as they can be nullified by White given time. Thus, it is very important to keep up the pace and to take full advantage of these strategic pluses.
Planning: Choose one of the following three plans:
A: As is well known, when there is an unprotected weak king in the centre of the board, queens must be retained. As White is threatening to exchange them on the hS-square, I should continue with 1 3 . . . hS 14 ttJd2 ..tg4 I S �e4 0-0-0 1 6 'it>c2 fS 17 'ij'c4 e4, when my advantage seems to be serious.
B: I think that, instead of losing time avoiding a queen exchange, it is preferable to develop the rest of my pieces and take full advantage of my pluses. Thus I should proceed with 1 3 .. .l;Ig8 1 4 g3 ( 1 4 'iVhS+ �xhS I S ..txhS+ 'it>e7 1 6 ..tf3 ..tfS 1 7 ttJd2 .l:tad8 =t and 14 'it>c2 e4 I S 'iVhS+ 'iVxhS 1 6 ..txhS+ 'it>e7 1 7 ttJd2 .l:txg2 1 8 .l:td l .l:txh2 1 9 ..te2 fl'iV 20 ..txfl e 3 -+ are both of no help to White) 14 . . . ..tg4. I do not see how White will survive. An indicative variation might be I S 'ij'xf2 0-0-0+ 1 6 ttJd2 ..txf2 1 7 gxh4 ..tfS 1 8 .l:tfl .l:tg2 1 9 ..tf3 .l:txh2 =t.
C: Time is more important than anything else, so I should react as in the previous plan but with a different approach: 1 3 . . . ..te6 14 �hS+ 'iVxhS I S ..txhS+ 'it>e7 . I only need to place my rooks on the d- and g-files and then just push my central pawns.

60
Test 52
MODERN CHESS PLANNING
Tony M i les - Bent La rsen Tilburg 1978
1 d 4 tL'lf6 2 tL'lf3 e6 3 c4 b6 4 Ji.f4 Ji.b7 5 e 3 Ji.e7 6 h 3 0-0 7 tL'lc3 d5 8 cxd5 exd5 9 Ji.d 3 tL'lbd7 10 0-0 a6 1 1 tL'le5 .l:!.e8 12 �f3 Ji.d6 13 tL'lg 4 tL'le 4 14 Ji.xd6 cxd6 15 lUc1 �g5 16 tL'le 2 l:ta c8 17 �f4 �x f4 18 tL'lx f4 g6 19 f3 tL'le f6 20 tL'lx f6+ tL'lx f6 21 'itf2 'itf8 (D)
White to play
Judgement: In this endgame White holds a significant advantage. This is mainly based on Black's weak pawn-structure (the pawns on d6 and d5 are isolated, doubled and weak) and his better bishop (most of Black's pawns are on light squares). Of course, exploiting these advantages cannot be that easy ; an appropriate and effective plan is called for. It is also important that White can torture Black for many moves, waiting for inaccuracies that can easily occur when one is constantly on the defensive.
Planning: Choose one of the following three plans:
A : As I cannot ask for more on the queenside (at least for the time being), I should commence activity on the other side of the board, starting with 22 h4. Black must parry the threat of 23 h5 by playing 22 . . . h5 himself, but this will immobilize his kingside pawns on light squares and will offer me an outpost for my knight on f4. Then I should proceed with Ji.c2-b3 and try to invade with my king on the kingside, via the weakened dark squares.
B: I do not see much promise in any part of the board except the queenside. Therefore, I shall seek activity there with 22 b4! ? (threatening a4-a5) 22 . . . b5 23 l:txc8 (23 a4 l:hc 1 24 l:!.xc 1 bxa4 25 l:tal Ji.c6 26 Ji.xa6 l:tb8 27 b5 Ji.xb5 28 l:tbl a3 =) 23 . . . l:txc8 24 a4 bxa4 25 l:txa4 l:tc6. My advan-tage looks secure and, by involving my king in the battle, I shall have every chance to win.
C: As in the first plan, I think that it is important to open up a second front on the kingside. This is best done with 22 g4. My idea is to continue with h4-h5 , opening the h-file for one of my rooks. Then I can transfer my king to d2, preparing the typical Ji.c2-b3. As Black cannot reply with 22 . . . g5 in view of 23 tL'le2 followed by tL'lg3-f5 and h4, he will have to stay passive and alert to all my threats, which could prove to be a hard task.

Test 53
TESTS
Ga rry Kaspa rov - U lf Andersson Tilburg 1 981
61
1 d4 ltJf6 2 c4 e6 3 ltJf3 b6 4 a 3 .Jtb7 S ltJc3 ltJe4 6 ltJxe4 .Jtxe4 7 ltJd2 .Jtg6 8 g 3 ltJc6 9 e 3 a6 10 b4 bS 11 cxbS axbS 12 .Jtb2 ltJa7 13 h4 h6 (D)
White to play
Judgement: White seems to control more space and his pieces are better coordinated. Black has to solve not only his development problems, but also that of his a7 -knight, which is really badly placed. However, if Black manages to regroup this piece to d6 (after . . . c6 and . . . dS) then his position will not be bad at all . While that is a lengthy plan, it places an onus on White to draw first blood, before it is too late. He is better but has to prove it.
Planning: Choose one of the following three plans:
A: I should not only think about my development, but at the same I must in keep in mind ways to interfere with my opponent' s development too. I think that, by sacrificing the d-pawn with 14 dS exdS I S .Jtg2 c6 1 6 0-0, I can succeed in keeping the black king in the centre for the time being. Black will have to create some weaknesses on the light squares around his king with . . . f6, which can only be to my benefit. By opening the centre and the e-file with a well-timed e4 advance, I shall have more than enough compensation for my small investment. This is the way to go!
B: I should just proceed with my development. 1 4 .Jtg2 dS ( 1 4 . . . c6 I S 0-0 .Jte7 1 6 e4 would be excellent) I S ltJb3 (even I S e4 should be at least ;i;) I S . . . .Jte7 1 6 0-0 0-0 is one line. In this position my supremacy on the queenside (and especially my outpost on the semi-open c-file) guarantees at least a slight but safe advantage.
c: I should combine development and activity on the semi-open c-file and the king side, where Black seems to face grave problems. A continuation like 14 hS .Jth7 I S iVg4 dS 1 6 .l:lc 1 .JtfS 1 7 �f3 would allow me to take the initiative all over the board. Then I can decide on the most effective plan.

62
Test 54
MODERN CHESS PLANNING
Gen nad i Soson ko - Bosko Abra movic New York 1 986
1 d4 e6 2 c4 f5 3 g 3 ttJ f6 4 SLg2 SLb4+ 5 SLd2 SLe7 6 �b 3 c6 7 d5 cxd5 8 cxd5 e5 9 ttJ c3 d6 10 ttJ f3 ttJbd7 1 1 0-0 0-0 12 ttJg5 ttJ c5 13 'i1ic4 h6 14 b4 ttJ cd7 15 ttJe6 ttJb6 16 'i1ib 3 SLxe6 17 dxe6 d5 18 lUdl 'ii'd6 19 ttJb5 'ii'c6 20 a4 ttJ c4 2 1 SLe 3 a6 22 ttJ c3 ttJxe 3 2 3 fxe 3 e4 24 ttJxd5 ttJxd5 25 �xd5 'ii'xd5 26 nxd5 h5 27 J:tc1 nad8 28 nxd8 nxd8 2 9 'itf2 SLd6 30 h 3 (D)
Black to play
Judgement: White is temporarily a pawn up, but it is almost certain that Black will be able to capture this pawn with . . . 'itf8-e7 sooner or later. The presence of opposite-coloured bishops is also important, as it can assist the drawing efforts of either side. Of course, the white bishop is not as active as its counterpart and it is not clear how it could be activated. Black has a lot of attractive continuations at his disposal, but not all of them can possibly be good. Overall, Black cannot stand worse and a lot depends on hitting upon the proper plan.
Planning: Choose one of the following three plans:
A : I shall just grab the offered b-pawn, as the white e6-pawn can wait. After 30 . . . SLxb4 31 g4 g6 32 nc7 b5 33 axb5 axb5 34 gxf5 gxf5 I shall be on the right track, as I shall also later win White's e-pawn and be a pawn up. This endgame will offer me excellent winning chances.
B: I should calmly aim to recapture the pawn with 30 . . . 'itf8 3 1 g4 (what else?) 3 l . . .g6 (3 l . . .hxg4 32 hxg4 g6 33 gxf5 gxf5 34 nh l would be only equal) 32 gxf5 gxf5 33 h4 'ite7 34 SLh3 'itxe6 35 ngl SLe7, with reasonable chances. The possible continuation 36 ng6+ 'ite5 37 l:th6 SLxh4+ 38 'itn l:td l + 39 'itg2 ne l 40 nxh5 J:txe2+ 4 1 'itn .l:!.f2+ 42 'itgl SLg3 + could justify my train of thought.
c: There is no need to run after any of the white pawns yet. I should first focus on burying the g2-bishop in a golden cage. This can be best done in a textbook way: 30 . . . g6 3 1 g4 h4. White 's bishop will never re-emerge, allowing me to continue the battle effectively with an extra piece. After that I can think about my opponent' s pawns !
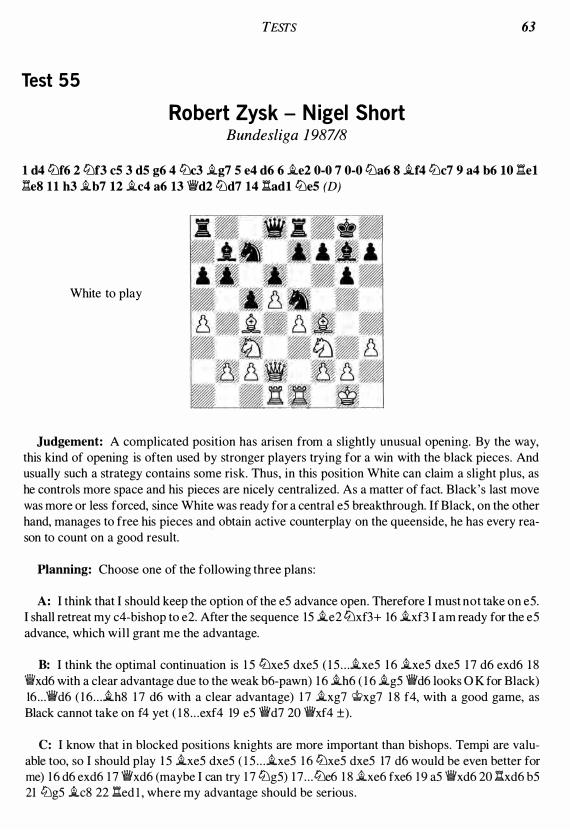
Test 55
TESTS
Robert Zysk - N igel Short Bundesliga 1 98718
63
1 d4 tZJf6 2 tZJf3 c5 3 d5 g6 4 tZJc3 iLg7 5 e4 d6 6 iLe2 0-0 7 0-0 tZJa6 8 iLf4 tZJc7 9 a4 b6 10 l:tel 'ue8 1 1 h 3 iLb7 12 iLc4 a6 13 'iVd2 tZJd7 14 'uadl tZJe5 (D)
White to play
Judgement: A complicated position has arisen from a slightly unusual opening. By the way, this kind of opening is often used by stronger players trying for a win with the black pieces. And usually such a strategy contains some risk. Thus, in this position White can claim a slight plus, as he controls more space and his pieces are nicely centralized. As a matter of fact. Black's last move was more or less forced, since White was ready for a central e5 breakthrough. If Black, on the other hand, manages to free his pieces and obtain active counterplay on the queen side, he has every reason to count on a good result.
Planning: Choose one of the following three plans:
A: I think that I should keep the option of the e5 advance open. Therefore I must not take on e5. I shall retreat my c4-bishop to e2. After the sequence 15 iLe2 tZJxf3+ 16 iLxf3 I am ready for the e5 advance, which will grant me the advantage.
B: I think the optimal continuation is 1 5 tZJxe5 dxe5 ( 1 5 . . . iLxe5 1 6 iLxe5 dxe5 1 7 d6 exd6 1 8 �xd6 with a clear advantage due to the weak b6-pawn) 1 6 iLh6 ( 1 6 iLg5 �d6 100ks O K for Black) 16 . . . 'iVd6 ( 1 6 . . . iLh8 1 7 d6 with a clear advantage) 1 7 iLxg7 �xg7 1 8 f4, with a good game, as Black cannot take on f4 yet ( l 8 . . . exf4 19 e5 �d7 20 �xf4 ±).
c: I know that in blocked positions knights are more important than bishops. Tempi are valuable too, so I should play 1 5 iLxe5 dxe5 ( l 5 . . . iLxe5 1 6 tZJxe5 dxe5 17 d6 would be even better for me) 1 6 d6 exd6 1 7 �xd6 (maybe I can try 1 7 tZJg5) 1 7 . . . tZJe6 1 8 iLxe6 fxe6 1 9 a5 'iVxd6 20 'uxd6 b5 21 ttJg5 iLc8 22 'ued l , where my advantage should be serious .

64 MODERN CHESS PLANNING
Test 56
Alexa nder Chern i n - Gen nadi Za ich i k Lvov 1 987
1 d4 d6 2 e4 liJf6 3 liJc3 g6 4 �e 3 �g7 5 'ii!Vd2 0-0 6 0-0-0 liJc6 7 f3 e5 8 liJge2 exd4 9 liJxd4 liJxd4 10 �xd4 �e6 1 1 �e 3 �e8 (D)
White to play
Judgement: This is a typical middlegame with opposite-side castling, where each tempo is valuable and can prove decisive. Both sides are ready to set their attacks in motion, starting with the usual pawn-storms on the flank where each side's target (the enemy king) is situated. White controls more space due to his e4-pawn, which means that he can transfer his pieces where necessary with greater ease. On the other hand, he still needs to finish his development. I would prefer White.
Planning: Choose one of the following three plans:
A: I am thinking about the typical g4 and h4 pawn avalanche, to open some lines around my opponent's king. But Black might go . . . hS at a certain moment, slowing down my play. Maybe I should stop that by playing 1 2 �h6 first. Then, as Black should avoid the exchange of his main defensive and offensive piece, his dark-squared bishop, he should continue with 1 2 . . . �h8. After that I can proceed with 1 3 g4 liJd7 1 4 h4 'ii'f6 I S �e2 �xa2 1 6 hS , obtaining a fierce attack.
B: Black's attack with an eventual . . . a6 and . . . bS advance does not look dangerous, so his attack should consist of the moves . . . c6, . . . bS and . . . 'ii'aS . First of all, I should calmly stop this counterplay with 1 2 �gS . Black must react with 1 2 . . . 'iVe7 ( l 2 . . . c6 1 3 eS! { 1 3 'iVxd6?! 'iVaS gives Black compensation } 1 3 . .. dxeS 14 �xd8 �axd8 I S �xd8 l::txd8 1 6 liJe4 ±), but then after 1 3 g4 I should be on top.
C: I notice that my fl -bishop does not yet have a reasonable square or, to put it differently, I cannot see yet where it will be needed. Also, I must keep in mind that tempi really count in such positions, so I must not waste any time and opt for a direct attack with 12 g4. Black should sacrifice a pawn for a counterattack with 1 2 . . . c6, but after 1 3 'iVxd6 'iVaS 1 4 'iVcs I should be on the right track to convert my advantage into victory.

Test 57
TESTS
M iso Ceba lo - Da n iel Ca m pora Berne 1988
65
1 d4 d5 2 c4 c6 3 ttJ c3 ttJ f6 4 ttJ f3 dx c4 5 a4 �f5 6 e 3 e6 7 �x c4 �b4 8 0-0 0-0 9 ttJh4 ttJbd7 10 f3 Sl.g6 11 ttJxg6 hxg6 12 e4 e5 13 �e 3 'ilVb6 14 �hl as 15 f4 exd4 16 �xd4 �c5 (D)
White to play
Judgement: The pawn-structure is unbalanced and both sides can boast a pawn-majority. As usual , the side that can put its majority to more effective use will gain the advantage. In this particular position it can only be White, as his rolling e- and f-pawns seem unstoppable (compare the pawns on e4 and c6). Another plus for White is his strong c4-bishop and the bad placement of Black's king, as it cannot seek cover on the semi-open h-file after the dangerous e5-e6 advance. White holds the advantage.
Planning: Choose one of the following three plans:
A: Time is valuable so I should proceed immediately with 17 �xf6 ttJxf6 1 8 e5. My majority starts advancing effectively and the presence of opposite-coloured bishops can only be of help in a future attack against the black king. Black might play 1 8 ... v,wxb2 1 9 nc 1 nad8 20 'iVf3 , with an advantage for me.
B: Black's c5-bishop is not really a strong piece, thus I should avoid exchanging it. The only way to do so is by 17 �e5. This, of course, temporarily blocks my majority, but it gives me time to regroup my pieces before commencing the final assault. Black should play 1 7 ... nfe8 ( 1 7 ... 'iVxb2 1 8 nbl +- or 1 7 ... ttJxe5 1 8 fxe5 ttJh7 1 9 e6 ±) 1 8 'iVf3 ttJxe5 1 9 fxe5 nxe5 20 �g3, when White has many threats CiVxe5, 'i¥xg6, nxf6).
c: White cannot afford to waste much time and so 1 7 �xc5 seems to be the only natural move. After 1 7 ... ttJxc5 ( 1 7 ... 'i¥xc5 1 8 �a2 nad8 1 9 �f3 ttJb6 20 e5 ttJfd5 2 1 ttJe4 �e7 22 �h3 ± must be even worse) 1 8 'iVe2 nad8 1 9 e5 ttJd5 20 nad l ttJxc3 2 1 bxc3 Itxd l 22 Itxd l nd8 23 ne l I think that I hold the advantage.

66
Test 58
MODERN CHESS PLANNING
Efi m Gel ler - John Fedorowicz New York 1 990
1 e4 cS 2 lDf3 lDc6 3 d4 cxd4 4 lDxd4 lDf6 S lDc3 eS 6 lDdbS d6 7 �gS a6 8 lDa 3 bS 9 �x f6 gx f6 10 lDdS �g7 1 1 c3 fS 12 ex fS �x fS 13 lDc2 �e6 14 lDce 3 lDe7 IS g 3 lDxdS 16 lDxdS 0-0 17 �g2
as 180-0 .i.1b8 19 �hS c.t>h8 20 l:tadl fS 2 1 .i.1d2 'ili'd7 22 .i.1fdl �f7 2 3 'iVh4 e4 24 lDf4 �eS (D)
White to play
Judgement: Both sides have developed harmoniously, in line with their opening choice. White's pawn-structure is healthier, but this is very common in the Sveshnikov Sicilian . White can also boast of a strongly-placed knight on f4, which helps both in the centre and a possible future attack against the black king. Black does not stand so badly either, as his bishop-pair and his potential activity on the queenside ( . . . b4) can compensate for his problems. This position offers roughly equal chances.
Planning: Choose one of the following three plans:
A : There's not much that I can do to improve my position. On the other hand, my a2-pawn is hanging and protecting it with 25 a3 wouldn' t be that nice after 25 . . . �b3 . Therefore, I must eliminate the dangerous e6-bishop with 25 lDxe6 'ili'xe6. A possible continuation is 26 f4 �g7 27 .i.1xd6 �xa2 28 .i.1d7 b4 and, if I want, I can secure the draw with 29 11xg7 c.t>xg7 30 l:!.d7+ !if7 3 1 �g5+ c.t>h8 32 :d8+.
B: An interesting idea is to activate my passive g2-bishop. This can be done with 25 f3 e3 (25 . . . exf3 26 lDxe6 �xe6 27 �xf3 b4 28 c4 ;1;) 26 .i.1e2 �xa2 27 .i.1xe3 . In this position I believe that my chances should be superior, due to my better pawn-structure.
C: As all my forces are placed almost optimally, I think that some drastic measures should be taken. An exchange sacrifice with 25 .i.1xd6 �xd6 26 .i.1xd6 should offer me what I am seeking : a pawn, occupation of the d-file, well-placed pieces for an attack on the black king and - the most important of all - the initiative.

Test 59
TESTS
l a n Rogers - G i l berto M i los Olympiad, Manila 1 992
6 7
1 d4 lLlf6 2 lLlf3 d6 3 lLlc3 .ig4 4 e4 e6 5 h 3 .ih5 6 'i!Ve2 c6 7 g4 .ig6 8 .ig5 .ie7 9 .ix f6 .ix f6 10 h4 h6 1 1 0-0-0 lLld7 12 �bl Wic7 13 �gl h5 14 g5 .ie7 (DJ
White to play
Judgement: Both sides have more or less developed harmoniously. White controls more space and can boast a strong centre, factors that allow rum to claim a slight advantage. Black seems to be a little bit cramped, but he has no pawn weaknesses or any other serious disadvantage. He might even take advantage of his bishop-pair if the centre opens up. In the meantime, White can feel safe, as in such positions knights usually prove more effective.
Planning: Choose one of the following three plans :
A: I think I should try to exchange the light-squared bishops, depriving Black of the bishoppair. This could prove significant if in the future the position opens up. So, I should play IS eS dS 1 6 Wie3 0-0 1 7 .id3, retaining a small but secure spatial advantage, as my knight i s not a worse piece than the e7-bishop.
B: I think it wouldn' t be advisable to touch my valuable centre. Instead, I should try to reinforce it by advancing my f-pawn, creating threats such as an eventual fS . Also, I must think about the future placement of my fl -bishop, which could be placed on d3 . So, with I S Wie3 0-0 1 6 lLld2 dS (forced; otherwise .id3 and f4-fS) 1 7 f4 dxe4 I S lLldxe4 and .id3 to come, I can preserve a pleasant spatial advantage.
c: My fust thought must be how to bury my opponent's dark-squared bishop, emphasizing the superiority of my knights. A path towards that direction is I S dS eS 1 6 .ih3 0-0-0 1 7 lLld2. Black's bishop-pair does not seem able to participate actively in the battle. Meanwhile, my knights can find excellent outposts . Later on, I can even transfer my rooks to the queen side, inviting Black to move his c-pawn to cS. After that, his bishops will be shut out of the game, allowing my knights supremacy.
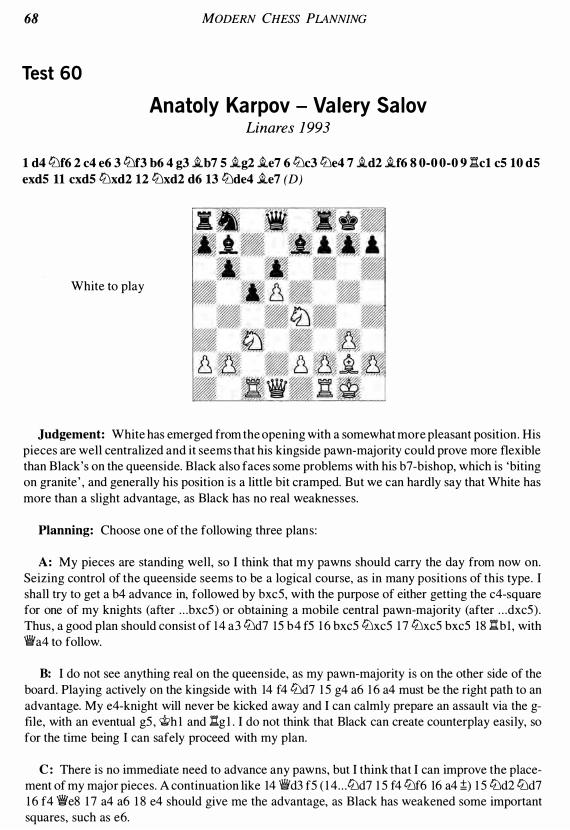
68 MODERN CHESS PLANNING
Test 60
Anatoly Ka rpov - Va lery Sa lov Linares 1993
1 d4 lLlf6 2 c4 e6 3 lLlf3 b6 4 g 3 ..tb7 S ..tg2 ..te7 6 lLlc3 lLle4 7 ..td2 ..tf6 8 0-0 0-0 9 nc1 cS 10 dS exdS 11 cxdS lLlxd2 12 lLlxd2 d6 13 lLlde4 ..te7 (D)
White to play
Judgement: White has emerged from the opening with a somewhat more pleasant position. His pieces are well centralized and it seems that his kingside pawn-majority could prove more flexible than Black's on the queenside. Black also faces some problems with his b7-bishop, which is 'biting on granite ' , and generally his position is a little bit cramped. But we can hardly say that White has more than a slight advantage, as Black has no real weaknesses.
Planning: Choose one of the following three plans :
A: My pieces are standing well, so I think that my pawns should carry the day from now on. Seizing control of the queenside seems to be a logical course, as in many positions of this type. I shall try to get a b4 advance in, followed by bxcS, with the purpose of either getting the c4-square for one of my knights (after . . . bxcS) or obtaining a mobile central pawn-majority (after . . . dxcS) . Thus, a good plan should consist of 14 a3 lLld7 IS b4 fS 1 6 bxcS lLlxcs 1 7 lLlxcs bxcS 18 nb 1 , with �a4 to follow.
B: I do not see anything real on the queenside, as my pawn-majority is on the other side of the board. Playing actively on the kingside with 14 f4 lLld7 I S g4 a6 1 6 a4 must be the right path to an advantage. My e4-knight will never be kicked away and I can calmly prepare an assault via the gfile, with an eventual gS , 'it'h l and ng l . I do not think that Black can create counterplay easily, so for the time being I can safely proceed with my plan.
c: There is no immediate need to advance any pawns, but I think that I can improve the placement of my major pieces. A continuation like 14 iHd3 fS ( 1 4 . . . lLld7 I S f4 lLlf6 16 a4 ;1;:) I s lLld2 lLld7 1 6 f4 'iVe8 l 7 a4 a6 1 8 e4 should give me the advantage, as Black has weakened some important squares, such as e6.

Test 6 1
TESTS
Yasser Sei rawa n - N ick de Fi rm ian USA Ch, Key West 1 994
69
1 d4 lbf6 2 c4 e6 3 lbf3 c5 4 e 3 d5 5 lbc3 lbc6 6 cxd5 exd5 7 �b5 �d6 8 0-0 0-0 9 dx c5 �x c5 10 b 3 �g4 1 1 �b2 .l::!.c8 12 .l::!.c1 �d6 13 h 3 �h5 14 �e2 �b8 (D)
White to play
Judgement: This is a typical middlegame with an isolated d-pawn, with its good and bad sides, examined in every textbook on this subject. White would like to exchange some pieces and reach an endgame, where the isolated pawn's weak side would be thrust into sharp relief. On the other hand, Black should not agree to such a turn of events , preferring a complicated middlegame, where his active and well-placed pieces will fully meet the position's needs. So, both sides already know what is to be done and what should be avoided, and must find a way to enforce their wishes.
Planning: Choose one of the following three plans :
A: As exchanges generally suit me, I should try to execute some ! Starting with 1 5 lbd4 �d6 1 6 g3 �g6 ( l 6 . . . �xe2 1 7 lbcxe2 would rather favour me) 1 7 a3 .l::!.fe8 1 8 �f3 , I shall have improved the placement of my pieces, retaining my slight opening advantage.
B: Well, exchanges must be good, but Black would not be that cooperative ! But I think that I can force Black to help me a bit with the strange (for such positions) 1 5 lbh4. Black can play 15 . . . �d6 ( 1 5 . . . �xe2 1 6 lbxe2 lbe4 1 7 lbf5 would be rather pleasant) , but after 1 6 g3 �xe2 ( l 6 . . . �g6 1 7 lbxg6 hxg6 1 8 �f3 �fd8 1 9 �g2 would increase my advantage) 1 7 lbxe2 lbe7 1 8 �d3 I think I have succeeded in my main idea, retaining a very small, though pleasant, advantage.
c: For the time being it is not so easy to exchange any pieces, as Black would not willingly cooperate. Therefore, I should strengthen my d4 outpost, which is of great significance in every such position and probably more important than the isolated pawn itself. A continuation like 1 5 lbb5 lbe4 16 lbbd4 'iVd7 1 7 a3 would therefore be appropriate. Later I can even try to reach a position with hanging pawns (by means of b4 and lbxc6).
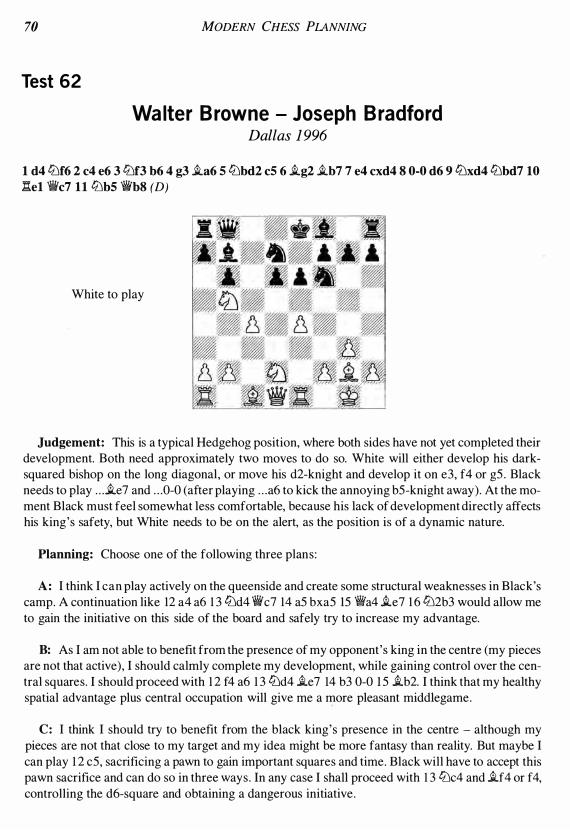
70 MODERN CHESS PLANNING
Test 62
Wa iter B rowne - Joseph B radford Dallas 1 996
1 d4 liJf6 2 c4 e6 3 liJf3 b6 4 g 3 SLa6 S liJbd2 cS 6 SLg2 SLb7 7 e4 cxd4 8 0-0 d6 9 liJxd4 liJbd7 10 nel 'V/iIc7U liJbS 'V/iIb8 (D)
White to play
Judgement: This is a typical Hedgehog position, where both sides have not yet completed their development. Both need approximately two moves to do so. White will either develop his darksquared bishop on the long diagonal, or move his d2-knight and develop it on e3, f4 or gS . Black needs to play . . . SLe7 and . . . 0-0 (after playing . . . a6 to kick the annoying bS-knight away). At the moment Black must feel somewhat less comfortable, because his lack of development directly affects his king's safety, but White needs to be on the alert, as the position is of a dynamic nature.
Planning: Choose one of the following three plans :
A : I think I can play actively on the queenside and create some structural weaknesses in Black's camp. A continuation like 12 a4 a6 1 3 liJd4 "V/iIc7 14 as bxaS IS "iVa4 SLe7 1 6 liJ2b3 would allow me to gain the initiative on this side of the board and safely try to increase my advantage.
B: As I am not able to benefit from the presence of my opponent's king in the centre (my pieces are not that active), I should calmly complete my development, while gaining control over the central squares. I should proceed with 1 2 f4 a6 l 3 liJd4 SLe7 14 b3 0-0 I S SLb2. I think that my healthy spatial advantage plus central occupation will give me a more pleasant middlegame.
c: I think I should try to benefit from the black king's presence in the centre - although my pieces are not that close to my target and my idea might be more fantasy than reality. But maybe I can play 1 2 cS, sacrificing a pawn to gain important squares and time. Black will have to accept this pawn sacrifice and can do so in three ways . In any case I shall proceed with 1 3 liJc4 and SLf4 or f4, controlling the d6-square and obtaining a dangerous initiative.

TESTS 71
Test 63
Sergio S l i pa k - Zoltan Al masi Buenos Aires 1996
1 d4 ttJ f6 2 ttJ f3 e6 3 e 3 b6 4 .ltd 3 .ltb7 5 0-0 .lte7 6 c4 0-0 7 ttJ c3 d5 8 'iYe2 ttJbd7 9 e4 dxe4 10 ttJxe4 cS 1 1 dx c5 .ltxe4 12 .ltxe4 ttJxe4 13 'iYxe4 ttJx c5 14 'iYe2 'iYd 3 15 l:tel .ltf6 16 .lte 3 l:tfd8 17 l:tabl 'iYxe2 18 l:txe2 ttJa4 19 'it'f1 l:ta c8 20 l:tc2 (D)
Black to play
Judgement: Black has the better ending due to his pressure on White 's queenside and occupation of the d-file. All his pieces are working at maximum capacity. However, White might be able to hold on as he has no static weaknesses, either in his pawn-structure or in his piece placement. Therefore, to put his short-term advantage to use, Black needs to construct a concrete and effective plan to turn it into a long-term one and then convert it into victory.
Planning: Choose one of the following three plans:
A: There is nothing decisive I can do in this position. As in every endgame, it is important to use the power of my king, starting with 20 . . . 'it'f8 . White might play 2 1 b3 ttJc5 22 'it'e2 ttJe4 23 l:tbc 1 i.e7, when I can preserve my advantage and slowly improve my king's position.
B: I think it is quite important to create some long-term weaknesses in White 's pawn-structure, as then my advantage would be stabilized. This can only be achieved on the queen side, where White 's c-pawn can become my target. Starting with 20 . . . b5 2 1 b3 ttJb6 22 l:tbc l bxc4 23 bxc4 'it>f8, I have succeeded in isolating his c-pawn. Of course, this pawn is also passed, but it cannot go far; I can easily blockade it and attack it. My king will prove quite useful for this purpose.
C: I think I can convert my slight short-term advantage into a serious, long-term one by exchanging two pieces for a rook and two pawns. The continuation 20 . . . ttJxb2 21 l:tcxb2 .ltxb2 22 l:txb2 l:txc4 will bring about a position in which I can easily create a passed pawn on the queen side, while White will be deprived of any serious counterplay with his minor pieces.

72
Test 64
MODERN CHESS PlANNING
Suat Ata l i k - N i kola i And ria nov Honolulu 1 997
1 d4 ttJ f6 2 c4 c6 3 ttJ c3 d5 4 ttJ f3 g6 5 Sl.g5 Sl.g7 6 e 3 0-0 7 Sl.d 3 dx c4 8 Sl.x c4 Sl.g4 9 Sl.x f6 Sl.x f6 10 h 3 Sl.x f3 1 1 'ifix f3 ttJd7 12 0-0 c5 13 l:tadl cxd4 14 exd4 l:tc8 15 Sl.b 3 l:tc6 16 l:tfel ttJb6 17 d5 l:tc7 18 ttJb5 l:td7 19 ttJxa7 Sl.xb2 20 ttJb5 ttJ c8 2 1 ttJd4 ttJd6 22 l:te2 Sl.xd4 2 3 l:txd4 'ifib6 24 l:tdl l:tc7 25 'ifif4 ttJ f5 26 g4 'ifid6 27 'ifig5 h6 28 'ifid2 ttJh4 2 9 �xh6 'ifif6 30 l:te 3 l:tfc8 (D)
White to play
Judgement: Black has sacrificed a pawn in order to gain the initiative. True, Black's forces are well placed and seem to cooperate harmoniously. His queen and knight are attacking the weakened white king and his rooks are ready to invade on either c3 or c l . Black must have enough compensation for his small material investment - or does he? White seems to have a lot of resources: the reduced material is to his benefit and, by suitable regrouping, he can hope for success.
Planning: Choose one of the following three plans :
A : As Black's threats might prove lethal, it is time for drastic measures. I should immediately try to generate some threats myself, in order to extinguish Black's initiative. 3 1 d6 seems to be a good idea. After the forced 3 1 . . .exd6 32 ned3 my threats become dangerous, thanks to my strong b3-bishop and the pressure down the d-file .
B : As I am material ahead, I should try to defend against Black's threats and then win the endgame. I should first cover my back rank (the c l -square) with 3 l l:ted3 , which opens the diagonal of my queen tow�ds that square. Then my queen can also return to e3, from where it can eliminate Black's threats.
c: I think it is most important to exchange queens, as then Black's initiative will be reduced. A continuation like 3 1 f4 (with the idea 32 �g5) 3 1 . . .l:tc 1 32 l:txc l l:txc 1 + 33 'it'f2 wouldn' t be bad, as my e3-rook can cover my king if needed, and then I can calmly play the desired �g5 .

Test 65
TESTS
Pred rag N i kol ic - Vlad i m i r Kra m n i k Amber blindfold, Monaco 1 998
73
1 d4 ttJ f6 2 c4 e6 3 ttJ f3 d5 4 ttJ c3 c6 5 cxd5 exd5 6 i.g5 i.e7 7 e 3 i.f5 8 i.d 3 i.xd 3 9 �xd 3 ttJbd7 100-00-0 1 1 ':abl a5 12 a 3 ttJe4 13 i.xe7 �xe7 14 b4 b5 15 �c2 axb4 16 axb4 ttJd6 17 ':b 3 ttJb6 18 ttJe5 ':fc8 19 ttJd 3 ttJb c4 20 ttJ c5 ':e8 2 1 h 3 g6 22 ':c1 ':a7 2 3 �dl h5 24 'it'hl �g5 25 ':bbl (D)
Black to play
Judgement: It's quite clear that something went wrong for White in the middlegame. He succeeded neither in his minority attack, which Black managed to halt, nor in a central break. Black's reactions were excellent and, as a result, he has taken over the a-file and has placed his knights on excellent central squares. Black has a great advantage, but no position can be won by just sitting back and waiting - a typical mistake that we can see in a lot of games. Achieving a huge advantage only means that we have excellent chances of winning, not that we have already won ! Black must form a plan to convert his advantage into victory.
Planning: Choose one of the following three plans :
A: I should double my rooks on the a-file with 25 . . . ':ea8, strengthening my domination of this file. White might go 26 ':al , but then with 26 . . . ':a3 I should preserve my advantage. Later I can even triple on the a-file with . . . ':8a7 and . . . �d8-a8.
B: I think I should move my knights towards the black king, to combine my a-file occupation with an attack on the white king. I shall start with my d6-knight: 25 . . . ttJf5 26 ':al ':xal 27 ':xal tt'lh4.
c: I think I cannot expect much from the a-file. The real target is the white king and I should transfer my forces towards it. Doubling rooks on the e-file and sacrificing a knight on e3 must be seriously considered, aithough this is hardly a standard plan in such positions. But 25 . . . ':ae7 26 ':al ttJf5 27 ':a2 ttJcxe3 28 fxe3 ':xe3 must be powerful, and it will break down White 's defence.

74
Test 66
MODERN CHESS PLANNING
Sergei Sh i pov - Tony M i les Hastings 1 998/9
1 d4 dS 2 c4 dx c4 3 ltJf3 ltJf6 4 e 3 e6 S �x c4 cS 6 0-0 a6 7 �b 3 b6 8 e4 cxd4 9 eS ltJfd7 10 �xd4 �b7 1 1 �f4 ltJcS 12 ltJc3 ltJxb 3 13 axb 3 �e7 14 �g 3 'it>f8 1S l:tdl ltJd7 (D)
White to play
Judgement: Black's opening experiment has not brought him any joy. His king has lost the right to castle, his rooks will find it hard to get connected, and his pieces are bunched up on his first two ranks. On the other hand, he can argue that he obtained the bishop-pair, but this is hardly sufficient compensation for all the downsides of his position. For the time being, White must decide on how to complete his development and how to create an attack against the black king.
Planning: Choose one of the following three plans:
A: I should complete my development, bringing my c l -bishop to the excellent f4-square. Then I can place my rooks in the centre, either on the c- and d-files, or both on the d-fiJe. A continuation like 1 6 ..if4 h6 1 7 h4 g6 1 8 l:tac l ( 1 8 l:td2 and l:tad l is another option) would preserve and even increase my advantage.
B: As the bishop-pair is my opponent's main trump, I should exchange one of them, at the same time completing my development. I can achieve this with 1 6 �g5 h6 17 iJ...xe7+ �xe7. Then, by regrouping my knight with 1 8 ltJd2 to the c4- or e4-square, I would be able to transfer it to the important d6-square .
c: As my advantage depends mostly on the bad placement of the opponent's king, I should not exchange any pieces and instead focus on a direct attack. For this purpose I need more pieces transferred to the kingside and the first candidate must be my aI -rook. This rook has no real targets on the semi-open a-file, but I think that with l:ta4-g4 it could become more useful . So, 1 6 l:ta4 �e8 ( 1 7 l:tad4 was a threat) 1 7 J:tg4 seems pleasant.

Test 67
TESTS
Rustem Dautov - J ud it Polga r Olympiad, Istanbul 2000
75
1 d4 ttJ f6 2 e4 e6 3 ttJ f3 b6 4 g 3 .lta6 5 'ilVa4 .ltb7 6 .ltg2 e5 7 dx e5 .ltx e5 80-00-0 9 ttJ e3 ttJe4 10 'iVe2 ttJx e3 11 'iVx e3 d5 12 .l:tdl ttJd7 13 .ltg5 'iVe8 14 exd5 .ltxd5 15 b4 .lte7 16 .ltxe7 W1xe7 17 .l:ta el .l:tfd8 (D)
White to play
Judgement: After some typical exchanges, it seems that there is not much White can expect from his position. But a careful examination proves that White stands slightly better. This is mainly due to his better control of the c-file and the possibility of invading the 7th rank. Also, we must not ignore the fact that it is White to move and that Black lacks any active plan. This is the kind of position where White can feel safe and, even if his slight advantage evaporates, he will face nothing worse than a likely draw.
Planning: Choose one of the following three plans:
A: I should take my chances and immediately invade the 7th rank. With 18 'iVc7 I am threatening e4 and ttJe5 or just ttJe5 , so Black must accept my pawn sacrifice with 1 8 . . . 'iVxb4, unpinning his knight. Then I can play 19 ttJd4 .ltxg2 20 �xg2, with strong threats like 2 1 ttJc6. I think my compensation for the pawn will be more than excellent.
B: I believe that in this type of set-up, White has only one strategic idea, but a very powerful one : bringing the knight to the c6-square, from where, protected by my pawn on b5 , it can have a paralysing effect on Black's position. So, I should proceed with 1 8 ttJd4 ttJf6 ( l 8 . . . .ltxg2 1 9 �xg2 is even worse for Black) 19 b5 .ltxg2 20 �xg2 .l:td5 21 ttJc6. My plan has been accomplished, giving me a pleasant and secure advantage.
c: The occupation of the c-file is fine and I do not need to be in a hurry to exploit it, as Black cannot do much. Invading the 7th rank looks fine, but I should first protect my b-pawn with 1 8 a3 . Black should reply 1 8 . . . ttJf6 ( 1 8 . . . a5 1 9 "VJIic7 axb4 20 ttJe5 ±) 1 9 ttJe5 .ltxg2 20 �xg2 .l:txd l 2 1 .l:txd l ttJd5 2 2 �c6. M y advantage looks adequate to claim the full point in this endgame.

76
Test 68
MODERN CHESS PLANNING
Zolta n Al masi - Josif Dorfman Austrian Team Ch 200213
1 e4 cS 2 lDf3 e6 3 d4 cxd4 4 lDxd4 a6 S i.d 3 lDf6 6 0-0 'fic7 7 'fie2 d6 8 c4 g6 9 lDc3 i.g7 10 l:tdl 0-0 U lDf3 lDc6 12 h 3 lDd7 13 i.e 3 (D)
Black to play
Judgement: A Hedgehog-type position has been reached. As usual in this structure, White enjoys a spatial advantage and in general can feel free to employ plans all over the board. On the other hand, Black controls important central squares, such as cS and eS, but must first complete his development (notably the c8-bishop) to feel secure. His d6-pawn is a potential target for White's forces, but attacking it is not a simple task. It is probably more important for White to keep Black's possible breaks . . . bS and . . . dS under control. In general, White holds a slight advantage, but this is not without risk and any inaccuracy can be fatal .
Planning: Choose one of the following three plans :
A: I think it is important to create some weakness in White's camp and focus my plans on it. This is the right moment to play 1 3 . . . i.xc3 14 bxc3 f6 ( 1 4 . . . lDcs I S i.h6 l:td8 1 6 i.gS gives White too much play on the dark squares around my king) . Later I can continue manoeuvring my knights ( . . . eS, . . . lDcS-e6, . . . lDaS) around my targets, the white c-pawns. Of course, White will still have a spatial advantage and the bishop-pair.
B : As my 'main' pawn-breaks with . . . bS and . . . dS are under control by my opponent, I should focus on my only other possible break, which is . . . fS . A continuation like 1 3 . . . lDdeS 1 4 l:tac 1 'fie7 ( l 4 . . . i.d7 I S lDe l lDb4 1 6 b3 fS 1 7 exfS gxfS 1 8 i.bl lDg6 1 9 lDd3 ;l; is an alternative) I S i.bl l:tb8 1 6 b3 l:te8 does not look so bad, as I have created enough counterplay in the centre, where the battle will take place.
c: I think that my first concern should be to complete my development and connect my rooks . My c8-bishop should be placed on the long diagonal, to assist a potential . . . dS or . . .fS advance, when the time comes. So, 1 3 . . . b6 1 4 l:tac 1 lDcS I S i.bl i.b7 would perfectly suit my Hedgehogtype position.
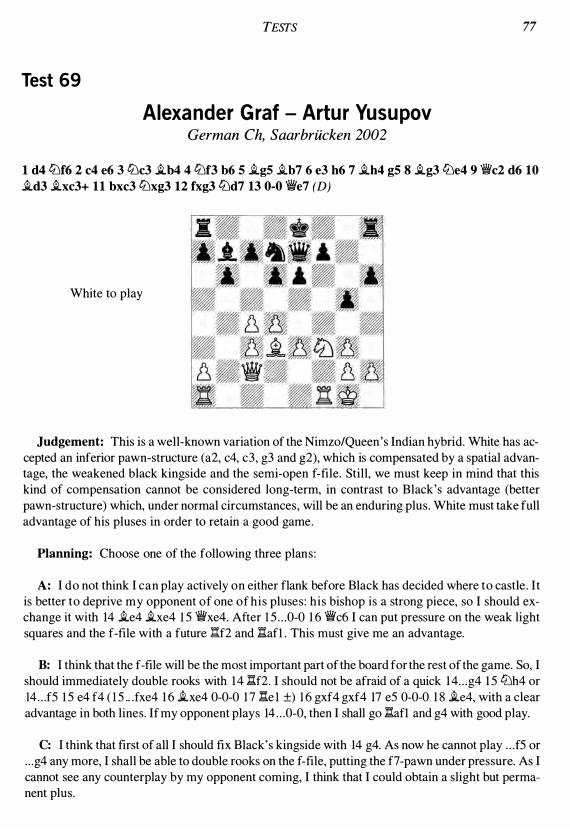
Test 69
TESTS
Alexa nder G raf - Artu r Yusu pov German Ch, Saarbrucken 2002
77
1 d4 ttJ f6 2 c4 e6 3 ttJ c3 i.b4 4 ttJ f3 b6 5 i.g5 i.b7 6 e 3 h6 7 i.h4 g5 8 i.g 3 ttJe4 9 'ilVc2 d6 10 i.d 3 i.x c3+ 1 1 bx c3 ttJxg 3 12 fxg 3 ttJd7 13 0-0 �e7 (D)
White to play
Judgement: This is a well-known variation of the Nimzo/Queen's Indian hybrid. White has accepted an inferior pawn-structure (a2, c4, c3, g3 and g2), which is compensated by a spatial advantage, the weakened black kingside and the semi-open f-file. Still, we must keep in mind that this kind of compensation cannot be considered long-term, in contrast to Black's advantage (better pawn-structure) which, under normal circumstances, will be an enduring plus. White must take full advantage of his pluses in order to retain a good game.
Planning: Choose one of the following three plans :
A: I do not think I can play actively on either flank before Black has decided where to castle . It is better to deprive my opponent of one of his pluses : his bishop is a strong piece, so I should exchange it with 14 i.e4 i.xe4 I S 'ilVxe4. After I S . . . 0-0 1 6 'ilVc6 I can put pressure on the weak light squares and the f-file with a future :f2 and !tafl . This must give me an advantage.
B: I think that the f-file will be the most important part of the board for the rest of the game. So, I should immediately double rooks with 1 4 !tf2. I should not be afraid of a quick 1 4 . . . g4 I S ttJh4 or 14 . . . fS I S e4 f4 ( l S .. .fxe4 1 6 i.xe4 0-0-0 1 7 l:te l ±) 1 6 gxf4 gxf4 17 eS 0-0-0 1 8 i.e4, with a clear advantage in both lines. If my opponent plays 14 . . . 0-0, then I shall go !tafl and g4 with good play.
c: I think that first of all I should fix Black's kingside with 14 g4. As now he cannot play . . . fS or . . . g4 any more, I shall be able to double rooks on the f-file, putting the f7-pawn under pressure. As I cannot see any counterplay by my opponent coming, I think that I could obtain a slight but permanent plus.

78
Test 70
MODERN CHESS PLANNING
M icha l Krasen kow - Konsta nti n Sa kaev Copenhagen 2003
1 d4 liJf6 2 c4 e6 3 liJf3 b6 4 liJc3 i.b7 S a 3 dS 6 cxdS liJxdS 7 'iVc2 liJx c3 8 bx c3 i.e7 9 e4 0-0 10 i.d 3 cS 1 1 0-0 'iVc8 12 �e2 i.a6 13 l:tdl i.xd 3 14 l:txd 3 liJd7 1S eS 'iVc6 16 i.gS l:tae8 17 l:tadl f6 18 ex f6 i.x f6 19 i.x f6 liJx f6 20 liJeS �c7 2 1 c4 cxd4 22 l:txd4 l:td8 2 3 'iVe 3 l:txd4 24 �xd4 l:tc8 (D)
White to play
Judgement: Both sides have damaged pawn-structures. White's a- and c-pawns are isolated and weak, as is Black's e-pawn. On the other hand, it is not easy for either side to attack these weaknesses, at least for the time being. But the most important strategic element in this position is the strong centralized e5-knight which, in imperial style, lies on a commanding outpost. This knight is the strength of White 's position and deprives Black of any counterplay. White's occupation of the open d-file is important, as at any favourable moment he can enter on the 6th or 7th rank. White holds the advantage, but only an appropriate plan can prove its true extent.
Planning: Choose one of the following three plans:
A: As I cannot achieve anything on the queenside or in the centre, I should focus on the kingside. Maybe I could advance my king side pawns with 25 g4 h6 26 h4, creating activity on this flank, gaining space and kicking the f6-knight away. Importantly, I cannot see how Black can benefit from my king's voluntary weakening.
B: Exchanging queens would allow me to attack the black pawns more easily. A continuation like 25 �d6 'ilVxd6 26 Itxd6 liJe4 27 l:td4 (27 l:txe6 liJd2) 27 . . . liJc5 28 f4 looks good and should preserve my advantage.
c: I should get rid of at least one of my weaknesses, and this can be done with 25 a4 l:tf8 26 f3 liJe8 (26 . . :�c5 27 'ii'xc5 bxc5 28 �d6 ±) 27 a5 bxa5 28 c5. The two doubled black a-pawns are hardly worth more than one and can be easily blocked, but my passed c-pawn may turn into a monster, securing my advantage.

Test 7 1
TESTS
Pentea la H a ri krishna - Ena m u l Hossa i n British Ch, Edinburgh 2003
1 e4 c5 2 liJc3 a6 3 liJf3 e6 4 g 3 b5 5 .tg2 .tb7 6 d 3 d6 7 0-0 liJf6 (D)
White to play
79
Judgement: It is rather early to give a firm evaluation of the position. White has not shown any great opening ambition, preferring just to develop his forces peacefully, waiting for the appropriate moment to undertake action. Some top players, when facing weaker opponents, do not wish to have a theoretical opening discussion, where they might face some extremely strong novelty, but instead prefer quiet openings and sharper middlegames, where their class will make the difference. So far, both sides have developed quietly. Good planning from this point on will be of great influence.
Planning: Choose one of the following three plans:
A: I do not think I can become active either in the centre or on the kingside. So, the only side of the board where I could develop an initiative is the queenside. A b4 advance looks like a nice plan, trying to exchange a black central pawn. This can best be done with 8 Itbl liJbd7 9 a3 .te7 10 b4. Later I can even try a4, which will further weaken Black's queen side pawns and turn them into targets.
B: I cannot ask for a great deal from my position, but I believe I can get good prospects with the early 8 e5 . After 8 . . . dxe5 9 liJxe5 .txg2 1 0 �xg2 I think I have an advantage. My queen will be placed on the influential h l -a8 diagonal, the a4 break will soon come and, in the meantime, Black must spend some tempi in order to castle.
c: I think I should gain some space on the kingside, like in many typical variations of the English Opening (with reversed colours) . For this purpose I should use my f-pawn, and later even my gand h-pawns. A continuation like 8 liJh4 liJc6 (8 . . . .te7 9 e5 ±) 9 f4 i.e7 10 f5 looks pleasant and gives me some initiative, guaranteeing a tiny opening advantage.

80 MODERN CHESS PlANNING
Test 7 2
Baris Gelfa nd - Alexa nder G rishch u k Russian Team Ch, Sochi 2004
1 d4 dS 2 c4 e6 3 liJc3 cS 4 cxdS exdS S liJf3 liJc6 6 g 3 liJf6 7 i.g2 i.e7 8 0-0 0-0 9 i.gS c4 10 liJeS i.e6 1 1 b 3 1!VaS 12 1!Vd2 �ad8 13 bx c4 i.b4 14 liJx c6 bx c6 IS l1fct dx c4 16 i.x f6 gx f6 17 e 3 cS 18 dS i.x c3 19 �x c3 i.xdS 20 i.xdS �xdS 2 1 1!Vc2 l:Ic8 (D)
White to play
Judgement: White has emerged from the opening with a much better pawn-structure. All of Black's pawns are weak and isolated and they are potential targets for White's forces. Black's cpawns are passed, but in reality they are weak, having been firmly blockaded. Sooner or later a four-rook endgame will appear on the board. Without the queen side pawns this would be a draw, but of course this can only be a dream for Black. If White manages to win the c- and f-pawns in return for his a-pawn, then he would have all the chances to win the game. In general, White does not wish to exchange any rooks and, if he manages to activate his second rook, all of Black's pawns will become accessible targets. Overall, White holds quite a healthy advantage.
Planning: Choose one of the following three plans:
A: I should just play the natural 22 lhc4, preparing 23 �c l . I should not be afraid of a queen ex-change with 22 . . . 1!Vd2 23 11c l (23 1!Ve4 �cd8 threatening . . . 1!Ve2 and . . . �d l + gives Black too much counterplay) 23 . . . 1!Vxc2 24 � l xc2, as then my king will be able to participate in the coming battle.
B: There is no hurry to win back the c4-pawn and I think there is also no point in exchanging queens this early. The simple 22 �c 1 retains all my options and, if Black wrongly plays 22 . . . �d3 23 �xc4 1!Vd2, I can safely win a pawn with the simple 24 �xc5 .
C: My first concern should be to activate my second rook as quickly as possible. With 22 .l:f.bl I shall be ready to enter the 7th or 8th rank and, by a well-timed 1!Ve4 or 1!Vf5 (of course after �xc4), my attack will be quite strong. The best idea is to combine pressure against the black c-pawn with an attack, posing a lot of problems.

Test 73
TESTS
Spyridon Skem bris - H ristodou los Ba n i kas Kalamata 2005
81
1 d4 ttJ f6 2 c4 g6 3 ttJ c3 i.g7 4 ttJ f3 0-0 S i.gS cS 6 dS d6 7 e 3 h6 8 i.h4 e6 9 ttJd2 exdS 10 cxdS b6 1 1 i.c4 a6 12 a4 ttJbd7 13 0-0 �e8 14 e4 gS IS i.g 3 ttJeS 16 �el ttJg6 17 i.e2 �b8 18 h 3 (D)
Black to play
\ Judgement: As is quite common in the Modem Benoni, a sharp middlegame has arisen. White
seems to enjoy some spatial advantage and pressure against the black d6-pawn. He also has at his disposal the excellent c4 outpost for one of his knights. On the other hand, Black cannot feel unhappy either, as his pieces are actively placed. His ideas should consist of the future . . . bS and . . . fS advances, which are not yet easy to accomplish, and using his own outpost on eS, as his gS-pawn makes an f4 advance nearly impossible, or at least pointless. However, for the time being, Black has to deal with more concrete problems, such as how to defend against the coming ttJc4. This position should be evaluated as unclear, with rich possibilities for both sides.
Planning: Choose one of the following three plans:
A: Covering my d6-pawn, but without diminishing my pieces' activity, must be my main concern. I would of course prefer to execute the manoeuvre . . . ttJd7-eS but, as this is impossible (the d6-pawn is hanging after 1 8 . . . ttJd7), I should try the active 1 8 . . . ttJf4. True, my pawn-structure will be weakened after 1 9 i.xf4 gxf4, but I shall gain as compensation the bishop-pair and better control of the dark squares.
B : The manoeuvre . . . ttJd7-eS is quite important and, if ! succeed in playing it, I shall gain the upper hand. I shall start with 1 8 . . :�c7 1 9 ttJc4 i.f8, and I am ready for . . . ttJd7-eS . This looks a little bit slow, but my plan with . . . ttJd7-eS , . . . i.g7 and .. .fS will give me excellent chances in the near future.
c: Immediately making use of my strong eS outpost must be the only solution. After 1 8 . . . ttJeS 19 ttJc4 (what else?) 1 9 . . . ttJxc4 20 i.xc4 I should manoeuvre my other knight to eS with 20 . . . ttJh7 (and . . . ttJf8-g6-eS) . This would allow me to retain a good game.

82 MODERN CHESS PLANNING
Test 74
Sergei Rublevsky - Alexa nder Motylev Russian Ch, Moscow 2005
1 e4 e5 2 lLlf3 lLlf6 3 d4 lLlxe4 4 i.d 3 d5 5 lLlxe5 lLld7 6 lLlxd7 i.xd7 7 0-0 i.d6 8 c4 c6 9 cxd5 cxd5 10 lLlc3 lLlx c3 1 1 bx c3 0-0 12 'iWh5 g6 13 'iWxd5 'iW c7 14 i.h6 l:tfe8 15 h4 i.e6 16 'iW f3 'iWx c3 17 'iW f6 i.f8 18 i.x f8 �x f8 19 �fdl �fd8 20 i.e4 i.d5 2 1 �a c1 'iWa 3 22 �c7 'iWxa2 2 3 h5 'iWe2 24 f3 'iWa6 25 'iWxa6 bxa6 (D)
White to play
Judgement: After a complicated middlegame (which was mostly home preparation ! ) , an interesting endgame has arisen. Black' s extra pawn is not important at all , as it is doubled and weak, while the 7th rank domination by the white rook is on the other hand very important. This endgame is rather unpleasant for Black, although of course not lost. The defence is extremely difficult, as White can apply pressure at will, without any real risk of losing . Such positions (reached with the assistance of modem technology) are bread and butter for the top players . With their home analysis and knowledge of what to do and how to do it, plus some class, the point is ready to fall into their hands !
Planning: Choose one of the following three plans :
A: I think it would be nice to acquire a strong central pawn duo with 26 �c5 i.xe4 27 fxe4. Then I can just bring my king to e3, protecting my pawns and allowing my rooks to be activated further. Probably Black has to continue with 27 . . . I:tac8, but then after 28 �a5 (28 �xc8 �xc8 29 'ito>f2 is an alternative) 28 . . . �c6 29 'ito>f2 I should stand well .
B : All my pieces are well placed already and I do not need to improve them further. All, that is, except my king, which must play an important role, as in every endgame. So, I should continue with 26 'ito>f2, centralizing it to protect my d4-pawn. Then my d l -rook could be moved to a more active square.
C: I think it is important to create back-rank threats with 26 h6. Black's king will not be easy to activate and I can calmly transfer mine to the centre. Although there seems to be nothing forced, my position should be dominating and my chances excellent.

Test 75
TESTS
Vese l i n Topa lov - Levon Aron ian Wijk aan Zee 2006
83
1 d4 lDf6 2 c4 e6 3 lDf3 b6 4 g 3 �a6 S b 3 �b4+ 6 �d2 �e7 7 �g2 c6 8 �c3 dS 9 lDeS lDfd7 10 lDxd7 lDxd7 1 1 lDd2 0-0 12 0-0 lDf6 13 e4 bS 14 exdS exdS IS �el l:tb8 16 cS �c8 17 lDf3 lDe4 (DJ
White to play
Judgement: Both sides have achieved their aims, in a position which is quite hard to access. White can seek to attack the weak c6-pawn, but Black will not find it difficult to defend. Actually, his pride (the e4-knight) is difficult to remove without blocking the g2-bishop (with f3) and, with ideas like . . . �f6 and . . . �fS he should in general feel fine. But White has not made any mistakes until now, so one might suspect that his position should be somewhat better (the tiny advantage that nearly every reasonable opening promises) . This is the kind of position where only the discovery of the right plan can lead to the absolute truth about the position.
Planning: Choose one of the following three plans:
A: I do not think this the right time for complications, but for a long, manoeuvring game. I should of course first retain my bishop with 1 8 �b2, threatening 1 9 lDeS . Then, after 1 8 . . . �f6 1 9 b4 �fS 2 0 a4 a6 2 1 lDd2, I should hold a small but lasting spatial advantage, with n o risk at all.
B: I must be quick if I really want to achieve something concrete . I should immediately jump in with 1 8 lDeS lDxc3 19 �d3 'J/iic7 20 'J/iixc3 .l::!.e8 (20 . . . �f6 2 1 l:te3 b4 22 �d2 l:te8 23 l:tael �xeS 24 .l:!.xeS l:txeS 2S l:txeS f6 26 .l:!.e3 ;t) 2 1 a4 (2 1 b4, with 22 a4 to follow, is a good alternative) . Play might continue with the logical 2 1 . . .b4 22 �f3 �f8 23 l:te3 f6 24 lDd3 l:txe3 2S fxe3 as 26 e4 �e6 27 �f4, with a slight advantage.
c: Black's knight is an annoying piece and also his only active one. The exchange sacrifice with 1 8 l:txe4 comes to mind. After 1 8 . . . dxe4 1 9 lDeS Black's central pawn) (c6 and e4) are under attack. If they drop, then my c- and d-pawns will be unstoppable.

Sol ut ions
Test 1 All the plans described look attractive, securing an advantage for White, so the decision is difficult ! Plan C ( 1 0 points) is the weakest one, as it is not easy to exploit the extra pawn, due to the
• exposed white king. The choice between the other two plans is a matter of taste. Plan B ( 1 8 points) i s excellent and should win in the long run, although White must be on the alert for perpetual check. In my opinion Plan A (20 points) is the simplest and does not require too much calculation. The king's centralization, the active rook and the opponent's weak pawnstructure must be decisive strategic elements.
The game continued: 43 'iib 3! 'iixb 3 44 l::1xb 3 fxg 3 45 hxg 3 a6 46
�f1 ! The impatient 46 l::1d3 �f7 47 e3? dxe3 ! 48
l::txe3 would only favour Black (48 l::1xd8?? e2 ! ) .
46 . . . �f7 47 �e 1 �e6 48 g4 ! Clearing the 3rd rank for the rook, which can
thus apply pressure to the black king side pawns. Moreover, the text-move prevents the future creation of a passed black pawn by . . . g5 and . . . h5 .
48 ... �e5 4 9 l::1f3 l::1d7 50 �d2 h6 Intending . . . g6 and . . . h5 . 50 . . . g6 5 1 g5 ! would
only help White. 51 l::1f5+! �e6 52 �d 3 g5 Forced, as the powerful threat of 53 l::1f4
would win the d4-pawn. 53 l::1f8 Now there are three black weaknesses acces
sible to the white rook (a6, d4 and h6), while Black's pieces are quite passive. Consequently, it is not surprising that Black's position soon collapses.
53 ... �e7 54 l::1c8 l::1d6 (D) 55 l::1c7+! �e8 Unappetizing, but SS . . . �e6 56 l::1h7 ! �dS 57
l::1e7 ! and 58 l::1e4 would not help Black either. 56 l::1c5! Intending l::1eS+ and l::1e4, winning the initial
target, the isolated black d4-pawn. The rest of
w
the game was one-sided, despite its long duration. White reacted correctly to any ' traps' Black set, and the end was :
56 ... l::1f6 57 l::1e5+ �d7 58 f3 l::1c6 59 l::1d5+ �e6 60 l::1xd4 l::1c1 61 a4 ! l::1c5 62 l::1d8! bxa4 63 l::1h8 l::1a5 64 l::1xh6+ �f7 65 �e4 a 3 66 bxa 3 .l:Ixa 3 67 .l:Id6! l::1a2 68 e 3 l::1a4+ 69 l::1d4 l::1a 1 70 l::1b4 as 71 l::1b7+ �e6 72 .l:Ib6+ �d7 73 l::1g6 l::1a4+ 74 �d5 l::1b4 75 l::1g7+ �e8 76 l::1a7 l::1b 3 77 �e4 l::1b4+ 78 �f5 l::1b5+ 79 �g6 l::1e5 80 f4 l::1xe 3 81 �xg5 l::1e7 82 l::1xa5 �f7 83 f5 .l:f.b7 84 .l:Ia6 �g7 85 l::tg6+ �f7 86 l::1c6 �g7 87 l::1c4 .l:Ia7 88 �f4 �h6 89 l::tc6+ �g7 90 g5 l::ta4+ 91 �e5 l::1a5+ 92 �e6 l::1a7 93 l::1d6 l::1a 1 94 l::1d7+ �g8 95 f6 l::1f1 96 g6 l::1e 1 + 97 �d6 l::1d 1 + 98 �c6 l::1c1+ 99 �b5 l::1b 1+ 100 �c4 l::1c1+ 101 �b 3 l::1b 1+ 102 �c2 l::1b8 103 l::1g7+ �f8 104 l::1h7 1-0
Test 2 Obviously, a central breakthrough is necessary in order to gain anything more than the better half of a draw. Plan B (0 points) does not help in this direction, as Black is not forced to continue with 32 . . . d4; instead, he will just sit and wait, as White cannot improve his position. Plan A (S points) is slightly better for White, although I doubt if he can achieve something more concrete from the position. But Plan C (20 points) is by far the best - the resulting position is hopeless for Black !
The game continued:
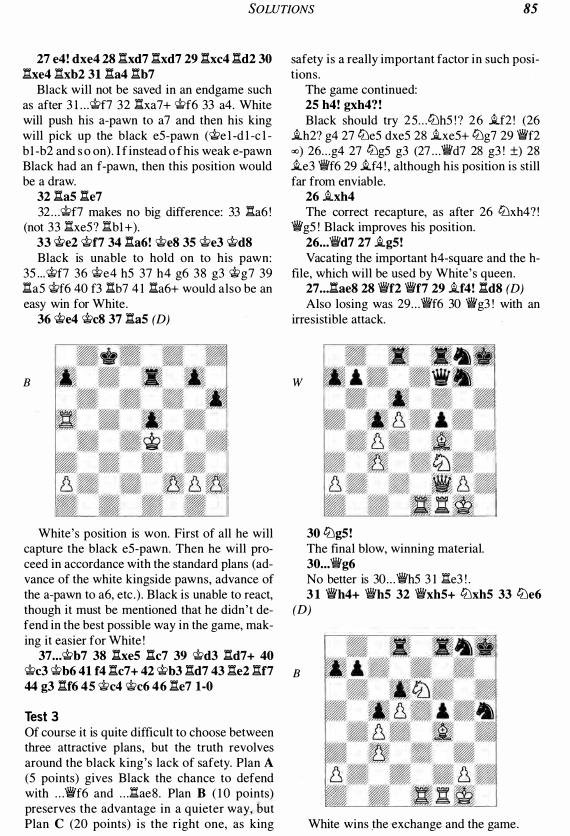
SOLUTIONS 85
27 e4 ! dxe4 2 8 l:txd7 l:txd7 2 9 l:tx c4 l:td2 30 l:txe4 l:txb2 31 l:ta4 l:tb7
Black will not be saved in an endgame such as after 3 l . . .�f7 32 l:txa7+ �f6 33 a4. White will push his a-pawn to a7 and then his king will pick up the black e5-pawn (�e l -d l -c l bl -b2 and s o on) . I f instead o f his weak e-pawn Black had an f-pawn, then this position would be a draw.
32 l:ta5 l:te7 32 . . . �f7 makes no big difference: 33 l:ta6 !
(not 33 l:txe5? l:tbl +). 33 �e2 �f7 34 l:ta6! �e 8 35 �e 3 �d 8 Black is unable to hold on to his pawn:
35 . . . �f7 36 �e4 h5 37 h4 g6 38 g3 �g7 39 l:ta5 �f6 40 f3 l:tb7 4 1 l:ta6+ would also be an easy win for White.
36 �e4 �c8 37 l:ta5 (D)
B
White's position is won. First of all he will capture the black e5-pawn. Then he will proceed in accordance with the standard plans (advance of the white kingside pawns, advance of the a-pawn to a6, etc . ) . Black is unable to react, though it must be mentioned that he didn' t defend in the best possible way in the game, making it easier for White !
37 • . • �b7 38 l:txe5 l:tc7 39 �d 3 l:td7+ 40 �c3 �b6 4 1 f4 l:tc7+ 42 �b 3 l:td7 4 3 l:te2 l:tf7 44 g 3 l:tf6 45 �c4 �c6 46 l:te7 1-0
Test 3 Of course it is quite difficult to choose between three attractive plans, but the truth revolves around the black king 's lack of safety. Plan A (5 points) gives Black the chance to defend with . . . 'iVf6 and . . . l:tae8. Plan B ( 1 0 points) preserves the advantage in a quieter way, but Plan C (20 points) is the right one, as king
safety is a really important factor in such positions.
The game continued: 25 h4 ! gxh4 ?! Black should try 25 . . . ltJh5 ! ? 26 �f2 ! (26
�h2? g4 27 ltJe5 dxe5 28 �xe5+ ltJg7 29 'iVf2 <Xl) 26 . . . g4 27 ltJg5 g3 (27 . . . 'iVd7 28 g3 ! ±) 28 �e3 'iVf6 29 �f4 ! , although his position is still far from enviable.
26 �xh4 The correct recapture, as after 26 ltJxh4? !
'iV g5 ! Black improves his position. 26 . . • 'iVd7 27 �g5! Vacating the important h4-square and the h
file, which will be used by White's queen. 27 . • . l:tae 8 2 8 'iVf2 'iVf7 2 9 �f4 ! l:td 8 (D) Also losing was 29 . . . 'iVf6 30 'iVg3 ! with an
irresistible attack.
w
30 ltJg5! The final blow, winning material. 30 . • . 'iVg6 No better is 30 . . . 'iVh5 3 1 l:te3 ! . 3 1 'iVh4+ 'iVh5 32 'iVxh5+ ltJxh5 33 ltJe6
(D)
B
White wins .the exchange and the game.

86 MODERN CHESS PLANNING
33 .. J�a8 34 lbx f8 lbx f4 35 �xf4 �x f8 36 l:te6 l:tf6 37 �x f6 lbx f6 38 nx f5 �g7 39 �f3 lbe4 40 �e 3 lbd2 4 1 �e7+ �f6 42 �xb7 a5 43 B �b8 lbx e4 44 �e8 �f5 45 �e6 a4 46 �f2 a 3 47 �e2 lbb6 48 �xd6 lba4 4 9 �d2 �e5 50 �a6 lbb2 51 d6 lbe4+ 52 �d 3 lbxd6 53 �xd6 1-0
Test 4 Plan A (20 points) is the right one. Bringing the 'poor' a8-rook directly into play can only be to Black's benefit, as the doubled black rooks on the e-file will be an extremely dangerous force. Plan B ( 1 0 points) does not promise more than equality, while Plan C (4 points) is unclear, as White also has targets after 1 5 lbc3 �c8 1 6 �ad l ! .
The game continued: 1 1 . . • �b8! 12 a 3 �b6 13 lbc3 �e6 14 i.f4
i.b7 Black's bishops look like hungry wolves. 15 lbd 3 e5! Preparing 1 6 . . . d5 , with a clear advantage.
The immediate 1 5 . . . d5 ? ! is inadequate due to 1 6 i.e3 ! .
16 i.e 3 Strengthening Black's centre with 1 6 l:txe6
fxe6 would not be a problem for Black. 16 ... �e8! Black defends energetically by tactical means,
as 1 7 i.xc5 ? is not on due to 1 7 .. .lhel + 1 8 �xe l i.xc5 1 9 �xe8+ �xe8 20 lbxc5 �e l#.
17 b4 ? ! White should concentrate on defence with
1 7 f3 or 1 7 :Lad 1 . 17 ... exb4 ! 18 axb4 "fie7 19 lbe2 After 1 9 lbc5 ? lbg4 ! 20 lbxe6 �xh2+ 2 1
�f1 �xg2+ 2 2 �e2 i.f6 the game would be over.
19 •.• i.d6! 20 lbg 3 (D) Also bad is 20 h3 lbd5 ! (2 1 lbd4 lbxe3 ! 22
lbxe6 i.h2+ 23 �h l i.xg2#) . 20 ... lbe4 ? Black didn' t realize it was time for the har
vest with 20 . . . i.xg3 ! 2 1 hxg3 �xe3 ! 22 fxe3 (22 �xe3 �xe3 23 fxe3 'iYxg3 24 lbe l lbg4 25 'iYxd7 'iVf2+ 26 �h l �f1#) 22 . . .'�xg3 23 e4 (23 lbf4 �xe3 24 �f1 lbg4 or 23 �e2 lbg4) 23 . . . i.xe4, winning.
2 1 i.d4 lbxg 3 22 hxg 3 i.xg 3! At last winning the pawn, but far less im
pressive than 20 . . . i.xg3 ! .
2 3 l:txe6 �xe6 24 lbe5 i.h2 +?! 24 . . . l:tg6 ! was much better. 25 �f1 Not, of course, 25 �h l ? �h6.
25 ... :Le7 26 �a5! i.d5? Keeping the tension with 26 . . . �c8 ! is the ap-
propriate continuation. 27 �xa6 h5 28 e4 "fif4 ! 2 9 exd5 Forced (29 �d l ? 'iVg4 ! ) . 29 . . . �xd4 30 lbd 3 h4 ! White would be fine after 30 . . .'iVxd5 ? 3 1
'iVa8+ �xa8 3 2 �xa8+ �h7 3 3 g3 h4 34 gxh4 ! (34 �g2? hxg3 35 fxg3 i.xg3) .
31 l:tel ! ? �xel+ 32 lbxel 'ilYxd5 Equally good is 32 . . .'fixb4 33 'iVd3 (33 "fic8+
�h7 34 "fixd7? 'iVc4+) 33 . . . i.d6. 33 'iVe2 i.d6 34 b5 �f8 35 lbf3 'iVb 3! 36
lbxh4 'iVbl + 37 'iVel 'iVxb5+ 38 'iVe2 (D)
B
38 ... "iYxe2 + ? A tragic mistake in time-trouble. In order to
create winning chances, Black should keep the queens on the board. It is well known that knights are better than bishops when there are pawns on only one side of the board. So, a better piece can easily compensate for a missing pawn, which is also the case in this game.

SOLUTIONS 8 7
3 9 'it>xe2 i.c5 40 ttJ f3 'it>e7 4 1 ttJe5! 112_112 A draw is inevitable, as White just places his
knight on the d3-square, blockading the extra black d-pawn, while Black has no way to break through. A sad end to an interesting game.
Test 5 Dynamic equality is a fact. Plan A (0 points) fails after 15 . . . i.d7 ! 16 'iif3 .l:Ie7 ! , when Black is on top. Plan C (0 points) is also ineffective due to a simple combination, which we shall examine. Thus, Plan B (20 points) is the right one.
The game continued: 15 �d 3?! ttJxe4 ! With this simple combination Black assumes
the advantage. 16 �xe4 ? ! White had t o try 1 6 ttJxe4 i.f5 ! 1 7 'iYxd6
i.xe4 1 8 �xc6 i.xc6 1 9 .l:Iad l b6, although Black has a clear advantage due to his strong bishop-pair. For practical reasons he tried to complicate the position a little bit, hoping for inaccuracies on Black's part.
16 .•. i.x c3 17 �x c6 bx c6 18 l!adl d5? And Black complies ! He should play the ob
vious 1 8 . . . .l:Iad8 1 9 .l:Id3 i.b4 ! 20 .l:Ifd l d5 2 1 ttJe5 �c8 ! +.
19 cxd5 i.xd5 20 .l:Ic1 ! i.f6 2 1 .l:Ix c5 as! 22 ttJd4 a4 ? !
Black's last try could have been 2 2 . . . i.xd4 23 i.xd4 a4 24 i.e3 hteb8, although White should be able to hold.
112_112 After 23 ttJxc6 axb3 24 axb3 i.xb3 25 i.d4
the draw is obvious.
Test 6 Plans A (20 points) and C (20 points) are nearly identical and both good. Black should avoid Plan B (0 points) .
The game continued: 49 • • • a5 Nothing changes with 49 . . . i.e l 50 f3 (50
i.e3 ? ! 'it>e7) 50 . . . a5 . 50 'it>b5 i.el 51 f3 'it>e8 52 h5 gxh5 Pawn exchanges do not favour the superior
side, but 52 . . . 'it>d7 ? ! (52 . . . f6 ! ? 53 h6? gxh6 54 i.xh6 g5 ! 55 f4 f5 ! and wins) is inferior: 53 hxg6 fxg6 54 i.e3 (54 f4 i.d2 ! ) and i.d4.
53 gxh5 'it>d7 54 h6 gxh6 55 i.xh6 'it>e6 56 i.g5 'it>e5
Black's position remains won. He will capture the white f-pawn, reaching a theoretically won ending.
57 i.e 3 f5 58 'it>a4 'it>f6 59 i.f4 'it>g6 60 'it>b5 'it>h5 61 'it>c4
The white king cannot guard the a5-pawn forever, as its counterpart will invade via the king side, and capture the f-pawn: 6 1 'it>a4 'it>h4 62 'it>b5 'it>h3 63 i.c7 'it>g2 64 f4 'it>f3 65 i.d6 i.d2 66 i.c7 'it>e4 67 'it>a4 i.xf4 68 i.xa5 i.e5 69 i.d2 'it>d3 70 i.h6 i.d4 ! 7 1 i.f4 'it>e4.
61...'it>h4 62 'it>d5 (D)
B
62 ... i.g 3? Black could have won with 62 . . . a4 ! 63 'it>e6
(63 'it>c4 i.g3 followed by . . . i.d6 and soon . . . 'it>h3) 63 . . . a3 64 i.e5 (64 'it>xf5 i.c3 ! ) 64 .. .f4 ! 6 5 'it>f5 i.d2 6 6 'it>e4 i.c 1 ! . Now, however, the placement of the black bishop on a spot from which it cannot simultaneously protect his apawn and threaten the white f-pawn is undesirable.
63 i.cl i.c7 64 'it>c6! i.d8 65 'it>b5 'it>g 3 66 f4 'it>f3 67 i.d2 'it>e2 68 i.c3 'it>d 3 69 i.e5 'it>c2 70 'it>a4 'it>d2 71 'it>b5 'it>d 3 72 i.d6 'it>c3 73 'it>a4 'it>c4 74 i.e5 'it>c5 75 i.b8 'it>c6 76 i.e5 i.c7 77 i.c3 'it>c5
Black has succeeded in switching his bishop to the right spot and will now head for the fpawn with his king.
78 i.d2 'it>c4 79 i.cl 'it>d 3 80 'it>b 3 'it>e2 81 'it>a4 'it>f3 82 i.d2 'it>e4 83 'it>b 3 a4+?
A bad move, giving away the win. Black could have won with 83 . . . i.b6 ! 84 'it>a4 'it>d3 85 i.e 1 'it>e3 .
84 'it>xa4 i.x f4 85 i.a5? 85 i.el ! i.e5 86 'it>b5 f4 87 'it>c6 ! would
have held the draw. 85 .•. i.e5 86 'it>b5

88 MODERN CHESS PlANNING
As 86 i.d2 brings no results (see the comment on White's 6 1 st move), White tries to reach a theoretical draw with his king behind the black pawn.
86 • . • f4 87 'it>c4 i.d4 88 i.c7 f3 89 i.g 3 i.g 1 ! 90 i.h4
White is reduced to moving his bishop, waiting for the opportunity to move his king to d5 when the black king moves away, or, alternatively, reach the promotion square with his king. 90 i.e 1 'it>e3 9 1 'it>d5 i.f2 92 i.b4 i.g3 93 i.c5+ 'it>d3 ! ! 94 i.b6 i.e1 95 'it>e5 i.d2 96 i.f2 'it>e2 ! 97 i.h4 i.e1 would also fail to save White.
90 ... i.h2 ? Incomprehensible. 90 . . . 'it>e3 9 1 'it>d5 i.f2 92
i.e7 i.e1 93 i.c5+ 'it>d3 ! brings about the position referred to in the previous comment.
91 i.e 1? Both sides make consecutive mistakes, illus
trating the difficulty of conducting this endgame. White could have achieved his aim with 9 1 i.f2 ! .
91 ... 'it>f4 ? 9 1 . . . i.g l ! would have been sufficed. 92 i.f2 i.g 3 93 i.b6 i.e 1 94 'it>d 3! Now White can achieve his aim by reaching
a theoretically drawn position. 94 ... 'it>g 3 95 'it>e4 i.f2 96 i.d8 'it>g2 (D)
w
In this ending the diagonal opposition loses. In order to reach the haven of the draw White must quickly place the g3-square under control by bringing his king to g4. If White continues mistakenly (i .e . practically offering Black a tempo) by moving his bishop, then he will lose; e .g . , 97 i.e7? i.g1 ! 98 i.h4 i.h2 ! 99 i.e 1 i.g3 .
97 'it>f5 ! i.g 1 98 i.h4 i.f2
The difference is clear. After 98 . . . i.h2 99 'it>g4 ! Black gets nowhere. White has reached the theoretical draw.
99 i.d8 i.c5 100 i.h4 i.e7 101 i.e 1 i.d6 102 'it>g4 i.b4 103 i.h4 l/z_l/z
Test 7 Plan A (5 points) is not bad, but Black seems able to keep White' s advantage to a minimum. Plan B ( 1 0 points) is also OK. White ' s pressure, especially along the c-file, is strong, and the black d4-pawn irrelevant. But Plan C (20 points) is quite nice and highlights Black's Achilles ' Heel .
The game continued: 22 e5! ? dxe5 22 . . . i.xe5 ! ? 23 i.f5 i.d7 24 i.xd7 'iVxd7 25
'iVd3 gives White sufficient compensation for the pawn.
2 3 i.f5 (D)
B
2 3 ... i.xe 3?! Black should not give up his dark-squared
bishop so easily. A better try is 23 . . . i.d7 24 i.xd7 'iVxd7 25 ttJb6 'iVb5 26 ttJf5 with compensation.
24 ttJxe 3 24 d6 ! ? i.xf5 (24 . . . i.xf2+? 25 'iVxf2 �d8
. 26 i.xc8 l:txc8 27 'iVxf6 +-) 25 'iVxf5 'iVe6 26 fxe3 ;!; is not bad.
24 ... e4 Black tries to be active, but he should have
preferred the modest 24 . . . i.d7 25 l:ta3 i.b5 26 l:td l , when White has compensation.
25 l:tfd 1 25 f3 ! ? i.xf5 26 ttJxf5 'iVe5 27 fxe4 is equally
good. 25 •.• i.x f5 26 ttJx f5 'iVe5 27 ttJe 3 ttJd7 28 d6
l:te6 2 9 l:td5 'iVf6 30 l:tad 1 l:tc8

SOLUTIONS 89
Maybe Black should have tried 30 . . . b6 ! ? 3 1 'u5d2 ! bxa5 32 lLld5 fiig7 (32 . . . fiid8? 33 lLle7+ Wh7 34 lLlc6) 33 fiia4 'ud8 34 fiixa5 ;t.
31 l:t5d2 Wh S (D)
w
32 filb 3! 'uc6? A serious error ! 32 . . . ,Ub8 33 lLld5 �f5 34
lLlb6 'ud8 35 lLlc4 'ub8 was essential . 33 lLlc4 ! 3 3 'iYxb7? ! lIexd6 34 �a8+ Wh7 3 5 'uxd6
'uxd6 36 'ilVxe4+ Wg8 37 �e8+ lLlf8 38 lLld5 fiie6 39 �xe6 1Ixe6 40 g4 is only slightly better for White.
33 • • • fiid S 34 'iVxb7 filcS 35 fiib 3! 'iVd S 36 f3! e 3? !
3 6 . . . exf3 ? ! 3 7 �xf3 .uc8 38 �f2 'uf6 3 9 fiih3 +- is equally bad for Black, but 36 . . . f5 37 'ue2 �e8 38 fxe4 'uxe4 39 'uxe4 fxe4 (39 . . . �xe4? 40 fiib7 +-) 40 fiih3 Wg7 4 1 'ue l ± was the only continuation. Now Black's position falls apart.
37 'ue2 l::!.cS 3S 'uxe 3 'uxe 3 39 'iVxe 3 'iVf6 40 lLlb6! 'iWf5?
A blunder, but 40 . . . lLlxb6 41 axb6 Wg7 42 fiie7 +- and 40 . . . ,Ud8 4 1 lLlxd7 1Ixd7 42 �e8+ +- are also insufficient.
1-0
Test 8 Plan A (5 points) is not optimal, because after 1 3 . . . lLlh8? ! 1 4 i.xd6 fiixd6 1 5 lLle5 lLlf7 1 6 f4 ! White should retain a slight advantage and, most importantly, Black lacks counterplay. Plan B ( 1 0 points) does not look bad, but it is slow, allowing White to pursue his own plans on the queenside. Plan C (20 points) , although not very common in such positions, is the best option.
The game continued:
13 ... lLlx f4 ! 14 ex f4 1 4 gxf4? g5 ! 1 5 fxg5 lLlxg5 ( 1 5 . . . f4? ! 1 6 h4 ! )
1 6 lLlxg5 fiixg5+ 1 7 Wh l i.xh2 ! 1 8 Wxh2 Wh8 (not 1 8 . . . ,Uf6?? 19 ,Ugl 'uh6+ 20 i.h5) is bad for White.
14 ... g5! 15 lLlxg5 Also after 1 5 fxg5 , the planned 1 5 . . . f4 would
be strong. 15 ... lLlxg5 16 fxg5 f4 ! The only move. 1 6 . . . fiixg5 ? is wrong: 1 7 f4
fii g7 1 8 c5 i.c7 1 9 fiid3 a5 20 lLld2 gives White a slight advantage.
17 lLld2 fiixg5 ls lLlf3 fiig7 19 i.d 3 An interesting position, with White having
compensation for a pawn, could arise after 1 9 g4 ! ? 'iVxg4+ 20 Wh l Wh8 2 1 ,Ugl �h5 22 c5 i.c7 23 i.d3 .
19 ... i.d7 20 'iVe2 Wh S 2 1 Wh 1? ! White should accept an unclear endgame af
ter 2 1 c5 ! i.c7 22 lLle5 i.xe5 23 fiixe5 'iiixe5 24 dxe5 a5 ! .
2 1.. • .l:tf6?! 2 l . . .dxc4 ! is preferable: 22 i.xc4 a5 23 lLle5
axb4 24 axb4 'uad8 ! +. 22 lLle5 l::!.a fS 23 fiig4 'WIe7 (D) An equal endgame arises after 23 . . . �h6 ! ? 24
c5 (24 lLlxd7? fxg3 25 fxg3 .I:tf2 26 h4 .I:tg8 -+) 24 . . . fxg3 25 fxg3 l:tf2 26 �h4 ltxfl + 27 �xfl 'uxfl + 28 i.xfl fiixh4 29 gxh4 i.xe5 30 dxe5 i.e8 3 1 i.h3 , but Black wanted more.
w
24 lLlxd7 This cannot be criticized, but 24 c5 i.xe5 25
dxe5 n6f7 26 ,Ugl ,Ug7 (26 .. .fxg3 ? ! 27 J:xg3 l:lxf2? 28 ltcgl 'iYf7 29 i.xh7 ! +-) 27 fiih3 fxg3 28 fxg3 leads to an interesting and double-edged position.
24 .. .'ii'xd7 25 cxd5 cxd5 26 'ufe 1 l:!.g S 27 �h 3 'ue S 2 S �e2 fiig7 2 9 gx f4 ? ?

90 MODERN CHESS PLANNING
A blunder in time-trouble. 29 g4 f3 30 g5 1:.ff8 3 1 1:.xe6 1:.xe6 32 �xe6 �xg5 33 1:.g 1 'ilVf4 34 'ilVh3 was essential .
2 9 •. J1h6! 30 'ilVe 3 30 �g2 'ilVxd4 3 1 1:.g1 �xf4 -+. 30 . • . 'ilVf6! 0- 1
Test 9 Exchanging queens will allow White to include his king in the proceedings. However, Black will not readily agree to that, so White has to force him. Plan A (3 points) doesn' t do much, as Black can defend with . . . 1:.c5 and/or sometimes obtain counterplay with . . . e4. Plan B (8 points) also looks excellent, but Black might get some counterplay after 4 7 �fl 1:.c 1 48 �b5 1:.gl . The correct plan is C (20 points) .
The game continued: 47 ltJg5! 'iYd7 (D) Or 47 . . . 1:.c3+ 48 �d2 1:.c2+ 49 �d3 e4+ 50
ltJxe4.
w
48 �f1 ! ? 4 8 ltJxe6+ 1:.xe6 4 9 �xe6 'ilVxe6 5 0 'ilVxb7+
�h6 5 1 a6 was also winning, but during the game White was wrongly afraid of the possibility of perpetual check after 5 1 . . .'ilVg4.
48 ... 1:.c7 This looks like the only try, as 48 . . . 1:.c 1 49
�b5 1!Vc8 50 �e7+ leads to mate. 4 9 �d 3 �c6 50 a4 The immediate 50 'iVe4 was possible, but
White retains winning chances even in the endgame, in case something goes wrong with his attack.
50 •.. 1:.d7 51 'ilVe4 'iYc1 + The endgame after 5 1 . . .1!Vxe4+ 52 ltJxe4 �f7
53 a6 bxa6 54 �xa6 1:.a7 55 �b5 and ltJd2-c4 would be a slow death.
52 �e2 'iYb2 + 53 �f3 'ilVc3 54 'ilVxg6+ �f8 55 'iYf6+! �e8 56 'ilVxe6+ �d8 (D)
Or 56 . . . 1:.e7 57 �g8+ �d7 58 'iYd5+ �e8 59 ltJe4.
w
57 'ilVg8+ �c7 Or the beautiful 57 . . . �e7 58 'iVf7+ �d8 (if
58 . . . �d6, then 59 ltJe4+) 59 ltJe6+ �c8 60 'ilVe8+ 1:.d8 6 1 'ilYxd8#.
58 'ilVc4+ 1-0
Test 1 0 I n such difficult positions there cannot be more than one satisfactory plan. Plan B (0 points) is the worst of all, as after 3 8 1:.bdl 1:.ad8 39 ltJe3 1:.e6 ! Black would get at the white f6-pawn. Plan A (5 points) is also not optimal, as after 38 ltJxf4 gxf4 39 h4 Black can assume the initiative with 39 . . . d5 ! 40 exd5 (40 1:.be l dxe4 4 1 �xe4 �xe4+ 42 1:.xe4 'ilVc6 ! ) 4 0 . . . e4. Although things are far from clear, I still prefer Black. Plan C (20 points) is correct.
The game continued: 38 h4 ! d5! As the lines 38 . . . ltJxg2 39 �xg2 gxh4 40
.'ilVh6 1:.g8 4 1 1:.f5 1:.g6 42 'ilVxh4 and 38 . . . h6? 39 hxg5 hxg5 40 ltJxf4 gxf4 41 �h2+ seem pleasant for White, Black tries to mix things up.
39 exd5 e4 40 hxg5? White should try 40 �d 1 e3 ! 4 1 ltJxe3 l:txe3
42 'iYxe3 ltJxd5 43 'iVf2 ltJxc3+ 44 �f3 ltJxbl 45 1:.xbl gxh4 46 1:.e l , when he ought to hold the position.
40 • . . ltJg6? 40 . . . exf3? 4 1 ltJxf4 and 40 . . . ltJxg2? 4 1 �xg2
are out of the question, but Black can grab the advantage with 40 . . . ltJxd5 ! 4 1 �e2 e3 42 'iVd4 (42 'iYel ltJf4 43 �f3 e2 +) 42 . . ..l:tad8.
41 �e2 e 3 42 'ilVd4 ! 1:.ad8 43 1:.f5!

SOLUTIONS 91
White is after the black e-pawn, but first drives the strong b7 -bishop to an inferior square.
43 ... .ltc8 44 l:tf3 l:te5 45 l:txe 3 l:txg5 46 d6! w Back-rank mate ideas allow White to en-
force this important advance. 46 ... �b847 �x c4 .ltb7 48 �x f7! lLlh4 (D)
w
4 9d7? White could win in various ways, such as 49
.ltfl .ltd5 (49 . . . lLlxg2 50 ne7) 50 �e7 lLlxg2 5 1 .ltxg2 .ltxg2+ 52 'it'xg2 l:txg4+ 5 3 'it'h3 or 49 .ltd3 .ltxg2+ 50 'it'gl �b7 5 1 d7 ! �xd7 52 .l:.e8+ ! . True, the pawn advance in the game was quite tempting, but not the best move !
4 9 • • • .ltxg2 + 50 'it'gl .lte4 ? The last mistake. 5 0 . . . .ltb7? 5 1 l:te8+ and
50 . . . l:tgg8? 5 1 .ltd3 lLlg6 52 l:te7 are clearly losing for Black, but he should try 50 . . . .ltc6 ! 5 1 �e8+ (5 1 l:td l ? ! lLlf3+ ! 5 2 .ltxf3 'ifg3+ =) 5 l . . .l:txe8 52 l:txe8+ 'iVxe8 53 dxe8"i1k'+ .ltxe8 54 b4 axb3 55 l:txb3, with just a slight advantage for White.
51 �e7? White thought that this was a killer ! But he
should play 5 1 l:td l lLlf5 (5 1 . . .lLlf3+ 52 .ltxf3 �g3+ 53 'it'fl �h3+ 54 'it'el �g3+ 55 'it'd2 +-) 52 �xe4 �g3+ 53 'it'fl �h3+ 54 'it'e l �h l + 55 'it'd2 �xe4 56 gxf5 with a decisive advantage.
51...lLlf5? Not, of course, 5 1 . . . .ltxb I? 52 f7 ! but after
5 1 . . .lLlf3+ ! 52 .ltxf3 �g3+ Black would force a draw by perpetual check.
52 �xe4 lLlxe 3 53 �xe 3 l:te5 (D) Or 53 . . . �e5 54 iYxe5 l:txe5 55 l:tfl ! l:txe2 56
f7 +-. 54 �d4 ! 'it'g8 There was no alternative, as the endgame af
ter 54 . . . l:txe2 55 f7+ �e5 (55 . . . l:te5 56 l:te l ) 56
�xe5+ l:txe5 57 l:tfl l:tf8 58 d8� l:txd8 59 f8'iV+ l:txf8 60 l:txf8+ is lost.
55 .ltc4+ 'it'f8 56 l:tfl �c7 57 �f4 �c5+ 58 'it'h2 l:tg5 59 .l:.el :g6 60 l:te2 ? !
White could have crowned his efforts brilliantly with 60 l:te8+ ! l:txe8 6 1 dxe8'if+ 'it'xe8 62 f7+ 'it'f8 63 �b8+. Time-trouble was a major factor here.
60 .•. �b6 61 'iVe5 �x f6 62 �x f6+ The game was adjourned at this point, but
Black resigned before resumption, because after 62 . . . l:txf6 63 .ltb5 White wins easily. A rather interesting game with a lot of ups and downs !
1-0
Test 1 1 It seems that Black can retain a pleasant advantage with all three plans. But we should consider Plan B (7 points) as the weakest, as it throws away Black's advantage in the centre and creates a nasty hole on c4 for no reason. Plan C ( 1 3 points) is fine, but it does not allow Black to get a well-protected passed pawn, as White can prepare to capture with a piece on e4 (24 �e2, or 24 lLld2, or even 24 exd5) . With the correct Plan A (20 points) Black is able to squeeze the maximum from his position, as described.
The game continued: 22 .•. dxe4 ! 2 3 dxe4 Black keeps a clear advantage after 23 lLlxe4
lLlxe4 (or 23 . . . lLld5) 24 dxe4 nb8 . 2 3 . • . .l::!.b8! 24 lLld2 lLld4 25 'iVd 3 25 .ltxd4 cxd4, with the idea . . . lLld7-c5 , is
not attractive for White . 25 • . . h5! 26 lLlg f1 l:td6! 27 .ltxd4 White 's hand is forced, as 27 lLlc4? ! l:td7 ! +
and 27 �c4? �e6 ! 28 lLle3 .lth6 ! 29 'it'fl .ltxe3

92 MODERN CHESS PLANNING
30 'iVxe6 l:.xe6 3 1 fxe3 tbb3 32 tbxb3 11xb3 -+ are not appealing.
27 ... cxd4 28 tbc4 l:.c6 2 9 tbfd2 tbd7 30 l:.cbl i..b4 ! 31 'iVh 3 tbc5 32 a5 �g7
Threatening 33 . . . tbxe4 ! . 33 tbf3 f6 34 tbcd2 'iVc8 34 . . . l:.bc8 =+ and 34 . . . tbd3 ! =+ are also good
enough. 35 'iVg 3 'iVg4 36 l:.c1 l:.b c8 37 l:.c4 i..xd2 ? ! Again 37 . . . tbd3 ! was a stronger continua
tion. 38 'iVxg4 Forced (not 38 tbxd2? 'iVe2 ! and Black wins
at once) . 38 ... hxg4 39 tbxd2 tbd 3 40 b 3 tbb2 4 1
l:.x c6 l:.x c6 42 �fl There was no joy in the active 42 b4 11c2 43
tbb3 (43 b5 l:.xd2 44 bxa6 l:.c2 45 a7 l:.c8 46 l:.bl tbd3 ! -+ or 43 tbfl l:.c4 44 b5 axb5 45 a6 l1a4 46 l:.xa4 tbxa4 47 a7 tbb6 -+) 43 . . . l:.c4 44 tbc5 d3 ! -+.
42 ... l:.c2 ! 43 �e2 �f7! (D)
w
The king is an important piece in every endgame. Now Black is planning to invade with his king ( . . . �e7-d6-c5-b4-c3 -+) if White does not push his b-pawn.
44 b4 tbc4 45 �d 3 l:.c3+ 46 �e2 tbd6 47 l:.hl f5! 48 f3
48 exf5 gxf5 49 h3 d3+ 50 �d 1 l:.a3 5 1 �c 1 l:.al + 52 tbbl tbc4 -+.
48 . • . gx f3+ 49 gx f3 f4 ? ! The forcing variation 4 9 . . . fxe4 50 fxe4 l:.e3+
5 1 �f2 tbxe4+ 52 tbxe4 l:.xe4 53 b5 axb5 54 l:.al l:.f4+ 55 �e2 �e6 56 a6 l:.f8 57 a7 l:.a8 -+ is much better.
50 l:.bl ttJb5 51 �dl l:.c8 52 l:.b2 tbc3+ 53 �el tba4 ! 54 l:.bl l:.b8 55 tbc4 �f6 56 tbd2 l:.h8! 57 tbfl tbc3 58 l:.b2 g5!
After some preparatory moves, Black is on the right track. By advancing his g-pawn he prepares the final blow.
59 l:.g2 l:.b8 60 l:.b2 l:.h8 61 l:.g2 l1b8 62 l:.b2 g4 ! 63 tbd2
No better is 63 fxg4 �g5 ! 64 h3 �h4 ! . 63 ... gx f3 63 . . . l:.h8 ! is even stronger.
64 tbx f3 l1b5 Black should avoid 64 . . . tbxe4? 65 l:.e2. 65 tbd2 �g5! 66 �fl f3! 67 tbx f3+ �f4 68
tbd2 tbxe4 69 tbc4 tbc3 70 l:.f2 + �g5 71 h4 + 7 1 tbd6 is met by 7 l . . .l:.d5 72 tbf7+ �g6
and . . . d3-d2. 71 ... �xh4 72 l:.f5 (D) Or 72 l:.f6 e4 73 l:.xa6 l:.xb4 -+.
B
72 ... e4 ! 73 tbd6 The black pawns would be unstoppable after
73 l:.xb5 tbxb5 . The rest was quite easy : 73 ... l1xb4 74 tbxe4 tbxe4 75 �f4 + �g 3 76
l:.xe4 �f3 77 �el d 3 78 l:.dl l:.b 3 0- 1
Test 1 2 In this position Black has managed to achieve good play. It would be 'unfair' to expect an advantage without Black's help, although White should try his best. Plan A (0 points) is unsatisfactory, as after 20 i..d3? tba4 ! Black gains the upper hand. Plan B (5 points) is in accordance with the position's evaluation. A draw would not be far away, as White's pressure is negligible. White should try Plan C (20 points) . Even if it is no� enough for a serious advantage, it maintains the pressure and forces Black to find concrete moves to keep White 's advantage to a minimum.
The game continued: 20 l:.bl ! tbx c4 2 1 'iVx c4 i..e5

SOLUTIONS 93
White would be much better after 2 1 . . JHc8 22 �xb4 �xb4 23 l:txb4 l:txa2 24 lLlxd6 l:tc 1 + 2S 'itg2 l:tcc2 26 l:tb8+ oltf8 27 'ith3 ! .
22 �xb4 �xb4 2 3 l:txb4 l:txa2 24 .l:!.c4 ! Now Black needs to be on the alert. 24 ... l:tfa8? ! After this White should gain the advantage.
24 . . . l:tb2? is bad due to 2S lLlxd6 ! +-, but Black should try 24 . . . fS ! ? 2S exfS l:txfS 26 l:tc8+ l:tf8 27 l:txf8+ 'itxf8 28 l:txh7 l:td2 29 lLlc7 oltd4 t.
25 l:tcc7?! Wrong. 2S l:tc6 ! promises an advantage. 25 . • . l:tb2 ? ! Black could force a draw with 2 S . . . l:te2 ! 26
l:txf7 l:ta1 + 27 'itg2 l:taa2 28 l:tfc7 l:txf2+ 29 'itg1 l:tg2+ 30 'itfl l:taf2+.
26 lLla7! White could go astray with 26 l:txf7? l:txbS !
or 26 lLlxd6? l:txb7 . 26 . • . .l:!.xb7 27 l:txb7 oltd4 Or 27 . . . 'itf8 ? ! 28 lLlc6 ±.
28 lLlc6 l:ta 1 + ? A critical mistake. With 28 . . . oltcS ! Black
could keep White 's advantage to a minimum. 2 9 'itg2 oltc5 30 l:tb2 ! White would lose his advantage with 30 eS ? !
dxeS 3 1 lLlxeS l:t d 1 ! . 30 • • • l:td 1 (D)
w
Black seems to be doing OK, but actually White holds the advantage, as he can apply effective pressure against the weak squares in Black's camp (d6 and f7) . This task is now easier because there no defensive forces around the black king.
31 lLld8! oltd4 Or 3 l . . .'itf8 32 lLlb7 oltd4 33 l:tc2 ! ±. 32 l:tb8! 'itg 7 33 l:tb7 'ith6?!
Maybe 33 . . . l:td2 34 lLle6+ 'itf6 3S lLlxd4 l:txd4 36 l:td7 ± was the lesser evil , but still not enough to save Black.
34 lLlx f7 + 'ith5 35 lLlxd6 l:td2 3S . . . h6 36 lLlbS l:tb1 37 d6 l:tb2 38 lLlxd4 !
l:txb7 39 eS +-. 36 l:txh7+ �g5 37 h4+ 1-0 Black resigned in view of 37 . . . 'itf6 38 lLle8+
'iteS 39 l:te7#.
Test 1 3 All three plans are satisfactory, but some are better than others ! Plan A ( 1 0 points) is only sufficient for equality and Plan C (S points) has the disadvantage of not completing development. The c8-bishop is struggling to get into play. After 1 8 . . . gS ? ! 19 fS lLlf8 White should continue 20 f6 ! (20 lLla4 lLld7 2 1 lLlcS lLleS 22 b3 b6 23 lLld3 +) 20 . . . olth8 2 1 oltd4, with an unclear game. The game continued with the correct Plan B (20 points) :
18 ... f5! 19 ex f5 (D) After 1 9 eS ? gS ! 20 fxgS (20 lLle2 gxf4 2 1
lLlxf4 oltxeS +) 20 . . . lLlxgS 2 1 oltf4 oltxeS 22 l:tde l lLlf7 Black can count on a healthy extra pawn.
B
19 . • . lLlf8! The main idea behind Black's strategy. 20 oltg 1? I t was better to try 20 f6 ! oltxf6 2 1 oltd4
oltxd4 22 l:txd4 oltfS 23 lLle4 oltxe4 24 oltxe4 l:tad8 2S l:tfd 1 l:txd4 26 l:txd4 l:te7, with just a slight advantage for Black.
20 . . • oltx f5 2 1 l:tfe 1 l:txel 22 l:txel lLle6 2 3 olte 3 l:td8
Black's pieces are all optimally placed, pressurizing White's pawns. A dream position for every King 's Indian player !

94 MODERN CHESS PLANNING
24 'it>h2 ..td4 ! Now, exchanging the dark-squared bishops
would lead either to the loss of the f4-pawn or the black rook's invasion on its 7th rank.
25 c;t>g 3 ..txe 3 26 �xe 3 .i:!.d2 (D)
w
White cannot avoid material loses. Although he fought to the bitter end, the result could not be changed. Black converted his advantage slowly but steadily into victory.
27 ..te4 ttJd4 28 ..tg2 .uxb2 2 9 'ue7 'it>f8 30 lIe7 ttJe6 31 .l::!.e8+ 'it>e7 32 ..tf3 l::te2 33 ttJd 1 lIxa2 34 l:lh8 l:ta 3 35 'it>f2 ttJx f4 36 1Ih7+ 'it>d6 37 .l::!.xb7 ttJxh 3+ 38 'it>g2 ttJ f4+ 39 'it>f2 ttJd 3+ 0- 1
Test 1 4 Actually this is the kind o f position w e characterize as dynamic equality. This type of equality can easily be disturbed by the slightest slip. Both sides must create threats as soon as possible, so as not to fall into passivity. Plan B (5 points) leads to dead equality : 27 ..te2 11h8 28 ..th5 .l::!.c8 29 a3 ..td6 30 �bc l (30 l:!d2 ..te5 3 1 nbd l .uc7 =) 30 . . J:txc 1 3 1 Itxc 1 .uc8 - l}oth sides can sign the scoresheets without any bad feelings ! Plan C ( 1 0 points) is rather equal (but also somewhat unclear) after 3 1 . . . .l::.dg8, so Plan A (20 points) is the correct one and allows White to continue fighting under reasonable circumstances .
The game continued: 27 ..te2 ! ? h5 28 ..tb 3 .l::!.h8 2 9 kIb c1 ..td6 30
ttJe2 h4 ? Black missed 30 . . . ..te5 ! 3 1 .i:!.d2 h4 32 gxh4
�xh4 33 g3 .l::.h6 34 .ucdl i.g4 (34 . . . �dh8? ! 35 ..txd5 ..txd5 36 �xd5 g4 37 'iitf1 l:th l + 38 ttJgl ) 35 'it>g2 ..th3+ 36 'it>g l i.g4, when he would be able to achieve a draw.
31 gxh4 gxh4 Or 3 l . . .�xh4 32 ttJc3 �dh8 33 c;t>f1 d4 34
exd4· ..txb3 35 axb3 ±. 32 ttJ e3 �h5 Not much different is 32 . . . h3 33 ..txd5 (33
gxh3 ? �dg8+ 34 'it>f1 ..txh3+ 35 'it>e2 ..tg4+ co) 33 . . . h2+ 34 'it>h l ..txd5 35 ttJxd5+ 'iite6 36 l:i.c2 ±.
33 ..txd5 h 3 34 ttJe4+ 'it>e7 35 ..txe6 h2 + Black must give this check, as 35 . . . 'it>xe6 36
gxh3 lIg8+ 37 'it>f1 ..te7 38 1Ic7 kIxh3 39 �dd7 +- is easy for White.
36 'iith 1 'it>xe6? ! Black must try 36 . . .fxe6 37 f4 ±. 37 f4 ? ! White missed the deadly 37 ttJc5+ ! 'it>e7 38
ttJxb7 J::!.d7 39 ttJxd6 l:i.xd6 40 ':c7+ 'it>d8 4 1 .uxd6+ 'it>xc7 4 2 �xa6 +-.
37 • . . ..te7 38 .uxd8 ..txd8 39 ttJg 3 l:!.h7 40 ttJn ..tb6 4 1 ttJxh2 'it>d5 42 g 3 f5 43 'it>g2 ..txe 3 44 'ud 1 + 'it>e4 45 ttJ f3 ( D)
B
Now the game is decided, as White 's extra material is worth its weight in gold in the endgame. Black slipped up on his 30th move and that was enough to seal his fate !
45 ... a5 46 ttJe5+ 'it>b4 47 .l::!.d 3 i.a7 48 .l::!.b 3+ 'it>a4 49 .i:!.e3 'iitb5 50 l1b 3+ 'it>a4 51 ttJ e4 b5 52 ttJd6 b4 53 �d 3 i.b8 54 ttJx f5 'iitb5 55 b 3 �e7 56 ttJd6+ 'it>e5 57 'it>f3 l:th7 58 ttJe4+ 'it>e6 59 �d2 .uh 1 60 ttJ f2 l:tc1 61 g4 l:i.e3+ 62 'it>e4 Itg 3 63 g5 i.e7 64 ttJd 3 ..tb6 65 ttJe5+ c;t>e7 66 g6 ..tg 1 67 'it>f5 1-0
Test 1 5 White must be on the alert; otherwise he cannot claim any opening advantage. Plan A (0 points) is out of the question, as after 1 3 .l::!.fd 1 'iVa5 ! ( 1 3 . . . i.e7 ? 1 4 ttJd5 cxd5 { 1 4 . . . ..txd5? 1 5 cxd5

SOLUTIONS 95
c5 1 6 b4 +- } 1 5 cxd5 'iVb7 1 6 dxe6 fxe6 1 7 'ilVc4 'it>f7 1 8 'ilVc7 ±) 1 4 c5 ! ? dxc5 1 5 ttJd2 .te7 1 6 ttJc4 'ilVc7 1 7 ttJd6+ .txd6 1 8 �xd6 �xd6 19 l::txd6 l::tc8 Black is fine. Plan B ( 1 0 points) has a point, as after 1 3 ttJh4 l::tb8 14 b3 g6 ! 1 5 ttJf3 ! .tg4 1 6 ttJd2 .tg7 1 7 h3 .te6 1 8 l::tfd 1 J:ld8 White can switch back to the right track with 1 9 b4 ! ;t, but of course White has lost valuable time. It is clear that Plan C (20 points) is the correct one and very effective at that.
The game continued: 13 b4 ! 'iVb7?! The lesser evil was 13 . . . a6 1 4 a4 l::tb8 15 b5
;t, but not 1 3 . . . .te7 ? ! 14 ttJd5 cxd5 1 5 cxd5 �b7 1 6 dxe6 fxe6 17 b5 ±.
14 b5 .te7 15 bx c6 'iVx c6 16 ttJd5 .td8 17 ttJb4 !
A strong idea, preparing the c5 advance. Black has no problems after 17 l::tfd l ? ! O-O ! 1 8 ttJb4 �c7 1 9 'ilVxd6? 'ilVxd6 20 l::txd6 .te7 2 1 l::txd7 .txd7 22 ttJxe5 .txb4 2 3 ttJxd7 l::tfe8 .
B
17 ... �c7 18 ttJa6! (D)
18 .. :�a5! ? 1 8 . . . �c6 1 9 c5 ±. 19 c5! The right path, as I already mentioned. 1 9
'ilVxd6? l::tc8 20 c 5 .te7 2 1 .td2 ! (2 1 'ilVd3 :1c6) 2 1 . . . .txd6 22 .txa5 ttJxc5 23 ttJxc5 l:txc5 24 �xc5 .txc5 25 ttJxe5 0-0 would not be to White 's taste.
19 • . • dx c5 20 ttJx c5 ttJx c5 2 1 J:tx c5! 2 1 .txc5 ? ! .te7 22 'ilVe3 ! �c8 23 .txa7 lhc l
24 l::txc l f6 25 ttJh4 'it>f7 26 ttJf5 l:Ic8 with compensation.
2 1...�a4 ! The only chance, as 2 1 . . .'ilVxa2? loses to 22
'ilVb5+ 'it>f8 23 'iVb7 . 22 ttJxe5 0-0 2 3 ttJ c6! 'iVxa2
Black could try 23 . . . .tb6 24 l::tc3 ! (24 l::tc2? .txe3 25 fxe3 =) 24 . . . .txe3 25 'ilVxe3 'ilVxa2 26 'ua3 'ilVb2 27 l::txa7, but White still has every reason to smile (±) .
24 .td4 ! .tb6 25 ttJe7+ Or 25 'iVg3 f6 26 l::tcc 1 l::tae8 27 .txb6 axb6
28 ttJd4 ±. 25 .. . 'it>h7 (D)
w
26 �g 3? In time-trouble White goes astray. The right
idea was 26 l::ta l ! �b3 (26 . . . 'ilVxa l +? 27 .txal .txc5 28 'ilVc3 ! ) 27 nc3 'iVb4 28 ttJc6 'iVb2 29 J:lbl 'ilVa2 30 .txb6 axb6 3 1 �xb6 ±.
26 • . . l::tg8! 27 ttJxg8 J:!.xg8 28 J:lal �e2 2 9 'iVe 3 �xe 3 30 .txe 3 .tx c5 31 .tx c5 l::tc8 32 .txa7 na8
The opposite-coloured bishop endgame is an easy draw. Black was lucky to escape into this .
33 f3 'it>g6 34 l:!.a6 'it>h7 35 'it>f2 .tc8 36 l::ta5 .te6 37 g4 'it>g8 38 h 3 f6 39 f4 'it>f7 40 f5 .td7 4 1 'it>e 3 .tc6 42 l::tc5 112_112
Test 1 6 Plans B ( 0 points) and C ( 0 points) are both bad for White. In the first case, after 1 8 dxc5? bxc5 1 9 ttJa4 �b5 ! 20 ttJc3 'ilVb7 Black gets the upper hand. In the latter, after 1 8 e4? dxe4 1 9 ttJxe4 J:lxe4 2 0 �xe4 .txe4 2 1 'ilVxe4 cxd4 22 b4 (22 ttJxd4? ttJc5 23 'ilVe3 ttJe6 -+) 22 . . . ttJc7 Black should also feel more than happy. So, White should choose Plan A (20 points) , which is also a typical one in similar positions .
The game continued: 18 ttJe2 ! g6 19 ttJd2 ! .ta8 20 ttJbl 20 b4 ! ? c4 (20 . . . cxb4 2 1 "iVa4 ! ttJc7 22 axb4
;t) 2 1 ttJbl ttJc7 22 ttJbc3 ;t is also playable. 20 • . . c4 2 1 ttJb c3 b5?! 2 l . . .ttJc7 22 b3 a6 ;t i s better.
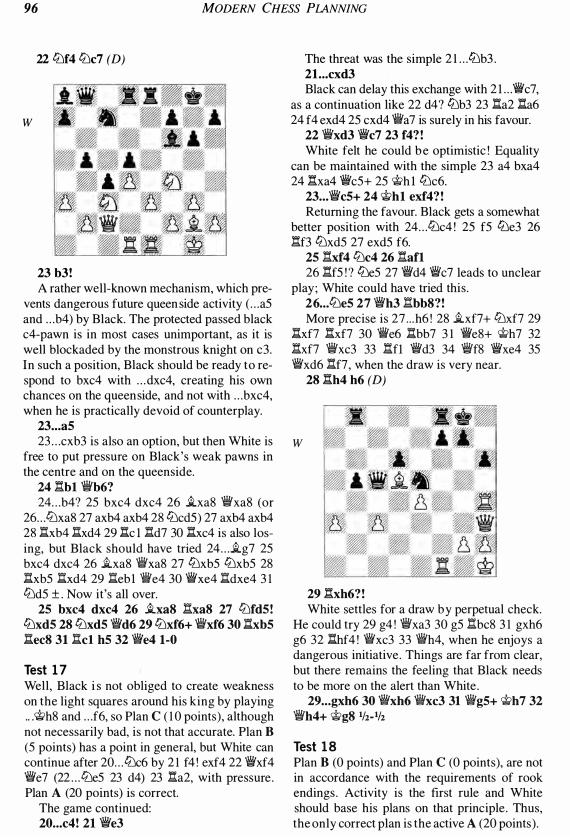
96 MODERN CHESS PlANNING
22 4Jf4 4Jc7 (D)
w
2 3 b 3! A rather well-known mechanism, which pre
vents dangerous future queen side activity ( . . . as and . . . b4) by Black. The protected passed black c4-pawn is in most cases unimportant, as it is well blockaded by the monstrous knight on c3. In such a position, Black should be ready to respond to bxc4 with . . . dxc4, creating his own chances on the queen side, and not with . . . bxc4, when he is practically devoid of counterplay.
2 3 ... a 5 23 . . . cxb3 is also an option, but then White is
free to put pressure on Black's weak pawns in the centre and on the queenside.
24 l:tb l �b6? 24 . . . b4? 2S bxc4 dxc4 26 .i.xa8 �xa8 (or
26 . . . 4Jxa8 27 axb4 axb4 28 4JcdS) 27 axb4 axb4 28 l:txb4 �xd4 29 l:tc l l:td7 30 l:txc4 is also losing, but Black should have tried 24 . . . .i.g7 2S bxc4 dxc4 26 .i.xa8 �xa8 27 4JxbS 4JxbS 28 l:txbS l:txd4 29 l:tebl 'iVe4 30 �xe4 l:tdxe4 3 1 4JdS ± . Now it's all over.
2 5 bx c4 dx c4 26 .i.xa S l:txa S 27 4Jfd 5! 4Jxd 5 2 S 4Jxd 5 'iVd6 2 9 4Jx f6+ �x f6 30 :!'xb 5 l:te cS 31 l:tcl h 5 32 'iVe4 1-0
Test 1 7 Well, Black i s not obliged to create weakness on the light squares around his king by playing .. .'it>h8 and . . . f6, so Plan C ( 1 0 points) , although not necessarily bad, is not that accurate. Plan B (S points) has a point in general, but White can continue after 20 . . . 4Jc6 by 2 1 f4 ! exf4 22 'iVxf4 '¥!Ie7 (22 . . . 4JeS 23 d4) 23 l:ta2, with pressure . Plan A (20 points) is correct.
The game continued: 20 ... c4 ! 2 1 �e 3
The threat was the simple 2 1 . . .4Jb3 . 2 1 . • . cxd 3 Black can delay this exchange with 2 l . . .�c7,
as a continuation like 22 d4? 4Jb3 23 l:ta2 l:ta6 24 f4 exd4 2S cxd4 �a7 is surely in his favour.
22 'iVxd 3 'iVc7 2 3 f4 ? ! White felt he could b e optimistic ! Equality
can be maintained with the simple 23 a4 bxa4 24 l:txa4 �cS+ 2S 'it>h I 4Jc6.
2 3 . • . 'iVc5+ 24 'it>h l ex f4 ? ! Returning the favour. Black gets a somewhat
better position with 24 . . . 4Jc4 ! 2S fS 4Je3 26 l:tf3 4JxdS 27 exdS f6.
2 5 l:tx f4 4Jc4 26 l:ta fl 26 l:tfS ! ? 4JeS 27 �d4 'Jjjjc7 leads to unclear
play ; White could have tried this . 26 ... 4Je 5 27 'iVh 3 l:tbb S?! More precise is 27 . . . h6 ! 28 .i.xf7+ 4Jxf7 29
l:txf7 l:txf7 30 'iVe6 l:tbb7 3 1 'iVe8+ 'it>h7 32 l:txf7 �xc3 33 l:tfl �d3 34 'Jjjjf8 'iVxe4 3S 'Jjjjxd6 l:tf7, when the draw is very near.
2 S l:th4 h6 (D)
w
2 9 l:.xh6?! White settles for a draw by perpetual check.
He could try 29 g4 ! �xa3 30 gS l:tbc8 3 1 gxh6 g6 32 l:thf4 ! �xc3 33 �h4, when he enjoys a dangerous initiative . Things are far from clear, but there remains the feeling that Black needs to be more on the alert than White .
2 9 • . • gxh6 30 �xh6 �x c3 31 �g 5+ 'it>h7 32 'iVh4+ 'it>g S 112_112
Test 1 8 Plan B (0 points) and Plan C (0 points), are not in accordance with the requirements of rook endings . Activity is the first rule and White should base his plans on that principle . Thus, the only correct plan is the active A (20 points) .

SOLUTIONS 97
The game continued: 26 l:td 1 ! b5 27 axb5 l:txb5 2 S l:td6!? f5? ! A n inaccuracy. Black does not wish t o make
any concessions, but 28 . . . l:tab8 ! 29 l:txf6 l:txb3 30 l:tc7 l:tf8 3 1 na7 l:tbS would leave White with only a symbolic advantage, as he can win the a-pawn with l:tfa6 or increase the pressure with g4 and M-hS , but without realistic winning chances in the face of correct defence by Black.
2 9 l:tg 3+ 'it'fS? The last and decisive mistake. Black was
forced to play 29 . . . 'it'h8 30 l:tf6 l:tf8 3 1 h4 ! (3 1 l:tf3 'it'g7 ! 32 l:t6xfS l:txfS 33 l:txfS l:tb8 with a draw), when White retains a small advantage.
30 nh6! l:tab S 31 l:txh7 l:txb 3 32 l:tg5! l:t3b5 Other moves also lose: 32 . . . l:t8bS 33 l:thhS
a4 34 l:txfS l:txfS 3S l:txfS or 32 .. J�8b7 33 l:th8+ ! 'it'e7 34 l:txfS l:ta7 3S l:txf7+ ! .
33 l:tx f5! nx f5 34 l:th S+ 'it'e7 35 l:txb S White has achieved a significant material
gain and an easy win is now in sight. 35 ... 'it'd6 36 g4 l:te5 37 'it'g2 'it'c5 3S h4 l:te6
39 l:taS 'it'b5 40 h5 a4 4 1 g5 1-0
Test 1 9 Plan A (20 points) i s the most combative and the most appropriate, and there is not even the slightest risk involved. Plan B ( 1 S points) is OK, but is equivalent to accepting a draw offer and shows a lack of fighting spirit. Plan C (S points) only helps White and eases his task, as it creates weaknesses/targets for his bishop.
The game continued: 17 . . • .i.c2 ! 1S l:te 1 The alternative 1 8 l:td2 is also acceptable:
1 8 . . . .i.e4 ! ? ( 1 8 . . . .i.g6 19 l:td l ! ) 19 tLJxeS ! ( 1 9 tLJe 1 ? ! b S + ) 1 9 . . . tLJxeS 2 0 l:te2 fS 2 1 f3 .i.xf3 22 l:txeS+ 'it'f6 23 l:tel .i.e4 24 .i.e3, with equal chances but not yet drawn !
1S ... f6 19 .i.e 3 This natural developing move is much better
than 1 9 tLJd4? ! tLJxd4 20 cxd4 e4 2 1 f3 l:thd8 ! +. 19 • • • l:thd S 20 .i.b6 l:td5 2 1 l:tac1 .i.d 3 22
l:tcd 1 ? ! Equality could b e maintained b y the modest
22 b3 . 22 . • . .i.c4 ! 2 3 b 3 Much worse is 23 tLJd2? .i.xa2 24 b3 l:td3 !
-+, but White can also try 23 l:txdS .i.xdS 24 tLJd2 as ! +.
2 3 • . . l:txd 1 24 l:txd 1 .i.e2 25 l:td2 .i.x f3 26 gx f3 l:tcS
Black has at last got the desired slight advantage. Although it is probably not enough for victory, it gives him reason to hope.
27 c4 tLJb S 2 S .i.a5 tLJc6 2 9 .i.b6 'it'e6! 30 'it'f1 tLJe7 31 a4
3 1 'it'e2? ! l:tc6 32 .i.e3 bS +. 31 . . . g5! 32 'it'e2 h5 33 l:td 3 tLJf5 Black is on the ascendancy ! Now he has se
cured a pleasant advantage.
B
34 l:td2 l:tc6 35 .i.e 3 l:td6! 36 b4 ? (D) Losing at once. The only try was 36 as +.
36 ... tLJxe 3! Black grabbed his chance to force a winning
pawn endgame, completing the torture in style ! 37 nxd6+ There was no difference in 37 fxe3 l:txd2+
38 'it'xd2 as ! 39 bxaS fS or 37 'it'xe3 l:txd2 38 'it'xd2 as ! 39 bxaS fS .
37 • . • 'it'xd6 3S fxe 3 White has no chance after 3 8 'it'xe3 as ! 39
bxaS fS 40 'it'd2 h4 ! . 3S ... a5! 39 b5 f5 40 'it'd 3 And White lost on time in a lost position.
0- 1
Test 20 The watchword of the King's Indian Defence is activity ! Plan C (20 points) is the most effective. Plan A (0 points) and Plan B (0 points) play into White 's hands and leave him with all the pressure. In the first plan, after 2 1 . . .'iVb8 White should first play 22 .i.bS ! and then .i.c6, a4, tLJc4, etc . In the second, the pawn on d6 is hanging.
The game continued: 2 1..:�e7! 22 g 3? !

98 MODERN CHESS PLANNING
White should try 22 .l:lxb6 ttJhS or 22 SLbS ttJhS 23 ttJc4 fS 00.
22 • • • h5! 2 3 h4 Or 23 .l:lxb6 h4 24 ttJc4 .l:lfd8 2S 'i'b3 ttJhS,
with the initiative for Black. 2 3 ... SLh6 24 ttJ c4 ttJd7! '+ 25 'iVbl f5 26 ex f5 The only move. Not 26 .l:lf2? f4 27 g4 'ili'xh4
28 gxhS �h8 29 ttJxd6 .l:lg8 =t.
26 ... gx f5 27 SLd 3? Forced was 27 %:tf2 �h8 28 .l:lg2 'iVf6 ,+. 27 ... 'iVf6?! Black slips. Stronger is 27 . . . f4 ! 28 'iVe l fxg3
29 'iVxg3+ �h8 =t.
28 'ifb2 'iVg6 Again, 28 . . . f4 ! ? 29 'iVh2 fxg3 30 'ili'xg3+
�h8 =t was stronger. 2 9 �h2 e4 30 SLe2 ? Passive and bad. White's only try was 30
SLbl ! SLg7 3 1 'ife2 f4 '+ / =t.
30 .. . b5! ! A n excellent idea, removing the b3-rook
from the defence of its king (3 1 ttJd2 ttJeS -+) . 30 . . . f4? 3 1 .l:lg l fxg3+ 32 l:!xg3 SLf4 33 fxe4 �h7 34 �h3 SLxg3 3S .l:lxg3 would not be that clear.
31 .l:lxb5 f4 32 g4 No help was 32 gxf4 .l:lxf4 ! or 32 .l:lgl fxg3+
33 �g2 exf3+ 34 SLxf3 .l:lxf3 -+. 32 ... hxg4 33 fxg4 f3 34 SLdl SLg7 34 . . . SLf4+ 3S �h l ttJeS 36 ttJxeS SLxeS 37
'tlVc 1 .l:lf4 -+ is also good enough. 35 'iVf2 'iVxg4 Or 3S . . . ttJf6 36 'iVg3 ttJxg4+ 37 �h l SLd4
-+. 36 .l:lgl 'ili'f4+ 37 �hl .l:la7! 38 .l:lg5 ttJ f6 39
ttJe 3 ttJh7 40 .l:lg4 'i'e5 4 1 SLc2 ttJ f6 42 .l:lg5 'iVd4 43 .l:lb6 ttJe8?!
Better is 43 . . . �h8 44 .l:lxd6 .l:lxa3 -+. 44 a4 .l:la f7 45 .l:lbl .l:lf4 ! 46 .l:ldl 'i'c3 47
.l:lel .l:l8f7 48 ttJg4 �f8! -+ 4 9 .l:le 3 'iVd4 50 h5 ttJ f6 51 ttJh2 ttJxd5 52 ttJn SLf6 53 .l:lxd5 'iVxd5 54 SLb 3 'iVxh5+ 55 ttJh2 .l:lg7 56 'iVd2 SLe5 57 'ifd5 0- 1
White lost on time before S7 . . . 'iVxh2+ S8 �xh2 .l:lh4# could occur.
Test 2 1 In Plan A (5 points) White's thinking process would seem justified after 12 SLf3 cxd4? ! 1 3 cxd4 exd4 1 4 SLc3 ! ;t ( 1 4 exd4? ! ttJedS ! ) , but Black is not obliged to accept the pawn sacrifice
and can play 1 2 . . . .l:ld8 ! instead. Plan B (0 points) creates no difficulties for Black. His better pawn-structure will prove to be a more significant strategic factor than White' s bishop-pair. Plan C (20 points) is correct. Unbalanced and mobile pawn-structures generally favour the bishop-pair. Pawn weaknesses in the form of the white a- and c-pawns are unimportant, as Black cannot even approach them.
The game continued: 12 dxe5! 'iVxe5 13 f3 ttJed5 1 3 . . . ttJfS ! ? 1 4 ttJxf5 SLxfS I S e4 SLe6 1 6
'iVc l ;t was a serious alternative for Black. 14 'iVc1 ! White has reached the desired position and is
now ready for further kingside advances. 14 ... 'iVe7?! Black should try 1 4 . . . ttJhS IS ttJxhS 'iVxhS
1 6 e4 ttJb6 1 7 a4 SLe6 1 8 .l:lbl ;to Black is obliged to seek exchanges, neutralizing to an extent White's initiative in the centre and on the kingside.
15 e4 ttJ c7 16 a4 1 6 SLg5 h6 1 7 SLf4 ± is also good. 16 ... SLd7 17 SLf4 ! .l:lfc8 18 .l:ldl ttJ ce8? A serious blunder, which ends the game
abruptly. Black was obliged to struggle on with 1 8 . . . ttJfe8 1 9 'iVe3 ±.
19 e5! 1-0
Test 22 Plan A (0 points) is not acceptable. The exchange sacrifice is not that strong, and after 27 .l:lac l White even enjoys a slight advantage. Plan C (S points) is unclear after 28 ttJeS ! ttJfe4 29 ttJxe4 ttJxe4, which Black should avoid as he has a better option: Plan B (20 points) is correct.
The game continued: 24 ... .l:la5! 25 .l:la cl .l:lf5 26 ttJe2 Black would retain the advantage even after
26 ttJe4 ttJxe4 27 .l:lxe4 ttJdS . 26 ... ttJbd5 27 SLh4 ttJh5 28 SLg 3 No better is 28 SLgS l:!8xf7 ! (28 . . . ttJhxf4? 29
SLxf4 ttJxf4 30 ttJxf4 .l:l8xf7 3 1 exf7+ 'iVxf7 32 �xc6 SLxd4+ 33 �h l .l:lxf4 34 �c8+ 00) 29 exf7+ 'iVxf7 30 'iVe4 h6 3 1 SLh4 ttJhxf4 =t.
28 ... 'iVc8 2 9 'iVe4 ttJh f6?! This move is good enough, but 29 . . . h6 ! 30
lLlc3 ttJdxf4 3 1 SLxf4 ttJxf4 32 ttJxa4 'iVxe6 -+ is even better.

SOLUTIONS 99
30 �d 3 Covering the e3-square, as 30 �c2 'iixe6 3 1
tbg5 �e3+ ! 3 2 i.f2 1:1xg5+ ! 3 3 fxg5 �xg5+ 34 i.g3, �e3+ ! 35 c.t>g2 tbe4 is winning for Black.
30 ... �xe6 31 tbg5 'ii'd7 Black has an appreciable advantage, thanks
to his correct play so far. 32 �c4 tbh5 33 tbh 3 1:1b8 34 �xa4 Or 34 'iixc6 �xc6 35 1:1xc6 1:1xb2 +. 34 ... 1:1xb2 35 tbg5? (D) A blunder in a difficult position. White qidn' t
like 35 �xc6 �xc6 36 1:1xc6 h6 37 a4 1:1a2 +, but he had no choice.
B
35 ... tbhx f4 ? ! The concrete 35 . . . 1:1xe2 ! 36 1:1xe2 tbhxf4 -+
would have been decisive, but Black's timetrouble was not helping at all ! Black now needed to put in some extra effort, but his advantage was still enough for the win:
36 tbx f4 tbx f4 37 tbe4 1:1f8 38 tbg5 h6 39 i.x f4 �g4+ 40 i.g 3 hxg5 4 1 �x c6 i.xd4+ 42 c.t>hl i.f6 4 3 a4 c.t>g7 44 1:1e 3 1:1a2 45 a5 �a4 ! 46 �b7 1:1f7 47 1:1c8 �xa5 48 1:1el 1:1b2 4 9 'ii'c6 �f5 50 1:1a8 g4 51 1:1a 3 i.d4 0- 1
Test 23
The game continued: 13 ... b4 ! With this quick queen side pawn expansion,
Black is the first to start activity, not allowing White to play on the kingside.
14 tbe2 ? ! The main alternative is 1 4 tbd l a5 ! 1 5 c4
bxc3 1 6 i.xc3 a4 ! 1 7 tbd4 tbxd4 1 8 i.xd4 i.a6 1 9 tbc3 'ii'b7 = and this should have been preferred.
14 ... a5! 15 tbbd4 White could try the immediate 1 5 c4, al
though after 1 5 . . . bxc3 1 6 i.xc3 i.a6 1 7 i.xa6 1:1xa6 1 8 1:1c l a4 ! Black should be satisfied.
15 ... i.a6 16 c4 The alternative is 1 6 tbxc6 �xc6 1 7 tbd4
'ii'b7 1 8 i.xa6 1:1xa6 =+=. 16 ... bx c3 This is nearly always the right answer to a c4
advance in this particular variation. 1 6 . . . tbxd4? ! 1 7 tbxd4 i.xc4 18 1:1c l d5 1 9 e5 tbd7 20 i.e3 ! ;1; would leave White satisfied.
17 i.x c3 i.xd 3 18 �xd 3 tbb4 Black correctly decided against 1 8 . . . tbxd4
19 tbxd4 d5 20 e5 tbe4 2 1 f5 ! 00 .
19 'iVbl 1:1fc8 20 a 3 tbc6 A more combative line than 20 . . . tba6 2 1
tbb5 ! 'tlVb6 2 2 tbxd6 i.xd6 2 3 e5 tbd5 24 exd6 tbxc3 25 tbxc3 'ik'xd6 26 f5 00.
2 1 tbx c6 Now 2 1 tbb5 ? ! does not work owing to
2 l . . .'ii'b6 22 tbxd6 i.xd6 23 e5 i.xe5 ! 24 fxe5 tbg4 =+= / +.
2 1...�x c6 22 tbd4 22 e5 ? ! is over-optimistic : 22 . . . tbd5 23 1:1f3
dxe5 24 fxe5 �c4 ! =+= / +. 22 .. . �b7 (D)
This one is a matter of pure theoretical knowledge. In order to give a correct assessment of w this position, one should know what has been played here so far and how it was assessed. Plan B (0 points) worked well for Black in the final position suggested in it, but White can try (in-stead of 1 5 a4) 15 a3 ! , which changes the assessment to at least ;1;. Plan C ( 1 3 points) is not that bad, but Plan A (20 points) is clearly best. All these details (and many more ! ) can be found in A Complete Guide to the Grivas Sicilian
(Gambit, 2005) . 23 tbf3

1 00 MODERN CHESS PLANNING
23 'iVd3 ! ? a4 ! =1= is another try. In general Black should be happy with his share of the chances .
23 . . • dS ! 24 lLlgS Or 24 exdS lLlxdS 2S 'iVe4 a4 (2S . . . .i.xa3? 26
.i.xg7 ! .i.xb2 27 .i.xb2 'iVxb2 28 fS ! with an attack) 26 �d4 g6 =1=.
24 • • • dxe4 2S lLlxe4 lLldS ! ? . The endgame resulting from 2 S . . . lLlxe4 26
�xe4 (26 'iVxe4 'iVxe4 27 �xe4 .i.xa3 28 .i.xg7 rJ;xg7 29 bxa3 �cS =1=) 26 . . . .i.xa3 27 .i.xg7 rJ;xg7 28 bxa3 'iVxbl 29 �xbl �ab8 30 �bel nc3 would offer slightly better chances for Black. Obviously, Black was looking for something more.
26 .i.d4 26 fS �a6 ! ' 26 • • • g6 27 'iVd 3 �d8 28 �f3 'iVd7 28 . . . �ac8 ! ? 29 b3 'iVbS =1= is also good. 29 nc1 �a4 30 'iVf2 30 .i.eS ! ? �ac8 (30 . . .f6? ! 3 1 .i.c7 ! �d7 32
lLlc3 ! 'iVb3 33 lLlxdS 'iVxdS =) 3 1 lLlc3 lLlxc3 32 .i.xc3 'iVb3 =1= was a reasonable option.
B
30 ... �a c8 30 . . . lLle3 ! ? 3 1 .i.xe3 'iVxe4 =1=. 31 lLlcS ? ! A second slip. 3 1 lLlc3 ! =1= is necessary. 31 .•. 'iVbS 32 lLle4 (D)
32 • . • 'iVd 3?! Returning the favour. 32 . . . �xc 1 ? ! 33 �xc 1
lLlxf4 34 lLlf6+ .i.xf6 3S .i.xf6 also muddies the waters, but 32 . . . 'iVb3 ! 33 �xc8 �xc8 34 lLlc3 a4 3S lLlxdS 'iVxdS =+= would increase Black's advantage.
33 lLlgS ? ! A comedy o f (slight) errors ! Modest but cor
rect was 33 lLlc3 lLlxc3 34 .i.xc3 �dS 3S �cel �cd8 =1=.
33 • . . .l:tx cI 34 �x c1 'iVfS ! 3S 'iVh4 ? A typical time-trouble error, although after
the forced 3s lLlh3 a4 36 rJ;g l h6 Black's advantage is undisputed.
3S • • • hS 36 :0 �c8? ! 36 . . . lLlxf4 ! 37 lLlxf7 .i.xh4 38 lLlh6+ rJ;h7 39
lLlxfS exfS 40 �xf4 .i.gS -+ is an easier path to victory.
37 'iVf2 eS ! 38 fxeS Or 38 .i.xeS .i.xgS 39 fxgS 'iVxf2 40 �xf2
�c 1 + 4 1 �f1 �xf1#. The rest was easy : 38 • . . 'iVx f2 39 .i.x f2 .i.xgS 40 .i.d4 l:tc2 0- 1 A typical rniddlegame success of the 'Grivas
Sicilian' !
Test 24 Plan B (0 points) certainly is not best, as it blocks one of the main pluses of White's position, the g2-bishop. Black is not forced to play the ridiculous 19 . . . .i.xfS?, which gives White a clear advantage, but can choose the natural 1 9 . . . .i.d7 . After 20 lLle7+ rJ;h8 2 1 lLledS lLlbxdS 22 lLlxdS .i.c6 White has not achieved much. Plan C (0 points) is also not of much help after 1 9 . . . i.d7 20 lLld6 i.c6. Plan A (20 points) is the best option. Sometimes even excellentIyplaced pieces have to retreat !
The game continued: 18 lLlb 3! lLlc4 Best. Worse is 1 8 . . . lLlbd7? ! 1 9 lLlaS lLleS 20
bS axbS 2 1 lLlxbS ± or 1 8 . . . eS ? ! 1 9 lLlcs lLlc4 20 b3 lLlb6 2 1 �d6 lLla8 22 lLldS lLlxdS 23 �xdS �e8 24 lLld7 .i.xd7 2S �xd7 ±.
19 �a 2 The correct reaction. 1 9 lLlaS ? ! is naiVe :
1 9 . . . lLlxaS 20 bxaS b6 = .
19 • . • i.d7? ! Black should choose 1 9 . . . b 6 20 �d4 lLleS 2 1
lLld2, keeping White's advantage to a minimum. 20 lLlcs i.c6 A retreat like 20 . . . i.c8 2 1 b3 lLleS 22 bS
axbS 23 lLlxbS b6 24 lLla6 i.xa6 2S �xa6 ± wouldn' t change much.
21 .i.x c6 bx c6 22 b 3! lLleS 23 lLlxa6 23 f4 ! lLlg6 24 Iha6 seems more accurate,
although the text-move is also satisfactory. 23 .•. �b6 24 �aS lLled7 Or 24 . . . lLldS 2S lLla4 �bS 26 e4 lLlf6 27 lLlc3
±. 2s lLla4 �b7 26 �c1 lLldS 27 �x c6 lLlxb4 28
lLlxb4 �xb4 (D)

SOLUTIONS 1 01
w
2 9 l:.e7! lL'lf6 30 lL'leS lL'le4 31 l:.a4 3 1 lL'ld7 ! l:.d8 32 l:.a4 ! l:.xa4 33 bxa4 is eas
ier. 31...lL'lx eS 32 l:.xb4 lL'la6 33 l:.eb7 lL'lxb4 34
l:.xb4 l:.d8 A case with 4 :4 pawns on the other flank and
a passed b-pawn. The superior side is able to win, thanks to the presence of the fourth pair of pawns on the kingside.
3S h4 hS 36 l:.b7 l:.dS 37 b4 gS ? ! Although this move does not have any bear
ing on the result of the game, creating weak pawns is a mistaken policy and allows White to win more easily.
38 hxgS l:.xgS 39 �h2 l:.dS 40 e 3 �g7 4 1 �g2 l:.d2 42 �f3 l:.b2 4 3 l:.b8 fS 44 bS �f6 4S b6 eS 46 b7!
The weak pawns that Black voluntarily created become targets for the white king.
46 ... �g7 47 �g2 l:.b 1 48 f4 l:.b2 + 4 9 �f1 1-0
Black resigned because after 49" .exf4 50 exf4 �h7 the white king enters via e6. This is easily done with �e 1 -d 1 -f1 -c 1 -c2-c3-c4-d5-e6 creating a zugzwang. Also winning was 49 �h3 .
Test 2 5 White actually holds the advantage, because Black lacks serious counterplay. However, by choosing Plan A (0 points) , White forfeits his plus after 20 i.e5 ? i.h6 ! with the idea " .f6. Also, 20 'ii'd2 l:.fe8 ! 21 i.h6 i.h8 22 �g2 e5 ! allows Black back into the game, so Plan C (7 points) cannot be correct. Plan B (20 points) is the strongest, as Black's queenside is really weak.
The game continued: 20 �b 3! e6 21 �b6 l:.a8 22 l:.a 3
The threat of 23 l:.b3 forces Black to exchange queens.
22 ... �e6 2 3 �bS ! After 2 3 l:.b3 ? ! �xa4 24 �xb7 �c4 Black
holds the barracks . 2 3 ... �xbS? A bad idea, based on a miscalculation. Black
should continue with the immediate 23 " .l:.fc8 24 %:teal , when White's plan of �d3, l':tb3-b5 and �c2-b3 would give him the advantage.
24 axbS lUe8 2S l:.ea 1 b6 26 b4 ! Black thought this was impossible, but the
truth was different ! 26 ... i.f8 (D)
w
27 bxaS ! This was an easy combination to calculate.
Of course 27 i.d2? l:.ab8 ! or 27 l:.a4? l:.xc3 would be naIve.
27 ... i.xa 3 A nice variation was 27" .g5 28 i.c7 ! ! i.xa3
(28" .l:.xc7 29 axb6 l:.xa3 30 bxc7 l:.xa1 + 3 1 �g2 l:.a8 3 2 b6 +-) 29 axb6 i.b2 30 l:.xa8 l:.xa8 3 1 b7 +-.
28 axb6! l:.eb8? Black had to try 28" .l:.xc3 ! 29 b7 l:.f8 30
b8� l:.xb8 3 1 i.xb8 i.e7 32 l:.b1 ±. 2 9 i.xb8 l:.xb8 30 l:.xa 3 l:.xb6 31 l:.b 3 The endgame is won for White. The plans
are well-known and can be found in a lot of textbooks . White will advance his king to the centre, exchange some central pawns and invade on either flank. In the meantime, Black can do nothing active or interfere with White's plan.
31...�f8 32 �f1 �e7 33 �e2 �d6 34 �d 3 eS ? !
This eases White's task, although i t doesn't affect the final result.
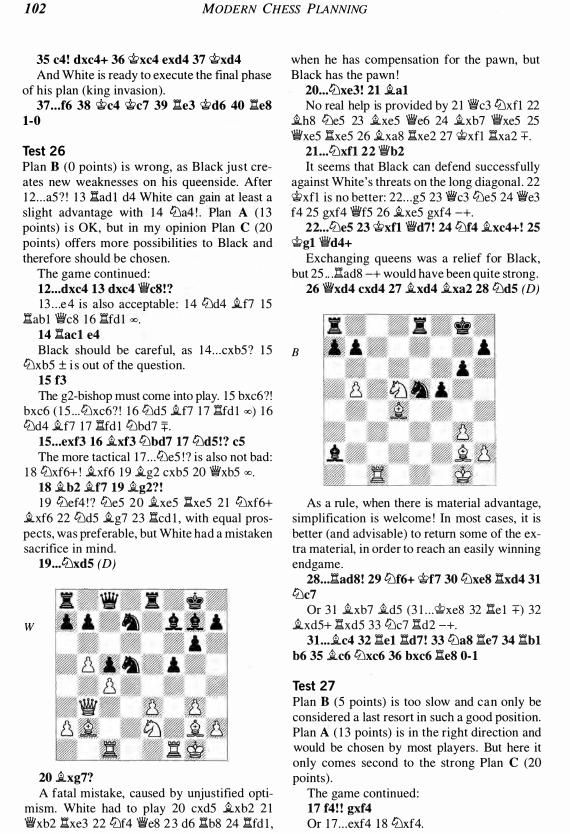
1 02 MODERN CHESS PLANNING
35 c4 ! dx c4 + 36 �x c4 exd4 37 �xd4 And White is ready to execute the final phase
of his plan (king invasion). 37 • . • f6 3S �c4 �c7 39 l:te 3 �d6 40 l:te S
1-0
Test 26 Plan B (0 points) is wrong, as Black just creates new weaknesses on his queen side. After 1 2 . . . a5 ? ! 1 3 l:tad l d4 White can gain at least a slight advantage with 1 4 liJa4 ! . Plan A ( 1 3 points) i s OK, but in my opinion Plan C (20 points) offers more possibilities to Black and therefore should be chosen.
The game continued: 12 • • • dx c4 13 dx c4 �cS!? 13 . . . e4 is also acceptable : 1 4 liJd4 il..f7 15
l:tabl �cS 1 6 l:tfd l 00 .
14 l:ta c1 e4 Black should be careful, as 1 4 . . . cxb5 ? 1 5
liJxb5 ± i s out of the question. 15 f3 The g2-bishop must come into play. 15 bxc6?!
bxc6 ( l 5 . . . liJxc6? ! 1 6 liJd5 il..f7 1 7 l:tfd l 00) 1 6 liJd4 il..f7 1 7 l:tfd l liJbd7 +.
15 ... ex f3 16 il..x f3 liJbd7 17 liJd5!? cS The more tactical 1 7 . . . liJe5 ! ? is also not bad:
I S liJxf6+ ! il..xf6 1 9 il..g2 cxb5 20 �xb5 00 .
IS il..b2 il..f7 19 il..g2 ? ! 1 9 liJef4 ! ? liJe5 20 il..xe5 l:txe5 2 1 liJxf6+
il..xf6 22 liJd5 il..g7 23 l:tcd l , with equal prospects, was preferable, but White had a mistaken sacrifice in mind.
19 ... liJxd5 (D)
w
20 il..xg7? A fatal mistake, caused by unjustified opti
mism. White had to play 20 cxd5 il..xb2 2 1 �xb2 l:txe3 22 liJf4 'iVeS 2 3 d6 .l:!.bS 24 l:tfd l ,
when he has compensation for the pawn, but Black has the pawn !
20 ... liJxe 3! 2 1 il..al No real help is provided by 2 1 1lVc3 liJxfl 22
il..hS liJe5 23 il..xe5 �e6 24 il..xb7 �xe5 25 �xe5 l:txe5 26 il..xaS l:txe2 27 �xfl l:txa2 +.
2 1...liJx f1 22 'iVb2 It seems that Black can defend successfully
against White's threats on the long diagonal . 22 �xfl is no better: 22 . . . g5 23 �c3 liJe5 24 �e3 f4 25 gxf4 �f5 26 il..xe5 gxf4 -+.
22 • . . liJe5 2 3 �x f1 �d7! 24 liJf4 il..x c4+! 25 �gl �d4+
Exchanging queens was a relief for Black, but 25 .. J:tadS -+ would have been quite strong.
26 �xd4 cxd4 27 il..xd4 il..xa2 2 S liJd5 (D)
B
As a rule, when there is material advantage, simplification is welcome ! In most cases, it is better (and advisable) to return some of the extra material, in order to reach an easily winning endgame.
2 S . • . l:tad S! 2 9 liJf6+ �f7 30 liJxe S l:txd4 31 liJc7
Or 3 1 il..xb7 il..d5 (3 l . . .�xeS 32 l:te l +) 32 il..xd5+ l:txd5 33 liJc7 l:td2 -+.
31...il..c4 32 l:tel l:td7! 33 liJa S l:te7 34 l:tb 1 b6 35 il..c6 liJx c6 36 bx c6 l:te S 0- 1
Test 27 Plan B (5 points) is too slow and can only be considered a last resort in such a good position. Plan A ( 1 3 points) is in the right direction and would be chosen by most players . But here it only comes second to the strong Plan C (20 points) .
The game continued: 17 f4 ! ! gx f4 Or 1 7 . . . exf4 I S liJxf4.

SOLUTIONS 103
18 tiJx f4 b6 Black declines the offer, as after 1 8 . . . exf4 1 9
�xf4 �a6 2 0 e 5 h 3 (20 . . . f5 2 1 e 6 tiJxe6 22 dxe6 �xe6 23 'iYf3 0-0-0 24 'iYe3 ± or 20 . . . fxe5 2 1 �xe5 .l:tf8 22 .l:txf8+ �xf8 23 'iVh5 tiJf7 24 .l:tfl +-) 2 1 g3 �xa2 22 .l:tf2 'iVa6 23 exf6 'iVxf6 24 �c l ! �d6 25 �b2 White has an enormous advantage. Nevertheless, as declining the sacrifice does not improve Black's position, he should have accepted it and put the onus on White to prove its correctness. In such cases, it is better to play with material in hand, rather than nothing at all in return for one's suffering !
19 tiJh5 tiJg8 20 'iYf3 20 tiJg7+ �f7 2 1 tiJf5 �xf5 22 .l:txf5 ± is
also strong, but slightly less effective. 20 . • . �e7?! (D) Black's position was not exactly a work of
art, but he should at least have chosen 20 . . . tiJf7 2 1 tiJxf6+ 'iYxf6 22 'iVxf6 tiJxf6 23 l:txf6 'i;e7 24 .l:tbfl ±.
w
2 1 �g5! .l:txh5
factor in such positions . The game continued with Plan B ( 1 6 points) , which is quite similar to Plan A, but definitely not as good:
2 3 .l:tcc3 tiJg7 24 cS tiJe6 25 �h4 �b7 Maybe Black could try the endgame after
25 . . . 'iV g5 ! ? 26 �xg5 tiJxg5 27 .l:tf4 f5 28 .l:ta4 ± . 26 .l:tfe 3 'iVg7 27 b4 ? ! 27 b3 ± is more to the point. Black's weak a-
pawn should stay on the board. 27 • . . axb4 28 axb4 .l:tb8 2 9 .l:ta 3! Rooks must operate on open files ! 2 9 • . :iWb2 ? 29 . . . d5 30 cxd6 cxd6 3 1 .l:tac3 ± was Black's
only acceptable continuation. 30 �ab 3? White could crown his efforts with a nice
and not very difficult combination, prompted by Black's weak king: 30 .l:txe6 ! dxe6 (30 . . . fxe6 3 1 �d8+ �g7 32 .l:tf3 +- or 30 . . . 'iVxa3 3 1 .l:te8+ �g7 32 �d4+ �h6 3 3 .l:te4 f6 34 'i-Vxf6 .l:txb4 35 'iVh4+ +-) 3 1 �d8+ �g7 32 .l:tf3 'i-Ve5 33 'V/iie7 +-.
30 • • . 'iVg7 31 l:ta 3! �b2 ? 32 .l:tad 3? Time-trouble caused this series of mutual
mistakes. 32 . • . �xb4 ? (D) After White's mistakes it is not inconceivable
that Black could fight back with 32 . . . .l:txb4 ! 33 'i-Ve7 'iYg7 34 .l:tb3 l:txb3 35 .l:txb3 f5 ! 36 'iVe8+ "ii'f8 37 �xf8+ tiJxf8 38 .l:ta3 d5 39 cxd6 cxd6 40 �xc6. This position would give White only a slight plus in the endgame.
Or: 2 1 . . .fxg5 22 'iYf8#; 2 l . . .tiJf7 22 �xh4 W .l:th6 23 �b2 .l:tf8 24 .l:tbf2 +-.
22 'iVxh5 fxg5 2 3 'iVh7+ 1-0
Test 28 Plan A (20 points) is the strongest. White's rooks will carry the day, as Black does not have enough resources to survive. I have to point out Black's best chance though, namely 23 . . . .l:tb7 ! (instead of 23 . . . .l:ta8 24 .l:te3 'iVf6 25 .l:te8+ �g7 26 �e3 +-) 24 'iVd3 tiJg7 25 :e2 'i-V g5 26 1He3 tiJe6 27 .l:te5 ±. Plan C (0 points) is out of the question, as it is not in agreement with the position's evaluation and Black can create some counterplay with 23 b4 f5 24 c5 f4. Rooks operate on open files and this is the most important
Now, after the mistaken capture on b4, White can win immediately.
33 .l:txe6! fxe6 White also wins after 33 . . . dxe6 34 .l:td8+
�g7 35 W1e7 or 33 .. :ifxh4 34 .l:te8+ �g7 35 gxM.

1 04 MODERN CHESS PLANNING
34 'ii'd S+ Wg7 35 'ii'e7+ Wg S 36 'ii'eS+ Wg7 37 l::tf3 'ii'x c5 3S l:lf7+ Wh6 39 'ii'h S Wg5 40 h4 + 1 -0
Test 29 White surely has the advantage, but it is not a large one, as Black has no static weaknesses. Plan A ( 1 3 points) is very much to the point and very similar to the best answer, Plan B (20 points) . Plan C (5 points) is less accurate, as af-ter 1 8 c5 Black can play 1 8 . . . ttJxc5 ! ( 1 8 . . . dxc5? ! 1 9 .i.h3 l:le7 2 0 e 5 ± ) 1 9 e 5 .i.xg2 ( 1 9 . . . fxe5 20 .i.xc6 bxc6 2 1 fxe5 'ii'g4 22 exd6 l:lxe l + 23 'ii'xe l cxd6 24 l:lxd6 ;1;) 20 exf6 l:lxe l + 2 1 l:lxe l 'ii'f5 22 Wxg2 gxf6 23 'iYxf6 'ii'xf6 24 .i.xf6 Wf7 with equality. You deserve the 5 points only if you calculated these variations .
The game continued: I S l:le3! l:le7 1 8 . . . ttJc5 1 9 l:ldel 'ii'g4 20 h3 'ii'g6 2 1 'ii'd4 is
also slightly better for White. 19 l:td el 'ilt'fS 20 a 3 b6 2 1 b4 axb4 22 axb4
l:la eS Black must be careful, as 22 . . . 'ii'f7? is pow
erfully met by the thematic but surprising thrust 23 e5 ! .i.xg2 24 e6; e .g . , 24 . . . l:lxe6 25 l:lxe6 .i.h3 26 l:le7 .
2 3 h 3 'ii'f7 24 'ii'd 3 .i.b7 Black could try 24 . . . f5 ! ? 25 exf5 l:lxe3 26
l:txe3 l:lxe3 27 'ii'xe3 .i.xg2 28 Wxg2 'ii'xf5 (28 . . . 'ii'xc4? 29 'ii'e6+ 'ii'xe6 30 fxe6 ttJf6 3 1 b5 ±) 29 .i.c3 ;1;.
25 .i.d4 .i.a6 26 b5 .i.cS? (D) A serious mistake. 26 . . . .i.b7 27 Wh2 ttJc5 28
.i.xc5 bxc5 (28 . . . dxc5 29 e5 ±) 29 b6 ! ? cxb6 30 'ii'xd6 'ii'xc4 3 1 'ii'xb6 ;1; was Black's best option. Now a tactical shot determines the result.
w
27 e5! Wh S
Or 27 . . . ttJc5 28 .i.xc5 dxc5 29 .i.d5 .i.e6 30 exf6 +-.
2 S .i.d5 'ii'fS 2 9 e6! This is much better than 29 exd6 l:lxe3 30
l:lxe3 l:lxe3 3 1 'ii'xe3 'ii'xd6 32 'ii'e8+ 'ii'f8 33 'ii'xf8+ ttJxf8 34 g4 ±.
2 9 ... ttJ c5 30 .i.x c5 dx c5 31 f5 l:ld S 32 'iYe4 l:ld6 33 g4 1-0
Test 30 I t is really difficult to create winning chances, but Black should try to do so with Plan A (20 points) . Plan B (0 points) is bad, because after 17 . . . ttJd4? 1 8 l:ld 1 ttJb8 19 e5 ( 1 9 .i.xd4 .i.xd4 20 ttJxd4 cxd4 2 1 ttJd5 ttJc6 22 c4 ! ;1;) 1 9 . . . ttJbc6 White can continue with 20 .i.xd4 ! cxd4 2 1 ttJb5 f6 2 2 ttJexd4 ttJxd4 2 3 l::txd4 l:lxd4 24 ttJxd4 fxe5 25 fxe5 ±. The expectations arising from Plan C (5 points) are overoptimistic . 1 7 . . . ttJf6 1 8 h3 e5 1 9 f5 ttJd4 20 fxg6 ttJxe2+ 2 1 ttJxe2 ttJxe4 2 2 gxf7+ Wxf7 2 3 g4 both players have chances.
The game continued: 17 ... .i.d4 ! I S .i.xd4 1 8 ttJd l is not much different after 1 8 . . . e5 !
( l 8 . . . ttJf6 1 9 .i.xd4 ttJxd4 20 ttJxd4 l:lxd4 2 1 e5 ttJe4 22 l:lel <Xl) 1 9 l:lfl ttJf6 20 .i.xd4 cxd4 2 1 ttJf2 l:le8 += .
I S ... cxd4 19 ttJdl e5! 20 ttJ f2 ex f4 Black would also enjoy a slight advantage
after 20 . . . f6 ! ? 2 1 l:ld l ttJc5 . 2 1 gx f4 ttJ c5 22 l:ldl a5 2 3 Wbl f6 24 Wc1? ! Passive play cannot be advisable. 24 ttJg3
Wf7 25 a3 We6 26 h3 f5 += was more natural . 24 ... Wf7 25 a 3 a4 26 Wbl Again White should proceed with 26 ttJg3
g5 27 ttJd3 We6. Now Black grabs his chance and increases his advantage.
26 ... g5! 27 l:lfl h6 28 fxg5 Or 28 l:ld l gxf4 29 ttJxf4 ttJe5 +. 2 S ... hxg5 2 9 ttJg 3 ttJ e5 30 l:ldl Forced, as 30 ttJf5 ? is inadequate : 30 . . . ttJf3
3 1 l:lh l ttJd2+ -+. 30 ... We6 31 Wa2 (D) 31...d 3! Exchanges should be in Black favour, as his
king will be able to penetrate into White's camp. 32 cxd 3 ttJexd 3 33 ttJxd 3?! It is strange that when it became necessary,
White failed to move his king ! 33 Wbl l:ld7 + was forced, although Black will succeed in

SOLUTIONS 105
B
converting the advantage into the full point sooner or later.
33 ... nxd 3 34 nn There is no meaningful alternative. 34 nxd3
also loses: 34 . . . lbxd3 3S lbe2 �eS 36 �bl lbcs 37 lbc3 lbxe4 38 lbxa4 bS 39 lbb6 fS 40 �c2 �d4 -+.
The game was decided quite quickly: 34 • . • nd2 35 lbfS lbxe4 36 h4 gxh4 37 lbxh4
lbcs 38 lbg6 lbd 3 39 lbf4+ lbx f4 40 nx f4 bS 4 1 nb4 ndS 42 b 3 axb 3+ 43 �xb 3 �eS 44 �c3 fS 45 nb 1 f4 0- 1
Test 3 1 Loss of time is unacceptable in modern chess . Of course I do not mean the manoeuvre lbd2-fl -e3 , which is quite common in this position and has a specific and important aim, but the useless prophylactic h3 move. So, the right plan should be A (20 points) . The other two plans are commonly used in this type of position (without the useless h3 of course) and are also playable . Both of them (B and C) achieve 1 3 points each.
The game continued: 8 . . • dS ! 9 exdS Alternatively, White could try 9 i.bS ! ? Wlc7,
when although Black should be satisfied, the game remains complex.
9 ... lbxdS 10 lbxdS i.xdS ll lbe 3 The pseudo-active 1 1 Wlg4? ! gives Black the
advantage after 1 1 . . .0-0 1 2 i.h6 i.f6 1 3 lbe3 i.xc4 1 4 lbxc4 ( 1 4 dxc4 �h8 +) 14 . . . �h8 .
1l ... i.x c4 12 lbx c4 ?! Although this is the most natural move,
White should have preferred 12 dxc4 Wlxd 1 + 1 3 �xd l 0-0-0+ 1 4 �e l i.gS ! I S lbdS i.xc 1 16 nxc 1 lbb4 ! with just a very small advantage for Black.
12 ... 0-0 13 a4 Securing c4 for the knight. 13 ... WldS ! Black's centralized pieces and good central
control give him the advantage. 14 0-0 nad8 15 Wle 1 Black would hold the advantage even after
the more natura1 1 S ne l fS ! 1 6 f4 i.f6. ls ... lbd4 16 lbe 3 Wle6! 17 i.d2 i.gS ! The tempting 1 7 . . . Wlg6? ! 1 8 �h l lbxc2? 1 9
lbxc2 Wlxd3 20 i.c3 Wlxc2 2 1 WlxeS i.f6 22 Wlxcs or 17 . . . fS? ! 18 i.c3 f4? 19 i.xd4 would have relinquished Black's advantage.
18 nc1 (DJ
B
White's pieces are passive and misplaced. Therefore, this is the right moment to open up the position, trying to benefit from their misplacement. This is a common and well-known strategy.
18 ... e4 ! 19 dxe4 Wlxe4 20 f3? ! Black's threat was 20 . . . i.xe3 2 1 i.xe3 (2 1
Wlxe3 Wlxe3 22 i.xe3 lbe2+) 2 1 . . .lbxc2. White should have played 20 c3 lbb3 2 1 nd l nfe8 (or 2 1 . . .Wlxa4 +), although Black has a clear advantage.
20 ... WleS ! 2 1 Wlf2 lbe2 +! 0- 1 White resigned in view of 22 Wlxe2 nxd2 23
Wlxd2 i.xe3+. A rather quick game, decided in the opening.
Test 32 Plan A (0 points) is inadequate. After 33 �g2 �f6 34 nf3 Black should play 34 . . . e4 ! , with an equal position. Plan C (0 points) is also not helpful to White, as he is unable to improve his position. The only correct plan is B (20 points) .
The game continued: 33 b 3! axb 3

1 06 MODERN CHESS PLANNING
Or: a) 33 . . . a3 34 J::tf2 ! 'it>f6 35 g4 ! J::txf2 36 'it>xf2,
and the threat of J::tf3+ followed by J::tf8 and 'it>e3-e4 decides.
b) 33 . . . 'it>f6 34 bxa4 ! lha4 35 J::tb3, threatening J::tb7 or J::tb5 .
34 axb 3 J::tf6 Forced, as otherwise the rook transfer J::ta2-
a5 is immediately decisive. 35 J::ta2 J::tfb6 36 J::ta5 J::txb 3 37 J::txb 3 J::txb 3
38 J::tx c5 .l:1b7 White has exchanged two of the four weak
black pawns (a4 and c5) but paradoxically his advantage has increased ! Naturally, there is a logical explanation for this phenomenon, and it consists of the increased activity of the white rook and the possibility it has gained of accessing Black's remaining weaknesses, at the same time driving its black counterpart into passivity.
39 J::tc6! 'it>e7! ? Black ' sacrifices' a pawn, intending to free
his rook from the protection of c7. Had he remained passive instead, then White would have won the black e5-pawn anyway, with 'it>f2-e3-e4. From a practical viewpoint, the move in the game is the indicated course of action.
40 J::te6+ 'it>d7 41 J::txe5 J::tb2 (DJ
w
It seems that Black has enough counterplay to draw the game, as he has cut off the white king on its back rank and will now place his rook behind the white c-pawn. However . . .
42 J::tf5! ! B y means of a series o f accurate moves,
White weakens the g6-square, in order to make it accessible to the white rook.
42 ... 'it>e7 43 J::th5 h6 43 . . . J::tc2? 44 J::txh7 'it>f6 45 J::th4. 44 J::te5+!
Now we see the idea behind 42 J::tf5 ! ! . 44 . . • 'it>d7 45 J::te6 J::tc2 46 J::tg6 J::tx c4 47
J::txg7+ 'it>d6 48 J::tg6+ 'it>xd5 4 9 J::txh6 The two connected passed pawns will beat
the isolated passed c-pawn. The white king's participation in the battle was not required (a very rare occurrence), as the white rook was exceptionally active.
4 9 • • . J::tc2 50 h4 cS 51 h5 c4 52 J::th8 J::te2 53 J::td8+ 'it>e4 54 h6 1-0
Test 33 Plan B (3 points) is really slow and gives White only a slight advantage, owing to his greater territorial control. Plan A (0 points), though alluring, fails to impress after l l . . .lDe5 ! 1 2 lDa5 iLxb5 1 3 cxb5 d5 1 4 lDxb7 ( 1 4 'iVd4 lDfd7) 14 . . . 'iVxb7 1 5 iLxe5 'iVxb5 1 6 e4 dxe4 ! 1 7 iLxf6 iLxf6 1 8 iLxe4 �d8. So, the correct choice is Plan C (20 points) . It is quite important to open up the position when we have short-term advantages, as explained in the evaluation.
The game continued: 1 1 cS ! e5 Forced, as 1 1 . . . lDe5 ? 1 2 lDa5 iLc8 1 3 iLxe5
dxe5 14 c6 ! is extremely good for White. 12 cxd6 iLxd6 Although White retains a serious advantage
in any case, Black should consider 1 2 .. :iYxd6 1 3 'iVxd6 iLxd6 14 J::tfd l exf4 1 5 J::txd6 fxg3 1 6 hxg3 ± or 1 2 . . . exf4 1 3 dxe7 lDxe7 1 4 �d4 fxg3 1 5 fxg3 ! iLc6 1 6 J::txf6 gxf6 1 7 'iVxf6 J::tf8 1 8 iLxc6+ lDxc6 1 9 lDb5 ±.
13 iLg5 iLe7 1 3 . . . 0-0? fails to 1 4 iLxf6 gxf6 1 5 lDe4,
while 1 3 . . . iLe6 14 iLxf6 gxf6 1 5 lDe4 iLe7 1 6 lDbc5 i s similar to the game continuation.
14 iLx f6! It is important for White to gain central
squares for his knights . 14 . • . gx f6 Obviously 1 4 . . . iLxf6 1 5 lDc5 iLf5 1 6 lDd5
was not attractive either. 15 lDd5 �d6 Trying to get his poor a8-rook into play. 16 J::tc1! The second white knight is ready to invade
Black's position. 16 • • • J::td8 17 lDc5 'iVb8 Or 1 7 . . . iLc8? 1 8 lDe4 +-. 18 e 3!

SOLUTIONS 1 0 7
An important move, gaining control over the d4-square and allowing the white queen to be transferred to the king side. Black is lost.
lS ... i.e6 The alternatives 1 8 . . . i.c8 1 9 �f3 �d6 20
tZJe4 and 1 8 . . . i.xc5 1 9 tZJxf6+ cJi;e7 20 tZJd5+ cJi;d6 2 1 �h5 i.b6 22 �fd 1 +- are hopeless for ' Black.
19 tZJxe6! fxe6 20 �hS+ cJi;d7? He had to play 20 . . . cJi;f8 2 1 tZJxe7 tZJxe7 22
�c4 ±. 2 1 tZJx f6+! (D)
B
1-0 White wins the house after 2 1 . . .i.xf6 22
'iYf7+ i.e7 23 �fd l +.
Test 34 Plan C (0 points) is completely irrelevant to the needs of the position . Black must avoid 1 6 . . . d4? (after 1 4 f4 �e7 1 5 0-0 i.c5 1 6 �de l ) 1 7 tZJa4 ! ± , but after 1 6 . ... i.d7 1 7 cJi;h l he has an equal game. Plan B (5 points) is too artificial, as White improves only his queen. Nevertheless, it is interesting ( 1 4 �a4 i.f5 1 5 i.xf5 �xf5 1 6 0-0) . Plan A (20 points) is the best choice imd the one in accordance with the requirements of the position.
The game continued: 14 tZJe2 ! 'iYgS The alternative was 1 4 . . . tZJe4 1 5 i.c3 ! �e7
( 1 5 . . . tZJxc3 1 6 'ii'xc3 ! ) 1 6 0-0 with a slight advantage for White.
IS i.c3! cJi;h S An even less clear position could arise after
1 5 . . . 'ii'xg2 ! ? 1 6 �gl �f3 1 7 i.xh7+ cJi;h8 1 8 i.xf6 �xf6 1 9 �xd5 . Black was not willing to try it.
16 tZJg 3 �e S 17 h4 ! ? �g4
After 17 .. ..l::txe3+ ! ? 1 8 cJi;n �f4 1 9 tZJe2 �xe2 20 i.xe2 tZJe4 2 1 i.f3 I would prefer White's position, but this is probably a matter of taste.
I S i.e2 !? White must be careful. The alluring 18 i.xf6
gxf6 1 9 i.e2 �xe3 20 0-0 �xh4 is unclear. lS ... 'iYe6 19 tZJhS ! tZJxhS A forced exchange, as 1 9 . . . i.e5 ? is met by
20 tZJxf6 �xf6 2 1 �xd5 i.f5 22 i.d3 i.xd3 23 �xd3 ±.
20 i.xhS i.d7 2 1 i.f3 i.c6 22 hS ! h6 2 3 �h4 ? !
White should probably try 2 3 0-0 �ac8 24 �d2 ;t
2 3 . . • �a cS 24 �g4 ! d4 ! 24 . . . i.f8 ? ! is rather passive : 25 �dd4 t.
2S �gxd4 !? White tries to complicate. 25 i.xc6 'ii'xg4 26
�xd4 �xe3+ 27 fxe3 �g3+ 28 'iWf2 �xf2+ 29 cJi;xf2 �xc6 is equal .
2S ... i.eS? A serious error. 25 . . . i.xf3 ! keeps the game
unclear: 26 gxf3 i.e5 27 �d7 i.xc3+ 28 bxc3 . 26 i.g4 ! 'Wie7 27 i.x cS i.xd4 2 S �xd4 �x cS
(D)
w
White has won a pawn but this is not the only positive aspect of his position . The presence of opposite-coloured bishops guarantees White attacking possibilities .
2 9 �fS ! �e S 30 �g4 f6? The only chance was 30 . . . �g8 3 1 �e5 �xe5
32 i.xe5 f6 33 i.d4 �d8 34 f3 �d5 35 �h4 cJi;g8 36 g4 ±.
31 �xg7! cJi;xg7 32 'iYg6+ cJi;fS 33 i.b4 1-0
Test 35 Plan A (0 points). is completely wrong, giving up the bishop-pair and helping Black to get rid

1 08 MODERN CHESS PLANNING
of his weakness without any loss of material. Plan B ( 1 0 points) is OK, but White does not need to play in this way . Opposite-coloured bishops can help Black in his defensive efforts, as White ' s a-pawn is also weak. The correct plan is C (20 points) ; then White can slowly but surely cash in the desired point.
The game continued: 2 3 'iVe5! lbd6 The alternative was 23 . . . 'iVe6 24 l:Ic2 �g6 25
�h5 �d6 26 �f3 ±. 24 �f3 l:Ia6 25 �b4 lbe4 ! (D) A passive continuation like 25 . . . 'iVe6 26 l:Ia1
'iVc4 27 �xa3 �e6 28 'iVxc4 �xc4 29 �c5 +would only play into White's hands.
w
26 �xe4 ! ? 2 6 �c2 �f5 2 7 'iVb3 ± i s also good. 26 ... 'iVxe4 27 'iVf8+? White overlooked a tactical blow. 27 �xa3 ±
is enough for a clear advantage. 27 . • .'ith7 28 'iVx f7 �e6? Black should play 28 . . . �h3 ! ! 29 gxh3 (29
'iVf3 'iVxf3 30 gxf3 c5 3 1 �xc5 l:Ig6+ 32 cith 1 �g2+ 33 citg1 �h3+ =) 29 . . . c5 30 �xc5 l:Ig6+ 3 1 1lVxg6+ (3 1 citn ? 'iVd3+ 32 cite1 l:Ig1 #) 3 1 . . .'iVxg6+ 32 citn 'ilfd3+ 33 citg2 citg6 34 �b4, with a draw.
2 9 'Y/iIe7 'iWg6 30 f3! e5 Nothing is changed by 30 . . . �xa2 3 1 �xa3
�e6 32 citf2 +- or 30 . . . �h3 3 1 g3 �f5 32 citf2 �g4 33 'iWf8 +-.
31 'ilfx e5 �xa2 32 e4 ! Not 32 �xa3? 'iVd3 33 �b4 �xe3+ 34 cith 1
l:Ig6 00• 32 ... �e6 33 �xa 3 �h 3 34 l:Ie2 l:If6 35 �e3
�d7 36 d5 e6 37 d6 h5 38 'ilfe 3 h4 39 l:Ie5? 39 f4 ! 'iVg4 40 l:If2 +- is a clear-cut route to
victory.
w
39 ... l:Ixd6 40 l:Ig5 l:Id 1+ 4 1 citf2 'iVf7?! More stubborn was 4 1 . . .'iVf6 ! 42 f4 ±. 42 �b2 g6 43 'iVe3 'iVf8 44 l:Ia5?! 44 l:Ie5 wins immediately. 44 .. .l:1b 1 (D)
45 cite 3! Preparing 46 l:Ia8 . The immediate 45 l:Ia8?
fails to 45 . . . l:Ixb2+. 45 ... cith6 46 l:Ia8! �e8 47 l:Ixe8 'iVxe8 48
�g7+ cith5 48 . . . citg5 49 �f6+ cith5 50 'iWh7#. 49 g4+ 1-0 Mate follows : 49 . . . hxg3 50 'iWh7+ citg5 5 1
h4#.
Test 3 6 Plan A ( 0 points) i s not dangerous for White, as after 1 5 . . . e6 1 6 b3 a5 1 7 �a3 l:Ie8 1 8 lbb5 unpleasant threats have appeared, such as lbd6 and �c5 . Plan C ( 1 0 points) seems to be OK, but White is not really threatening an early a5 advance and so he is not obliged to weaken the b5-square. So, Plan B (20 points), though somewhat artificial, is a good choice and allows Black to obtain a good game. It must be mentioned that the immediate 1 5 . . . e5 ? is bad, not due to the variations given earlier, but because of 16 lbc6 ! ( 1 6 lbb3? �f5 ! 17 l:Ia1 l:Ic8 +) 16 .. :�Vc7 1 7 lbb4 ! ( 1 7 �xd5 ? lbxd5 18 'ilVxd5 �b7 -+) 1 7 . . . �e6 1 8 as 'ilfc5 1 9 axb6 'iVxb4 20 bxa7 l:Ixa7 2 1 �xd5 l:Id8 22 �d2 ! ! �e7 23 �xe6 'iVxe6 24 'ilVc2 ±.
The game continued: 15 ... 'iVd7! 16 b 3 e5? ! This is premature. With 1 6 . . . l:Ib8 ! 1 7 �b2 e5
1 8 a5 lba8 1 9 lbc2 lbc7 Black secures a slight advantage.
17 lbe2 l:tb8

SOLUTIONS 109
The alternative was 1 7 . . . �b7 1 8 a5 tDc8 1 9 a6 ( 1 9 tDb4 d4) 1 9 . . . �xa6 20 tDb4 �b7 2 1 tDxd5 0() and Black should have seriously considered it.
18 as tDa4 ? A blunder. The only move was 1 8 . . . tDc4 1 9
�xd5 'iVxd5 20 �xd5 tDxa5 2 1 �a3 .l:td8 22 .l:tfd l �b7 = .
19 �d 2 tDc5 20 �b4 Now White has a clear advantage. 20 .. .l:tb5 21 'iVxd5 'iVxd5 22 �xd5 �f5 23
�c4 ! Most precise, as 23 e4? �xe4 24 �xe4 tDxe4
25 �xf8 �xf8 would give Black some compensation.
23 • . • .l:txb4 Also unattractive was 23 . . . .l:tfb8 24 �xb5
.l:txb5 25 .l:tb2 e4 (25 . . . �xc2 26 .l:txc2 .l:txb4 27 .l:txc5 ±) 26 .l:tbbl e3 27 �xc5 .l:txc5 28 tDxe3 �xbl 29 b4 and .l:txbl +-.
24 tDxb4 �xbl 25 .l:t"bl .l:tb8 25 . . . .l:tc8 26 tDd5 Wf8 is no different. 26 tDc6 .l:tb7 27 .l:tdl �f6 28 b4 tDa4 Or 28 . . . tDe6 29 .l:td6 Wg7 30 �xe6 fxe6 3 1
e4 +-.
w
29 .l:td6 Wg7 (D)
30e4 ! Paralysing Black. The rest is easy. 30 ... tDc3 31 f3 .l:tc7 3 l . . .�e7 32 tDxe7 .l:txe7 33 .l:tc6 +-. 32 �d 3 tDa 2 33 b5 tDc3 34 b6 axb6 35
axb6 .l:tb7 36 tDa5 .l:tb8 37 b7 tDa4 38 .l:tc6 1-0
Test 37 Plan A (0 points) with 20 . . . �g3 ? is inadequate. After 2 1 f4 ! (2 1 �e3 ? �h2+ 22 Wfl b6 =+=
would really be strong) 2 l . . .�h8 22 tDe2 �h4 23 �g5 'iVh5 24 tDg3 �h7 25 'iVxd5 �xc3 26
.l:tc 1 'iVg7 27 tDe2 White stands much better ! Plan B (5 points) is naive and offers no more than equality. Plan C (20 points) is the optimal choice: it is straight to the point of contesting the initiative.
The game continued: 20 ... tDe6! 21 �e 3 White 's alternative was 2 1 tDxe6 �xe6 22
�b3 ! (22 �e3? .l:tc8 -+) 22 . . . 'iVg3 23 .l:td l �xh3 24 f4 �xc3 25 'iVxd5 Wh7 26 �g5 .l:tf8 =t.
21...tDf4 22 'iVf2 'iVf6 Black could also think about the immediate
22 . . . 'iVg5 ! ? 23 Wh l 'iVf6 24 .l:td l (24 �a4 b6) 24 . . . �d7 +.
23 'iVd 2 White would love somehow to solve the prob
lem of his passive bishop, but he can ' t, even after 23 �a4 ! ? b6 ! 24 �c6 .l:tb8 25 �b5 a6 26 �fl b5 +.
23 • • . �h4 24 'iVf2 �f6 25 �d 2 'iVg5! Repeating moves is not a bad habit, as it can
help to avoid time-trouble. But of course two times are enough !
26 Whl �d7 27 .l:tgl ? ! (D) An inaccuracy. White should have opted for
27 .l:tbl b6 28 �b3 'i\Vg3 29 'iVf2 �xf2 30 �xf2 .l:tc8 +.
B
27 . • . 'iVg 3! 28 'ilVel tDh5?! The idea is obvious, but 28 . . . tDe2 ! 29 f4
�xe3 30 tDxe2 �f6 =+= is more forceful. 2 9 f4 �x f4 30 �x f4 �x f4 31 g 3 �f6 32
Wh 2 .l:te8 33 'ilVd 2 "ike5 34 .l:tg 2 �e 3! 35 �b 3 "ikxd 2?!
Time-trouble (and blindness ! ) prevented the execution of the simple but effective combination 35 . . . tDxg3 ! 36 �xe3 tDfl + 37 Wg l tDxe3 -+.

1 1 0 MODERN CHESS PLANNING
36 :txd2 :te 3 37 ttJe2 ? ! The last mistake. White could still fight on
with 37 .i.xd5 ttJxg3 38 :tg2 ttJe4 39 :txg6+ W 'ith7 40 .i.xf7 :txh3+ 4 1 'itg 1 :txc3 :t. It is clear that in the final position of this line White is doing better than in the game !
37 ... .i.b5! 38 ttJd4 .i.c4 Now it's all over. The finish was : 39 .i.x c4 dx c4 40 ttJe2 ttJ f6 4 1 :tb2 b6 42 a4
ttJe4 43 as bxa5 44 :ta2 a4 45 h4 a 3 46 ttJd4 0- 1
White 's flag fell, making things easier for both sides !
Test 38 Plan A (0 points) i s bad, as Black also gets his share of counterplay. Plan B ( l 0 points) would be a reasonable choice, but it is inferior to Plan C (20 points). This is a characteristic example of the transformation of advantages, where the superior side is not carried away by the initial evaluation of the position but seeks to discover its truly significant aspects.
The game continued: 32 %:ta2 ! 'itd7 33 .i.c3 'ite6 34 b4 ! axb4 35
�xb4 .i.xb4 ? ! Black should keep the bishops o n the board,
making White 's task more difficult. A possible continuation could be 35 . . . .i.c7 . Then White must play really carefully in order to win: 36 a5 l:ta6 and now:
a) Not the alluring 37 g4? fxe4 ! (37 . . . f4? 38 h4 h6 39 h5 gxh5 40 gxh5 .i.d8 { 40 . . . .i.d6 4 1 l:tg2 .i.xb4 42 :tg6+ 'itd7 43 'itxb4 +- } 4 1 .l:Id2 ! .i.e7 42 .i.xe7 'itxe7 43 'itb4 'ite6 44 :tg2 +-) 38 fxe4 g5 ! (38 . . . .i.d8? 39 :td2 .i.c7 40 g5 :ta7 41 :ta2 :ta6 42 :tf2 .i.d8 43 h4 :ta7 44 l:tf8 +-) 39 .i.c3 h6 40 :th2 .i.d8 (40 .. J:ta7? 4 1 h4 .i.xa5 ? 42 hxg5 hxg5 43 :th6+ +-) 4 1 l:td2 .i.c7 , when White has got nowhere.
b) 37 exf5+ ! gxf5 38 g4 'itf6 39 .i.c3 'ite6 40 h4 .i.d6 (or 40 .. .fxg4 4 1 fxg4 e4 42 l:te2 'itf7 43 :tf2+ ! 'ite8 44 :tf5 ±) 41 g5 e4 42 fxe4 fxe4 43 h5 .i.e5 44 .i.xe5 'itxe5 45 g6 ! hxg6 46 h6 ! ! +-.
Clearly it would have been easier in this case for White to go astray.
36 'itxb4 'itd6 37 as! l:ta6 (D) Forced, as after 37 . . . f4? 38 a6 g5 39 :tal h6
40 'itc4 h5 4 1 l:ta3 'itd7 42 'itc5 'itc7 43 :ta4 h4 44 :ta3 :ta8 45 a7 'itb7 46 'itd6 the win is simple.
We now have a typical rook ending, where the outside passed pawn is worth its weight in gold.
38 'itc4 ? A careless move. 3 8 exf5 ! gxf5 3 9 g4 ± was
correct. 38 ... fxe4 ? And as many times before and many more
in the future, Black returns the favour. After 38 . . . f4 ! 39 h4 h6 40 'itb4 'ite7 4 1 'ita4 'itd6 42 :td2+ 'itc7 43 :td 1 :ta8 White has no way to win.
39 fxe4 'itc7 40 'itc5 'itb7?! 40 . . . 'itd7 is more stubborn : 41 h4 ! 'ite6
(4 1 . . . h5 42 )la3 ! 'itc7 43 'itb4 'itd6 44 :tg3) 42 g4 'itd7 43 g5 'ite6 44 'itb4 'itd6 45 :tf2 'ite7 46 1:[f6. Although the result wouldn' t change, White would have to work harder.
4 1 'itd6 :ta8 42 'itxe5 1-0
Test 39 Plan B (0 points) and Plan C (0 points) are out of the question, as White cannot benefit from the time that Black needs to complete his development in this way. In such cases White must attack the centre as quickly as possible, so Plan A (20 points) is the only acceptable option.
The game continued: 13 c4 ! .i.d6 Or 1 3 . . .'iVa5 1 4 :tac 1 .i.e7 1 5 ttJe5 and White
is much better. 14 as Wic7 15 dx c5 ttJx c5 1 5 . . . .i.xc5 makes no effective difference: 1 6
i..xc5 ttJxc5 ( l 6 . . .'�xc5 1 7 cxd5 'ilVxd5 1 8 'ilVe3 'iYc5 1 9 ttJd4 ! .i.xg2 20 l:tac 1 +-) 1 7 'ilVxb4 0-0 1 8 cxd5 .i.xd5 19 :tac 1 ±.
16 'iYxb4 Even 1 6 a6 .i.a8 1 7 ttJd4 ± was good.

SOLUTIONS 111
16 ... 0-0 Black would stand miserably after 1 6 . . . ttJe4
1 7 'iYa4+ iLc6 1 8 'iYc2 ± as well. 17 cxd5 iLxd5 18 l:ta c1 'fie7 19 iLf4 iLx f4
20 gx f4 ! ? Or 20 'iYxf4 ttJb3 2 1 l:txc8 l:txc8 22 e4 iLc4
23 ttJe5 iLb5 24 iLfl ! ±. 20 .•• l:tc7 2 1 ttJe5 2 1 f5 ! ? iLxf3 22 iLxf3 exf5 23 'iYf4 ± was a
reasonable alternative. 2 1...iLxg2 22 'it>xg2 f6 (D)
w
2 3 ttJd7! A typical positional tactic, allowing White to
exchange pieces. In the resulting endgame it will be easier for White to benefit from his material advantage.
2 3 •.• l:txd7 24 l:txd7 �xd7 25 �x c5 �b8 Alternatives like 25 " .'iYd2 26 'iYc4 'it>h8 27
l:tc2 'iYxa5 28 1lVxe6 ± or 25" .e5 26 fxe5 �g4+ 27 'it>h l 'iYxe2 28 'iVd5+ 'it>h8 29 exf6 �xb2 30 fxg7+ 'iVxg7 3 1 l:tg l ± would also preserve White's advantage.
26 l:tc2 'iYb7+ 27 'it>g 3?! 27 'iVc6 ! ± is much better. 27 .•. �e4 28 f3 'fig6+ 2 9 'it>f2 h5? Black should benefit from White's mistaken
27th move and opt for 29" .'iYh6 ! 30 llVd6 'iYxh2+ 3 1 'it>e3 �g l + 32 'it>d2 'it>n 33 b4 ;t / ±, but time-trouble affected his decision.
30 'iYc6? Why not 30 Wixa7 l:td8 3 1 l:tc l ±? 30 ... 'it>h7 31 Wie4 l:tb5 32 l:tc6 Wixe4 33 fxe4
�xa5 34 l:txe6 l:tb5 35 �a6 �xb2 36 l:txa7 l:tb4 37 l:te7 'it>g6
An original 4 :3 rook ending. White's doubled pawns constitute a weakness, but they also help create a passed pawn more easily.
38 'it>f3 l:tb 3+ 39 e 3
White is forced to return the extra material, as there is no other way to make progress. In return he will obtain a protected passed pawn.
39 • . • l:tb2 40 h4 ! l:th2 4 1 f5+ 'it>h6 42 e5! A better try than 42 'it>g3 l:te2. 42 ... l:th 3+! 42" .l:txh4? 43 e6 or 42" .fxe5 ? 43 'it>g3 ! l:te2
44 l:txe5 would have been clearly mistaken. 43 'it>g2 l:txh4 The careless 43 " Jhe3 ?? loses to 44 exf6 ! . 44 e6 l:te4 ?! 44" .g6 ! would have led to a draw.
45 'it>f3 l:te5 46 e4 h4 46" .g6? is only seemingly strong: 47 l:tn !
gxf5 48 l:txf6+ 'it>g7 49 l:tn+ 'it>g8 50 exf5 and White wins.
47 l:te8 'it>h7 48 l:td8! g6 Black has run out of useful moves. His rook is
forced to remain passive on e5, while 48" .'it>h6? 49 l:th8+ 'it>g5 50 l:th7 g6 5 1 l:tg7 or 48".h3? 49 l:td2 ! is undesirable.
49 'it>f4 After 49 l:td5 'it>g7 ! 50 l:txe5 ? ! fxe5 5 1 e7
'it>n 52 f6 g5 White obtains no more than a drawish queen ending.
4 9 • • . 'it>g7 50 l:td7+ 'it>g8 51 l:tc7 h 3 52 l:tc2 'it>g7 53 l:th2 g5+ 54 'it>f3 l:ta5? 1-0
At the same time Black resigned. Instead, he had to try 54" .g4+ ! 55 'it>f4 ! (55 'it>xg4? l:txe4+ 56 'it>f3 l:th4 57 'it>g3 l:th5 ! 58 'it>g4 l:tg5+) 55" .'it>h6 56 'it>xg4 ! l:txe4+ 57 'it>xh3 'it>g5 5 8 l:tf2, when White can gain slight winning chances by moving his rook to the e-fi1e at the right moment, but the actual win is still in doubt.
Test 40 Plan A (0 points) in fact looks quite bad: after 23" .l:tc8? ! 24 l:txc8 iLxc8 25 a4 f5 26 exf5 ! gxf5 27 a5 'it>f6 28 l:tc6 l:ta8 29 l:tc7 Black is tied down to defence, allowing White to claim the advantage. Plan C (0 points) is also bad. White must play not 24 iLb5 ?, but 24 'it>f2 ! f5 25 'it>e3 , with an advantage. So, Plan B (20 points) is in fact the only acceptable choice for Black.
The game continued: 2 3 • • . iLb5! 24 nc2 ? White must avoid 24 iLxb5 ? ! axb5 25 l:tc2
l:tfa8 26 l:txb5 l:txa2 27 l:tbb2 l:tal + 28 'it>f2 f5 ! , when Black has the initiative and some winning

112 MODERN CHESS PLANNING
chances. However, he should prefer 24 ..t>f2 or even 24 �d l I ?, with equal chances.
24 . . • �xe2 2S �xe2 �e8! 26 ..t>f2 �eS ! Preparing the . . .fS break, as the immediate
26 . . . fS 27 eS ! dxeS 28 �e6 would not trouble White.
27 �eb2 fS 28 �e6 After 28 �b7? .l:hb7 29 .tlxb7 �c2+ 30 ..t>g3
..t>f6 White faces multiple problems. 28 • . • �aS ! 2 9 �e4 �bS ! White was threatening 3 0 a4 ! , locking i n the
as-rook. Black will now be able to use the ' shy' a7-rook as well.
30 �bb4 30 �xbS ? axbS 3 1 �c2 fxe4 32 fxe4 ..t>f6
would bring Black a quick victory, as the white pawns on a2 and e4 will prove very weak and one of them will soon be captured.
30 ..• �ab7 31 a 3 as! 32 �xbS �xbS 33 �e7 ..t>f6 34 �a7 �eS 3S g 3 hS (D)
w
36h4 ? White's position is clearly inferior, but after
this move it becomes easily lost. A better try was 36 ..t>g2 fxe4 37 fxe4 gS ! 38 ..t>gl g4 39 ..t>g2 �c4 40 �xa5 �xe4 with an obvious advantage for Black, who however will still have to prove it.
36 ... �e2 +! 37 ..t>gl White also loses after 37 ..t>e3 �c3+ 38 ..t>f4
fxe4 39 fxe4 �xa3 40 na8 a4 4 1 �a6 ..t>f7 42 �a7 �al 43 ..t>gS a3 44 �a4 a2 4S ..t>h6 ..t>f6 46 �aS �gl . Of course there are many subvariations, but this is a typical line.
37 • • • �c3! 38 �xaS White also has no chances after 38 ..t>f2 fxe4
39 fxe4 �xa3, when Black follows up with . . . �al , . . . a4-a3-a2 and . . . ..t>eS .
38 ... �x f3 39 ex fS �xg 3+ 40 ..t>h2 �g4 4 1 fxg6 �xh4+ 42 ..t>g 3 �g4+ 4 3 ..t>h 3 ..t>xg6 0- 1
Test 4 1 Plan A ( 0 points) and Plan B ( 0 points) are too passive, giving up the extra material and leaving White with the initiative on the queenside. In the first case, after 27 . . . �h6? 28 �xh6 ..t>xh6 29 liJxaS �a7 30 'ifc3 ! White has a clear advantage. In the second, White can take the pawn with 28 liJxaS ! , as Black has no way to exploit the pin. The energetic Plan C (20 points) consists of an excellent exchange sacrifice and seems to be the only acceptable path. Before we go on, I should mention that this was a 30-minute game, which explains the many mistakes from both sides. Nevertheless, it was a very interesting game.
The game continued: 27 . • . liJx eS ! 28 liJb6 liJe6 2 9 liJxa8 �xa8 30
fie3 liJd4 31 �n h4 ! Ensuring control over the dark squares across
the whole board ! Black has reasonable compensation for the exchange and a fair share of the chances .
32 �a 3 �a7 33 'ife4 ? ! White should play 33 �ca1 'ifc7 3 4 �a4 cS
with an unclear position. 33 . . • �f6?! Better is 33 . . . liJbc2 34 �a4 liJxe3 3S fxe3
liJe6 +. 34 1;Ieal? 34 �a4 would retain the equilibrium. 34 . . • 'ife7?? NaIve. 34 . . . liJbc2 ! + was not so difficult. 3S �a4 ?? Missing 3S �xb4 ! axb4 36 �xa7, etc . 3S • . . ..t>g7 Or 3S . . . liJbc2 ! ? 36 �xd4 liJxd4 00 .
36 'ife3 cS 37 �c1 �e7 38 �e4 'iVd8 39 neal 'ifa8 40 �d 3?
White goes astray. 40 f3 ! fS 41 exfS gxfS 00 is essential .
40 • . . �d8?! Black should play 40 . . :�xe4 ! 4 1 'ifxb4 "iWxd3
42 'i'b2 c4 +. 41 �n iVa8 42 'ii'e4 ? 42 �d3 ? is wrong, but 42 f3 ! was again nec
essary. 42 • • • liJb e2 ? ! Many mistakes ! 42 . . . liJdc2 ! 43 �c l �c6 44
�b3 liJxe3 4S fxe3 �xe4 + was quite good for Black.
43 �el �xe4 44 �xd4 ?

SOLUTIONS 113
44 .lld2 ! ltJb4 45 'iVc3 + was not attractive, but it was the only real option for White.
44 • • • ltJxd4 45 l:tcal �f4 ! Due to his superiority on the dark squares,
Black has a clear advantage. 46 'iVc3?! Maybe White should try 46 l:txa5 ! ? l:txa5 47
l:txa5 e4 48 l:txc5 .llxc5 49 'iVxc5 e3 50 fxe3 'iVxe3+ 5 1 'it>h 1 'iVf4 =t, but who wants to defend such an endgame?
46 ... .lld6 47 'iVe 3 'iVf5 The alternative was 47 . . . 'iVxe3 48 fxe3 ltJc2
49 l:txa5 l:txa5 50 l:txa5 ltJxe3 =t.
48 l:txa5 l:txa5 4 9 l:txa5 e4 ! 50 .llc4 .llf4 51 'iVa 3
Also hopeless was 5 1 'iVxd4+ cxd4 52 l:Ixf5 gxf5 -+.
51.. • .lld6? Wrong ! 5 l . . .e3 ! is very strong (52 fxe3 'iVbl +
53 'it>f2 .llg3#) and quickly brings positive results.
52 l:ta7 ltJe6 53 iVc3+ .ie5 54 'iVb 3? 54 'iVd2 ! ltJg5 55 'it>n + is necessary. 54 ... ltJg5? Black could (again) crown his efforts with
54 .. :�f4 ! 55 'iYe3 iVh2+ 56 'it>n .if4 57 'iVc3+ ltJd4 58 l:txf7+ 'it>h6 =t.
55 iVe 3 .lld4 56 'iVe2 ? An equal endgame arises after 56 'ilVd2 ! e3
57 fxe3 'iVbl + 58 .lln ltJe4 59 'iVe2 ltJg3 60 'iVf2 �xn + 6 1 �xn .ixe3+ 62 'iVf2 ltJe2+ 63 'it>n .ixf2 64 'it>xf2 ltJf 4.
B
Now White cannot last long. 56 ... 'iVf4 ! 57 l:tb7 (D)
57 ... e 3! At last ! Weaknesses on the dark squares will
prove decisive. 58 fxe 3
There was nothing better: 5 8 f3 .lle5 -+. 58 ... .llxe 3+ 59 'it>hl ltJe4 60 'iVb2 + Or 60 l:txf7+ 'iVxf7 6 1 .llxf7 ltJg3+ 62 'it>h2
ltJxe2 -+. 60 ... .lld4 61 'iVc2 ltJg 3+ 62 'it>h2 ltJn ++ 0- 1 White resigned in view of 63 'it>h l 'ilVh2#.
Test 42 Plan C (0 points) has no underlying logic and is surely the worst option. The other two plans are correct and give Black a winning position. In my opinion Plan B (20 points) is the best, purely on practical reasons . Targeted pawns must first be blockaded and then captured ! Plan A ( 1 7 points) i s met quite often in practice and i s one we must keep in mind in most endgames (and even middlegames) : exchanging quantity for quality !
The game continued: 36 ... ltJx f3 37 l:tx c6 White must accept the offer, as otherwise he
just loses a pawn. 37 ... l:tx c6 38 l:tx f3+ 'it>g5 39 l:tg 3 l:td6? Black loses his way ! With 39 . . . l:tf6 ! 40 'it>c2
'it>h4 41 l:tg2 g5 42 'it>d3 l:tf4 43 'it>e3 'it>h3 44 l:tgl l:txg4 45 l:th I + 'it>g2 46 l:Ih6 l:tg3+ 47 'it>d2 g4 48 l:txb6 l:tf3 49 b4 cxb4 50 axb4 g3 he could cash the point in.
40 'it>c2 l:td4 4 1 l:tb 3! l:td6 4 l . . .'it>xg4? leads to equality : 42 l:txb6 g5 43
l:tc6 l:td5 44 'it>c3 'it>f4 45 l:tf6+ l:tf5 46 l:txf5+ 'it>xf5 47 'it>d3 g4 48 b3.
42 l:tg 3 'it>h4 ! 43 l:tgl l:td4 ?! Black's last chance for 43 . . . g5 ! . 44 l:tel (D) 44 g5 l:tg4 45 l:tel l:txg5 46 l:te6 b5 47 l:tb6
c4 48 'it>c3 is equal .
B
44 ... g5 45 l:te6 b5 46 l:tb6 b4 47 a4 !
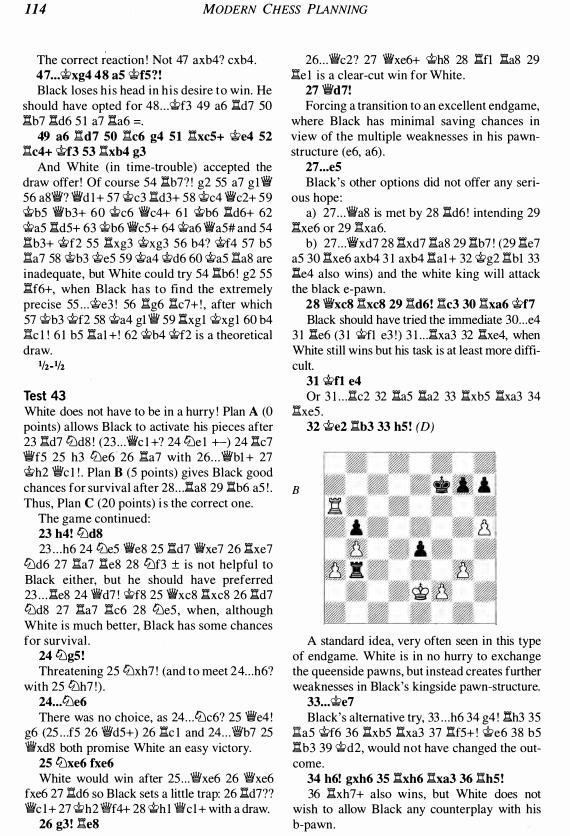
114 MODERN CHESS PLANNING
The correct reaction ! Not 47 axb4? cxb4. 47 • . . �xg4 48 a5 �f5?! Black loses his head in his desire to win. He
should have opted for 48 . . . �f3 49 a6 l:td7 50 l:tb7 l:td6 5 1 a7 l:ta6 = .
49 a6 l:td7 50 l:t e6 g4 51 l:tx e5+ �e4 52 l:t e4+ �f3 53 l:txb4 g 3
And White (in time-trouble) accepted the draw offer ! Of course 54 l:tb7? ! g2 55 a7 g lfi 56 a8fi? 'ii'd l + 57 �c3 l:td3+ 58 �c4 fic2+ 59 �b5 fib3+ 60 �c6 fic4+ 6 1 �b6 l:td6+ 62 �a5 l:td5+ 63 �b6 fic5+ 64 �a6 fia5# and 54 l:tb3+ �f2 55 l:txg3 �xg3 56 b4? �f4 57 b5 l:ta7 58 �b3 �e5 59 �a4 �d6 60 �a5 l:ta8 are inadequate, but White could try 54 l:tb6 ! g2 55 l:tf6+, when Black has to find the extremely precise 55 . . . �e3 ! 56 l:tg6 l:tc7+ ! , after which 57 �b3 �f2 58 �a4 gl � 59 .l:Ixgl 'it>xgl 60 b4 �c l ! 6 1 b5 l:tal + ! 62 �b4 �f2 is a theoretical draw.
llz_llz
Test 43 White does not have to be in a hurry ! Plan A (0 points) allows Black to activate his pieces after 23 l:td7 tbd8 ! (23 . . . fic 1 +? 24 tbe l +-) 24 l:tc7 fif5 25 h3 tbe6' 26 l:ta7 with 26 . . . �bl + 27 �h2 �c 1 ! . Plan B (5 points) gives Black good chances for survival after 28 . . . l:ta8 29 l:tb6 a5 ! . Thus, Plan C (20 points) i s the correct one.
The game continued: 2 3 h4 ! tbd8 23 . . . h6 24 tbe5 fie8 25 l:td7 fixe7 26 l:txe7
tbd6 27 l:ta7 l:te8 28 tbf3 ± is not helpful to Black either, but he should have preferred 23 . . . l:te8 24 'iYd7 ! �f8 25 'ii'xc8 l:txc8 26 l:td7 tbd8 27 l:ta7 l:tc6 28 tbe5 , when, although White is much better, Black has some chances for survival .
24 tbg5! Threatening 25 tbxh7 ! (and to meet 24 . . . h6?
with 25 tbh7 ! ) . 24 ... tbe6 There was no choice, as 24 . . . tbc6? 25 �e4 !
g6 (25 . . .f5 26 'tWd5+) 26 l:tc 1 and 24 . . . 'fgb7 25 'ilVxd8 both promise White an easy victory.
25 tbxe6 fxe6 White would win after 25 . . . iVxe6 26 iVxe6
fxe6 27 l:td6 so Black sets a little trap: 26 l:td7?? �c 1 + 27 �h2 Wkf4+ 28 �h 1 iVc 1 + with a draw.
26 g 3! l:te8
26 . . . �c2? 27 'iYxe6+ �h8 28 l:tfl l:ta8 29 �e l is a clear-cut win for White.
27 'ii'd7! Forcing a transition to an excellent endgame,
where Black has minimal saving chances in view of the multiple weaknesses in his pawnstructure (e6, a6) .
27 ... e5 Black's other options did not offer any seri
ous hope: a) 27 . . . fia8 is met by 28 l:td6 ! intending 29
l:txe6 or 29 �xa6. b) 27 . . . fixd7 28 l:txd7 l:ta8 29 l:tb7 ! (29 l:te7
a5 30 l:txe6 axM 3 1 axM l:tal + 32 �g2 l:tbl 33 .l:Ie4 also wins) and the white king will attack the black e-pawn.
28 fix e8 l:tx e8 2 9 l:td6! l:t e3 30 l:txa6 �f7 Black should have tried the immediate 30 . . . e4
3 1 l:te6 (3 1 �fl e3 ! ) 3 l . . .l:txa3 32 l:txe4, when White still wins but his task is at least more difficult.
31 �f1 e4 Or 3 l . . .:tc2 32 l:ta5 l:ta2 33 l:txb5 l:txa3 34
�xe5 . 32 �e2 l:Ib 3 33 h5! (D)
B
A standard idea, very often seen in this type of endgame. White is in no hurry to exchange the queenside pawns, but instead creates further weaknesses in Black's kingside pawn-structure.
33 ... �e7 Black's alternative try, 33 . . . h6 34 g4 ! .l:Ih3 35
l:ta5 �f6 36 l:txb5 l:txa3 37 �H5+ ! �e6 38 b5 l:tb3 39 �d2, would not have changed the outcome.
34 h6! gxh6 35 l:Ixh6 l:txa 3 36 l:th5! 36 l:txh7+ also wins, but White does not
wish to allow Black any counterplay with his b-pawn.

SOLUTIONS 115
36 . . . �b 3 37 �xb5 �f6 38 �b8 White 's plans are now easy to establish. First
he will push his b-pawn to b7 and then: a) If the black king stays on the kingside,
White will win the black e-pawn and then push his f-pawn as well. A possible continuation is 38 . . . �g7 39 b5 h6 40 b6 �h7 41 b7 �g7 42 �d2 �h7 43 �c2 �b6 44 �c3 �g7 45 �d4 �b4+ 46 �d5, and Black is forced to abandon the protection of his e-pawn as the threat of 47 �c6 ! �c4+ 48 �b5 is decisive.
b) If the black king moves to the queenside, then White will, at the appropriate moment, exchange his b-pawn for Black's kingside footsoldiers .
The above-mentioned plans are considered 'elementary' and can be found in many endgame works.
38 ... h5 39 b5 �e7 40 b6 �d7 41 b7 �c7 42 �h8 �xb7
Or 42 . . . �xb7 43 �h7+ �c6 44 nxb7 �xb7 45 �e3 .
43 �xh5 �c6 44 �e5 1-0 Black resigned in view of 44 .. J:tb4 45 �e3
�d6 46 �xe4.
Test 44 In such positions it is important to create immediate pressure. Black's pieces are not ready to defend in all parts of the board, as time is needed for regrouping. Plan A ( 1 3 points) is obviously good but slow, and Plan C ( 1 0 points) might give Black some counterplay via the afile, which will be opened. The right strategy is to open the centre, i .e . Plan B (20 points) .
The game continued: 17 e4 ! dxe4 18 ttJxe4 ttJd7 Black cannot play 1 8 . . . ttJxd4? 19 ttJxd4 'iVxd4
due to 20 i.c3 . 19 i.g5! 'iia5 20 h4 ! The attack is growing. The idea of h5 and
transferring the queen towards the black king is quite strong.
20 ... Wid5 2 1 �c3 i.g7 22 �el ! White could protect his d4-pawn with 22
i.e3 , but this is not as important as the transfer of his queen to the kingside. The threat of 23 i.c4 forces Black to accept the sacrifice, which opens more .lines against the exposed black camp.
22 ... ttJxd4 2 3 ttJxd4 �xd4 24 J::tdl !
With many threats, such as 25 i.b5 . Black is undeveloped (the c8-bishop and c8-rook are still on their starting squares) and the weak spots at d6 and f6 are a nightmare for him.
24 ... �e5 25 �e 3 (D)
B
25 ... ttJ f6? Black cracks under pressure, as so often hap
pens. His only chance was 25 . . . ttJf8 26 i.e2 ! i.d7 27 i.f4, with a clear advantage for White.
26 f4 ! Winning a piece. The rest was easy:
26 ... ttJd5 27 fxe5 ttJxe 3 28 i.xe 3 i.xe5 2 9 i.e2 b5 30 i.f3 �b8 31 i.a7 �b7 32 i.d4 1-0
Test 45 Advanced and well-protected pawns often lay the groundwork for ideas and plans. Here, the e5-pawn offers a direction for our �ngside plans. If White tries Plan A (3 points) or C (3 points), Black can continue with 1 8 . . . b5 ! , pre-paring the manoeuvre . . . ttJb6-c4 and . . . a5 , with more than enough counterplay on the queen side. The queen side is the only part of the board where Black can create counterplay, so the logical approach for White is to be active on the opposite side. Plan B (20 points) is correct.
The game continued: 18 'iie4 ! 'iVd7 19 'iVg4 �h8?! 1 9 . . . �h7 ! is more accurate: 20 i.d2 �ac8 2 1
ttJd4 ttJc3 22 i.xb7 'iixb7 2 3 b 5 'iVd5 24 a4 i.b4 25 ttJc6 'iixd2 26 �xb4 ttJe2+ 27 �g2 �xb4 28 ttJxb4 ttJd4 29 �ac l ;t
20 �h5 �g8? (D) A fatal mistake. Black should try 20 . . . �h7
2 1 i.d2 �ac8 22 �ac l ;1;. 2 1 i.xh6! gxh6 22 �xh6 f5 There is no salvation, as 22 . . . l:fe8 23 J::te4 !
(23 ttJg5? i.xg5 24 'ikxg5+ �f8 25 �h6+ �e7

1 1 6 MODERN CHESS PLANNING
w
26 'itb4+ �f8 27 �ad l �d8 =) 23 . . .f5 24 exf6 i.xf6 25 �g4+ i.g7 26 lDe5 �c7 27 �e l gives White too strong an attack.
2 3 �g6+ �h8 24 lDd4 ! i.c8 Or 24 . . . i.d8 25 lDxe6 �e8 26 lDd4 i.c7 27
lDxf5 +-. 25 �adl �d8 (D)
w
26 lDx f5! i.f8 27 �e4 ! All of White's forces are participating in the
attack. The end was short : 27 ... i.g7 28 �h4+ �g8 2 9 i.xd5 exd5 30
�xd5! 1-0
Test 46 Plan A (0 points) is obviously no fun for Black and Plan B (5 points) is not really threatening. It is easy to see that the only real option is Plan C (20 points) .
The game continued: 17 ... �e7! 18 lDh 3 �ae8 19 lDg5 'ilVh6! 20 f4
lDg4 2 1 i.x c6 �x c6 22 l:txe7 �xe7 2 3 �el White must be on the alert. 23 f5 ? is inade-
quate : 23 . . . lDe3 24 �f4 �e5 25 g4 �h6 -+. 2 3 ... lDe 3 24 'ilVe2 h6 25 lDe4 Or 25 lDf3 'ilVa6 26 a4 'ii'a5 +.
25 . . . �e6 26 c4 b6 27 �f3 f5 28 lDd2 �e8?
An over-optimistic move. 28 . . . g5 ! 29 �xc6 �xc6 30 lDf3 �g6 3 1 lDe5 �g7 + is much better.
2 9 �e2 ! White grabs his chance. 29 lDfl ? is wrong:
29 . . . lDc2 ! 30 �xe6 �xe6 3 1 �a8+ �h7 +. 2 9 ... �h7?! Maybe Black should try 29 . . . g5 30 fxg5 hxg5
3 1 lDfl g4 32 �f4 lDd l 33 �g5+ �h8 =t. 30 lDf1 ! White is now back in the game. 30 ... �e7 31 h 3 b5 32 lDxe 3 bx c4 33 bx c4
dxe 3 34 �g2 �a4 35 �d5 �dl 36 �x f5+ g6 37 �g4 �xd 3 38 h4 h5 39 �f3 as 40 f5!
Although Black tried to be tricky, White didn' t stray from the right path and, with precise play, held the equilibrium.
40 . . . �x f5 41 �x f5 gx f5 42 �f3 �e4 43 �xe 3 �x c4 44 �e6 �g7 45 �c6 a4 46 �a6 �f7 47 �h6 l::tc2 48 �c6 �xa2 4 9 �x c5 �e6 50 �f4 ? !
This does not give the draw away, but 50 �a5 ! a3 5 1 �f4 �f2+ 52 �e3 �g2 53 �f3 �a2 54 �f4 = is an easier path.
50 ... �f2 + 51 �e 3 �b2 ! 52 �c6+? White loses his head ! 52 �a5 nb4 53 'it'f3 =
was not that difficult to find. 52 ... �e5? 52 . . . �d5 ! is surely best.
53 �c5+ 'it'e6 54 �c6+? �d5! 55 �h6 No better is 55 na6 �b4 56 �a5+ �c4 57
nxf5 a3 -+. 55 ... �e5?! Although this does not spoil Black's advan
tage, 55 . . . a3 ! 56 �xh5 �b3+ 57 'it'd2 (57 'it'f4 .l:;Ib4+ 58 'it'f3 �a4 59 �xf5+ 'it'e6 60 �c5 a2 -+) 57 . . . a2 58 �xf5+ 'it'c4 59 �a5 �xg3 -+ is more precise.
56 �xh5 �b 3+ 57 'it'f2 'it'e4 ! 58 �g2 (D) 58 �h8 also loses : 58 . . . �b2+ 59 'it'g l a3 60
�a8 a2 -+. 58 ... �b8! Of course ! In the endgame, rooks generally
belong behind passed pawns . How many times have we forgotten this principle and how times have we wondered how we could possibly forget it?
59 �h7 �a8 60 �e7+ 'it'd5 61 �el a 3 62 �al a2 63 'it'f3 'it'e5 64 �el + 'it'f6 65 �al 'it'g6 66 'it'f4 �a5 67 �e 3
67 g4 is met by 67 . . . �a4+ 68 'it'e3 fxg4 -+.

SOLUTIONS 11 7
B
67 .• ..l:ta 3+ 68 �f2 Or 68 �f4 �f6 69 h5 lta4+ 70 �e3 �g5 and
the h-pawn falls. 68 . • • �h5 69 �g2 �g4 70 �h2 lta8! 71 �g2
lta4 72 �h2 lta 3! 73 h5 �xh5 74 �h 3 f4 75 �h2 fxg 3+ 76 �g2 �g4 77 ltc1 �f4 0- 1
Test 47 Plan C (5 points) is out of the question, as it only promises equality after 21 b4? ! ltdc8 22 liJb3 c4 ! 23 liJa5 cxd3 24 ltxc7 ltxc7 25 ltxc7 liJxc7 26 liJxb7 'ilVxb7. White 's idea is generally correct, but it cannot be realized in this particular position. Plan A (5 points) is also just equal, as White's bishop will never be allowed to attack Black's queenside pawns, while Black is ready to exchange all the major pieces. The correct plan is B (20 points) .
The game continued: 2 1 a4 ! ltd c8 22 e4 ! ? A n interesting idea. White restrains the power
of the black bishop, at the same time gaining control over important central squares.
22 • . • liJe f6 Also possible is 22 . . :iVb8 23 liJe5 liJef6 24
h3 t. 2 3 liJe5! White cannot hope for more than equality af
ter the premature 23 axb5 axb5 24 b4 'iVa7 25 h3 �b6 26 bxc5 ltxc5 27 d4 ltxc2 28 ltxc2 ltxc2 29 'ilVxc2 b4.
2 3 . • . liJxe5?! Black should prefer 23 . . :�'b8 ! 24 h3 t, as on
his previous move. 24 'ilVxe5 liJd7 25 'ti'b2 i.c6 26 axb5 axb5
(D) 27 b4 ! The time has come ! 27 ... i.b7
w
Maybe Black should choose 27 . . . cxb4 28 'iVxb4 liJf6 29 d4 liJe8 30 h3 instead, although White holds the advantage.
28 liJb 3? After this miscalculation Black is back in the
game. White could get a clear advantage with the natural 28 bxc5 ltxc5 (28 . . . liJxc5 29 'ilVxb5 i.a6 30 'iYb6 ltc6 3 1 e5 ltxb6 32 i.xa8 ltxa8 33 ltxc5 ±) 29 ltxc5 liJxc5 30 d4 liJd7 3 1 ltal ioa6 32 e5 'iIIa7 33 liJe4.
28 • . • c4 ! 2 9 liJa5 liJb6? Black slips again. 29 . . . 'ilVa6 30 ion 'ti'b6 3 1
liJxb7 'fHxb7 32 dxc4 bxc4 3 3 ltxc4 ltxc4 34 ltxc4 ltxc4 35 i.xc4 'iVxe4 36 �c3 t was not that bad.
30 'iVe5! 'ilVb8? The final and fatal mistake. 30 . . . 'ilVa6 ! is es
sential : 3 1 liJxb7 ltxb7 (3 1 . . .liJd7 32 'ilVd4 'ilVxb7 33 dxc4 e5 34 'fHd3 bxc4 35 1.:txc4 ±) 32 ltal liJa4 33 i.n ! f6 (33 . . . h6 34 dxc4 bxc4 35 'ilVa5 �xa5 36 bxa5 .l:tb4 37 e5 ±) 34 'ilVd4 ltbc7 35 dxc4 bxc4 36 i.h3 ! ±.
31 'iVxb5 i.a8 1-0
Test 48 Plan B (0 points) is not a serious option. After 25 �c5 ? ltd7 ! Black's threats are still valid, while White has in the meantime also misplaced his rook. Of course Black shouldn' t exchange any rooks, as then he is forfeiting his potential pressure down the half-open files. Plan C (0 points) is more than fine for Black after 25 liJd2 a5 ! 26 'iVc4 ltad8 27 liJb3 'iVe8 ! . The only correct plan is A (20 points) .
The game continued: 25 liJe 1 ! .:f.ad8 26 J:Ig 3+ �h8 27 liJc2 ltg8? The wrong direction, as there is nothing for
Black in the g-file. 27 . . . a5 ! 28 'tlVc4 t / ± was essential .

118 MODERN CHESS PLANNING
28 4Je 3 l:tdg5 2 9 b 3 White 's advantage has increased further. 2 9 ... h6 30 'fid6 'iith7 31 l:i.el l:i.8g7 32 .uxg5
hxg5 The other capture is even worse: 32 . . . Ihg5? !
33 f4 l:i.g7 3 4 f5 +-. 33 4Jg4 ! ..td5 34 ne 3! 'iitg6 35 l:i.c3! The c-file is more important. 35 lIh3 ? l:i.h7
gives White nothing. 35 • . :�e7 36 �g 3 �a 3 37 h 3? ! Time-trouble prevented White from finding
the straightforward 37 h4 ! �al + 38 �h2 llh7 39 4Je5+ ! +-.
37 • • Jld7 38 'iith2 ? ! Still playing safely. The active 38 f4 ! , aiming
at the black king, is decisive : 38 .. .'�al + 39 'iith2 �b2 40 fxg5 ..txg2 4 1 gxf6 +-.
38 • • • ..tc6?! Black should seek survival chances in the
endgame. 38 . . .'�d6 ! 39 �xd6 Ihd6 40 4Je3 ..tc6 4 1 I:tc4 ± was essential .
39 �d 3 39 f4 ! ltxd4 40 fxg5 J:.d2 4 1 4Je3 �d6 42
�xd6 l:i.xd6 43 gxf6 'iitxf6 44 g4 +- was still the right path to follow.
39 ..• ..te4 ? 40 lte 3? 40 4Jxf6 ! +- wouldn' t be that difficult to
find with a little more time on the clock. 40 ... ..td5 (D)
w
4 1 f4 ! Finally White understood what he had to
do ! 4 1 ... 11c7 There is no solution to be found: 4 1 . . .'�d6 42
fxg5 �xg3+ 43 1hg3 +- or 4 l . . .gxf4 42 �xf4 �e7 43 l:tg3 .
42 f5+ ex f5 43 �x c7 fxg4 44 �d7 g 3+ 45 l1xg 3 ..txb 3 46 �xb7 1-0
Test 49 Plan B (20 points) was the correct one. After 24 4Jxe4 ! fxe4 25 �xe4 Black can only play the obscure but absolutely necessary 25 . . . �xh3+ ! ! (25 . . . 4Jf6? 26 �e7+ 'iitg6 27 l:i.hg l + +- or 25 . . . 4Je5 ? 26 �f4+ 'iite8 27 l:i.xe5+ ! dxe5 28 �xe5+ 'iitd8 29 �f6+ 'iitd7 30 l:te l +-) 26 �xh3 4Jf6+ 27 'iith4 ! 4Jxe4 28 l:txe4 l:!g6? ! (28 . . J::tg2 ! ?) 29 l:i.f4+ l1f6 30 ..tg5 nf5 3 1 1::txf5+ ..txf5 32 ..tf4 ..td3 3 3 ..txd6 ..txc4 34 l:td l , even if this gives White good winning chances . Plan C (0 points) plays into Black's hands. After 24 f3? 4Je5 ! 25 l:i.hgl l:i.xg l 26 l:i.xgl �xa2 only Black can be better. Plan A (8 points) is the second-best choice and should merely give White somewhat better chances in a complicated position. Unfortunately, this was the path that I chose. The game continued:
24 Ithgl? ! Itg6? (D) Black missed the correct defence: 24 . . . 4Je5 !
25 l:i.xg8 'iitxg8 26 l:tgl + 4Jg6 27 ..tf4 .l::!.a6 28 �bl ! t.
w
25 ..tf4 ? But now the thematic sacrifice was even
stronger ! After 25 4Jxe4 ! fxe4 26 'iYxe4 �xh3+ (26 . . . 4Je5 27 'iVf4+ 'iite8 28 'YWf8+ 'iitd7 29 1Ixg6 hxg6 30 'YWg7+ 'iite8 3 1 Itxe5+ dxe5 32 �f8+ 'iitd7 33 �f7+ 'iitd6 34 ..tf8#) 27 'iitxh3 4Jf6+ 28 �e6+ ..txe6+ 29 dxe6+ 'iite8 (29 . . . 'iite7 30 oUxg6 hxg6 3 1 ..tg5 +- l:i.xa2? 32 ..txf6+ 'iitxf6 33 e7) 30 nxg6 hxg6 3 1 ..tf4 White should win without much trouble.
25 ... l:ta6 Another possibility is 25 . . . 4Je5 ! ? 26 'iVd 1
�xa2 (26 . . . 4Jd3 ! ? 27 �h5 ! 'iVb2 ! { 27 . . . 4Jxf4?? 28 'ilYxh7+ Wf6 29 l:txg6+ 4Jxg6 30 J:tgl +- } 28 �xh7+ 'J/iig7 29 �xg7+ 'iitxg7 30 .l::!.xg6+ ��g6 3 1 l:i.gl + 'iith5 32 ..txd6 l:txa2 33 4Jb3

SOLUTIONS 119
lhf2+ 34 11g2 �xg2+ 3S 'it>xg2 .lia6 36 tZJxcS .lixc4 37 tZJxd3 exd3 38 .lib4 .lixdS+ 39 'it>g3 =) 27 �S tZJf3+ 28 'it>h 1 tZJxg 1 29 'iVxh7+ �g7 30 �hS+ �g8 3 1 'iVe8+ with perpetual check. White cannot afford any winning try .
26 �dl tZJf6 27 �bl ! tZJh5! 28 'iVb8 tZJx f4 2 9 'iVe7+ 'it>f6 30 'iVd8+ rJ;f7 31 �e7+ �f6 32 l::txg6+ hxg6?
Also bad is 32 . . . 'it>xg6?? 33 �gl + +-, but 32 . . . tZJxg6 ! 33 'iVxc8 �xa2 34 'iYe6+ 'it>g7 3S Ite2 leads to unclear play and is the only acceptable continuation for Black.
33 'iVd8+ White thought that he couldn't hope for more
than a draw. Time-trouble played an important role, as there wasn' t enough time to examine the various possibilities carefully enough. 33 �e3 ! 'iVaS 34 �xc8 �a8 (D) (34 .. .'iVxd2?? 3S 'iVf8+ 'it>gS { 3S . . . �eS 36 'VJIig7# } 36 .l:!.g3+ 'it>h4 37 �f6+ 'it>hS 38 'iVgS#) is the correct continuation.
w
Then, 3S �d7? even loses, to 3S . . . 'iVxd2 36 'iVxd6+ 'it>gS 37 h4+ 'it>g4, but again with the thematic sacrifice 3S tZJxe4+ ! ! fxe4 36 'iV g4 tZJhS 37 l:txe4 'iVd2 (37 . . . �g8 38 l:te6+ 'it>f7 39 'ii'f3+ 'it>g7 40 l:te7+ rJ;h6 41 'iVe3+ gS 42 'iVe6+ �g6 43 'iVc8 g4 44 h4 g3+ 4S 'it>h 1 'iVc3 46 'iVf8+ +-) 38 �e6+ �f7 39 lWxg6+ 'it>f8 40 'iYfS+ �g8 4 1 l:tg6+ tZJg7 42 lWe6+ 'it>h7 43 lWf7 l:tg8 44 l:tg4 'ilVh6 4S 'VJIie7 +- enables White to collect the full point. I was unsure about all this and, since the game was played in a team event, (wrongly) preferred to take the draw. Things like that can happen in any game where the mind is not clear and the time is short.
33 ... 'it>f7 34 'iYe7+ 'it>f6 35 �d8+ �f7 36 'iVe7+ �f6 l/z_l/z
Test 50 Plan C (20 points) is the best one, and highlights the secret of such positions: knights can prove better pieces than bishops here. Of course, we should not underestimate Plan A ( 1 7 points), because Black retains the option of a potential . . . .lixe2, but we should not embrace Plan B ( 1 0 points) , although objectively i t doesn' t change the position's evaluation too much. A lot of positions are equal, but because of the difference in the strength of the various plans available, as well as the implementation of the appropriate exchanges, they can turn out very pleasantly.
The game continued: 14 . • . .lixe2 ! 15 �xe2 tZJxd4 16 tZJxd4 exd4
17 �xd4 'VJIib6!? 1 7 . . . .lics 18 'il!Vd3 is equal . 18 .lie 3 1 8 WVxb6 ! ? is also playable: 1 8 . . .l:txb6 ! 1 9
.lie3 ( 1 9 a3 ? ! bxa3 20 b 3 �a6 + ) 1 9 . . . .lics 20 .lixcs tZJxcS = .
18 ... i.e5 19 'iVd2 i.xe 3 20 l:txe 3 l:tfe8 2 1 f5! The correct idea, seeking counterplay in the
right direction. There was no time for delay : 2 1 lte2 g6 ! =1=.
2 1..:iWe7!? 2 l . . .exfS 22 e6 fxe6 23 nxe6 'iVcs 24 �xdS
1WxdS 2S .lixdS �f8 = was not to Black's liking. 22 fxe6? White should refrain from this immediate ex
change, which reduces his pressure on the kingside. 22 l:te2 ! is correct: 22 . . . exfS (22 . . . tZJxeS ? ! 2 3 fxe6 fxe6 24 �e3) 2 3 .lixdS tZJf8 24 l:tfl g6 2S g4 l:te8 26 gxfS �xeS 27 llxeS �xeS+ 28 fVf4 'iVxf4+ 29 l:txf4 ItbS 30 .lie4 l:teS 3 1 .lid3 as , with equal chances .
22 . . . fxe6 2 3 l:te2 Worse is 23 �c 1 ? ! l:tf8 24 'il!Vd4 �fS +. 2 3 .. J�.f8! 24 �dl?! 24 1he 1 as =1= should have been preferred. 24 ... 'it>h8? ! Not, of course, 24 . . . aS ? 2S .lixdS ! , but after
24 . . . tZJxeS ! 2S 'iVe3 �fS 26 l::id4 (26 l'!fl �hS ! 27 rJ;h 1 :e8 +) 26 . . . :bf8 27 �xb4 n8f6 Black can claim a significant advantage.
25 �g5 'iVe5! (D) Covering the important e7-square, while re
taining the pressure on the white eS-pawn. Instead, 2S . . . tZJb6? ! 26 �g4 WVe7 27 'VJIid4 tZJc4 28 b3 tZJb6 29 c3 bxc3 30 �c 1 00 would be a step in the wrong direction.

120 MODERN CHESS PLANNING
w
26 �g4 �e7 26 . . JHS? 27 �xdS �c7 28 �d6 ttJxeS 29
�d4 ttJf3+ 30 i.xf3 �xf3 3 1 �g2 er; is hardly positive for Black.
27 �d4 ? ! The only move was 2 7 �d3 . 27 ... a5? ! Again Black failed to find the strong contin
uation 27 . . . �fS ! 28 �xdS hS 29 �xd7 �xd7 30 �c4 as =t.
28 �f4 �x f4 ! 2 9 'iVx f4 After 29 gxf4 �f8 30 h4 ttJcS 3 1 i.h3 'iVf7
32 I:tf2 a4 Black also holds a pleasant and safe advantage.
2 9 ... �f8 30 �e 3 �c5 31 Vlt'd 3 A queen exchange by 3 1 �xcS ttJxcS 32 h4
ttJa4 33 i.h3 .l:!.e8 34 b3 ttJc3 3S �f2 'it>g8 -+ would be a disaster for White.
31. .. �c7 3 1 . . .�fS ! ? 32 'ii'a6 ttJf8 33 'iVd3 'it>g8 =t is
also good. 32 �a6 ttJ c5 33 �b5 h6! Not falling into the trap with 33 . . . �b8? ! 34
�f2 'it>g8 3S Vlt'e2. 34 �e 3 ttJd7 ( D) 34 . . . �f2 ! ? 3S �e2 l::tfS =t.
w
35 �e2 ? ! White should opt for 3S �e2 �fS 36 �a6
�b6 (36 . . . ttJb6 ! ? 37 �e l �f2 =t; 36 . . . �xc2? 37 �xe6 d4 38 �e l �f2 39 �dS d3 40 e6 d2 4 1 exd7 dxe l � 4 2 d8�+ 'it>h7 4 3 �Sg8+ 'it>g6 44 �b6+ �f6 4S 'ilkb7 �xg2+ 46 �xg2 �f2 47 �e8+ =) 37 �e2 �cS =t, although his position is far from good.
35 ... ttJxe5 36 �a6 �f6 Black's best course is probably 36 . . . ttJf3+ 37
i.xf3 �xf3 38 �g2 �eS -+. 37 b 3 ttJ c6 38 �d 3 �d6 38 . . . �b6 39 i.xdS ttJd4 ! 40 �e3 �f2+ 4 1
'it>h 1 �xc2 -+. 39 c4 bx c3 40 �x c3 e5? (D) The safest was 40 . . . I:tfS 4 1 �d2 a4 42 bxa4
ttJeS -+. Now White gets some play, as his bishop finds some targets.
w
4 1 �d2 d4 42 �c4 42 �xc6 'ilkxc6 43 i.xc6 �xc6 44 'it>g2 �c3
-+ is no help to White, but maybe he should try 42 �d3 ! ? =t.
42 ... ttJe7!? A nice idea, intending to attack White 's
bishop when i t comes to e4 ( . . . ttJg8-f6), allowing Black's central pawns to advance to good effect.
43 i.e4 �f8 44 �c2 ttJg8 45 'iVb5? White had to seek survival chances in the
endgame with 4S �cS ! 'ilkxcs (4S . . . 'iVb8 46 �xaS ttJf6 47 �e l +) 46 �xcS �f2+ 47 'it>gl �e2 ! (47 . . . �xa2? 48 �c8) 48 i.fS e4 ! 49 �xaS (49 �c8 d3 wins for Black) 49 . . . d3 SO 'it>fl gS =t, although his mission would remain difficult. After the text-move, his position collapsed fairly quickly.
45 ... ttJ f6 46 �d 3 ttJxe4 47 'iVxe4 d 3 48 �c6 �d7 0- 1
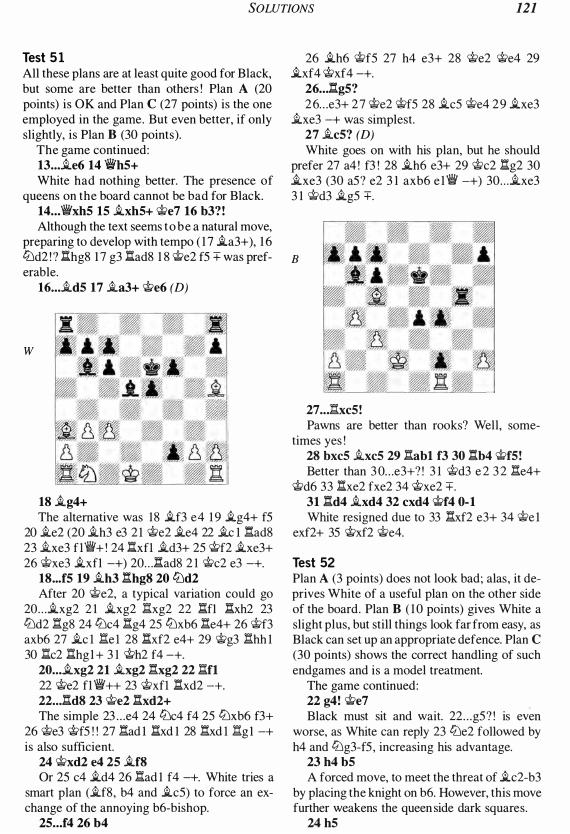
SOLUTIONS 121
Test 5 1 All these plans are at least quite good for Black, but some are better than others ! Plan A (20 points) is OK and Plan C (27 points) is the one employed in the game. But even better, if only slightly, is Plan B (30 points).
The game continued: 13 ... �e6 14 'ilYhS+ White had nothing better. The presence of
queens on the board cannot be bad for Black. 14 .. :�xhS lS �xhS+ �e7 16 b 3? ! Although the text seems to be a natural move,
preparing to develop with tempo ( 1 7 �a3+), 1 6 ttJd2 ! ? l:thg8 1 7 g3 l:tad8 1 8 �e2 f5 + was preferable.
16 ... �dS I7 �a 3+ �e6 (D)
w
18 �g4+ The alternative was 18 �f3 e4 1 9 �g4+ f5
20 �e2 (20 �h3 e3 2 1 �e2 �e4 22 .tc 1 �ad8 23 �xe3 fl'ilV+ ! 24 l:txfl �d3+ 25 �f2 �xe3+ 26 �xe3 �xf1 -+) 20 . . . l::tad8 2 1 �c2 e3 -+.
18 ... fS 19 �h 3 l:thg8 20 ttJd2 After 20 �e2, a typical variation could go
20 . . . �xg2 2 1 �xg2 l:txg2 22 l:!.f1 l:!.xh2 23 ttJd2 l:!.g8 24 ttJc4 l:tg4 25 ttJxb6 l:te4+ 26 �f3 axb6 27 �c 1 l:te l 28 l:!.xf2 e4+ 29 �g3 l:thh 1 30 l:tc2 l:.hg 1 + 3 1 �h2 f4 -+.
20 ... .txg2 2 1 �xg2 l:txg2 22 l:!.f1 22 �e2 f1 �++ 23 �xfl l:!.xd2 -+.
22 ... l:td8 2 3 �e2 l:txd2 + The simple 23 . . . e4 24 ttJc4 f4 25 ttJxb6 f3+
26 �e3 �f5 ! ! 27 l:tad 1 l:!.xd 1 28 l:txd l 1:tg 1 -+ is also sufficient.
24 �xd2 e4 2S �f8 Or 25 c4 �d4 26 l:tad 1 f4 -+. White tries a
smart plan (�f8, b4 and �c5) to force an exchange of the annoying b6-bishop.
2S ... f4 26 b4
26 �h6 �f5 27 h4 e3+ 28 �e2 �e4 29 �xf4 �xf4 -+.
26 . . • l:tgS ? 2 6 . . . e3+ 2 7 �e2 �f5 28 �c5 �e4 2 9 �xe3
�xe3 -+ was simplest. 27 �cS? (D) White goes on with his plan, but he should
prefer 27 a4 ! f3 ! 28 �h6 e3+ 29 �c2 l:tg2 30 �xe3 (30 a5? e2 3 1 axb6 e 1 'it' -+) 30 . . . �xe3 3 1 �d3 �g5 +.
B
27 .. .lhcS ! Pawns are better than rooks? Well, some
times yes ! 28 bx cS �x cS 2 9 l:.abl f3 30 l:tb4 �fS ! Better than 3 0 . . . e3+? ! 3 1 �d3 e 2 3 2 l:te4+
�d6 33 l:txe2 fxe2 34 �xe2 +. 31 l:td4 �xd4 32 cxd4 �f4 0- 1 White resigned due to 33 l:!.xf2 e3+ 34 �e 1
exf2+ 35 �xf2 We4.
Test 52 Plan A (3 points) does not look bad; alas, it deprives White of a useful plan on the other side of the board. Plan B ( 1 0 points) gives White a slight plus, but still things look far from easy, as Black can set up an appropriate defence. Plan C (30 points) shows the correct handling of such endgames and is a model treatment.
The game continued: 22 g4 ! �e7 Black must sit and wait. 22 . . . g5 ? ! is even
worse, as White can reply 23 ttJe2 followed by h4 and ttJg3-f5 , increasing his advantage.
2 3 h4 bS A forced move, to meet the threat of �c2-b3
by placing the knight on b6. However, this move further weakens the queen side dark squares.
24 hS

122 MODERN CHESS PLANNING
White 's initiative on the kingside is dangerous, but there is also a threat to Black's centre involving an eventual �c2-b3 followed by gS . The immediate 24 �c2? ! It'ld7 2S �b3 It'lb6 would allow Black to consolidate.
24 ... lt'ld7 25 1:tx e8 1:tx e8 26 1:thl ! A s White cannot use the c-file effectively, he
switches to the h-file, which may prove even more valuable.
26 ... lt'lf8 26 . . . lt'lb6? is unplayable: 27 hxg6 hxg6 28
It'lxg6+ ! fxg6 29 1:th7+ +-. 27 hxg6 hxg6 28 <;t>e2 By stationing his king on d2, White not only
neutralizes the enemy rook but also renews the threat of �c2-b3 . Black must cover the invasion squares of the white rook, leaving his knight to defend the weak dS-pawn.
28 ... <;t>f6 2 9 <;t>d2 <;t>g7 30 nel ! As the black king i s far away, this was the
right moment for the white king to invade on the queenside and especially to as , which Black weakened with his forced 23rd move.
30 .. Jhc1 31 <;t>x c1 <;t>f6 32 'iitd2 b4 If 32 . . . �c6 (preparing 33 . . . aS) then 33 a4 !
+- would do the job. 33 <;t>e2 as (D)
w
34 �b5! The last important move, after which Black
cannot prevent the white king from penetrating his queenside.
34 ... lt'le6 35 It'lxe6 fxe6 36 <;t>b 3 <;t>g5 37 <;t>a4 e5 38 <it>xa5 exd4 39 exd4 <;t>f4 40 �d7! <;t>e 3 41 <;t>b6 �a8 42 <;t>a7 <;t>xd4 43 f4 ! 1-0
Test 53 Plan C (0 points) actually implies fishing around without any concrete purpose. Although at first
sight it looks good, it just spoils White' s position. Plan B (S points) is naIve and, although it keeps a slight advantage, Black should certainly be happy to face it. That he chose the strong and very effective Plan A (30 points) shows the strength of the young Kasparov !
The game continued: 14 d5! exd5 15 �g2 e6 16 0-0 f6 Other moves are hardly better: a) 1 6 . . . fS ? ! 1 7 It'lf3 ! 'WIe7 1 8 It'leS �e6 1 9
a4 ! ±. b) 16 . . . lt'lc8? ! 1 7 ne l �fS 18 e4 dxe4 1 9
It'lxe4 �e6 20 1lVhS 1:tg8 2 1 It'lf6+ ! ! gxf6 22 1:txe6+ It'le7 (22 . . . dxe6 23 �xc6+ <;t>e7 24 �xa8 +-) 23 �xf6 (23 ::'xf6 1:tg6 24 lte l .a.xf6 2S �xf6 dS 26 �h3 iVd6 27 �e6 +-) 23 . . . dxe6 24 �xc6+ It'lxc6 2S �xd8 lt'lxd8 26 'i¥xbS+ +-.
17 .l:!.el ! Much better than the immediate 1 7 e4? ! dxe4
1 8 �xe4 �f7 ! 00 .
17 • . . �e7?! Black should try 1 7 . . .'�f7, although after 1 8
e4 dxe4 1 9 lt'lxe4 �fS 20 hS White's position is clearly preferable.
18 �g4 ! <;t>f7 19 h5 �h7 20 e4 dxe4 2 1 �xe4 !
Exchanging light-squared bishops would allow White access to the important g6-square.
2 1 • • • �xe4 22 It'lxe4 22 nxe4 �H8 23 WVg6+ <;t>g8 24 1:tg4 1If7 2S
'ilVxh6 ± is also good. 22 . . • lt'le8 Probably the only defence, as 22 . . JH8 ? ! 23
l::tad l dS 24 It'lxf6 ! +- and 22 . . . l:te8 23 'iVg6+ <;t>f8 24 g4 ! It'lc8 2S gS +- are too easy.
2 3 1:tadl 1la7?! (D) A slip in an already bad position can be truly
fatal . 23 . . . lt'lb6 24 lt'lcS �xcS 2S �g6+ <;t>f8 26 bxcS It'ldS 27 l::te4 ± was the only try.
24 It'lx f6! ! gx f6 Forced: 24 . . . �xf6? ! 2S 'i¥g6+ 'it>f8 26 �xf6
gxf6 27 .l:i.e6 +-. 25 'iYg6+ <;t>f8 26 �el ! A very difficult but highly effective idea !
White 's position was so good that he could also play 26 1:txe7 'ilVxe7 27 �xf6 �h7 28 �xh8 'ilVxg6 29 hxg6 +-.
26 . • • d5 Or 26 . . . 'i¥e8 27 �xh6+ 1:txh6 28 �xh6+
<it>f7 29 �g6+ <;t>f8 30 'iVg4 +-. 27 l:td4 !
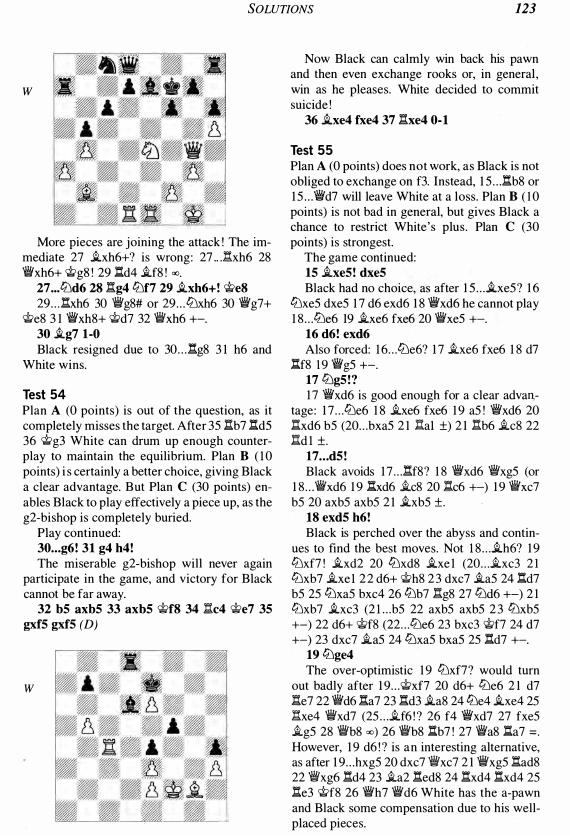
SOLUTIONS 123
w
More pieces are joining the attack ! The immediate 27 .ixh6+? is wrong: 27 .. Jhh6 28 �xh6+ 'it>g8 ! 29 �d4 .if8 ! 00.
27 ... lLld6 28 �g4 lLlf7 2 9 .ixh6+! 'it>e8 29 . . . �xh6 30 �g8# or 29 . . . lLlxh6 30 �g7+
'it>e8 3 1 �xh8+ 'it>d7 32 �xh6 +-. 30 .ig7 1-0 Black resigned due to 30 . . . �g8 3 1 h6 and
White wins.
Test 54 Plan A (0 points) is out of the question, as it completely misses the target. After 35 nb7 �d5 36 'it>g3 White can drum up enough counterplay to maintain the equilibrium. Plan B ( l 0 points) i s certainly a better choice, giving Black a clear advantage. But Plan C (30 points) enables Black to play effectively a piece up, as the g2-bishop is completely buried.
Play continued: 30 ... g6! 31 g4 h4 ! The miserable g2-bishop will never again
participate in the game, and victory for Black cannot be far away.
32 b5 axb5 33 axb5 'it>f8 34 lic4 'it>e7 35 gx f5 gx f5 (D)
w
Now Black can calmly win back his pawn and then even exchange rooks or, in general , win as he pleases. White decided to commit suicide !
36 .ixe4 fxe4 37 �xe4 0- 1
Test 55 Plan A (0 points) does not work, as Black is not obliged to exchange on B. Instead, 1 5 . . . �b8 or 1 5 . . . �d7 will leave White at a loss. Plan B ( 1 0 points) is not bad in general, but gives Black a chance to restrict White's plus . Plan C (30 points) is strongest.
The game continued: 15 .ixe5! dxe5 Black had no choice, as after 1 5 . . . .ixe5 ? 1 6
lLlxe5 dxe5 1 7 d6 exd6 1 8 �xd6 he cannot play 1 8 . . . lLle6 19 .ixe6 fxe6 20 �xe5 +-.
16 d6! exd6 Also forced: 1 6 . . . lLle6? 1 7 .ixe6 fxe6 1 8 d7
�f8 1 9 �g5 +-. 17 lLlg5!? 1 7 'iVxd6 is good enough for a clear advan
tage : 1 7 . . . lLle6 1 8 .ixe6 fxe6 1 9 a5 ! �xd6 20 nxd6 b5 (20 . . . bxa5 2 1 l:!al ±) 2 1 llb6 .ic8 22 Itd l ±.
17 .. . d5! Black avoids 1 7 . . . �f8? 1 8 �xd6 �xg5 (or
1 8 . . . �xd6 1 9 �xd6 .ic8 20 lic6 +-) 1 9 �xc7 b5 20 axb5 axb5 2 1 .ixb5 ±.
18 exd5 h6! Black is perched over the abyss and contin-
ues to find the best moves. Not l 8 . . . .ih6? 1 9 lLlxf7 ! .ixd2 20 lLlxd8 .ixe 1 (20 . . . .ixc3 2 1 lLlxb7 .ixel 2 2 d6+ 'it>h8 2 3 dxc7 .ia5 24 �d7 b5 25 lLlxa5 bxc4 26 lLlb7 ng8 27 lLld6 +-) 2 1 lLlxb7 .ixc3 (2 l . . .b5 22 axb5 axb5 2 3 lLlxb5 +-) 22 d6+ 'it>f8 (22 . . . lLle6 23 bxc3 'it>f7 24 d7 +-) 23 dxc7 .ia5 24 lLlxa5 bxa5 25 �d7 +-.
19 lLlge4 The over-optimistic 1 9 lLlxf7? would turn
out badly after 1 9 . . . 'it>xf7 20 d6+ lLle6 2 1 d7 l:te7 22 �d6 �a7 23 �d3 .ia8 24 lLle4 .ixe4 25 l::!.xe4 �xd7 (25 . . . .if6 ! ? 26 f4 �xd7 27 fxe5 .ig5 28 �b8 00) 26 �b8 �b7 ! 27 �a8 �a7 = .
However, 1 9 d6 ! ? is an interesting alternative, as after 1 9 . . . hxg5 20 dxc7 Wixc7 2 1 �xg5 �ad8 22 Wixg6 �d4 23 .ia2 �ed8 24 �xd4 �xd4 25 �e3 'it>f8 26 �h7 �d6 White has the a-pawn and Black some compensation due to his wellplaced pieces.

124 MODERN CHESS PLANNING
19 . • . J::tb8 20 SLa2 ! With the idea of 2 1 a5 . 20 • • • SLa8 Black rejects the passive position arising af
ter 20 . . . a5 ? ! 2 1 SLc4 �h7 22 d6 lbe6 23 lbb5 (23 d7? l:Ie7 00) 23 . . . SLxe4 24 l:Ixe4 i¥d7 25 c3 ±.
2 1 d6 A more secure advantage could be obtained
with the simple 2 1 a5 ! bxa5 22 d6 lbb5 23 lba4. 2 1 • • • lbe6 22 lbd5? (D) Wrong ! White can preserve an advantage
with the typical 22 a5 .
B
22 ... �h8?! Black had to make a hard decision. 22 . . . �f8? !
23 lbdf6 ! SLxf6 24 d7 SLxe4 25 dxe8i¥+ �xe8 26 l:Ixe4 ± and 22 . . . �h7 ? ! 23 lbe7 i¥d7 24 SLd5 f5 25 SLxa8 1:txa8 26 lbd5 ! �d8 27 d7 l:If8 28 lbd6 l:Ib8 29 c3 ;!;; are also unpleasant, but Black could retain fair drawing chances with 22 . . . SLxd5 ! 23 i¥xd5 'iVd7 24 a5 b5 ! (24 . . . bxa5 ? 25 i¥d2 ! ±) 25 lbxc5 lbxc5 26 �xc5 l:Ibc8 27 i¥d5 l:Ixc2 28 l:Ic 1 l:Iec8 ! (not 28 . . . l:Ixc l ? 29 l:Ixc 1 l:Ie6 30 l:Ic7 �xd6 3 1 i¥b7 +-) 29 l:Ixc2 l:Ixc2 30 f4 �h7 . These variations are long and would have been difficult to calculate over the board.
2 3 lbe7! l:Ib7?! Better is 23 . . . SLxe4 (23 . . . l:Ixe7 24 dxe7 i¥xe7
25 i¥d6 'iVxd6 26 lbxd6 +-) 24 SLxe6 l:Ixe7 25 dxe7 'iVxe7 26 l:!xe4 'ikxe6 27 'tlVd7 ±.
24 SLxe6 fxe6 25 lbxg6+ �h7 26 lbe7 c4 Or 26 . . . l:Id7 27 'iVe2 +-.
27 'iVe2 bS? Black's position was lost anyway, but allow
ing a mate can be considered a mistake nevertheless .
28 lbg5+! 1-0
Black resigned, faced with 28 . . . hxg5 29 'iVh5+ SLh6 30 i¥g6+ �h8 3 1 'iVxh6#.
Test 56 Plan A (5 points) in a way helps Black as White voluntarily closes down the h-file, when Black might have his share of counterplay. Plan C (0 points) is inadequate, as it gives Black compensation for the pawn after 14 . . . 'iVc7 ! . White should really care about Black's counterplay, so by using Plan B (30 points) he manages to obtain a much better position.
The game continued: 12 SLg5! 'iVe7 As mentioned, 1 2 . . . c6? is inadequate: 1 3 e5 !
( 1 3 i¥xd6? ! i¥a5 with compensation) 1 3 . . . dxe5 14 i¥xd8 l:Iaxd8 1 5 l:Ixd8 l:Ixd8 1 6 lbe4 lbxe4 1 7 SLxd8 SLh6+ 1 8 �bl lbf2 1 9 l:Igl SLe3 20 SLe2.
13 g4 'iVrs 14 �bl The immediate 1 4 h4 lbd7 1 5 h5 is also pos
sible, but White is not in a hurry ! 14 . . • a6 15 h4 (D)
B
15 • . • h6 Black is ill-advised to play 1 5 . . . h5 ? 1 6 SLxf6
SLxf6 1 7 gxh5 gxh5 1 8 l:Ig l + �h7 1 9 lbd5 SLxd5 20 'iVxd5 l:Ie5 2 1 'iVb3 b5 22 f4 l:Ie6 23 'ikf3 +-, but 1 5 . . . lbd7 ! ? is a serious alternative: 1 6 h5 lbe5 1 7 SLe2 h6 1 8 SLe3 g5 1 9 f4 ±.
16 SLx f6! SLx f6 17 gS hxg5 Or 1 7 . . . SLg7 1 8 h5 ! hxg5 1 9 SLh3 l:Iad8 20
hxg6 fxg6 2 1 'iVxg5 +-. 18 hxg5 SLg7 1 8 . . . SLxc3 1 9 'iVxc3 'iVg7 20 "fixc7 is win
ning for White. 19 f4 1 9 SLd3 ! c6 20 'tlVh2 'iVe7 2 1 "iWh7+ �f8 22
f4 +- looks like a better continuation for White.

SOLUTIONS 125
Still, the text-move does not spoil White' s position.
19 • . • ,i,g4 20 lIel ! Correct ! 2 0 ,i,e2? ! ,i,xe2 2 1 'iVxe2 'iVe7 ± is
not quite as good. 20 ... c6 20 . . . ,i,xc3 is not a solution either, as after 2 1
'iVxc3 'iV g 7 2 2 'iV g3 ! ,i,hS 2 3 ,i,c4 'iVd4 24 ,i,dS c6 2S c3 'iVcs 26 ,i,b3 it is quite unlikely that Black will survive.
2 1 ,i,e2 ! ,i,xe2 22 lIxe2 f5 A desperate try, giving the black king an es
cape-route, but alas Black does not even come close to using it. The alternative was 22 . . . dS 23 eS 'iVb4 24 lIeh2 lIad8 2S lIh7 +-.
2 3 gx f6 'it'x f6 (D)
w
24 lIgl ! A difficult decision, but there i s nothing more
to expect from the h-file. The new (and important) target is the pawn on g6 and in general the g-file.
24 • . • lIf8 Or 24 . . . 'iVd4 2S 'it'c l . 25 lIg4 lIae8 26 lIeg2 lIe7 27 a 3! a5 28
�d 3 lItT7 2 9 e5! As White has placed all his pieces optimally,
the final assault begins. 2 9 ... dxe5 29 . . . 'iVfS is no better: 30 �xd6 lId7 3 1 �cS
+-. 30 lLle4 �e6 The other queen move, 30 . . .'ilVfS , also loses :
3 1 'iVd8+ ,i,f8 32 lIxg6+ l:tg7 33 lIf6 +-. 31 J:txg6 � c8 3 1 . . .'iVdS 32 lIxg7 + lIxg7 33 lLlf6+ and
3 1 . . . 'iVfS 32 'iVd8+ 'lth7 33 lI6g4 are also hopeless for Black.
32 lLld6 1-0
After 32 . . . e4 33 �b3 all hope for Black has evaporated.
Test 57 Plan B (0 points) is bad, as Black can sacrifice the exchange, i .e. instead of 1 8 . . . lLlxeS ? he can try l 8 . . .l:txeS ! 1 9 fxeS lLlxeS , when he can feel satisfied. Plan C ( 1 0 points) is not that bad, but it offers only a slight advantage for White in the final position, as many pieces have been exchanged and the pawn-majority has not yet started to roll forward. That's why Plan A (30 points) is the best choice !
The game continued: 17 ,i,x f6! lLlx f6 18 e5 �xb2 Black's alternatives were no better: 1 8 . . . lIad8
19 'ii'f3 'iVb4 20 ,i,a2 lLlh7 2 l lLle4 ± or 1 8 . . . 'iVb4 19 �e2 lIae8 20 lIa3 ! ±.
19 11c1 ! lIad8 (D) No better is 1 9 . . . lLlh7 20 e6 fxe6 2 1 lLle4 !
,i,e3 22 lIbl �d4 23 �xd4 ,i,xd4 24 lIxb7 'lth8 2S lLld6 I:!.a7 26 lIxa7 ,i,xa7 27 ,i,xe6 ±.
w
20 'it'f3 lLld5?! This cannot be the solution to Black's prob
lems. The only try was 20 . . . lLlh7 2 1 e6 fxe6 22 lLle4 ! ,i,d6 23 lIbl 'iVa3 24 'iVg4 ! 'lth8 2S 'it'xe6 ±, or even 20 . . . lLlhS 2 1 fS ±.
2 1 lLlxd5 cxd5 22 ,i,xd5 �d4 Black must exchange queens, as otherwise
he could get mated. For instance, 22 . . . 'iVa3 23 ,i,b3 +-.
2 3 I:!.cdl 23 ,i,b3 b6 24 e6 +- is also good. 2 3 • • • �e 3 Snatching the pawn with 23 . . . 'iVxa4 is equally
hopeless : 24 e6 I:!.xdS 2S �xdS b6 26 exf7+ lIxf7 27 'iVe6 ,i,f8 28 I:!.d8 �c2 29 fS +-.
24 llYxe 3 ,i,xe 3 25 J:tf3! ,i,c5 26 e6 (D)

126 MODERN CHESS PLANNING
White has accomplished his main plan and is now winning.
B
26 . • J:txd5 This is the only try (not 26 . . . fxe6? 27 i.xe6+
'it>h7 2S lIh3#), but still not enough to save the game.
27 1Ixd5 b6 28 ex f7+ 'it>x f7 2 9 lIfd 3 lIc8 30 g 3 'it>f6 31 1Id7 l::te8 32 'it>g2 .l:i.e4 33 1Ic7 lIxa4 34 lIc6+ 'it>e7 35 lIxg6 :a2 + 36 'it>f3 a4 37 lIxg7+ 'it>f6 38 .l:i.a7 a 3 39 h4 b5 40 lIa6+ 'it>e7 4 1 1Id5?!
4 1 1Ic3 .llf2+ 42 'it>g4 i.d6 43 l::te3+ 'it>d7 44 lId3 +- would have been simpler. White 's position is so overwhelming that he can even afford some minor mistakes !
4 1...lIc2 42 1Ih5 'it>f7 43 l:th7+ 'it>g8 44 l:tb7 a2 45 1:[a8+ i.f8 46 'it>g4 b4 47 h5 lIh2 48 f5 1-0
Test 58 Plan A (S points) is not particularly demanding and is quite drawish. Plan B (0 points) is inadequate as well, as after 27 . . . b4 2S i.n �f6 Black would even stand slightly better. The correct plan is C (30 points) , where White in fact risks very little. He can't prove an advantage, 'only ' an initiative, but Black must be on the alert to hold the balance.
The game continued: 25 1Ixd6! ? i.xd6 26 lIxd6 lIfe8 This is best. Alternatives like 26 . . . .l:i.beS? 27
i.n i.c4 2S i.xc4 bxc4 29 ttJg6+ 'it>gS 30 ttJxfS lIxfS 3 1 lIdS +- and 26 . . . i.xa2? 27 ttJg6+ 'it>gS 2S ttJxfS lIxfS 29 lIdS b4 30 cxb4 axb4 3 1 g4 ± are inferior.
27 g4 ! b4 ? ! Black should try 27 . . .fxg4 ! 2S i.xe4 i.fS ! 29
.llf6 �d7 30 ttJg6+ (not 30 i.xfS ?? 'iVd l + 3 1
'it>g2 �f3+ 3 2 'it>g l lIe l #, while White should also avoid 30 lIxfS ? ! lIxe4 3 1 �f6+ 'fIg7 32 .llxbS ! lIfS 33 'iVxg7+ 'it>xg7 34 ttJhS+ 'it>g6 3S ttJg3 lIa4 36 a3 lIf6 +) 30 . . . i.xg6 (30 . . . 'it>gS? 3 1 i.dS+ 'iWxdS 32 lIfS+ lIxfS 33 ttJe7+ 'it>hS 34 ttJxdS ±) 3 1 1Ixg6 1Ie7 32 �f6+ lIg7 33 1Ih6 'it>gS 34 1IhS , when White certainly has enough compensation for the material, but the outcome remains uncertain .
28 cxb4 1Ib c8? This is a definite mistake. After 2S . . . i.xa2
29 gxfS axb4 30 ttJg6+ 'it>gS 3 1 i.xe4 or 2S . . . lIxb4 29 ttJxe6 lIxe6 30 lIdS+ 'it>g7 3 1 gxfS 'iWxfS 32 lId7+ White has the initiative, but Black can defend more stubbornly.
2 9 h 3? ! A loss of time. 29 ttJxe6 ! lIxe6 30 lIdS+
lIxdS 3 1 'iVxdS+ 'it>g7 32 bxaS ± was strong. 2 9 ... fxg4 30 �g5!? As 30 i.xe4 .l:i.c 1 + 3 1 'it>g2 i.fS (3 l . . .g3? 32
i.xh7 ! ! +-) 32 i.dS gxh3+ (with compensation) and 30 ttJxe6 lIxe6 3 1 lIxe6 llVxe6 32 bxaS e3 33 fxe3 'fIxe3+ 34 'it>h2 'iVeS+ 3S 'ifg3 �xb2 = were not appealing to White, he decided to try something different.
30 ... gxh 3? And Black bites the hook ! 30 . . . i.xa2 ! 3 1
bxaS gxh3 32 ttJxh3 lIgS 3 3 'iVeS+ lIg7 (with compensation) was his only acceptable try.
31 �e5+ 'it>g8 32 �g5+ 'it>h8 33 �e5+ 'it>g8 34 i.xe4 ! i.xa2 35 �g5+ �g7 (D)
3S . . . 'it>hS is no better: 36 ttJg6+ ! hxg6 37 lIxg6 +-.
w
36 i.xh7+! ! 'it>h8 36 . . . 'it>xh7 37 lIg6 l:tc7 3S 'it>h2 ! lIbS 39
�hS+ 'it>gS 40 1lVxaS +- would not change the outcome .
37 i.g6 1Ie5

SOLUTIONS 12 7
Or 37 . . . axb4 38 'it>h2 +-, and the threats are deadly.
38 'iYh4+ 'it>g8 39 'it>h2 ! �e7 40 i.h7+! 'it>f7 40 . . .'�xh7 4 1 �g4+ 'it>f7 42 l:td7+ l:te7 43
l:txe7+ 'it>xe7 44 'iVxc8 +-. 4 1 i.g6+ 'it>g8 42 �f6! 'it>g7 43 i.f5! 1-0 Black resigned in view of 43 . . . l:txfS 44 'iVh6+
'it>g8 4S l:txfS , 43 . . . �xf6 44 liJhS+ or 43 . . . 'it>g8 44 l:tg6+ 'it>f7 4S �h7+ 'it>e8 46 'iVh8+.
Test 59 Plan A (0 points) even gives Black the advantage after 1 7 . . . cS ! 1 8 i.xg6 fxg6 + and is of course inadequate. Plan B (S points) allows Black to equalize by 1 8 . . . liJb6 19 i.d3 liJdS 20 liJxdS cxdS 2 1 liJf2 i.xd3 22 liJxd3 J:tac8 23 c3 g6. Plan C (30 points) is correct.
The game continued: 15 d5! e5 There was not much choice: I S . . . 0-0-0? ! 1 6
dxe6 fxe6 1 7 liJd4 liJcs 1 8 i.h3 i.f7 19 �c4 'iVd7 20 f4 ± or I S . . . 0-0? ! 1 6 dxe6 fxe6 1 7 i.h3 liJcs 1 8 liJd4 'it>f7 19 J:tg3 eS 20 �c4+ 'it>e8 2 1 liJfS ±.
16 i.h 3 0-0-0 Forced: 1 6 . . . 0-0? 1 7 dxc6 bxc6 1 8 i.xd7
�xd7 1 9 liJxeS +-. 17 liJd2 'it>b8 18 liJc4 liJb6 19 liJxb6 Also 1 9 liJe3 t was quite OK, keeping more
pieces on the board. 19 • • • 'iVxb6 1 9 . . . axb6? ! 20 i.fS bS 2 1 J:td3 ±.
20 l:td 3 Threatening 2 1 dxc6 bxc6 22 liJdS ! +-. 20 ... 'it>a8 2 1 a 3 l:td f8 22 i.f5! Stopping Black's future activity on the king
side. 22 l:tgd l ? f6 00 would not be to White's liking.
22 ... i.h7 Renewing the idea (planning . . . g6 and . . . f6
00) .
2 3 J:i.gd 1 g6 Black should have seriously considered play
ing 23 . . . cS t, but this was not an easy decision. 24 dx c6! bx c6! 24 . . . gxfS ? is naIve. After 2S liJdS �xc6 (or
2S . . . �d8 26 J:tb3 +-) White can choose between 26 liJxe7 and 26 .l::!.c3, both winning.
25 i.d7 Wic7? (D) Falling into the trap ! Also bad was 2S .. J!d8?
26 l:txd6 ! i.xd6 27 l:txd6 +-, but Black could
stay in the game with 2S . . . l:tb8 ! 26 b3 "V/Iic7 27 i.h3 t.
w
26 i.x c6+! ! A n excellent sacrifice, allowing the rest of
the white pieces to join a violent attack. Moreover, White is effectively not material down for the time being, as Black's extra piece is the miserable h7-bishop. It is the quality and not the quantity of the pieces that counts in chess.
26 • . :�x c6 27 liJd5 i.d8 Or 27 . . .'VJlid7 28 l:tc3 J:1c8 29 �a6 Wib7 30
�xb7+ 'it>xb7 3 1 l:tb3+ 'it>a8 32 liJxe7 +-. 28 l:tc3 'iVb7 Other moves don' t help : 28 . . . �d7 29 �a6
+-; 28 . . .'�a4 29 �d3 ! <;t>b7 30 liJb4 +-. 2 9 l:tb 3 Wic6 Everything works out for White ! 29 . . . i.b6 is
met by 30 a4 +-. 30 l:tdd 3! i.a5 Although Black would lose the endgame af
ter 30 . . . i.b6 3 1 liJxb6+ axb6 32 .l::!.xd6 Wixd6 33 �a6+ 'it>b8 34 l:txb6+ 'iVxb6 3S �xb6+ 'it>c8 36 �cS+ 'it>b7 37 �e7+ <;t>a8 38 b4 +-, maybe he had to play in this way, but during a game this is a hard decision to make.
31 .l::!.d c3! i.x c3 32 �a6! ! Finishing the job in style ! Black resigned in
view of the forced variation 32 . . . l:tc8 33 liJb6+ Wixb6 (33 . . . 'it>b8 34 liJxc8+ 'it>c7 3S l:i.xc3 +-) 34 1hb6 J:tb8 3S l:i.xb8+ l:txb8 36 'iVc6+ +-.
1-0
Test 60 Pawn-majorities and minorities can give us a direction to follow when choosing a plan. It is best for White to try his hand with Plan B (30 points) . Plan A (S points) is certainly inferior and does not give Black any serious problem,

128 MODERN CHESS PLANNING
although White seems to be doing OK - that' s why it receives some points. Plan C ( 1 S points) is quite similar to Plan B, but White does not need to waste valuable time by moving his queen without a good reason.
The game continued: 14 f4 ! tiJd7?! 1 4 . . .fS ? ! 15 tiJf2 a6 1 6 e4 would guarantee
White a better position due to the weakness of the e6-square, but 1 4 . . . i.cS ! ? 1 5 tiJf2 a6 1 6 g4 b5 1 7 g5 tiJd7 is probably a better try, as at least the white knight does not come to e4.
IS g4 ! a6 16 a4 .l:te8 The alternative was 1 6 . . . tiJf6 1 7 tiJf2 h6 I S
h4 gS 1 9 hxgS hxgS 20 e3 ±. 17 gS i.f8 18 �hl ! bS ! ? A n interesting pawn sacrifice, aimed, at get
ting some counterplay. A passive reaction, such as l S . . . g6 1 9 i.h3 or l S . . . .l:tbS 1 9 b3, wouldn' t change the evaluation (±).
19 axbS axbS 20 tiJxbS 'iVb6 (D) Or 20 . . . tiJb6 2 1 tiJbc3 tiJc4 22 �d3 i.a6
(22 . . . tiJxb2? 23 �bS +-) 23 �g3, with the idea 24 f5 , g6 ±.
w
2 1 tiJb c3 Better than 2 1 tiJa3 ? ! i.a6 ! with some coun
terplay. 2 1 ... 'iIi'b4 2 1 . . . i.a6 is answered with 22 .l:tf3 , intending
.l:th3 and 'iVe 1 -h4. 22 �d 3 tiJb6 2 3 �g 3! �h8 23 . . . tiJxdS? is inadequate due to 24 tiJxdS
i.xdS 25 tiJf6+ gxf6 26 gxf6+ �hS 27 i.xdS +-.
24 .l:tcdl tiJc4 Alternatives like 24 . . . tiJa4 25 .l:tb1 or 24 . . . i.cS
2S fS .l:te5 26 g6 i.xf5 27 tiJg5 ! were not of much help either.
2S b 3! White is playing really strongly ! 25 fS tiJeS !
would allow Black some chances . 2S • • • tiJb6 26 g6! Not, of course, 26 fS? ! .l:ta3 27 g6 f6 ! .
26 . • . fxg6 Black did not have much choice: 26 . . . hxg6
27 'iWh4+ �gS 2S tiJg5 +- or 26 . . . f6 27 gxh7, with tiJxf6 coming.
27 fS gx fS 28 .l:tx fS tiJd7 2 9 .l:td f1 ! 29 tiJxd6? would only assist Black after
29 . . . i.xd6 30 �xd6 �xc3 ! (30 . . . tiJfS? 3 1 �g3 tiJg6 32 e4 ±) 3 1 'iWxd7 i.a6 32 .l:tdfl .l:tgS 33 d6 i.xe2 °o.
2 9 • . . tiJeS 30 .l:tSf4 It is too early for 30 tiJgS �g4 3 1 .l:txe5 ? !
�xg3 3 2 .l:txeS �xg2+ ! 33 �xg2 .l:txeS 00 .
30 . • • �b6 30 . . . tiJg6 3 1 .l:tg4 i.cS 32 .l:txg6 hxg6 33
'iVxg6, with tiJgS +- to follow, would not solve Black's problems.
31 tiJgS tiJg6 (D) 3 l . . .i.e7 also loses: 32 tiJf7+ tiJxf7 33 .l:txf7
i.fS 34 i.e4 �gS 35 i.xh7+ �xh7 36 .l:tgl +-.
w
Now White can crown his efforts with a nice and very effective combination.
32 tiJf7+ �g8 33 'iWxg6! 1-0 Black resigned due to 33 . . . hxg6 34 .l:th4,
with mate to follow on hS .
Test 6 1 Plan A ( 0 points) i s a bad idea, as Black will enjoy an excellent rniddlegame after l S . . . tiJe5 ! . What i s more important, White has not managed to exchange any pieces. Plan C (20 points) is a standard one, which most chess-players would go for, but the availability of the excellent Plan B (30 points) relegates it to second

SOLUTIONS 129
choice. Let ' s see how this plan worked in practice:
15 ttJ h4 ! �d6 1 5 . . . .i.xe2 1 6 ttJxe2 ttJe4 1 7 ttJf5 is pleasant
for White. 16 g 3 .i.g6? Black had to play the modest 16 . . . .i.xe2 1 7
ttJxe2 ttJe7 1 8 �d3 ;1; . White could rely o n his slight but secure advantage.
17 ttJb5 17 ttJxg6 ! ? hxg6 1 8 .i.f3 l:tfd8 1 9 .i.g2 ± is
also good for White. 17 ... �e6 18 .i.x f6 �x f6 Inadequate was 1 8 . . . gxf6 1 9 .i.g4 f5 20 .i.f3 ,
guaranteeing Black a slow but certain death ! 19 ttJxg6 bxg6 20 .i.g4 ? White misses his chance. He should play the
not so difficult 20 �xd5 ! �b2 2 1 .i.c4 �xa2 22 �d7 l:tcd8 23 �xb7 ±.
20 . • . .l:!.cd8 2 1 ttJd4 .i.e5? White would retain a slight advantage after
2 l . . .ttJe5 ? ! 22 'it>g2 .l:!.fe8 23 .l:!.c2, but it was time for Black to equalize with 2 1 . . .ttJxd4 ! 22 'iVxd4 �xd4 23 exd4 .l:!.fe8.
22 ttJx c6! bx c6 2 3 �d 3! nd6 The opposite-coloured bishops do not guar
antee the draw. Black's central pawn-chain is really weak and White can benefit from it. 23 . . . d4? ! is even less satisfactory in view of 24 e4, with the idea .l:!.c4, f4 and e5 .
24 'it>g2 ? ! Although this does not spoil White 's advan
tage, 24 .l:!.c5 ! is more to the point: 24 . . . 'ilVe7 (24 . . . .i.b2 25 .l:!.bl .i.a3 ? 26 b4 +-) 25 .l:!.fc 1 'iVb7 26 �c2 ±.
24 . • . �e7 25 .l:!.c5! �b7 26 .l:!.fc1 .i.b2 ! 27 .l:!.lc2 .i.a 3 28 .l:!.a5 .i.b4 2 9 .l:!.a4 .l:!.f6 (D)
w
30 e4 !?
30 a3 .i.e7 3 1 b4 and �a6 was also very strong, but White wanted to weaken the black d5-pawn further.
30 • • • .l:!.e8 Or 30 . . . dxe4 3 1 �xe4 .l:!.b8 32 .l:!.c4 c5 33
�xb7 .l:!.xb7 34 .i.f3 .l:!.e7 35 a3 .i.d2 36 .l:!.xc5 ±. 31 exd5 cxd5 32 .i.f3 .l:!.d8 33 a 3! .i.e7 34
l:!.a5 .l:!.f5 35 b4 White's advantage is obvious as the vital
black pawn will fall . 35 . . . �b6 36 .l:!.a6 One cannot really criticize this move, but
White could have played the stronger 36 .l:!.xd5 ! .l:!.fxd5 37 .i.xd5 a5 38 �c4 axb4 39 .i.xf7+ 'it>h7 40 .l:!.e2 .i.f6 4 1 �e4 .i.g5 42 axb4 +-.
36 ••• �b8 37 �d4 ! .i.f6 Or 37 . . . �b5 38 .l:!.xa7 .i.f6 39 �d l , with .l:!.a5
+- to come. 38 'iVxa7 �e5 39 �e 3 �al Exchanging queens with 39 . . . �xe3 40 fxe3
would not trouble White: 40 . . . .l:!.e5 4 1 b5 .l:!.xe3 42 b6 .l:!.b3 43 a4 +-.
40 �cl 'iVe5 4 1 l:te2 �b8 42 �c2 ! .l:!.x f3! ? A last attempt to muddy the waters with
some tactics. 42 . . . d4 loses to 43 �d3 . 43 'it>x f3 d4 44 �c6! d 3 45 .l:!.d2 .i.g5 46
.l:!.dl 'it>h7 47 'it>g2 d2 48 �f3! .l:!.d7 Or 48 . . . .l:!.e8 49 'ii'xf7 .l:!.e l 50 .l:!.xg6 �a8+ 5 1
f3 .i.h6 (5 l . . .�g8 52 'ii'xg8+ 'it>xg8 5 3 .l:!.xg5 .l:!.xd l 54 .l:!.d5 +-) 52 .l:r.xh6+ 'it>xh6 53 .l:!.xd2 +-.
49 .l:!.a5 'iVd8 50 .l:!.a8 'ilVc7 51 .l:!.e8 �c2 52 b5 l:ld 3
52 . . . l:lc7 53 �a8 +-. 53 'iVx f7 .i.f6 54 �g8+ 'it>h6 55 �h8+ 1-0 Mate follows: 55 . . . 'it>g5 56 'iVh4+ 'it>f5 57
'iVf4# .
Test 62 In Hedgehog positions it is not very common to sacrifice the c4-pawn for the initiative so early, but in this particular position this is the strongest plan. Plan C (30 points) is the correct choice. Plan A ( 1 0 points) gives White a slight plus due to his better pawn-structure and is only an inferior choice here because Plan C is so strong. Plan B (5 points) leads to a typical Hedgehog position, where White has a spatial advantage, but nothing more.
The game continued: 12 cS ! dx c5

130 MODERN CHESS PLANNING
1 2 . . . bxc5 ? 1 3 4Jc4 �c6 1 4 4Jbxd6+ �xd6 1 5 4Jxd6+ <tie7 16 e5 ! +- is inadequate for Black, but maybe he should consider succumbing to an inferior endgame with 1 2 . . . 4Jxc5 1 3 4Jc4 4Jfxe4 1 4 �xe4 4Jxe4 1 5 .l::txe4 �xe4 1 6 4Jcxd6+ �xd6 1 7 �xd6 ! ( 1 7 4Jxd6+? �xd6 ! I S 'ilVxd6 .l::tdS 1 9 'ilVxdS+ <tixdS +) 1 7 . . . 'ilVxd6 I S 4Jxd6+ <tie7 1 9 4Jxe4 ±. He would then have some chances to hold the draw.
13 4Jc4 e5 The alternative was 1 3 . . . �c6 1 4 4Jbd6+
�xd6 1 5 4Jxd6+ <tie7 1 6 e5 4Jd5 ( 1 6 . . . 4Jxe5 17 4Jf5+ ! exf5 I S �xc6 'ilVd6 1 9 11Vxd6+ <tixd6 20 �xaS .l::txaS 2 1 �f4 is much better for White) l 7 'iYg4 ! <tifS ( 1 7 . . . 4Jxe5 I S 4Jf5+ ! <tid7 { I S . . . exf5 1 9 'ii'xg7 <tie6 20 f4 f6 2 1 fxe5 fxe5 22 �g5 .l::tfS 23 .l::tadl +- } 1 9 'ilVxg7 .l::tgS 20 'iYxh7 ! 4Jf6 2 1 .l::td l + +-) I S �h5 g6 1 9 �h6+ <tigS 20 'iYe2 ±.
14 f4 �c6 Or 1 4 . . . �a6 1 5 'ilVa4 ! �xb5 1 6 �xb5 a6 1 7
�c6 �cS I S 4Jxe5 ± . 15 4Jc3 White could also try 1 5 'iWa4 ! ?; e.g. , 1 5 . . . a6? !
( 1 5 . . . �xb5 transposes to the previous note) 1 6 4Jbd6+ �xd6 1 7 'iVxc6 +-.
15 . . • b5 Probably the best, as 15 . . . �e7 16 4Jd5 �dS
17 fxe5 4Jxe5 I S �f4 4Jfd7 19 �h5 ! +- is not acceptable for Black.
16 fxe5 bx c4 Also hopeless is 1 6 . . . 4Jxe5 1 7 4Jxe5 'iYxe5
I S �f4 'iYd4+ 1 9 'iYxd4 cxd4 20 e5 �xg2 2 1 exf6+ <tid7 2 2 4Jxb5 �b7 2 3 .l::tad l +-.
17 ex f6 (D)
B
17 ... 4Je5? ! The final slip i n a very difficult position.
Black's only chance to fight was 17 . . . 1lVe5 ! ? I S
�f4 'ilVd4+ 1 9 J:Ie3 ! 0-0-0 ( 1 9 . . .'�xd l+? 20 .l::txdl 0-0-0 2 1 �h3 .l::tgS 22 4Jd5 +-) 20 'ilVe2 4Je5 (20 .. .'i!Vxf6? 2 1 �xc4 +-) 2 1 .l::td l 4Jd3 22 e5, with a clear plus for White.
IS 4Jd5 �d6 19 �g5 g6 20 b 3! Opening more lines can only be to White 's
benefit. 20 • • • cxb 3 2 1 axb 3 h6 22 �d2 'iWb S 2 3 .l:!.a6
c4 Or 23 . . . �d6 24 �f4 'iYb7 25 'iVal 0-0 26
4Je7+ +-. 24 bx c4 �c5+ 25 �e 3 �xe 3+ 26 .l::txe 3 1lVb7
27 .l::tb 3! �d7 2 S 'iYd4 ! Game over ! The poor knight has nowhere to
hide. 2 S . • • 4Jg4 2 9 h 3 �xd5 30 exd5 0-0 Finally the black king has completed his
duty, but the cost was high. 31 hxg4 .l::tfe S 32 .l::ta2 .l::te 1+ 33 <tih2 h5 34
g5 �f5 35 �f4 'ii'cs 36 1lVf2 1-0
Test 63 Plan A (0 points) is totally pointless and White simply equalizes. Plan B ( 1 0 points) could be a serious option, as White 's c-pawn is more of a weakness than a strength, but the presence of the excellent Plan C (30 points) makes the decision clear.
The game continued: 20 ... 4Jxb2 ! 2 1 .l::tcxb2 �xb2 22 l:Ixb2 .l::tx c4
2 3 4Je5?! White should try 23 <tie2 f6 24 h4 e5 25 g3
lIdcS 26 .l:!.d2 .l::tc2 27 h5 <tif7, although his position would still be miserable.
2 3 ... .l::tc3 24 �d2 .l::tc5 25 f4 .l:!.d cS 26 a 3 .l::tc2 27 l:tx c2 .l::tx c2 (D)
w
This is the position Black aimed for when he played 20 . . . 4Jxb2. Black's advantage is decisive.

SOLUTIONS 131
Here we have an endgame, the phase of a chess game when a rook and just one pawn are often superior to two minor pieces, in contrast to a middlegame. There, the two minor pieces can prove really powerful, particularly if they can be employed in an attack against the king. Here Black has a rook and two pawns (not just one) . Secondly, White has no counterplay, no passed pawns, and no objects to attack, while Black can attack the weak a3-pawn and simply create a passed pawn on the queenside - and one in the centre, if necessary . Therefore we can evaluate the position as won for Black; the active position of his rook and bad placement of the white king make B lack' s task easier.
28 �b4 f6! 2 9 lLlf3 �f7 30 lLld4 l:!.c4 31 lLle2 a5 32 �d2
Or 32 �c3 l:!.a4 33 �b2 b5 34 �f2 b4 35 axb4 axb4 -+.
32 . • . l:!.c2 33 �cl 33 �e3 l:!.a2 34 �xb6 l:!.xa3 -+. 33 . • . b5 34 �f2 b4 35 axb4 axb4 36 �e 3 b 3
37 �d 3 l:!.x c1! 38 lLlx c1 b2 39 �c2 bx c1'iV+ 40 �x c1 �g6
The pawn ending is easily won. The end was :
4 1 �d2 �f5 42 �e 3 �g4 43 �e4 h5 0- 1
Test 64 Plan C (0 points) gives chances only to Black, as it even blocks the retreat of the white queen. Black has many ways to meet 3 1 f4?, such as 3 l . . .l:!.c 1 32 �f2 (32 l:!.xc 1 ? l:!.xc 1 + 33 �f2 �b2+ 34 l:!.e2 Vi'd4+ 35 �g3 l:!.c3+ ! 36 �xh4 'iVf6+ 37 �g5 'iVh8+) 32 . . . l:!.xdl 33 �xd l l:!.c 1 34 �e2 l:!.h l -+. Plan B (5 points) with 3 1 l:!.ed3 is only slightly better for White: 3 l . . .lLlf3+ 32 �g2 (32 l:!.xf3 'iVxf3 33 d6 exd6 34 'iVxg6+ �h8 =) 32. : .lLle5 33 l:!.e3 l:!.c3 34 l:!.d4 lLlc4 35 .l:!.xc4 l:!.8xc4 36 �xc4 l:!.xc4 37 l:!.a3 .l:!.c8 38 'iVe3 'iVd6 39 .l:!.a5 . Plan A (30 points) is best.
The game continued: 31 d6! exd6 There was no choice: 3 1 . . J:tc l ? 32 dxe7
l:!.xd l + 33 �xd l +-. 32 l:!.ed 3 l:!.e7 Other moves do not improve Black's lot:
32 . . . l:!.d7 33 f4 ! .l:!.c5 34 f5 ! Ite5 35 fxg6 lLlxg6 36 l:!.f1 'iVg5 37 'iVxg5 l:!.xg5 38 1::td4 ± or 32 . . . l:!.c6 ! ? 33 'iVe3 b5 34 'iVg3 g5 35 l!xd6 l:!.xd6 36 �xd6 ±.
33 l:!.xd6 l:!.el + 34 l:!.xel lLlf3+ 35 �f1 'iVxd6 36 l:!.e6! !
I n good positions small combinations often arise, quickly resolving matters.
36 • • • lLld2 + No different i s 3 6 . . . fxe6 3 7 �xg6+ �f8
(37 . . . �h8 38 'iVh6+ �g8 39 �xe6+ +-) 38 'iVf6+ �e8 39 �a4+ l:!.c6 40 'iVxf3 +-.
37 �e2 fxe6 38 'iVxg6+ �f8 39 'iVf6+ �e8 Or 39 . . . �g8 40 �xe6+ �h7 4 1 �f5+ +-. 40 �a4+ l:!.c6 4 1 �x c6+ bx c6?! Maybe Black had to try the endgame result
ing from 4 l . . .'iVxc6 42 'iVg6+ �e7 43 �xd2 'iVd5+ 44 �e3 �xa2 45 'iVg7+ �e8 46 'iVxb7 'iVa3+ 47 �f4 'iVxh3 48 �g5, but this would also be pretty hopeless. Still, it is better to fight with one pawn less than two, even if the result should be the same !
42 'iVg6+ �d7 43 'iVc2 (D)
B
This is the end of White's combination that started on move 36. He recovers his sacrificed piece and, with two extra pawns in a queen ending, he has no trouble cashing in. The end was :
43 • . • �e7 44 'iVxd2 'iVe5+ 45 �f3 c5 46 h4 'iVf6+ 47 �g 3 'iVe5+ 48 'iVf4 �c3+ 4 9 �e 3 �c2 50 h5 c4 51 h6 �f6 52 �d4+ e5 53 �d6+ �g5 54 h7 �c3+ 55 �g2 e4 56 �f8 1-0
Test 65 Plan A (20 points) cannot be bad, as it is rather typical for such positions. Still, although safe, it is slow. Plan B (5 points) gives White a chance to fight back with 26 e4 ! , although Black must still be somewhat better. But Plan C (30 points) is excellent and shows how the ' logical imagination' of a strong GM converts an unquestionable positional advantage into a full point on the scorecard. He does not ' sit on his hands ' ,

132 MODERN CHESS PlANNING
waiting for the fruits to fall ; instead he shakes the tree with great vigour !
The game continued: 25 . • . l::tae7! 26 l:ta 1 liJf5 Now the threat of . . . liJcxe3 becomes very
real . 27 l::ta2 liJcxe 3! There was no reason to prepare this sacrifice
further. White's position falls apart. 2 S fxe 3 l::txe 3 2 9 .l:f.f2 There was no real alternative : 29 'iVd2 'iVh4
30 l::taal liJg3+ 3 1 <it>h2 liJe2 32 liJxe2 l::txe2 33 'iVd l l::tSe3 -+.
2 9 . • • 'iVh4 Black wants to collect all the white pawns
(d4 and b4) . 30 'iVd2 And not 30 <it>gl ? ! l::te l + 3 1 'iVxel 1:txel + 32
l::txe l 'iVxd4 -+. 30 • • • liJxd4 Black could also consider 30 . . . 'ii'xd4 3 1
'iVxd4 liJxd4 32 l::td2 liJf5 33 <it>gl h4 +. 31 l::tcf1? (D) 3 1 liJd3 ? liJb3 wasn' t a real alternative, but
White had to try 3 1 <it>g l ! liJf5 32 liJe2 'iVf6 33 l::td l 'iVe5 34 liJf4 h4, when Black has the advantage but White can still put up a real fight.
B
31...liJf5! 32 l::tx f5?! Making Black's task easier. More practical
chances were to be found in 32 <it>gl 'iVxb4 33 liJxd5 'iVxc5 34 liJf6+ <it>g7 35 liJxeS+ l::txeS or 32 l::tf4 liJg3+ 33 <it>gl 'iVg5 34 l::txf7 liJxfl 35 .l:f.xfl 'iVg3 36 liJd7 l::tSe6 37 l::tfS+ <it>g7 3S 'iVd4+ <it>h6 39 l'.:tfl %:re I 40 'iVhS+ <it>g5 41 'iVdS+ l::te7 42 l::txel 'iVxe l + 43 <it>h2 h4, although White's position is objectively lost in either case.
32 . • . gx f5 33 liJd 1
Or 33 liJd3 'ilVg3 ! 34 l::td l l::txd3 35 'iVxd3 l::te l +.
33 • • • l::te 1 34 <it>gl l::tSe2 35 'iVc3 l::txd 1 0- 1
Test 66 Plan A (0 points) is naIve and certainly only helps to improve Black's position. Plan B (5 points) is not that bad, though quite slow. Time is an important factor, and Black can use the respite to secure some safety for his king. Plan C (30 points) is just killing Black !
The game continued: 16 .l:f.a4 ! 'iVe S?! Black had to try 1 6 . . . h5 1 7 .l:f.ad4 iLc6 I S
iLg5 .l:f.cs 1 9 'iVf4 <it>gS 20 liJe4 ±. 17 l::tg4 g6 Other moves are also inadequate : 1 7 . . . .l:f.gS
I S l:txg7 ! .l:f.xg7 19 iLh6 +- or 17 . . . iLxf3 I S l:txg7 ! iLxd l 1 9 .l:f.gS+ .l:f.xgS 20 iLh6+ l::tg7 2 1 'iixg7#.
I S iLh6+ <it>g S 19 liJg5 iLfS This loses more quickly than 19 . . . .l:f.dS 20
l::tgd4 (or 20 .l:f.e l liJc5 2 1 .l:f.f4) 20 . . . liJc5 2 1 .l:f.xdS iLxdS 2 2 b4 liJd7 2 3 liJge4.
w
20 iLx fS <it>x fS Or 20 . . . liJxfS 2 1 .l:f.f4. 2 1 .l:f.gd4 iLc6 22 .l:f.f4 f5 22 . . . liJxe5 23 'iVe3 liJd7 24 liJxf7 . 2 3 ex f6 e5 (D)
24 'iVd 3! 1-0 Black resigned due to 24 . . . exf4 25 fid6+
<it>gS 26 f7+ .
Test 67 Plan A (0 points) is too optimistic . Black can play 20 . . . liJf6 and in case of 2 1 liJc6? 'iVe4+ 22 <it>gl .l:f.fS he is a healthy pawn up. Plan C (5 points) does not offer much after 22 . . . fieS, but
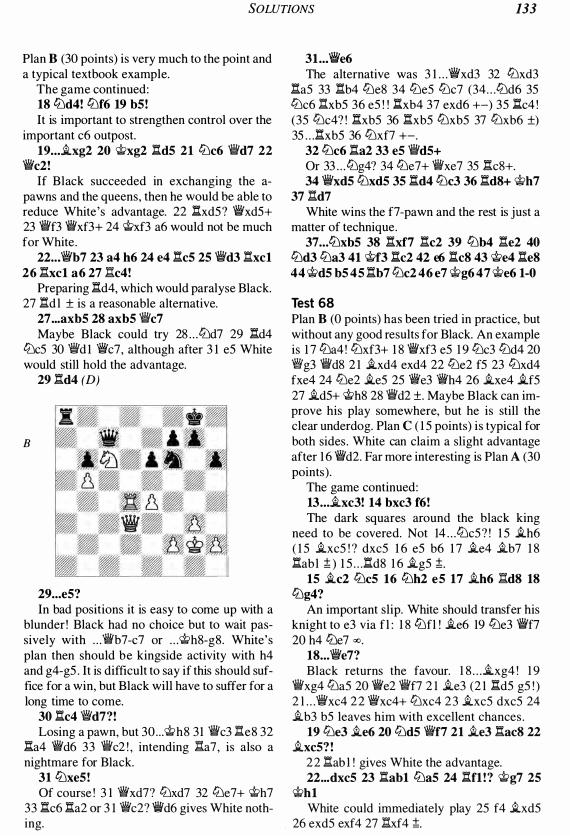
SOLUTIONS 133
Plan B (30 points) is very much to the point and a typical textbook example.
The game continued: 18 ttJd4 ! ttJ f6 19 b5! It is important to strengthen control over the
important c6 outpost. 19 ... i.xg2 20 �xg2 lIdS 2 1 ttJ e6 �d7 22
�e2 ! If Black succeeded in exchanging the a
pawns and the queens, then he would be able to reduce White 's advantage. 22 lIxd5 ? �xd5+ 23 �f3 �xf3+ 24 �xf3 a6 would not be much for White.
22 .. .'i'b7 2 3 a4 h6 24 e4 lIeS 25 �d 3 lIx c1 26 ':'x c1 a6 27 1:te4 !
Preparing lId4, which would paralyse Black. 27 lId l ± is a reasonable alternative.
27 ... axb5 28 axb5 Wie7 Maybe Black could try 28 . . . ttJd7 29 lId4
ttJc5 30 Wid 1 filc7, although after 3 1 e5 White would still hold the advantage.
2 9 lId4 (D)
B
2 9 ... e5? In bad positions it is easy to come up with a
blunder ! Black had no choice but to wait passively with . . . filb7-c7 or . . . �h8-g8. White's plan then should be kingside activity with h4 and g4-g5 . It is difficult to say if this should suffice for a win, but Black will have to suffer for a long time to come.
30 lIe4 Wid7?! Losing a pawn, but 30 . . . �h8 31 filc3 �e8 32
lIa4 �d6 33 �c2 ! , intending �a7, is also a nightmare for Black.
31 ttJxe5! Of course ! 3 1 'ilVxd7? ttJxd7 32 ttJe7+ �h7
33 lIc6 lIa2 or 3 1 filc2? 1\Vd6 gives White nothing.
31 .. :ii'e6 The alternative was 3 1 . . .�xd3 32 ttJxd3
lIa5 33 lIb4 ttJe8 34 ttJe5 ttJc7 (34 . . . ttJd6 35 ttJc6 1Ixb5 36 e5 ! ! lIxb4 37 exd6 +-) 35 lIc4 ! (35 ttJc4? ! lIxb5 36 lIxb5 ttJxb5 37 ttJxb6 ±) 35 . . . lIxb5 36 ttJxf7 +-.
32 ttJ e6 lIa2 33 e5 �d5+ Or 33 . . . ttJg4? 34 ttJe7+ �xe7 35 lIc8+. 34 �xd5 ttJxd5 35 lId4 ttJ e3 36 lId8+ �h7
37 1Id7 White wins the f7-pawn and the rest is just a
matter of technique. 37 ... ttJxb5 38 lIx f7 lIe2 39 ttJb4 lIe2 40
ttJd 3 ttJa 3 4 1 �f3 lIe2 42 e6 lIe8 43 �e4 lIe8 44 �d5 b5 45 lIb7 ttJ e2 46 e7 �g6 47 �e6 1-0
Test 68 Plan B (0 points) has been tried in practice, but without any good results for Black. An example is 1 7 ttJa4 ! ttJxf3+ 1 8 �xf3 e5 1 9 ttJc3 ttJd4 20 l\Vg3 �d8 2 1 i.xd4 exd4 22 ttJe2 f5 23 ttJxd4 fxe4 24 ttJe2 i.e5 25 file3 filh4 26 i.xe4 i.f5 27 i.d5+ �h8 28 'ilVd2 ±. Maybe Black can improve his play somewhere, but he is still the clear underdog. Plan C ( 1 5 points) is typical for both sides . White can claim a slight advantage after 1 6 'ti'd2. Far more interesting is Plan A (30 points).
The game continued: 13 . . • i.x e3! 14 bx e3 f6! The dark squares around the black king
need to be covered. Not 14 . . . ttJc5 ? ! 1 5 i.h6 ( 1 5 i.xc5 ! ? dxc5 1 6 e5 b6 1 7 i.e4 i.b7 1 8 lIabl ;t ) 1 5 . . . lId8 1 6 i.g5 ;t.
15 i.e2 ttJ e5 16 ttJ h2 e5 17 i.h6 1:td8 18 ttJg4 ?
An important slip. White should transfer his knight to e3 via f l : 1 8 ttJfl ! i.e6 19 ttJe3 �f7 20 h4 ttJe7 co .
18 . • . �e7? Black returns the favour. 1 8 . . . i.xg4 ! 1 9
�xg4 ttJa5 20 �e2 �f7 2 1 i.e3 (2 1 lIdS g5 ! ) 2 l . . .�xc4 2 2 �xc4+ ttJxc4 2 3 i.xc5 dxc5 24 i.b3 b5 leaves him with excellent chances .
19 ttJe 3 i.e6 20 ttJd5 �f7 2 1 i.e 3 lIa e8 22 i.x e5? !
2 2 lIab l ! gives White the advantage. 22 ..• dx e5 2 3 lIab 1 ttJa5 24 lIf1 !? �g7 25
�h 1 White could immediately play 25 f4 i.xd5
26 exd5 exf4 27 l:!.xf4 ;t.
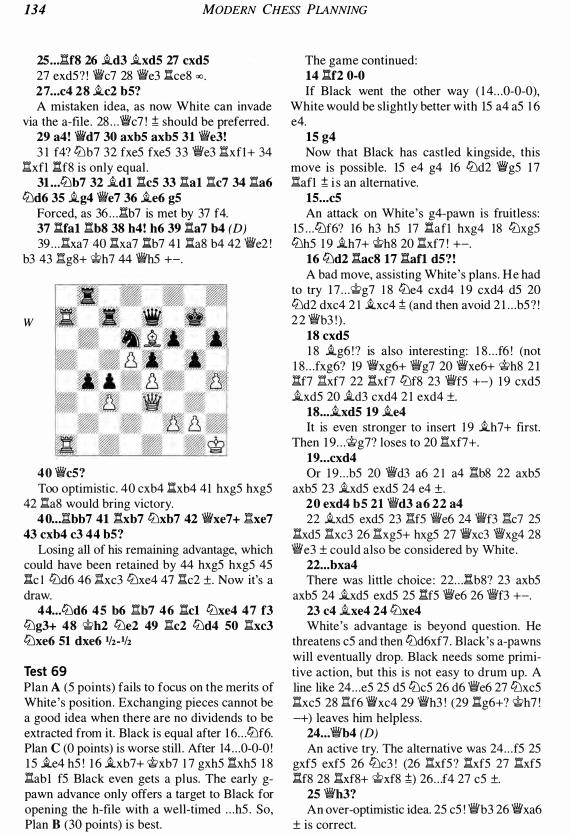
134 MODERN CHESS PLANNING
25 ... �f8 26 �d 3 �xd5 27 cxd5 27 exdS ? ! Wic7 28 Wie3 1lce8 00 .
27 ... c4 28 �c2 b5? A mistaken idea, as now White can invade
via the a-file. 28 . . . Wic7 ! ;!; should be preferred. 2 9 a4 ! 'iVd7 30 axb5 axb5 31 Wie 3! 3 1 f4? ltJb7 32 fxeS fxeS 33 Wie3 llxfl + 34
llxfl nf8 is only equal . 31 ... ltJb7 32 �dl �c5 33 llal llc7 34 lla6
ltJd6 35 �g4 W1e7 36 �e6 g5 Forced, as 36 . . . llb7 is met by 37 f4. 37 1lfal llb8 38 h4 ! h6 39 1la7 b4 (D) 39 . . . llxa7 40 llxa7 ltb7 4 1 1la8 b4 42 Wie2 !
b3 43 llg8+ 'iith7 44 WihS +-.
w
40 'iYc5? Too optimistic. 40 cxb4 1lxb4 41 hxgS hxgS
42 lla8 would bring victory. 40 .. J:tbb7 4 1 '!:!'xb7 ltJxb7 42 Wixe7+ .!:!.xe7
43 cxb4 c3 44 b5? Losing all of his remaining advantage, which
could have been retained by 44 hxgS hxgS 4S 1lc 1 ltJd6 46 1:hc3 ltJxe4 47 llc2 ±. Now it's a draw.
44 • . . ltJd6 45 b6 llb7 46 �c1 ltJxe4 47 f3 ltJg 3+ 48 'iith2 ltJe2 4 9 llc2 ltJd4 50 llx c3 ltJxe6 51 dxe6 l/z_l/z
Test 69 Plan A (S points) fails to focus on the merits of White 's position. Exchanging pieces cannot be a good idea when there are no dividends to be extracted from it. Black is equal after 1 6 . . . ltJf6. Plan C (0 points) is worse still . After 14 . . . 0-0-0 ! I S �e4 hS ! 1 6 �xb7+ 'iitxb7 1 7 gxhS llxhS 1 8 llabl fS Black even gets a plus. The early gpawn advance only offers a target to Black for opening the h-file with a well-timed . . . hS . So, Plan B (30 points) is best.
The game continued: 14 l:!.f2 0-0 If Black went the other way ( 1 4 . . . 0-0-0),
White would be slightly better with IS a4 as 1 6 e4.
15 g4 Now that Black has castled kingside, this
move is possible. IS e4 g4 16 ltJd2 WigS 1 7 llafl ;!; i s an alternative.
15 . • • c5 An attack on White's g4-pawn is fruitless:
IS . . . ltJf6? 16 h3 hS 17 �afl hxg4 18 ltJxgS ltJhS 1 9 �h7+ 'iith8 20 l::txf7 ! +-.
16 ltJd2 �a c8 17 l:!.a fl d5?! A bad move, assisting White 's plans. He had
to try 1 7 . . . 'iitg7 1 8 ltJe4 cxd4 1 9 cxd4 dS 20 ltJd2 dxc4 2 1 �xc4 ;!; (and then avoid 2 l . . .bS ? ! 2 2 Wib3 ! ) .
18 cxd5 1 8 �g6 ! ? is also interesting: 1 8 . . . f6 ! (not
1 8 . . . fxg6? 19 Wixg6+ 'iJig7 20 "iVxe6+ 'iith8 2 1 1lf7 lIxf7 22 �xf7 ltJf8 23 WifS +-) 1 9 cxdS �xdS 20 �d3 cxd4 2 1 exd4 ±.
18 ... �xd5 19 �e4 It is even stronger to insert 1 9 �h7+ first.
Then 1 9 . . . 'iitg7? loses to 20 llxf7+. 19 ... cxd4 Or 1 9 . . . bS 20 �d3 a6 2 1 a4 :b8 22 axbS
axbS 23 �xdS exdS 24 e4 ±. 20 exd4 b5 2 1 iVd 3 a6 22 a4 22 �xdS exdS 23 llfS W1e6 24 Wif3 llc7 2S
:xdS llxc3 26 I;IxgS+ hxgS 27 'iVxc3 �xg4 28 Wk'e3 ± could also be considered by White .
22 ... bxa4 There was little choice : 22 . . J1b8? 23 axbS
axbS 24 �xdS exdS 2S �fS Wie6 26 �f3 +-. 2 3 c4 �xe4 24 ltJxe4 White 's advantage is beyond question. He
threatens cS and then ltJd6xf7 . Black's a-pawns will eventually drop. Black needs some primitive action, but this is not easy to drum up. A line like 24 . . . eS 2S dS ltJcS 26 d6 Wie6 27 ltJxcS llxcS 28 1!f6 'iVxc4 29 Wih3 ! (29 ng6+? 'iith7 ! -+) leaves him helpless.
24 .. :iVb4 (D) An active try. The alternative was 24 . . . fS 2S
gxfS exfS 26 ltJc3 ! (26 :xfS ? llxfS 27 llxfS :f8 28 llxf8+ 'iitxf8 ;!;) 26 . . .f4 27 cS ±.
25 Wih 3? An over-optimistic idea. 2S cS ! Wib3 26 Wixa6
± is correct.

SOLUTIONS 135
w
25 .. :�x c4 ! Only this way ! The passive 2S . . . ct;g7? 26
tDf6 Wie7 27 cS tDxf6 28 ::'xf6 'iVxf6 29 �xf6 ct;xf6 30 Wixh6+ ct;e7 3 1 �xgS+ f6 32 'iVe3 is hopeless for Black.
26 Wixh6 Black has excellent compensation after 26
tDd6 'iWxd4 27 tDxc8 ::'xc8 28 �xh6 'iWe3 00.
26 .. :�xd4 27 �xg5+ 'iWg7?! 27 . . . ct;h8 ! is more precise: 28 'iWh4+ ct;g8 29
gS (29 tDgS Wih8 30 Wig3 �d4 00) 29 .. JIc4 30 �e l a3 °o.
28 �e7! tDe5? A major error. Alternatives like 28 . . . ::'cd8?
29 ::'d2 +- or 28 . . . �c7? 29 tDf6+ +- were not helpful either, but Black should have played 28 . . . 'iWd4 ! 29 �el ct;g7 (29 .. J:t.c7 30 h3 ;l;) 30 'iVgS+ ct;h8 3 1 'iWhS+ ct;g8 32 gS, with only a slight advantage for White.
2 9 tDf6+ ct;h8 30 'iVa 3! This is probably what Black missed. The
white queen returns to the attack, and Black is helpless ! It's true that when you focus on one flank, you can easily miss moves in other parts of the board. But of course, this cannot be a serious excuse !
30 • • . tDxg4 30 . . . 'iVh6 3 1 gS 'iWg6 (3 l . . .'iWh4 32 �f4 +-)
32 �g3 +- or 30 . . . �g6 3 1 Wial tDd3 32 tDd7+ Wig7 33 �f3 ! +-.
31 'iVh 3+ tDh6 32 �f3 32 �f4 ! �gS 33 �h4 �cS+ 34 ct;h l +- is
more clear-cut. 32 . • . I:i.c5 32 . . . �gS is met most simply by 33 tDe4 ! +-. 33 tDd7 33 tDg4 ! 'iVg6 34 �f6 .l:thS 3S �c3 +- was
another direct winning continuation. But White can finish off the game as he pleases .
33 . . . 1:1f5 34 �x f5 ex f5 35 tDx f8 'iWd4+ 3S . . . 'iVxf8 36 �xfS +-. 36 ct;h 1 ct;g7 37 �a 3 tDg4 38 h 3 tDe 3 39
'iVe7 Wib6 40 tDd7 1-0
Test 70 Plan B (0 points) helps White in no way, and costs him his advantage. By placing his knight on the cS-outpost, Black achieves at least equal chances. Plan C (S points) fails to impress much, as Black can regroup his knight effectively (28 . . . tDf6 and . . . tDdS) . Plan A (30 points) is correct, and very strong too !
The game continued: 25 g4 ! h6 Black could consider 2S . . . gS ! ? 26 h4 ! gxh4
(26 . . . hS ! ? 27 gxhS gxh4 28 h6 ! ) 27 gS tDhS 28 tDg4 Wig7 29 tDh6+ ct;h8 30 �xh4 ± as an alternative.
26 h4 (D)
B
26 • . . Wic5?! Black should retain the queens on the board
with 26 . . . �f8 27 hS Wib7 28 Wid6 lle8 ±. He could then hope to benefit from the weakened white king some day. Anyway, in the endgame his survival chances are close to zero.
27 g5 hxg5 28 hxg5 'iVxd4 2 9 �xd4 tDh5 The alternative was 29 . . . tDe8 30 ct;g2 ::'c7 3 1
ct;g3 ct;f8 32 ct;g4 ct;e7 33 ct;hS tDd6 34 f4 tDfS 3S l:td3 , when White has a simple plan : ct;g6-h7, g6, and a4-aS +-.
30 ct;g2 ct;h7 Alternatives such as 30 . . Jl:f8 3 1 tDg6 lie8
(3 l . . .eS 32 ne4 tDf4+ 33 l:txf4 ! +-) 32 ct;f3 eS 33 l:te4 and ct;g4 +- and 30 . . . �cS 3 1 g6 �c8 32 lld7 I:i.a8 33 ct;f3 tDf6 34 �e7 +- are not really helpful.
31 f4 ? !

136 MODERN CHESS PlANNING
A slip. 3 1 �f3 ! is better: 3 l . . .l:!.cS (3 l . . .l:!.f8+ 32 �g4 l:!.fS 33 4Jd3 g6 34 l:!.d7+ 4Jg7 3S l:!.xa7 +-) 32 �e4 bS (32 . . . l:!.aS 33 l:!.d6 ! +-) 33 l:!.d8 ! bxc4 (33 . . . g6 34 l:!.d7+ �g8 3S �d4) 34 g6+ �h6 3S f4 4Jf6+ 36 �e3 +-.
31 .•• l:!.f8 32 �f3 l:!.f5 33 4Jd 3 (D)
B
33 . • • g6? ! Black returns the favour. H e should continue
33 . . . eS ! : a) 34 �g4? exd4 3 S �xfS 4Jg3+ and then: a l ) 36 �e6 �g6 37 4JeS+ (37 �eS 4Je2 38
�e4 �hS) 37 . . . �hS 38 �dS 4Je2 (38 . . . 4JfS ? 39 �e4 g6 40 �d3) 39 �e4 �h4 40 4Jc6 d3 4 1 �xd3 4Jxf4+ 4 2 �e4 �xgS 43 4Jxa7 4Je2 = .
a2) 36 �eS �g6 3 7 a4 (37 �xd4 �fS or 37 cS bxcS 38 4JxcS 4Je2 39 a4 as ! ) 37 . . . 4Je2 ! (37 . . . 4JfS ? 38 4Jb4) 3 8 cS (38 as bxaS 39 cS 4Jc3 40 �xd4 4JbS+ 4 1 �eS a4 42 c6 a3 43 4Jb4 as 44 4Ja2 4Jc7 =) 38 . . . bxcS 39 4JxcS as ! 40 �e4 d3 ! = .
b) 34 4JxeS 4Jxf4 3S �e4 l:!.f8 (3S . . . 4Je2 36 g6+ �h6 37 l:!.d7 4Jg3+ 38 �dS ±) 36 l:!.d7 . White 's advantage is obvious but Black has in any case improved his chances, as he is no longer dead lost.
34 l:!.d7+ �g8 35 �g4 ! 3 S l:!.e7?? i s naIve: 3 S . . . 4Jxf4 ! 36 4Jxf4 eS . 35 • • • l:!.a5 36 4Je5 l:!.xa 3 37 4Jxg6 White is winning. The black king has been
caught in multiple mating-nets. 37 • • • 4Jg7 Or 37 . . . 4Jg3 38 l:!.e7 4JfS 39 l:!.xe6 4Je3+ 40
�hS 4Jxc4 4 1 4Je7+ �f7 42 fS +-. 38 l:!.d8+ �f7 39 4Je5+ �e7 40 4Jc6+ �f7
4 1 l:!.d7+ �f8 4 l . . .�g6 42 4Je7+ �h7 (42 . . . �f7 43 4JfS+)
43 fS +- would not make a difference. 42 g6 4Je8
42 . . . 4JfS 43 �gS +-. 43 l:!.f7+ 1-0 Black resign�d in view of 43 . . . �g8 44 4Je7+
�h8 4S l:!.h7#. The final violent attack was particularly impressive. We do not see such attacks in endgames that often.
Test 7 1 Plan A ( 2 points) offers next to nothing. Black can even play 1 O . . . c4, with a good game. Plan C ( 1 S points) is not that bad, although the position remains unclear, with chances for both sides . So, Plan B (30 points), while not a terribly strong one, forces Black to work hard in order to restrain White's advantage and is worth trying out.
The game continued: 8 e5!? dxe5 9 4Jxe5 Ji.xg2 10 �xg2 4Jbd7 1 0 . . . 4Jfd7?? loses on the spot to 1 1 'iVf3 ! .
The main alternative i s 1 O . . . Ji.d6 ! ? 1 1 �f3 l:!.a7 1 2 l:!.el ;1;.
U 4Jxd7 'iVxd7 12 'ili'f3 l:!.c8 13 a4 ! The first two of White's ideas have been ac
complished. 13 ... Ji.e7?! An inaccurate move, which only helps White
to open and use the a-file. Black had to accept the slightly inferior position after 1 3 . . . b4 1 4 4Je4 4Jxe4 I S �xe4 ( I S dxe4? ! c 4 =) I S . . . 'ili'c6 1 6 'ilVxc6+ l:!.xc6 1 7 b3 hS 1 8 Ji.b2 l:!.h7 1 9 l:!.ae l g6 20 f4.
14 axb5 axb5 15 l:ta5! Unpleasant problems start to appear for
Black. In any case, now he is forced to play the undesirable . . . b4.
15 ... b4 16 4Je4 ! 1 6 4Ja4? ! 4JdS ! gives White little . 16 . • . c4 ? A second slip in only 1 6 moves can be too
much. Black didn' t like the position arising after 1 6 . . . 0-0 1 7 b3, when his pawns are fixed on his bishop's squares, but this was the lesser evil.
17 dx c4 filc7 18 4Jx f6+! The optimistic 18 l:!.a8? is wrong in view of
1 8 . . . filxc4 ! = .
18 . • . Ji.x f6 19 l:!.a4 ! filx c4 20 c3! l:!.b8 The following forcing line was also possible :
20 . . . Ji.e7 2 1 l:!.a7 bxc3 22 �b7 filc6+ 23 filxc6+ l:!.xc6 24 l:!.a8+ Ji.d8 2S l:!.d l �e7 26 bxc3 l:!.xc3 27 Ji.b2 l:!.b3 28 l:!.a7+ �e8 29 Ji.xg7 l:!.g8 30 l:!.xd8+ ! �xd8 3 1 l:!.a8+ +-.
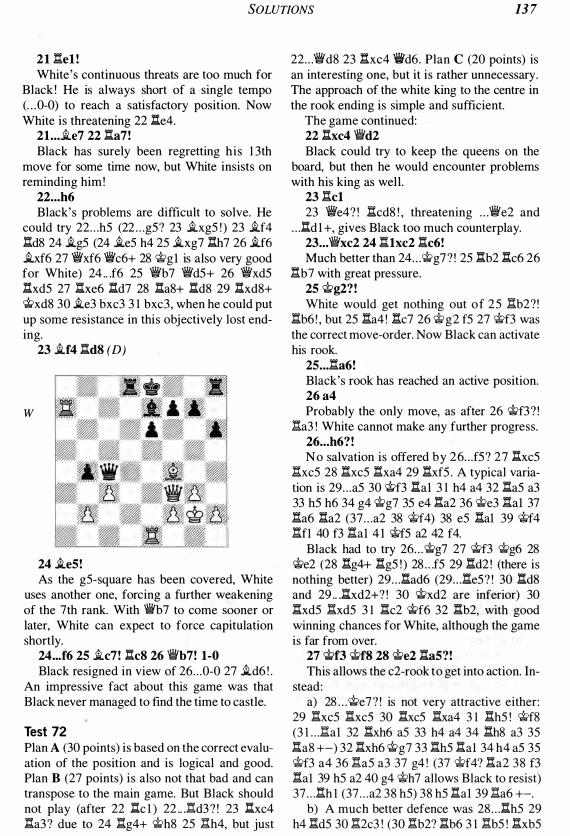
SOLUTIONS 13 7
2 1 ne 1 ! White 's continuous threats are too much for
Black ! He is always short of a single tempo (. . . 0-0) to reach a satisfactory position. Now White is threatening 22 ne4.
2 1 . • . i.e7 22 na7! Black has surely been regretting his 1 3th
move for some time now, but White insists on reminding him !
22 ... h6 Black's problems are difficult to solve. He
could try 22 . . . h5 (22 . . . g5? 23 i.xg5 ! ) 23 i.f4 nd8 24 i.g5 (24 i.e5 h4 25 i.xg7 nh7 26 i.f6 i.xf6 27 �xf6 'ii'c6+ 28 'itgl is also very good for White) 24 .. .f6 25 �b7 �d5+ 26 �xd5 nxd5 27 nxe6 nd7 28 na8+ nd8 29 nxd8+ 'itxd8 30 i.e3 bxc3 3 1 bxc3, when he could put up some resistance in this objectively lost ending.
2 3 i.f4 nd8 (D)
w
24 i.e5! As the g5-square has been covered, White
uses another one, forcing a further weakening of the 7th rank. With �b7 to come sooner or later, White can expect to force capitulation shortly.
24 ... f6 25 i.c7! nc8 26 �b7! 1-0 Black resigned in view of 26 . . . 0-0 27 i.d6 ! .
An impressive fact about this game was that Black never managed to find the time to castle.
Test 72 Plan A (30 points) is based on the correct evaluation of the position and is logical and good. Plan B (27 points) is also not that bad and can transpose to the main game. But Black should not play (after 22 nc 1 ) 22 .. J�d3 ? ! 23 nxc4 na3 ? due to 24 ng4+ 'ith8 25 l::!.h4, but just
22 . . . �d8 23 nxc4 �d6. Plan C (20 points) is an interesting one, but it is rather unnecessary. The approach of the white king to the centre in the rook ending is simple and sufficient.
The game continued: 22 nx c4 �d2 Black could try to keep the queens on the
board, but then he would encounter problems with his king as well.
2 3 nc1 23 �e4? ! .l:!.cd8 ! , threatening . . . �e2 and
. . . nd l +, gives Black too much counterplay. 2 3 ... �x c2 24 nlx c2 nc6! Much better than 24 . . . 'itg7 ? ! 25 nb2 nc6 26
nb7 with great pressure. 25 'itg2 ? ! White would get nothing out of 25 ·.l:!.b2? !
nb6 ! , but 25 na4 ! nc7 26 'itg2 f5 27 'itf3 was the correct move-order. Now Black can activate his rook.
25 ... na6! Black's rook has reached an active position. 26a4 Probably the only move, as after 26 'itf3 ? !
na3 ! White cannot make any further progress. 26 ... h6? ! No salvation is offered by 26 . . . f5 ? 27 nxc5
nxc5 28 nxc5 nxa4 29 nxf5 . A typical variation is 29 . . . a5 30 'itf3 nal 3 1 h4 a4 32 na5 a3 33 h5 h6 34 g4 'itg7 35 e4 na2 36 'ite3 nal 37 na6 na2 (37 . . . a2 38 'itf4) 38 e5 nal 39 'itf4 nf1 40 f3 nal 4 1 'itf5 a2 42 f4.
Black had to try 26 . . . 'itg7 27 'itf3 'itg6 28 'ite2 (28 ng4+ ng5 ! ) 28 . . .f5 29 nd2 ! (there is nothing better) 29 . . . nad6 (29 . . . ne5 ? ! 30 nd8 and 29 .. Jhd2+? ! 30 'itxd2 are inferior) 30 nxd5 .l:!.xd5 3 1 nc2 'itf6 32 nb2, with good winning chances for White, although the game is far from over.
27 'itn 'itrs 28 'ite2 na5?! This allows the c2-rook to get into action. In
stead: a) 28 . . . 'ite7 ? ! is not very attractive either:
29 nxc5 nxc5 30 nxc5 nxa4 3 1 nh5 ! 'itf8 (3 1 . . .nal 32 nxh6 a5 33 h4 a4 34 nh8 a3 35 na8 +-) 32 nxh6 'itg7 33 nh5 nal 34 h4 a5 35 'itf3 a4 36 na5 a3 37 g4 ! (37 'itf4? na2 38 f3 nal 39 h5 a2 40 g4 'ith7 allows Black to resist) 37 . . . nh 1 (37 . . . a2 38 h5) 38 h5 nal 39 .l:!.a6 +-.
b) A much better defence was 28 . . . nh5 29 h4 nd5 30 n2c3 ! (30 nb2? nb6 3 1 nb5 ! nxb5

138 MODERN CHESS PLANNING
32 axb5 �g7 33 �f3 �d6 34 �xc5 �b6 =) 30 . . . �g7 3 1 �d3 �xd3 32 �xd3 ±.
2 9 .l:!.b2 ! White 's rook becomes active, while Black's
is forced into passivity. The difference can be seen in the final result.
2 9 • . J�d6 30 �b8+ �e7 31 �h4 ! 3 1 �c8? l:tda6 32 .l:!.c7+ �e6 is not what
White was seeking ! 31.. . .l:!.b6 There was no difference with 3 1 . . .l::tc6 32
.l:!.e4+ .l:!.e6 33 �b7+ �d6 (33 . . . �f8 34 �h4 �c6 35 .l:!.xh6 �g7 36 �h4 c4 37 .l:!.b4 c3 38 l::thc4 +-) 34 .l:!.f4 +-.
32 .l:!.c8 �d7 33 l:th8 .l:!.b4 34 .l:!.4xh6 .l:!.b6 Or 34 . . . .l:!.axa4 35 .l:!.xf6 .l:!.b2+ 36 �f3 �aa2
37 �g2 �e7 38 .l:!.f4 +-.
35 .l:!.6h7 .l:!.xa4 36 .l:!.x f7+ �c6 37 .l:!.x f6+ �b5 38 �xb6+ axb6 (D)
w
39h4 !
is rather slow and gives White many options to keep the game unclear.
The game continued: 18 .•. lLlf4 ! 19 �x f4 ? ! Maybe White had to try the modest but ac
ceptable 1 9 �fl lLld7 20 lLlc4 lLle5 2 1 lLlxe5 �xe5 00 .
19 • . • gx f4 20 �d 3 lLld7 Now White has the better pawn-structure,
but Black's two bishops and dark-square control are more significant.
2 1 'ilVe2 lLle5 22 lLlf3 �h8! The g-file will also play an important part in
the game. 2 3 �h 1 .l:!.g8 24 .l:!.a 3 An interesting idea, trying to get some extra
protection for the h-pawn along the third rank. 24 .•. lLlx f3 25 �x f3 �e5 26 'iVh5 The 'passive' 26 lLld l 'iVh4 27 �fl �g4 28
'ilVd3 �xd l 29 �xd l �xf2 + is no improvement.
26 • • . 'iVf6 26 . . . 'ilVg5 27 �xg5 hxg5 28 f3 �d4 + is also
good. 27 �f1?! I think White had to play 27 �e2 .l:!.g5 28
'iVf3 h5 + for better or worse. 27 ... l:tg5 28 'ii'f3 h5 2 9 �d 3 Or 29 �gl �g4 30 hxg4 (30 'iVd3 c4 3 1
'ilVxc4 �xh3 -+) 30 . . . hxg4 3 1 'ilVd3 11h5 -+. 2 9 • . • c4 (D)
Now White wins without much trouble. His pawn-mass on the king side cannot be stopped w and his king is closer to the enemy pawns.
39 • . J�a2 + 39 . . . �c4 40 h5 b5 4 1 h6 l:ta6 42 g4 +-.
40 �f3 c4 40 . . . .l:!.a7 4 1 g4 .l:!.c7 42 �e2 c4 43 �d2 �b4
44 l:i.b8 l:i.d7+ 45 �c2 b5 46 h5 c3 47 h6 +-. 4 1 h5 1:!.a7 42 .l:!.c8! .l:!.f7+ 43 �e2 �b4 43 . . . .l:!.g7 44 e4 l:tg5 45 h6 J::th5 46 �h8 c3 47
g4 .l:!.h 1 48 �d3 �b4 49 f4 �b3 50 .l:!.c8 +-.
44 g4 .l:!.h7 45 f4 'itib5 1-0 30 �d 1
Test 73 Plan A (30 points) , which is standard for such structures, is correct. Plan B (0 points) is inadequate : 1 8 . . . 'iVc7? 1 9 lLlc4 �f8 20 e5 ! dxe5 2 1 d6 ± . Plan C ( 1 5 points) , although not that bad,
There was no real salvation for White, but he had to try 30 'ilVxc4 (not 30 'iVf3 ? �g4 ! and Black wins) . Then Black must find a precise path : 30 . . . f3 ! 3 1 g3 (3 1 �c7 fxg2+ 32 �xg2 .l:!.xg2 · { or 32 . . . 'ii'f4 -+ } 33 �xg2 �xh3+ 34 �xh3 �f3+ 35 'itih4 �f6#) 3 1 . . .h4 32 "fIc7

SOLUTIONS 139
hxg3 33 fxg3 (33 'i¥xb8 g2+ 34 i.xg2 fxg2+ 35 'iitg l i.h2+ ! 36 'iitxh2 g l �+ 37 .l:!.xg l 'i¥xf2+ 38 'iith l .l:!.xg l#) 33 .. .l:hg3 34 'i¥xb8 �g l + ! 35 W 'iitxg l f2+ 36 'iitg2 fxe l lb+ ! 37 'iitg l i.d4+ 38 'iith2 'i¥f2+ 39 i.g2 �xg2#.
30 • . • i.xh 3! 31 gxh 3 3 1 lbbl i.g4 32 f3 i.d7 -+. 31...f3! 32 lbe2 There was no good answer to the threat of
. . . 'i¥f4. 32 . . • fxe2 33 �xe2 I!.bg S 34 i.g2 'i¥f4 35
.l:!.g 3 h4 ! 0- 1
Test 74 Plan A (5 points) gives away White's main advantage, his domination of the 7th rank, and allows Black to make an easy draw. Plan B ( 1 5 points) i s not that bad, but Black can ease his defence by 26 . . . gxh5 . Plan C (30 points) is best.
The game continued: 26 h6! �d6 27 'iitf2 g5 27 . . . .l:!.ad8 28 l:!.xa7 i.b3 29 .l:!.d2 g5 30 �b2
i.c4 3 1 'iite3 .uxh6 (3 l . . ..l:i.xd4? 32 .l:i.b4 ! ) 32 .l:!.c2 i.d5 33 .uc5 l:!.e6 34 'it>d3 i.xe4+ 35 fxe4 doesn' t solve Black's problems either, but it was an option.
2 S :!.d c1! i.xe4 28 . . . 'iitf8 is no better: 29 .l:!. l c5 i.xe4 30 fxe4
.l:!.e8 3 1 i:txg5 .l:!.xh6 (3 l . . .:txe4? 32 i:tg8+ 'iitxg8 33 .l:!.c8+ mates, or 3 l . . ..l:!.xd4? 32 .l:!.g7 .l:i.e7 and again 33 llg8+ forces mate) 32 e5 �he6 33 'iitf3 ! ± (and not 33 .l:i.xa7 ? ! .l:!.8e7 34 11a8+ i:te8 35 .l:i.xe8+ lhe8 =) .
2 9 ItcS+ .l:i.d S 30 �xd S+ :!.xd S 31 fxe4 f5? A serious mistake. Black's only chance lay
in 3 l . . .'iitf8 ! 32 'iite3 .l:!.d6 33 d5 .l:!.xh6 34 l:!.c8+ 'iite7 35 .l:i.c7+ 'iite8 36 'it>d4. White stands better, but Black can put up a decent fight.
32 'iite 3 fxe4 (D) 33 l:tc7! The king's power in the endgame is well
known. Therefore, it is most important that the enemy king is not allowed to join the battle .
33 . . . .l:.d6 34 J:tg7+ 'iith S 34 . . . 'iitf8 35 .l:!.xh7 'iitg8 36 i:tg7+ 'iitf8 37
�xg5 .l:i.xh6 38 'it>xe4 +-. 35 Itxg5 Ihh6 36 d5! 36 'iitxe4? .l:!.g6 ! would ruin everything. 36 . • . a5 Now 36 . . . .l:Ig6 is impossible due to 37 Jlxg6
hxg6 38 d6.
37 'iitxe4 a4 3S .l:!.g 3 a 3 There was nothing better. A nice variation
that shows the weakness of the black king is 38 . . . .l:!.a6 39 .l:!.d3 ! a3 40 d6 .l:!.a4+ 4 1 'iitd5 �a5+ 42 'iitc6 .l:!.a6+ 43 'iitb7 a2 44 d7 al � 45 d8�+ 'iitg7 46 'i¥g5+ .l:!.g6 47 .l:i.d7+ 'iith8 48 .l:!.d8+ 'iitg7 49 �e7+ 'iith6 50 'i¥h4+ 'iitg7 5 1 .l:!.d7+, with mate to follow.
39 .l:!.xa 3 'iitg S Or 39 . . . 'iitg7 40 .l:!.xa7+ 'iitf8 4 1 g4 ki.g6 42
'iitf5 Itd6 43 c;t>e5 �g6 44 .l:!.xh7 :!.xg4 45 'iite6 l:te4+ 46 'iitd7 .l:!.a4 47 �h8+ 'iitf7 48 I!.c8 +-.
40 'it>d4 'iitfS 4 1 .l:!.e 3! Once more cutting off Black's king ! 4 1..J:th2 There was no salvation: 4 1 . . . .l:i.g6 42 g3 'iitf7
43 'it>c5 .l:i.g8 44 'iitc6 +-. 42 I!.e2 I!.h 1 43 d6 a5 44 'it>c5 %:!.c1 + 45 'iitb6
.l:!.b 1+ 46 'iitc7! Certainly not 46 'iitxa5 ?? .l:i.d 1 47 .l:!.e6 'iitf7 = .
46 • • • .l:i.c1+ 47 'iitd S a4 4 S .l:!.a2 ! 1-0 Black resigned due to 48 . . . I!.c4 49 d7 h5 50
.l:!.a3 h4 5 1 .l:!.f3+ 'iitg7 52 'iite7 .l:!.e4+ 53 'iitd6 �d4+ 54 'iite6 I!.d2 55 I!.f7+ 'iitg8 56 .l:!.f5 or 48 . . J:tgl 49 d7 a3 50 .l:i.f2+ 'iitg7 5 1 .l:!.c2.
Test 75 Plans A (5 points) and B (7 points) did not offer more than an equal position in most of the games where they were employed. Black always managed to handle White 's threats and he actually achieved a plus-score. Plan C (30 points) is very logical and enables White to achieve a serious advantage.
The game continued: I S .l:!.xe4 ! dxe4 19 lbe5 �d5 Or 1 9 . . :�c7 20 i.xe4 i.b7 2 1 'iVf3 .l:i.bc8 22
a4 ±. 20 'iVe 1 !
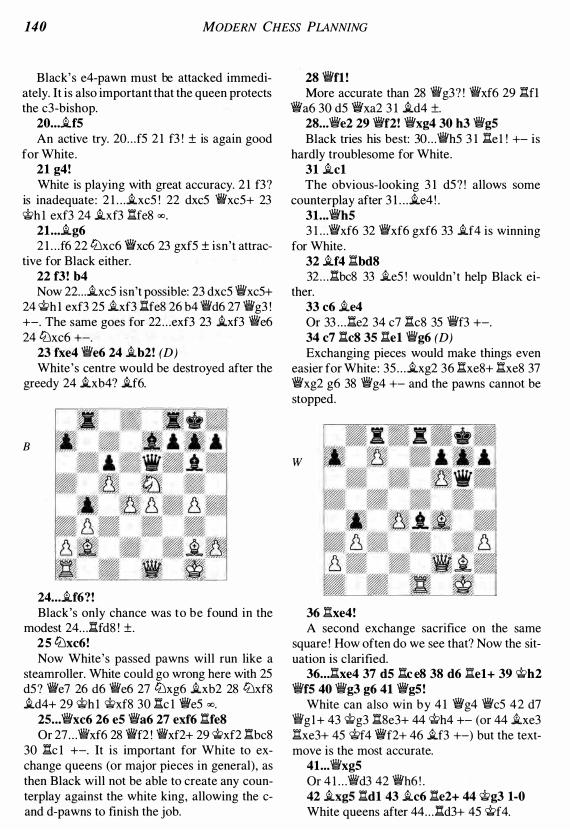
140 MODERN CHESS PLANNING
Black' s e4-pawn must be attacked immediately. It is also important that the queen protects the c3-bishop.
20 ... �f5 An active try. 20 . . . fS 2 1 f3 ! ± is again good
for White. 2 1 g4 ! White is playing with great accuracy. 2 1 f3?
is inadequate : 2 1 . . . .ixcS ! 22 dxcS 'i:lYxcS+ 23 Wh l exf3 24 .ixf3 l:tfe8 <Xl .
2 1.. • .ig6 2 1 . . .f6 22 ttJxc6 'ilt'xc6 23 gxfS ± isn't attrac
tive for Black either. 22 f3! b4 Now 22 . . . .ixcs isn't possible: 23 dxcS 'i:lYxcS+
24 Wh 1 exf3 2S .ixf3 l:tfe8 26 b4 'i:lYd6 27 'i:IY g3 ! +-. The same goes for 22 . . . exf3 23 .ixf3 'i:lYe6 24 ttJxc6 +-.
2 3 fxe4 'i:lYe6 24 .ib2 ! ( D) White 's centre would be destroyed after the
greedy 24 .ixb4? .if6.
B
24 . • • .if6?! Black's only chance was to be found in the
modest 24 . . . l:tfd8 ! ± . 25 ttJx c6! Now White 's passed pawns will run like a
steamroller. White could go wrong here with 2S dS ? flie7 26 d6 'i:lYe6 27 ttJxg6 .ixb2 28 ttJxf8 .id4+ 29 Wh l Wxf8 30 l:tc 1 flieS <Xl.
25 . • :�x c6 26 e5 'i:lYa6 27 ex f6 l:tfe8 Or 27 . . . 'i:lYxf6 28 'i:lYf2 ! 'i:lYxf2+ 29 Wxf2 l:tbc8
30 l:tc 1 +-. It is important for White to exchange queens (or major pieces in general), as then Black will not be able to create any counterplay against the white king, allowing the cand d-pawns to finish the job.
28 flif1 ! More accurate than 28 'i:lYg3? ! 'i:lYxf6 29 ':f1
'i:lYa6 30 dS 'ilt'xa2 3 1 .id4 ±. 28 . • . 'i:lYe2 2 9 flif2 ! flixg4 30 h 3 'i:lYg5 Black tries his best: 30 . . . flihS 3 1 l:tel ! +- is
hardly troublesome for White. 31 .ic1 The obvious-looking 3 1 dS ? ! allows some
counterplay after 3 1 . . . .ie4 ! . 31...flih5 3 l . . .flixf6 32 flixf6 gxf6 33 .if4 is winning
for White . 32 .if4 l:tbd8 32 . . . l:tbc8 33 .ieS ! wouldn' t help Black ei-
ther. 33 c6 .ie4 Or 33 . . . l:te2 34 c7 �c8 3S 'i:lYf3 +-. 34 c7 l:tc8 35 �el 'i:lYg6 (D) Exchanging pieces would make things even
easier for White : 3S . . . .ixg2 36 l:txe8+ l:txe8 37 'i:lYxg2 g6 38 'i:lYg4 +- and the pawns cannot be stopped.
w
36 l:txe4 ! A second exchange sacrifice on the same
square ! How often do we see that? Now the situation is clarified.
36 • • . l:txe4 37 d5 l:tce8 38 d6 �el + 39 Wh2 'i:lYf5 40 'i:lYg 3 g6 4 1 flig5!
White can also win by 4 1 flig4 flics 42 d7 'iig l + 43 Wg3 l:t8e3+ 44 Wh4 +- (or 44 .ixe3 l:txe3+ 4S Wf4 flif2+ 46 .if3 +-) but the textmove is the most accurate.
4 1...'i:lYxg5 Or 4 l . . .'i:lYd3 42 flih6 ! . 42 .ixg5 l:tdl 43 .ic6 l:te2 + 44 Wg 3 1-0 White queens after 44 . . . l:td3+ 4S Wf4.

Eva l uation Ta ble
Test Possible scores
A B C
1 20 1 8 1 0
2 5 0 20
3 5 1 0 20
4 20 1 0 4
5 0 20 0
6 20 0 20
7 5 1 0 20
8 5 1 0 20
9 3 8 20
1 0 5 0 20
1 1 20 7 1 3
1 2 0 5 20
1 3 1 0 20 5
14 20 5 1 0
1 5 0 1 0 20
1 6 20 0 0
1 7 20 5 1 0
1 8 20 0 0
1 9 20 1 5 5
20 0 0 20
2 1 5 0 20
22 0 20 5
23 20 0 1 3
24 20 0 0
25 0 20 7
26 1 3 0 20
27 1 3 5 20
28 20 1 6 0
29 1 3 20 5
30 20 0 5
3 1 20 1 3 1 3
32 0 20 0
33 0 3 20
34 20 5 0
35 0 1 0 20
36 0 20 1 0
3 7 0 5 20
3 8 0 1 0 20
39 20 0 0
40 0 20 0
4 1 0 0 20
42 1 7 20 0
Your Score
1 000+
Test Possible scores Your Score
A
43 0
44 1 3
45 3
46 0
47 5
48 20
49 8
50 1 7
5 1 20
52 3
53 30
54 0
55 0
56 5
57 30
58 5
59 0
60 5
6 1 0
62 1 0
63 0
64 30
65 20
66 0
67 0
68 30
69 5
70 30
7 1 2
72 30
73 30
74 5
75 5
Your Total:
Rating Results 2550 - 2750 2400 - 2549 2250 - 2399 2 1 00 - 2249 1 950 - 2099 1 800 - 1 949 1 650 - 1 799 1 1 80 - 1 649
B C
5 20
20 1 0
20 3
5 20
20 5
0 0
20 0
1 0 20
30 27
1 0 30
5 0
1 0 3 0
1 0 3 0
30 0
0 1 0
0 30
5 30
30 1 5
30 20
5 30
10 30
5 0
5 30
5 30
30 5
0 1 5
30 0
0 5
30 1 5
27 20
0 1 5
1 5 30
7 30
Strength Grandmaster International Master FIDE Master National Master Strong club player Good club player Average club player Lower club or social player

I ndex of P layers
List of G rivas's Opponents
Numbers refer to pages. A bold number indicates that the named player had White. Otherwise Grivas had White. An italic number indicates the page where the solution and game continuation are given.
Allahverdiev 34 , 102 Anand 1 3 , 87 Andersson 5 1 , 1 14 Avrukh 50, 113 Babula 28, 97 Barlov 19 , 91 Bousios 16, 89; 37, 1 04 Chemov 40, 105 Chiburdailldze 12 , 86 Cooper, 1. 20, 92 Daniilidis 1 0, 84 Emms 25, 96 Fragiadakis 57, 1 1 8 Gavrilakis 3 6 , 1 03; 58, 119 Ghinda 14 , 87 Hossain 39, 105 Ignatiadis 56, 1 1 7 Ivanisevic 45 , 109 Kalesis, N. 24, 95; 53 , 1 15 Kapnisis, S . 42, 107 Karayiannis 43, 1 07 Kofidis, A. 22, 94 Kotronias 9, 84
I ndex of Other Ga mes
Kourkounakis 32, 100 Logothetis 55 , 1 1 7 Mastoras 54 , 116 Mastrokoukos 46, 1 10 Meister, P. 48, 111 Milov, V. 49, 112 Moutousis 21 , 93 Papaioannou 30, 98 Poluektov 35, 102 Porfiriadis 26, 96; 27, 9 7 Pountzas 4 1 , 106 Prentos 31, 99 Rama 29, 98 Shahtahtinski 52, 1 1 5 Sideris 1 5 , 88 Skalkotas 47, 1 1 0 Skembris 1 1 , 85 Smyslov 23, 94 Todorcevic 1 8 , 90 Velickovic 38 , 104 Velikov 17 , 90 Vouldis 33 , 101 Yusupov 44 , 108
Numbers refer to pages. When a player's name appears in bold, that player had White. Otherwise the FIRST-NAMED PLAYER had White. An italic number indicates the page where the solution and game continuation can be found.
ABRAMOVIC - Sosonko 62, 123 ALMASI, Z. - Dorfman 76, 133; Slipak 7 1 , 130 ANDERSSON - Kasparov 6 1 , 122 ANDRIANOV - Atalik 72, 131 ARONIAN - Topalov 83, 139 ATALIK - Andrianov 72, 131 BANIKAS - Skembris 8 1 , 138 BRADFORD - Browne 70, 129
B ROWNE - Bradford 70, 129 CAMPORA - Cebalo 65 , 125 CAPABLANCA - Janowski 8 CEBALO - Campora 65 , 125 CHERNIN - Zaichik 64, 124 DAUTOV - Polgar, 1. 75, 132 DE FIRMIAN - Seirawan 69, 128 DORFMAN - Almasi, Z. 76, 133
INDEX OF OPENINGS 143
FEDOROWICZ - Geller 66, 126 GELFAND - Grishchuk 80, 137 GELLER - Fedorowicz 66, 126 GRAF - Yusupov 77, 134 GRISHCHUK - Gelfand 80, 137 GUFELD - Kavalek 59, 121 HARIKRISHNA - Hossain 79, 136 HOSSAIN - Harikrishna 79, 136 JANOWSKI - Capablanca 8 KARPOV - Salov 68, 127 KASPARov - Andersson 6 1 , 1 22 KAVALEK - Gufeld 59, 121 KRAMNIK - Nikolic 73, 131 KRASENKOW - Sakaev 78, 135 LARSEN - Miles 60, 121 MILES - Larsen 60, 121 ; Shipov 74, 132 MlLOS - Rogers 67, 127
I ndex of Open i ngs
Numbers refer to pages. Codes are ECO codes.
English Opening A 1 3 55; A2 1 34; A29 36; A32 41
Queen's Pawn Mise. A4 1 67; A43 47, 63 ; A49 33; A53 40; A54 37; A56 57
Modem Benoni A74 15
Dutch Defence A80 1 6; A90 62
Pirc Defence B07 64
Sicilian Defence B20 18; B22 1 7; B23 38, 54, 58, 79; B30 25, 2 7, 39; B33 31 , 66; B42 76; B53 23
Petroff Defence C43 82
Ruy Lopez (Spanish) C64 59; C77 19 ; C83 14; C84 12
MorYLEV - Rublevsky 82, 139 NIKOLIC - Kramnik 73, 131 POLGAR, J. - Dautov 75, 132 ROGERS - Milos 67, 127 RUBLEVSKY - Motylev 82 , 139 SAKAEV - Krasenkow 78, 135 SALOV - Karpov 68, 127 SEIRAWAN - de Firrnian 69 , 128 SHIPOV - Miles 74, 132 SHORT - Zysk 63, 123 S KEMBRIS - Banikas 8 1 , 138 SLIPAK - Almasi, Z. 7 1 , 130 SOSONKO - Abramovic 62, 123 TOPALOV - Aronian 83, 139 Yusupov - Graf 77, 134 ZAICHIK - Chemin 64, 1 24 ZYSK - Short 63, 123
Queen's Gambit D07 29, 35, 43; D 1 5 26, 56; D 1 8 65; D27 51, 74; D32 69; D34 80; D35 73 ; D4 1 22 ; D45 42 ; D55 10
Griinfeld Defence D9 1 72; D94 52
Catalan Opening E03 32
Bogo-Indian Defence E l l 53
Queen's Indian Defence E l 2 60, 61 , 78; E 1 3 77; E l 4 71 ; E I 5 9, 24, 70, 75, 83; E 1 8 68
Nimzo-Indian Defence E30 1 1
King's Indian Defence E60 44 ; E6 1 81 ; E68 2 1 ; E7 1 45; E73 49; E75 13 ; E80 30, 48; E90 46; E92 28, 50; E97 20

Other Classic M idd legame Books from Gambit Publ ications
Chess for Zebras Jonathan Rowson " . . . overflows with sheer common sense, practical insight and good humour. Rowson annotates many games in great depth and with unusual objectivity." - IM Craig Pritchett, GLASGOW HERALD 256 pages, 248 x 1 72 mm; $29. 95 / £1 7. 99
Secrets of Modern Chess Strategy John Watson "Marvellously written, scholarly and persuasive . . . the best available discursive history of strategic developments in modem chess" - John Hurley, SUNDAY TRIBUNE 2 72 pages, 248 x 1 72 mm; $29. 95 / £1 9. 99
50 Essential Chess Lessons Steve Giddins "One of those books I wish I had 30-40 years ago. I would' ve become a master (if ! had taken the time to study it) ." - Bob Long, CHESSCO 1 60 pages, 248 x 1 72 mm; $24. 95 / £14. 99
The Grandmaster's M ind Amatzia Avni "Original and extremely interesting . . . lots of fun, but it's also an important and most welcome addition to chess literature." - IM Jeremy Silman, SILMAN ' S REVIEWS 1 76 pages, 2 1 0 x 1 45 mm; $23. 95 / £13. 99
Modern Chess Ana lysis Robin Smith "Despite being a chess professional who uses chess software almost every day to analyse and prepare for games, I learned numerous new techniques from Smith 's book" - GM lan Rogers, CANBERRA TIMES 1 76 pages, 248 x 1 72 mm; $24. 95 / £15. 99
How to Play Dynamic Chess Valeri Beim " . . . simply the best I have ever read on this topic. I suspect even some players of the first rank will find something to think about, and the rest of us will have our games adjusted forever." - Don Aldrich, CHESS TODAY 1 76 pages, 248 x 1 72 mm; $2 7. 50 / £1 5. 99
Secrets of Chess Defence Mihail Marin "Mihail has written a book that will change your mind about defence as an important element to the game." - Michael Stevenson, NZ CHESS MAGAZINE 1 76 pages, 248 x 1 72 mm; $24. 95 / £1 5. 99
U nderstanding Chess Move by Move John Nunn "Beautifully put together. Anyone who plays over the games in it slowly and carefully is bound to improve his understanding of chess . . . one of the very best books of the past decade of so" - Peter Connor, CHESSVILLE 240 pages, 248 x 1 72 mm; $19. 95 / £1 4. 99
Creative Chess Strategy A lfonso Romero "I was excited by numerous brilliantly played top-level games that I 'd never seen . . . . to me, this is the most entertaining and absorbing of recent books that deal with strategy" - IM John Watson, TWIC 224 pages, 248 x 1 72 mm; $24. 95 / £1 7. 99
U nderstanding Pawn Play in Chess Drazen Marovif: "Serious study of this book will reward any player, regardless of their standard" - GM Danny Gorrnally, WEEKEND CHESS 208 pages, 2 1 0 x 1 45 mm; $21 . 95 / £1 4. 99
About the Publisher: Gambit Publications Ltd is passionate about creating innovative and instructive chess books. Gambit specializes in chess, and the company is owned and run exclusively by chess masters and grandmasters .
[e3AI�1 811 T I www.ga mbitbooks .com
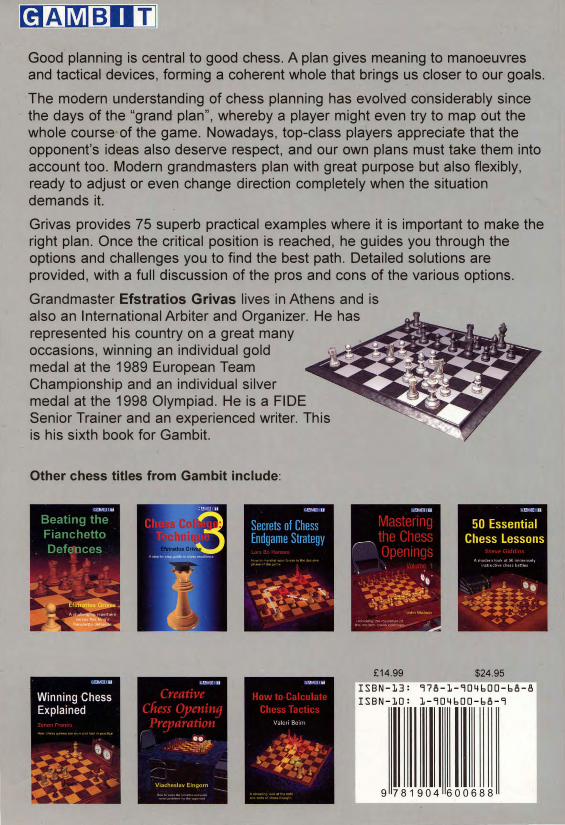
MAI�!4IBIITI
Good planning is central to good chess. A plan gives meaning to manoeuvres and tactical devices, forming a coherent whole that brings us closer to our goals.
The modern understanding of chess planning has evolved co"nsiderably since the days of the "grand plan", whereby a player might even try to map out the whole course of the game. Nowadays, top-class players appreciate that the opponent's ideas also deserve respect, and our own plans must take them into account too. Modern grandmasters plan with great purpose but also flexibly, ready to adjust or even change direction completely when the situation demands it.
Grivas provides 75 superb practical examples where it is important to make the right plan. Once the critical position is reached, he guides you through the options and challenges you to find the best path. Detailed solutions are provided, with a full discussion of the pros and cons of the various options.
Grandmaster Efstratios Grivas lives in Athens and is also an International Arbiter and Organizer. He has represented his country on a great many !::�Si��li��� occasions, winning an individual gold
� medal at the 1989 European Team Championship and an individual silver medal at the 1998 Olympiad. He is a FIDE Senior Trainer and an experienced writer. This is his sixth book for Gambit.
Other chess titles from Gambit include:
.1....... I g".:.""m,. .•..
I : '
'-1 £14.99 $24.95
ISBN-13: 978-1-904600-68-8
ISBN-l0: 1-904600-68-9
9781904600688


![N Tarrasch Gambit classic …studimonetari.org/edg/latex/tarraschclassico.pdf · Tarrasch Gambit classic Database: ... Tarrasch’s Gambit] Generated by Scid 4.2.2, ... Gundavaa 2460](https://static.fdocuments.us/doc/165x107/5a7897a67f8b9a273b8bacbd/n-tarrasch-gambit-classic-gambit-classic-database-tarraschs-gambit.jpg)