Firewall Settings for AVG 7download.avg.com/filedir/doc/OTHERS/firewall_settings_for_AVG... · 3 1....
31
Firewall Settings for AVG 7.5 Document revision 75.2 (8.2.2007) Copyright GRISOFT, s.r.o. All rights reserved. This product uses RSA Data Security, Inc. MD5 Message-Digest Algorithm, Copyright (C) 1991-2, RSA Data Security, Inc. Created 1991. This product uses code from C-SaCzech library, Copyright (c) 1996-2001 Jaromir Dolecek <[email protected]> This product uses compression library zlib, Copyright (C) 1995-2002 Jean-loup Gailly and Mark Adler All other trademarks are the property of their respective owners.
-
Upload
hoangtuyen -
Category
Documents
-
view
217 -
download
0
Transcript of Firewall Settings for AVG 7download.avg.com/filedir/doc/OTHERS/firewall_settings_for_AVG... · 3 1....
Firewall Settings for AVG 7.5
Document revision 75.2 (8.2.2007)
Copyright GRISOFT, s.r.o. All rights reserved.
This product uses RSA Data Security, Inc. MD5 Message-Digest Algorithm, Copyright (C) 1991-2, RSA Data Security, Inc. Created 1991. This product uses code from C-SaCzech library, Copyright (c) 1996-2001 Jaromir Dolecek <[email protected]> This product uses compression library zlib, Copyright (C) 1995-2002 Jean-loup Gailly and Mark Adler All other trademarks are the property of their respective owners.
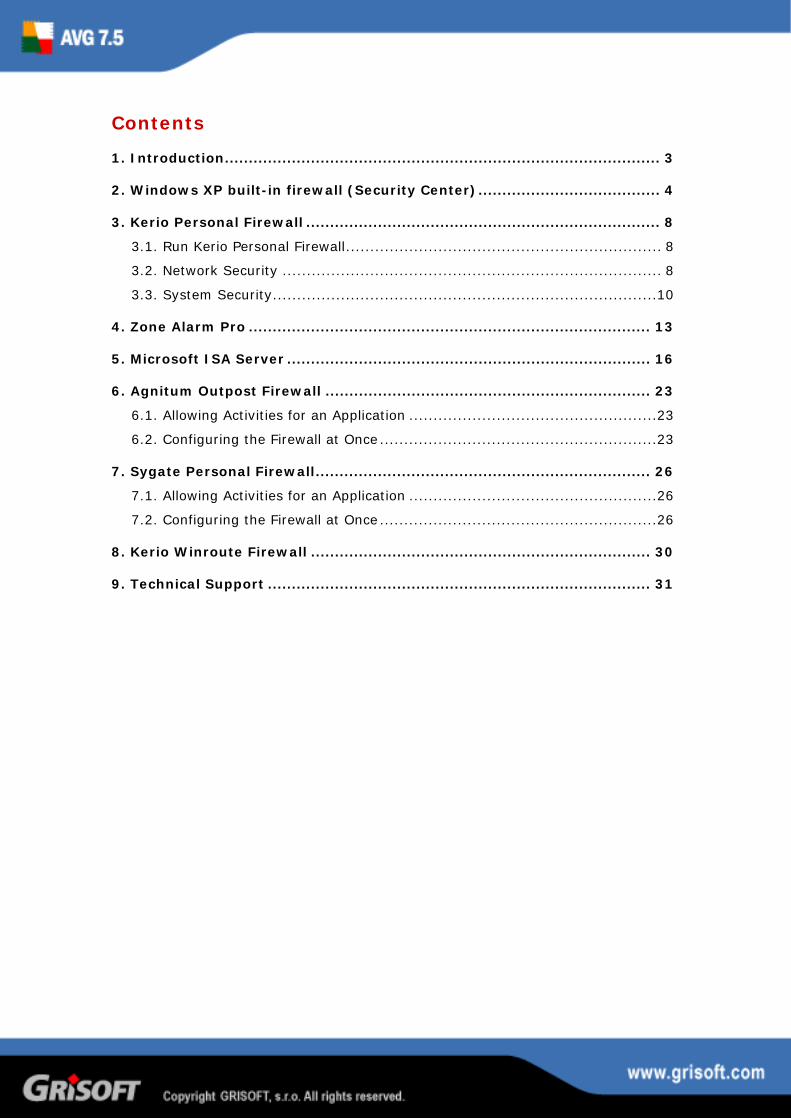
Contents
1. Introduction........................................................................................... 3
2. Windows XP built-in firewall (Security Center)...................................... 4
3. Kerio Personal Firewall .......................................................................... 8 3.1. Run Kerio Personal Firewall................................................................. 8 3.2. Network Security .............................................................................. 8 3.3. System Security...............................................................................10
4. Zone Alarm Pro .................................................................................... 13
5. Microsoft ISA Server ............................................................................ 16
6. Agnitum Outpost Firewall .................................................................... 23 6.1. Allowing Activities for an Application ...................................................23 6.2. Configuring the Firewall at Once.........................................................23
7. Sygate Personal Firewall...................................................................... 26 7.1. Allowing Activities for an Application ...................................................26 7.2. Configuring the Firewall at Once.........................................................26
8. Kerio Winroute Firewall ....................................................................... 30
9. Technical Support ................................................................................ 31

3
1. Introduction
In case you have installed AVG on your computer, and you are running a firewall at the same time, you might be experiencing problems while sending/receiving email messages and/or downloading AVG updates.
This documentation refers to the firewall settings required for proper AVG functionality and it covers the settings instructions and recommendations for the following firewalls:
Windows XP built-in firewall (Security Center)
Kerio Personal Firewall
Zone Alarm Pro firewall
Microsoft ISA Server
Agnitum Outpost Firewall
Sygate Personal Firewall
Kerio Winroute Firewall

4
2. Windows XP built-in firewall (Security Center)
Typically, the Windows XP built-in firewall default settings correspond very well to AVG configuration. Most probably, no problems will occur at all. However, should you run up against problems, please follow these steps:
Windows XP Firewall Settings
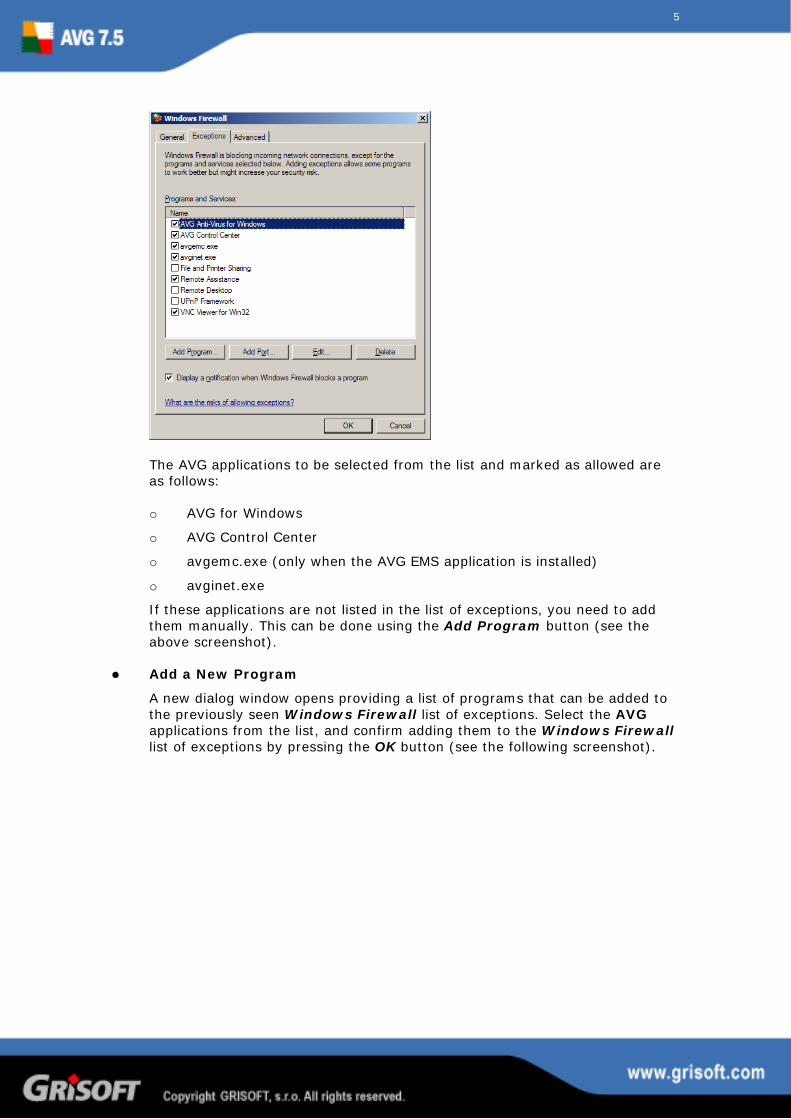
Open the Windows Firewall settings dialog window: Start / Settings / Control Panels / Windows Firewall. On the General tab make sure the Do not allow exceptions option is not selected.
Define Exceptions
Switch to the Exceptions tab with the list of applications that are blocked to access to the internet. You need to allow access to internet for all AVG applications. To do so, mark each check box related to an AVG application in the list of programs and services (see the following screenshot).
5
The AVG applications to be selected from the list and marked as allowed are as follows:
o AVG for Windows
o AVG Control Center
o avgemc.exe (only when the AVG EMS application is installed)
o avginet.exe
If these applications are not listed in the list of exceptions, you need to add them manually. This can be done using the Add Program button (see the above screenshot).
Add a New Program
A new dialog window opens providing a list of programs that can be added to the previously seen Windows Firewall list of exceptions. Select the AVG applications from the list, and confirm adding them to the Windows Firewall list of exceptions by pressing the OK button (see the following screenshot).

6
In case you are not able to see any AVG application in the program list, you have to add them manually. Click the Browse button, and find the above listed files (avgw.exe, avgcc.exe, avginet.exe and avgemc.exe) in the AVG7 program folder (by default C:\Program Files\Grisoft\AVG7):
Confirm adding the selected files by pressing the OK button in the Add a Program dialog window.
AVG Remote Administration
In case the station you are working with is a part of the AVG Remote Administration, and it is:
o running as an AVG client connected to the AVG DataCenter;
o running AVGADMIN and AVG TCP Server at the same time;
o running AVGADMIN;
7
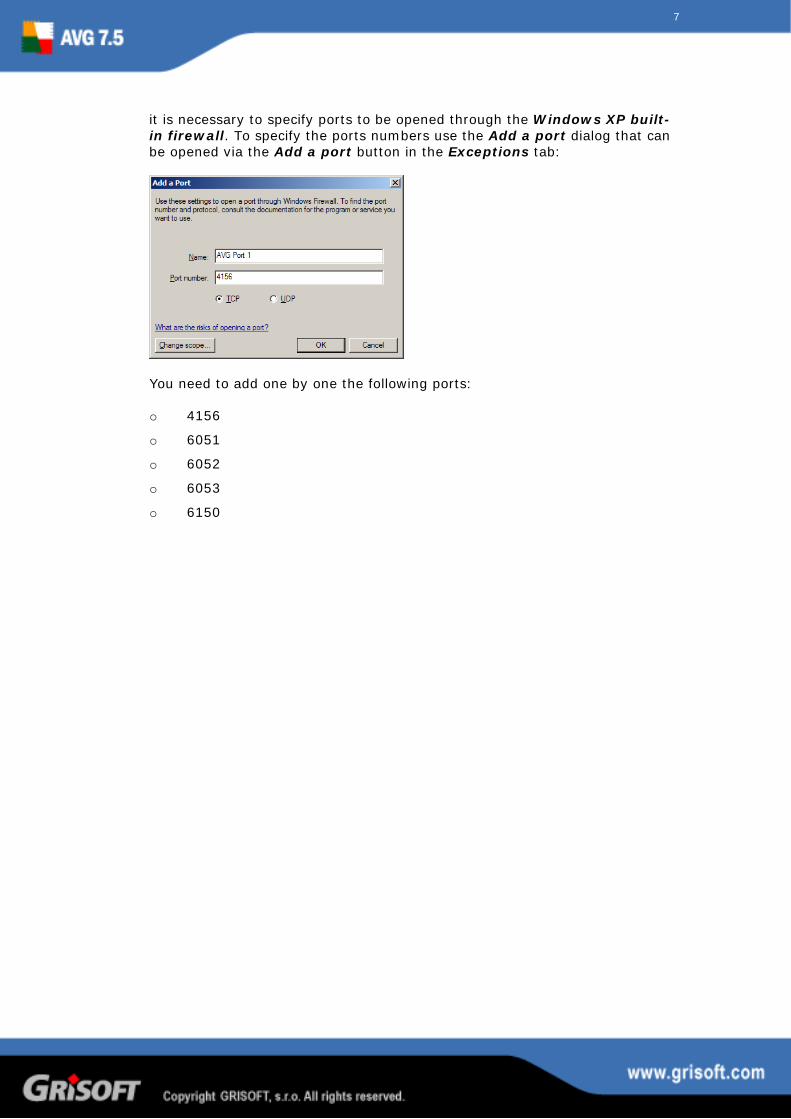
it is necessary to specify ports to be opened through the Windows XP built-in firewall. To specify the ports numbers use the Add a port dialog that can be opened via the Add a port button in the Exceptions tab:
You need to add one by one the following ports:
o 4156
o 6051
o 6052
o 6053
o 6150
8
3. Kerio Personal Firewall
With the Kerio Personal Firewall you will probably need to configure the settings to allow AVG (and its applications) to connect to the internet (send/receive data), and to launch other applications (to update). To configure the Kerio Personal Firewall settings, follow these steps:
3.1. Run Kerio Personal Firewall
You should see the Kerio Personal Firewall shield icon in your system tray – double-click on it to open the Kerio Personal Firewall configuration window.
If you cannot see such an icon, you have to launch the Firewall Engine from the All Programs / Kerio / Personal Firewall X folder of the Windows Start menu. The X stands for the version of your product (for example 4). The Kerio Personal Firewall icon in the system tray will be present then.
3.2. Network Security
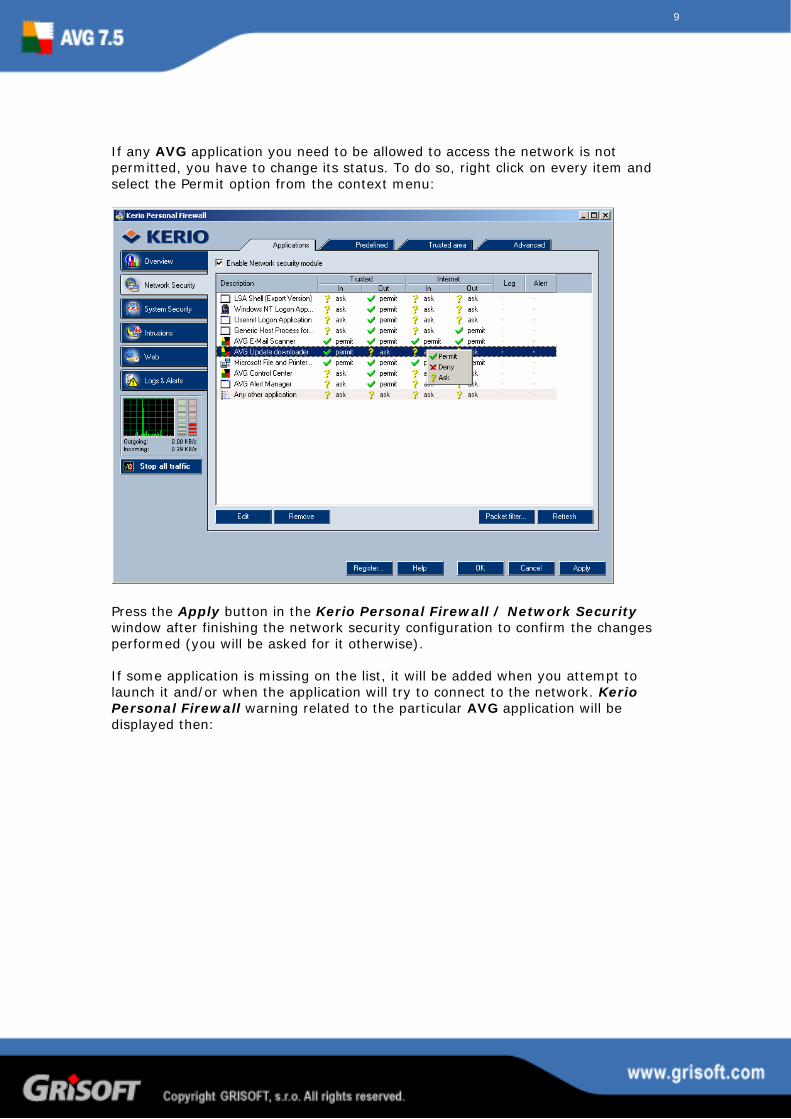
In the Network Security item (left menu), Applications tab (top menu) you are able to overview a list of programs with the information on whether these are allowed to connect to the internet. In the list, verify that all AVG applications are labeled as permit in all fields present (Trusted In/Out and internet In/Out).
Here is the list of all AVG applications that must always be allowed to connect to the internet:
o avginet.exe – application for performing AVG online updates (located in the Program Files/Grisoft/Avg7 directory by default)
o avgemc.exe – AVG E-mail Scanner for anti-virus scanning of e-mail (located in the Program Files/Grisoft/Avg7 directory by default)
Following two applications must be allowed to access the network when the workstation is a part of AVG Remote Administration:
o avgmsvr.exe – AVG Alert Manager component (located in the Program Files/Grisoft/Avg7 directory by default)
o avgcc.exe – AVG Control Center (located in the Program Files/Grisoft/Avg7 directory by default)
And finally, when there are installed the control components of AVG Remote Administration on the workstation, the following applications must be also allowed to communicate over the network:
o avgadmin.exe – the main control application of AVG Remote Administration, AVGADMIN (if the product is installed on your computer, it is located in the Program Files/Grisoft/AvgAdmin7 by default)
o avgtcpsv.exe – AVG TCP Server application for AVG Remote Administration (if the product is installed on your computer, it is located in the Program Files/Grisoft/AVG TCP Server by default)
o avginetl.exe – AVG InetLite application (if installed, it is located in the Program Files/Grisoft/Avg TCP Server by default)
9
If any AVG application you need to be allowed to access the network is not permitted, you have to change its status. To do so, right click on every item and select the Permit option from the context menu:
Press the Apply button in the Kerio Personal Firewall / Network Security window after finishing the network security configuration to confirm the changes performed (you will be asked for it otherwise).
If some application is missing on the list, it will be added when you attempt to launch it and/or when the application will try to connect to the network. Kerio Personal Firewall warning related to the particular AVG application will be displayed then:
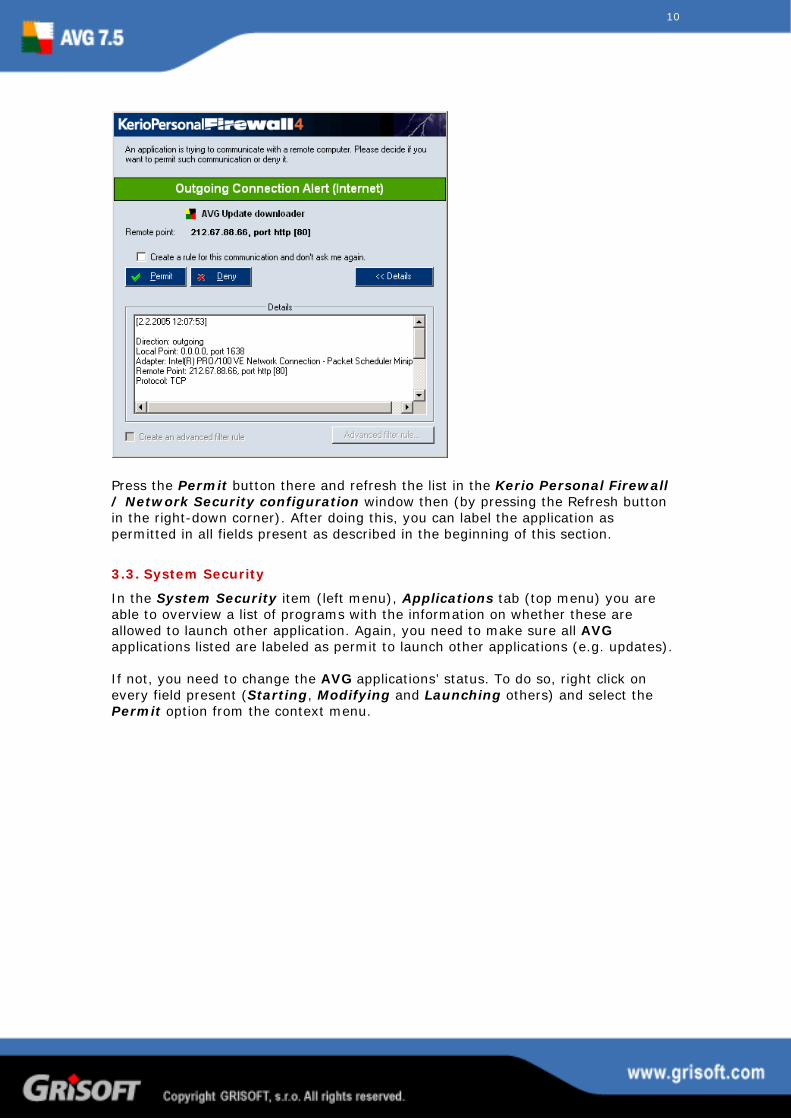
10
Press the Permit button there and refresh the list in the Kerio Personal Firewall / Network Security configuration window then (by pressing the Refresh button in the right-down corner). After doing this, you can label the application as permitted in all fields present as described in the beginning of this section.
3.3. System Security
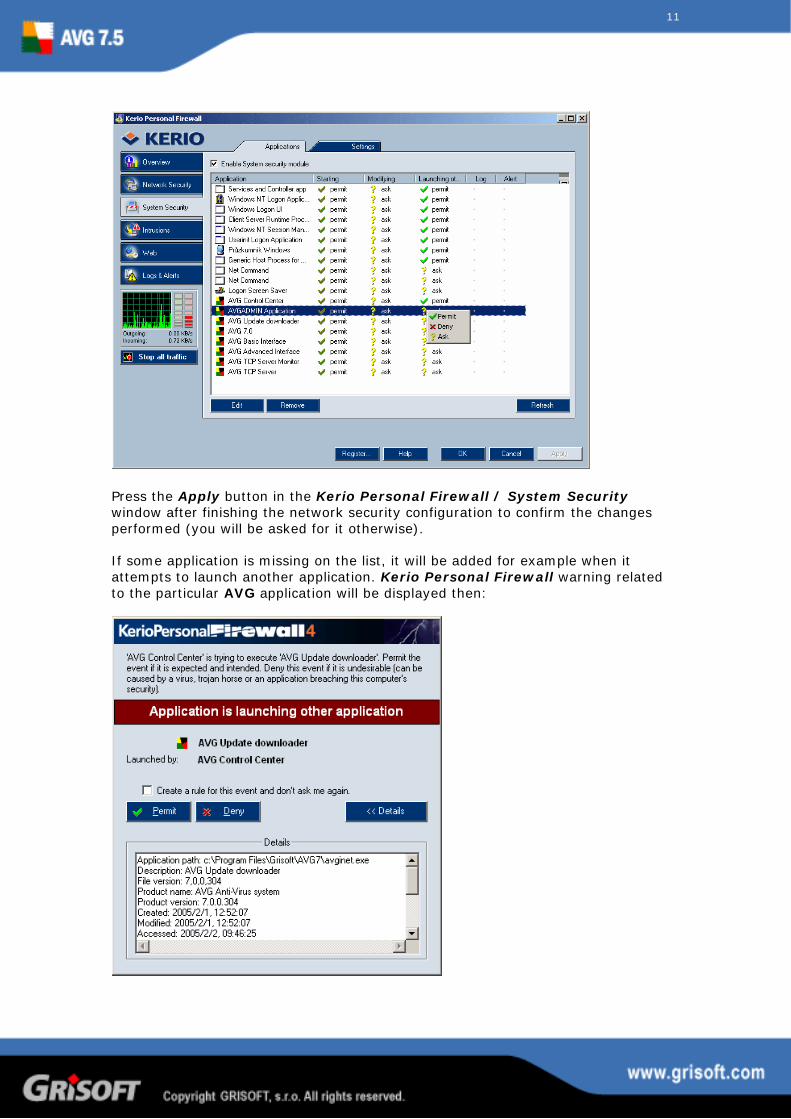
In the System Security item (left menu), Applications tab (top menu) you are able to overview a list of programs with the information on whether these are allowed to launch other application. Again, you need to make sure all AVG applications listed are labeled as permit to launch other applications (e.g. updates).
If not, you need to change the AVG applications’ status. To do so, right click on every field present (Starting, Modifying and Launching others) and select the Permit option from the context menu.
11
Press the Apply button in the Kerio Personal Firewall / System Security window after finishing the network security configuration to confirm the changes performed (you will be asked for it otherwise).
If some application is missing on the list, it will be added for example when it attempts to launch another application. Kerio Personal Firewall warning related to the particular AVG application will be displayed then:

12
Press the Permit button there and refresh the list in the Kerio Personal Firewall / System Security configuration window then (by pressing the Refresh button in the right-down corner). Then you can label the application as permitted in all fields present as described in the beginning of this section.

13
4. Zone Alarm Pro
With the Zone Alarm Pro you will probably need to configure the settings so that it is allowed for the AVG (and its applications) to connect to the internet (send/receive data), and to launch other applications (to update). To configure the Zone Alarm Pro settings, follow these steps:
Run Zone Alarm Pro
You should see the ZoneAlarm Pro icon in your system tray – double-click on it to open the ZoneAlarm Pro configuration window.
If you cannot see such an icon, you have to launch the Zone Labs Security application from the All Programs / Zone Labs folder of the Windows Start menu. The ZoneAlarm Pro icon in the system tray will be present then.
Program Control
In the Program Control section (left menu), Programs tab (top menu) you are able to overview a list of programs with the information on whether these are allowed to connect to the internet. In the list, verify that all AVG applications are labeled as allowed (green confirmation mark).
If not, you have to change the AVG applications’ status. To do so, right click on every item and select the confirmation mark from the context menu.
Here is the list of all AVG applications that must always be allowed to connect to the internet:
o avginet.exe – application for performing AVG online updates (located in the Program Files/Grisoft/Avg7 directory by default)
o avgemc.exe – AVG E-mail Scanner for anti-virus scanning of e-mail (located in the Program Files/Grisoft/Avg7 directory by default)
14
Following two applications must be allowed to access the network when the workstation is a part of AVG Remote Administration:
o avgmsvr.exe – AVG Alert Manager component (located in the Program Files/Grisoft/Avg7 directory by default)
o avgcc.exe – AVG Control Center (located in the Program Files/Grisoft/Avg7 directory by default)
And finally, when there are installed the control components of AVG Remote Administration on the workstation, the following applications must be also allowed to communicate over the network:
o avgadmin.exe – the main control application of AVG Remote Administration, AVGADMIN (if the product is installed on your computer, it is located in the Program Files/Grisoft/AvgAdmin7 by default)
o avgtcpsv.exe – AVG TCP Server application for AVG Remote Administration (if the product is installed on your computer, it is located in the Program Files/Grisoft/Avg TCP Server by default)
o avginetl.exe – AVG InetLite application (if installed, it is located in the Program Files/Grisoft/Avg TCP Server by default)
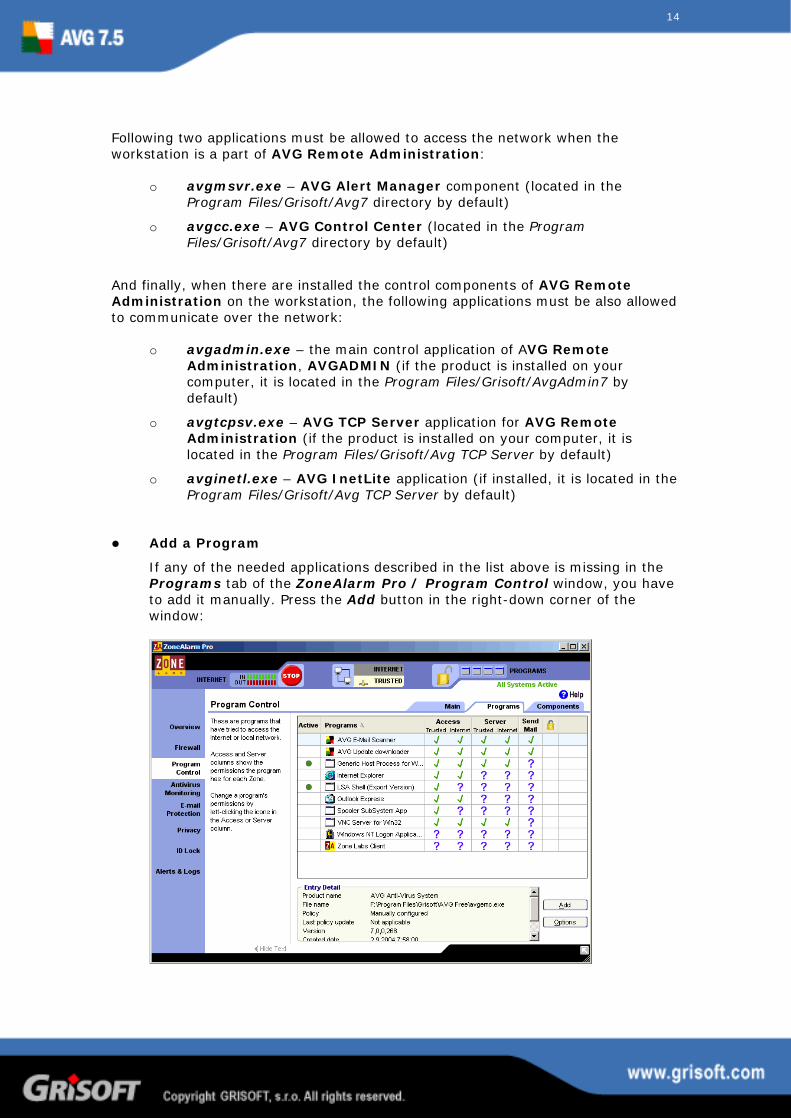
Add a Program
If any of the needed applications described in the list above is missing in the Programs tab of the ZoneAlarm Pro / Program Control window, you have to add it manually. Press the Add button in the right-down corner of the window:

15
Choose the desired application in the following dialog:
By default, the files are located in the Grisoft program folder (Program Files/Grisoft/AVG7, Program Files/Grisoft/AvgAdmin7 or Program Files/Grisoft/Avg TCP Server), as described in the list in previous section.
E-mail Protection
In the E-mail Protection item (left menu), Main tab (top menu) you need to disable the built-in inbound/outbound email protection provided by the Zone Alarm Pro. By switching the Zone Alarm Pro implemented email verification off you will enable the more comprehensive AVG email control.

16
5. Microsoft ISA Server
Any network traffic is blocked by default after installation of ISA Server. If you want to allow AVG applications to connect to the network, you must create at least one rule in the ISA Server environment.
To create a rule, follow the steps below:
Open the Microsoft ISA Server Main Configuration Window
Launch the New Access Rule Wizard
Choose the Microsoft Internet Security and Acceleration Server 2004 item in the main navigation tree located in the left side of the window. The name of your computer should be displayed here. Unpack it (for example by double-clicking on the computer’s icon in the navigation tree) and choose the Firewall Policy item:
Go to the Tasks tab in the right side of the window then and choose the Create New Access Rule action. The wizard’s window displays then.
Proceed with the New Access Rule Wizard
Fill in the name of the new rule (e. g. AVG):

17
Choose the Allow option in the next window (the rule’s purpose is to allow the AVG applications to communicate over the network):
In the following Protocols window choose the Selected protocols option in the This rule applies to field:

18
Use the Add button to open the tree menu with protocols available to add:
Choose the HTTP and HTTPS protocols in the Add Protocols window using the Add button.
19
When the station is a part of AVG Remote Administration, or when there are the AVGADMIN and/or the AVG TCP Server applications running on the station, you have to add also the TCP protocol as well.
However, any station may be in need of use of the TCP protocol under some circumstances (for example when performing an update from a local web server), so it is always recommended to add the TCP protocol connection!
The protocol is not in the list, so you must create a new protocol connection using the New button in the upper area of the Add Protocols window.
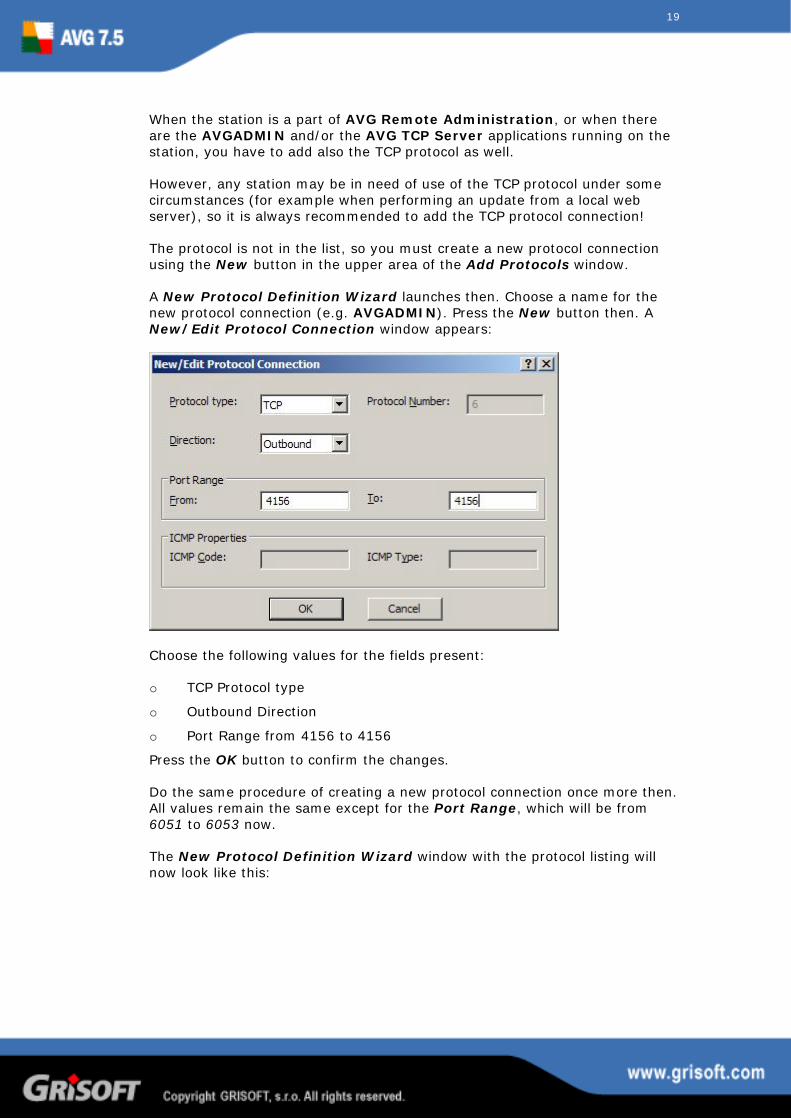
A New Protocol Definition Wizard launches then. Choose a name for the new protocol connection (e.g. AVGADMIN). Press the New button then. A New/Edit Protocol Connection window appears:
Choose the following values for the fields present:
o TCP Protocol type
o Outbound Direction
o Port Range from 4156 to 4156
Press the OK button to confirm the changes.
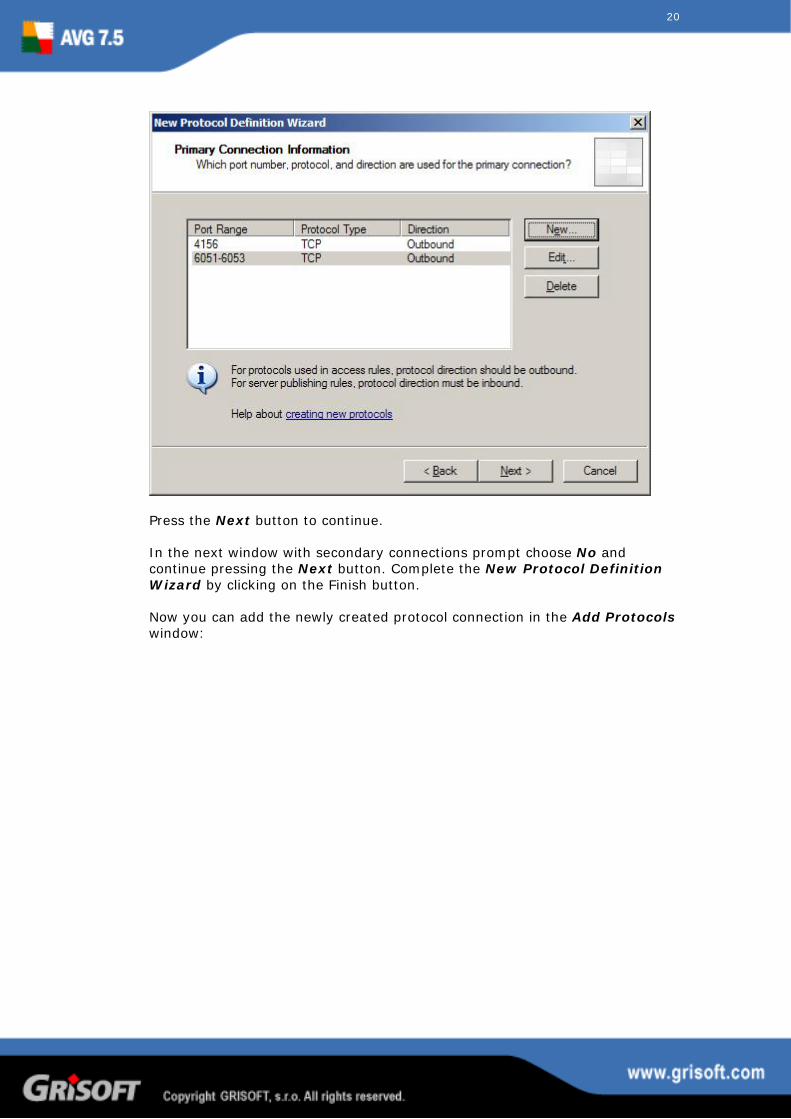
Do the same procedure of creating a new protocol connection once more then. All values remain the same except for the Port Range, which will be from 6051 to 6053 now.
The New Protocol Definition Wizard window with the protocol listing will now look like this:
20
Press the Next button to continue.
In the next window with secondary connections prompt choose No and continue pressing the Next button. Complete the New Protocol Definition Wizard by clicking on the Finish button.
Now you can add the newly created protocol connection in the Add Protocols window:

21
Your protocol is in the User-Defined folder of the tree menu here. Use the Add button to add it.
The Protocols window of the New Access Rule Wizard should look like this now:
22
Press the Next button to continue.
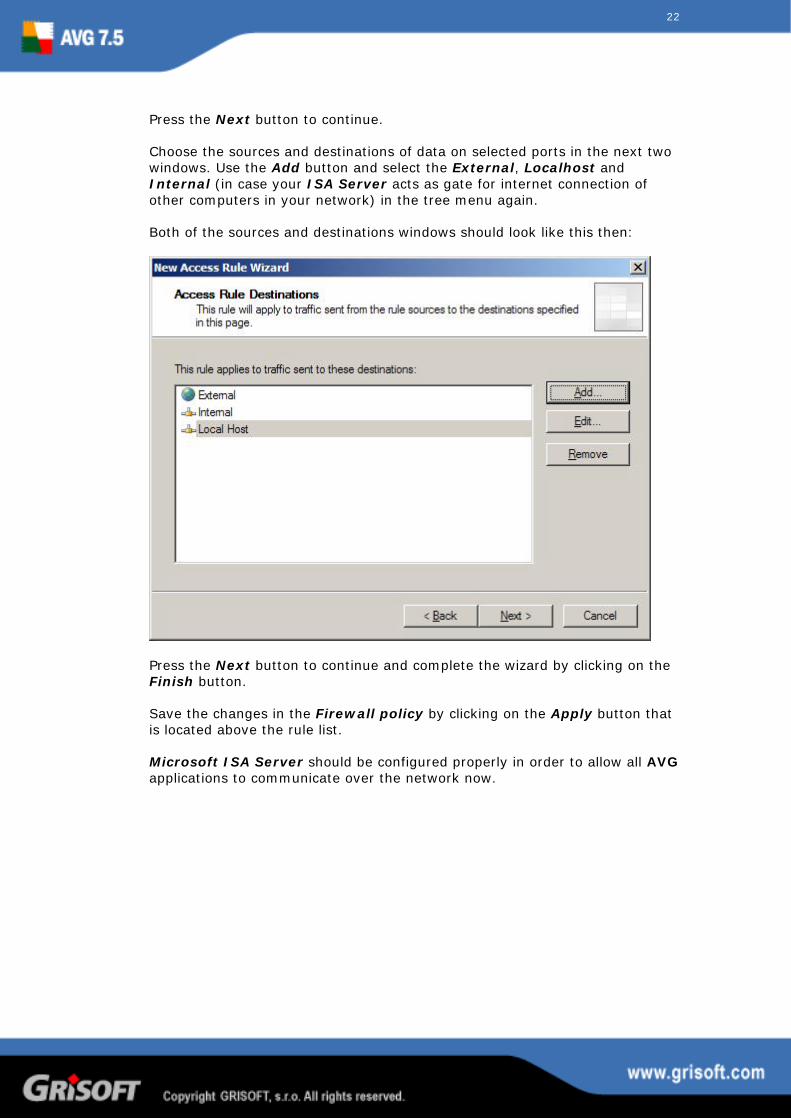
Choose the sources and destinations of data on selected ports in the next two windows. Use the Add button and select the External, Localhost and Internal (in case your ISA Server acts as gate for internet connection of other computers in your network) in the tree menu again.
Both of the sources and destinations windows should look like this then:
Press the Next button to continue and complete the wizard by clicking on the Finish button.
Save the changes in the Firewall policy by clicking on the Apply button that is located above the rule list.
Microsoft ISA Server should be configured properly in order to allow all AVG applications to communicate over the network now.

23
6. Agnitum Outpost Firewall
You may be asked to allow network connection for some applications during their start up after installation of the product. This is related to AVG products as well.
You can set up the firewall so that it will permanently allow network communication for all AVG applications. Doing this you will definitely not decrease the level of protection of your system. On the contrary, AVG will be enabled to fully employ all of its functions then, bringing the reliability of your anti-virus protection to maximum.
6.1. Allowing Activities for an Application
The firewall will react whenever an unknown application is trying to make a network connection. This holds even for AVG applications before setting them up manually. The following window is displayed (for AVG Control Center in this example):
Choose the Allow all activities for this application option and press the OK button. Perform the same action whenever a similar AVG related window appears.
6.2. Configuring the Firewall at Once
However, you should allow the AVG applications to access the network even before they try to open a connection. If you want to allow the network communication for AVG applications (recommended!) at once, open the Agnitum Outpost Firewall main window:

24
Add the allowed applications by right-clicking on the Plugins item in the main navigation tree. Choose the Options menu item then. A new window will open then. Go to the Applications tab in the window:
Add all AVG applications currently installed on your computer using the Add button.
Here is the list of all AVG applications that must always be allowed to connect to the internet:

25
o avginet.exe – application for performing AVG online updates (located in the Program Files/Grisoft/Avg7 directory by default)
o avgemc.exe – E-mail Scanner for anti-virus scanning of e-mail (located in the Program Files/Grisoft/Avg7 directory by default)
Following two applications must be allowed to access the network when the workstation is a part of AVG Remote Administration:
o avgmsvr.exe – AVG Alert Manager component (located in the Program Files/Grisoft/Avg7 directory by default)
o avgcc.exe – AVG Control Center (located in the Program Files/Grisoft/Avg7 directory by default)
And finally, when there are installed the control components of AVG Remote Administration on the workstation, the following applications must be also allowed to communicate over the network:
o avgadmin.exe – the main control application of AVG Remote Administration, AVGADMIN (if the product is installed on your computer, it is located in the Program Files/Grisoft/AvgAdmin7 by default)
o avgtcpsv.exe – AVG TCP Server application for AVG Remote Administration (if the product is installed on your computer, it is located in the Program Files/Grisoft/Avg TCP Server by default)
o avginetl.exe – AVG InetLite application (if installed, it is located in the Program Files/Grisoft/Avg TCP Server by default)
Commit your selection by pressing the OK button. All AVG applications requiring the network communication should be fully operational then.
26
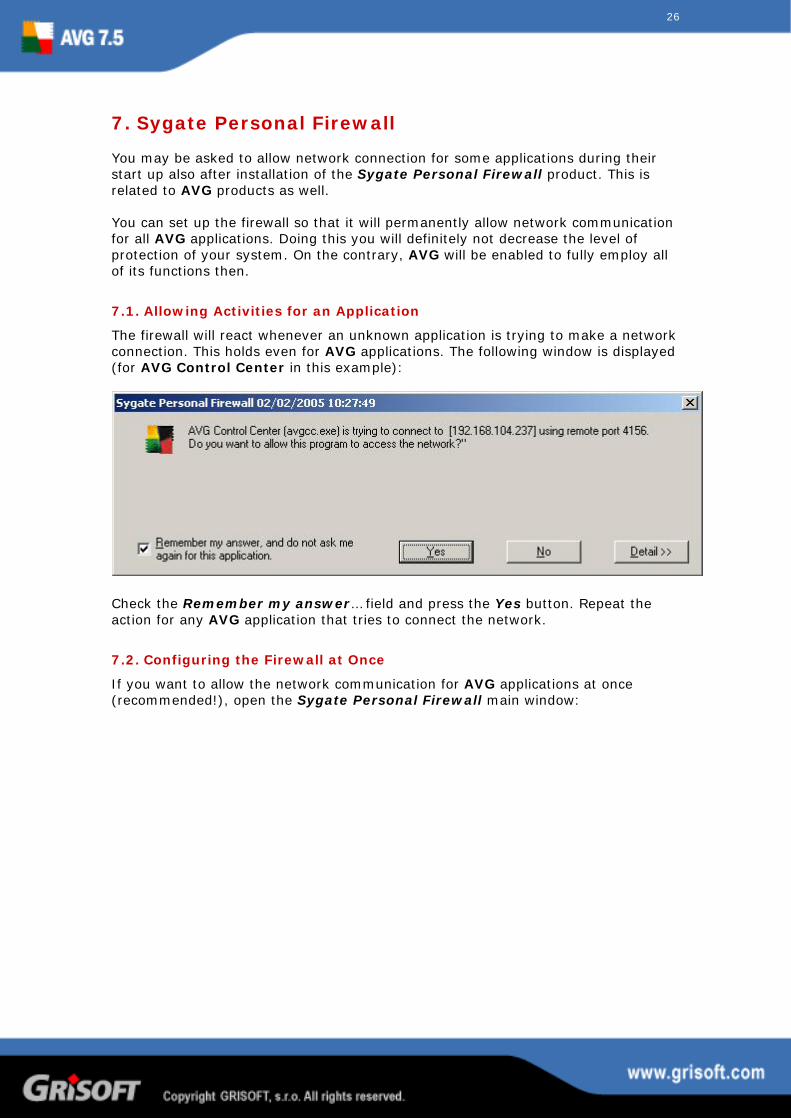
7. Sygate Personal Firewall
You may be asked to allow network connection for some applications during their start up also after installation of the Sygate Personal Firewall product. This is related to AVG products as well.
You can set up the firewall so that it will permanently allow network communication for all AVG applications. Doing this you will definitely not decrease the level of protection of your system. On the contrary, AVG will be enabled to fully employ all of its functions then.
7.1. Allowing Activities for an Application
The firewall will react whenever an unknown application is trying to make a network connection. This holds even for AVG applications. The following window is displayed (for AVG Control Center in this example):
Check the Remember my answer… field and press the Yes button. Repeat the action for any AVG application that tries to connect the network.
7.2. Configuring the Firewall at Once
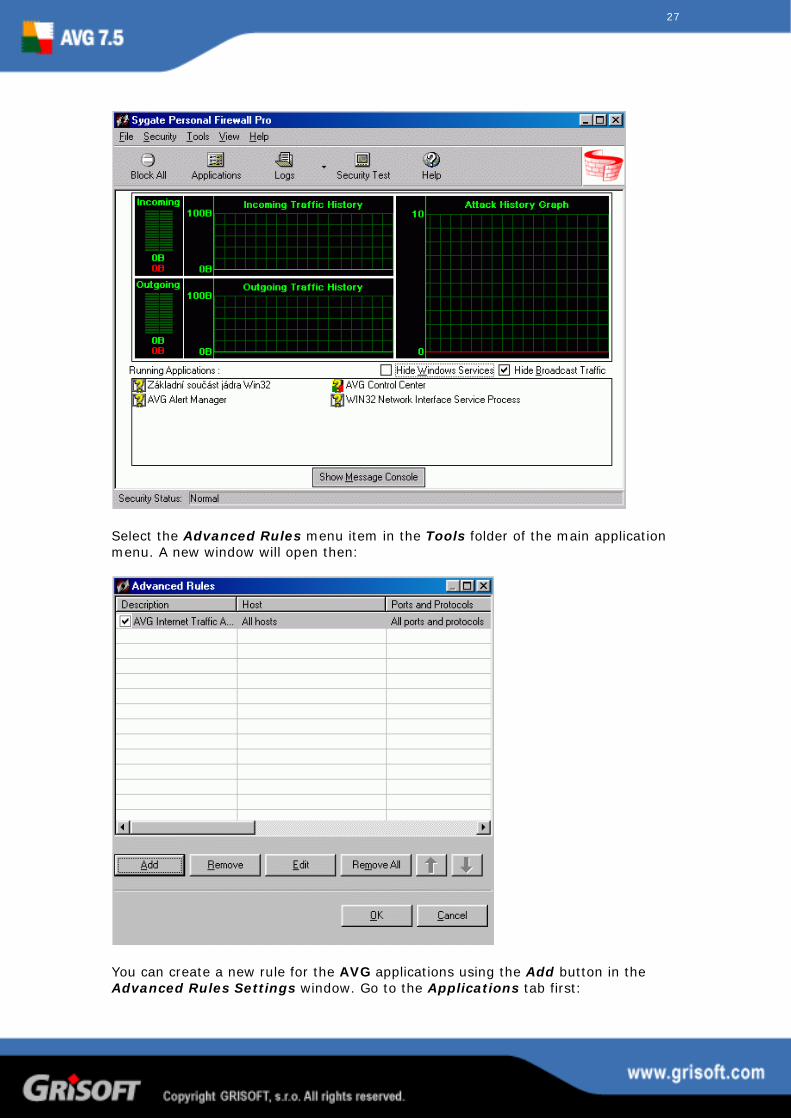
If you want to allow the network communication for AVG applications at once (recommended!), open the Sygate Personal Firewall main window:
27
Select the Advanced Rules menu item in the Tools folder of the main application menu. A new window will open then:
You can create a new rule for the AVG applications using the Add button in the Advanced Rules Settings window. Go to the Applications tab first:
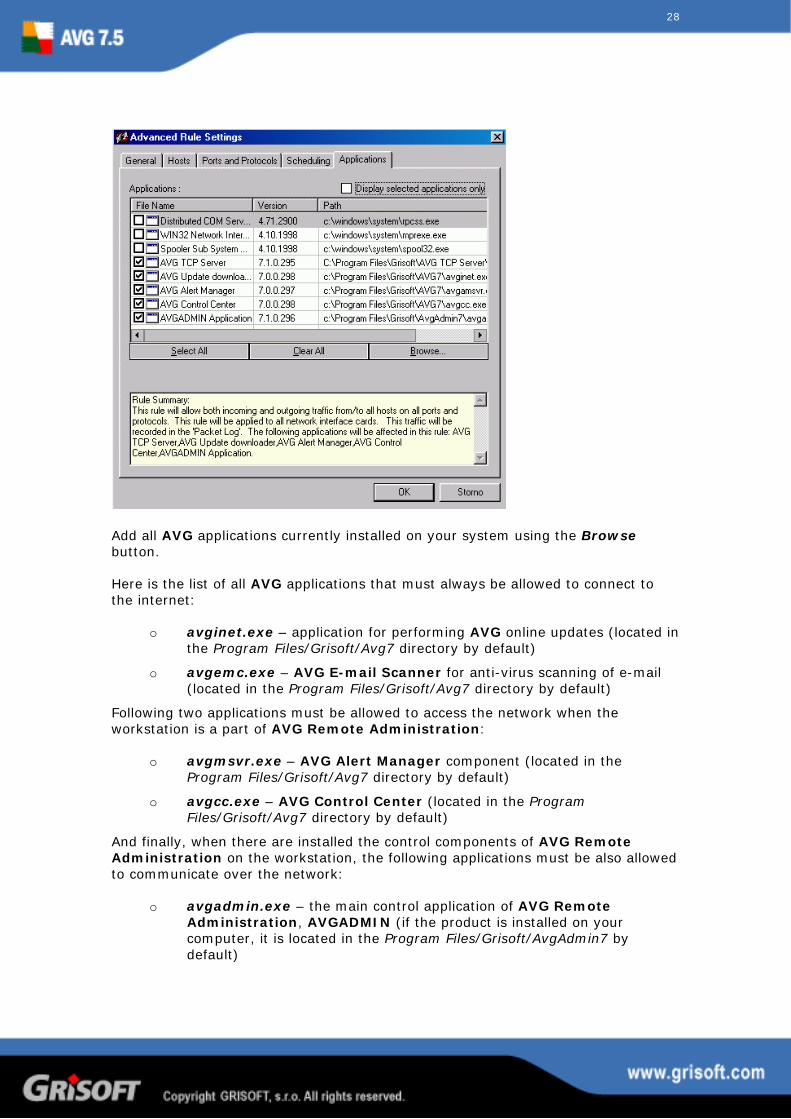
28
Add all AVG applications currently installed on your system using the Browse button.
Here is the list of all AVG applications that must always be allowed to connect to the internet:
o avginet.exe – application for performing AVG online updates (located in the Program Files/Grisoft/Avg7 directory by default)
o avgemc.exe – AVG E-mail Scanner for anti-virus scanning of e-mail (located in the Program Files/Grisoft/Avg7 directory by default)
Following two applications must be allowed to access the network when the workstation is a part of AVG Remote Administration:
o avgmsvr.exe – AVG Alert Manager component (located in the Program Files/Grisoft/Avg7 directory by default)
o avgcc.exe – AVG Control Center (located in the Program Files/Grisoft/Avg7 directory by default)
And finally, when there are installed the control components of AVG Remote Administration on the workstation, the following applications must be also allowed to communicate over the network:
o avgadmin.exe – the main control application of AVG Remote Administration, AVGADMIN (if the product is installed on your computer, it is located in the Program Files/Grisoft/AvgAdmin7 by default)

29
o avgtcpsv.exe – AVG TCP Server application for AVG Remote Administration (if the product is installed on your computer, it is located in the Program Files/Grisoft/Avg TCP Server by default)
o avginetl.exe – AVG InetLite application (if installed, it is located in the Program Files/Grisoft/Avg TCP Server by default)
Go to the General tab then:
You have to allow any network communication for the selected AVG applications by selecting the Allow this traffic option.
Commit the rule creation by pressing the OK button. All AVG applications requiring the network communication should be fully operational then.
30
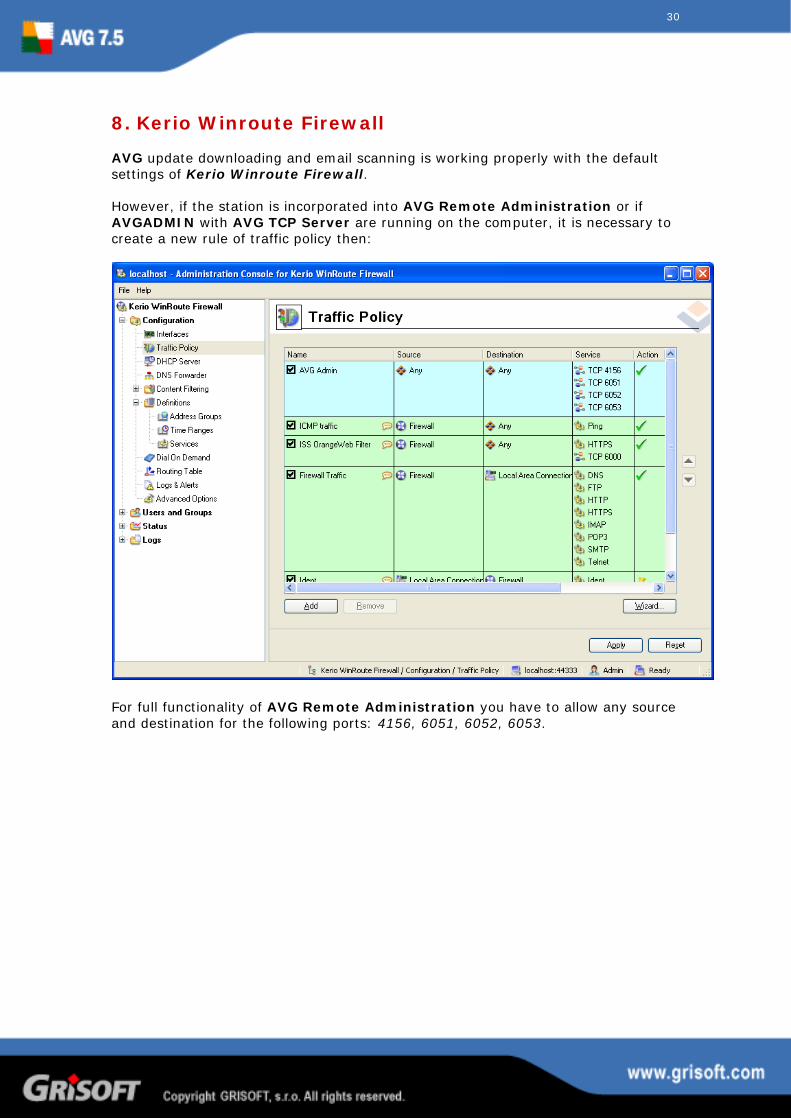
8. Kerio Winroute Firewall
AVG update downloading and email scanning is working properly with the default settings of Kerio Winroute Firewall.
However, if the station is incorporated into AVG Remote Administration or if AVGADMIN with AVG TCP Server are running on the computer, it is necessary to create a new rule of traffic policy then:
For full functionality of AVG Remote Administration you have to allow any source and destination for the following ports: 4156, 6051, 6052, 6053.
31
9. Technical Support
Should you have any further problems with your AVG product, please refer to the FAQ section of the Grisoft website at http://www.grisoft.com.
If you do not succeed in finding help this way, contact the technical support department at [email protected]. Be sure to include your AVG license number in the body of the e-mail.