FinePix4800Zoom Owner's Manual - Fujifilm on the Power Supply ... Test Shots Prior to Photography...
67
BL00007-200 (1) OWNER’S MANUAL This manual will show you how to use your FUJIFILM DIGITAL CAMERA FinePix4800ZOOM correctly. Please follow the instructions carefully.
Transcript of FinePix4800Zoom Owner's Manual - Fujifilm on the Power Supply ... Test Shots Prior to Photography...
BL00007-200(1)OWNER’S MANUAL This manual will show you how to use your FUJIFILM DIGITAL CAMERA FinePix4800ZOOM correctly. Please follow the instructions carefully.

32
Warning
This symbol is intended to alert the user tothe presence of uninsulated “dangerousvoltage” within the product’s enclosurethat may be of sufficient magnitude toconstitute a risk of electric shock topersons.
This symbol is intended to alert the userto the presence of important operatingand maintenance (servicing) instructionsin the l i terature accompanying theappliance.
For customers in the U.S.A.FCC StatementThis device complies with part 15 of the FCCRules. Operation is subject to the following twoconditions : (1) This device may not causeharmful interference, and (2) this device mustaccept any interference received, includinginterference that may cause undesiredoperation.
CAUTION : TO REDUCE THE RISK OF ELECTRIC SHOCK.
DO NOT REMOVE COVER (OR BACK).
NO USER-SERVICEABLE PARTS INSIDE.
REFER SERVICING TO QUALIFIED SERVICE PERSONNEL.
The graphical symbols are located on the bottom of the case.
To prevent fire or shock hazard, do not expose the unit to rain or moisture. CAUTIONThis equipment has been tested and found tocomply with the limits for a Class B digital device,pursuant to Part 15 of the FCC Rules. These limitsare designed to provide reasonable protectionagainst harmful interference in a residentialinstallation. This equipment generates, uses, andcan radiate radio frequency energy and, if notinstalled and used in accordance with theinstructions, may cause harmful interference toradio communications. However, there is noguarantee that interference will not occur in aparticular installation. If this equipment does causeharmful interference to radio or televisionreception, which can be determined by turning theequipment off and on, the user is encouraged totry to correct the interference by one or more ofthe following measures :— Reorient or relocate the receiving antenna.— Increase the separation between the
equipment and receiver.— Connect the equipment into an outlet on a
circuit different from that to which the receiver isconnected.
Please read the Safety Notes (➡P.127)and make sure you understand thembefore using the camera.
— Consult the dealer or an experienced radio/TVtechnician for help.
You are cautioned that any changes ormodifications not expressly approved in thismanual could void the user’s authority to operatethe equipment.
Notes on the Grant:To comply with Part 15 of the FCC rules, thisproduct must be used with a Fujifilm-specifiedferrite-core video cable, USB cable, and DCsupply cord.
For customers in CanadaCAUTIONThis Class B digital apparatus complies withCanadian ICES-003.

54
1 Getting Ready
Warning ................................................................... 2Preface .................................................................... 6Camera Features and Accessories ......................... 7Nomenclature .......................................................... 8
2 Basic PhotographyTAKING PICTURES (AUTO MODE) ......................... 25
Number of Available Frames ................................ 30USING AF/AE LOCK ................................................. 31FRAMING GUIDELINE FUNCTION .......................... 33VIEWING YOUR IMAGES (PLAYBACK) .................. 34FAST FORWARDING IMAGES ................................ 35PLAYBACK ZOOM .................................................... 36
Saving Trimmed Images ...................................... 37MULTI-FRAME PLAYBACK ...................................... 38ERASING SINGLE FRAME ...................................... 39USING A TV MONITOR ............................................ 41
3 Advanced Features PhotographyADVANCED FEATURES PHOTOGRAPHY ............. 42
� Photography mode specifications ..................... 42
5AUTO/4SCENE POSITION .................... 43Selecting the 4 photography mode ............... 43rPORTRAIT tSCENE (LANDSCAPE) yNIGHT SCENE oBLACK AND WHITE .......... 443MANUAL ........................................................ 456CONTINUOUS SHOOTING ........................... 46uMOVIE (VIDEO) ............................................. 47i AUDIO RECORDING ..................................... 50
FLASH PHOTOGRAPHY .......................................... 52A7Auto Flash Mode ............................................ 53\Red-Eye Reduction ........................................ 537 Forced Flash .................................................. 54
S7Slow Synchro ................................................. 54] Suppressed Flash .......................................... 55
aMACRO (CLOSE-UP) PHOTOGRAPHY ............. 56DIGITAL ZOOM ......................................................... 57
PHOTOGRAPHY MENU OPERATION ..................... 58Switching Pages ............................................... 58USELF-TIMER PHOTOGRAPHY ..................... 59DVOICE CAPTIONING ..................................... 61|AUTO BRACKETING ..................................... 63EWHITE BALANCE .......................................... 64RSENSITIVITY ................................................. 65WMANUAL FOCUS ........................................... 65SSHARPNESS ................................................. 66PFLASH (FLASH BRIGHTNESS ADJUSTMENT) .... 67
PHOTOGRAPHY MENU
PHOTOGRAPHY MODE 4 Advanced Features Playback
5 SettingsIN SETTINGS ............................................................ 92
� List of settings ................................................... 92� SET–UP menu options ..................................... 92
USING THE OPTION MENU .................................... 93Using SET–UP ..................................................... 93
QlSETTING THE FILE SIZE AND QUALITY (COMPRESSION RATIO) ................................ 94
IN PC CONNECTION .............................................. 101CONNECTING AT DSC MODE .............................. 102CONNECTING AT PC-CAMERA MODE ................ 104DISCONNECTING FROM THE PC ........................ 106CAMERA CUSTOMIZING ....................................... 107
ADVANCED PLAYBACK .......................................... 71� Playback mode menu ....................................... 71
MOVIE (VIDEO) ........................................................ 72PLAYING BACK AUDIO RECORDINGS .................. 74PLAYING BACK VOICE CAPTIONING .................... 76
{ERASING SINGLE • ALL FRAMES/FORMATTING ... 78}PLAYBACK (AUTOMATIC PLAYBACK) ........ 80OSETTING AND REMOVING
SINGLE FRAME PROTECTION .................... 81OSETTING AND REMOVING PROTECTION
FOR ALL FRAMES ........................................ 83FHOW TO SPECIFY PRINT OPTIONS ........... 85FDPOF DATE SETTING .................................. 86FDPOF SET FRAME ........................................ 87FDPOF REVIEW/RESET ................................. 89FDPOF RESET ALL ......................................... 90
PLAYBACK MENU 1
2
3
4
5
6
Contents
QLCD MONITOR BRIGHTNESS/VOLUME ........... 95
IMAGE DISPLAY .................................................. 96Preview Zoom ................................................... 96Selecting Recorded Images ............................. 97
AUTO POWER SAVE .......................................... 98SETTING THE STARTUP SCREEN .................... 99FRAME NO. MEMORY ...................................... 100
SET–UP
6 PC Connection
System Expansion Options ................................ 108Accessories Guide ............................................. 109Notes on Using Your Camera Correctly ............. 111Notes on the Power Supply ................................ 112
Notes on Using the Battery .......................... 112AC Power Adapter ........................................ 114
Notes on the SmartMedia™ ............................... 115Warning Displays ............................................... 117Troubleshooting .................................................. 120Specifications ..................................................... 124Explanation of Terms ......................................... 126Safety Notes ....................................................... 127EC Declaration of Conformity ............................. 131
TEV (EXPOSURE COMPENSATION) ..................... 67AMULTI-EXP .................................................... 68IPHOTOMETRY .............................................. 70
PREFACE ................................................................. 15Selecting the Language ....................................... 15Attaching the Strap ............................................... 15
SETTING UP THE CRADLE ..................................... 16LOADING THE BATTERY ........................................ 17CHARGING THE BATTERY ..................................... 18USING THE AC POWER ADAPTER ........................ 19LOADING THE SmartMedia™ .................................. 20REMOVING THE SmartMedia™ ............................... 21SWITCHING ON AND OFF ....................................... 22SETTING THE DATE AND TIME .............................. 23
76
� Test Shots Prior to PhotographyFor particularly important photographs (such as weddingsand overseas trips), always take a test photograph and viewthe image to make sure that the camera is functioningnormally.� Fuji Photo Film Co., Ltd. cannot accept liability for any
incidental losses (such as the costs of photography or theloss of income from photography) incurred as a result offaults with this product.
� Notes on CopyrightImages recorded using your digital camera system cannot beused in ways that infringe copyright laws without the consentof the owner, unless intended only for personal use. Note thatsome restrictions apply to the photographing of stageperformances, entertainments and exhibits, even whenintended purely for personal use. Users are also asked to notethat the transfer of memory cards containing images or dataprotected under copyright laws is only permissible within therestrictions imposed by those copyright laws.� Liquid CrystalIf the LCD monitor or display panel is damaged, takeparticular care with the liquid crystal in the monitor or panel.If any of the following situations arise, take the urgent actionindicated.� If liquid crystal comes in contact with your skin
Wipe the area with a cloth and then wash thoroughly withrunning water and soap.
� If liquid crystal gets into your eyeFlush the affected eye with clean water for at least 15 minutes and then seek medical assistance.
� If liquid crystal is swallowedFlush your mouth thoroughly with water. Drink large
quantities of water and induce vomiting. Then seekmedical assistance.
� Notes on Electrical InterferenceIf the camera is to be used in hospitals or aircrafts, pleasenote that this camera may cause interference to otherequipment in the hospital or aircraft. For details, pleasecheck with the applicable regulations.� Handling Your Digital CameraThis camera contains precision electronic components. Toensure that images are recorded correctly, do not subjectthe camera to impact or shock while an image is beingrecorded.� Trademark Information� IBM PC/AT is a registered trademark of International
Business Machines Corp. of the U.S.A.� iMac and Macintosh are registered trademarks of Apple
Computer, Inc.� Windows is a registered trademark of the Microsoft
Corporation of the U.S. registered in the U.S.A. and othercountries. Windows is an abbreviated term referring to theMicrosoft Windows Operating System.
� SmartMedia is a trademark of Toshiba Corporation.� Other company or product names are trademarks or
registered trademarks of the respective companies. � Explanation of Color Television SystemNTSC: National Television System Committee, color
television telecasting specifications adopted mainlyin the U.S.A., Canada and Japan.
PAL: Phase Alternation by Line, a color television systemadopted mainly by European countries and China.
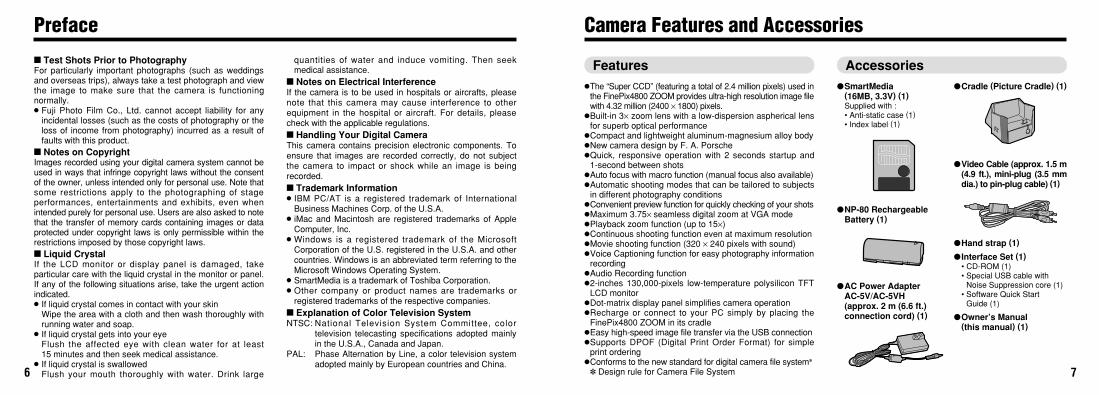
Camera Features and Accessories
Features Accessories�The “Super CCD” (featuring a total of 2.4 million pixels) used in
the FinePix4800 ZOOM provides ultra-high resolution image filewith 4.32 million (2400 × 1800) pixels.
�Built-in 3× zoom lens with a low-dispersion aspherical lensfor superb optical performance
�Compact and lightweight aluminum-magnesium alloy body�New camera design by F. A. Porsche�Quick, responsive operation with 2 seconds startup and
1-second between shots�Auto focus with macro function (manual focus also available)�Automatic shooting modes that can be tailored to subjects
in different photography conditions�Convenient preview function for quickly checking of your shots�Maximum 3.75× seamless digital zoom at VGA mode�Playback zoom function (up to 15×)�Continuous shooting function even at maximum resolution�Movie shooting function (320 × 240 pixels with sound)�Voice Captioning function for easy photography information
recording�Audio Recording function�2-inches 130,000-pixels low-temperature polysilicon TFT
LCD monitor�Dot-matrix display panel simplifies camera operation�Recharge or connect to your PC simply by placing the
FinePix4800 ZOOM in its cradle�Easy high-speed image file transfer via the USB connection�Supports DPOF (Digital Print Order Format) for simple
print ordering�Conforms to the new standard for digital camera file system✽
✽ Design rule for Camera File System
�SmartMedia (16MB, 3.3V) (1)Supplied with :• Anti-static case (1)• Index label (1)
�NP-80 RechargeableBattery (1)
�AC Power Adapter AC-5V/AC-5VH(approx. 2 m (6.6 ft.)connection cord) (1)
Preface
�Cradle (Picture Cradle) (1)
�Video Cable (approx. 1.5 m(4.9 ft.), mini-plug (3.5 mmdia.) to pin-plug cable) (1)
�Hand strap (1)
�Interface Set (1)• CD-ROM (1)• Special USB cable with
Noise Suppression core (1)• Software Quick Start
Guide (1)
�Owner’s Manual (this manual) (1)

98
Nomenclature ✽ Refer to the pages in parentheses for more details.
Viewfinder window
DIGITAL(USB)socket(P.101)
A/V OUT(audio/visual output)socket(P.41)
DC IN 5V(power input)socket(P.19)
Flash(P.52)Shutter button
Strap mount(P.15)
Flash control sensor
Microphone
Self - timer lamp(P.60)
Lens/Lens Cover
Viewfinder lamp(P.29)Mode dial (P.12)
OPEN(Flash pop-up)button(P.52)Viewfinder(P.27)
Power button(P.22)
Mode switch(P.12)
DISP button(P.25,33,34)
SmartMedia slot cover release button(P.20)
SmartMedia slot cover(P.20)
SmartMedia slot(P.20)
BACK button
Display panel(P.10)
Battery cover(P.17)
MENU/OK button
Tripod mount
LCD monitor
Speaker(P.95)
Cradle connection socket / Connection socket cover(P.18,102)
4-direction( )button

1110
Display Details
Mode Auto • Portrait • Scene • Night Scene • Black and White •Manual • Continuous shooting • Movie • Audio recording •
Option • Zoom • lSetting the file size and quality
4-direction button Up • Down • Left • Right
Zoom Telephoto • Wide-angle
Preview Zoom Zoom Up • Zoom Down
Flash Auto • Red-Eye Reduction • Forced Flash • Slow Synchro • Suppressed Flash
Macro ON • OFF
Manual Focus Moves the focus closer • Moves the focus further away
Mode Still images • Movie • Audio recording • Zoom/Trimming • Playback progress • Pause • Option
Frame Advance Previous image • Next image
Playback Zoom Zoom Up • Zoom Down
Movie Playback Play • Pause • Fast forward • Rewind • Stop • Movie frame advance
Audio recording/ Play • Pause • Fast forward • Rewind • Stop • Voice captioning Skip playback
1Ph
oto
grap
hy
2Playb
ack
4-direction buttonsetting display( )
4-direction buttonsetting display( )
4-direction buttonsetting display( )
4-direction buttonsetting display( )
Mode display
Number of remaining shots
Display PanelThe display panel uses icons to show the camera’s operation status as an aid to the camera user. Usethe 4-direction button as indicated by the displayed icons.
✽ The display panel can be used to check and modify camera settings such as the photography or playback mode,the number of available shots, the flash settings and the macro setting.
✽ The display panel glows orange for 5 seconds when you are taking pictures (except when you press the shutterbutton) and green for 5 seconds when you are playing back images or sounds.
Nomenclature

1312
Nomenclature
Movie (Video)(P.47)
Scene position(P.43)Audio recording(P.50)
Continuous shooting(P.46)
Manual(P.45)
Auto(P.25,43)
Mode switch
Mode dial
Example of Monitor Text Display: Shooting
Example of Monitor Text Display: Playback
Photography Mode(P.25)Mode switch(P.25,34)
Playback mode(P.34)POWER button(P.22)
Battery low warning
Macro
Self-timer
Manual focus
Auto bracketing
Number of remaining shotsCamera shake warning
AF warning
Battery low warning
Image quality
File size
AF frame
Photography Mode
Zoom bar
Date
Playback mode
Date
Playback frame number
Time
DPOF
Protection
Voice captioning

15
1
14
You can use the “SET–UP” screen on thiscamera to select ENGLISH or FRENCH as theLANGUAGE used for screen display (➡P.92).The screens in this manual are shown inENGLISH.
➀Pass the loop of this cord on the end of thestrap through the strap mount.
➁Then pass the other end of the strap throughthe loop of the thin cord and pull the straptight.
Nomenclature
Power lamp(P.105)
Power button(P.103)
Connection plug(P.18)
DC IN 5V(Power input)socket(P.16)
DIGITAL(USB)socket(P.101)
Cradle
� The Cradle �
1 Getting Ready PREFACE
The cradle is a powerful tool for expanding the functionality of your camera:�When you are not using the camera, you can place it in the cradle to charge the battery (➡P.18).�You can use the cradle's USB interface to quickly transfer image files to your PC (➡Card Reader
Mode on P.102).�Use the cradle for videoconferencing via the Internet (➡“PC-Camera Mode” on P.104).
�! You must connect the AC power adapter and the special USB cable provided in the USBInterface Set to the cradle (➡P.16, 101).
�➀ �➁Attaching the StrapSelecting the Language
�! Take care not to press on the lens cover when youare carrying the camera.

17
1
LOADING THE BATTERY
16
SETTING UP THE CRADLE
Arrowmark
➀ Hold the battery in, ➁ and close the batterycover.
2
�! Do not use excessive force to open the batterycover.
�! When replacing the battery, always switch thecamera off beforehand. If you open the battery coverwithout switching the camera off, the camerasettings may revert to the factory defaults.
�! See P.101 for information on connecting the cradleto your PC.
�! Problems arising from the use of products other thangenuine FUJIFILM products are not covered by yourwarranty.
➀Slide the battery cover out to open it.➁Insert the battery in the direction indicated by
the arrow “ ” on the battery.
Connect the AC-5V/AC-5VH AC Power Adapterto the cradle.
AC-5V : U.S.A. and Canada modelAC-5VH: other countries model
Plug the AC-5V/AC-5VH AC Power Adapter intothe main power outlet.
NP-80 rechargeable battery.
�! The battery is not fully charged at shipment. Youmust charge the battery before you use it.
�! See P.112 – 113 for more information on thebattery.
� Battery Type �
DC IN 5V socket
11 2
e
�➀ �➀�➁
�➁
�! The socket-outlet shall be installed near theequipment and shall be easily accessible.
�! The shape of the plug and socket-outlet depends onthe country of use.
Ensure that you push the AC power adapterplug into the socket.

DC IN 5V socket
19
1
USING THE AC POWER ADAPTER
18
CHARGING THE BATTERY
➀Open the connector cover on the bottom ofthe camera.
➁Check that the camera is switched off andthen place it in the cradle.
The self-timer lamp lights and battery chargingbegins. When charging is completed, the lightgoes off.
You can connect the AC-5V/AC-5VH AC PowerAdapter directly to the DC IN 5V socket on thecamera without using the cradle. The AC PowerAdapter is useful because it allows you to easilykeep the camera charged, thereby allowing youto take pictures and play back images withoutworrying about depleting the battery.
�Compatible AC power adaptersModel: AC-5V/AC-5VH (provided as an accessory
or sold separately)
21
�! Charging a fully depleted battery takes approximately5 hours.
�! Switching the cradle on during charging interruptsthe charging.
�! By using the optional Battery Charger BC-80, youcan reduce the charging time to approximately 70minutes (➡P.109).
�! Push the cradle connection plug firmly into thecamera socket.
�! Problems arising through the use of products otherthan genuine FUJIFILM products are not covered byyour warranty.
�! See P.114 for additional notes on the AC poweradapter.
�! The shape of the plug and socket-outlet depends onthe country of use.
Check that the camera is switched off. Plug theAC power adapter connector into the DC IN 5Vsocket on the camera and then plug the adapteritself into the main power outlet.
You do not need to press the power buttonon the cradle.
�➀ �➁
�! The socket-outlet shall be installed near theequipment and shall be easily accessible.

21
1
REMOVING THE SmartMedia™
20
LOADING THE SmartMedia™
1
Push the SmartMedia into the slot slightly andallow it to pop back out. It can then be pulled outeasily.
➀Check that the indicator in the viewfinder isgreen and then switch the camera off.
➁Release the SmartMedia cover lock as shownin the figure.
Never open the SmartMedia slot cover whilethe camera is switched on.This could destroythe image data or damage the SmartMediaitself.
�! See P.22 for information on switching the camera onand off.
2SmartMedia™
➀Check that the camera is switched off andopen the slot cover.
➁Push the SmartMedia firmly into the SmartMediaslot as far as it will go.
➂Close the slot cover.
�! If you open the slot cover while the camera isswitched on, the camera is automatically switchedoff to protect the SmartMedia.
�! The SmartMedia will not slide fully into the slot if it isinserted facing the wrong way. Be careful not toapply undue force to the SmartMedia.
� Only use 3.3V SmartMediaMG-4S ( 4MB), MG-16SW ( 16MB, ID)MG-8S ( 8MB), MG-32SW ( 32MB, ID)MG-16S (16MB), MG-64SW ( 64MB, ID)MG-32S (32MB), MG-128SW (128MB, ID)MG-64S (64MB)
�! Images cannot be recorded or erased if a write-protect sticker is affixed to the SmartMedia.
�! Operation of this camera is only guaranteed when itis used with FUJIFILM SmartMedia.
�! Some 3.3V SmartMedia are labelled as “3V” or “ID”cards.
�! See P.115 for more information on SmartMedia.
�➀ �➀
�➁
�➁�➂
� See P.85, 108 for information on printingimages.
� See P.101 – 108 for information on downloadingimages to a PC.
� Printing Images and Downloading Images to a PC �
�! To protect the SmartMedia, always store it in thespecial anti-static case.

23
1
SETTING THE DATE AND TIME
22
SWITCHING ON AND OFF
➀Press the “MENU/OK” button to display themenu screen.
➁Use “d”, “c”, “a” or “b” to select “SET–UP”from the “QOPTION” menu.
➂Press the “MENU/OK” button.
➀The “SET–UP” screen appears.Use “a” or “b” to select “DATE/TIME”.
➁Press “c”.
�! See P.92 for more information on the “QOPTION”menu.
�! If at least 3 hours have passed since the AC poweradapter was connected or the battery inserted anddate and time set, then those settings will bemaintained for roughly 1 hour even when the camerahas no power supply (when the AC power adapter isdisconnected and the battery is removed).
If the date was cleared and you selected “SETDATE/TIME”, proceed from step (➡P.24).3
2Blank
LCD Monitor Display Panel
Blinking red
Lit red Flashing
Lit white
Press the “< ” (power) button to switch thecamera on and off. When you switch the cameraon, the viewfinder lamp lights (green).If the date has been cleared, a confirmationmessage appears. To set the date, press the“MENU/OK” button (➡P.24).
1
� Auto Power Save Function �
You can check the remaining battery charge onthe LCD monitor by pressing the “DISP” buttonto switch the LCD monitor on.➀Battery has ample charge. (No indicator
displayed.)➁The battery is approximately half charged.➂Battery charge low. Replace or recharge the
battery as it will run out shortly.➃The battery is exhausted. The display will
shortly go blank and the camera will stopworking. Replace or recharge the battery.
�! The display panel icons ➀ and ➁ are only shown for2 seconds when the camera is switched on.
2
�! If you switch the camera on when the Mode switch isset to “1”, the lens cover opens and the lens movesout. For this reason, take care to avoid touching thelens when you switch the camera on.
1
When this function is enabled, the LCD monitorswitches off to conserve battery power if the camerais not used in any way for 30 seconds (See P.98 fordetails).
�➀�➀
�➁
�➁�➂

25
2
TAKING PICTURES (AUTO MODE)
24
SETTING THE DATE AND TIME
Loop the strap over your wrist, brace your elbowsfirmly against your body and hold the camerawith both hands.
➀Set the Mode switch to “1 ” ➁ Set thePhotography Mode dial to “5”. For viewfinderphotography (other than Macro mode), press the“DISP” button to switch the LCD monitor off.
�Photography range:Approx. 60 cm (2 ft.) to infinity
�! For subjects closer than 60 cm (2 ft.), use Macrophotography (➡P.56).
�! To minimize power consumption, you should use theviewfinder (switch the LCD monitor off) to take pictures.
�! Automatic flash mode is recommended for ordinaryphotography (➡P.53).
�! The image will be blurred if the camera moves whenyou take the picture (camera shake). When you areshooting in low-light conditions, use the flash (➡P.52) ora tripod to prevent blurred images due to camera shake.
1 2
➀Use the “d c” button to select the desireditem and then use the “a” and “b ” buttons tocorrect the setting.
➁When you have finished setting the date and time,press the “MENU/OK” button to confirm the setting.
The “SET–UP” screen reappears. Press the“MENU/OK” button to exit the settings screen.
�! If you hold down the “a” or “b” button, the numberschange continuously.
�! When the time displayed passes “12:00:00”, theAM/PM setting automatically switches.
�! To set the time precisely, press the “MENU/OK”button when the time is at zero seconds.
3 4
If the date was cleared and you selected“SET DATE/TIME”, the camera switches tophotography or playback mode withoutreturning to the “SET–UP” screen.
4
2 Basic Photography
�➀ �➀�➁ �➁
�! If “∞”, “–”or “§”isdisplayed, first wipe the contact surface on theSmartMedia (gold-colored area) thoroughly with asoft, dry cloth and then reload the SmartMedia. Insome cases, you may have to format theSmartMedia (➡P.78).

27
2
26
TAKING PICTURES (AUTO MODE)
Using the viewfinder or LCD monitor, frame yourshot so that the subject fills the entire AF (AutoFocus) frame.
�! If your subject is not in the center of the picture, useAF/AE lock to take the picture(➡P.31).
�! For dimly lit scenes where the subject is difficult to seein the LCD monitor, you should use the viewfinder.
When you are using the viewfinder to take apicture at a distance of 0.8 m to 1.5 m (2.6 ft. to4.8 ft.), only the shaded area in the figure isphotographed.
5 6
AF frame
AF frame
�! If the image on the LCD monitor is difficult to see,adjust the monitor brightness.
Be careful to ensure that the lens, microphoneand flash control sensor are not obscured byyour hands or the camera strap.
�! The camera may not be able to take successfulpictures if your fingers or the strap are in the way.
�! Check that the lens is clean. If it is dirty, clean thelens as described on P.111.
To zoom in on the subject, press “a” (0TELE).To zoom out, press “b” (-WIDE). A “zoom bar”appears on the LCD monitor when you zoom inor out.
�! Zooming stops briefly when the camera switchesbetween optical zoom and digital zoom (➡P.57).
�! Equivalent to a 3× optical zoom lens with a focal lengthof 36 mm – 108 mm on a 35 mm camera. When youswitch the camera on, the focal length is equivalant to44mm.
3 44
Zoom bar
LCD monitor
Viewfinder

29
2
28
TAKING PICTURES (AUTO MODE)
� Viewfinder Lamp Display ✽ When the LCD monitor is switched on, more detailed warning messagesare displayed (➡P.117).
�Very shiny subjects such as a mirror or car body.�Subjects photographed through glass.�Subjects that do not reflect well, such as hair or fur.�Subjects with no substance, such as smoke or flames.�When the subject is dark.
� Subjects Not Suitable for Autofocus �Press the shutter button down half way. Theimage is focused when the AF frame on the LCDmonitor becomes smaller and the shutter speedand aperture sett ing appear (the greenviewfinder lamp stops blinking and remains lit).
�! When you press the shutter button down halfway,the video image on the LCD monitor freezes briefly.However, this is not the image that is recorded.
�! If the shot is too dark to focus, try standing about 2 m(6.6 ft.) from your subject to take the picture.
7
To take the picture, press the shutter buttondown fully without lifting your finger off it. Thecamera beeps and takes the picture, and thedata is then recorded.
�! If you press the shutter button down fully in one motion,the shot is taken without the AF frame changing.
�! When you take a picture, the viewfinder lamp lights orange(camera not ready) before switching back to green toindicate that the camera is again ready for shooting.
�! The viewfinder lamp flashes orange while the flash ischarging.
�! Since the amount of image data recorded is not fixed andvaries depending on the subject (level of image detail,etc.), the number of available shots may not decreaseafter the image is recorded, or may decrease by 2.
�! See P.117 – 119 for information on the warningdisplays.
7Beep
8Display Status
Lit green Ready to shoot.
Blinking green AF/AE in progress or camera shake warning.
Blinking green andorange alternately
Recording to SmartMedia.
Lit orange Image being recorded onto the SmartMedia.
Blinking orange Flash charging. PC communication in progress
Blinking red�SmartMedia warning.
No SmartMedia loaded, SmartMedia not formatted,incorrect format, write-protect sticker used,SmartMedia full, SmartMedia error.
�Lens operation error.
All camera operations are possible.
All camera operations are possible.
Only zooming and picture taking arepossible.
No camera operations are possible.
No camera operations are possible.
No camera operations are possible.
Camera Operation
�When there is very little contrast between the subjectand the background (such as white walls or subjectsdressed in the same color as the background).
�When there are objects in front of or behind thesubject (such as an animal in a cage or a person infront of a tree).
�Subjects moving at high speed.
Though the FinePix4800 ZOOM uses an accurate autofocus mechanism, it may have difficulty focusing or not beable to focus at all for the types of subject and situation listed below. In such cases, the image may be out of focus.

Number of remaining shots
31
2
USING AF/AE LOCK
30
TAKING PICTURES (AUTO MODE)
In a shot with this type of composition, thesubjects (two people in this case) are not in theAF frame. If the shot is taken at this point, thesubjects will not be in focus.
Move the camera slightly so that one of thesubjects in the AF frame.
1 2
� AF/AE Lock �On the FinePix4800 ZOOM, when you press the shutter button down half way, the focus andexposure settings are fixed (AF/AE lock). If you want to focus on a subject that is off to one side ofthe image or if you want to set the exposure before you compose the final shot, lock the AF and AEsettings and then compose and shoot your picture to get the best results.
Number of Available Frames
� Standard number of shots per SmartMedia™The number of shots that can be recorded onto a SmartMedia card varies slightly depending on the type ofsubject. Also, the difference between the standard number of shots and the actual number of available shotsincreases for SmartMedia with a higher capacity.
✽ The numbers of available shots are shown for formatted SmartMedia.
Quality Mode
Image DataSizeMG-4S (4MB)
MG-8S (8MB)
MG-16S/SW (16MB)
MG-32S/SW (32MB)
6
12
25
50
12
25
49
99
44
89
163
330
Approx.1700KB
Approx.810KB
Approx.620KB
Approx.320KB
Approx.90KB
FINE NORMAL
MG-64S/SW (64MB)
MG-128SW (128MB)
36
74
18
8
4
2
77
156
38
19
9
4
101
204
198
398
663
1330
File Size G 2400 × 1800 K 640 × 480
FINE NORMAL NORMAL
11
23
46
94
4
10
20
41
9
19
39
79
Approx.330KB
Approx.770KB
Approx.390KB
189
379
82
166
159
319
H 1600 × 1200 J 1280 × 960
BASIC FINE NORMAL
The number of available shots is displayed onthe LCD monitor or display panel.
�! See P.94 for information on changing the File sizeand Quality setting.
�! At shipment, the default settings are “1M” (file size)and “NORMAL” (quality).

LCD monitor ON
Framing Guideline displayed
LCD monitor OFF
33
2
FRAMING GUIDELINE FUNCTION
32
USING AF/AE LOCK
The photography mode can be set to “5 •4 •3 or 6”. The mode shown on the LCDmonitor switches each time you press the “DISP”button. Press the “DISP” button to display theframing guideline.
�! The framing guideline is not recorded on the image.�! The lines in the scene frame roughly divide the
recorded pixels into three equal parts horizontally andvertically. When the image is printed, the resultingprint may be shifted slightly from the scene frame.
Keep holding the shutter button down halfway(AF/AE lock). Check that the AF frame on theLCD monitor shrinks and that the shutter speedand aperture setting are displayed (the viewfinderlamp (green) changes from blinking to steady).
Continue to hold the shutter button down halfway.Move the camera back to the original image andthen fully press down on the shutter button.
�! You can reapply the AF/AE lock as many times asyou like before releasing the shutter.
�! The AF/AE lock operates in all photography modesand can be used to ensure excellent results.
3 Beep4 Scene
Use this frame when you want to position yourmain subject in the center of the frame or whenyou want to align your shot with the horizon.This feature allows you to compose a shot thatcaptures the moment while focusing on thesubject size and the overall balance of the shot.
Always use the AF/AE lock to compose yourpicture.Failing to use the AF/AE lock may result inthe image being out of focus.
� Important �

Normal playback
Multi-frame playback
No text displayed
35
2
FAST FORWARDING IMAGES
34
VIEWING YOUR IMAGES (PLAYBACK)
1
You can fast forward through the frames byholding down “d ” or “c ” button for about 1 second during playback.
During fast forward, 3 frames are showntogether in miniature on the monitor. When youstop fast forward, the image enclosed in thecursor (the orange box) is displayed on themonitor as a single image.
�! A progress bar is displayed to show the approximateplayback position on the SmartMedia.
22
You can use “d” and “c” button to move forwardand backward respectively through your images.The monitor display changes each time youpress the “DISP” button.
�! If image on the monitor is difficult to see, adjust themonitor brightness (➡P.93, 95).
Set the Mode switch to “2”.
�! When you set the Mode switch to “2 ”, the lastimage shot is displayed.
011
You can use this camera to view (excluding some uncompressed data) images recorded on anFinePix4800 ZOOM or images recorded onto a 3.3V SmartMedia using a FUJIFILM FinePix series,MX series and DX series digital camera.
� Images That Can be Viewed on the FinePix4800 ZOOM �

37
2
36
PLAYBACK ZOOM
Pressing the “a” or “b ” button during single-frameplayback zooms in (enlarges) or out on a still image.When you use this function, a zoom bar is displayed.�Zoom scales:G 2400 × 1800 pixel images: Approx. 15×(Max)H 1600 × 1200 pixel images: Approx. 10×(Max)J 1280 × 960 pixel images: Approx. 8×(Max)K 640 × 480 pixel images: Approx. 4×(Max)
After you have zoomed in on your image,➀Press the “DISP” button.➁Use the “ab” and “dc” buttons to zoom in on
different parts of the image.➂Press the “DISP” button again to revert to
zoomed display.
After using playback zoom, press the “MENU/OK”button to trim the image.
Check the size of the image being saved andthen press the “MENU/OK” button. The trimmedimage is saved as a separate file.
�! Pressing the “d” or “c” button during zoomingcancels zooming and moves to the next image.
�! Press the “BACK” button to return to normal unscaleddisplay.
1 2
Zoom bar
Saving Trimmed Images
12
The size of the saved image variesdepending on the zoom scale. In VGA mode,“ ” is displayed in yellow. Atresolutions below VGA, “ ” isno longer displayed.
�Image Sizes
H Best for printsJ Good for prints
K“ ” is displayed in yellowsince the quality is too low for printing.
�➀ �➁�➂
�! Lower than K : “ ” is no longerdisplayed and images cannot be saved trimmed as thequality is not suitable for printing.

Normal playback
Multi-frame playback
No text displayed
39
2
ERASING SINGLE FRAME
38
MULTI-FRAME PLAYBACK
➀Set the Mode switch to “2”.➁Press the “MENU/OK” button to display the
Menu screen on the monitor.
Select “FRAME” in the “{ERASE” menu andpress the “MENU/OK” button.
�! See P.78 for more information on Erasing all framesand Formating.
�! Multi-frame playback (➡P.38) is an easy way toselect images to be protected.
1 2
�! Multi-frame playback is also useful for specifyingerase, protect and DPOF settings for single framesand for selecting images when you want to check orcancel DPOF settings.
�! The LCD monitor text display disappears afterapproximately 3 seconds.
�! Playback zoom cannot be used with multi-frameplayback.
In playback mode, the display shown on theLCD monitor switches each time you press the“DISP” button. Press the “DISP” button until themulti-frame playback screen (9 frames) appears.
➀Select a frame by using “d”, “c”, “a” and “b”button to move the cursor (the orange box) tothe desired frame. Press the “a” or “b” buttonseveral times to switch to the previous page orthe next page.
➁You can enlarge the selected image bypressing the “DISP” button again.
1 2 �➀�➀ �➁�➁

41
2
USING A TV MONITOR
40
ERASING SINGLE FRAME
Switch off the camera and TV. Plug the A/Vcable (accessory) into the A/V OUT (audio-visualoutput) socket on the camera.
Plug the other end of the cable into theaudio/video input socket on the TV. Then switchthe camera and TV on and take pictures or playback images as you would normally.
�! If you connect the A/V cable during playback, youwill not hear the sound from the camera.
�! The image continues to be displayed on the LCDmonitor.
�! If you disconnect or reconnect the A/V cable whilethe power is switched on, the sound may not beoutput correctly.
�! If there is a power outlet available, connect the AC-5V/AC-5VH AC Power Adapter.
�! If your TV has stereo audio input sockets, plug thecable into the left (white) socket.
�! Refer to the instructions provided with your TV formore information on audio and A/V input for your TV.
A/V OUT socket
Video(yellow)
Audio(white)
To terminals
1 24
Press the “d” or “c” button to display the imageto be erased.
Press the “MENU/OK” button to erase thedisplayed image. When erasing is complete, thenext image appears and the “™” messageis displayed.
�! To cancel single-frame erase, press the “BACK”button to return to the menu. To exit the menu screen,press the “BACK” button again.
�! If “¡” is displayed, the image protectionmust be removed to erase the image (➡P.81).
�! If the “º” message is displayed,DPOF is specified. When you press the “MENU/OK”button, the image is erased and the DPOF settingsare updated.
3
To continue erasing images, repeat theprocedure from step .3

43
3
42
ADVANCED FEATURES PHOTOGRAPHY
Turn the Mode dial to set the mode.
This is the simplest mode for taking pictures andcan be used in a wide range of situations.
➀Press the “MENU/OK” button to display themenu.
➁Use “a ”, “b ”, “d ” or “c ” to select thephotography mode from the “Y SCENEPOSITION” menu.
➂Press the “MENU/OK” button to confirm yourselection.
5 Auto
This setting provides modes tailored to the typeof scene photographed.In “4” (Scene Position) mode, you can choosefrom 4 types of scene: r • t • y or o.
4 Scene Position
Selecting the 4 photography modeThe Advanced Photography section introduces a range of camera functions that you can access bysetting the Mode switch to “1”.� Photography mode specifications
✽ You cannot change the flash and macro settings when you are using manual focus.
Scene position
5Auto (➡P.43) U Self-timer (➡P.59)D Voice captioning (➡P.61)
Photography mode Accessible menu settings Factorydefault
OFFOFF
4Scene Position (➡P.43)Y Scene position (➡P.43)U Self-timer (➡P.59)W Manual focus (Nighttime
shots only) (➡P.65)
U Self-timer (➡P.59)EWhite barance (➡P.64)R Sensitivity (➡P.65)W Manual focus (➡P.65)S Sharpness (➡P.66)P Flash (➡P.67)T EV (➡P.67)A Multi-exposure (➡P.68)I Photometry (➡P.70)
rOFFOFF
OFFAUTO125OFF
NORMAL00
OFFMULTI
— —
r Portrait (➡P.44)tScene (➡P.44)y Night Scene (➡P.44)oBlack and White (➡P.44)
w Manual (➡P.45)
u Movie (Video) (➡P.47)
Macrophotography
(➡P.56)
Flashphotography
(➡P.52)
A7, \, 7, S7
— —
A7, \, 7, S7—
\, 7A7, \, 7, S7
A7, \, 7, S7
—
Shared menusettings
QOPTION✽See P.93 for
more infor-mation oneach of thesettings.
— —i Audio Recording (➡P.50) — —
U Self-timer (➡P.59)W Manual focus (➡P.65)| Auto bracketing (➡P.63)
OFFOFFOFF
e Continuous Shooting(➡P.46) —
3Advanced FeaturesPhotography
�➀ �➁�➂
5 AUTO/4 SCENE POSITIONPHOTOGRAPHY MODE

45
3
44
Manual mode allows you to specify your owncombinations of photography settings.
Turn the Mode dial to set the mode. Press the “MENU/OK” button to display the menu.See P.58 – 70 for details of the photographymenu.
�! The factory default settings for “3 MANUAL” areshown on P.42.To revert to the factory default settings, use “RESETALL”. (➡P.92)
2
3 Manual
1Use this mode for shots of people. Portrait modeprovides soft-tone images with natural skincolors.
�Usable Flash ModesAuto Flash, Red-Eye Reduction, Forced Flash,Slow Synchro
Use this mode for shots taken in the evening orat night. Night Scene mode gives priority toslower shutter speeds.
�ShutterSlow shutter speed mode with speeds as slowas 3 seconds.
�Usable Flash ModesRed-Eye Reduction, Forced Flash
Use this mode for daytime shots of scenery.Landscape mode provides crisp, clear shots ofbuildings, mountains and other scenery.
�Usable Flash ModesThe Flash mode is automatically set toSuppressed Flash. This setting cannot bechanged.
You can use this option to shoot in black andwhite regardless of the type of scene.
�Usable Flash ModesAuto flash, Red-Eye Reduction, Forced Flash,Slow Synchro
y Night Scene
t Scene (Landscape)
r Portrait
w MANUALPHOTOGRAPHY MODE
o Black and white
With the exception of o Black and Whitemode, the Macro setting cannot be selected.
r PORTRAIT •t SCENE •yNIGHT SCENE •oBLACK AND WHITEPHOTOGRAPHY MODE

Total recording time
47
3
u MOVIE (VIDEO)PHOTOGRAPHY MODE
46
�! Because the audio is recorded as you shoot, take carenot to cover the microphone with your finger (➡P.8).
�! The shooting time per shot may be shorter than 80seconds depending on the available space on theSmartMedia.
�! You can not switch the LCD monitor off in this mode.�! You may not be able to play back your movie on
cameras other than the FinePix4800 ZOOM.
The available shooting time and the “£”message are shown on the LCD monitor.
Turn the Mode dial to select the settings.
1
� SmartMedia standard shooting time
✽ The total recording time are shown for newly formattedSmartMedia.
Use this mode to shoot up to 80 seconds of videoper movie.�Movie format: Motion JPEG (➡P.126)
320 × 240 pixels10 frames per secondWith sound
8 Movie (Video)
2
�! You cannot use the flash in this mode.�! The continuous photography speed is the same
regardless of the quality and file size settings.�! The focus and exposure are determined for the first
frame and cannot be changed during shooting.�! The “®” message is displayed while data is
being recorded onto the SmartMedia.�! The time required to record a file is approximately
7 seconds in “G • NORMAL” mode.
Turn the Mode dial to set the mode. A “pPREVIEW” screen is always shown whenyou take pictures in this mode. The images arearranged from left to right in the order they weretaken. To record the images, press the“MENU/OK” button. To not record the images,press the “BACK” button. You can also select the image to be recorded.See P.97 for details.
In this mode, the camera shoots up to 3 continuousframes at intervals as short as 0.2 seconds.
6 Continuous Shooting
SmartMedia Capacity
MG-4S (4MB) Approx. 23 sec.MG-8S (8MB) Approx. 47 sec.MG-16S (16MB) Approx. 94 sec.MG-32S (32MB) Approx. 191 sec.MG-64S (64MB) Approx. 385 sec.MG-128S (128MB) Approx. 774 sec.
6 CONTINUOUS SHOOTINGPHOTOGRAPHY MODE
Auto bracketing can be used in this mode (➡ P.63).
1 2

49
3
48
u MOVIE (VIDEO)PHOTOGRAPHY MODE
In Movie mode, the lens is locked at the wide-angle setting and only the digital zoom can beused. You can use “a” and “b” to zoom in andout. A “zoom bar” is displayed on the LCDmonitor.
�Digital zoom focal distanceApprox. 36 mm to 67.5 mm (1.4 in. to 2.7 in.)(Approx. 1.875×)
�! You do not need to hold down the shutter button.�! The focus is fixed at 50 cm (1.6 ft.) to infinity.�! The focus and white balance are fixed during
shooting, but the exposure varies automatically tosuit the scene being shot.
Shooting begins when you fully depress theshutter button.
43
The white balance is automatically set whenyou fully depress the shutter button.
�! Once the remaining time runs out, movie recordingautomatically stops and the movie is stored on theSmartMedia.
During shooting, a timer in the top-right corner ofthe LCD monitor counts down the remainingtime.
�! The time required to record a 80 seconds movie(roughly 12 MB) is approximately 11 seconds.
�! If you end shooting immediately after you startshooting, only 3 seconds of movie is shot.
If you press the shutter button during shooting,shooting ends and the movie is recorded on theSmartMedia.
5 6
Zoom bar

51
3
50
i AUDIO RECORDINGPHOTOGRAPHY MODE
Turn the Mode dial to set the mode. The available audio recording time is shown inthe top-right corner of the LCD monitor, while theelapsed recording t ime and the “£ ”message are shown in the center of the LCDmonitor.
➀Fully depressing the shutter button startsaudio recording.
➁During audio recording, the self-timer lampblinks and counters on the LCD monitor showthe elapsed and remaining time.
Press the shutter button during audio recordingto stop recording.
1 2
Use this mode to record up to 30 minutes of soundper audio recording.
�Recording format: WAVE (➡P.126)
9 Audio Recording
�! Take care not to block the microphone (➡P.8) withyour fingers, etc.
�! The maximum length of the audio recording may beshorter than 30 minutes depending on the availablespace on the SmartMedia.
�! You do not need to hold down the shutter button.�! Once the remaining time runs out, audio recording
automatically stops.
�! Even if you press the shutter button to end audiorecording immediately after recording starts,approximately 3 seconds of sound will be recorded.
� Standard audio recording times for SmartMedia
✽ These total recording times are for newly formattedSmartMedia.
3 4 STOPPED
To prevent the lens from remaining extended,select this mode before switching the cameraoff.
Elapsed timeRemaining time
SmartMedia capacity Total recording time
MG-4S (4MB) Approx. 8 min.MG-8S (8MB) Approx. 16 min.MG-16S (16MB) Approx. 33 min.MG-32S (32MB) Approx. 67 min.MG-64S (64MB) Approx. 135 min.MG-128S (128MB) Approx. 272 min.
RECORDING �➀
�➁

53
3
52
FLASH PHOTOGRAPHY
\ Red-Eye ReductionUse this mode to ensure that the subject’s eyesappear natural when photographing people inlow-light conditions.The flash fires a pre-flash just before the pictureis taken and then fires again to take the actualpicture.
Use this mode for ordinary photography. Theflash fires automatically as required by theshooting conditions.
A7 Auto Flash Mode
� Red-Eye Effect �
1
Press the “7OPEN” button to pop up the flash.
�Effective flash range (for “5”)Wide-angle: Approx. 0.2 m to 3.5 m
(0.6 ft. to 11.5 ft.)Telephoto : Approx. 0.2 m to 2 m
(0.6 ft. to 6.6 ft.)
�! Take care not to push down the pop-up flash whenyou hold the camera.
�! If the photography mode is “5”, use the AutoFlash mode.
�! When you pop the flash up, the image shown on thescreen may disappear and the screen may go darkbecause the flash is charging. In this event, theviewfinder lamp flashes orange.
�! The available flash settings are limited depending onthe photography mode (➡P.42).
�! The flash setting cannot be changed while you areusing manual focus (➡P.65).
Press “c” to select the flash setting. The flashsetting changes (A7 • \ • 7 • S7) each timeyou press “c”.
2
When you use the flash to photograph people in low-light conditions, their eyes sometimes appearred in the picture. This is caused by the light of the flash reflecting off the inside of the eye. UseRed-Eye Reduction flash to effectively minimize the likelihood of the red-eye effect.Take the following measures to make Red-Eye Reduction more effective :
� Get the subjects to look at the camera. � Get as close as possible to the subjects.

55
3
54
FLASH PHOTOGRAPHY
] Suppressed FlashPressing the flash down switches the camera toSuppressed Flash mode.Use this mode for photography using indoorlighting, for shots taken through glass, and forphotography in venues such as theaters or atindoor sporting events where the distance is toogreat for the flash to be effective. When you useSuppressed Flash, the Auto White Balancefunction (➡P.126) operates so that natural colorsare captured along with the ambience of theavailable light.�! If you are shooting in Suppressed Flash mode in dark
conditions, use a tripod to prevent camera shake.�! See P.29, 118 for information on the camera shake
warning.
Close the flash to switch to Suppressed Flashmode. The “]” icon appears on the displaypanel and you cannot use the flash.
� In the modes shown below, the “]” icon is notdisplayed but the flash still cannot be used.t Scene (Landscape) (➡P.44)u Movie (Video) (➡P.47)e Continuous shooting (➡P.46)
7 Forced FlashUse this flash mode to photograph backlitscenes, such as a subject against a window orin the shade of a tree, or to obtain the correctcolors when you are shooting under lightingsuch as fluorescent tubes. In this mode, theflash fires in bright as well as dark conditions.
This is a flash mode that uses a slow shutterspeed. This allows you to take pictures of peopleat night that clearly show both your subjects andthe nighttime backdrop.
S7 Slow Synchro
�! The image may be overexposed when you shootbright scenes.
�! Because a slow shutter speed is used, a tripodshould be used to prevent camera shake.
To take a picture of a main subject with nightscene in background, please use the “y”(Night Scene) settings (➡P.44) in “4 ”mode.

57
3
DIGITAL ZOOM
56
a MACRO (CLOSE-UP) PHOTOGRAPHY
You can use the digital zoom function for allResolution (File Size) settings other than “G”.Note that the digital zoom only functions whenyou use the LCD monitor to take shots.
�To use the digital zoomUse the optical zoom to zoom in fully (telephoto)and then press the “a0 ” button again.
�To revert to optical zoomUse the digital zoom to zoom out fully (wide-angle) and then press the “b- ” button again.
�! You cannot use the digital zoom for resolutions of“G”.
�! When you use the digital zoom, the image on theLCD monitor no longer changes smoothly.
�! See P.94 for information on changing the file sizesetting.
A “zoom bar” appears on the screen. If the imageon the screen is difficult to make out, press theshutter button down halfway.
�Digital zoom focal lengths (35 mm cameraequivalent)H : Equivalent to approx. 108 mm – 162 mm
(Approx. 1.5×)J : Equivalent to approx. 108 mm – 203 mm
(Approx. 1.88×)K : Equivalent to approx. 108 mm – 405 mm
(Approx. 3.75×)Movie: Equivalent to approx. 36 mm – 67.5 mm
(Approx. 1.875×)
Optical zoom
Digital zoom
Zoom bar display
21This mode can be selected in the “5 •o •eand w” photography modes.Selecting Macro mode allows you to take close-up shots.
�Effective Photography Range:Approx. 20 cm – 80 cm (0.6 ft. – 2.6 ft.).
�! The macro setting cannot be changed while you areusing manual focus (➡P.65).
�! Select the appropriate Flash mode for the conditions(➡P.52).
�! If the flash is too bright, adjust the flash brightness(➡P.67).
�! When shooting in dark conditions, use a tripod toprevent camera shake.
�! The LCD monitor automatically switches on.�! Macro photography is automatically cancelled in the
following situations:• When the photography mode is switched to “4•u”.• When the camera is switched off.
The setting switches between “/MACRO OFF”and “a” each time you press “d”.The “a” icon appears on the display panel andthe LCD monitor when you are using Macro mode.If you use the viewfinder to take a picture in
Macro mode, the field visible through theviewfinder does not match the field actuallyphotographed because the viewfinder andlens are in different positions. Accordingly,you should use the LCD monitor to takepictures in Macro mode. �! The optical zoom is equivalent to approximately
36 mm – 108 mm on a 35 mm camera.

59
3
SELF-TIMER PHOTOGRAPHYPHOTOGRAPHY MENU
58
PHOTOGRAPHY MENU OPERATIONPHOTOGRAPHY MENU
Beep1
This mode can be selected in the “5 •4 •3 • and 6” photography modes.In this mode a timer runs for roughly 10 secondsbefore the shutter is released. Use this mode forshots such as photographs of yourself.
Position the AF frame over the subject and pressthe shutter button. The camera focuses on thesubject in the frame and the self-timer starts torun.
�! You can also use the AF/AE lock (➡P.31).�! Be careful not to stand in front of the camera when
you press the shutter button as this can causefocusing or light metering errors.
2
➀Press the “MENU/OK” button to display themenu.
➁Use “d” and “c” to select the menu item and“a” and “b” to change the setting.
➂Press the “MENU/OK” button to confirm thesetting.
In “wMANUAL” mode, you need to switchbetween menus.Use the page numbers on the right-hand side ofthe LCD monitor to jump to another page.
�! The settings available in the menu screen differdepending on the photography mode. See P.42 fordetails.
Switching Pages
� Photography MenuPage Setting
1 U •E •R •Q2 W •S •P •T3 A •I
�➀ �➁�➂

61
3
60
SELF-TIMER PHOTOGRAPHYPHOTOGRAPHY MENU
3 4
The self-timer lamp lights steadily for roughly 5seconds and then blinks for another 5 seconds,after which the shot is taken.
The time until the shutter releases is shown as acountdown bar on the LCD monitor and displaypanel.Self-timer mode is automatically cancelled aftereach shot.
�! To stop the self-timer, once it has started running,press the “BACK” button.
�! The self-timer is not cancelled for multi-exposureshots.
�! You can check the countdown on the display panelwhen the LCD monitor is switched off.
�! The sound recording time may be shorter than 30 seconds depending on the available space on theSmartMedia.
�! Even if the LCD monitor is switched off, itautomatically switches on when you take a pictureusing the voice captioning function. The LCD monitorswitches off again when audio recording ends.
�! If you do not want to record a voice captioning, pressthe “BACK” button. Note that the image will still berecorded.
This function can be selected in the “5 ”photography mode.Voice captioning allows you to record a voicecaptioning (comment) up to 30 seconds long foran image immediately after you take the shot.
�Recording format: WAVE (➡P.126)Audio file size: Approx. 240 KB
(for a 30 seconds voice captioning)
Take a picture as normal. The “¶ ”message then appears on the LCD monitor.
21
D VOICE CAPTIONINGPHOTOGRAPHY MENU

63
3
A preview screen appears when you take apicture. A is correctly exposed, B is overexposedand C is underexposed. To record the images,press the “MENU/OK” button. To proceed withoutrecording the images, press the “BACK” button. You can also select the image to be recorded.See P.97 for details.
�! Flash photography cannot be used.�! This feature always takes 3 shots. However, if there
is insufficient space on the SmartMedia for 3 shots,no picture will be taken.
This mode can be selected in the “6” photographymode.Use this feature to photograph the same imagewith different exposure settings. Auto bracketingautomatically shoots 3 consecutive frames, oneof which is correctly exposed while the remainingtwo are underexposed and overexposedrespectively by a set amount.�The three available settings are ±1/3, ±2/3 and
±1 EV. See P.126 for a definition of EV.
�! The “®” message appears on the LCD monitorwhile the images are being recorded onto theSmartMedia.
�! The time required to record a file is approximately 7seconds in “G • NORMAL” mode.62
➀Press the “MENU/OK” button to start recordingthe voice captioning.
➁During audio recording, the remaining time isshown on the LCD monitor and the self-timerlamp blinks.
3
Face the microphone (➡P.8) on the front ofthe camera to record your comment. Hold thecamera roughly 20 cm (7.8 in.) away for thebest results.
When you have recorded 30 seconds of sound, the“≠” message appears on the LCD monitor.
To finish: Press the “MENU/OK” button.To re-record your comment: Press the “BACK”
button.
4
�! To end your comment during recording, press the“MENU/OK” button.
�➀
�➁
| AUTO BRACKETINGPHOTOGRAPHY MENUD VOICE CAPTIONINGPHOTOGRAPHY MODE

65
3
64
This mode can be selected in the “w ”photography mode.Use this setting when you want to take brightpictures indoors without using a flash or whenyou want to use a fast shutter speed (to preventcamera shake, etc.).
�Settings: 125 (standard), 200, 400
This function can be selected in the “y • 3”and “e” photography modes. When the cameracannot focus in AF mode, use this mode to setthe focus and take the picture.When you select this mode, the “f” icon appearson the LCD monitor.
1AUTO: Automatic adjustment(Shooting to show the ambience of thelight source)
z : Shooting outdoors in fine weather
x : Shooting in shade
c : Shooting under “Daylight” fluorescentlamps
v : Shooting under “Warm White” fluorescentlamps
b : Shooting under “Cool White” fluorescentlamps
n : Shooting in incandescent light
✽ The white balance setting (unless it is a CustomWhite Balance setting) is ignored when you use theflash. To achieve the desired effect in your shot,press the flash back down to suppress flashoperation (➡P.55).
This mode can be selected in the “3 ”photography mode.Change the white balance setting when youwant to take a picture with the white balancefixed for the surroundings and lighting conditionspicture is taken.In Auto mode, the correct white balance may notbe obtained for subjects such as close-ups ofpeople’s faces and shots taken under a speciallight source. In such situations, select the correctwhite balance for the light source. See P.126 formore information on the white balance.
E WHITE BALANCEPHOTOGRAPHY MENU R SENSITIVITYPHOTOGRAPHY MENU W MANUAL FOCUSPHOTOGRAPHY MENU

67
3
TEV (EXPOSURE COMPENSATION)
66
This mode can be selected in the “3 ”photography mode.Use this setting when you cannot obtain thecorrect brightness, such as when the flash doesnot reach the subject (is too faint) or when youare using the flash for a close-up shot.
�Correction range: 5 steps(–0.6 EV to +0.6 EV in 0.3 EV increments)See P.126 for more information on EV.
This mode can be selected in the “3 ”photography mode.Use the Brightness setting to obtain the optimumimage brightness (exposure) when the subject ismuch brighter or darker than the background.
�Correction range: 11 steps (–1.5 EV to +1.5 EV in 0.3 EV increments). See P.126 for a information on EV.
�! The Brightness setting is disabled in the followingsituations:• When the flash is used in Auto or Red-Eye Reduction
mode.• When dark scenes are shot in Forced Flash mode.
This mode can be selected in the “3 ”photography mode.Use this setting to soften or emphasize outlinesor to adjust the image quality.
�Three levels of sharpness are availableHARD : Emphasizes the outlines.
Best for shots of subjects such asbuildings or text where you wantsharp images.
NORMAL : Best for ordinary photography.Provides edge sharpness that isideal for ordinary shots.
SOFT : Softens the outlines.Best for shots of subjects such aspeople, where a softer image isdesirable.
�! Because the macro and flash settings cannot bechanged once manual focus is set to “ON”, set themacro (➡P.56) and flash (➡P.52) settings beforehand.
FarNear
Press “d” ( ) to focus on a near subject and“c” ( ) to focus on a far subject. Use the LCDmonitor to check the focus.
2
W MANUAL FOCUSPHOTOGRAPHY MENU S SHARPNESSPHOTOGRAPHY MENU PFLASH (FLASH BRIGHTNESS ADJUSTMENT)PHOTOGRAPHY MENU PHOTOGRAPHY MENU
TEV (EXPOSURE COMPENSATION)

69
3
68
➀A “pPREVIEW” screen appears when youtake a picture.
➁Press “c” to move to the next image frame.
1
When you take the next (multi-exposure) shot,the images are overlaid and displayed in thepreview screen.
�To overlay more images: Press “c”.�To record the current image: Press “MENU/OK”.�To return to the previous image: Press “d”.�To stop without recording any images:
Press “BACK”.
2
� Copying of printed text (black characterson white paper) (+1.5 EV)
� Backlit portraits (+0.6 EV to +1.5 EV)� Very bright scenes (such as snowfields)
and highly reflective subjects (+0.9 EV)� Shots made up predominantly of sky.
(+0.9 EV)
� Spotlit subjects, particularly against darkbackgrounds (–0.6 EV)
� Copying of printed text (white characterson black paper) (–0.6 EV)
� Scenes with low reflectivity, such as shotsof pine trees or dark foliage (–0.6 EV)
This mode can be selected in the “3 ”photography mode.“MULTI-EXP (multi-exposure)” provides a way ofoverlaying photographed images on top of eachother to give a final image that cannot beobtained through normal photography.
Guide to using + (positive) compensation
�! If the photographed image is overexposed, usenegative compensation in the EV (exposurecompensation) setting to correct the negativecompensation.
�! Only the optical zoom can be used for multi-exposure shots. The digital zoom (➡P.57) does notfunction.
There is no limit on the number of timesmulti-exposure can be used.
Guide to using – (negative) compensation
� Subjects for Which Exposure Adjustment is Particularly Effective � �➀
�➁
A MULTI-EXPPHOTOGRAPHY MENU
�! Exposure compensation is disabled in the followingsituations :• When the flash is used in Auto or Red-eye Reduction
mode.• When Forced Flash mode is used and the scene
photographed is dark.�! A preview image is always shown, regardless of the
photographed image display setting.
TEV (EXPOSURE COMPENSATION)PHOTOGRAPHY MENU
TEV (EXPOSURE COMPENSATION)

DC IN 5V socket
71
4
ADVANCED PLAYBACK
70
The Advanced Playback section introduces a range of playback functions that you can access bysetting the Mode switch to “2”.
� Playback mode menu
If you are close to a power outlet, you should use theAC Power Adapter AC-5V/AC-5VH (provided as anaccessory or sold separately) to avoid any loss ofpower during still image or movie playback (➡P.19).
{ ERASE (P.78)} PLAYBACK (P.80)O PROTECT (P.81)F DPOF (P.85)Q OPTION (P.92)
{ ERASE (P.78)} PLAYBACK (P.80)O PROTECT (P.81)
—Q OPTION (P.92)
{ ERASE (P.78)—
O PROTECT (P.81)—
Q OPTION (P.92)
Available playbackmenu settings
File to be Played Back Still Images Movies Audio
4 Advanced Features Playback
�! The camera is fixed in Multi mode when e •5 •4 or 8 is selected.
�AVERAGEThe advantage of this mode is that theexposure tends not to change for differentcompositions or subjects. This mode isparticularly effective for shots of peoplewearing black or white clothing and shots ofscenery.
�SPOTThis mode is useful for subjects withstrongly contrasting light and dark areaswhere you want to achieve the correctexposure for a particular feature.
�MULTIIn this mode, the camera uses automaticscene recognition to analyze the subjectand provide optimum exposure in a widerange of shooting conditions. This modeshould be used for everyday photography.
This mode can be selected in the “3 ”photography mode.Use this mode for scenes where the brightnessof the subject and background differ markedly sothat the Multi setting is unlikely to achieve thedesired result.
�AVERAGE: Light metering where an averagevalue for the entire image is used.
�SPOT : Light metering where the exposureis optimized for the center of theimage.
�MULTI : Light metering where the cameraautomatically assesses the sceneand selects the optimum exposure.
� The light metering modes are effective for the following subjects �
I PHOTOMETRYPHOTOGRAPHY MENU

73
4
72
MOVIE (VIDEO)
� Compatible Movie Files �The FinePix4800 ZOOM can play back movie files shot on an FinePix4800 ZOOM and movie filesrecorded on a 3.3V SmartMedia using a FUJIFILM digital camera. If you attempt to play back a movie thatis longer than 80 seconds, the “•” message appears and playback fails.
� Playing back movies
The movie automatically stops when playback ends.Playback
Control Description
Pauses the movie during playback. Press this button againto resume playback.Pause/Resume
Stops playback.Stop
Press these during playback to skip forwards or backwardsthrough the movie.Fast forward/Rewind
• Each time you press “d” or “c” when the movie is paused,the movie advances or goes back one frame.
• Hold down the button to move through the frames quickly.Skip playback
When paused
2
➀Press “b” to play the movie.➁The LCD monitor shows the playback time
and a playback progress bar.
�! Take care not to block the speaker.�! If the sound is difficult to hear, adjust the volume
(➡P.93, 95). �! If the subject of the movie is very bright, white
streaks may appear on the image during playback.This is normal and is not a fault.
�! Movies cannot be played back using multi-frameplayback. Use the “DISP” button to revert to normalplayback.
1
Use “d” or “c” to select the movie file.
Movies are displayed somewhat smaller thanstill images.
�➀
�➁
✽ See P.102 for information on playing back movies on your PC.
Rewind Forward

75
4
74
PLAYING BACK AUDIO RECORDINGS� Playing Back Audio Recordings
The audio recording automatically stops when playback ends.Playback
Control Description
Pauses the movie during playback. Press this button againto resume playback.Pause/Resume
Stops playback.Stop
• Press these during playback to skip forwards or backwardsthrough the audio recording.
• Hold down the button to advance or rewind quickly.Fast forward/Rewind
Each time you press “d” or “c” when the recording ispaused, playback skips backwards or forwards.✽ A progress bar is displayed as a rough guide to the
playback position.
Audio skip
When paused
2
➀Press “b” to play the audio recording.➁The LCD monitor shows the playback time.
�! You cannot play back audio recordings using multi-frame playback. Use the “DISP” button to revert tonormal playback. �! Take care not to block the speaker.
�! If the sound is difficult to hear, adjust the volume. (➡ P.93, 95)
1
Use “d” or “c” to select a voice file.
The microphone icon is displayed.
�➀
�➁
✽ See P.102 for information on playing back audio recordings on your PC.
Rewind Forward

77
4
76
PLAYING BACK VOICE CAPTIONING� Playing Back Voice captioning
The voice captioning automatically stops when playbackends.Playback
Control Description
Pauses the movie during playback. Press this button againto resume playback.Pause/Resume
Stops playback.Stop
Press these during playback to skip forwards or backwardsthrough the voice captioning.Fast forward/Rewind
2
�! You cannot play back voice captioning using multi-frame playback. Use the “DISP” button to revert tonormal playback.
1
Use “d” or “c” to select an image file that has avoice captioning.
The “9” icon is displayed.
➀Press “b” to play the voice captioning.➁The LCD monitor shows the playback time
and a playback progress bar.
�! Take care not to block the speaker.�! If the sound is difficult to hear, adjust the volume
(➡P.93, 95).
� Compatible Voice captioning Files �The FinePix4800 ZOOM can play back voice captioning files recorded on an FinePix4800 ZOOM andvoice captioning files up to 30 seconds long recorded on a 3.3V SmartMedia using a FUJIFILM digitalcamera.
�➁
�➀
✽ You cannot use skip playback for voice captions.✽ See P.102 for information on playing back voice captions on your PC.
Rewind Forward

79
4
78
➀Use “d” or “c” to select “{ERASE”.➁Use “a” and “b ” to select “FRAME”, “ALL
FRAMES” or “FORMAT”.➂Press the “MENU/OK” button.
�! To cancel the frame erase procedure, press the“BACK” button.
�! If the “ª” message is displayed,DPOF is specified. When you press the “MENU/OK”button, the image is erased.
2 3
A confirmation message appears. To erase allthe frames or format the SmartMedia, press the“MENU/OK” button.In the frame erase screen, use “d” or “c” to selecta file and then press the “MENU/OK” button.
Erases all unprotected files.
Erases only the selected file.
�! Protected files (➡P.81, 83) are not erased.
�! If “∞ ”, “– ”, “• ” or“§ ” is displayed, first wipe the contactsurface on the SmartMedia (gold-colored area)thoroughly with a soft, dry cloth and then reload theSmartMedia. If this does not resolve the problem,format the card. �! Press the “BACK” button to exit the menu.
1
If you press the “MENU/OK” button, the menuscreen will appear on the LCD monitor.
FRAME
ALL FRAMES
FORMATErases all the data and reformats (initializes) theSmartMedia for use with this camera.
�! Formatting also erases protected files.
Formatting erases all the data on theSmartMedia, including protected files.
�➀
�➁
�➂
{ ERASING SINGLE• ALL FRAMES/FORMATTINGPLAYBACK MENU

81
4
80
Press the “MENU/OK” button to display themenu on the monitor.
➀Use “d” or “c” to select “OPROTECT”.➁Use “a” or “b” to select “FRAME SET/RESET”.➂Press the “MENU/OK” button.
1
�! Multi-frame playback is an easy way to selectimages to be protected (➡P.38).
2
Protection can be set for an image to preventit from being inadvertently erased. However,note that formatting erases all images (➡ P.78).
1
Press the “MENU/OK” button to display themenu on the monitor.
�! The Auto Power Off function does not operate duringplayback.
�! Playback for movies and voice captions startsautomatically. When playback ends, the cameraadvances to the next frame. Audio recordings arenot played back.
➀Use “d” or “c” to select “}PLAYBACK”.➁Press the “MENU/OK” button. The image
frames are automatically advanced andplayed back.
�! If you press the “DISP” button once during playback,the playback frame number is displayed on themonitor.
�! To interrupt “}PLAYBACK”, press the “BACK”button.
2 �➀ �➀�➁
�➁
�➂
} PLAYBACK (AUTOMATIC PLAYBACK)PLAYBACK MENU O SETTING AND REMOVING SINGLE FRAME PROTECTIONPLAYBACK MENU

83
4
82
Press the “MENU/OK” button to display themenu on the LCD monitor.
➀Use “d” or “c” to select “OPROTECT”.➁Use “a” or “b ” to select “PROTECT ALL” or
“UNPROTECT ALL”.➂Press the “MENU/OK” button.
1 2
Use “d” or “c” to select the image to be protected. Press the “MENU/OK” button to protect the file.The “j” icon appears on the LCD monitor. To remove the protection, press the “MENU/OK”button again.
�! If you do not want to protect any images, press the“BACK” button to return to the menu. To exit themenu screen, press the “BACK” button again.
3 4
To protect another image, repeat theprocedure from step .3
Note that formatting erases all images,including protected images (➡P.78).
�➀
�➁
�➂
O SETTING AND REMOVING SINGLE FRAME PROTECTIONPLAYBACK MENU O SETTING AND REMOVING PROTECTION FOR ALL FRAMESPLAYBACK MENU

85
4
84
A confirmation screen will appear to proceed,press the “MENU/OK” button.
3
�! If you do not want to protect any images, press the“BACK” button to return to the menu. To exit themenu screen, press the “BACK” button again.
DPOF stands for Digital Print Order Format and refers to a format that is used forrecording printing specifications for images shot using a digital camera on media such asSmartMedia. The recorded specifications include information on which frames are to beprinted and how many prints of each frame are required.
This section gives a detailed description of how to order your prints with the FinePix4800ZOOM.
✽ Note that some printers do not support date and time imprinting or specification of thenumber of prints.
✽ Note that the warnings shown below may be displayed while you are specifying theprints.
º (➡P.119)
When you erase the image, the DPOF setting for that image is deleted at the sametime.
œ (➡P.119)
If you load a SmartMedia that contains frames specified for printing on anothercamera, those print specifications are all reset and replaced by the new printspecifications.
∑ (➡P.119)
No more than 1000 frames can be specified on the same SmartMedia.
O SETTING AND REMOVING PROTECTION FOR ALL FRAMESPLAYBACK MENU F HOW TO SPECIFY PRINT OPTIONSPLAYBACK MENU

87
4
86
1
➀Use the “a” or “b” to select “FRAME”.➁Press the “MENU/OK” button.
�! Before specifying “FRAME SET”, always specifywhether the date is set.
2
➀Use “d” or “c” to display the frame to be specified.➁Use “a” or “b” to specify the number of prints.The “d ” icon and the number of prints isdisplayed for the frames for which settings havebeen confirmed. If the date has been set, the“k” icon is also displayed.�! Using “d” or “c” to move forwards or backwards a
frame automatically confirms the setting.
To continue using “FRAME SET”, repeatsteps �➀ and �➁.
This function allows you to select whether or notthe date of shooting is included on the print.➀Set the Mode switch to “2”.➁Press the “MENU/OK” button to display the
menu on the monitor.➂Press “c” to select “FDPOF”.
➀Use “b” to select “kDATE”.➁Use “d” or “c” to specify “DATE ON” or “DATE
OFF”. The setting is then effective until it ischanged or until the camera is switched off.
�! Before specifying any other settings, first specifywhether date is to be shown or not.
�! DPOF settings cannot be specified for movies oraudio recordings.
1 2 �➀�➀�➀�➀ �➁�➁�➁�➁
�➂
F DPOF DATE SETTINGPLAYBACK MENU F DPOF SET FRAMEPLAYBACK MENU

89
4
88
➀Use “a” or “b” to select “REVIEW/RESET”.➁Press the “MENU/OK” button.
Pressing “d” or “c” plays back only the framesfor which the number of prints has beenspecified, allowing you to check the settings foreach frame.
�! Multi-frame playback is an easy way to selectimages (➡P.38).
�! If you do not want to check or delete the DPOFsettings, press the “BACK” button to return to themenu. To exit the menu screen, press the “BACK”button again.
21
<To Cancel the Settings>Pressing the “BACK” only cancels the setting forthe currently selected frame. You cannot cancelsettings for frames other than the currentlyselected frame.
43
<To Apply the Settings>When you have finished specifying the DPOFsettings, always press the “MENU/OK” button toconfirm the settings. The total number of printsappears on the LCD monitor and the menuscreen reappears.
�! You can specify up to 99 prints for each frame. Also,the maximum number of frames that can be specifiedfor printing on the same SmartMedia is 999.
�! “TOTAL” shows the total number of prints specified.
�➀ �➁
F DPOF REVIEW/RESETPLAYBACK MENUF DPOF SET FRAMEPLAYBACK MENU

91
4
90
3
A confirmation screen will appear. Press the“MENU/OK” button.
A confirmation screen appears. To proceed,press the “MENU/OK” button.
2
�! If all the print settings are cancelled, the “TOTAL”reverts to “00000” and the LCD monitor screenbackground turns blue.
�! If you do not want to check or delete the DPOFsettings, press the “BACK” button to return to themenu. To exit the menu screen, press the “BACK”button again.
3
To delete the print setting, display the image forwhich the setting is to be deleted and then pressthe “MENU/OK” button. When the print settinghas been deleted, the next image appears withthe “¢” message displayed.
➀Use “a” or “b ” to select “RESET ALL”.➁Press the “MENU/OK” button.
1
To delete further print settings, repeat theprocedure from step .2
�➀ �➁
F DPOF REVIEW/RESETPLAYBACK MENU F DPOF RESET ALLPLAYBACK MENU
�! The DPOF menu is not displayed during movie oraudio recording playback.

93
5
USING THE OPTION MENU
92
IN SETTINGS
If you selected “SET–UP”, the “SET–UP” screenappears.➀Use “a” or “b ” to select the desired setting.➁Use “d” or “c” to change the setting.
Press the “MENU/OK” button to exit set-up.
➀Press the “MENU/OK” button to display themenu screen.
➁Use “d”, “c” to select “Q” and “a” or “b ” toselect the desired setting.
➂Press the “MENU/OK” button to move to theselected setting.
�! Press “c” for “SET STARTUP SCREEN”, “DATE/TIME” or “RESET ALL”.
Using SET–UP
PlaybackPhotography
The “Settings” chapter looks at functions available from “QOPTION” in the photography and playbackmenus.
� List of settings
� SET–UP menu options
FILE SIZE/QUALITY (P.94)SET–UPLCD BRIGHTNESS (P.95)
When Shooting Still Images
SET–UPLCD BRIGHTNESS (P.95)
When Shooting Movies/Recording Audio
SET–UPVOLUME (P.95)LCD BRIGHTNESS (P.95)
During Playback
Settings Display Explanation
IMAGE DISPLAY
USB MODE
AUTO POWER SAVE
DATE/TIME
STARTUP SCREEN
FRAME NO.
SET STARTUP SCREEN
OFF/POSTVIEW/PREVIEW
DSC/PC CAM
2MIN/5MIN/OFF
SET q
ON/OFF
RENEW/CONT
SET q
See P.96 for details.
See P.101 for details.
See P.98 and P.126 for details.
See P.23 for details.
Allows you to specify whether the stored startup screen appearson the LCD monitor when you switch the camera on.
See P.100 for details.
See P.99 for details.
Factorydefault
OFF
DSC
2MIN
—
OFF
RENEW
—
BEEP HIGH/LOW/OFF Sets the volume of the beep that sounds when the cameracontrols are used.HIGH
LANGUAGE ENGLISH/FRANCAIS Select English or French as the language used for screen display.ENGLISH
RESET ALL OK qResets all the camera settings (including the photography andplayback menu settings) other than the date/time, startup screenand camera customization settings to the factory default values.
—
5 Settings
�➀ �➁�➂�➀ �➁

G 2400 × 1800 pixel
H 1600 × 1200 pixel
J 1280 × 960 pixel
K 640 × 480 pixel 95
5
94�! To exit this procedure without changing the settings,
press the “BACK” button.
When you use the “LCD BRIGHTNESS” or“VOLUME” settings, an “adjustment bar” appearson the LCD monitor.
➀Use “d ” or “c” to adjust the LCD monitorbrightness or speaker volume.
➁Press the “MENU/OK” button to confirm theadjustment.
1 2You can select any combination of 3 file sizesettings and 4 quality (compression ratio) settingsaccording to the type of shot you want to take.
➀Use “a” or “b ” to change the file size settingand “d” or “c” to change the quality setting.
➁Press the “MENU/OK” button to confirm the setting.
�! This setting can be selected in still photography mode.
�! There are 8 combinations of file size and qualitysettings in total (➡P.30).
To produce high-quality printsUse the largest possible image size and a lowcompression rate (FINE or NORMAL). However,because this results in large file sizes for eachframe, the number of available shots is reduced.
For use on the InternetThese images are intended to be viewed on aPC monitor, so you should use a small file size[640 × 480]. Because this reduces the amount ofdata in each frame, the remaining number ofavailable frames is increased.
Quality (compression ratio)For better image quality, select “FINE”. For moreimages per SmartMedia card, select “BASIC”.Normally, the “NORMAL” setting provides ampleimage quality.
� Image Sizes
�➀�➀ �➁�➁
�! The volume can be set when the Mode switch is setto Playback.
Q LCD MONITOR BRIGHTNESS/VOLUMEQl SETTING THE FILE SIZE AND QUALITY (COMPRESSION RATIO)

97
5
96
IMAGE DISPLAYSET–UP
This function allows you to select and recordimages in the “6 Continuous Shooting” and “g Auto Bracketing” modes.➀Use “d” and “c” to select the images you do
not want to record.➁Press “b ” to add or remove the “C” Mark.
Place an “C” mark under all the images you donot want to record and then press the“MENU/OK” button to record the remainingimages.
Selecting Recorded Images
12
This setting allows you to specify whether thephotographed image is displayed after you takea picture.OFF : The photographed image is automatically
recorded without being displayed.POSTVIEW: The photographed image is displayed
for about 2 seconds and is thenautomatically recorded.
PREVIEW : The photographed image is displayedand you can then select whether torecord the image.You can also select preview zoom andrecorded images.� Press “MENU/OK” to record the image.� Press “BACK” to discard the image.
You can enlarge the preview to check the imagedetails.➀Use “a” or “b ” to zoom in or out.➁Press the “DISP” button.➂Use “ab ” and “dc” to zoom in on different
parts of the image.➃Press the “DISP” button again to revert to
zoomed display.
Preview Zoom
�! Cropping in the preview image is not saved.�! The operation procedure is the same as for playback
zoom (➡P.36).
�! When continuous shooting, auto bracketing or multi-exposure shooting is selected, images are alwayspreviewed regardless of the setting.
�➀ �➀
�➃
�➁
�➂
�! Preview zoom cannot be used with continuousshooting or auto bracketing.
�➁

99
5
SETTING THE STARTUP SCREENSET–UP
98
AUTO POWER SAVESET–UP
When you switch the camera on, the startupscreen set here appears on the LCD monitor.➀When you select “SET STARTUP SCREEN”,
the stored screens are displayed.➁Use “d” or “c” to select the image to be set.➂Press the “MENU/OK” button to set the image.
➀The setting confirmation screen appears.➁Press the “MENU/OK” button.
1 2
Set the “SET STARTUP SCREEN” setting inthe SET–UP menu to “ON” (➡P.92).
Once you enable this function, the monitor istemporari ly switched off to reduce powerconsumption (Sleep mode) if the camera is notused for about 30 seconds. If the camera is thenleft unused for a further time (2 or 5 minutes), itis automatically switched off. Use this functionwhen you want to get the maximum possiblerunning time from the battery.
When the camera is in sleep mode, pressing theshutter button down halfway brings the cameraback to full operational mode. This is a usefulfeature as it allows you to take pictures morequickly than switching the camera off and thenon again.
�! Operation can also be restored by pressing buttonsother than the shutter button.
�! When the camera is in Sleep mode, “FinePix” isdisplayed on the display panel.
�! Auto Power Save is disabled during automaticplayback and when a USB connection is being used.
The Sleep function does not operate when the LCDmonitor is switched off or when the camera is inSetup or Playback mode. However, if the cameracontrols are not used for some time (2 minutes or 5minutes), the camera automatically switches off.
�➀�➀
�➁�➁ �➂
�! Because the startup screen is displayed in a frame,part of the image is obscured by the frame.

DC IN 5V socket
DIGITAL(USB)socket
101
6
IN PC CONNECTION
100
FRAME NO. MEMORYSET–UP
PC Connection describes how to set up a USB connection and provides an overview of the functionsavailable using a USB connection. Refer to the Software Quick Start Guide booklet for details.
This mode provides a simple way to read imagesfrom a SmartMedia and store images on to aSmartMedia. (➡P.102).
DSC Mode
Videoconferencing sessions can be conductedbetween PCs connected to the Internet. This functioncan also be used to record video on a PC (➡P.104).
�! Videoconferencing is not supported on Macintoshcomputers.
PC-CAM (camera) Mode
Refer to the Software Quick Start Guide bookletfor information on installing the software.
6 PC Connection
You can check the file number by viewing theimage. The last 4 digits of the 7-digit numbers inthe top right corner of the screen are the filenumbers, while the first 3 digits show the directorynumber.
�! If the SmartMedia already contains image files withfile numbers higher than the highest file number onthe last SmartMedia, images are stored beginningfrom the highest f i le number on the currentSmartMedia.
�! When you change the SmartMedia, always switch thecamera off before you open the SmartMedia slot cover.If you open the slot cover without switching the cameraoff, the frame number memory will not function.
�! File numbers run from 0001 to 9999. Once 9999 isexceeded, the directory number changes from 100 to101. The maximum number is 999–9999.
�! If you switch the Frame NO. Memory function toRENEW, the highest file number stored by the functionis reset.
�! The displayed frame number may differ for imagesphotographed on other cameras.
�! Using “RESET ALL” resets the “last file No.” setting.
AA
BBFormatted SmartMedia used for both A and B.
Setting this function to “CONT.” makes filemanagement easier as it ensures that file namesare not duplicated when images are downloadedto a PC.
RENEW: Pictures are stored on each SmartMediabeginning with a file number “0001”.
CONT. : Pictures are stored beginning from thehighest file number stored on the lastSmartMedia used.
File numberDirectory number
Frame number
The following functions can be accessed by down-loading and using the special software (➡P.107).� Setting your favorite image on the PC as the
startup screen.� Adding Auto Play display methods� Appending copyright information to the Exif
information for photographed images
Camera Customization
➀Connect the AC-5V/AC-5VH AC Power Adapterand the special USB cable to the cradle.
➁Connect the special USB cable to the USBport on your PC.
�➀ �➁
�! Ensure that you insert the USB cable plugs into thecorrect sockets.

103
6
102
CONNECTING AT DSC MODE
3 4
When you press the “<” (power) button on thecradle, the camera is connected to your PC as aremovable disk drive and the power lamp on thecradle lights. “DSC” also appears on the displaypanel.
The self-timer lamp blinks and the viewfinderlamp alternately blinks green and orange whilethe camera is communicating with your PC. Donot disconnect the camera during communication.
�! See P.106 for information on removing the camera.
�! The Auto Power Save function does not operatewhen the camera is connected to a PC.
� When the Cradle is Not Used �
Set the “USB MODE” setting in the “SET–UP”menu to “DSC”. (➡P.92, 93)
�! Check that the AC power adapter and the specialUSB cable are connected to the cradle.
1 2
➀Load a SmartMedia containing photographedimages.
➁Open the connection socket cover on thebottom of the camera.
➂Switch the camera off and place it in thecradle.
�! Push the camera firmly onto the cradle connector.
Connect the special USB cable to the DIGITAL(USB) socket on the camera and switch thecamera on (➡P.9, 22).
�! The AC power adapter should be used when thecamera is connected to a PC (➡P.19).
�➀ �➁
�➂
Install the software by referring to theSoftware Quick Start Guide booklet for theinstallation procedure.
If Windows driver installation has started, referto the Software Quick Start Guide booklet.
� If You Do Not Use FinePixViewer �You need QuickTime 3.0 or later or DirectX 8.0Runtime (for Windows). To play back audio,use the software provided with your operatingsystem (Windows and Macintosh).

105
6
104
CONNECTING AT PC-CAMERA MODE
Stand
3 4
Set the “USB MODE” setting in the “SET–UP”menu to “PC CAM” (➡P.92, 93).
1 2
Refer to the Software Quick Start Guide bookletfor information on installing the software.
➀Open the connection socket cover on thebottom of the camera.
➁Switch the camera off and place it in thecradle.
�! Push the camera firmly onto the cradle connector.
When you press the “<” (power) button on thecradle, the camera is connected to your PC andthe power lamp on the cradle l ights. “PCCAMERA” also appears on the display panel.� Focal range: Approx. 50 cm (1.6 ft.) to infinity
�! The Auto Power Save function does not operatewhen the camera is connected to a PC.
➀The self-timer lamp blinks or the viewfinder lampalternately blinks green and orange while thecamera is communicating with your computer.Do not disconnect the camera whilecommunication is in progress.
➁The angle of the cradle can be changed. Thisis useful when the cradle is used for a PC-camera connection.
�! The lens is fixed at the wide-angle zoom settingduring PC-camera connection.
�! See P.106 for information on removing the camera.
� When the Cradle is Not Used �
The PC Camera connection allows you to record movies onyour PC and use the camera for videoconferencing. Refer tothe Software Quick Start Guide booklet for details.
Connect the special USB cable to the DIGITAL(USB) socket on the camera and switch the cameraon. (➡P.9, 22)�! The AC power adapter should be used when the
camera is connected to a PC. (➡P.19)
�➀
�➁
�! Check that the AC power adapter and the specialUSB cable are connected to the cradle.
�➀ �➁
If Windows driver installation has started, referto the Software Quick Start Guide booklet.

107
6
CAMERA CUSTOMIZING
106
DISCONNECTING FROM THE PC
➀Download “FinePix4800Customizer” softwarefrom “http://home.fujifilm.com/products/digital/”.
➁Install the software in “DSCSETUP” folder inthe “FinePixViewer” folder on your PC.
➂Load a SmartMedia that has available space andconnect the camera (DSC mode) with the PC.
➃Use the FinePixViewer on the PC and transferthe customizing data to the camera.
Disconnect the cradle from the PC and removethe camera (➡P.106).➀When you switch the camera on, the
customized screen appears.➁Press “c” to check the details.➂Press the “MENU/OK” button to proceed.
1 2
Do not switch the SmartMedia during thecustomization procedure.
�! If you selected “NO”, the customized screen appearsthe next time you switch the camera on.
✽The figure showsthe Macintoshscreen display.
Card reader connection
➀Check that the self-timer lamp is not blinking(the camera is no longer communicating withyour PC).
➁Select the correct procedure below for theoperating system used on your computer. � Windows 98
Check that the power lamp on the cradle is litsteadily.
� Windows Me/2000 ProfessionalExit “FinePixViewer”. Then click the Eject icon inthe taskbar and eject the media. Check that the"REMOVE OK" message is displayed.
� MacintoshQuit “FinePixViewer”. Drag the removable diskdrive icon on the desktop to the Trash and thencheck that the power lamp on the cradle is blinkingslowly.
➂Press the “<” (power) button on the cradleand then disconnect the cradle / camera fromthe PC.
➃Remove the camera from the cradle.➄Close the connection socket cover on the
bottom of the camera.
Always follow the procedure below beforedisconnecting the camera from your PC.
PC-camera connection
➀You must exit “FinePixViewer”.➁Check that the self-timer lamp is not blinking
(the camera is no longer communicating withyour PC).
➂Press the “<” (power) button on the cradle toturn it off, and then disconnect the cradle /camera from the PC.
➃Remove the camera from the cradle.➄Close the connection socket cover on the
bottom of the camera.
�➀
�➁
�➂
�➃
�➄
�➂

109108
Accessories Guide
e By using the FinePix4800 ZOOM together with other optional FUJIFILM products, your system canbe expanded to fill a wide range of uses.
PC CARDADAPTER
FinePix4800 ZOOMDigital Camera
(USB)
Video output
(PC card slot)
Personal Computer (commercially available)
(Floppy disk drive)
Digital Photo Printer
(USB)
(IEEE1394)
(USB)
SmartMedia
PC Card Adapter
Image Memory Card Reader
Image Memory Card Reader
Floppy Disk Adapter (FlashPath)
TV monitor (commercially available)
System Expansion Options
� PC-AD3 PC Card AdapterThe PC Card Adapter allows the SmartMedia to be used as a PC Card StandardATA-compliant (PCMCIA 2.1) PC card (Type II).� Compatible with SmartMedia of 5V/3.3V, 2MB to 128MB.
e The optional accessories (sold separately) can make taking pictures with the FinePix4800 ZOOMeven easier. For information on how to attach and use the accessories, refer to the instructionsprovided with the accessory used.
� SmartMedia™These are separately available SmartMedia cards. Use the following SmartMedia:� MG-4S: 4MB, 3.3V � MG-8S: 8MB, 3.3V � MG-16S/SW: 16MB, 3.3V� MG-32S/SW: 32MB, 3.3V � MG-64S/SW: 64MB, 3.3V � MG-128SW: 128MB, 3.3V✽ Some 3.3V SmartMedia are labelled as “3V” or “ID” cards.
� AC Power Adapter AC-5V/AC-5VHUse the AC-5V/AC-5VH when taking pictures for a long period of time or whenthe FinePix4800 ZOOM is connected to a personal computer.✽ The shape of the AC power adapter, the plug and socket outlet depend on the country.
� NP-80 Rechargeable BatteryThe NP-80 is a rechargeable lithium-ion battery.
PC CARDADAPTER
� BC-80 Battery ChargerUse the BC-80 to quickly charge the rechargeable battery.Battery charging takes roughly Approx. 70 minutes (charging an NP-80).

111110
Notes on Using Your Camera CorrectlyAccessories Guide
� Floppy Disk Adapter (FlashPath)This adapter is the same size and shape as a 3.5-inches floppy disk. You can copythe images on a SmartMedia to your PC simply by loading the SmartMedia into thefloppy disk adapter and then inserting the adapter into your floppy disk drive.
� SM-R2 Image Memory Card ReaderThe SM-R2 allows images to very easily be read to and written from an imagememory card (SmartMedia) to a personal computer. Its USB interface provideshigh-speed data transmission.� Windows 98/98SE, Windows Me, Windows 2000 Professional or iMac and models
that support USB as standard.
� DM-R1 Image Memory Card Reader This device provides a simple way to transfer image data in either directionbetween your PC and an image memory card (SmartMedia or CompactFlashType II (Microdrive-compatible)).The IEEE 1394 interface provides high-speed data transfer.� Windows 98 Second Edition, Windows 2000 Professional (read-only), iMacDV and
Power Macintosh PCs with FireWire as a standard feature. Mac OS 8.5.1 to 9.0
Compatible OS Compatible SmartMedia
Windows 95/98/98SE/Me/NT4.0MacOS 7.6.1 to 9.1 5V/3.3V, 2MB to 128MBFD-A2
� Places to AvoidDo not store or use the camera in the following types oflocations :� Very humid, dirty or dusty places.� In direct sunlight or in places subject to extreme
temperature rises, such as in a closed car in summer.� Extremely cold places.� Places subject to strong vibrations.� Places affected by smoke or steam.� Places subject to strong magnetic fields (such as
places near motors, transformers or magnets).� In contact with chemicals such as pesticides or next
to rubber or vinyl products for long periods of time.
� Do not expose the camera to sandThe FinePix4800 ZOOM is particularly and adverselyaffected by sand. In sandy locations such as beachesor deserts, or in locations where there is wind bornesand, ensure that the camera is not exposed to sand.This can cause faults that may be irreparable.
� Notes on CondensationIf the camera is carried suddenly from a cold locationinto a warm place, water droplets (condensation) mayform on the inside of the camera or on the lens. Whenthis occurs, switch the camera off and wait an hourbefore using the camera. Condensation may also formon the SmartMedia card. In this event, remove theSmartMedia and wait a short time before using it again.
� When the Camera is Unused for Long PeriodsIf you do not intend to use the camera for a long periodof time, remove the batteries and the SmartMedia cardbefore storing the camera.
� Cleaning Your Camera� Use a blower brush to remove dust from the lens and
LCD surface and then wipe lightly with a soft, drycloth. If any soiling remains, apply a small amount oflens cleaning liquid to a piece of FUJIFILM lenscleaning paper and wipe gently.
� Do not scratch hard objects against the lens, LCDmonitor screen or viewfinder as these surfaces areeasily damaged.
� Clean the body of the camera with a soft dry cloth. Donot use volatile substances such as thinners, benzineor insecticide, as these may react with camera bodyand cause deformation or remove the coating.
� Using the Camera OverseasWhen travelling overseas, do not place your camera inthe check-in baggage. Baggage handling at airportsmay subject baggage to violent shocks, and the cameramay be damaged internally even when no externaldamage is visible.
e Be sure to read this information in conjunction with “Safety Notes” (➡P.127) to ensure that you useyour camera correctly.
� SC-FX8This is a special deerskin case that protects the camera against soiling, dust andminor impacts when it is being carried.

113112
Lithium ion batteries are both compact and capable ofstoring large quantities of power. However, if they arestored for long periods while charged, the performanceof the battery can be impaired.� If the battery will not be used for some time, run the
battery flat before storing it.� If the battery is kept in storage for a long period, charge
the battery and then run it flat again at least once a year.� Always remove the battery from the digital camera or
battery charger when it is not being used. Leftinstalled, minute amounts of current flow even whenunused, and the battery may become excessivelydrained and no longer function.
� Attach the cap and store in a cool place.✽The battery should be stored in a dry location with an
ambient temperature between +15°C and +25°C(+59°F and +77°F).
✽Do not leave the battery in hot or extremely cold places.
�Handling the Battery
To avoid injury or damage, observe the following:
� Do not allow the metal portions of the battery to touchother metal objects.
� Do not bring the battery close to a flame or throw itinto a fire.
� Do not attempt to disassemble or modify the battery.
The FinePix4800 ZOOM camera uses a rechargeablelithium-ion battery. Note the points below when using therechargeable battery. Take particular care to read theSafety Notes to ensure that you use the battery correctly.✽When shipped, the NP-80 is not fully charged. Always
charge the battery before using it.� Always remove the battery cap when using the battery.� When you are carrying the battery around, load it into
the digital camera or attach the cap.� When storing the battery, store it with the cap fitted.
Notes on Using the Battery
Notes on the Power Supply
Battery
Terminal
Cap
�Battery Features� The battery gradually loses its charge even when not
used. Use a battery that has been charged recently(in the last day or two) to take pictures.
� To maximize the battery life, switch the camera off asquickly as possible when it is not being used.
� The number of available shots will be lower in coldlocations or at low temperatures. Take along a sparefully charged battery.You can also increase the amount of power producedby putting the battery in your pocket or another warm
place to heat it and then loading it into the camerajust before you take a picture.If you are using a heating pad, take care not to placethe battery directly against the pad. The camera maynot operate if you use a depleted battery in coldconditions.
�Charging the Battery� The battery can be charged using the AC-5V/AC-5VH
(provided as an accessory or sold separately) ACPower Adapter supplied with the FinePix4800 ZOOM.The battery takes approximately 5 hours to charge.If you use the BC-80 Battery Charger (sold separately),the battery can be charged in approximately 70 minutes.
� This rechargeable battery does not need to be fullydischarged or exhausted flat before being charged.
� The battery may feel warm after it has been chargedor immediately after being used. This is perfectlynormal.
� The battery can be charged at temperatures between0°C and +40°C (+32°F and +104°F), but should becharged between +10°C and +30°C (+50°F and +86°F)to obtain maximum battery performance.
� Do not recharge a fully charged battery.
� Battery LifeAt normal temperatures, this battery can be used atleast 300 times.If the time for which the battery provides power shortensmarkedly, this indicates that the battery has reached theend of its effective life and should be replaced.
Notes on storage To avoid damaging the battery or shortening itslife, observe the following:
� Do not drop the battery or otherwise subject it tostrong impacts.
� Do not immerse the battery in water.
To ensure that you obtain optimum batteryperformance, observe the following:
� Always keep the battery terminals clean.� Store the battery in a cool, dry place. Storing the
battery for long periods in a hot location can shortenthe battery life.
If you use the battery for a long period, the camerabody and the battery itself will become warm. This isnormal and is not a malfunction. Use the AC poweradapter supplied with the camera if you are takingpictures or viewing images for a long period of time.
�SpecificationsNominal voltage DC 3.7VMaximum voltage DC 4.2VNominal capacity 1300mAhOperating temperature 0°C to +40°C (+32°F to +104°F)Dimensions 19.8 mm × 20.4 mm × 55.5 mm
(0.78 in. × 0.8 in. × 2.19 in.)(W × H × D)
Mass (Weight) Approx. 40g (1.4 oz.)✽ These specifications are subject to change without notice.

115114
�SmartMediaThe SmartMedia card supplied with your FinePix4800ZOOM camera is a new image recording mediumdeveloped especially for use in digital cameras. EachSmartMedia card contains a built-in semiconductormemory chip (NAND flash memory) which is used forstoring digital image data.Because the data is stored electronically, the storedimage data can be erased from the card and new datarecorded.
�SmartMedia with IDsThe SmartMedia ID is a SmartMedia that has anindividually assigned identification number. SmartMediaID cards can be used with devices that use ID numbersfor copyright protection or other purposes. This cameraaccepts SmartMedia ID cards in the same way asconventional SmartMedia cards.
�Storing DataIn the situations listed below, recorded data may beerased (destroyed). Please note that Fuji Photo FilmCo., Ltd. accepts no responsibility whatsoever for theloss (destruction) of recorded data.✽When the SmartMedia is used incorrectly by the
owner or a third party✽When the SmartMedia is exposed to static electricity
or electrical noise
✽When the SmartMedia cover is opened or theSmartMedia removed, or when the camera isswitched off during data recording, during dataerasing (SmartMedia formatting) or during frameadvance when images are being played back.
Back up important data onto another medium.(MO disk, floppy disk, hard disk, etc.)
�Notes on Handling SmartMedia� When inserting the card into the camera, hold the
SmartMedia straight as you push it in.� Never remove the SmartMedia or switch the camera
off during data recording, during data erasing(SmartMedia formatting) or during frame advancewhen images are being played back. These actionscould result in damage to the SmartMedia.
� Use only the SmartMedia specified for use with theFinePix4800 ZOOM. The use of other SmartMediacould damage the camera.
� SmartMedia are precision electronic devices. Do notbend, drop, or subject SmartMedia to excessiveshocks.
� Do not use or store SmartMedia in environmentslikely to be affected by strong static electricity orelectrical noise.
Notes on the SmartMedia™
AC Power Adapter
Notes on the Power Supply
Always use the AC-5V/AC-5VH AC Power Adapter withthe FinePix4800 ZOOM Camera.The use of an AC power adapter other than the AC-5V/AC-5VH could result in damage to your FinePix4800ZOOM Digital Camera.� This AC power adapter is designed exclusively for
indoor use.� Plug the connection cord plug securely into the DC
input terminal of the FUJIFILM Digital camera.� Turn off the power switch of the FUJIFILM Digital
camera before disconnecting the connection cordfrom the FUJIFILM Digital camera’s DC inputterminal. To disconnect, take hold of the plug and pullit out (do not disconnect it by pulling on the cord).
� Do not use this AC power adapter with any deviceexcept the specified device.
� During use, this AC power adapter will become hot totouch, but this is normal.
� Do not disassemble the AC power adapter. Doing socould be dangerous.
� Do not use this device in a place with hightemperature and high humidity.
� Do not drop or subject this device to strong shocks.� This device may emit a humming noise, but this is
normal.� If used near a radio, this device may cause static, so
play the radio in a distant place.
✽Very occasionally, DC output will be prevented by theoperation of the internal protection circuit. In thisevent, unplug the AC-5V/AC-5VH from the powersocket for a few moments and then plug it in again.This will restore DC output.
�SpecificationsPower Supply AC 100V to 240V, 50/60HzRated Input Capacity 12W (U.S.A. and Canada)
0.15A to 0.24A (other countries)Rated Output DC 5.0V 1.5A (U.S.A. and Canada)
DC 5.0V 2.0A (other countries)Temperature During Use 0°C to +40°C (+32°F to +104°F)
(U.S.A. and Canada)0°C to +45°C (other countories)
Storage Temperature -10°C to +70°C (+14°F to +158°F)Dimensions (MAX.) 47 mm × 20 mm × 72 mm
(1.9 in. × 0.8 in. × 2.8 in.)(W × H × D) (U.S.A. and Canada)49 mm × 40 mm × 65 mm(W × H × D) (U.K.)49 mm × 31 mm × 65 mm(W × H × D) (other countries)
Mass (Weight) Approx. 120 g (6.3 oz.) (U.S.A. and Canada)Approx. 200 g (U.K.)Approx. 180 g (other countries)
Connection Cord Length Approx. 2 m (6.6 ft.)✽ Please note that specifications and characteristics are
subject to change without notice.FUJIFILM shall not be held liable for damages resultingfrom errors in this Owner’s Manual.

117116
Warning Displays e The table below lists the warnings that are displayed on the LCD monitor
Warning DisplayedExplanation Remedy
The camera battery is low on charge.
No SmartMedia is loaded, or it isloaded incorrectly.
• The SmartMedia is not formatted.• The SmartMedia terminals are
soiled.• Camera faul.
• The SmartMedia terminals aresoiled.
• The SmartMedia is damaged.• The SmartMedia format is
incorrect.• Camera faul.The SmartMedia is fully recorded.
The SmartMedia is write-protected.
• An attempt was made to playback aframe not recorded on this camera.
• The SmartMedia terminals aresoiled.
• Camera faul.
Replace or recharge the battery.
Load the SmartMedia (3.3V) in the correctdirection.
• Format the SmartMedia.• Wipe the contact area on the SmartMedia
with a soft dry cloth. • Contact your FUJIFILM dealer.
• Wipe the contact area on the SmartMediawith a soft dry cloth. It may be necessary toformat the SmartMedia. If the errormessage is still displayed, replace theSmartMedia.
• Contact your FUJIFILM dealer.
Use a SmartMedia that is not write-protected.
• Images cannot be played back.
• Wipe the contact surface on the SmartMediathoroughly with a soft, dry cloth. In some cases,you may have to format the SmartMedia.
• Contact your FUJIFILM dealer.
Erase some images or use a SmartMediathat has ample free space.
LCD Monitor displaypanel
Notes on the SmartMedia™
� Do not use or store SmartMedia in very hot, humid orcorrosive environments.
� Take care not to touch the SmartMedia’s contact areaor allow the area to become soiled. Use a dry lint-freecloth to wipe away any soiling that does occur.
� To avoid damage caused by static electricity, alwaysuse the special static-free case provided duringtransportation or storage, or keep the SmartMedia ina storage case if available.
� Do not carry SmartMedia in locations such as atrouser pocket. This could subject the SmartMedia toexcessive force when you sit down, therebydamaging the SmartMedia.
� The SmartMedia may feel warm when it is removedfrom the camera after extended periods of picturetaking or image viewing. This is normal and does notindicate a fault.
� Inserting a SmartMedia that is charged with staticelectricity into your camera may result in a cameramalfunction. If this occurs, switch the camera off andthen on again.
� Affix the label onto the designated area of the card.Do not use third-party labels as this can lead toproblems when the card is inserted or removed.
� When you attach the label, take care that it does notcover any of the write-protect area.
�Notes on Using SmartMedia with a PC� If you intend to take photos using a SmartMedia that
has been used on a PC, format the SmartMedia onyour camera.
� When you format a SmartMedia in the camera andthen shoot and record images, a directory (folder) isautomatically created. Image data is then recorded inthis directory.
� Do not change or delete the directory (folder) namesor file names on the SmartMedia from your PC as thiswill make it impossible to use the SmartMedia in yourcamera.
� Always use the camera to erase image data on aSmartMedia.
� To edit image data, copy the image data to the PC’shard disk and then edit the copied data.
�SpecificationsType Image memory card for digital cameras
(SmartMedia)Operating voltage 3.3VOperating conditions Temperature:
0°C to +40°C (+32°F to +104°F)Humidity: 80% or less (condensation free)
Dimensions 37 mm × 45 mm × 0.76 mm(1.45 in. × 1.77 in. × 0.03 in.) (W × H × D)
(Lit red)

119118
ExplanationWarning Displayed
RemedyLCD Monitor
Camera malfunction or fault. • Switch the camera off and on again, takingcare not to touch the lens.
• Turn the camera off and on again a fewtimes.
Prints were specified for morethan 1000 frames in the DPOFframe settings.
The maximum number of frames for whichprints can be specif ied on the sameSmartMedia is 999. Print specifications canbe set for a maximum of 999 frames on thesame SmartMedia.
displaypanel
Lens cover fault. Switch the camera off and on again, takingcare not to touch the lens.
The DPOF file contains an error.Alternatively, the DPOF file wasset up on a different device.
Press the “MENU/OK” button to create anew DPOF file and specify all the DPOFsettings again.
There is a strong likelihood ofcamera shake because theshutter speed is slow.
A protected frame was erased.
The AF (auto focus) cannot workeffectively.
There is a print order specified forimage you attempted to erase.
Remove the protection.
• If the image is too dark, take the picture ata distance of around 2 m (6.6 ft.) from thesubject.
• Use AF lock to take the picture.
When you erase the image, the DPOFsettings for that image are deleted at thesame time.
Use flash photography. However, a tripodshould be used for some scenes and modes.
• The data could not be recordeddue to a SmartMedia error or aconnection error between theSmartMedia and camera.
• The photographed image cannotbe recorded as it is too large tofit in the available space on theSmartMedia.
• Re-insert the SmartMedia or switch thecamera off and then on again.
• Use a new SmartMedia.
Warning Displays
Warning DisplayedExplanation Remedy
• The voice captioning file isfaulty.
• Camera faul
• The voice captioning cannot be playedback.
• Contact your FUJIFILM dealer.
LCD Monitor displaypanel
––
––
––
––
––
––
The frame number has reached999–9999.
Switch the Frame No. Memory function off anduse a formatted SmartMedia to take the picture.
Outside the AE continuous range. The shot can be taken, but the exposure willnot be correct.––

121120
Problem Cause Remedy
Troubleshooting e If you think the camera is faulty, check the following once more
Problem Cause Remedy
No power. • The battery is exhausted.• The AC power adapter plug has come out
of the power outlet.• The camera is not connected to the cradle
correctly.
• Load a new fully charged battery.• Plug the adapter back in.
• Ensure that the camera is properly fittedinto the cradle.
Power cuts out duringoperation.
• The battery is exhausted. • Load a new fully charged battery.
Battery runs out quickly. • Camera is being used in extreemely coldconditions.
• The terminals are soiled.
• The battery is flat.
• Put the battery in your pocket or anotherwarm place to heat it and then load it intothe camera just before you take a picture.
• Wipe the battery terminals with a clean,dry cloth.
• Load a new fully charged battery.
No photograph is takenwhen the shutter buttonis pressed.
• No SmartMedia is loaded.• The SmartMedia is fully recorded.
• The SmartMedia is write-protected.• The SmartMedia is not formatted.• The SmartMedia contact area is soiled.
• The SmartMedia is damaged.• The Auto Power Save function has
switched the camera off.• The battery is exhausted.
• Load a SmartMedia.• Load a new SmartMedia or erase a
frame.• Remove the write-protection.• Format the SmartMedia.• Wipe the SmartMedia contact area with a
clean dry cloth.• Load a new SmartMedia.• Switch the camera on.
• Load a new fully charged battery.
Can’t use the flash totake pictures.
• The Mode switch and Mode dial has beenmoved to another setting.
• The flash is closed.• The Photography mode is which the flash
does not fire was used.• The shutter button was pressed wile the
flash was charging.
• Set the Mode switch and Mode dial to thecorrect setting.
• Pop the flash up.• Select a mode in which the flash can be
used. (➡P.42)• Wait until charging is completed before
pressing the shutter button.
The flash will not charge. • No compatible SmartMedia is loaded.
• The flash is closed.• The battery is exhausted.
• Load a new SmartMedia, erase a frame,or remove the write-protection.
• Pop the flash up.• Load a new fully charged battery.
The playback image istoo dark even though Iused the flash.
• The subject is too far away.• The flash was covered by your finger.• The flash was pressed down with your
finger.
• Move closer to the subject.• Hold the camera correctly.• Hold the camera correctly.
The image is blurred. • The lens is dirty.• The lens is zoomed to telephoto in Macro
mode.• The photographed subject was too dark.
• Clean the lens.• Cancel Macro mode.
• Try standing about 2 m (6.6 ft.) from yoursubject to take the picture.
There is speckling onthe image.
• The shot was taken with a shutter speedslower than 1/4 second.
• This is a characteristic of CCDs and doesnot indicate a camera fault.
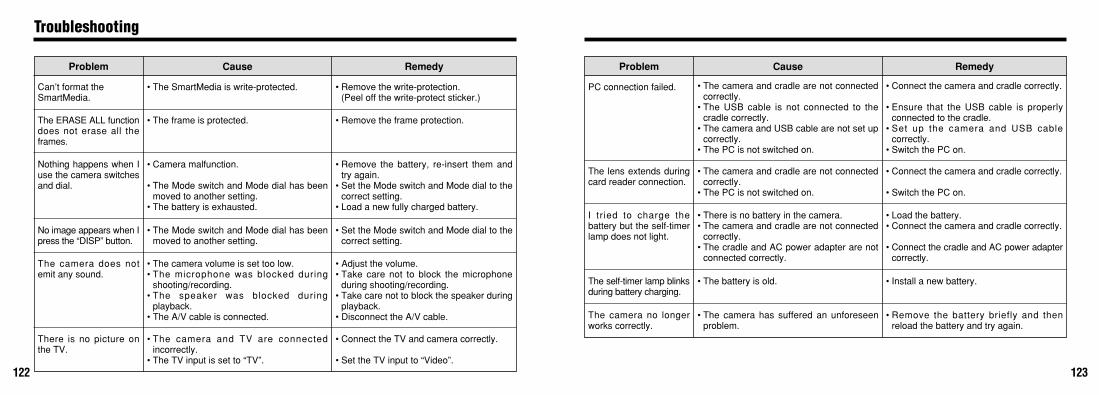
123122
Problem Cause RemedyProblem Cause Remedy
Troubleshooting
Can’t format theSmartMedia.
• The SmartMedia is write-protected. • Remove the write-protection.(Peel off the write-protect sticker.)
The ERASE ALL functiondoes not erase all theframes.
• The frame is protected. • Remove the frame protection.
Nothing happens when Iuse the camera switchesand dial.
• Camera malfunction.
• The Mode switch and Mode dial has beenmoved to another setting.
• The battery is exhausted.
• Remove the battery, re-insert them andtry again.
• Set the Mode switch and Mode dial to thecorrect setting.
• Load a new fully charged battery.
No image appears when Ipress the “DISP” button.
• The Mode switch and Mode dial has beenmoved to another setting.
• Set the Mode switch and Mode dial to thecorrect setting.
The camera does notemit any sound.
• The camera volume is set too low.• The microphone was blocked during
shooting/recording.• The speaker was blocked during
playback.• The A/V cable is connected.
• Adjust the volume.• Take care not to block the microphone
during shooting/recording.• Take care not to block the speaker during
playback.• Disconnect the A/V cable.
There is no picture onthe TV.
• The camera and TV are connectedincorrectly.
• The TV input is set to “TV”.
• Connect the TV and camera correctly.
• Set the TV input to “Video”.
PC connection failed. • The camera and cradle are not connectedcorrectly.
• The USB cable is not connected to thecradle correctly.
• The camera and USB cable are not set upcorrectly.
• The PC is not switched on.
• Connect the camera and cradle correctly.
• Ensure that the USB cable is properlyconnected to the cradle.
• Set up the camera and USB cablecorrectly.
• Switch the PC on.
The lens extends duringcard reader connection.
• The camera and cradle are not connectedcorrectly.
• The PC is not switched on.
• Connect the camera and cradle correctly.
• Switch the PC on.
I tr ied to charge thebattery but the self-timerlamp does not light.
• There is no battery in the camera.• The camera and cradle are not connected
correctly.• The cradle and AC power adapter are not
connected correctly.
• Load the battery.• Connect the camera and cradle correctly.
• Connect the cradle and AC power adaptercorrectly.
The self-timer lamp blinksduring battery charging.
• The battery is old. • Install a new battery.
The camera no longerworks correctly.
• The camera has suffered an unforeseenproblem.
• Remove the battery briefly and thenreload the battery and try again.

125124
Telephoto Approx. 0.2 m – 2 m (0.6 ft. – 6.6 ft.)
Flash modes: Auto, Red-Eye Reduction, Forced Flash,Slow Synchro
� LCD monitor:2-inches, low-temperature polysilicon TFT 130,000 pixels
� Video output:NTSC (U.S.A./Canada model) / PAL (Europe model)
� Self-Timer: 10 sec. timer clock
� A/V Output: Stereo mini- jack (1)� Digital: USB (1) for image data output with a PC� DC Input: Socket for specified AC power adapter� Cradle connection socket: For connection to supplied cradle
Power Supply and Others
Input/Output Terminals
Specifications
System
Quality Mode
Image Data Size
MG-4S (4MB)MG-8S (8MB)MG-16S/SW (16MB)MG-32S/SW (32MB)
6122550
12254999
4489
163330
Approx.1700KB
Approx.810KB
Approx.620KB
Approx.320KB
Approx.90KB
FINE NORMAL
MG-64S/SW (64MB)MG-128SW (128MB)
3674
18842
77156
3819
94
101204
198398
6631330
File Size G 2400 × 1800 K 640 × 480 Movie✽1
(Video)Audio✽2
recording
FINE NORMAL NORMAL
Approx. 23 sec.
Approx. 47 sec.
Approx. 94 sec.
Approx. 191 sec.
—
Approx. 385 sec.
Approx. 774 sec.
—
Approx. 8 min.
Approx. 16 min.
Approx. 33 min.
Approx. 67 min.
—
Approx. 135 min.
Approx. 272 min.
—
11234694
4102041
9193979
Approx.330KB
Approx.770KB
Approx.390KB
189379
82166
159319
H 1600 × 1200 J 1280 × 960
BASIC FINE NORMAL
� Model: Digital camera FinePix4800 ZOOM� CCD sensor:
1/1.7-inch Super CCD (with primary color filter) The total number of pixels: 2.4 million in an interwoven pattern.The number of effective pixels: 2.3 million.
� Image file size:2400 × 1800 pixels (4.32 million pixels) / 1600 × 1200 pixels /1280 × 960 pixels / 640 × 480 pixels
� File format:Still image: Exif ver.2.1 (JPEG)Movie : AVI format, Motion JPEGAudio : Exif Ver. 2.1 audio file standard-compliant
� Storage media: SmartMedia (3.3V)� Viewfinder: Real image optical� Lens: Super EBC Fujinon optical 3× zoom lens
� Aperture: F2.8/F7.0 (Wide-angle) to F4.5/F10.8 (Telephoto)� Focus: TTL contrast-type, Auto or Manual� Focus distance: f = 8.3 mm – 24.9 mm
(Equivalent to 36 mm – 108 mm on a 35 mm camera)� Exposure control:
TTL 64-zones metering, Program AE, exposurecompensation available in Manual photography mode
� Sensitivity: Equivalent to ISO 125/200/400� White balance:
Auto (In Manual modes, 7 positions can be selected.)� Focal range:
Normal: Approx. 60 cm (2.0 ft.) to infinityMacro : Approx. 20 cm (0.6 ft.) to 80 cm (2.6 ft.)
� Shutter: Variable-speed, 3 sec. to 1/2000 sec. (using AE)� Flash: Auto flash using flash control sensor
Effective range: Wide-angle Approx. 0.2 m – 3.5 m (0.6 ft. – 11.5 ft.)
�Number of frames recorded� Power supply:
Use one of the following• Rechargeable Battery NP-80 or AC Power Adapter
AC-5V/AC-5VH�No. of available shots using battery (battery life) with
a fully charged battery
� Conditions for use:Temperature : 0°C to +40°C (+32°F to +104°F)80% humidity or less (no condensation)
� Camera dimensions (W/H/D):80 mm × 97.5 mm × 36.3 mm / 3.1 in. × 3.8 in. × 1.4 in.(not including accessories and attachments)
� Camera mass (weight): 258 g / 9.1 oz.(not including accessories, batteries or SmartMedia)
� Weight for photography: Approx. 300 g / 10.6 oz.(including batteries and SmartMedia)
� Cradle dimensions (W × H × D):80 mm × 53 mm × 80 mm/3.1 in. × 2.1 in. × 3.1 in.
� Cradle mass weight: Approx. 125 g/4.4 oz.� Cradle I/O terminals:
DC input socket, digital (USB) socket and connectorsocket (for camera connection)
� Accessories: See P.7� Optional Accessories: See P.109 – 110
✽ These specifications are subject to change without notice.FUJIFILM shall not be held liable for damages resultingfrom errors in this Owner’s Manual.
✽ The LCD monitor on your digital camera is manufacturedusing advanced high-precision technology. Even so, smallbright points and anomalous colors (particularly aroundtext) may appear on the monitor. These are normal displaycharacteristics and do not indicate a fault with the monitor.This phenomenon will not appear on the recorded image.
✽ The operation error may be caused in a digital cameraby the strong radio interference (i. e. electric fields, staticelectricity, line noise, etc.).
The number of shots shown here is an approximate guide to thenumber of consecutive shots that can be taken based on 50% flashusage at normal temperatures. However, the actual number ofavailable shots will vary depending on the ambient temperaturewhen the camera is used and the amount of charge in the battery.The number of available shots or available shooting time will belower in cold conditions.
Battery Type No. of Shots Auto Play Audio Recording
NP-80LCD monitor ON Approx. 120 Approx. 1 hour Approx. 1 hour
Approx. 250 – Approx. 3 hourLCD monitor OFF
✽1: Total recording time (Up to 80 sec. for continuous recording)✽2: Total recording time (Up to 30 min. for continuous recording)

127126
Explanation of TermsAF/AE Lock:On the FinePix4800 ZOOM, pressing the shutter button downhalf way locks the focus and exposure settings (AF and AElock). If you want to focus on a subject that is not centered inthe frame or change the picture composition after theexposure is set, you can obtain good results by changing thecomposition after the AF and AE settings are locked.
Auto Power Save Function:If the camera is not used in any way for 15 seconds, thisfunction switches features such as the LCD monitor off(Sleep mode) to prevent battery depletion and the waste ofpower when the AC power adapter is connected. If thecamera is then left unused for a further period, the AutoPower Save function switches the camera off. This periodcan be set to 2 minutes or 5 minutes on this camera.� Auto Power Save does not operate during automatic
playback, when a USB connection is being used or if theAuto Power Save function is disabled during setup.
DPOF: Digital Print Order FormatDPOF is a format used for recording information on astorage media (image memory card, etc.) that allows you tospecify which of the frames shot using a digital camera areprinted and how many prints are made of each image.
EV:A number that denotes exposure. The EV is determined bythe brightness of the subject and sensitivity (speed) of the filmor CCD. The number is larger for bright subjects and smallerfor dark subjects. As the brightness of the subject changes, adigital camera maintains the amount of light hitting the CCD ata constant level by adjusting the aperture and shutter speed.When the amount of light striking the CCD doubles, the EVincreases by 1. Likewise, when the light is halved, the EVdecreases by 1.
JPEG:Joint Photographics Experts GroupA file format used for compressing and saving color images. Thecompression ratio can be selected, but the higher thecompression ratio, the poorer the quality of the expanded image.Motion JPEG:A type of AVI (Audio Video Interleave) file format thathandles images and sound as a single file. Images in thefile are recorded in JPEG format. Motion JPEG can beplayed back by QuickTime 3.0 or later.PC Card:A generic term for cards that meet the PC Card Standard.PC Card Standard:A standard for PC cards determined by the PCMCIA.PCMCIA:Personal Computer Memory Card International Association (US).WAVE:This is the standard Windows file format for recording sound.The file extension is “WAV”, and the data itself is recordedeither as PCM or as a compressed recording. This camerauses PCM recording.The files can be played back as follows:Windows: Use the accessories supplied with the operating
system (MediaPlayer and SoundRecorder)Macintosh: Use the applications supplied with the operating
system (SimpleText and QuickTime).White Balance:Whatever the kind of the light, the human eye adapts to itso that a white object still looks white. On the other hand,devices such as digital cameras see a white subject aswhite by first adjusting the color balance to suit the color ofthe ambient light around the subject. This adjustment iscalled matching the white balance. A function thatautomatically matches the white balance is called anAutomatic White Balance function.
Safety Notes
If a problem arises, switch the cameraoff, remove the battery, disconnect andunplug the AC power adapter.Continued use of the camera when it isemitting smoke, is emitting any unusualodor, or is in any other abnormal statecan cause a fire or electric shock.� Contact your FUJIFILM dealer.
Do not allow water or foreign objectsto enter the camera.If water or foreign objects get inside thecamera, switch the camera off, removethe battery and disconnect and unplugthe AC power adapter.Continued use of the camera can causea fire or electric shock.� Contact your FUJIFILM dealer.
Do not place the camera on anunstable surface.This can cause the camera to fall or tipover and cause injury.
� To ensure that you use your FinePix4800 ZOOMcamera correctly, read these Safety Notes and yourOwner’s Manual carefully beforehand.
� After reading these Safety Notes, store them in asafe place.
About the IconsThe icons shown below are used in this document toindicate the severity of the injury or damage that canresult if the information indicated by the icon is ignoredand the product is used incorrectly as a result.
WARNINGThis icon indicates that death orserious injury can result if theinformation is ignored.
CAUTIONThis icon indicates that personalinjury or material damage canresult if the information is ignored.
The icons shown below are used to indicate the natureof the information which is to be observed.
Triangular icons notify the user of informationrequiring attention (“Important ”).
Circular icons with a diagonal bar notify theuser that the action indicated is prohibited(“Prohibited”).
Filled circles with an exclamation mark notifythe user of an action that must be performed(“Required”).
WARNING
Unplug from power socket.

129128
Safety Notes
Never attempt to modify or disassemblethe camera. (Never open the casing.)Do not use the camera when it has beendropped or the casing is damaged.This can cause a fire or electric shock.� Contact your FUJIFILM dealer.
Do not use the camera in the bathroomor shower.This can cause a fire or electric shock.
Never attempt to take pictures whilein motion.Do not use the camera while you arewalking or operating a moving car orother vehicle.This can result in you falling down orbeing involved in a traffic accident.
Do not touch any metal parts of thecamera during a thunderstorm.This can cause an electric shock due toinduced current from the l ightningdischarge.
Do not modify, heat or unduly twist orpull the connection cord and do notplace heavy objects on the connectioncord.These actions could damage the cordand cause a fire or electric shock.� If the cord is damaged, contact your
FUJIFILM dealer.
Do not use the batteries except asspecified.Load the batteries with the polespositioned as indicated by the and marks.
Do not heat, modify or attempt todisassemble the batteries.Do not drop or subject the batteriesto impacts.Do not attempt to recharge lithium oralkaline batteries.Do not store the batteries withmetallic products.Do not use chargers other than thespecified model to charge the battery.Any of these actions can cause thebatteries to burst or leak and cause fireor injury as a result.
Do notdisassemble.
Do not use inthe bathroom or
shower.
WARNING WARNINGDo not use this camera in locationsseverely affected by oil fumes, steam,humidity or dust.This can cause a fire or electric shock.
Do not leave this camera in placessubject to extremely high temperatures.Do not leave the camera in locationssuch as a sealed vehicle or in directsunlight.This can cause a fire.
Keep out of the reach of smallchildren.This product could cause injury in thehands of a child.
Do not place heavy objects on thecamera.This can cause the heavy object to tipover or fall and cause injury.
Use only the batteries or AC poweradapter specified for use with thiscamera.Do not use voltages other than thepower supply voltage shown.The use of other power sources cancause a fire.
WARNING CAUTION

131130
Safety Notes EC Declaration of Conformity
Do not move the camera while the ACpower adapter is still connected.Do not pull on the connection cord todisconnect the AC power adapter.This can damage the power cord orcables and cause a fire or electricshock.
Do not cover or wrap the camera orthe AC power adapter in a cloth orquilt.This can cause heat to build up anddistort the casing or cause a fire.
When you are cleaning the camera oryou do not plan to use the camera foran extended period, remove thebattery and disconnect and unplugthe AC power adapter.Failure to do so can cause a fire orelectric shock.
Using a flash too close to a person'seyes may temporariy affect the eyesightTake particular care when photographinginfants and young childern.
CAUTIONDo not use the AC power adapterwhen the plug is damaged or the plugsocket connection is loose.This could cause a fire or electric shock.
Request regular internal testing andcleaning for your camera.Build-up of dust in your camera can causea fire or electric shock.� Contact your FUJIFILM dealer to
request internal cleaning every 2 years.
CAUTIONWeName : Fuji Photo Film (Europe) G.m.b.H.Address : Heesenstrasse 31
40549 Dusseldorf, Germany
declare that the productProduct Name : FUJIFILM DIGITAL CAMERA FinePix4800 ZOOMManufacture’s Name : Fuji Photo Film Co., Ltd.Manufacture’s Address : 26-30, Nishiazabu 2-chome, Minato-ku,
Tokyo 106-8620, Japan
is in conformity with the following StandardsSafety : EN60065EMC : EN55022 : 1998 Classe B
EN55024 : 1998EN61000-3-2 : 1995 + A1:1998 + A2:1998
following the provision of the EMC Directive (89/336/EEC, 92/31/EEC and 93/68/EEC) and Low Voltage Directive (73/23/EEC).
Dusseldorf, Germany May 1, 2001
Place Date Signature/Managing Director
Bij dit produkt zijn batterijen geleverd. Wanneer deze leeg zijn, moet u ze nietweggooien maar inleveren als KCA

Printed in Japan FGS-103104-FG
Printed on recycled paper.26-30, Nishiazabu 2-chome, Minato-ku, Tokyo 106-8620, Japan