final fantasy walkthrough
85
Final Fantasy: FAQ/Walkthrough by Action Version 1.0, Last Updated 2007-01-31 View/Download Original File Hosted by GameF AQs Return to Final Fantasy (GBA) FAQs & Guides Liked this FAQ? Click here to recommend this item to other users. ============== ============================================ (80 characters) ===== _ / _________ / \ ____ _____ __ _ ______ _ ___/ \ _ _ \ __ __-- -__ __/ \ __ <-------_____ \ __ \ \ __ : 0 0 : --- \ _ _ \ ___ : ___/\ _____ _ \__ _ _ _____ `---__ _/ /___\ O O \ : \__ : ,` <________V__\ _________ \ ____ ______ __ _ ___ ____ ______ ______ __ __ \ __ \ __ __ __ ____ \ \___/ / __/ __ \ __ ____ \_ _/ __ __ \ \ __ ____ \ \ ____ _ _ _ \__ _ _ _ ______ _ ______ /___\ ___________________________________________________________________ -------------------------------------------------------------------------------- F I N A L F A N T A S Y I & I I - D A W N O F S O U L S F A Q / W A L K T H R O U G H = v1.0 = Copyright 2004-2006, Action (R Jackson) Email: actionjmanx (at) gmail (dot) com Version: 1.0 All rights reserved. The world lies shrouded in darkness The winds die... The seas rage... The earth decays... But the people believe in a prophecy, patiently awaiting its fulfillment. "When darkess veils the world, four Warriors of Light shall come." After a long journey, four young travelers did at last appear... ...and in the hand of each was clutched a crystal. The following sites may use this FAQ:
-
Upload
sapphire2083 -
Category
Documents
-
view
226 -
download
0
Transcript of final fantasy walkthrough
8/7/2019 final fantasy walkthrough
http://slidepdf.com/reader/full/final-fantasy-walkthrough 1/85
Final Fantasy: FAQ/Walkthrough by ActionVersion 1.0, Last Updated 2007-01-31 View/Download Original File Hosted by GameFAQsReturn to Final Fantasy (GBA) FAQs & GuidesLiked this FAQ? Click here to recommend this item to other users. ========================================================== (80 characters) =====
_
/ _________ / \ ____ _____ __ _ ______ _ ___/ \ _ _ \ __ __-- -__ __/ \ __ <-------_____ \ __ \ \ __ : 0 0 : --- \ _ _ \ ___ : ___/\ _____ _ \__ _ _ _____ `---__ _//___\ O O
\ : \__ : ,`<________V__\
_________ \ ____ ______ __ _ _______ ______ ______ __ __ \ __ \ __ __ __ ____ \ \___/ / __/ __ \ __ ____ \_ _/ __ __ \ \ __ ____ \ \ ____ _ _ _ \__ _ _ _ ______ _
______ /___\ ___________________________________________________________________ --------------------------------------------------------------------------------
F I N A L F A N T A S Y I & I I - D A W N O F S O U L S
F A Q / W A L K T H R O U G H = v1.0 =
Copyright 2004-2006, Action (R Jackson)Email: actionjmanx (at) gmail (dot) comVersion: 1.0All rights reserved.
The world liesshrouded in darkness
The winds die...The seas rage...The earth decays...
But the people believein a prophecy, patientlyawaiting its fulfillment.
"When darkess veils theworld, four Warriors of Light
shall come."
After a long journey,four young travelersdid at last appear...
...and in the hand of each
was clutched a crystal.
The following sites may use this FAQ:
8/7/2019 final fantasy walkthrough
http://slidepdf.com/reader/full/final-fantasy-walkthrough 2/85
[http://www.gamefaqs.com] ............................................ GameFAQs*[http://www.1up.com] ....................................................... 1UP[http://www.ign.com] ....................................................... IGN[http://www.neoseeker.com] ........................................... Neoseeker[http://www.supercheats.com] ...................................... Super Cheats
If you see this FAQ anywhere else, please let me know at my email, which can be
found above.
*GameFAQs has affiliates that are allowed to use this FAQ freely. GameSpot isone of those affiliates, same with all of CNet. If you see this FAQ on a CNetsite, don't bother telling me, since (technically) they are allowed to use it.
*************************************************** WARNING! READ BEFORE CONTINUING! ***************************************************
First off, this document will contain a lot of <SPOILERS>. And major ones at
that. You have been warned.
Do NOT email me about "You missed this chest [insert location here]". I alreadyKNOW of all the chests, but due to the fact that FF1 has duplicate chests(explained in section [MKEY9]), my FAQ will lead you in the most efficient paththat I see. If you follow my FAQ to the letter and STILL somehow find a chest,then you can email me about it (keep in mind that I'm 99.98% sure I have allthe chests).
Second, this FAQ covers FF1 ONLY. FF2 will not be covered in the least. Thereis a Final Fantasy II FAQ of mien that is seperate, and it's on GameFAQs aswell (just scroll down).
Last, if you have an email to send me, please be sure to put "FF1 Walkthrough"or something like that in the Subject line. I'll probably end up deleting itotherwise. And please include your screen name so I know who to give credit to,should I place new information inside. :) [ZRZJZAZCZKZSZOZNZ]
============================================================: Latest Version Info------------
Version 1.0 - Finally completed the main walkthrough. I intend to work on theother parts at a later date, hopefully very soon.
1.0 - Completed: January 31, 2007. Time: 10:12 PM. Size: 235k- Walkthrough section is laid out and finished- "Characters" section complete- "Travel Notes" section complete- blacksniper's guide included- Soul of Chaos not included yet- Bestiary not included yet- Appendices not included yet
============================================================: Font Spacing Check
------------
Check please if the numbers and dots align. If not, then switch to a monospaced
8/7/2019 final fantasy walkthrough
http://slidepdf.com/reader/full/final-fantasy-walkthrough 3/85
font to properly view this document.
1234567890..........
The default Wordpad font (Courier New) is most suited for viewing thisFAQ. However, I used Notepad, with the same font, while writing this FAQ.
There's really no significant difference between the two when viewing this FAQ.
============================================================: Keyword System------------
A good friend of mine, Arctic (best known for his sweet FF7 FAQ), used theKeyword System in Version 1.1 of his FAQ and has used it ever since. Its solepurpose is to allow you (the user) to search for anything in this FAQ with thegreatest of ease. [GRGJGAGCGKGSGOGNG]
Utilizing the Find function (Ctrl+F) that can be used in both Notepad andWordpad, the keyword system is used at the start of each chapter andsubsection. When reading the Table of Contents, you'll see the following bya certain section:
[Keyword]
Press Ctrl+F and type in the following:
^[Keyword]
And you'll immediately be brought to the corresponding section after you pressEnter. Make sure you don't drop the ^ or you'll end up back in the Table of
Contents.
============================================================: Anti-Plagiarism Format------------
It seems that nowdays you can take a quote from any magazine, stick it into anysearch engine and find the same article written by 4-5 different people. As faras I know, hardly any FAQ writers have implemented a working anti-plagiarismformat in their FAQs. So yeah, I have added one.
If you see something that looks completely out of place, it's probably an anti-plagiarism tag. Given, although the system I'm putting in this FAQ/Walk isn'tfoolproof, it's my own attempt at anti-plagiarism. I'm pretty sure someone willcrack the code, but I'm planning on making it harder than hell for them to doso.
============================================================: Table of Contents------------
-> Final Fantasy Mechanics .................................... [MECH]-> Controls ................................................. [MCTL]
-> Main Menu ................................................ [MMNU]-> Status Effects ........................................... [MSTA]
8/7/2019 final fantasy walkthrough
http://slidepdf.com/reader/full/final-fantasy-walkthrough 4/85
-> Characters ................................................ [CHAR1]-> Warrior -> Knight ....................................... [CHARA]-> Thief -> Ninja .......................................... [CHARB]-> Monk -> Master .......................................... [CHARC]-> Red Mage -> Red Wizard .................................. [CHARD]-> White Mage -> White Wizard .............................. [CHARE]-> Black Mage -> Black Wizard .............................. [CHARF]
-> Travel Notes .............................................. [NOTE1](for any FF player) ^
-> Reading This Guide ......................................... [NOTE2]
-> Walkthrough-> Rescue Mission .......................................... [RESC1]-> Cornelia .............................................. [RESC2]-> Castle Cornelia ....................................... [RESC3]-> Cornelia Area ......................................... [RESC4]-> Chaos Shrine .......................................... [RESC5]
-> Castle Cornelia ....................................... [RESC6]
-> Path to the Mystic Key .................................. [MKEY1]-> Matoya's Cave ......................................... [MKEY2]-> Pravoka Area .......................................... [MKEY3]-> Pravoka ............................................... [MKEY4]-> The Sea ............................................... [MKEY5]-> Elfheim ............................................... [MKEY6]-> Elfheim Area .......................................... [MKEY7]-> Western Keep .......................................... [MKEY8]-> Marsh Cave ............................................ [MKEY9]-> Western Keep .......................................... [MKEY0]-> Matoya's Cave ......................................... [MKEYA]
-> Elven Castle .......................................... [MKEYB]
-> Looting the Mystic Treasures ............................ [LOOT1]-> Castle Cornelia ....................................... [LOOT2]-> Chaos Shrine .......................................... [LOOT3]-> Western Keep .......................................... [LOOT4]-> Marsh Cave ............................................ [LOOT5]
-> Relighting the Earth Crystal ............................ [ERTH1]-> Mt. Duergar ........................................... [ERTH2]-> Mt. Duergar Area ...................................... [ERTH3]-> Melmond ............................................... [ERTH4]-> Melmond Area .......................................... [ERTH5]-> Cavern of Earth ....................................... [ERTH6]-> Giant's Cave .......................................... [ERTH7]-> Sage's Cave ........................................... [ERTH8]-> Cavern of Earth ....................................... [ERTH9]
-> Class Change Quest ...................................... [CHNG1]-> Crescent Lake ......................................... [CHNG2]-> Cave of Ice ........................................... [CHNG3]-> Ryukahn Desert ........................................ [CHNG4]-> Gaia .................................................. [CHNG5]-> The Cidatel of Trials ................................. [CHNG6]-> Dragon Caves .......................................... [CHNG7]
-> Class Change Tactics .................................. [CHNG8]
-> Relighting the Fire Crystal ............................. [FIRE1]
8/7/2019 final fantasy walkthrough
http://slidepdf.com/reader/full/final-fantasy-walkthrough 5/85
-> Crescent Lake ......................................... [FIRE2]-> Crescent Lake Area .................................... [FIRE3]-> Mt. Gulg .............................................. [FIRE4]
-> Relighting the Water Crystal ............................ [WATR1]-> Gaia .................................................. [WATR2]-> Caravan ............................................... [WATR3]
-> Waterfall Cavern ...................................... [WATR4]-> Onrac ................................................. [WATR5]-> Gaia .................................................. [WATR6]-> Onrac ................................................. [WATR7]-> The Sunken Shrine ..................................... [WATR8]
-> Relighting the Wind Crystal ............................. [WIND1]-> Melmond Graveyard ..................................... [WIND2]-> Lufenia Area .......................................... [WIND3]-> Lufenia ............................................... [WIND4]-> Mirage Tower .......................................... [WIND5]-> Flying Fortress ....................................... [WIND6]
-> The Final Battle ........................................ [LAST1]-> Battle Preparations ................................... [LAST2]-> Chaos Shrine .......................................... [LAST3]-> Temple of Chaos ....................................... [LAST4]-> Epilogue .............................................. [LAST5]
-> Soul of Chaos Dungeons ..................... (under construction)-> Earthgift Shrine ......................... (under construction)-> Hellfire Chasm ........................... (under construction)-> Lifespring Grotto ........................ (under construction)-> Whisperwind Cove ......................... (under construction)
-> Frequently Asked Questions .................................. [FAQ]
-> Secrets Quick Help .......................... (under construction)
-> blacksniper's Guide-to-not-having-a-sucky-Monk/Master ..... [MONK1]
-> Bestiary ..................................... (under construction)
-> Appendix A: Equipment ........................ (under construction)
-> Full Update History ........................................ [UPDT]
-> Copyrights, Disclaimers, etc. .............................. [COPY]
============================================================: Final Fantasy Mechanics ^[MECH] :------------ ------------
This section will cover the basics of Final Fantasy. Use this guide if youdon't want to scroll back to the Contents section:
-> Final Fantasy Mechanics [MECH] <- (you are here)-> Controls [MCTL]-> Main Menu [MMNU]
-> Status Effects [MSTA]
Don't forget the carat ^ when you're using the Find Function!
8/7/2019 final fantasy walkthrough
http://slidepdf.com/reader/full/final-fantasy-walkthrough 6/85
------------: Controls ^[MCTL]------------
If you have the manual, you should RTFM. If you need to ask what it means, you
shouldn't be asking in the first place.
If you're using an emulator, shame on you. Pirating is bad, etc. At any rate,here's the controls. I'd like to use some ASCII, but if you can't figure outwhere these buttons are, you're probably too damn stupid to own a GBA anyways.
-> D-Pad ........... Move character / Move cursor-> A Button ........ Confirm / Talk / Examine / Ride or Disembark Airship-> B Button ........ Cancel / Dash (Dash with control pad)-> L Button ........ Toggle between pages (where L and R buttons are shown) /
Switch the displayed character-> R Button ........ Toggle between pages (where L and R buttons are shown) /
Switch the displayed character-> Start ........... Open Main Menu / Pause or Resume battle-> Select .......... Press B and then Select to open up the World Map.
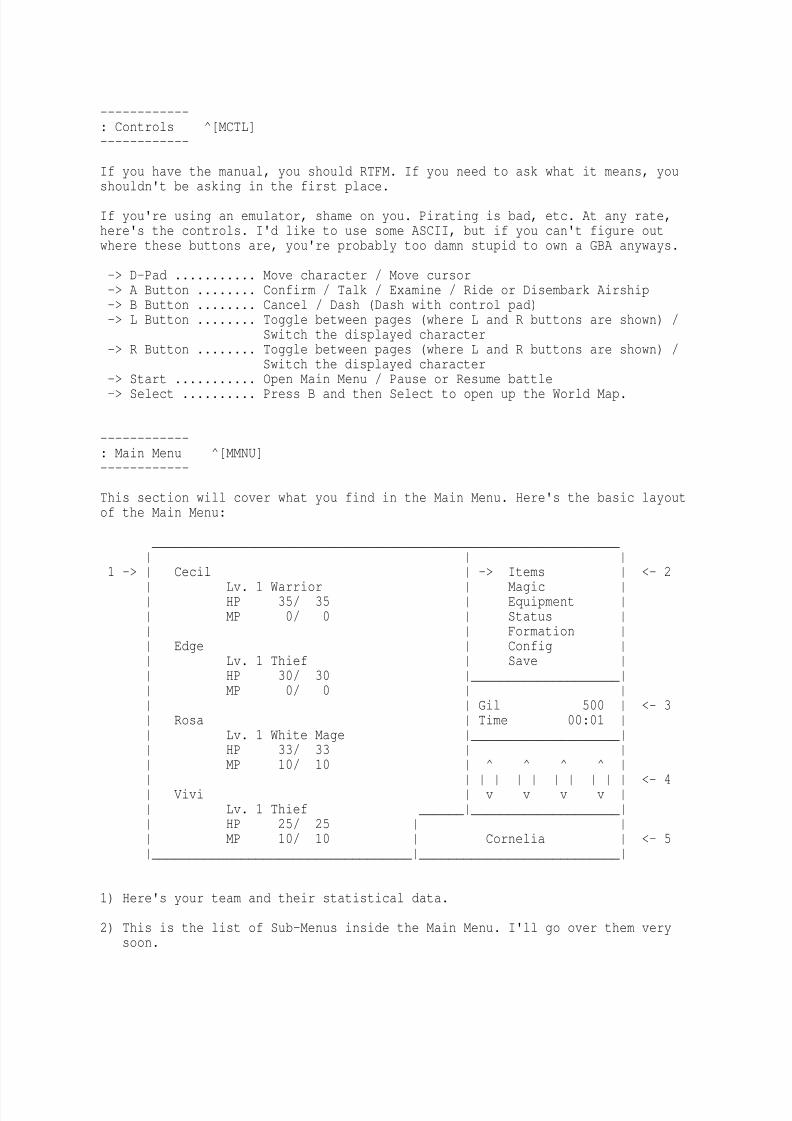
------------: Main Menu ^[MMNU]------------
This section will cover what you find in the Main Menu. Here's the basic layoutof the Main Menu:
_______________________________________________________________
1 -> Cecil -> Items <- 2
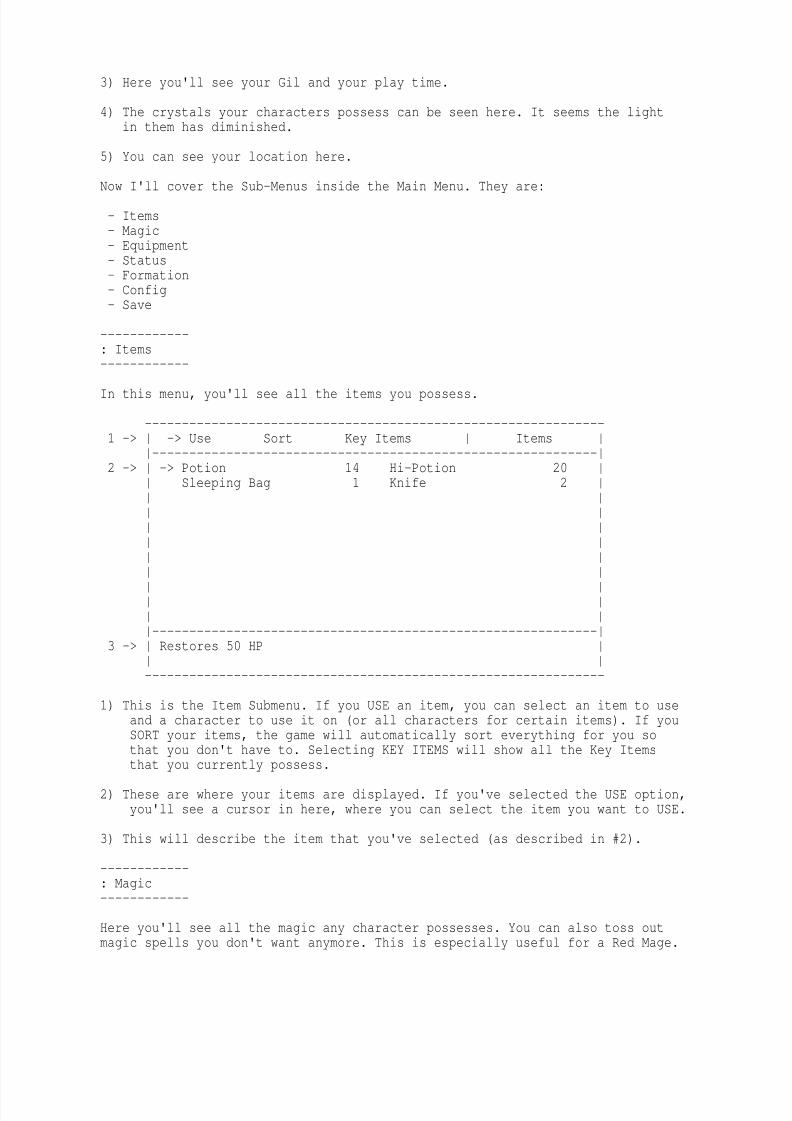
Lv. 1 Warrior Magic HP 35/ 35 Equipment MP 0/ 0 Status Formation Edge Config Lv. 1 Thief Save HP 30/ 30 ____________________ MP 0/ 0 Gil 500 <- 3 Rosa Time 00:01 Lv. 1 White Mage ____________________ HP 33/ 33 MP 10/ 10 ^ ^ ^ ^ <- 4 Vivi v v v v Lv. 1 Thief __________________________ HP 25/ 25 MP 10/ 10 Cornelia <- 5______________________________________________________________
1) Here's your team and their statistical data.
2) This is the list of Sub-Menus inside the Main Menu. I'll go over them verysoon.
8/7/2019 final fantasy walkthrough
http://slidepdf.com/reader/full/final-fantasy-walkthrough 7/85
3) Here you'll see your Gil and your play time.
4) The crystals your characters possess can be seen here. It seems the lightin them has diminished.
5) You can see your location here.
Now I'll cover the Sub-Menus inside the Main Menu. They are:
- Items- Magic- Equipment- Status- Formation- Config- Save
------------: Items
------------
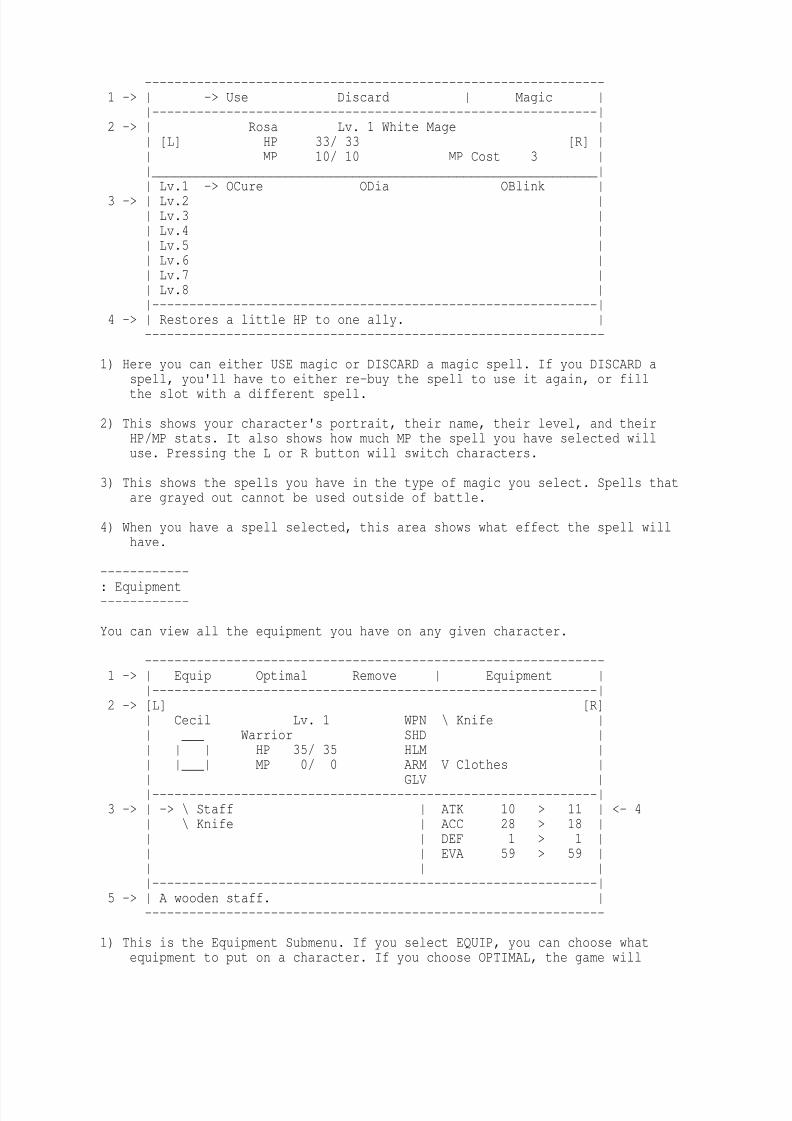
In this menu, you'll see all the items you possess.
--------------------------------------------------------------1 -> -> Use Sort Key Items Items
------------------------------------------------------------2 -> -> Potion 14 Hi-Potion 20
Sleeping Bag 1 Knife 2
------------------------------------------------------------
3 -> Restores 50 HP --------------------------------------------------------------
1) This is the Item Submenu. If you USE an item, you can select an item to useand a character to use it on (or all characters for certain items). If youSORT your items, the game will automatically sort everything for you sothat you don't have to. Selecting KEY ITEMS will show all the Key Itemsthat you currently possess.
2) These are where your items are displayed. If you've selected the USE option,you'll see a cursor in here, where you can select the item you want to USE.
3) This will describe the item that you've selected (as described in #2).
------------: Magic------------
Here you'll see all the magic any character possesses. You can also toss outmagic spells you don't want anymore. This is especially useful for a Red Mage.
8/7/2019 final fantasy walkthrough
http://slidepdf.com/reader/full/final-fantasy-walkthrough 8/85
--------------------------------------------------------------1 -> -> Use Discard Magic
------------------------------------------------------------2 -> Rosa Lv. 1 White Mage
[L] HP 33/ 33 [R] MP 10/ 10 MP Cost 3 ____________________________________________________________
Lv.1 -> OCure ODia OBlink 3 -> Lv.2
Lv.3 Lv.4 Lv.5 Lv.6 Lv.7 Lv.8 ------------------------------------------------------------
4 -> Restores a little HP to one ally. --------------------------------------------------------------
1) Here you can either USE magic or DISCARD a magic spell. If you DISCARD aspell, you'll have to either re-buy the spell to use it again, or fillthe slot with a different spell.
2) This shows your character's portrait, their name, their level, and theirHP/MP stats. It also shows how much MP the spell you have selected willuse. Pressing the L or R button will switch characters.
3) This shows the spells you have in the type of magic you select. Spells thatare grayed out cannot be used outside of battle.
4) When you have a spell selected, this area shows what effect the spell willhave.
------------: Equipment------------
You can view all the equipment you have on any given character.
--------------------------------------------------------------1 -> Equip Optimal Remove Equipment
------------------------------------------------------------2 -> [L] [R]
Cecil Lv. 1 WPN \ Knife ___ Warrior SHD HP 35/ 35 HLM ___ MP 0/ 0 ARM V Clothes GLV ------------------------------------------------------------
3 -> -> \ Staff ATK 10 > 11 <- 4 \ Knife ACC 28 > 18 DEF 1 > 1 EVA 59 > 59 ------------------------------------------------------------
5 -> A wooden staff. --------------------------------------------------------------
1) This is the Equipment Submenu. If you select EQUIP, you can choose whatequipment to put on a character. If you choose OPTIMAL, the game will
8/7/2019 final fantasy walkthrough
http://slidepdf.com/reader/full/final-fantasy-walkthrough 9/85
auto-matically choose the best equipment for your character, based uponthe highest defense. REMOVE will take off any piece of equipment you like.
2) Here you'll see your character's portrait, their level, class, currentequipment, and their attack power, defense and magic defense. Pressing theL or R button will switch characters.
3) If you select a piece of equipment in #2, you'll see a cursor here which youcan use to select a new piece of equipment.
4) If you select a piece of equipment in #3, you'll see how it affects yourstats here. Stat increases are shown in yellow and stat decreases are shownin gray.
5) If you select a piece of equipment in #3, you'll see a description of theequipment here.
------------: Status
------------
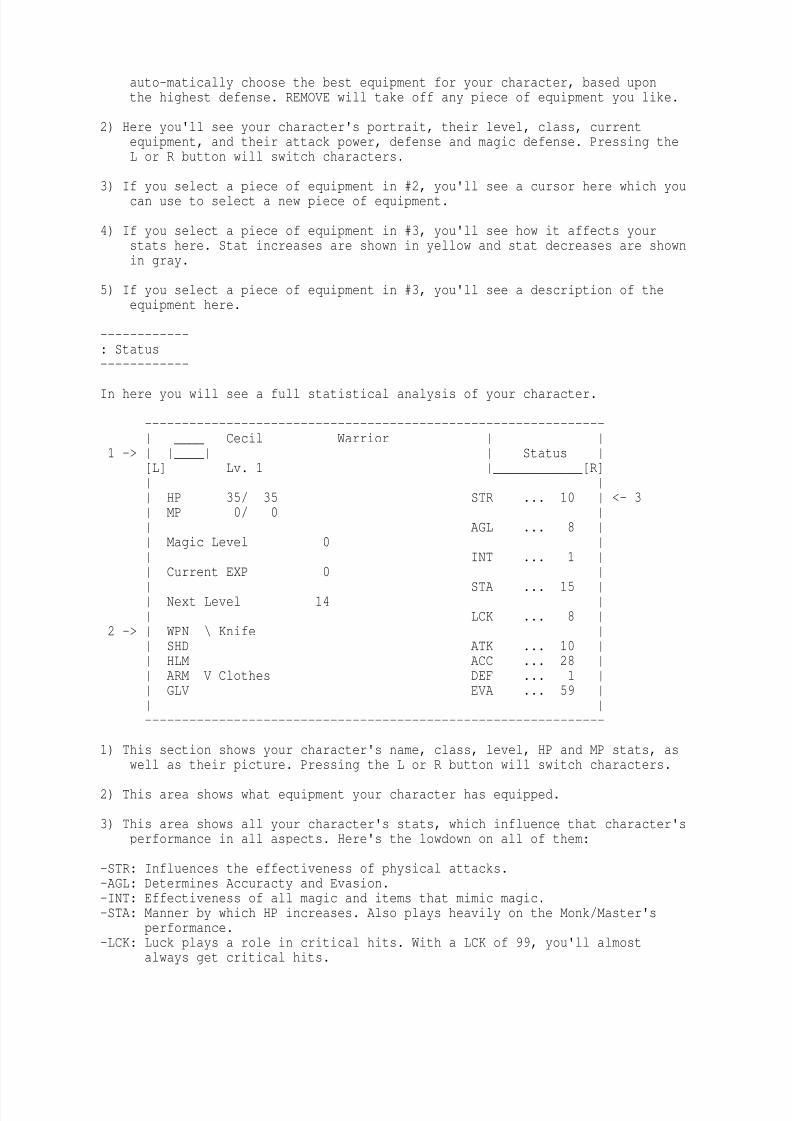
In here you will see a full statistical analysis of your character.
-------------------------------------------------------------- ____ Cecil Warrior
1 -> ____ Status [L] Lv. 1 ____________[R] HP 35/ 35 STR ... 10 <- 3 MP 0/ 0 AGL ... 8 Magic Level 0
INT ... 1 Current EXP 0 STA ... 15 Next Level 14 LCK ... 8
2 -> WPN \ Knife SHD ATK ... 10 HLM ACC ... 28 ARM V Clothes DEF ... 1 GLV EVA ... 59 --------------------------------------------------------------
1) This section shows your character's name, class, level, HP and MP stats, aswell as their picture. Pressing the L or R button will switch characters.
2) This area shows what equipment your character has equipped.
3) This area shows all your character's stats, which influence that character'sperformance in all aspects. Here's the lowdown on all of them:
-STR: Influences the effectiveness of physical attacks.-AGL: Determines Accuracty and Evasion.-INT: Effectiveness of all magic and items that mimic magic.-STA: Manner by which HP increases. Also plays heavily on the Monk/Master's
performance.-LCK: Luck plays a role in critical hits. With a LCK of 99, you'll almost
always get critical hits.
8/7/2019 final fantasy walkthrough
http://slidepdf.com/reader/full/final-fantasy-walkthrough 10/85
-ATK: This is your attack power, influenced by STR and the weapon equipped.Combined they create the number you see when you attack in battle.
-ACC: Probability of hitting when attacking.-DEF: This is your defensive power, influenced by all the armor you wear.
Combined they create the total defensive power on the character.-EVA: Probability of evading an attack.
------------: Formation------------
Here you can change the order of your team. You'll want to place physicalfighters closer to the top since they'll be targeted more often. On any givenattack:
The first slot has a 50% (1/2) chance of being targeted.
The second slot has a 25% (1/4) chance of being targeted.
The third slot has a 12.5 (1/8) chance of being targeted.
The fourth slot has a 12.5 (1/8) chance of being targeted.
------------: Config------------
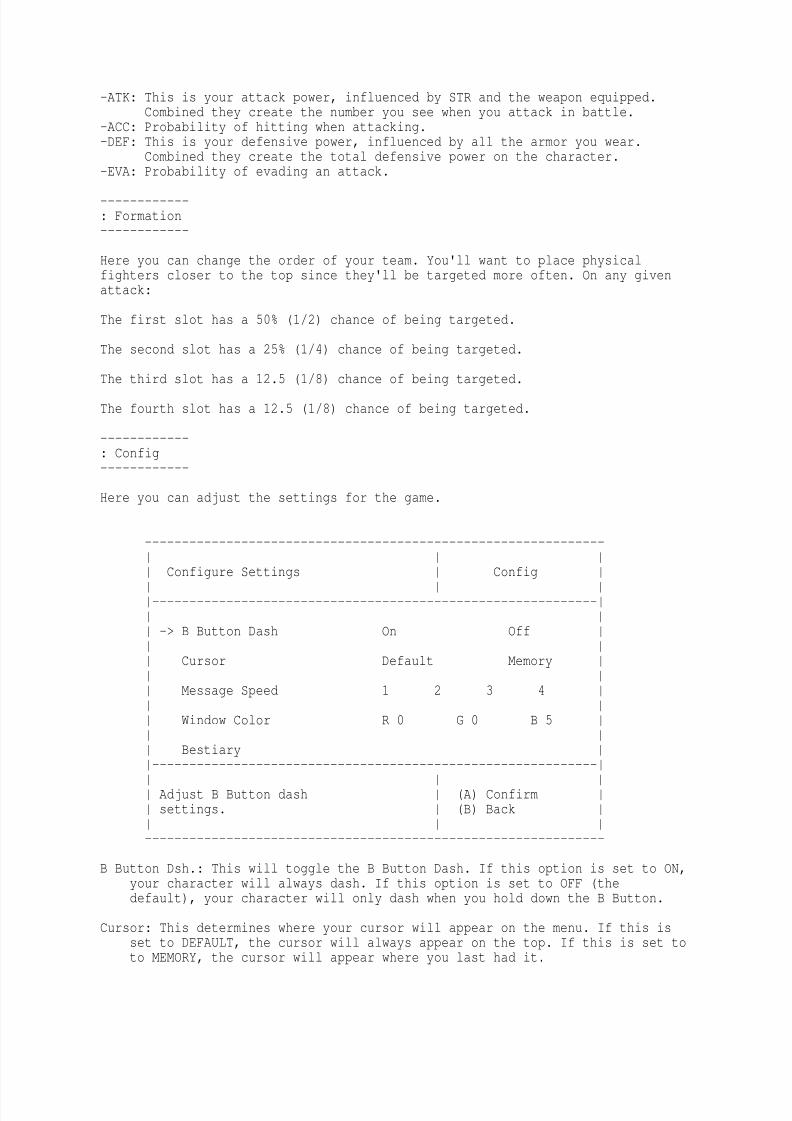
Here you can adjust the settings for the game.
--------------------------------------------------------------
Configure Settings Config ------------------------------------------------------------ -> B Button Dash On Off Cursor Default Memory Message Speed 1 2 3 4 Window Color R 0 G 0 B 5 Bestiary ------------------------------------------------------------ Adjust B Button dash (A) Confirm settings. (B) Back --------------------------------------------------------------
B Button Dsh.: This will toggle the B Button Dash. If this option is set to ON,your character will always dash. If this option is set to OFF (thedefault), your character will only dash when you hold down the B Button.
Cursor: This determines where your cursor will appear on the menu. If this isset to DEFAULT, the cursor will always appear on the top. If this is set toto MEMORY, the cursor will appear where you last had it.
8/7/2019 final fantasy walkthrough
http://slidepdf.com/reader/full/final-fantasy-walkthrough 11/85
Window Color: If you hate blue for some odd reason, you can change the color ofthe window. Using the Red, Green and Blue colors, you can change eachcolor's settings from a level between 0 and 7. The color you choose willfollow to every window's colors.
Bestiary: Here you can check all the enemies you've defeated so far. Monsters
highlighted in yellow with [new] to the left of them are monsters that youhave not yet viewed in the Bestiary.
------------: Save------------
If you are at a Save Point or on the Overworld, you can save your game. Doingso will save your progress (duh) so you can:
1) Go to sleep.2) See #1 for details.
When you see the Game Over screen, you can reload your last save and not bescrewed.
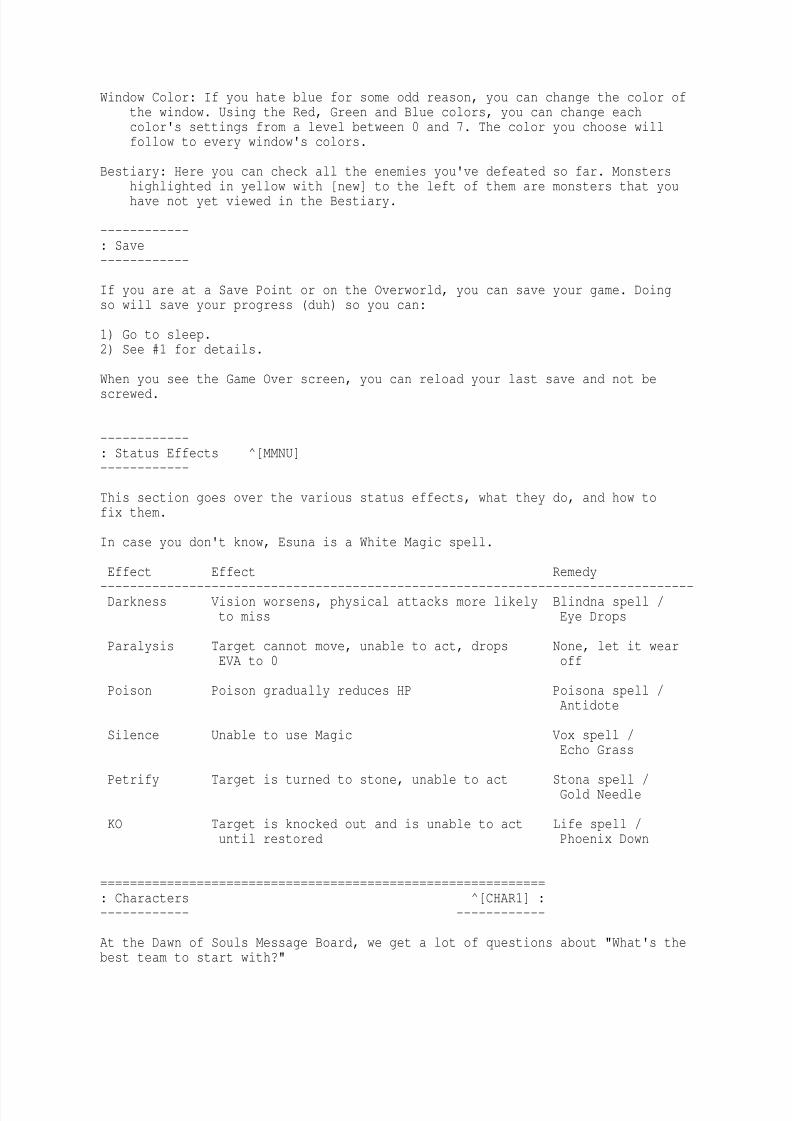
------------: Status Effects ^[MMNU]------------
This section goes over the various status effects, what they do, and how tofix them.
In case you don't know, Esuna is a White Magic spell.
Effect Effect Remedy--------------------------------------------------------------------------------Darkness Vision worsens, physical attacks more likely Blindna spell /
to miss Eye Drops
Paralysis Target cannot move, unable to act, drops None, let it wearEVA to 0 off
Poison Poison gradually reduces HP Poisona spell /Antidote
Silence Unable to use Magic Vox spell /Echo Grass
Petrify Target is turned to stone, unable to act Stona spell /Gold Needle
KO Target is knocked out and is unable to act Life spell /until restored Phoenix Down
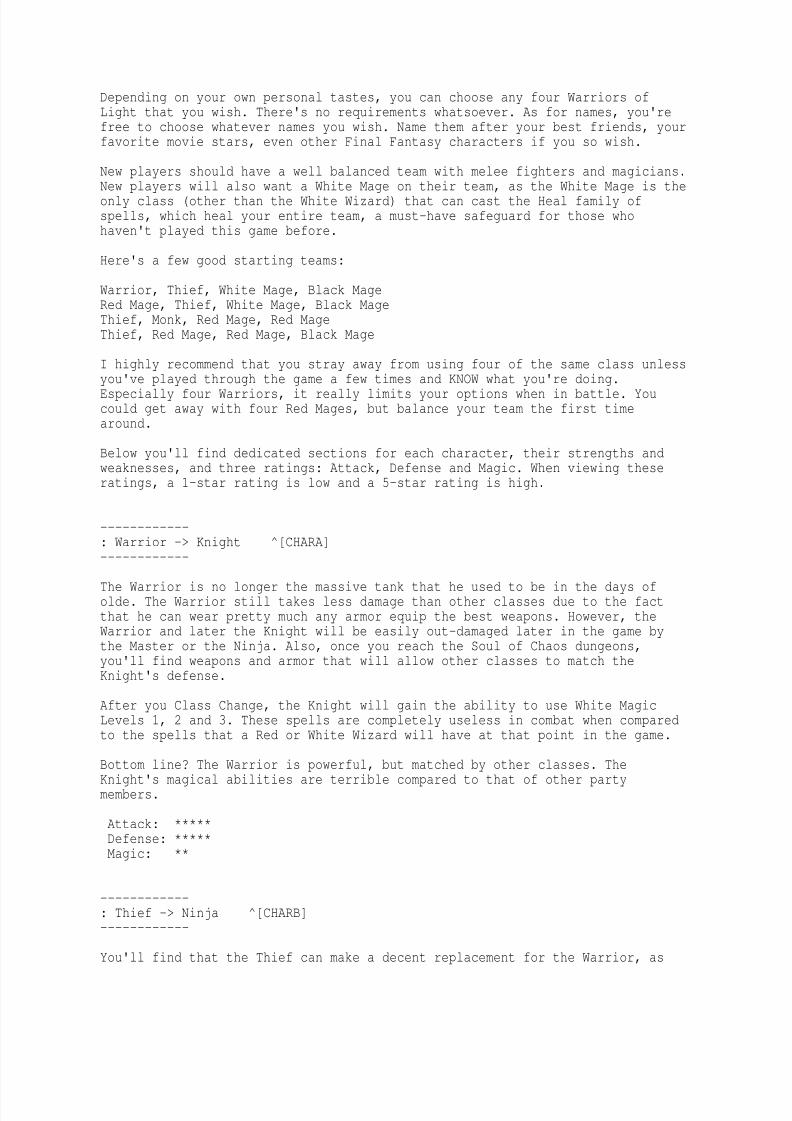
============================================================: Characters ^[CHAR1] :------------ ------------
At the Dawn of Souls Message Board, we get a lot of questions about "What's thebest team to start with?"
8/7/2019 final fantasy walkthrough
http://slidepdf.com/reader/full/final-fantasy-walkthrough 12/85
Depending on your own personal tastes, you can choose any four Warriors ofLight that you wish. There's no requirements whatsoever. As for names, you'refree to choose whatever names you wish. Name them after your best friends, yourfavorite movie stars, even other Final Fantasy characters if you so wish.
New players should have a well balanced team with melee fighters and magicians.
New players will also want a White Mage on their team, as the White Mage is theonly class (other than the White Wizard) that can cast the Heal family ofspells, which heal your entire team, a must-have safeguard for those whohaven't played this game before.
Here's a few good starting teams:
Warrior, Thief, White Mage, Black MageRed Mage, Thief, White Mage, Black MageThief, Monk, Red Mage, Red MageThief, Red Mage, Red Mage, Black Mage
I highly recommend that you stray away from using four of the same class unlessyou've played through the game a few times and KNOW what you're doing.Especially four Warriors, it really limits your options when in battle. Youcould get away with four Red Mages, but balance your team the first timearound.
Below you'll find dedicated sections for each character, their strengths andweaknesses, and three ratings: Attack, Defense and Magic. When viewing theseratings, a 1-star rating is low and a 5-star rating is high.
------------: Warrior -> Knight ^[CHARA]
------------
The Warrior is no longer the massive tank that he used to be in the days ofolde. The Warrior still takes less damage than other classes due to the factthat he can wear pretty much any armor equip the best weapons. However, theWarrior and later the Knight will be easily out-damaged later in the game bythe Master or the Ninja. Also, once you reach the Soul of Chaos dungeons,you'll find weapons and armor that will allow other classes to match theKnight's defense.
After you Class Change, the Knight will gain the ability to use White MagicLevels 1, 2 and 3. These spells are completely useless in combat when comparedto the spells that a Red or White Wizard will have at that point in the game.
Bottom line? The Warrior is powerful, but matched by other classes. TheKnight's magical abilities are terrible compared to that of other partymembers.
Attack: *****Defense: *****Magic: **
------------: Thief -> Ninja ^[CHARB]
------------
You'll find that the Thief can make a decent replacement for the Warrior, as
8/7/2019 final fantasy walkthrough
http://slidepdf.com/reader/full/final-fantasy-walkthrough 13/85
the Thief is nearly capable of matching the Warrior in terms of damage. TheThief is also fast and can usually attack first. However, once you ClassChange, I've found that your Ninja can be slightly slower than the WhiteWizard.
Once you Class Change, the Ninja becomes even more versatile than the Thief.The Ninja can use Black Magic Levels 1, 2, 3 and 4, which includes the most
useful spells, Temper and Haste.
The Ninja could possibly replace a Black Mage due to the fact that Haste andTemper are really the only two Black Magic spells you really need. However,having a Ninja in place of a Black Mage requires you to complete the ClassChange sidequest.
Attack: ****Defense: ****Magic: ****
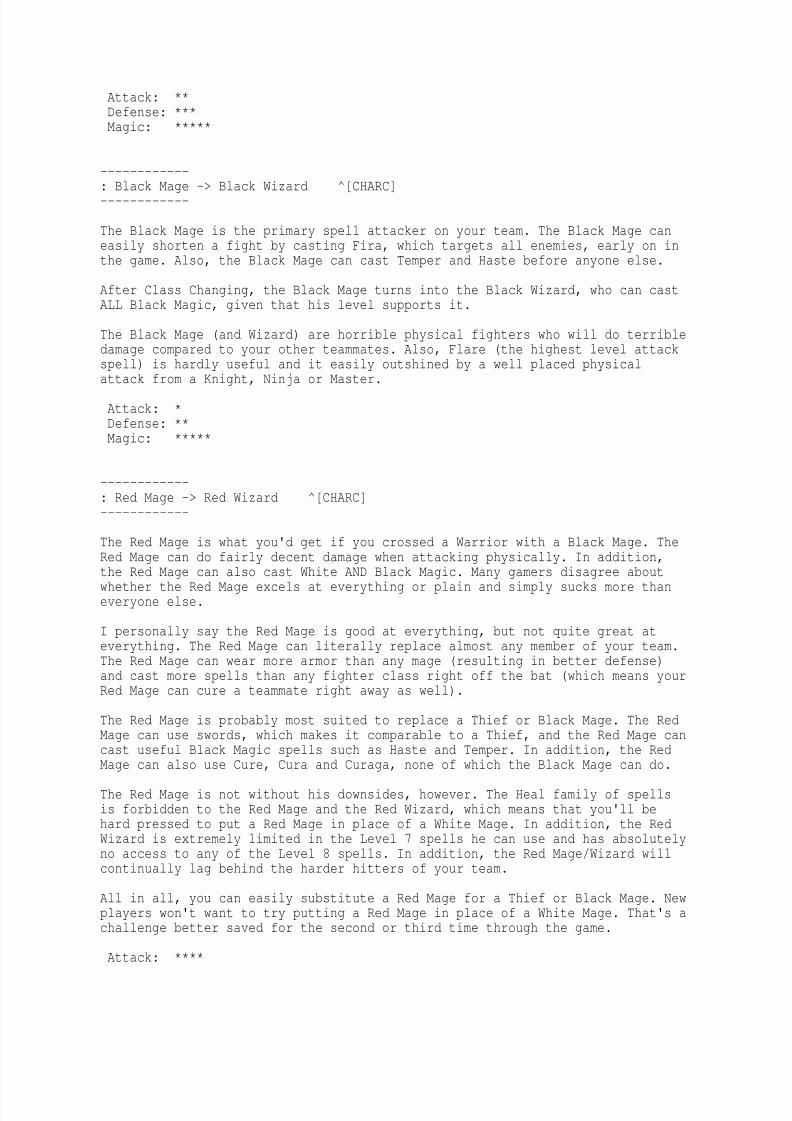
------------: Monk -> Master ^[CHARC]------------
The Monk is probably the biggest damage dealer in the entire squad. And here'sthe best part: the Monk requires no equipment to do so! The Monk can easilyout-damage your Warrior while using nothing but his bare hands (as long as youtake off the equipment).
The Monk really requires no equipment, which saves on Gil that you can use forother characters (spells, armor, etc.) Also, all the stuff that your Monk willfind useful isn't even bought in stores.
However, this massive power surge comes at a price. The Monk gains no MagicDefense, which means your Monk will succumb to monsters that cast spells. TheMaster will gain MDEF, but it also requires you to complete the Class Changesidequest. In addition, the Monk cannot learn spells, nor can the Master. Thisforces your Monk/Master to be a physical fighter ONLY.
Attack: *****Defense: ****Magic: N/A
------------: White Mage -> White Wizard ^[CHARC]------------
The White Mage is easily the greatest healer on your team. The White Mage andWhite Wizard are the only two classes that can case the Heal family of spells,which heal your entire party at once.
The White Mage is an essential for any new player. The Heal spells alone are alarge safeguard for new players so that they aren't easily defeated in battle.
When the White Mage Class Changes, he'll turn into the White Wizard, who can(eventually) cast ALL White Magic spells, given that his level supports it.
However, the White Mage/Wizard is not a physical fighter and cannot deal outmassive physical damage. In addition, Holy, the high-level attack spell, can'treally compare to a well placed physical attack from a Knight, Ninja or Master.
8/7/2019 final fantasy walkthrough
http://slidepdf.com/reader/full/final-fantasy-walkthrough 14/85
Attack: **Defense: ***Magic: *****
------------
: Black Mage -> Black Wizard ^[CHARC]------------
The Black Mage is the primary spell attacker on your team. The Black Mage caneasily shorten a fight by casting Fira, which targets all enemies, early on inthe game. Also, the Black Mage can cast Temper and Haste before anyone else.
After Class Changing, the Black Mage turns into the Black Wizard, who can castALL Black Magic, given that his level supports it.
The Black Mage (and Wizard) are horrible physical fighters who will do terribledamage compared to your other teammates. Also, Flare (the highest level attack
spell) is hardly useful and it easily outshined by a well placed physicalattack from a Knight, Ninja or Master.
Attack: *Defense: **Magic: *****
------------: Red Mage -> Red Wizard ^[CHARC]------------
The Red Mage is what you'd get if you crossed a Warrior with a Black Mage. The
Red Mage can do fairly decent damage when attacking physically. In addition,the Red Mage can also cast White AND Black Magic. Many gamers disagree aboutwhether the Red Mage excels at everything or plain and simply sucks more thaneveryone else.
I personally say the Red Mage is good at everything, but not quite great ateverything. The Red Mage can literally replace almost any member of your team.The Red Mage can wear more armor than any mage (resulting in better defense)and cast more spells than any fighter class right off the bat (which means yourRed Mage can cure a teammate right away as well).
The Red Mage is probably most suited to replace a Thief or Black Mage. The RedMage can use swords, which makes it comparable to a Thief, and the Red Mage cancast useful Black Magic spells such as Haste and Temper. In addition, the RedMage can also use Cure, Cura and Curaga, none of which the Black Mage can do.
The Red Mage is not without his downsides, however. The Heal family of spellsis forbidden to the Red Mage and the Red Wizard, which means that you'll behard pressed to put a Red Mage in place of a White Mage. In addition, the RedWizard is extremely limited in the Level 7 spells he can use and has absolutelyno access to any of the Level 8 spells. In addition, the Red Mage/Wizard willcontinually lag behind the harder hitters of your team.
All in all, you can easily substitute a Red Mage for a Thief or Black Mage. Newplayers won't want to try putting a Red Mage in place of a White Mage. That's a
challenge better saved for the second or third time through the game.
Attack: ****
8/7/2019 final fantasy walkthrough
http://slidepdf.com/reader/full/final-fantasy-walkthrough 15/85
Defense: ****Magic: ***
============================================================: Travel Notes ^[NOTE1] :------------ ------------
In case you're new to the Final Fantasy world, there are a few things youshould ALWAYS be aware of. As a matter of fact, I'm so confident in these notes,I'm going to say they apply to just about every Final Fantasy game in existance.
1. SAVE!!!!! I cannot emphasize this enough. Save early, safe often, SAVEBEFORE ENTERING A BIG BATTLE. AND FOR THE LOVE OF GOD (Buddah, Allah, orwhomever you choose to worship), SAVE ON DIFFERENT FILES!! Through theprocess of saving, you'll save yourself a LOT of headache and a LOT of losttime (like your entire game if you save on one file and somehow royallymess it up). Whether you save at a Save Sphere (FFX) or at an Inn (FF1),you should save whenever you can. In FF1 Dawn of Souls, you can save pretty
much anywhere (not just Inns). You'll most likely want to save beforeentering that scary-looking dungeon or talking to that boss that's 30pixels taller than you. Trust me on this, even the BEST FF players can messup every once in a while and lose their entire party. Also, you have threesave slots ... USE THEM! I can't tell you how many emails I get (FF2 moresothan others) about users who have royally ****ed up their game because theyneglected to save on multiple files. And if you really need a prime exampleof how you should save on different files, go play a Suikoden game.
2. TALK TO EVERYONE!! They'll (usually) give you clues as to where you shouldgo, who to talk to, etc. Plus, some of them even blurt out funny quotes,like the infamous "This guy are sick", or perhaps they'll provide clues tohidden treasures. Who knows? All you gotta do is talk to them.
3. LEVEL UP!! Unless you're doing a low-level game, you (probably) want to makeyour characters more powerful than the guys they fight. It's not smart totake your 500 HP characters into a battle against an enemy with 900,000 HPand an attack of 30,000, and it doesn't matter how high your evasion is.To do this, just fight the majority of your battles instead of running awayall the time. If you find yourself getting your ass handed to you each andevery battle, then yeah, you might want to backtrack and beat up weakerenemies until you level up a few levels.
4. CURE IS YOUR BEST FRIEND! Seriously here, Cure/Cura/Curaga/Curaja will mostlikely be used more than all your other spells combined. Once you learn thehigher-level Cure spell, you'll probably want to put it close to the top ofyour magic list. [YRTJEASECKXSXOVNNB]
5. MAKE SURE YOU'RE PREPARED!! Bring along plenty of Potions, Tents, Cottages,whatever it is that toots your horn, but going in empty-handed is justplain stupid.
============================================================: Reading This Guide ^[NOTE2] :------------ ------------
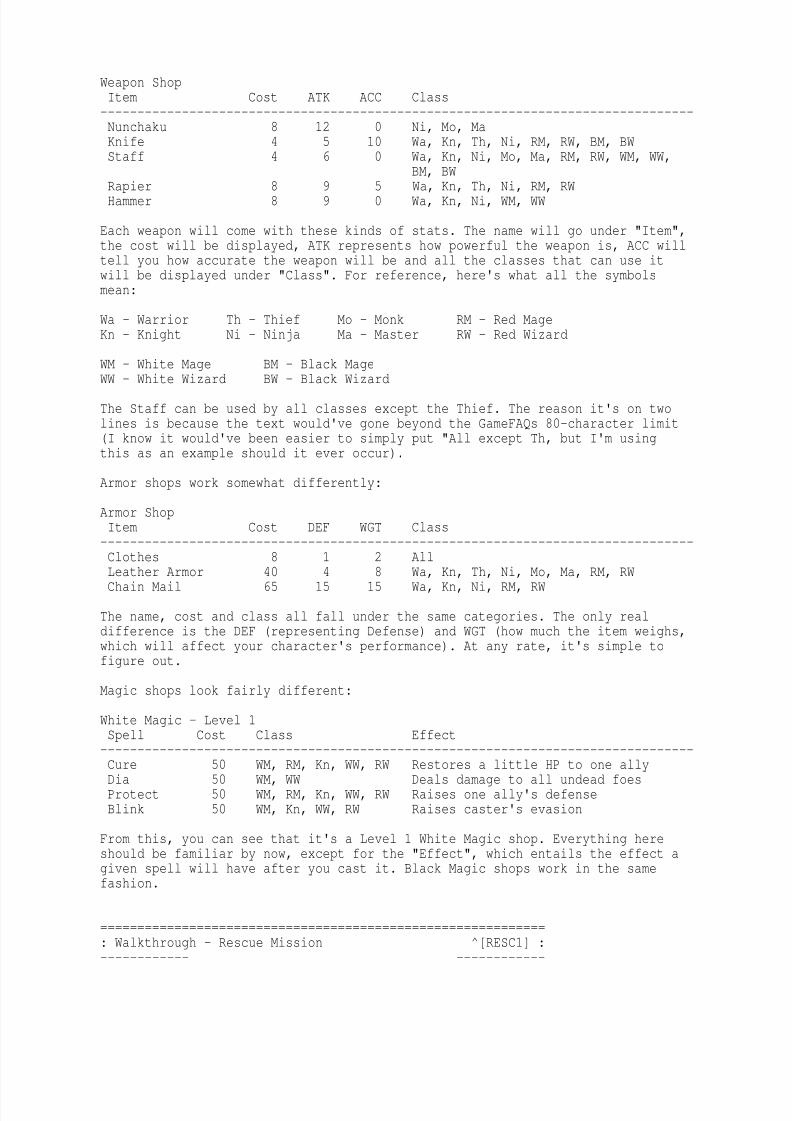
You'll notice that this guide looks significantly different than my other
guides (in terms of shopping and whatnot). That's because Final Fantasy worksin different ways. Take a look at the typical Weapon Shop:
8/7/2019 final fantasy walkthrough
http://slidepdf.com/reader/full/final-fantasy-walkthrough 16/85
Weapon ShopItem Cost ATK ACC Class--------------------------------------------------------------------------------Nunchaku 8 12 0 Ni, Mo, MaKnife 4 5 10 Wa, Kn, Th, Ni, RM, RW, BM, BWStaff 4 6 0 Wa, Kn, Ni, Mo, Ma, RM, RW, WM, WW,
BM, BW
Rapier 8 9 5 Wa, Kn, Th, Ni, RM, RWHammer 8 9 0 Wa, Kn, Ni, WM, WW
Each weapon will come with these kinds of stats. The name will go under "Item",the cost will be displayed, ATK represents how powerful the weapon is, ACC willtell you how accurate the weapon will be and all the classes that can use itwill be displayed under "Class". For reference, here's what all the symbolsmean:
Wa - Warrior Th - Thief Mo - Monk RM - Red MageKn - Knight Ni - Ninja Ma - Master RW - Red Wizard
WM - White Mage BM - Black MageWW - White Wizard BW - Black Wizard
The Staff can be used by all classes except the Thief. The reason it's on twolines is because the text would've gone beyond the GameFAQs 80-character limit(I know it would've been easier to simply put "All except Th, but I'm usingthis as an example should it ever occur).
Armor shops work somewhat differently:
Armor ShopItem Cost DEF WGT Class--------------------------------------------------------------------------------
Clothes 8 1 2 AllLeather Armor 40 4 8 Wa, Kn, Th, Ni, Mo, Ma, RM, RWChain Mail 65 15 15 Wa, Kn, Ni, RM, RW
The name, cost and class all fall under the same categories. The only realdifference is the DEF (representing Defense) and WGT (how much the item weighs,which will affect your character's performance). At any rate, it's simple tofigure out.
Magic shops look fairly different:
White Magic - Level 1Spell Cost Class Effect--------------------------------------------------------------------------------Cure 50 WM, RM, Kn, WW, RW Restores a little HP to one allyDia 50 WM, WW Deals damage to all undead foesProtect 50 WM, RM, Kn, WW, RW Raises one ally's defenseBlink 50 WM, Kn, WW, RW Raises caster's evasion
From this, you can see that it's a Level 1 White Magic shop. Everything hereshould be familiar by now, except for the "Effect", which entails the effect agiven spell will have after you cast it. Black Magic shops work in the samefashion.
============================================================: Walkthrough - Rescue Mission ^[RESC1] :------------ ------------
8/7/2019 final fantasy walkthrough
http://slidepdf.com/reader/full/final-fantasy-walkthrough 17/85
Lukahn's prophecy foretold of a time when four Warriors of Light would come tosave the world from darkness. You should know by now that characters you havejust selected ARE those four warriors. On top of all that, the Warriors ofLight must follow their destiny to bring the light back to all four Crystals.Now then, hopefully you're on the same page on the game, so let's get to it.
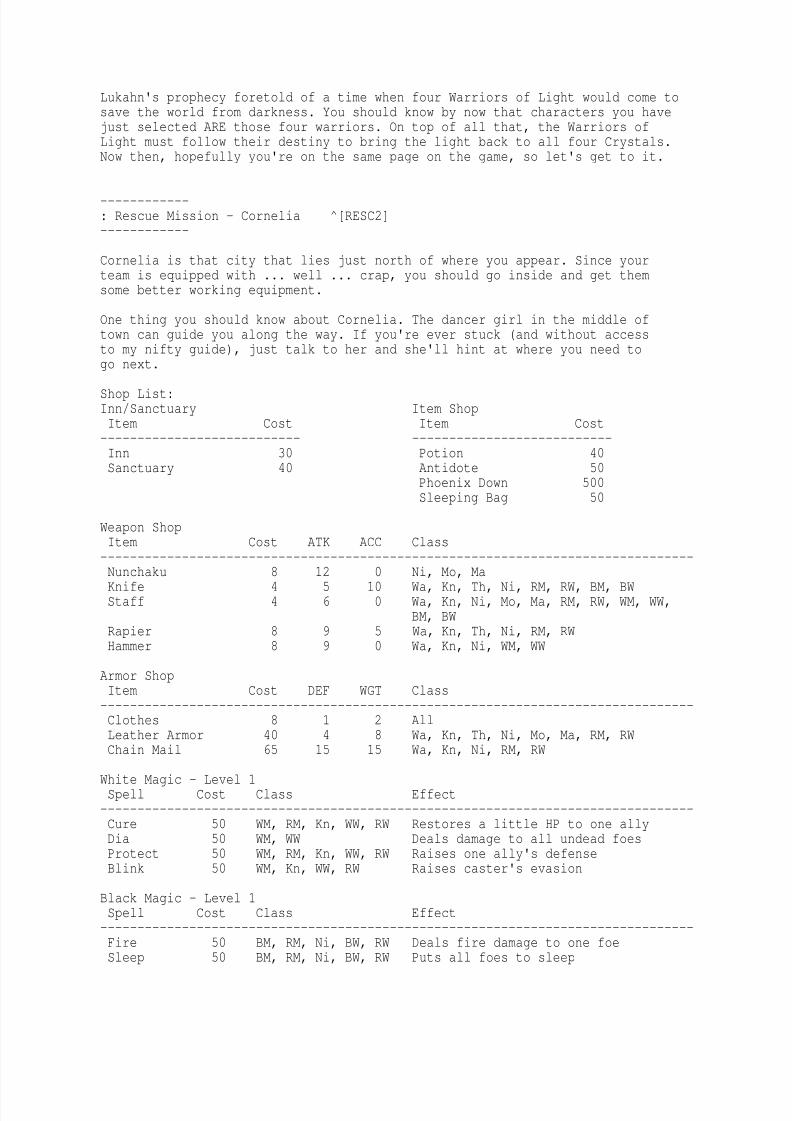
------------: Rescue Mission - Cornelia ^[RESC2]------------
Cornelia is that city that lies just north of where you appear. Since yourteam is equipped with ... well ... crap, you should go inside and get themsome better working equipment.
One thing you should know about Cornelia. The dancer girl in the middle oftown can guide you along the way. If you're ever stuck (and without accessto my nifty guide), just talk to her and she'll hint at where you need to
go next.
Shop List:Inn/Sanctuary Item ShopItem Cost Item Cost--------------------------- ---------------------------Inn 30 Potion 40Sanctuary 40 Antidote 50
Phoenix Down 500Sleeping Bag 50
Weapon ShopItem Cost ATK ACC Class
--------------------------------------------------------------------------------Nunchaku 8 12 0 Ni, Mo, MaKnife 4 5 10 Wa, Kn, Th, Ni, RM, RW, BM, BWStaff 4 6 0 Wa, Kn, Ni, Mo, Ma, RM, RW, WM, WW,
BM, BWRapier 8 9 5 Wa, Kn, Th, Ni, RM, RWHammer 8 9 0 Wa, Kn, Ni, WM, WW
Armor ShopItem Cost DEF WGT Class--------------------------------------------------------------------------------Clothes 8 1 2 AllLeather Armor 40 4 8 Wa, Kn, Th, Ni, Mo, Ma, RM, RWChain Mail 65 15 15 Wa, Kn, Ni, RM, RW
White Magic - Level 1Spell Cost Class Effect--------------------------------------------------------------------------------Cure 50 WM, RM, Kn, WW, RW Restores a little HP to one allyDia 50 WM, WW Deals damage to all undead foesProtect 50 WM, RM, Kn, WW, RW Raises one ally's defenseBlink 50 WM, Kn, WW, RW Raises caster's evasion
Black Magic - Level 1Spell Cost Class Effect
--------------------------------------------------------------------------------Fire 50 BM, RM, Ni, BW, RW Deals fire damage to one foeSleep 50 BM, RM, Ni, BW, RW Puts all foes to sleep

8/7/2019 final fantasy walkthrough
http://slidepdf.com/reader/full/final-fantasy-walkthrough 18/85
Focus 50 BM, RM, Ni, BW, RW Lowers one foe's evasionThunder 50 BM, RM, Ni, BW, RW Deals lightning damage to one foe
The very first thing you'll want to do is buy some better weaponry for yourteam. Considering you start out with 500 Gil, you have a lot of cash to playwith. Warriors, Thieves and Red Mages will all want the Rapier. If you REALLYwant a Hammer for your White Mage, go for it. If you have a White Mage and a
Black Mage, just put the Staff that your White Mage has onto the Black Mage.
For armor, the Chain Mail is a very good choice, but it's rather spendy (notto mention you'll still want spells), so if you have a Warrior and a Red Magein your party, get the Chain Mail for your strongest member only (the Warrior).
Once you're done purchasing weapons and armor (and equipping your teamproperly), sell off your old stuff. It won't equal to much Gil, but you'rebasically holding on to worthless items for nothing.
For White Magic, Cure is a must. Period. If you're going to get one Whitespell, make it Cure. After that, get Protect and Blink. I don't think there are
enough undead enemies in the game to make the Dia family worthwhile at all.Besides, Fire works just as well.
In the Black Magic department, I prefer Fire; it's a good spell that does somenice damage this early on. After Fire, Thunder is another great elementialspell. For your third spell, I suggest Sleep, since it targets everyone andcould buy you some valuable time if you're in a pinch.
Don't worry about items for now. Besides, you probably won't have enough Gilleftover (after weapons, armor and spells) to get much of anything.
Once you're done, attempt to head outside and talk to one of the guards.They'll recognize you (more like your Crystals) and bring you to the King.
------------: Rescue Mission - Castle Cornelia ^[RESC3]------------
Items obtained Equipment obtained---------------- --------------------N/A N/A
Watch a scene as the King charges you with rescuing his daughter, Sarah. And itreally doesn't matter if you want to or not ... you're doing it because that'sthe only way to advance the story. Not to mention you're basically stuck onCornelia until the bridge is fixed. :)
Don't worry about any of the treasures in Castle Cornelia. They're all blockedoff until later.
To exit Castle Cornelia, simply head south until you hit the first floor. Keepgoing south to exit the castle.
------------: Rescue Mission - Cornelia Area ^[RESC4]------------
This section covers monsters found in the Cornelia area.
8/7/2019 final fantasy walkthrough
http://slidepdf.com/reader/full/final-fantasy-walkthrough 19/85
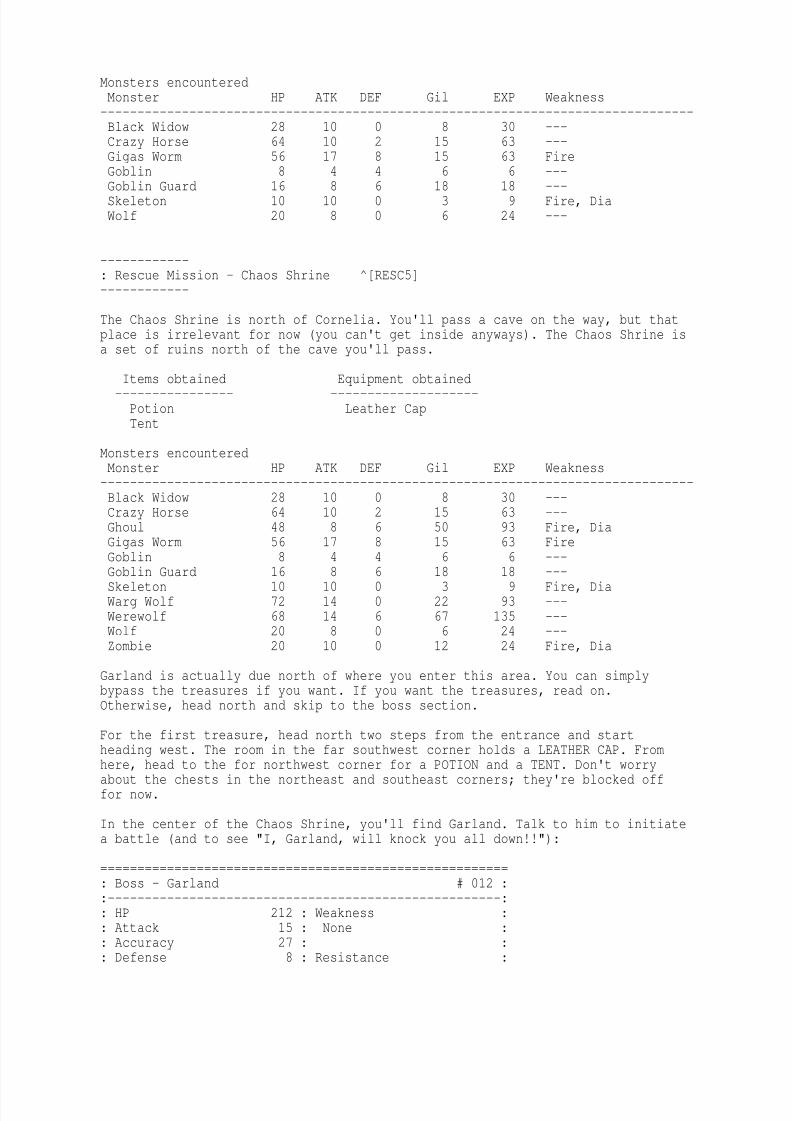
Monsters encounteredMonster HP ATK DEF Gil EXP Weakness--------------------------------------------------------------------------------Black Widow 28 10 0 8 30 ---Crazy Horse 64 10 2 15 63 ---Gigas Worm 56 17 8 15 63 FireGoblin 8 4 4 6 6 ---
Goblin Guard 16 8 6 18 18 ---Skeleton 10 10 0 3 9 Fire, DiaWolf 20 8 0 6 24 ---
------------: Rescue Mission - Chaos Shrine ^[RESC5]------------
The Chaos Shrine is north of Cornelia. You'll pass a cave on the way, but thatplace is irrelevant for now (you can't get inside anyways). The Chaos Shrine isa set of ruins north of the cave you'll pass.
Items obtained Equipment obtained---------------- --------------------Potion Leather CapTent
Monsters encounteredMonster HP ATK DEF Gil EXP Weakness--------------------------------------------------------------------------------Black Widow 28 10 0 8 30 ---Crazy Horse 64 10 2 15 63 ---Ghoul 48 8 6 50 93 Fire, DiaGigas Worm 56 17 8 15 63 Fire
Goblin 8 4 4 6 6 ---Goblin Guard 16 8 6 18 18 ---Skeleton 10 10 0 3 9 Fire, DiaWarg Wolf 72 14 0 22 93 ---Werewolf 68 14 6 67 135 ---Wolf 20 8 0 6 24 ---Zombie 20 10 0 12 24 Fire, Dia
Garland is actually due north of where you enter this area. You can simplybypass the treasures if you want. If you want the treasures, read on.Otherwise, head north and skip to the boss section.
For the first treasure, head north two steps from the entrance and startheading west. The room in the far southwest corner holds a LEATHER CAP. Fromhere, head to the for northwest corner for a POTION and a TENT. Don't worryabout the chests in the northeast and southeast corners; they're blocked offfor now.
In the center of the Chaos Shrine, you'll find Garland. Talk to him to initiatea battle (and to see "I, Garland, will knock you all down!!"):
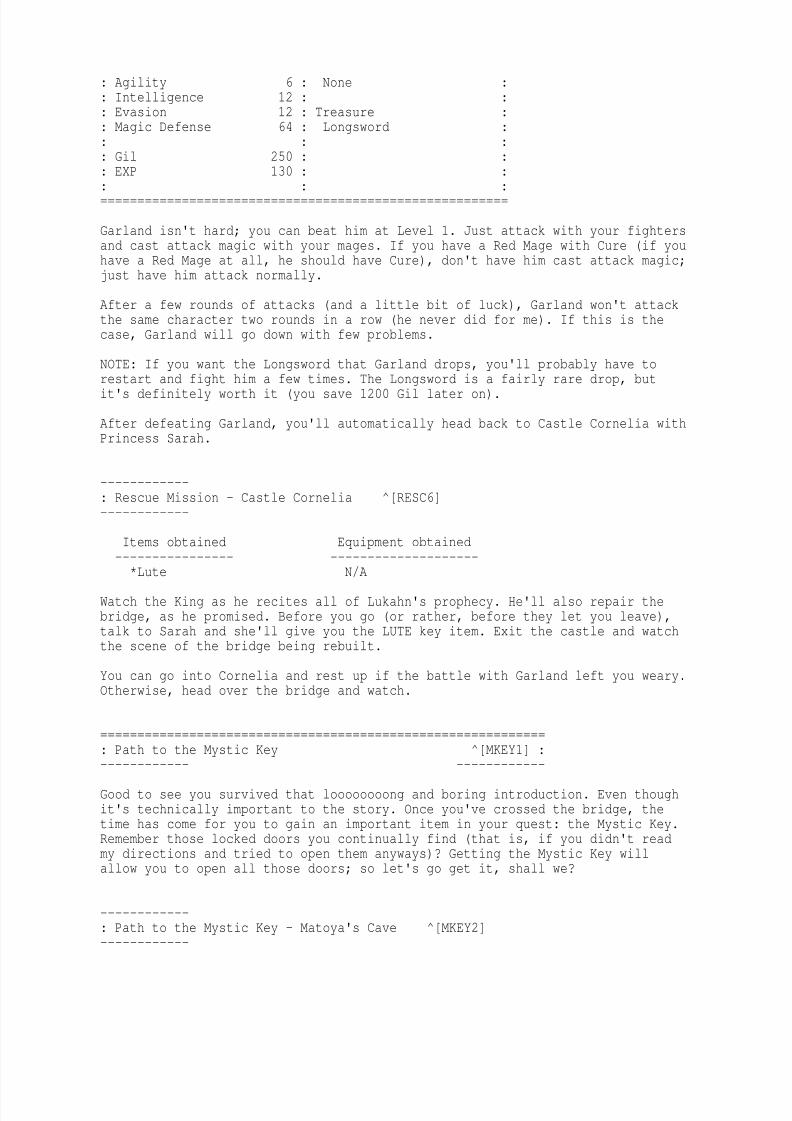
=======================================================: Boss - Garland # 012 ::-----------------------------------------------------:: HP 212 : Weakness :
: Attack 15 : None :: Accuracy 27 : :: Defense 8 : Resistance :
8/7/2019 final fantasy walkthrough
http://slidepdf.com/reader/full/final-fantasy-walkthrough 20/85
: Agility 6 : None :: Intelligence 12 : :: Evasion 12 : Treasure :: Magic Defense 64 : Longsword :: : :: Gil 250 : :: EXP 130 : :
: : :=======================================================
Garland isn't hard; you can beat him at Level 1. Just attack with your fightersand cast attack magic with your mages. If you have a Red Mage with Cure (if youhave a Red Mage at all, he should have Cure), don't have him cast attack magic;just have him attack normally.
After a few rounds of attacks (and a little bit of luck), Garland won't attackthe same character two rounds in a row (he never did for me). If this is thecase, Garland will go down with few problems.
NOTE: If you want the Longsword that Garland drops, you'll probably have torestart and fight him a few times. The Longsword is a fairly rare drop, butit's definitely worth it (you save 1200 Gil later on).
After defeating Garland, you'll automatically head back to Castle Cornelia withPrincess Sarah.
------------: Rescue Mission - Castle Cornelia ^[RESC6]------------
Items obtained Equipment obtained
---------------- --------------------*Lute N/A
Watch the King as he recites all of Lukahn's prophecy. He'll also repair thebridge, as he promised. Before you go (or rather, before they let you leave),talk to Sarah and she'll give you the LUTE key item. Exit the castle and watchthe scene of the bridge being rebuilt.
You can go into Cornelia and rest up if the battle with Garland left you weary.Otherwise, head over the bridge and watch.
============================================================: Path to the Mystic Key ^[MKEY1] :------------ ------------
Good to see you survived that loooooooong and boring introduction. Even thoughit's technically important to the story. Once you've crossed the bridge, thetime has come for you to gain an important item in your quest: the Mystic Key.Remember those locked doors you continually find (that is, if you didn't readmy directions and tried to open them anyways)? Getting the Mystic Key willallow you to open all those doors; so let's go get it, shall we?
------------
: Path to the Mystic Key - Matoya's Cave ^[MKEY2]------------
8/7/2019 final fantasy walkthrough
http://slidepdf.com/reader/full/final-fantasy-walkthrough 21/85
Matoya's Cave is located due north of Cornelia. It's located on the farnorthern penninsula.
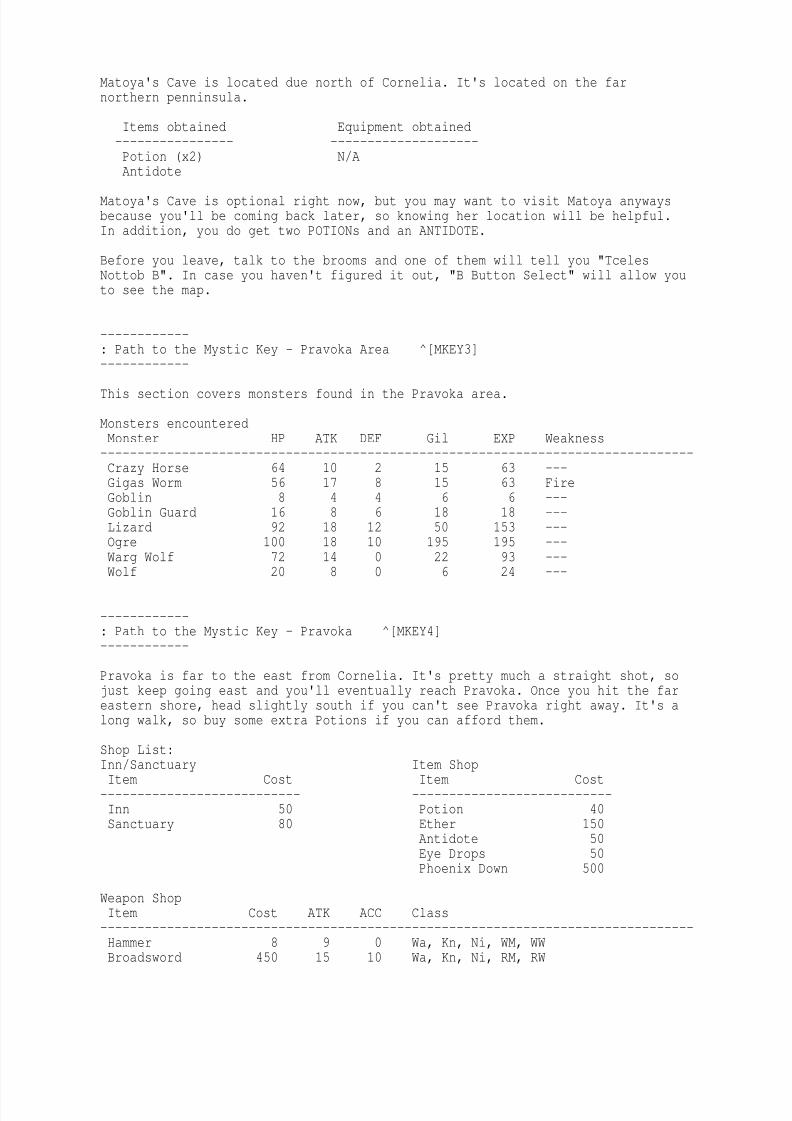
Items obtained Equipment obtained---------------- --------------------Potion (x2) N/AAntidote
Matoya's Cave is optional right now, but you may want to visit Matoya anywaysbecause you'll be coming back later, so knowing her location will be helpful.In addition, you do get two POTIONs and an ANTIDOTE.
Before you leave, talk to the brooms and one of them will tell you "TcelesNottob B". In case you haven't figured it out, "B Button Select" will allow youto see the map.
------------: Path to the Mystic Key - Pravoka Area ^[MKEY3]
------------
This section covers monsters found in the Pravoka area.
Monsters encounteredMonster HP ATK DEF Gil EXP Weakness--------------------------------------------------------------------------------Crazy Horse 64 10 2 15 63 ---Gigas Worm 56 17 8 15 63 FireGoblin 8 4 4 6 6 ---Goblin Guard 16 8 6 18 18 ---Lizard 92 18 12 50 153 ---Ogre 100 18 10 195 195 ---
Warg Wolf 72 14 0 22 93 ---Wolf 20 8 0 6 24 ---
------------: Path to the Mystic Key - Pravoka ^[MKEY4]------------
Pravoka is far to the east from Cornelia. It's pretty much a straight shot, sojust keep going east and you'll eventually reach Pravoka. Once you hit the fareastern shore, head slightly south if you can't see Pravoka right away. It's along walk, so buy some extra Potions if you can afford them.
Shop List:Inn/Sanctuary Item ShopItem Cost Item Cost--------------------------- ---------------------------Inn 50 Potion 40Sanctuary 80 Ether 150
Antidote 50Eye Drops 50Phoenix Down 500
Weapon ShopItem Cost ATK ACC Class
--------------------------------------------------------------------------------Hammer 8 9 0 Wa, Kn, Ni, WM, WWBroadsword 450 15 10 Wa, Kn, Ni, RM, RW
8/7/2019 final fantasy walkthrough
http://slidepdf.com/reader/full/final-fantasy-walkthrough 22/85
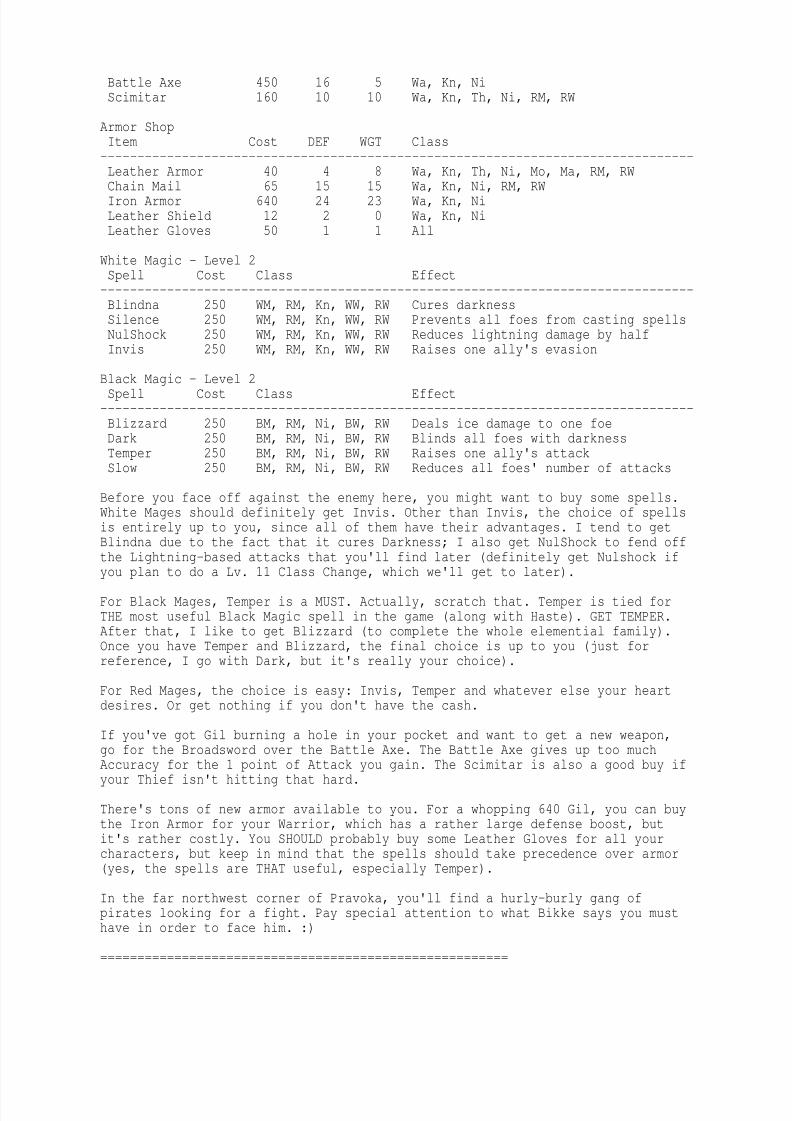
Battle Axe 450 16 5 Wa, Kn, NiScimitar 160 10 10 Wa, Kn, Th, Ni, RM, RW
Armor ShopItem Cost DEF WGT Class--------------------------------------------------------------------------------Leather Armor 40 4 8 Wa, Kn, Th, Ni, Mo, Ma, RM, RW
Chain Mail 65 15 15 Wa, Kn, Ni, RM, RWIron Armor 640 24 23 Wa, Kn, NiLeather Shield 12 2 0 Wa, Kn, NiLeather Gloves 50 1 1 All
White Magic - Level 2Spell Cost Class Effect--------------------------------------------------------------------------------Blindna 250 WM, RM, Kn, WW, RW Cures darknessSilence 250 WM, RM, Kn, WW, RW Prevents all foes from casting spellsNulShock 250 WM, RM, Kn, WW, RW Reduces lightning damage by halfInvis 250 WM, RM, Kn, WW, RW Raises one ally's evasion
Black Magic - Level 2Spell Cost Class Effect--------------------------------------------------------------------------------Blizzard 250 BM, RM, Ni, BW, RW Deals ice damage to one foeDark 250 BM, RM, Ni, BW, RW Blinds all foes with darknessTemper 250 BM, RM, Ni, BW, RW Raises one ally's attackSlow 250 BM, RM, Ni, BW, RW Reduces all foes' number of attacks
Before you face off against the enemy here, you might want to buy some spells.White Mages should definitely get Invis. Other than Invis, the choice of spellsis entirely up to you, since all of them have their advantages. I tend to getBlindna due to the fact that it cures Darkness; I also get NulShock to fend off
the Lightning-based attacks that you'll find later (definitely get Nulshock ifyou plan to do a Lv. 11 Class Change, which we'll get to later).
For Black Mages, Temper is a MUST. Actually, scratch that. Temper is tied forTHE most useful Black Magic spell in the game (along with Haste). GET TEMPER.After that, I like to get Blizzard (to complete the whole elemential family).Once you have Temper and Blizzard, the final choice is up to you (just forreference, I go with Dark, but it's really your choice).
For Red Mages, the choice is easy: Invis, Temper and whatever else your heartdesires. Or get nothing if you don't have the cash.
If you've got Gil burning a hole in your pocket and want to get a new weapon,go for the Broadsword over the Battle Axe. The Battle Axe gives up too muchAccuracy for the 1 point of Attack you gain. The Scimitar is also a good buy ifyour Thief isn't hitting that hard.
There's tons of new armor available to you. For a whopping 640 Gil, you can buythe Iron Armor for your Warrior, which has a rather large defense boost, butit's rather costly. You SHOULD probably buy some Leather Gloves for all yourcharacters, but keep in mind that the spells should take precedence over armor(yes, the spells are THAT useful, especially Temper).
In the far northwest corner of Pravoka, you'll find a hurly-burly gang ofpirates looking for a fight. Pay special attention to what Bikke says you must
have in order to face him. :)
=======================================================
8/7/2019 final fantasy walkthrough
http://slidepdf.com/reader/full/final-fantasy-walkthrough 23/85
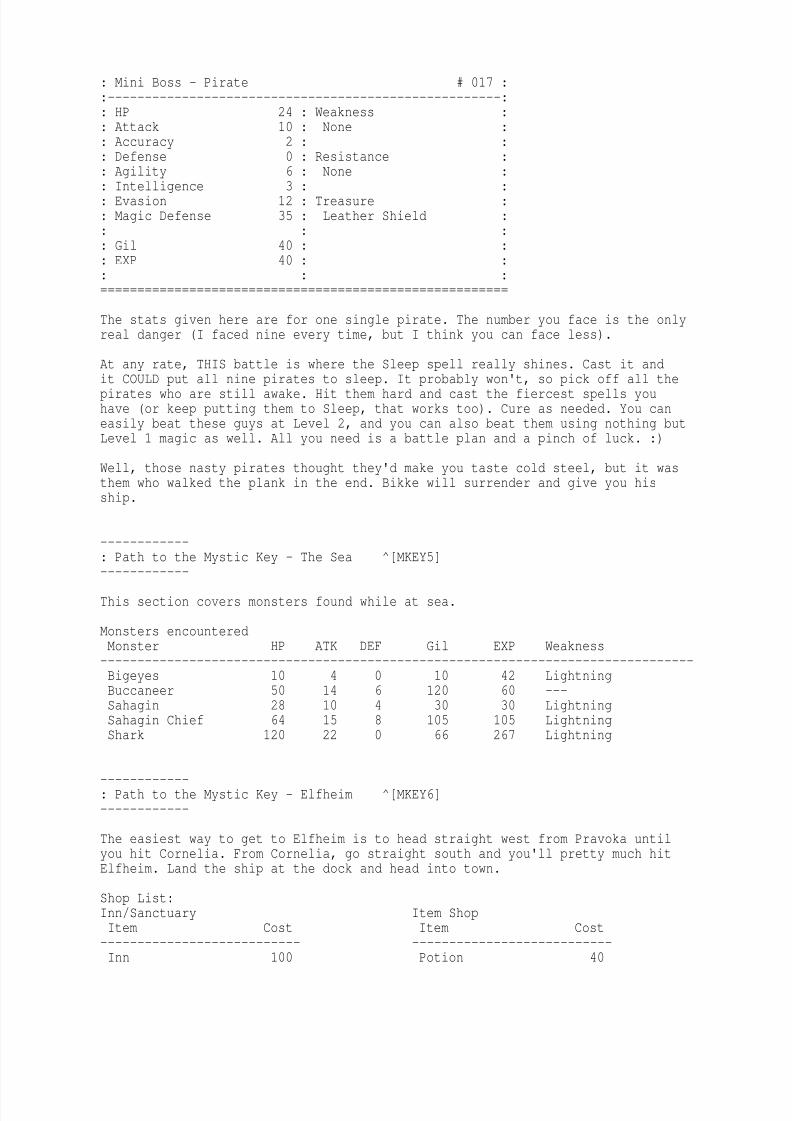
: Mini Boss - Pirate # 017 ::-----------------------------------------------------:: HP 24 : Weakness :: Attack 10 : None :: Accuracy 2 : :: Defense 0 : Resistance :: Agility 6 : None :
: Intelligence 3 : :: Evasion 12 : Treasure :: Magic Defense 35 : Leather Shield :: : :: Gil 40 : :: EXP 40 : :: : :=======================================================
The stats given here are for one single pirate. The number you face is the onlyreal danger (I faced nine every time, but I think you can face less).
At any rate, THIS battle is where the Sleep spell really shines. Cast it andit COULD put all nine pirates to sleep. It probably won't, so pick off all thepirates who are still awake. Hit them hard and cast the fiercest spells youhave (or keep putting them to Sleep, that works too). Cure as needed. You caneasily beat these guys at Level 2, and you can also beat them using nothing butLevel 1 magic as well. All you need is a battle plan and a pinch of luck. :)
Well, those nasty pirates thought they'd make you taste cold steel, but it wasthem who walked the plank in the end. Bikke will surrender and give you hisship.
------------
: Path to the Mystic Key - The Sea ^[MKEY5]------------
This section covers monsters found while at sea.
Monsters encounteredMonster HP ATK DEF Gil EXP Weakness--------------------------------------------------------------------------------Bigeyes 10 4 0 10 42 LightningBuccaneer 50 14 6 120 60 ---Sahagin 28 10 4 30 30 LightningSahagin Chief 64 15 8 105 105 LightningShark 120 22 0 66 267 Lightning
------------: Path to the Mystic Key - Elfheim ^[MKEY6]------------
The easiest way to get to Elfheim is to head straight west from Pravoka untilyou hit Cornelia. From Cornelia, go straight south and you'll pretty much hitElfheim. Land the ship at the dock and head into town.
Shop List:Inn/Sanctuary Item Shop
Item Cost Item Cost--------------------------- ---------------------------Inn 100 Potion 40
8/7/2019 final fantasy walkthrough
http://slidepdf.com/reader/full/final-fantasy-walkthrough 24/85
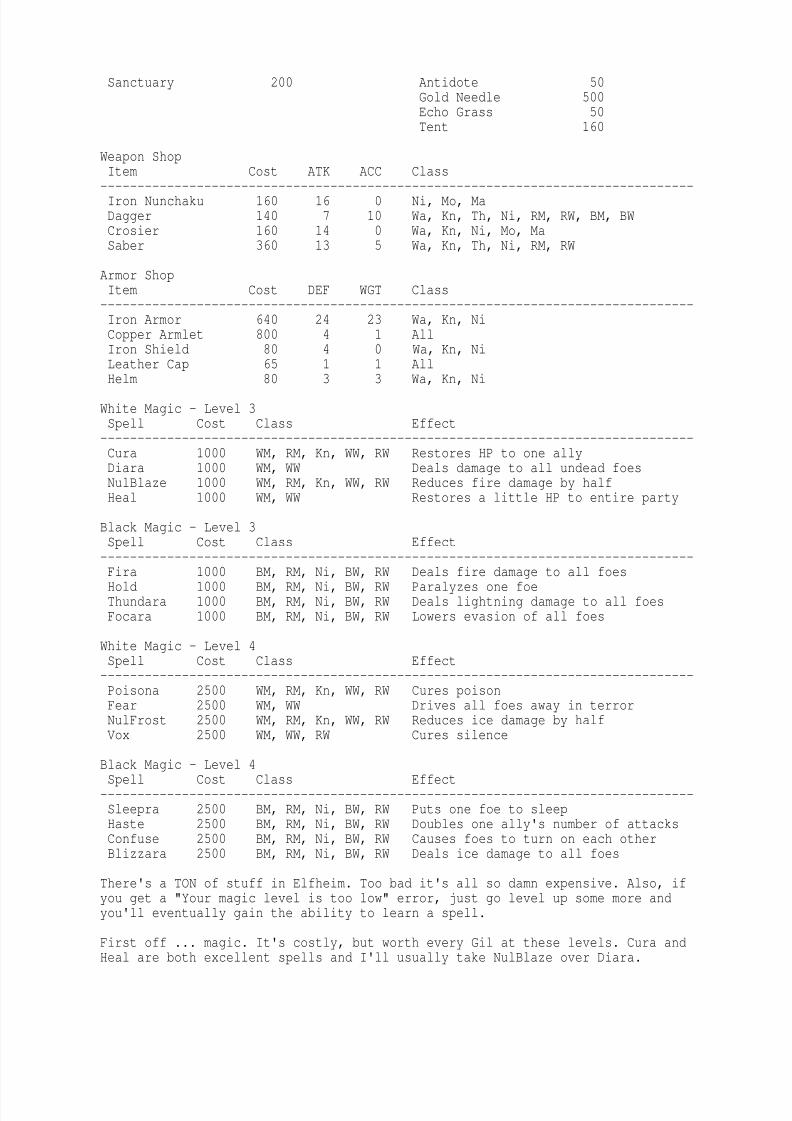
Sanctuary 200 Antidote 50Gold Needle 500Echo Grass 50Tent 160
Weapon ShopItem Cost ATK ACC Class
--------------------------------------------------------------------------------Iron Nunchaku 160 16 0 Ni, Mo, MaDagger 140 7 10 Wa, Kn, Th, Ni, RM, RW, BM, BWCrosier 160 14 0 Wa, Kn, Ni, Mo, MaSaber 360 13 5 Wa, Kn, Th, Ni, RM, RW
Armor ShopItem Cost DEF WGT Class--------------------------------------------------------------------------------Iron Armor 640 24 23 Wa, Kn, NiCopper Armlet 800 4 1 AllIron Shield 80 4 0 Wa, Kn, Ni
Leather Cap 65 1 1 AllHelm 80 3 3 Wa, Kn, Ni
White Magic - Level 3Spell Cost Class Effect--------------------------------------------------------------------------------Cura 1000 WM, RM, Kn, WW, RW Restores HP to one allyDiara 1000 WM, WW Deals damage to all undead foesNulBlaze 1000 WM, RM, Kn, WW, RW Reduces fire damage by halfHeal 1000 WM, WW Restores a little HP to entire party
Black Magic - Level 3Spell Cost Class Effect
--------------------------------------------------------------------------------Fira 1000 BM, RM, Ni, BW, RW Deals fire damage to all foesHold 1000 BM, RM, Ni, BW, RW Paralyzes one foeThundara 1000 BM, RM, Ni, BW, RW Deals lightning damage to all foesFocara 1000 BM, RM, Ni, BW, RW Lowers evasion of all foes
White Magic - Level 4Spell Cost Class Effect--------------------------------------------------------------------------------Poisona 2500 WM, RM, Kn, WW, RW Cures poisonFear 2500 WM, WW Drives all foes away in terrorNulFrost 2500 WM, RM, Kn, WW, RW Reduces ice damage by halfVox 2500 WM, WW, RW Cures silence
Black Magic - Level 4Spell Cost Class Effect--------------------------------------------------------------------------------Sleepra 2500 BM, RM, Ni, BW, RW Puts one foe to sleepHaste 2500 BM, RM, Ni, BW, RW Doubles one ally's number of attacksConfuse 2500 BM, RM, Ni, BW, RW Causes foes to turn on each otherBlizzara 2500 BM, RM, Ni, BW, RW Deals ice damage to all foes
There's a TON of stuff in Elfheim. Too bad it's all so damn expensive. Also, ifyou get a "Your magic level is too low" error, just go level up some more andyou'll eventually gain the ability to learn a spell.
First off ... magic. It's costly, but worth every Gil at these levels. Cura andHeal are both excellent spells and I'll usually take NulBlaze over Diara.
8/7/2019 final fantasy walkthrough
http://slidepdf.com/reader/full/final-fantasy-walkthrough 25/85
Poisonia is probably the first Lv. 4 spell you'll want to get, since the areaaround Elfheim has a lot of monsters that can inflict Poison. After that, getVox and NulFrost (Fear isn't that great at all).
In the Black Magic department, Fira is a really nice spell to have, as isThundara; the third slot is up to you. HASTE IS A MUST-HAVE, so get it as soonas you can (it'll make your world-saving business much easier). Blizzara is
also a great spell to have. I like Confuse over Sleepra, but neither one canhold a light to Haste. :)
Once you have the magic you want, you can burn the rest of your Gil on CopperArmlets and Leather Caps for everyone who isn't a Warrior (they need to survivetoo, ya know?). If you have the extra Gil, boost up your main fighter'sdefense.
Everything in Elfheim's Weapon Shop ... well ... sucks. The only thing worthnoting is the Dagger, which is a better weapon for your Black Mage. All theother weapons are crap compared to the Broadsword back in Pravoka. The onlyadvantage Elfheim's weapons have is that they're cheaper. I really suggest
going back to Pravoka if you want better weaponry.
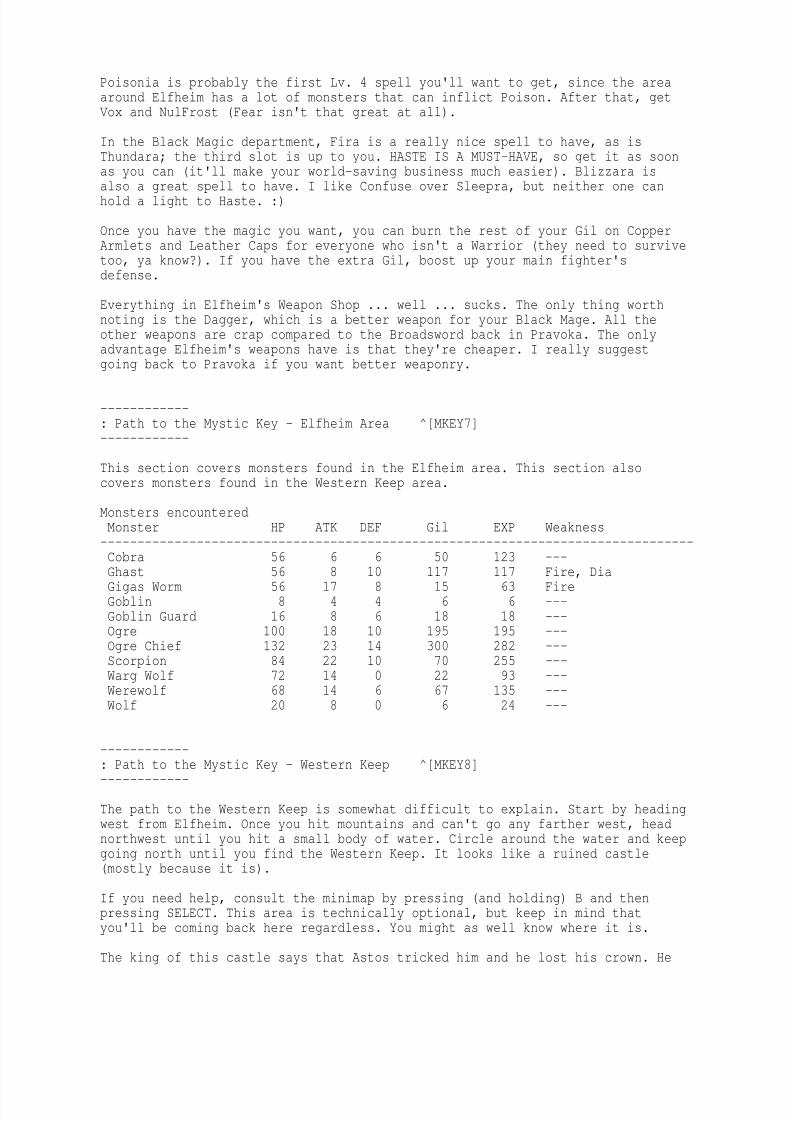
------------: Path to the Mystic Key - Elfheim Area ^[MKEY7]------------
This section covers monsters found in the Elfheim area. This section alsocovers monsters found in the Western Keep area.
Monsters encounteredMonster HP ATK DEF Gil EXP Weakness--------------------------------------------------------------------------------
Cobra 56 6 6 50 123 ---Ghast 56 8 10 117 117 Fire, DiaGigas Worm 56 17 8 15 63 FireGoblin 8 4 4 6 6 ---Goblin Guard 16 8 6 18 18 ---Ogre 100 18 10 195 195 ---Ogre Chief 132 23 14 300 282 ---Scorpion 84 22 10 70 255 ---Warg Wolf 72 14 0 22 93 ---Werewolf 68 14 6 67 135 ---Wolf 20 8 0 6 24 ---
------------: Path to the Mystic Key - Western Keep ^[MKEY8]------------
The path to the Western Keep is somewhat difficult to explain. Start by headingwest from Elfheim. Once you hit mountains and can't go any farther west, headnorthwest until you hit a small body of water. Circle around the water and keepgoing north until you find the Western Keep. It looks like a ruined castle(mostly because it is).
If you need help, consult the minimap by pressing (and holding) B and thenpressing SELECT. This area is technically optional, but keep in mind that
you'll be coming back here regardless. You might as well know where it is.
The king of this castle says that Astos tricked him and he lost his crown. He
8/7/2019 final fantasy walkthrough
http://slidepdf.com/reader/full/final-fantasy-walkthrough 26/85
asks you to get it for him, so let's get to it.
------------: Path to the Mystic Key - Marsh Cave ^[MKEY9]------------
The Marsh Cave is directly south of the Western Keep. Just keep heading southand west and you'll eventually find yourself in a swamp-type area. At the farsouthern end of this area is a hole which is the entrance to the Marsh Cave.
The Marsh Cave brings about a new concept as well: duplicate chests. There aremultiple chests that all contain the same item. Once you open one chest withthe item, all of that item's duplicate chests will empty as well, so you can'tget multiple broadswords (as cool as that would be).
Items that have duplicate chests will have a (DC) symbol by them.
Items obtained Equipment obtained
---------------- --------------------Phoenix Down DaggerCottage Broadsword1980 Gil (total) Copper Armlet*Crown
Monsters encounteredMonster HP ATK DEF Gil EXP Weakness--------------------------------------------------------------------------------Bloodbones 144 26 12 378 378 Fire, DiaCrawler 84 1 8 200 186 ---Gargoyle 80 12 8 80 132 ---Ghoul 48 8 6 50 93 Fire, Dia
Gray Ooze 76 30 7 70 255 LightningGreen Slime 24 1 255 20 84 Fire, IceShadow 50 10 0 45 90 Fire, DiaSkeleton 10 10 0 3 9 Fire, DiaTarantula 64 5 12 50 141 ---Warg Wolf 72 14 0 22 93 ---Werewolf 68 14 6 67 135 ---Zombie 20 10 0 12 24 Fire, Dia
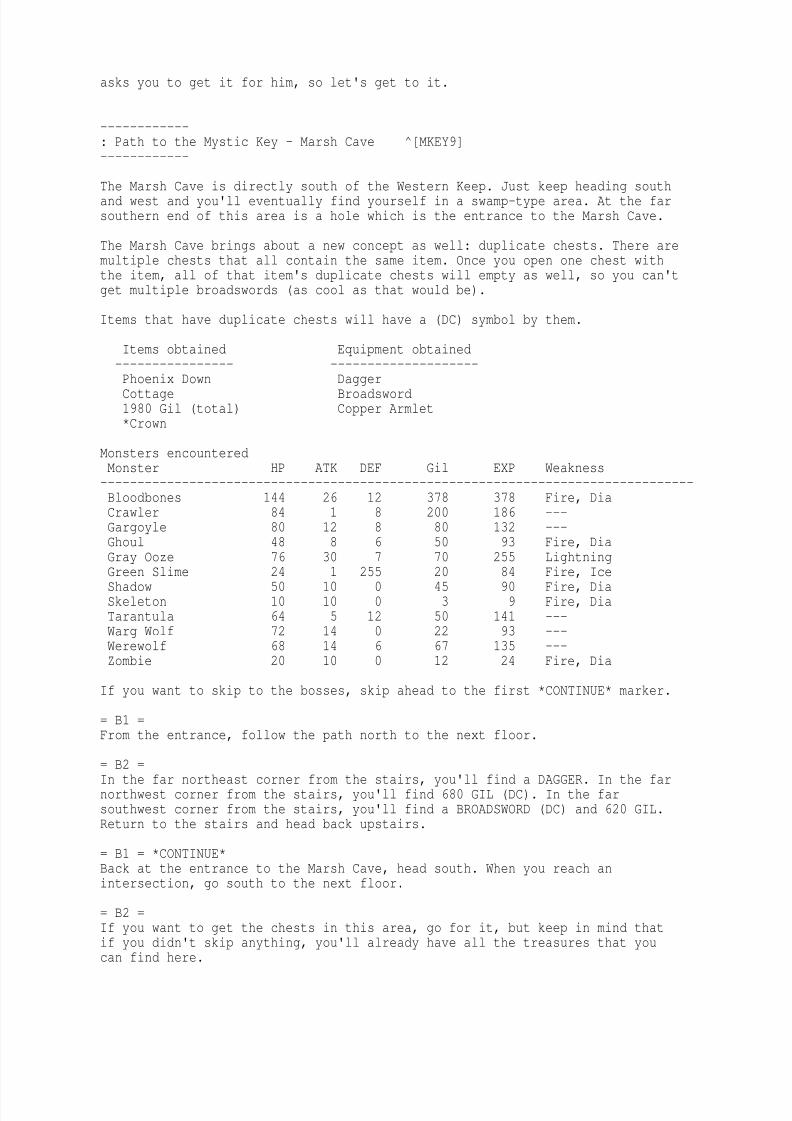
If you want to skip to the bosses, skip ahead to the first *CONTINUE* marker.
= B1 =From the entrance, follow the path north to the next floor.
= B2 =In the far northeast corner from the stairs, you'll find a DAGGER. In the farnorthwest corner from the stairs, you'll find 680 GIL (DC). In the farsouthwest corner from the stairs, you'll find a BROADSWORD (DC) and 620 GIL.Return to the stairs and head back upstairs.
= B1 = *CONTINUE*Back at the entrance to the Marsh Cave, head south. When you reach anintersection, go south to the next floor.
= B2 =
If you want to get the chests in this area, go for it, but keep in mind thatif you didn't skip anything, you'll already have all the treasures that youcan find here.
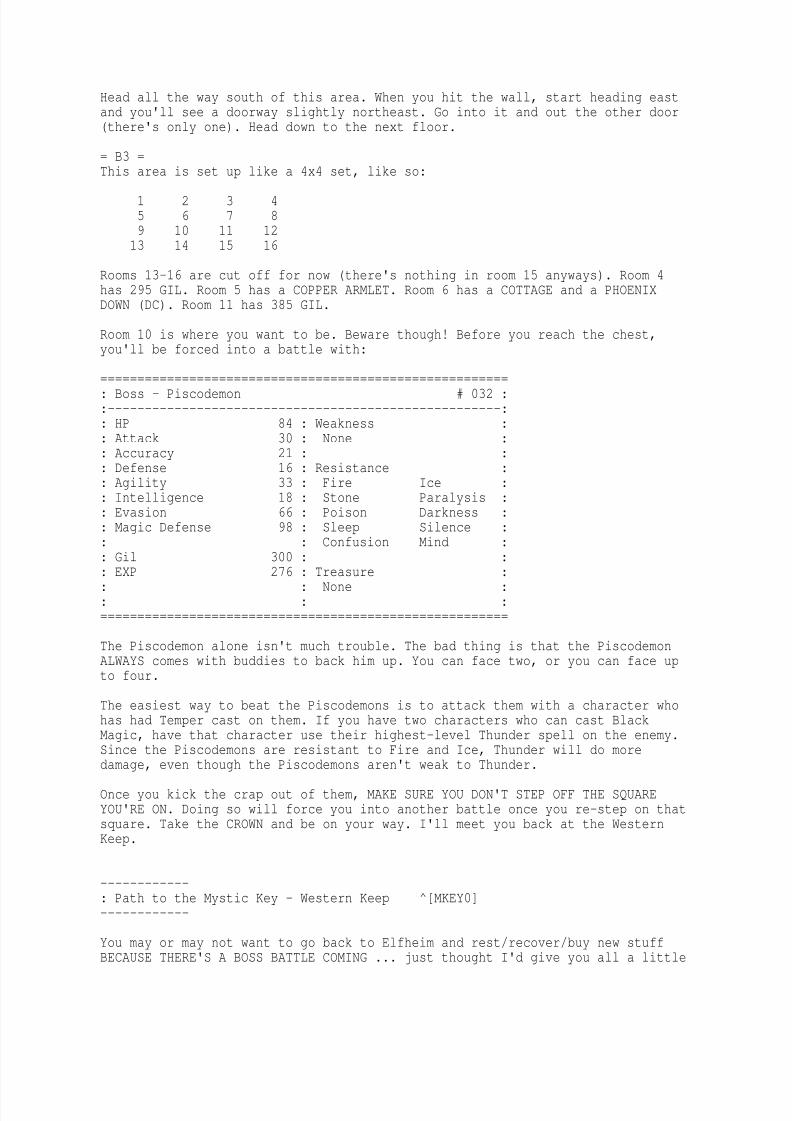
8/7/2019 final fantasy walkthrough
http://slidepdf.com/reader/full/final-fantasy-walkthrough 27/85
Head all the way south of this area. When you hit the wall, start heading eastand you'll see a doorway slightly northeast. Go into it and out the other door(there's only one). Head down to the next floor.
= B3 =This area is set up like a 4x4 set, like so:
1 2 3 45 6 7 89 10 11 1213 14 15 16
Rooms 13-16 are cut off for now (there's nothing in room 15 anyways). Room 4has 295 GIL. Room 5 has a COPPER ARMLET. Room 6 has a COTTAGE and a PHOENIXDOWN (DC). Room 11 has 385 GIL.
Room 10 is where you want to be. Beware though! Before you reach the chest,you'll be forced into a battle with:
=======================================================: Boss - Piscodemon # 032 ::-----------------------------------------------------:: HP 84 : Weakness :: Attack 30 : None :: Accuracy 21 : :: Defense 16 : Resistance :: Agility 33 : Fire Ice :: Intelligence 18 : Stone Paralysis :: Evasion 66 : Poison Darkness :: Magic Defense 98 : Sleep Silence :: : Confusion Mind :
: Gil 300 : :: EXP 276 : Treasure :: : None :: : :=======================================================
The Piscodemon alone isn't much trouble. The bad thing is that the PiscodemonALWAYS comes with buddies to back him up. You can face two, or you can face upto four.
The easiest way to beat the Piscodemons is to attack them with a character whohas had Temper cast on them. If you have two characters who can cast BlackMagic, have that character use their highest-level Thunder spell on the enemy.Since the Piscodemons are resistant to Fire and Ice, Thunder will do moredamage, even though the Piscodemons aren't weak to Thunder.
Once you kick the crap out of them, MAKE SURE YOU DON'T STEP OFF THE SQUAREYOU'RE ON. Doing so will force you into another battle once you re-step on thatsquare. Take the CROWN and be on your way. I'll meet you back at the WesternKeep.
------------: Path to the Mystic Key - Western Keep ^[MKEY0]------------
You may or may not want to go back to Elfheim and rest/recover/buy new stuffBECAUSE THERE'S A BOSS BATTLE COMING ... just thought I'd give you all a little
8/7/2019 final fantasy walkthrough
http://slidepdf.com/reader/full/final-fantasy-walkthrough 28/85
heads up. Oh, and Phoenix Downs are especially good to have.
Items obtained Equipment obtained---------------- --------------------*Crystal Eye N/A
Talk to the king ... and prepare to face:
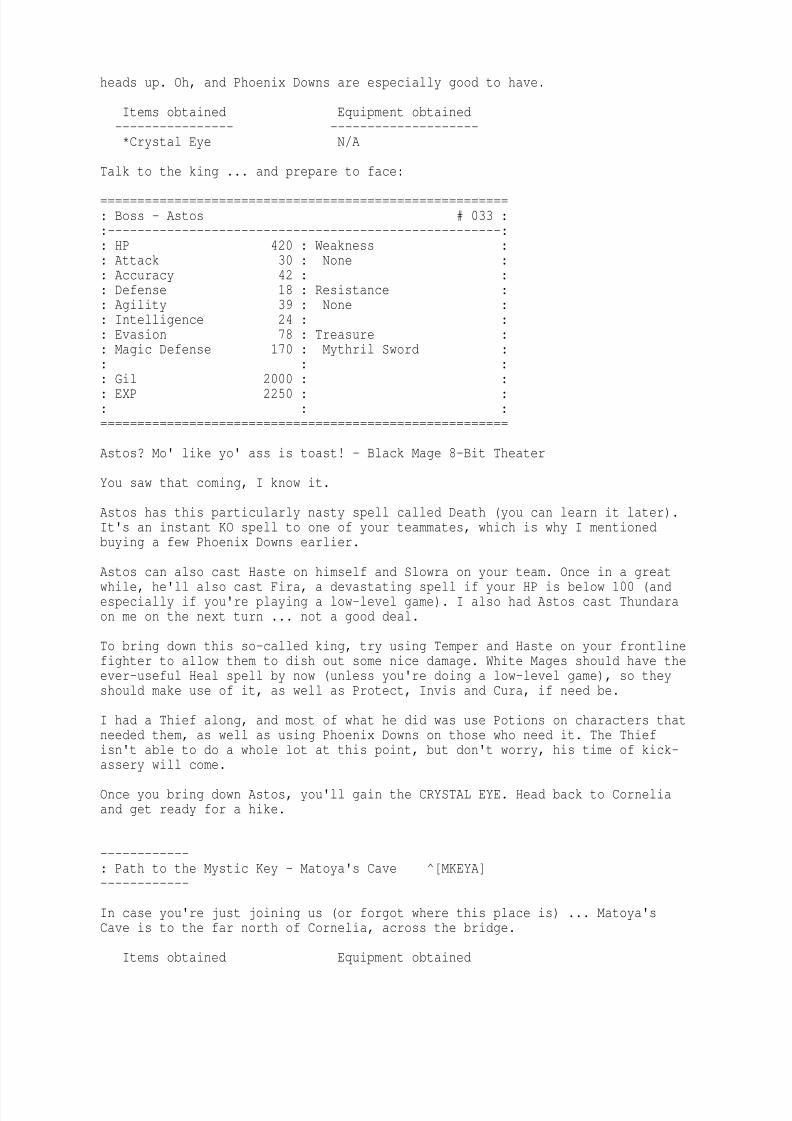
=======================================================: Boss - Astos # 033 ::-----------------------------------------------------:: HP 420 : Weakness :: Attack 30 : None :: Accuracy 42 : :: Defense 18 : Resistance :: Agility 39 : None :: Intelligence 24 : :: Evasion 78 : Treasure :: Magic Defense 170 : Mythril Sword :
: : :: Gil 2000 : :: EXP 2250 : :: : :=======================================================
Astos? Mo' like yo' ass is toast! - Black Mage 8-Bit Theater
You saw that coming, I know it.
Astos has this particularly nasty spell called Death (you can learn it later).It's an instant KO spell to one of your teammates, which is why I mentionedbuying a few Phoenix Downs earlier.
Astos can also cast Haste on himself and Slowra on your team. Once in a greatwhile, he'll also cast Fira, a devastating spell if your HP is below 100 (andespecially if you're playing a low-level game). I also had Astos cast Thundaraon me on the next turn ... not a good deal.
To bring down this so-called king, try using Temper and Haste on your frontlinefighter to allow them to dish out some nice damage. White Mages should have theever-useful Heal spell by now (unless you're doing a low-level game), so theyshould make use of it, as well as Protect, Invis and Cura, if need be.
I had a Thief along, and most of what he did was use Potions on characters thatneeded them, as well as using Phoenix Downs on those who need it. The Thiefisn't able to do a whole lot at this point, but don't worry, his time of kick-assery will come.
Once you bring down Astos, you'll gain the CRYSTAL EYE. Head back to Corneliaand get ready for a hike.
------------: Path to the Mystic Key - Matoya's Cave ^[MKEYA]------------
In case you're just joining us (or forgot where this place is) ... Matoya's
Cave is to the far north of Cornelia, across the bridge.
Items obtained Equipment obtained
8/7/2019 final fantasy walkthrough
http://slidepdf.com/reader/full/final-fantasy-walkthrough 29/85
---------------- --------------------Potion (x2) N/AAntidote*Jolt Tonic
Talk to Matoya and she'll take back her CRYSTAL EYE and give you the JOLT TONICin return. It can awaken pretty much anyone, so let's take it to Elven Castle.
Also, if you haven't looted this place ... do so now.
------------: Path to the Mystic Key - Elven Castle ^[MKEYB]------------
There's no reason for me to tell you where the Elven Castle is ... if you can'tfigure out that it's to the north of Elfheim, then you shouldn't be playingthis game ... let alone reading this FAQ.
Items obtained Equipment obtained
---------------- --------------------1500 Gil (total) Mythril Hammer*Mystic Key Bronze Gloves
Talk to the Healer beside the Prince's bed. He'll awaken and give you thelegendary MYSTIC KEY. But that's not all there is here. Head outside the castlebut don't leave this area yet. Circle around to the northeastern side andyou'll find an area you couldn't access before. With the Mystic Key in hand,open up the door to find a MYTHRIL HAMMER, BRONZE GLOVES and 1500 GIL. Sweet.
============================================================: Looting the Mystic Treasures ^[LOOT1] :
------------ ------------
Kicking some evil elven ass will net you a great prize: the Mystic Key. It willopen all those locked doors that say they are "bound by the mystic key". Sinceyou need to obtain a quest item via the Mystic Key, getting it was pretty mucha requirement. Also, there's tons of other treasures for you to nab whileyou're at it. Remember, you only need to return to Castle Cornelia and obtainthe Nitro Powder; everything else is optional. At any rate, if you're ready togo, so am I, so let's get moving.
------------: Looting the Mystic Treasures - Castle Cornelia ^[LOOT2]------------
If you need help finding Castle Cornelia, use the world map by pressing B andSELECT.
Items obtained Equipment obtained---------------- --------------------Tent Iron ArmorCottage Saber*Nitro Powder Mythril Knife
To get to the treasure area, you need to circle around the inner castle wall
(not the outer one, since you can't circle around it anyways). Once you circlearound, you'll see an opening in the northern side, which you should enter.Follow the path to the two treasure rooms. The six treasures you find in the
8/7/2019 final fantasy walkthrough
http://slidepdf.com/reader/full/final-fantasy-walkthrough 30/85
two rooms are as follows: IRON ARMOR, TENT, NITRO POWDER (the required item),and in the second room you'll find a COTTAGE, SABER, and a MYTHRIL KNIFE.Technically, you only need to get the Nitro Powder ... but it's kinda stupid tonot get all the items. I mean ... they're right there.
At any rate, you can skip ahead to the next section, or you can read on and getthe other treasures available.
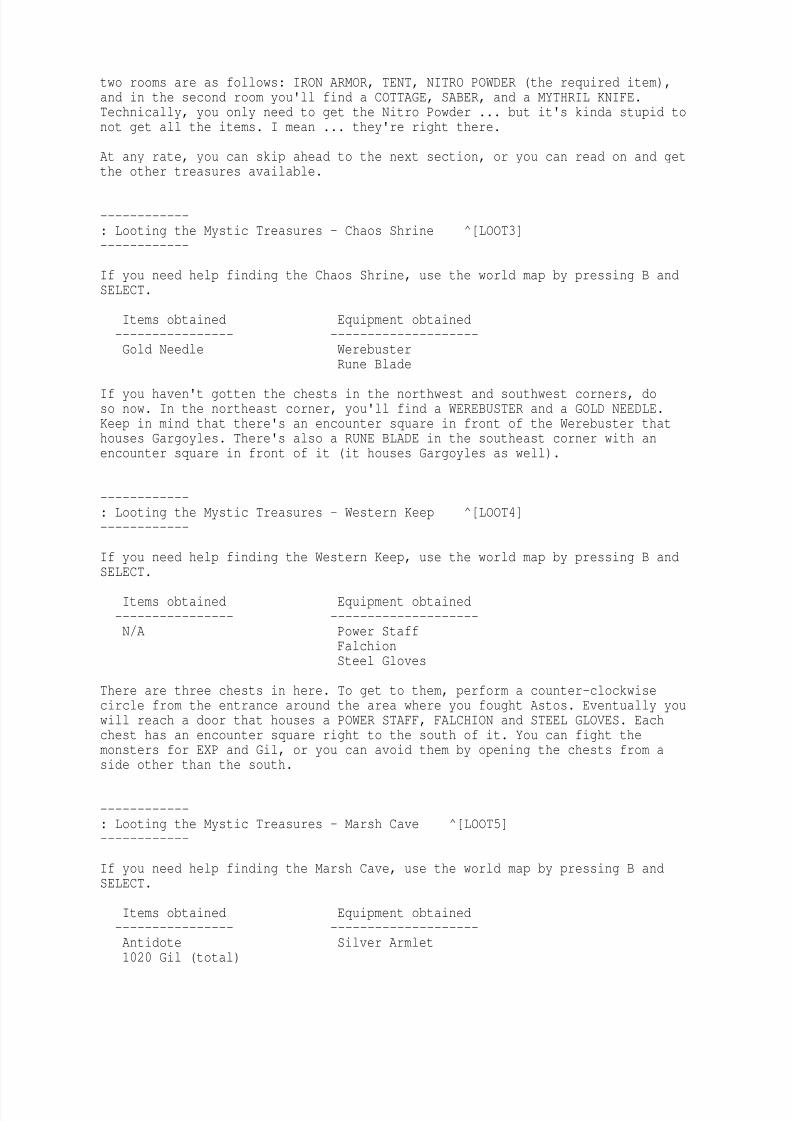
------------: Looting the Mystic Treasures - Chaos Shrine ^[LOOT3]------------
If you need help finding the Chaos Shrine, use the world map by pressing B andSELECT.
Items obtained Equipment obtained---------------- --------------------Gold Needle Werebuster
Rune Blade
If you haven't gotten the chests in the northwest and southwest corners, doso now. In the northeast corner, you'll find a WEREBUSTER and a GOLD NEEDLE.Keep in mind that there's an encounter square in front of the Werebuster thathouses Gargoyles. There's also a RUNE BLADE in the southeast corner with anencounter square in front of it (it houses Gargoyles as well).
------------: Looting the Mystic Treasures - Western Keep ^[LOOT4]------------
If you need help finding the Western Keep, use the world map by pressing B andSELECT.
Items obtained Equipment obtained---------------- --------------------N/A Power Staff
FalchionSteel Gloves
There are three chests in here. To get to them, perform a counter-clockwisecircle from the entrance around the area where you fought Astos. Eventually youwill reach a door that houses a POWER STAFF, FALCHION and STEEL GLOVES. Eachchest has an encounter square right to the south of it. You can fight themonsters for EXP and Gil, or you can avoid them by opening the chests from aside other than the south.
------------: Looting the Mystic Treasures - Marsh Cave ^[LOOT5]------------
If you need help finding the Marsh Cave, use the world map by pressing B andSELECT.
Items obtained Equipment obtained
---------------- --------------------Antidote Silver Armlet1020 Gil (total)
8/7/2019 final fantasy walkthrough
http://slidepdf.com/reader/full/final-fantasy-walkthrough 31/85
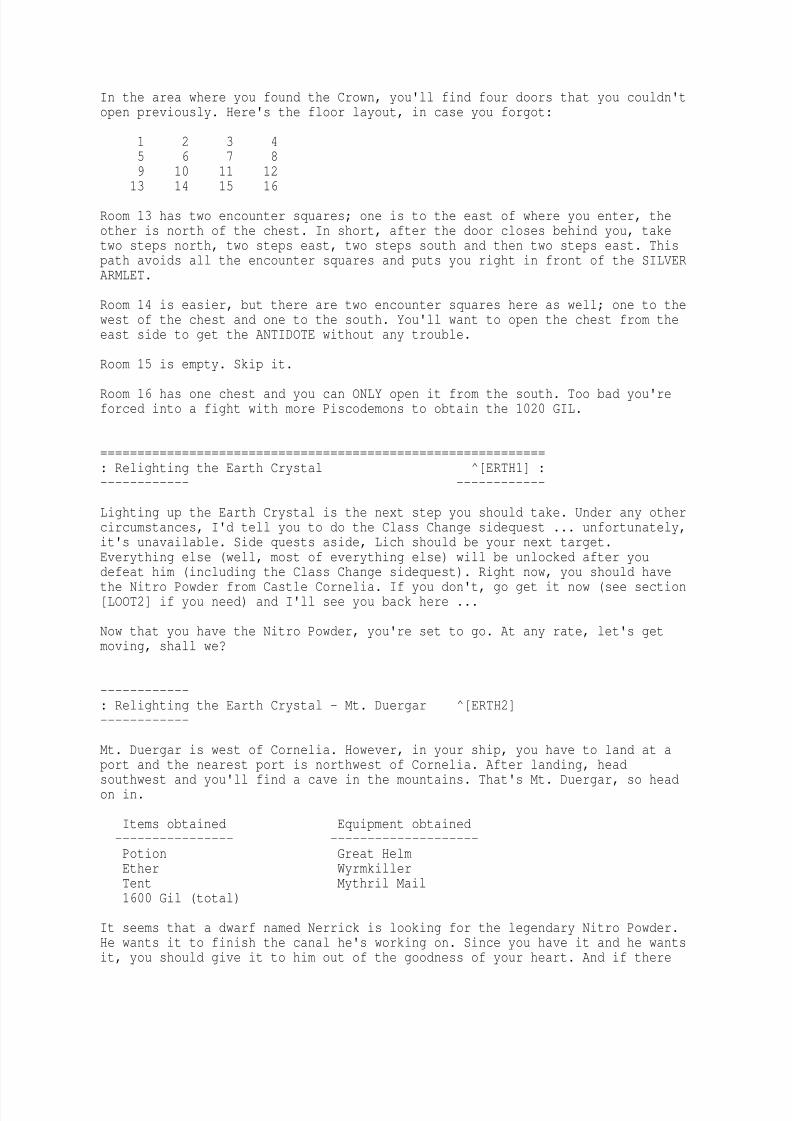
In the area where you found the Crown, you'll find four doors that you couldn'topen previously. Here's the floor layout, in case you forgot:
1 2 3 45 6 7 89 10 11 12
13 14 15 16
Room 13 has two encounter squares; one is to the east of where you enter, theother is north of the chest. In short, after the door closes behind you, taketwo steps north, two steps east, two steps south and then two steps east. Thispath avoids all the encounter squares and puts you right in front of the SILVERARMLET.
Room 14 is easier, but there are two encounter squares here as well; one to thewest of the chest and one to the south. You'll want to open the chest from theeast side to get the ANTIDOTE without any trouble.
Room 15 is empty. Skip it.
Room 16 has one chest and you can ONLY open it from the south. Too bad you'reforced into a fight with more Piscodemons to obtain the 1020 GIL.
============================================================: Relighting the Earth Crystal ^[ERTH1] :------------ ------------
Lighting up the Earth Crystal is the next step you should take. Under any othercircumstances, I'd tell you to do the Class Change sidequest ... unfortunately,it's unavailable. Side quests aside, Lich should be your next target.
Everything else (well, most of everything else) will be unlocked after youdefeat him (including the Class Change sidequest). Right now, you should havethe Nitro Powder from Castle Cornelia. If you don't, go get it now (see section[LOOT2] if you need) and I'll see you back here ...
Now that you have the Nitro Powder, you're set to go. At any rate, let's getmoving, shall we?
------------: Relighting the Earth Crystal - Mt. Duergar ^[ERTH2]------------
Mt. Duergar is west of Cornelia. However, in your ship, you have to land at aport and the nearest port is northwest of Cornelia. After landing, headsouthwest and you'll find a cave in the mountains. That's Mt. Duergar, so headon in.
Items obtained Equipment obtained---------------- --------------------Potion Great HelmEther WyrmkillerTent Mythril Mail1600 Gil (total)
It seems that a dwarf named Nerrick is looking for the legendary Nitro Powder.He wants it to finish the canal he's working on. Since you have it and he wantsit, you should give it to him out of the goodness of your heart. And if there
8/7/2019 final fantasy walkthrough
http://slidepdf.com/reader/full/final-fantasy-walkthrough 32/85
is no goodness in your heart, you should give it to him anyways because it'sthe only way to advance the story and reach Lich. :)
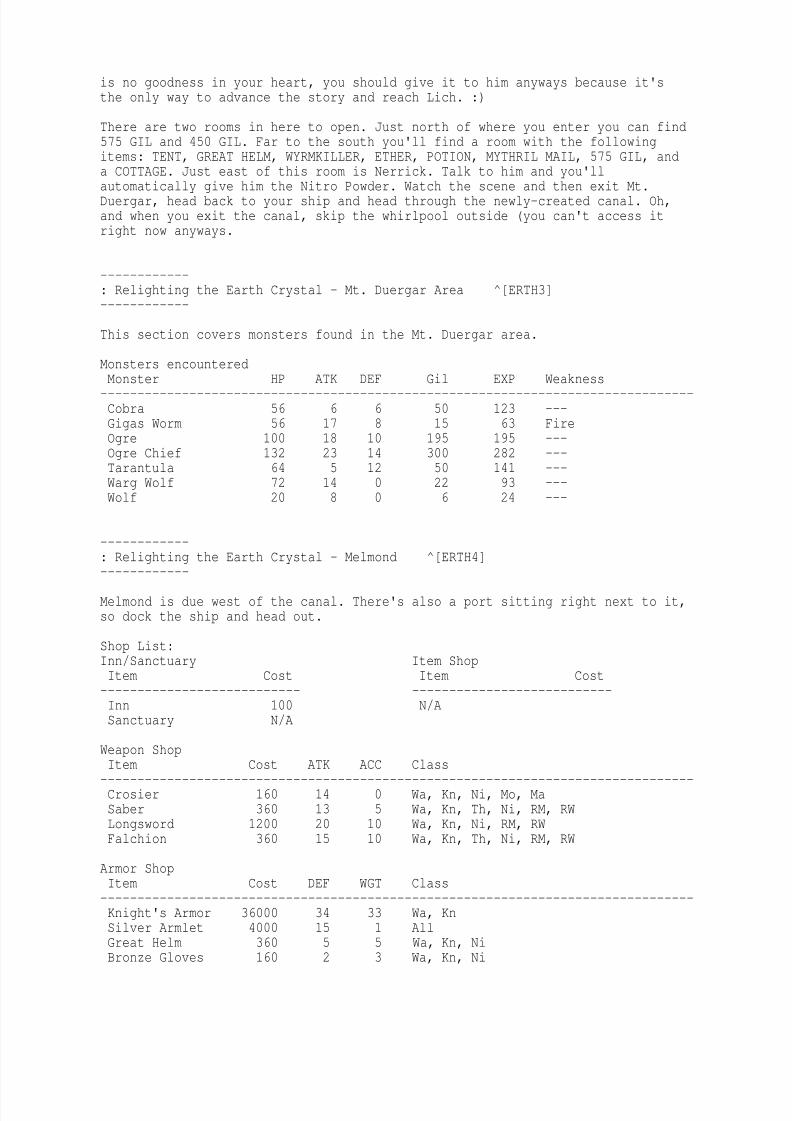
There are two rooms in here to open. Just north of where you enter you can find575 GIL and 450 GIL. Far to the south you'll find a room with the followingitems: TENT, GREAT HELM, WYRMKILLER, ETHER, POTION, MYTHRIL MAIL, 575 GIL, anda COTTAGE. Just east of this room is Nerrick. Talk to him and you'll
automatically give him the Nitro Powder. Watch the scene and then exit Mt.Duergar, head back to your ship and head through the newly-created canal. Oh,and when you exit the canal, skip the whirlpool outside (you can't access itright now anyways.
------------: Relighting the Earth Crystal - Mt. Duergar Area ^[ERTH3]------------
This section covers monsters found in the Mt. Duergar area.
Monsters encounteredMonster HP ATK DEF Gil EXP Weakness--------------------------------------------------------------------------------Cobra 56 6 6 50 123 ---Gigas Worm 56 17 8 15 63 FireOgre 100 18 10 195 195 ---Ogre Chief 132 23 14 300 282 ---Tarantula 64 5 12 50 141 ---Warg Wolf 72 14 0 22 93 ---Wolf 20 8 0 6 24 ---
------------
: Relighting the Earth Crystal - Melmond ^[ERTH4]------------
Melmond is due west of the canal. There's also a port sitting right next to it,so dock the ship and head out.
Shop List:Inn/Sanctuary Item ShopItem Cost Item Cost--------------------------- ---------------------------Inn 100 N/ASanctuary N/A
Weapon ShopItem Cost ATK ACC Class--------------------------------------------------------------------------------Crosier 160 14 0 Wa, Kn, Ni, Mo, MaSaber 360 13 5 Wa, Kn, Th, Ni, RM, RWLongsword 1200 20 10 Wa, Kn, Ni, RM, RWFalchion 360 15 10 Wa, Kn, Th, Ni, RM, RW
Armor ShopItem Cost DEF WGT Class--------------------------------------------------------------------------------Knight's Armor 36000 34 33 Wa, Kn
Silver Armlet 4000 15 1 AllGreat Helm 360 5 5 Wa, Kn, NiBronze Gloves 160 2 3 Wa, Kn, Ni
8/7/2019 final fantasy walkthrough
http://slidepdf.com/reader/full/final-fantasy-walkthrough 33/85
Steel Gloves 600 4 5 Wa, Kn, Ni
White Magic - Level 5Spell Cost Class Effect--------------------------------------------------------------------------------Curaga 4000 WM, RM, WW, RW Restores a lot of HP to one allyLife 4000 WM, WW, RW Revives one KO'd ally
Diaga 4000 WM, WW Deals damage to all undead foesHealara 4000 WM, WW Restores HP to entire party
Black Magic - Level 5Spell Cost Class Effect--------------------------------------------------------------------------------Firaga 4000 BM, RM, BW, RW Deals fire damage to all foesScourge 4000 BM, BW, RW Instantly kills all foesTeleport 4000 BW, RW Transports party to previous floorSlowra 4000 BM, RM, BW, RW Reduces one foe's number of attacks
If you've obtained all the treasures using the Mystic Key, a lot of these items
for purchase won't really raise your defense that much. Examples are the SteelGloves and the Great Helm. The Knight's Armor IS a significant step from itsnearest counterpart (that you can get right now), the Mythril Mail.
The spells here are great. Unfortunately, it's possible that your charactersmight not be at a sufficient level to use them. At any rate, feel free to dropDiaga from your White Mage's books and learn the other three.
Your Black Mages should probably save a slot for Teleport if you plan on doingthe Class Change Quest. You should get Firaga and Scourge otherwise (you couldswap out Scourge for Slowra if you like, since they're both fairly decentspells).
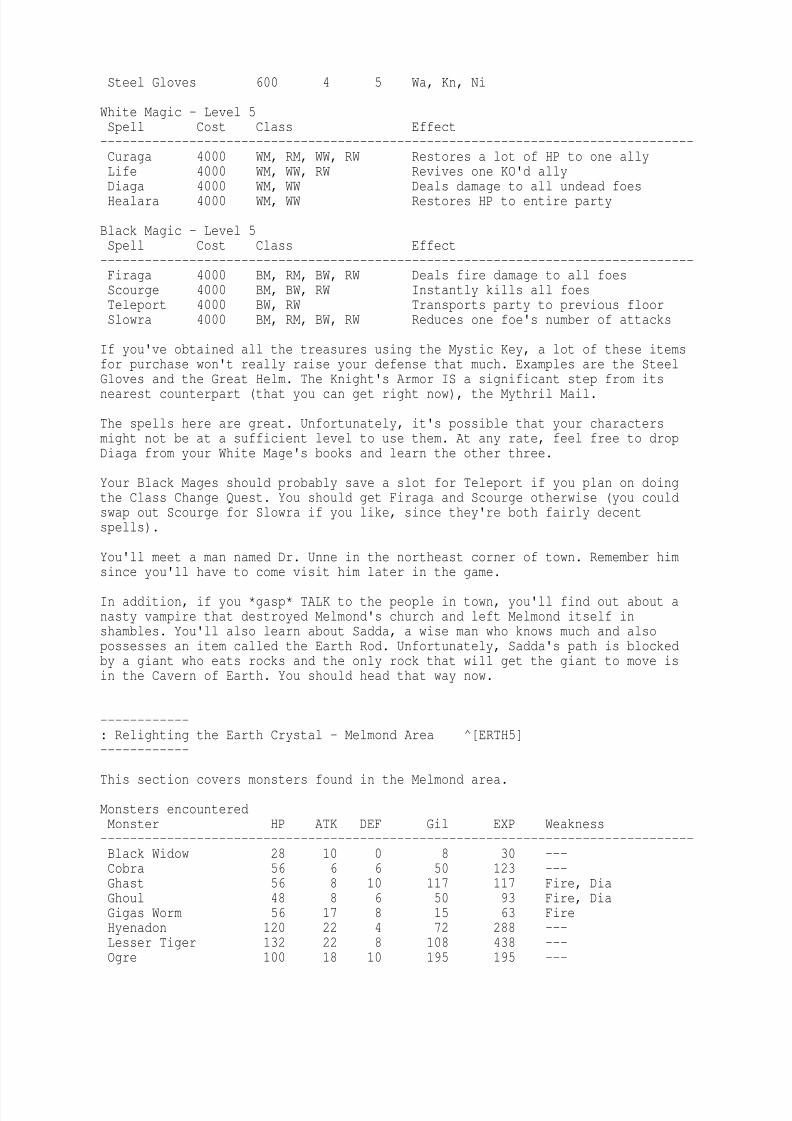
You'll meet a man named Dr. Unne in the northeast corner of town. Remember himsince you'll have to come visit him later in the game.
In addition, if you *gasp* TALK to the people in town, you'll find out about anasty vampire that destroyed Melmond's church and left Melmond itself inshambles. You'll also learn about Sadda, a wise man who knows much and alsopossesses an item called the Earth Rod. Unfortunately, Sadda's path is blockedby a giant who eats rocks and the only rock that will get the giant to move isin the Cavern of Earth. You should head that way now.
------------: Relighting the Earth Crystal - Melmond Area ^[ERTH5]------------
This section covers monsters found in the Melmond area.
Monsters encounteredMonster HP ATK DEF Gil EXP Weakness--------------------------------------------------------------------------------Black Widow 28 10 0 8 30 ---Cobra 56 6 6 50 123 ---Ghast 56 8 10 117 117 Fire, DiaGhoul 48 8 6 50 93 Fire, DiaGigas Worm 56 17 8 15 63 Fire
Hyenadon 120 22 4 72 288 ---Lesser Tiger 132 22 8 108 438 ---Ogre 100 18 10 195 195 ---
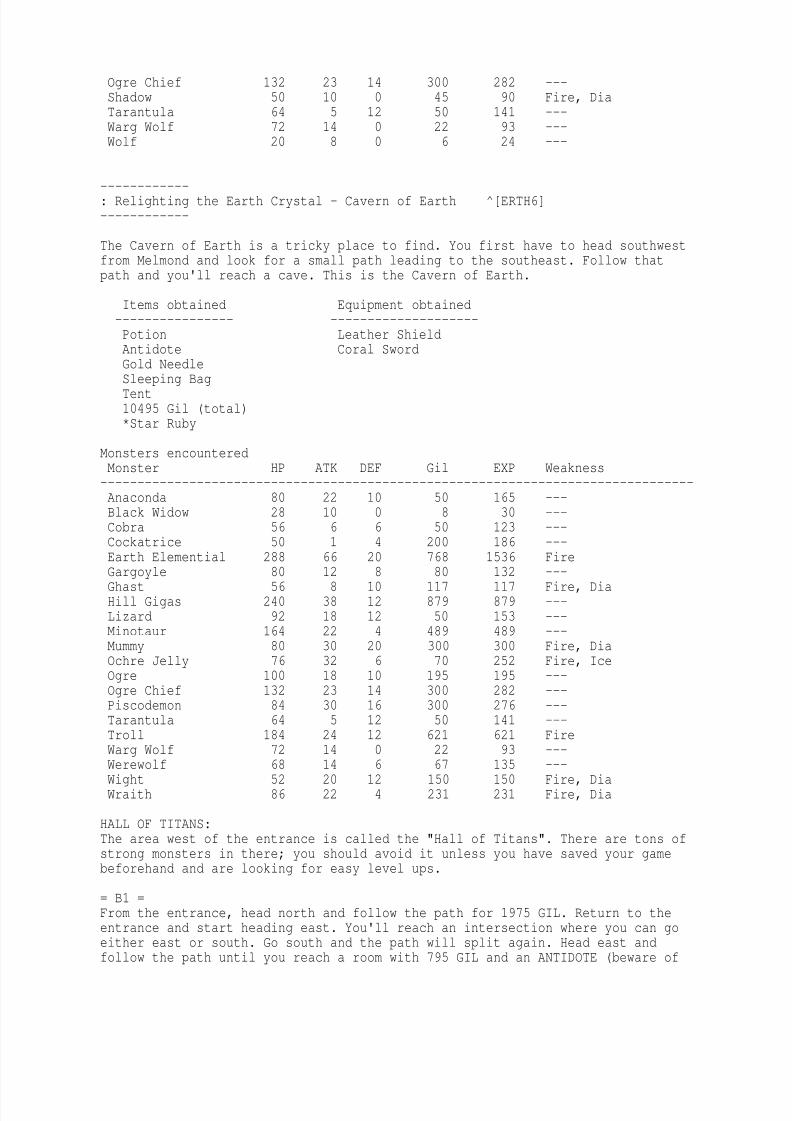
8/7/2019 final fantasy walkthrough
http://slidepdf.com/reader/full/final-fantasy-walkthrough 34/85
Ogre Chief 132 23 14 300 282 ---Shadow 50 10 0 45 90 Fire, DiaTarantula 64 5 12 50 141 ---Warg Wolf 72 14 0 22 93 ---Wolf 20 8 0 6 24 ---
------------: Relighting the Earth Crystal - Cavern of Earth ^[ERTH6]------------
The Cavern of Earth is a tricky place to find. You first have to head southwestfrom Melmond and look for a small path leading to the southeast. Follow thatpath and you'll reach a cave. This is the Cavern of Earth.
Items obtained Equipment obtained---------------- --------------------Potion Leather ShieldAntidote Coral Sword
Gold NeedleSleeping BagTent10495 Gil (total)*Star Ruby
Monsters encounteredMonster HP ATK DEF Gil EXP Weakness--------------------------------------------------------------------------------Anaconda 80 22 10 50 165 ---Black Widow 28 10 0 8 30 ---Cobra 56 6 6 50 123 ---Cockatrice 50 1 4 200 186 ---
Earth Elemential 288 66 20 768 1536 FireGargoyle 80 12 8 80 132 ---Ghast 56 8 10 117 117 Fire, DiaHill Gigas 240 38 12 879 879 ---Lizard 92 18 12 50 153 ---Minotaur 164 22 4 489 489 ---Mummy 80 30 20 300 300 Fire, DiaOchre Jelly 76 32 6 70 252 Fire, IceOgre 100 18 10 195 195 ---Ogre Chief 132 23 14 300 282 ---Piscodemon 84 30 16 300 276 ---Tarantula 64 5 12 50 141 ---Troll 184 24 12 621 621 FireWarg Wolf 72 14 0 22 93 ---Werewolf 68 14 6 67 135 ---Wight 52 20 12 150 150 Fire, DiaWraith 86 22 4 231 231 Fire, Dia
HALL OF TITANS:The area west of the entrance is called the "Hall of Titans". There are tons ofstrong monsters in there; you should avoid it unless you have saved your gamebeforehand and are looking for easy level ups.
= B1 =From the entrance, head north and follow the path for 1975 GIL. Return to the
entrance and start heading east. You'll reach an intersection where you can goeither east or south. Go south and the path will split again. Head east andfollow the path until you reach a room with 795 GIL and an ANTIDOTE (beware of
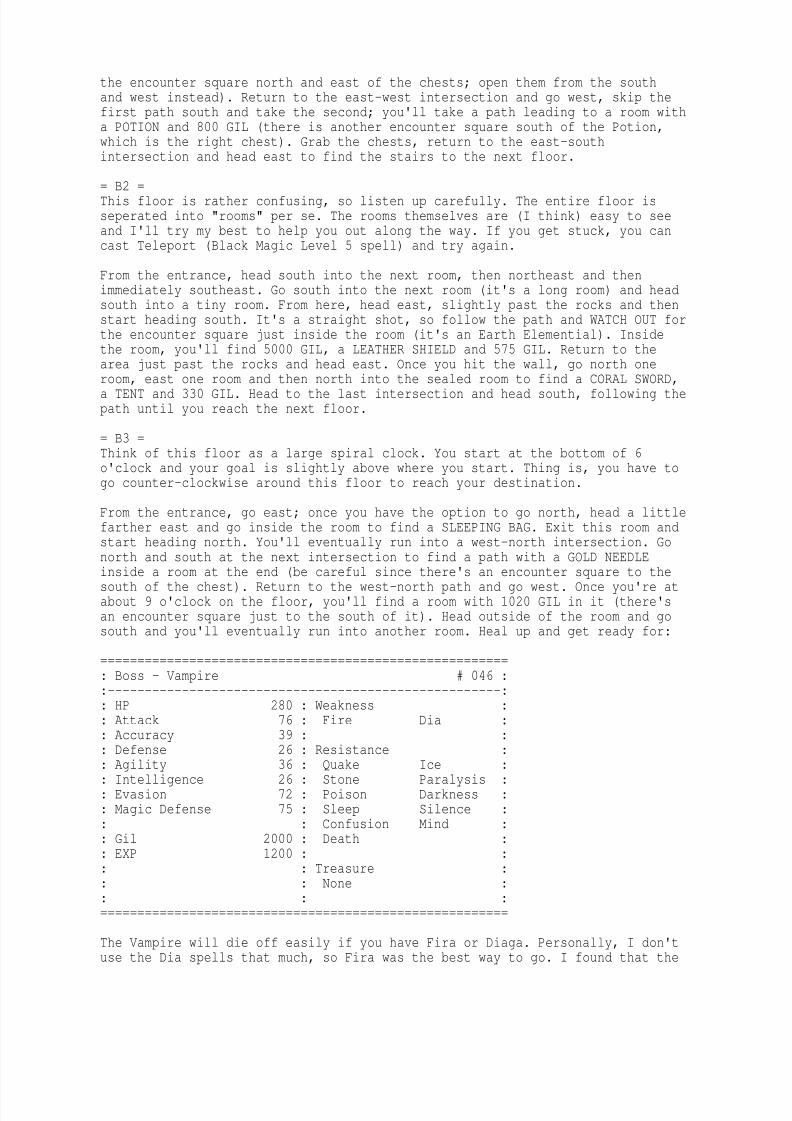
8/7/2019 final fantasy walkthrough
http://slidepdf.com/reader/full/final-fantasy-walkthrough 35/85
the encounter square north and east of the chests; open them from the southand west instead). Return to the east-west intersection and go west, skip thefirst path south and take the second; you'll take a path leading to a room witha POTION and 800 GIL (there is another encounter square south of the Potion,which is the right chest). Grab the chests, return to the east-southintersection and head east to find the stairs to the next floor.
= B2 =This floor is rather confusing, so listen up carefully. The entire floor isseperated into "rooms" per se. The rooms themselves are (I think) easy to seeand I'll try my best to help you out along the way. If you get stuck, you cancast Teleport (Black Magic Level 5 spell) and try again.
From the entrance, head south into the next room, then northeast and thenimmediately southeast. Go south into the next room (it's a long room) and headsouth into a tiny room. From here, head east, slightly past the rocks and thenstart heading south. It's a straight shot, so follow the path and WATCH OUT forthe encounter square just inside the room (it's an Earth Elemential). Insidethe room, you'll find 5000 GIL, a LEATHER SHIELD and 575 GIL. Return to the
area just past the rocks and head east. Once you hit the wall, go north oneroom, east one room and then north into the sealed room to find a CORAL SWORD,a TENT and 330 GIL. Head to the last intersection and head south, following thepath until you reach the next floor.
= B3 =Think of this floor as a large spiral clock. You start at the bottom of 6o'clock and your goal is slightly above where you start. Thing is, you have togo counter-clockwise around this floor to reach your destination.
From the entrance, go east; once you have the option to go north, head a littlefarther east and go inside the room to find a SLEEPING BAG. Exit this room andstart heading north. You'll eventually run into a west-north intersection. Go
north and south at the next intersection to find a path with a GOLD NEEDLEinside a room at the end (be careful since there's an encounter square to thesouth of the chest). Return to the west-north path and go west. Once you're atabout 9 o'clock on the floor, you'll find a room with 1020 GIL in it (there'san encounter square just to the south of it). Head outside of the room and gosouth and you'll eventually run into another room. Heal up and get ready for:
=======================================================: Boss - Vampire # 046 ::-----------------------------------------------------:: HP 280 : Weakness :: Attack 76 : Fire Dia :: Accuracy 39 : :: Defense 26 : Resistance :: Agility 36 : Quake Ice :: Intelligence 26 : Stone Paralysis :: Evasion 72 : Poison Darkness :: Magic Defense 75 : Sleep Silence :: : Confusion Mind :: Gil 2000 : Death :: EXP 1200 : :: : Treasure :: : None :: : :=======================================================
The Vampire will die off easily if you have Fira or Diaga. Personally, I don'tuse the Dia spells that much, so Fira was the best way to go. I found that the
8/7/2019 final fantasy walkthrough
http://slidepdf.com/reader/full/final-fantasy-walkthrough 36/85
easiest thing to do was to have my Black/Red Mage cast Fira while the otherthree teammates healed with Cura and Potions.
The Vampire mainly uses a physical attack, which really hurts, even if you havethe Knight's Armor equipped. The Vampire will also heal itself after eachround. The amount it heals itself for isn't comparable to Fira or Diaga, but itwill add up if you leave the Vampire alone for too long. Also, the Vampire can
hit your characters with Paralysis.
Overall, the Vampire isn't too hard at all. Take it down and grab the Star Rubythat's sitting northwest of it. Cast Teleport or walk out, it's time to visitan old man. Besides, you need the Earth Rod to get lower in the dungeon.
------------: Relighting the Earth Crystal - Giant's Cave ^[ERTH7]------------
The Giant's Cave is west of Melmond and the Cavern of Earth. From the Cavern
of Earth, just head back across the land path and keep going southwest. You'llrun into a cave; that's where you need to be.
Items obtained Equipment obtained---------------- --------------------1070 Gil (total) Mythril Helm
Great Axe
Monsters encounteredMonster HP ATK DEF Gil EXP Weakness--------------------------------------------------------------------------------Lesser Tiger 132 22 8 108 438 ---Ogre 100 18 10 195 195 ---
Ogre Chief 132 23 14 300 282 ---Tarantula 64 5 12 50 141 ---Warg Wolf 72 14 0 22 93 ---
There's really only one path to follow, so follow it. You'll find the rockmonster; talk to him and you'll feed him the Star Ruby. After you do, you'llsee the stairs to the north, but head south for now and you'll find a room witha MYTHRIL HELM, 450 GIL, 620 GIL and a GREAT AXE. Now exit to the north.
------------: Relighting the Earth Crystal - Sage's Cave ^[ERTH8]------------
There's one path to the Sage's Cave, so follow it and you'll see the Sage'sCave on the far southern end of the landmass.
Items obtained Equipment obtained---------------- --------------------*Earth Rod N/A
Follow the path and enter the second door you'll see. You'll find Sadda in hereand he'll explain the situation further. He'll also give you the EARTH ROD andtell you where to use it.
------------: Relighting the Earth Crystal - Cavern of Earth ^[ERTH9]
8/7/2019 final fantasy walkthrough
http://slidepdf.com/reader/full/final-fantasy-walkthrough 37/85
------------
If you need help finding the Cavern of Earth, use the world map by pressing Band SELECT.
Items obtained Equipment obtained---------------- --------------------
Tent Staff13075 Gil Mythril Shield
Monsters encounteredMonster HP ATK DEF Gil EXP Weakness--------------------------------------------------------------------------------Anaconda 80 22 10 50 165 ---Black Widow 28 10 0 8 30 ---Cobra 56 6 6 50 123 ---Cockatrice 50 1 4 200 186 ---Earth Elemential 288 66 20 768 1536 FireGargoyle 80 12 8 80 132 ---
Ghast 56 8 10 117 117 Fire, Dia*Goblin Guard 16 8 6 18 18 ---Hill Gigas 240 38 12 879 879 ---*Hyenadon 120 22 4 72 288 ---Lizard 92 18 12 50 153 ---Minotaur 164 22 4 489 489 ---Mummy 80 30 20 300 300 Fire, DiaOchre Jelly 76 32 6 70 252 Fire, IceOgre 100 18 10 195 195 ---Ogre Chief 132 23 14 300 282 ---*Ogre Mage 144 23 10 723 723 ---Piscodemon 84 30 16 300 276 ---Sphinx 228 23 12 1160 1160 ---
Tarantula 64 5 12 50 141 ---Troll 184 24 12 621 621 FireWarg Wolf 72 14 0 22 93 ---Werewolf 68 14 6 67 135 ---Wight 52 20 12 150 150 Fire, DiaWraith 86 22 4 231 231 Fire, Dia
Monsters I didn't see on the first three floors are denoted with the * marker.
Hopefully you remember the way to the Vampire. If not ... well, I was planningon telling you the shorter route anyways.
= B1 =Head east and follow the path and you'll eventually reach the next floor.
= B2 =Head south into the next room, then north one room, then south three rooms (youwill end up in the small room with a south-east intersection). Start headingeast past the rocks and head south when you can't go east any longer. You'llend up on the next floor.
= B3 =Take the east path continue counter-clockwise in the same path you took before.When you re-enter the Vampire's lair, take the east door out and follow thepath until you see the gray rock. Talk to it and you'll use the Earth Rod and
descend to the next floor.
= B4 =
8/7/2019 final fantasy walkthrough
http://slidepdf.com/reader/full/final-fantasy-walkthrough 38/85
This area is split off into "rooms" as well. From where you enter, head westand then north into a large open area. Remember this area because if you go getthe treasures I'm about to lead you to, you'll come back here.
Head north and follow the path around (there is only one path) until youreach a room with tons of encounter squares and 5450 GIL, 1445 GIL, 1520 GIL,a STAFF and 3400 GIL. Head back to the large open area.
From the large open area, head west and then south. From this room, go all theway west and then north. Keep heading northwest (you'll go through multiplerooms in the process) and once you can't go any farther northwest, head southtwo rooms and then you'll be able to head farther northeast. Don't do so quiteyet. Instead, head south and follow the path into a room with a TENT, 1250 GILand a MYTHRIL SHIELD. Return to the previous intersection and head northwestand head to the next floor.
= B5 =Well, I hope you got here okay. If not ... well ... you probably wouldn't bereading this right now, would you? :)
*ahem* Anyways, there's only one thing to do on this floor. Circle around andmake your way to the northeast. You're pretty much on a straight path, so keepfollowing the path and you'll eventually run into a room. HEAL AND SAVE, thentalk to the orb in the middle of the room and get ready for a fight:
=======================================================: Boss - Lich # 049 ::-----------------------------------------------------:: HP 1200 : Weakness :: Attack 40 : Fire Dia :: Accuracy 49 : :: Defense 40 : Resistance :
: Agility 12 : Quake Ice :: Intelligence 30 : Stone Paralysis :: Evasion 24 : Poison Darkness :: Magic Defense 120 : Sleep Silence :: : Confusion Mind :: Gil 3000 : Death :: EXP 2200 : :: : Treasure :: : Dry Ether :: : :=======================================================
For the record, Lich is male. "I am he who feeds on the power of earth." Justto prevent any unneccessary emails.
One more thing ... if you've been using blacksniper's Lv. 11 Class ChangeGuide (or have been playing the 15 puzzle game), you might have some Red, Whiteor Blue Curtains. USE THEM (I really can't stress this enough) as well as anyRed Fangs you might have. They'll help ... a lot.
Lich may not seem like a powerful foe, but believe me, he is. He can paralyzeany of your characters with his physical attack, or cast Blizzara and/orThundara, which can instantly KO lower level characters. I've also had Lichcast Sleepra on my team, which can be rather debilitating in itself. Lich cancast Haste as well, which makes his physical attack that much more deadly.
Lich is weak against Fire and Dia spells; you should use this weakness to youradvantage. There's two methods to taking down Lich. First, equip the Rune Blade
8/7/2019 final fantasy walkthrough
http://slidepdf.com/reader/full/final-fantasy-walkthrough 39/85
on your primary fighter (since it deals extra damage to spellcasters) and thencast Haste on them, then continually cast Temper on them. You should Cure (orHeal) as necessary and try to keep your team at optimal health.
The second is to have a character with Black Magic casting Fire/Fira on Lichwhile the other three keep the primary spellcaster alive (and themselves aswell). I used this at the lowest level (which is 8) and it worked fairly well,
although I had a major problem with Lich casting -ra level spells on me(Blizzara and Sleepra are particular nusiances since I didn't have NulFrost atthe time).
The choice of how to fight this battle is entirely up to you. I recommend theHaste/Temper/Rune Blade method if your levels are higher, but if you have yourown method, feel free to use it.
Once you beat Lich, you'll see the Earthgift Shrine open up (and I very highlysuggest you wait to attempt it since it'll probably pwn you at your levels). Inaddition, you'll see a teleporter behind the Crystal, so step on it and take afree ride to Go ... I mean, the outside of the dungeon.
============================================================: Class Change Quest ^[CHNG1] :------------ ------------
Sweet, so you've finally taken down Lich. Advancing the story would send youstraight to the next Fiend, which would be Marilith. Great, right? If youcouldn't do anything else, I'd definitely tell you to head in Marilith'sdirection. Remember though, you're the Light Warriors and you're going to needsome more power if you want to really whoop some ass. In any case, the ClassChange Quest is completely optional, but I highly suggest you do it since yourcharacters will definitely benefit from it in the long run.
------------: Class Change Quest - Crescent Lake ^[CHNG2]------------
To get to Crescent Lake, head south of Melmond and hang a west once you reachthe southern tip of the continent (y'know, the one that the Cavern of Earth ison). Keep going west until you hit another landmass and then jag south a bit tofind a dock. Dock the ship and head southwest, around the southern end of thecrescent-shaped lake and you'll hit Crescent Lake (I think you can figure outjust WHY they named their town "Crescent Lake"). Head on inside.
Items obtained Equipment obtained---------------- --------------------*Canoe N/A
Shop List:Inn/Sanctuary Item ShopItem Cost Item Cost--------------------------- ---------------------------Inn 200 Potion 40Sanctuary 400 Hi-Potion 150
Ether 150Phoenix Down 500
Tent 160
Weapon Shop
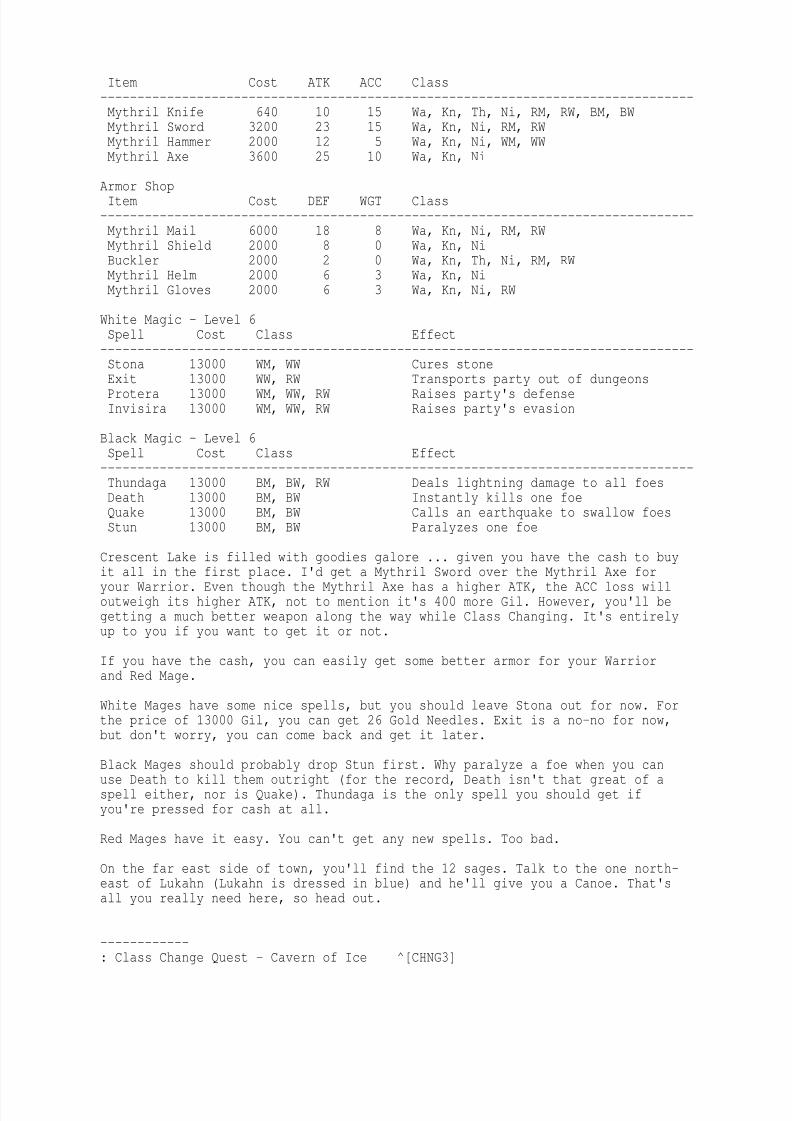
8/7/2019 final fantasy walkthrough
http://slidepdf.com/reader/full/final-fantasy-walkthrough 40/85
Item Cost ATK ACC Class--------------------------------------------------------------------------------Mythril Knife 640 10 15 Wa, Kn, Th, Ni, RM, RW, BM, BWMythril Sword 3200 23 15 Wa, Kn, Ni, RM, RWMythril Hammer 2000 12 5 Wa, Kn, Ni, WM, WWMythril Axe 3600 25 10 Wa, Kn, Ni
Armor ShopItem Cost DEF WGT Class--------------------------------------------------------------------------------Mythril Mail 6000 18 8 Wa, Kn, Ni, RM, RWMythril Shield 2000 8 0 Wa, Kn, NiBuckler 2000 2 0 Wa, Kn, Th, Ni, RM, RWMythril Helm 2000 6 3 Wa, Kn, NiMythril Gloves 2000 6 3 Wa, Kn, Ni, RW
White Magic - Level 6Spell Cost Class Effect--------------------------------------------------------------------------------
Stona 13000 WM, WW Cures stoneExit 13000 WW, RW Transports party out of dungeonsProtera 13000 WM, WW, RW Raises party's defenseInvisira 13000 WM, WW, RW Raises party's evasion
Black Magic - Level 6Spell Cost Class Effect--------------------------------------------------------------------------------Thundaga 13000 BM, BW, RW Deals lightning damage to all foesDeath 13000 BM, BW Instantly kills one foeQuake 13000 BM, BW Calls an earthquake to swallow foesStun 13000 BM, BW Paralyzes one foe
Crescent Lake is filled with goodies galore ... given you have the cash to buyit all in the first place. I'd get a Mythril Sword over the Mythril Axe foryour Warrior. Even though the Mythril Axe has a higher ATK, the ACC loss willoutweigh its higher ATK, not to mention it's 400 more Gil. However, you'll begetting a much better weapon along the way while Class Changing. It's entirelyup to you if you want to get it or not.
If you have the cash, you can easily get some better armor for your Warriorand Red Mage.
White Mages have some nice spells, but you should leave Stona out for now. Forthe price of 13000 Gil, you can get 26 Gold Needles. Exit is a no-no for now,but don't worry, you can come back and get it later.
Black Mages should probably drop Stun first. Why paralyze a foe when you canuse Death to kill them outright (for the record, Death isn't that great of aspell either, nor is Quake). Thundaga is the only spell you should get ifyou're pressed for cash at all.
Red Mages have it easy. You can't get any new spells. Too bad.
On the far east side of town, you'll find the 12 sages. Talk to the one north-east of Lukahn (Lukahn is dressed in blue) and he'll give you a Canoe. That'sall you really need here, so head out.
------------: Class Change Quest - Cavern of Ice ^[CHNG3]
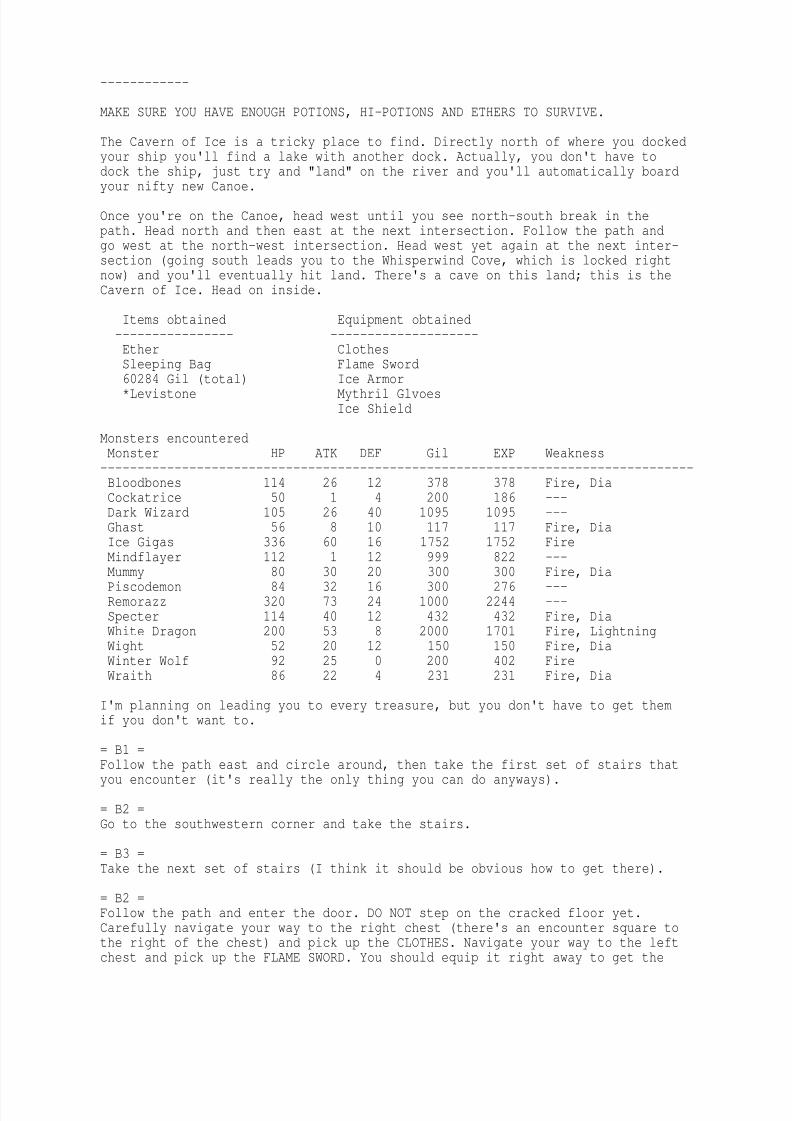
8/7/2019 final fantasy walkthrough
http://slidepdf.com/reader/full/final-fantasy-walkthrough 41/85
------------
MAKE SURE YOU HAVE ENOUGH POTIONS, HI-POTIONS AND ETHERS TO SURVIVE.
The Cavern of Ice is a tricky place to find. Directly north of where you dockedyour ship you'll find a lake with another dock. Actually, you don't have todock the ship, just try and "land" on the river and you'll automatically board
your nifty new Canoe.
Once you're on the Canoe, head west until you see north-south break in thepath. Head north and then east at the next intersection. Follow the path andgo west at the north-west intersection. Head west yet again at the next inter-section (going south leads you to the Whisperwind Cove, which is locked rightnow) and you'll eventually hit land. There's a cave on this land; this is theCavern of Ice. Head on inside.
Items obtained Equipment obtained---------------- --------------------Ether Clothes
Sleeping Bag Flame Sword60284 Gil (total) Ice Armor*Levistone Mythril Glvoes
Ice Shield
Monsters encounteredMonster HP ATK DEF Gil EXP Weakness--------------------------------------------------------------------------------Bloodbones 114 26 12 378 378 Fire, DiaCockatrice 50 1 4 200 186 ---Dark Wizard 105 26 40 1095 1095 ---Ghast 56 8 10 117 117 Fire, DiaIce Gigas 336 60 16 1752 1752 Fire
Mindflayer 112 1 12 999 822 ---Mummy 80 30 20 300 300 Fire, DiaPiscodemon 84 32 16 300 276 ---Remorazz 320 73 24 1000 2244 ---Specter 114 40 12 432 432 Fire, DiaWhite Dragon 200 53 8 2000 1701 Fire, LightningWight 52 20 12 150 150 Fire, DiaWinter Wolf 92 25 0 200 402 FireWraith 86 22 4 231 231 Fire, Dia
I'm planning on leading you to every treasure, but you don't have to get themif you don't want to.
= B1 =Follow the path east and circle around, then take the first set of stairs thatyou encounter (it's really the only thing you can do anyways).
= B2 =Go to the southwestern corner and take the stairs.
= B3 =Take the next set of stairs (I think it should be obvious how to get there).
= B2 =Follow the path and enter the door. DO NOT step on the cracked floor yet.
Carefully navigate your way to the right chest (there's an encounter square tothe right of the chest) and pick up the CLOTHES. Navigate your way to the leftchest and pick up the FLAME SWORD. You should equip it right away to get the
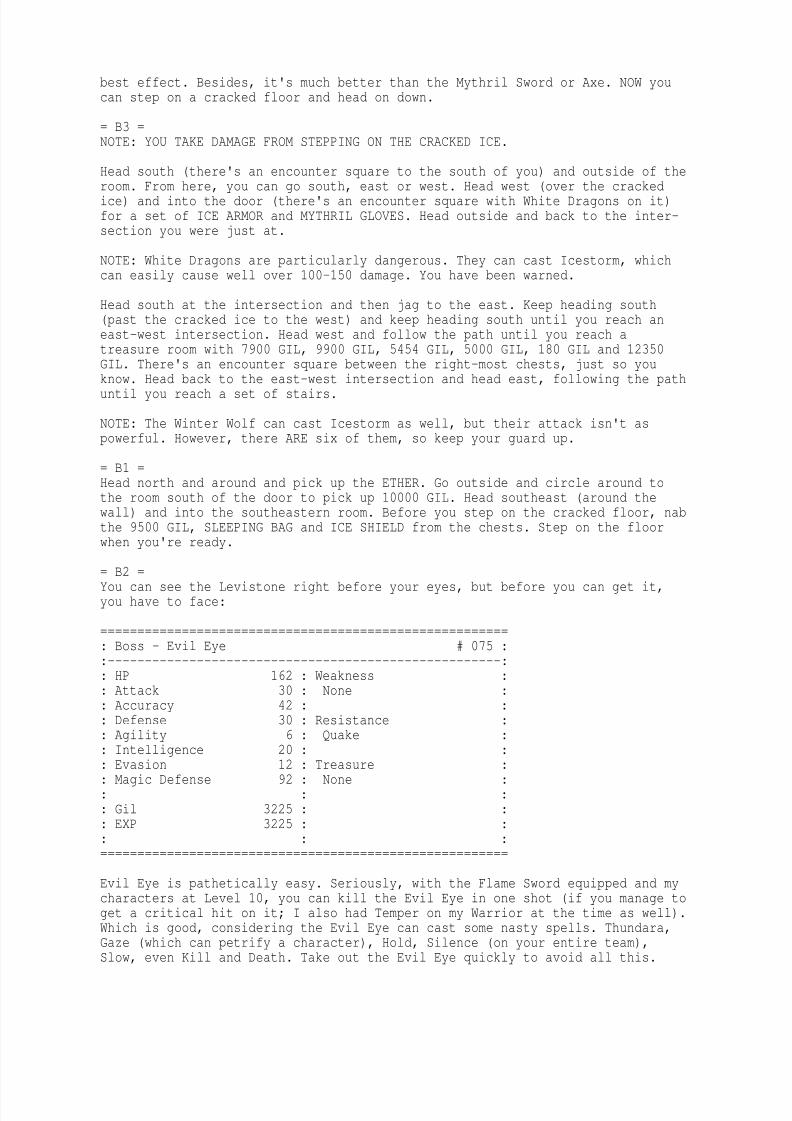
8/7/2019 final fantasy walkthrough
http://slidepdf.com/reader/full/final-fantasy-walkthrough 42/85
best effect. Besides, it's much better than the Mythril Sword or Axe. NOW youcan step on a cracked floor and head on down.
= B3 =NOTE: YOU TAKE DAMAGE FROM STEPPING ON THE CRACKED ICE.
Head south (there's an encounter square to the south of you) and outside of the
room. From here, you can go south, east or west. Head west (over the crackedice) and into the door (there's an encounter square with White Dragons on it)for a set of ICE ARMOR and MYTHRIL GLOVES. Head outside and back to the inter-section you were just at.
NOTE: White Dragons are particularly dangerous. They can cast Icestorm, whichcan easily cause well over 100-150 damage. You have been warned.
Head south at the intersection and then jag to the east. Keep heading south(past the cracked ice to the west) and keep heading south until you reach aneast-west intersection. Head west and follow the path until you reach atreasure room with 7900 GIL, 9900 GIL, 5454 GIL, 5000 GIL, 180 GIL and 12350
GIL. There's an encounter square between the right-most chests, just so youknow. Head back to the east-west intersection and head east, following the pathuntil you reach a set of stairs.
NOTE: The Winter Wolf can cast Icestorm as well, but their attack isn't aspowerful. However, there ARE six of them, so keep your guard up.
= B1 =Head north and around and pick up the ETHER. Go outside and circle around tothe room south of the door to pick up 10000 GIL. Head southeast (around thewall) and into the southeastern room. Before you step on the cracked floor, nabthe 9500 GIL, SLEEPING BAG and ICE SHIELD from the chests. Step on the floorwhen you're ready.
= B2 =You can see the Levistone right before your eyes, but before you can get it,you have to face:
=======================================================: Boss - Evil Eye # 075 ::-----------------------------------------------------:: HP 162 : Weakness :: Attack 30 : None :: Accuracy 42 : :: Defense 30 : Resistance :: Agility 6 : Quake :: Intelligence 20 : :: Evasion 12 : Treasure :: Magic Defense 92 : None :: : :: Gil 3225 : :: EXP 3225 : :: : :=======================================================
Evil Eye is pathetically easy. Seriously, with the Flame Sword equipped and mycharacters at Level 10, you can kill the Evil Eye in one shot (if you manage toget a critical hit on it; I also had Temper on my Warrior at the time as well).
Which is good, considering the Evil Eye can cast some nasty spells. Thundara,Gaze (which can petrify a character), Hold, Silence (on your entire team),Slow, even Kill and Death. Take out the Evil Eye quickly to avoid all this.
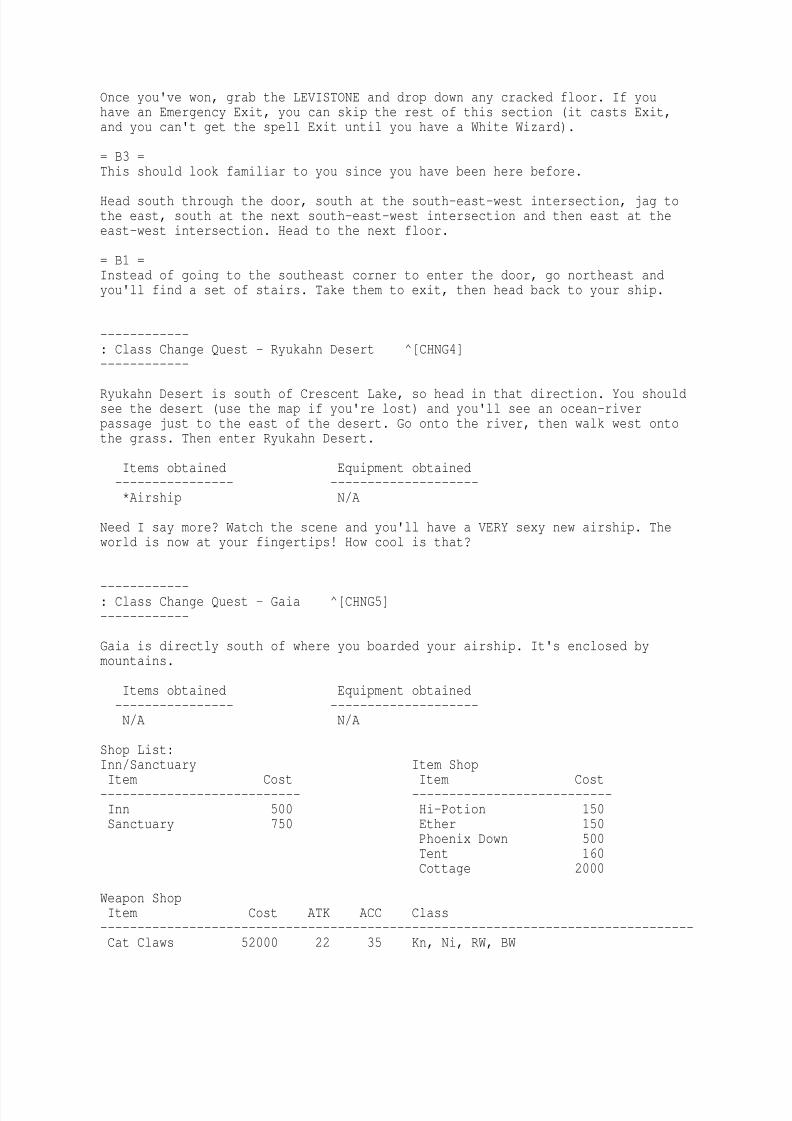
8/7/2019 final fantasy walkthrough
http://slidepdf.com/reader/full/final-fantasy-walkthrough 43/85
Once you've won, grab the LEVISTONE and drop down any cracked floor. If youhave an Emergency Exit, you can skip the rest of this section (it casts Exit,and you can't get the spell Exit until you have a White Wizard).
= B3 =This should look familiar to you since you have been here before.
Head south through the door, south at the south-east-west intersection, jag tothe east, south at the next south-east-west intersection and then east at theeast-west intersection. Head to the next floor.
= B1 =Instead of going to the southeast corner to enter the door, go northeast andyou'll find a set of stairs. Take them to exit, then head back to your ship.
------------: Class Change Quest - Ryukahn Desert ^[CHNG4]
------------
Ryukahn Desert is south of Crescent Lake, so head in that direction. You shouldsee the desert (use the map if you're lost) and you'll see an ocean-riverpassage just to the east of the desert. Go onto the river, then walk west ontothe grass. Then enter Ryukahn Desert.
Items obtained Equipment obtained---------------- --------------------*Airship N/A
Need I say more? Watch the scene and you'll have a VERY sexy new airship. Theworld is now at your fingertips! How cool is that?
------------: Class Change Quest - Gaia ^[CHNG5]------------
Gaia is directly south of where you boarded your airship. It's enclosed bymountains.
Items obtained Equipment obtained---------------- --------------------N/A N/A
Shop List:Inn/Sanctuary Item ShopItem Cost Item Cost--------------------------- ---------------------------Inn 500 Hi-Potion 150Sanctuary 750 Ether 150
Phoenix Down 500Tent 160Cottage 2000
Weapon ShopItem Cost ATK ACC Class
--------------------------------------------------------------------------------Cat Claws 52000 22 35 Kn, Ni, RW, BW

8/7/2019 final fantasy walkthrough
http://slidepdf.com/reader/full/final-fantasy-walkthrough 44/85
Armor ShopItem Cost DEF WGT Class--------------------------------------------------------------------------------Ruby Armlet 40000 24 1 AllProtect Ring 16000 8 1 All
White Magic - Level 7
Spell Cost Class Effect--------------------------------------------------------------------------------Curaja 30000 WW Fully restores one ally's HPDiaja 30000 WW Deals damage to all undead foes
Black Magic - Level 7Spell Cost Class Effect--------------------------------------------------------------------------------Blizzaga 30000 BW Deals ice damage to all foesBreak 30000 BW Petrifies one foe
White Magic - Level 8
Spell Cost Class Effect--------------------------------------------------------------------------------Holy 40000 WW Damages all foes with holy lightNulAll 40000 WW Reduces damage from spells by halfDispel 40000 WW Negates one foe's magical defenses
Black Magic - Level 8Spell Cost Class Effect--------------------------------------------------------------------------------Stop 40000 BW Stops time and paralyzes all foesWarp 40000 BW Banishes foes to another dimensionKill 40000 BW Instantly kills one foe
Gaia is on a continent known as "The Hawk". Gaia is considered to be the "Eyeof the Hawk" since it's located in that position. In addition, you learn aboutan ancient city to the south known as the "Wing of the Hawk", but that'sanother section for another time. You'll also come back to Gaia later, so nowyou know where it is AND you can access it on your Map.
The biggest reason I have you come here was because of the Level 7 and 8 MagicShops you'll find here (not to mention the great equipment you can purchase).However, keep in mind that the Level 8 spells offered in Gaia are NOT all theLevel 8 spells available, so when you can actually buy these spells, don't useall your spell slots on them.
IF YOU HAVE THE CASH ... both of the items sold in the Armor Shop totally rock!Seriously! Not only can everyone equip them, but the Protect Ring guardsagainst instant-Death attacks and the Ruby Armlet is one of the better piecesof armor in the game. If you only have the Gil for one set, I suggest you getit for your weakest character.
At any rate, there's not much to do here, so do whatever you can and head out.
------------: Class Change Quest - The Cidatel of Trials ^[CHNG6]------------
There's two ways two reach the Cidatel of Trials. The first way involves theairship, the second requires your ship and canoe.
8/7/2019 final fantasy walkthrough
http://slidepdf.com/reader/full/final-fantasy-walkthrough 45/85
By way of airship, head directly west of Gaia and you'll run into a river-oceansection. Head slightly south of there and you'll see the Cidatel of Trials. Ifyou wanted to use the ship/canoe method, this is how you'd do it.
If you're planning on using the airship, there's no flat land nearby to landon. If you head back east, you'll see a small desert with a small patch of landsoutheast of there that you can land. You COULD land northwest of the Cidatel,
but I think that path is slightly longer than what I just described to you.
At any rate, you know where the Cidatel is, so head on over.
Items obtained Equipment obtained---------------- --------------------Cottage Gauntlets8795 Gil (total) Healing Staff*Rat's Tail Ruby Armlet
Ice BrandSteel Gloves
Monsters encounteredMonster HP ATK DEF Gil EXP Weakness--------------------------------------------------------------------------------Clay Golem 176 64 7 800 1257 ---Horned Devil 94 10 32 387 387 ---King Mummy 188 43 24 1000 984 Fire, DiaMedusa 68 20 10 699 699 ---Mindflayer 112 1 12 999 822 ---Minotaur Zombie 224 40 14 1050 1050 Fire, DiaMummy 80 30 20 300 300 Fire, DiaNightmare 200 30 24 700 1272 IceRakshasa 110 20 30 800 603 ---
The Cidatel of Trials is short but dangerous. Be warned.
= 1F =Walk north and talk to the dwarf. After he grants you permission, head to thenorthwest corner and walk into the chair to begin the trial.
= 2F =Head south and you'll find a series of teleporters. The first two are easysince you only have one choice. In the third room, take the bottom teleporter.Take the fourth teleporter. Take the bottom teleporter. Take the sixthteleporter. Take the right teleporter. Head east and enter the door to step onan encounter square and then nab the GAUNTLETS (DC). Step outside and take twosteps west, then head directly south and take that teleporter. Take the stairs.
= 3F =Head north and prepare for a fight with Nightmares. After the battle, pick upthe HEALING STAFF from the chest and then head west, where you'll find a RUBYARMLET, ICE BRAND and STEEL GLOVES. Go south and pick up the COTTAGE, 1455 GIL,and 7340 GIL (and the Gauntlets if you didn't pick them up earlier). Go eastand pick up the RAT'S TAIL from the chest. Now step in front of the throne andget ready:
=======================================================: Boss - Dragon Zombie # 075 ::-----------------------------------------------------:
: HP 268 : Weakness :: Attack 56 : Fire Dia :: Accuracy 67 : :
8/7/2019 final fantasy walkthrough
http://slidepdf.com/reader/full/final-fantasy-walkthrough 46/85
: Defense 30 : Resistance :: Agility 12 : Quake Ice :: Intelligence 26 : Stone Paralysis :: Evasion 24 : Poison Darkness :: Magic Defense 135 : Sleep Silence :: : Confusion Mind :: Gil 999 : Death :
: EXP 2331 : :: : Treasure :: : Megalixer :: : :=======================================================
Believe it or not ... the Dragon Zombie is actually optional. If you have anEmergency Exit item (obtained via the 15 puzzle minigame while on your ship),you can use it and escape the battle with the greatest of ease. The Exitspell WOULD work just as well, but you can't obtain it until you have a WhiteWizard anyways. :)
If you're still reading this, I can assume that you don't have an EmergencyExit. Well, to be honest, the only thing the Dragon Zombie ever did to me wassimply attack. And it didn't do much at all for damage. Buff up your frontlinefighter and have them attack. The Dragon Zombie will die off in no time. Stepon the throne.
= 1F =Exit and head back to your ship.
------------: Class Change Quest - Dragon Caves ^[CHNG7]------------
The Dragon Caves are west of the Cidatel of Trials. You should probably explorethem all anyways since there's free treasures hidden in most of them. Also,you'll see the Hellfire Chasm (which is closed off for now, but at least youknow where it is).
Once you find a long path going south, that's where you need to be. Follow thepath and you'll eventually run into Bahamut, the Dragon King.
Items obtained Equipment obtained---------------- --------------------X-Potion N/ADry EtherElixerGold NeedleTentCottage19975 Gil (total)
Talk to Bahamut and he'll acknowledge your courage and bestow fitting titles tosuch brave warriors. Go outside and gain a few levels so that your characterscan gain some MP. Then you can move on to the next section and update all yourspells.
------------: Class Change Quest - Class Change Tactics ^[CHNG8]------------
8/7/2019 final fantasy walkthrough
http://slidepdf.com/reader/full/final-fantasy-walkthrough 47/85
Items obtained Equipment obtained---------------- --------------------N/A N/A
Knights should head back to Cornelia to pick up Cure, Protect and Blink (Diais off limits). In Pravoka, I suggest getting Invis, NulShock and Silence (or
Blindna if you put Silence on a White/Red Mage). In Elfheim, Knights can onlyobtain Cura and and NulBlaze.
Ninjas should get Fire and Thunder (if you want to fill the third spell slot,get Sleep) from Cornelia. Blizzard and Temper (for sure Temper) in Pravoka andDark if you want to stick in a third spell. In Elfheim, get Fira, Thundara andwhatever spell you feel like (I had Focara on my Black Mage) for Level 3spells. However, you MUST GET HASTE for a Ninja, and then I usually get Confuseand Blizzara . If you have a Black Mage, you now have two characters who cancast Temper and Haste, which is a definite advantage to your team.
There's really not much for a Master to do. All they get is a shiny new sprite
and some different level up stats.
White Wizards should head over to Crescent Lake to pick up Exit.
Black Wizards should head over to Melmond to get Teleport, which is a greatcompliment to Exit (or replacement if you have no White Wizard).
Red Wizards get a major spell addition. They can learn Life, Scourge andTeleport in Melmond. In Crescent Lake, they can learn Exit, Invisira, Proteraand Thundaga. If your levels are sufficient, you can head to Gaia to pick upthe Level 7 spells available, but I'll be getting to that later.
For the record, almost everyone can equip better armor.
============================================================: Relighting the Fire Crystal ^[FIRE1] :------------ ------------
NOTE: FROM HERE ON OUT, I WILL WRITE THIS FAQ AS IF YOU HAVE UNDERTAKEN THECLASS CHANGE QUEST (like I said you should).
Meeting with Bahamut and obtaining some new skills will definitely come inhandy with the last Crystals you have to relight. In all reality, you could golight the Crystals in any order; however, the easiest way to do it is Fire,Water, Wind (besides, you have to go to the Sunken Shrine before you can evenattempt the Wind Crystal). At any rate, you should head back to Crescent Laketo rest and reload before attempting to take on Marilith. Killing Marilith isno easy task (Mt. Gulg is a pretty long dungeon), but with enough restorativeitems along, it'll be a snap. If you don't have enough Gil for tons (well, atleast 15-20) of Potions, Hi-Potions and Ethers, go fight some battles and getsome Gil to do so. So without further ado, let's go fight Marilith, shall we?
------------: Relighting the Fire Crystal - Crescent Lake ^[FIRE2]------------
To get to Crescent Lake, head south of Melmond and hang a west once you reachthe southern tip of the continent (y'know, the one that the Cavern of Earth ison). Keep going west until you hit another landmass and then jag south a bit to
8/7/2019 final fantasy walkthrough
http://slidepdf.com/reader/full/final-fantasy-walkthrough 48/85
find a dock. Dock the ship and head southwest, around the southern end of thecrescent-shaped lake and you'll hit Crescent Lake (I think you can figure outjust WHY they named their town "Crescent Lake"). Head on inside.
Items obtained Equipment obtained---------------- --------------------N/A N/A
Shop List:Inn/Sanctuary Item ShopItem Cost Item Cost--------------------------- ---------------------------Inn 200 Potion 40Sanctuary 400 Hi-Potion 150
Ether 150Phoenix Down 500Tent 160
Weapon Shop
Item Cost ATK ACC Class--------------------------------------------------------------------------------Mythril Knife 640 10 15 Wa, Kn, Th, Ni, RM, RW, BM, BWMythril Sword 3200 23 15 Wa, Kn, Ni, RM, RWMythril Hammer 2000 12 5 Wa, Kn, Ni, WM, WWMythril Axe 3600 25 10 Wa, Kn, Ni
Armor ShopItem Cost DEF WGT Class--------------------------------------------------------------------------------Mythril Mail 6000 18 8 Wa, Kn, Ni, RM, RWMythril Shield 2000 8 0 Wa, Kn, NiBuckler 2000 2 0 Wa, Kn, Th, Ni, RM, RW
Mythril Helm 2000 6 3 Wa, Kn, NiMythril Gloves 2000 6 3 Wa, Kn, Ni, RW
White Magic - Level 6Spell Cost Class Effect--------------------------------------------------------------------------------Stona 13000 WM, WW Cures stoneExit 13000 WW, RW Transports party out of dungeonsProtera 13000 WM, WW, RW Raises party's defenseInvisira 13000 WM, WW, RW Raises party's evasion
Black Magic - Level 6Spell Cost Class Effect--------------------------------------------------------------------------------Thundaga 13000 BM, BW, RW Deals lightning damage to all foesDeath 13000 BM, BW Instantly kills one foeQuake 13000 BM, BW Calls an earthquake to swallow foesStun 13000 BM, BW Paralyzes one foe
You've been here before, so nothing here should be new. You can pick up Exitfor your White Wizard if you haven't done so already, as well as any new spellsfor your Red Wizard.
None of the equipment here should be new. However, check out the Item Shop.Everything you need to fight Marilith is right here, with the lone exception of
the Cottage, but Tents do the job just fine. Stock up and head out.
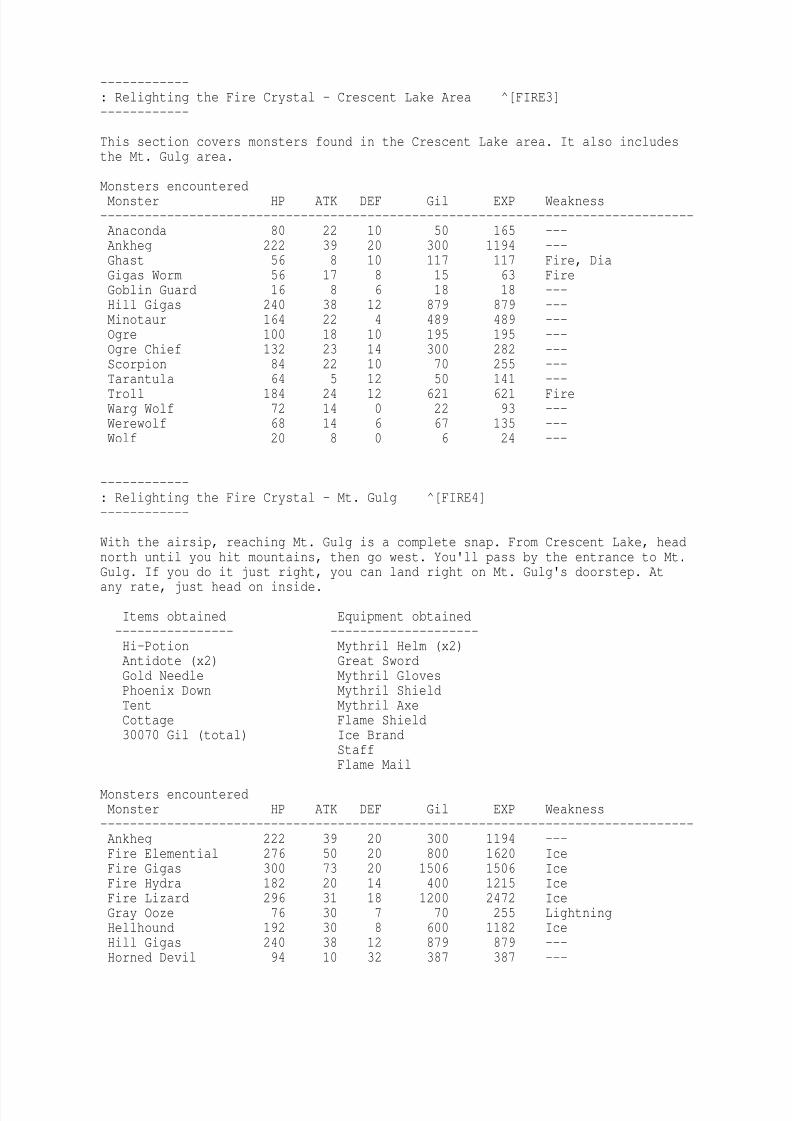
8/7/2019 final fantasy walkthrough
http://slidepdf.com/reader/full/final-fantasy-walkthrough 49/85
------------: Relighting the Fire Crystal - Crescent Lake Area ^[FIRE3]------------
This section covers monsters found in the Crescent Lake area. It also includesthe Mt. Gulg area.
Monsters encounteredMonster HP ATK DEF Gil EXP Weakness--------------------------------------------------------------------------------Anaconda 80 22 10 50 165 ---Ankheg 222 39 20 300 1194 ---Ghast 56 8 10 117 117 Fire, DiaGigas Worm 56 17 8 15 63 FireGoblin Guard 16 8 6 18 18 ---Hill Gigas 240 38 12 879 879 ---Minotaur 164 22 4 489 489 ---Ogre 100 18 10 195 195 ---Ogre Chief 132 23 14 300 282 ---
Scorpion 84 22 10 70 255 ---Tarantula 64 5 12 50 141 ---Troll 184 24 12 621 621 FireWarg Wolf 72 14 0 22 93 ---Werewolf 68 14 6 67 135 ---Wolf 20 8 0 6 24 ---
------------: Relighting the Fire Crystal - Mt. Gulg ^[FIRE4]------------
With the airsip, reaching Mt. Gulg is a complete snap. From Crescent Lake, head
north until you hit mountains, then go west. You'll pass by the entrance to Mt.Gulg. If you do it just right, you can land right on Mt. Gulg's doorstep. Atany rate, just head on inside.
Items obtained Equipment obtained---------------- --------------------Hi-Potion Mythril Helm (x2)Antidote (x2) Great SwordGold Needle Mythril GlovesPhoenix Down Mythril ShieldTent Mythril AxeCottage Flame Shield30070 Gil (total) Ice Brand
StaffFlame Mail
Monsters encounteredMonster HP ATK DEF Gil EXP Weakness--------------------------------------------------------------------------------Ankheg 222 39 20 300 1194 ---Fire Elemential 276 50 20 800 1620 IceFire Gigas 300 73 20 1506 1506 IceFire Hydra 182 20 14 400 1215 IceFire Lizard 296 31 18 1200 2472 IceGray Ooze 76 30 7 70 255 Lightning
Hellhound 192 30 8 600 1182 IceHill Gigas 240 38 12 879 879 ---Horned Devil 94 10 32 387 387 ---
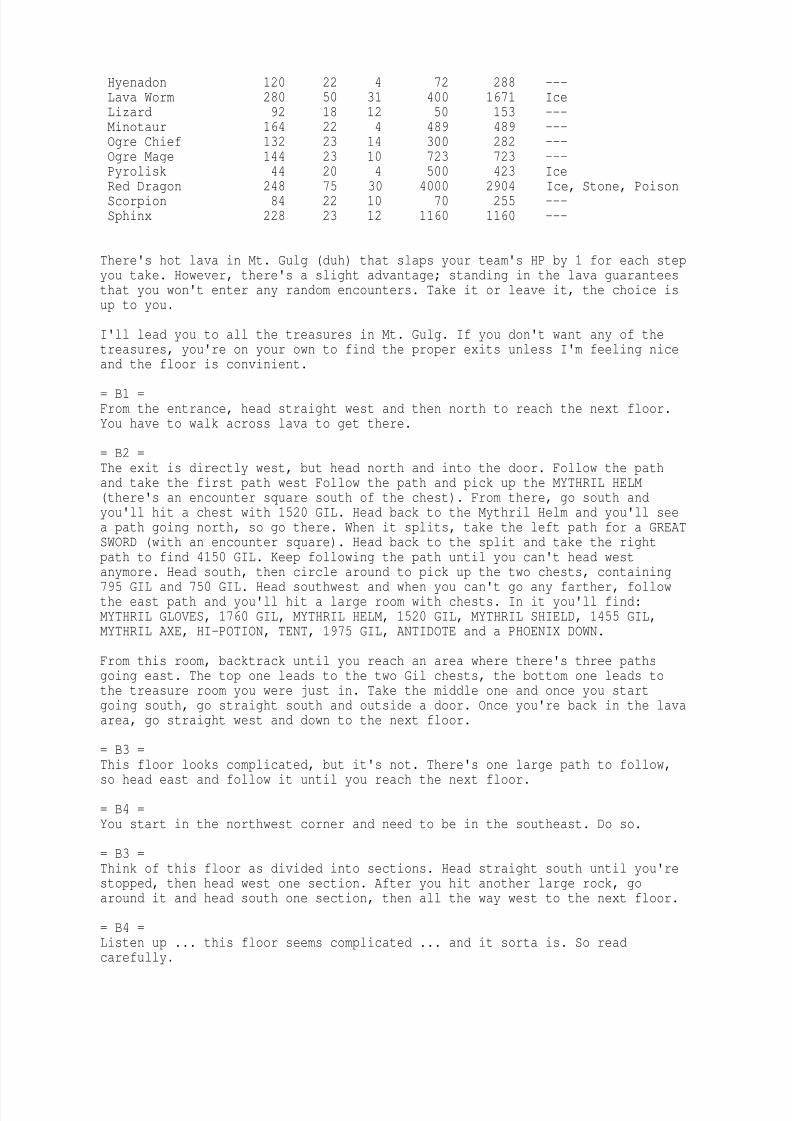
8/7/2019 final fantasy walkthrough
http://slidepdf.com/reader/full/final-fantasy-walkthrough 50/85
Hyenadon 120 22 4 72 288 ---Lava Worm 280 50 31 400 1671 IceLizard 92 18 12 50 153 ---Minotaur 164 22 4 489 489 ---Ogre Chief 132 23 14 300 282 ---Ogre Mage 144 23 10 723 723 ---Pyrolisk 44 20 4 500 423 Ice
Red Dragon 248 75 30 4000 2904 Ice, Stone, PoisonScorpion 84 22 10 70 255 ---Sphinx 228 23 12 1160 1160 ---
There's hot lava in Mt. Gulg (duh) that slaps your team's HP by 1 for each stepyou take. However, there's a slight advantage; standing in the lava guaranteesthat you won't enter any random encounters. Take it or leave it, the choice isup to you.
I'll lead you to all the treasures in Mt. Gulg. If you don't want any of thetreasures, you're on your own to find the proper exits unless I'm feeling nice
and the floor is convinient.
= B1 =From the entrance, head straight west and then north to reach the next floor.You have to walk across lava to get there.
= B2 =The exit is directly west, but head north and into the door. Follow the pathand take the first path west Follow the path and pick up the MYTHRIL HELM(there's an encounter square south of the chest). From there, go south andyou'll hit a chest with 1520 GIL. Head back to the Mythril Helm and you'll seea path going north, so go there. When it splits, take the left path for a GREATSWORD (with an encounter square). Head back to the split and take the right
path to find 4150 GIL. Keep following the path until you can't head westanymore. Head south, then circle around to pick up the two chests, containing795 GIL and 750 GIL. Head southwest and when you can't go any farther, followthe east path and you'll hit a large room with chests. In it you'll find:MYTHRIL GLOVES, 1760 GIL, MYTHRIL HELM, 1520 GIL, MYTHRIL SHIELD, 1455 GIL,MYTHRIL AXE, HI-POTION, TENT, 1975 GIL, ANTIDOTE and a PHOENIX DOWN.
From this room, backtrack until you reach an area where there's three pathsgoing east. The top one leads to the two Gil chests, the bottom one leads tothe treasure room you were just in. Take the middle one and once you startgoing south, go straight south and outside a door. Once you're back in the lavaarea, go straight west and down to the next floor.
= B3 =This floor looks complicated, but it's not. There's one large path to follow,so head east and follow it until you reach the next floor.
= B4 =You start in the northwest corner and need to be in the southeast. Do so.
= B3 =Think of this floor as divided into sections. Head straight south until you'restopped, then head west one section. After you hit another large rock, goaround it and head south one section, then all the way west to the next floor.
= B4 =Listen up ... this floor seems complicated ... and it sorta is. So readcarefully.
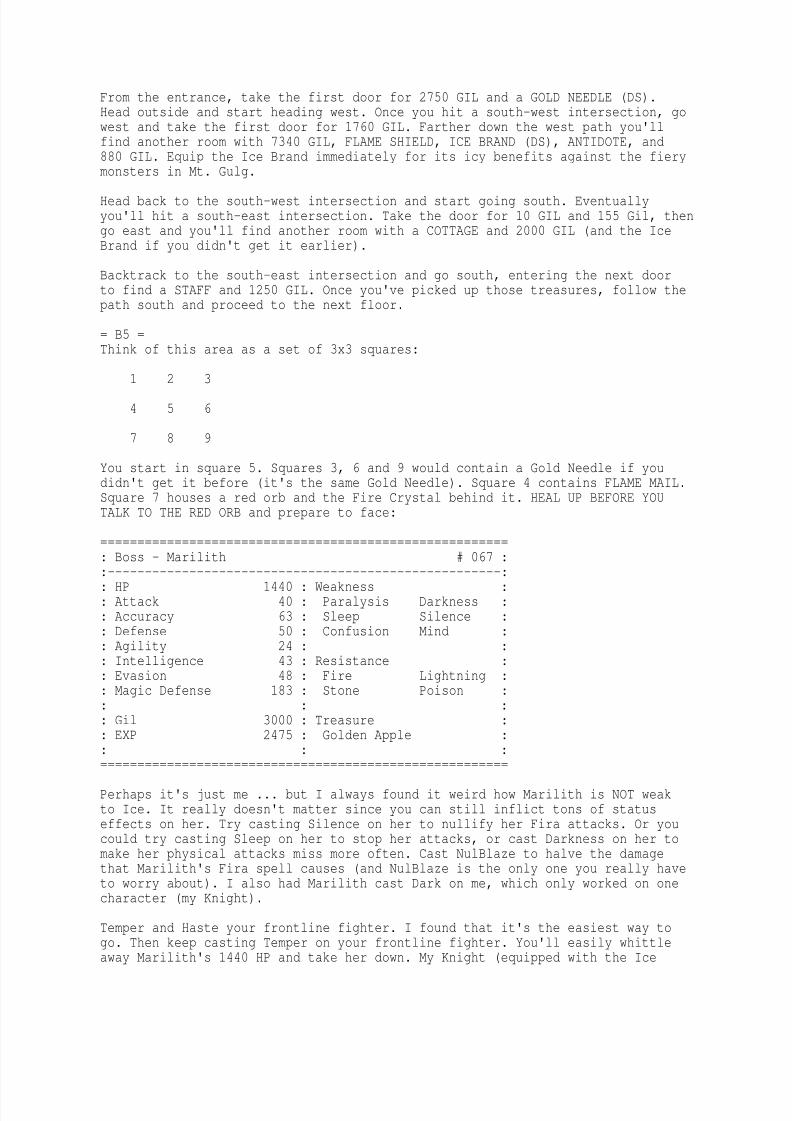
8/7/2019 final fantasy walkthrough
http://slidepdf.com/reader/full/final-fantasy-walkthrough 51/85
From the entrance, take the first door for 2750 GIL and a GOLD NEEDLE (DS).Head outside and start heading west. Once you hit a south-west intersection, gowest and take the first door for 1760 GIL. Farther down the west path you'llfind another room with 7340 GIL, FLAME SHIELD, ICE BRAND (DS), ANTIDOTE, and880 GIL. Equip the Ice Brand immediately for its icy benefits against the fierymonsters in Mt. Gulg.
Head back to the south-west intersection and start going south. Eventuallyyou'll hit a south-east intersection. Take the door for 10 GIL and 155 Gil, thengo east and you'll find another room with a COTTAGE and 2000 GIL (and the IceBrand if you didn't get it earlier).
Backtrack to the south-east intersection and go south, entering the next doorto find a STAFF and 1250 GIL. Once you've picked up those treasures, follow thepath south and proceed to the next floor.
= B5 =Think of this area as a set of 3x3 squares:
1 2 3
4 5 6
7 8 9
You start in square 5. Squares 3, 6 and 9 would contain a Gold Needle if youdidn't get it before (it's the same Gold Needle). Square 4 contains FLAME MAIL.Square 7 houses a red orb and the Fire Crystal behind it. HEAL UP BEFORE YOUTALK TO THE RED ORB and prepare to face:
=======================================================
: Boss - Marilith # 067 ::-----------------------------------------------------:: HP 1440 : Weakness :: Attack 40 : Paralysis Darkness :: Accuracy 63 : Sleep Silence :: Defense 50 : Confusion Mind :: Agility 24 : :: Intelligence 43 : Resistance :: Evasion 48 : Fire Lightning :: Magic Defense 183 : Stone Poison :: : :: Gil 3000 : Treasure :: EXP 2475 : Golden Apple :: : :=======================================================
Perhaps it's just me ... but I always found it weird how Marilith is NOT weakto Ice. It really doesn't matter since you can still inflict tons of statuseffects on her. Try casting Silence on her to nullify her Fira attacks. Or youcould try casting Sleep on her to stop her attacks, or cast Darkness on her tomake her physical attacks miss more often. Cast NulBlaze to halve the damagethat Marilith's Fira spell causes (and NulBlaze is the only one you really haveto worry about). I also had Marilith cast Dark on me, which only worked on onecharacter (my Knight).
Temper and Haste your frontline fighter. I found that it's the easiest way togo. Then keep casting Temper on your frontline fighter. You'll easily whittleaway Marilith's 1440 HP and take her down. My Knight (equipped with the Ice
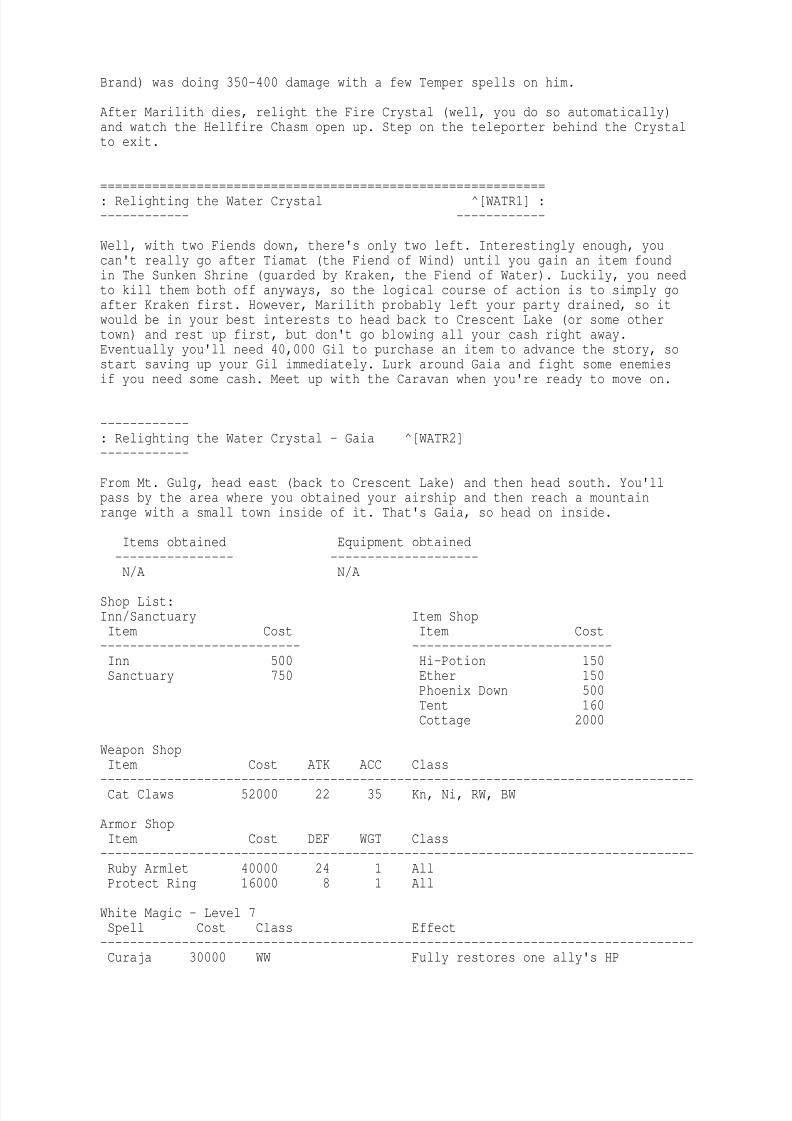
8/7/2019 final fantasy walkthrough
http://slidepdf.com/reader/full/final-fantasy-walkthrough 52/85
Brand) was doing 350-400 damage with a few Temper spells on him.
After Marilith dies, relight the Fire Crystal (well, you do so automatically)and watch the Hellfire Chasm open up. Step on the teleporter behind the Crystalto exit.
============================================================: Relighting the Water Crystal ^[WATR1] :------------ ------------
Well, with two Fiends down, there's only two left. Interestingly enough, youcan't really go after Tiamat (the Fiend of Wind) until you gain an item foundin The Sunken Shrine (guarded by Kraken, the Fiend of Water). Luckily, you needto kill them both off anyways, so the logical course of action is to simply goafter Kraken first. However, Marilith probably left your party drained, so itwould be in your best interests to head back to Crescent Lake (or some othertown) and rest up first, but don't go blowing all your cash right away.Eventually you'll need 40,000 Gil to purchase an item to advance the story, so
start saving up your Gil immediately. Lurk around Gaia and fight some enemiesif you need some cash. Meet up with the Caravan when you're ready to move on.
------------: Relighting the Water Crystal - Gaia ^[WATR2]------------
From Mt. Gulg, head east (back to Crescent Lake) and then head south. You'llpass by the area where you obtained your airship and then reach a mountainrange with a small town inside of it. That's Gaia, so head on inside.
Items obtained Equipment obtained
---------------- --------------------N/A N/A
Shop List:Inn/Sanctuary Item ShopItem Cost Item Cost--------------------------- ---------------------------Inn 500 Hi-Potion 150Sanctuary 750 Ether 150
Phoenix Down 500Tent 160Cottage 2000
Weapon ShopItem Cost ATK ACC Class--------------------------------------------------------------------------------Cat Claws 52000 22 35 Kn, Ni, RW, BW
Armor ShopItem Cost DEF WGT Class--------------------------------------------------------------------------------Ruby Armlet 40000 24 1 AllProtect Ring 16000 8 1 All
White Magic - Level 7
Spell Cost Class Effect--------------------------------------------------------------------------------Curaja 30000 WW Fully restores one ally's HP

8/7/2019 final fantasy walkthrough
http://slidepdf.com/reader/full/final-fantasy-walkthrough 53/85
Diaja 30000 WW Deals damage to all undead foes
Black Magic - Level 7Spell Cost Class Effect--------------------------------------------------------------------------------Blizzaga 30000 BW Deals ice damage to all foesBreak 30000 BW Petrifies one foe
White Magic - Level 8Spell Cost Class Effect--------------------------------------------------------------------------------Holy 40000 WW Damages all foes with holy lightNulAll 40000 WW Reduces damage from spells by halfDispel 40000 WW Negates one foe's magical defenses
Black Magic - Level 8Spell Cost Class Effect--------------------------------------------------------------------------------Stop 40000 BW Stops time and paralyzes all foes
Warp 40000 BW Banishes foes to another dimensionKill 40000 BW Instantly kills one foe
Gaia is on a continent known as "The Hawk". Gaia is considered to be the "Eyeof the Hawk" since it's located in that position. In addition, you learn aboutan ancient city to the south known as the "Wing of the Hawk", but that'sanother section for another time.
Buy your equipment, spells, etc. etc. Remember that you'll be coming back herethough.
------------
: Relighting the Water Crystal - Caravan ^[WATR3]------------
YOU NEED 40,000 GIL BEFORE YOU COME HERE. OBTAIN IT NOW.
FINDING the Desert Caravan is a task in itself. Luckily for you, you haveAction's handy-dandy FAQ/Walkthrough to help. :)
*ahem* From Gaia, head east until you reach another landmass. Head south untilyou find a desert. The Caravan is here, even though you can't see it on themap. Land your airship in a tiny green patch southeast of the desert and walkup into it. The Caravan itself is located on a small patch of seperate desertto the west of the forest (the forest is northwest of where you should land theairship).
Items obtained Equipment obtained---------------- --------------------*Bottled Faerie N/A
Shop List:Inn/Sanctuary Item ShopItem Cost Item Cost--------------------------- ---------------------------Inn N/A Bottled Faerie 40,000Sanctuary N/A
That's right ... there's ONE thing to do here. If it isn't obvious ... well ...yeah. Just buy the Faerie and leave. However, if you talk to the guy again,
8/7/2019 final fantasy walkthrough
http://slidepdf.com/reader/full/final-fantasy-walkthrough 54/85
he'll have a new inventory lined up for you.
Item ShopItem Cost---------------------------Giant's Tonic 1500Faerie Tonic 1500
Strength Drink 1000Protect Drink 1000Speed Drink 1000
All of these items are in-battle temporary stat-raising items. Get some if youwant, but either way, you need to go back to Gaia. However, before you do,there are some things you can get out of the way. You'll have to do themlater if you don't do them now, so you might as well do them now.
-- As quoted on the boards ... ----------------------------------------------- The hardest boss? I think it was the caravan master. With his strict
business sense and inflexible prices, the only way to get past him would be to pay him, and that means he wins. User - TurbidCurrent ------------------------------------------------------------------------------
------------: Relighting the Water Crystal - Waterfall Cavern ^[WATR4]------------
From where you landed your airship to reach the caravan, there's a river to theeast. If you follow it, you can head upstream, straight into the waterfall.
Items obtained Equipment obtained---------------- --------------------24480 Gil (total) Wizard's Staff*Warp Cube Ribbon
Defender
Monsters encounteredMonster HP ATK DEF Gil EXP Weakness--------------------------------------------------------------------------------Clay Golem 176 64 7 800 1257 ---Cockatrice 50 1 4 200 186 ---Green Dragon 354 72 16 5000 4068 IceKing Mummy 188 43 24 1000 984 Fire, DiaMummy 80 30 20 300 300 Fire, DiaNightmare 200 30 24 700 1272 IcePyrolisk 44 20 4 500 423 Ice
There's only one floor. So listen up.
From the entrance, head north until you are able to go west. Head west, skipthe south path and continue on (you'll travel in a sideways S curve). You willeventually reach a point with five breaks in the path (four plus the one thatyou entered through). Start heading northwest and you'll reach another inter-section. Head south and you'll enter a room with the following treasures:
WIZARD'S STAFF, RIBBON, 13,450 GIL, 6,400 GIL, 5,000 GIL and a DEFENDER sword.Talk to the robot in here to get the WARP CUBE.
8/7/2019 final fantasy walkthrough
http://slidepdf.com/reader/full/final-fantasy-walkthrough 55/85
Leave by using the Exit spell or by walking out.
------------: Relighting the Water Crystal - Onrac ^[WATR5]------------
Onrac is located to the east of the river that you find the Waterfall Cavernon. Follow the river and you'll see a town. That's Onrac, so head on inside.
Items obtained Equipment obtained---------------- --------------------N/A N/A
Shop List:Inn/Sanctuary Item ShopItem Cost Item Cost--------------------------- ---------------------------Inn 300 Hi-Potion 150
Sanctuary 750 Ether 150Remedy 1500Gold Needle 500Cottage 2000
White Magic - Level 7Spell Cost Class Effect--------------------------------------------------------------------------------NulDeath 30000 WW Enhances party's defense against deathHealaga 30000 WW Restores a lot of HP to entire party
Black Magic - Level 7Spell Cost Class Effect
--------------------------------------------------------------------------------Saber 30000 BW Raises caster's attack and accuracyBlind 30000 BW Blinds one foe with darkness
You can get some great spells here, but there's no armor or weapons shops. Havefun with Healaga and Saber. NulDeath is a good spell, but its uses are somewhatlimited. Blind isn't the greatest spell, so feel free to drop it if you want.
The real reason you're here right now is because you'll have to come back hereeventaully. In the southeast corner, you'll find a barrel that's been rebuiltas a submarine (which really makes you wonder HOW a wooden submarine wouldsurvive the pressure at the bottom of the sea ... but whatever). Once you getthe oxyale, you can come back and face off against Kraken.
------------: Relighting the Water Crystal - Gaia ^[WATR6]------------
Head back to Gaia (use the map if you need).
Items obtained Equipment obtained---------------- --------------------*Oxyale N/A
Once you enter Gaia, watch the Faerie fly off. Now, head to the Sanctuary andhead east, following the path until you reach a spring. Talk to the Faerie andit'll give you the Oxyale. With the Oxyale in hand, head back to Onrac.
8/7/2019 final fantasy walkthrough
http://slidepdf.com/reader/full/final-fantasy-walkthrough 56/85
------------: Relighting the Water Crystal - Onrac ^[WATR7]------------
Head back to Onrac (use the map if you need).
Items obtained Equipment obtained---------------- --------------------N/A N/A
In the southeast corner of Onrac, talk to the character in front of the barreland she'll ask you to save the mermaids. Talk to the barrel (althoughpersonally I'd feel unsafe trying to reach the bottom of the ocean in a punywooden barrel, but whatever) and select "Yes".
Make sure you're ready to go with plenty of Hi-Potions, Ethers and PhoenixDowns. The Sunken Shrine is a tricky area.
------------: Relighting the Water Crystal - Sunken Shrine ^[WATR8]------------
Who would've thought? A dungeon at the bottom of the ocean! And the Fiend ofWater is down here, no less! Well, it's time to play garbage-player, becauseyou're here to take out the trash. >=)
Items obtained Equipment obtained---------------- --------------------Antidote Diamond Armor
99150 Gil (total) Light Axe (x2)*Rosetta Stone Mage's Staff
Diamond ArmletDiamond ShieldDiamond HelmDiamond GlovesGiant's GlovesRibbon
Monsters encounteredMonster HP ATK DEF Gil EXP Weakness--------------------------------------------------------------------------------Deepeyes 304 30 16 3591 3591 LightningGhost 180 93 30 990 990 Fire, DiaSahagin Chief 64 15 8 105 105 LightningSahagin Prince 204 47 20 882 882 LightningSea Scorpion 148 35 18 300 639 LightningSea Snake 224 35 12 600 957 LightningSea Troll 216 40 20 852 852 LightningShark 120 22 0 66 267 LightningWater Elemential 300 69 20 800 1962 IceWater Naga 356 9 8 2355 2355 LightningWhite Shark 344 50 8 600 2361 Lightning
There's two things you HAVE to do here. The first is to defeat Kraken; the
second is to take the Rosetta Stone (in case you couldn't tell, it's in here).I'll lead you to the Rosetta Stone first because it's shorter, then I'll leadyou to Kraken. You're free to skip the Rosetta Stone now, but you're going to
8/7/2019 final fantasy walkthrough
http://slidepdf.com/reader/full/final-fantasy-walkthrough 57/85
need it regardless of whether or not you want it, so I suggest getting itnow.
= 3F = *Rosetta Stone*Start by heading north. After you pass four pillars, head east and into thedoor to nab 2000 GIL. Head back outside and return to the pillars. Before yougo anywhere, go all the way west and then head slightly north to find a door
that houses 9900 GIL. Now return to the pillars and head all the way north.When you can't go any farther north, go east and you'll see a set of stairs.Take them.
= 4F =Follow the path south and then all the way west. Follow the wall around to thenorth and eventually you'll hit a door with 20 GIL inside. Head outside andstart heading northwest, then northeast. Follow the path and you'll eventuallyreach another room with a DIAMOND ARMOR in it. Head back to where you got the20 Gil and head southwest as far as you can; you'll reach another door with aLIGHT AXE in a chest. From outside of this room, head west and you'll pass bya room with a MAGE'S STAFF inside and another door with 12350 GIL inside. In
the southeast corner you'll see some more stairs, so take them.
= 5F =For the record, I never ran into any monsters on this floor, so I'm going tosay it's monster-free. On the other hand, this floor IS filled with mermaidswho all have something to tell you when you talk to them.
Think of this area as a set of 4x4 squares:
1 2 3 45 6 7 89 10 11 1213 14 15 16
The stairs you start at are at 14. There isn't a room there, just the stairs.
Room 10 contains 9000 GIL, 1760 GIL, and a DIAMOND ARMLET.
Go northwest of Room 10 to find a path that leads to the other rooms.
Room 2 contains 2750 GIL. Room 3 contains 10,000 GIL and 10 GIL. Room 7 holds4150 GIL. Room 8 has 5000 GIL. Room 15 has an ANTIDOTE. Room 16 contains aDIAMOND SHIELD.
Head northwest of Room 1 to find a small path that leads around the map. It'lllead you to Room 4 and the DIAMOND HELM, DIAMOND GLOVES and ROSETTA STONEinside.
Now then, either walk back or use the Exit spell. Either way, you still need toget back to 3F.
= 3F = *Kraken Fight*Instead of heading northeast to go get the Rosetta Stone, head northwest anddown the stairs.
= 2F =Head slightly west and then all the way north. You'll find a set of stairs inthe northeast corner of this area, so take them.
= 3F =Take the next set of stairs.
8/7/2019 final fantasy walkthrough
http://slidepdf.com/reader/full/final-fantasy-walkthrough 58/85
= 4F =Take the next set of stairs in the southeast corner.
= 3F =Head north into the room and pick up the 110 GIL and 450 GIL. Head south anddown the stairs.
= 2F =Head west until you reach a north-south-west intersection. Head south and thensouthwest and enter a room with 7690 GIL and 8135 GIL. Exit and head all theway west to find another room with 5450 GIL, 385 GIL and the GIANT'S GLOVES.Exit this room and start making your way north and you'll find another roomwith a LIGHT AXE inside. Outside of this room, head east and you'll find yetanother room that contains a RIBBON, 9900 GIL, 7340 GIL and 2750 GIL. Head backout and head slightly west, then north and northwest. Take the stairs.
= 1F =Head west and then take the first path north that you find. Eventually you'll
find a path west, so take it. You'll reach a room, so enter it and make yourway to the northwest side of it. You'll find an exit more towards the middle-west, so exit it and follow the path until you reach the next door. Inside thedoor, HEAL UP BEFORE YOU TALK TO THE BLUE ORB. Prepare for the fight:
=======================================================: Boss - Kraken # 102 ::-----------------------------------------------------:: HP 1800 : Weakness :: Attack 50 : Lightning :: Accuracy 90 : :: Defense 60 : Resistance :: Agility 42 : Quake Fire :
: Intelligence 32 : :: Evasion 84 : Treasure :: Magic Defense 160 : Kikuichimonji :: : :: Gil 5000 : :: EXP 4245 : :: : :=======================================================
Kraken is weak to Lightning, so use that to your advantage. Buff up your ownevasion using Invisira or Invis (you can use the White Robe to case Invisiraif you have it). Protera will help, but it's really not needed if you have agood set of Invis on your crew. I've fought Kraken a number of times and henever uses spells, just strong physical attacks, so you shouldn't have toworry about casting Nul-anything.
In the first round, your frontline fighter should use the Giant's Gloves thatyou SHOULD have by now (if you don't, then you haven't been following my FAQtoo well). At any rate, have your crew cast Temper and Haste on that fighter,and then have them attack. In the meanwhile, have someone cast Invis orInvisira on your crew. Keep your HP high and have your frontline fighter attacknonstop.
Keep up this pattern and Kraken will go down in no time. Light the crystal,watch the Lifespring Grotto open and head out using the teleporter.
============================================================
8/7/2019 final fantasy walkthrough
http://slidepdf.com/reader/full/final-fantasy-walkthrough 59/85
: Relighting the Wind Crystal ^[WIND1] :------------ ------------
Cutting down Kraken means that there's only one Fiend left. After running a fewerrands around the world, you'll be all set to face Tiamat, the final Fiend.The tasks you'll complete include a trip all around the world. Having theRosetta Stone will start the task (and you should have it if you've been
following my walkthrough). Also the obscene amounts of Gil you should have(99150 Gil to be precise) from the Sunken Shrine will be more than sufficientfor the two Level 8 spells you should be getting as well.
Remember ... you NEED THE ROSETTA STONE, so go get it if you haven't already.In any case, once you have the Rosetta Stone and you're ready to go, let's doit.
------------: Relighting the Wind Crystal - Melmond Graveyard ^[WIND2]------------
If you need help finding Melmond, use the world map by pressing B and SELECT.
Items obtained Equipment obtained---------------- --------------------*Lufenian Langauge N/A
In the northeast corner of Melmond, you'll find Dr. Unne. He'll take theRosetta Stone and translate it. As thanks, he'll teach you Lufenian, thelanguage he was trying to decipher. Now that you know Lufenian, you can speakto the Lufenians in (take a guess) Lufenia!
------------: Relighting the Wind Crystal - Lufenia Area ^[WIND3]------------
If you remember where Gaia is, you basically know how to get to Lufenia.However, the only place to land your airship is far north of Lufenia, closer tothe body of the Hawk. Go to Gaia, then head south until you reach a small lake.Northwest of that lake you'll find a small patch of green land that you canland the airship on.
Hope you brought some Cottages along. It's a long walk from where you land toLufenia.
Monsters encounteredMonster HP ATK DEF Gil EXP Weakness--------------------------------------------------------------------------------Allosaurus 480 65 10 502 3387 ---Baretta 256 60 38 300 1428 ---Desert Baretta 352 98 48 1 2610 ---Hill Gigas 240 38 60 879 879 ---Minotaur Zombie 224 40 14 1050 1050 Fire, DiaSand Worm 200 46 14 900 2683 ---Troll 184 24 12 621 621 FireTyrannosaur 600 115 10 600 7200 ---Winter Wolf 92 25 0 200 402 Fire
Wyvern 212 30 12 50 1173 ---
I included the enemies around Mirage Tower in with the enemies around Lufenia.
8/7/2019 final fantasy walkthrough
http://slidepdf.com/reader/full/final-fantasy-walkthrough 60/85
I think it's easier that way. If it doesn't look like it belongs in a forest,try looking for it in the desert.
------------: Relighting the Wind Crystal - Lufenia ^[WIND4]------------
Lufenia is far to the south of where you land your airship. Use the map if youneed help.
Items obtained Equipment obtained---------------- --------------------*Chime N/A
Shop List:Inn/Sanctuary Item ShopItem Cost Item Cost--------------------------- ---------------------------
Inn N/A N/ASanctuary N/A
White Magic - Level 8Spell Cost Class Effect--------------------------------------------------------------------------------Full-Life 40000 WW Revives one ally and fully restores HP
Black Magic - Level 8Spell Cost Class Effect--------------------------------------------------------------------------------Flare 40000 BW Blasts all foes with light and heat
The best spells reside in Lufenia; if you have a Black or White Wizard, youNEED to get these spells since they're the best Level 8 spells available. Andunless you've been totally blowing your Gil, there's really no reason NOT toget them (unless, of course, your magic level is too low).
To get to the magic shop, head northeast from the entrance and when you see anopening in the wall, head straight east to hit two shops; one for White Wizardsand the other for Black Wizards.
Also, before you go make sure to pick up the Chime from a Lufenian just east ofthe entrance. Circle around from the entrance to speak to him (or her?) andobtain the Chime.
------------: Relighting the Wind Crystal - Mirage Tower ^[WIND5]------------
If you've been following my walkthrough, you have the Warp Cube, which is whatyou need to obtain before heading into the Mirage Tower. If you don't have it,go back to section [WATR4] and pick it up (don't forget the carat). Meet meback here once you do. You also need the Rosetta Stone (found in section[WATR8]) and have shown it to Unne (found in section [WIND2]).
From where you left the airship on your Lufenia trip, go straight south and you
will find another patch of green land. Land on it and head into the desert.Smack in the middle of the desert you'll find a tower. That's the Mirage Tower,so head on in.
8/7/2019 final fantasy walkthrough
http://slidepdf.com/reader/full/final-fantasy-walkthrough 61/85
Items obtained Equipment obtained---------------- --------------------Tent Aegis ShieldCottage Healing Helm83945 Gil (total) Vorpal Sword
Thor's Hammer
Sun BladeDragon Mail
Monsters encounteredMonster HP ATK DEF Gil EXP Weakness--------------------------------------------------------------------------------Black Knight 260 44 38 1800 1263 ---Chimera 300 30 20 2500 2064 IceCockatrice 50 1 4 200 186 ---Guardian 200 25 40 400 1224 LightningHellhound 192 30 8 600 1182 IceKing Mummy 188 43 24 1000 984 Fire, Dia
Medusa 68 20 10 699 699 ---Mummy 80 30 20 300 300 Fire, DiaNightmare 200 30 24 700 1272 IcePyrolisk 44 20 4 500 423 IceSabertooth 200 24 8 500 843 ---Vampire 280 76 26 2000 1200 Fire, DiaWeretiger 160 30 16 780 780 ---Wyrm 260 40 22 502 1218 ---Wyvern 212 30 12 50 1173 ---
The Mirage Tower and the Flying Fortress allow for no breaks. Make sure youarrive prepared to face both areas with plenty of Hi-Potions, Ethers, Remediesand Phoenix Downs. Between Onrac and Gaia, you'll be able to stock up on all
the supplies you need before facing off against the two dungeons. You mightalso want to get a few Cottages in case you need to warp out and don't want tobe left stranded with little to no HP/MP.
The Mirage Tower is also built like a clock. So you'll see me referring topositions on the clock on 2F.
= 1F =The stairway is due west of where you enter. All you need to do is head northinto the door and south through the west door and up the stairs. However, ifyou enter the door and head north, you'll find a plethora of treasure, whichincludes the following: 800 GIL, TENT, AEGIS SHIELD, 2750 GIL, 3400 GIL,HEALING HELM, 18010 GIL and a VORPAL SWORD. Head up to the next floor when youare ready.
= 2F =You start at 6 o'clock and the exit is at 12 o'clock. Start by heading counterclockwise until you pass the stairs (blocked by a wall) and keep going untilyou reach 10 o'clock. You can either go up the stairs or follow the outline ofthe black room until you find a door. Inside you'll find the following: 13000GIL, 12350 GIL, THOR'S HAMMER, 7900 GIL, 8135 GIL, COTTAGE, 7600 GIL, SUNBLADE, 10000 GIL and DRAGON MAIL. Once you have the treasure, head on up thestairs.
= 3F =
Circle around and enter the room and get ready for:
=======================================================
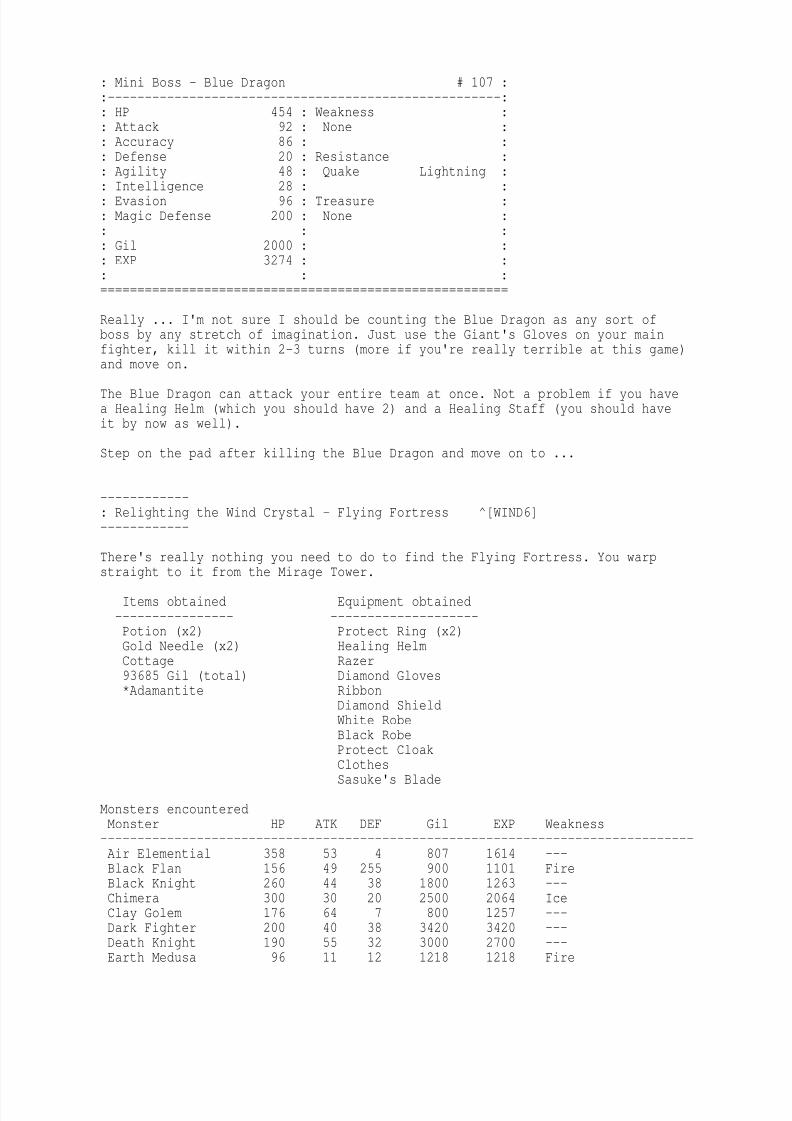
8/7/2019 final fantasy walkthrough
http://slidepdf.com/reader/full/final-fantasy-walkthrough 62/85
: Mini Boss - Blue Dragon # 107 ::-----------------------------------------------------:: HP 454 : Weakness :: Attack 92 : None :: Accuracy 86 : :: Defense 20 : Resistance :: Agility 48 : Quake Lightning :
: Intelligence 28 : :: Evasion 96 : Treasure :: Magic Defense 200 : None :: : :: Gil 2000 : :: EXP 3274 : :: : :=======================================================
Really ... I'm not sure I should be counting the Blue Dragon as any sort ofboss by any stretch of imagination. Just use the Giant's Gloves on your mainfighter, kill it within 2-3 turns (more if you're really terrible at this game)
and move on.
The Blue Dragon can attack your entire team at once. Not a problem if you havea Healing Helm (which you should have 2) and a Healing Staff (you should haveit by now as well).
Step on the pad after killing the Blue Dragon and move on to ...
------------: Relighting the Wind Crystal - Flying Fortress ^[WIND6]------------
There's really nothing you need to do to find the Flying Fortress. You warpstraight to it from the Mirage Tower.
Items obtained Equipment obtained---------------- --------------------Potion (x2) Protect Ring (x2)Gold Needle (x2) Healing HelmCottage Razer93685 Gil (total) Diamond Gloves*Adamantite Ribbon
Diamond ShieldWhite RobeBlack RobeProtect CloakClothesSasuke's Blade
Monsters encounteredMonster HP ATK DEF Gil EXP Weakness--------------------------------------------------------------------------------Air Elemential 358 53 4 807 1614 ---Black Flan 156 49 255 900 1101 FireBlack Knight 260 44 38 1800 1263 ---Chimera 300 30 20 2500 2064 IceClay Golem 176 64 7 800 1257 ---
Dark Fighter 200 40 38 3420 3420 ---Death Knight 190 55 32 3000 2700 ---Earth Medusa 96 11 12 1218 1218 Fire
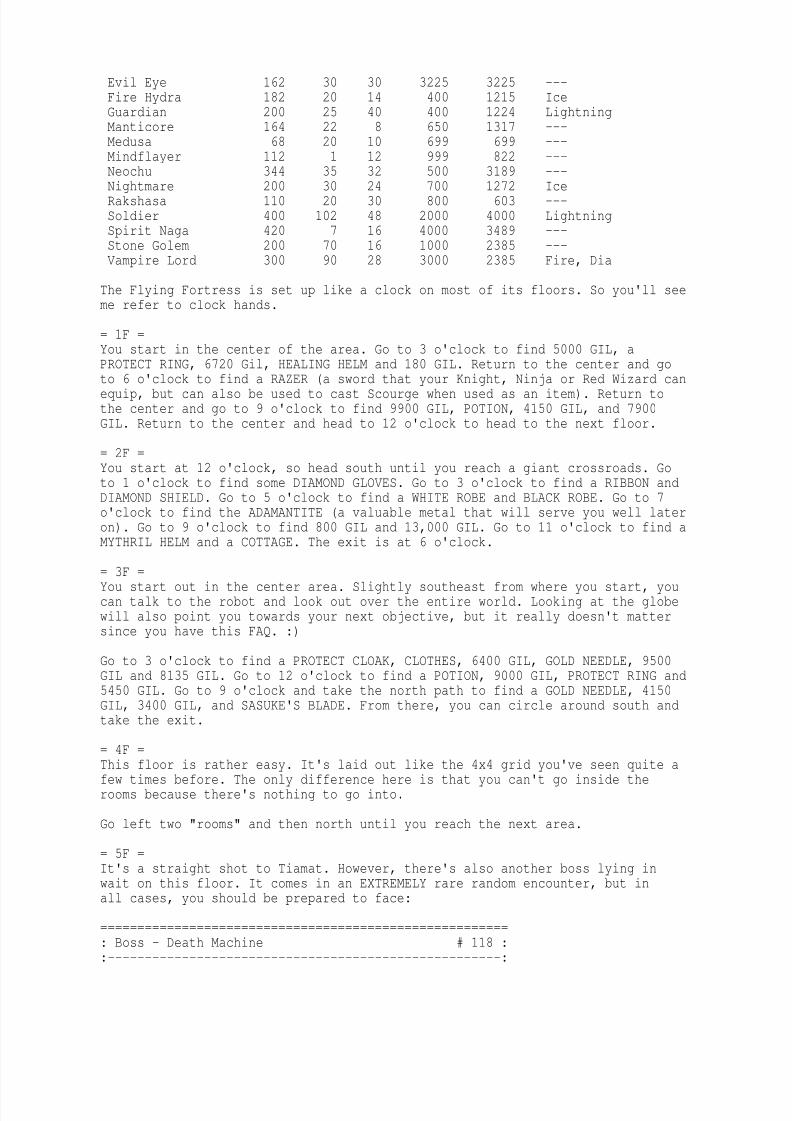
8/7/2019 final fantasy walkthrough
http://slidepdf.com/reader/full/final-fantasy-walkthrough 63/85
Evil Eye 162 30 30 3225 3225 ---Fire Hydra 182 20 14 400 1215 IceGuardian 200 25 40 400 1224 LightningManticore 164 22 8 650 1317 ---Medusa 68 20 10 699 699 ---Mindflayer 112 1 12 999 822 ---Neochu 344 35 32 500 3189 ---
Nightmare 200 30 24 700 1272 IceRakshasa 110 20 30 800 603 ---Soldier 400 102 48 2000 4000 LightningSpirit Naga 420 7 16 4000 3489 ---Stone Golem 200 70 16 1000 2385 ---Vampire Lord 300 90 28 3000 2385 Fire, Dia
The Flying Fortress is set up like a clock on most of its floors. So you'll seeme refer to clock hands.
= 1F =You start in the center of the area. Go to 3 o'clock to find 5000 GIL, a
PROTECT RING, 6720 Gil, HEALING HELM and 180 GIL. Return to the center and goto 6 o'clock to find a RAZER (a sword that your Knight, Ninja or Red Wizard canequip, but can also be used to cast Scourge when used as an item). Return tothe center and go to 9 o'clock to find 9900 GIL, POTION, 4150 GIL, and 7900GIL. Return to the center and head to 12 o'clock to head to the next floor.
= 2F =You start at 12 o'clock, so head south until you reach a giant crossroads. Goto 1 o'clock to find some DIAMOND GLOVES. Go to 3 o'clock to find a RIBBON andDIAMOND SHIELD. Go to 5 o'clock to find a WHITE ROBE and BLACK ROBE. Go to 7o'clock to find the ADAMANTITE (a valuable metal that will serve you well lateron). Go to 9 o'clock to find 800 GIL and 13,000 GIL. Go to 11 o'clock to find aMYTHRIL HELM and a COTTAGE. The exit is at 6 o'clock.
= 3F =You start out in the center area. Slightly southeast from where you start, youcan talk to the robot and look out over the entire world. Looking at the globewill also point you towards your next objective, but it really doesn't mattersince you have this FAQ. :)
Go to 3 o'clock to find a PROTECT CLOAK, CLOTHES, 6400 GIL, GOLD NEEDLE, 9500GIL and 8135 GIL. Go to 12 o'clock to find a POTION, 9000 GIL, PROTECT RING and5450 GIL. Go to 9 o'clock and take the north path to find a GOLD NEEDLE, 4150GIL, 3400 GIL, and SASUKE'S BLADE. From there, you can circle around south andtake the exit.
= 4F =This floor is rather easy. It's laid out like the 4x4 grid you've seen quite afew times before. The only difference here is that you can't go inside therooms because there's nothing to go into.
Go left two "rooms" and then north until you reach the next area.
= 5F =It's a straight shot to Tiamat. However, there's also another boss lying inwait on this floor. It comes in an EXTREMELY rare random encounter, but inall cases, you should be prepared to face:
=======================================================: Boss - Death Machine # 118 ::-----------------------------------------------------:
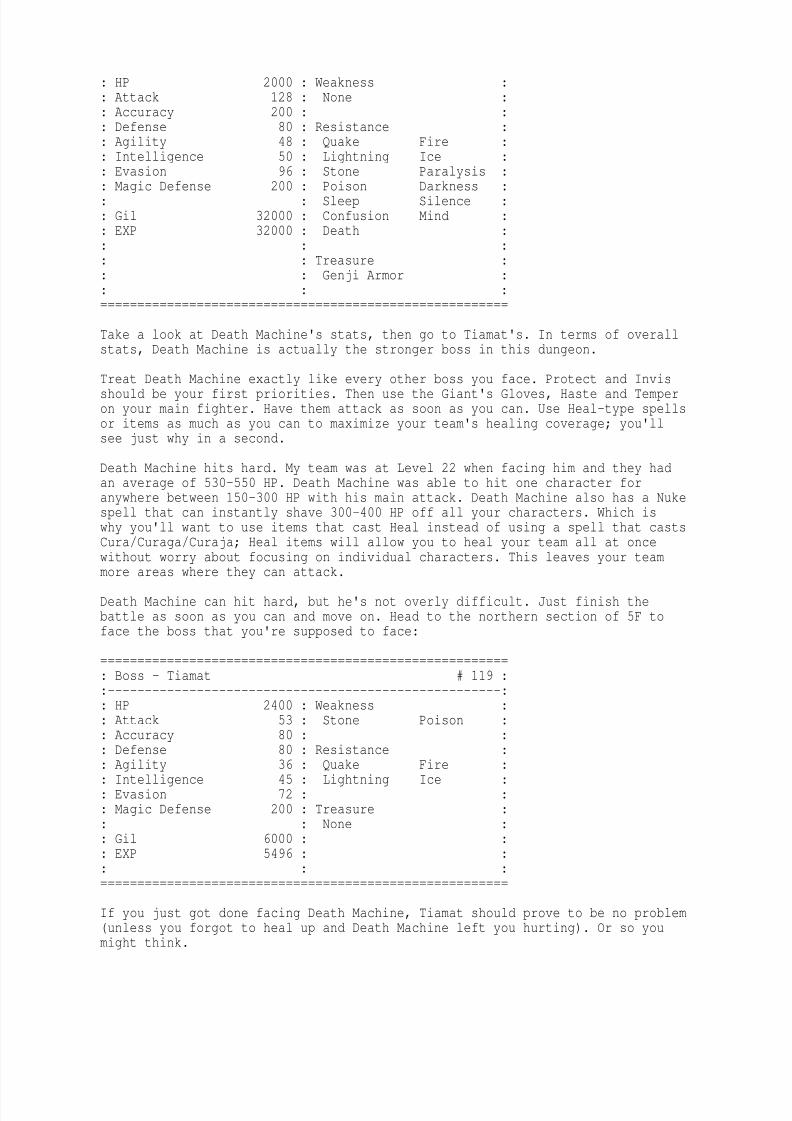
8/7/2019 final fantasy walkthrough
http://slidepdf.com/reader/full/final-fantasy-walkthrough 64/85
: HP 2000 : Weakness :: Attack 128 : None :: Accuracy 200 : :: Defense 80 : Resistance :: Agility 48 : Quake Fire :: Intelligence 50 : Lightning Ice :: Evasion 96 : Stone Paralysis :
: Magic Defense 200 : Poison Darkness :: : Sleep Silence :: Gil 32000 : Confusion Mind :: EXP 32000 : Death :: : :: : Treasure :: : Genji Armor :: : :=======================================================
Take a look at Death Machine's stats, then go to Tiamat's. In terms of overallstats, Death Machine is actually the stronger boss in this dungeon.
Treat Death Machine exactly like every other boss you face. Protect and Invisshould be your first priorities. Then use the Giant's Gloves, Haste and Temperon your main fighter. Have them attack as soon as you can. Use Heal-type spellsor items as much as you can to maximize your team's healing coverage; you'llsee just why in a second.
Death Machine hits hard. My team was at Level 22 when facing him and they hadan average of 530-550 HP. Death Machine was able to hit one character foranywhere between 150-300 HP with his main attack. Death Machine also has a Nukespell that can instantly shave 300-400 HP off all your characters. Which iswhy you'll want to use items that cast Heal instead of using a spell that castsCura/Curaga/Curaja; Heal items will allow you to heal your team all at once
without worry about focusing on individual characters. This leaves your teammore areas where they can attack.
Death Machine can hit hard, but he's not overly difficult. Just finish thebattle as soon as you can and move on. Head to the northern section of 5F toface the boss that you're supposed to face:
=======================================================: Boss - Tiamat # 119 ::-----------------------------------------------------:: HP 2400 : Weakness :: Attack 53 : Stone Poison :: Accuracy 80 : :: Defense 80 : Resistance :: Agility 36 : Quake Fire :: Intelligence 45 : Lightning Ice :: Evasion 72 : :: Magic Defense 200 : Treasure :: : None :: Gil 6000 : :: EXP 5496 : :: : :=======================================================
If you just got done facing Death Machine, Tiamat should prove to be no problem
(unless you forgot to heal up and Death Machine left you hurting). Or so youmight think.
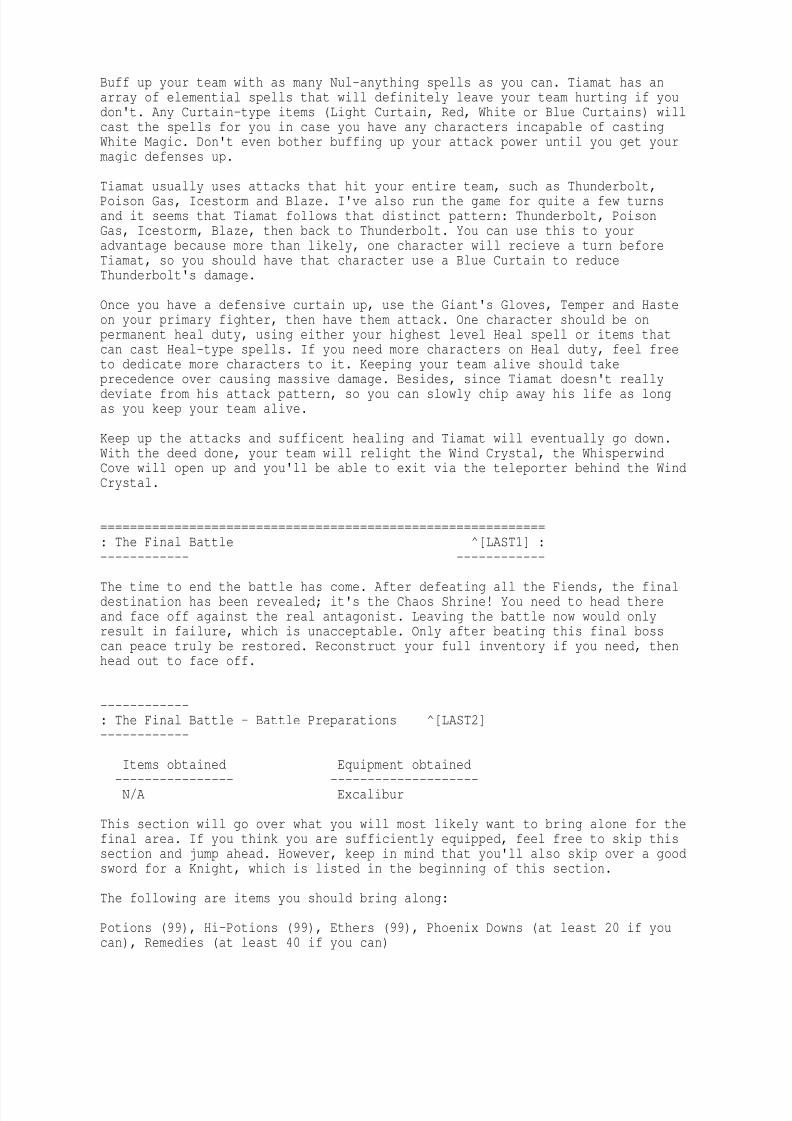
8/7/2019 final fantasy walkthrough
http://slidepdf.com/reader/full/final-fantasy-walkthrough 65/85
Buff up your team with as many Nul-anything spells as you can. Tiamat has anarray of elemential spells that will definitely leave your team hurting if youdon't. Any Curtain-type items (Light Curtain, Red, White or Blue Curtains) willcast the spells for you in case you have any characters incapable of castingWhite Magic. Don't even bother buffing up your attack power until you get yourmagic defenses up.
Tiamat usually uses attacks that hit your entire team, such as Thunderbolt,Poison Gas, Icestorm and Blaze. I've also run the game for quite a few turnsand it seems that Tiamat follows that distinct pattern: Thunderbolt, PoisonGas, Icestorm, Blaze, then back to Thunderbolt. You can use this to youradvantage because more than likely, one character will recieve a turn beforeTiamat, so you should have that character use a Blue Curtain to reduceThunderbolt's damage.
Once you have a defensive curtain up, use the Giant's Gloves, Temper and Hasteon your primary fighter, then have them attack. One character should be onpermanent heal duty, using either your highest level Heal spell or items thatcan cast Heal-type spells. If you need more characters on Heal duty, feel free
to dedicate more characters to it. Keeping your team alive should takeprecedence over causing massive damage. Besides, since Tiamat doesn't reallydeviate from his attack pattern, so you can slowly chip away his life as longas you keep your team alive.
Keep up the attacks and sufficent healing and Tiamat will eventually go down.With the deed done, your team will relight the Wind Crystal, the WhisperwindCove will open up and you'll be able to exit via the teleporter behind the WindCrystal.
============================================================: The Final Battle ^[LAST1] :
------------ ------------
The time to end the battle has come. After defeating all the Fiends, the finaldestination has been revealed; it's the Chaos Shrine! You need to head thereand face off against the real antagonist. Leaving the battle now would onlyresult in failure, which is unacceptable. Only after beating this final bosscan peace truly be restored. Reconstruct your full inventory if you need, thenhead out to face off.
------------: The Final Battle - Battle Preparations ^[LAST2]------------
Items obtained Equipment obtained---------------- --------------------N/A Excalibur
This section will go over what you will most likely want to bring alone for thefinal area. If you think you are sufficiently equipped, feel free to skip thissection and jump ahead. However, keep in mind that you'll also skip over a goodsword for a Knight, which is listed in the beginning of this section.
The following are items you should bring along:
Potions (99), Hi-Potions (99), Ethers (99), Phoenix Downs (at least 20 if youcan), Remedies (at least 40 if you can)
8/7/2019 final fantasy walkthrough
http://slidepdf.com/reader/full/final-fantasy-walkthrough 66/85
8/7/2019 final fantasy walkthrough
http://slidepdf.com/reader/full/final-fantasy-walkthrough 67/85
Chimera 300 30 20 2500 2064 IceClay Golem 176 64 7 800 1257 ---Dark Fighter 200 40 38 3420 3420 ---Dark Wizard 105 26 40 1095 1095 ---Death Eye 360 120 60 1 1 Fire, DiaDragon Zombie 268 56 30 999 2331 Fire, DiaEarth Elemential 288 66 20 768 1536 Fire
Earth Medusa 96 11 12 1218 1218 FireFire Gigas 300 73 20 1506 1506 IceFire Lizard 296 31 18 1200 2472 IceGreen Dragon 354 72 16 5000 4068 IceIce Gigas 336 60 16 1752 1752 FireIron Golem 304 93 100 3000 6717 ---Lava Worm 280 50 31 400 1671 IcePurple Worm 448 65 10 1000 4344 ---Red Dragon 248 75 30 4000 2904 Ice, Stone, PoisonRhyos 350 40 18 5000 4584 IceSahagin Prince 204 47 20 882 882 LightningSea Scorpion 148 35 18 300 639 Lightning
Sea Snake 224 35 12 600 957 LightningSea Troll 216 40 20 852 852 LightningStone Golem 200 70 16 1000 2385 ---Vampire 280 76 26 2000 1200 Fire, DiaVampire Lord 300 90 28 3000 2385 Fire, DiaWater Elemential 300 69 20 800 1962 IceWhite Dragon 200 53 8 2000 1701 Fire, LightningWhite Shark 344 50 8 600 2361 LightningWinter Wolf 92 25 0 200 402 Fire
There are a few tips I should give you before undertaking this dungeon. Firstoff, try to conserve your MP. Even if you have 99 Ethers, they can burn uprather quickly. If you can, use items to heal instead of using MP. You have
plenty of them: the Healing Helm and Healing Staff. Even though they're slow,they get the job done without spending any MP. They're also an excellent way toconserve Potions and Hi-Potions. Simply find a weak group of enemies, kill allbut one and then have at it with the Heal items.
Also, items can be extremely useful, such as items that cast Nul-anything. Feelfree to use them if necessary, but keep in mind that they will also come inhandy later on when you fight the bosses.
Lastly, a lot of the enemies here are weak to some sort of element. Exploitingthose weaknesses will definitely help you in the long run. Also, unless you'vesold all your extra equipment, you should have plenty of items that castelemential spells. Use those to your advantage.
Now then, that's all the advice I have to give. Let's move on ...
= 1F =From the entrance, head south as far as you can, then go east. You'll find astairway in the southeast corner, so take it.
= 2F =Head straight east and take the stairway.
= 3F =From the entrance, head south until you reach the southwest corner. From there,
go east until you reach the center of this floor (you'll know you're therebecause you'll see a line of pillars leading to a doorway). Enter the doorwayand face off against:
8/7/2019 final fantasy walkthrough
http://slidepdf.com/reader/full/final-fantasy-walkthrough 68/85
=======================================================: Mini Boss - Death Eye # 121 ::-----------------------------------------------------:: HP 360 : Weakness :: Attack 120 : Fire Dia :: Accuracy 150 : :
: Defense 60 : Resistance :: Agility 12 : Quake Ice :: Intelligence 35 : Stone Paralysis :: Evasion 24 : Poison Darkness :: Magic Defense 160 : Sleep Silence :: : Confusion Mind :: Gil 1 : Death :: EXP 1 : :: : Treasure :: : Elixer :: : :=======================================================
Okay, the Death Eye isn't a huge threat since you can kill it within 1-2 turns.The only real reason it's here as a mini-boss is because it's a forced fight.However, if you leave it alone, it can use some rather nasty spells on you likeStop, Warp, Break, Death, Hold, Silence, Slow and even Dispel, just to name afew, some of which can instantly KO teammates. Kill it quickly (don't evenbother trying to build up offense or defense) to defeat the threat before iteven becomes a threat.
After you defeat the Death Eye, open the chests in the northwest and northeastcorners for a Dry Ether and an Elixer. Then stand in front of the tablet andtalk to it to activate a short scene and move on.
= 2F =Head south and outside the door and then to the southwest corner. After youreach the southwest corner, head to the northwest corner to find a set ofstairs. Take them.
= 1F =You start in the northeast corner and your destination is the northwest corner.Head there and take the stairs.
= B1 =You start in the southwest corner and your destination is the southeast corner.However, it's not a straight shot; you have circle all the way around to thenorthwest corner, then the northeast corner, then to the southeast corner.Before you approach the stairs, HEAL UP! Also, it really helps if you haveProtect Rings as they'll guard against instant-death attacks. In addition, aRibbon on a character with low Magic Defense (like a Knight or Master) willhelp against other spells. Once you're all healed up and equipped, approach thestairs (it doesn't matter what direction you approach them from since there'sencounter squares on all sides) and get ready to face:
=======================================================: Boss - Lich # 124 ::-----------------------------------------------------:: HP 2800 : Weakness :: Attack 50 : Dia :
: Accuracy 64 : :: Defense 80 : Resistance :: Agility 24 : Ice Stone :
8/7/2019 final fantasy walkthrough
http://slidepdf.com/reader/full/final-fantasy-walkthrough 69/85
: Intelligence 34 : Paralysis Poison :: Evasion 48 : Darkness Sleep :: Magic Defense 140 : Silence Confusion :: : Mind Death :: Gil 1 : :: EXP 2000 : Treasure :: : None :
: : :=======================================================
Lich has an entire new lineup of spells (much deadlier spells) to throw at youwhich include Flare, Warp, Stop and Kill. It also seems like Lich loops thosespells. With Protect Rings equipped on your team, Kill becomes ineffective. ARibbon will protect a low Magic Defense character (my Knight had troubles inthis fight) from Warp and Stop. This essentially makes Flare the only realthreat in this fight.
Your equipment is more of what creates your defense in this fight, not yourspells. With a Ribbon and Protect Ring on a character, they only have to fear
Flare.
Have your strongest fighter use the Giant's Gloves and place everyone else onHeal spell/item priority. When your fighter is beefed up, attack away. Lichwill go down soon enough. When the battle is complete, move on to the stairs.
= B2 =Jag south, then go west between the pillars, then north and into the door.Follow the path and take the first east path that you can. Head past theraised floor area and keep going until you're surrounded by four smaller roomswith no doors. Head south to find another door. Keep going south until youreach some more pillars. Head west, but dont' go towards the stairs yet. Headsouth and you'll find two doors. The left door houses a PROTECT RING and a
SASUKE'S BLADE waaaaaay down the path. The right door holds a PROTECT CLOAK anda MEGALIXER. Before you go back to the stairs, be sure you have Protect Ringsand Ribbons equipped. Because once you approach the stairs, you'll face:
=======================================================: Boss - Marilith # 125 ::-----------------------------------------------------:: HP 3200 : Weakness :: Attack 60 : None :: Accuracy 63 : :: Defense 80 : Resistance :: Agility 30 : Fire Lightning :: Intelligence 41 : Ice Stone :: Evasion 60 : Poison :: Magic Defense 183 : :: : Treasure :: Gil 1 : None :: EXP 2000 : :: : :=======================================================
Marilith (like Lich here) has a new lineup of spells. I saw Firaga, Death andStun just to name a few. However, with a Protect Ring and a Ribbon on yourweakest Magic Defense character (or more than one if you like), Death and Stunbecome useless, which makes Firaga your only real threat. Even then, a well-
placed Healaga spell (or multiple characters on Heal-item duty) is more thanenough to nullify any bad effects you might suffer.
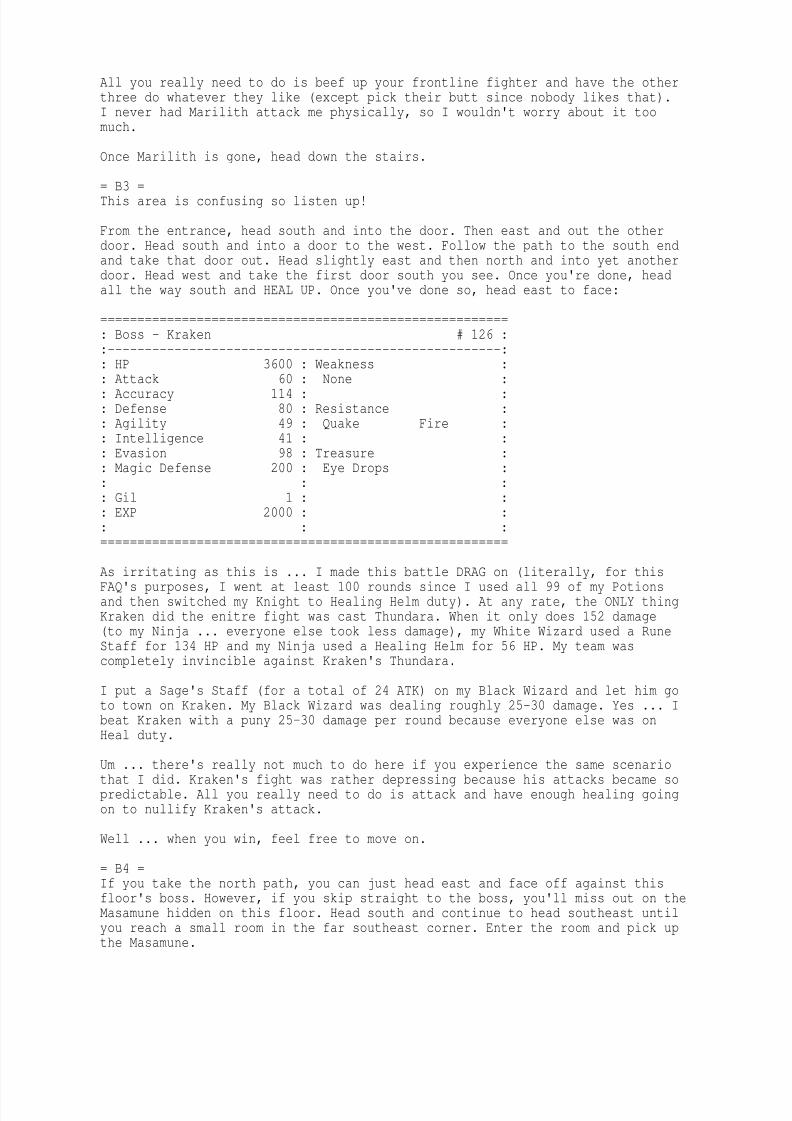
8/7/2019 final fantasy walkthrough
http://slidepdf.com/reader/full/final-fantasy-walkthrough 70/85
All you really need to do is beef up your frontline fighter and have the otherthree do whatever they like (except pick their butt since nobody likes that).I never had Marilith attack me physically, so I wouldn't worry about it toomuch.
Once Marilith is gone, head down the stairs.
= B3 =This area is confusing so listen up!
From the entrance, head south and into the door. Then east and out the otherdoor. Head south and into a door to the west. Follow the path to the south endand take that door out. Head slightly east and then north and into yet anotherdoor. Head west and take the first door south you see. Once you're done, headall the way south and HEAL UP. Once you've done so, head east to face:
=======================================================: Boss - Kraken # 126 ::-----------------------------------------------------:
: HP 3600 : Weakness :: Attack 60 : None :: Accuracy 114 : :: Defense 80 : Resistance :: Agility 49 : Quake Fire :: Intelligence 41 : :: Evasion 98 : Treasure :: Magic Defense 200 : Eye Drops :: : :: Gil 1 : :: EXP 2000 : :: : :=======================================================
As irritating as this is ... I made this battle DRAG on (literally, for thisFAQ's purposes, I went at least 100 rounds since I used all 99 of my Potionsand then switched my Knight to Healing Helm duty). At any rate, the ONLY thingKraken did the enitre fight was cast Thundara. When it only does 152 damage(to my Ninja ... everyone else took less damage), my White Wizard used a RuneStaff for 134 HP and my Ninja used a Healing Helm for 56 HP. My team wascompletely invincible against Kraken's Thundara.
I put a Sage's Staff (for a total of 24 ATK) on my Black Wizard and let him goto town on Kraken. My Black Wizard was dealing roughly 25-30 damage. Yes ... Ibeat Kraken with a puny 25-30 damage per round because everyone else was onHeal duty.
Um ... there's really not much to do here if you experience the same scenariothat I did. Kraken's fight was rather depressing because his attacks became sopredictable. All you really need to do is attack and have enough healing goingon to nullify Kraken's attack.
Well ... when you win, feel free to move on.
= B4 =If you take the north path, you can just head east and face off against thisfloor's boss. However, if you skip straight to the boss, you'll miss out on theMasamune hidden on this floor. Head south and continue to head southeast until
you reach a small room in the far southeast corner. Enter the room and pick upthe Masamune.
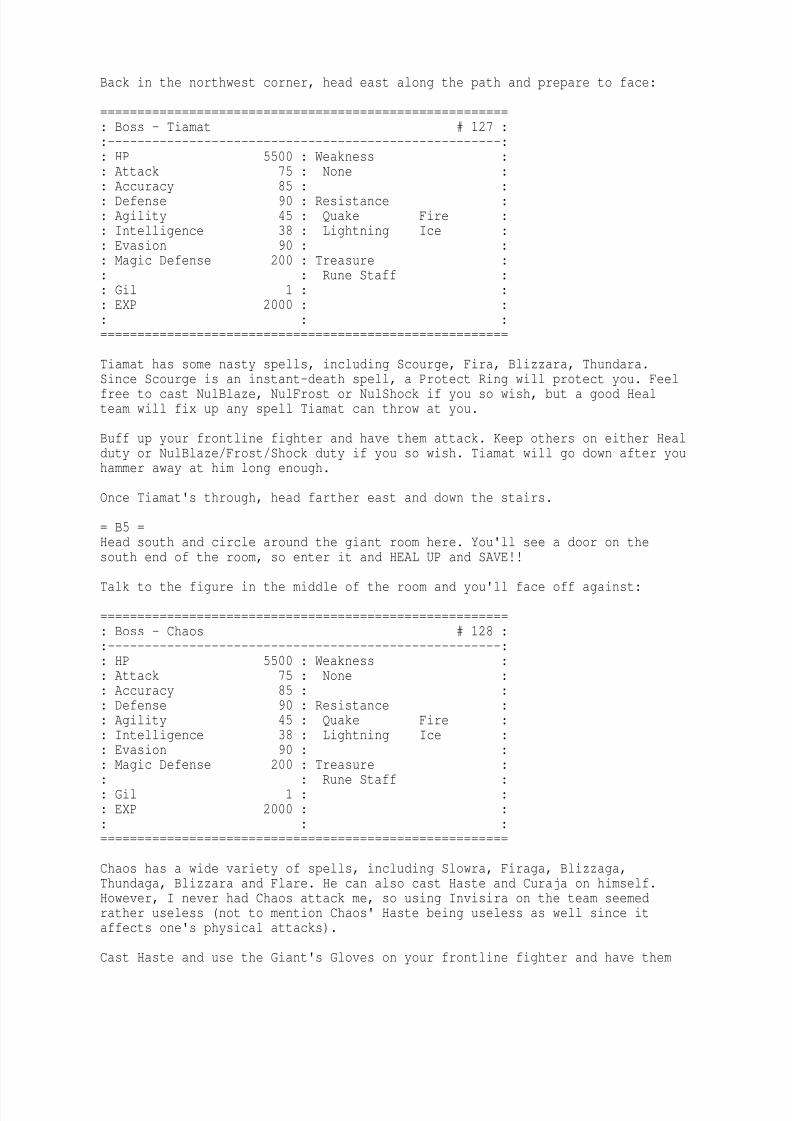
8/7/2019 final fantasy walkthrough
http://slidepdf.com/reader/full/final-fantasy-walkthrough 71/85
Back in the northwest corner, head east along the path and prepare to face: =======================================================: Boss - Tiamat # 127 ::-----------------------------------------------------:: HP 5500 : Weakness :: Attack 75 : None :
: Accuracy 85 : :: Defense 90 : Resistance :: Agility 45 : Quake Fire :: Intelligence 38 : Lightning Ice :: Evasion 90 : :: Magic Defense 200 : Treasure :: : Rune Staff :: Gil 1 : :: EXP 2000 : :: : :=======================================================
Tiamat has some nasty spells, including Scourge, Fira, Blizzara, Thundara.Since Scourge is an instant-death spell, a Protect Ring will protect you. Feelfree to cast NulBlaze, NulFrost or NulShock if you so wish, but a good Healteam will fix up any spell Tiamat can throw at you.
Buff up your frontline fighter and have them attack. Keep others on either Healduty or NulBlaze/Frost/Shock duty if you so wish. Tiamat will go down after youhammer away at him long enough.
Once Tiamat's through, head farther east and down the stairs.
= B5 =Head south and circle around the giant room here. You'll see a door on the
south end of the room, so enter it and HEAL UP and SAVE!!
Talk to the figure in the middle of the room and you'll face off against:
=======================================================: Boss - Chaos # 128 ::-----------------------------------------------------:: HP 5500 : Weakness :: Attack 75 : None :: Accuracy 85 : :: Defense 90 : Resistance :: Agility 45 : Quake Fire :: Intelligence 38 : Lightning Ice :: Evasion 90 : :: Magic Defense 200 : Treasure :: : Rune Staff :: Gil 1 : :: EXP 2000 : :: : :=======================================================
Chaos has a wide variety of spells, including Slowra, Firaga, Blizzaga,Thundaga, Blizzara and Flare. He can also cast Haste and Curaja on himself.However, I never had Chaos attack me, so using Invisira on the team seemedrather useless (not to mention Chaos' Haste being useless as well since it
affects one's physical attacks).
Cast Haste and use the Giant's Gloves on your frontline fighter and have them
8/7/2019 final fantasy walkthrough
http://slidepdf.com/reader/full/final-fantasy-walkthrough 72/85
8/7/2019 final fantasy walkthrough
http://slidepdf.com/reader/full/final-fantasy-walkthrough 73/85
26 that sent time spiraling27 into a loop?
28 None can say.
29 It seemed the cycle into which30 time had fallen would last forever.
31 But the bravery of four young32 travelers changed that. They took33 the forces that filled the world with34 darkness, and used them to35 bathe the world in light.
36 None will ever recall37 the struggle the four endured,38 for the breaking of the chain39 means that it never existed.
40 But within the tales of fantasy41 that people tell, the memory42 of their deeds lives on ...
43 Tales of dwarves and elves,44 of dragons and shining civilizations45 that reached for the heavens even46 as they fell.
47 And now their return is upon us.
48 With the memory of their struggle49 buried deep in their hearts, they
50 will quietly watch over the world.
51 Remember always that the forces52 of the world must be used as53 they were intended - that the54 power of light must never be55 used for dark, and that the true56 Crystals reside in your heart.
57 For you are the warrior who58 crossed time.
59 You are the bringer of light ...
My interpretation:
I'll begin on lines 8-14. It seems that the power of the Crystals was beginningto weaken, which allowed the Fiends to rise up and wreak havoc on the world. Italso allowed them to surpress the remaining power of the Crystals. Keep in mindthat this process does NOT begin immediately before the game starts, since it'sstated in-game that the Fiends have been wreaking their havoc for the past 400+years.
On lines 15-16, it states that monsters began to roam and that the world sankinto darkness, probably due to the rise of the Fiends. This is also supported
at the very beginning of the game, in case you decided to watch the introscene.
8/7/2019 final fantasy walkthrough
http://slidepdf.com/reader/full/final-fantasy-walkthrough 74/85
Before the game begins, Garland goes renegade and kidnaps Princess Sarah.Lukahn makes his legendary prophecy, which is actually stated in the beginningof this document. The Warriors of Light then appear, each with a Crystal intheir hand. To prove they really are the Warriors of Light, the King chargesthem to defeat Garland and rescue Sarah (described in-game).
The Light Warriors defeat Garland and rescue Sarah. However, it's not over for
Garland quite yet. He should be dead, but the Fiends send him back in timewhere he becomes Chaos. Chaos sends the Fiends to the future (approxamately1400-1200 years to the future, since the Fiends wake up in approxamately 200year intervals) (described in-game).
This is where the time loop comes into play. Somewhere along the line, theLight Warriors are defeated, meaning that Chaos won't be defeated in the past.This means that Chaos can terrorize the past and send the Fiends to the future.In the future (our present), the Fiends are allowed to wreak their havoc andsend Garland back in time to become Chaos (described in-game).
This is where you, the player, enter the picture. You break the time loop by
defeating Garland, returning the light to the Crystals (as described in lines5-7) and go back in time to defeat Chaos, which breaks the time loop. I'massuming that you defeat Chaos before he can send the Fiends to the future,which would essentially break the time loop. Since Chaos is defeated, he can'tsend the Fiends to the future, which means they can't wreak havoc and sendGarland back in time.
The Light Warriors remember what they've done (as described in lines 48-50),but nobody else does since breaking the loop essentially nullifies itsexistence (described in lines 36-39). However, it seems that the tales of theirheroics will still remain (described in lines 40-42).
That's my interpretation. If you have a problem with it, feel free to email me,
but make sure you include evidence of what you're claiming (location, characteryou heard a quote from, point in the game, every detail you can give).Otherwise I'll most likely disregard it and toss it away.
============================================================: Frequently Asked Questions ^[FAQ] :------------ ------------========================================================== (80 characters) =====
============================================================: Frequently Asked Questions ^[FAQ] :------------ ------------
If you have a question on how to play the game, check here first. The answerto your question can probably be found here.
In addition, this FAQ has gotten fairly extensive. I've decided to implementthe Keyword System here too. You'll see the question and its corresponding Key-word with it. Use it the same way you would any other section in this FAQ, anddon't forget the carat (^). :)
( Yes, these ARE the same questions found on the Final Fantasy I&II Dawn of )( Souls Message Board, modified for this FAQ )
This FAQ will cover the following questions:
[Q000] How do I access the Map?
8/7/2019 final fantasy walkthrough
http://slidepdf.com/reader/full/final-fantasy-walkthrough 75/85
[Q001] What is the Class Change?[Q002] How do I Class Change?[Q003] What are the benefits of the Class Change?[Q004] How come my Monk isn't doing any damage?[Q005] How come my Monk's DEF drops when I put armor on him?[Q006] What's the Ship game?[Q007] Is the White Mage really female?
[Q008] I'm stuck in a Soul of Chaos dungeon. Help!
Now then, let's do it.
+------------------------------------------------------------------------------+
[Q] How do I access the Map? ^[Q000]
[A] The Map is one of the most useful items in the game. To see it, hold downthe B button and press SELECT. You can access the map from the very startof the game.
+------------------------------------------------------------------------------+
[Q] What is the Class Change? ^[Q001]
[A] The Class Changing Quest is completely optional. However, it's ratherbeneficial to you. It gives all your characters some shiny new sprites andnew class names. In addition, you'll be able to access better weapons andarmor, and your mages will be able to learn better spells.
If you want all four Light Warriors to CC at the same time with the lowestlevel possible, the lowest level you can do it at (and have all 4 the samelevel) is Level 11. Trust me when I say you can't get any lower than 11.
+------------------------------------------------------------------------------+
[Q] How do I Class Change? ^[Q002]
[A] To begin, you MUST have defeated the Lich in the Cavern of Earth. Thiswill allow you to obtain the canoe (you can't get it until you defeatLich), and the Ship, the only two items required to start the quest.
1. To get the Canoe, go Crescent Lake (located southwest from the Cavern ofEarth) and talk to the Elders on the eastern side of the town.
2. With the Canoe in hand, go to the Ice Cavern (go back to your ship, headnorth to the next port) and follow the river. Complete the Ice Cavern andpick up the Levistone.
3. With the Levistone in your possesion, go to the desert south of CrescentLake (you have to jump directly from your Ship to the Canoe) and enter themiddle of the desert. You'll see a cutscene and obtain the Airship.
4. Now that you have the Airship, the world is yours for the taking! Take alook at the map and look at the middle-top of the map. To the left are theDragon Caves, where you'll get the actual upgrade. To the right is the "LeftWing of the Eagle". Land on the left wing and walk a long-ass way to get tothe Cidatel of Trials.
5. Complete the Cidatel of Trials to obtain the Rat's Tail.
6. Take the Rat's Tail and go to the Dragon Caves. Land on the island with 2
8/7/2019 final fantasy walkthrough
http://slidepdf.com/reader/full/final-fantasy-walkthrough 76/85
holes. Inside one of them you'll find Bahamut, the King of Dragons. With theRat's Tail, he'll Class Change your characters.
Congratulations! You're now class changed!
+------------------------------------------------------------------------------+
[Q] What are the benefits of the Class Change? ^[Q003]
[A] Each class has a different effect when you CC them.
Warrior -> Knight: Knights can cast White Magic from Level 1 to Level 3. Theywill also gain MP when they level up.
Thief -> Ninja: Ninjas can cast Black Magic from Level 1 to Level 4, includingthe ever-useful Temper and Haste! They will also gain MP when they level up.
Monk -> Master: The Master gains Magic Defense when he levels up. However, theMaster will NEVER be able to max out his MDEF, even with a Level 11 CC.
However, every bit of MDEF he gets is still helpful.
White Mage -> White Wizard: White Wizards gain the ability to cast ALL WhiteMagic, given that your level is high enough. Curaja, Healaga and Holy areextremely useful spells for White Wizards.
Black Mage -> Black Wizard: Black Wizards gain the ability to cast ALL BlackMagic, given that your level is high enough. Flare and Break are usefulspells for the Black Wizard. Saber will make your Black Wizard into a decentmelee fighter as well.
Red Mage -> Red Wizard: Red Wizards gain the ability to cast more powerfulspells. White Magic spells gained are Blink, Vox, Life, Exit, Protera,
Invisira, NulDeath. Black Magic spells gained are Scourge, Teleport,Thundaga, Blizzaga.
+------------------------------------------------------------------------------+
[Q] How come my Monk isn't doing any damage? ^[Q004]
[A] Let's face it, your Monk is doing crap for damage. Even your Black Mage isdoing more melee damage than your Monk.
Take the weapon you have off your Monk. Let him fight bare-handed. You'll beable to see some real power then. Or take a look at blacksniper's Monk UsageGuide.
+------------------------------------------------------------------------------+
[Q] How come my Monk's DEF drops when I put armor on him? ^[Q005]
[A] The Monk is built to confuse the hell out of you. To put it simply, theMonk is best suited when he has no armor and no weapon equipped.
That's right. Take off the armor. All of it. The ONE piece of beneficialequipment you have for a Monk or Master is the Ribbon. That's it. Or take alook at blacksniper's Monk Usage Guide.
+------------------------------------------------------------------------------+
[Q] What's the Ship game? ^[Q006]
8/7/2019 final fantasy walkthrough
http://slidepdf.com/reader/full/final-fantasy-walkthrough 77/85
[A] When you're on the Ship (NOT the Airship) and sailing away on the deepblue sea, hold down the B button and press the A button 23 times. Thescreen will change and you'll be able to play the 15 game.
The entire point of the game is to move the tiles and get them to read in thecorrect order. When the tile turns red, it's in the correct spot. If it's blue,
it's not in the correct spot.
Just move any tile into the empty slot. You can only move one at a timeanyways.
+------------------------------------------------------------------------------+
[Q] Is the White Mage really female? ^[Q007]
[A] The question of "Is the White Mage female?" is widely debated with theupdated FF1 graphics found in Origins and later Dawn of Souls.
The answer? It's completely up to you. When you Class Changed in the originalFF1 (for the NES), the characters were pretty much undisputably male. You cancall them all male or all female, it's totally up to you. Yes, even the Monkcould be considered female, but it would take some imagination. @_@
For the purpose of this document, they'll all be referred to as male.
+------------------------------------------------------------------------------+
[Q] I'm stuck in a Soul of Chaos dungeon. Help! ^[Q008]
[A] In the Soul of Chaos dungeons, you don't die. Period. Even if your teamgets annihilated, you'll just appear outside of the dungeon you're in and
everyone will be at 1 HP.
Keep in mind, this doesn't work in any other dungeon. Only the EarthgiftShrine, Hellfire Chasm, Lifespring Grotto and Whisperwind Cove. Being defeatedin any other area will result in a Game Over.
+------------------------------------------------------------------------------+
======================================================================: blacksniper's Guide-to-not-having-a-sucky-Monk/Master ^[MONK1] :------------ ------------
Yes, you read this title right. My friend blacksniper has written his own guideon how to (basically) not have your Monk/Master suck. Unfortunately, it wasn'taccepted by GameFAQs (despite the fact that the Monk/Master works on its ownmechanics). At any rate, I told him I'd put it in here. And without furtherado, it's blacksniper's Guide-to-not-having-a-sucky-Monk/Master:
NOTE: blacksniper uses his own version of the Find system. You may want to readup and use it accordingly.
____ ____ _ _ __ __ ____ __ _ _ ____ __ ___ _ _ ( ___)(_ _)( \( ) /__\ ( ) ( ___)/__\ ( \( )(_ _) /__\ / __)( \/ ))__) _)(_ ) ( /(__)\ )(__ )__)/(__)\ ) ( )( /(__)\ \__ \ \ /
(__) (____)(_)\_)(__)(__)(____) (__)(__)(__)(_)\_) (__)(__)(__)(___/ (__)__ / )

8/7/2019 final fantasy walkthrough
http://slidepdf.com/reader/full/final-fantasy-walkthrough 78/85
)((__)
___ _____ __ __ __ _____ ____ / __)( _ )( )( )( ) ( _ )( ___)\__ \ )(_)( )(__)( )(__ )(_)( )__)(___/(_____)(______)(____) (_____)(__)
___ _ _ __ _____ ___
/ __)( )_( ) /__\ ( _ )/ __)( (__ ) _ ( /(__)\ )(_)( \__ \\___)(_) (_)(__)(__)(_____)(___/
O=====================================================================OFinal Fantasy I&II - Dawn of Souls Using the Monk Guide Written by: blacksniper (Jordan Mepham) E-Mail: the_soul_of_archangels AT yahoo DOT com Started on: Thursday, February 08, 2006 11:32:00 PM Last revision on: Monday, February 13, 2006 10:04 PM Version: FINAL Created in Microsoft Word using Courier New, 10 point font
ASCII art created in Courier New, 9 point font O=====================================================================O
O=====================================================================O CONTENTS O====O===========================================================O====O
Introduction ---------------------------------------- (INT)How it works ---------------------------------------- (HIW)Equip Listing --------------------------------------- (STF)Armor Listing --------------------------------------- (A-Z)Weapon Listing -------------------------------------- (XXX)Copyright & Legal ----------------------------------- (DIE)Credits --------------------------------------------- (THX)
O====O===========================================================O====OTo jump to a section quickly press Ctrl+F and type a key code above. O=====================================================================O
O=====================================================================O (tiny) Introduction (INT)O=====================================================================O
Hello, all, and good day to you. This guide is here to help youunderstand the Monk and Master class in FF1. The class is somewhatconfusing to people and with good cause.
This guide will help you understand why those weapons the shops sellare worthless and why (for whatever reason) being naked is a goodthing. I'm going to teach you everything I know about the Monk andMaster. So sit back, grab some snacks (healthy ones, okay?), andprepare yourselves for the wide-wide world of Monks.
O=====================================================================O How it works (HIW)O=====================================================================O
First off, I'll explain how the monk works in a purely technical sense.
Monk Hands ATK = [STR / 2] + [(STA + 1) * 3 / 4]
Monk Unarmed HLM = [STA / 8]Monk Unarmed GLV = [STA / 8]Monk Unarmed ARM = [[STA / 4] * 3 / 2]
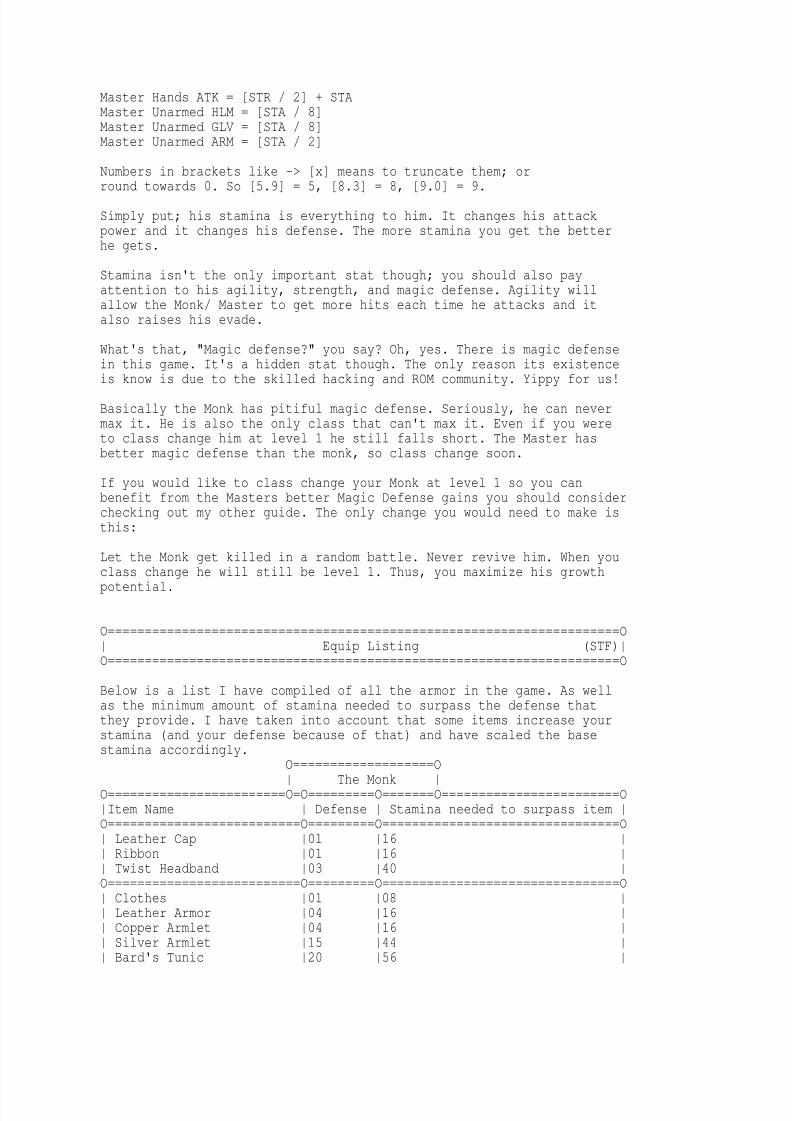
8/7/2019 final fantasy walkthrough
http://slidepdf.com/reader/full/final-fantasy-walkthrough 79/85
Master Hands ATK = [STR / 2] + STAMaster Unarmed HLM = [STA / 8]Master Unarmed GLV = [STA / 8]Master Unarmed ARM = [STA / 2]
Numbers in brackets like -> [x] means to truncate them; or
round towards 0. So [5.9] = 5, [8.3] = 8, [9.0] = 9.
Simply put; his stamina is everything to him. It changes his attackpower and it changes his defense. The more stamina you get the betterhe gets.
Stamina isn't the only important stat though; you should also payattention to his agility, strength, and magic defense. Agility willallow the Monk/ Master to get more hits each time he attacks and italso raises his evade.
What's that, "Magic defense?" you say? Oh, yes. There is magic defense
in this game. It's a hidden stat though. The only reason its existenceis know is due to the skilled hacking and ROM community. Yippy for us!
Basically the Monk has pitiful magic defense. Seriously, he can nevermax it. He is also the only class that can't max it. Even if you wereto class change him at level 1 he still falls short. The Master hasbetter magic defense than the monk, so class change soon.
If you would like to class change your Monk at level 1 so you canbenefit from the Masters better Magic Defense gains you should considerchecking out my other guide. The only change you would need to make isthis:
Let the Monk get killed in a random battle. Never revive him. When youclass change he will still be level 1. Thus, you maximize his growthpotential.
O=====================================================================O Equip Listing (STF)O=====================================================================O
Below is a list I have compiled of all the armor in the game. As wellas the minimum amount of stamina needed to surpass the defense thatthey provide. I have taken into account that some items increase yourstamina (and your defense because of that) and have scaled the basestamina accordingly.
O===================O The Monk
O========================O=O=========O=======O========================OItem Name Defense Stamina needed to surpass item O==========================O=========O================================O Leather Cap 01 16 Ribbon 01 16 Twist Headband 03 40 O==========================O=========O================================O Clothes 01 08 Leather Armor 04 16
Copper Armlet 04 16 Silver Armlet 15 44 Bard's Tunic 20 56
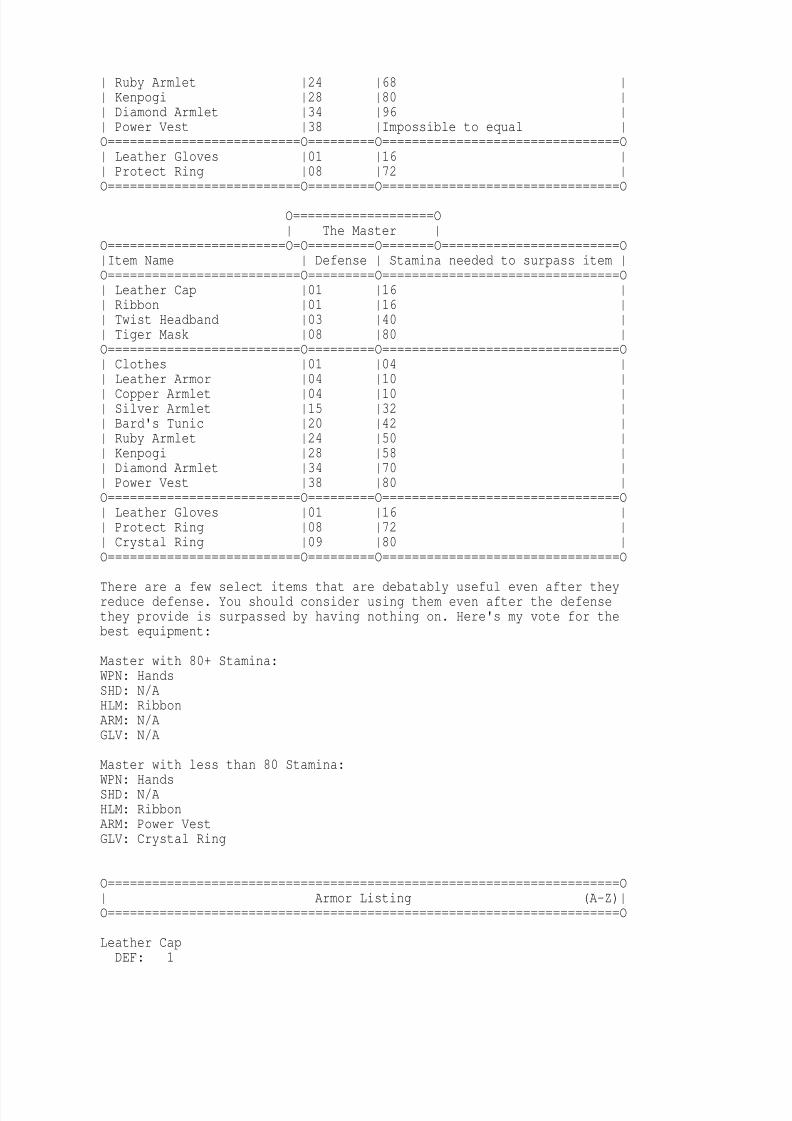
8/7/2019 final fantasy walkthrough
http://slidepdf.com/reader/full/final-fantasy-walkthrough 80/85
Ruby Armlet 24 68 Kenpogi 28 80 Diamond Armlet 34 96 Power Vest 38 Impossible to equal O==========================O=========O================================O Leather Gloves 01 16 Protect Ring 08 72
O==========================O=========O================================O
O===================O The Master
O========================O=O=========O=======O========================OItem Name Defense Stamina needed to surpass item O==========================O=========O================================O Leather Cap 01 16 Ribbon 01 16 Twist Headband 03 40 Tiger Mask 08 80 O==========================O=========O================================O
Clothes 01 04 Leather Armor 04 10 Copper Armlet 04 10 Silver Armlet 15 32 Bard's Tunic 20 42 Ruby Armlet 24 50 Kenpogi 28 58 Diamond Armlet 34 70 Power Vest 38 80 O==========================O=========O================================O Leather Gloves 01 16 Protect Ring 08 72 Crystal Ring 09 80
O==========================O=========O================================O
There are a few select items that are debatably useful even after theyreduce defense. You should consider using them even after the defensethey provide is surpassed by having nothing on. Here's my vote for thebest equipment:
Master with 80+ Stamina:WPN: HandsSHD: N/AHLM: RibbonARM: N/AGLV: N/A
Master with less than 80 Stamina:WPN: HandsSHD: N/AHLM: RibbonARM: Power VestGLV: Crystal Ring
O=====================================================================O Armor Listing (A-Z)O=====================================================================O
Leather CapDEF: 1
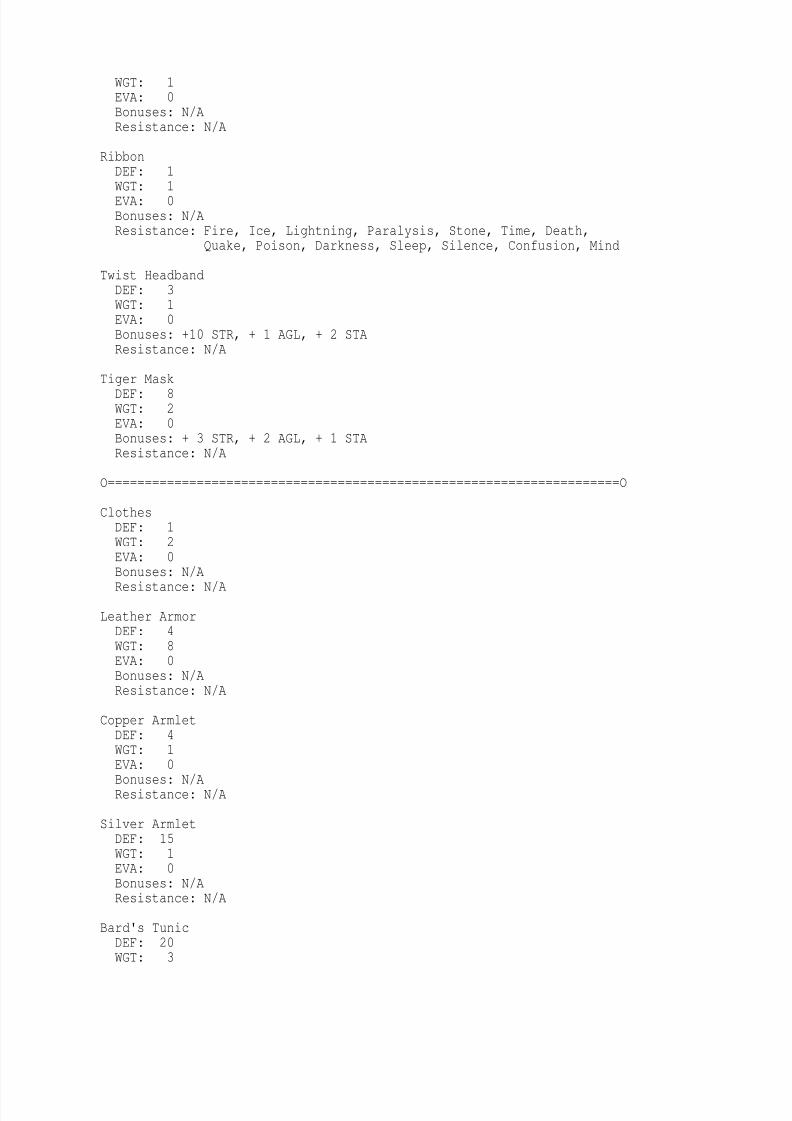
8/7/2019 final fantasy walkthrough
http://slidepdf.com/reader/full/final-fantasy-walkthrough 81/85
WGT: 1EVA: 0Bonuses: N/AResistance: N/A
RibbonDEF: 1
WGT: 1EVA: 0Bonuses: N/AResistance: Fire, Ice, Lightning, Paralysis, Stone, Time, Death,
Quake, Poison, Darkness, Sleep, Silence, Confusion, Mind
Twist HeadbandDEF: 3WGT: 1EVA: 0Bonuses: +10 STR, + 1 AGL, + 2 STAResistance: N/A
Tiger MaskDEF: 8WGT: 2EVA: 0Bonuses: + 3 STR, + 2 AGL, + 1 STAResistance: N/A
O=====================================================================O
ClothesDEF: 1WGT: 2
EVA: 0Bonuses: N/AResistance: N/A
Leather ArmorDEF: 4WGT: 8EVA: 0Bonuses: N/AResistance: N/A
Copper ArmletDEF: 4WGT: 1EVA: 0Bonuses: N/AResistance: N/A
Silver ArmletDEF: 15WGT: 1EVA: 0Bonuses: N/AResistance: N/A
Bard's TunicDEF: 20WGT: 3
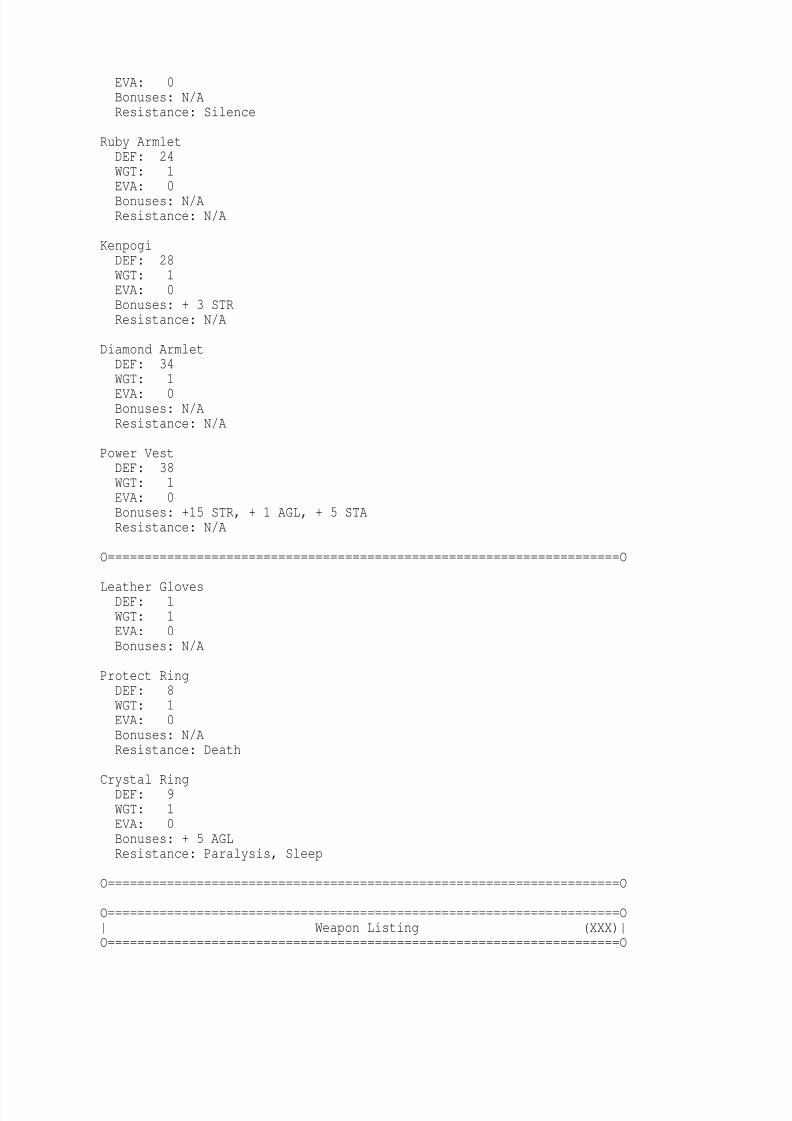
8/7/2019 final fantasy walkthrough
http://slidepdf.com/reader/full/final-fantasy-walkthrough 82/85
EVA: 0Bonuses: N/AResistance: Silence
Ruby ArmletDEF: 24WGT: 1
EVA: 0Bonuses: N/AResistance: N/A
KenpogiDEF: 28WGT: 1EVA: 0Bonuses: + 3 STRResistance: N/A
Diamond Armlet
DEF: 34WGT: 1EVA: 0Bonuses: N/AResistance: N/A
Power VestDEF: 38WGT: 1EVA: 0Bonuses: +15 STR, + 1 AGL, + 5 STAResistance: N/A
O=====================================================================O
Leather GlovesDEF: 1WGT: 1EVA: 0Bonuses: N/A
Protect RingDEF: 8WGT: 1EVA: 0Bonuses: N/AResistance: Death
Crystal RingDEF: 9WGT: 1EVA: 0Bonuses: + 5 AGLResistance: Paralysis, Sleep
O=====================================================================O
O=====================================================================O
Weapon Listing (XXX)O=====================================================================O
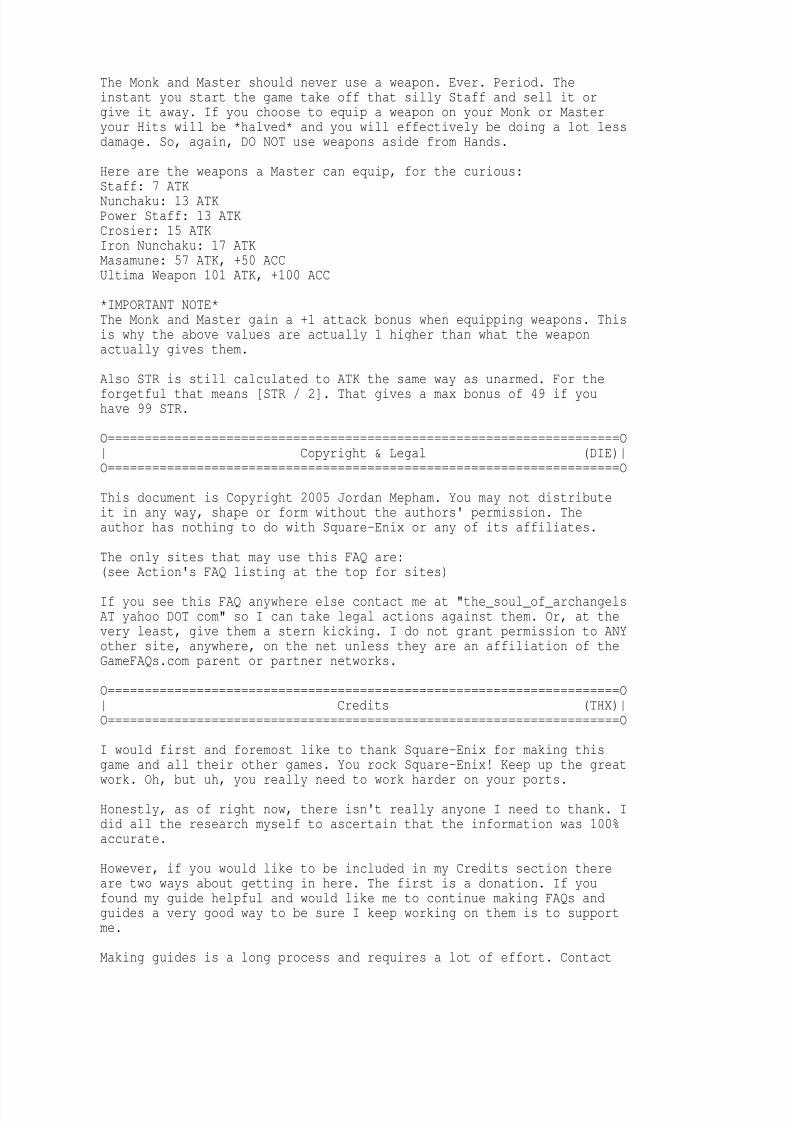
8/7/2019 final fantasy walkthrough
http://slidepdf.com/reader/full/final-fantasy-walkthrough 83/85
The Monk and Master should never use a weapon. Ever. Period. Theinstant you start the game take off that silly Staff and sell it orgive it away. If you choose to equip a weapon on your Monk or Masteryour Hits will be *halved* and you will effectively be doing a lot lessdamage. So, again, DO NOT use weapons aside from Hands.
Here are the weapons a Master can equip, for the curious:
Staff: 7 ATKNunchaku: 13 ATKPower Staff: 13 ATKCrosier: 15 ATKIron Nunchaku: 17 ATKMasamune: 57 ATK, +50 ACCUltima Weapon 101 ATK, +100 ACC
*IMPORTANT NOTE*The Monk and Master gain a +1 attack bonus when equipping weapons. Thisis why the above values are actually 1 higher than what the weaponactually gives them.
Also STR is still calculated to ATK the same way as unarmed. For theforgetful that means [STR / 2]. That gives a max bonus of 49 if youhave 99 STR.
O=====================================================================O Copyright & Legal (DIE)O=====================================================================O
This document is Copyright 2005 Jordan Mepham. You may not distributeit in any way, shape or form without the authors' permission. Theauthor has nothing to do with Square-Enix or any of its affiliates.
The only sites that may use this FAQ are:(see Action's FAQ listing at the top for sites)
If you see this FAQ anywhere else contact me at "the_soul_of_archangelsAT yahoo DOT com" so I can take legal actions against them. Or, at thevery least, give them a stern kicking. I do not grant permission to ANYother site, anywhere, on the net unless they are an affiliation of theGameFAQs.com parent or partner networks.
O=====================================================================O Credits (THX)O=====================================================================O
I would first and foremost like to thank Square-Enix for making thisgame and all their other games. You rock Square-Enix! Keep up the greatwork. Oh, but uh, you really need to work harder on your ports.
Honestly, as of right now, there isn't really anyone I need to thank. Idid all the research myself to ascertain that the information was 100%accurate.
However, if you would like to be included in my Credits section thereare two ways about getting in here. The first is a donation. If youfound my guide helpful and would like me to continue making FAQs andguides a very good way to be sure I keep working on them is to support
me.
Making guides is a long process and requires a lot of effort. Contact
8/7/2019 final fantasy walkthrough
http://slidepdf.com/reader/full/final-fantasy-walkthrough 84/85
me at "the_soul_of_archangels AT yahoo DOT com" for more information.
The second way is to double check my work. If you can confirm thosestamina values needed to surpass the armors defense values I'll credityou here. Like I said above I've done all this work myself and late atnight... so I may have made a mistake here and there.
(Note from Action): blacksniper also thanks Action for putting thissection into his FAQ/Walkthrough. :)
============================================================: Full Update History ^[UPDT] :------------ ------------
1.0 - Completed: January 31, 2007. Time: 10:12 PM. Size: 235k- Walkthrough section is laid out and finished- "Characters" section complete- "Travel Notes" section complete
- blacksniper's guide included- Soul of Chaos not included yet- Bestiary not included yet- Appendices not included yet
0.1 - Completed: July 13, 2006. Time: 2:37 AM. Size: 50k- Layout is complete.
============================================================: Copyrights, Disclaimers, etc. ^[COPY] :------------ ------------
I swear that all of this FAQ was written by ME. This document is based solelyon my knowledge of Final Fantasy 1. I did NOT claim any info as my own if I didnot obtain it on my own. I expect you to do the same. Don't copy this FAQ orany information inside. You may NOT post this FAQ on a site without my consent.I assure you, I'll do my best to protect my work with the full extent of thelaw, if need be. I will not tolerate any illegal copies of this document withoutmy permission. You may not sell this FAQ for monetary value, it is for personaluse only. The sole purpose of this FAQ is to help users find their way throughFinal Fantasy 1 and should not be used for any other purpose whatsoever. You donot own any part of this FAQ, even if you download it.
A few special thanks before I close this FAQ (in semi-alphabetical order):
Anubis IV <-- For creation of the Keyword System
Arctic <-- For designs from his FF7 FAQ
Nintendo Power <-- I used some of their info
Squaresoft LTD <-- For making the original Final Fantasy. Without it, therewouldn't be a Dawn of Souls for me to write on. ^_^
SquareEnix <-- For making Dawn of Souls, and for giving me a game to write on.
GameFAQs/CJayC <-- For hosting many great FAQs/Walkthroughs/etc.
The following users for questions and comments. Whether or not I answered youremails (due to Gmail being stupid), keep in mind I always read them!

8/7/2019 final fantasy walkthrough
http://slidepdf.com/reader/full/final-fantasy-walkthrough 85/85
In no particular order:
None yet!
Final Fantasy FAQ/WalkthroughCopyright (c) 2004-2005
Action/R JacksonAll rights reserved
Warrior, Thief, Monk, Red Mage, White Mage, Black Mage, Garland and all relatedcharacters are property of SquareEnix.
- F I N -Final Fantasy: FAQ/Walkthrough by ActionVersion 1.0, Last Updated 2007-01-31 View/Download Original File Hosted by GameFAQsReturn to Final Fantasy (GBA) FAQs & Guides