files.transtutors.com · Web viewSQL Exam This exam has three major steps. The first two steps...
27
SQL Exam This exam has three major steps. The first two steps should be completed during the first week of the course. The final step must be completed and submitted for grading by the “Exam 1” due date specified in the course syllabus. All three steps require the use of Oracle Application Express (APEX). In step 1, each student must complete a registration to gain access to APEX. In step 2, six data base tables are created in APEX and data is inserted into each table. In step 3, each student must solve 15 data base query problems and save their SQL solutions in a Word document. The Word document is then submitted for grading using Blackboard. 1
Transcript of files.transtutors.com · Web viewSQL Exam This exam has three major steps. The first two steps...

SQL Exam
This exam has three major steps. The first two steps should be completed during the first week of the course. The final step must be completed and submitted for grading by the “Exam 1” due date specified in the course syllabus.
All three steps require the use of Oracle Application Express (APEX).
In step 1, each student must complete a registration to gain access to APEX.
In step 2, six data base tables are created in APEX and data is inserted into each table.
In step 3, each student must solve 15 data base query problems and save their SQL solutions in a Word document. The Word document is then submitted for grading using Blackboard.
1

STEP 1. APEX Registration. Go to the website http://apex.oracle.com/i/index.html
The screen below will appear.
Click on the button labeled “Request a Free Workspace”.
2

Click on the button labeled “Get Started “.
Fill in the three items, the click on the button labeled “Next”.
3

Enter a workspace name such as “MMIS630Workspaceyourname”. Click on the button labeled “Next”.
4

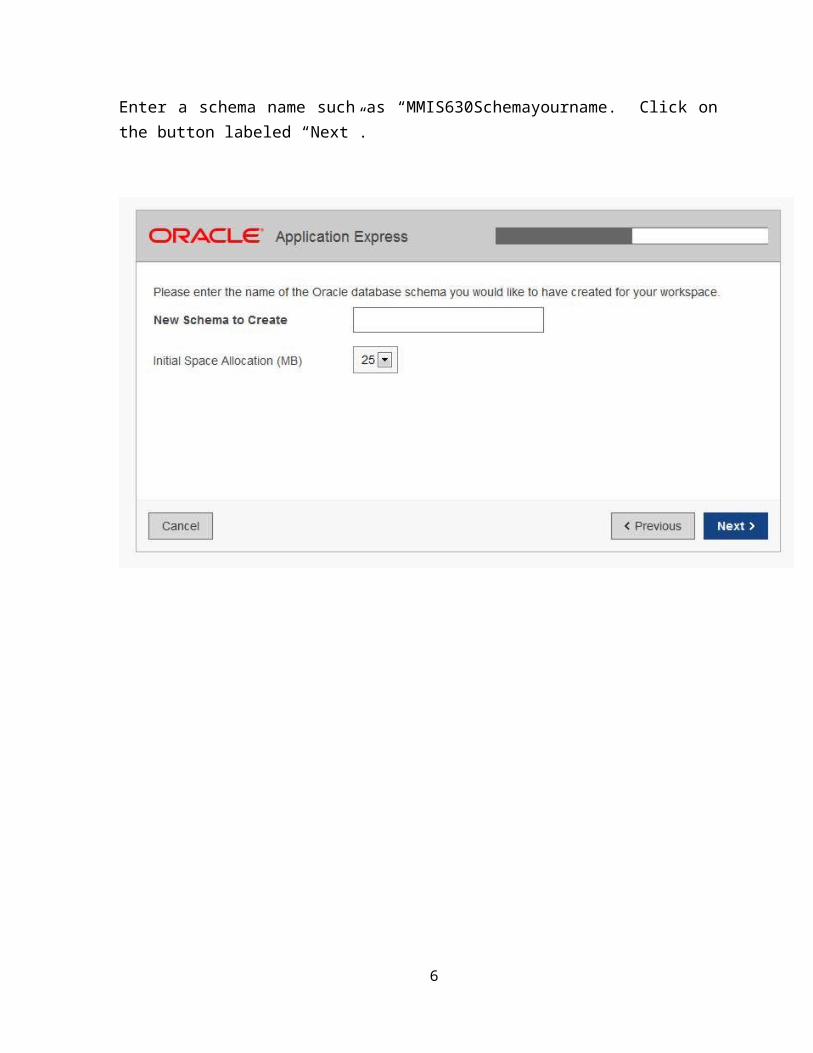
Enter a schema name such as “MMIS630Schemayourname. Click on the button labeled “Next”.
5
Complete the questionnaire. Click on the button labeled “Next”.
6

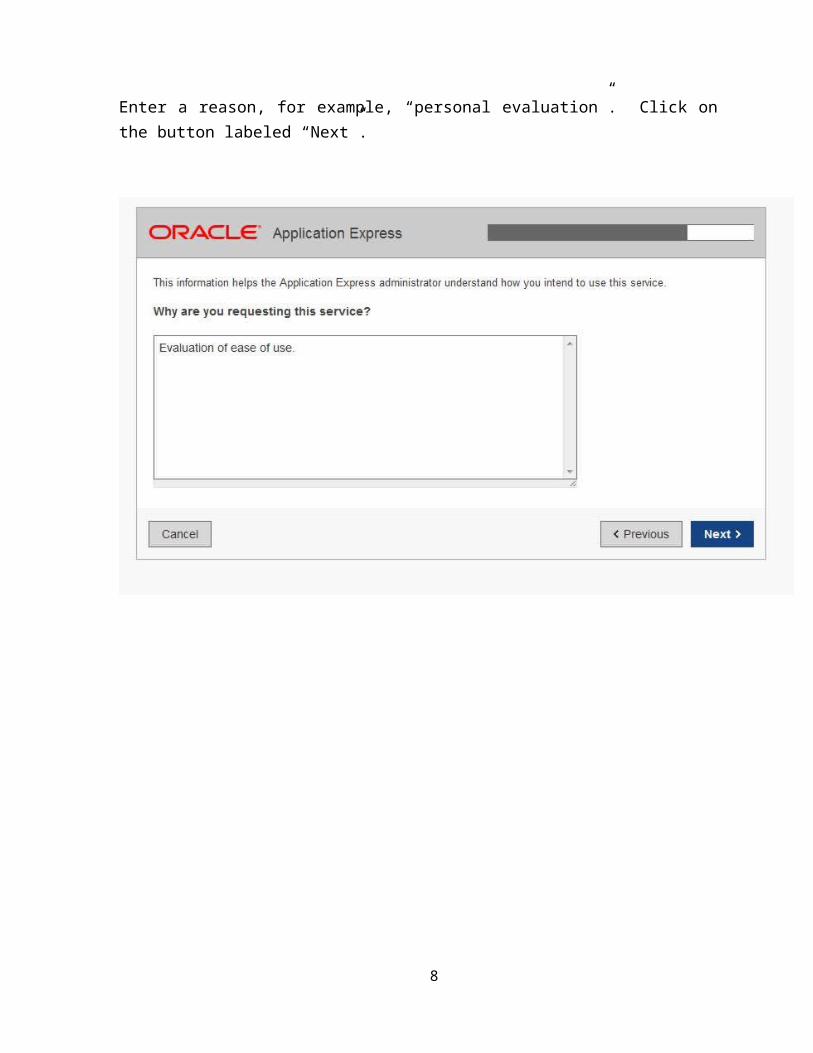
Enter a reason, for example, “personal evaluation”. Click on the button labeled “Next”.
7
Read the agreement. Scroll to the bottom of the agreement. Indicate your approval. Click on the button labeled “Next”.
8

You should make note of your workspace and schema name and check your email address.
Enter the verification code. Click on the button labeled “Submit Request”.
9

Click on the button labeled “Return to Login”.
10

Ignore this screen. Go to the next page in this document.
11

Check your email for a message from APEX informing you that your request for an account has been approved. There is a link in the email message. Click on that link to create your APEX workspace. You will receive a confirmation screen that says that your APEX workspace has been created. You will also receive a second email message from APEX that contains a password. Use the link in the second email message to start APEX. The first time you start APEX, you will be required to enter and confirm a permanent password. Make note of your new password. Once your new password setup is done, you must login to APEX with your new password.
Sign into APEX with your new password at http://apex.oracle.com
(Note: to login to APEX in the future, always go to http://apex.oracle.com)
The “APEX home” screen below appears.
All SQL work in this course will be performed in the SQL section of APEX. To access the SQL section, click on the button labeled “SQL>”.
12

After clicking on the “SQL>” button, the screen below appears next. This screen is very similar in appearance to the “APEX home” screen. This new screen is the “SQL home” screen. The “SQL home” screen has an “Object Browser” button that the “APEX home” screen does not have. On the “SQL home” screen below, click on the button labeled “SQL>”.
13

This is the “SQL command” screen. This screen will be used to enter SQL query statements and also be used to see the results of SQL queries.
SQL statements will be pasted into the SQL command box on this screen to create and populate the five data base tables you will need in Step 3 of this exam. Your APEX registration is complete. Continue to Step 2 on the next page of this document.
14

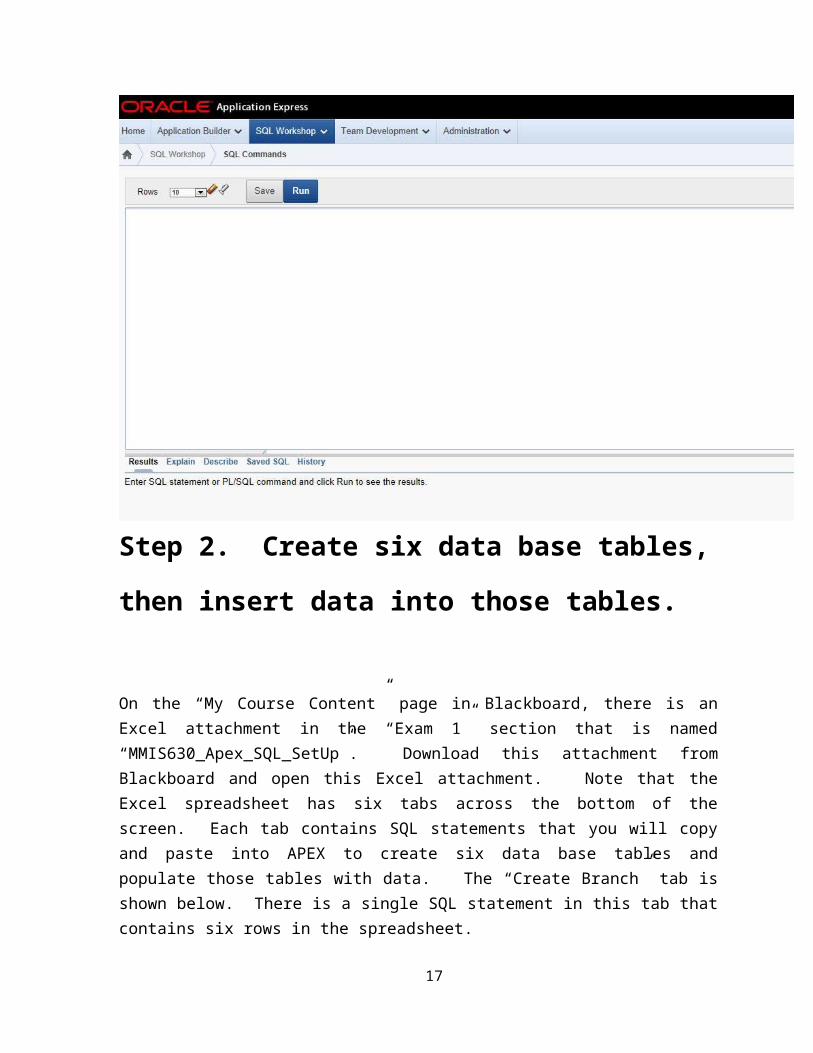
Step 2. Create six data base tables,
then insert data into those tables.
On the “My Course Content” page in Blackboard, there is an Excel attachment in the “Exam 1” section that is named “MMIS630_Apex_SQL_SetUp”. Download this attachment from Blackboard and open this Excel attachment. Note that the Excel spreadsheet has six tabs across the bottom of the screen. Each tab contains SQL statements that you will copy and paste into APEX to create six data base tables and populate those tables with data. The “Create Branch” tab is shown below. There is a single SQL statement in this tab that contains six rows in the spreadsheet.
15

Copy rows 1-6 from the spreadsheet tab “Create Branch” and paste those rows into the SQL command box in APEX as shown below. Then click on the button labeled “Run”. APEX will process the SQL “Create table” statement. When finished with the create function, APEX will respond with “Table Created”.
16
17

Delete the SQL statement in the SQL command box in APEX using your keyboard delete key. Enter “describe branch;” in the SQL command box in APEX (don’t forget the semi-colon at the end), then click on the button labeled “Run”. A description of the data base table will appear as shown below.
18

Use the “Create Publisher”, “Create Author”, “Create Book”, “Create Wrote”, and “Create Invent” tabs in the Excel spreadsheet as follows:
For each tab, copy the SQL statement in the Excel spreadsheet tab into the SQL command box in APEX, click on the button labeled “RUN”, confirm that the “Table Created” message appears, enter the SQL “describe” command followed by the appropriate table name (publisher, author, book, wrote, and invent), click on the button labeled “RUN”, confirm that a description of the table appears.
Upon completion of the items described above, you will have created six tables in APEX. The tables are: branch, publisher, author, book, wrote, and invent. Now we will populate these tables with data using the Excel spreadsheet tab “Data”.
The “Data” tab contains 137 rows starting with a “BEGIN” statement and ending with the “END;” statement. Copy and paste all 137 statements into the SQL command box in APEX. Click on the button labeled “RUN”. APEX will respond with a “Statement Processed” message.
19

You can now view all rows in each of your five tables, for example, to show all rows in the branch table, enter “select * from branch;” in the SQL command box in APEX, then click on the button labeled “Run”. Your screen should look like the one below.
20

You should confirm that all six tables (branch, publisher, author, book, wrote, and invent) are populated with data by using a “select” query for each of the five tables.
Step 2 of this document is now complete.
Go to the next page in this document to begin step 3.
21

Step 3: Two parts, part “A” on this page and part “B” on the next page.
Part “A”. Solve 15 SQL data base query problems. Do not begin the 16 SQL data base query problems below until you have finished reading textbook chapter 3 in its entirety. After reading the textbook, read this page and the next page, then you can start working on the 16 SQL data base query problems below.
Develop the SQL statements to accomplish each of the following 16 queries. Enter each SQL statement into the SQL command box in APEX to test the results your SQL statement produces.
The 15 queries:
1. List the book code and book title for every book.
2. List the name of every publisher located in New York state.
3. List the name of every branch that has at least 10 employees.
4. List the code and title of every book whose type is HOR and that is paperback.
5. List the code, title and price for each book with a price that is greater than $10 but less than
$20.
6. Customers who are part of a special program get a 15% discount on regular book prices. To
determine the discounted prices, list the book code, title, and discounted price of every
book. (your calculated column should determine 85% of the current price that is, 100% less
a 15% discount.)
7. List the book code and title of every book whose type is FIC, MYS, or ART. Use the IN
operator in your command.
8. Repeat number 7 and list the books in descending order by book code.
9. Find out how many book types are available. (Do not include duplicates)
10. Calculate the average price for each type of book.
11. Find the name of the most expensive book.
22

12. For every book, list the book code, book title, publisher code, and publisher name.
13. List the book title for every book of type CS that is published by Best and Furrow.
14. Change the number of units on hand to 5 for all books located in branch number 1.
15. Insert a new book into the database. The book code is 9700, the title is “Using Microsoft
Access 2000”, the publisher is Best and Furrow, the book type is computer science, the price
is $19.97, and the book is available only in paperback. The author number is 07, and there
are four (4) books on hand in branch number 1. The sequence number is 2.
Continue to Part “B” on the next page in this document.
23

Part “B”. Submit your 15 SQL statement solutions to Blackboard.
1. The deliverable for this assignment is a list of each of the 15 actual SQL statements you entered into the SQL command box in APEX and the results produced by the command.
2. Create a Word document. 3. For each of the 15 questions, copy both the SQL statement you entered in the APEX
command box and the results produced from that command and paste into the Word document. Be sure to clearly number each SQL statement/results.
4. Be sure to include your name, the course name (MMIS630), and the assignment name (SQL Exam) on your Word document.
5. Submit your Word document to Blackboard for Exam1.
24