
FileMaker Pro and Microsoft® Office Integration · PDF fileFileMaker Pro and...
47
-
Upload
nguyenliem -
Category
Documents
-
view
220 -
download
2
Transcript of FileMaker Pro and Microsoft® Office Integration · PDF fileFileMaker Pro and...

FileMaker Pro and Microsoft® Office Integration page �

FileMaker Pro and Microsoft® Office Integration page �
Table of Contents
Executive Summary ...................................................................................................................3
Introduction ................................................................................................................................3
Top Reasons to Read This Guide .............................................................................................3
Before You Get Started..............................................................................................................4
Downloading the FileMaker Trial Software and the Business Productivity Kit ...................4
Installing FileMaker Pro .............................................................................................................4
Sharing Data between FileMaker Pro and Microsoft Excel ...................................................5
Part I Extracting Data from Excel into a New FileMaker Database ................................5
Part II Extracting Data from Excel into an Existing FileMaker Database .......................7
Part III Saving and Sending Records as an Excel File From FileMaker ...................... 10
Part IV Getting Data out of FileMaker into Excel with an ODBC Query .................... 13
Part V Embedding an Excel Chart in FileMaker ............................................................ 22
Sharing Data between FileMaker Pro and Microsoft Word ............................................... 26
Using FileMaker as a Data Source for a Word Mail Merge Document ...................... 26
Sharing Data between FileMaker Pro and Microsoft PowerPoint ..................................... 35
Part I Dynamically Linking FileMaker Data within a PowerPoint ................................. 35
Part II Using FileMaker as an Asset Library to Store Office Documents .................... 37
Sharing Data between FileMaker Pro and Microsoft Exchange,
Outlook and Entourage ......................................................................................................... 41
Part I Creating Emails From within FileMaker Pro ........................................................ 41
Part II Managing Incoming Emails with a FileMaker Plug-In ....................................... 42
FileMaker and Microsoft Office Integration Resources ...................................................... 47
About the Author .................................................................................................................... 47

FileMaker Pro and Microsoft® Office Integration page �
Executive SummaryEffective decision making, using the best quality commercial data, is a key success factor for any small business owner or workgroup manager. To help maximize the value of commercial data and eliminate data duplication errors, it is important that business information held in one software application can be exchanged and reported in another.
This guide shows you why FileMaker Pro is the perfect companion database application for Microsoft Office on the Windows and Macintosh platforms. A series of real world examples are used to show how easily business data can be exchanged between FileMaker Pro and Microsoft Office applications. The Business Productivity Solution, a ready to use database template that can be downloaded from the FileMaker Web site, is used to demonstrate how records can be moved both into and out of Microsoft Excel, Word, PowerPoint, and Outlook or Entourage. No prior database knowledge or programming experience is required to follow the examples and apply the techniques demonstrated for your own business or workgroup.
IntroductionFileMaker Pro is an ideal database application to use with Microsoft Office, on either Windows or Macintosh computers in your business. You can store customer records and create invoices with FileMaker, then extract this data into Excel to chart and graphically present your sales totals for this quarter. The same customer details held in a FileMaker database can be used by Microsoft Word to create a mail merge letter for a marketing campaign. You can present a chart of your live sales data in a PowerPoint presentation, using a direct link back to the source data held in a FileMaker database. With FileMaker, you can create a one off email to a single customer, or manage a comprehensive targeted email campaign. You can send outgoing emails, generated in FileMaker, via Outlook, Outlook Express or Entourage.
A series of examples will be presented in this guide to demonstrate how business data can be integrated between FileMaker and Microsoft Office. This guide shows you how an existing FileMaker database, the Business Productivity Solution, which is available for download from the FileMaker Web site, can be easily adapted to enable you to exchange information between FileMaker and Microsoft Office.
Finally, a third party FileMaker plug-in will be demonstrated that can capture and synchronise incoming emails between your Outlook or Entourage mail folders and a FileMaker database.
The Top Reasons to Read this GuideBy spending just a short time with this informative guide, you will learn how to:
• Integrate your business data seamlessly between FileMaker Pro and Microsoft Office• Present sales data graphically with Excel and paste the chart as a dynamic link in a FileMaker
container field• Use your FileMaker contact data as a source table to create a mail merge document in Word• Store a FileMaker sales report query in Excel to present as part of a PowerPoint presentation• Use FileMaker as an asset register to store project documents, spreadsheets and presentations
created with Microsoft Office• Launch and update these documents directly from FileMaker• Create outgoing emails from within FileMaker• Use a FileMaker plug-in to capture Outlook or Entourage contacts, calendar events, tasks, notes
and incoming emails within a FileMaker database

FileMaker Pro and Microsoft® Office Integration page �
Before You Get StartedYou will need a copy of FileMaker Pro 8.5 installed on your Macintosh or Windows computer, to try out the Microsoft Office data integration examples presented in this guide. If you are using a previous version of FileMaker in your business, you may be eligible for discounted upgrade pricing. Speak to your local FileMaker office about this, or check the FileMaker Web site at www.filemaker.com.
The minimum system requirements for FileMaker Pro 8.5 are shown in Table 1.
Macintosh• Macintosh computer with a PowerPC G3, G4, or G5 processor • Apple computers with Intel processors • 256MB of RAM • CD or DVD drive and hard disk drive • Mac OS X 10.3.9 or Mac OS X 10.4
Windows• Pentium III 500MHz or higher • 256MB of RAM • CD or DVD drive and hard disk drive • SVGA (800 x 600) or higher resolution video adapter and display • Windows 2000 (Service Pack 4), Windows XP (Service Pack 2)
Table 1: FileMaker Pro 8.5 system requirements
Downloading the FileMaker Trial Software and the Business Productivity KitYou can request a free 30-day trial copy of FileMaker Pro 8.5 at www.filemakertrial.com/bpk. After you have submitted your details you will be redirected to a download page. You can also download the FileMaker Business Productivity Solution database files. These files are fully working business database templates which you can either start to use immediately, or customize for your own business needs. The files are also a great source for design ideas which you can use in your own database. We will be using these files to demonstrate how easily a FileMaker database can be integrated with Microsoft Office. You can also request a copy of FileMaker Pro 8.5 and the Business Productivity Solution files in other languages, from your regional FileMaker Web site. FileMaker International’s Web sites and distributors are listed at www.filemaker.com/company/intl/index.html.
Installing FileMaker ProInstall FileMaker Pro 8.5 on your computer and expand the contents of the compressed Zip or DMG file that contains the Business Productivity Solution files. Save the expanded folder to your desktop or another preferred location. Open the FileMaker folder. Highlight and launch the Setup file in the folder and follow the dialog box instructions to install FileMaker on your machine.
The examples in this document are presented using Microsoft Office Professional Edition 2003 on the Windows platform. There are minor variations in the format of some of the dialog boxes with other versions of Microsoft Office on the Windows and Macintosh platforms.

FileMaker Pro and Microsoft® Office Integration page �
Sharing Data between FileMaker Pro and Microsoft Excel
Part I Extracting Data from Excel into a New FileMaker DatabaseInformation held in an Excel worksheet can be easily transferred into a new FileMaker database. FileMaker Pro has built in translators to open files created with Excel 95 or later for Windows and Excel 98 or later for Macintosh.
Step �: Using Drag and Drop to Create a New FileMaker File from an Excel Worksheet
To demonstrate how FileMaker opens an existing Excel file, a simple Excel spreadsheet containing sales data is shown in Figure 1.
Figure 1: Existing sales data held in an Excel spreadsheet
You can drag and drop the Excel spreadsheet file icon onto the FileMaker Pro application icon, or a shortcut (Windows) or alias (MacOS) icon, as shown in Figure 2.
Figure 2: Dragging an Excel workbook icon onto a FileMaker Pro shortcut
Step �: Choosing Which Worksheet to Open in FileMaker Pro
FileMaker Pro will be launched, if the application is not open already, and the Specify Excel Data dialog box, shown in Figure 3, will appear, prompting you to select a worksheet from the Excel file, for

FileMaker Pro and Microsoft® Office Integration page �
FileMaker to open.
Figure 3: The Specify Excel Data dialog box
Step �: Using Column Headings as FileMaker Field Names
When you have selected a worksheet, the First Row Option dialog box, shown in Figure 4, will appear asking you whether you wish to create field names from the cell contents of the first row, or treat the first row in the worksheet as a data record.
Figure 4: The First Row Option dialog box
Step �: Naming and Saving the New FileMaker file
If you click the field names button in the First Row Option, the Create a new file named dialog box will appear, prompting you to name and save the new FileMaker database. By default, FileMaker will title

FileMaker Pro and Microsoft® Office Integration page �
the new file with the name of the original Excel file and the suffix ‘converted’ added, shown in Figure 5.
Figure 5: Saving the newly created FileMaker database based on the Excel file
The new FileMaker file will contain a set of fields equivalent to each column in the worksheet, and the number of records created will be the same as the number of data rows in the Excel file. The similarity between the original Excel worksheet and the new FileMaker file can be seen by comparing Figure 6 with Figure 1.
Figure 6: The newly created FileMaker file based on the Sales Data Excel worksheet
Part II Extracting Data from Excel into an Existing FileMaker DatabaseYou may wish to add the contents of an Excel Worksheet to an existing FileMaker file. FileMaker has a comprehensive set of file type translators to enable you to import data from a wide variety of source files, as new records, or as replacement records, within an existing database.
Step �: Importing new records from an Excel file into a FileMaker Database
We can use the newly created Sales Data Converted FileMaker database to demonstrate how the contents of an Excel worksheet can be added to the file as new (or replacement) records. Open the
FileMaker Pro and Microsoft® Office Integration page �
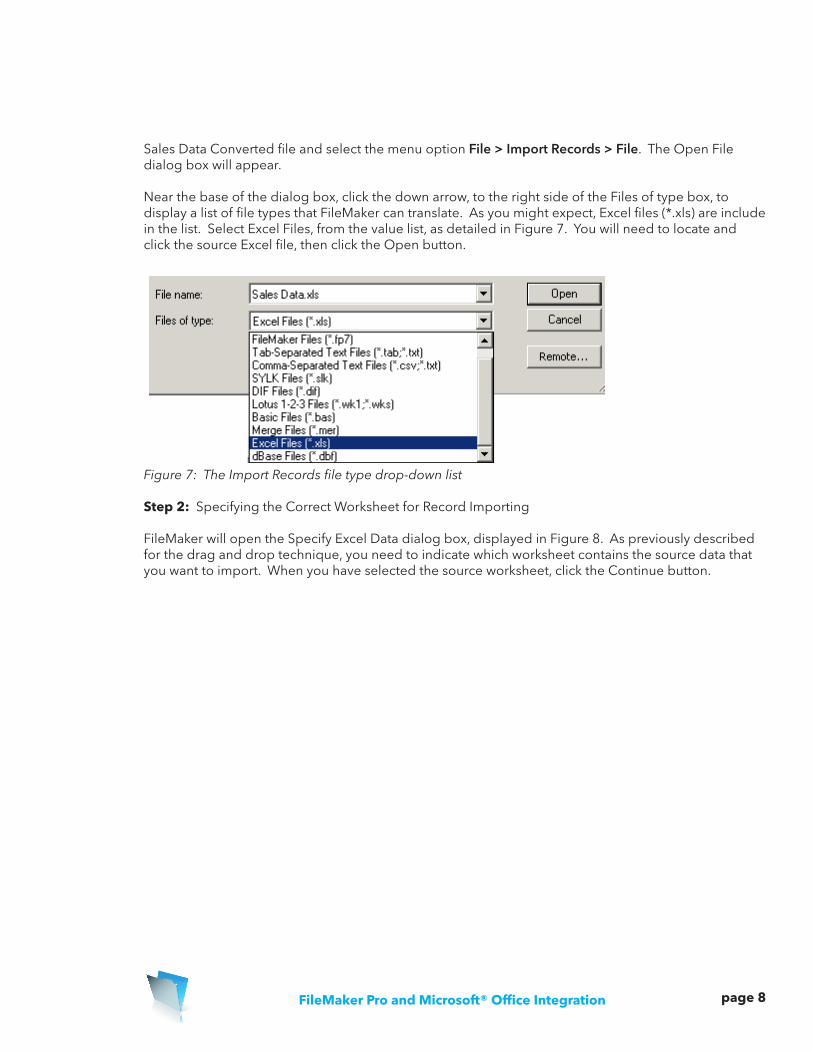
Sales Data Converted file and select the menu option File > Import Records > File. The Open File dialog box will appear.
Near the base of the dialog box, click the down arrow, to the right side of the Files of type box, to display a list of file types that FileMaker can translate. As you might expect, Excel files (*.xls) are include in the list. Select Excel Files, from the value list, as detailed in Figure 7. You will need to locate and click the source Excel file, then click the Open button.
Figure 7: The Import Records file type drop-down list
Step �: Specifying the Correct Worksheet for Record Importing
FileMaker will open the Specify Excel Data dialog box, displayed in Figure 8. As previously described for the drag and drop technique, you need to indicate which worksheet contains the source data that you want to import. When you have selected the source worksheet, click the Continue button.

FileMaker Pro and Microsoft® Office Integration page �
Figure 8: Selecting a worksheet in the Specify Excel Data dialog box
Step �: Specifying the Import Options for the Excel Worksheet
The Import Field Mapping dialog box will then appear, shown in Figure 9. This dialog box contains several option settings to help you import the data from the source worksheet. You can move the target fields on the right side of the box up or down, by clicking on the double arrow icon to the left of each field title. You can switch on or off the import arrow between each source field and target field, as indicated in the Field Mapping section. There are three radio buttons in the Import Action section, which give you the choice of using the source data from Excel to add new records to the file, replace the existing found set of records in the file, or update matching records.
It is important to note that the import options to update existing records or update matching records both overwrite existing data during the import process. This action cannot be undone. To safeguard your data, choose the menu option File > Save a Copy As to make a backup of the FileMaker Pro file, before you perform an import that updates records. You can find out more information about FileMaker’s import settings and options using the FileMaker Pro Help, or online at the FileMaker Knowledge Base Web site, www.filemaker.com/kb.

FileMaker Pro and Microsoft® Office Integration page �0
Figure 9: The Import Field Mapping dialog box for importing new records into an existing FileMaker file
At the end of the import process, FileMaker will present you with an Import Summary dialog box, informing you how many records have been added or updated in the file, as shown in Figure 10.
Figure 10: The Import Summary dialog box
Part III Saving and Sending Records as an Excel File From FileMaker
FileMaker Pro has a feature called Excel Maker, that makes it easy to create a new Excel file, or PDF document, based on the current set of records you are browsing in a FileMaker database.
When you use the Excel Maker to create an Excel file, only the fields present in the layout you are currently browsing will be included in the new Excel workbook. If you want to include the contents of additional fields from FileMaker within an Excel file, you can use the menu option File > Export

FileMaker Pro and Microsoft® Office Integration page ��
Records. Choose to save the exported record set as an Excel file, then follow the export options dialog boxes to customize what fields to include.
Step �: Using the BPS Sales Orders file to create a New Excel Worksheet
The Excel Maker feature in FileMaker Pro is an easy way to extract data from either the current record or the found set of records you are browsing in a FileMaker database and work with this data in a new Excel worksheet. This is a great way to use Excel’s graphing capabilities to create a chart based on a set of records in a FileMaker file.
We can use the bps_Sales_Orders database to demonstrate how easily you can create a new Excel worksheet from within a FileMaker file. This file is one of the databases included in the Business Productivity Solution.
Launch FileMaker Pro 8.5 on your computer and using the Open File dialog box, locate and open the folder called BPS_1.0, which contains the Business Productivity Solution files. Open the file called bps__Main_Menu. This file will open the associated FileMaker files that make up the Business Productivity Solution.
A dialog box may appear as the file opens advising you that the date and time formats for the file are different to your computer’s system settings. You can dismiss this message by clicking either the ‘System Setting’, or the ‘File Setting’ button.
The Business Productivity Solution Main Menu window will appear, as shown in Figure 11.
Figure 11: The Business Productivity Solution Main Menu
If this is the first time you have used the BPS Sales Orders file, it would be of benefit to add some example or actual customer, inventory item and sales invoice records to the various modules.
FileMaker Pro and Microsoft® Office Integration page ��
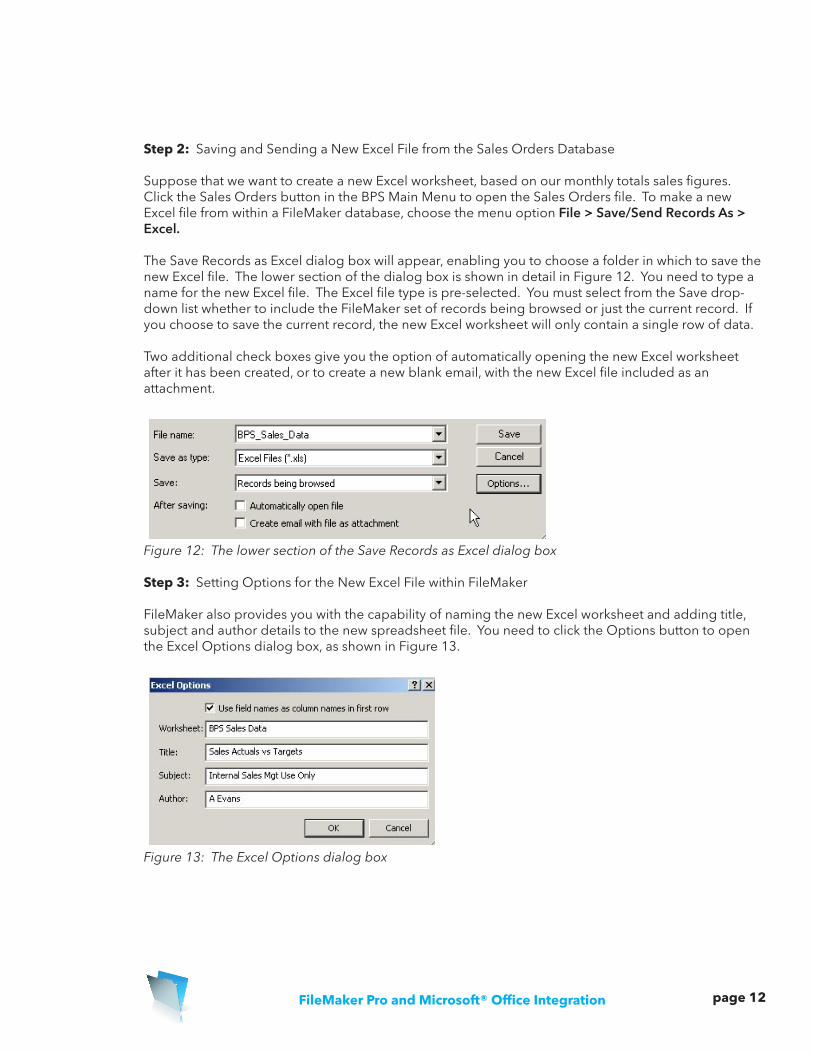
Step �: Saving and Sending a New Excel File from the Sales Orders Database
Suppose that we want to create a new Excel worksheet, based on our monthly totals sales figures. Click the Sales Orders button in the BPS Main Menu to open the Sales Orders file. To make a new Excel file from within a FileMaker database, choose the menu option File > Save/Send Records As > Excel.
The Save Records as Excel dialog box will appear, enabling you to choose a folder in which to save the new Excel file. The lower section of the dialog box is shown in detail in Figure 12. You need to type a name for the new Excel file. The Excel file type is pre-selected. You must select from the Save drop-down list whether to include the FileMaker set of records being browsed or just the current record. If you choose to save the current record, the new Excel worksheet will only contain a single row of data.
Two additional check boxes give you the option of automatically opening the new Excel worksheet after it has been created, or to create a new blank email, with the new Excel file included as an attachment.
Figure 12: The lower section of the Save Records as Excel dialog box
Step �: Setting Options for the New Excel File within FileMaker
FileMaker also provides you with the capability of naming the new Excel worksheet and adding title, subject and author details to the new spreadsheet file. You need to click the Options button to open the Excel Options dialog box, as shown in Figure 13.
Figure 13: The Excel Options dialog box

FileMaker Pro and Microsoft® Office Integration page ��
Step �: Reviewing the new Excel Worksheet
After clicking the OK button, the new Excel worksheet will appear, as shown in Figure 14. The field names from the Sales Order file have been preserved as column headings and each invoice record from the browsed set in FileMaker appears as a new row in the worksheet.
Figure 14: The newly created Excel worksheet generated from within FileMaker
The Next section covers a more advanced technique of extracting data from FileMaker into Excel using an ODBC query. If you are happy with the above methods from sharing information between FileMaker and Excel, you may like to jump ahead to next section, which describes how records in a FileMaker database can be used in a Microsoft Word document.
Part IV Getting Data out of FileMaker into Excel with an ODBC QueryYou can share information held in a FileMaker database with other applications using ODBC (Open database Connectivity) and JDBC (Java Database Connectivity). You can choose to make a FileMaker database available as a data source for ODBC compliant applications, such as Excel. FileMaker and Excel are excellent complementary applications. You can use Excel to produce a graph from a data series, originating in FileMaker. You can then use object linking and embedding to paste the graph back into a FileMaker container field.
In this example, we will create a new database query from Excel to extract sales figures from the BPS Sales Orders file. We will then chart the sales data and then copy and embed the resulting graph back in a FileMaker database.
Step �: Preparing Your Computer to Create an ODBC Query from FileMaker
You will need to have Microsoft Query installed on your computer to follow the example of extracting data from FileMaker into Excel, using an ODBC query. Microsoft Query is not automatically installed during a typical installation of Microsoft Office. It is a good idea to have your Microsoft Office CD to hand, as you may be prompted for it in order to install Microsoft Query on your computer.
The ODBC client driver, which is included on the FileMaker CD, is not installed as part of the standard FileMaker installation. You will need to locate and install the ODBC driver software from your FileMaker Pro 8.5 or FileMaker Pro 8 disk.
Load the FileMaker Pro disk in your computer. When the installation dialog box appears, click the middle ‘spectacles’ button, shown in Figure 15, to explore the contents of the disk.

FileMaker Pro and Microsoft® Office Integration page ��
Figure 15: Click the Explore button in the FileMaker installation dialog box to locate the ODBC driver software
Inside the FileMaker disk is a folder called xDBC, which holds the FileMaker ODBC and JDBC driver software. Open both the xDBC folder and the ODBC Client Driver Installer folder within it.
Click the Setup file, which is displayed in Figure 16, and follow the onscreen prompts, to install the FileMaker ODBC Client driver.
Figure 16: The contents of the ODBC Driver folder on the FileMaker disk
Step �: Enabling a FileMaker File to be an ODBC Data Source
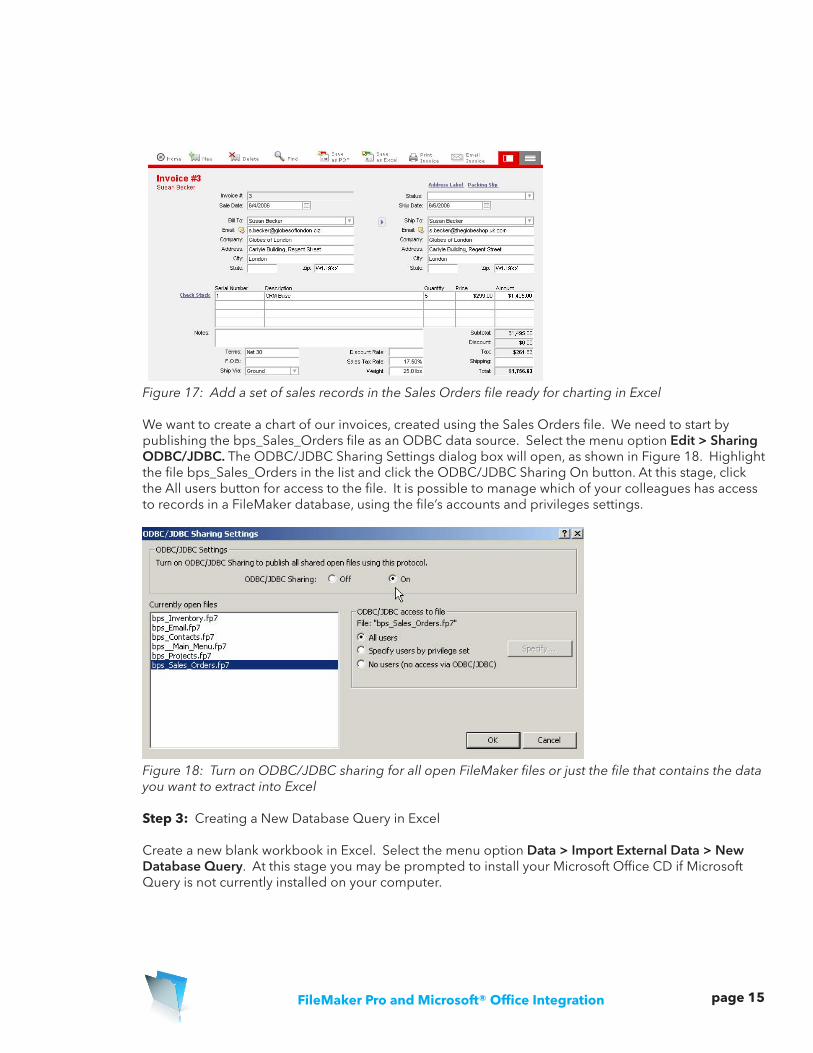
Open the bps_Sales_Orders file and, if none exist, add new sample sales invoices to the file, as shown in Figure 17.
FileMaker Pro and Microsoft® Office Integration page ��
Figure 17: Add a set of sales records in the Sales Orders file ready for charting in Excel
We want to create a chart of our invoices, created using the Sales Orders file. We need to start by publishing the bps_Sales_Orders file as an ODBC data source. Select the menu option Edit > Sharing ODBC/JDBC. The ODBC/JDBC Sharing Settings dialog box will open, as shown in Figure 18. Highlight the file bps_Sales_Orders in the list and click the ODBC/JDBC Sharing On button. At this stage, click the All users button for access to the file. It is possible to manage which of your colleagues has access to records in a FileMaker database, using the file’s accounts and privileges settings.
Figure 18: Turn on ODBC/JDBC sharing for all open FileMaker files or just the file that contains the data you want to extract into Excel
Step �: Creating a New Database Query in Excel
Create a new blank workbook in Excel. Select the menu option Data > Import External Data > New Database Query. At this stage you may be prompted to install your Microsoft Office CD if Microsoft Query is not currently installed on your computer.
FileMaker Pro and Microsoft® Office Integration page ��
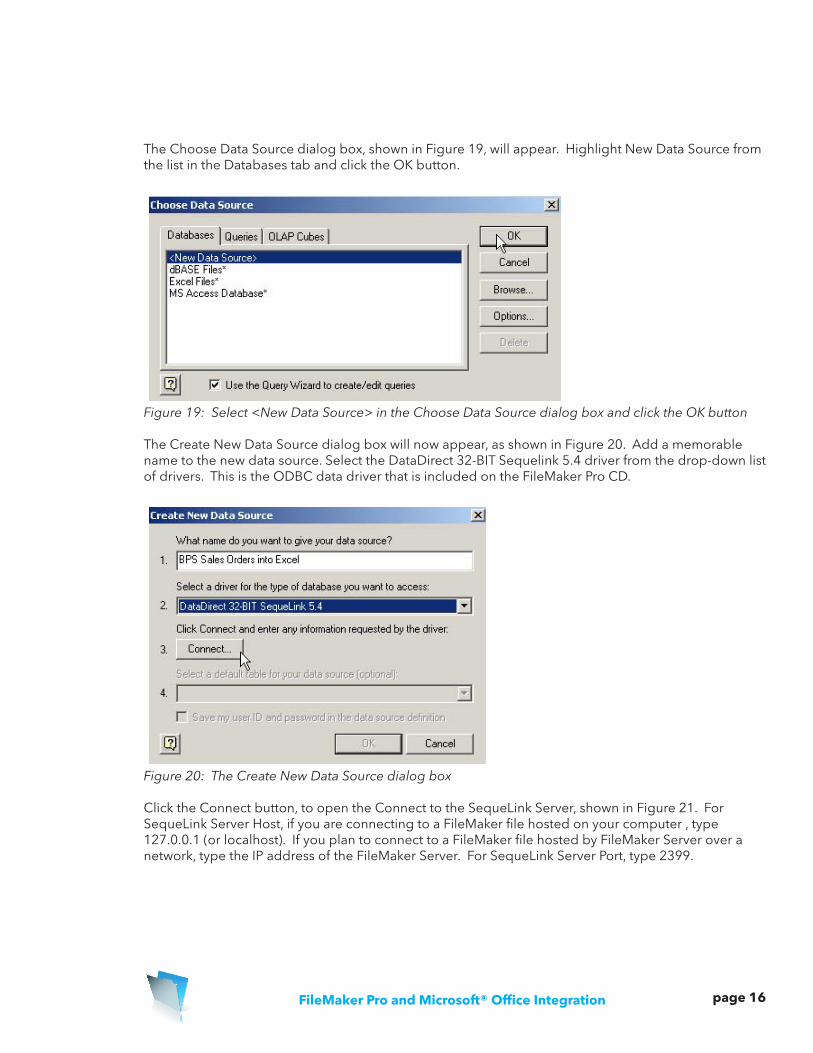
The Choose Data Source dialog box, shown in Figure 19, will appear. Highlight New Data Source from the list in the Databases tab and click the OK button.
Figure 19: Select <New Data Source> in the Choose Data Source dialog box and click the OK button
The Create New Data Source dialog box will now appear, as shown in Figure 20. Add a memorable name to the new data source. Select the DataDirect 32-BIT Sequelink 5.4 driver from the drop-down list of drivers. This is the ODBC data driver that is included on the FileMaker Pro CD.
Figure 20: The Create New Data Source dialog box
Click the Connect button, to open the Connect to the SequeLink Server, shown in Figure 21. For SequeLink Server Host, if you are connecting to a FileMaker file hosted on your computer , type 127.0.0.1 (or localhost). If you plan to connect to a FileMaker file hosted by FileMaker Server over a network, type the IP address of the FileMaker Server. For SequeLink Server Port, type 2399.

FileMaker Pro and Microsoft® Office Integration page ��
Figure 21: The Connect to the SequeLink Server dialog box
Click the button to the right of Server Data Source to open the Server Data Sources dialog box, displayed in Figure 22, which should contain a list of available FileMaker file data sources.
Figure 22: The Server Data Sources dialog box
When the OK button is clicked, the Logon to SequeLink Service dialog box will appear, requesting you to type in an appropriate account name and password for the selected FileMaker file data source. For the bps_Sales_Orders file, type Admin in the User Name and leave the Password blank, shown in Figure 23.
Figure 23: Type the FileMaker file account name and password in the Logon to SequeLink Service dialog box
Provided the account name and password used has ODBC access to the file, you will now see a list of available table occurrences from the FileMaker source file, in the Select a table drop-down list. For this example, choose the Sales Orders table.

FileMaker Pro and Microsoft® Office Integration page ��
You have now completed the Create New Data Source dialog box, shown in Figure 24. You may like to check the box to save User ID and password, to make it easier to capture the same source data in the future.
Figure 24: The completed Create New Data Source dialog box
When the OK button is clicked, the newly named Data Source will be added to the list displayed in the Choose Data Source dialog box, shown in Figure 25.
Figure 25: The New Data Source has been added to the selection list
Step �: Customising the Database Query
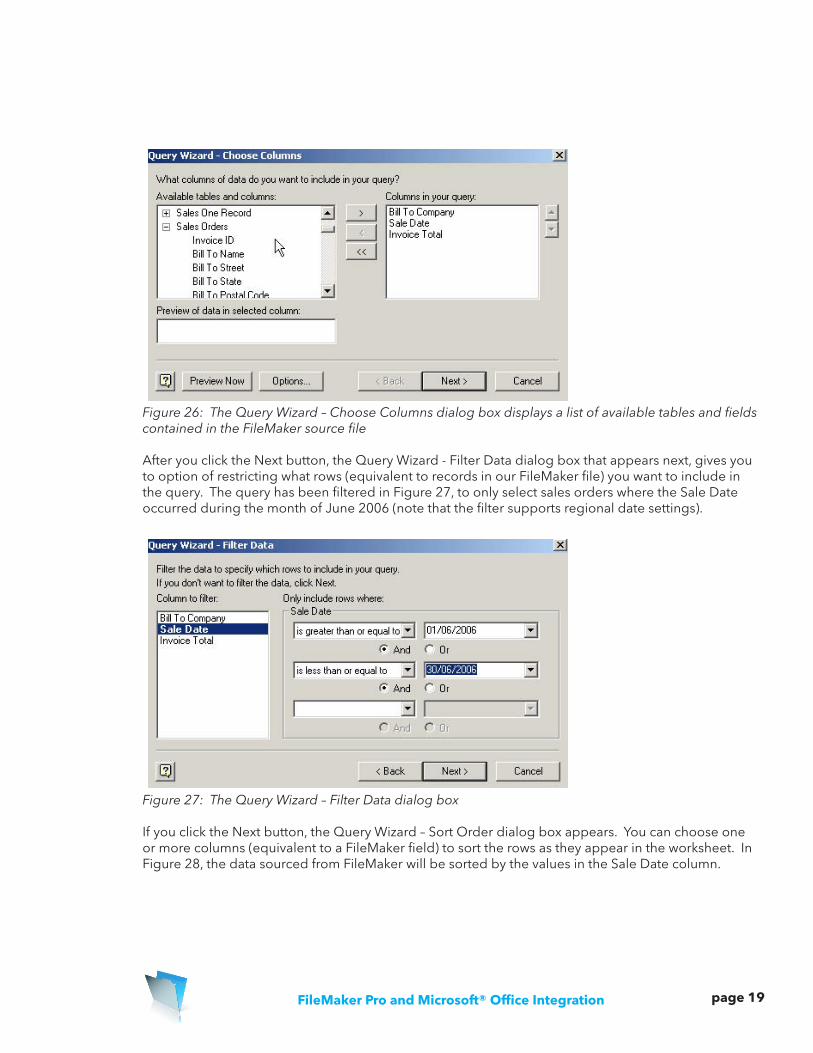
If you now click the OK button, the Query Wizard will be launched, starting with the Choose Columns dialog box, as detailed in Figure 26. We want to create a sales chart in Excel. To do this, add the Bill to Company, Sale Date and Invoice Total columns, from the Sales Orders table, to the query.
FileMaker Pro and Microsoft® Office Integration page ��
Figure 26: The Query Wizard – Choose Columns dialog box displays a list of available tables and fields contained in the FileMaker source file
After you click the Next button, the Query Wizard - Filter Data dialog box that appears next, gives you to option of restricting what rows (equivalent to records in our FileMaker file) you want to include in the query. The query has been filtered in Figure 27, to only select sales orders where the Sale Date occurred during the month of June 2006 (note that the filter supports regional date settings).
Figure 27: The Query Wizard – Filter Data dialog box
If you click the Next button, the Query Wizard – Sort Order dialog box appears. You can choose one or more columns (equivalent to a FileMaker field) to sort the rows as they appear in the worksheet. In Figure 28, the data sourced from FileMaker will be sorted by the values in the Sale Date column.

FileMaker Pro and Microsoft® Office Integration page �0
Figure 28: The Query Wizard – Sort Order
When you click the Next button, the Query Wizard – Finish dialog box will appear, shown in Figure 29. The Query Wizard now has enough information to capture the source data. You now have the option to insert the data into the Excel worksheet. You can also click the Save Query button to preserve your settings for future use.
Figure 29: The Query Wizard – Finish dialog box
When the Finish button is clicked, you will be able to choose from which cell to insert the data, in the existing or a new worksheet, as shown in Figure 30.

FileMaker Pro and Microsoft® Office Integration page ��
Figure 30: The Import Data dialog box
When the OK button is clicked, you will again be prompted to enter the account name and password for the source file, to logon to the SequeLink Service, shown in Figure 31.
Figure 31: The Logon to Sequelink Service dialog box
Step �: Reviewing the FileMaker Data in Excel
Finally, the selected FileMaker source data will be inserted into the Excel worksheet, shown with some example sales data in Figure 32.
Figure 32: The selected FileMaker source data filtered, sorted and inserted into the Excel worksheet
FileMaker Pro and Microsoft® Office Integration page ��
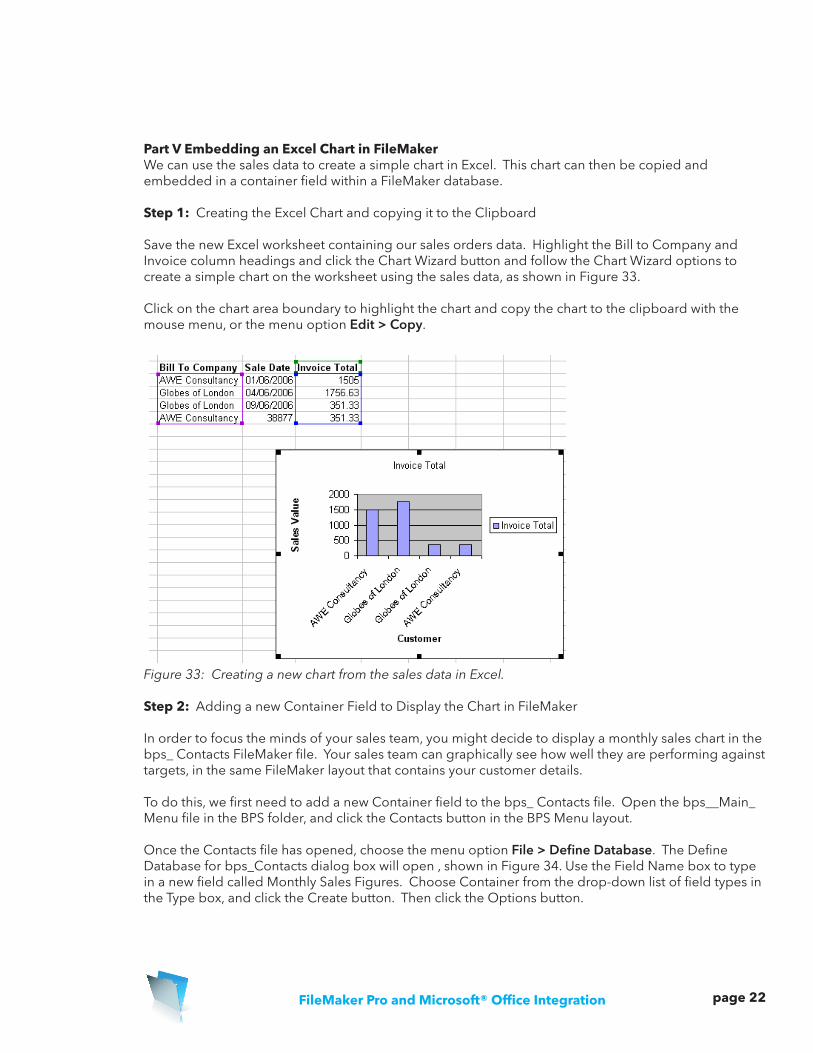
Part V Embedding an Excel Chart in FileMakerWe can use the sales data to create a simple chart in Excel. This chart can then be copied and embedded in a container field within a FileMaker database.
Step �: Creating the Excel Chart and copying it to the Clipboard
Save the new Excel worksheet containing our sales orders data. Highlight the Bill to Company and Invoice column headings and click the Chart Wizard button and follow the Chart Wizard options to create a simple chart on the worksheet using the sales data, as shown in Figure 33.
Click on the chart area boundary to highlight the chart and copy the chart to the clipboard with the mouse menu, or the menu option Edit > Copy.
Figure 33: Creating a new chart from the sales data in Excel.
Step �: Adding a new Container Field to Display the Chart in FileMaker
In order to focus the minds of your sales team, you might decide to display a monthly sales chart in the bps_ Contacts FileMaker file. Your sales team can graphically see how well they are performing against targets, in the same FileMaker layout that contains your customer details.
To do this, we first need to add a new Container field to the bps_ Contacts file. Open the bps__Main_Menu file in the BPS folder, and click the Contacts button in the BPS Menu layout.
Once the Contacts file has opened, choose the menu option File > Define Database. The Define Database for bps_Contacts dialog box will open , shown in Figure 34. Use the Field Name box to type in a new field called Monthly Sales Figures. Choose Container from the drop-down list of field types in the Type box, and click the Create button. Then click the Options button.

FileMaker Pro and Microsoft® Office Integration page ��
Figure 34: Add a new Global Container field called Monthly Sales Figures to the bps_Contacts file
The Options for field “Monthly Sales Figures” dialog box will appear, shown in Figure 35. Click the Storage tab and check the box titled Use Global Storage. Click the OK button to close the Field Options dialog box, then click the OK button to close the Define Database dialog box.
Figure 35: The Global Storage option in the Options for Field dialog box
Step �: Adding the Container Field to the Contacts Form View Layout
You may notice that the newly defined Monthly Sales Figures field has been automatically added to the base of the Contacts Form View layout. This default FileMaker setting, where any newly defined fields for a file are added to the currently selected layout, can be switched off. To do this, choose the menu

FileMaker Pro and Microsoft® Office Integration page ��
option Edit > Preferences, to open the Preferences dialog box, click the Layout tab and uncheck the box titled Add newly defined fields to current layout. The Layout Tab of the Preferences dialog box is shown in Figure 36.
Figure 36: Switching off the default FileMaker setting where any newly defined fields in a file are automatically added to the current layout
If the newly defined field called Monthly Sales Figures has not been automatically added to the layout, you can add the field by dragging the Field tool, in the Status Area, to the required position and selecting the new field from the Specify Field dialog box, that appears when the mouse button is released. In Figure 37, the new field has been place on the layout between the contact details and the existing Picture field.
Figure 37: The new Monthly Sales Figures container field added to the Form View Layout
FileMaker Pro and Microsoft® Office Integration page ��
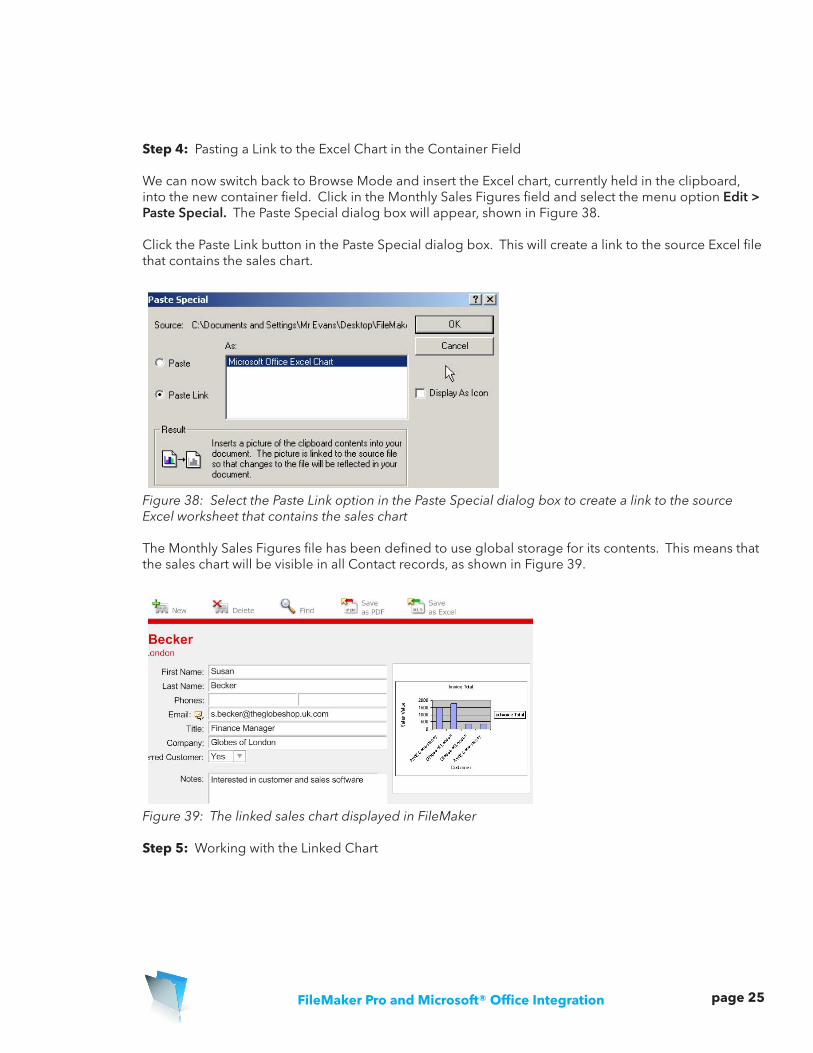
Step �: Pasting a Link to the Excel Chart in the Container Field
We can now switch back to Browse Mode and insert the Excel chart, currently held in the clipboard, into the new container field. Click in the Monthly Sales Figures field and select the menu option Edit > Paste Special. The Paste Special dialog box will appear, shown in Figure 38.
Click the Paste Link button in the Paste Special dialog box. This will create a link to the source Excel file that contains the sales chart.
Figure 38: Select the Paste Link option in the Paste Special dialog box to create a link to the source Excel worksheet that contains the sales chart
The Monthly Sales Figures file has been defined to use global storage for its contents. This means that the sales chart will be visible in all Contact records, as shown in Figure 39.
Figure 39: The linked sales chart displayed in FileMaker
Step �: Working with the Linked Chart

FileMaker Pro and Microsoft® Office Integration page ��
From within the FileMaker file, you can now edit or open the linked worksheet that contains the original sales data and sales chart. Click on the chart in the Monthly Sales Figures field and open the mouse menu, as shown in Figure 40. You can now select the mouse menu option Edit Linked Worksheet, which will open the original Excel worksheet directly from FileMaker. Or you can double click the chart to view the original Excel worksheet containing the chart.
Figure 40: The mouse menu option when the Monthly Sales Figures Field is selected
Sharing Data between FileMaker Pro and Microsoft Word
Using FileMaker as a Data Source for a Word Mail Merge DocumentIt is easy to add a new letter layout within a FileMaker file and print a letter to a single customer, a specific group of customers based on search criteria, or all customer records in a database.
You may however have an existing letter template in Word that you would like to use as the basis of a mail merge document, using customer records that are held in FileMaker. You can export a selected set of records from a FileMaker database, as a Merge file, which can be used as a recipient list for a Word mail merge document.
Step �: Preparing a Letter for Mail Merging in Microsoft Word
Launch Microsoft Word and open your existing letter template document, if you have one. Or you might like to create a new marketing letter, similar to the example shown in Figure 41.

FileMaker Pro and Microsoft® Office Integration page ��
Figure 41: A sample marketing letter written in Word, ready for merge fields to be added
Step �: Creating the Merge Data File in FileMaker
We can export the customer records held in the bps_Contacts file to create a new merge data source file. You can either select all records in the Contacts file to include in the new merge file, or reduce the list of recipients by searching for a specific group of customers. When you are happy with your chosen set of records, select the menu option File > Export Records.
The Export Records to File dialog box will appear. The file name and type options, at the base of the dialog box, are shown in Figure 42. Type a name for the new exported records file. Click the down arrow to the right of the Save as type field and choose Merge Files from the list of file types. Choose a folder location to save the new merge file to, and click the Save button.
Figure 42: The file options in the Export Records to File dialog box
The Specify Field Order for Export dialog box will appear, shown in Figure 43. As a default setting, the list of fields displayed on the left, is based on the current layout. Highlight each of the fields you want to included in your mail merge letter, and click the Move button each time. When you are happy with your selected fields, click the Export button. A new merge file will now be created in the location you select.

FileMaker Pro and Microsoft® Office Integration page ��
Figure 43: The Specify Field Order for Export dialog box
Step �: Linking the Merge Data File to the Merge Letter
Switch back to the letter document in Word and select the menu option Tools > Letters and Mailings > Mail Merge. The Mail Merge task pane will open, as shown in Figure 44. You use the hyperlinks in the task pane to navigate through the mail merge process.
Figure 44: Step 1 of the Mail Merge task pane
FileMaker Pro and Microsoft® Office Integration page ��
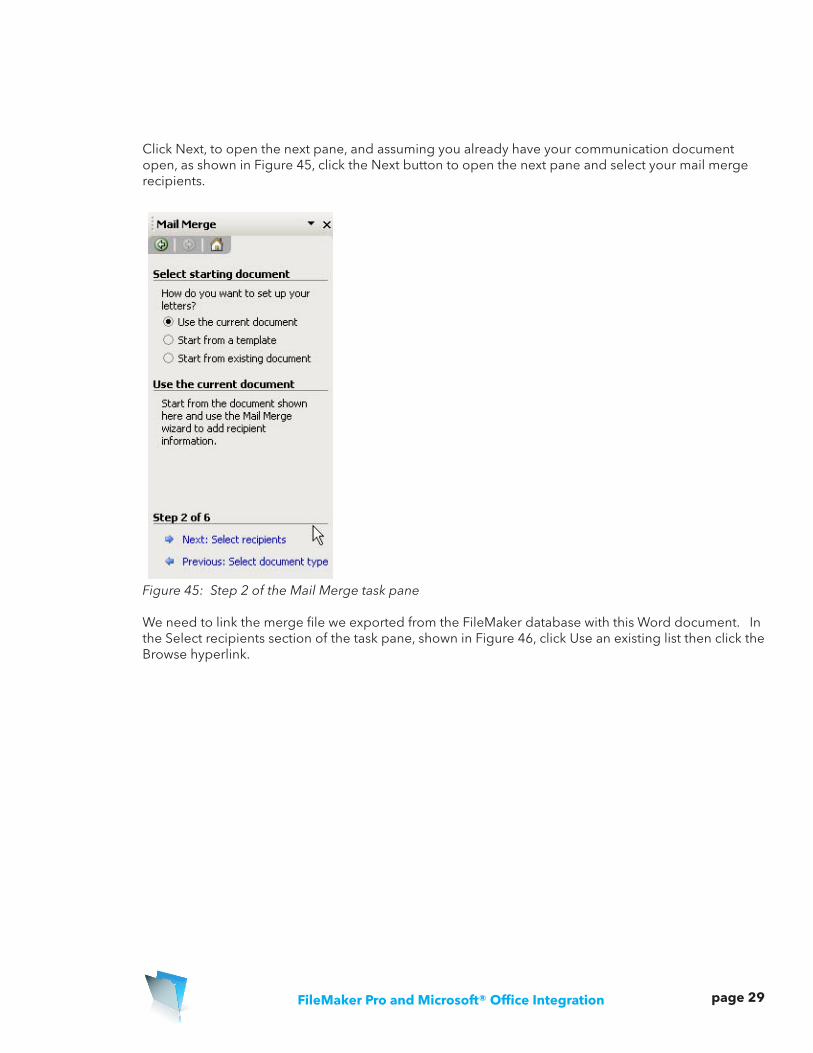
Click Next, to open the next pane, and assuming you already have your communication document open, as shown in Figure 45, click the Next button to open the next pane and select your mail merge recipients.
Figure 45: Step 2 of the Mail Merge task pane
We need to link the merge file we exported from the FileMaker database with this Word document. In the Select recipients section of the task pane, shown in Figure 46, click Use an existing list then click the Browse hyperlink.

FileMaker Pro and Microsoft® Office Integration page �0
Figure 46: Step 3 of the Mail Merge task pane
The Select Data Source dialog box will appear, shown in Figure 47. You will need to open the folder where you saved the exported merge file. To make the merge file visible in order to select it, you will need to choose All Files in the Files of type drop-down list. When you have highlighted and selected the merge file, click the OK button.
Figure 47: Select the exported merge file in the Select Data Source dialog box

FileMaker Pro and Microsoft® Office Integration page ��
Step �: Reviewing the Recipients List in the Data File
A Mail Merge Recipients dialog box will then appear, as displayed in Figure 48, with the list of recipients displayed. If you did not sort the records in FileMaker prior to creating the new merge file, you may wish to sort the recipient list by name, company or address details at this stage. As an example, with a large recipient list, you might be able to negotiate a discounted postage fee with your mail service if your letters are pre-sorted by postal code.
Click the OK button, if you are happy with the recipient list.
Figure 48: The Mail Merge Recipients dialog box gives you to option of reviewing, filtering and sorting the target list
Step �: Adding Merge Fields to the Mail Merge Letter
We need to add fields to our mail merge letter. We can do this in the fourth Mail Merge task pane. Click the More items hyperlink, shown in Figure 49.

FileMaker Pro and Microsoft® Office Integration page ��
Figure 49: Step 4 of the Mail Merge task pane includes a hyperlink to add merge fields to the document
The Insert Merge Field dialog box will appear, as shown in Figure 50. Highlight each field and click the Insert button to add the merge field to the Word document. When you have added the fields to the document, click the Close button.
Figure 50: The Insert Merge Field dialog box will include the field list from the merge data file

FileMaker Pro and Microsoft® Office Integration page ��
Once the fields have been added, your communication document should look similar to Figure 51.
Figure 51: The Word letter document with the merge fields added
Step �: Previewing the Completed Mail Merge Document
Click the Next hyperlink to preview the mail merge letters, with an example presented in Figure 52.
Figure 52: In Step 5 of the Mail Merge task pane the merged letters can be Previewed
Finally, you can click the Next hyperlink to complete the merge and either print or customize individual letters within the new mail merge document, as shown in Figure 53.

FileMaker Pro and Microsoft® Office Integration page ��
Figure 53: In step 6 of the Mail Merge task pane the merged letters can be edited and printed
Step �: Automating the Creation of a Merge File with a FileMaker Script
To assist you with future mail merges, you may wish to save a document containing the merge fields originating from FileMaker, as a Word template. The procedure for creating the new merge data file from FileMaker can also be simplified for future use by writing a simple script. The Merge to Word script shown in Figure 54, contains only the Export Records script step. The settings for the merge output file can be embedded in the script after clicking the specify output file button, and the fields to be included in the merge file are set after clicking the specify export order button.

FileMaker Pro and Microsoft® Office Integration page ��
Figure 54: A simple script created in a FileMaker file to automate the procedure for exporting records as a merge file
Sharing Data between FileMaker Pro and Microsoft PowerPoint
Part I Dynamically Linking FileMaker Data within a PowerPoint PresentationThe same Object Linking and Embedding (OLE) technology that enabled us to insert an Excel chart into a FileMaker container field can also be used to keep your PowerPoint presentations up to date with the latest data in a FileMaker file. We can use the same Excel file from earlier which included sales data originating from the BPS Sales Orders in FileMaker.
Step �: Inserting FileMaker Data as a Chart in a PowerPoint Presentation
Launch your PowerPoint presentation and select the slide in which you wish to present the FileMaker sales data that was graphed in Excel. Select the PowerPoint menu option Insert > Object. The Insert Object dialog box will appear. Click the Create from File radio button, shown in Figure 55, and click the Browse button to locate and select the SalesDatafromBPS Excel file that we created earlier. Check the Link button, to create a dynamic link between this PowerPoint document and the Excel worksheet.

FileMaker Pro and Microsoft® Office Integration page ��
Figure 55: Adding a dynamic link to FileMaker sales data plotted in Excel from within a PowerPoint presentation
After you click the OK button, the Excel chart will appear in the PowerPoint slide.
Step �: Opening the Linked Chart during a Slide Show
You can make the chart automatically open the linked Excel worksheet, when clicked during the presentation. Select the menu option Slide Show > Action Settings. The Action Settings dialog box will appear shown in Figure 56. To open the OLE object by clicking it during a slide show, click the Mouse Click tab, or click the Mouse Over tab to activate the object when the mouse is moved over the chart.
Figure 56: You can use the Action Settings dialog box to open or edit the Excel worksheet containing the up to date FileMaker sales data from within PowerPoint

FileMaker Pro and Microsoft® Office Integration page ��
If any of your audience request to view the original record set in FileMaker, you can of course use the same OLE technique to launch the original database file from within a PowerPoint presentation.
Part II Using FileMaker as an Asset Library to Store Office DocumentsThere are many professional firms using FileMaker as an electronic asset library, to store business documents. New Media and design agencies store job bag images in a file, while architects and solicitors can store and retrieve project plans or drafts of contracts in FileMaker. You can store virtually any type of file in a FileMaker container field and if you have the original document application installed on your computer, you can open the file from FileMaker.
Step �: Opening the Document Library FileMaker Template
We can use the Document Library template that ships with FileMaker Pro, to build an example asset library file. Launch FileMaker, click the Create a new file using a template button, and select the Document Library from the Business – General set of database templates, shown in Figure 57. Click the OK button to create the new file.
Figure 57: Select the Document Library template
If the templates library does not automatically appear when you launch FileMaker, select the menu option Edit > Preferences to open the Preferences dialog box. In the General tab, shown in Figure 58, check the box titled Show templates in New Database dialog box

FileMaker Pro and Microsoft® Office Integration page ��
Figure 58: Check the show templates box in FileMaker Preferences
The new document library file will open. Click the New button to add a new record, as shown for a PowerPoint presentation example in Figure 59.
Step �: Inserting a File into the Document Library File
Figure 59: Use the Document Library file to store details on a PowerPoint Presentation
The Document Library Form View layout includes a container field displayed as a white rectangle with the label ‘Picture’ behind it. In addition to a description of the file, you can store the file itself, or a reference to it, within the container field. Click the container field and choose Insert > File from either the mouse menu, or the Insert menu.
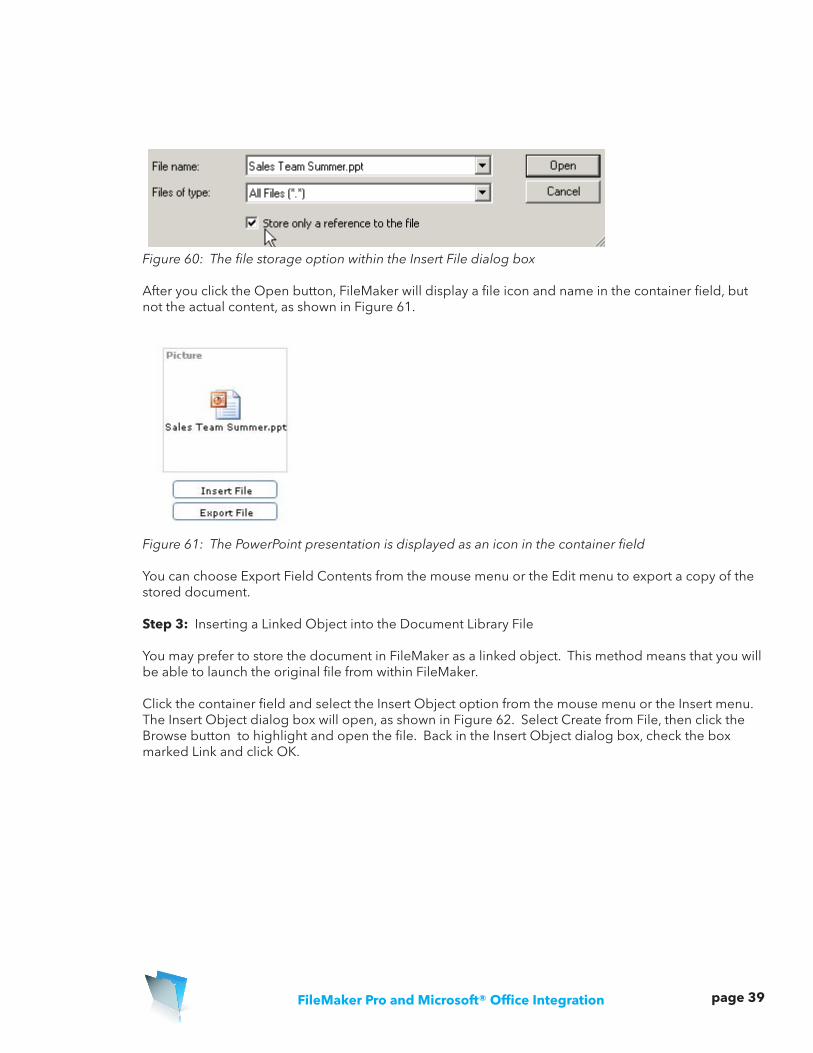
Use the Insert File dialog box, which then appears, to select the document that you want to add to the FileMaker record. At the base of the dialog box there is a check box that gives you the option to store only a reference to the file, shown in Figure 60. If you select Store only a reference to the file, FileMaker Pro doesn’t import the file, it only keeps track of where it is on your hard disk, saving disk space.
FileMaker Pro and Microsoft® Office Integration page ��
Figure 60: The file storage option within the Insert File dialog box
After you click the Open button, FileMaker will display a file icon and name in the container field, but not the actual content, as shown in Figure 61.
Figure 61: The PowerPoint presentation is displayed as an icon in the container field
You can choose Export Field Contents from the mouse menu or the Edit menu to export a copy of the stored document.
Step �: Inserting a Linked Object into the Document Library File
You may prefer to store the document in FileMaker as a linked object. This method means that you will be able to launch the original file from within FileMaker.
Click the container field and select the Insert Object option from the mouse menu or the Insert menu. The Insert Object dialog box will open, as shown in Figure 62. Select Create from File, then click the Browse button to highlight and open the file. Back in the Insert Object dialog box, check the box marked Link and click OK.

FileMaker Pro and Microsoft® Office Integration page �0
Figure 62: Use the Insert Object dialog box to add a link to the original file in a container field
Step �: Working with The Linked File
You will now see an image of the original file in the container field. Click in the container field and open the mouse menu. For the PowerPoint presentation example shown in Figure 63, you can show, edit or open the linked presentation file.
Figure 63: The mouse menu options for a linked PowerPoint file in a FileMaker container field

FileMaker Pro and Microsoft® Office Integration page ��
Sharing Data between FileMaker Pro and Microsoft Exchange, Outlook and Entourage
Part I Creating Emails From within FileMaker Pro
Using the Send Mail Command to Create Emails From within FileMaker ProIt is possible to open your computer’s email application from within FileMaker using the Send Mail button command or script step. You can add a button to a FileMaker layout, adjacent to an email address field, to make it easy for colleagues to create a new email to a selected individual.
An example of a send mail button can be seen in the Form View layout of the bps_Contacts database that forms part of the Business Productivity Solution template. The email button in the Contacts layout is shown in Figure 64 and when clicked runs a Send Email script. You can simplify the formatting of an email button so that it just runs the Send Mail command.
Figure 64: Adding a button to a FileMaker layout to run the Send Mail command
Customizing the Send Mail Script Step or Button CommandThe Send Mail options dialog box is shown in Figure 65. The dialog box provides you with several options for composing one or more emails, based on the records you are browsing in your FileMaker file.
You can choose to create a single email to the current record or generate multiple emails using the currently browsed set of records containing valid email addresses. There are boxes for you to customize how the To, CC and BCC email header boxes are managed. You can specify the email subject and text body and decide whether to attach one or more files with the email.
In the example shown in Figure 65 multiple emails will be created addressed to each of the records currently browsed in FileMaker, based on the contents of the Email field in the Contacts table for each record. The email message has been customized, after clicking the right arrow tile to the right of the message box and choosing the Specify Calculation option. A custom salutation has been included in the email text, using the contents of the First Name field in each recipient record.

FileMaker Pro and Microsoft® Office Integration page ��
Figure 65: The Send Mail Options dialog box
The Email database module, which forms part of the Business Productivity Solution, is a great example of how FileMaker can be used to create and manage complex email marketing campaigns. It is well worth taking a copy of the bps_Email file and using the email scripts included in the file, to give you ideas for how FileMaker can be used to drive email communications.
It is important to be aware of the Perform without dialog option, that forms part of the Send Mail script step or button command. If this option is selected, FileMaker will place the composed email message in the email application outbox, ready to be sent. If this option is not selected, the composed message is left open in the email application so it can be reviewed. In Microsoft Outlook Express or Microsoft Entourage on the Macintosh operating system, the new message is left in the Drafts folder.
Part II Managing Incoming Emails with a FileMaker Plug-InFor any business or workgroup, one of the challenges in implementing an effective customer relationship management (CRM) solution is the ability for all the sales team to share not just outgoing communications to a customer, but have the ability to view and respond to incoming emails, as well.

FileMaker Pro and Microsoft® Office Integration page ��
It can be quite a challenge to set up email rules across all your business computers to send copies of emails received from prospects and clients to shared folders, where colleagues who may also be working on the same customer account can access and review the most recent incoming emails.
The easiest way to adapt a shared FileMaker contacts database to store incoming emails, is to create a new related file with fields to record the date and time of the incoming email, the originator’s email address, to whom the email was sent, the subject and message of the email.
For individual customers, you can use the email address as a key field in the relationship. To view emails from any individual from a company in a portal, you can use the email domain to the right of the ‘@’ symbol in the originator’s email address to create a relationship to a customer record with the same default email address.
This technique does require some copying and pasting of an incoming email’s constituent parts to be effective. There are some third party FileMaker Plug-ins available that can synchronise emails and related data between Microsoft Outlook or Entourage and FileMaker Pro.
Further details on barcode plug-in providers and developers who specialize in shipping solutions can be found at the end of this article. We can use the PC Exchange plug-in available from Productive Computing to demonstrate how easily emails can be imported and exported between FileMaker and Outlook.
Step �: Installing the Exchange Manipulator Plug-in
You can download a demonstration copies of Productive Computing’s Exchange, Outlook and Entourage FileMaker plug-ins from their Web site at www.productivecomputing.com. On a Windows PC, copy the Exchange Manipulator plug-in to the folder called Extensions within the FileMaker Pro extensions folder, shown in Figure 66.

FileMaker Pro and Microsoft® Office Integration page ��
Figure 66: The Exchange Manipulator plug-in within the Extensions folder
Step �: Activating the Plug-in
Launch FileMaker Pro and select the menu option Edit > Preferences to open the Preferences dialog box. Select the Plug-Ins tab. Highlight and check the PC Exchange Client Manipulator plug-in in the list, as shown in Figure 67, and make sure that the plug-in has a tick in the enabled box.

FileMaker Pro and Microsoft® Office Integration page ��
Figure 67: Enabling the PC Exchange plug-in in the Preferences dialog box
Step �: Testing the Exchange Manipulator Plug-In
You can review how the Exchange Client manipulator works by opening the FileMaker file called Outlook_Exchange Manip Demo, which is downloaded with the plug-in. The demonstration database included a series of tabs across the top of the layout, to demonstrate how contacts, calendar events, tasks, notes and emails can be ‘pulled’ into and ‘pushed’ out of a FileMaker database.
Script examples are included with the file and displayed on the menu layouts, as shown in Figure 68.
Figure 68: Productive Computing demonstration file includes script step examples in the menu layouts
You can test the plug-in with your own Outlook emails and select an Outlook folder to pull emails from into FileMaker, as shown for an example in Figure 69.

FileMaker Pro and Microsoft® Office Integration page ��
Figure 69: The field structure of an email ‘pulled’ from Outlook into FileMaker using the Exchange Client Manipulator plug-in
The Outlook, Entourage and Exchange plug-ins from Productive Computing do use powerful script step commands which you may find quite challenging initially if you are relatively new to FileMaker. The plug-ins do provide a technique for capturing incoming emails without the need to copy and paste date, which you might like to incorporate at a future stage in your FileMaker CRM solution.

FileMaker Pro and Microsoft® Office Integration page ��
FileMaker and Microsoft Office Integration Resources
You can get further information about FileMaker and ODBC / JDBC drivers from the FileMaker Web site. http://filemaker.com/developers/resources/odbc.html
In addition, the FileMaker Knowledge base Web site has articles on how to use ODBC to integrate data between FileMaker and Microsoft Office.http://www.filemaker.com/kb
There are several third party FileMaker plug-ins available that can assist you to exchange data between FileMaker Pro database and Microsoft Office applications.
Productive Computing is a long established FileMaker development firm that has developed a range of FileMaker plug-ins specifically designed to help you synchronize data between a FileMaker database and Microsoft Outlook, Outlook Exchange and Entourage.http://www.productivecomputing.com/index.php
Datavisions are another FileMaker development company who supply a Microsoft Outlook synchronisation plug-in called Outlook Ops for the Windows platform.http://www.datavations.comhttp://www.outlookops.com
A full list of third party plug-ins for FileMaker Pro is available on the following FileMaker Web site;http://solutions.filemaker.com/solutions/search_results.jsp?developer=plug-in&status=Plug-In
About the Author
Arthur Evans is a FileMaker writer, developer and trainer.His book, FileMaker Pro Business Applications for versions 8 and 8.5, is published by Wordware Publishing Inc. July 2006. ISBN: 1598220144www.aweconsultancy.com
© 2006 FileMaker, Inc. All rights reserved. FileMaker and the FileMaker folder logos are trademarks or registered trademarks of FileMaker, Inc. in the U.S. and other countries. Mac and Mac logo are registered trademarks of Apple Computer, Inc. in the U.S. and other countries. Microsoft, Windows, and the Windows logo are trademarks or registered trademarks of Microsoft Corporation in the U.S. and/or other countries. Adobe and the Adobe PDF logo are trademarks or registered trademarks of Adobe Systems, Inc. in the U.S. and other countries. All other trademarks are the property of their respective holders.
The example companies, organizations, products, domain names, email addresses, logos, people, places and events are purely fictitious, and any resemblance to existing persons are companies is purely coincidental.