File: W055 Rev. 01.02.2009 Jose umbert ... · Jose umbert 126, 08402. Granollers, Barcelona, Spain....
15
File: W055 Rev. 01.02.2009 www.ceraroot.com Jose umbert 126, 08402 Granollers, Barcelona, Spain Tel. +34 938614841
-
Upload
phungkhanh -
Category
Documents
-
view
215 -
download
0
Transcript of File: W055 Rev. 01.02.2009 Jose umbert ... · Jose umbert 126, 08402. Granollers, Barcelona, Spain....
File: W055Rev. 01.02.2009
www.ceraroot.com Jose umbert 126, 08402Granollers, Barcelona, SpainTel. +34 938614841

1. Case selection:
– INDICATIONS:• Good oral and general health conditions• Metal allergies • Single unit restorations +++• Multi unit restorations +++• Full arch restorations rehabilitated by sextants, and with multiple
approaches. • Good occlusion.• Immediate implants• Transmucosal implantation.
– CONTRAINDICATIONS:• Smokers• Cross-bites & Parafunctions• Active periodontitis. • Large horizontal and/or vertical bone resorbtions should be
regenerated before, and implants placed in a second stage. • Full arch restorations rehabilitated with a one piece restoration. • Immediate loading should be avoided• Immediate temporaries in the posterior areas should be avoided.
2. Pre-operative planning:
– Meticulous initial examination, with multi-disciplinary approach.– Stone models in the articulator, and a wax-up of the intended restorative
final objective. – Photos – Panoramic x-ray (Periapical x-rays and TC exams when needed)– Look for the bone available for implant anchorage. Height and width. – Implant model selection. See manufacturer recommendations. – Prepare a Surgical Guide (a simple vacuum splint could be enough)– Prepare a Protective Splint for the healing period (vacuum)
File: W055Rev. 01.02.2009
www.ceraroot.com Jose umbert 126, 08402Granollers, Barcelona, SpainTel. +34 938614841
3. Surgery:
– Good oral health condition. Special attention to hygiene conditions.– Quite smoking 15 days before and after surgery– Antibiotic coverage.– Use a surgical guide for the optimal position and inclination of implants.– Use CeraRoot drilling sequence according to the implant type. – Sinus with less than 8 mm of residual alveolar bone, should be grafted
previously and implants placed 6 months later. – Horizontally resorbed alveolar bones with insufficient residual bone should
be grafted before and implants placed in a second stage. After implant site preparation, at least 1.5 mm of residual bone should remain circumferentially around the implant specially in the buccal and lingual aspects. Check implant type and diameter before surgery.
– Immediate implants are safe when:• no active infection is present• there is enough bone and no fenestrations• good primer stability can be achieved
– X-ray to confirm good implant position– Postoperative antibiotic coverage (4 days) and analgesic if needed. – Deliver the Protective Splint: it should be wear 24 hours a day during 2
months. Including meals and sleep. It should only be removed after meals for a good cleaning of it and the mouth. If during the 2 months this splint breaks down it should be replaced by an other splint.
4. Temporary Restorations:
– First choice is always the Protective Splint where a temporary tooth can be added, for example with some resin or composite.
– Cemented fixed restorations can be delivered in the anterior region for aesthetic reasons, taking into considerations that it is more risky than the first choice. A conventional temporary cement can be used. It is very important to keep it out of occlusion in centric, lateral and protrusive excursions. Do not remove the temporary restorations for 2 months to minimise the risk of implant mobility.
File: W055Rev. 01.02.2009
www.ceraroot.com Jose umbert 126, 08402Granollers, Barcelona, SpainTel. +34 938614841

5. Healing Period:
– Let the implants heal for at least 2 months before taking any impressions. – Grafted sites might require a longer healing period ranging from 6 to 12
months.– Do not let the patient chew on the implants during healing time to minimize
the risk of implant failure.– The patient should wear the protective splint 24 hours a day.
6. Final Restoration
– Should not be delivered before 4 months after surgery, to obtain soft tissue stability.
– Zirconia based restorations or Empress II restorations are indicated. – Do not use porcelain fused to metal restorations. – A resin-modified glass ionomer cement (e.g. Fuji Cem II (GC CORPORATION)) is
recommended for the final cementation of zirconia restorations. – All-ceramic restorations can be cemented with a dual-curing luting
composite system (e.g. Variolink II (Ivoclar-Vivadent))– X-ray to confirm the fit of restoration.
7. Maintenance
– Check ups: 1, 3 and 6 months. – Annual periapical x-rays.– Regular dental hygiene. – All potential bruxers should be advised to wear a protective night guard to
avoid implant and restorative failures.
File: W055Rev. 01.02.2009
www.ceraroot.com Jose umbert 126, 08402Granollers, Barcelona, SpainTel. +34 938614841
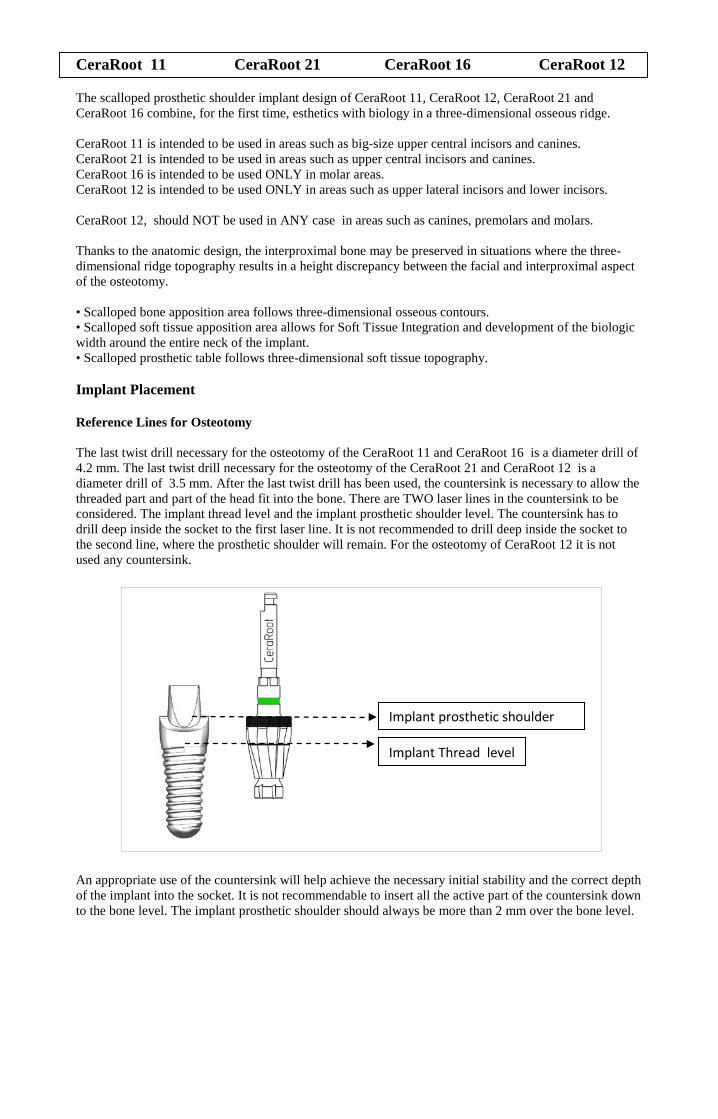
CeraRoot 11 CeraRoot 21 CeraRoot 16 CeraRoot 12 The scalloped prosthetic shoulder implant design of CeraRoot 11, CeraRoot 12, CeraRoot 21 and CeraRoot 16 combine, for the first time, esthetics with biology in a three-dimensional osseous ridge. CeraRoot 11 is intended to be used in areas such as big-size upper central incisors and canines. CeraRoot 21 is intended to be used in areas such as upper central incisors and canines. CeraRoot 16 is intended to be used ONLY in molar areas. CeraRoot 12 is intended to be used ONLY in areas such as upper lateral incisors and lower incisors. CeraRoot 12, should NOT be used in ANY case in areas such as canines, premolars and molars. Thanks to the anatomic design, the interproximal bone may be preserved in situations where the three-dimensional ridge topography results in a height discrepancy between the facial and interproximal aspect of the osteotomy. • Scalloped bone apposition area follows three-dimensional osseous contours. • Scalloped soft tissue apposition area allows for Soft Tissue Integration and development of the biologic width around the entire neck of the implant. • Scalloped prosthetic table follows three-dimensional soft tissue topography. Implant Placement Reference Lines for Osteotomy The last twist drill necessary for the osteotomy of the CeraRoot 11 and CeraRoot 16 is a diameter drill of 4.2 mm. The last twist drill necessary for the osteotomy of the CeraRoot 21 and CeraRoot 12 is a diameter drill of 3.5 mm. After the last twist drill has been used, the countersink is necessary to allow the threaded part and part of the head fit into the bone. There are TWO laser lines in the countersink to be considered. The implant thread level and the implant prosthetic shoulder level. The countersink has to drill deep inside the socket to the first laser line. It is not recommended to drill deep inside the socket to the second line, where the prosthetic shoulder will remain. For the osteotomy of CeraRoot 12 it is not used any countersink.
An appropriate use of the countersink will help achieve the necessary initial stability and the correct depth of the implant into the socket. It is not recommendable to insert all the active part of the countersink down to the bone level. The implant prosthetic shoulder should always be more than 2 mm over the bone level.
Implant Thread level
Implant prosthetic shoulder

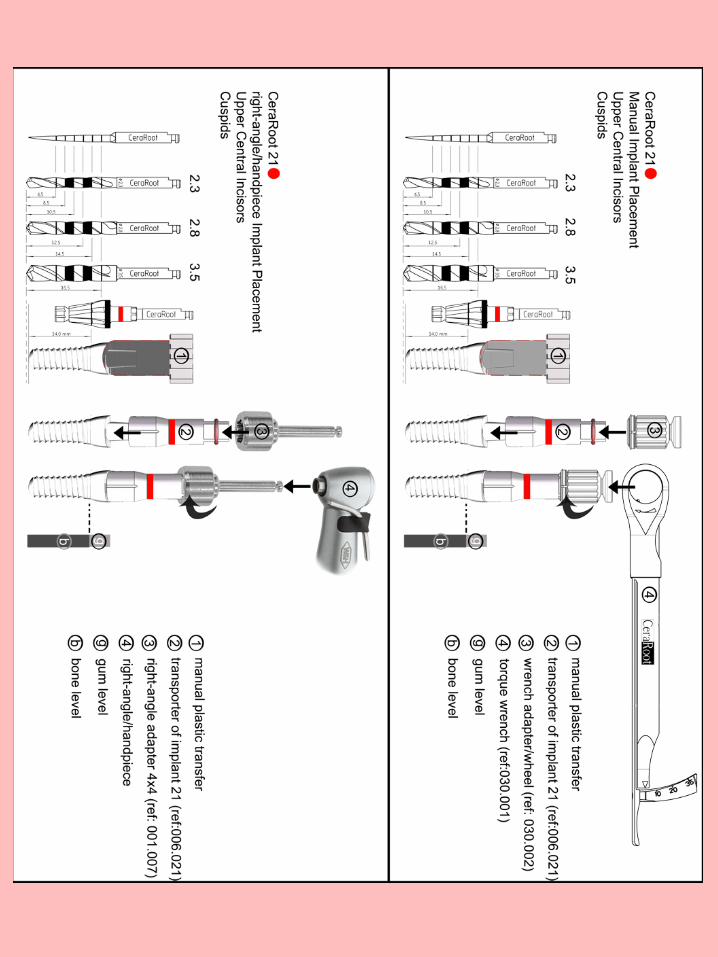
Inserting the implant into the socket Once the implant CeraRoot 11 or CeraRoot 21 or CeraRoot 12 or CeraRoot 16, has been opened from the blister (figure 1), it is carried into the socket and screwed several turns until the silicone tube separates from the implant abutment.
Once the implant is in the socket, (figure 2), you may start screwing with the specific transporter and wrench adapter wheel until the desired position has been reached. The implant is screwed in the socket with the help of the torque wrench.
Figure 1
Figure 2
The position of the implant head/abutment during the insertion is shown in the next diagram.
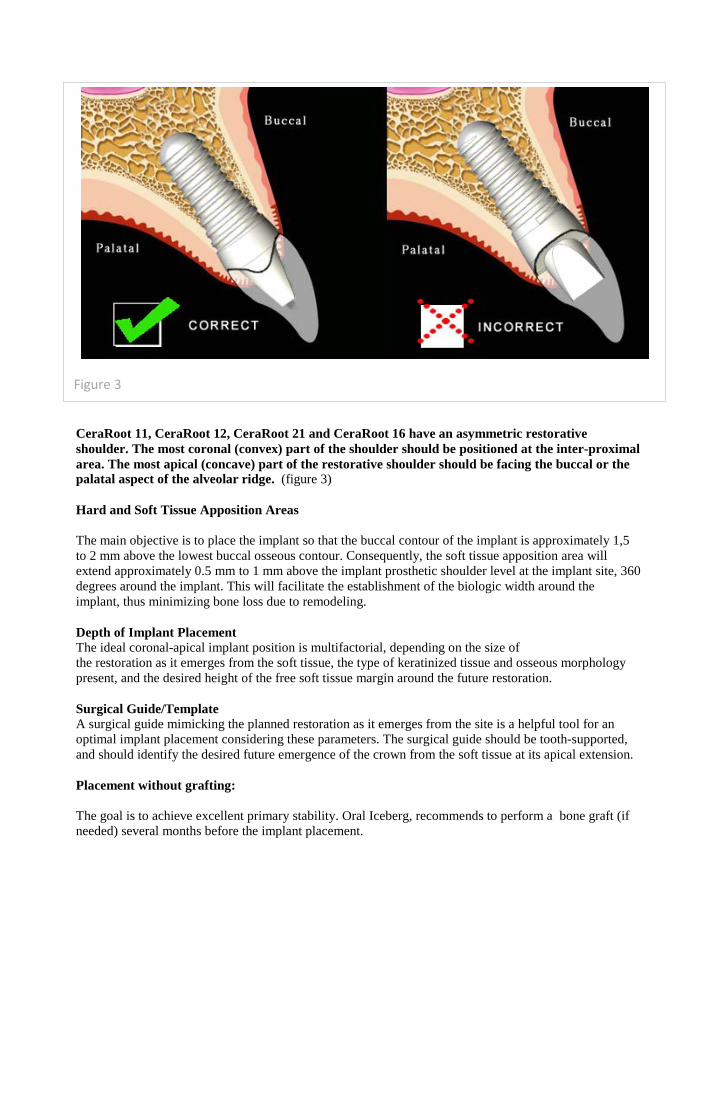
CeraRoot 11, CeraRoot 12, CeraRoot 21 and CeraRoot 16 have an asymmetric restorative shoulder. The most coronal (convex) part of the shoulder should be positioned at the inter-proximal area. The most apical (concave) part of the restorative shoulder should be facing the buccal or the palatal aspect of the alveolar ridge. (figure 3) Hard and Soft Tissue Apposition Areas The main objective is to place the implant so that the buccal contour of the implant is approximately 1,5 to 2 mm above the lowest buccal osseous contour. Consequently, the soft tissue apposition area will extend approximately 0.5 mm to 1 mm above the implant prosthetic shoulder level at the implant site, 360 degrees around the implant. This will facilitate the establishment of the biologic width around the implant, thus minimizing bone loss due to remodeling. Depth of Implant Placement The ideal coronal-apical implant position is multifactorial, depending on the size of the restoration as it emerges from the soft tissue, the type of keratinized tissue and osseous morphology present, and the desired height of the free soft tissue margin around the future restoration. Surgical Guide/Template A surgical guide mimicking the planned restoration as it emerges from the site is a helpful tool for an optimal implant placement considering these parameters. The surgical guide should be tooth-supported, and should identify the desired future emergence of the crown from the soft tissue at its apical extension. Placement without grafting: The goal is to achieve excellent primary stability. Oral Iceberg, recommends to perform a bone graft (if needed) several months before the implant placement.
Figure 3


CeraRoot 14 The scalloped and ovoid head implant design of CeraRoot 14 combines, for the first time, esthetics with biology in a three-dimensional osseous ridge. CeraRoot 14 is intended to be used in areas such as upper and lower bicuspids, and lower canines. Thanks to the anatomic design, the interproximal bone may be preserved in situations where the three-dimensional ridge topography results in a height discrepancy between the facial and interproximal aspect of the osteotomy. • Scalloped bone apposition area follows three-dimensional osseous contours. • Scalloped soft tissue apposition area allows for Soft Tissue Integration and development of the biologic width around the entire neck of the implant. • Scalloped prosthetic table follows three-dimensional soft tissue topography. Implant Placement Reference Lines for Osteotomy The last twist drill necessary for the osteotomy of the CeraRoot 14 is a diameter drill of 3.5 mm. After the twist drill has been used, the countersink is necessary to allow the threaded part and part of the head fit into the bone. There are TWO laser lines in the countersink to be considered. The implant thread level and the implant prosthetic shoulder level. The countersink has to drill deep inside the socket to the first laser line. It is not recommended to drill deep inside the socket to the second line, where the prosthetic shoulder will remain.
Surgery advice !! : Once the countersink, has performed the osteotomy, the implant socket will be cylindrical. Then, If the countersink is pushed gently, to the buccal and to the palatal/lingual aspect, (having visibility of the laser lines at all time), you will achieve an ovoid shape osteotomy. This shape will allow the implant head to be more stable into the socket, and improve the emergence profile of the restoration. This process is not recommended to be performed when:
- Extraction and implant placement on the same day - Poor amount of bone in the buccal plate. - More than 4 mm thickness of soft tissue around the socket.
Implant Thread level
Implant prosthetic shoulder

Inserting the implant into the socket Once the implant CeraRoot 14, has been opened from the blister (figure 1), it is carried into the socket without any rotation
. Once the implant is inside the socket, remove the cap and the silicone tube from the abutment part. (figure 2)
Once the implant is in the right position (figure 3) into the socket, you can start tapping (gentle impacts) the implant following the axiality of the implant until final desired depth has been reached. The implant is inserted not by screwing or rotation, but by pushing in.
Figure 1
Figure 2

The position of the implant head/abutment during the insertion is shown in the next diagram.
CeraRoot 14 has a threaded part to improve stability when the implant has been inserted by tapping. The purpose of the threads, are to improve the initial stability once the implant is inserted. The threads are not used for screwing the implant in. Hard and Soft Tissue Apposition Areas The main objective is to place the implant so that the buccal contour of the implant is approximately 1,5 to 2 mm above the lowest buccal osseous contour. Consequently, the soft tissue apposition area will extend approximately 0.5 mm to 1 mm above the implant prosthetic shoulder level at the implant site, 360 degrees around the implant. This will facilitate the establishment of the biologic width around the implant, thus minimizing bone loss due to remodeling. Depth of Implant Placement The ideal coronal-apical implant position is multifactorial, depending on the size of the restoration as it emerges from the soft tissue, the type of keratinized tissue and osseous morphology present, and the desired height of the free soft tissue margin around the future restoration. Surgical Guide/Template A surgical guide mimicking the planned restoration as it emerges from the site is a helpful tool for an optimal implant placement considering these parameters. The surgical guide should be tooth-supported, and should identify the desired future emergence of the crown from the soft tissue at its apical extension. Placement without grafting: The goal is to achieve excellent primary stability. Oral Iceberg, recommends to perform a bone graft (if needed) several months before the implant placement.
Figure 3