
Figure 6-1– The Person class, showing private, protected...
100
Copyright © , 2002 by James W Cooper 101 Figure 6-1– The Person class, showing private, protected, and public variables, and static and abstract methods The top part of the box contains the class name and package name (if any). The second compartment lists the class’s variables, and the bottom compartment lists its methods. The symbols in front of the names indicate that member’s visibility, where “+” means public, “-” means private, and “#” means protected. Static methods are shown underlined. Abstract methods may be shown in italics or, as shown in Figure Figure 6-1, with an “{abstract}” label. You can also show all of the type information in a UML diagram where that is helpful, as illustrated in Figure 6-2a. a b Figure 6-2 - The Person class UML diagram shown both with and without the method types UML does not require that you show all of the attributes of a class, and it is usual only to show the ones of interest to the discussion at hand. For example, in Figure 6-2 b, we have omitted some of the method details.
Transcript of Figure 6-1– The Person class, showing private, protected...

Copyright © , 2002 by James W Cooper
101
Figure 6-1– The Person class, showing private, protected, and public variables, and static and abstract methods
The top part of the box contains the class name and package name (if any). The second compartment lists the class’s variables, and the bottom compartment lists its methods. The symbols in front of the names indicate that member’s visibility, where “+” means public, “-” means private, and “#” means protected. Static methods are shown underlined. Abstract methods may be shown in italics or, as shown in Figure Figure 6-1, with an “{abstract}” label.
You can also show all of the type information in a UML diagram where that is helpful, as illustrated in Figure 6-2a.
a b
Figure 6-2 - The Person class UML diagram shown both with and without the method types
UML does not require that you show all of the attributes of a class, and it is usual only to show the ones of interest to the discussion at hand. For example, in Figure 6-2 b, we have omitted some of the method details.
Copyright © , 2002 by James W Cooper
102
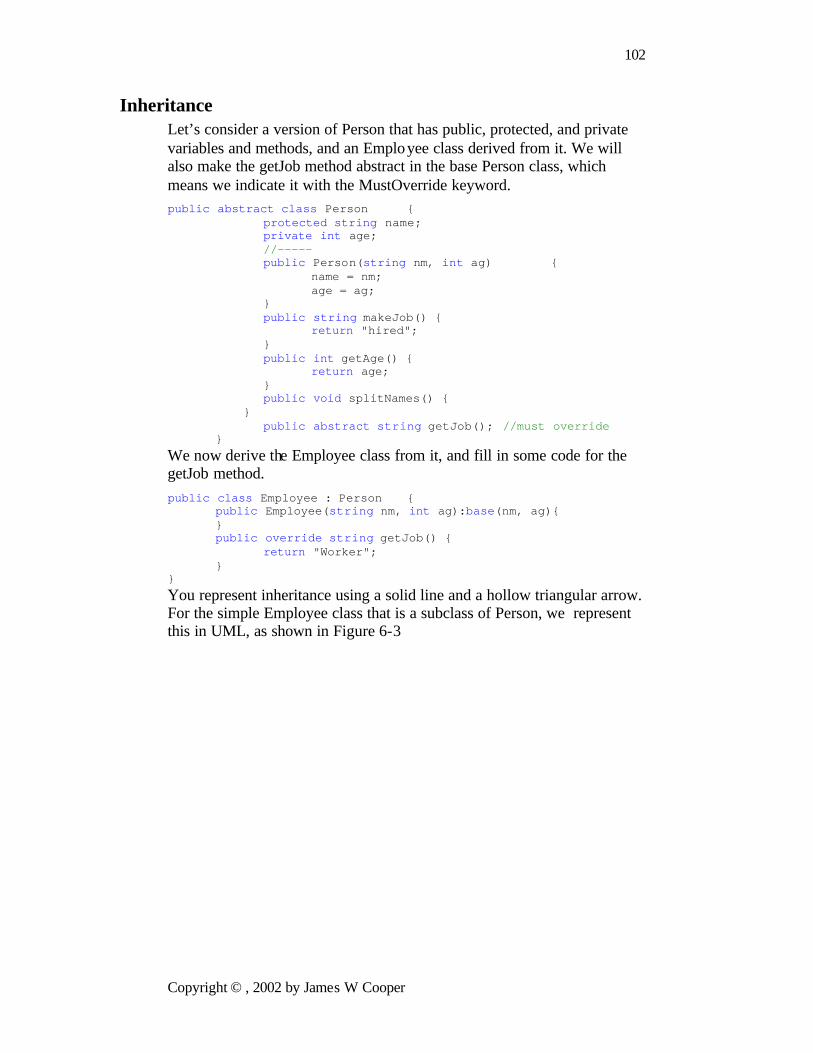
Inheritance Let’s consider a version of Person that has public, protected, and private variables and methods, and an Employee class derived from it. We will also make the getJob method abstract in the base Person class, which means we indicate it with the MustOverride keyword. public abstract class Person { protected string name; private int age; //----- public Person(string nm, int ag) { name = nm; age = ag; } public string makeJob() { return "hired"; } public int getAge() { return age; } public void splitNames() { } public abstract string getJob(); //must override } We now derive the Employee class from it, and fill in some code for the getJob method. public class Employee : Person { public Employee(string nm, int ag):base(nm, ag){ } public override string getJob() { return "Worker"; } } You represent inheritance using a solid line and a hollow triangular arrow. For the simple Employee class that is a subclass of Person, we represent this in UML, as shown in Figure 6-3
Copyright © , 2002 by James W Cooper
103
Figure 6-3 – The UML diagram showing Employee derived from Person
Note that the name of the Employee class is not in italics because it is now a concrete class and because it includes a concrete method for the formerly abstract getJob method. While it has been conventional to show the inheritance with the arrow pointing up to the superclass, UML does not require this, and sometimes a different layout is clearer or uses space more efficiently.
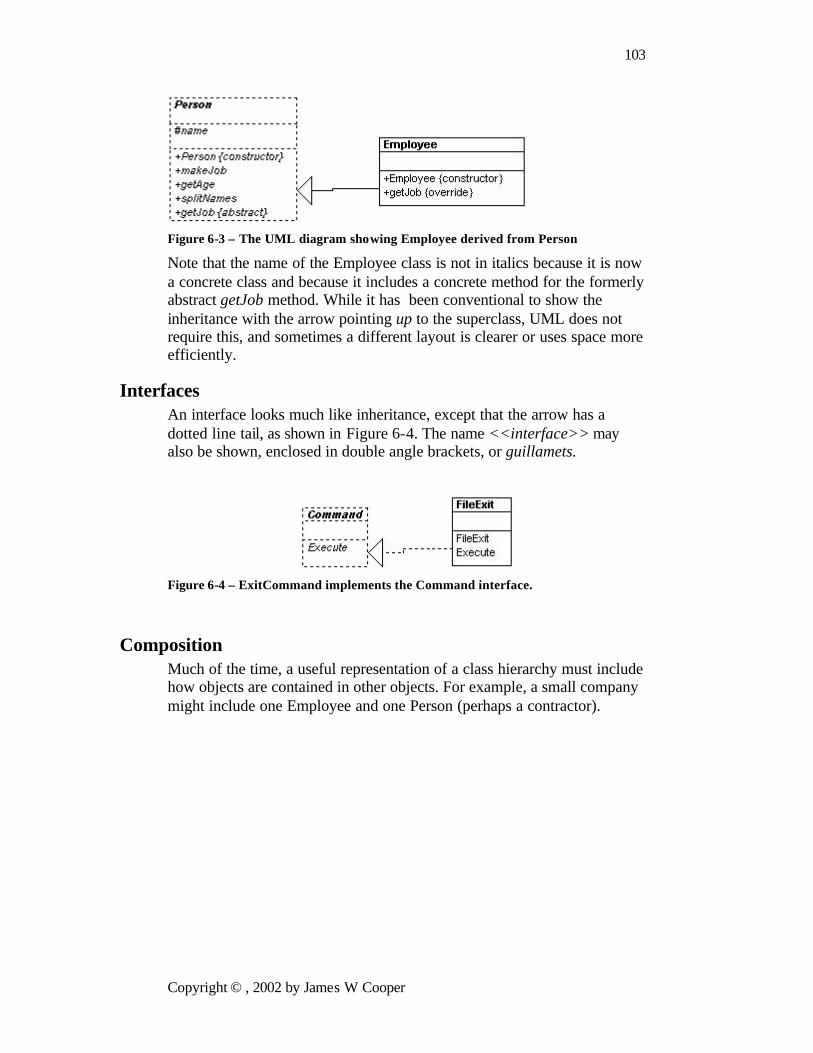
Interfaces An interface looks much like inheritance, except that the arrow has a dotted line tail, as shown in Figure 6-4. The name <<interface>> may also be shown, enclosed in double angle brackets, or guillamets.
Figure 6-4 – ExitCommand implements the Command interface.
Composition Much of the time, a useful representation of a class hierarchy must include how objects are contained in other objects. For example, a small company might include one Employee and one Person (perhaps a contractor).

Copyright © , 2002 by James W Cooper
104
public class Company { private Employee emp; private Person prs; public Company() { } } We represent this in UML, as shown in Figure 6-5.
Figure 6-5 – Company contains instances of Person and Employee.
The lines between classes show that there can be 0 to 1 instances of Person in Company and 0 to 1 instances of Employee in Company. The diamonds indicate the aggregation of classes within Company.
If there can be many instances of a class inside another, such as the array of Employees shown here public class Company { private Employee[] emps; private Empoyee emp; private Person prs; public Company() { } }
we represent that object composition as a single line with either a “*” on it or “0, *” on it, as shown in Figure 6-6.
Copyright © , 2002 by James W Cooper
105
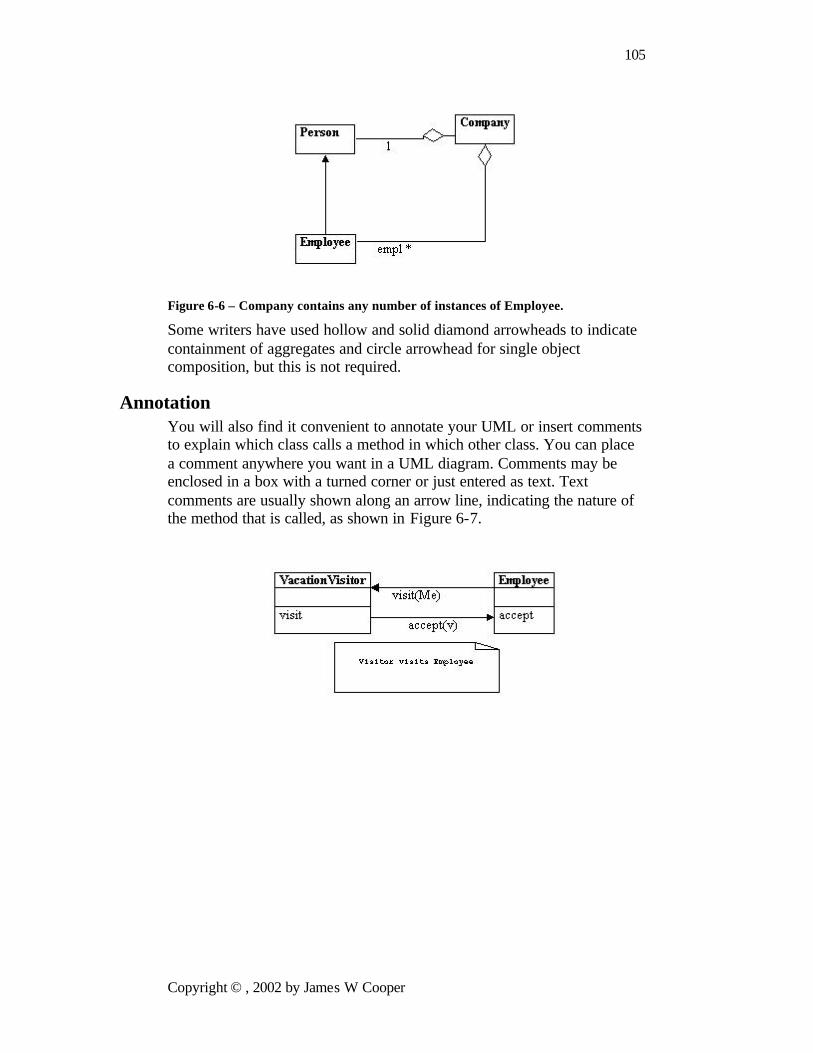
Figure 6-6 – Company contains any number of instances of Employee.
Some writers have used hollow and solid diamond arrowheads to indicate containment of aggregates and circle arrowhead for single object composition, but this is not required.
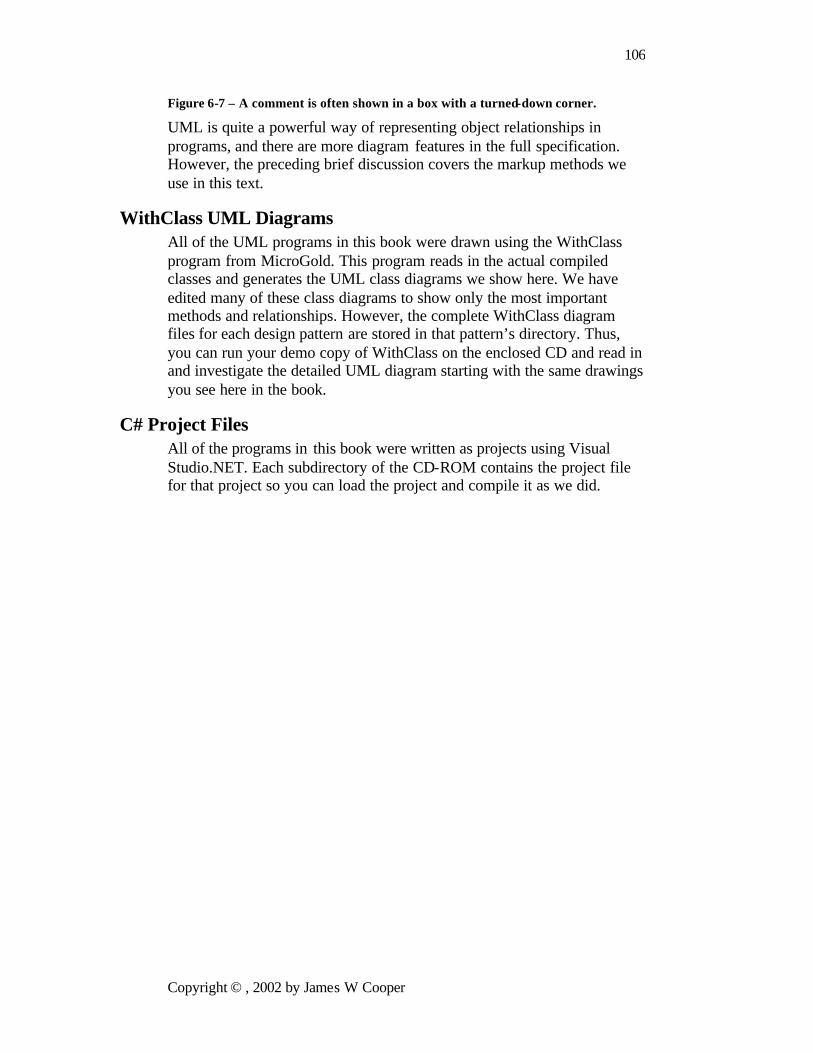
Annotation You will also find it convenient to annotate your UML or insert comments to explain which class calls a method in which other class. You can place a comment anywhere you want in a UML diagram. Comments may be enclosed in a box with a turned corner or just entered as text. Text comments are usually shown along an arrow line, indicating the nature of the method that is called, as shown in Figure 6-7.
Copyright © , 2002 by James W Cooper
106
Figure 6-7 – A comment is often shown in a box with a turned-down corner.
UML is quite a powerful way of representing object relationships in programs, and there are more diagram features in the full specification. However, the preceding brief discussion covers the markup methods we use in this text.
WithClass UML Diagrams All of the UML programs in this book were drawn using the WithClass program from MicroGold. This program reads in the actual compiled classes and generates the UML class diagrams we show here. We have edited many of these class diagrams to show only the most important methods and relationships. However, the complete WithClass diagram files for each design pattern are stored in that pattern’s directory. Thus, you can run your demo copy of WithClass on the enclosed CD and read in and investigate the detailed UML diagram starting with the same drawings you see here in the book.
C# Project Files All of the programs in this book were written as projects using Visual Studio.NET. Each subdirectory of the CD-ROM contains the project file for that project so you can load the project and compile it as we did.

Copyright © , 2002 by James W Cooper
107
7. Arrays, Files and Exceptions in C#
C# makes handling arrays and files extremely easy and introduces exceptions to simplify error handling.
Arrays In C#, all arrays are zero based. If you declare an array as int[] x = new int[10];
such arrays have 10 elements, numbered from 0 to 9. Thus, arrays are in line with the style used in C, C++ and Java. const int MAX = 10; float[] xy = new float[MAX]; for (int i = 0; i < MAX; i++ ) { xy[i] = i; } You should get into the habit of looping through arrays to the array bounds minus one as we did in the above example.
All array variables have a length property so you can find out how large the array is: float[] z = new float[20]; for (int j = 0; j< z.Length ; j++) { z[j] = j; } Arrays in C# are dynamic and space can be reallocated at any time. To create a reference to an array and allocate it later within the class, use the syntax: float z[]; //declare here z = new float[20]; //create later
Copyright © , 2002 by James W Cooper
108
Collection Objects The System.Collections namespace contains a number of useful variable length array objects you can use to add and obtain items in several ways.
ArrayLists The ArrayList object is essentially a variable length array that you can add items to as needed. The basic ArrayList methods allow you to add elements to the array and fetch and change individual elements:
float[] z = {1.0f, 2.9f, 5.6f}; ArrayList arl = new ArrayList (); for (int j = 0; j< z.Length ; j++) {
arl.Add (z[j]); }
The ArrayList has a Count property you can use to find out how many elements it contains. You can then move from 0 to that count minus one to access these elements, treating the ArrayList just as if it were an array:
for (j = 0; j < arl.Count ; j++) { Console.WriteLine (arl[j]);
}
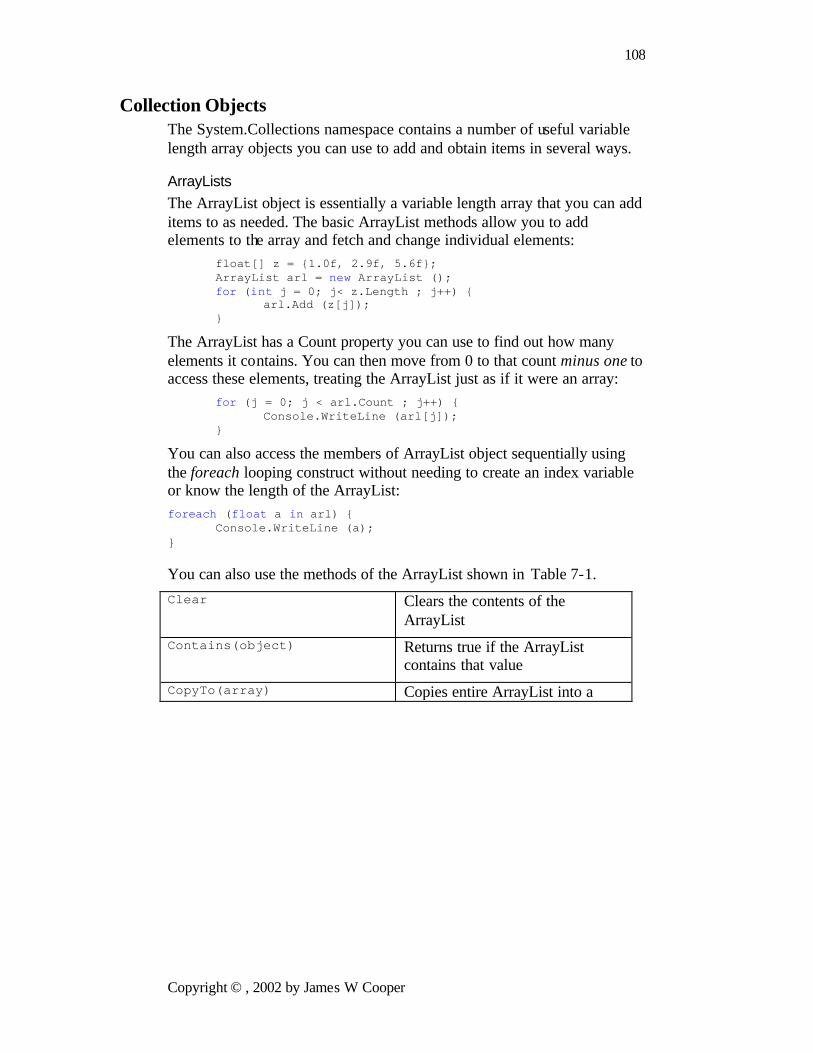
You can also access the members of ArrayList object sequentially using the foreach looping construct without needing to create an index variable or know the length of the ArrayList: foreach (float a in arl) { Console.WriteLine (a); } You can also use the methods of the ArrayList shown in Table 7-1. Clear Clears the contents of the
ArrayList Contains(object) Returns true if the ArrayList
contains that value CopyTo(array) Copies entire ArrayList into a
Copyright © , 2002 by James W Cooper
109
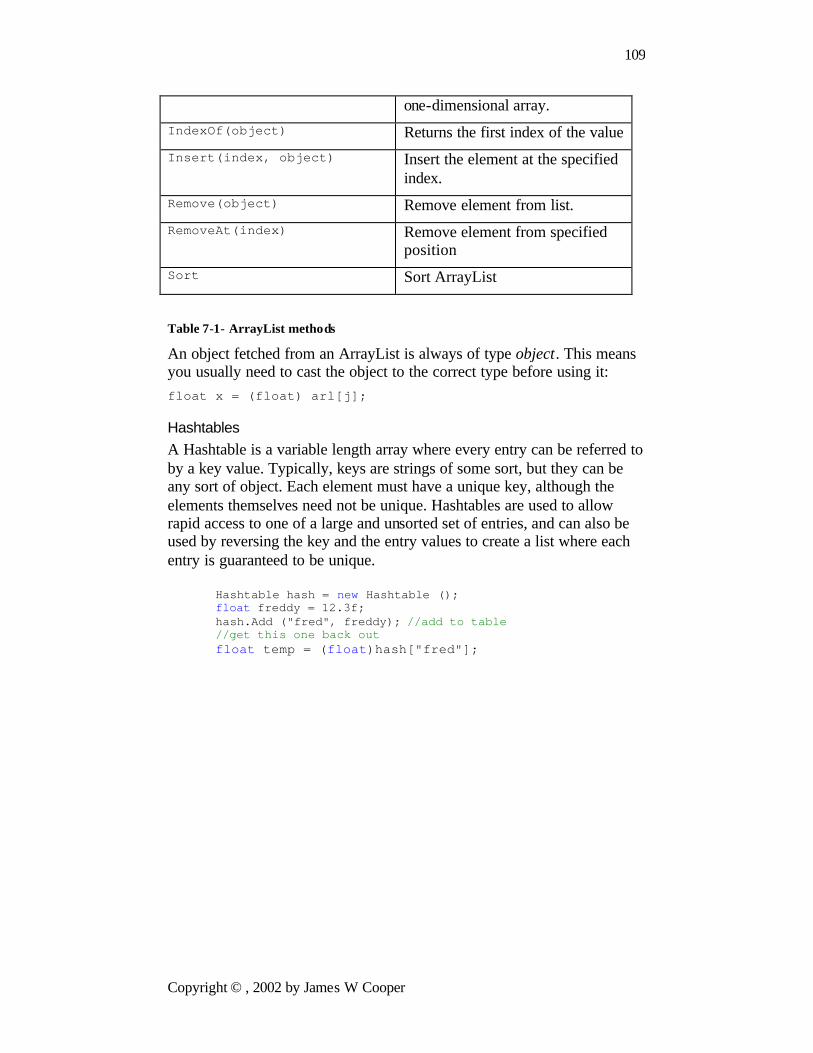
one-dimensional array. IndexOf(object) Returns the first index of the value Insert(index, object) Insert the element at the specified
index. Remove(object) Remove element from list. RemoveAt(index) Remove element from specified
position Sort Sort ArrayList
Table 7-1- ArrayList methods
An object fetched from an ArrayList is always of type object. This means you usually need to cast the object to the correct type before using it: float x = (float) arl[j];
Hashtables A Hashtable is a variable length array where every entry can be referred to by a key value. Typically, keys are strings of some sort, but they can be any sort of object. Each element must have a unique key, although the elements themselves need not be unique. Hashtables are used to allow rapid access to one of a large and unsorted set of entries, and can also be used by reversing the key and the entry values to create a list where each entry is guaranteed to be unique.
Hashtable hash = new Hashtable (); float freddy = 12.3f; hash.Add ("fred", freddy); //add to table //get this one back out float temp = (float)hash["fred"];

Copyright © , 2002 by James W Cooper
110
Note that like the ArrayList, we must cast the values we obtain from a Hashtable to the correct type. Hashtables also have a count property and you can obtain an enumeration of the keys or of the values.
SortedLists The SortedList class maintains two internal arrays, so you can obtain the elements either by zero-based index or by alphabetic key.
float sammy = 44.55f; SortedList slist = new SortedList (); slist.Add ("fred", freddy); slist.Add ("sam", sammy); //get by index float newFred = (float)slist.GetByIndex (0); //get by key float newSam = (float)slist["sam"]; You will also find the Stack and Queue objects in this namespace. They behave much as you’d expect, and you can find their methods in the system help documentation.
Exceptions Error handling in C# is accomplished using exceptions instead of other more awkward kinds of error checking. The thrust of exception handling is that you enclose the statements that could cause errors in a try block and then catch any errors using a catch statement. try { //Statements } catch (Exception e) { //do these if an error occurs } finally { //do these anyway }

Copyright © , 2002 by James W Cooper
111
Typically, you use this approach to test for errors around file handling statements, although you can also catch array index out of range statements and a large number of other error conditions. The way this works is that the statements in the try block are executed and if there is no error, control passes to the finally statements if any, and then on out of the block. If errors occur, control passes to the catch statement, where you can handle the errors, and then control passes on to the finally statements and then on out of the block.
The following example shows testing for any exception. Since we are moving one element beyond the end of the ArrayList, an error will occur: try {
//note- one too many for(int i = 0; i <= arl.Count ; i++) Console.WriteLine (arl[i]); } catch(Exception e) { Console.WriteLine (e.Message ); }
This code prints out the error message and the calling locations in the program and then goes on. 0123456789Index was out of range. Must be non-negative and less than the size of the collection. Parameter name: index at System.Collections.ArrayList.get_Item(Int32 index) at arr.Form1..ctor() in form1.cs:line 58 By contrast, if we do not catch the exception, we will get an error message from the runtime system and the program will exit instead of going on. Some of the more common exceptions are shown in Table 6-2. AccessException Error in accessing a method or
field of a class. ArgumentException Argument to a method is not
Copyright © , 2002 by James W Cooper
112
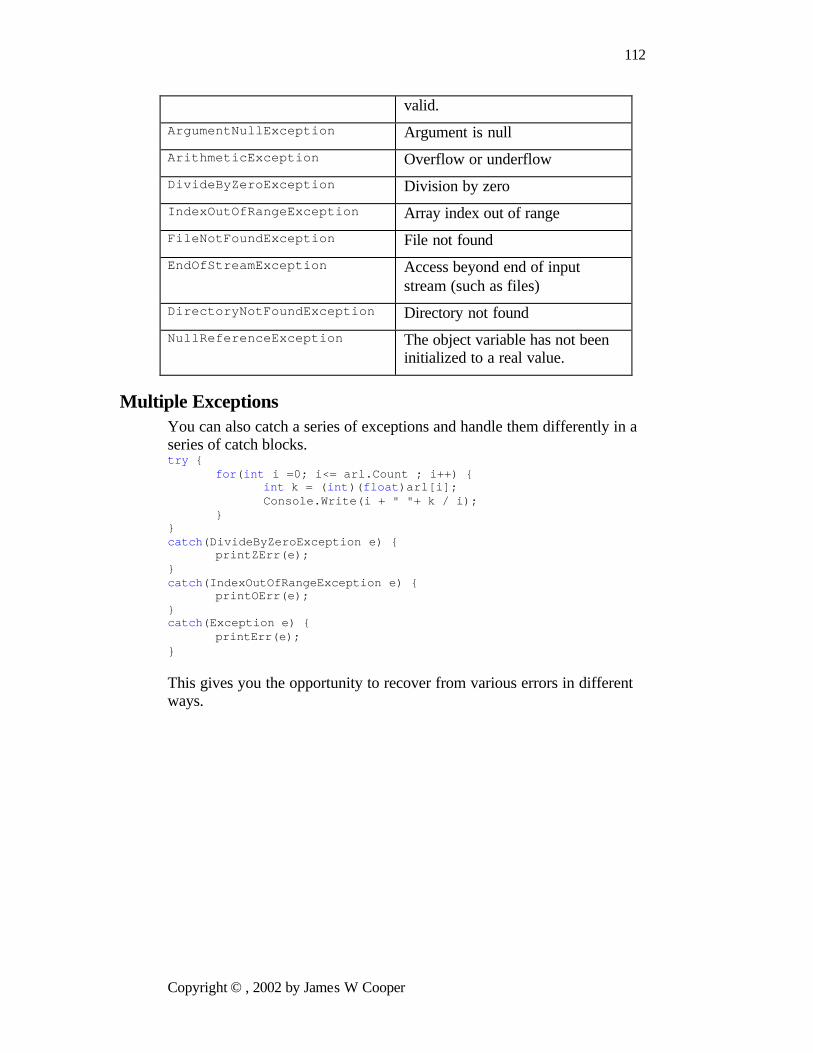
valid. ArgumentNullException Argument is null ArithmeticException Overflow or underflow DivideByZeroException Division by zero IndexOutOfRangeException Array index out of range FileNotFoundException File not found EndOfStreamException Access beyond end of input
stream (such as files) DirectoryNotFoundException Directory not found NullReferenceException The object variable has not been
initialized to a real value.
Multiple Exceptions You can also catch a series of exceptions and handle them differently in a series of catch blocks. try {
for(int i =0; i<= arl.Count ; i++) { int k = (int)(float)arl[i]; Console.Write(i + " "+ k / i); } } catch(DivideByZeroException e) { printZErr(e); } catch(IndexOutOfRangeException e) { printOErr(e); } catch(Exception e) { printErr(e); } This gives you the opportunity to recover from various errors in different ways.
Copyright © , 2002 by James W Cooper
113
Throwing Exceptions You don’t have to deal with exceptions exactly where they occur: you can pass them back to the calling program using the Throw statement. This causes the exception to be thrown in the calling program: try { //statements } catch(Exception e) { throw(e); //pass on to calling program } Note that C# does not support the Java syntax throws , that allows you to declare that a method will throw an exception and that you therefore must provide an exception handler for it.
File Handling The file handling objects in C# provide you with some fairly flexible methods of handling files.
The File Object The File object represents a file, and has useful methods for testing for a file’s existence as well as renaming and deleting a file. All of its methods are static, which means that you do not ( and cannot) create an instance of File using the new operator. Instead, you use its methods directly. if (File.Exists ("Foo.txt")) File.Delete ("foo.txt"); You can also use the File object to obtain a FileStream for reading and writing file data: //open text file for reading StreamReader ts = File.OpenText ("foo1.txt"); //open any type of file for reading FileStream fs = File.OpenRead ("foo2.any"); Some of the more useful File methods are shown in the table below:
Copyright © , 2002 by James W Cooper
114
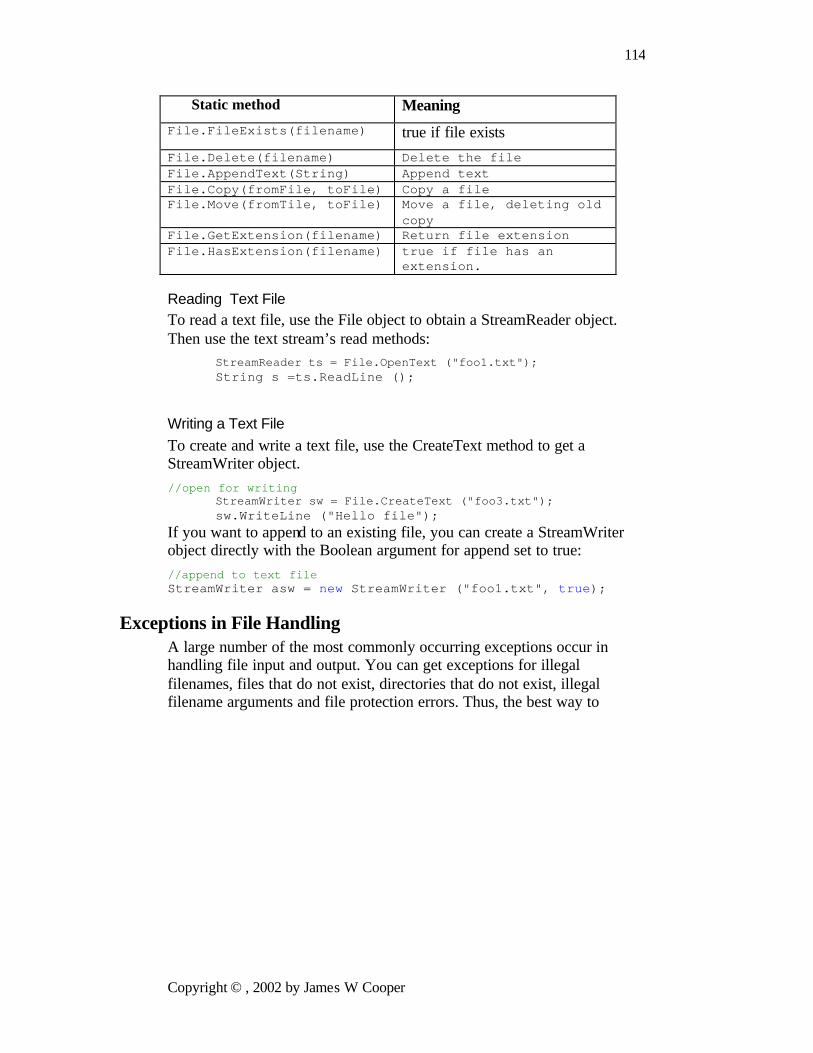
Static method Meaning File.FileExists(filename) true if file exists File.Delete(filename) Delete the file File.AppendText(String) Append text File.Copy(fromFile, toFile) Copy a file File.Move(fromTile, toFile) Move a file, deleting old
copy File.GetExtension(filename) Return file extension File.HasExtension(filename) true if file has an
extension.
Reading Text File To read a text file, use the File object to obtain a StreamReader object. Then use the text stream’s read methods:
StreamReader ts = File.OpenText ("foo1.txt"); String s =ts.ReadLine ();
Writing a Text File To create and write a text file, use the CreateText method to get a StreamWriter object. //open for writing StreamWriter sw = File.CreateText ("foo3.txt"); sw.WriteLine ("Hello file"); If you want to append to an existing file, you can create a StreamWriter object directly with the Boolean argument for append set to true: //append to text file StreamWriter asw = new StreamWriter ("foo1.txt", true);
Exceptions in File Handling A large number of the most commonly occurring exceptions occur in handling file input and output. You can get exceptions for illegal filenames, files that do not exist, directories that do not exist, illegal filename arguments and file protection errors. Thus, the best way to

Copyright © , 2002 by James W Cooper
115
handle file input and output is to enclose file manipulation code in Try blocks to assure yourself that all possible error conditions are caught, and thus prevent embarrassing fatal errors. All of the methods of the various file classes show in their documentation which methods they throw. You can assure yourself that you catch all of them by just catching the general Exception object, but if you need to take different actions for different exceptions, you can test for them separately.
For example, you might open text files in the following manner: try { //open text file for reading StreamReader ts = File.OpenText ("foo1.txt"); String s =ts.ReadLine (); } catch(Exception e ) { Console.WriteLine (e.Message ); }
Testing for End of File There are two useful ways of making sure that you do not pass the end of a text file: looking for a null exception and looking for the end of a data stream. When you read beyond then end of a text file, no error occurs and no end of file exception is thrown. However, if you read a string after the end of a file, it will return as a null value. You can use this to create an end-of-file function in a file reading class: private StreamReader rf; private bool eof; //------------ public String readLine () { String s = rf.ReadLine (); if(s == null) eof = true; return s; } //------------ public bool fEof() { return eof; }
Copyright © , 2002 by James W Cooper
116
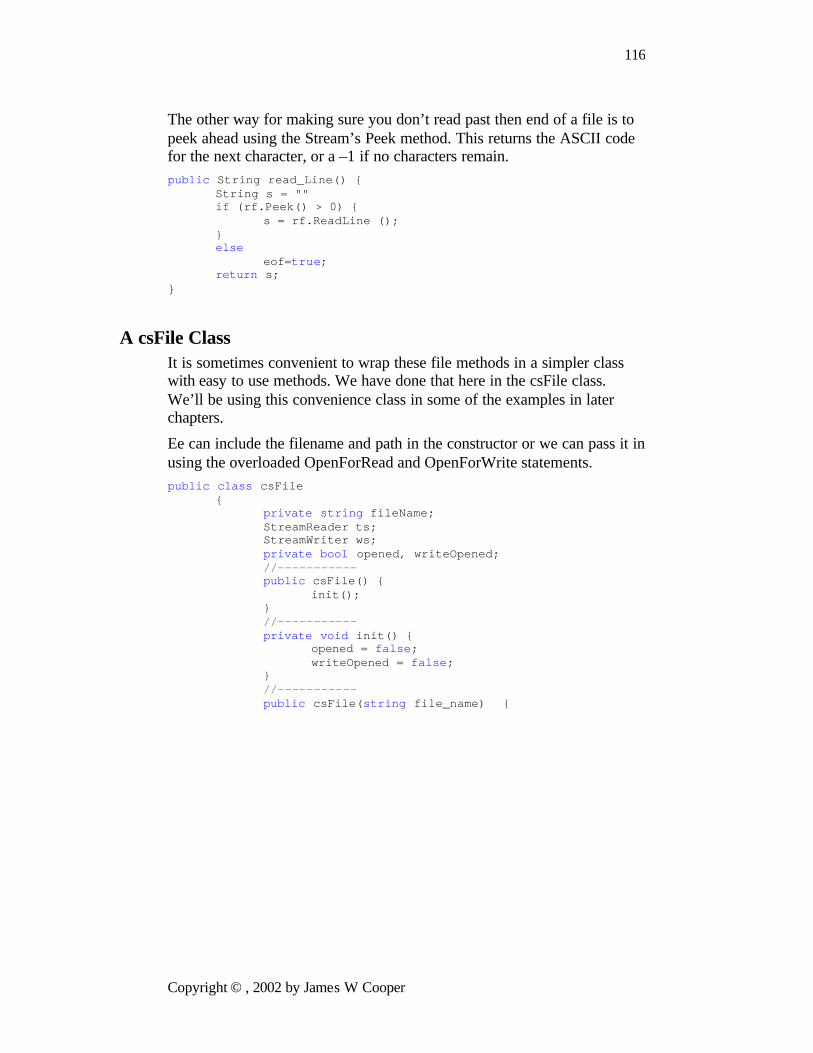
The other way for making sure you don’t read past then end of a file is to peek ahead using the Stream’s Peek method. This returns the ASCII code for the next character, or a –1 if no characters remain. public String read_Line() { String s = "" if (rf.Peek() > 0) { s = rf.ReadLine (); } else eof=true; return s; }
A csFile Class It is sometimes convenient to wrap these file methods in a simpler class with easy to use methods. We have done that here in the csFile class. We’ll be using this convenience class in some of the examples in later chapters.
Ee can include the filename and path in the constructor or we can pass it in using the overloaded OpenForRead and OpenForWrite statements. public class csFile { private string fileName; StreamReader ts; StreamWriter ws; private bool opened, writeOpened; //----------- public csFile() { init(); } //----------- private void init() { opened = false; writeOpened = false; } //----------- public csFile(string file_name) {
Copyright © , 2002 by James W Cooper
117
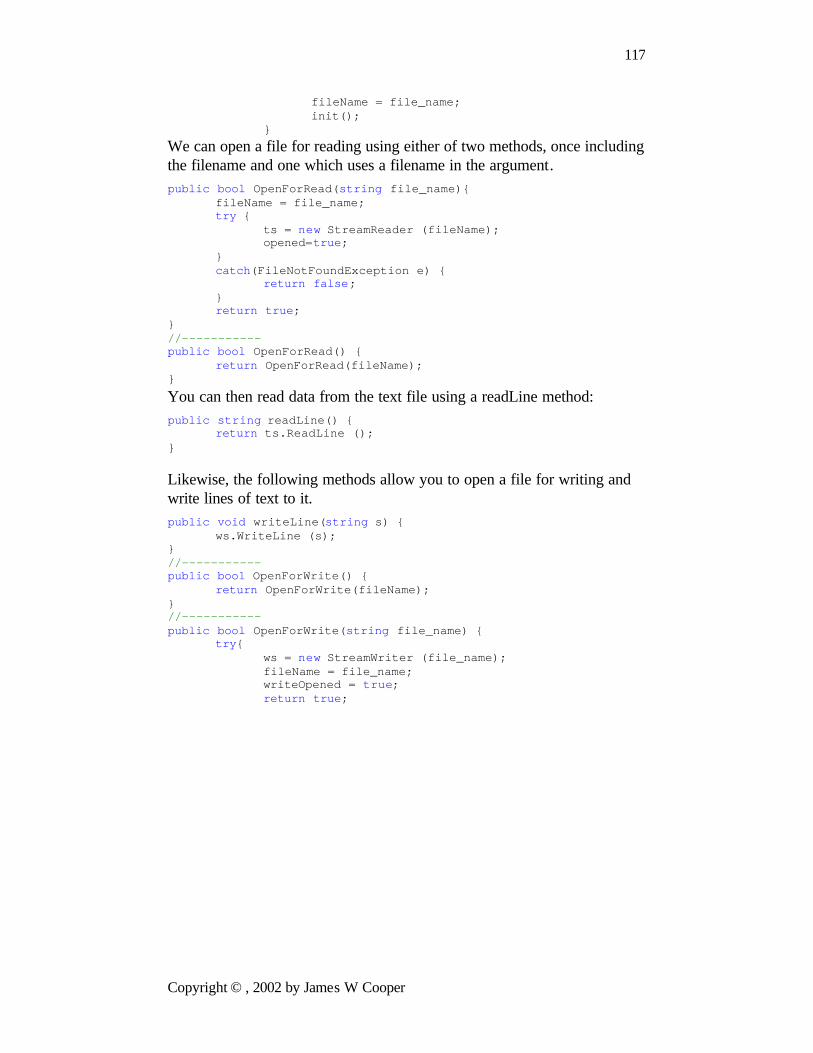
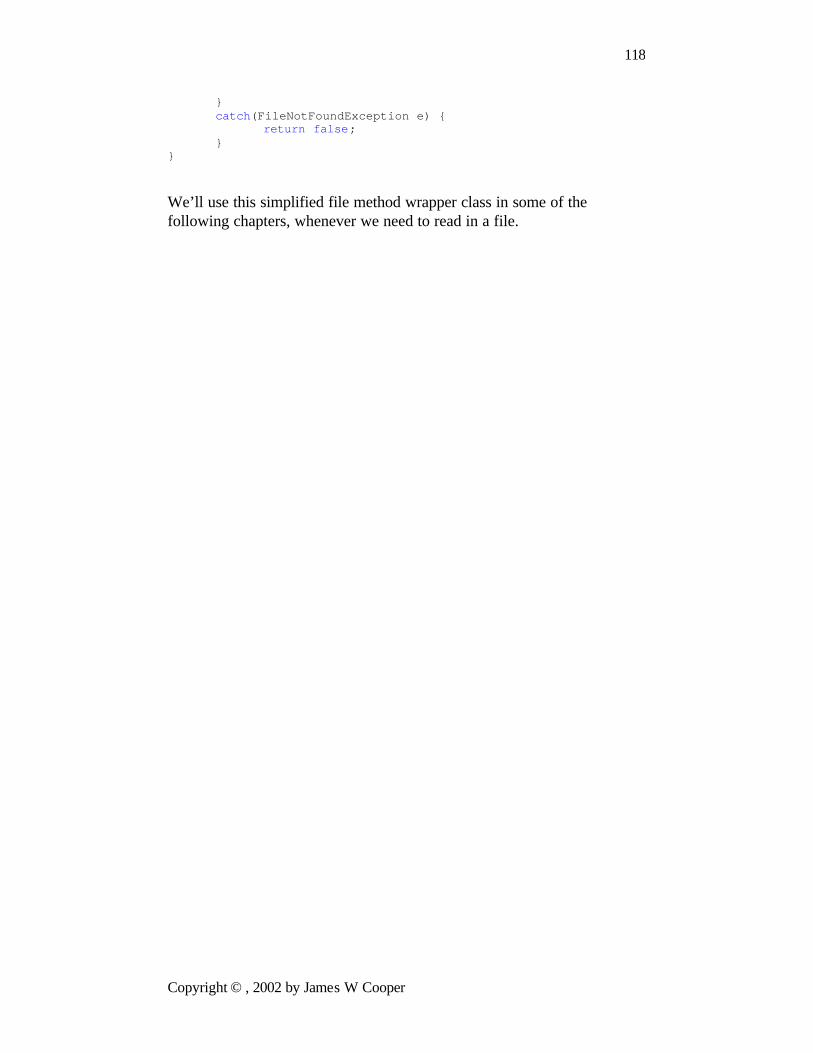
fileName = file_name; init(); } We can open a file for reading using either of two methods, once including the filename and one which uses a filename in the argument. public bool OpenForRead(string file_name){ fileName = file_name; try { ts = new StreamReader (fileName); opened=true; } catch(FileNotFoundException e) { return false; } return true; } //----------- public bool OpenForRead() { return OpenForRead(fileName); } You can then read data from the text file using a readLine method: public string readLine() { return ts.ReadLine (); } Likewise, the following methods allow you to open a file for writing and write lines of text to it. public void writeLine(string s) { ws.WriteLine (s); } //----------- public bool OpenForWrite() { return OpenForWrite(fileName); } //----------- public bool OpenForWrite(string file_name) { try{ ws = new StreamWriter (file_name); fileName = file_name; writeOpened = true; return true;
Copyright © , 2002 by James W Cooper
118
} catch(FileNotFoundException e) { return false; } } We’ll use this simplified file method wrapper class in some of the following chapters, whenever we need to read in a file.

Copyright © , 2002 by James W Cooper
119
Part 2. Creational Patterns With the foregoing description of objects, inheritance, and interfaces in hand, we are now ready to begin discussing design patterns in earnest. Recall that these are merely recipes for writing better object-oriented programs. We have divided them into the Gang of Four’s three groups: creational, structural and behavioral. We’ll start out in this section with the creational patterns.
All of the creational patterns deal with ways to create instances of objects. This is important because your program should not depend on how objects are created and arranged. In C#, of course, the simplest way to create an instance of an object is by using the new operator. Fred fred1 = new Fred(); //instance of Fred class However, this really amounts to hard coding, depending on how you create the object within your program. In many cases, the exact nature of the object that is created could vary with the needs of the program, and abstracting the creation process into a special “creator” class can make your program more flexible and general.
The Factory Method pattern provides a simple decision-making class that returns one of several possible subclasses of an abstract base class, depending on the data that are provided. We’ll start with the Simple Factory pattern as an introduction to factories and then introduce the Factory Method Pattern as well.
The Abstract Factory pattern provides an interface to create and return one of several families of related objects.
The Builder pattern separates the construction of a complex object from its representation so that several different representations can be created, depending on the needs of the program.

Copyright © , 2002 by James W Cooper
120
The Prototype pattern starts with an instantiated class and copies or clones it to make new instances. These instances can then be further tailored using their public methods.
The Singleton pattern is a class of which there can be no more than one instance. It provides a single global point of access to that instance.

Copyright © , 2002 by James W Cooper
121
8. The Simple Factory Pattern
One type of pattern that we see again and again in OO programs is the Simple Factory pattern. A Simple Factory pattern is one that returns an instance of one of several possible classes, depending on the data provided to it. Usually all of the classes it returns have a common parent class and common methods, but each of them performs a task differently and is optimized for different kinds of data. This Simple Factory is not, in fact, one of the 23 GoF patterns, but it serves here as an introduction to the somewhat more subtle Factory Method GoF pattern we’ll discuss shortly.
How a Simple Factory Works To understand the Simple Factory pattern, let’s look at the diagram in Figure 8-1.
X
doIt( )
XY
doIt( )
XZ
doIt( )
XFactory
+getClass(as Integer):X
Produces different instances of X
Figure 8-1– A Simple Factory pattern
In this figure, X is a base class, and classes XY and XZ are derived from it. The XFactory class decides which of these subclasses to return, depending on the arguments you give it. On the right, we define a getClass method to be one that passes in some value abc and that returns some instance of the class x. Which one it returns doesn't matter to the programmer, since they all have the same methods but different implementations. How it decides which one to return is

Copyright © , 2002 by James W Cooper
122
entirely up to the factory. It could be some very complex function, but it is often quite simple.
Sample Code Let's consider a simple C# case where we could use a Factory class. Suppose we have an entry form and we want to allow the user to enter his name either as “firstname lastname” or as “lastname, firstname.” We’ll make the further simplifying assumption that we will always be able to decide the name order by whether there is a comma between the last and first name.
This is a pretty simple sort of decision to make, and you could make it with a simple if statement in a single class, but let’s use it here to illustrate how a factory works and what it can produce. We’ll start by defining a simple class that takes the name string in using the constructor and allows you to fetch the names back. //Base class for getting split names public class Namer { //parts stored here protected string frName, lName; //return first name public string getFrname(){ return frName; } //return last name public string getLname() { return lName; } } Note that our base class has no constructor.
The Two Derived Classes Now we can write two very simple derived classes that implement that interface and split the name into two parts in the constructor. In the FirstFirst class, we make the simplifying assumption that everything before the last space is part of the first name. public class FirstFirst : Namer { public FirstFirst(string name) { int i = name.IndexOf (" "); if(i > 0) {
frName = name.Substring (0, i).Trim ();
Copyright © , 2002 by James W Cooper
123
lName = name.Substring (i + 1).Trim (); } else { lName = name; frName = "";
} }
} And in the LastFirst class, we assume that a comma delimits the last name. In both classes, we also provide error recovery in case the space or comma does not exist. public class LastFirst : Namer { public LastFirst(string name) { int i = name.IndexOf (","); if(i > 0) { lName = name.Substring (0, i); frName = name.Substring (i + 1).Trim (); } else { lName = name; frName = ""; } } } In both cases, we store the split name in the protected lName and frName variables in the base Namer class. Note that we don’t even need any getFrname or getLname methods, since we have already written them in the base class.
Building the Simple Factory Now our Simple Factory class is easy to write. We just test for the existence of a comma and then return an instance of one class or the other. public class NameFactory { public NameFactory() {} public Namer getName(string name) { int i = name.IndexOf (","); if(i > 0) return new LastFirst (name); else return new FirstFirst (name); } }

Copyright © , 2002 by James W Cooper
124
Using the Factory Let’s see how we put this together. In response to the Compute button click, we use an instance of the NameFactory to return the correct derived class. private void btCompute_Click(
object sender, System.EventArgs e) { Namer nm = nameFact.getName (txName.Text ); txFirst.Text = nm.getFrname (); txLast.Text = nm.getLname (); } Then we call the getFrname and getLname methods to get the correct splitting of the name. We don’t need to know which derived class this is: the Factory has provided it for us, and all we need to know is that it has the two get methods.
The complete class diagram is shown in Figure 8-2.
Figure 8-2– The Namer factory program
We have constructed a simple user interface that allows you to enter the names in either order and see the two names separately displayed. You can see this program in Figure 8-3.

Copyright © , 2002 by James W Cooper
125
Figure 8-3 –The Namer program executing
You type in a name and then click on the Get name button, and the divided name appears in the text fields below. The crux of this program is the compute method that fetches the text, obtains an instance of a Namer class, and displays the results.
And that’s the fundamental principle of the Simple Factory pattern. You create an abstraction that decides which of several possible classes to return, and it returns one. Then you call the methods of that class instance without ever knowing which subclass you are actually using. This approach keeps the issues of data dependence separated from the classes’ useful methods.
Factory Patterns in Math Computation Most people who use Factory patterns tend to think of them as tools for simplifying tangled programming classes. But it is perfectly possible to use them in programs that simply perform mathematical computations. For example, in the Fast Fourier Transform (FFT), you evaluate the following four equations repeatedly for a large number of point pairs

Copyright © , 2002 by James W Cooper
126
over many passes through the array you are transforming. Because of the way the graphs of these computations are drawn, the following four equations constitute one instance of the FFT “butterfly.” These are shown as Equations 1-4.
(1)
(2)
(3)
(4)
However, there are a number of times during each pass through the data where the angle y is zero. In this case, your complex math evaluation reduces to Equations (5-8).
(5) (6)
(7)
(8)
We first define a class to hold complex numbers: public class Complex { float real; float imag; //--------------------------------- public Complex(float r, float i) { real = r; imag = i; } //--------------------------------- public void setReal(float r) { real = r;} //--------------------------------- public void setImag(float i) {imag= i;} //--------------------------------- public float getReal() {return real;} //--------------------------------- public float getImag() {return imag;} } Our basic Buttefly class is an abstract class that can be filled in by one of the implementations of the Execute command: public abstract class Butterfly {
)cos()sin()cos()sin()sin()cos()sin()cos(
221'2
221'1
221'2
221'1
yIyRIIyIyRIIyIyRRRyIyRRR
−−=++=+−=−+=
21'2
21'1
21'2
21'1
IIIIIIRRRRRR
−=+=−=+=
Copyright © , 2002 by James W Cooper
127
float y; public Butterfly() { } public Butterfly(float angle) { y = angle; } abstract public void Execute(Complex x, Complex y); } We can then make a simple addition Butterfly class which implements the add and subtract methods of equations 5-8: class addButterfly : Butterfly { float oldr1, oldi1; public addButterfly(float angle) { } public override void Execute(Complex xi, Complex xj) { oldr1 = xi.getReal(); oldi1 = xi.getImag(); xi.setReal(oldr1 + xj.getReal()); xj.setReal(oldr1 - xj.getReal()); xi.setImag(oldi1 + xj.getImag()); xj.setImag(oldi1 - xj.getImag()); } } The TrigButterfly class is analogous except that the Execute method contains the actual trig functions of Equations 1-4: public class TrigButterfly:Butterfly { float y, oldr1, oldi1; float cosy, siny; float r2cosy, r2siny, i2cosy, i2siny; public TrigButterfly(float angle) { y = angle; cosy = (float) Math.Cos(y); siny = (float)Math.Sin(y); } public override void Execute(Complex xi, Complex xj) { oldr1 = xi.getReal(); oldi1 = xi.getImag(); r2cosy = xj.getReal() * cosy; r2siny = xj.getReal() * siny; i2cosy = xj.getImag()*cosy; i2siny = xj.getImag()*siny; xi.setReal(oldr1 + r2cosy +i2siny); xi.setImag(oldi1 - r2siny +i2cosy); xj.setReal(oldr1 - r2cosy - i2siny); xj.setImag(oldi1 + r2siny - i2cosy); }

Copyright © , 2002 by James W Cooper
128
} Then we can make a simple factory class that decides which class instance to return. Since we are making Butterflies, we’ll call our Factory a Cocoon. We never really need to instantiate Cocoon, so we will make its one method static: public class Cocoon { static public Butterfly getButterfly(float y) { if (y != 0) return new TrigButterfly(y); else return new addButterfly(y); } }
Programs on the CD-ROM \Factory\Namer The name factory \Factory\FFT A FFT example
Thought Questions 1. Consider a personal checkbook management program like Quicken.
It manages several bank accounts and investments and can handle your bill paying. Where could you use a Factory pattern in designing a program like that?
2. Suppose you are writing a program to assist homeowners in designing additions to their houses. What objects might a Factory be used to produce?

Copyright © , 2002 by James W Cooper
129
9. The Factory Method
We’ve just seen a couple of examples of the simplest of factories. The factory concept recurs all throughout object-oriented programming, and we find a few examples embedded in C# itself and in other design patterns (such as the Builder pattern). In these cases a single class acts as a traffic cop and decides which subclass of a single hierarchy will be instantiated.
The Factory Method pattern is a clever but subtle extension of this idea, where no single class makes the decision as to which subclass to instantiate. Instead, the superclass defers the decision to each subclass. This pattern does not actually have a decision point where one subclass is directly selected over another class. Instead, programs written to this pattern define an abstract class that creates objects but lets each subclass decide which object to create.
We can draw a pretty simple example from the way that swimmers are seeded into lanes in a swim meet. When swimmers compete in multiple heats in a given event, they are sorted to compete from slowest in the early heats to fastest in the last heat and arranged within a heat with the fastest swimmers in the center lanes. This is referred to as straight seeding.
Now, when swimmers swim in championships, they frequently swim the event twice. During preliminaries everyone competes, and the top 12 or 16 swimmers return to compete against each other at finals. In order to make the preliminaries more equitable, the top heats are circle seeded: The fastest three swimmers are in the center lane in the fastest three heats, the second fastest three swimmers are in the next to center lane in the top three heats, and so forth
So, how do we build some objects to implement this seeding scheme and illustrate the Factory Method. First, let’s design an abstract Event class. public abstract class Event { protected int numLanes; protected ArrayList swimmers;

Copyright © , 2002 by James W Cooper
130
public Event(string filename, int lanes) { numLanes = lanes; swimmers = new ArrayList(); //read in swimmers from file csFile f = new csFile(filename); f.OpenForRead (); string s = f.readLine(); while (s != null) { Swimmer sw = new Swimmer(s); swimmers.Add (sw); s = f.readLine(); } f.close(); } public abstract Seeding getSeeding(); public abstract bool isPrelim(); public abstract bool isFinal(); public abstract bool isTimedFinal(); } Note that this class is not entirely without content. Since all the derived classes will need to read data from a file, we put that code in the base class.
These abstract methods simply show the rest of a complete implementation of and Event class. Then we can implement concrete classes from the Event class, called PrelimEvent and TimedFinalEvent. The only difference between these classes is that one returns one kind of seeding and the other returns a different kind of seeding.
We also define an abstract Seeding class with the following methods. public abstract class Seeding { protected int numLanes; protected int[] lanes; public abstract IEnumerator getSwimmers(); public abstract int getCount(); public abstract int getHeats(); protected abstract void seed(); //-------------------------------- protected void calcLaneOrder() {
//complete code on CD
Copyright © , 2002 by James W Cooper
131
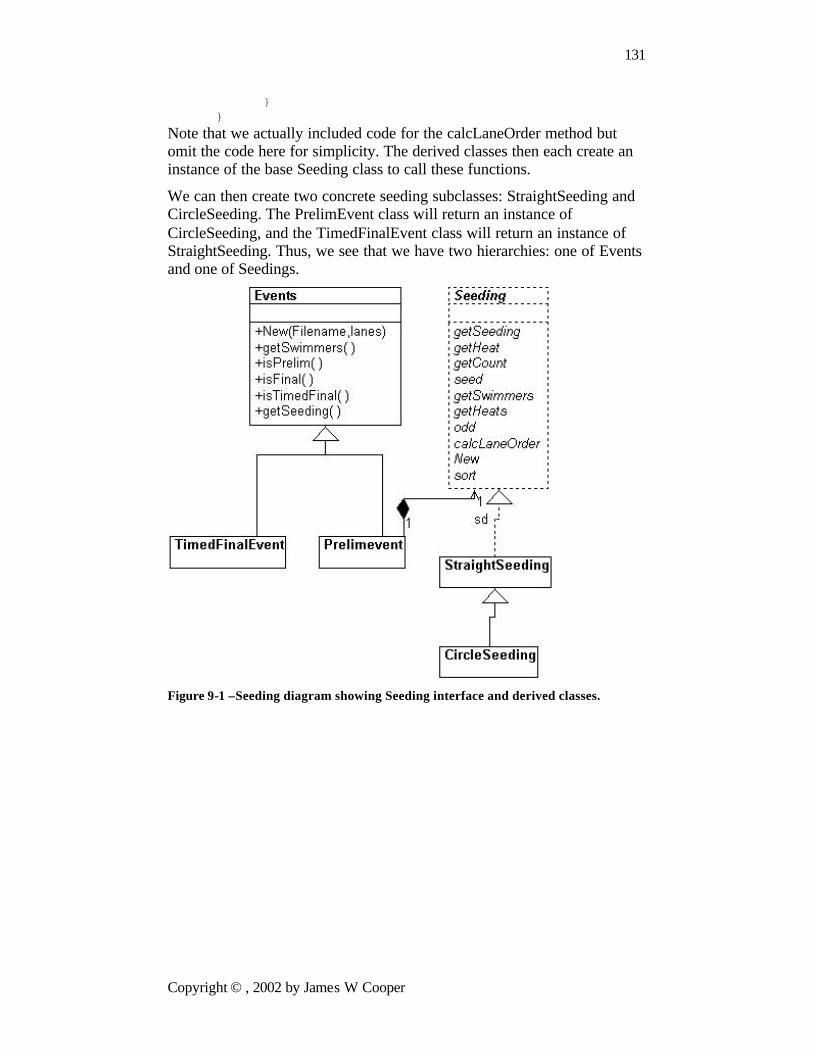
} } Note that we actually included code for the calcLaneOrder method but omit the code here for simplicity. The derived classes then each create an instance of the base Seeding class to call these functions.
We can then create two concrete seeding subclasses: StraightSeeding and CircleSeeding. The PrelimEvent class will return an instance of CircleSeeding, and the TimedFinalEvent class will return an instance of StraightSeeding. Thus, we see that we have two hierarchies: one of Events and one of Seedings.
Figure 9-1 –Seeding diagram showing Seeding interface and derived classes.

Copyright © , 2002 by James W Cooper
132
In the Events hierarchy, you will see that both derived Events classes contain a getSeeding method. One of them returns an instance of StraightSeeding and the other an instance of CircleSeeding. So you see, there is no real factory decision point as we had in our simple example. Instead, the decision as to which Event class to instantiate is the one that determines which Seeding class will be instantiated.
While it looks like there is a one-to-one correspondence between the two class hierarchies, there needn’t be. There could be many kinds of Events and only a few kinds of Seeding used.
The Swimmer Class We haven’t said much about the Swimmer class, except that it contains a name, club age, seed time, and place to put the heat and lane after seeding. The Event class reads in the Swimmers from some database (a file in our example) and then passes that collection to the Seeding class when you call the getSeeding method for that event.
The Events Classes We have seen the previous abstract base Events class. In actual use, we use it to read in the swimmer data and pass it on to instances of the Swimmer class to parse.
The base Event class has empty methods for whether the event is a prelim, final, or timed final event. We fill in the event in the derived classes.
Our PrelimEvent class just returns an instance of CircleSeeding. public class PrelimEvent:Event { public PrelimEvent(string filename, int lanes):
base(filename,lanes) {} //return circle seeding public override Seeding getSeeding() { return new CircleSeeding(swimmers, numLanes); } public override bool isPrelim() { return true;

Copyright © , 2002 by James W Cooper
133
} public override bool isFinal() { return false; } public override bool isTimedFinal() { return false; } } Our TimedFinalEvent class returns an instance of StraightSeeding. public class TimedFinalEvent:Event { public TimedFinalEvent(string filename,
int lanes):base(filename, lanes) {} //return StraightSeeding class public override Seeding getSeeding() { return new StraightSeeding(swimmers, numLanes); }
public override bool isPrelim() { return false; } public override bool isFinal() { return false; } public override bool isTimedFinal() { return true; } } In both cases our events classes contain an instance of the base Events class, which we use to read in the data files.
Straight Seeding In actually writing this program, we’ll discover that most of the work is done in straight seeding. The changes for circle seeding are pretty minimal. So we instantiate our StraightSeeding class and copy in the Collection of swimmers and the number of lanes. protected override void seed() { //loads the swmrs array and sorts it sortUpwards();

Copyright © , 2002 by James W Cooper
134
int lastHeat = count % numLanes; if (lastHeat < 3) lastHeat = 3; //last heat must have 3 or more int lastLanes = count - lastHeat; numHeats = count / numLanes; if (lastLanes > 0) numHeats++; int heats = numHeats; //place heat and lane in each swimmer's object //Add in last partial heat //copy from array back into ArrayList
//details on CDROM } This makes the entire array of seeded Swimmers available when you call the getSwimmers method.
Circle Seeding The CircleSeeding class is derived from StraightSeeding, so it starts by calling the parent class’s seed method and then rearranges the top heats protected override void seed() { int circle; base.seed(); //do straight seed as default if (numHeats >= 2 ) { if (numHeats >= 3) circle = 3; else circle = 2; int i = 0; for (int j = 0; j < numLanes; j++) { for (int k = 0; k < circle; k++) { swmrs[i].setLane(lanes[j]); swmrs[i++].setHeat(numHeats - k); } } }
Our Seeding Program In this example, we took a list of swimmers from the Web who competed in the 500-yard freestyle and the 100-yard freestyle and used them to build

Copyright © , 2002 by James W Cooper
135
our TimedFinalEvent and PrelimEvent classes. You can see the results of these two seedings in Figure 9-2. In the left box, the 500 Free event is selected, and you can see that the swimmers are seeded in strainght seeing from slowest to fastest. In the right box, the 100 Free event is selected and is circle seeded, with the last 3 heats seeded in a rotating fashion.
Figure 9-2– Straight seeding of the 500 free and circle seeding of the 100 free
Other Factories Now one issue that we have skipped over is how the program that reads in the swimmer data decides which kind of event to generate. We finesse this here by simply creating the correct type of event when we read in the data. This code is in our init method of our form: private void init() { //create array of events events = new ArrayList (); lsEvents.Items.Add ("500 Free"); lsEvents.Items.Add ("100 Free"); //and read in their data events.Add (new TimedFinalEvent ("500free.txt", 6)); events.Add (new PrelimEvent ("100free.txt", 6)); }
Copyright © , 2002 by James W Cooper
136
Clearly, this is an instance where an EventFactory may be needed to decide which kind of event to generate. This revisits the simple factory with which we began the discussion.
When to Use a Factory Method You should consider using a Factory method in the following situations.
• A class can’t anticipate which kind of class of objects it must create.
• A class uses its subclasses to specify which objects it creates.
• You want to localize the knowledge of which class gets created.
There are several variations on the factory pattern to recognize.
1. The base class is abstract and the pattern must return a complete working class.
2. The base class contains default methods and these methods are called unless the default methods are insufficient.
3. Parameters are passed to the factory telling it which of several class types to return. In this case the classes may share the same method names but may do something quite different.
Thought Question Seeding in track is carried out from inside to outside lanes. What classes would you need to develop to carry out tracklike seeding as well?
Programs on the CD-ROM \FactoryMethod\Seeder Seeding program

Copyright © , 2002 by James W Cooper
137
10. The Abstract Factory Pattern
The Abstract Factory pattern is one level of abstraction higher than the factory pattern. You can use this pattern when you want to return one of several related classes of objects, each of which can return several different objects on request. In other words, the Abstract Factory is a factory object that returns one of several groups of classes. You might even decide which class to return from that group using a Simple Factory.
Common thought experiment-style examples might inc lude automobile factories. You would expect a Toyota factory to work exclusively with Toyota parts and a Ford factory to use Ford parts. You can consider each auto factory as an Abstract Factory and the parts the groups of related classes.
A GardenMaker Factory Let’s consider a practical example where you might want to use the abstract factory in your application. Suppose you are writing a program to plan the layout of gardens. These could be gardens consisting of annuals, vegetables, or perennials. However, no matter which kind of garden you are planning, you want to ask the same questions.
1. What are good border plants?
2. What are good center plants?
3.What plants do well in partial shade?
(And probably a lot more plant questions that we won’t get into here.)
We want a base C# Garden class that can answer these questions as class methods. public class Garden { protected Plant center, shade, border; protected bool showCenter, showShade, showBorder; //select which ones to display public void setCenter() {showCenter = true;}

Copyright © , 2002 by James W Cooper
138
public void setBorder() {showBorder =true;} public void setShade() {showShade =true;} //draw each plant public void draw(Graphics g) { if (showCenter) center.draw (g, 100, 100); if (showShade) shade.draw (g, 10, 50); if (showBorder) border.draw (g, 50, 150); } }
Our Plant object sets the name and draws itself when its draw method is called. public class Plant { private string name; private Brush br; private Font font; public Plant(string pname) { name = pname; //save name font = new Font ("Arial", 12); br = new SolidBrush (Color.Black ); } //------------- public void draw(Graphics g, int x, int y) { g.DrawString (name, font, br, x, y); } } In Design Patterns terms, the Garden interface is the Abstract Factory. It defines the methods of concrete class that can return one of several classes. Here, we return central, border, and shade- loving plants as those three classes. The abstract factory could also return more specific garden information, such as soil pH or recommended moisture content.
In a real system, each type of garden would probably consult an elaborate database of plant information. In our simple example we’ll return one kind of each plant. So, for example, for the vegetable garden we simply write the following. public class VeggieGarden : Garden { public VeggieGarden() { shade = new Plant("Broccoli"); border = new Plant ("Peas");
Copyright © , 2002 by James W Cooper
139
center = new Plant ("Corn"); } }
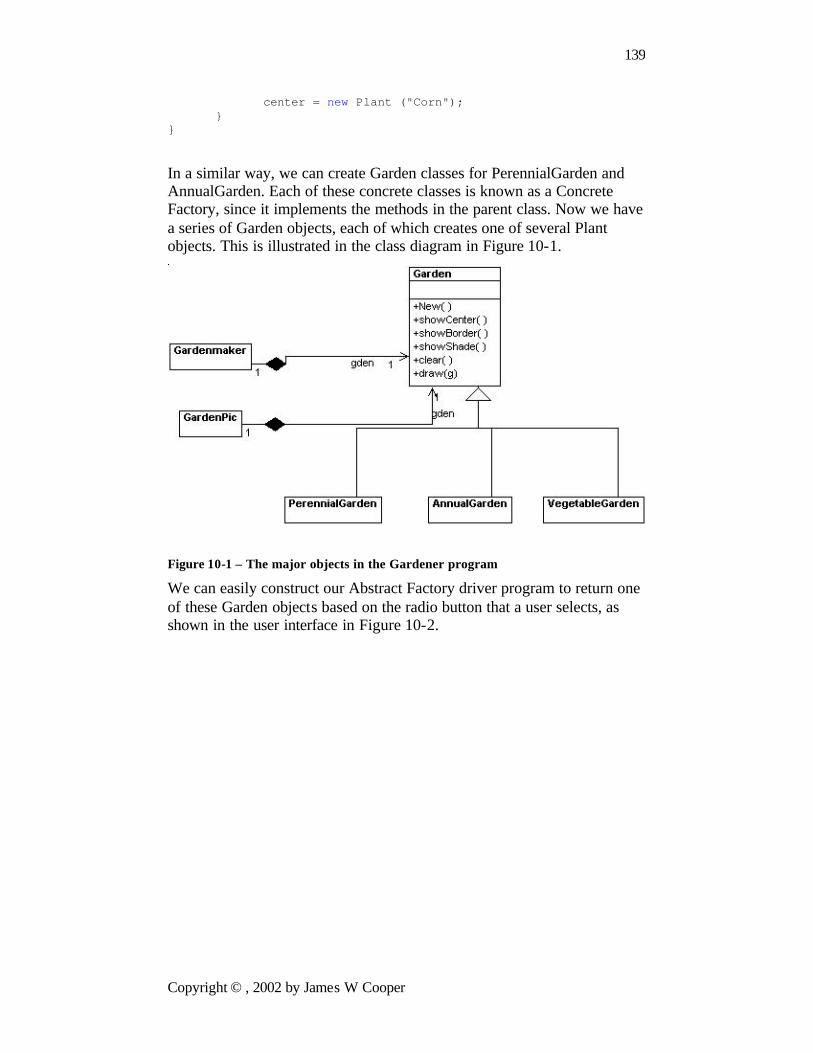
In a similar way, we can create Garden classes for PerennialGarden and AnnualGarden. Each of these concrete classes is known as a Concrete Factory, since it implements the methods in the parent class. Now we have a series of Garden objects, each of which creates one of several Plant objects. This is illustrated in the class diagram in Figure 10-1.
Figure 10-1 – The major objects in the Gardener program
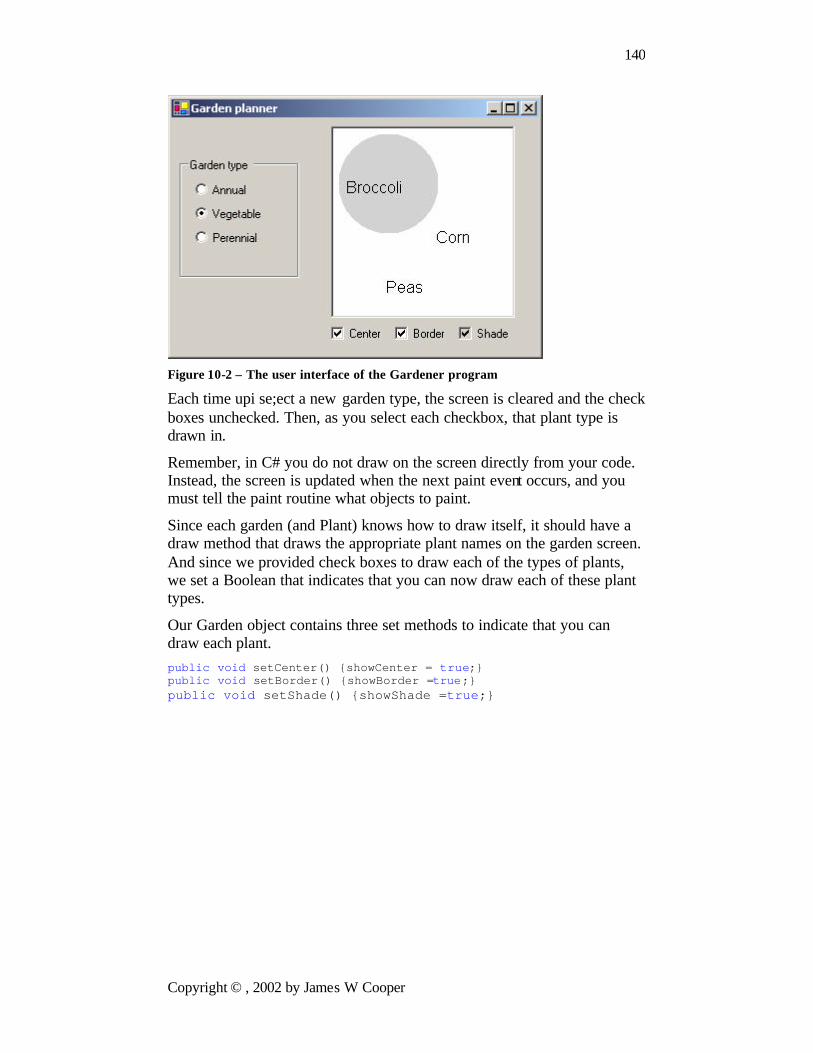
We can easily construct our Abstract Factory driver program to return one of these Garden objects based on the radio button that a user selects, as shown in the user interface in Figure 10-2.
Copyright © , 2002 by James W Cooper
140
Figure 10-2 – The user interface of the Gardener program
Each time upi se;ect a new garden type, the screen is cleared and the check boxes unchecked. Then, as you select each checkbox, that plant type is drawn in.
Remember, in C# you do not draw on the screen directly from your code. Instead, the screen is updated when the next paint event occurs, and you must tell the paint routine what objects to paint.
Since each garden (and Plant) knows how to draw itself, it should have a draw method that draws the appropriate plant names on the garden screen. And since we provided check boxes to draw each of the types of plants, we set a Boolean that indicates that you can now draw each of these plant types.
Our Garden object contains three set methods to indicate that you can draw each plant. public void setCenter() {showCenter = true;} public void setBorder() {showBorder =true;} public void setShade() {showShade =true;}

Copyright © , 2002 by James W Cooper
141
The PictureBox We draw the circle representing the shady area inside the PictureBox and draw the names of the plants inside this box as well. This is best accomplished by deriving a new GardenPic class from PictureBox and giving it the knowledge to draw the circle and the garden plant names, Thus, we need to add a paint method not to the main GardenMaker window class but to the PictureBox it contains. This thus overrides the base OnPaint event of the underlying Control class. public class GdPic : System.Windows.Forms.PictureBox { private Container components = null; private Brush br; private Garden gden;
//----------- private void init () { br = new SolidBrush (Color.LightGray ); }
//----------- public GdPic() { InitializeComponent(); init(); }
//----------- public void setGarden(Garden garden) { gden = garden; }
//----------- protected override void OnPaint ( PaintEventArgs pe ){ Graphics g = pe.Graphics; g.FillEllipse (br, 5, 5, 100, 100); if(gden != null) gden.draw (g); } Note that we do not have to erase the plant name text each time because OnPaint is only called when the whole picture needs to be repainted.

Copyright © , 2002 by James W Cooper
142
Handling the RadioButton and Button Events When one of the three radio buttons is clicked, you create a new garden of the correct type and pass it into the picture box class. You also clear all the checkboxes. private void opAnnual_CheckedChanged(
object sender, EventArgs e) { setGarden( new AnnualGarden ()); } //----- private void opVegetable_CheckedChanged(
object sender, EventArgs e) { setGarden( new VeggieGarden ()); } //----- private void opPerennial_CheckedChanged(
object sender, EventArgs e) { setGarden( new PerennialGarden ()); } //----- private void setGarden(Garden gd) { garden = gd; //save current garden gdPic1.setGarden ( gd); //tell picture bos gdPic1.Refresh (); //repaint it ckCenter.Checked =false; //clear all ckBorder.Checked = false; //check ckShade.Checked = false; //boxes }
When you click on one of the check boxes to show the plant names, you simply call that garden’s method to set that plant name to be displayed and then call the picture box’s Refresh method to cause it to repaint. private void ckCenter_CheckedChanged(
object sender, System.EventArgs e) { garden.setCenter (); gdPic1.Refresh (); } //----- private void ckBorder_CheckedChanged(
object sender, System.EventArgs e) { garden.setBorder(); gdPic1.Refresh ();

Copyright © , 2002 by James W Cooper
143
} //----- private void ckShade_CheckedChanged(
object sender, System.EventArgs e) { garden.setShade (); gdPic1.Refresh (); } The final C# Gardener class UML diagram is shown in Figure 10-3.
Figure 10-3 – The UML diagram for the Gardener program.
Adding More Classes One of the great strengths of the Abstract Factory is that you can add new subclasses very easily. For example, if you needed a GrassGarden or a WildFlowerGarden, you can subclass Garden and produce these classes. The only real change you’d need to make in any existing code is to add some way to choose these new kinds of gardens.
Copyright © , 2002 by James W Cooper
144
Consequences of Abstract Factory One of the main purposes of the Abstract Factory is that it isolates the concrete classes that are generated. The actual class names of these classes are hidden in the factory and need not be known at the client level at all.
Because of the isolation of classes, you can change or interchange these product class families freely. Further, since you generate only one kind of concrete class, this system keeps you from inadvertently using classes from different families of products. However, it is some effort to add new class families, since you need to define new, unambiguous conditions that cause such a new family of classes to be returned.
While all of the classes that the Abstract Factory generates have the same base class, there is nothing to prevent some subclasses from having additional methods that differ from the methods of other classes. For example, a BonsaiGarden class might have a Height or WateringFrequency method that is not in other classes. This presents the same problem that occurs in any subclass: You don’t know whether you can call a class method unless you know whether the subclass is one that allows those methods. This problem has the same two solutions as in any similar case: You can either define all of the methods in the base class, even if they don’t always have an actual function, or, you can derive a new base interface that contains all the methods you need and subclass that for all of your garden types.
Thought Question If you are writing a program to track investments, such as stocks, bonds, metal futures, derivatives, and the like, how might you use an Abstract Factory?
Programs on the CD-ROM \AbstractFactory\GardenPlanner The Gardener program

Copyright © , 2002 by James W Cooper
145
11. The Singleton Pattern
The Singleton pattern is grouped with the other Creational patterns, although it is to some extent a pattern that limits the creation of classes rather than promoting such creation. Specifically, the Singleton assures that there is one and only one instance of a class, and provides a global point of access to it. There are any number of cases in programming where you need to make sure that there can be one and only one instance of a class. For example, your system can have only one window manager or print spooler, or a single point of access to a database engine. Your PC might have several serial ports but there can only be one instance of “COM1.”
Creating Singleton Using a Static Method The easiest way to make a class that can have only one instance is to embed a static variable inside the class that we set on the first instance and check for each time we enter the constructor. A static variable is one for which there is only one instance, no matter how many instances there are of the class. To prevent instantiating the class more than once, we make the constructor private so an instance can only be created from within the static method of the class. Then we create a method called getSpooler that will return an instance of Spooler, or null if the class has already been instantiated. public class Spooler { private static bool instance_flag= false; private Spooler() { } public static Spooler getSpooler() { if (! instance_flag)
return new Spooler (); else return null; } } One major advantage to this approach is that you don’t have to worry about exception handling if the singleton already exists-- you simply get a null return from the getSpooler method. Spooler sp = Spooler.getSpooler();

Copyright © , 2002 by James W Cooper
146
if (sp != null) Console.WriteLine ("Got 1 spooler"); Spooler sp2 = Spooler.getSpooler (); if (sp2 == null) Console.WriteLine ("Can\'t get spooler"); } And, should you try to create instances of the Spooler class directly, this will fail at compile time because the constructor has been declared as private. //fails at compiler time Spooler sp3 = new Spooler ();
Finally, should you need to change the program to allow two or three instances, this class is easily modified to allow this.
Exceptions and Instances The above approach has the disadvantage that it requires the programmer to check the getSpooler method return to make sure it is not null. Assuming that programmers will always remember to check errors is the beginning of a slippery slope that many prefer to avoid.
Instead, we can create a class that throws an Exception if you attempt to instantiate it more than once. This requires the programmer to take action and is thus a safer approach. Let’s create our own exception class for this case: public class SingletonException:Exception { //new exception type for singleton classes public SingletonException(string s):base(s) { } } Note that other than calling its parent classes through the base constructor, this new exception type doesn’t do anything in particular. However, it is convenient to have our own named exception type so that the runtime system will warn us if this type of exception is thrown when we attempt to create an instance of Spooler.

Copyright © , 2002 by James W Cooper
147
Throwing the Exception Let’s write the skeleton of our PrintSpooler class-- we’ll omit all of the printing methods and just concentrate on correctly implementing the Singleton pattern: public class Spooler { static bool instance_flag = false; //true if one instance public Spooler() { if (instance_flag) throw new SingletonException(
"Only one printer allowed"); else { instance_flag = true; //set flag
Console.WriteLine ("printer opened"); }
} }
Creating an Instance of the Class Now that we’ve created our simple Singleton pattern in the PrintSpooler class, let’s see how we use it. Remember that we must enclose every method that may throw an exception in a try - catch block. public class singleSpooler { static void Main(string[] args) { Spooler pr1, pr2; //open one printer--this should always work Console.WriteLine ("Opening one spooler"); try { pr1 = new Spooler(); } catch (SingletonException e) { Console.WriteLine (e.Message); } //try to open another printer --should fail Console.WriteLine ("Opening two spoolers"); try {
pr2 = new Spooler(); } catch (SingletonException e) { Console.WriteLine (e.Message); } }
Then, if we execute this program, we get the following results:

Copyright © , 2002 by James W Cooper
148
Opening one spooler printer opened Opening two spoolers Only one spooler allowed where the last line indicates than an exception was thrown as expected.
Providing a Global Point of Access to a Singleton Since a Singleton is used to provide a single point of global access to a class, your program design must provide for a way to reference the Singleton throughout the program, even though there are no global variables in C#.
One solution is to create such singletons at the beginning of the program and pass them as arguments to the major classes that might need to use them. pr1 = iSpooler.Instance(); Customers cust = new Customers(pr1); The disadvantage is that you might not need all the Singletons that you create for a given program execution, and this could have performance implications.
A more elaborate solution could be to create a regis try of all the Singleton classes in the program and make the registry generally available. Each time a Singleton is instantiated, it notes that in the Registry. Then any part of the program can ask for the instance of any singleton using an identifying string and get back that instance variable.
The disadvantage of the registry approach is that type checking may be reduced, since the table of singletons in the registry probably keeps all of the singletons as Objects, for example in a Hashtable object. And, of course, the registry itself is probably a Singleton and must be passed to all parts of the program using the constructor or various set functions.
Probably the most common way to provide a global point of access is by using static methods of a class. The class name is always available and the static methods can only be called from the class and not from its instances, so there is never more than one such instance no matter how many places in your program call that method..

Copyright © , 2002 by James W Cooper
149
Other Consequences of the Singleton Pattern 1. It can be difficult to subclass a Singleton, since this can only work
if the base Singleton class has not yet been instantiated.
2. You can easily change a Singleton to allow a small number of instances where this is allowable and meaningful.
Programs on Your CD-ROM \Singleton\SinglePrinter Shows how print spooler could be
written thowing exception
\Singleton\InstancePrinter Creates one instance or returns null

Copyright © , 2002 by James W Cooper
150
12. The Builder Pattern
In this chapter we’ll consider how to use the Builder pattern to construct objects from components. We have already seen that the Factory pattern returns one of several different subclasses, depending on the data passed in arguments to the creation methods. But suppose we don’t want just a computing algorithm but a whole different user interface because of the data we need to display. A typical example might be your e-mail address book. You probably have both individual people and groups of people in your address book, and you would expect the display for the address book to change so that the People screen has places for first and last name, company, e-mail address, and phone number.
On the other hand, if you were displaying a group address page, you’d like to see the name of the group, its purpose, and a list of members and their e-mail addresses. You click on a person and get one display and on a group and get the other display. Let’s assume that all e-mail addresses are kept in an object called an Address and that people and groups are derived from this base class, as shown in Figure 12-1.
Address
Person Group
Figure 12-1 – Both Person and Group are derived from Address.
Depending on which type of Address object we click on, we’d like to see a somewhat different display of that object’s properties. This is a little more than just a Factory pattern because we aren’t returning objects that are

Copyright © , 2002 by James W Cooper
151
simple descendants of a base display object but totally different user interfaces made up of different combinations of display objects. The Builder pattern assembles a number of objects, such as display controls, in various ways, depending on the data. Furthermore, by using cla sses to represent the data and forms to represent the display, you can cleanly separate the data from the display methods into simple objects.
An Investment Tracker Let’s consider a somewhat simpler case where it would be useful to have a class build our UI for us. Suppose we are going to write a program to keep track of the performance of our investments. We might have stocks, bonds, and mutual funds, and we’d like to display a list of our holdings in each category so we can select one or more of the investments and plot their comparative performance.
Even though we can’t predict in advance how many of each kind of investment we might own at any given time, we’d like to have a display that is easy to use for either a large number of funds (such as stocks) or a small number of funds (such as mutual funds). In each case, we want some sort of a multiple-choice display so that we can select one or more funds to plot. If there are a large number of funds, we’ll use a multichoice list box, and if there are three or fewer funds, we’ll use a set of check boxes. We want our Builder class to generate an interface that depends on the number of items to be displayed and yet have the same methods for returning the results.
Our displays are shown in Figure 12-2. The top display contains a large number of stocks, and the bottom contains a small number of bonds.

Copyright © , 2002 by James W Cooper
152
Figure 12-2- Stocks with the list interface and bonds with the check box interface

Copyright © , 2002 by James W Cooper
153
Now let’s consider how we can build the interface to carry out this variable display. We’ll start with a multiChoice interface that defines the methods we need to implement. public interface MultiChoice { ArrayList getSelected(); void clear(); Panel getWindow(); } The getWindow method returns a Panel containing a multiple-choice display. The two display panels we’re using here — a check box panel or a list box panel — implement this interface. public class CheckChoice:MultiChoice { or public class ListChoice:MultiChoice { C# gives us considerable flexibility in designing Builder classes, since we have direct access to the methods that allow us to construct a window from basic components. For this example, we’ll let each builder construct a Panel containing whatever components it needs. We can then add that Panel to the form and position it. When the display changes, you remove the old Panel and add a new one. In C#, a Panel is just a unbordered container that can hold any number of Windows components. The two implementations of the Panel must satisfy the MultiChoice interface.
We will create a base abstract class called Equities and derive the stocks, bonds, and mutual funds from it. public abstract class Equities { protected ArrayList array; public abstract string toString(); //---------- public ArrayList getNames() { return array; } //---------- public int count() {

Copyright © , 2002 by James W Cooper
154
return array.Count ; } } Note the abstract toString method. We’ll use this to display each kind of equity in the list box. Now our Stocks class will just contain the code to load the ArrayList with the stock names. public class Stocks:Equities { public Stocks() { array = new ArrayList(); array.Add ("Cisco"); array.Add ("Coca Cola"); array.Add ("GE"); array.Add ("Harley Davidson"); array.Add ("IBM"); array.Add ("Microsoft"); } public override string toString() { return "Stocks"; } }
All the remaining code (getNames and count) is implemented in the base Equities class. The Bonds and Mutuals classes are entirely analogous.
The Stock Factory We need a little class to decide whether we want to return a check box panel or a list box panel. We’ll call this class the StockFactory class. However, we will never need more than one instance of this class, so we’ll create the class so its one method is static. public class StockFactory { public static MultiChoice getBuilder(Equities stocks) { if (stocks.count ()<=3) { return new CheckChoice (stocks); } else { return new ListChoice(stocks); }
} }

Copyright © , 2002 by James W Cooper
155
We never need more than one instance of this class so we make the getBuilder method static so we can call it directly without creating a class instance. In the language of Design Patterns, this simple factory class is called the Director, and the actual classes derived from multiChoice are each Builders.
The CheckChoice Class Our Check Box Builder constructs a panel containing 0 to 3 check boxes and returns that panel to the calling program. //returns a panel of 0 to 3 check boxes public class CheckChoice:MultiChoice { private ArrayList stocks; private Panel panel; private ArrayList boxes; //------ public CheckChoice(Equities stks) { stocks = stks.getNames (); panel = new Panel (); boxes = new ArrayList (); //add the check boxes to the panel for (int i=0; i< stocks.Count; i++) { CheckBox ck = new CheckBox (); //position them ck.Location = new Point (8, 16 + i * 32); string stk = (string)stocks[i]; ck.Text =stk; ck.Size = new Size (112, 24); ck.TabIndex =0; ck.TextAlign = ContentAlignment.MiddleLeft ; boxes.Add (ck); panel.Controls.Add (ck); } } } The methods for returning the window and the list of selected names are shown here. Note that we use the cast the object type returned by an ArrayList to the Checkbox type the method actually requires. //------ //uncheck all check boxes

Copyright © , 2002 by James W Cooper
156
public void clear() { for(int i=0; i< boxes.Count; i++) { CheckBox ck = (CheckBox)boxes[i]; ck.Checked =false; } } //------ //return list of checked items public ArrayList getSelected() { ArrayList sels = new ArrayList (); for(int i=0; i< boxes.Count ; i++) { CheckBox ck = (CheckBox)boxes[i]; if (ck.Checked ) { sels.Add (ck.Text ); } } return sels; } //------ //return panel of checkboxes public Panel getWindow() { return panel; }
The ListboxChoice Class This class creates a multiselect list box, inserts it into a Panel, and loads the names into the list. public class ListChoice:MultiChoice { private ArrayList stocks; private Panel panel; private ListBox list; //------ //constructor creates and loads the list box public ListChoice(Equities stks) { stocks = stks.getNames (); panel = new Panel (); list = new ListBox (); list.Location = new Point (16, 0); list.Size = new Size (120, 160); list.SelectionMode =SelectionMode.MultiExtended ; list.TabIndex =0; panel.Controls.Add (list);

Copyright © , 2002 by James W Cooper
157
for(int i=0; i< stocks.Count ; i++) { list.Items.Add (stocks[i]); } } Since this is a multiselect list box, we can get all the selected items in a single SelectedIndices collection. This method, however, only works for a multiselect list box. It returns a –1 for a single-select list box. We use it to load the array list of selected names as follows. //returns the Panel //------ public Panel getWindow() { return panel; } //returns an array of selected elements //------ public ArrayList getSelected() { ArrayList sels = new ArrayList (); ListBox.SelectedObjectCollection
coll = list.SelectedItems ; for(int i=0; i< coll.Count; i++) { string item = (string)coll[i]; sels.Add (item ); } return sels; } //------ //clear selected elements public void clear() { list.Items.Clear(); }
Using the Items Collection in the ListBox Control You are not limited to populating a list box with strings in C#. When you add data to the Items collection, it can be any kind of object that has a toString method.
Since we created our three Equities classes to have a toString method, we can add these classes directly to the list box in our main program’s constructor. public class WealthBuilder : Form {
Copyright © , 2002 by James W Cooper
158
private ListBox lsEquities; private Container components = null; private Button btPlot; private Panel pnl; private MultiChoice mchoice; private void init() { lsEquities.Items.Add (new Stocks()); lsEquities.Items.Add (new Bonds()); lsEquities.Items.Add (new Mutuals()); } public WealthBuilder() { InitializeComponent(); init(); }
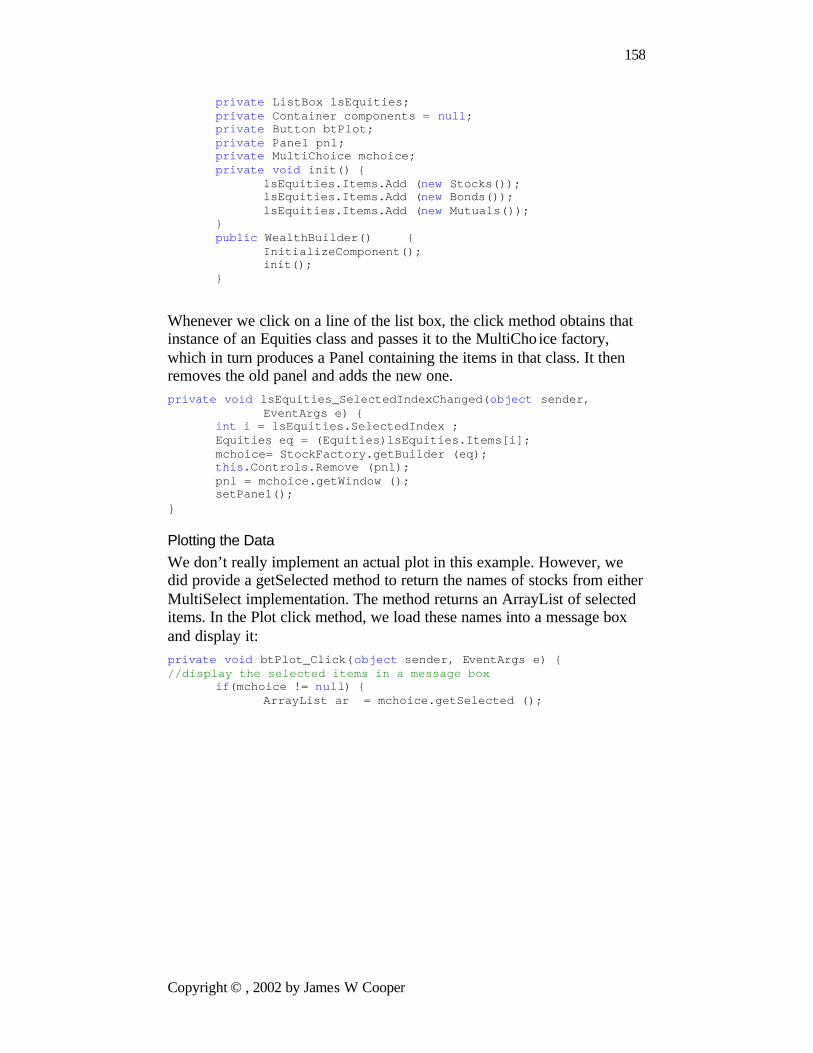
Whenever we click on a line of the list box, the click method obtains that instance of an Equities class and passes it to the MultiCho ice factory, which in turn produces a Panel containing the items in that class. It then removes the old panel and adds the new one. private void lsEquities_SelectedIndexChanged(object sender,
EventArgs e) { int i = lsEquities.SelectedIndex ; Equities eq = (Equities)lsEquities.Items[i]; mchoice= StockFactory.getBuilder (eq); this.Controls.Remove (pnl); pnl = mchoice.getWindow (); setPanel(); }
Plotting the Data We don’t really implement an actual plot in this example. However, we did provide a getSelected method to return the names of stocks from either MultiSelect implementation. The method returns an ArrayList of selected items. In the Plot click method, we load these names into a message box and display it: private void btPlot_Click(object sender, EventArgs e) { //display the selected items in a message box if(mchoice != null) { ArrayList ar = mchoice.getSelected ();
Copyright © , 2002 by James W Cooper
159
string ans = ""; for(int i=0; i< ar.Count ; i++) { ans += (string)ar[i] +" "; } MessageBox.Show (null, ans,
"Selected equities", MessageBoxButtons.OK ); } }
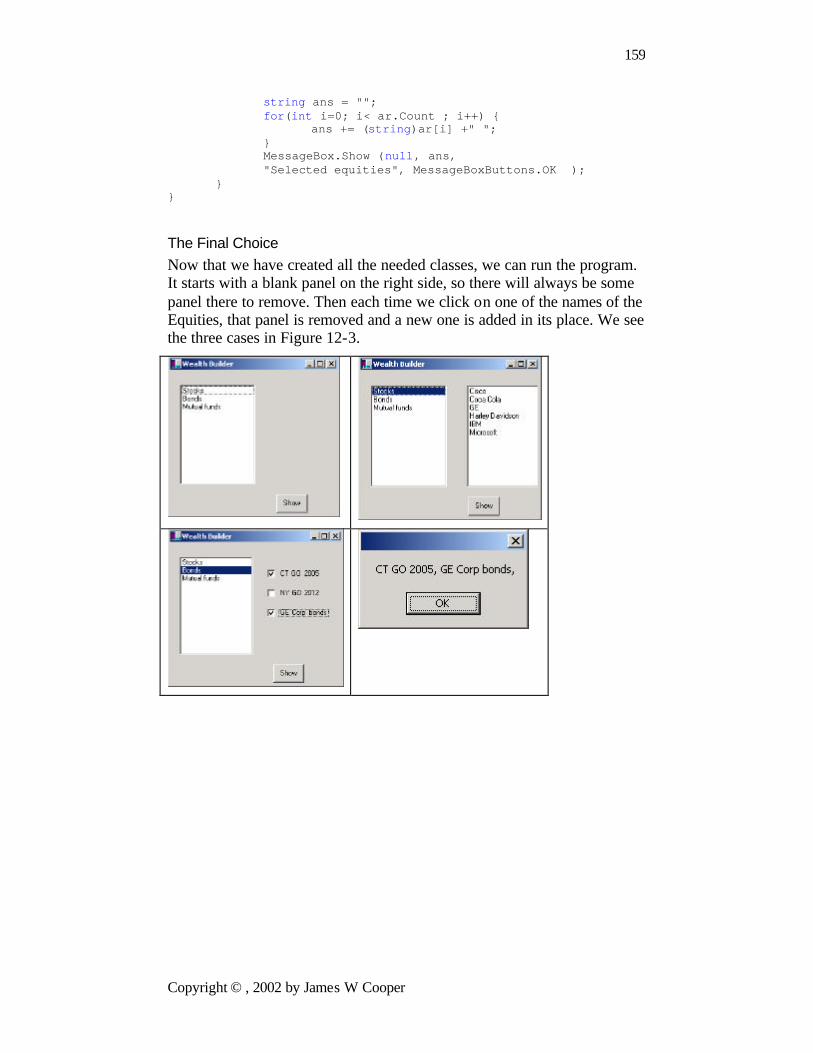
The Final Choice Now that we have created all the needed classes, we can run the program. It starts with a blank panel on the right side, so there will always be some panel there to remove. Then each time we click on one of the names of the Equities, that panel is removed and a new one is added in its place. We see the three cases in Figure 12-3.

Copyright © , 2002 by James W Cooper
160
Figure 12-3- The WealthBuilder program, showing the list of equitites, the listbox, the checkboxes and the plot panel.
You can see the relationships between the classes in the UML diagram in Figure 12-4.
Figure 12-4 – The inheritance relationships in the Builder pattern
Consequences of the Builder Pattern 1. A Builder lets you vary the internal representation of the product it
builds. It also hides the details of how the product is assembled.
2. Each specific Builder is independent of the others and of the rest of the program. This improves modularity and makes the addition of other Builders relatively simple.
3. Because each Builder constructs the final product step by step, depending on the data, you have more control over each final product that a Builder constructs.
A Builder pattern is somewhat like an Abstract Factory pattern in that both return classes made up of a number of methods and objects. The main difference is that while the Abstract Factory returns a family of related classes, the Builder constructs a complex object step by step, depending on the data presented to it.

Copyright © , 2002 by James W Cooper
161
Thought Questions 1. Some word-processing and graphics programs construct menus
dynamically based on the context of the data being displayed. How could you use a Builder effectively here?
2. Not all Builders must construct visual objects. What might you construct with a Builder in the personal finance industry? Suppose you were scoring a track meet, made up of five or six different events. How can you use a Builder there?
Programs on the CD-ROM \Builders\Stocks Basic equities Builder
Copyright © , 2002 by James W Cooper
162
13. The Prototype Pattern
The Prototype pattern is another tool you can use when you can specify the general class needed in a program but need to defer the exact class until execution time. It is similar to the Builder in that some class decides what components or details make up the final class. However, it differs in that the target classes are constructed by cloning one or more prototype classes and then changing or filling in the details of the cloned class to behave as desired.
Prototypes can be used whenever you need classes that differ only in the type of processing they offer—for example, in parsing of strings representing numbers in different radixes. In this sense, the prototype is nearly the same as the Examplar pattern described by Coplien (1992).
Let’s consider the case of an extensive database where you need to make a number of queries to construct an answer. Once you have this answer as result set, you might like to manipulate it to produce other answers without issuing additional queries.
In a case like the one we have been working on, we’ll consider a database of a large number of swimmers in a league or statewide organization. Each swimmer swims several strokes and distances throughout a season. The “best times” for swimmers are tabulated by age group, and even within a single four-month season many swimmers will pass their birthdays and fall into new age groups. Thus, the query to determine which swimmers did the best in their age group that season is dependent on the date of each meet and on each swimmer’s birthday. The computational cost of assembling this table of times is therefore fairly high.
Once we have a class containing this table sorted by sex, we could imagine wanting to examine this information sorted just by time or by actual age rather than by age group. It would not be sensible to recompute
Copyright © , 2002 by James W Cooper
163
these data, and we don’t want to destroy the original data order, so some sort of copy of the data object is desirable.
Cloning in C# The idea of cloning a class (making an exact copy) is not a designed- in feature of C#, but nothing actually stops you from carrying out such a copy yourself. The only place the Clone method appears in C# is in ADO DataSet manipulation. You can create a DataSet as a result of a database query and move through it a row at a time. If for some reason you need to keep references to two places in this DataSet, you would need two “current rows.” The simplest way to handle this in C# is to clone the DataSet. DataSet cloneSet; cloneSet = myDataSet.Clone(); Now this approach does not generate two copies of the data. It just generates two sets of row pointers to use to move through the records independently of each other. Any change you make in one clone of the DataSet is immediately reflected in the other because there is in fact only one data table. We discuss a similar problem in the following example.
Using the Prototype Now let’s write a simple program that reads data from a database and then clones the resulting object. In our example program, we just read these data from a file, but the original data were derived from a large database, as we discussed previously. That file has the following form. Kristen Frost, 9, CAT, 26.31, F Kimberly Watcke, 10, CDEV,27.37, F Jaclyn Carey, 10, ARAC, 27.53, F Megan Crapster, 10, LEHY, 27.68, F We’ll use the csFile class we developed earlier.
Copyright © , 2002 by James W Cooper
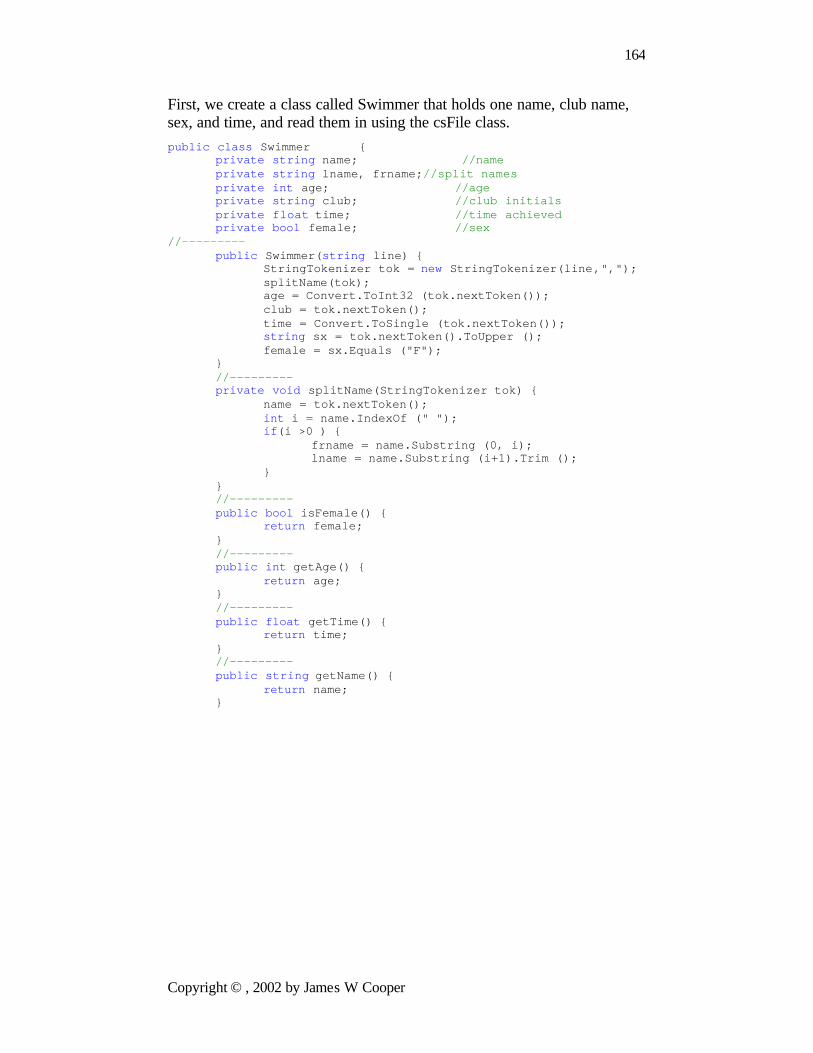
164
First, we create a class called Swimmer that holds one name, club name, sex, and time, and read them in using the csFile class. public class Swimmer { private string name; //name private string lname, frname;//split names private int age; //age private string club; //club initials private float time; //time achieved private bool female; //sex //--------- public Swimmer(string line) {
StringTokenizer tok = new StringTokenizer(line,","); splitName(tok); age = Convert.ToInt32 (tok.nextToken()); club = tok.nextToken(); time = Convert.ToSingle (tok.nextToken()); string sx = tok.nextToken().ToUpper (); female = sx.Equals ("F"); } //--------- private void splitName(StringTokenizer tok) { name = tok.nextToken(); int i = name.IndexOf (" "); if(i >0 ) { frname = name.Substring (0, i); lname = name.Substring (i+1).Trim (); } } //--------- public bool isFemale() { return female; } //--------- public int getAge() { return age; } //--------- public float getTime() { return time; } //--------- public string getName() { return name; }
Copyright © , 2002 by James W Cooper
165
//--------- public string getClub() { return club; } } Then we create a class called SwimData that maintains an ArrayList of the Swimmers we read in from the database. public class SwimData { protected ArrayList swdata; private int index; public SwimData(string filename) { swdata = new ArrayList (); csFile fl = new csFile(filename); fl.OpenForRead (); string s = fl.readLine (); while(s != null) { Swimmer sw = new Swimmer(s); swdata.Add (sw); s = fl.readLine (); } fl.close (); } //----- public void moveFirst() { index = 0; } //----- public bool hasMoreElements() { return (index < swdata.Count-1 ); } //----- public void sort() { } //----- public Swimmer getSwimmer() { if(index < swdata.Count ) return (Swimmer)swdata[index++]; else return null; } } }
Copyright © , 2002 by James W Cooper
166
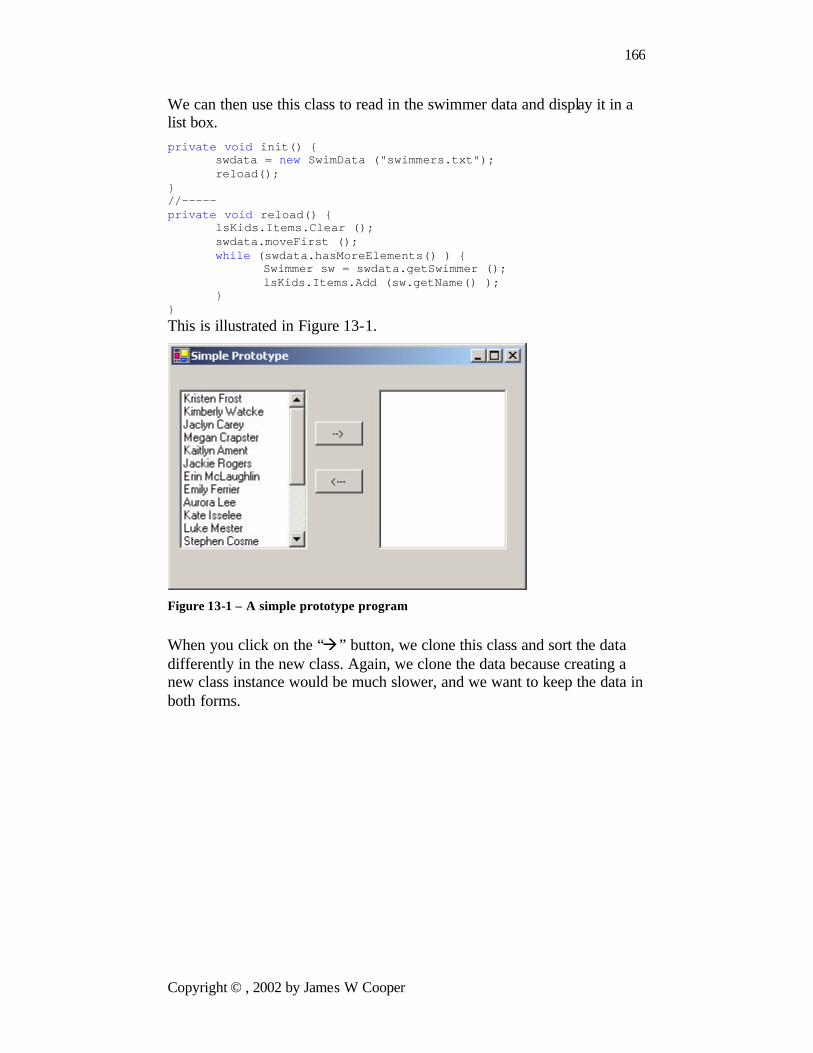
We can then use this class to read in the swimmer data and display it in a list box. private void init() { swdata = new SwimData ("swimmers.txt"); reload(); } //----- private void reload() { lsKids.Items.Clear (); swdata.moveFirst (); while (swdata.hasMoreElements() ) { Swimmer sw = swdata.getSwimmer (); lsKids.Items.Add (sw.getName() ); } } This is illustrated in Figure 13-1.
Figure 13-1 – A simple prototype program
When you click on the “à” button, we clone this class and sort the data differently in the new class. Again, we clone the data because creating a new class instance would be much slower, and we want to keep the data in both forms.

Copyright © , 2002 by James W Cooper
167
private void btClone_Click(object sender, EventArgs e) { SwimData newSd = (SwimData)swdata.Clone (); newSd.sort (); while(newSd.hasMoreElements() ) { Swimmer sw = (Swimmer)newSd.getSwimmer (); lsNewKids.Items.Add (sw.getName() ); } } We show the sorted results in Figure 13-2
Figure 13-2 – The sorted results of our Prototype program.
Cloning the Class While it may not be strictly required, we can make the SwimData class implement the ICloneable interface. public class SwimData:ICloneable { All this means is that the class must have a Clone method that returns an object: public object Clone() {

Copyright © , 2002 by James W Cooper
168
SwimData newsd = new SwimData(swdata); return newsd; } Of course, using this interface implies that we must cast the object type back to the SwimData type when we receive the clone: SwimData newSd = (SwimData)swdata.Clone (); as we did above.
Now, let’s click on the”ß” button to reload the left-hand list box from the original data. The somewhat disconcerting result is shown in Figure 13-3.
Figure 13-3 – The Prototype showing the disconcertin re-sort of the left list box.
Why have the names in the left-hand list box also been re-sorted? Our sort routine looks like this: public void sort() { //sort using IComparable interface of Swimmer swdata.Sort (0,swdata.Count ,null); }

Copyright © , 2002 by James W Cooper
169
Note that we are sorting the actual ArrayList in place. This sort method assumes that each element of the ArrayList implements the IComparable interface, public class Swimmer:IComparable { All this means is that it must have an integer CompareTo method which returns –1, 0 or 1 depending on whether the comparison between the two objects returns less than, equal or greater than. In this case, we compare the two last names using the string class’s CompareTo method and return that: public int CompareTo(object swo) { Swimmer sw = (Swimmer)swo; return lname.CompareTo (sw.getLName() ); } Now we can understand the unfortunate result in Figure 14-3. The original array is resorted in the new class, and there is really only one copy of this array. This occurs because the clone method is a shallow copy of the original class. In other words, the references to the data objects are copies, but they refer to the same underlying data. Thus, any operation we perform on the copied data will also occur on the original data in the Prototype class.
In some cases, this shallow copy may be acceptable, but if you want to make a deep copy of the data, you must write a deep cloning routine of your own as part of the class you want to clone. In this simple class, you just create a new ArrayList and copy the elements of the old class’s ArrayList into the new one. public object Clone() { //create a new ArrayList ArrayList swd = new ArrayList (); //copy in swimmer objects for(int i = 0; i < swdata.Count ; i++) swd.Add (swdata[i]); //create new SwimData object with this array SwimData newsd = new SwimData (swd); return newsd; }

Copyright © , 2002 by James W Cooper
170
Using the Prototype Pattern You can use the Prototype pattern whenever any of a number of classes might be created or when the classes are modified after being created. As long as all the classes have the same interface, they can actually carry out rather different operations.
Let’s consider a more elaborate example of the listing of swimmers we just discussed. Instead of just sorting the swimmers, let’s create subclasses that operate on that data, modifying it and presenting the result for display in a list box. We start with the same basic class SwimData.
Then it becomes possible to write different derived SwimData classes, depending on the application’s requirements. We always start with the SwimData class and then clone it for various other displays. For example, the SexSwimData class resorts the data by sex and displays only one sex. This is shown in Figure 13-4.
Figure 13-4 – The OneSexSwimData class displays only one sex on the right.
In the SexSwimData class, we sort the data by name but return them for display based on whether girls or boys are supposed to be displayed. This class has this polymorphic sort method.

Copyright © , 2002 by James W Cooper
171
public void sort(bool isFemale) { ArrayList swd = new ArrayList(); for (int i = 0; i < swdata.Count ; i++) { Swimmer sw =(Swimmer)swdata[i]; if (isFemale == sw.isFemale() ) { swd.Add (sw); } } swdata = swd; } Each time you click on the one of the sex option buttons, the class is given the current state of these buttons. private void btClone_Click(object sender, System.EventArgs e) { SexSwimData newSd = (SexSwimData)swdata.Clone (); newSd.sort (opFemale.Checked ); lsNewKids.Items.Clear() ; while(newSd.hasMoreElements() ) { Swimmer sw = (Swimmer)newSd.getSwimmer (); lsNewKids.Items.Add (sw.getName() ); } } Note that the btClone_Click event clones the general SexSwimdata class instance swdata and casts the result to the type SexSwimData. This means that the Clone method of SexSwimData must override the general SwimData Clone method because it returns a different data type: public object Clone() { //create a new ArrayList ArrayList swd = new ArrayList (); //copy in swimmer objects for(int i=0; i< swdata.Count ; i++) swd.Add (swdata[i]); //create new SwimData object with this array SexSwimData newsd = new SexSwimData (swd); return newsd; } This is not very satisfactory, if we must rewrite the Clone method each time we derive a new highly similar class. A better solution is to do away with implementing the ICloneable interface where each class has a Clone
Copyright © , 2002 by James W Cooper
172
method, and reverse the process where each receiving class clones the data inside the sending class. Here we show a revised portion of the SwimData class which contains the cloneMe method. It takes the data from another instance of SwimData anc copies it into the ArrayList inside this instance of the class: public class SwimData { protected ArrayList swdata; private int index; //----- public void cloneMe(SwimData swdat) { swdata = new ArrayList (); ArrayList swd=swdat.getData (); //copy in swimmer objects for(int i=0; i < swd.Count ; i++) swdata.Add (swd[i]); } This approach then will work for all child classes of SwimData without having to cast the data between subclass types.
Dissimilar Classes with the Same Interface Classes, however, do not have to be even that similar. The AgeSwimData class takes the cloned input data array and creates a simple histogram by age. If you click on “F,” you see the girls’ age distribution and if you click on “M,” you see the boys’ age distribution, as shown in Figure 13-5

Copyright © , 2002 by James W Cooper
173
Figure 13-5 – The AgeSwimData class displays an age distribution.
This is an interesting case where the AgeSwimData class inherits the cloneMe method from the base SwimData class, but overrides the sort method with one that creates a proto-swimmer with a name made up of the number of kids in that age group. public class AgeSwimData:SwimData { ArrayList swd; public AgeSwimData() { swdata = new ArrayList (); } //------ public AgeSwimData(string filename):base(filename){} public AgeSwimData(ArrayList ssd):base(ssd){} //------ public override void cloneMe(SwimData swdat) { swd = swdat.getData (); } //------ public override void sort() { Swimmer[] sws = new Swimmer[swd.Count ]; //copy in swimmer objects for(int i=0; i < swd.Count ; i++) { sws[i] = (Swimmer)swd[i]; } //sort into increasing order

Copyright © , 2002 by James W Cooper
174
for( int i=0; i< sws.Length ; i++) { for (int j = i; j< sws.Length ; j++) { if (sws[i].getAge ()>sws[j].getAge ())
Swimmer sw = sws[i]; sws[i]=sws[j]; sws[j]=sw; }
} } int age = sws[0].getAge (); int agecount = 0; int k = 0; swdata = new ArrayList (); bool quit = false; while( k < sws.Length && ! quit ) { while(sws[k].getAge() ==age && ! quit) { agecount++; if(k < sws.Length -1) k++; else quit= true; } //create a new Swimmer with a series of X's for a name //for each new age string name = ""; for(int j = 0; j < agecount; j++) name +="X"; Swimmer sw = new Swimmer(age.ToString() + " " + name + "," + age.ToString() +
",club,0,F"); swdata.Add (sw);
agecount = 0; if(quit) age = 0; else age = sws[k].getAge (); } } }
Now, since our original classes display first and last names of selected swimmers, note that we achieve this same display, returning Swimmer

Copyright © , 2002 by James W Cooper
175
objects with the first name set to the age string and the last name set to the histogram.
SwimData
initClonesetDatasortMoveFirsthasMoreElementsgetNextSwimmer
Swimmer
initgetTimegetSexgetNamegetClubgetAgebb
TimeSwimData
SwimData_CloneSwimData_getNextSwimmerSwimData_hasMoreElementsSwimData_initSwimData_MoveFirstSwimData_setDataSwimData_sort
SexSwimData
SwimData_CloneSwimData_getNextSwimmerSwimData_hasMoreElementsSwimData_initSwimData_MoveFirstSwimData_setDataSwimData_sortb
1
1sw
Figure 13-6 – The UML diagram for the various SwimData classes
The UML diagram in Figure 13-6 illustrates this system fairly clearly. The SwimInfo class is the main GUI class. It keeps two instances of SwimData but does not specify which ones. The TimeSwimData and SexSwimData classes are concrete classes derived from the abstract
Copyright © , 2002 by James W Cooper
176
SwimData class, and the AgeSwimData class, which creates the histograms, is derived from the SexSwimData class.
You should also note that you are not limited to the few subclasses we demonstrated here. It would be quite simple to create additional concrete classes and register them with whatever code selects the appropriate concrete class. In our example program, the user is the deciding point or factory because he or she simply clicks on one of several buttons. In a more elaborate case, each concrete class could have an array of characteristics, and the decision point could be a class registry or prototype manager that examines these characteristics and selects the most suitable class. You could also combine the Factory Method pattern with the Prototype, where each of several concrete classes uses a different concrete class from those available.
Prototype Managers A prototype manager class can be used to decide which of several concrete classes to return to the client. It can also manage several sets of prototypes at once. For example, in addition to returning one of several classes of swimmers, it could return different groups of swimmers who swam different strokes and distances. It could also manage which of several types of list boxes are returned in which to display them, including tables, multicolumn lists, and graphical displays. It is best that whichever subclass is returned, it not require conversion to a new class type to be used in the program. In other words, the methods of the parent abstract or base class should be sufficient, and the client should never need to know which actual subclass it is dealing with.
Consequences of the Prototype Pattern Using the Prototype pattern, you can add and remove classes at run time by cloning them as needed. You can revise the internal data representation
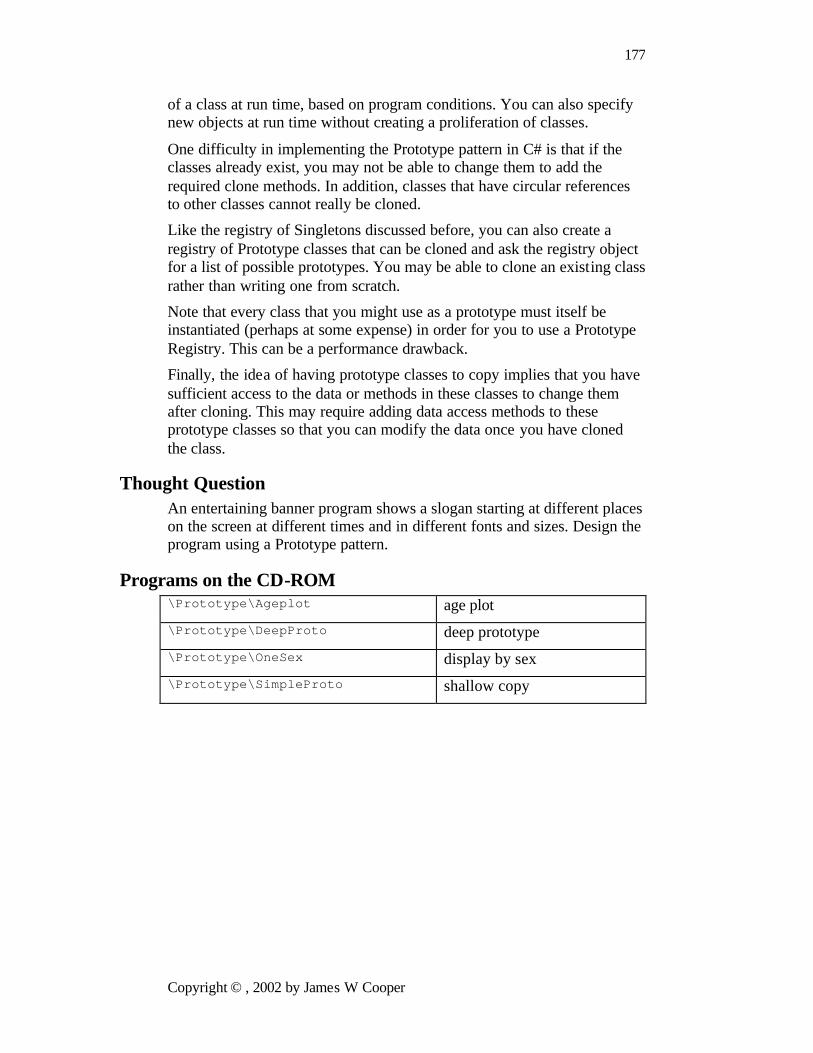
Copyright © , 2002 by James W Cooper
177
of a class at run time, based on program conditions. You can also specify new objects at run time without creating a proliferation of classes.
One difficulty in implementing the Prototype pattern in C# is that if the classes already exist, you may not be able to change them to add the required clone methods. In addition, classes that have circular references to other classes cannot really be cloned.
Like the registry of Singletons discussed before, you can also create a registry of Prototype classes that can be cloned and ask the registry object for a list of possible prototypes. You may be able to clone an existing class rather than writing one from scratch.
Note that every class that you might use as a prototype must itself be instantiated (perhaps at some expense) in order for you to use a Prototype Registry. This can be a performance drawback.
Finally, the idea of having prototype classes to copy implies that you have sufficient access to the data or methods in these classes to change them after cloning. This may require adding data access methods to these prototype classes so that you can modify the data once you have cloned the class.
Thought Question An entertaining banner program shows a slogan starting at different places on the screen at different times and in different fonts and sizes. Design the program using a Prototype pattern.
Programs on the CD-ROM \Prototype\Ageplot age plot \Prototype\DeepProto deep prototype \Prototype\OneSex display by sex \Prototype\SimpleProto shallow copy
Copyright © , 2002 by James W Cooper
178
\Prototype\TwoclassAgePlot age and sex display
Summary of Creational Patterns The Factory pattern is used to choose and return an instance of a class from a number of similar classes, based on data you provide to the factory.
The Abstract Factory pattern is used to return one of several groups of classes. In some cases, it actually returns a Factory for that group of classes.
The Builder pattern assembles a number of objects to make a new object, based on the data with which it is presented. Frequently, the choice of which way the objects are assembled is achieved using a Factory.
The Prototype pattern copies or clones an existing class, rather than creating a new instance, when creating new instances is more expensive.
The Singleton pattern is a pattern that ensures there is one and only one instance of an object and that it is possible to obtain global access to that one instance.

Copyright © , 2002 by James W Cooper
179
Part 3. Structural Patterns Structural patterns describe how classes and objects can be combined to form larger structures. The difference between class patterns and object patterns is that class patterns describe how inheritance can be used to provide more useful program interfaces. Object patterns, on the other hand, describe how objects can be composed into larger structures using object composition or the inclusion of objects within other objects.
For example, we’ll see that the Adapter pattern can be used to make one class interface match another to make programming easier. We’ll also look at a number of other structural patterns where we combine objects to provide new functionality. The Composite, for instance, is exactly that—a composition of objects, each of which may be either simple or itself a composite object. The Proxy pattern is frequently a simple object that takes the place of a more complex object that may be invoked later—for example, when the program runs in a network environment.
The Flyweight pattern is a pattern for sharing objects, where each instance does not contain its own state but stores it externally. This allows efficient sharing of objects to save space when there are many instances but only a few different types.
The Façade pattern is used to make a single class represent an entire subsystem, and the Bridge pattern separates an object’s interface from its implementation so you can vary them separately. Finally, we’ll look at the Decorator pattern, which can be used to add respons ibilities to objects dynamically.
You’ll see that there is some overlap among these patterns and even some overlap with the behavioral patterns in the next chapter. We’ll summarize these similarities after we describe the patterns.

Copyright © , 2002 by James W Cooper
180
14. The Adapter Pattern
The Adapter pattern is used to convert the programming interface of one class into that of another. We use adapters whenever we want unrelated classes to work together in a single program. The concept of an adapter is thus pretty simple: We write a class that has the desired interface and then make it communicate with the class that has a different interface.
There are two ways to do this: by inheritance and by object composition. In the first case, we derive a new class from the nonconforming one and add the methods we need to make the new derived class match the desired interface. The other way is to include the original class inside the new one and create the methods to translate calls within the new class. These two approaches, called class adapters and object adapters, are both fairly easy to implement.
Moving Data Between Lists Let’s consider a simple program that allows you to select some names from a list to be transferred to another list for a more detailed display of the data associated with them. Our initial list consists of a team roster, and the second list the names plus their times or scores.
In this simple program, shown in Figure 14-1, the program reads in the names from a roster file during initialization. To move names to the right-hand list box, you click on them and then click on the arrow button. To remove a name from the right-hand list box, click on it and then on Remove. This moves the name back to the left-hand list.
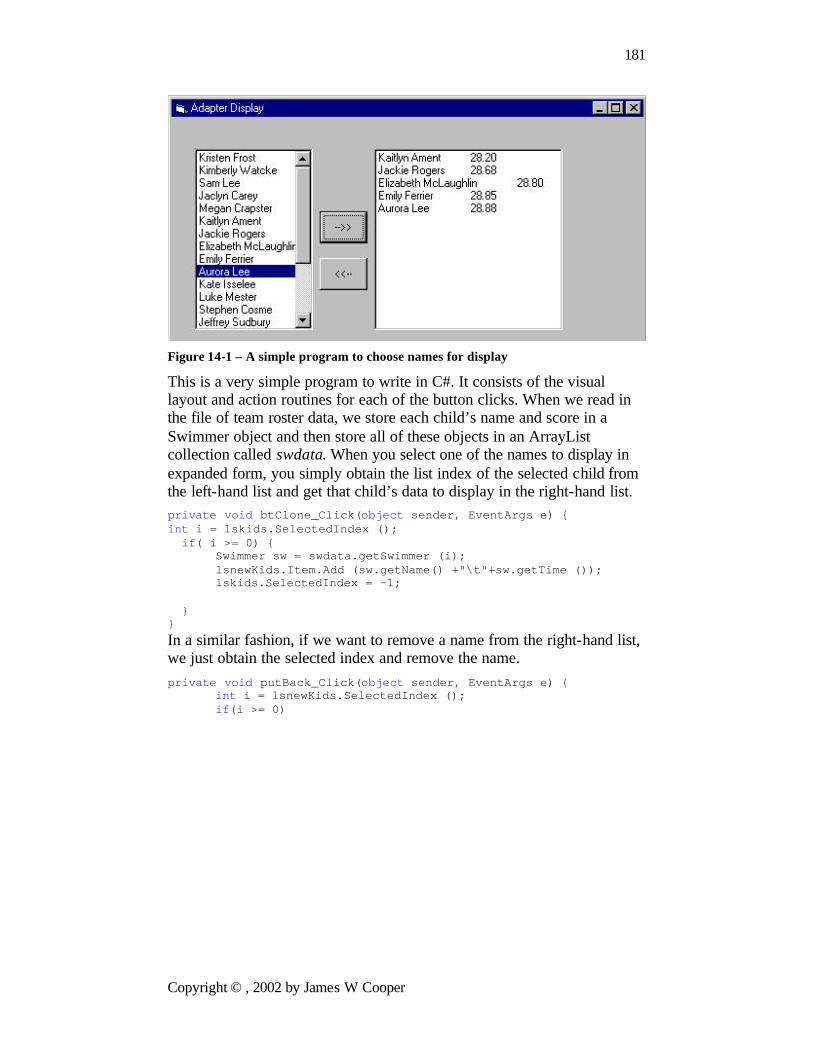
Copyright © , 2002 by James W Cooper
181
Figure 14-1 – A simple program to choose names for display
This is a very simple program to write in C#. It consists of the visual layout and action routines for each of the button clicks. When we read in the file of team roster data, we store each child’s name and score in a Swimmer object and then store all of these objects in an ArrayList collection called swdata. When you select one of the names to display in expanded form, you simply obtain the list index of the selected child from the left-hand list and get that child’s data to display in the right-hand list. private void btClone_Click(object sender, EventArgs e) { int i = lskids.SelectedIndex (); if( i >= 0) {
Swimmer sw = swdata.getSwimmer (i); lsnewKids.Item.Add (sw.getName() +"\t"+sw.getTime ()); lskids.SelectedIndex = -1; } } In a similar fashion, if we want to remove a name from the right-hand list, we just obtain the selected index and remove the name. private void putBack_Click(object sender, EventArgs e) {
int i = lsnewKids.SelectedIndex (); if(i >= 0)

Copyright © , 2002 by James W Cooper
182
lsNewKids.Items.RemoveAt (i); } Note that we obtain the column spacing between the two rows using the tab character. This works fine as long as the names are more or less the same length. However, if one name is much longer or shorter than the others, the list may end up using a different tab column, which is what happened for the third name in the list.
Making an Adapter Now it is a little awkward to remember to use the Items collection of the list box for some operations and not for others. For this reason, we might prefer to have a class that hides some of these complexities and adapts the interface to the simpler one we wish we had, rather like the list box interface in VB6. We’ll create a simpler interface in a ListAdapter class which then operates on an instance of the ListBox class: public class ListAdapter { private ListBox listbox; //operates on this one public ListAdapter(ListBox lb) { listbox = lb; } //----- public void Add(string s) { listbox.Items.Add (s); } //----- public int SelectedIndex() { return listbox.SelectedIndex; } //----- public void Clear() { listbox.Items.Clear (); } //----- public void clearSelection() { int i = SelectedIndex(); if(i >= 0) { listbox.SelectedIndex =-1; } } }

Copyright © , 2002 by James W Cooper
183
Then we can make our program a little simpler: private void btClone_Click(object sender, EventArgs e) { int i = lskids.SelectedIndex (); if( i >= 0) { Swimmer sw = swdata.getSwimmer (i); lsnewKids.Add (sw.getName() + "\t" + sw.getTime ()); lskids.clearSelection (); } } Now, let’s recognize that if we are always adding swimmers and times space apart like this, maybe there should be a method in our ListAdapter that handles the Swimmer object directly: public void Add(Swimmer sw) { listbox.Items.Add (sw.getName() + "\t" + sw.getTime()); } This simplifies the click event handler even more: private void btClone_Click(object sender, EventArgs e) { int i = lskids.SelectedIndex (); if( i >= 0) { Swimmer sw = swdata.getSwimmer (i); lsnewKids.Add (sw); lskids.clearSelection (); } } What we have done is create an Adapter class that contains a ListBox class and simplifies how you use the ListBox. Next, we’ll see how we can use the same approach to create adapters for two of the more complex visual controls.
Using the DataGrid To circumvent the problem with the tab columns in the simple list box, we might turn to a grid display. The grid table that comes with Visual Studio.NET is called the DataGrid. It can be bound to a database or to an
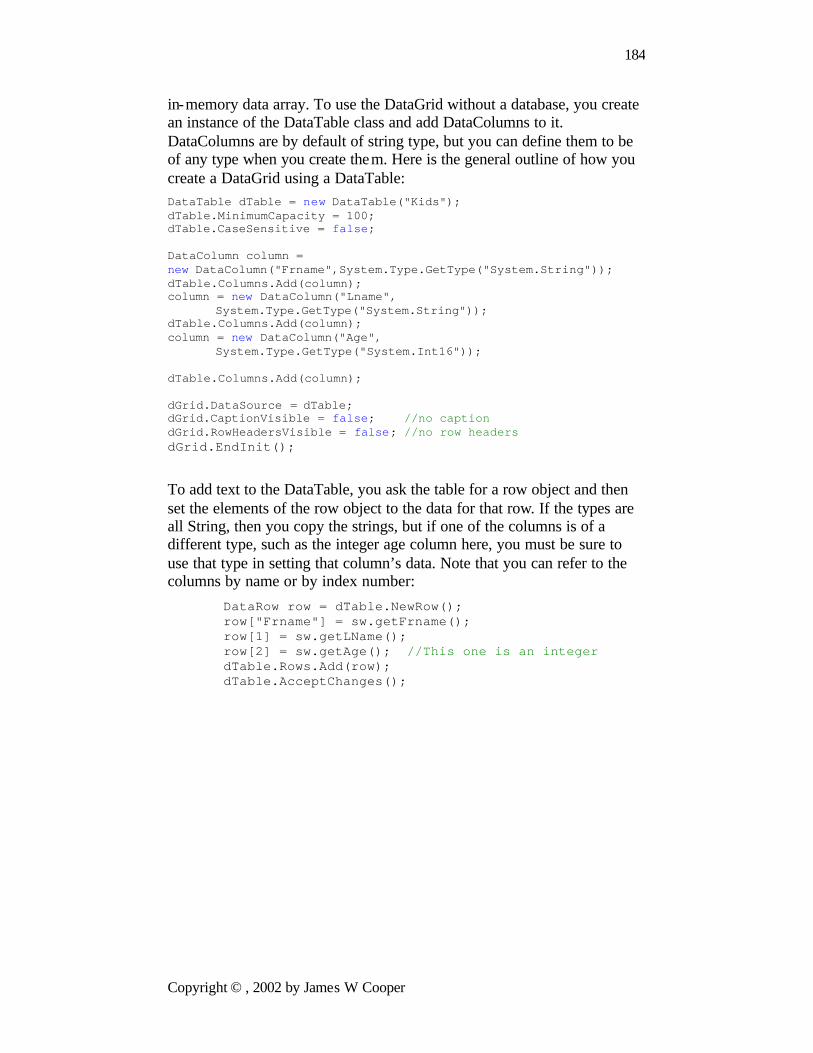
Copyright © , 2002 by James W Cooper
184
in-memory data array. To use the DataGrid without a database, you create an instance of the DataTable class and add DataColumns to it. DataColumns are by default of string type, but you can define them to be of any type when you create them. Here is the general outline of how you create a DataGrid using a DataTable: DataTable dTable = new DataTable("Kids"); dTable.MinimumCapacity = 100; dTable.CaseSensitive = false; DataColumn column = new DataColumn("Frname",System.Type.GetType("System.String")); dTable.Columns.Add(column); column = new DataColumn("Lname",
System.Type.GetType("System.String")); dTable.Columns.Add(column); column = new DataColumn("Age",
System.Type.GetType("System.Int16")); dTable.Columns.Add(column); dGrid.DataSource = dTable; dGrid.CaptionVisible = false; //no caption dGrid.RowHeadersVisible = false; //no row headers dGrid.EndInit();
To add text to the DataTable, you ask the table for a row object and then set the elements of the row object to the data for that row. If the types are all String, then you copy the strings, but if one of the columns is of a different type, such as the integer age column here, you must be sure to use that type in setting that column’s data. Note that you can refer to the columns by name or by index number:
DataRow row = dTable.NewRow(); row["Frname"] = sw.getFrname(); row[1] = sw.getLName(); row[2] = sw.getAge(); //This one is an integer dTable.Rows.Add(row); dTable.AcceptChanges();

Copyright © , 2002 by James W Cooper
185
However, we would like to be able to use the grid without changing our code at all from what we used for the simple list box. We do this by creating a GridAdapter which follows that same interface: public interface LstAdapter { void Add(Swimmer sw) ; int SelectedIndex() ; void Clear() ; void clearSelection() ; } The GridAdapter class implements this interface and is instantiated with an instance of the grid. public class GridAdapter:LstAdapter { private DataGrid grid; private DataTable dTable; private int row; //----- public GridAdapter(DataGrid grd) { grid = grd; dTable = (DataTable)grid.DataSource; grid.MouseDown +=
new System.Windows.Forms.MouseEventHandler (Grid_Click);
row = -1; } //----- public void Add(Swimmer sw) { DataRow row = dTable.NewRow(); row["Frname"] = sw.getFrname(); row[1] = sw.getLName(); row[2] = sw.getAge(); //This one is an integer dTable.Rows.Add(row); dTable.AcceptChanges(); } //----- public int SelectedIndex() { return row; } //----- public void Clear() { int count = dTable.Rows.Count ; for(int i=0; i< count; i++) {

Copyright © , 2002 by James W Cooper
186
dTable.Rows[i].Delete (); } } //----- public void clearSelection() {} }
Detecting Row Selection The DataGrid does not have a SelectedIndex property and the rows do not have Selected properties. Instead, you must detect a MouseDown event with a MouseEvent handler and then get the HitTest object and see if the user has clicked on a cell: public void Grid_Click(object sender, MouseEventArgs e) { DataGrid.HitTestInfo hti = grid.HitTest (e.X, e.Y); if(hti.Type == DataGrid.HitTestType.Cell ){ row = hti.Row ; } } Note that we can now simply call the GridAdapter class’s Add method when we click on the “à” button, regardless of which display control we are using. private void btClone_Click(object sender, System.EventArgs e) { int i = lskids.SelectedIndex (); if( i >= 0) { Swimmer sw = swdata.getSwimmer (i); lsNewKids.Add (sw); lskids.clearSelection (); } }
Using a TreeView If, however, you choose to use a TreeView control to display the data you select, you will find that there is no convenient interface that you can use to keep your code from changing.
For each node you want to create, you create an instance of the TreeNode class and add the root TreeNode collection to another node. In our

Copyright © , 2002 by James W Cooper
187
example version using the TreeView, we’ll add the swimmer’s name to the root node collection and the swimmer’s time as a subsidiary node. Here is the entire TreeAdapter class. public class TreeAdapter:LstAdapter { private TreeView tree; //------ public TreeAdapter(TreeView tr) { tree=tr; } //------ public void Add(Swimmer sw) { TreeNode nod; //add a root node nod = tree.Nodes.Add(sw.getName()); //add a child node to it nod.Nodes.Add(sw.getTime().ToString ()); tree.ExpandAll (); } //------ public int SelectedIndex() { return tree.SelectedNode.Index ; } //------ public void Clear() { TreeNode nod; for (int i=0; i< tree.Nodes.Count ; i++) { nod = tree.Nodes [i]; nod.Remove (); }
} //------ public void clearSelection() {} } The TreeDemo program is shown in Figure 14-2.

Copyright © , 2002 by James W Cooper
188
Figure 14-2 – The TreeDemo program.
The Class Adapter In the class adapter approach, we derive a new class from Listbox (or the grid or tree control) and add the desired methods to it. In this class adapter example, we create a new class called MyList which is derived from the Listbox class and which implements the following interface: public interface ListAdapter { void Add(Swimmer sw) ; void Clear() ; void clearSelection() ; } The derived MyList class is public class MyList : System.Windows.Forms.ListBox, ListAdapter { private System.ComponentModel.Container components = null; //----- public MyList() { InitializeComponent(); } //----- public void Add(string s) {
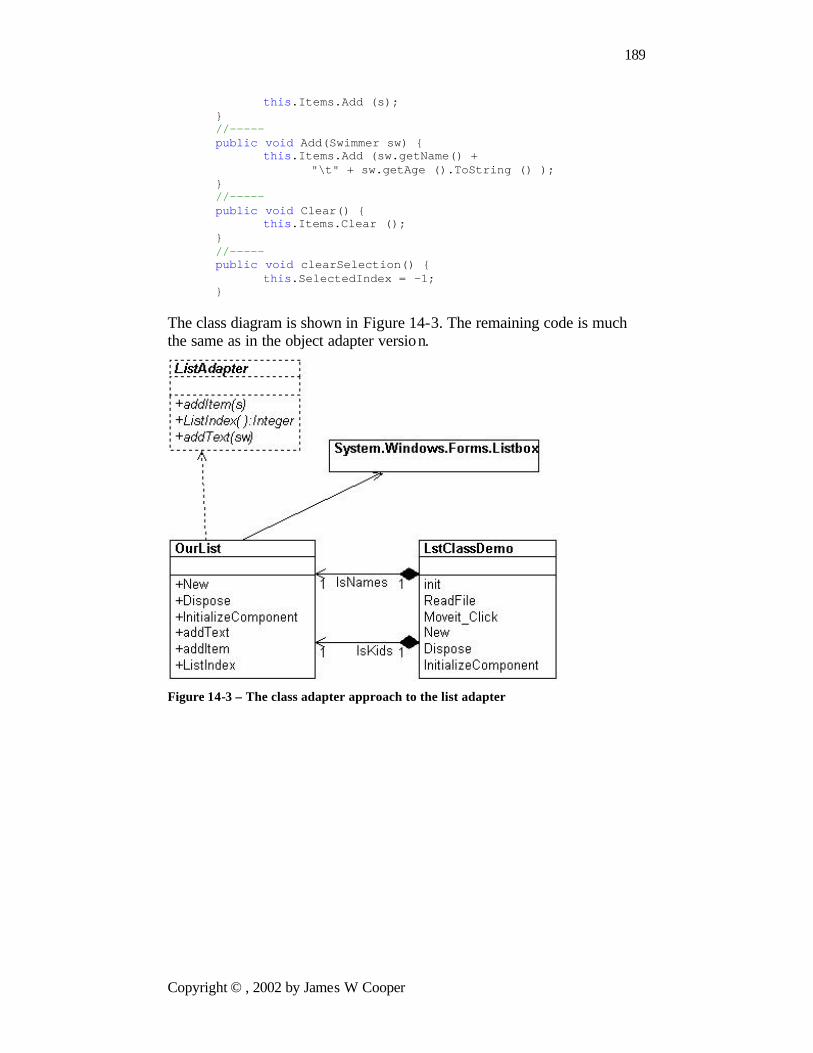
Copyright © , 2002 by James W Cooper
189
this.Items.Add (s); } //----- public void Add(Swimmer sw) { this.Items.Add (sw.getName() + "\t" + sw.getAge ().ToString () ); } //----- public void Clear() { this.Items.Clear (); } //----- public void clearSelection() { this.SelectedIndex = -1; } The class diagram is shown in Figure 14-3. The remaining code is much the same as in the object adapter version.
Figure 14-3 – The class adapter approach to the list adapter

Copyright © , 2002 by James W Cooper
190
There are also some differences between the class and the object adapter approaches, although they are less significant than in C++.
The class adapter
• Won’t work when we want to adapt a class and all of its subclasses, since you define the class it derives from when you create it.
• Lets the adapter change some of the adapted class’s methods but still allows the others to be used unchanged.
An object adapter
• Could allow subclasses to be adapted by simply passing them in as part of a constructor.
• Requires that you specifically bring any of the adapted object’s methods to the surface that you wish to make available.
Two-Way Adapters The two-way adapter is a clever concept that allows an object to be viewed by different classes as being either of type ListBox or type DataGrid. This is most easily carried out using a class adapter, since all of the methods of the base class are automatically available to the derived class. However, this can only work if you do not override any of the base class’s methods with any that behave differently.
Object Versus Class Adapters in C# The C# List, Tree, and Grid adapters we previously illustrated are all object adapters. That is, they are all classes that contain the visual component we are adapting. However, it is equally easy to write a List or Tree Class adapter that is derived from the base class and contains the new add method.
In the case of the DataGrid, this is probably not a good idea because we would have to create instances of DataTables and Columns inside the

Copyright © , 2002 by James W Cooper
191
DataGrid class, which makes one large complex class with too much knowledge of how other classes work.
Pluggable Adapters A pluggable adapter is one that adapts dynamically to one of several classes. Of course, the adapter can only adapt to classes it can recognize, and usually the adapter decides which class it is adapting based on differing constructors or setParameter methods.
Thought Question How would you go about writing a class adapter to make the DataGrid look like a two-column list box?
Programs on the CD-ROM \Adapter\TreeAdapter Tree adapter \Adapter\ListAdapter List adapter \Adapter\GridAdapter Grid adapter \Adapter\ClassAdapter Class-based list adapter

Copyright © , 2002 by James W Cooper
192
15. The Bridge Pattern
At first sight, the Bridge pattern looks much like the Adapter pattern in that a class is used to convert one kind of interface to another. However, the intent of the Adapter pattern is to make one or more classes’ interfaces look the same as that of a particular class. The Bridge pattern is designed to separate a class’s interface from its implementation so you can vary or replace the implementation without changing the client code.
The participants in the Bridge pattern are the Abstraction, which defines the class’s interface; the Refined Abstraction, which extends and implements that interface; the Implementor, which defines the interface for the implementation classes; and the ConcreteImplementors, which are the implementation classes.
Suppose we have a program that displays a list of products in a window. The simplest interface for that display is a simple Listbox. But once a significant number of products have been sold, we may want to display the products in a table along with their sales figures.
Since we have just discussed the adapter pattern, you might think immediately of the class-based adapter, where we adapt the interface of the Listbox to our simpler needs in this display. In simple programs, this will work fine, but as we’ll see, there are limits to that approach.
Let’s further suppose that we need to produce two kinds of displays from our product data: a customer view that is just the list of products we’ve mentioned and an executive view that also shows the number of units shipped. We’ll display the product list in an ordinary ListBox and the executive view in an DataGrid table display. These two displays are the implementations of the display classes, as shown in Figure 15-1.
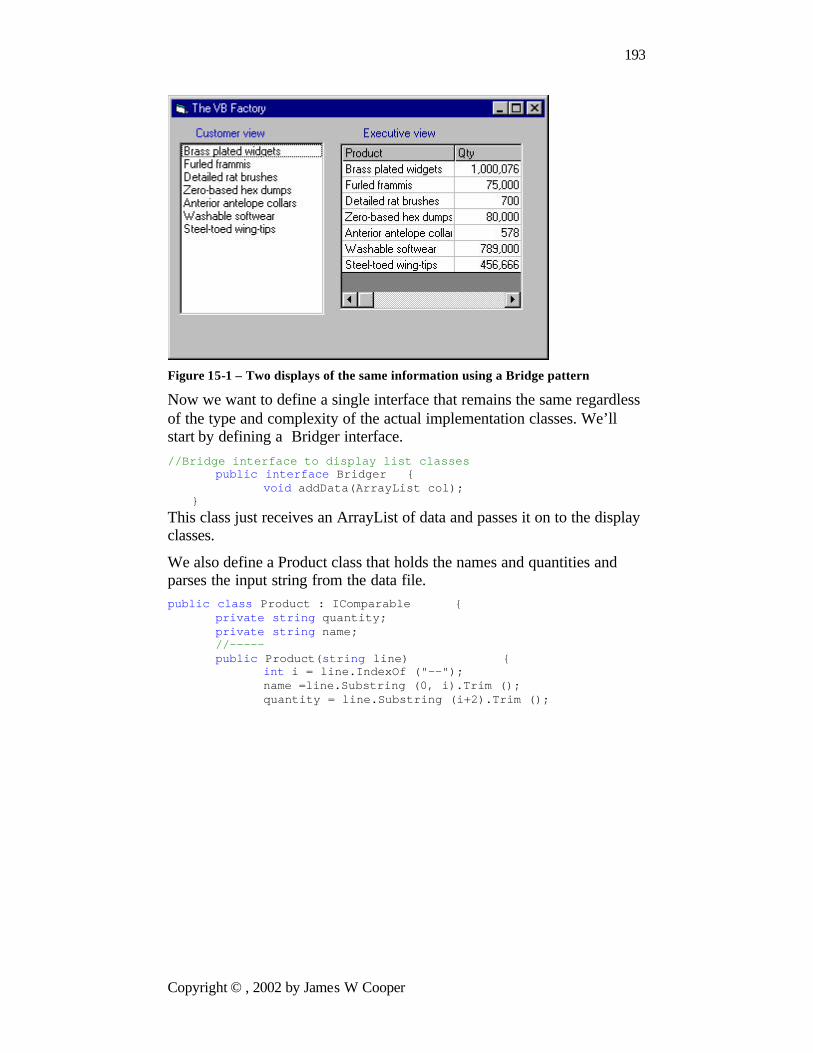
Copyright © , 2002 by James W Cooper
193
Figure 15-1 – Two displays of the same information using a Bridge pattern
Now we want to define a single interface that remains the same regardless of the type and complexity of the actual implementation classes. We’ll start by defining a Bridger interface. //Bridge interface to display list classes public interface Bridger { void addData(ArrayList col); } This class just receives an ArrayList of data and passes it on to the display classes.
We also define a Product class that holds the names and quantities and parses the input string from the data file. public class Product : IComparable { private string quantity; private string name; //----- public Product(string line) { int i = line.IndexOf ("--"); name =line.Substring (0, i).Trim (); quantity = line.Substring (i+2).Trim ();

Copyright © , 2002 by James W Cooper
194
} //----- public string getQuantity() { return quantity; } //----- public string getName() { return name; } } On the other side of the bridge are the implementation classes, which usually have a more elaborate and somewhat lower-level interface. Here we’ll have them add the data lines to the display one at a time. public interface VisList { //add a line to the display void addLine(Product p); //remove a line from the display void removeLine(int num); } The bridge between the interface on the left and the implementation on the right is the listBridge class, which instantiates one or the other of the list display classes. Note that it implements the Bridger interface for use of the application program. public class ListBridge : Bridger { protected VisList vis; //------ public ListBridge(VisList v) { vis = v; } //----- public virtual void addData(ArrayList ar) { for(int i=0; i< ar.Count ; i++) { Product p = (Product)ar[i]; vis.addLine (p); } } }

Copyright © , 2002 by James W Cooper
195
Note that we make the VisList variable protected and the addData method virtual so we can extend the class later. At the top programming level, we just create instances of a table and a list using the listBridge class. private void init() { products = new ArrayList (); readFile(products); //read in the data file //create the product list prodList = new ProductList(lsProd); //Bridge to product VisList Bridger lbr = new ListBridge (prodList); //put the data into the product list lbr.addData (products); //create the grid VisList gridList = new GridList(grdProd); //Bridge to the grid list Bridger gbr = new ListBridge (gridList); //put the data into the grid display gbr.addData (products); }
The VisList Classes The two VisList classes are really quite similar. The customer version operates on a ListBox and adds the names to it. //A VisList class for the ListBox public class ProductList : VisList { private ListBox list; //----- public ProductList(ListBox lst) { list = lst; } //----- public void addLine(Product p) { list.Items.Add (p.getName() ); } //----- public void removeLine(int num) { if(num >=0 && num < list.Items.Count ){ list.Items.Remove (num); } } }

Copyright © , 2002 by James W Cooper
196
The ProductTable version of the visList is quite similar except that it adds both the product name and quantity to the two columns of the grid. public class GridList:VisList { private DataGrid grid; private DataTable dtable; private GridAdapter gAdapter; //----- public GridList(DataGrid grd) { grid = grd; dtable = new DataTable("Products"); DataColumn column = new DataColumn("ProdName"); dtable.Columns.Add(column); column = new DataColumn("Qty"); dtable.Columns.Add(column); grid.DataSource = dtable; gAdapter = new GridAdapter (grid); } //----- public void addLine(Product p) { gAdapter.Add (p); }
The Class Diagram The UML diagram in Figure 15-2 for the Bridge class shows the separation of the interface and the implementation quite clearly. The Bridger class on the left is the Abstraction, and the listBridge class is the implementation of that abstraction. The visList interface describes the public interface to the list classes productList and productTable. The visList interface defines the interface of the Implementor, and the Concrete Implementors are the productList and productTable classes.
Note that these two concrete implementors are quite different in their specifics even though they both support the visList interface.

Copyright © , 2002 by James W Cooper
197
ProductTablegridListtabValtabCharvisList_addLinevisList_initvisList_removeLine
ProductListlst
visList_addLinevisList_initvisList_removeLine
ListBridge
Bridger_addDataBridger_init
visList
addLineremoveLineinit
Bridger
addDatainit
1
1visL
Figure 15-2 – The UML diagram for the Bridge pattern used in the two displays of product information
Extending the Bridge Now suppose we need to make some changes in the way these lists display the data. For example, maybe you want to have the products displayed in alphabetical order. You might think you’d need to either modify or subclass both the list and table classes. This can quickly get to be a maintenance nightmare, especially if more than two such displays are needed eventually. Instead, we simply derive a new SortBridge class similar to the listBridge class.
Copyright © , 2002 by James W Cooper
198
In order to sort Product objects, we have the Product class implement the IComparable interface which means it has a CompareTo method: public class Product : IComparable { private string quantity; private string name; //----- public Product(string line) { int i = line.IndexOf ("--"); name =line.Substring (0, i).Trim (); quantity = line.Substring (i+2).Trim (); } //----- public string getQuantity() { return quantity; } //----- public string getName() { return name; } //----- public int CompareTo(object p) { Product prod =(Product) p; return name.CompareTo (prod.getName ()); } With that change, sorting of the Product objects is much easier: public class SortBridge:ListBridge { //----- public SortBridge(VisList v):base(v){ } //----- public override void addData(ArrayList ar) { int max = ar.Count ; Product[] prod = new Product[max]; for(int i=0; i< max ; i++) { prod[i] = (Product)ar[i]; } for(int i=0; i < max ; i++) { for (int j=i; j < max; j++) { if(prod[i].CompareTo (prod[j])>0) { Product pt = prod[i]; prod[i]= prod[j]; prod[j] = pt;

Copyright © , 2002 by James W Cooper
199
} } } for(int i = 0; i< max; i++) { vis.addLine (prod[i]); } } }
You can see the sorted result in Figure 15-3.
Figure 15-3 – The sorted list generated using SortBridge class
This clearly shows that you can vary the interface without changing the implementation. The converse is also true. For example, you could create another type of list display and replace one of the current list displays without any other program changes as long as the new list also implements the VisList interface. Here is the TreeList class: public class TreeList:VisList { private TreeView tree; private TreeAdapter gAdapter; //----- public TreeList(TreeView tre) { tree = tre;

Copyright © , 2002 by James W Cooper
200
gAdapter = new TreeAdapter (tree); } //----- public void addLine(Product p) { gAdapter.Add (p); } Note that we take advantage of the TreeAdapter we wrote in the previous chapter, modified to work on Product objects: public class TreeAdapter { private TreeView tree; //------ public TreeAdapter(TreeView tr) { tree=tr; } //------ public void Add(Product p) { TreeNode nod; //add a root node nod = tree.Nodes.Add(p.getName()); //add a child node to it nod.Nodes.Add(p.getQuantity ()); tree.ExpandAll (); } In Figure Figure 15-4, we have created a tree list component that implements the VisList interface and replaced the ordinary list without any change in the public interface to the classes.