
ficon - Cisco - Global Home Page · FICON features can be implemented ... storage replication...
26
CHAPTER 23-1 Cisco MDS 9000 Fabric Manager Switch Configuration Guide OL-7753-01 23 Configuring FICON FI-bre CON-nection (FICON) interface capabilities enhances the Cisco MDS 9000 Family by supporting both open systems and mainframe storage network environments. Inclusion of Control Unit Port (CUP) support further enhances the MDS offering by allowing inband management of the switch from FICON processors. FICON features can be implemented in any switch in the Cisco MDS 9000 Family running SAN-OS Release 1.3(x) or above. While no hardware changes are required, you do need the MAINFRAME_PKG license to configure FICON parameters. This chapter contains the following topics: • About FICON, page 23-2 • MDS-Specific FICON Advantages, page 23-3 • FICON Port Numbering, page 23-6 • MDS FICON Prerequisites, page 23-11 • Enabling FICON, page 23-12 • Creating FICON VSANs (enabling FICON) Using Fabric Manager, page 23-12 • Creating FICON VSANs (enabling FICON) Using Device Manager, page 23-13 • Deleting FICON VSANs (Disabling FICON), page 23-13 • Viewing FICON Director History, page 23-14 • Configuring Code Page, page 23-14 • Configuring the FC ID Last Byte, page 23-14 • Automatically Saving the Running Configuration, page 23-14 • Binding Port Numbers to PortChannels, page 23-15 • Binding Port Numbers to FCIP Interfaces, page 23-15 • Configuring FICON Ports, page 23-15 • Entering FICON Port Configuration Information, page 23-16 • Viewing FICON Port Attributes, page 23-17 • FICON Configuration Files, page 23-17 • Creating FICON Files, page 23-18 • Deleting FICON Files, page 23-19 • Copying FICON Files, page 23-19
-
Upload
doannguyet -
Category
Documents
-
view
217 -
download
2
Transcript of ficon - Cisco - Global Home Page · FICON features can be implemented ... storage replication...

Cisco MDS 9000 FabrOL-7753-01
C H A P T E R 23
Configuring FICONFI-bre CON-nection (FICON) interface capabilities enhances the Cisco MDS 9000 Family by supporting both open systems and mainframe storage network environments. Inclusion of Control Unit Port (CUP) support further enhances the MDS offering by allowing inband management of the switch from FICON processors.
FICON features can be implemented in any switch in the Cisco MDS 9000 Family running SAN-OS Release 1.3(x) or above. While no hardware changes are required, you do need the MAINFRAME_PKG license to configure FICON parameters.
This chapter contains the following topics:
• About FICON, page 23-2
• MDS-Specific FICON Advantages, page 23-3
• FICON Port Numbering, page 23-6
• MDS FICON Prerequisites, page 23-11
• Enabling FICON, page 23-12
• Creating FICON VSANs (enabling FICON) Using Fabric Manager, page 23-12
• Creating FICON VSANs (enabling FICON) Using Device Manager, page 23-13
• Deleting FICON VSANs (Disabling FICON), page 23-13
• Viewing FICON Director History, page 23-14
• Configuring Code Page, page 23-14
• Configuring the FC ID Last Byte, page 23-14
• Automatically Saving the Running Configuration, page 23-14
• Binding Port Numbers to PortChannels, page 23-15
• Binding Port Numbers to FCIP Interfaces, page 23-15
• Configuring FICON Ports, page 23-15
• Entering FICON Port Configuration Information, page 23-16
• Viewing FICON Port Attributes, page 23-17
• FICON Configuration Files, page 23-17
• Creating FICON Files, page 23-18
• Deleting FICON Files, page 23-19
• Copying FICON Files, page 23-19
23-1ic Manager Switch Configuration Guide
Chapter 23 Configuring FICON About FICON
• Port Swapping, page 23-19
• Swapping FICON Ports, page 23-20
• Clearing FICON Device Allegiance, page 23-21
• CUP Inband Management, page 23-21
• Configuring Fabric Binding, page 23-21
• Activating Fabric Binding, page 23-24
• Deactivating Fabric Binding, page 23-24
• Fabric Binding CopyActive to Config, page 23-24
• Creating a Fabric Binding Configuration, page 23-25
• Deleting a Fabric Binding Configuration, page 23-25
• Viewing Fabric Binding Active Database, page 23-25
• Viewing Fabric Binding Violations, page 23-25
• Clearing Fabric Binding Statistics, page 23-26
• Viewing EFMD Statistics, page 23-26
• Displaying RLIR Information, page 23-26
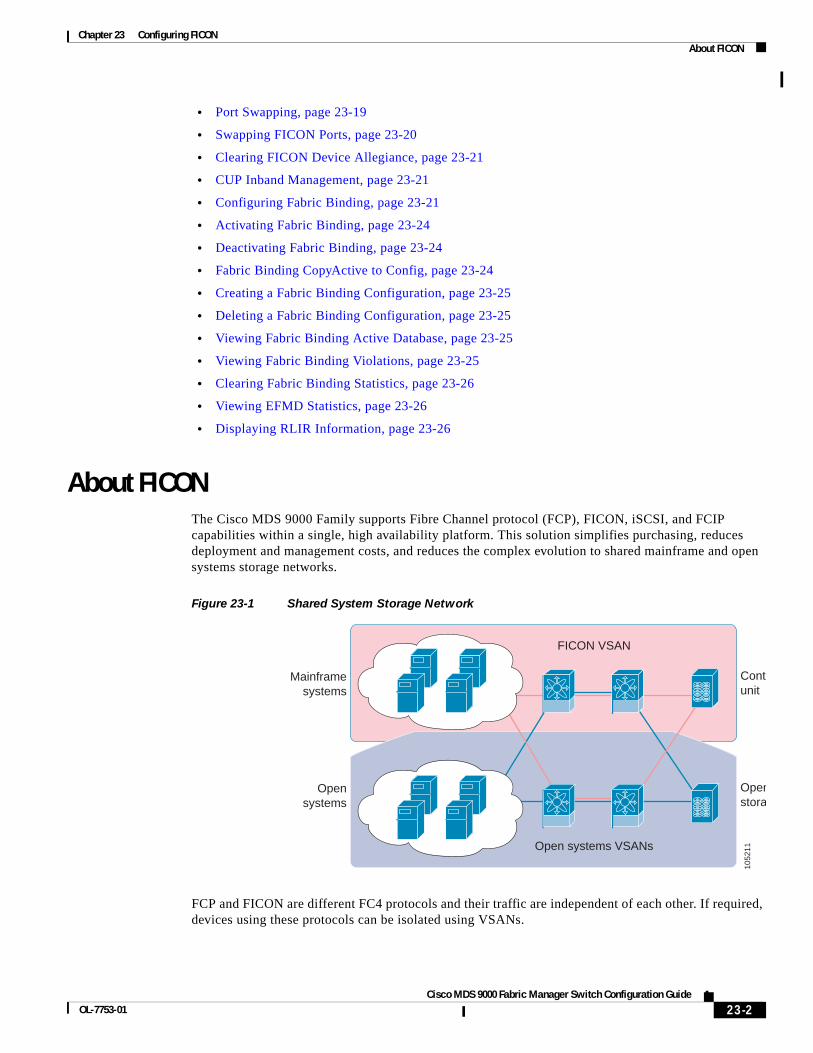
About FICONThe Cisco MDS 9000 Family supports Fibre Channel protocol (FCP), FICON, iSCSI, and FCIP capabilities within a single, high availability platform. This solution simplifies purchasing, reduces deployment and management costs, and reduces the complex evolution to shared mainframe and open systems storage networks.
Figure 23-1 Shared System Storage Network
FCP and FICON are different FC4 protocols and their traffic are independent of each other. If required, devices using these protocols can be isolated using VSANs.
Openstorag
Opensystems
Contrunit
Mainframesystems
Open systems VSANs
FICON VSAN
1052
11
23-2Cisco MDS 9000 Fabric Manager Switch Configuration Guide
OL-7753-01

Chapter 23 Configuring FICON MDS-Specific FICON Advantages
MDS-Specific FICON AdvantagesThis section explains the additional FICON advantages in Cisco MDS switches:
This section contains the following topics:
• Fabric-Optimization with VSANs, page 23-3
• FCIP Support, page 23-4
• PortChannel Support, page 23-5
• VSANs for FICON and FCP Intermixing, page 23-5
• MDS-Supported FICON Features, page 23-5
Fabric-Optimization with VSANsGenerally, separate physical fabrics have a high level of switch management and have a higher implementation cost. Further, the ports in each island may be over-provisioned depending on the fabric configuration.
By using the Cisco MDS-specific VSAN technology, you can introduce greater efficiency between these physical fabrics by lowering the cost of over-provisioning and reducing the number of switches to be managed.
VSANs also help you to move unused ports nondisruptively and provides a common redundant physical infrastructure.
23-3Cisco MDS 9000 Fabric Manager Switch Configuration Guide
OL-7753-01

Chapter 23 Configuring FICON MDS-Specific FICON Advantages
Figure 23-2 VSAN-specific Fabric Optimization
VSANs enable global SAN consolidation by allowing you to convert existing SAN islands into virtual SAN islands on a single physical network. It provides hardware-enforced security and separation between applications or departments to allow coexistence on a single network. It also allows virtual rewiring to consolidate your storage infrastructure. You can move assets between departments or applications without the expense and disruption of physical relocation of equipment.
While you can configure up to 256 VSANs in any Cisco MDS switch, you can enable FICON in only eight of these VSANs.
FCIP SupportThe multilayer architecture of the Cisco MDS 9000 Family enables a consistent feature set over a protocol-agnostic switch fabric. Cisco MDS 9500 Series and MDS 9216 switches transparently integrate Fibre Channel, FICON and Fibre Channel over IP (FCIP) in one system. The FICON over FCIP feature enables cost-effective access to remotely located mainframe resources. With the MDS 9000 platform, storage replication services such as IBM PPRC and XRC can be extended over metro to global distances using ubiquitous IP infrastructure and simplifying business continuance strategies.
The Cisco MDS implementation of FICON provides support for IP tunneling to efficiently consolidate SANs over WAN distances. IP tunnels enable a globally accessible storage infrastructure. Refer to the for further information on FCIP.
Separate physical fabrics Collapsed fabric withVSANs
SAN island fordepartment no.1
SAN island fordepartment no. 2
SAN island fordepartment no. 3
Applicationservers
Diskarrays
Department no. 1
Department no. 2VSAN
Department no.3VSAN
Commonstorage poolfound among
VSANs
1052
12
23-4Cisco MDS 9000 Fabric Manager Switch Configuration Guide
OL-7753-01
Chapter 23 Configuring FICON MDS-Specific FICON Advantages
PortChannel SupportThe Cisco MDS implementation of FICON provides support for efficient utilization and increased availability of inter-switch links necessary to build stable large-scale SAN environments. PortChannels ensure an enhanced ISL availability and performance in Cisco MDS switches.
VSANs for FICON and FCP IntermixingCisco MDS 9000 Family FICON-enabled switches simplify deployment of even the most complex intermix environments. Multiple logical FICON, Z-Series Linux/FCP and Open-Systems FCP fabrics can be overlaid onto a single physical fabric by simply creating VSANs as required for each service. VSANs provide both hardware isolation and protocol specific fabric services, eliminating the complexity and potential instability of zone-based intermix schemes.
By default, the FICON feature is disabled in all switches in the Cisco MDS 9000 Family. When the FICON feature is disabled, FC IDs can be allocated seamlessly. Intermixed environments are addressed by the SAN-OS software. The challenge of mixing Fibre Channel Protocol (FCP) and FICON protocols are addressed by Cisco MDS switches when implementing VSANs.
Switches and Directors in the Cisco MDS 9000 Family support FCP and FICON protocol intermixing at the port level. If these protocols are intermixed in the same switch, you can use VSANs to isolate FCP and FICON ports.
Tip When creating an intermix environment, place all FICON devices in one VSAN (other than the default VSAN) and segregate the FCP switch ports in a separate VSAN (other than the default VSAN). This isolation ensures proper communication for all connected devices.
MDS-Supported FICON FeaturesThe Cisco MDS 9000 Family FICON features include:
• Flexibility and investment protection--The Cisco MDS 9000 Family shares common switching and service modules across all Cisco MDS 9500 Series as well as the Cisco MDS 9216 Switch. (refer to the Cisco MDS 9500Series and the Cisco MDS 9216 Switch Hardware Installation Guides).
• High-availability FICON-enabled director--The Cisco MDS 9500 Series combines nondisruptive software upgrades, stateful process restart and failover, and full redundancy of all major components for a new standard in director-class availability. It supports up to 224 2/1-Gbps, autosensing FICON or Fibre Channel FCP ports in any combination in a single chassis and up to 768 Fibre Channel ports in a single rack--1.44 Tbps of internal system bandwidth ensures smooth integration of future 10-Gbps modules.
• Infrastructure protection--Common software releases infrastructure protection is available across all Cisco MDS 9000 platforms.
• VSAN technology--The Cisco MDS 9000 Family introduces VSAN technology for hardware-enforced, isolated environments within a single physical fabric for secure sharing of physical infrastructure and enhanced FICON intermix support.
23-5Cisco MDS 9000 Fabric Manager Switch Configuration Guide
OL-7753-01

Chapter 23 Configuring FICON FICON Port Numbering
• Port-level configurations:
– BB_credits for each port.
– Port security for each port.
– Enable beaconing for ports and the director unit
– Configure an alias name, instead of the WWN, for switches and attached node devices.
– Comprehensive security framework--The Cisco MDS 9000 Family supports RADIUS authentication, Simple Network Management Protocol Version 3 (SNMPv3), role-based access control, Secure Shell Protocol (SSH), Secure File Transfer Protocol (SFTP), Fibre Channel Security Protocol (FC-SP), VSANs, hardware-enforced zoning, LUN zoning, read-only zones, ACLs, fabric binding and VSAN-based access control.
– View the local accounting log to locate FICON events.
– Unified storage management--Cisco MDS 9000 FICON-enabled switches are fully IBM CUP standard compliant for in-band management using the IBM S/A OS/390 I/O operations console.
– Port address-based configurations--port name, blocked or unblocked state, and the prohibit connectivity attributes.
– Display the following information:
– Individual Fibre Channel ports, such as the port name, port number, Fibre Channel address, operational state, type of port, and login data.
– Nodes attached to ports.
– Port performance and statistics.
• Store and apply configuration files.
• FICON and Open Systems Management Server features if installed.
• Enhanced Cascading Support
• Set the date and time on the switch.
• Configure SNMP trap recipients and community names.
• Call Home configurations--director name, location, description, and contact person.
• Configure preferred domain ID, FC ID persistence, and principle switch priority.
• Sophisticated SPAN diagnostics--The Cisco MDS 9000 Family provides industry-first intelligent diagnostics, protocol, decoding, and network analysis tools as well as integrated call-home capability for added reliability, faster problem resolution, and reduced service costs.
• Configure R_A_TOV, E_D_TOV
• Perform maintenance tasks for the director including maintaining firmware levels, accessing the director logs, and collecting data to support failure analysis.
• Display and clear port-level incident alerts
FICON Port NumberingWith reference to the FICON feature, ports in Cisco MDS switches are identified by a statically defined 8-bit value known as the port number. Port numbers are assigned based on the module and the slot in the chassis. Port numbers cannot be changed and the first port in a switch always starts with a 0.
23-6Cisco MDS 9000 Fabric Manager Switch Configuration Guide
OL-7753-01
Chapter 23 Configuring FICON FICON Port Numbering
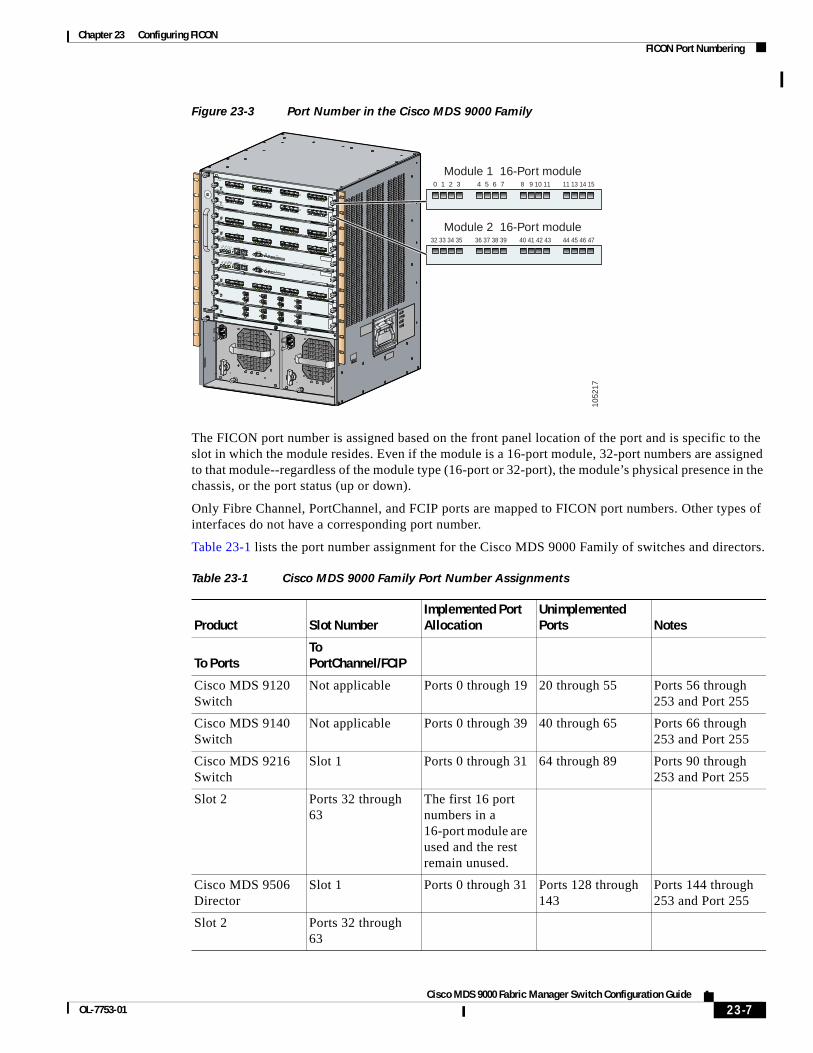
Figure 23-3 Port Number in the Cisco MDS 9000 Family
The FICON port number is assigned based on the front panel location of the port and is specific to the slot in which the module resides. Even if the module is a 16-port module, 32-port numbers are assigned to that module--regardless of the module type (16-port or 32-port), the module’s physical presence in the chassis, or the port status (up or down).
Only Fibre Channel, PortChannel, and FCIP ports are mapped to FICON port numbers. Other types of interfaces do not have a corresponding port number.
Table 23-1 lists the port number assignment for the Cisco MDS 9000 Family of switches and directors.
0 1 2 3 4 5 6 7 8 9 10 11 11 13 14 15
Module 1 16-Port module
32 33 34 35 36 37 38 39 40 41 42 43 44 45 46 47
Module 2 16-Port module
1052
17
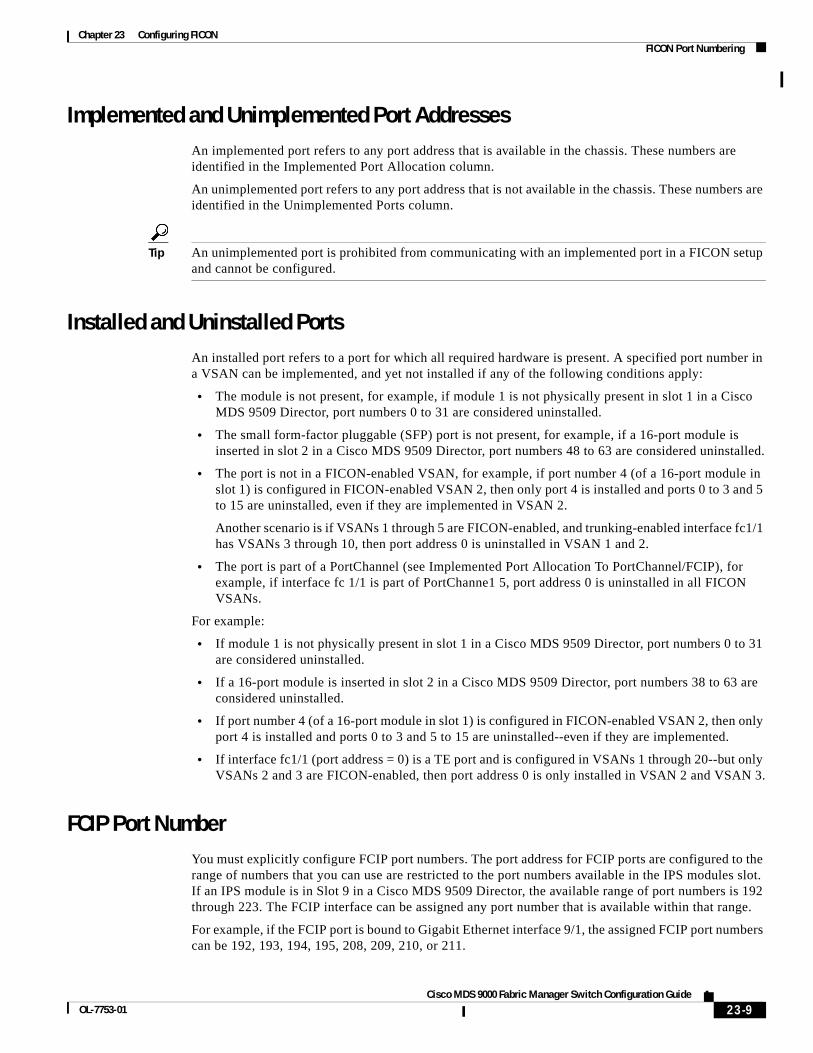
Table 23-1 Cisco MDS 9000 Family Port Number Assignments
Product Slot NumberImplemented Port Allocation
Unimplemented Ports Notes
To PortsTo PortChannel/FCIP
Cisco MDS 9120 Switch
Not applicable Ports 0 through 19 20 through 55 Ports 56 through 253 and Port 255
Cisco MDS 9140 Switch
Not applicable Ports 0 through 39 40 through 65 Ports 66 through 253 and Port 255
Cisco MDS 9216 Switch
Slot 1 Ports 0 through 31 64 through 89 Ports 90 through 253 and Port 255
Slot 2 Ports 32 through 63
The first 16 port numbers in a 16-port module are used and the rest remain unused.
Cisco MDS 9506 Director
Slot 1 Ports 0 through 31 Ports 128 through 143
Ports 144 through 253 and Port 255
Slot 2 Ports 32 through 63
23-7Cisco MDS 9000 Fabric Manager Switch Configuration Guide
OL-7753-01

Chapter 23 Configuring FICON FICON Port Numbering
Port AddressesBy default, port numbers are the same as port addresses.
Slot 3 Ports 64 through 95
Slot 4 Ports 96 through 127
Slot 5 None Supervisor modules are not allocated port numbers.
Slot 6 None
Cisco MDS 9509 Director
Slot 1 Ports 0 through 31 Ports 224 through 239
Ports 240 through 253 and Port 255
Slot 2 Ports 32 through 63
Slot 3 Ports 64 through 95
Slot 4 Ports 96 through 127
Slot 5 None Supervisor module are not allocated port numbers.
Slot 6 None
Slot 7 Ports 128 through 159
The first 16 port numbers in a 16-port module are used and the rest remain unused.
Slot 8 Ports 160 through 191
Slot 9 Ports 192 through 223
Table 23-1 Cisco MDS 9000 Family Port Number Assignments (continued)
23-8Cisco MDS 9000 Fabric Manager Switch Configuration Guide
OL-7753-01
Chapter 23 Configuring FICON FICON Port Numbering
Implemented and Unimplemented Port AddressesAn implemented port refers to any port address that is available in the chassis. These numbers are identified in the Implemented Port Allocation column.
An unimplemented port refers to any port address that is not available in the chassis. These numbers are identified in the Unimplemented Ports column.
Tip An unimplemented port is prohibited from communicating with an implemented port in a FICON setup and cannot be configured.
Installed and Uninstalled PortsAn installed port refers to a port for which all required hardware is present. A specified port number in a VSAN can be implemented, and yet not installed if any of the following conditions apply:
• The module is not present, for example, if module 1 is not physically present in slot 1 in a Cisco MDS 9509 Director, port numbers 0 to 31 are considered uninstalled.
• The small form-factor pluggable (SFP) port is not present, for example, if a 16-port module is inserted in slot 2 in a Cisco MDS 9509 Director, port numbers 48 to 63 are considered uninstalled.
• The port is not in a FICON-enabled VSAN, for example, if port number 4 (of a 16-port module in slot 1) is configured in FICON-enabled VSAN 2, then only port 4 is installed and ports 0 to 3 and 5 to 15 are uninstalled, even if they are implemented in VSAN 2.
Another scenario is if VSANs 1 through 5 are FICON-enabled, and trunking-enabled interface fc1/1 has VSANs 3 through 10, then port address 0 is uninstalled in VSAN 1 and 2.
• The port is part of a PortChannel (see Implemented Port Allocation To PortChannel/FCIP), for example, if interface fc 1/1 is part of PortChanne1 5, port address 0 is uninstalled in all FICON VSANs.
For example:
• If module 1 is not physically present in slot 1 in a Cisco MDS 9509 Director, port numbers 0 to 31 are considered uninstalled.
• If a 16-port module is inserted in slot 2 in a Cisco MDS 9509 Director, port numbers 38 to 63 are considered uninstalled.
• If port number 4 (of a 16-port module in slot 1) is configured in FICON-enabled VSAN 2, then only port 4 is installed and ports 0 to 3 and 5 to 15 are uninstalled--even if they are implemented.
• If interface fc1/1 (port address = 0) is a TE port and is configured in VSANs 1 through 20--but only VSANs 2 and 3 are FICON-enabled, then port address 0 is only installed in VSAN 2 and VSAN 3.
FCIP Port NumberYou must explicitly configure FCIP port numbers. The port address for FCIP ports are configured to the range of numbers that you can use are restricted to the port numbers available in the IPS modules slot. If an IPS module is in Slot 9 in a Cisco MDS 9509 Director, the available range of port numbers is 192 through 223. The FCIP interface can be assigned any port number that is available within that range.
For example, if the FCIP port is bound to Gigabit Ethernet interface 9/1, the assigned FCIP port numbers can be 192, 193, 194, 195, 208, 209, 210, or 211.
23-9Cisco MDS 9000 Fabric Manager Switch Configuration Guide
OL-7753-01

Chapter 23 Configuring FICON FICON Port Numbering
Figure 23-4 FCIP Port Numbers in the Cisco MDS 9000 Family
Gigabit Ethernet ports do not have a corresponding mapping to the FICON port number concept.
Port Numbering SummaryThe following guidelines apply to FICON port numbers:
• Supervisor modules do not have port number assignments.
• Port number are VSAN independent--Fibre Channel port numbers do not change based on VSANs or TE ports.
• Each PortChannel must be explicitly associated with a FICON port number.
• When the port number for a physical PortChannel becomes uninstalled, the relevant PortChannel configuration is applied to the physical port.
• Each FCIP tunnel must be explicitly associated with a FICON port number—If the port number is not assigned for PortChannels or for FCIP tunnels, the associated ports will not come up (see the “FCIP and PortChannel Port Numbers” section on page 23-10).
FCIP and PortChannel Port NumbersFCIP and PortChannels cannot be used in a FICON enabled VSAN unless they are explicitly bound to a port number. Refer to“Binding Port Numbers to PortChannels” section on page 23-15 or “Binding Port Numbers to FCIP Interfaces” section on page 23-15 for configuration details.
Tip You can assign port numbers which are not in the PortChannel range and which are not bound to PortChannel or FCIP interfaces.
0 1 2 3 4 5 6 7 8 9 10 11 11 13 14 15
48 49 50 51 52 53 54 55 56 57 58 59 60 61 62 63
32 33 34 35 36 37 38 39
192 193 194 195
208 209 210 211
40 41 42 43 44 45 46 47
Module 1 16-Port module
Module 2 32-Port module
Module 9 IPS module
1953
07
23-10Cisco MDS 9000 Fabric Manager Switch Configuration Guide
OL-7753-01

Chapter 23 Configuring FICON MDS FICON Prerequisites
FC ID AllocationFICON requires a predictable and static FC ID allocation scheme. When FICON is enabled, the FC ID allocated to a device is based on the port address of the port to which it is attached. The port address forms the middle byte of the fabric address. Additionally, the last byte of the fabric address should be the same for all devices in the fabric. By default, the last byte value is 0 and can be configured.
Note You cannot configure persistent FC IDs in FICON-enabled VSANs.
Cisco MDS switches have a dynamic FC ID allocation scheme. When FICON is enabled or disabled on a VSAN, all the ports are flapped to switch from the dynamic to static FC IDs and vice versa.
Figure 23-5 Static FC ID Allocation for FICON
FICON CascadingThe SAN-OS software allows multiple switches in a FICON network. To configure multiple switches, you must enabled and configure fabric binding in that switch.
MDS FICON PrerequisitesTo ensure that a FICON VSAN is operationally up, be sure to verify the following requirements:
• Set the default zone to permit, if you are not using the zoning feature.
• Enable in-order delivery on the VSAN.
• Enable (and if required, configure) fabric binding on the VSAN.
• Verify that conflicting persistent FC IDs do not exist in the switch.
• Verify that the configured domain ID and requested domain ID match.
• Add the CUP (area FE) to the zone, if you are using zoning.
If any of these requirements are not met, the FICON feature cannot be enabled.
Static Domain Port Address Last Byte
5 0x44 0
Static FC ID allocation for interface fc3/5 includes thestatic domain ID (5), the port address (0x44), and the last byte value (0). 11
3134
23-11Cisco MDS 9000 Fabric Manager Switch Configuration Guide
OL-7753-01
Chapter 23 Configuring FICON Enabling FICON
Enabling FICONBy default FICON is disabled in all switches in the Cisco MDS 9000 Family. You can enabled FICON on a per VSAN basis in one of two ways:
• Manually addressing each prerequisite.
• By using the Device Manager (refer to the Cisco MDS 9000 Family Fabric Manager User Guide for further information).
Effects of Enabling FICONWhen you enable the FICON feature in Cisco MDS switches, the following apply:
• The IPL configuration file is automatically created.
• You cannot disable in-order delivery, fabric binding, or static domain ID configurations.
• You cannot disable fabric binding or static domain ID configurations for the FICON-enabled VSAN.
• The load balancing scheme is changed to Source ID (SID), Destination ID (DID). You cannot change it back to SID,DID,OXID.
Creating FICON VSANs (enabling FICON) Using Fabric ManagerThe VSAN that is created here does not need to be a new VSAN. It is a new FICON VSAN. When a new FICON VSAN is created, static (insistent) domain IDs, in-order delivery, and fabric binding must be enabled so the FICON VSAN can operate. When you enable the FICON feature in Cisco MDS switches, the following apply:
• The IPL configuration file is automatically created (see the “FICON Configuration Files” section).
• You cannot disable in-order delivery, fabric binding, or static (insistent) domain ID configurations.
If you specify an existing VSAN with operational traffic to be used for the FICON VSAN, the traffic will be disrupted. In this case, a warning message is displayed before you create the FICON VSAN.
To create a FICON VSAN using Fabric Manager, follow these steps:
Step 1 From Fabric Manager, right click on All VSANs in the Logical pane, and click Create VSAN.
You see the Create VSAN dialog box.
Step 2 Choose the switches you want to be in the VSAN.
Step 3 Enter a VSAN ID.
Step 4 Enter the name of the VSAN, if desired.
Step 5 Select the type of load balancing, the interop value, and the admin state you would like.
Step 6 If this is to be a FICON VSAN, check the FICON check box.
Step 7 To enable fabric binding for the selected switches, check that check box.
Step 8 Click Create to create the new VSAN, or click Close to close the dialog box without creating the VSAN.
Step 9 Open Device Manager for each switch in the VSAN.
23-12Cisco MDS 9000 Fabric Manager Switch Configuration Guide
OL-7753-01

Chapter 23 Configuring FICON Creating FICON VSANs (enabling FICON) Using Device Manager
Step 10 Choose FICON > VSANs. You see the FICON VSANs dialog box.
Step 11 Enter the VSAN membership information.
Creating FICON VSANs (enabling FICON) Using Device ManagerThe VSAN that is created here does not need to be a new VSAN. It is a new FICON VSAN. When a new FICON VSAN is created, static (insistent) domain IDs, in-order delivery, and fabric binding must be enabled so the FICON VSAN can operate. When you enable the FICON feature in Cisco MDS switches, the following apply:
• The IPL configuration file is automatically created (see the “FICON Configuration Files” section on page 23-17).
• You cannot disable in-order delivery, fabric binding, or static (insistent) domain ID configurations.
If you specify an existing VSAN with operational traffic to be used for the FICON VSAN, the traffic will be disrupted. In this case, a warning message is displayed before you create the FICON VSAN.
To create a FICON VSAN, follow these steps:
Step 1 From Device Manager, choose FICON > VSANs. You see the FICON VSANs/Files configuration dialog box.
Step 2 Ensure that the VSANs tab is enabled.
Step 3 Click Create. You see the Create FICON VSANs dialog box.
Step 4 Enter the VSAN ID.
Step 5 Enter the Domain ID.
Step 6 Click Create to create the new VSAN, or click Close to close the dialog box without creating the VSAN.
Deleting FICON VSANs (Disabling FICON)To delete a FICON VSAN, follow these steps:
Step 1 From Device Manager, choose FICON > VSANs. You see the FICON VSAN configuration dialog box.
Step 2 Ensure that the VSANs tab is enabled.
Step 3 Click anywhere in the row for the VSAN you want to delete.
Step 4 Click Delete to delete the VSAN.
Note Deleting the VSAN will also delete the associated FICON configuration file, and the file cannot be recovered.
23-13Cisco MDS 9000 Fabric Manager Switch Configuration Guide
OL-7753-01

Chapter 23 Configuring FICON Viewing FICON Director History
Viewing FICON Director HistoryTo view FICON director history, follow these steps:
Step 1 From Device Manager, choose FICON > VSANs. You see the FICON VSAN configuration dialog box.
Step 2 Ensure that the VSANs tab is enabled.
Step 3 Click anywhere in the row for the VSAN that you are interested in.
Step 4 Click Director History to display a history of FICON-related changes to this switch.
Configuring Code PageFICON strings are coded in Extended Binary-Coded Decimal Interchange Code (EBCDIC) format. Refer to your mainframe documentation for details on the code page options. Cisco MDS switches support international-5, france, brazil, germany, italy, japan, spain-latinamerica, uk, and us-canada (default) EBCDIC format options.
Tip This is an optional configuration. If you are not sure of the EBCDIC format to be used, we recommend retaining the us-canada (default) option.
Configuring the FC ID Last ByteFICON requires the last byte of the fabric address to be the same for all allocated FC IDs. By default, this value is set to 0. You can only change the FC ID last byte when the FICON switch is in the offline state.
Automatically Saving the Running ConfigurationWhen active equals saved is enabled in a VSAN, any FICON changes to the block, prohibit or port address name are immediately written to the IPL file (see the “FICON Configuration Files” section on page 23-17).
If active equals saved is enabled in any FICON-enabled VSAN in the fabric, all non-FICON configuration changes are automatically saved to persistent storage (implicit copy running start) when a configuration is changed. In this case, the current active configuration across all VSANs is saved to persistent storage.
The table below displays the results of active equals saved being enabled in at least one FICON VSAN.
Note If your switch or fabric consists of multiple FICON -enabled VSANs, and one of these VSANs have active equals saved enabled, changes made to the non-FICON configuration results in all configurations being saved to the startup configuration.
23-14Cisco MDS 9000 Fabric Manager Switch Configuration Guide
OL-7753-01
Chapter 23 Configuring FICON Binding Port Numbers to PortChannels
Binding Port Numbers to PortChannelsYou can bind (or associate) a PortChannel with a FICON port number to bring up that interface.
Binding Port Numbers to FCIP InterfacesYou can bind (or associate) an FCIP interface with a FICON port number to the selected PortChannel interface.
Configuring FICON PortsYou can perform FICON configurations on a per-port address basis in the Cisco MDS 9000 Family of switches.
Even if a port is uninstalled, the port address-based configuration is accepted by the Cisco MDS switch. This configuration is applied to the port when the port becomes installed.
FICON Information Refresh NoteWhen viewing FICON information through the Device Manager dialog boxes, you must manually refresh the display by clicking the Refresh button in order to see the latest updates. This is true whether you configure FICON through the CLI or through the Device Manager.
There is no automatic refresh of FICON information. This information would be refreshed so often that it would affect performance.
Blocking PortsIf you block a port, the port is retained in the operationally down state. If you unblock a port, a port initialization is attempted. When a port is blocked, data and control traffic is not allowed on that port.
Physical Fibre Channel port blocks will continue to transmit Off-Line State (OLS) primitive sequence on a blocked port.
Note The shutdown/no shutdown port state is independent of the block/no block port state. If a port is shutdown, unblocking that port will not initialize the port.
Caution You cannot block or prohibit CUP port (0XFE).
23-15Cisco MDS 9000 Fabric Manager Switch Configuration Guide
OL-7753-01

Chapter 23 Configuring FICON Entering FICON Port Configuration Information
Prohibiting PortsTo prevent implemented ports (see the“Implemented and Unimplemented Port Addresses” section on page 23-9) from talking to each other, you can configure two or more ports to be in a prohibited state. If you prohibit ports, the specified ports are prevented from communicating with each other.
Note Unimplemented ports are always prohibited.
Prohibit configurations are always symmetrically applied—if you prohibit Port 0 from talking to Port 15, Port 15 is automatically prohibited from talking to Port 0.
Note If an interface is already configured in E or TE mode and you try to prohibit that port, your prohibit configuration is rejected. Similarly, if a port is not up and you prohibit that port, the port is not allowed to come up in E mode nor in TE mode.
Entering FICON Port Configuration Information
Note To view the latest FICON information, you must click the Refresh button. See the “FICON Information Refresh Note” section on page 23-15 for more information.
To display FICON Port Configuration information, follow these steps:
Step 1 From Device Manager, choose FICON > VSANs. You see the FICON VSAN configuration dialog box.
Step 2 Ensure that the VSANs tab is enabled.
Step 3 Click anywhere in the row for the VSAN for which you want to configure port information.
Step 4 Click Port Configuration to display the Port Configuration dialog box.
Step 5 Enter the port configuration information. Click Apply to save the configuration information, or click Cancel to close the dialog box without saving the changes.
23-16Cisco MDS 9000 Fabric Manager Switch Configuration Guide
OL-7753-01

Chapter 23 Configuring FICON Viewing FICON Port Attributes
Viewing FICON Port Attributes
Note To view the latest FICON information, you must click Refresh. See the “FICON Information Refresh Note” section on page 23-15 for more information.
To view FICON port attributes, follow these steps:
Step 1 From Device Manager, choose FICON > VSANs. You see the FICON VSAN configuration dialog box.
Step 2 Ensure that the VSANs tab is enabled.
Step 3 Click anywhere in the row for the VSAN that you are interested in.
Step 4 Click Port Attributes to display the Port Attributes dialog box.
FICON Configuration FilesYou can save up to 16 FICON configuration files on each FICON-enabled VSAN (in persistent storage). The file format is proprietary to IBM TM. These files can be read and written by IBM hosts using the inband CUP protocol. Additionally, you can use the Cisco MDS CLI or FM applications to operate these FICON configuration files
Multiple FICON configuration files with the same name can exist in the same switch, provide they reside in different VSANs. For example, you can create a configuration file named XYZ in both VSAN 1 and VSAN 3.
When you enable the FICON feature in a VSAN, the switches always uses the startup FICON configuration file, called IPL. This file is created with a default configuration as soon as FICON is enabled on a VSAN.
FICON configuration files contain the following configuration for each implemented port address:
• Block
• Prohibit mask
• Port address name
Refer to the
for details on the normal configuration files used by Cisco MDS switches. This configuration file includes FICON enabled attribute for a VSAN, port number mapping for port channels and FCIP interfaces, port number to port address mapping, port and trunk allowed VSAN configuration for ports, in-order guarantee, configuring static domain ID, and fabric binding configuration.
Caution When FICON is disabled on a VSAN, all the FICON configuration files are irretrievably lost.
23-17Cisco MDS 9000 Fabric Manager Switch Configuration Guide
OL-7753-01

Chapter 23 Configuring FICON Creating FICON Files
Accessing FICON Configuration FilesOnly one user can access the configuration file at any given time:
• While this file is being accessed by user 1, user 2 cannot access this file.
• When user 2 does attempt to access this file, an error is issued to user 2.
• If user 1 has been inactive for more than 15 seconds, the file is automatically closed and available for use by any other permitted user.
FICON configuration files can be accessed by any host, SNMP, or CLI user who is permitted to access the switch. The locking mechanism in the SAN-OS software restricts access to one user at a time per file. This lock applies to newly-created files and previously-saved files. Before accessing any file, you must lock the file and obtain the file key. A new file key is used by the locking mechanism for each lock request. The key is discarded when the lock timeout of 15 seconds expires. The lock timeout value cannot be changed.
Editing FICON Configuration FilesThe configuration file submode allows you to create and edit FICON configuration files. If a specified file does not exist, it is created. Up to 16 files can be saved. Each file name is restricted to 8 alphanumeric characters.
Creating FICON FilesIf a specified file does not exist, it is created. Up to 16 files can be saved. Each file name is restricted to 8 alphanumeric characters.
Note To view the latest FICON information, you must click the Refresh button. See the “FICON Information Refresh Note” section on page 23-15 for more information.
To create a FICON file, follow these steps:
Step 1 From Device Manager, choose FICON > VSANs. You see the FICON VSANs/Files dialog box.
Step 2 Click the Files tab.
Step 3 Click Create. You see the Create FICON VSANs Files dialog box.
Step 4 Enter the VSAN ID.
Step 5 Enter the File Name.
Step 6 Enter the Description.
Step 7 Click Create to create the new file, or click Close to close the dialog box without creating the file.
23-18Cisco MDS 9000 Fabric Manager Switch Configuration Guide
OL-7753-01
Chapter 23 Configuring FICON Deleting FICON Files
Deleting FICON Files
Note To view the latest FICON information, you must click Refresh. See the “FICON Information Refresh Note” section on page 23-15 for more information.
To delete a FICON file, follow these steps:
Step 1 From Device Manager, choose FICON > VSANs. You see the FICON VSANs/Files dialog box.
Step 2 Click the Files tab.
Step 3 Click anywhere in the row for the file you want to delete.
Step 4 Click Delete to delete the file.
Copying FICON FilesThe SAN-OS software maintains different configuration files to support a FICON network. These configuration files can be saved using Device Manager. FICON configuration files do not contain the following information that is normally saved with the running configuration:
Note To view the latest FICON information, you must click the Refresh button. See the “FICON Information Refresh Note” section on page 23-15 for more information.
• Port number to port address mapping
• PortChannel to port number mapping
• Port swap occurrences
• FICON enabled VSANs
FICON configuration files are independent of these parameters. Instead, this information is stored in persistent storage as they can be modified independent of the startup configuration.
To copy a FICON file, follow these steps:
Step 1 From Device Manager, choose FICON > VSANs. You see the FICON VSANs/Files dialog box.
Step 2 Click the Files tab.
Step 3 Click to highlight the row for the file you want to copy.
Port SwappingThe port swap FICON feature is only provided for maintenance purposes and is supported in all switches in the Cisco MDS 9000 Family support this feature.
23-19Cisco MDS 9000 Fabric Manager Switch Configuration Guide
OL-7753-01

Chapter 23 Configuring FICON Swapping FICON Ports
Swapping the ports causes all configuration associated with old-port-number and new port-number to be swapped, including VSAN configurations. This command is only associated with the two ports in concerned. You must issue this VSAN-independent command from the EXEC mode.
Tip If the active equals saved option is enabled on any FICON VSAN, then the swapped configuration is automatically saved to startup. Otherwise, you must explicitly copy the running startup immediately after swapping the ports.
MDS switches also allow port swapping for non-existent ports as specified below:
• Only FICON-specific configurations (prohibit, block, and port address mapping) is swapped.
• No other system configuration is swapped.
• All other system configurations are only maintained for existing ports.
Once you swap ports, the switch automatically performs the following actions:
• Shuts down both the old and new ports
• Swaps the port configuration
• Any attempt to bring the port up using the after swap noshut option after the new-port-number will not work unless you explicitly issue the no shutdown command to resume traffic.
Port Swapping GuidelinesBe sure to follow these guidelines when using the FICON port swap feature:
• Port swapping is not supported for logical ports (PortChannels, FCIP links). Neither the old-port-number nor the new-port-number can be a logical port.
• Port swapping is not supported between physical ports that are part of a PortChannel. Neither the old-port-number nor the new-port-number can be a physical port that is part of a PortChannel.
• Before performing a port swap, the SAN-OS software performs a compatibility check. If the two ports have incompatible configuration, the port swap is rejected with an appropriate reason code. For example, if a port with BB_credits as 25 is being swapped with an OSM port for which a maximum of 12 BB_credits is allowed (not a configurable parameter), the port swap operation is rejected.
• If ports have default values (for some incompatible parameters), then port swap is allowed to go through and the ports retain their default values. If you swap a 16-port module with a 32-port module, the BB_credits will no longer be compatible and the ports can be swapped. If BB_credits are not configured, the default settings will still be in effect at the time of the swap.
The 32-port module guidelines also apply for port swapping configurations.
Swapping FICON Ports
Note To view the latest FICON information, you must click the Refresh button. See the “FICON Information Refresh Note” section on page 23-15 for more information.
To swap ports, follow these steps:
23-20Cisco MDS 9000 Fabric Manager Switch Configuration Guide
OL-7753-01
Chapter 23 Configuring FICON Clearing FICON Device Allegiance
Step 1 Choose two Fibre Channel ports by holding down the CTRL key and clicking on them.
Step 2 Choose FICON > Swap Selected Ports.
Clearing FICON Device AllegianceFICON requires serialization of access between multiple mainframes, CLI, and SNMP sessions be maintained on Cisco MDS 9000 Family switches by controlling device allegiance for the currently-executing session. Any other session is denied permission to perform configuration changes unless the required allegiance is available.
CUP Inband ManagementThe Control Unit Port (CUP) protocol configures access control and provides unified storage management capabilities from a mainframe computer. Cisco MDS 9000 FICON-enabled switches are fully IBM CUP standard compliant for inband management using the IBM S/A OS/390 I/O operations console.
The CUP specification is proprietary to IBM.
CUP is supported by switches and directors in the Cisco MDS 9000 Family. The CUP function allows the mainframe to manage the MDS switches.
Host communication includes control functions like blocking/unblocking ports, as well as monitoring and error reporting functions.
Configuring Fabric BindingThe SAN-OS 1.3(x) fabric binding feature ensures ISLs are only enabled between specified switches in the fabric binding configuration. Fabric binding is configured on a per-VSAN basis and can only be implemented in FICON VSANs. You can still perform fabric binding configuration in a non-FICON VSAN--these configurations will only come into effect after FICON is enabled.
This feature helps prevent unauthorized switches from joining the fabric or disrupting current fabric operations. It uses the Exchange Fabric Membership Data (EFMD) protocol in FICON networks to ensure that the list of authorized switches is identical in all switches in the fabric.
This section contains the following topics:
• Port Security versus Fabric Binding, page 23-22
• Enforcing Fabric Binding, page 23-22
• Enabling Fabric Binding, page 23-23
• Configuring a List of sWWNs, page 23-23
• Activating Fabric Binding, page 23-23
23-21Cisco MDS 9000 Fabric Manager Switch Configuration Guide
OL-7753-01
Chapter 23 Configuring FICON Configuring Fabric Binding
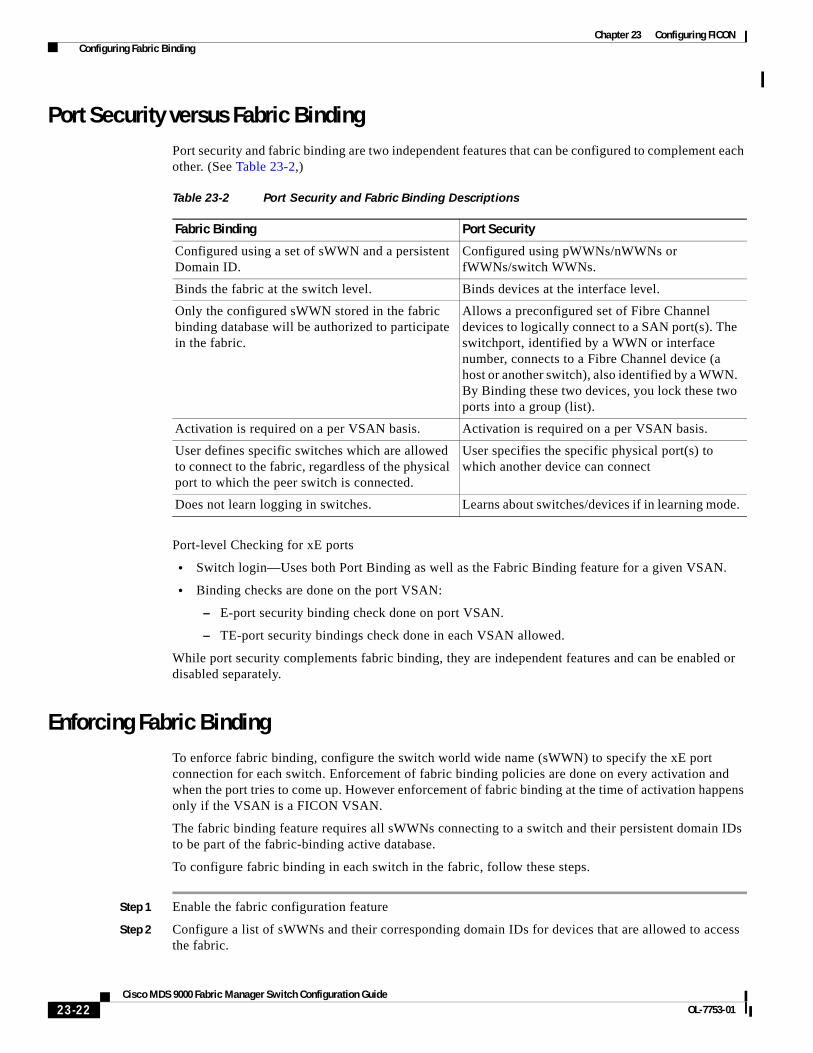
Port Security versus Fabric BindingPort security and fabric binding are two independent features that can be configured to complement each other. (See Table 23-2,)
Port-level Checking for xE ports
• Switch login—Uses both Port Binding as well as the Fabric Binding feature for a given VSAN.
• Binding checks are done on the port VSAN:
– E-port security binding check done on port VSAN.
– TE-port security bindings check done in each VSAN allowed.
While port security complements fabric binding, they are independent features and can be enabled or disabled separately.
Enforcing Fabric BindingTo enforce fabric binding, configure the switch world wide name (sWWN) to specify the xE port connection for each switch. Enforcement of fabric binding policies are done on every activation and when the port tries to come up. However enforcement of fabric binding at the time of activation happens only if the VSAN is a FICON VSAN.
The fabric binding feature requires all sWWNs connecting to a switch and their persistent domain IDs to be part of the fabric-binding active database.
To configure fabric binding in each switch in the fabric, follow these steps.
Step 1 Enable the fabric configuration feature
Step 2 Configure a list of sWWNs and their corresponding domain IDs for devices that are allowed to access the fabric.
Table 23-2 Port Security and Fabric Binding Descriptions
Fabric Binding Port Security
Configured using a set of sWWN and a persistent Domain ID.
Configured using pWWNs/nWWNs or fWWNs/switch WWNs.
Binds the fabric at the switch level. Binds devices at the interface level.
Only the configured sWWN stored in the fabric binding database will be authorized to participate in the fabric.
Allows a preconfigured set of Fibre Channel devices to logically connect to a SAN port(s). The switchport, identified by a WWN or interface number, connects to a Fibre Channel device (a host or another switch), also identified by a WWN. By Binding these two devices, you lock these two ports into a group (list).
Activation is required on a per VSAN basis. Activation is required on a per VSAN basis.
User defines specific switches which are allowed to connect to the fabric, regardless of the physical port to which the peer switch is connected.
User specifies the specific physical port(s) to which another device can connect
Does not learn logging in switches. Learns about switches/devices if in learning mode.
23-22Cisco MDS 9000 Fabric Manager Switch Configuration Guide
OL-7753-01

Chapter 23 Configuring FICON Configuring Fabric Binding
Step 3 Activate the fabric binding database.
Step 4 Save the fabric binding configuration.
Step 5 Verify the fabric binding configuration.
Enabling Fabric BindingThe fabric binding feature must be enabled in each switch in the fabric that participate in the fabric binding. By default, this feature is disabled in all switches in the Cisco MDS 9000 Family.
The configuration and verification commands for the fabric binding feature are only available when fabric binding is enabled on a switch. When you disable this configuration, all related configurations are automatically discarded.
Configuring a List of sWWNsA user-specified fabric binding list contains a list of switch WWNs (sWWNs) within a fabric. If a sWWN attempts to join the fabric, and that sWWN is not in the list or the sWWN is using a domain ID that differs from the one specified in the allowed list, the ISL between the switch and the fabric is automatically isolated in that VSAN and the switch is denied entry into the fabric.
The persistent domain ID must be specified along with the sWWN. Domain ID authorization is required in FICON VSANs where the domains are statically configured and the end devices reject a domain ID change in all switches in the fabric.
Activating Fabric BindingThe fabric binding maintains a configuration database (config-database) and an active database. The config-database is a read-write database which collects the configurations you perform. These configurations are only enforced upon activation. This activation overwrites the active database with the contents of the config-database. The active database is read-only and is the database that checks each switch that attempts to login.
By default, the fabric binding feature is not activated. You cannot activate the switch if entries existing in the config database conflict with the current state of the fabric. For example, one of the already logged in switches may be denied login by the config database.
You can choose the force option to override these situations.
After activation, any already logged in switch that violates the current active database will be logged out, and all switches that were previously denied login due to fabric binding restrictions will be reinitialized.
Forcing Fabric Binding Activation
If the database activation is rejected due to one or more conflicts listed in the previous section, you may decide to proceed with the activation by using the force option.
23-23Cisco MDS 9000 Fabric Manager Switch Configuration Guide
OL-7753-01
Chapter 23 Configuring FICON Activating Fabric Binding
Activating Fabric BindingThe fabric binding feature must be enabled in each switch in the fabric that participate in the fabric binding. By default, this feature is disabled in all switches in the Cisco MDS 9000 Family.
To activate fabric binding, follow these steps:
Step 1 From Device Manager, choose FICON > Fabric Binding. You see the Fabric Binding dialog box.
Step 2 Ensure that the Actions tab is enabled.
Step 3 Click in the Actions column for the VSAN(s) for which you want to activate fabric binding.
Step 4 Choose Activate or Force Activate.
Step 5 Click Apply to activate the fabric binding, or click Close to close the dialog box without activating fabric binding for the selected VSAN(s).
Deactivating Fabric BindingTo deactivate fabric binding, follow these steps:
Step 1 From Device Manager, choose FICON > Fabric Binding. You see the Fabric Binding dialog box.
Step 2 Ensure that the Actions tab is enabled.
Step 3 Click in the Actions column for the VSAN(s) for which you want to deactivate fabric binding.
Step 4 Choose Deactivate.
Step 5 Click Apply to deactivate the fabric binding, or click Close to close the dialog box without deactivating fabric binding for the selected VSAN(s).
Fabric Binding CopyActive to ConfigTo copy the active fabric binding to the configuration file, follow these steps:
Step 1 From Device Manager, choose FICON > Fabric Binding. You see the Fabric Binding dialog box.
Step 2 Ensure that the Actions tab is enabled.
Step 3 Click in the CopyActive ToConfig column for the VSAN(s) for which you want to copy fabric binding.
Step 4 Click Apply to copy the fabric binding, or click Close to close the dialog box without copying the fabric binding for the selected VSAN(s).
23-24Cisco MDS 9000 Fabric Manager Switch Configuration Guide
OL-7753-01

Chapter 23 Configuring FICON Creating a Fabric Binding Configuration
Creating a Fabric Binding ConfigurationTo create a fabric binding configuration, follow these steps:
Step 1 From Device Manager, choose FICON > Fabric Binding. You see the Fabric Binding dialog box.
Step 2 Click the Config Database tab.
Step 3 Click Create to display the Create Fabric Binding Config Database dialog box.
Step 4 Enter the VSAN ID, the peer WWN, and the domain ID.
Step 5 Click Create to create the fabric binding configuration, or click Close to close the dialog box without creating the fabric binding configuration.
Deleting a Fabric Binding ConfigurationTo delete a fabric binding configuration, follow these steps:
Step 1 From Device Manager, choose FICON > Fabric Binding. You see the Fabric Binding dialog box.
Step 2 Click the Config Database tab.
Step 3 Click in the row for the VSAN for which you want to delete the fabric binding configuration.
Step 4 Click Delete to delete the fabric binding configuration, or click Close to close the dialog box without deleting the fabric binding configuration.
Viewing Fabric Binding Active DatabaseTo view the fabric binding active database, follow these steps:
Step 1 From Device Manager, choose FICON > Fabric Binding. You see the Fabric Binding dialog box.
Step 2 Click the Active Database tab to display the active database.
Viewing Fabric Binding ViolationsTo view fabric binding violations, follow these steps:
Step 1 From Device Manager, choose FICON > Fabric Binding. You see the Fabric Binding dialog box.
Step 2 Click the Violations tab to display fabric binding violations.
23-25Cisco MDS 9000 Fabric Manager Switch Configuration Guide
OL-7753-01
Chapter 23 Configuring FICON Clearing Fabric Binding Statistics
Clearing Fabric Binding StatisticsTo clear fabric binding statistics, follow these steps:
Step 1 From Device Manager, choose FICON > Fabric Binding. You see the Fabric Binding dialog box.
Step 2 Click the Statistics tab to display the fabric binding statistics.
Step 3 Check the check box in the Clear column for the VSAN(s) for which you want to clear statistics.
Step 4 Click Apply.
Viewing EFMD StatisticsTo view EFMD statistics, follow these steps:
Step 1 From Device Manager, choose FICON > Fabric Binding. You see the Fabric Binding dialog box.
Step 2 Click the EFMD Statistics tab to display EFMD statistics.
Displaying RLIR InformationThe Registered Link Incident Report (RLIR) application provides a method for a switchport to send a LIR to a registered Nx-port.
When a Link Incident Record (LIR) is detected in FICON-enabled switches in the Cisco MDS 9000 Family form a RLIR Extended Link Service (ELS) and sends it to the members in it’s Established Registration List (ERL).
In case of multi-switch topology, a Distribute Registered Link Incident Record (DRLIR) Inter Link Service (ILS) are sent to all reachable remote domains along with the RLIR ELS. On receiving the DRLIR ILS, the switch extracts the RLIR ELS and sends to the members of the ERL.
The Nx-ports interested in receiving the RLIR ELS send Link Incident Record Registration (LIRR) ELS request to the management server on the Switch. The RLIRs are processed on a per-VSAN basis.
The RLIR application is highly available and the data is stored to persistent storage when the running configuration is saved.
Viewing the RLIR information shows the complete statistics of LIRR, RLIR, and DRLIR frames. It lists the number of frames received, sent, and rejected. Specify the VSAN ID for per VSAN statistics, If you do not specify the VSAN ID, then the statistics is shown for all active VSANs.
23-26Cisco MDS 9000 Fabric Manager Switch Configuration Guide
OL-7753-01