fi Image Scanner Getting Started · 2015. 11. 5. · The ADF can be set to any of the following...
13
Getting Started Getting Started Image Scanner Image Scanner fi -6670/fi -6770/fi -6750S fi -6670/fi -6770/fi -6750S P3PC-2242-06EN 1 Conventions Symbols Used In This Manual For notational conventions, the following symbols are used in this manual. Naming Conventions in This Manual ■ Scanners The scanners are indicated as follows: The explanation in this manual bases on the following models: •ADF type: fi-6670 •Flatbed type: fi-6770 ■ Operating Systems and Software Products The OSs and products in this manual are indicated as follows: This symbol alerts operators to particularly impor- tant information. Be sure to read this information. This symbol alerts operators to helpful advice regarding operation. Model Indication fi-6670 ADF type Scanner fi-6770/fi-6750S Flatbed type Product Indication Windows ® XP Home Edition (Service Pack 3 or later) Windows ® XP Professional (Service Pack 3 or later) Windows ® XP Professional x64 Edition (Service Pack 2 or later) Windows XP Windows * 1 Windows Server ® 2003, Standard Edition Windows Server ® 2003, Standard x64 Edition Windows Server ® 2003 R2, Standard Edition (Service Pack 2 or later) Windows Server ® 2003 R2, Standard x64 Edition (Service Pack 2 or later) Windows Server 2003 Windows Vista ® Home Basic (32-bit/64-bit) (Service Pack 1 or later) Windows Vista ® Home Premium (32-bit/64-bit) (Service Pack 1 or later) Windows Vista ® Business (32-bit/64-bit) (Service Pack 1 or later) Windows Vista ® Enterprise (32-bit/64-bit) (Service Pack 1 or later) Windows Vista ® Ultimate (32-bit/64-bit) (Service Pack 1 or later) Windows Vista Thank you for purchasing a fi-6670 / fi-6770 / fi-6750S Color Scanner series. This Getting Started is the startup guide that summarizes the preparatory actions needed before use. Be sure to thoroughly read this manual before you start using the scanner. Read the Operator’s Guide (PDF) included in the Setup DVD-ROM for information about the scanner’s operation procedures, daily care, consumables replacement, and troubleshooting. Microsoft, Windows, Windows Server, Windows Vista, Excel, and SharePoint are either registered trade- marks or trademarks of Microsoft Corporation in the United States and/or other countries. Word is a product of Microsoft Corporation in the United States. ISIS is a registered trademark or trademark of EMC Corporation in the United States. ABBYY™ FineReader™ Engine © ABBYY. OCR by ABBYY ABBYY and FineReader are trademarks of ABBYY Software, Ltd. which may be registered in some jurisdic- tions. ScanSnap, ScanSnap Manager, and PaperStream are registered trademarks of PFU LIMITED in Japan. Other company names and product names are the registered trademarks or trademarks of the respective companies. December, 2014 © PFU LIMITED 2008-2014
Transcript of fi Image Scanner Getting Started · 2015. 11. 5. · The ADF can be set to any of the following...

Getting StartedGetting StartedImage ScannerImage Scannerfi-6670/fi-6770/fi-6750Sfi-6670/fi-6770/fi-6750S
P3PC-2242-06EN
1
Conventions
Symbols Used In This ManualFor notational conventions, the following symbols are used in
this manual.
Naming Conventions in This Manual■ Scanners
The scanners are indicated as follows:
The explanation in this manual bases on the following models:
•ADF type: fi-6670•Flatbed type: fi-6770
■ Operating Systems and Software ProductsThe OSs and products in this manual are indicated as follows:
This symbol alerts operators to particularly impor-tant information. Be sure to read this information.
This symbol alerts operators to helpful advice regarding operation.
Model Indication
fi-6670 ADF type Scanner
fi-6770/fi-6750S Flatbed type
Product Indication
Windows® XP Home Edition (Service Pack 3 or later)
Windows® XP Professional (Service Pack 3 or later)
Windows® XP Professional x64 Edition (Service Pack 2 or later)
Windows XP
Windows
*1
Windows Server® 2003, Standard Edition
Windows Server® 2003, Standard x64 Edition
Windows Server® 2003 R2, Standard Edition (Service Pack 2 or later)
Windows Server® 2003 R2, Standard x64 Edition (Service Pack 2 or later)
Windows Server 2003
Windows Vista® Home Basic (32-bit/64-bit) (Service Pack 1 or later)
Windows Vista® Home Premium (32-bit/64-bit) (Service Pack 1 or later)
Windows Vista® Business (32-bit/64-bit)(Service Pack 1 or later)
Windows Vista® Enterprise (32-bit/64-bit) (Service Pack 1 or later)
Windows Vista® Ultimate (32-bit/64-bit)(Service Pack 1 or later)
Windows Vista
Thank you for purchasing a fi-6670 / fi-6770 / fi-6750S Color Scanner series. This Getting Started is the startup guide that summarizes the preparatory actions needed before use. Be sure to thoroughly read this manual before you start using the scanner.Read the Operator’s Guide (PDF) included in the Setup DVD-ROM for information about the scanner’s operation procedures, daily care, consumables replacement, and troubleshooting.
Microsoft, Windows, Windows Server, Windows Vista, Excel, and SharePoint are either registered trade-marks or trademarks of Microsoft Corporation in the United States and/or other countries.Word is a product of Microsoft Corporation in the United States.ISIS is a registered trademark or trademark of EMC Corporation in the United States.ABBYY™ FineReader™ Engine © ABBYY. OCR by ABBYYABBYY and FineReader are trademarks of ABBYY Software, Ltd. which may be registered in some jurisdic-tions.ScanSnap, ScanSnap Manager, and PaperStream are registered trademarks of PFU LIMITED in Japan.Other company names and product names are the registered trademarks or trademarks of the respective companies.
December, 2014© PFU LIMITED 2008-2014

2
*1) Where there is no distinction between the different versions of the above operating system, the general term "Windows" is used.
Arrow Symbols in This ManualRight-arrow symbols () are used to separate icons or menu options you should select in succession.
Example: Select [Tool] [Scan Setting].
Screen Examples in This ManualThe screen examples in this manual are subject to change without notice in the interest of product improvement. If the actual displayed screen differs from the screen examples in this manual, operate by following the actual displayed screen while referring to the user's manual of the scanner application you are using.The screen examples used in this manual are of the TWAIN driver, ISIS driver, and ScandAll PRO (image scanning appli-cation).
Safety InformationThe attached "Safety Precautions" manual describes impor-tant details for users to use this product safely and correctly. Read the Safety Precautions thoroughly before you start using this product.
Warning Indications Used In This ManualThe following indications are used in this manual to obviate any change of accident or damage to you and/or the equip-ment.
Product Indication
Windows Server® 2008 Standard (32-bit/64-bit)
Windows Server® 2008 R2 Standard (64-bit)
Windows Server 2008
Windows
*1
Windows® 7 Home Premium (32-bit/64-bit)
Windows® 7 Professional (32-bit/64-bit)
Windows® 7 Enterprise (32-bit/64-bit)
Windows® 7 Ultimate (32-bit/64-bit)
Windows 7
Windows Server® 2012 Standard (64-bit)
Windows Server 2012
Windows Server® 2012 R2 Standard (64-bit)
Windows Server 2012 R2
Windows® 8 (32-bit/64-bit)
Windows® 8 Pro (32-bit/64-bit)
Windows® 8 Enterprise (32-bit/64-bit)
Windows 8
Windows® 8.1 (32-bit/64-bit)
Windows® 8.1 Pro (32-bit/64-bit)
Windows® 8.1 Enterprise (32-bit/64-bit)
Windows 8.1
�������
This indication alerts operators to an operation that, if not strictly observed, may result in severe injury or death.
�������
This indication alerts operators to an operation that, if not strictly observed, may result in safety hazards to personnel or damage to equipment.

3
1 Preparation
Contents of the Scanner PackageWhen you unpack the scanner package, make sure that all of the following parts are included in the package. Make sure the scanner package contains all the parts listed in the package contents list that is included in the package box.If any parts are missing or defective, contact your FUJITSU scanner dealer or an authorized FUJITSU scanner service provider.
Scanner (x1)
ADF paper chute (x1)
Stacker (x1)
AC cable (The contents may vary depending on the country and the model purchased.)
USB cable (x1)
Setup DVD-ROM (x1)
2D Barcode for PaperStream Setup CD-ROM (x1)[fi-6670/fi-6770]
Safety Precautions (x1)
Operator panel overlay (x5)

2 Installing the Scanner
The following describes how to install the scanner.
1 Place the scanner at its installation site.The outer dimensions and the spaces required for installing the respective scanner types are as follows:
2 Unlock the Transport Lock (Flatbed type only).Using a coin or similar, rotate the Transport Lock counterclockwise by 90 degree to unlock it.
3 Adjust the position of the ADF (Flatbed type only).
1) Holding the handle, lift open the Document Cover.
2) Remove the ADF Lock Screws, and then set them to the Lock Screw Storage Holes.
(13.0)
(19.6)(13.4)
329
1179
690 (27.1)
432 (17.0)686
500700342
1030 (40.5)
300 (11.8)640 (25.1)390 (15.3)
(27.0)
(46.4)
(27.5)
(Unit: mm/inches)Flatbed typeADF type
Installation space
Outer dimensions
4

3) Gently close the Document Cover.
4) Change the position of the ADF.
The ADF can be set to any of the following three positions:After repositioning the ADF, be sure that the ADF is firmly locked to the new position.
■ Traditional (Factory default)
■ Standard (Space-saving type and for right-handed operators)Slide the ADF toward the center of the scanner.Note the following explanation in this manual is based upon this standard type of the scanner.
■ Reversed (Space-saving type and for left-handed operators)Slide the ADF toward the center of the scanner, and then rotate it counterclockwise by 180 degree.
4 Attach the Stacker and the ADF Paper Chute to the scanner.
1) Insert the hooks of the ADF Paper Chute into their corresponding holes on the scanner.
2) Fit the protruding sections of the Stacker into their corresponding slots on the scanner.
�������
• Be careful not to pinch your fingers when moving the ADF.• Never rotate the ADF by more than 180 degree. Doing so may damage the ADF.
Protruding sectionHook
5
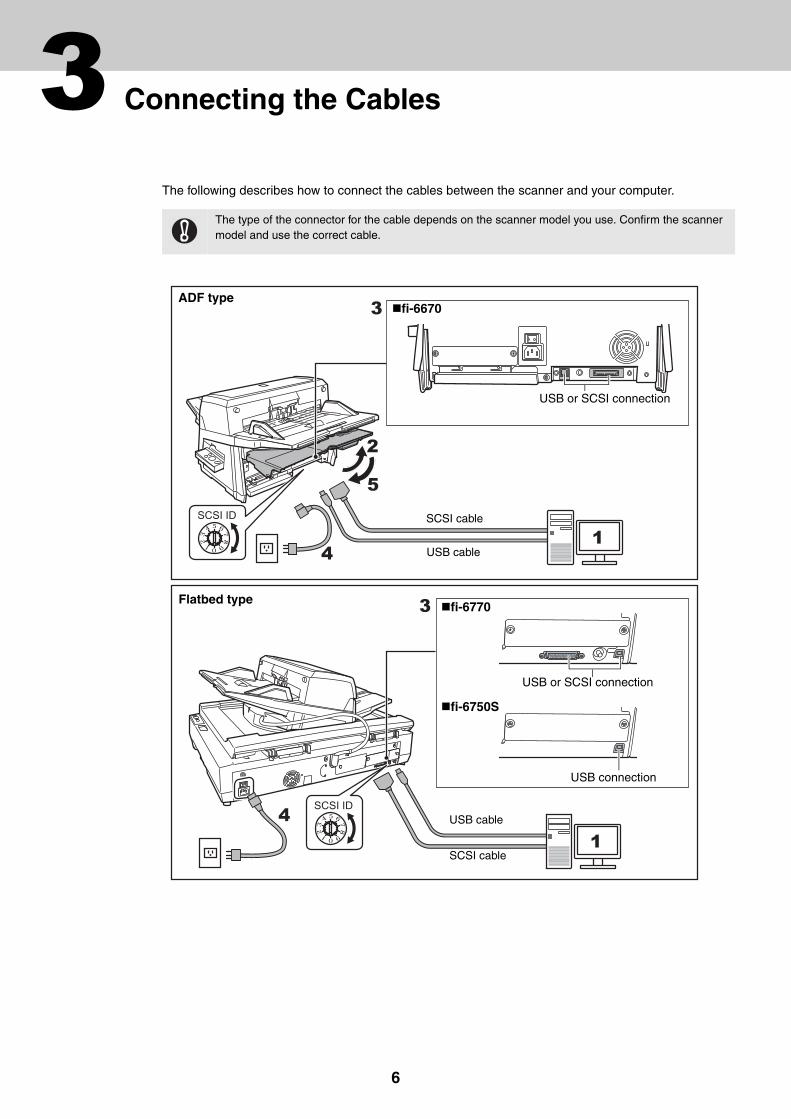
3 Connecting the Cables
The following describes how to connect the cables between the scanner and your computer.
The type of the connector for the cable depends on the scanner model you use. Confirm the scanner model and use the correct cable.
1
1
5
4
4
2
3
3
SCSI ID
SCSI ID
ADF type
Flatbed type
USB cable
SCSI cable
USB or SCSI connection
fi-6670
fi-6770
fi-6750S
USB cable
SCSI cable
USB or SCSI connection
USB connection
6

1 Make sure that the computer is turned OFF.
2 Open the Cable Cover (ADF type only).
3 Connect the scanner to your computer either with a USB or SCSI cable.
The following describes the requirements for connecting with the respective cables.
■ USB cable• Be sure to use the USB cable which comes as an accessory with this scanner.• When connecting to an USB hub, use the first stage USB hub that is closest to the computer. If you use
the second or later hub stages, the scanner may not operate correctly.• If you connect the scanner with USB 2.0, it is required that the USB port and the Hub be compliant with
USB 2.0. The scanning speed slows down when you connect the scanner with USB 1.1.
■ SCSI cable
• When using the scanner with a SCSI interface, the following types of SCSI cable and SCSI card must be purchased.
• SCSI cable:Use a SCSI cable whose connector on the computer side mates to the connector on the SCSI card installed on your computer.On the scanner side, use a 50-pin high-density type SCSI cable.
• SCSI card:Find the recommended SCSI card information on the Fujitsu website (FAQ):
http://www.fujitsu.com/global/support/computing/peripheral/scanners/scsi/• In a SCSI daisy chain formation, connect the scanner so that it is the terminated device.• The SCSI ID initially set at the factory is [5]. If the SCSI ID of another SCSI device is set to the same ID,
change the scanner's SCSI ID to [0] through [7].
4 Connect the Power cable to the Power Connector of your scanner and to the power outlet.
5 Close the Cable Cover (ADF type only).Let the cables out from the side slots of the scanner.
• You cannot make both USB and SCSI cable connections at the same time.• You cannot connect multiple computers to the scanner at the same time.• Turn off the scanner and your computer first when you switch the interface cable.
Be careful not to damage any pins of the SCSI connector when connecting the scanner to your computer.
�������
Be sure to use the supplied power cable. Use of other power cables may cause electrical shock or malfunction.Do not use the supplied power cable for other products. Doing so may cause electrical shock or malfunction.
7

4 Installing the Software
Bundled SoftwareThe following software are bundled with the scanner:
■PaperStream IP (TWAIN) DriverConforms to the TWAIN standard. Used when you operate the scanner using TWAIN-compliant applications.
■PaperStream IP (ISIS) DriverConforms to the ISIS standard. Used when you operate the scanner using ISIS-compliant applications.
■2D Barcode for PaperStream [fi-6670/fi-6770]This option can recognize two dimensional codes.Can be used with the PaperStream IP (TWAIN) driver, the PaperStream IP (ISIS) driver, or Paper-Stream Capture.For fi-6750S, the 2D Barcode for PaperStream option is sold separately.For details about the installation, refer to readme in the 2D Barcode for PaperStream Setup CD-ROM.
■Software Operation PanelConfigure various settings such as the operation of the scanner and managing the consumables. Installed together with the PaperStream IP (TWAIN) driver and PaperStream IP (ISIS) driver.
■Error Recovery GuideShows the error status and countermeasures when an error occurs. Installed together with the PaperStream IP (TWAIN) driver and PaperStream IP (ISIS) driver.
■PaperStream CaptureAn image scanning application that supports the PaperStream IP (TWAIN) driver and Paper-Stream IP (ISIS) driver. By defining scan settings as document profiles, you can customize the settings according to your preference.
■ScanSnap Manager for fi SeriesAn application that scans images with the driver settings that are used exclusively for ScanSnap Manager for fi Series. PaperStream IP (TWAIN) driver is required to use this application. Enables easy scanning with a single button.You can download and install this application from the download web page.
■Scan to Microsoft SharePointAn application that allows you to upload your files easily from ScanSnap Manager for fi Series to a SharePoint site. Can be used to scan from ScanSnap Manager for fi Series.You can download and install this application from the download web page.
■ABBYY FineReader for ScanSnap™ Bundled for use with ScanSnap Manager for fi Series, this application converts scanned images into Microsoft® Office (Word/Excel®/ PowerPoint®) files. Can be used to scan from ScanSnap Manager for fi Series.You can download and install this application from the download web page.
■ManualIncludes Safety Precautions, Getting Started, and Operator's Guide.
■Scanner Central Admin AgentUsed to centralize the management of multiple scanners, by allowing you to apply firmware updates simultaneously, monitor the operating status, and check the scanner information.Note that required applications will differ depending on the form of operation.For details, refer to the Scanner Central Admin User’s Guide.
8

■fi Series Online UpdateAn application that checks for the software updates for fi Series, and runs the updates.
■Other Software (Legacy)Software that were bundled with older versions of scanners are also included.
• TWAIN DriverConforms to the TWAIN standard. Used when you operate the scanner using TWAIN-compliant appli-cations.
• ISIS DriverConforms to the ISIS standard. Used when you operate the scanner using ISIS-compliant applications.
• Image Processing Software OptionA software option featuring advanced binarization of scanned images. Can be installed together with the scanner drivers (TWAIN/ISIS).
• ScandAll PROScandAll PRO is a software application for scanning images, which is in compliance with both TWAIN/ISIS standards. By assigning scan settings into batch profiles, it enables one-touch operations to perform scanning in ways that best suit your needs.You can download and install this application from the download web page.
Installing the Bundled SoftwareInstall the bundled software from the Setup DVD-ROM in the following procedure.Note that there are two ways to install the bundled software: select [Installation (Recommended)] to install all the software required to operate the scanner, or [Installation (Custom)] to select and install the software as needed.
The following software are installed:
■PaperStream IP (TWAIN) Driver
■Software Operation Panel
■Error Recovery Guide
■PaperStream Capture
■Manual
■Scanner Central Admin Agent
■fi Series Online Update
1 Turn on the computer and log onto Windows as a user with Administrator privileges.
If an old version of the software is installed already, uninstall it first. For details about the uninstallation procedures, refer to "A.5 Uninstalling the Software" in the Opera-tor's Guide.
Installation (Recommended)
9

2 Insert the Setup DVD-ROM into the DVD drive. The [fi Series Setup] screen appears.
3 Click the scanner model.
4 Click the [Installation (Recommended)] button.
5 Follow the instructions on the screen to proceed with the installation.
1 Perform steps 1 to 3 in "Installation (Recommended)" (on page 9).
2 Click the [Installation (Custom)] button.
3 Select the check box for the software to install and click the [Next] button.
4 Follow the instructions on the screen to proceed with the installation.
If the [fi Series Setup] screen does not appear, double-click "Setup.exe" in the Setup DVD-ROM via Windows Explorer or [Computer].
Installation (Custom)
10

5 Test-Scanning Documents
Using PaperStream Capture, you can test-scan documents to check if they are scanned with the ADF correctly. For how to scan documents with the flatbed, refer to “Chapter 4 Various Documents” in the Operator’s Guide.The following describes how to test-scan a document:
1 Turn on the scanner.
1) Press the “I” side of the main power switch of the scanner.
2) Press the [Power] button on the Operator Panel.The scanner is turned ON, and the Power LED on the Operator Panel lights in green.Note that while the scanner is being initialized, the indication of the Function Number Display changes as; "8" "P" "1", where "1" means that the Operator Panel is in the Ready Status.
2 Turn on your computer.
3 The scanner is automatically detected, and the [Found New Hardware] dialog box appears. Select [Locate and install driver software (recommended)] to install the driver, following the on-screen instructions.
If you see an error indication other than the above on the Function Number Display, refer to “Chapter 7 Troubleshooting” in the Operator’s Guide.Ex. :If “U” is displayed on the Function Number Display, it means that the Transport Lock remains locked. In such case, you need to unlock the Transport Lock.For how to unlock the Transport Lock, refer to "Section 2 Installing the Scanner" (on page 4).
For a SCSI connection, turn on the scanner and confirm that the Function Number Display shows “1.” Then, turn on your computer.
Check
Function
Send to
Scan / StopPower
Check
Function
Send to
Power
Scan / StopOperator Panel
ADF type Flatbed type
Function Number Display
[Power] button
Operator Panel
[Power] button
Function Number Display
11

4 Load a sheet into the scanner.
1) Load the document on the ADF Paper Chute face down.
2) Align the side guides to the width of the document.
3) Pull out the Stacker to the length of the document, and then raise the Stopper.
5 Start up PaperStream Capture.
■Windows XP/Windows Vista/Windows Server 2008/Windows 7Select the [Start] menu [All Programs] [PaperStream Capture] [PaperStream Capture].
■Windows Server 2012/Windows 8Right-click the Start screen, select [All apps] on the app bar, and then select [PaperStream Capture] under [PaperStream Capture].
■Windows Server 2012 R2/Windows 8.1Click [ ] on the lower left side of the Start screen, and then select [PaperStream Capture] under [PaperStream Capture].To display [ ], move the mouse cursor.
6 Click the [Scan] button in the Menu Area.
7 Click one of the three types of document profiles that are prepared before-hand.Below is an example of when the document profile [Black and White] is clicked.
The document is scanned, and the scanned image is displayed.
12

For information about other scanning features, refer to “Chapter 4 Various Documents” in the Operator's Guide contained in the Setup DVD-ROM.
Refer to “Chapter 7 Troubleshooting” in the Operator’s Guide, in case you see a number and an alphabet displayed on the Function Number Display.
13


![[ A ] SPIRITS ADF [ADF] VODKA - BASIC](https://static.fdocuments.us/doc/165x107/6169d8c211a7b741a34c063e/-a-spirits-adf-adf-vodka-basic.jpg)