Federal Communications Commission (FCC) … Communications Commission (FCC) Declaration of...
132
-
Upload
truongngoc -
Category
Documents
-
view
223 -
download
0
Transcript of Federal Communications Commission (FCC) … Communications Commission (FCC) Declaration of...
Federal Communications Commission (FCC) Declaration of Conformity
K-Sun Corporation370 SMC Drive, PO Box 309Somerset, WI 54025Phone: 715-247-4440
Product Name: K-Sun LABELShop® B2Model Number: K-Sun LABELShop® B2
This device complies with part 15 of the FCC Rules. Operation is subject to the following two conditions: (1) This device may not cause harmful interference, and (2) this device must accept any interference received, including interference that may cause undesired operation.
Note: This equipment has been tested and found to comply with the limits for a Class B digital device, pursuant to part 15 of the FCC Rules. These limits are designed to provide reasonable protection against harmful interference in a residential installation. This Equipment generates, uses and can radiate radio frequency energy and, if not installed and used in accordance with the instructions, may cause harmful interference to radio communications. However, there is no guarantee that interference will not occur in a particular installation. If this equipment does cause harmful interference to radio or television reception, which can be determined by turning the equipment off and on, the user is encouraged to try to correct the interference by one or more of the following measures:
Reorient or relocate the receiving antenna. Increase the separation between the equipment and receiver. Connect the equipment into an outlet on a circuit different from that to which
the receiver is connected. Consult the dealer or an experienced radio/TV technician for help. To ensure compliance with the limits for a Class B digital device the enclosed
interface cable should be used. (If Applicable) Modifications or changes not expressly approved by K-Sun Corporation could
void the user’s authority to operate the equipment.
IntroductionThank you for purchasing LABELShop��BEE3.
This manual is divided into four sections: 1. Getting Started2. Basic Operations 13. Basic Operations 24. Additional FunctionsPlease read this manual before using your LABELShop��BEE3.
This manual contains CAUTION and WARNING notices which must be observed and tips that can assist you complete the task more easily and more effectively.Be sure to keep this manual handy for future references.
All rights reserved. No part of this manual may be reproduced, stored in a retrieval system, or transmitted in any form or by any means, electronic, mechanical, photocopying, recording, or otherwise, without our prior written permission.The contents of this manual are subject to change without notice.All efforts have been made to ensure the accuracy of the contents of this manual. However, should any errors be detected, we would greatly appreciate being informed of them.
� Texts you have entered are temporary saved in this device, but not kept for extended period of time. We shall not be liable for damages, losses, costs, or expenses incurred as a result of malfunction, repair, test, or battery exhaustion of this device.� About the labels
Before attaching labels, be sure to check the purpose of use and the material of the adhered surface. Depending on the material, environmental conditions, etc., following problems may occur. -Color of the labels changes -Labels come off -Texts on the label wear off -Cannot peel off the labels -Glue remains on the adhered surface -The adhered surface absorbs the color of the label -The adhered surface is damagedWe shall not be liable for any damages, losses, costs, or expenses arising from these problems.� Do not carry out any operations not described in this manual, or LABELShop� BEE3
may break or cause injury.

Introduction 1
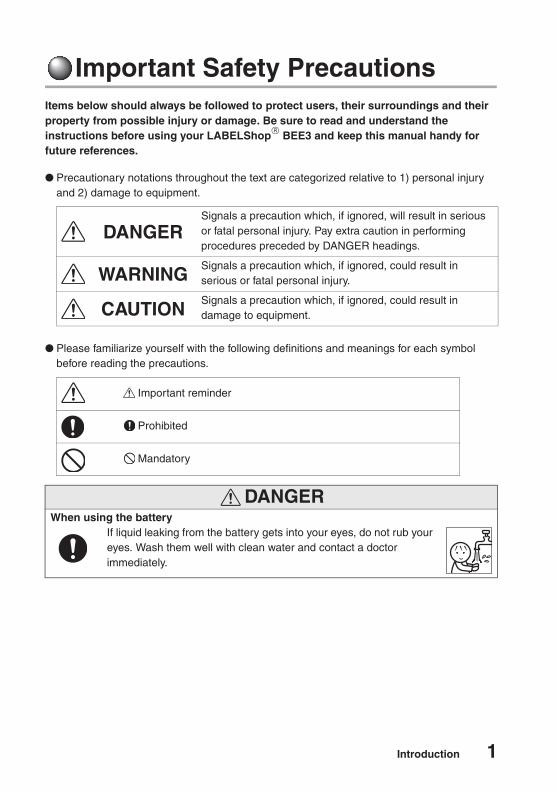
Important Safety PrecautionsItems below should always be followed to protect users, their surroundings and their property from possible injury or damage. Be sure to read and understand the instructions before using your LABELShop� BEE3 and keep this manual handy for future references.
Precautionary notations throughout the text are categorized relative to 1) personal injury and 2) damage to equipment.
Please familiarize yourself with the following definitions and meanings for each symbol before reading the precautions.
DANGERSignals a precaution which, if ignored, will result in serious or fatal personal injury. Pay extra caution in performing procedures preceded by DANGER headings.
WARNINGSignals a precaution which, if ignored, could result in serious or fatal personal injury.
CAUTIONSignals a precaution which, if ignored, could result in damage to equipment.
Important reminder
Prohibited
Mandatory
DANGERWhen using the battery
If liquid leaking from the battery gets into your eyes, do not rub your eyes. Wash them well with clean water and contact a doctor immediately.
2 Introduction
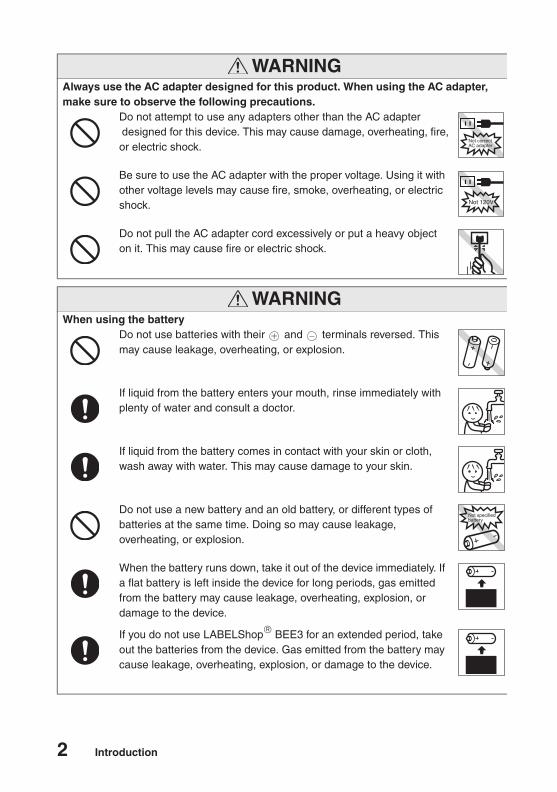
WARNINGAlways use the AC adapter designed for this product. When using the AC adapter, make sure to observe the following precautions.
Do not attempt to use any adapters other than the AC adapter designed for this device. This may cause damage, overheating, fire, or electric shock.
Be sure to use the AC adapter with the proper voltage. Using it with other voltage levels may cause fire, smoke, overheating, or electric shock.
Do not pull the AC adapter cord excessively or put a heavy object on it. This may cause fire or electric shock.
WARNINGWhen using the battery
Do not use batteries with their and terminals reversed. This may cause leakage, overheating, or explosion.
If liquid from the battery enters your mouth, rinse immediately with plenty of water and consult a doctor.
If liquid from the battery comes in contact with your skin or cloth, wash away with water. This may cause damage to your skin.
Do not use a new battery and an old battery, or different types of batteries at the same time. Doing so may cause leakage, overheating, or explosion.
When the battery runs down, take it out of the device immediately. If a flat battery is left inside the device for long periods, gas emitted from the battery may cause leakage, overheating, explosion, or damage to the device.
If you do not use LABELShop� BEE3 for an extended period, take out the batteries from the device. Gas emitted from the battery may cause leakage, overheating, explosion, or damage to the device.
Not correctAC adapter
Not 120V
Not specified battery

Introduction 3
Follow the instructions given on the label or a package of the battery. Misuse of the batteries may cause leakage, overheating, explosion, injury, or damage to the device.
WARNINGOther
Do not step on, drop, hit, or have strong impacts on this device. This may cause fire or electric shock. If your LABELShop� BEE3 is damaged, turn the power off, remove the AC adapter from the electrical outlet, and contact a local distributor. Using the damaged device may cause fire and electric shock.
Do not touch the device, the AC adapter, or the plug with wet hands. This may cause malfunction, fire, or electric shock.
Keep plastic bags out of reach of children. Children may suffocate if they put their heads into plastic bags.
Do not spill liquid or spray insecticide onto LABELShop� BEE3. This may cause malfunction, fire, or electric shock. If you spilled liquid, turn the power off, remove the AC adapter from the electrical outlet, and contact a local distributor. Using the damaged device may cause fire and electric shock.
Never modify or disassemble the device. This may cause fire or electric shock. Do not carry out any operations not described in this manual, or LABELShop� BEE3 may break or cause injury.
WARNING
Instructions
4 Introduction
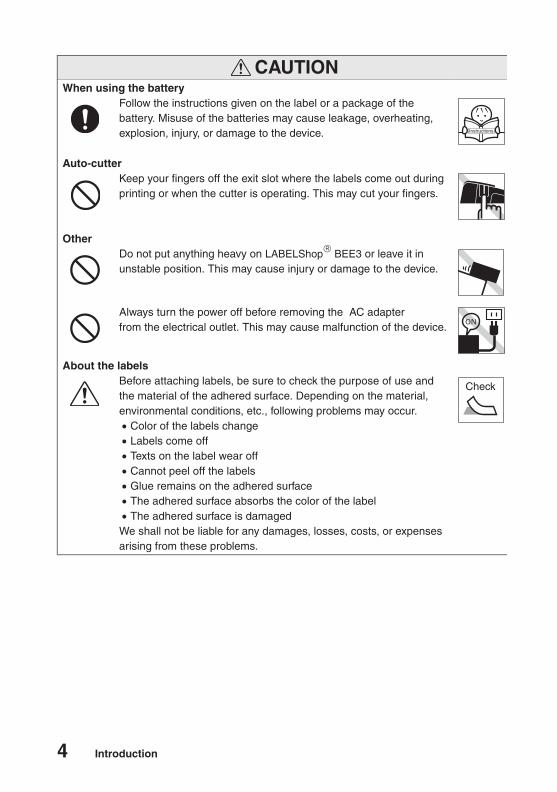
CAUTIONWhen using the battery
Follow the instructions given on the label or a package of the battery. Misuse of the batteries may cause leakage, overheating, explosion, injury, or damage to the device.
Auto-cutterKeep your fingers off the exit slot where the labels come out during printing or when the cutter is operating. This may cut your fingers.
OtherDo not put anything heavy on LABELShop� BEE3 or leave it in unstable position. This may cause injury or damage to the device.
Always turn the power off before removing the AC adapter from the electrical outlet. This may cause malfunction of the device.
About the labelsBefore attaching labels, be sure to check the purpose of use and the material of the adhered surface. Depending on the material, environmental conditions, etc., following problems may occur.� Color of the labels change� Labels come off� Texts on the label wear off� Cannot peel off the labels� Glue remains on the adhered surface� The adhered surface absorbs the color of the label � The adhered surface is damagedWe shall not be liable for any damages, losses, costs, or expenses arising from these problems.
Instructions
Check
Introduction 5
Precautions when using tape cartridges
Precautions when installing tape cartridges
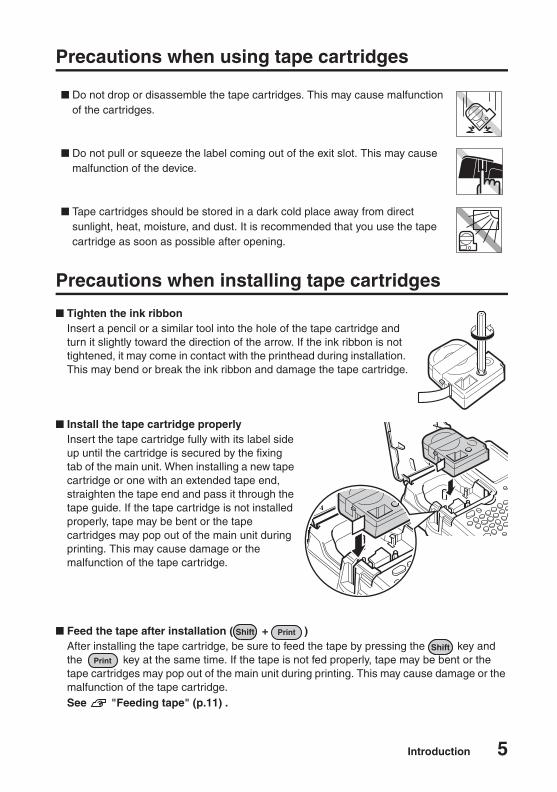
Tighten the ink ribbonInsert a pencil or a similar tool into the hole of the tape cartridge and turn it slightly toward the direction of the arrow. If the ink ribbon is not tightened, it may come in contact with the printhead during installation. This may bend or break the ink ribbon and damage the tape cartridge.
Install the tape cartridge properlyInsert the tape cartridge fully with its label side up until the cartridge is secured by the fixing tab of the main unit. When installing a new tape cartridge or one with an extended tape end, straighten the tape end and pass it through the tape guide. If the tape cartridge is not installed properly, tape may be bent or the tape cartridges may pop out of the main unit during printing. This may cause damage or the malfunction of the tape cartridge.
Feed the tape after installation ( + )After installing the tape cartridge, be sure to feed the tape by pressing the key and the key at the same time. If the tape is not fed properly, tape may be bent or the tape cartridges may pop out of the main unit during printing. This may cause damage or the malfunction of the tape cartridge.See "Feeding tape" (p.11) .
Do not drop or disassemble the tape cartridges. This may cause malfunction of the cartridges.
Do not pull or squeeze the label coming out of the exit slot. This may cause malfunction of the device.
Tape cartridges should be stored in a dark cold place away from direct sunlight, heat, moisture, and dust. It is recommended that you use the tape cartridge as soon as possible after opening.
6 Introduction
General cautions
Be sure to read and understand the "Important Safety Precautions" before using your LABELShop� BEE3.Unplug the AC adapter from both the device and the outlet after use. This may prevent possible accidents caused by tripping over the cord.Do not store the device in direct sunlight, in places with dust or excessive humidity, or in extreme temperatures.Do not attach labels on people, living things, public buildings or properties of others.Do not block or insert objects into the AC adapter socket or the tape eject slot.Never touch the printhead.Be sure to use the tape cartridges that has "LABELShop Tape Mark".Avoid using a tape cartridge with no remaining tapes or pressing without installing tape cartridge. This may cause overheating and malfunction of the printhead.Always press + to feed the tape. Never pull out the tape forcibly, otherwise the tape cartridge will be broken and unusable.Handle the tape cartridges with care, and avoid having impacts on them.Do not handle the keyboard roughly. Do not use a pencil or a sharp material to press the keys. This may damage the keyboard.LABELShop� BEE3 makes sounds when ejecting tapes. This is normal operation for the device.Be careful not to cut yourself when using scissors.Be sure to turn the power off after use.Be sure to replace batteries with the power turned off. If you replace the batteries while the LABEL Shop� BEE3 is powered, files or data stored on it may be deleted.If your LABEL Shop� BEE3 is not to be used for long periods, remove the batteries, the AC adapter, and tape cartridge from the main unit. LABELShop� BEE3, batteries, the AC adapter, and tape cartridges should be stored in a dark cold place away from direct sunlight, excessive temperature and humidity, magnetism, vibration and dust.If a battery is left inside the device for extended period of time, liquid from the battery may leak. Follow the instructions given on the package of the battery and replace it before the expiry date.Dispose of the used batteries according to the local regulations.LABELShop� BEE3 contains a lithium battery to save texts and files. See the sticker on the backside of the main unit as a guide for the timing and replace the lithium battery. To replace the battery, consult the local dealer or our customer center. Replacement is performed at your expense.Do not carry out any operations not described in this manual. It may cause injury or damage to the device.Contents, specifications, and design described in this manual are subject to change without prior notice.
Introduction 7
Using This Manual
About this manual
This manual contains the following sections:
Getting StartedDescribes preparations required before using the LABELShop� BEE3.
Basic OperationsDivided into three sections."Basic Operation 1" explains operations such as entering texts and attaching labels."Basic Operation 2" explains more advanced operations such as adding new paragraph. "Basic Operation 3" explains how to create a label that wrap around a cable or any other cylindrically-shaped object.If you are a first-time user, reading from the "Basic Operation 1" is recommended.
Additional FunctionsDescribes useful information that can assist you complete the task more easily and more effectively. Read and understand "Basic Operations 1" and "Basic Operations 2" before you begin on this section.
Symbols used in this manual
The following symbols are used in this manual:
Labels in this manual: Labels contained in this manual are all samples and may differ from actual labels.
Symbol Description
, Indicates operation procedures.
, Indicates the character keys.
, , Indicates the function keys.
Indicates the keys to move the cursor or select an item.
See Introduces the reference pages. Refer to the specified pages as necessary.
Indicates useful tips.
Explains limitations and conditions that you should be aware of.
8 Introduction
Contents
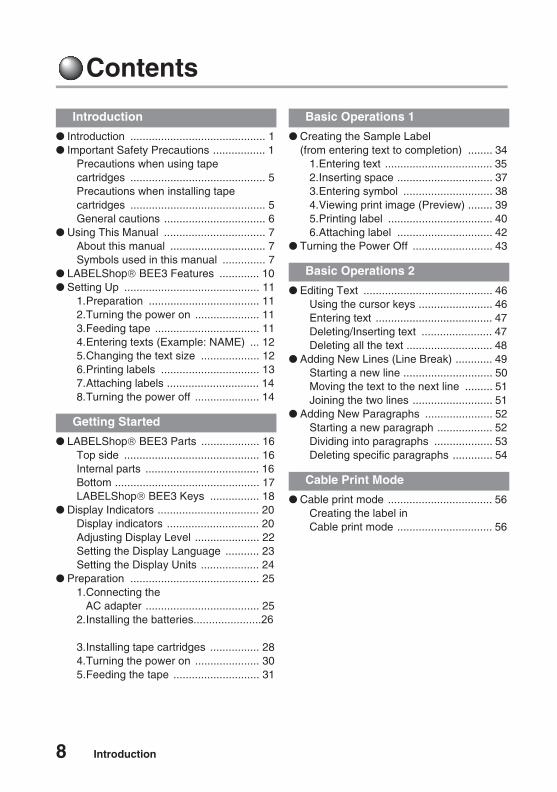
Introduction ............................................ 1Important Safety Precautions ................. 1
Precautions when using tape cartridges ............................................ 5Precautions when installing tape cartridges ............................................ 5General cautions ................................. 6
Using This Manual ................................. 7About this manual ............................... 7Symbols used in this manual .............. 7
LABELShop� BEE3 Features ............. 10Setting Up ............................................ 11
1.Preparation .................................... 112.Turning the power on ..................... 113.Feeding tape .................................. 114.Entering texts (Example: NAME) ... 125.Changing the text size ................... 126.Printing labels ................................ 137.Attaching labels .............................. 148.Turning the power off ..................... 14
LABELShop� BEE3 Parts ................... 16Top side ............................................ 16Internal parts ..................................... 16Bottom ............................................... 17LABELShop� BEE3 Keys ................ 18
Display Indicators ................................. 20Display indicators .............................. 20Adjusting Display Level ..................... 22Setting the Display Language ........... 23Setting the Display Units ................... 24
Preparation .......................................... 251.Connecting the AC adapter ..................................... 252.Installing the batteries......................26
3.Installing tape cartridges ................ 284.Turning the power on ..................... 305.Feeding the tape ............................ 31
Creating the Sample Label (from entering text to completion) ........ 34
1.Entering text ................................... 352.Inserting space ............................... 373.Entering symbol ............................. 384.Viewing print image (Preview) ........ 395.Printing label .................................. 406.Attaching label ............................... 42
Turning the Power Off .......................... 43
Editing Text .......................................... 46Using the cursor keys ........................ 46Entering text ...................................... 47Deleting/Inserting text ....................... 47Deleting all the text ............................ 48
Adding New Lines (Line Break) ............ 49Starting a new line ............................. 50Moving the text to the next line ......... 51Joining the two lines .......................... 51
Adding New Paragraphs ...................... 52Starting a new paragraph .................. 52Dividing into paragraphs ................... 53Deleting specific paragraphs ............. 54
Cable print mode .................................. 56Creating the label in Cable print mode ............................... 56
Introduction
Getting Started
Basic Operations 1
Basic Operations 2
Cable Print Mode
Introduction 9
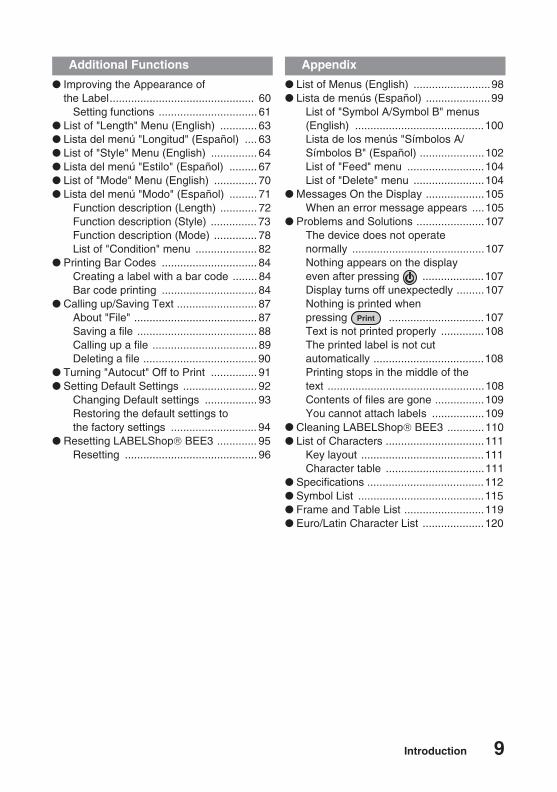
Improving the Appearance of the Label............................................... 60
Setting functions ................................ 61List of "Length" Menu (English) ............ 63Lista del menú "Longitud" (Español) .... 63List of "Style" Menu (English) ............... 64Lista del menú "Estilo" (Español) ......... 67List of "Mode" Menu (English) .............. 70Lista del menú "Modo" (Español) ......... 71
Function description (Length) ............ 72Function description (Style) ............... 73Function description (Mode) .............. 78List of "Condition" menu .................... 82
Printing Bar Codes ............................... 84Creating a label with a bar code ........ 84Bar code printing ............................... 84
Calling up/Saving Text .......................... 87About "File" ........................................ 87Saving a file ....................................... 88Calling up a file .................................. 89Deleting a file ..................................... 90
Turning "Autocut" Off to Print ............... 91Setting Default Settings ........................ 92
Changing Default settings ................. 93Restoring the default settings to the factory settings ............................ 94
Resetting LABELShop� BEE3 ............. 95Resetting ........................................... 96
List of Menus (English) .........................98Lista de menús (Español) .....................99
List of "Symbol A/Symbol B" menus (English) ..........................................100Lista de los menús "Símbolos A/Símbolos B" (Español) .....................102List of "Feed" menu .........................104List of "Delete" menu .......................104
Messages On the Display ...................105When an error message appears ....105
Problems and Solutions ......................107The device does not operate normally ...........................................107Nothing appears on the display even after pressing ....................107Display turns off unexpectedly .........107Nothing is printed when pressing ...............................107Text is not printed properly ..............108The printed label is not cut automatically ....................................108Printing stops in the middle of the text ...................................................108Contents of files are gone ................109You cannot attach labels .................109
Cleaning LABELShop� BEE3 ............110List of Characters ................................111
Key layout ........................................111Character table ................................111
Specifications ......................................112Symbol List .........................................115Frame and Table List ..........................119Euro/Latin Character List ....................120
Additional Functions Appendix
10 Introduction
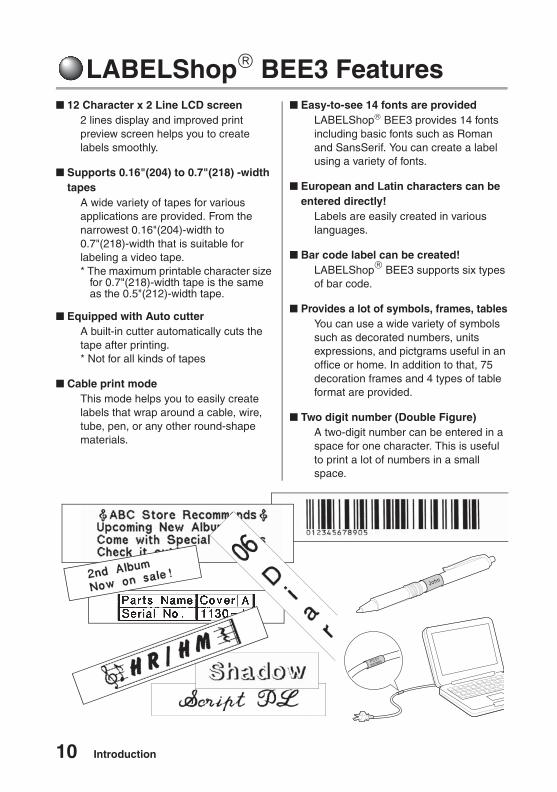
LABELShop� BEE3 Features12 Character x 2 Line LCD screen
2 lines display and improved print preview screen helps you to create labels smoothly.
Supports 0.16"(204) to 0.7"(218) -width tapes
A wide variety of tapes for various applications are provided. From the narrowest 0.16"(204)-width to 0.7"(218)-width that is suitable for labeling a video tape. * The maximum printable character size
for 0.7"(218)-width tape is the same as the 0.5"(212)-width tape.
Equipped with Auto cutterA built-in cutter automatically cuts the tape after printing.* Not for all kinds of tapes
Cable print modeThis mode helps you to easily create labels that wrap around a cable, wire, tube, pen, or any other round-shape materials.
Easy-to-see 14 fonts are providedLABELShop� BEE3 provides 14 fonts including basic fonts such as Roman and SansSerif. You can create a label using a variety of fonts.
European and Latin characters can be entered directly!
Labels are easily created in various languages.
Bar code label can be created!LABELShop� BEE3 supports six types of bar code.
Provides a lot of symbols, frames, tablesYou can use a wide variety of symbols such as decorated numbers, units expressions, and pictgrams useful in an office or home. In addition to that, 75 decoration frames and 4 types of table format are provided.
Two digit number (Double Figure) A two-digit number can be entered in a space for one character. This is useful to print a lot of numbers in a small space.
Introduction 11
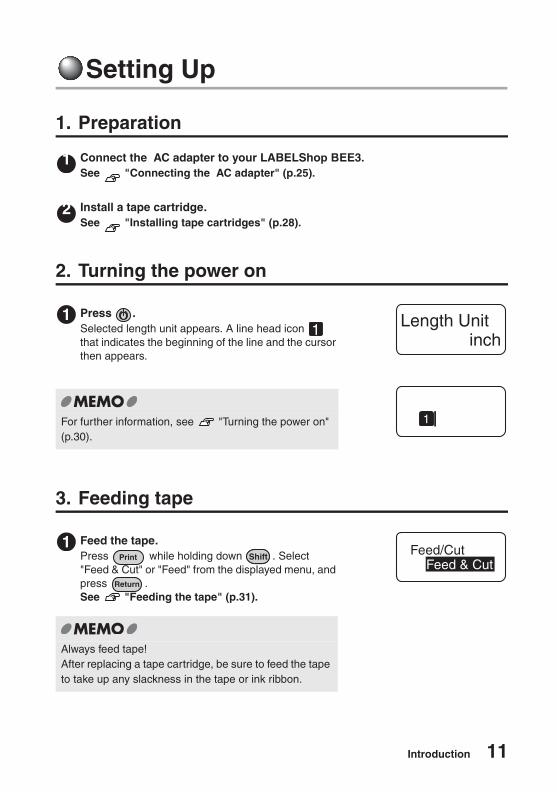
Setting Up
1. Preparation
Connect the AC adapter to your LABELShop BEE3.See "Connecting the AC adapter" (p.25).
Install a tape cartridge.See "Installing tape cartridges" (p.28).
2. Turning the power on
3. Feeding tape
Press .Selected length unit appears. A line head icon that indicates the beginning of the line and the cursor then appears.
For further information, see "Turning the power on" (p.30).
Feed the tape.Press while holding down . Select "Feed & Cut" or "Feed" from the displayed menu, and press .See "Feeding the tape" (p.31).
Always feed tape!After replacing a tape cartridge, be sure to feed the tape to take up any slackness in the tape or ink ribbon.
1
2
1 Length Unitinch
1
1Feed & Cut
Feed/Cut
12 Introduction
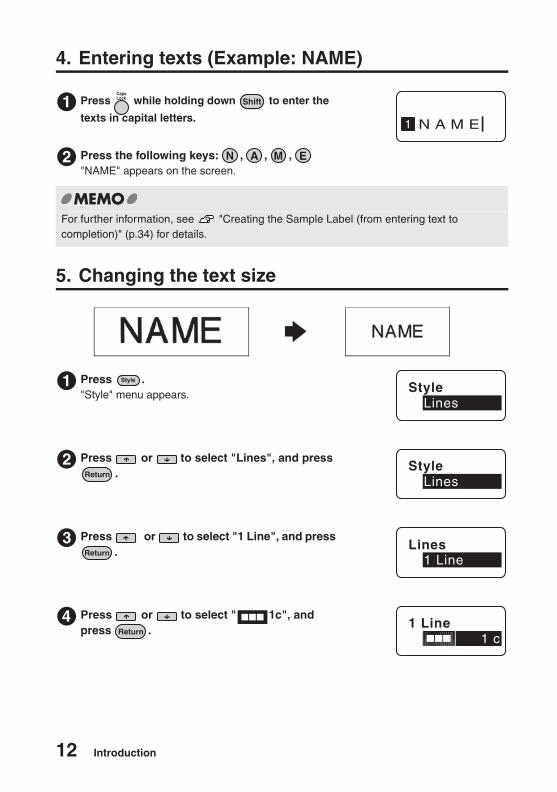
4. Entering texts (Example: NAME)
5. Changing the text size
Press while holding down to enter the
texts in capital letters.
Press the following keys: , , , "NAME" appears on the screen.
For further information, see "Creating the Sample Label (from entering text to completion)" (p.34) for details.
Press . "Style" menu appears.
Press or to select "Lines", and press .
Press or to select "1 Line", and press .
Press or to select " 1c", and press .
1
2
N A M E1
1 StyleLines
2 StyleLines
3 Lines1 Line
4 1 Line1 c

Introduction 13
6. Printing labels
Press or to select "End?", and press .
Press or to select "Label", and press .
For further information, see "Creating the Sample Label (from entering text to completion)" (p.34).
Press .The print preview is displayed by automatically scrolling through the entire text.
Press .Printing starts after "Length" is displayed on the screen. When the printing is completed, LABEL PRNTER tape. automatically cuts the tape.Do not pull the tape forcibly.
For further information, see "Printing label" (p.40).
5 StyleEnd?
6 AreaLabel
N A M E1
1NAME
X.Xin
2 Auto X.X"1

14 Introduction
7. Attaching labels
Attach the label and rub it firmly.
8. Turning the power off
Peel off the backing sheet.
For further information, see "Attaching label" (p.42).
Press .
Disconnect the AC adapter.
For further information, see "Turning the Power Off" (p.43).
1
2
1
2
Getting Started
This section describes how to connect the AC adapter to your
LABELShop� BEE3 and turn the power on. If you are a first time user, it is recommended that you read this section first.
16 Getting Started
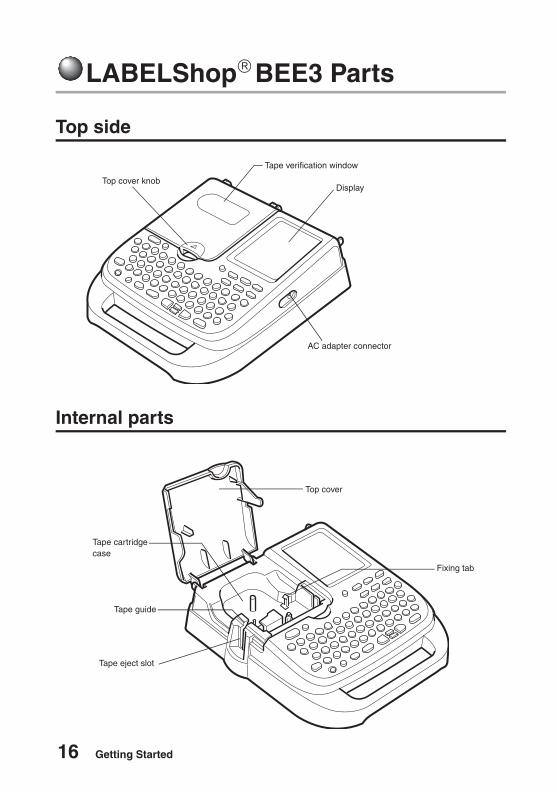
LABELShop� BEE3 Parts
Top side
Internal parts
Top cover knob
Tape verification window
Display
AC adapter connector
Top cover
Fixing tab
Tape cartridge case
Tape guide
Tape eject slot
Getting Started 17
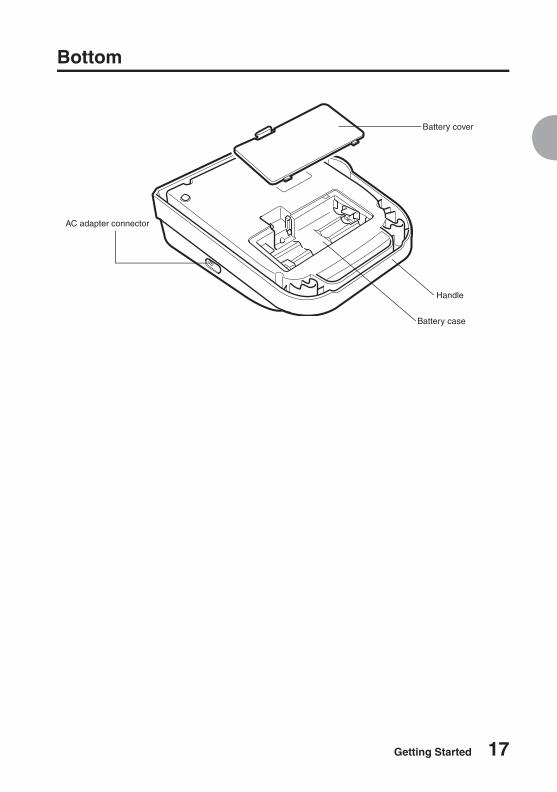
Bottom
Battery cover
Battery case
AC adapter connector
Handle
18 Getting Started
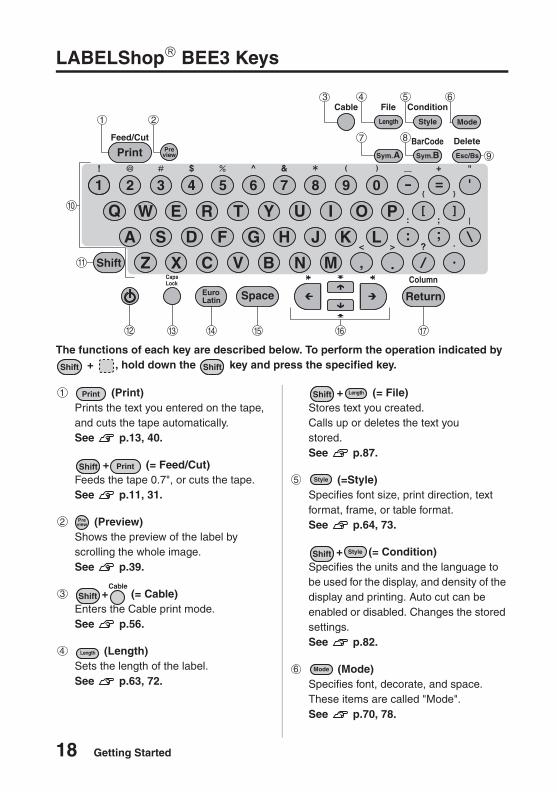
LABELShop� BEE3 Keys
(Print)Prints the text you entered on the tape, and cuts the tape automatically.See p.13, 40.
+ (= Feed/Cut)Feeds the tape 0.7", or cuts the tape. See p.11, 31.
(Preview)Shows the preview of the label by scrolling the whole image.See p.39.
+ (= Cable)Enters the Cable print mode.See p.56.
(Length)Sets the length of the label.See p.63, 72.
+ (= File)Stores text you created.Calls up or deletes the text youstored.See p.87.
(=Style)Specifies font size, print direction, text format, frame, or table format.See p.64, 73.
+ (= Condition)Specifies the units and the language to be used for the display, and density of the display and printing. Auto cut can be enabled or disabled. Changes the stored settings.See p.82.
(Mode)Specifies font, decorate, and space. These items are called "Mode".See p.70, 78.
The functions of each key are described below. To perform the operation indicated by + , hold down the key and press the specified key.
Getting Started 19
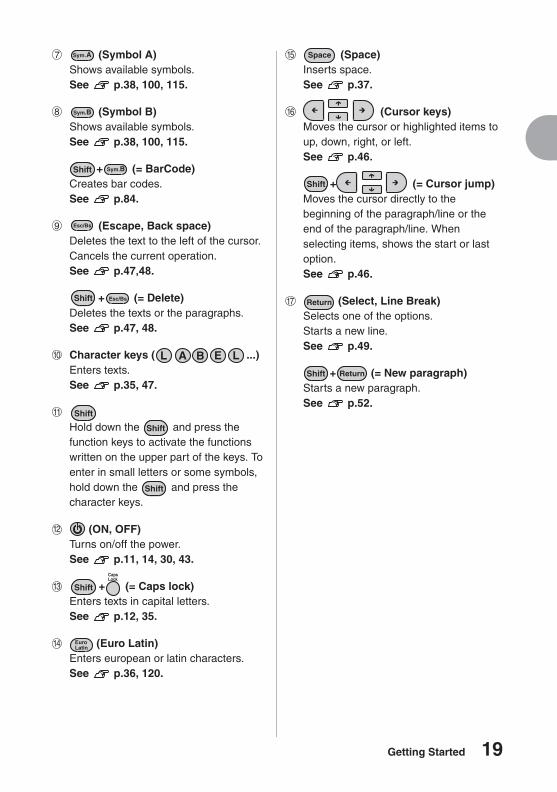
(Symbol A)Shows available symbols.See p.38, 100, 115.
(Symbol B)Shows available symbols.See p.38, 100, 115.
+ (= BarCode)Creates bar codes.See p.84.
(Escape, Back space)Deletes the text to the left of the cursor.Cancels the current operation.See p.47,48.
+ (= Delete)Deletes the texts or the paragraphs.See p.47, 48.
Character keys ( ...)Enters texts. See p.35, 47.
Hold down the and press the function keys to activate the functions written on the upper part of the keys. To enter in small letters or some symbols, hold down the and press the character keys.
(ON, OFF)Turns on/off the power. See p.11, 14, 30, 43.
+ (= Caps lock)Enters texts in capital letters.See p.12, 35.
(Euro Latin)Enters european or latin characters.See p.36, 120.
(Space)Inserts space. See p.37.
(Cursor keys)Moves the cursor or highlighted items to up, down, right, or left.See p.46.
+ (= Cursor jump)Moves the cursor directly to the beginning of the paragraph/line or the end of the paragraph/line. When selecting items, shows the start or last option.See p.46.
(Select, Line Break)Selects one of the options.Starts a new line.See p.49.
+ (= New paragraph)Starts a new paragraph.See p.52.

20 Getting Started
Display Indicators
Display indicators
<Text enter screen>
Line head icon ( ... )Appears on the line head to show the current line number. When there is a text(s) to be printed on the label,
and appear on the line head.
means that you cannot print the line.See p.35, 49, 52.
Confirmed texts (Example: 12AB)Texts to be printed on the label.
Text mode change icon ( )Displayed when changing the character mode such as font and decorate in the line or paragraph.See p.78.
Cursor ( )A movable indicator on a display, marking the position at which a character can be entered, corrected, or deleted.See p.46.
Memory full icon ( )Appears when the maximum number of letters (approx. 90 letters) are entered.You cannot enter any letters until you delete a part of or whole of the text.
Font indicatorIndicates the font name of the character at the cursor position.See p.78.
Auto cut indicatorLights when "Auto Cut" is set to "On".See p.91.
Getting Started 21
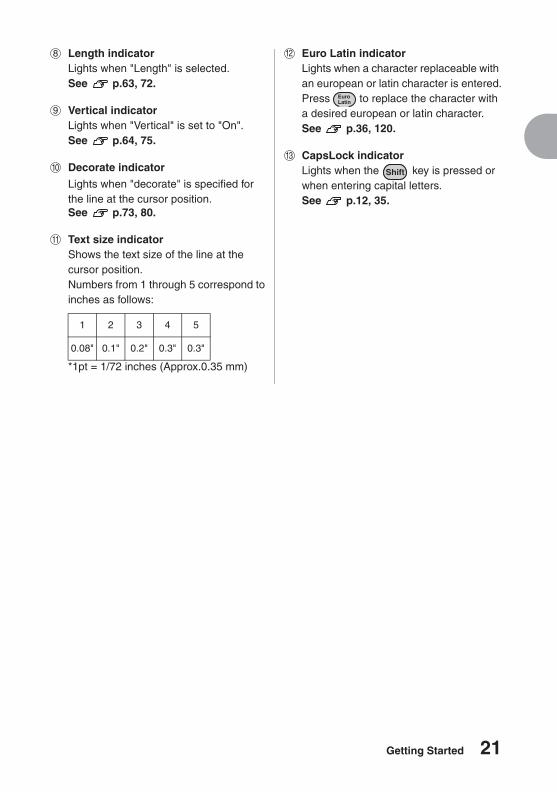
Length indicatorLights when "Length" is selected.See p.63, 72.
Vertical indicatorLights when "Vertical" is set to "On".See p.64, 75.
Decorate indicator
Lights when "decorate" is specified for the line at the cursor position.See p.73, 80.
Text size indicatorShows the text size of the line at the cursor position.Numbers from 1 through 5 correspond to inches as follows:
*1pt = 1/72 inches (Approx.0.35 mm)
Euro Latin indicatorLights when a character replaceable with an european or latin character is entered.Press to replace the character with a desired european or latin character.See p.36, 120.
CapsLock indicatorLights when the key is pressed or when entering capital letters.See p.12, 35.
1 2 3 4 5
0.08" 0.1" 0.2" 0.3" 0.3"
22 Getting Started
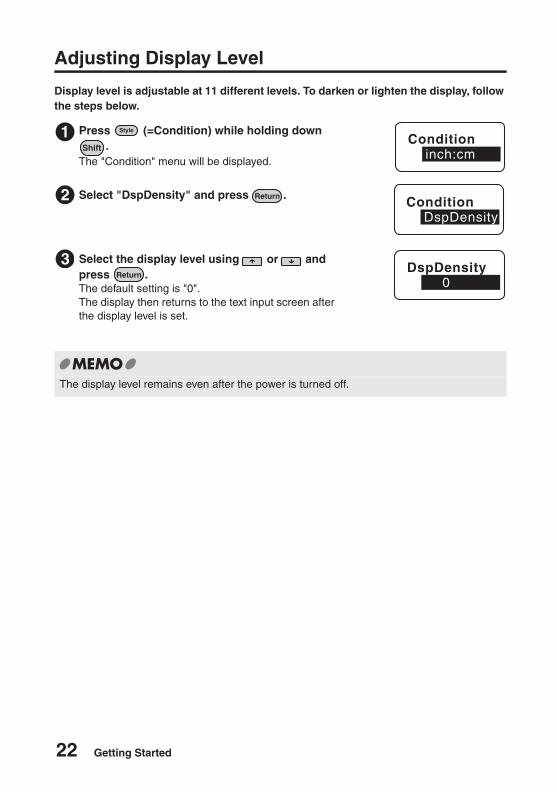
Adjusting Display Level
Display level is adjustable at 11 different levels. To darken or lighten the display, follow the steps below.
Press (=Condition) while holding down .
The "Condition" menu will be displayed.
Select "DspDensity" and press .
Select the display level using or and press .The default setting is "0".The display then returns to the text input screen after the display level is set.
The display level remains even after the power is turned off.
1 Conditioninch:cm
2 ConditionDspDensity
3 DspDensity0
Getting Started 23
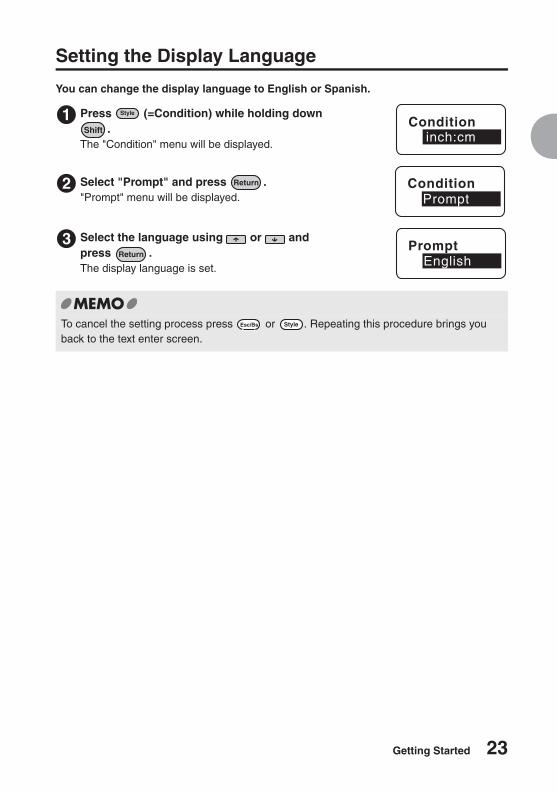
Setting the Display Language
You can change the display language to English or Spanish.
Press (=Condition) while holding down .
The "Condition" menu will be displayed.
Select "Prompt" and press ."Prompt" menu will be displayed.
Select the language using or and press .The display language is set.
To cancel the setting process press or . Repeating this procedure brings you back to the text enter screen.
1 Conditioninch:cm
2 ConditionPrompt
3 PromptEnglish
24 Getting Started
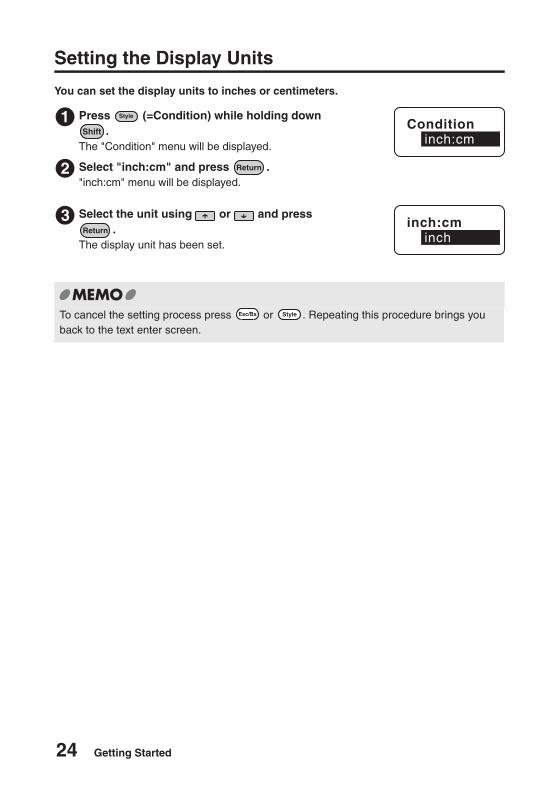
Setting the Display Units
You can set the display units to inches or centimeters.
Press (=Condition) while holding down .
The "Condition" menu will be displayed.
Select "inch:cm" and press ."inch:cm" menu will be displayed.
Select the unit using or and press .
The display unit has been set.
To cancel the setting process press or . Repeating this procedure brings you back to the text enter screen.
1
2
Conditioninch:cm
3 inch:cminch
Getting Started 25
Preparation
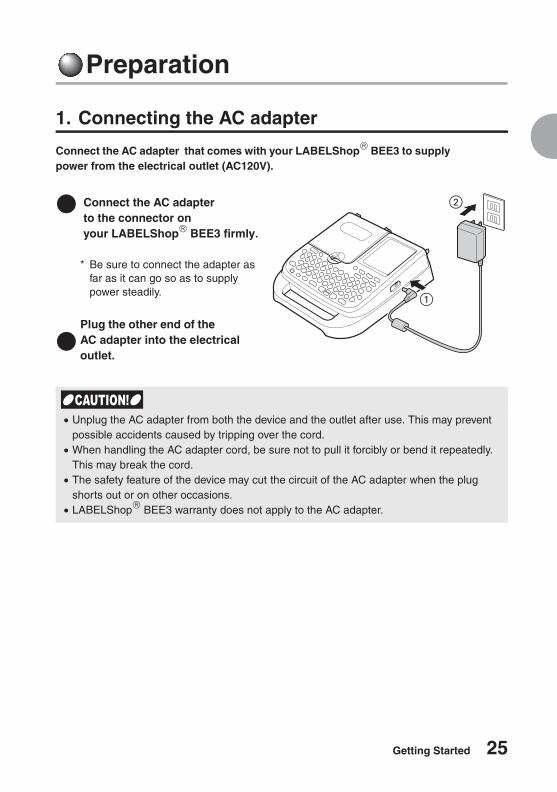
1. Connecting the AC adapter
Connect the AC adapter that comes with your LABELShop� BEE3 to supply power from the electrical outlet (AC120V).
Connect the AC adapter to the connector on your LABELShop� BEE3 firmly.
* Be sure to connect the adapter as far as it can go so as to supply power steadily.
Plug the other end of the AC adapter into the electrical outlet.
� Unplug the AC adapter from both the device and the outlet after use. This may prevent possible accidents caused by tripping over the cord.� When handling the AC adapter cord, be sure not to pull it forcibly or bend it repeatedly.
This may break the cord.� The safety feature of the device may cut the circuit of the AC adapter when the plug
shorts out or on other occasions.� LABELShop� BEE3 warranty does not apply to the AC adapter.
1
2
26 Getting Started
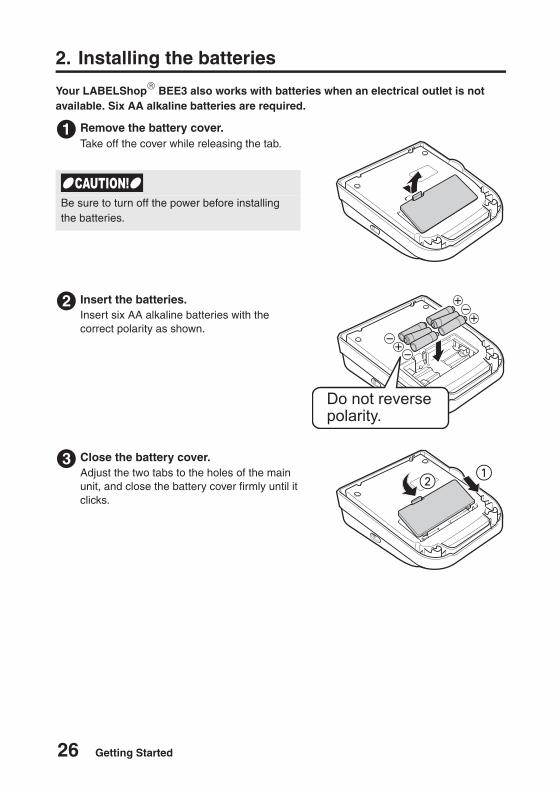
2. Installing the batteries
Your LABELShop� BEE3 also works with batteries when an electrical outlet is not available. Six AA alkaline batteries are required.
Remove the battery cover.Take off the cover while releasing the tab.
Be sure to turn off the power before installing the batteries.
Insert the batteries.Insert six AA alkaline batteries with the correct polarity as shown.
Close the battery cover.Adjust the two tabs to the holes of the main unit, and close the battery cover firmly until it clicks.
1
2
3
Getting Started 27
� Use AA alkaline batteries only. Other types of battery have short lives, and the message to notify the user that the battery is running out may not be displayed.� The batteries are used for storing files, text data you entered on the
LABELShop� BEE3. Even though you can print only with the battery power, it will shorten the battery life. To minimize the battery consumption, always use the AC adapter or the optional Truck/Auto adapter (LSTA-3B)whenever using the LABELShop� BEE3.� You can print labels with batteries installed, however, it is strongly recommended that you
connect either adapter before printing.� Be sure to replace the batteries with the power turned off to avoid the stored data on the
LABELShop� BEE3 from being deleted. Also, do not keep the LABELShop� BEE3 without the batteries for more than four minutes. Otherwise all of the text data or settings you entered or saved may be cleared.� Make sure to use the AC adapter only.
� Print speed becomes slower when the AC adapter is not connected.� Printing on the wide tape will temporarily cause the device to consume a large amount of
current, and can cause the device to display "Change Batteries" even if new batteries are installed. This is normal operation for the device.� Print speed becomes slower when the batteries are running low, then "Change Batteries"
appears on the display. Replace all the batteries with new ones or connect the AC adapter immediately, otherwise the LABELShop� BEE3 may turn off in the middle of the operation or during printing.� New AA alkaline batteries will supply enough power for the device to print on one tape
cartridge (0.7" x 26') at room temperatures. However, when you operate the device in cold places or print on wide tapes, the life span of the batteries becomes shorter. You are recommended to use the AC adapter as much as possible. Do not use an AC adapter other than the one designed for this printer.� Make sure to turn off the power after use.� If your LABELShop� BEE3 is not to be used for long periods, remove the batteries from
the device to avoid possible leakage.� Dispose of the used batteries according to your local regulations.
28 Getting Started
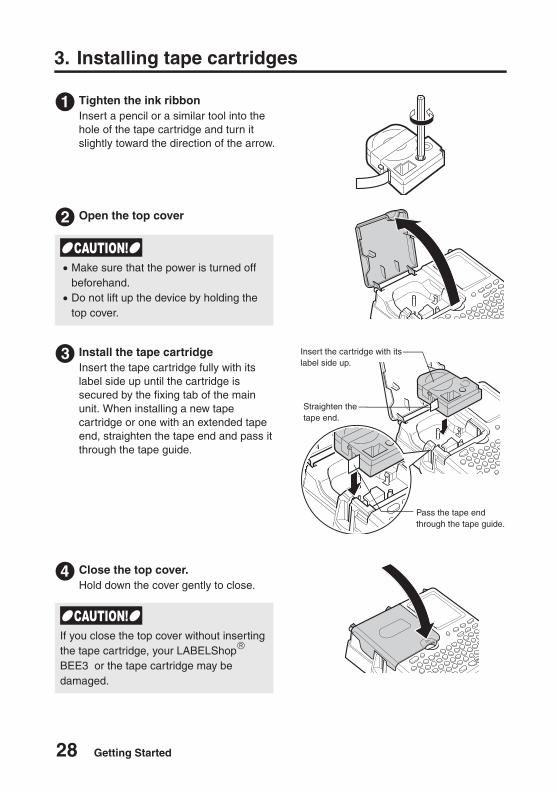
3. Installing tape cartridges
Tighten the ink ribbonInsert a pencil or a similar tool into the hole of the tape cartridge and turn it slightly toward the direction of the arrow.
Open the top cover
Install the tape cartridgeInsert the tape cartridge fully with its label side up until the cartridge is secured by the fixing tab of the main unit. When installing a new tape cartridge or one with an extended tape end, straighten the tape end and pass it through the tape guide.
Close the top cover.Hold down the cover gently to close.
1
2
� Make sure that the power is turned off beforehand.� Do not lift up the device by holding the
top cover.
3
Straighten the tape end.
Insert the cartridge with its label side up.
Pass the tape end through the tape guide.
4
If you close the top cover without inserting the tape cartridge, your LABELShop� BEE3 or the tape cartridge may be damaged.

Getting Started 29
Removing the tape cartridgeTo ensure proper and beautiful printing, the tape cartridge is secured to the main unit firmly. To remove, place your fingers on the tabs provided on both sides of the cartridge as shown in the figure, lift the tabs straight up to pull out the cartridge.
� LABELShop� BEE3 supports five different width of the tape cartridges (4mm, 6mm, 9mm, 12mm, 18mm). Number of lines printed on the tape varies depending the tape width.See "Adding New Lines (Line Break)" (p.49).� Tape cartridges should be stored in a dark cold place away from direct sunlight,
excessive temperature and humidity, and dust.� It is recommended that you use the tape cartridge as soon as possible after opening.� When installing the tape cartridge, insert it firmly as far as it can go.� The maximum character size printable on 212-width and 218 width tapes are the same.� When the tape cartridge that is not supported by the LABELShop� BEE3 is installed, a
message; "Check Tape!" or "No Tape!" appears. Reinstall the supported tape cartridge properly.
Tabs

30 Getting Started
4. Turning the power on
Observe the following precautions before you turn the power on.� Is the AC adapter connected to the LABELShop� BEE3 and the electrical outlet?� Are the batteries installed properly? (When operating the device with the batteries alone.)
Text you have entered remains even after turning the power off. When the device is turned on again, the text appears after the selected length unit is displayed. Selected options for the settings such as font and text size are also indicated. See "Display Indicators" (p.20).
Press .
Auto power-offIf there is no activity for approx. five minutes, the LABELShop� BEE3 automatically shuts down in order to save battery power. (Text you have entered remains.) Press again to restore. In order to save battery power, it is recommended that you turn off the power manually when the device is not to be used.
1
Length Unitinch 1
* Selected length unit is displayed on the screen for approx. one second.
* Line head icon ( and the cursor will appear.
Getting Started 31
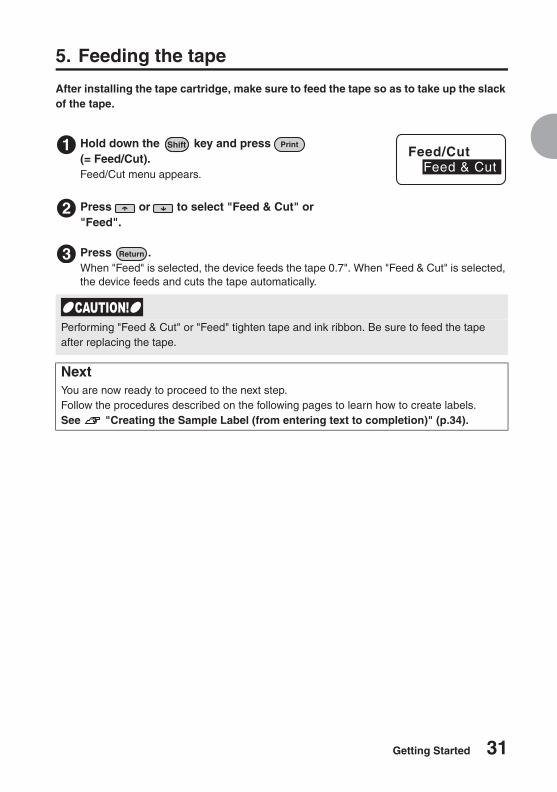
5. Feeding the tape
After installing the tape cartridge, make sure to feed the tape so as to take up the slack of the tape.
Press .When "Feed" is selected, the device feeds the tape 0.7". When "Feed & Cut" is selected, the device feeds and cuts the tape automatically.
Hold down the key and press (= Feed/Cut).Feed/Cut menu appears.
Press or to select "Feed & Cut" or "Feed".
Performing "Feed & Cut" or "Feed" tighten tape and ink ribbon. Be sure to feed the tape after replacing the tape.
NextYou are now ready to proceed to the next step. Follow the procedures described on the following pages to learn how to create labels.See "Creating the Sample Label (from entering text to completion)" (p.34).
1
2
Feed/CutFeed & Cut
3

32 Getting Started
Basic Operations 1- Creating basic labels -
This section describes LABELShop� BEE3 basic operations.You will learn how to enter text, print, and create simple labels.
34 Basic Operations 1
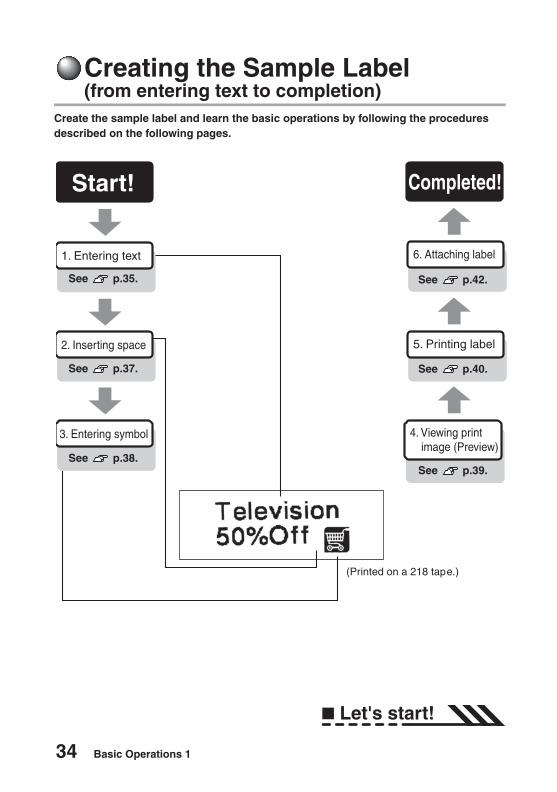
Creating the Sample Label (from entering text to completion)
Create the sample label and learn the basic operations by following the procedures described on the following pages.
Start!
(Printed on a 218 tape.)
4. Viewing print image (Preview)
5. Printing label
6. Attaching label
Completed!
1. Entering text
3. Entering symbol
2. Inserting space
See p.35.
See p.37.
See p.38.See p.39.
See p.40.
See p.42.
Let's start!
Basic Operations 1 35
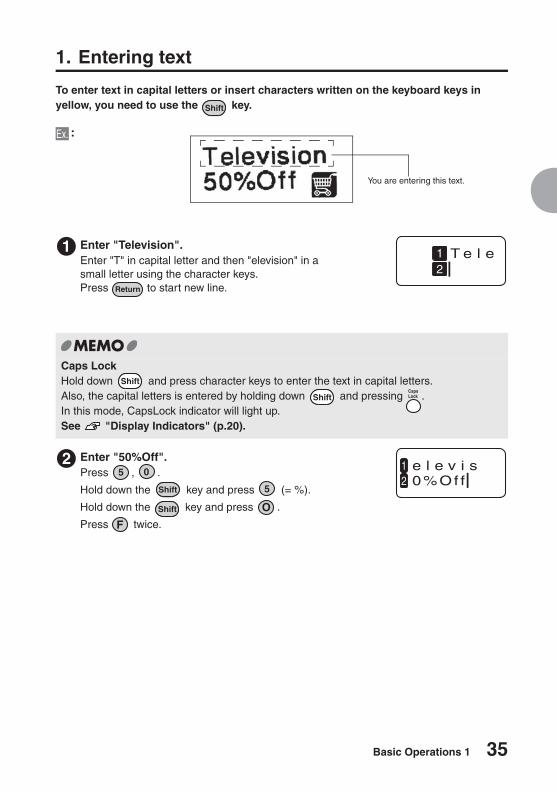
1. Entering text
To enter text in capital letters or insert characters written on the keyboard keys in yellow, you need to use the key.
:
Enter "Television".Enter "T" in capital letter and then "elevision" in a small letter using the character keys.Press to start new line.
Caps LockHold down and press character keys to enter the text in capital letters.Also, the capital letters is entered by holding down and pressing .In this mode, CapsLock indicator will light up.See "Display Indicators" (p.20).
Enter "50%Off".Press , .
Hold down the key and press (= %).
Hold down the key and press .
Press twice.
You are entering this text.
Ex.
1 T e l e12
2 e l e v i s0%Of f
12
36 Basic Operations 1
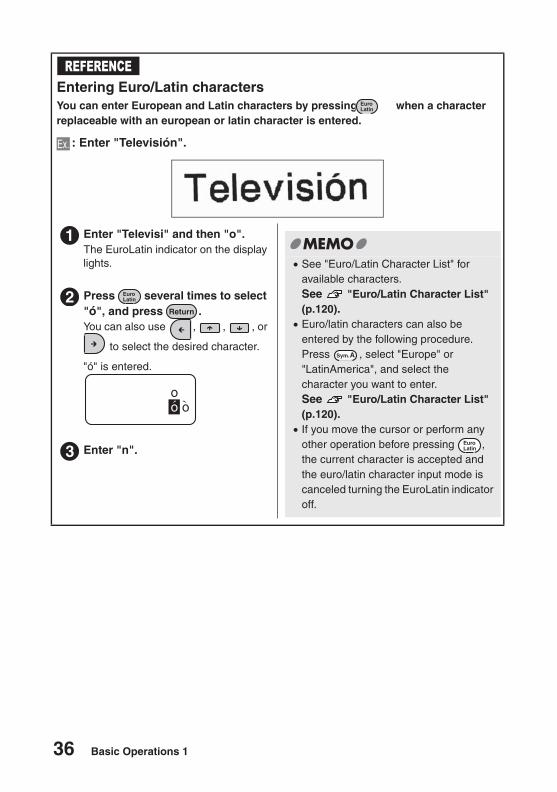
Entering Euro/Latin charactersYou can enter European and Latin characters by pressing when a character replaceable with an european or latin character is entered.
: Enter "Televisión".
REFERENCE
Ex.
Enter "Televisi" and then "o".The EuroLatin indicator on the display lights.
Press several times to select "ó", and press .You can also use , , , or
to select the desired character.
"ó" is entered.
Enter "n".
1
2
oo o
3
� See "Euro/Latin Character List" for available characters.See "Euro/Latin Character List" (p.120).� Euro/latin characters can also be
entered by the following procedure. Press , select "Europe" or "LatinAmerica", and select the character you want to enter.See "Euro/Latin Character List" (p.120).� If you move the cursor or perform any
other operation before pressing , the current character is accepted and the euro/latin character input mode is canceled turning the EuroLatin indicator off.
Basic Operations 1 37
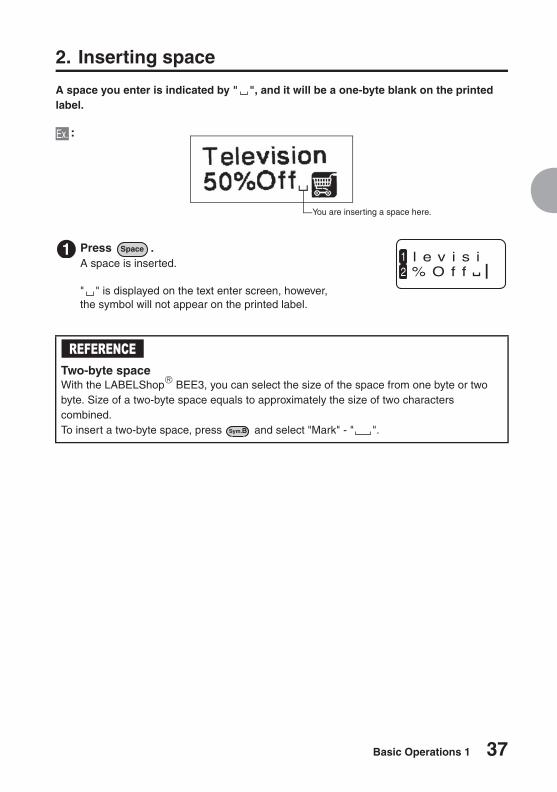
2. Inserting space
A space you enter is indicated by " ", and it will be a one-byte blank on the printed label.
:
Press .A space is inserted.
" " is displayed on the text enter screen, however, the symbol will not appear on the printed label.
Two-byte spaceWith the LABELShop� BEE3, you can select the size of the space from one byte or two byte. Size of a two-byte space equals to approximately the size of two characters combined. To insert a two-byte space, press and select "Mark" - " ".
You are inserting a space here.
Ex.
1 l e v i s i% O f f
12
REFERENCE
38 Basic Operations 1
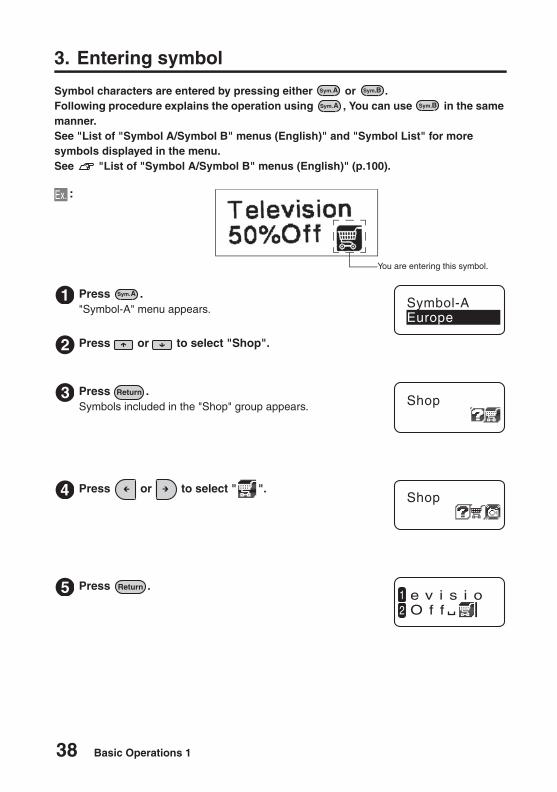
3. Entering symbol
Symbol characters are entered by pressing either or .Following procedure explains the operation using , You can use in the same manner.See "List of "Symbol A/Symbol B" menus (English)" and "Symbol List" for more symbols displayed in the menu.See "List of "Symbol A/Symbol B" menus (English)" (p.100).
:
Press ."Symbol-A" menu appears.
Press or to select "Shop".
Press .Symbols included in the "Shop" group appears.
Press or to select " ".
Press .
You are entering this symbol.
Ex.
1
2
Symbol-AEurope
3 Shop
4 Shop
5 e v i s i oO f f
12
Basic Operations 1 39
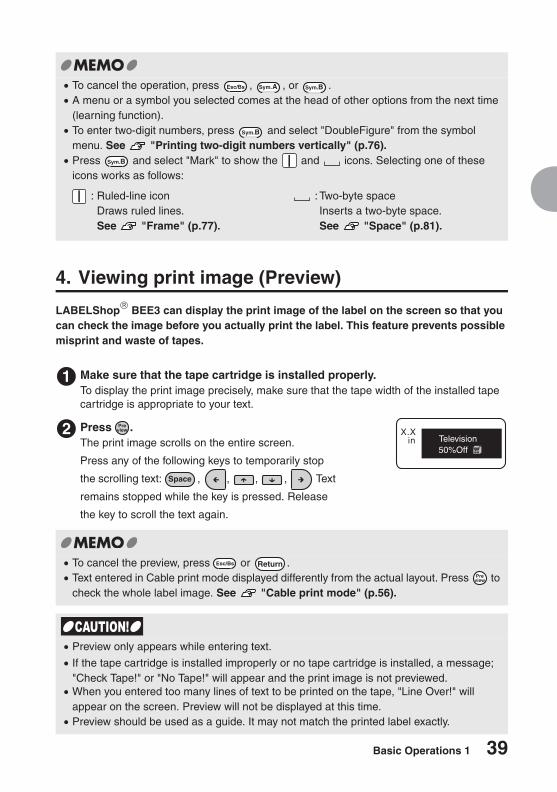
4. Viewing print image (Preview)
LABELShop� BEE3 can display the print image of the label on the screen so that you can check the image before you actually print the label. This feature prevents possible misprint and waste of tapes.
Make sure that the tape cartridge is installed properly.To display the print image precisely, make sure that the tape width of the installed tape cartridge is appropriate to your text.
� To cancel the operation, press , , or .� A menu or a symbol you selected comes at the head of other options from the next time
(learning function).� To enter two-digit numbers, press and select "DoubleFigure" from the symbol
menu. See "Printing two-digit numbers vertically" (p.76).� Press and select "Mark" to show the and icons. Selecting one of these
icons works as follows:
Press .The print image scrolls on the entire screen.
Press any of the following keys to temporarily stop
the scrolling text: , , , , Text
remains stopped while the key is pressed. Release
the key to scroll the text again.
� To cancel the preview, press or .� Text entered in Cable print mode displayed differently from the actual layout. Press to
check the whole label image. See "Cable print mode" (p.56).
� Preview only appears while entering text.
� If the tape cartridge is installed improperly or no tape cartridge is installed, a message; "Check Tape!" or "No Tape!" will appear and the print image is not previewed.� When you entered too many lines of text to be printed on the tape, "Line Over!" will
appear on the screen. Preview will not be displayed at this time.� Preview should be used as a guide. It may not match the printed label exactly.
: Ruled-line iconDraws ruled lines.See "Frame" (p.77).
: Two-byte spaceInserts a two-byte space.See "Space" (p.81).
1
2Television
X.Xin
50%Off
40 Basic Operations 1
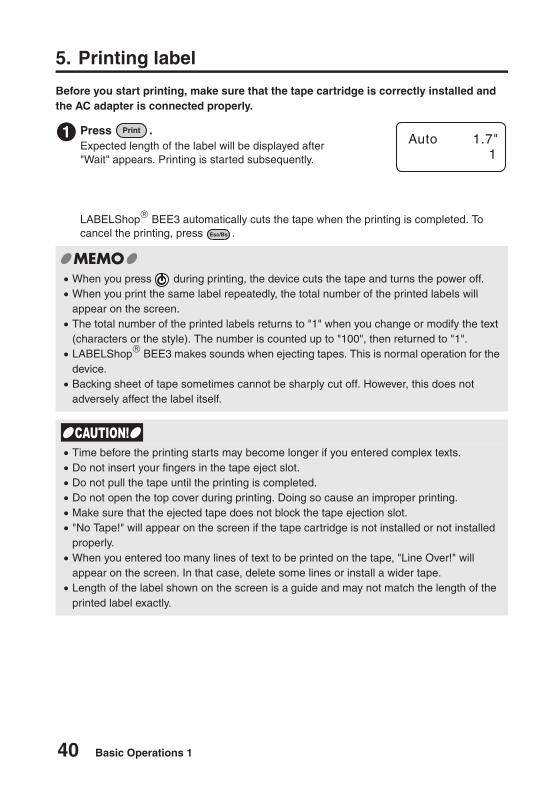
5. Printing label
Before you start printing, make sure that the tape cartridge is correctly installed and the AC adapter is connected properly.
LABELShop� BEE3 automatically cuts the tape when the printing is completed. To cancel the printing, press .
Press .Expected length of the label will be displayed after "Wait" appears. Printing is started subsequently.
� When you press during printing, the device cuts the tape and turns the power off.� When you print the same label repeatedly, the total number of the printed labels will
appear on the screen.� The total number of the printed labels returns to "1" when you change or modify the text
(characters or the style). The number is counted up to "100", then returned to "1".� LABELShop� BEE3 makes sounds when ejecting tapes. This is normal operation for the
device.� Backing sheet of tape sometimes cannot be sharply cut off. However, this does not
adversely affect the label itself.
� Time before the printing starts may become longer if you entered complex texts.� Do not insert your fingers in the tape eject slot.� Do not pull the tape until the printing is completed.� Do not open the top cover during printing. Doing so cause an improper printing.� Make sure that the ejected tape does not block the tape ejection slot.� "No Tape!" will appear on the screen if the tape cartridge is not installed or not installed
properly.� When you entered too many lines of text to be printed on the tape, "Line Over!" will
appear on the screen. In that case, delete some lines or install a wider tape.� Length of the label shown on the screen is a guide and may not match the length of the
printed label exactly.
1 Auto 1.7"1
Basic Operations 1 41
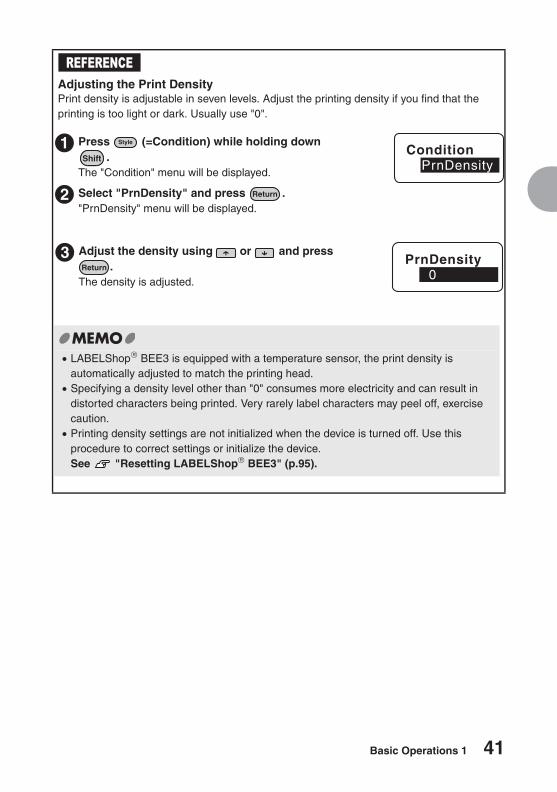
Adjusting the Print DensityPrint density is adjustable in seven levels. Adjust the printing density if you find that the printing is too light or dark. Usually use "0".
REFERENCE
Press (=Condition) while holding down .
The "Condition" menu will be displayed.
Select "PrnDensity" and press ."PrnDensity" menu will be displayed.
1
2
ConditionPrnDensity
Adjust the density using or and press .
The density is adjusted.
� LABELShop� BEE3 is equipped with a temperature sensor, the print density is automatically adjusted to match the printing head.� Specifying a density level other than "0" consumes more electricity and can result in
distorted characters being printed. Very rarely label characters may peel off, exercise caution.� Printing density settings are not initialized when the device is turned off. Use this
procedure to correct settings or initialize the device.See "Resetting LABELShop� BEE3" (p.95).
3 PrnDensity 0
42 Basic Operations 1
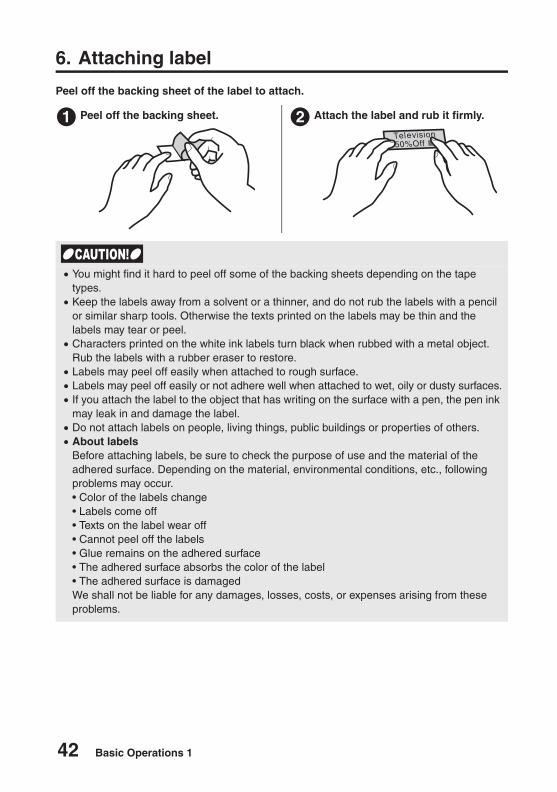
6. Attaching label
Peel off the backing sheet of the label to attach.
Peel off the backing sheet. Attach the label and rub it firmly.
� You might find it hard to peel off some of the backing sheets depending on the tape types.� Keep the labels away from a solvent or a thinner, and do not rub the labels with a pencil
or similar sharp tools. Otherwise the texts printed on the labels may be thin and the labels may tear or peel.� Characters printed on the white ink labels turn black when rubbed with a metal object.
Rub the labels with a rubber eraser to restore.� Labels may peel off easily when attached to rough surface.� Labels may peel off easily or not adhere well when attached to wet, oily or dusty surfaces.� If you attach the label to the object that has writing on the surface with a pen, the pen ink
may leak in and damage the label.� Do not attach labels on people, living things, public buildings or properties of others.� About labels
Before attaching labels, be sure to check the purpose of use and the material of the adhered surface. Depending on the material, environmental conditions, etc., following problems may occur.
We shall not be liable for any damages, losses, costs, or expenses arising from these problems.
1 2elevision
50%Off
Basic Operations 1 43
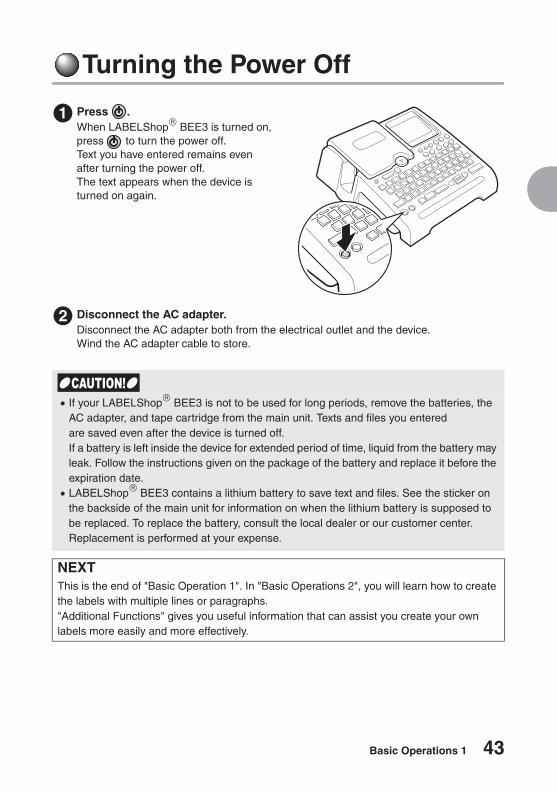
Turning the Power Off
Disconnect the AC adapter.Disconnect the AC adapter both from the electrical outlet and the device.Wind the AC adapter cable to store.
Press .When LABELShop� BEE3 is turned on, press to turn the power off. Text you have entered remains even after turning the power off. The text appears when the device is turned on again.
� If your LABELShop� BEE3 is not to be used for long periods, remove the batteries, the AC adapter, and tape cartridge from the main unit. Texts and files you entered are saved even after the device is turned off. If a battery is left inside the device for extended period of time, liquid from the battery may leak. Follow the instructions given on the package of the battery and replace it before the expiration date.� LABELShop� BEE3 contains a lithium battery to save text and files. See the sticker on
the backside of the main unit for information on when the lithium battery is supposed to be replaced. To replace the battery, consult the local dealer or our customer center. Replacement is performed at your expense.
NEXTThis is the end of "Basic Operation 1". In "Basic Operations 2", you will learn how to create the labels with multiple lines or paragraphs."Additional Functions" gives you useful information that can assist you create your own labels more easily and more effectively.
1
2

44 Basic Operations 1
Basic Operations 2- Creating labels for various purposes -
In this section, you will learn to create the labels with multiple lines or paragraphs so that you can arrange the layout as you like.
46 Basic Operations 2
Editing TextYou can edit the text by inserting or deleting characters.
Using the cursor keys
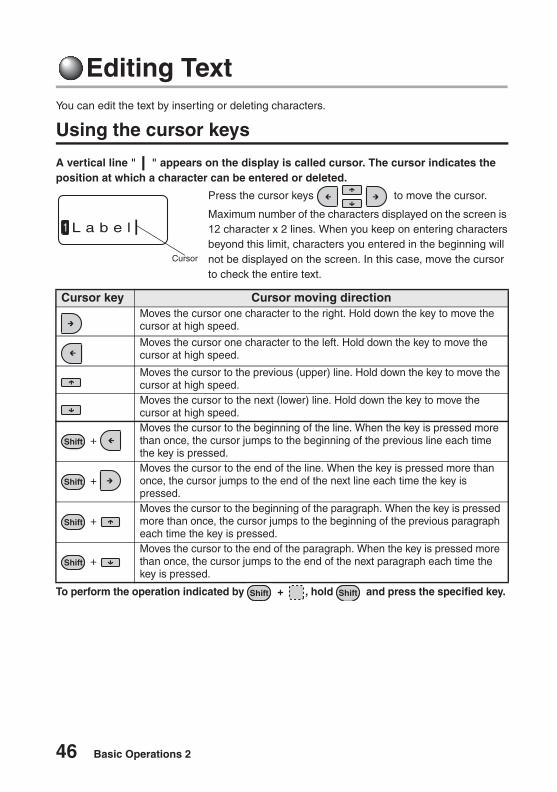
A vertical line " " appears on the display is called cursor. The cursor indicates the position at which a character can be entered or deleted.
To perform the operation indicated by + , hold and press the specified key.
Press the cursor keys to move the cursor.
Maximum number of the characters displayed on the screen is 12 character x 2 lines. When you keep on entering characters beyond this limit, characters you entered in the beginning will not be displayed on the screen. In this case, move the cursor to check the entire text.
Cursor key Cursor moving directionMoves the cursor one character to the right. Hold down the key to move the cursor at high speed.
Moves the cursor one character to the left. Hold down the key to move the cursor at high speed.
Moves the cursor to the previous (upper) line. Hold down the key to move the cursor at high speed.Moves the cursor to the next (lower) line. Hold down the key to move the cursor at high speed.
+ Moves the cursor to the beginning of the line. When the key is pressed more than once, the cursor jumps to the beginning of the previous line each time the key is pressed.
+ Moves the cursor to the end of the line. When the key is pressed more than once, the cursor jumps to the end of the next line each time the key is pressed.
+ Moves the cursor to the beginning of the paragraph. When the key is pressed more than once, the cursor jumps to the beginning of the previous paragraph each time the key is pressed.
+ Moves the cursor to the end of the paragraph. When the key is pressed more than once, the cursor jumps to the end of the next paragraph each time the key is pressed.
L a b e l1
Cursor
Basic Operations 2 47
Entering text
Deleting/Inserting text
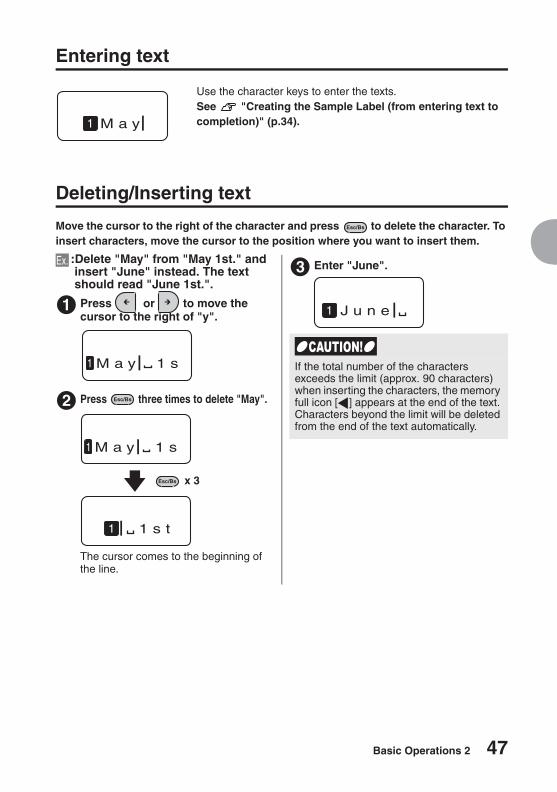
Move the cursor to the right of the character and press to delete the character. To insert characters, move the cursor to the position where you want to insert them.
Use the character keys to enter the texts.See "Creating the Sample Label (from entering text to completion)" (p.34).
:Delete "May" from "May 1st." and insert "June" instead. The text should read "June 1st.".
Press or to move the cursor to the right of "y".
Press three times to delete "May".
x 3
The cursor comes to the beginning of the line.
Enter "June".
M a y1
Ex.
1
M a y 1 s1
2
M a y 1 s1
1 s t1
3
J u n e1
If the total number of the characters exceeds the limit (approx. 90 characters) when inserting the characters, the memory full icon [ ] appears at the end of the text. Characters beyond the limit will be deleted from the end of the text automatically.
48 Basic Operations 2
Deleting all the text
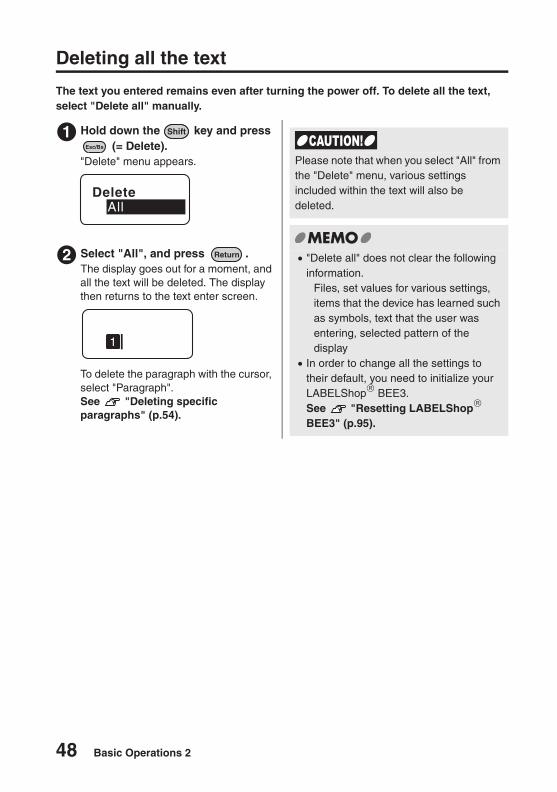
The text you entered remains even after turning the power off. To delete all the text, select "Delete all" manually.
Hold down the key and press (= Delete).
"Delete" menu appears.
Select "All", and press .The display goes out for a moment, and all the text will be deleted. The display then returns to the text enter screen.
To delete the paragraph with the cursor, select "Paragraph".See "Deleting specific paragraphs" (p.54).
1
DeleteAll
2
1
Please note that when you select "All" from the "Delete" menu, various settings included within the text will also be deleted.
� "Delete all" does not clear the following information.
Files, set values for various settings, items that the device has learned such as symbols, text that the user was entering, selected pattern of the display
� In order to change all the settings to their default, you need to initialize your LABELShop� BEE3.See "Resetting LABELShop� BEE3" (p.95).
Basic Operations 2 49
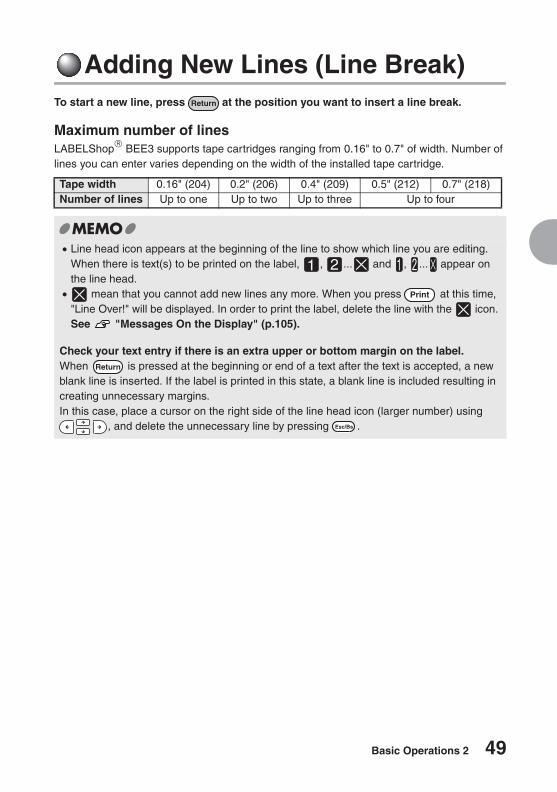
Adding New Lines (Line Break)To start a new line, press at the position you want to insert a line break.
Maximum number of linesLABELShop� BEE3 supports tape cartridges ranging from 0.16" to 0.7" of width. Number of lines you can enter varies depending on the width of the installed tape cartridge.
Tape width 0.16" (204) 0.2" (206) 0.4" (209) 0.5" (212) 0.7" (218)Number of lines Up to one Up to two Up to three Up to four
� Line head icon appears at the beginning of the line to show which line you are editing. When there is text(s) to be printed on the label, , ... and , ... appear on the line head.� mean that you cannot add new lines any more. When you press at this time,
"Line Over!" will be displayed. In order to print the label, delete the line with the icon. See "Messages On the Display" (p.105).
Check your text entry if there is an extra upper or bottom margin on the label.When is pressed at the beginning or end of a text after the text is accepted, a new blank line is inserted. If the label is printed in this state, a blank line is included resulting in creating unnecessary margins.In this case, place a cursor on the right side of the line head icon (larger number) using
, and delete the unnecessary line by pressing .
50 Basic Operations 2
Starting a new line
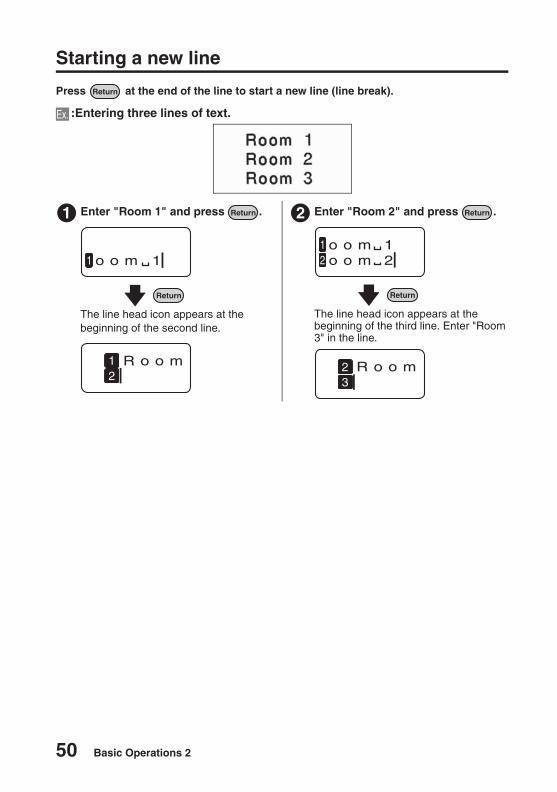
Press at the end of the line to start a new line (line break).
:Entering three lines of text.
Enter "Room 1" and press .
The line head icon appears at the beginning of the second line.
Enter "Room 2" and press .
The line head icon appears at the beginning of the third line. Enter "Room 3" in the line.
Ex.
1
o o m 11
R o o m21
2
o o m 11o o m 22
R o o m23
Basic Operations 2 51
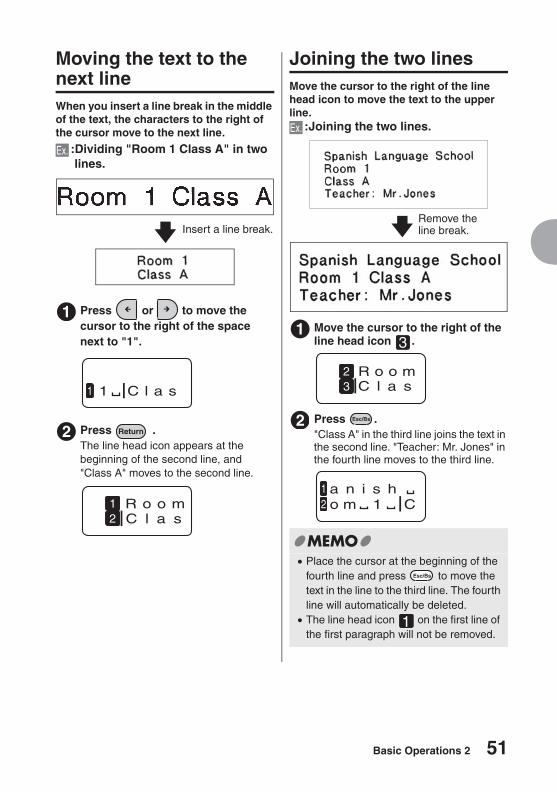
Moving the text to the next lineWhen you insert a line break in the middle of the text, the characters to the right of the cursor move to the next line.
:Dividing "Room 1 Class A" in two lines.
Insert a line break.
Press or to move the cursor to the right of the space next to "1".
Press .The line head icon appears at the beginning of the second line, and "Class A" moves to the second line.
Joining the two linesMove the cursor to the right of the line head icon to move the text to the upper line.
:Joining the two lines.
Move the cursor to the right of the line head icon .
Press ."Class A" in the third line joins the text in the second line. "Teacher: Mr. Jones" in the fourth line moves to the third line.
Ex.
1
C l a s11
2
R o o mC l a s
12
Ex.
Remove theline break.
1
R o o mC l a s
23
2
o ma n i s h
1 C21
� Place the cursor at the beginning of the fourth line and press to move the text in the line to the third line. The fourth line will automatically be deleted.
� The line head icon on the first line of the first paragraph will not be removed.
52 Basic Operations 2
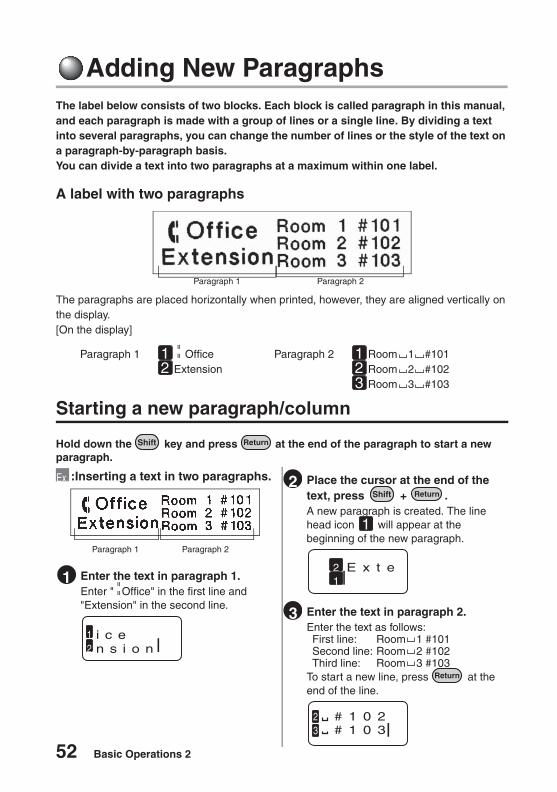
Adding New ParagraphsThe label below consists of two blocks. Each block is called paragraph in this manual, and each paragraph is made with a group of lines or a single line. By dividing a text into several paragraphs, you can change the number of lines or the style of the text on a paragraph-by-paragraph basis. You can divide a text into two paragraphs at a maximum within one label.
A label with two paragraphs
The paragraphs are placed horizontally when printed, however, they are aligned vertically on the display.[On the display]
Starting a new paragraph/column
Hold down the key and press at the end of the paragraph to start a new paragraph.
Paragraph 1 OfficeExtension
Paragraph 2 Room 1 #101Room 2 #102Room 3 #103
:Inserting a text in two paragraphs.
Enter the text in paragraph 1.Enter " Office" in the first line and "Extension" in the second line.
Place the cursor at the end of the text, press + .A new paragraph is created. The line head icon will appear at the beginning of the new paragraph.
Enter the text in paragraph 2.Enter the text as follows:First line: Room 1 #101Second line: Room 2 #102Third line: Room 3 #103
To start a new line, press at the end of the line.
Paragraph 1 Paragraph 2
Ex.
Paragraph 1 Paragraph 2
1
i c e1n s i o n2
2
E x t e21
3
# 1 0 2# 1 0 3
23
Basic Operations 2 53
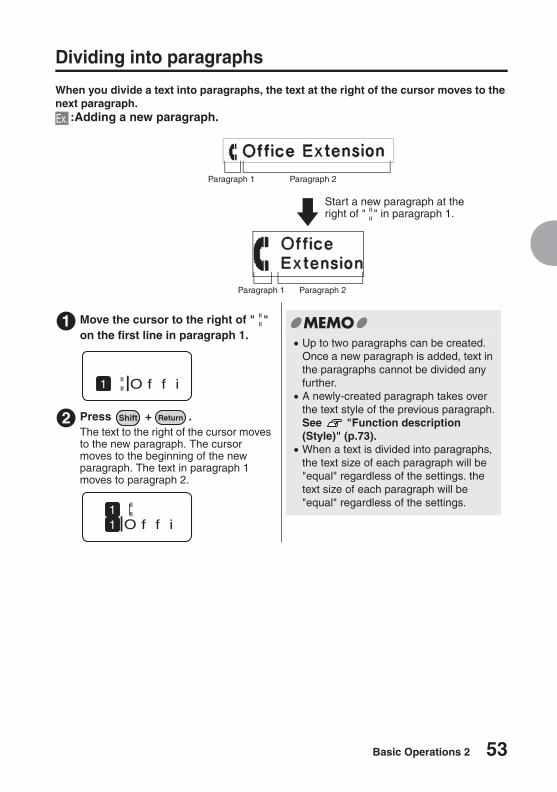
Dividing into paragraphs
When you divide a text into paragraphs, the text at the right of the cursor moves to the next paragraph.
:Adding a new paragraph.
Move the cursor to the right of " " on the first line in paragraph 1.
Press + .The text to the right of the cursor moves to the new paragraph. The cursor moves to the beginning of the new paragraph. The text in paragraph 1 moves to paragraph 2.
Ex.
Paragraph 1 Paragraph 2
Start a new paragraph at the right of " " in paragraph 1.
Paragraph 2Paragraph 1
1
O f f i1
2
O f f i11
� Up to two paragraphs can be created. Once a new paragraph is added, text in the paragraphs cannot be divided any further.� A newly-created paragraph takes over
the text style of the previous paragraph.See "Function description (Style)" (p.73).� When a text is divided into paragraphs,
the text size of each paragraph will be "equal" regardless of the settings. the text size of each paragraph will be "equal" regardless of the settings.
54 Basic Operations 2
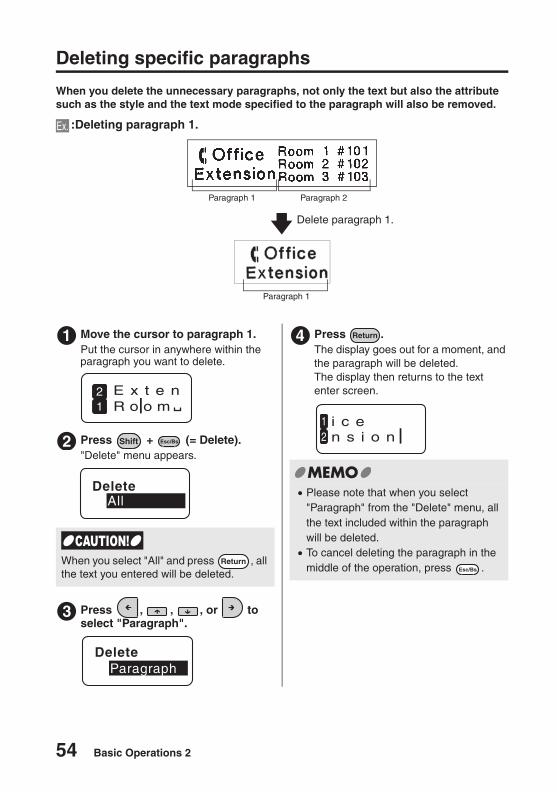
Deleting specific paragraphs
When you delete the unnecessary paragraphs, not only the text but also the attribute such as the style and the text mode specified to the paragraph will also be removed.
:Deleting paragraph 1.
Move the cursor to paragraph 1.Put the cursor in anywhere within the paragraph you want to delete.
Press + (= Delete)."Delete" menu appears.
Press , , , or to select "Paragraph".
Press .The display goes out for a moment, and the paragraph will be deleted.The display then returns to the text enter screen.
Ex.
Paragraph 1 Paragraph 2
Delete paragraph 1.
Paragraph 1
1
R o o m21
E x t e n
2
DeleteAll
When you select "All" and press , all the text you entered will be deleted.
3
DeleteParagraph
4
i c e1n s i o n2
� Please note that when you select "Paragraph" from the "Delete" menu, all the text included within the paragraph will be deleted.
� To cancel deleting the paragraph in the middle of the operation, press .
Cable Print Mode- Printing label for cables -
In this section, you will learn how to create labels that wrap around a cable, wire, tube, pen or any other round-shaped materials.
56 Cable Print Mode
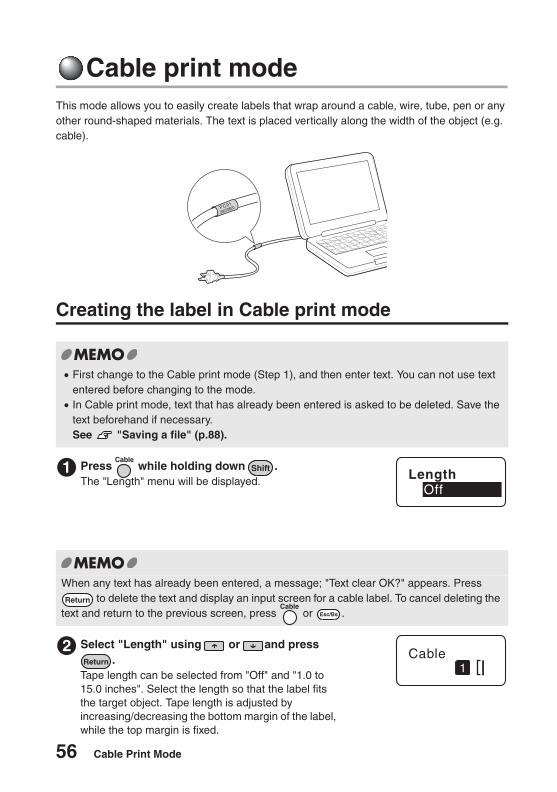
Cable print modeThis mode allows you to easily create labels that wrap around a cable, wire, tube, pen or any other round-shaped materials. The text is placed vertically along the width of the object (e.g. cable).
Creating the label in Cable print mode
� First change to the Cable print mode (Step 1), and then enter text. You can not use text entered before changing to the mode.� In Cable print mode, text that has already been entered is asked to be deleted. Save the
text beforehand if necessary. See "Saving a file" (p.88).
Press while holding down .The "Length" menu will be displayed.
When any text has already been entered, a message; "Text clear OK?" appears. Press to delete the text and display an input screen for a cable label. To cancel deleting the
text and return to the previous screen, press or .
Select "Length" using or and press .
Tape length can be selected from "Off" and "1.0 to 15.0 inches". Select the length so that the label fits the target object. Tape length is adjusted by increasing/decreasing the bottom margin of the label, while the top margin is fixed.
1 LengthOff
2 Cable1
Cable Print Mode 57
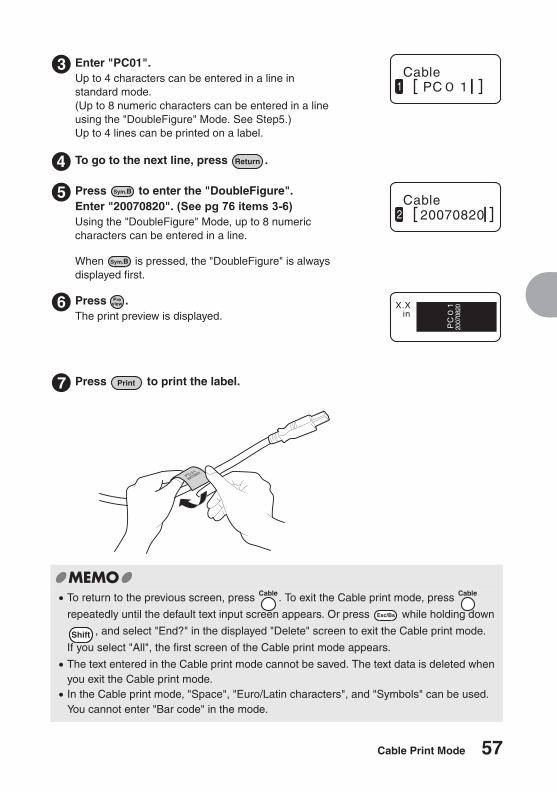
Enter "PC01".Up to 4 characters can be entered in a line in standard mode.(Up to 8 numeric characters can be entered in a line using the "DoubleFigure" Mode. See Step5.)Up to 4 lines can be printed on a label.
To go to the next line, press .
Press to enter the "DoubleFigure".Enter "20070820". (See pg 76 items 3-6)Using the "DoubleFigure" Mode, up to 8 numeric characters can be entered in a line.
When is pressed, the "DoubleFigure" is always displayed first.
Press .The print preview is displayed.
Press to print the label.
� To return to the previous screen, press . To exit the Cable print mode, press
repeatedly until the default text input screen appears. Or press while holding down
, and select "End?" in the displayed "Delete" screen to exit the Cable print mode.
If you select "All", the first screen of the Cable print mode appears.
� The text entered in the Cable print mode cannot be saved. The text data is deleted when you exit the Cable print mode.� In the Cable print mode, "Space", "Euro/Latin characters", and "Symbols" can be used.
You cannot enter "Bar code" in the mode.
3 Cable1 PC
4
5 Cable2 20070820
6
P C
X.Xin
2007
0820
7
58 Cable Print Mode
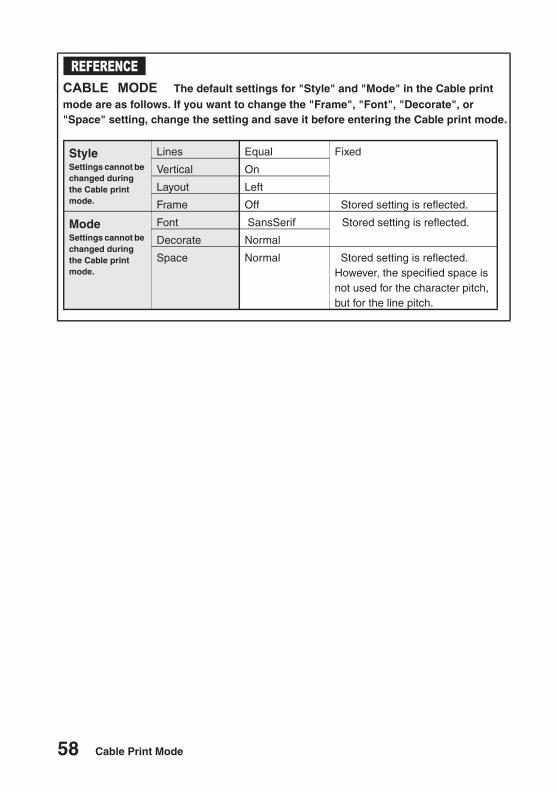
CABLE MODE The default settings for "Style" and "Mode" in the Cable print mode are as follows. If you want to change the "Frame", "Font", "Decorate", or "Space" setting, change the setting and save it before entering the Cable print mode.
REFERENCE
StyleSettings cannot be changed during the Cable print mode.
Lines Equal Fixed
Vertical On
Layout Left
Frame Off Stored setting is reflected.
ModeSettings cannot be changed during the Cable print mode.
Font SansSerif Stored setting is reflected.
Decorate Normal
Space Normal Stored setting is reflected.However, the specified space is not used for the character pitch, but for the line pitch.
Additional Functions- Using LABELShop� BEE3 freely and creatively -
This section describes how to make better use of the function keys. You will learn to change the orientation of the label, improve the appearance of the label, and save the entered text.
60 Additional Functions
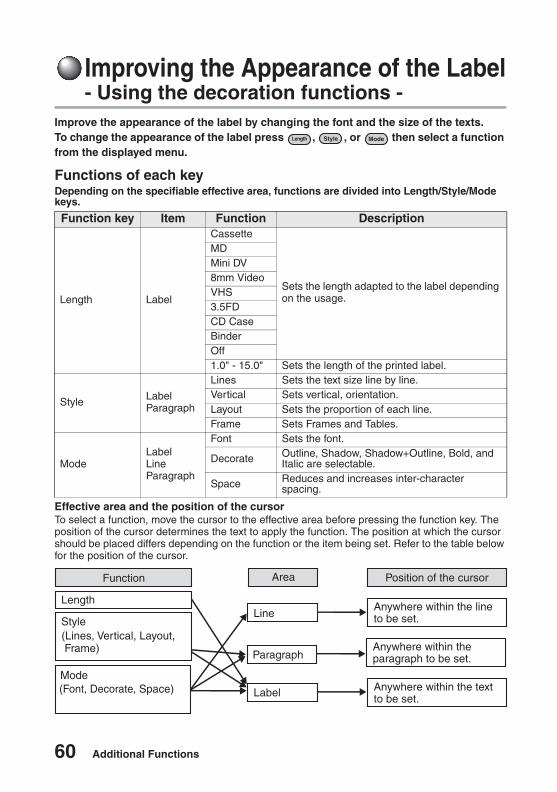
Improving the Appearance of the Label- Using the decoration functions -
Improve the appearance of the label by changing the font and the size of the texts. To change the appearance of the label press , , or then select a function from the displayed menu.
Functions of each keyDepending on the specifiable effective area, functions are divided into Length/Style/Mode keys.
Effective area and the position of the cursorTo select a function, move the cursor to the effective area before pressing the function key. The position of the cursor determines the text to apply the function. The position at which the cursor should be placed differs depending on the function or the item being set. Refer to the table below for the position of the cursor.
Function key Item Function Description
Length Label
Cassette
Sets the length adapted to the label depending on the usage.
MDMini DV8mm VideoVHS3.5FDCD CaseBinderOff1.0" - 15.0" Sets the length of the printed label.
Style LabelParagraph
Lines Sets the text size line by line.Vertical Sets vertical, orientation.Layout Sets the proportion of each line.Frame Sets Frames and Tables.
ModeLabelLineParagraph
Font Sets the font.
Decorate Outline, Shadow, Shadow+Outline, Bold, and Italic are selectable.
Space Reduces and increases inter-character spacing.
Anywhere within the line to be set.
Anywhere within the paragraph to be set.
Anywhere within the text to be set.
Style(Lines, Vertical, Layout, Frame)
Length
(Font, Decorate, Space)
Line
Paragraph
Label
AreaFunction Position of the cursor
Mode

Additional Functions 61
Setting functions
Functions can be set through the following procedure:
Place the cursor.When applying the function to a whole line or a paragraph, place the cursor in the line or paragraph respectively.When applying the function to the entire text, place the cursor anywhere within the text.See "Effective area and the position of the cursor" (p.60).
Press a function key. ( , , or )
Select a function.Select a function using or and press .
Set the options for each function.Select an option using or and press .
: The "Font" option of "Mode"
Select "End?"Once a function has been set, the next function within the same menu appears.
A different function can be set within the same menu (in this case "Mode"). Select a function using or
and press . Follow the same steps as in and .
Once the setting is complete select "End?" and press .
Proceed to step .
To set a different function (in this case "Style" or "Length"), return to the text enter screen after step and press another function key.
1
2
3
LengthOff
StyleLines
ModeFont
Length Style Mode
4
Ex.
In "Length" mode, pressing brings you back to the text input screen accepting the current setting.
FontSansSerif
5
4 5
6
ModeEnd?
6

62 Additional Functions
When setting the "Mode"
When setting the "Style" function
When setting the "Length" functionThe effective area screen is not displayed (nothing changes on the text enter screen).
Set the effective area of a set function.Set the effective area of a set function.Referring to the table below set a effective area using
or and press .Once the setting is complete, the text enter screen will be displayed again.
Label Applies the selected style to the whole text (nothing changes on the text screen).
Line (Text mode change icon) is displayed at the beginning of the line where the cursor is placed, the selected mode applies from the characters after
until the end of the line (or until the next ).
Paragraph (Text mode change icon) is displayed on the first line of the paragraph where the cursor is placed, the selected mode applies from the characters after until the end of the paragraph.
Label The selected style applies to the whole text (nothing changes on the text screen).
Paragraph The selected style applies to the paragraph where the cursor is positioned (nothing changes on the text screen).
� The (Text mode change icon) is not printed.� can be deleted. Deleting will apply the settings of the previous .
If there is no applied to the text, the settings of "Label" or the default settings apply.� The factory settings of each function (default) can be checked on pages "List of "Length"
Menu (English)" (p.63), "List of "Style" Menu (English)" (p.64), and "List of "Mode" Menu (English)" (p.70). These settings can be changed using "Setting Default Settings" (p.92).� Pressing a function key or while performing settings returns to the previous screen.
Repeating this operation cancels the settings and takes you back to the text enter screen.� You can check part of the settings on the indicators.
See "Display indicators" (p.20).Settings can also be checked by pressing the function key of each function and displaying the options of the function. The inverted option is the current setting.� Characters may be distorted due to effects, text size or a high number of strokes.
6 AreaLabel
Additional Functions 63
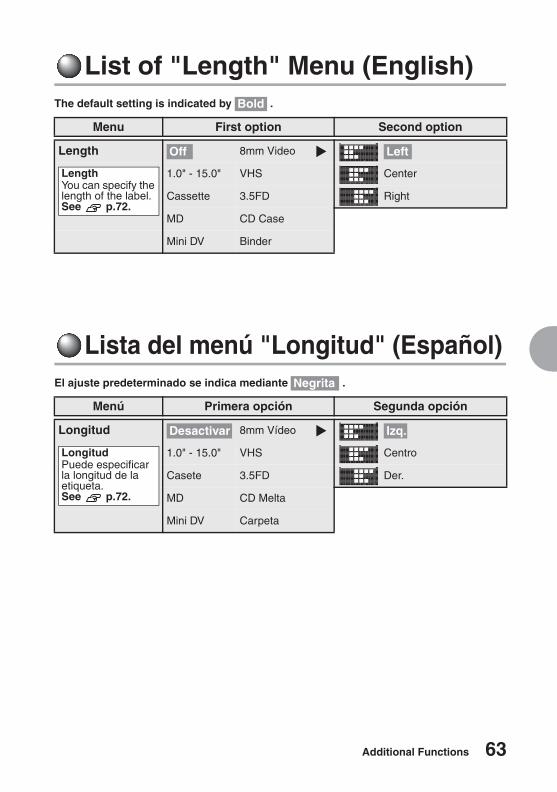
List of "Length" Menu (English)The default setting is indicated by .
Lista del menú "Longitud" (Español)El ajuste predeterminado se indica mediante .
Menu First option Second option
Length 8mm Video
1.0" - 15.0" VHS Center
Cassette 3.5FD Right
MD CD Case
Mini DV Binder
Menú Primera opción Segunda opción
Longitud 8mm Vídeo
1.0" - 15.0" VHS Centro
Casete 3.5FD Der.
MD CD Melta
Mini DV Carpeta
Bold
Off Left
LengthYou can specify the length of the label.See p.72.
Negrita
Desactivar Izq.
LongitudPuede especificar la longitud de la etiqueta.See p.72.
64 Additional Functions
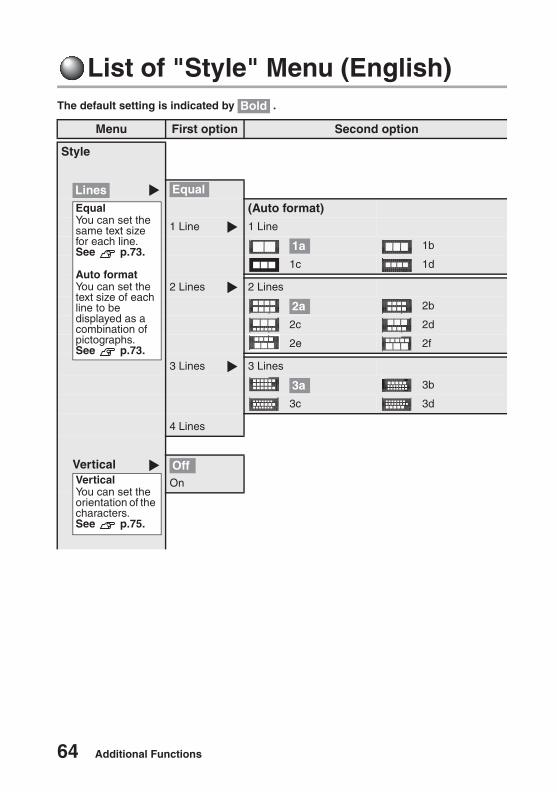
List of "Style" Menu (English)The default setting is indicated by .
Menu First option Second option
Style
(Auto format)
1 Line 1 Line
1b
1c 1d
2 Lines 2 Lines
2b
2c 2d
2e 2f
3 Lines 3 Lines
3b
3c 3d
4 Lines
Vertical
On
Bold
Lines Equal
EqualYou can set the same text size for each line.See p.73.
Auto formatYou can set the text size of each line to be displayed as a combination of pictographs.See p.73.
1a
2a
3a
OffVerticalYou can set the orientation of the characters.See p.75.

Additional Functions 65
Menu First option Second option
Style
Layout
Center
Right
Frame
Table 02 03 04
LeftLayoutYou can set the alignment of the characters of each line.
Off
TableYou can create table labels that look like pictographs.See p.77.
01
66 Additional Functions
Menu First option Second option
Style
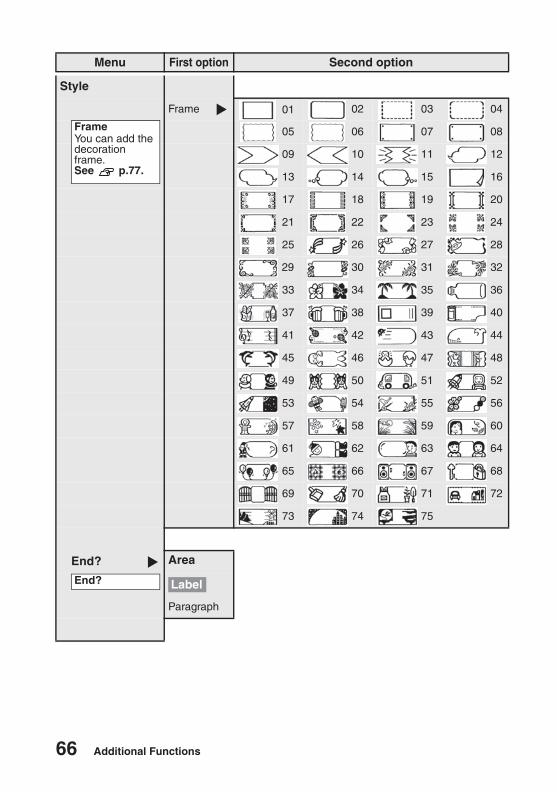
Frame 01 02 03 04
05 06 07 08
09 10 11 12
13 14 15 16
17 18 19 20
21 22 23 24
25 26 27 28
29 30 31 32
33 34 35 36
37 38 39 40
41 42 43 44
45 46 47 48
49 50 51 52
53 54 55 56
57 58 59 60
61 62 63 64
65 66 67 68
69 70 71 72
73 74 75
End? Area
Paragraph
FrameYou can add the decoration frame.See p.77.
End? Label
Additional Functions 67
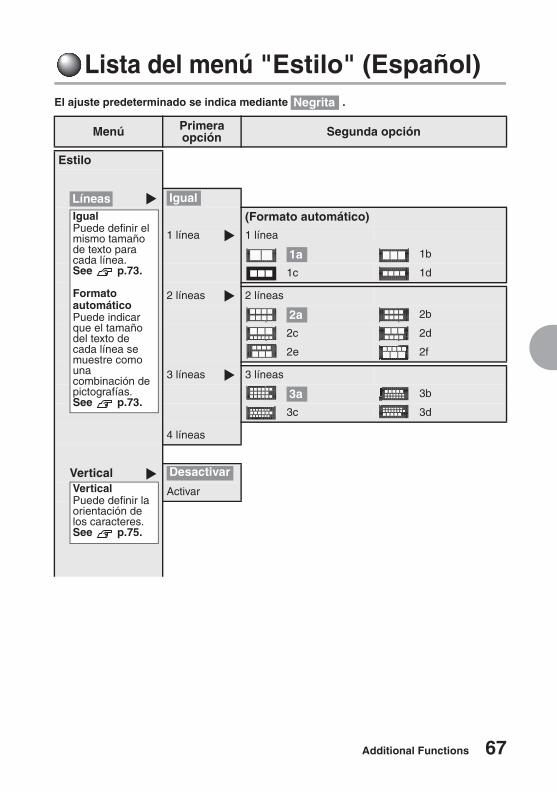
Lista del menú "Estilo" (Español)El ajuste predeterminado se indica mediante .
Menú Primeraopción Segunda opción
Estilo
(Formato automático)
1 línea 1 línea
1b
1c 1d
2 líneas 2 líneas
2b
2c 2d
2e 2f
3 líneas 3 líneas
3b
3c 3d
4 líneas
Vertical
Activar
Negrita
Líneas IgualIgualPuede definir el mismo tamaño de texto para cada línea.See p.73.
Formato automáticoPuede indicar que el tamaño del texto de cada línea se muestre como una combinación de pictografías.See p.73.
1a
2a
3a
DesactivarVerticalPuede definir la orientación de los caracteres.See p.75.
68 Additional Functions
Menú Primeraopción Segunda opción
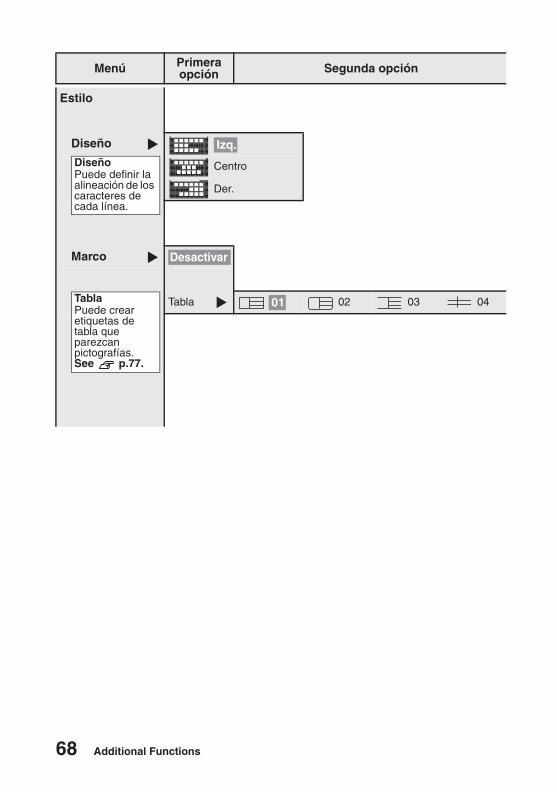
Estilo
Diseño
Centro
Der.
Marco
Tabla 02 03 04
Izq.DiseñoPuede definir la alineación de los caracteres de cada línea.
Desactivar
TablaPuede crear etiquetas de tabla que parezcan pictografías.See p.77.
01
Additional Functions 69
Menú Primeraopción Segunda opción
Estilo
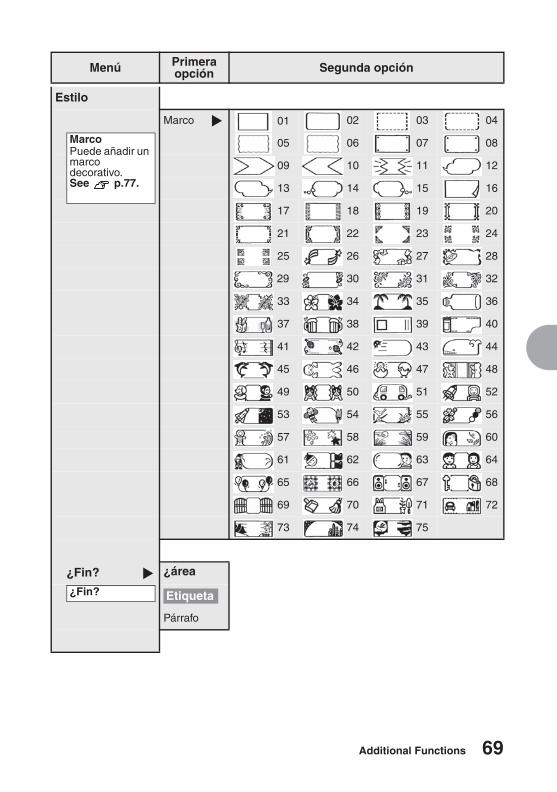
Marco 01 02 03 04
05 06 07 08
09 10 11 12
13 14 15 16
17 18 19 20
21 22 23 24
25 26 27 28
29 30 31 32
33 34 35 36
37 38 39 40
41 42 43 44
45 46 47 48
49 50 51 52
53 54 55 56
57 58 59 60
61 62 63 64
65 66 67 68
69 70 71 72
73 74 75
¿Fin? ¿área
Párrafo
MarcoPuede añadir un marco decorativo.See p.77.
¿Fin? Etiqueta
70 Additional Functions
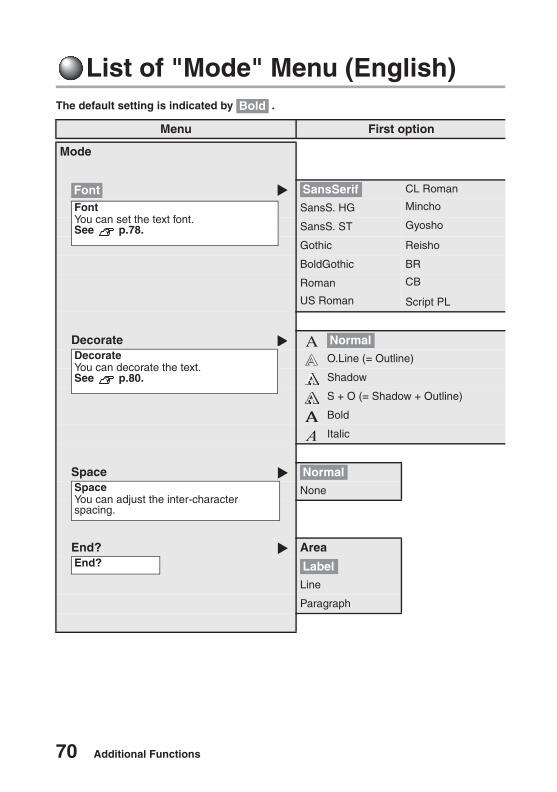
List of "Mode" Menu (English)The default setting is indicated by .
Menu First option
Mode
CL Roman
SansS. HG Mincho
SansS. ST Gyosho
Gothic Reisho
BoldGothic BR
Roman CB
US Roman Script PL
Decorate
O.Line (= Outline)
Shadow
S + O (= Shadow + Outline)
Bold
Italic
Space
None
End? Area
Line
Paragraph
Bold
Font SansSerifFontYou can set the text font.See p.78.
NormalDecorateYou can decorate the text.See p.80.
NormalSpaceYou can adjust the inter-character spacing.
End? Label

Additional Functions 71
Lista del menú "Modo" (Español)El ajuste predeterminado se indica mediante .
Menú Primera opción
Modo
CL Roman
SansS. HG Mincho
SansS. ST Gyosho
Gothic Reisho
BoldGothic BR
Roman CB
US Roman Script PL
Decorar
Conto.
Sombra
S + C
Negri.
Itálic
Espacio
Ninguna
¿Fin? ¿área
Línea
Párrafo
Negrita
Fuente SansSerifFuentePuede definir la fuente del texto.See p.78.
NormalDecorarPuede decorar el texto.See p.80.
NormalEspacioPuede ajustar el espaciado entre caracteres.
¿Fin? Etiqueta
72 Additional Functions
Function description (Length)
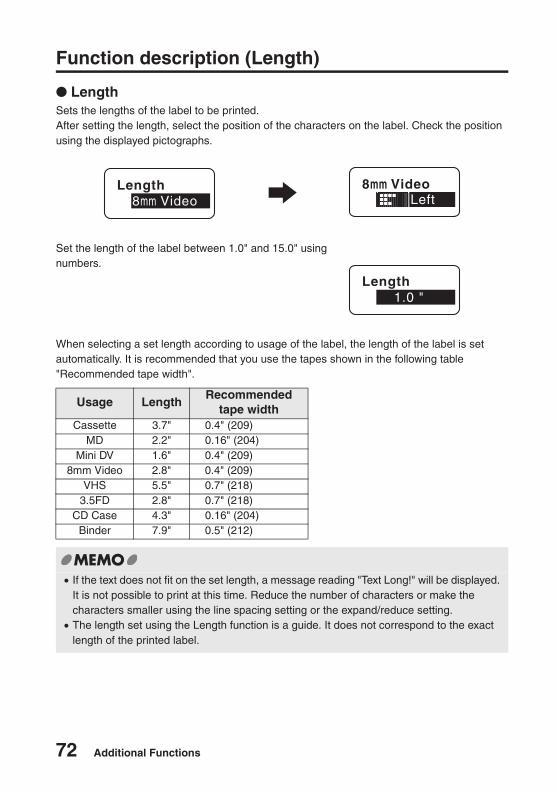
LengthSets the lengths of the label to be printed. After setting the length, select the position of the characters on the label. Check the position using the displayed pictographs.
When selecting a set length according to usage of the label, the length of the label is set automatically. It is recommended that you use the tapes shown in the following table "Recommended tape width".
Set the length of the label between 1.0" and 15.0" using numbers.
Usage LengthRecommended
tape widthCassette 3.7" 0.4" (209)
MD 2.2" 0.16" (204)Mini DV 1.6" 0.4" (209)
8mm Video 2.8" 0.4" (209)VHS 5.5" 0.7" (218)
3.5FD 2.8" 0.7" (218)CD Case 4.3" 0.16" (204)
Binder 7.9" 0.5" (212)
� If the text does not fit on the set length, a message reading "Text Long!" will be displayed. It is not possible to print at this time. Reduce the number of characters or make the characters smaller using the line spacing setting or the expand/reduce setting.� The length set using the Length function is a guide. It does not correspond to the exact
length of the printed label.
Length8mm Video
8mm VideoLeft
Length1.0 "
Additional Functions 73
Function description (Style)
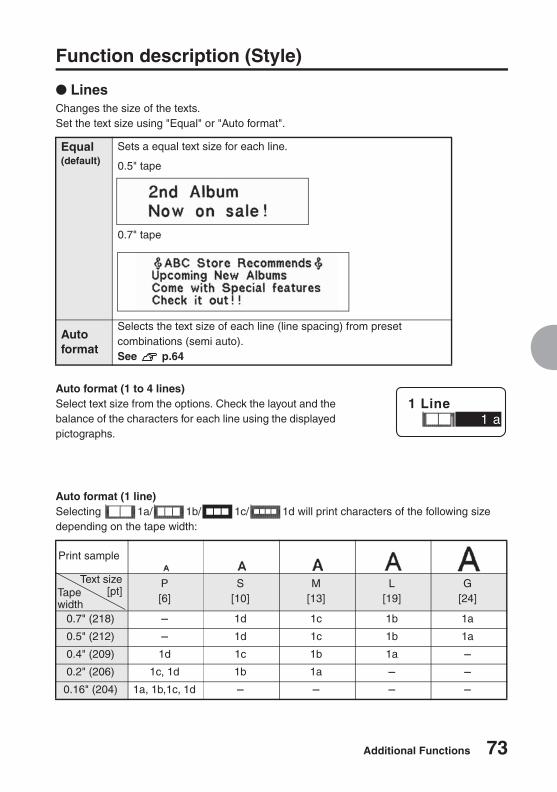
LinesChanges the size of the texts. Set the text size using "Equal" or "Auto format".
Auto format (1 line)Selecting 1a/ 1b/ 1c/ 1d will print characters of the following size depending on the tape width:
Equal(default)
Sets a equal text size for each line.
Auto format
Selects the text size of each line (line spacing) from preset combinations (semi auto).See p.64
Auto format (1 to 4 lines)Select text size from the options. Check the layout and the balance of the characters for each line using the displayed pictographs.
Print sample
P[6]
S[10]
M[13]
L[19]
G[24]
0.7" (218) - 1d 1c 1b 1a
0.5" (212) - 1d 1c 1b 1a
0.4" (209) 1d 1c 1b 1a -
0.2" (206) 1c, 1d 1b 1a - -
0.16" (204) 1a, 1b,1c, 1d - - - -
0.5" tape
0.7" tape
1 Line1 a
Text size[pt]Tape
width
74 Additional Functions
� The auto format is represented using pictographs.� The text size of each line differs depending on the width of the tape and can be checked
on the text size indicator.� If the number of set lines and the number of lines input differs, "Equal" will be used to
print.� Maximum character size printable on 0.5"-width tape and 0.7"-width tape are the same.
Check your text entry if there is an extra upper or bottom margin on the label... When is pressed at the beginning or end of a text after the text is accepted, a new blank line is inserted. If the label is printed in this state, a blank line is included resulting in creating unnecessary margins.In this case, place a cursor on the right side of the line head icon (larger number) using
, and delete the unnecessary line by pressing .
Additional Functions 75
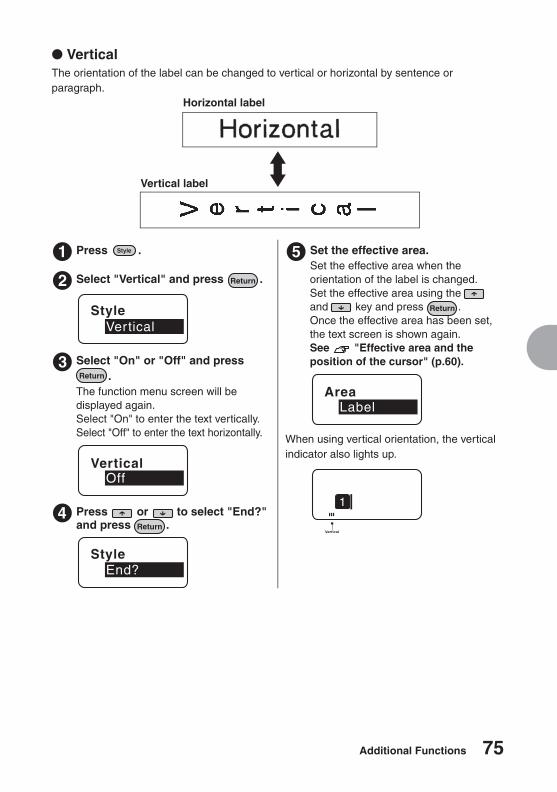
VerticalThe orientation of the label can be changed to vertical or horizontal by sentence or paragraph.
Press .
Select "Vertical" and press .
Select "On" or "Off" and press .
The function menu screen will be displayed again. Select "On" to enter the text vertically. Select "Off" to enter the text horizontally.
Press or to select "End?" and press .
Set the effective area.Set the effective area when the orientation of the label is changed.Set the effective area using the and key and press .Once the effective area has been set, the text screen is shown again.See "Effective area and the position of the cursor" (p.60).
When using vertical orientation, the vertical indicator also lights up.
Horizontal label
Vertical label
1
2
StyleVertical
3
VerticalOff
4
StyleEnd?
5
AreaLabel
1
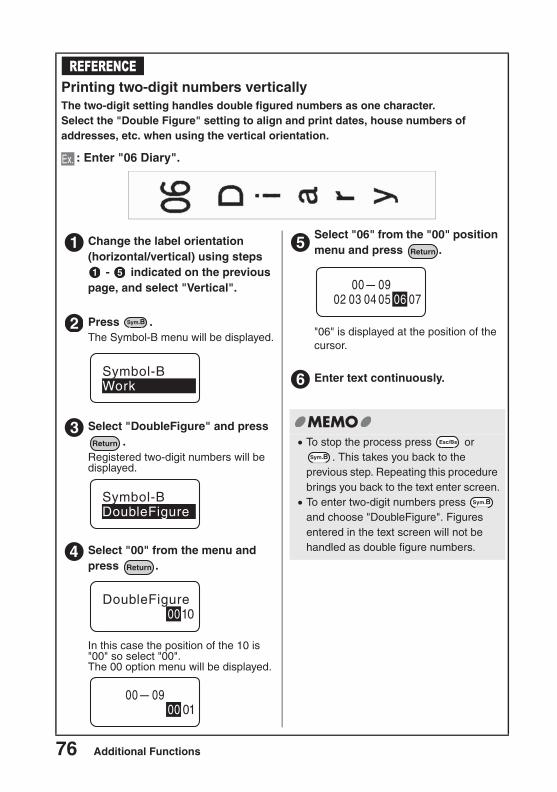
76 Additional Functions
Printing two-digit numbers verticallyThe two-digit setting handles double figured numbers as one character.Select the "Double Figure" setting to align and print dates, house numbers of addresses, etc. when using the vertical orientation.
: Enter "06 Diary".
REFERENCE
Ex.
Change the label orientation (horizontal/vertical) using steps
- indicated on the previous page, and select "Vertical".
Press .The Symbol-B menu will be displayed.
Select "DoubleFigure" and press .
Registered two-digit numbers will be displayed.
Select "00" from the menu and press .
In this case the position of the 10 is "00" so select "00".The 00 option menu will be displayed.
Select "06" from the "00" position menu and press .
"06" is displayed at the position of the cursor.
Enter text continuously.
1
1 5
2
Symbol-BWork
3
Symbol-BDoubleFigure
4
DoubleFigure0010
00 – 0900 01
5
00 – 09040302 05 06 07
6
� To stop the process press or . This takes you back to the
previous step. Repeating this procedure brings you back to the text enter screen.
� To enter two-digit numbers press and choose "DoubleFigure". Figures entered in the text screen will not be handled as double figure numbers.
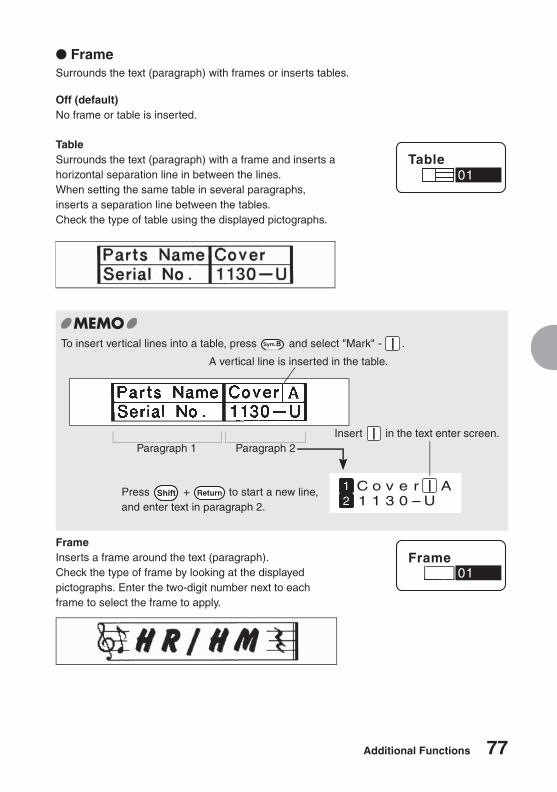
Additional Functions 77
FrameSurrounds the text (paragraph) with frames or inserts tables.
Off (default)No frame or table is inserted.
TableSurrounds the text (paragraph) with a frame and inserts a horizontal separation line in between the lines. When setting the same table in several paragraphs, inserts a separation line between the tables. Check the type of table using the displayed pictographs.
To insert vertical lines into a table, press and select "Mark" - .
FrameInserts a frame around the text (paragraph).Check the type of frame by looking at the displayed pictographs. Enter the two-digit number next to each frame to select the frame to apply.
Table01
C o v e r A1 1 3 0-U
12
Paragraph 2Paragraph 1Insert in the text enter screen.
Press + to start a new line, and enter text in paragraph 2.
A vertical line is inserted in the table.
Frame01
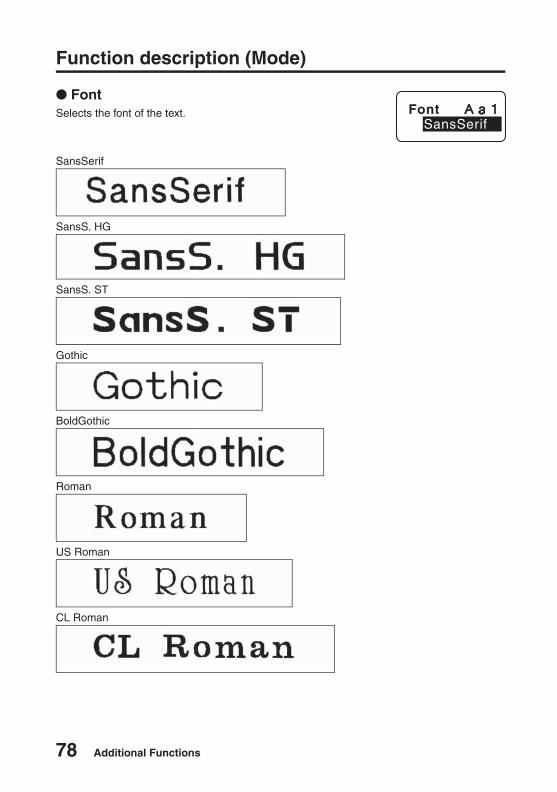
78 Additional Functions
Function description (Mode)
FontSelects the font of the text.
SansSerif
SansS. HG
SansS. ST
Gothic
BoldGothic
Roman
US Roman
CL Roman
FontSansSerif
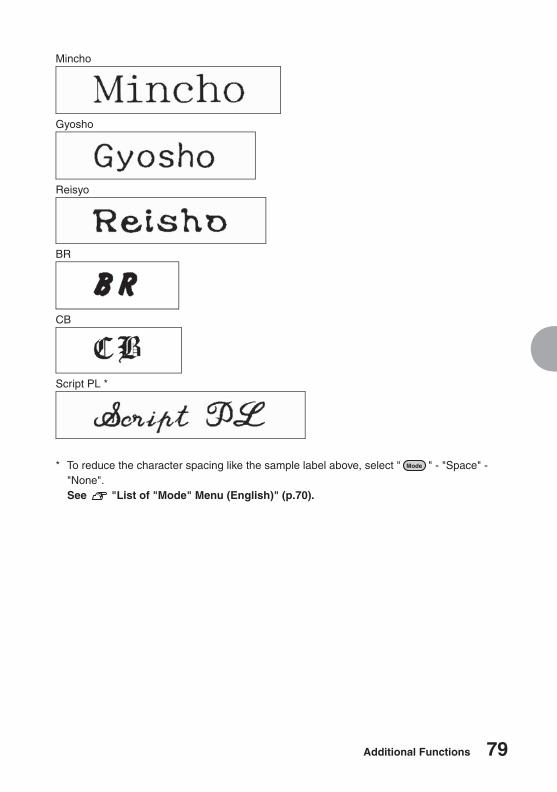
Additional Functions 79
* To reduce the character spacing like the sample label above, select " " - "Space" - "None".See "List of "Mode" Menu (English)" (p.70).
Mincho
Gyosho
Reisyo
BR
CB
Script PL *
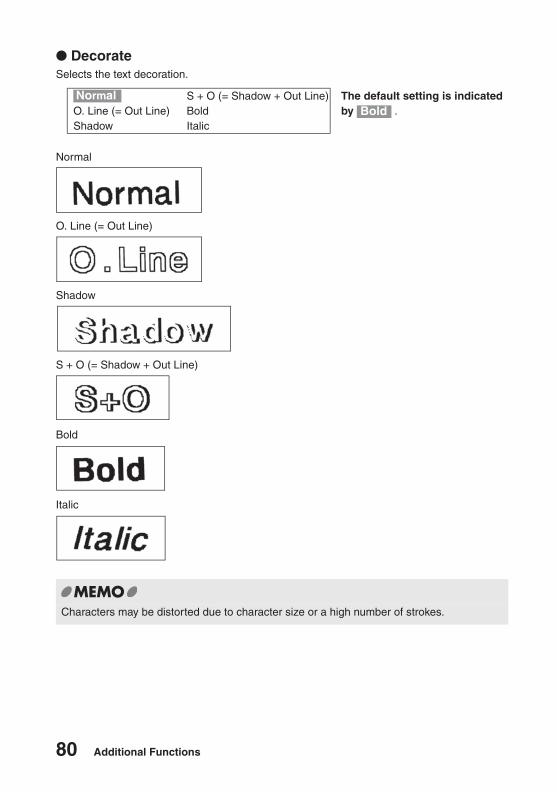
80 Additional Functions
DecorateSelects the text decoration.
O. Line (= Out Line) Shadow
S + O (= Shadow + Out Line) Bold Italic
The default setting is indicated by .
Normal
O. Line (= Out Line)
Shadow
S + O (= Shadow + Out Line)
Bold
Italic
Characters may be distorted due to character size or a high number of strokes.
NormalBold

Additional Functions 81
SpaceSets the inter-character spacing.
Normal
None
Setting "Space"� Selecting "None", may have no effect on characters that are pre-designed minutely.� You can create eye-catching labels by decreasing the inter-character spacing of large
characters or increasing the inter-character spacing of small characters.

82 Additional Functions
List of "Condition" menu
Pressing while holding down (= Condition) allows you to change the default settings for screen display units and the display language. (The default setting is indicated by).
Menu First option Second option
Condition
cm
Prompt
Spanish
PrnDensity -5
:
:
+5
DspDensity -3
:
:
+3
Auto Cut
Off
inch: cm
inch: cmSets the unit displayed on the display.See p.24.
inch
English
PromptSets the language displayed on the display.See p.23.
PrnDensitySets the print density.See p.41. 0
DspDensitySets the density of the display.See p.22. 0
On
Auto CutTurns on/off the auto cut function.See p.91.
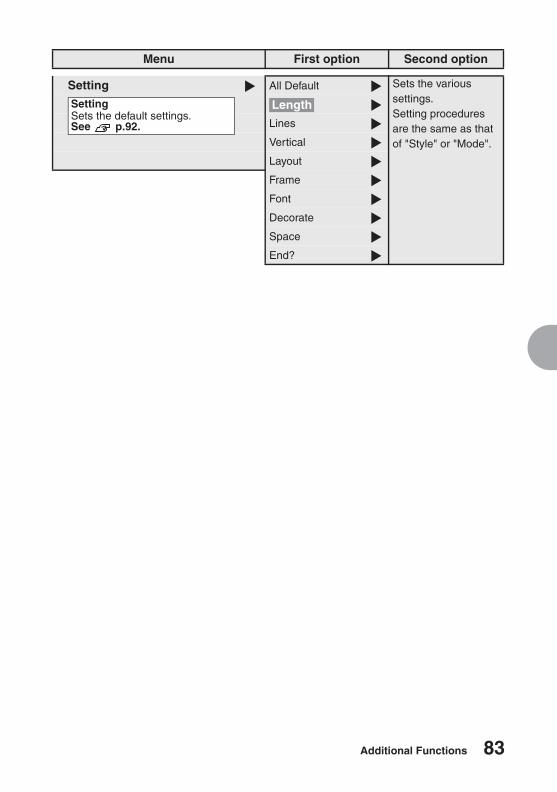
Additional Functions 83
Setting All Default Sets the various settings.Setting procedures are the same as that of "Style" or "Mode".
Lines
Vertical
Layout
Frame
Font
Decorate
Space
End?
Menu First option Second option
SettingSets the default settings.See p.92.
Length
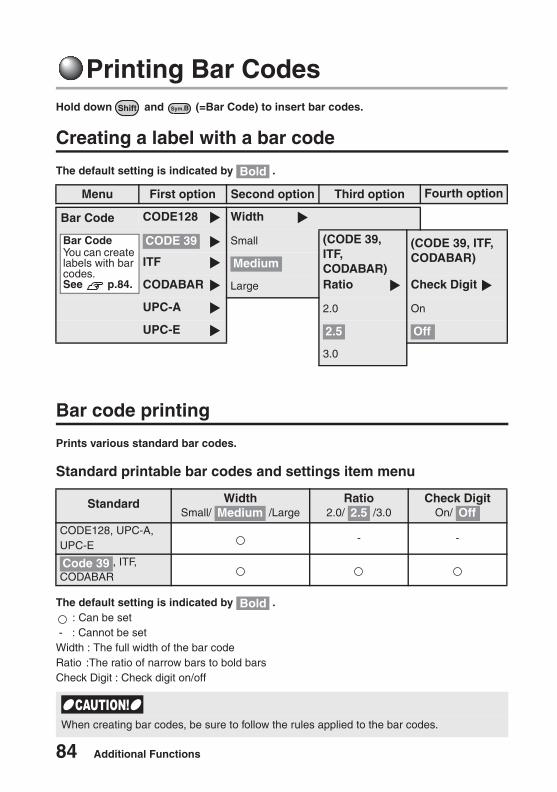
84 Additional Functions
Printing Bar CodesHold down and (=Bar Code) to insert bar codes.
Creating a label with a bar code
The default setting is indicated by .
Bar code printing
Prints various standard bar codes.
Standard printable bar codes and settings item menu
The default setting is indicated by . : Can be set
- : Cannot be setWidth : The full width of the bar codeRatio :The ratio of narrow bars to bold bars Check Digit : Check digit on/off
Menu First option Second option Third option Fourth option
Bar Code CODE128 Width
Small (CODE 39, ITF, CODABAR)
(CODE 39, ITF, CODABAR)ITF
CODABAR Large Ratio Check Digit
UPC-A 2.0 On
UPC-E
3.0
Standard WidthSmall/ /Large
Ratio2.0/ /3.0
Check DigitOn/
CODE128, UPC-A, UPC-E
- -
, ITF, CODABAR
When creating bar codes, be sure to follow the rules applied to the bar codes.
Bold
Bar CodeYou can create labels with bar codes.See p.84.
CODE 39
Medium
2.5 Off
Medium 2.5 Off
Code 39
Bold
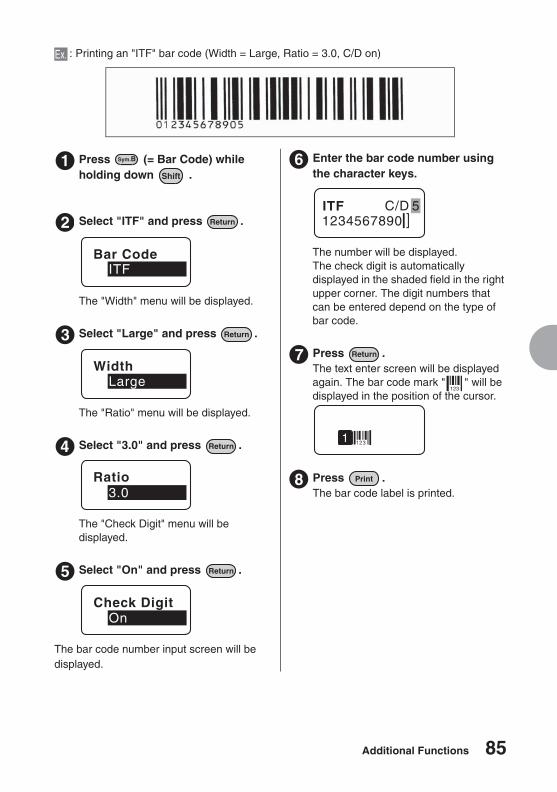
Additional Functions 85
: Printing an "ITF" bar code (Width = Large, Ratio = 3.0, C/D on)
Press (= Bar Code) while holding down .
Select "ITF" and press .
The "Width" menu will be displayed.
Select "Large" and press .
The "Ratio" menu will be displayed.
Select "3.0" and press .
The "Check Digit" menu will be displayed.
Select "On" and press .
The bar code number input screen will be displayed.
Enter the bar code number using the character keys.
The number will be displayed.The check digit is automatically displayed in the shaded field in the right upper corner. The digit numbers that can be entered depend on the type of bar code.
Press .The text enter screen will be displayed again. The bar code mark " " will be displayed in the position of the cursor.
Press .The bar code label is printed.
Ex.
1
2
Bar CodeITF
3
WidthLarge
4
Ratio3.0
5
Check DigitOn
6
ITF C/D1234567890
5
7
1
8
86 Additional Functions
� A single document can have up to one bar code.� Bar codes contain considerable data, and use up a lot of memory when saved in files.� To change the bar code number or the type of bar code, move the cursor to immediately
after (right side) the bar code mark " " and press + (= Bar Code). The "Bar code" menu will be displayed. Next, repeat the above process.� To modify a bar code number, go to the bar code number enter screen, delete the
previously entered bar code number and enter the new bar code number.� To delete a bar code, move the cursor to immediately after the bar code mark " " (right
side) and press .� Style and Mode functions can be set for bar code marks in the same way as for standard
characters but will be shown as follows: Settings that will be shown on bar code marks
� Always make sure that the bar codes are read correctly by a bar code reader before they are used. If they are not read correctly by the bar code reader adjust the "Width" or "Ratio" and check again.� To print bar codes, it is recommended that you use a tape with a white background and
black characters as they are easily read by bar code readers.� The digits that can be entered vary according to the type of bar code. ITF and CODABAR
allow 1 to 19.� ITF bar codes only support even digit numbers. When entering even digit numbers with
Check Digit setting set to "On" or when inputting odd digit numbers with Check Digit setting set to "Off", the spare code "0" is automatically input in the first row.� The Check Digit of UPC-E is not displayed on the bar code number input screen or in the
bar code number.� CODABAR cannot be read by the bar code reader unless one of "A, B, C, D" are input at
the beginning and the end of the code.� The length of the bar code (bar area) and the length of the numbers is not always the
same. This does not affect their usability.
Style Frame, Table
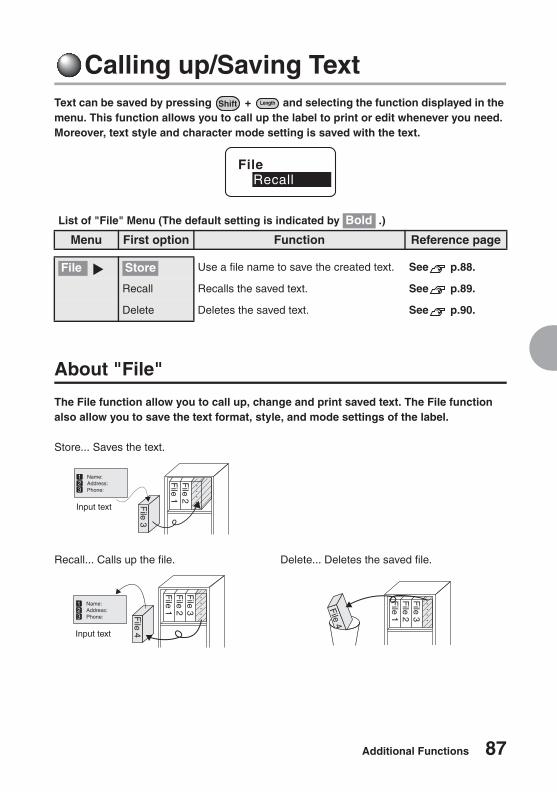
Additional Functions 87
Calling up/Saving TextText can be saved by pressing + and selecting the function displayed in the menu. This function allows you to call up the label to print or edit whenever you need. Moreover, text style and character mode setting is saved with the text.
About "File"
The File function allow you to call up, change and print saved text. The File function also allow you to save the text format, style, and mode settings of the label.
Store... Saves the text.
List of "File" Menu (The default setting is indicated by .)
Menu First option Function Reference page
Use a file name to save the created text. See p.88.
Recall Recalls the saved text. See p.89.
Delete Deletes the saved text. See p.90.
FileRecall
Bold
File Store
Input text
Name:Address:Phone:
File 3
File 1
File 2
Input text
Name:Address:Phone:
File 1
File 2
File 3
File 4
File 4
File 1
File 2
File 3
Recall... Calls up the file. Delete... Deletes the saved file.
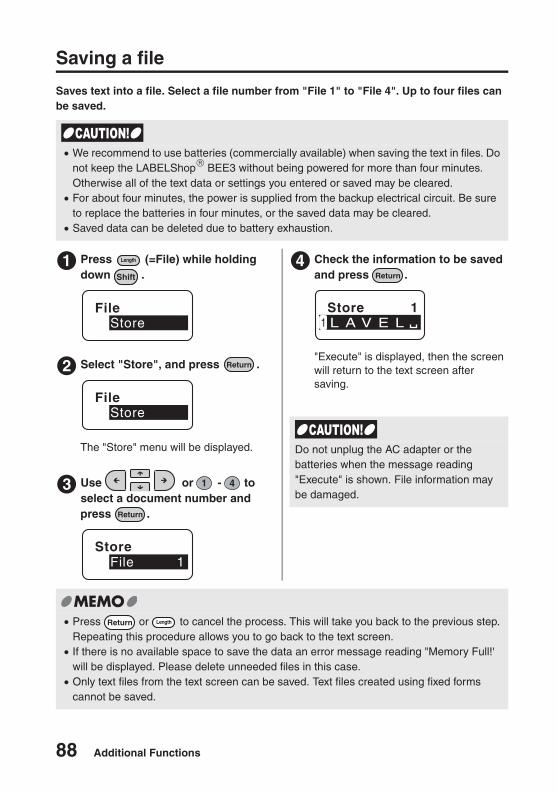
88 Additional Functions
Saving a file
Saves text into a file. Select a file number from "File 1" to "File 4". Up to four files can be saved.
� We recommend to use batteries (commercially available) when saving the text in files. Do not keep the LABELShop� BEE3 without being powered for more than four minutes. Otherwise all of the text data or settings you entered or saved may be cleared.� For about four minutes, the power is supplied from the backup electrical circuit. Be sure
to replace the batteries in four minutes, or the saved data may be cleared.� Saved data can be deleted due to battery exhaustion.
Press (=File) while holding down .
Select "Store", and press .
The "Store" menu will be displayed.
Use or - to select a document number and press .
Check the information to be saved and press .
"Execute" is displayed, then the screen will return to the text screen after saving.
� Press or to cancel the process. This will take you back to the previous step. Repeating this procedure allows you to go back to the text screen.� If there is no available space to save the data an error message reading "Memory Full!'
will be displayed. Please delete unneeded files in this case. � Only text files from the text screen can be saved. Text files created using fixed forms
cannot be saved.
1
FileStore
2
FileStore
3
StoreFile 1
4
L A V E L1Store 1
Do not unplug the AC adapter or the batteries when the message reading "Execute" is shown. File information may be damaged.
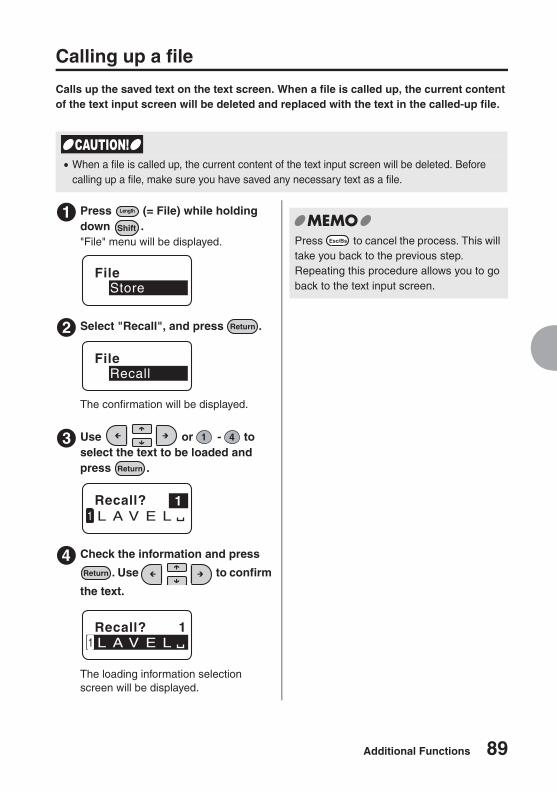
Additional Functions 89
Calling up a file
Calls up the saved text on the text screen. When a file is called up, the current content of the text input screen will be deleted and replaced with the text in the called-up file.
Press (= File) while holding down ."File" menu will be displayed.
Select "Recall", and press .
The confirmation will be displayed.
Use or - to select the text to be loaded and press .
Check the information and press
. Use to confirm
the text.
The loading information selection screen will be displayed.
� When a file is called up, the current content of the text input screen will be deleted. Before calling up a file, make sure you have saved any necessary text as a file.
1
FileStore
2
FileRecall
3
L A V E L1Recall? 1
4
L A V E L1Recall? 1
Press to cancel the process. This will take you back to the previous step. Repeating this procedure allows you to go back to the text input screen.
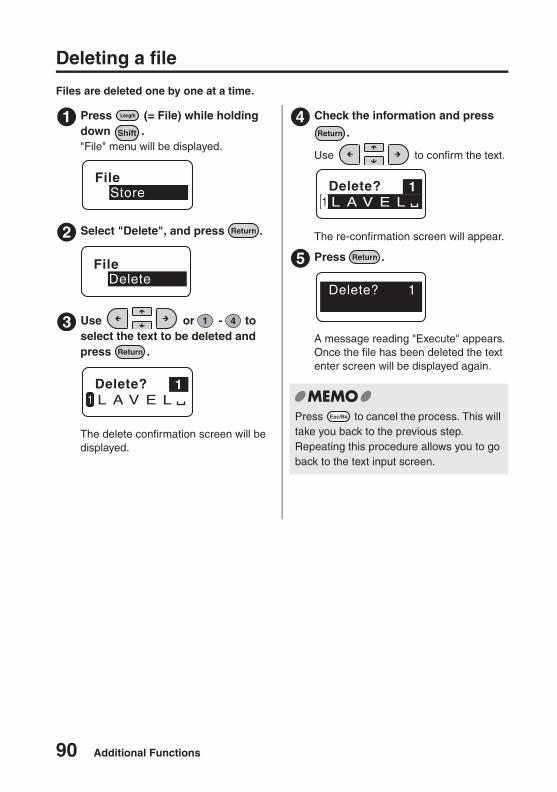
90 Additional Functions
Deleting a file
Files are deleted one by one at a time.
Press (= File) while holding down ."File" menu will be displayed.
Select "Delete", and press .
Use or - to select the text to be deleted and press .
The delete confirmation screen will be displayed.
Check the information and press
.
Use to confirm the text.
The re-confirmation screen will appear.
Press .
A message reading "Execute" appears. Once the file has been deleted the text enter screen will be displayed again.
1
FileStore
2
FileDelete
3
L A V E L1Delete? 1
4
L A V E L1Delete? 1
5
Delete? 1
Press to cancel the process. This will take you back to the previous step. Repeating this procedure allows you to go back to the text input screen.
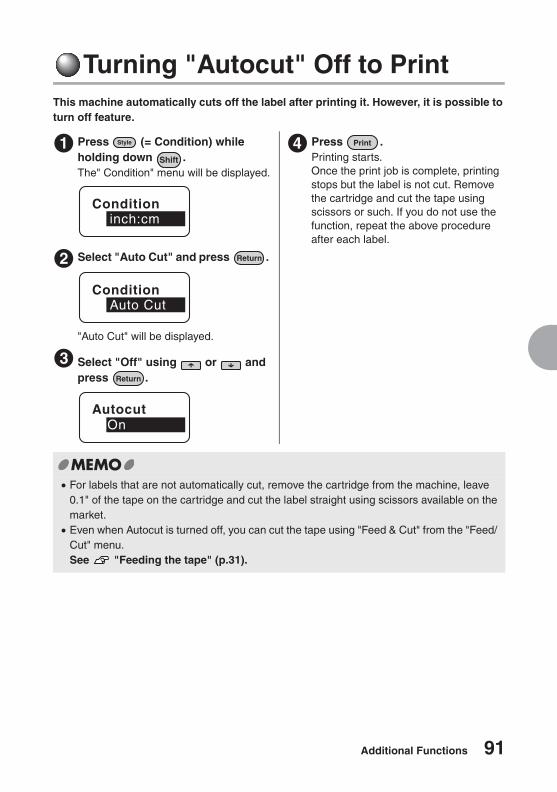
Additional Functions 91
Turning "Autocut" Off to PrintThis machine automatically cuts off the label after printing it. However, it is possible to turn off feature.
Press (= Condition) while holding down .The" Condition" menu will be displayed.
Select "Auto Cut" and press .
"Auto Cut" will be displayed.
Select "Off" using or and press .
Press .Printing starts. Once the print job is complete, printing stops but the label is not cut. Remove the cartridge and cut the tape using scissors or such. If you do not use the function, repeat the above procedure after each label.
� For labels that are not automatically cut, remove the cartridge from the machine, leave 0.1" of the tape on the cartridge and cut the label straight using scissors available on the market.� Even when Autocut is turned off, you can cut the tape using "Feed & Cut" from the "Feed/
Cut" menu. See "Feeding the tape" (p.31).
1
Conditioninch:cm
2
ConditionAuto Cut
3
AutocutOn
4

92 Additional Functions
Setting Default SettingsDefault settings for items such as "Font" and "Space" can be changed.The following functions can be set using , and .
Key functions
Selecting a function displays the item menu list. The selected item is the default setting. If you often use different "Font", etc. to the one specified in the factory setting (default) you can change the factory settings so that you do not need to change the settings using , and each time you create a text.If the default settings are changed, the label will automatically reflect the changes. For example setting the "Vertical" default setting to "On" will result in all labels being written vertically.
However, it is always possible to restore the factory settings.
Key Functions that can be set
Length Length
Style Lines, Vertical, Layout, Frame/Table
Mode Font, Decorate, Space
� See pages "List of "Length" Menu (English)" (p.63), "List of "Style" Menu (English)" (p.64), "List of "Mode" Menu (English)" (p.70) to see the factory settings of each function.� Deleting all the text using , , and will restore the default settings.� Data saved in a file will reflect the settings at the time of the saving.
Delete all the text before changing the default settings.See "Deleting all the text" (p.48).
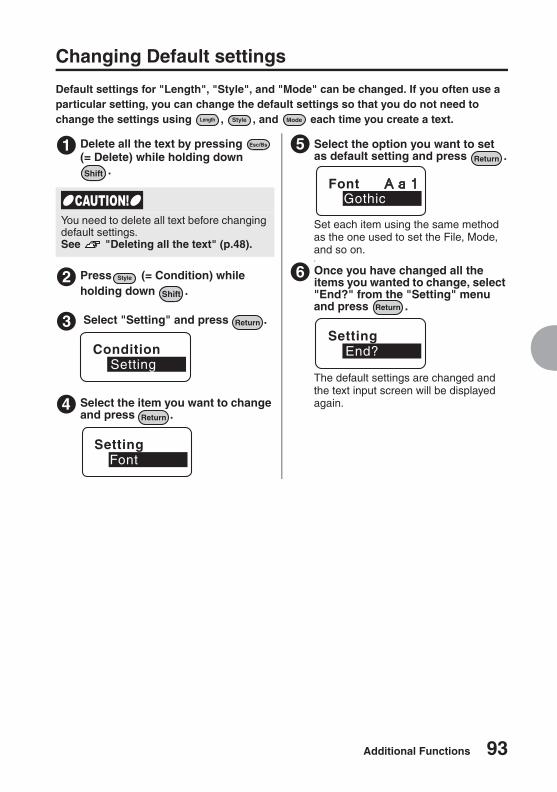
Additional Functions 93
Changing Default settings
Default settings for "Length", "Style", and "Mode" can be changed. If you often use a particular setting, you can change the default settings so that you do not need to change the settings using , , and each time you create a text.
Delete all the text by pressing (= Delete) while holding down
.
Press (= Condition) while holding down .
Select "Setting" and press .
Select the item you want to change and press .
Select the option you want to set as default setting and press .
Set each item using the same method as the one used to set the File, Mode, and so on.v
Once you have changed all the items you wanted to change, select "End?" from the "Setting" menu and press .
The default settings are changed and the text input screen will be displayed again.
1
You need to delete all text before changing default settings.See "Deleting all the text" (p.48).
2
3
ConditionSetting
4
SettingFont
5
FontGothic
6
SettingEnd?
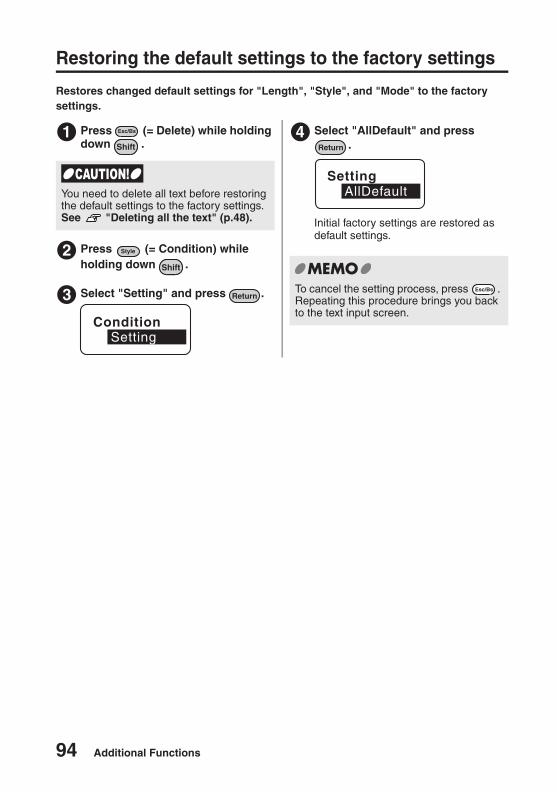
94 Additional Functions
Restoring the default settings to the factory settings
Restores changed default settings for "Length", "Style", and "Mode" to the factory settings.
Press (= Delete) while holding down .
Press (= Condition) while holding down .
Select "Setting" and press .
Select "AllDefault" and press .
Initial factory settings are restored as default settings.
1
You need to delete all text before restoring the default settings to the factory settings.See "Deleting all the text" (p.48).
2
3
ConditionSetting
4
SettingAllDefault
To cancel the setting process, press . Repeating this procedure brings you back to the text input screen.
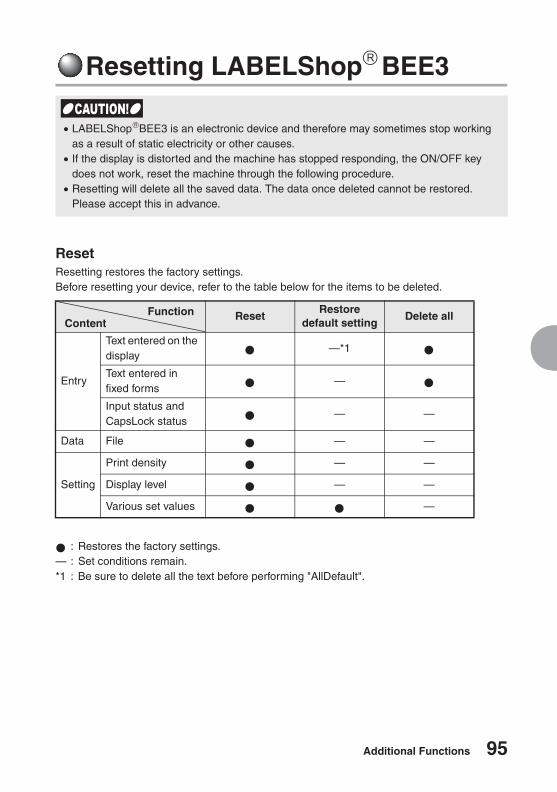
Additional Functions 95
Resetting LABELShop� BEE3
ResetResetting restores the factory settings. Before resetting your device, refer to the table below for the items to be deleted.
: Restores the factory settings.— : Set conditions remain.*1 : Be sure to delete all the text before performing "AllDefault".
� LABELShop�BEE3 is an electronic device and therefore may sometimes stop working as a result of static electricity or other causes. � If the display is distorted and the machine has stopped responding, the ON/OFF key
does not work, reset the machine through the following procedure.� Resetting will delete all the saved data. The data once deleted cannot be restored.
Please accept this in advance.
ResetRestore
default settingDelete all
Entry
Text entered on the display
—*1
Text entered in fixed forms
—
Input status and CapsLock status
— —
Data File — —
Setting
Print density — —
Display level — —
Various set values —
FunctionContent

96 Additional Functions
Resetting
Press and turn the power off.
Press ."Reset" will be displayed. Once the machine is reset the selected length unit will be displayed, the text enter screen appears.
If the machine does not turn off when pressing , unplug the AC adapter and remove the batteries. Plug the AC Adapter again or install the batteries and press again. Power is restored.
Press while holding down and .A message reading "Reset?" blinks.
� To abort resetting process press any key except for .� Please be noted that the saved files and various data will be deleted once you reset the
device.
1
2 Reset?
3

Appendix
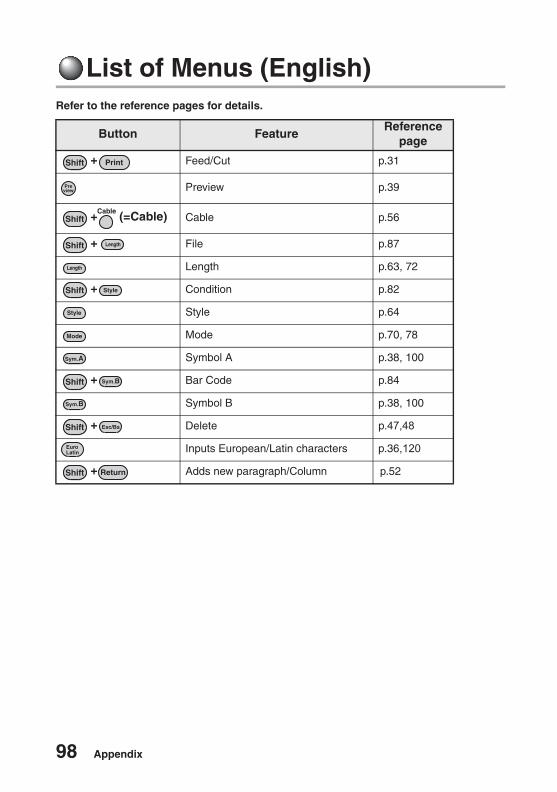
98 Appendix
List of Menus (English)Refer to the reference pages for details.
Button FeatureReference
page
+ Feed/Cut p.31
Preview p.39
+ (=Cable) Cable p.56
+ File p.87
Length p.63, 72
+ Condition p.82
Style p.64
Mode p.70, 78
Symbol A p.38, 100
+ Bar Code p.84
Symbol B p.38, 100
+ Delete p.47,48
Inputs European/Latin characters p.36,120
+ Adds new paragraph/Column p.52
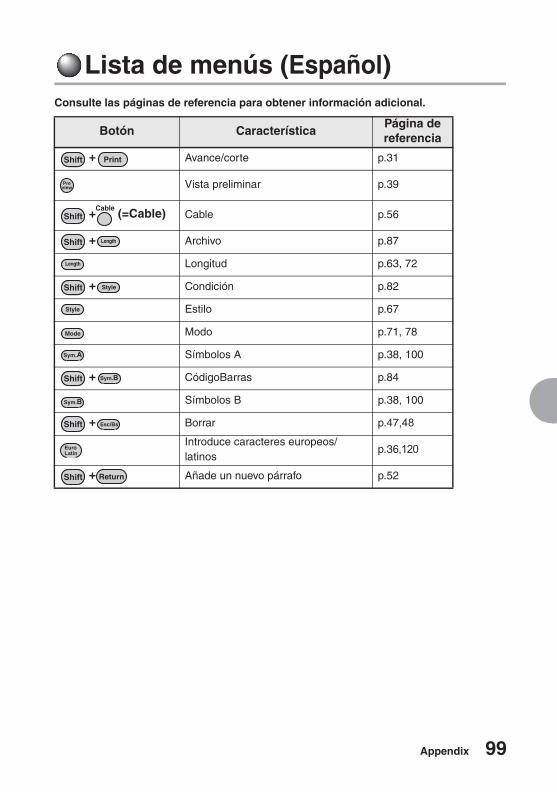
Appendix 99
Lista de menús (Español)Consulte las páginas de referencia para obtener información adicional.
Botón CaracterísticaPágina de referencia
+ Avance/corte p.31
Vista preliminar p.39
+ (=Cable) Cable p.56
+ Archivo p.87
Longitud p.63, 72
+ Condición p.82
Estilo p.67
Modo p.71, 78
Símbolos A p.38, 100
+ CódigoBarras p.84
Símbolos B p.38, 100
+ Borrar p.47,48
Introduce caracteres europeos/latinos
p.36,120
+ Añade un nuevo párrafo p.52
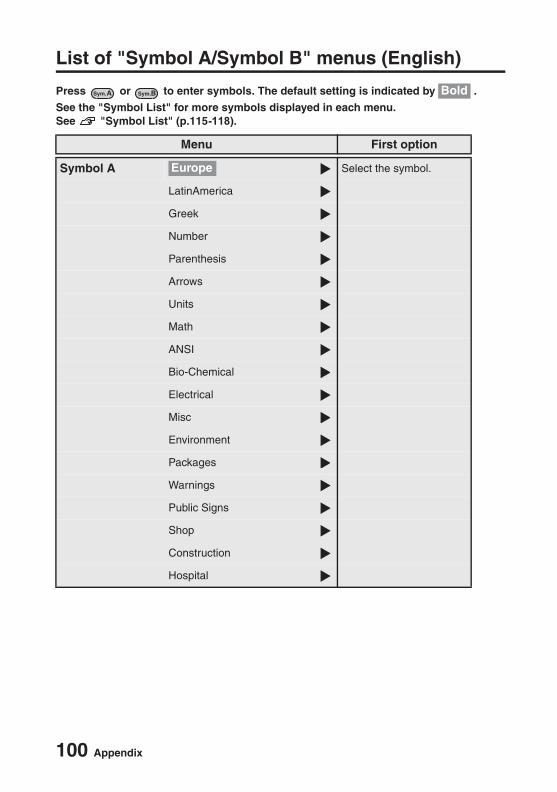
100 Appendix
List of "Symbol A/Symbol B" menus (English)
Press or to enter symbols. The default setting is indicated by .
See the "Symbol List" for more symbols displayed in each menu.See "Symbol List" (p.115-118).
Menu First option
Symbol A Select the symbol.
LatinAmerica
Greek
Number
Parenthesis
Arrows
Units
Math
ANSI
Bio-Chemical
Electrical
Misc
Environment
Packages
Warnings
Public Signs
Shop
Construction
Hospital
Bold
Europe
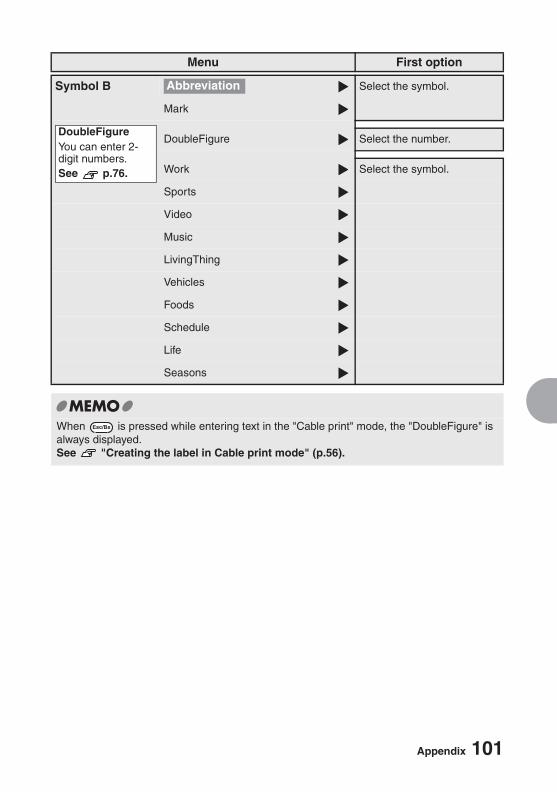
Appendix 101
Menu First option
Symbol B Select the symbol.
Mark
DoubleFigure Select the number.
Work Select the symbol.
Sports
Video
Music
LivingThing
Vehicles
Foods
Schedule
Life
Seasons
When is pressed while entering text in the "Cable print" mode, the "DoubleFigure" is always displayed.See "Creating the label in Cable print mode" (p.56).
Abbreviation
DoubleFigureYou can enter 2-digit numbers.See p.76.
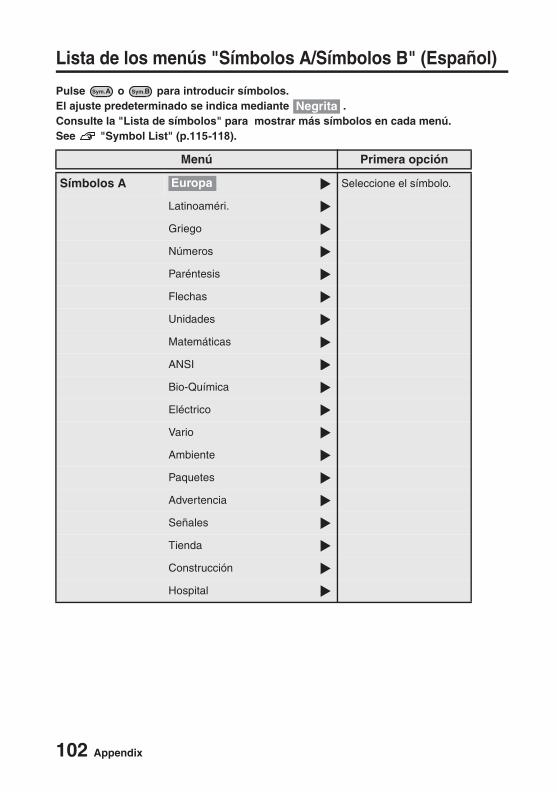
102 Appendix
Lista de los menús "Símbolos A/Símbolos B" (Español)
Pulse o para introducir símbolos. El ajuste predeterminado se indica mediante .Consulte la "Lista de símbolos" para mostrar más símbolos en cada menú.See "Symbol List" (p.115-118).
Menú Primera opción
Símbolos A Seleccione el símbolo.
Latinoaméri.
Griego
Números
Paréntesis
Flechas
Unidades
Matemáticas
ANSI
Bio-Química
Eléctrico
Vario
Ambiente
Paquetes
Advertencia
Señales
Tienda
Construcción
Hospital
Negrita
Europa
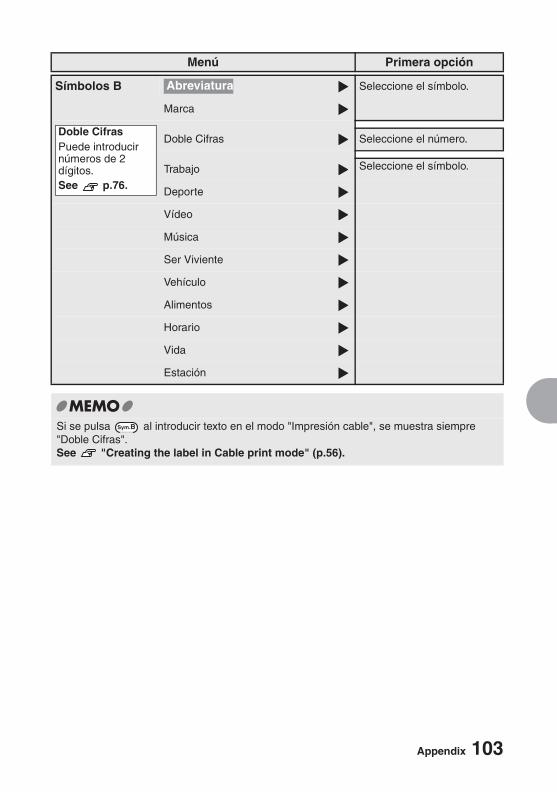
Appendix 103
Menú Primera opción
Símbolos B Seleccione el símbolo.
Marca
Doble Cifras Seleccione el número.
Trabajo Seleccione el símbolo.
Deporte
Vídeo
Música
Ser Viviente
Vehículo
Alimentos
Horario
Vida
Estación
Si se pulsa al introducir texto en el modo "Impresión cable", se muestra siempre "Doble Cifras".See "Creating the label in Cable print mode" (p.56).
Abreviatura
Doble CifrasPuede introducir números de 2 dígitos.See p.76.
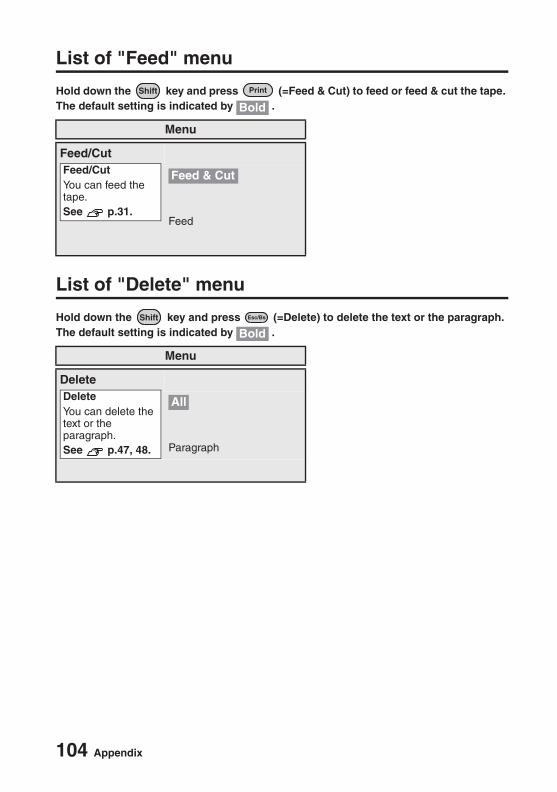
104 Appendix
List of "Feed" menu
Hold down the key and press (=Feed & Cut) to feed or feed & cut the tape. The default setting is indicated by .
List of "Delete" menu
Hold down the key and press (=Delete) to delete the text or the paragraph. The default setting is indicated by .
Menu
Feed/Cut
Feed
Menu
Delete
Paragraph
Bold
Feed/CutYou can feed the tape.See p.31.
Feed & Cut
Bold
DeleteYou can delete the text or the paragraph.See p.47, 48.
All
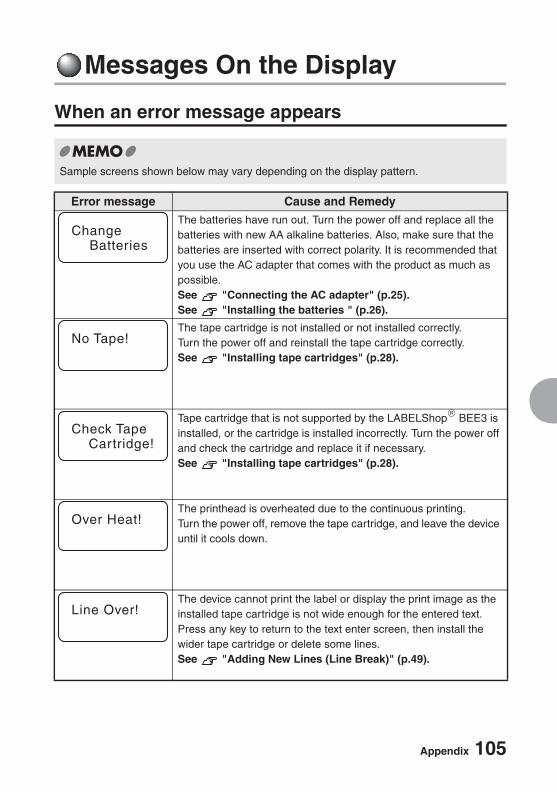
Appendix 105
Messages On the Display
When an error message appears
Sample screens shown below may vary depending on the display pattern.
Error message Cause and Remedy
The batteries have run out. Turn the power off and replace all the batteries with new AA alkaline batteries. Also, make sure that the batteries are inserted with correct polarity. It is recommended that you use the AC adapter that comes with the product as much as possible.See "Connecting the AC adapter" (p.25).See "Installing the batteries " (p.26).
The tape cartridge is not installed or not installed correctly. Turn the power off and reinstall the tape cartridge correctly.See "Installing tape cartridges" (p.28).
Tape cartridge that is not supported by the LABELShop� BEE3 is installed, or the cartridge is installed incorrectly. Turn the power off and check the cartridge and replace it if necessary.See "Installing tape cartridges" (p.28).
The printhead is overheated due to the continuous printing. Turn the power off, remove the tape cartridge, and leave the device until it cools down.
The device cannot print the label or display the print image as the installed tape cartridge is not wide enough for the entered text.Press any key to return to the text enter screen, then install the wider tape cartridge or delete some lines.See "Adding New Lines (Line Break)" (p.49).
Change Batteries
No Tape!
Check Tape Cartridge!
Over Heat!
Line Over!
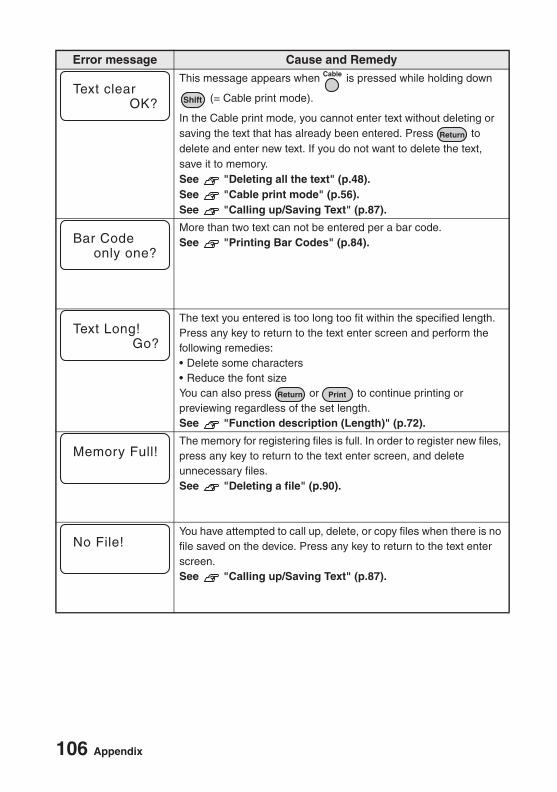
106 Appendix
This message appears when is pressed while holding down
(= Cable print mode).
In the Cable print mode, you cannot enter text without deleting or saving the text that has already been entered. Press to delete and enter new text. If you do not want to delete the text, save it to memory.See "Deleting all the text" (p.48).See "Cable print mode" (p.56).See "Calling up/Saving Text" (p.87).
More than two text can not be entered per a bar code.See "Printing Bar Codes" (p.84).
The text you entered is too long too fit within the specified length. Press any key to return to the text enter screen and perform the following remedies:
You can also press or to continue printing or previewing regardless of the set length.See "Function description (Length)" (p.72).
The memory for registering files is full. In order to register new files, press any key to return to the text enter screen, and delete unnecessary files.See "Deleting a file" (p.90).
You have attempted to call up, delete, or copy files when there is no file saved on the device. Press any key to return to the text enter screen.See "Calling up/Saving Text" (p.87).
Error message Cause and Remedy
Text clearOK?
Bar Codeonly one?
Text Long!Go?
Memory Full!
No File!
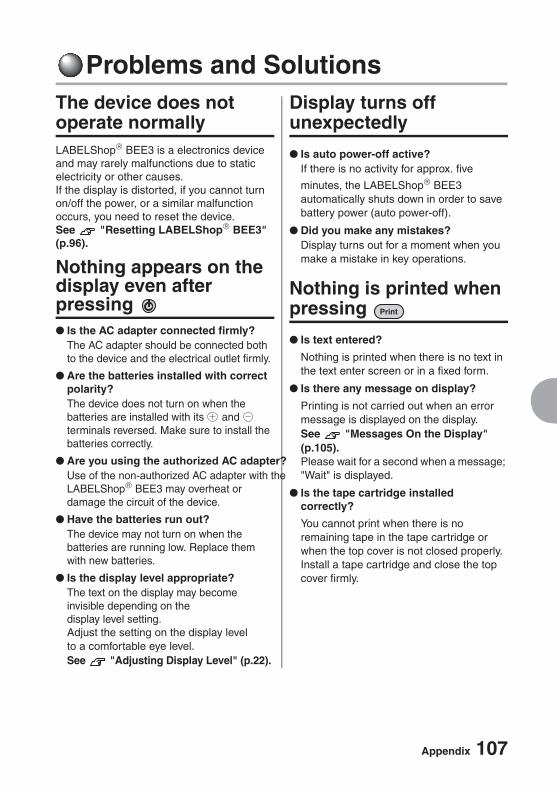
Appendix 107
Problems and SolutionsThe device does not operate normallyLABELShop� BEE3 is a electronics device and may rarely malfunctions due to static electricity or other causes. If the display is distorted, if you cannot turn on/off the power, or a similar malfunction occurs, you need to reset the device.See "Resetting LABELShop� BEE3" (p.96).
Nothing appears on the display even after pressing
Is the AC adapter connected firmly?The AC adapter should be connected both to the device and the electrical outlet firmly.
Are the batteries installed with correct polarity?The device does not turn on when the batteries are installed with its and terminals reversed. Make sure to install the batteries correctly.
Are you using the authorized AC adapter?Use of the non-authorized AC adapter with the LABELShop� BEE3 may overheat or damage the circuit of the device.
Have the batteries run out?The device may not turn on when the batteries are running low. Replace them with new batteries.
Is the display level appropriate?The text on the display may become invisible depending on the display level setting.Adjust the setting on the display level to a comfortable eye level.See "Adjusting Display Level" (p.22).
Display turns off unexpectedly
Is auto power-off active?If there is no activity for approx. five
minutes, the LABELShop� BEE3 automatically shuts down in order to save battery power (auto power-off).
Did you make any mistakes?Display turns out for a moment when you make a mistake in key operations.
Nothing is printed when pressing
Is text entered?
Nothing is printed when there is no text in the text enter screen or in a fixed form.
Is there any message on display?
Printing is not carried out when an error message is displayed on the display.See "Messages On the Display" (p.105).Please wait for a second when a message; "Wait" is displayed.
Is the tape cartridge installed correctly?
You cannot print when there is no remaining tape in the tape cartridge or when the top cover is not closed properly.Install a tape cartridge and close the top cover firmly.
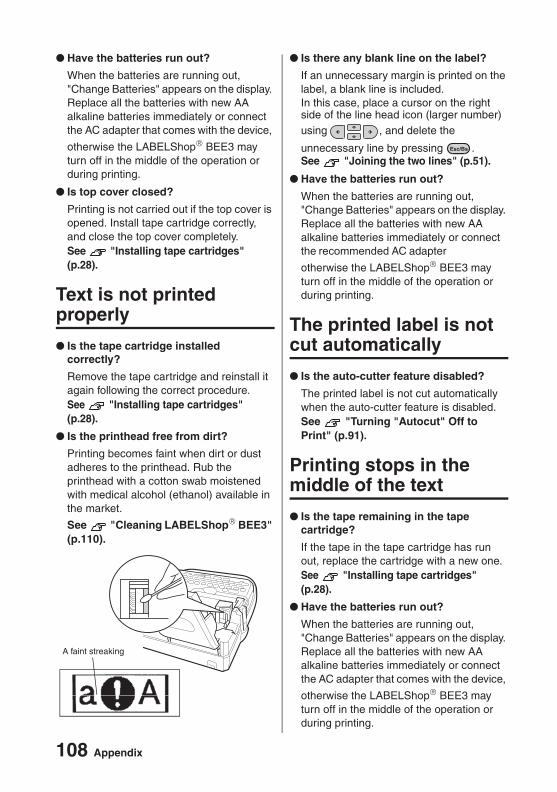
108 Appendix
Have the batteries run out?
When the batteries are running out, "Change Batteries" appears on the display. Replace all the batteries with new AA alkaline batteries immediately or connect the AC adapter that comes with the device,
otherwise the LABELShop� BEE3 may turn off in the middle of the operation or during printing.
Is top cover closed?
Printing is not carried out if the top cover is opened. Install tape cartridge correctly, and close the top cover completely.See "Installing tape cartridges" (p.28).
Text is not printed properly
Is the tape cartridge installed correctly?
Remove the tape cartridge and reinstall it again following the correct procedure.See "Installing tape cartridges" (p.28).
Is the printhead free from dirt?
Printing becomes faint when dirt or dust adheres to the printhead. Rub the printhead with a cotton swab moistened with medical alcohol (ethanol) available in the market.
See "Cleaning LABELShop� BEE3" (p.110).
Is there any blank line on the label?
If an unnecessary margin is printed on the label, a blank line is included.In this case, place a cursor on the right side of the line head icon (larger number) using , and delete the
unnecessary line by pressing .See "Joining the two lines" (p.51).
Have the batteries run out?
When the batteries are running out, "Change Batteries" appears on the display. Replace all the batteries with new AA alkaline batteries immediately or connect the recommended AC adapter
otherwise the LABELShop� BEE3 may turn off in the middle of the operation or during printing.
The printed label is not cut automatically
Is the auto-cutter feature disabled?
The printed label is not cut automatically when the auto-cutter feature is disabled.See "Turning "Autocut" Off to Print" (p.91).
Printing stops in the middle of the text
Is the tape remaining in the tape cartridge?
If the tape in the tape cartridge has run out, replace the cartridge with a new one.See "Installing tape cartridges" (p.28).
Have the batteries run out?
When the batteries are running out, "Change Batteries" appears on the display. Replace all the batteries with new AA alkaline batteries immediately or connect the AC adapter that comes with the device,
otherwise the LABELShop� BEE3 may turn off in the middle of the operation or during printing.
A faint streaking
Appendix 109
Contents of files are gone
Has the device been reset?
Once you reset your LABELShop� BEE3, the saved data such as files, settings are all deleted.See "Deleting all the text" (p.48).See "Calling up/Saving Text" (p.87).
Did you disconnect the AC adapter or remove the batteries during operation?
Do not disconnect the AC adapter or remove the batteries when "Execute", "Wait", or "Printing" is displayed on the screen, or the saved data such as files will be cleared.
You cannot attach labels
Is the backing sheet removed?
Peel off the backing sheet of the adhesive tape to attach.See "Attaching label" (p.42).
Are you attaching labels to clean and flat surface?
Labels may peel off easily or not adhere well when attached to oily, dusty, or rough surfaces.

110 Appendix
Cleaning LABELShop� BEE3To remove dirt and dust from the exterior
Use a soft and dry cloth to wipe off. If the exterior is extremely dirty, use a cloth wrung out of water. Never use chemical dusters, agents, or solvents such as benzine, thinner, or alcohol.
When the printing becomes faintPrinting becomes faint when dirt or dust adheres to the printhead. Rub the printhead with a cotton swab moistened with medical alcohol (ethanol) available in the market.
A faint streaking
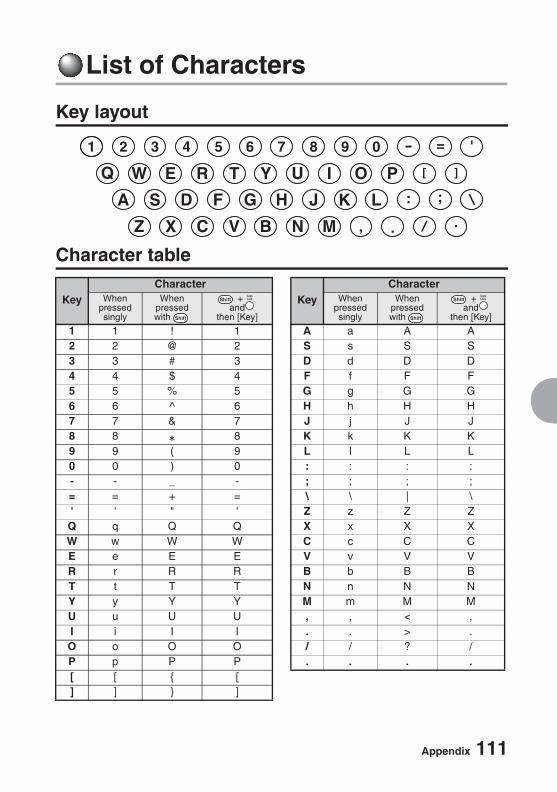
Appendix 111
List of Characters
Key layout
Character table
KeyCharacter
KeyCharacter
When pressed singly
When pressed with
+ and
then [Key]
When pressed singly
When pressed with
+ and
then [Key]
1 1 ! 1 A a A A2 2 @ 2 S s S S3 3 # 3 D d D D4 4 $ 4 F f F F5 5 % 5 G g G G6 6 ^ 6 H h H H7 7 & 7 J j J J8 8 8 K k K K9 9 ( 9 L l L L0 0 ) 0 : : : :- - _ - ; ; ; ;= = + = \ \ | \' ' " ' Z z Z ZQ q Q Q X x X XW w W W C c C CE e E E V v V VR r R R B b B BT t T T N n N NY y Y Y M m M MU u U U , , < ,I i I I . . > .O o O O / / ? /P p P P . . . .[ [ { [] ] } ]
112 Appendix
SpecificationsInputInput device Keyboard (67 keys)
Character keys 48, function keys 19
DisplayDisplay panel Dot matrix STN LCDCharacter display 102 dot x 32 dot x 12 character x 2 lineDisplay level -5 - Normal - +5 (11 levels)Indicators 25LED 1
StorageDocument memory About 90 characters (with limited backup)Internal files Variable-length data
About 90 characters/max. 4 files
FontsInternal fonts SansSerif CL Roman
SansS. HG MinchoSansS. ST GyoshoGothic ReishoBoldGothic BRRoman CBUS Rpman Script PL
PrintingPrinting method Thermal transfer PRO printingPrint density -3 - Normal - +3 (7 levels)Head type Thin film thermal head (180 dpi, 64 dot)Tape width detect Detects P tape standard holes (5 types)Tape cartridge Compliant with P tape standard
One-time tape cartridge that prevents reversal and slackWear-resistant PRO mechanism4mm(204),6mm(206),9mm (209),12mm(212),18mm(218)
Cutter Auto-cutter with the mechanism to remove electricity

Appendix 113
Print functionsFive character sizes, 25 types.
Size 1 16 x 16 dot Size 2 24 x 24 dot Size 3 32 x 32 dotSize 4 48 x 48 dotSize 5 60 x 60 dot
Length Length 1.0-15.0" (3.9-40.0cm)Style Vertical Horizontal or vertical text orientation
Lines Equal, 1Line (1a-1d), 2Lines (2a-2f), 3Lines (3a-3d), 4Lines
Layout Left, Center, RightFrame Off, Table 01-04, frame 01-75
Mode Font SansSerif, SansS. HG, SansS. ST, Gothic, BoldGothic, Roman, US Roman, CL Roman, Mincho, Gyosho, Reisyo, BR, CB, Script PL
Decorate Normal, Out Line, Shadow, Shadow+Out Line, Bold, Italic
Space Normal, NoneNum./BCR Bar Code (6 types: CODE128, CODE 39, ITF, CODABAR,
UPC-A, UPC-E)Print density -3, -2, -1, 0, +1, +2, +3Display density -5, -4, -3, -2, -1, 0, +1, +2, +3, +4, +5 Saved data Length, Style, Mode
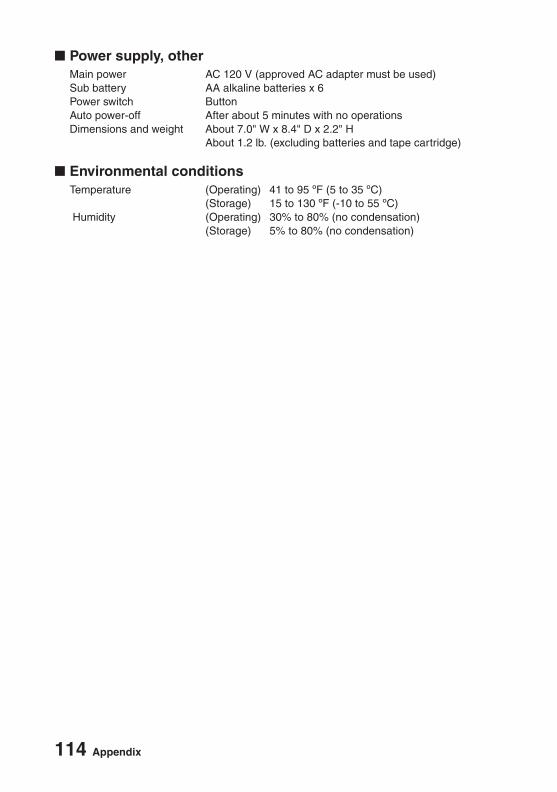
114 Appendix
Power supply, otherMain power AC 120 V (approved AC adapter must be used)Sub battery AA alkaline batteries x 6Power switch ButtonAuto power-off After about 5 minutes with no operationsDimensions and weight About 7.0" W x 8.4" D x 2.2" H
About 1.2 lb. (excluding batteries and tape cartridge)
Environmental conditionsTemperature (Operating) 41 to 95 ºF (5 to 35 ºC)
(Storage) 15 to 130 ºF (-10 to 55 ºC) Humidity (Operating) 30% to 80% (no condensation)
(Storage) 5% to 80% (no condensation)

115
Symbol List
Category Symbol
Europe
LatinAmerica
Greek
Number
Parenthesis
Arrows
� Images in the "Symbol List" may differ from actual ones of printed label.
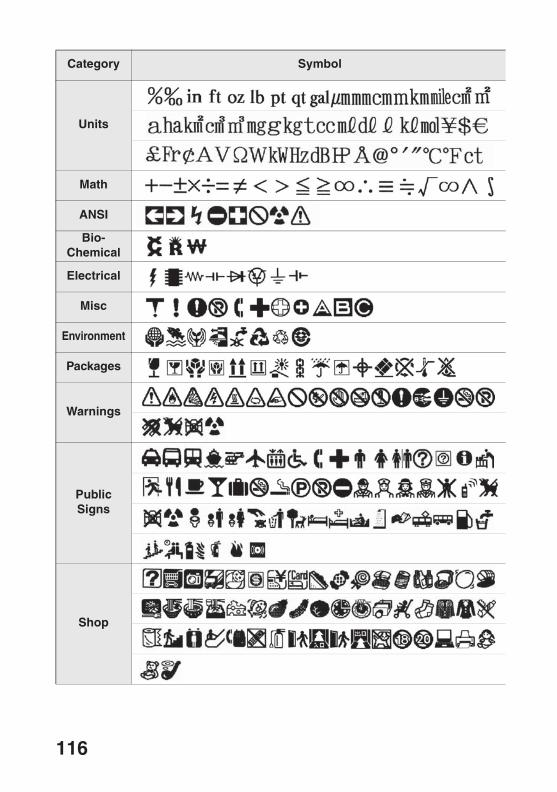
116
Units
Math
ANSI
Bio-Chemical
Electrical
Misc
Environment
Packages
Warnings
Public Signs
Shop
Category Symbol
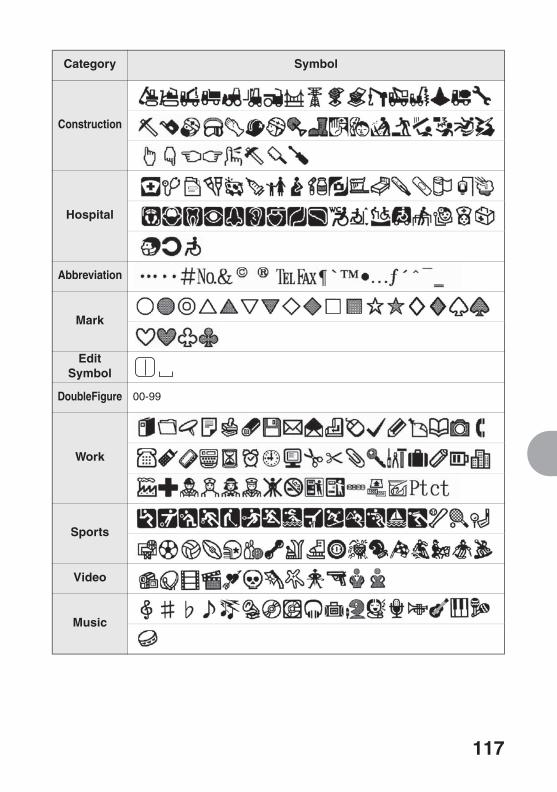
117
Construction
Hospital
Abbreviation
Mark
Edit Symbol
DoubleFigure 00-99
Work
Sports
Video
Music
Category Symbol

118
LivingThing
Vehicles
Foods
Schedule
Life
Seasons
Category Symbol
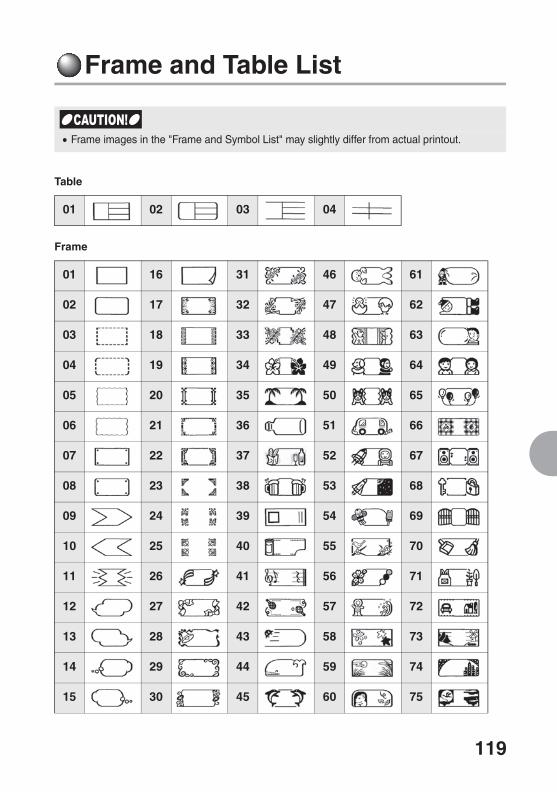
119
Frame and Table List
Table
Frame
01 02 03 04
01 16 31 46 61
02 17 32 47 62
03 18 33 48 63
04 19 34 49 64
05 20 35 50 65
06 21 36 51 66
07 22 37 52 67
08 23 38 53 68
09 24 39 54 69
10 25 40 55 70
11 26 41 56 71
12 27 42 57 72
13 28 43 58 73
14 29 44 59 74
15 30 45 60 75
� Frame images in the "Frame and Symbol List" may slightly differ from actual printout.
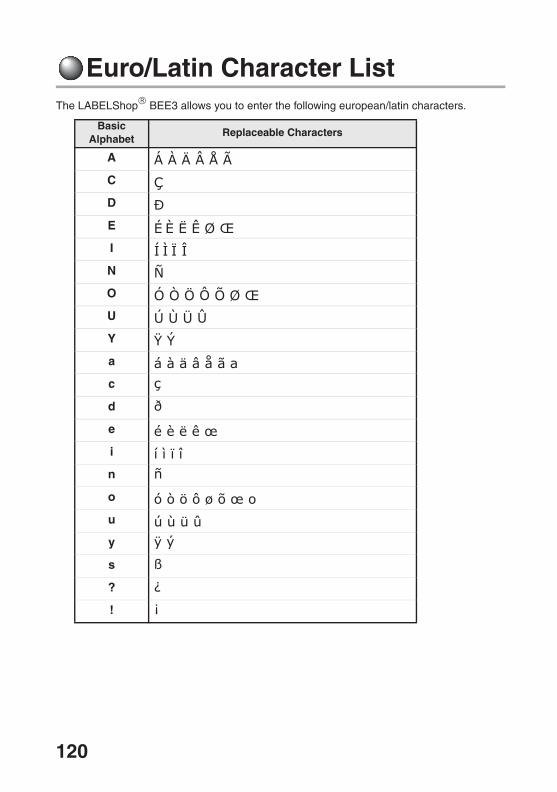
120
Euro/Latin Character ListThe LABELShop� BEE3 allows you to enter the following european/latin characters.
Basic Alphabet
Replaceable Characters
A Á À Ä Â Å ÃC ÇD ÐE É È Ë Ê Ø ŒI Í Ì Ï ÎN ÑO Ó Ò Ö Ô Õ Ø ŒU Ú Ù Ü ÛY Ÿ Ýa á à ä â å ã ac ç
d ð
e é è ë ê œi í ì ï în ñ
o ó ò ö ô ø õ œ ou ú ù ü ûy ÿ ý
s ß
? ¿
! ¡

Accessories
LSAD-2B Adapter for K-Sun LABELShop® BEE3®
LSTA-3B DC Auto and Truck Adapter for K-Sun LABELShop® BEE3®
LSCSS-BEE Black Plastic Case for K-Sun LABELShop® BEE3® (holds machine, adapters, supply cartridges, owners manual, wrist strap, tape cutter tool)LSALWS Adjustable Locking Wrist Strap
Shrink Tube Cartridge (96”) for use with shrink tube models
203STBW Black on White 1/8” (Use with: BEE3, BEE3+) 203STBY Black on Yellow 1/8” (Use with: BEE3, BEE3+) 205STBW Black on White 3/16” (Use with: BEE3, BEE3+) 205STBR Black on Red 3/16” (Use with: BEE3, BEE3+) 205STBY Black on Yellow 3/16” (Use with: BEE3, BEE3+) 208STBW Black on White 1/4” (Use with: BEE3+) 208STBY Black on Yellow 1/4” (Use with: BEE3+)210STBW Black on White 3/8” (Use with: BEE3+)211STBW Black on White 1/2” (Use with: BEE3+)
211STBR Black on Red 1/2” (Use with: BEE3+)211STBY Black on Yellow 1/2” (Use with: BEE3+)
Industrial Labeling Tape, 1/6” (4mm) 26’ each
204BW Black on White
Industrial Labeling Tape, 1/4” (6mm) 26’ each
206BC Black on Clear
206BW Black on White
206BY Black on Yellow
206WB White on Black
206BG Black on Green
206BB Black on Blue
206BR Black on Red
Industrial Labeling Tape, 3/8” (9mm) 26’ each
209BC Black on Clear
209BW Black on White
209BY Black on Yellow
209WB White on Black
209BG Black on Green
209BB Black on Blue
209BR Black on Red
Part Number Description
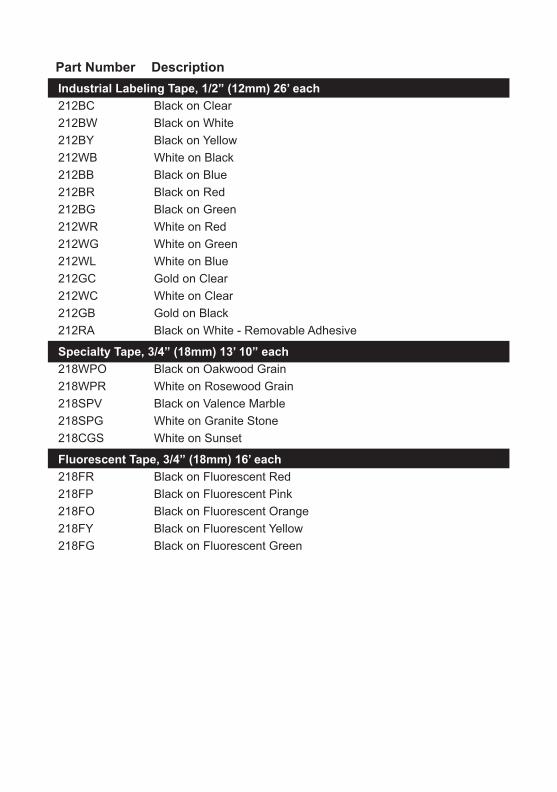
Industrial Labeling Tape, 1/2” (12mm) 26’ each
212BC Black on Clear
212BW Black on White
212BY Black on Yellow
212WB White on Black
212BB Black on Blue
212BR Black on Red
212BG Black on Green
212WR White on Red
212WG White on Green
212WL White on Blue
212GC Gold on Clear
212WC White on Clear
212GB Gold on Black
212RA Black on White - Removable Adhesive
Specialty Tape, 3/4” (18mm) 13’ 10” each
218WPO Black on Oakwood Grain
218WPR White on Rosewood Grain
218SPV Black on Valence Marble
218SPG White on Granite Stone
218CGS White on Sunset
Fluorescent Tape, 3/4” (18mm) 16’ each
218FR Black on Fluorescent Red
218FP Black on Fluorescent Pink
218FO Black on Fluorescent Orange
218FY Black on Fluorescent Yellow
218FG Black on Fluorescent Green
Part Number Description
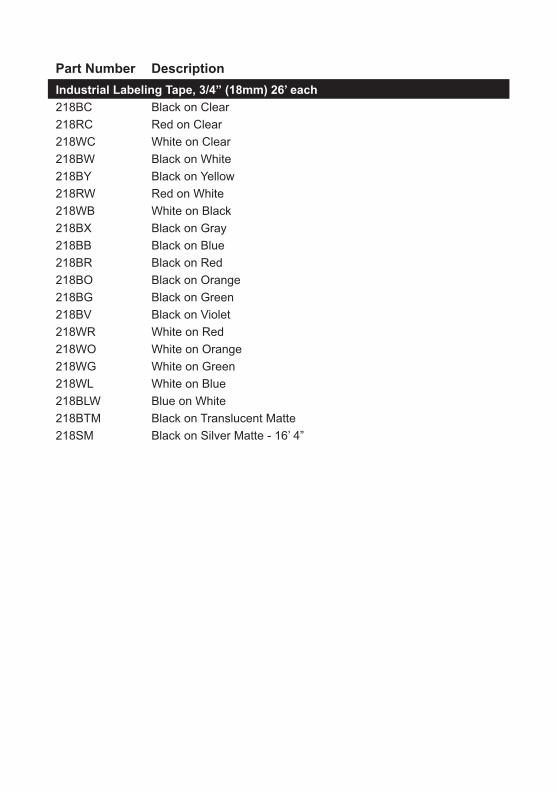
Industrial Labeling Tape, 3/4” (18mm) 26’ each
218BC Black on Clear
218RC Red on Clear
218WC White on Clear
218BW Black on White
218BY Black on Yellow
218RW Red on White
218WB White on Black
218BX Black on Gray
218BB Black on Blue
218BR Black on Red
218BO Black on Orange
218BG Black on Green
218BV Black on Violet
218WR White on Red
218WO White on Orange
218WG White on Green
218WL White on Blue
218BLW Blue on White
218BTM Black on Translucent Matte
218SM Black on Silver Matte - 16’ 4”
Part Number Description

NOTES:

NOTES:

NOTES:
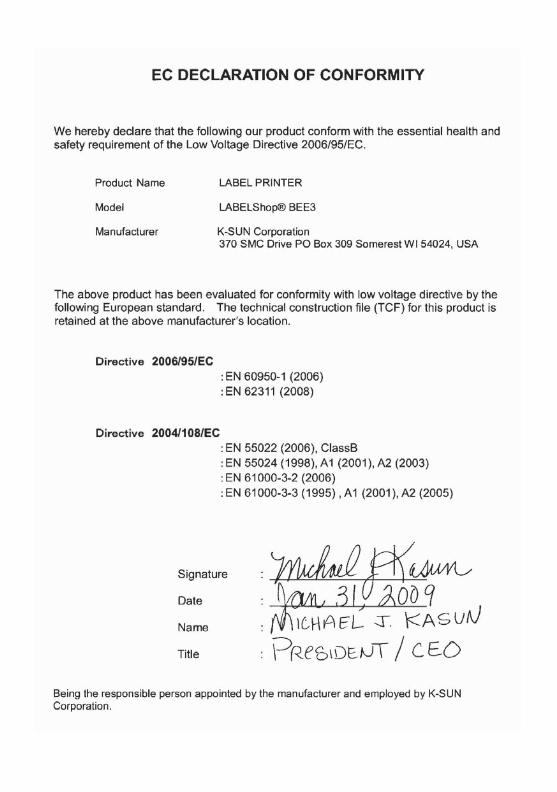

Printed on Recycled Paper
MBEE3_11.2010