Features - Novell Directory Services (NDS) iDataAgent · Features - Novell Directory Services (NDS)...
72
Features - Novell Directory Services (NDS) iDataAgent TABLE OF CONTENTS OVERVIEW SYSTEM REQUIREMENTS - NETWARE SERVER IDATAAGENTS INSTALLATION z Install the NetWare Server iDataAgents z Install the NetWare Server iDataAgents - Clustered Environment -Virtual Server BACKUP - NETWARE SERVER RESTORE DATA - NETWARE SERVER CONFIGURATION z Backup Sets - File System, NetWare Server, Active Directory, and Microsoft Data Protection Manager iDataAgents z Subclients - NetWare/NDS/GroupWise MANAGEMENT z Backup Job History z Restore Job History Features - Novell Directory Services (NDS) iDataAgent Page 1 of 72
Transcript of Features - Novell Directory Services (NDS) iDataAgent · Features - Novell Directory Services (NDS)...

Features - Novell Directory Services (NDS) iDataAgent
TABLE OF CONTENTS
OVERVIEW
SYSTEM REQUIREMENTS - NETWARE SERVER IDATAAGENTS
INSTALLATION
Install the NetWare Server iDataAgents
Install the NetWare Server iDataAgents - Clustered Environment -Virtual Server
BACKUP - NETWARE SERVER
RESTORE DATA - NETWARE SERVER
CONFIGURATION
Backup Sets - File System, NetWare Server, Active Directory, and Microsoft Data Protection Manager iDataAgents
Subclients - NetWare/NDS/GroupWise
MANAGEMENT
Backup Job History
Restore Job History
Features - Novell Directory Services (NDS) iDataAgent
Page 1 of 72

Overview - NetWare Server iDataAgents
Choose from the following topics:
Introduction
Replica Rings
Supported Data Types
Tree Levels in the NetWare iDataAgents
License Requirement
Using the Appropriate NetWare Server iDataAgent
Disaster Recovery Considerations
INTRODUCTION
There are three iDataAgents available for backing up and restoring NetWare Servers:
iDataAgent for NetWare File System
iDataAgent for Novell Directory Services (NDS)
iDataAgent for Novell GroupWise (See Overview - Novell GroupWise iDataAgent for comprehensive information)
These are the back up and restore vehicles for all data residing on NetWare Servers.
The NetWare File System iDataAgent allows you to back up and restore the File System of a NetWare server. You should install this iDataAgent on each NetWare server whose File System you want to secure.
The NDS iDataAgent allows you to back up and restore the NDS tree residing on a NetWare server. You can back up the NDS tree from any NetWare server within the tree.
The following example shows the iDataAgents needed to fully secure a hypothetical heterogeneous computing environment:
REPLICA RINGS
The next diagram illustrates a typical NetWare installation environment. The tree, Company, consists of two partitions, hence two replica rings. Notice that while the File System iDataAgent is installed on all the servers, the NDS iDataAgent is installed on one server from each of the replica rings. The NDS iDataAgent is not installed on server USA_2, as their NDS data will be secured through server USA_1.
For maximum efficiency, it is recommended that you select one NetWare server in each replica ring, and install the NDS iDataAgent to this server.
Features - Novell Directory Services (NDS) iDataAgent
Page 2 of 72

Back to Top
SUPPORTED DATA TYPES
FILE SYSTEM DATA TYPES
Data Protection Operations for the following data types are supported by the NetWare File System iDataAgent:
Traditional Volumes
NSS Volumes - The NetWare File System iDataAgent can back up files on an NSS volume that are open while using the NetWare feature Copy on Write (COW). COW does not replace the need for third party applications that handle back up of open files, since these applications may handle traditional volumes where NetWare COW does not.
All types of namespaces (i.e., Long, DOS, MAC and NFS)
Server Specific information (Disaster Recovery information)
When restoring file system data it is possible to restore across different namespaces, as long as the filenames fit where the data will be restored. You have the option to restore trustees, data with no trustees, or trustees and data. Restoring user space restrictions is also supported.
NDS DATA TYPES
Data Protection Operations for the following data types are supported by the Novell Directory Services (NDS) iDataAgent:
NDS Objects, such as users at the object level
NDS Schema
When restoring NDS data it is possible to restore individual objects without restoring the entire tree.
Back to Top
TREE LEVELS IN THE NETWARE IDATAAGENTS
When NetWare iDataAgents are installed, the following levels are automatically created in the CommCell Browser.
To secure the file system of a NetWare server, you need the NetWare File System iDataAgent. Any other agent (e.g., Windows File System iDataAgent) cannot be used to secure a NetWare server. To secure a GroupWise database, you may use the Novell GroupWise iDataAgent, NetWare File System iDataAgent, or the OES File System iDataAgent, depending on your environment. Any other agent (e.g., Windows File System iDataAgent) cannot be used to secure a GroupWise database.
Note that to secure a GroupWise database using the NetWare File System iDataAgent or OES File System iDataAgent, Novell's TSAFS.NLM must be loaded with the EnableGW switch.
Due to a limitation set by Novell, the NDS iDataAgent cannot backup license objects.
Features - Novell Directory Services (NDS) iDataAgent
Page 3 of 72

Back to Top
LICENSE REQUIREMENT
To perform a data protection operation using this Agent a specific Product License must be available in the CommServe® Server.
Review general license requirements included in License Administration. Also, View All Licenses provides step-by-step instructions on how to view the license information.
Back to Top
USING THE APPROPRIATE NETWARE SERVER IDATAAGENT
For total coverage of your NetWare environment, we recommend installing the File System iDataAgent on all NetWare servers. Doing so ensures that all NetWare File System data can be backed up and recovered. You can install the NDS and/or GroupWise iDataAgent in addition to the NetWare File System iDataAgent.
It is not necessary to install the NDS iDataAgent on every NetWare server, as the NDS data is often replicated on servers within the same tree.
Back to Top
DISASTER RECOVERY CONSIDERATIONSBefore you use your agent, be sure to review and understand the associated full system restore (or disaster recovery) procedure. The procedure for some agents may require that you plan specific actions or consider certain items before an emergency occurs. See Disaster Recovery for more information regarding your agent.
Back to Top
obelisk2: ClientNetWare File SystemFile System: AgentdefaultBackupSet: Backup Sets
default: Subclients
Novell GroupWiseGroupWise DB: Agent
default: Subclients
Novell Directory Services (NDS)Novell Directory Services: AgentdefaultBackupSet: Backup Sets
default: Subclients
You cannot back up data with one NetWare iDataAgent and restore it with the other. For example, you cannot restore your NDS tree using the File System iDataAgent.
Features - Novell Directory Services (NDS) iDataAgent
Page 4 of 72

System Requirements - NetWare File System iDataAgent
The following requirements are for the NetWare File System iDataAgents:
DISCLAIMER
Minor revisions and/or service packs that are released by application and operating system vendors are supported by our software but may not be individually listed in our System Requirements. We will provide information on any known caveat for the revisions and/or service packs. In some cases, these revisions and/or service packs affect the working of our software. Changes to the behavior of our software resulting from an application or operating system revision/service pack may be beyond our control. The older releases of our software may not support the platforms supported in the current release. However, we will make every effort to correct the behavior in the current or future releases when necessary. Please contact your Software Provider for any problem with a specific application or operating system.
Additional considerations regarding minimum requirements and End of Life policies from application and operating system vendors are also applicable
This feature/product/platform is on Extended Support in this release. See Deprecated Features, Products, and Platforms for more information.
OPERATING SYSTEM PROCESSOR
NETWARE FILE SYSTEM IDATAAGENT
NetWare 6.5 up to Support Pack 8
NetWare 6.5 File System on VMware ESX 2.5.1 (as guest operating system)
NetWare 6.5 File System on VMware ESX 2.5.2 (as guest operating system)
NetWare 6.5 File System on VMware ESX 2.5.3 (as guest operating system)
NetWare 6.5 File System on VMware ESX 3.0 (as guest operating system)
NetWare 6.5 Branch Office with Support Pack 5
Intel Pentium or compatible minimum required
The NetWare MediaAgent / iDataAgents are installed on a NetWare server using a Novell client computer, with Novell Client 4.91 SP4 on one of the following operating systems:
Microsoft Windows XP Professional 32-bit Editions
Microsoft Windows Server 2003 32-bit Editions up with a minimum of Service Pack 2
CLUSTER SUPPORT
See Clustering - Support
MEMORY
32 MB RAM minimum required beyond the requirements of the operating system and running applications
HARD DISK50 MB minimum of hard disk space for software
50 MB of additional hard disk space for log file growth
10 MB of temp space required for install or upgrade (where the temp directory resides)
PERIPHERALSDVD-ROM drive
Network Interface Card
MISCELLANEOUSNovell NetWare TCP/IP Services configured on the computer.
Novell's Storage Management Service must be installed and configured in order to utilize the Target Service Agents.
You must have some form of name resolution between your CommServe, NetWare Server, and MediaAgent to ensure proper operations. It is recommended that your NetWare server has DNS services configured.
Features - Novell Directory Services (NDS) iDataAgent
Page 5 of 72

Install the NetWare Server Agents - Express InstallTABLE OF CONTENTS
Install Requirements
Before You Begin
Install ProcedureGetting StartedSelect Components for InstallationFirewall ConfigurationConfiguration of Other Installation OptionsSchedule Automatic UpdateConfigure Client NameStorage Policy SelectionConfigure Account InformationVerify Summary of Install OptionsSetup Complete
Post-Install Considerations
INSTALL REQUIREMENTSThe NetWare Agents are remotely installed from a Novell Client computer to the NetWare Server(s). This installation procedure describes the installation of all four NetWare Agents:
NDS iDataAgent
NetWare File System iDataAgent
Novell GroupWise iDataAgent
File Archiver for NetWare Agent
Verify that the NetWare server to which you are installing and the Novell client from which you are installing satisfies the minimum requirements specified in the following System Requirements:
System Requirements - NetWare Server for NetWare File System and NDS iDataAgents
System Requirements - Novell GroupWise iDataAgent
System Requirements - File Archiver for NetWare Agent
In order to secure the File System data on all NetWare servers, you must install the File System iDataAgent to each NetWare server.
In order to secure GroupWise data, the GroupWise iDataAgent must be installed on each GroupWise server.
When you select the File Archiver for NetWare Agent for install, the NetWare File System iDataAgent is automatically selected for install.
It is not necessary to install the NDS iDataAgent to every NetWare server because the same NDS data can be backed up from any server in the same tree. You may want to split your NDS backup to match your partitions. See the figure below for an example NDS installation.
CUSTOM AND EXPRESS INSTALLATION MODESThe install program allows you to install multiple MediaAgents and Agents at the same time, using either the Express or Custom installation modes. If you are installing on only one computer the modes do not apply.
CUSTOM INSTALLATION MODE
The custom mode is useful to customize each installation. Use the Custom mode when you wish to:
Install MediaAgents and/or Agents attached to multiple CommServes
Example: This diagram illustrates a typical NDS installation. The tree, Company, consists of two partitions, hence two replica rings. Notice that while the File System iDataAgent is installed on all the servers, the NDS iDataAgent is installed on one server from each of the replica rings. The NDS iDataAgent is not installed on server USA_2, as their NDS data will be secured through server USA_1.
For maximum efficiency, it is recommended that you select one NetWare server in each replica ring, and install the NDS iDataAgent to this server.
Features - Novell Directory Services (NDS) iDataAgent
Page 6 of 72

Assign unique configurations for each of the MediaAgents and/or Agents
For step-by-step instruction on installing the NetWare Agent using the custom mode, see Install the NetWare Server Agents - Custom Install.
EXPRESS INSTALLATION MODE
The Express mode is useful to rapidly install multiple MediaAgents and/or Agents. Use the Express mode when all the MediaAgents and/or Agents that you wish to install can have the following options:
The same CommServe
The same path structure for the install directory
The same path structure for the Index Cache directory (for MediaAgents)
The same path structure for the Job Results directory
Review the following Install Requirements before installing the software:
GENERALReview Install Considerations before installing the software.
Agents should be installed only after the CommServe and at least one MediaAgent have been installed in the CommCell. Also, keep in mind that the
CommServe® software and MediaAgent must be installed and running (but not necessarily on the same computer), before you can install the Agent.
Close all applications and disable any programs that run automatically, including anti-virus, screen savers and operating system utilities. Some of the programs, including many anti-virus programs, may be running as a service. Stop and disable such services before you begin. You can re-enable them after the installation.
Ensure there is an available license on the CommServe software for the Agent.
Verify that you have the Software Installation Disc that is appropriate to the destination computer’s operating system.
AGENT SPECIFICIf there is an agent installed on the Novell Client computer you will be using to run the installation, then configuring firewall settings will conflict with running services. To prevent this, stop all running base services on the Novell Client computer before you begin installation. Start them after the installation is complete. For more information, see Services.
If your network does not have the DNS lookup or some other name resolution facility, open the hosts file and enter the FQDN (Fully Qualified Domain Name) and IP address of the CommServe computer. The host’s file is usually located in the SYS:\ETC directory.
BEFORE YOU BEGINFrom a Novell client, log on to the NetWare server you want to install as a user with Supervisor rights or use an account that has Read/Write/Modify/Erase/Create/File Scan rights to the SYS:SYSTEM directory.
For the Novell GroupWise iDataAgent, either the GWTSA.NLM or the TSAFSGW.NLM should be loaded prior to install.
INSTALL PROCEDURE
GETTING STARTED
1. Create the bIgnoreCommServeVersion registry key. To create the registry key, see the following steps:
Click Start, click Run, type regedit, and then click OK. Navigate to the following directory:
HKEY_LOCAL_MACHINE\SOFTWARE\Right click the SOFTWARE and click New -> Key.
Name the key as GalaxyInstallerFlags.
Right click the GalaxyInstallerFlags and select New -> DWORD value, name it as bIgnoreCommServeVersionDouble-click the bIgnoreCommServeVersion key modify the Value data to 1.
2. Place the software installation disc for the Windows platform into the Novell client’s disc drive or a mapped disc drive on another computer or a network share.
If the installation menu does not appear:
a. Click Start on the Windows task bar, and then click Run.
b. Browse the installation disc drive, right-click Setup.exe, then click Open.
In the language screen, click the down arrow, select the desired language from the pull-down list, and then click Next to continue.
3. Select the option to install software on a NetWare server.
Features - Novell Directory Services (NDS) iDataAgent
Page 7 of 72
NOTES
The options in this menu depend on the computer in which the software is being installed.
4. Read the Welcome screen.
Click Next to continue, if no other applications are running.
5. Select Install from the Install/Uninstall Selection screen.
Click Next to continue.
6. Read the license agreement, then select I accept the terms in the license agreement.
Click Next to continue.
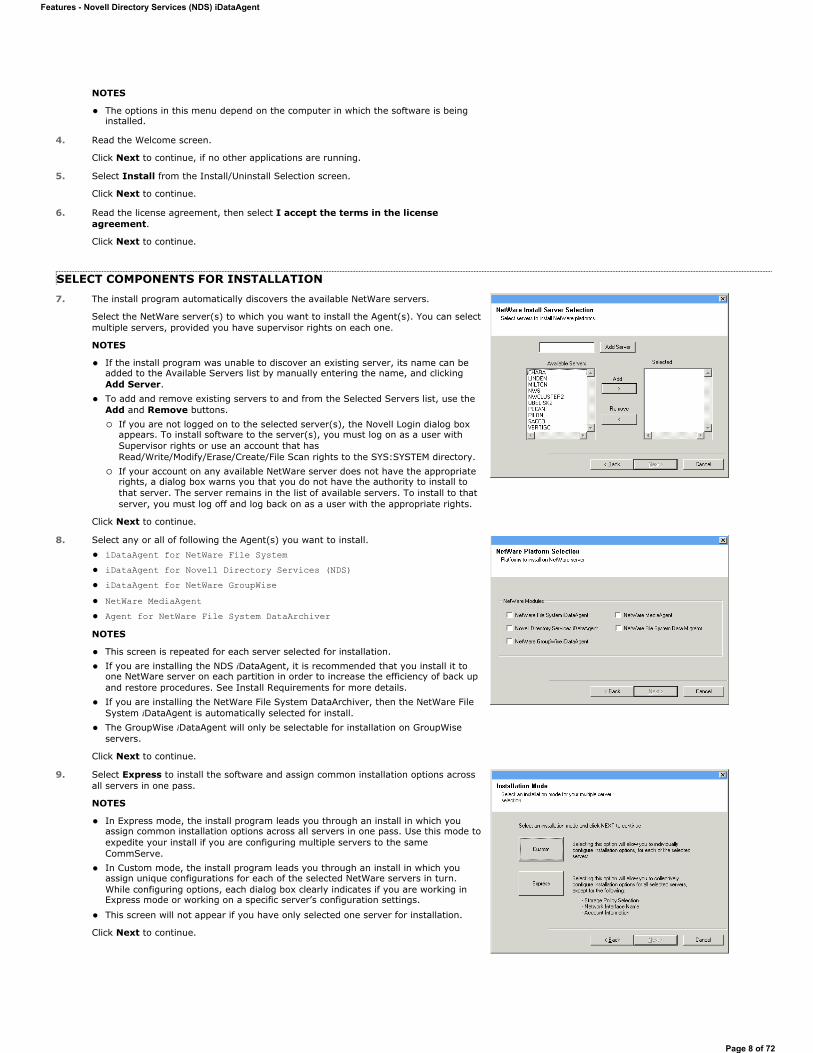
SELECT COMPONENTS FOR INSTALLATION7. The install program automatically discovers the available NetWare servers.
Select the NetWare server(s) to which you want to install the Agent(s). You can select multiple servers, provided you have supervisor rights on each one.
NOTES
If the install program was unable to discover an existing server, its name can be added to the Available Servers list by manually entering the name, and clicking Add Server. To add and remove existing servers to and from the Selected Servers list, use the Add and Remove buttons.
If you are not logged on to the selected server(s), the Novell Login dialog box appears. To install software to the server(s), you must log on as a user with Supervisor rights or use an account that has Read/Write/Modify/Erase/Create/File Scan rights to the SYS:SYSTEM directory. If your account on any available NetWare server does not have the appropriate rights, a dialog box warns you that you do not have the authority to install to that server. The server remains in the list of available servers. To install to that server, you must log off and log back on as a user with the appropriate rights.
Click Next to continue.
8. Select any or all of following the Agent(s) you want to install. iDataAgent for NetWare File SystemiDataAgent for Novell Directory Services (NDS)iDataAgent for NetWare GroupWiseNetWare MediaAgentAgent for NetWare File System DataArchiver
NOTES
This screen is repeated for each server selected for installation. If you are installing the NDS iDataAgent, it is recommended that you install it to one NetWare server on each partition in order to increase the efficiency of back up and restore procedures. See Install Requirements for more details. If you are installing the NetWare File System DataArchiver, then the NetWare File System iDataAgent is automatically selected for install. The GroupWise iDataAgent will only be selectable for installation on GroupWise servers.
Click Next to continue.
9. Select Express to install the software and assign common installation options across all servers in one pass.
NOTES
In Express mode, the install program leads you through an install in which you assign common installation options across all servers in one pass. Use this mode to expedite your install if you are configuring multiple servers to the same CommServe. In Custom mode, the install program leads you through an install in which you assign unique configurations for each of the selected NetWare servers in turn. While configuring options, each dialog box clearly indicates if you are working in Express mode or working on a specific server’s configuration settings.
This screen will not appear if you have only selected one server for installation.
Click Next to continue.
Features - Novell Directory Services (NDS) iDataAgent
Page 8 of 72

10. Accept the default Destination Path or enter an alternate install path.
NOTES
In an Express install the Browse button is disabled. Destination folders:
must follow DOS naming conventions
must not exceed a length of 8.3 characters must not use the following characters when specifying the destination folder: / : * ? " < > | It is recommended you use alphanumeric characters only.
Click Next to continue.
FIREWALL CONFIGURATION11. Select from the following:
If this Client communicates with the CommServe Server and/or MediaAgent across a firewall, select Yes, configure firewall services, and then click Next to continue. Proceed to the next Step. If firewall configuration is not required, click No, do not configure firewall services and then click Next to continue. Proceed to the next section.
NOTES
Operating systems, such as Windows 2008 and Windows Vista, may have more than one profile present. When you select No to configure firewall services, verify that firewall settings are not enabled in the profile(s).
If the system detects firewall settings are present in the profile(s), you must select from the following:
Disable firewall for ALL profiles: Employ caution when choosing this option; firewall settings will be disabled in all profiles. This requires a system reboot; installation automatically resumes after reboot.
No, Firewall is not enabled: Select this option if your firewall settings allow communication with the CommServe computer.Click Back to configure firewall services.
CONFIGURATION OF OTHER INSTALLATION OPTIONS12. Enter the fully qualified domain name of the CommServe computer. (TCP/IP network
name. e.g., computer.company.com)
NOTES
Do not use spaces when specifying a new name for the CommServe Host Name. If a component has already been installed, this screen will not be displayed; instead, the installer will use the same Server Name as previously specified.
Click Next to continue.
13. Enter the username and password associated with an external domain user account or a CommCell user account to authorize the installation of this agent.
NOTES
This window will be displayed when the Require Authentication for AgentInstallation option is selected in the CommCell Properties. For more information, see Authentication for Agent Installs.
Click Next to continue.
Features - Novell Directory Services (NDS) iDataAgent
Page 9 of 72

14. Select one of the Load Options: Automatically load the software onto the server after installation. Automatically load the software each time you restart the server.
NOTES
If you choose not to autoload the agents after installation, you will need to manually load the Agents onto each server after completing the installation.
Click Next to continue.
15. Specify the location of the client’s job results directory.
NOTES
The Agent uses the job results directory to store the client’s backup and restore job results. In an Express install the Browse button is disabled. Job results folders:
must follow DOS naming conventions must not exceed a length of 8.3 characters must not use the following characters when specifying the destination folder: % * ? < > | It is recommended you use alphanumeric characters only.
Click Browse to change directories.
Click Next to continue.
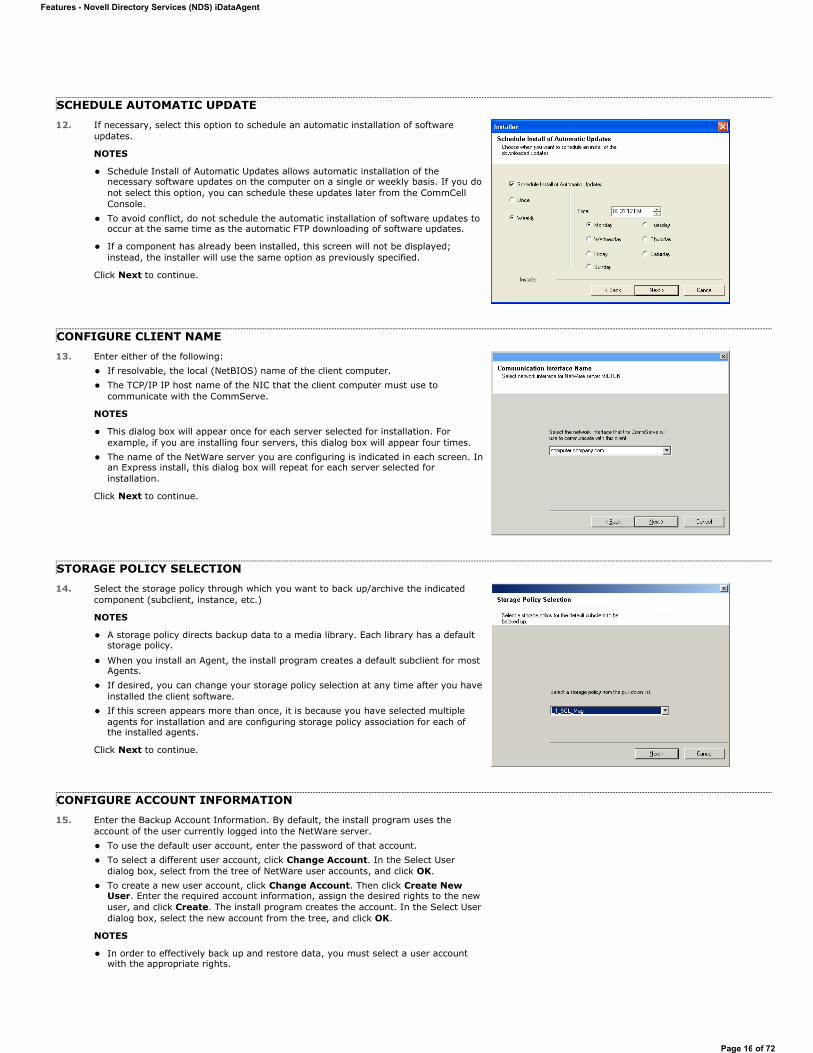
SCHEDULE AUTOMATIC UPDATE16. If necessary, select this option to schedule an automatic installation of software
updates.
NOTES
Schedule Install of Automatic Updates allows automatic installation of the necessary software updates on the computer on a single or weekly basis. If you do not select this option, you can schedule these updates later from the CommCell Console. To avoid conflict, do not schedule the automatic installation of software updates to occur at the same time as the automatic FTP downloading of software updates.
If a component has already been installed, this screen will not be displayed; instead, the installer will use the same option as previously specified.
Click Next to continue.
CONFIGURE CLIENT NAME17. Enter either of the following:
If resolvable, the local (NetBIOS) name of the client computer. The TCP/IP IP host name of the NIC that the client computer must use to communicate with the CommServe.
NOTES
This dialog box will appear once for each server selected for installation. For example, if you are installing four servers, this dialog box will appear four times.
The name of the NetWare server you are configuring is indicated in each screen. In an Express install, this dialog box will repeat for each server selected for installation.
Click Next to continue.
STORAGE POLICY SELECTION
Features - Novell Directory Services (NDS) iDataAgent
Page 10 of 72

18. Configure storage policies for the NetWare File System if selected for installation. Select the storage policy through which you want to back up/archive the indicated component (subclient, instance, etc.)
NOTES
A storage policy directs backup data to a media library. Each library has a default storage policy. When you install an Agent, the install program creates a default subclient for most Agents. If desired, you can change your storage policy selection at any time after you have installed the client software.
If this screen appears more than once, it is because you have selected multiple agents for installation and are configuring storage policy association for each of the installed agents.
Click Next to continue.
CONFIGURE ACCOUNT INFORMATION19. Enter the Backup Account Information. By default, the install program uses the
account of the user currently logged into the NetWare server. To use the default user account, enter the password of that account. To select a different user account, click Change Account. In the Select User dialog box, select from the tree of NetWare user accounts, and click OK. To create a new user account, click Change Account. Then click Create New User. Enter the required account information, assign the desired rights to the new user, and click Create. The install program creates the account. In the Select User dialog box, select the new account from the tree, and click OK.
NOTES
In order to effectively back up and restore data, you must select a user account with the appropriate rights.
For the File System iDataAgent, GroupWise iDataAgent and File Archiver for NetWare Agent, it is recommended that the user account have supervisor rights to the server.
For the NDS iDataAgent, you must select a NetWare user account with supervisor rights to the root of the entire NDS tree.
Changing a network account requires about five minutes to be synchronized.
Click Next to continue.
See the NetWare Server iDataAgents section in User Accounts and Passwords for more information.
VERIFY SUMMARY OF INSTALL OPTIONS
20. Verify the summary of selected options.
NOTES
The Summary on your screen should reflect the components you selected for install, and may look different from the example shown.
Click Next to continue or Back to change any of the options.
The install program now starts copying the software to the computer. This step may take several minutes to complete.
SETUP COMPLETE
21. Setup displays the successfully installed components.
NOTES
The Setup Complete message displayed on your screen will reflect the components you installed, and may look different from the example shown. If you install an Agent with the CommCell Console open, you need to refresh the CommCell Console (F5) to see the new Agents.
Click Finish to continue.
Features - Novell Directory Services (NDS) iDataAgent
Page 11 of 72

22. Click OK to exit the install program.
The installation is now complete.
NOTES
Schedules help ensure that the data protection operations for the Agent are automatically performed on a regular basis without user intervention. For more information, see Scheduling.
POST-INSTALL CONSIDERATIONS
GENERALInstall post-release updates or Service Packs that may have been released after the release of the software. When you are installing a Service Pack, ensure that it is the same version as the one installed in the CommServe Server. Alternatively, you can enable Automatic Updates for quick and easy installation of updates in the CommCell component.
After installing the Agent, you may want to configure the Agent before running a data protection operation. The following list includes some of the most common features that can be configured:
Configure your subclients - see Subclients for more information. Schedule your data protection operations - see Scheduling for more information. Configure Alerts - See Alerts and Monitoring for more information. Schedule Reports - See Reports for more information.
The software provides many more features that you will find useful. See the Index for a complete list of supported features.
AGENT SPECIFICFor the GroupWise iDataAgent, depending on your GroupWise system configuration, either the GWTSA.NLM or the TSAFSGW.NLM should be loaded prior to install as well as prior to loading client services each time the server is rebooted.
If either the GWTSA.NLM or the TSAFSGW.NLM is not loaded, use the appropriate NetWare Command File (NCF) to load the NLM. The following example pertains to the GWTSA.NLM, but also applies to the TSAFSGW.NLM:
Build the GWTSA.NCF file to specify where the GroupWise directories are located on the system using the following arguments:
LOAD SYS:\SYSTEM\SMDR LOAD SYS:\SYSTEM\GWTSA /HOME-GROUPWISE:\GRPWISE\CVGWDOM\ /HOME-GROUPWISE:\GRPWISE\CVGWPO
The following configuration tasks are required before performing an Archive Operation using this Archiver Agent: Create a Subclient - see Subclients - File Archiver for NetWare for more information. Archiving Rules are initially disabled by default. You must clear the Disable All Rules option in the Subclient Properties (Archiving Rules) or (Rules) tab and configure the archiving rules before conducting rules-based Archive Operations.
DISASTER RECOVERY CONSIDERATIONSBefore you use your agent, be sure to review and understand the associated full system restore (or disaster recovery) procedure. The procedure for some agents may require that you plan specific actions or consider certain items before an emergency occurs. See Disaster Recovery for more information regarding your agent.
Features - Novell Directory Services (NDS) iDataAgent
Page 12 of 72

Install the NetWare Server Agents - Clustered Environment -Custom InstallTABLE OF CONTENTS
Install Requirements
Before You Begin
Install ProcedureGetting StartedSelect Components for InstallationDestination PathConfiguration of Other Installation OptionsSchedule Automatic UpdateConfigure Client NameStorage Policy SelectionConfigure Account InformationVerify Summary of Install OptionsSetup Complete
Post-Install Considerations
INSTALL REQUIREMENTSThe following NetWare Server Agents can be installed in the cluster group:
NetWare File System iDataAgent
File Archiver for NetWare Agent
Novell GroupWise iDataAgent
The NetWare File System iDataAgent, File Archiver for NetWare Agent, and Novell GroupWise iDataAgent are remotely installed from a Novell Client computer to the NetWare Server(s). This installation procedure describes the installation for both of these NetWare Agents.
The NetWare File System iDataAgent must be installed on all of the Physical nodes in the cluster before installing any NetWare Agents/MediaAgents in the cluster group. Installs in the cluster group are always Custom installs. Furthermore, all physical and virtual servers within a cluster must be installed to the same CommServe.
See Install the NetWare Server iDataAgents - Express Install or Install the NetWare Server iDataAgents - Custom Install for instructions on installing the NetWare File System iDataAgent to the physical node.
Once the NetWare File System iDataAgent has been installed onto the physical node, the NetWare File System iDataAgent, File Archiver for NetWare Agent, and Novell GroupWise iDataAgent can be installed in the cluster group using the following procedure. When the virtual server install procedure is performed, an automated configuration of the Galaxy.INI file is performed on all available nodes at the same time.
For an overview of deploying the software components in a clustered environment, see Clustering Support.
Verify that the NetWare server to which you are installing and the Novell client from which you are installing satisfy the minimum requirements specified in the following System Requirements:
System Requirements - NetWare Server iDataAgents for NetWare File System iDataAgent
System Requirements - File Archiver for NetWare Agent
System Requirements - Novell GroupWise iDataAgent
The following procedure describes the steps involved in installing the NetWare File System iDataAgent and the File Archiver for NetWare Agent. Note that if you have already installed the NetWare File System iDataAgent, the sequence of the install steps may vary for the File Archiver for NetWare Agent when installed separately.
Review the following Install Requirements before installing the software:
GENERALReview Install Considerations before installing the software.
Agents should be installed only after the CommServe and at least one MediaAgent have been installed in the CommCell. Also, keep in mind that the
CommServe® software and MediaAgent must be installed and running (but not necessarily on the same computer), before you can install the Agent.
Close all applications and disable any programs that run automatically, including anti-virus, screen savers and operating system utilities. Some of the programs, including many anti-virus programs, may be running as a service. Stop and disable such services before you begin. You can re-enable them after the installation.
Ensure there is an available license on the CommServe software for the Agent.
Verify that you have the Software Installation Disc that is appropriate to the destination computer’s operating system.
Features - Novell Directory Services (NDS) iDataAgent
Page 13 of 72

If there is an agent installed on the Novell Client computer you will be using to run the installation, then configuring firewall settings will conflict with running services. To prevent this, stop all running base services on the Novell Client computer before you begin installation. Start them after the installation is complete. For more information, see Services.
If your network does not have the DNS lookup or some other name resolution facility, open the hosts file and enter the FQDN (Fully Qualified Domain Name) and IP address of the CommServe computer. The host’s file is usually located in the SYS:\ETC directory.
CLUSTERCheck the following on the cluster computer in which you wish to install the software:
Cluster software is installed and running.
Active and passive nodes are available.
Disk array devices configured with access to the shared array.
Public Network Interface Card is bound first, before the private Network Interface Card. (Does not apply to NetWare Cluster.)
BEFORE YOU BEGINFrom a Novell client, log on to the NetWare server you want to install as a user with Supervisor rights or use an account that has Read/Write/Modify/Erase/Create/File Scan rights to the SYS:SYSTEM directory.
INSTALL PROCEDURE
GETTING STARTED
1. Create the bIgnoreCommServeVersion registry key. To create the registry key, see the following steps: Click Start, click Run, type regedit, and then click OK. Navigate to the following directory:
HKEY_LOCAL_MACHINE\SOFTWARE\Right click the SOFTWARE and click New -> Key.
Name the key as GalaxyInstallerFlags.
Right click the GalaxyInstallerFlags and select New -> DWORD value, name it as bIgnoreCommServeVersionDouble-click the bIgnoreCommServeVersion key modify the Value data to 1.
2. Place the software installation disc for the Windows platform into the Novell client’s disc drive or a mapped disc drive on another computer or a network share.
If the installation menu does not appear:
a. Click Start on the Windows task bar, and then click Run.
b. Browse the installation disc drive, right-click Setup.exe, then click Open.
In the language screen, click the down arrow, select the desired language from the pull-down list, and then click Next to continue.
3. Select the option to install software on a NetWare server.
NOTES
The options in this menu depend on the computer in which the software is being installed.
4. Read the Welcome screen.
Click Next to continue, if no other applications are running.
5. Select Install from the Install/Uninstall Selection screen.
Click Next to continue.
6. Read the license agreement, then select I accept the terms in the license agreement.
Click Next to continue.
SELECT COMPONENTS FOR INSTALLATION7. The install program automatically discovers the available NetWare servers.
Select the NetWare server(s) to which you want to install the Agent(s). You can select multiple servers, provided you have supervisor rights on each one.
NOTES
Features - Novell Directory Services (NDS) iDataAgent
Page 14 of 72
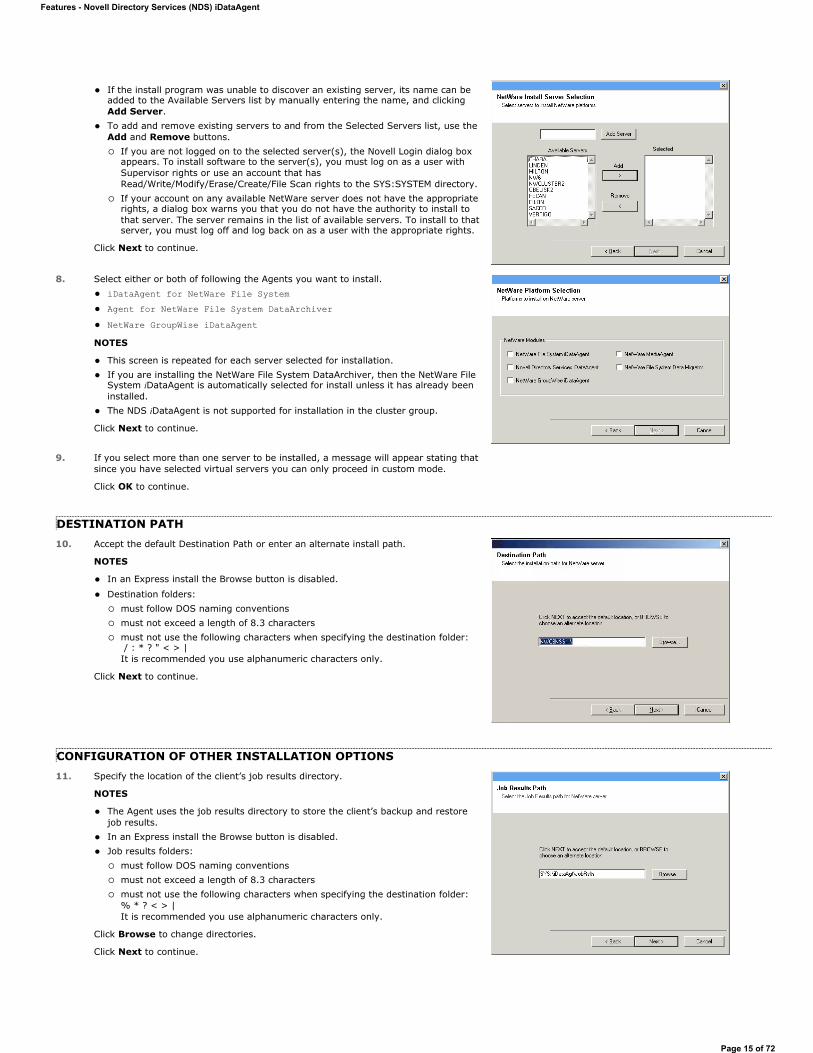
If the install program was unable to discover an existing server, its name can be added to the Available Servers list by manually entering the name, and clicking Add Server. To add and remove existing servers to and from the Selected Servers list, use the Add and Remove buttons.
If you are not logged on to the selected server(s), the Novell Login dialog box appears. To install software to the server(s), you must log on as a user with Supervisor rights or use an account that has Read/Write/Modify/Erase/Create/File Scan rights to the SYS:SYSTEM directory. If your account on any available NetWare server does not have the appropriate rights, a dialog box warns you that you do not have the authority to install to that server. The server remains in the list of available servers. To install to that server, you must log off and log back on as a user with the appropriate rights.
Click Next to continue.
8. Select either or both of following the Agents you want to install. iDataAgent for NetWare File SystemAgent for NetWare File System DataArchiverNetWare GroupWise iDataAgent
NOTES
This screen is repeated for each server selected for installation. If you are installing the NetWare File System DataArchiver, then the NetWare File System iDataAgent is automatically selected for install unless it has already been installed. The NDS iDataAgent is not supported for installation in the cluster group.
Click Next to continue.
9. If you select more than one server to be installed, a message will appear stating that since you have selected virtual servers you can only proceed in custom mode.
Click OK to continue.
DESTINATION PATH10. Accept the default Destination Path or enter an alternate install path.
NOTES
In an Express install the Browse button is disabled.
Destination folders: must follow DOS naming conventions must not exceed a length of 8.3 characters must not use the following characters when specifying the destination folder: / : * ? " < > | It is recommended you use alphanumeric characters only.
Click Next to continue.
CONFIGURATION OF OTHER INSTALLATION OPTIONS11. Specify the location of the client’s job results directory.
NOTES
The Agent uses the job results directory to store the client’s backup and restore job results. In an Express install the Browse button is disabled. Job results folders:
must follow DOS naming conventions must not exceed a length of 8.3 characters must not use the following characters when specifying the destination folder: % * ? < > | It is recommended you use alphanumeric characters only.
Click Browse to change directories.
Click Next to continue.
Features - Novell Directory Services (NDS) iDataAgent
Page 15 of 72
SCHEDULE AUTOMATIC UPDATE12. If necessary, select this option to schedule an automatic installation of software
updates.
NOTES
Schedule Install of Automatic Updates allows automatic installation of the necessary software updates on the computer on a single or weekly basis. If you do not select this option, you can schedule these updates later from the CommCell Console. To avoid conflict, do not schedule the automatic installation of software updates to occur at the same time as the automatic FTP downloading of software updates.
If a component has already been installed, this screen will not be displayed; instead, the installer will use the same option as previously specified.
Click Next to continue.
CONFIGURE CLIENT NAME13. Enter either of the following:
If resolvable, the local (NetBIOS) name of the client computer. The TCP/IP IP host name of the NIC that the client computer must use to communicate with the CommServe.
NOTES
This dialog box will appear once for each server selected for installation. For example, if you are installing four servers, this dialog box will appear four times. The name of the NetWare server you are configuring is indicated in each screen. In an Express install, this dialog box will repeat for each server selected for installation.
Click Next to continue.
STORAGE POLICY SELECTION14. Select the storage policy through which you want to back up/archive the indicated
component (subclient, instance, etc.)
NOTES
A storage policy directs backup data to a media library. Each library has a default storage policy.
When you install an Agent, the install program creates a default subclient for most Agents. If desired, you can change your storage policy selection at any time after you have installed the client software. If this screen appears more than once, it is because you have selected multiple agents for installation and are configuring storage policy association for each of the installed agents.
Click Next to continue.
CONFIGURE ACCOUNT INFORMATION15. Enter the Backup Account Information. By default, the install program uses the
account of the user currently logged into the NetWare server. To use the default user account, enter the password of that account. To select a different user account, click Change Account. In the Select User dialog box, select from the tree of NetWare user accounts, and click OK. To create a new user account, click Change Account. Then click Create New User. Enter the required account information, assign the desired rights to the new user, and click Create. The install program creates the account. In the Select User dialog box, select the new account from the tree, and click OK.
NOTES
In order to effectively back up and restore data, you must select a user account with the appropriate rights.
Features - Novell Directory Services (NDS) iDataAgent
Page 16 of 72

For the File System iDataAgent, GroupWise iDataAgent and File Archiver for NetWare Agent, it is recommended that the user account have supervisor rights to the server. For the NDS iDataAgent, you must select a NetWare user account with supervisor rights to the root of the entire NDS tree.
Changing a network account requires about five minutes to be synchronized.
Click Next to continue.
See the NetWare Server iDataAgents section in User Accounts and Passwords for more information.
You will be returned to Step to Destination Path for each server you have selected to configure for this custom installation. Once all of the servers have been configured, the install will continue.
VERIFY SUMMARY OF INSTALL OPTIONS16. Verify the summary of selected options.
NOTES
The Summary on your screen should reflect the components you selected for install, and may look different from the example shown.
Click Next to continue or Back to change any of the options.
The install program now starts copying the software to the computer. This step may take several minutes to complete.
SETUP COMPLETE17. Setup displays the successfully installed components.
NOTES
The Setup Complete message displayed on your screen will reflect the components you installed, and may look different from the example shown. If you install an Agent with the CommCell Console open, you need to refresh the CommCell Console (F5) to see the new Agents.
Click Finish to continue.
18. Click OK to exit the install program.
The installation is now complete.
NOTES
Schedules help ensure that the data protection operations for the Agent are automatically performed on a regular basis without user intervention. For more information, see Scheduling.
POST-INSTALL CONSIDERATIONS
Features - Novell Directory Services (NDS) iDataAgent
Page 17 of 72

GENERALInstall post-release updates or Service Packs that may have been released after the release of the software. When you are installing a Service Pack, ensure that it is the same version as the one installed in the CommServe Server. Alternatively, you can enable Automatic Updates for quick and easy installation of updates in the CommCell component.
After installing the Agent, you may want to configure the Agent before running a data protection operation. The following list includes some of the most common features that can be configured:
Configure your subclients - see Subclients for more information. Schedule your data protection operations - see Scheduling for more information. Configure Alerts - See Alerts and Monitoring for more information. Schedule Reports - See Reports for more information.
The software provides many more features that you will find useful. See the Index for a complete list of supported features.
AGENT SPECIFICThe following configuration tasks are required before performing an Archive Operation using this Archiver Agent:
Create a Subclient - see Subclients - File Archiver for NetWare for more information.
Archiving Rules are initially disabled by default. You must clear the Disable All Rules option in the Subclient Properties (Archiving Rules) or (Rules) tab and configure the archiving rules before conducting rules-based Archive Operations.
DISASTER RECOVERY CONSIDERATIONSBefore you use your agent, be sure to review and understand the associated full system restore (or disaster recovery) procedure. The procedure for some agents may require that you plan specific actions or consider certain items before an emergency occurs. See Disaster Recovery for more information regarding your agent.
Features - Novell Directory Services (NDS) iDataAgent
Page 18 of 72
Install the Novell Directory Service (NDS) iDataAgent - OES LinuxTABLE OF CONTENTS
Install Requirements
Before You Begin
Install ProcedureGetting StartedSelect Components for InstallationBase Software InstallationClient Group SelectionNovell User AccountSetup Complete
Post-Install Considerations
INSTALL REQUIREMENTSThe NDS iDataAgent - OES Linux is installed on the computer from which the iDataAgent secures data. (This computer is referred to as the Client computer in this install procedure.)
Verify that the computer in which you wish to install the software satisfies the minimum requirements specified in System Requirements - Novel Directory Service iDataAgent.
Review the following Install Requirements before installing the software:
GENERALReview Install Considerations before installing the software.
Agents should be installed only after the CommServe and at least one MediaAgent have been installed in the CommCell. Also, keep in mind that the CommServe and MediaAgent must be installed and running (but not necessarily on the same computer), before you can install the Agent.
Ensure there is an available license on the CommServe for the Agent.
Verify that you have the Software Installation Disc that is appropriate to the destination computer’s operating system.
BEFORE YOU BEGINLog on to the client as root.
The install package requires super-user permissions to execute.
INSTALL PROCEDURE
GETTING STARTED
1. Place the software installation disc for the Unix platform into the disc drive.
You can also install the product using a disc drive mounted on another computer on the network.
On Solaris, double-click the cvpkgadd program from the File Manager window. On other Unix platforms, open the Terminal window, navigate to the software installation disc and then enter ./cvpkgadd.
2. The product banner and other information is displayed.
Press Enter to continue.
3. Read the license agreement. Type y and press Enter to continue.
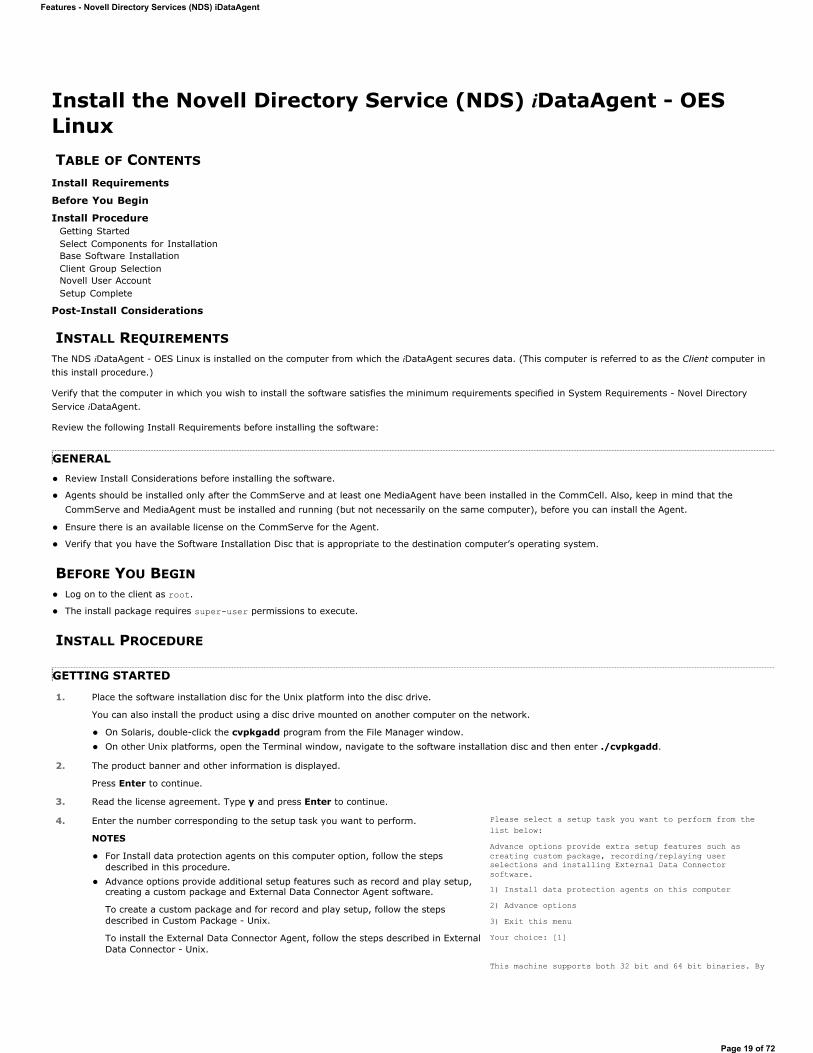
4. Enter the number corresponding to the setup task you want to perform.
NOTES
For Install data protection agents on this computer option, follow the steps described in this procedure. Advance options provide additional setup features such as record and play setup, creating a custom package and External Data Connector Agent software.
To create a custom package and for record and play setup, follow the steps described in Custom Package - Unix.
To install the External Data Connector Agent, follow the steps described in External Data Connector - Unix.
Please select a setup task you want to perform from the list below:Advance options provide extra setup features such as creating custom package, recording/replaying user selections and installing External Data Connector software.1) Install data protection agents on this computer2) Advance options3) Exit this menuYour choice: [1]
This machine supports both 32 bit and 64 bit binaries. By
Features - Novell Directory Services (NDS) iDataAgent
Page 19 of 72

5. If your computer is 32-bit, press Enter.
If your computer is 64-bit, see Install Unix Agents on 64-bit Platform for step-by-step procedure.
default, we will install 32 bit binary set that has full support for all the modules included in this package. Please note that 64 bit binary set currently only support limited modules.1) All platforms (32 bit)2) FS and MA only (64 bit)Your choice: [1]
6. This prompt is displayed only when you are installing on AIX, HP-UX, Linux, or Solaris computers.
Press Enter to continue
NOTES
When you install on non-clustered computer, you must select the number associated with the option Install on a physical machine.
Certain Simpana packages can be associated with a virtual IP, or in other words, installed on a "virtual machine" belonging to some cluster. At any given time the virtual machine's services and IP address are active on only one of the cluster's servers. The virtual machine can "fail-over" from one server to another, which includes stopping services and deactivating IP address on the first server and activating the IP address/services on the other server.You now have a choice of performing a regular Simpana install on the physical host or installing Simpana on a virtual machine for operation within a cluster. Most users should select "Install on a physical machine" here. 1) Install on a physical machine 2) Install on a virtual machine 3) Exit Your choice: [1]
7. If you have only one network interface, press Enter to accept the default network interface name and continue.
If you have multiple network interfaces, enter the number corresponding to the network interface that you wish to use as default, and then press Enter to continue.
NOTES
The interface name and IP addresses depend on the computer in which the software is installed and may be different from the example shown.
We found one network interface available on your machine. We will associate it with the physical machine being installed, and it will also be used by the CommServe to connect to the physical machine. Note that you will be able to additionally customize Datapipe Interface Pairs used for the backup data traffic later in the Simpana Java GUI.Please check the interface name below, and make connections if necessary:Physical Machine Host Name: [angel.company.com]
8. Specify the client name for the computer.
Press Enter to accept the default name and continue, orEnter a new client name for the computer and then press Enter to continue.
Please specify the client name for this machine.It does not have to be the network host name: you can enter any word here without spaces. The only requirement is that it must be unique on the CommServe.Physical Machine Client name: [angel]
SELECT COMPONENTS FOR INSTALLATION9. Enter the number corresponding to the CVGxNDS module that you would like to
install.
A confirmation screen will mark your choice with an "X". Type "d" for Done, and press Enter to continue.
NOTES
To select multiple component, enter the number by adding a space. Your screen may look different from the example shown. Components that either have already been installed, or which cannot be installed, will not be shown. In addition, the list of modules that appear depends on the specific Unix File System in which the package is installed. (e.g., CVGxWA will appear only when the installation package is run on a Solaris computer.)
Install Simpana on physical machine client.company.comSelect the Simpana module that you would like to install[ ] 1) Media Agent [1301] [CVGxMA][ ] 2) FileSystem IDA [1101] [CVGxIDA] >) >>>>> NEXT PAGE >>>>>>[a=all n=none r=reverse q=quit d=done >=next <=previous ?=help]Enter number(s)/one of "a,n,r,q,d,>,<,?" here: 2
BASE SOFTWARE INSTALLATION10. If you wish to install the agent software for restore only, enter Yes and press Enter
to continue. See Installing Restore Only Agents for more information.
Otherwise, accept no, press Enter to continue.
Do you want to use the agents for restore only without consuming licenses? [no]
11. Type the appropriate number to install the latest software scripts and press Enter to continue.
NOTES
Select Download from the software provider website to download the latest software scripts from your software provider website.
Make sure you have internet connectivity when you are using this option.
Select Use the one in the installation media, to install the software scripts from
Installation Scripts Pack provides extra functions and latest support and fix performed during setup time. Please specify how you want to get this pack.If you choose to download it from the website now, please make sure you have internet connectivity at this time. This process may take some time depending on the internet connectivity.1) Download from the software provider website.2) Use the one in the installation media
Features - Novell Directory Services (NDS) iDataAgent
Page 20 of 72

the disc or share from which the installation is performed. Select Use the copy I already have by entering its unix path, to specify the path if you have the software script in an alternate location.
3) Use the copy I already have by entering its unix pathYour choice: [1] 2
12. Enter Yes to download and install the latest service packs and post packs from the software provider.
NOTES
Internet connectivity is required to download updates. This step is applicable for multi instancing.
Press Enter to continue.
Keep Your Install Up to Date - Latest Service Pack Latest Service Pack provides extra functions and latest support and fix for the packages you are going to install. You can download the latest service pack from software provider website.If you decide to download it from the website now, please make sure you have internet connectivity at this time. This process may take some time depending on the internet connectivity.Do you want to download the latest service pack now? [no] Press <ENTER> to continue ...
13. Specify the location where you want to install the software.
NOTES
The amount of free space required depends on the components selected for install, and may look different from the example shown.
Press Enter to accept the default path and continue, orEnter a path and then press Enter to continue.
Press Enter again to confirm the path.
Please specify where you want us to install Simpana binaries. It must be a local directory and there should be at least 98MB of free space available. All files will be installed in a "simpana" subdirectory, so if you enter "/opt", the files will actually be placed into "/opt/simpana".Installation Directory: [/opt]..Simpana will be installed in /opt/simpana. Press ENTER to continue ...
14. Specify the location for the log files.
NOTES
All the modules installed on the computer will store the log files in this directory. The amount of free space required depends on the components selected for install, and may look different from the example shown.
Press Enter to accept the default path and continue, orEnter a path and then press Enter to continue.
Press Enter again to confirm the path.
Please specify where you want to keep Simpana log files.It must be a local directory and there should be at least 100MB of free space available. All log files will be created in a "simpana/Log_Files" subdirectory, so if you enter "/var/log", the logs will actually be placed into "/var/log/simpana/Log_Files".Log Directory: [/var/log]..Simpana log files will be created in /var/log/simpana/Log_Files.Press ENTER to continue ...
15. Indicate whether you would like to launch processes with inherent database access rights.
Press Enter to assign a new group, orType No and then press Enter to continue.
Most of Simpana processes run with root privileges, but some are launched by databases and inherit database access rights. To make sure that registry and log files can be written to by both kinds of processes we can either make such files world-writeable or we can grant write access only to processes belonging to a particular group, e.g. a "simpana" or a "dba" group.We highly recommend now that you create a new user group and enter its name in the next setup screen. If you choose not to assign a dedicated group to Simpana processes, all temporary and configuration files will be created with -rw-rw-rw permissions. If you're planning to backup Oracle DB you should use "dba" group. Would you like to assign a specific group to Simpana? [yes]
16. If you indicated Yes in the previous step, you will be prompted for the group name that must be used to launch processes.
Enter the group name and then press Enter to continue.
Press Enter again to continue.
Please enter the name of the group which will be assigned to all Simpana files and on behalf of which all Simpana processes will run.In most of the cases it's a good idea to create a dedicated "simpana" group. However, if you're planning to use Oracle iDataAgent or SAP Agent, you should enter Oracle's "dba" group here.Group name: dbaREMINDERIf you are planning to install Simpana Informix, DB2, PostgreSQL, Sybase or Lotus Notes iDataAgent, please make sure to include Informix, DB2, etc. users into group "dba".Press <ENTER> to continue ...
17. Type a network TCP port number for the Communications Service (CVD) and press Enter.
Type a network TCP port number for the Client Event Manager Service (EvMgrC) and press Enter.
NOTES
For more information about Network TCP Ports, see Network TCP Port Requirements. For more information about these services, see Services.
Every instance of Simpana should use a unique set of network ports to avoid interfering with other instances running on the same machine.The port numbers selected must be from the reserved port number range and have not been registered by another application on this machine.
Please enter the port numbers.
Port Number for CVD : [8600]
Port Number for EvMgrC: [8602]
Features - Novell Directory Services (NDS) iDataAgent
Page 21 of 72
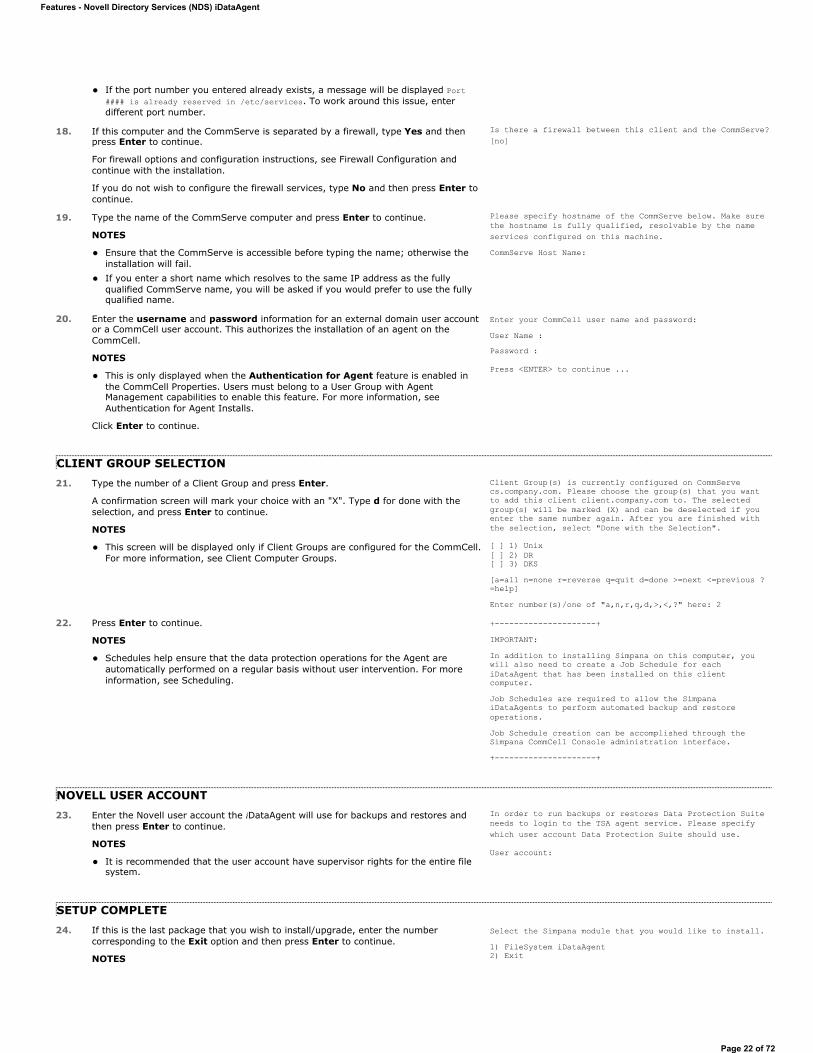
If the port number you entered already exists, a message will be displayed Port #### is already reserved in /etc/services. To work around this issue, enter different port number.
18. If this computer and the CommServe is separated by a firewall, type Yes and then press Enter to continue.
For firewall options and configuration instructions, see Firewall Configuration and continue with the installation.
If you do not wish to configure the firewall services, type No and then press Enter to continue.
Is there a firewall between this client and the CommServe? [no]
19. Type the name of the CommServe computer and press Enter to continue.
NOTES
Ensure that the CommServe is accessible before typing the name; otherwise the installation will fail. If you enter a short name which resolves to the same IP address as the fully qualified CommServe name, you will be asked if you would prefer to use the fully qualified name.
Please specify hostname of the CommServe below. Make sure the hostname is fully qualified, resolvable by the name services configured on this machine.CommServe Host Name:
20. Enter the username and password information for an external domain user account or a CommCell user account. This authorizes the installation of an agent on the CommCell.
NOTES
This is only displayed when the Authentication for Agent feature is enabled in the CommCell Properties. Users must belong to a User Group with Agent Management capabilities to enable this feature. For more information, see Authentication for Agent Installs.
Click Enter to continue.
Enter your CommCell user name and password:User Name : Password :
Press <ENTER> to continue ...
CLIENT GROUP SELECTION21. Type the number of a Client Group and press Enter.
A confirmation screen will mark your choice with an "X". Type d for done with the selection, and press Enter to continue.
NOTES
This screen will be displayed only if Client Groups are configured for the CommCell. For more information, see Client Computer Groups.
Client Group(s) is currently configured on CommServe cs.company.com. Please choose the group(s) that you want to add this client client.company.com to. The selected group(s) will be marked (X) and can be deselected if you enter the same number again. After you are finished with the selection, select "Done with the Selection".
[ ] 1) Unix[ ] 2) DR[ ] 3) DKS [a=all n=none r=reverse q=quit d=done >=next <=previous ?=help]Enter number(s)/one of "a,n,r,q,d,>,<,?" here: 2
22. Press Enter to continue.
NOTES
Schedules help ensure that the data protection operations for the Agent are automatically performed on a regular basis without user intervention. For more information, see Scheduling.
+---------------------+IMPORTANT:In addition to installing Simpana on this computer, you will also need to create a Job Schedule for each iDataAgent that has been installed on this client computer.Job Schedules are required to allow the Simpana iDataAgents to perform automated backup and restore operations.Job Schedule creation can be accomplished through the Simpana CommCell Console administration interface.+---------------------+
NOVELL USER ACCOUNT23. Enter the Novell user account the iDataAgent will use for backups and restores and
then press Enter to continue.
NOTES
It is recommended that the user account have supervisor rights for the entire file system.
In order to run backups or restores Data Protection Suite needs to login to the TSA agent service. Please specify which user account Data Protection Suite should use.
User account:
SETUP COMPLETE24. If this is the last package that you wish to install/upgrade, enter the number
corresponding to the Exit option and then press Enter to continue.
NOTES
Select the Simpana module that you would like to install.1) FileSystem iDataAgent2) Exit
Features - Novell Directory Services (NDS) iDataAgent
Page 22 of 72

POST-INSTALL CONSIDERATIONS
GENERALInstall post-release updates or Service Packs that may have been released after the release of the software. When you are installing a Service Pack, ensure that it is the same version as the one installed in the CommServe Server. Alternatively, you can enable Automatic Updates for quick and easy installation of updates in the CommCell component.
After installing the Agent, you may want to configure the Agent before running a data protection operation. The following list includes some of the most common features that can be configured:
Configure your subclients - see Subclients for more information.
Schedule your data protection operations - see Scheduling for more information.
Configure Alerts - See Alerts and Monitoring for more information.
Schedule Reports - See Reports for more information.
The software provides many more features that you will find useful. See the Index for a complete list of supported features.
Only modules that are not installed/upgraded appear in the list. Your screen may appear different from the example shown. If you are installing on AIX, FreeBSD, IRIX or Tru64 computers, if this module was the last possible module to install, you are automatically exited from the program. Otherwise, type the number for the Exit option and then press Enter. The installation is completed.
Module number: [1]
25. Enter the number corresponding to the Exit option and then press Enter to continue.
The installation is now complete.
Certain Simpana packages can be associated with a virtual IP, or in other words, installed on a "virtual machine" belonging to some cluster. At any given time the virtual machine's services and IP address are active on only one of the cluster's servers. The virtual machine can "fail-over" from one server to another, which includes stopping services and deactivating IP address on the first server and activating the IP address/services on the other server. Currently you have Simpana installed on physical node stone.company.com.Now you have a choice of either adding another package to the existing installation or configure Simpana on a virtual machine for use in a cluster.1) Add another package to stone.company.com 2) Install Simpana on a virtual machine 3) Exit Your choice: [1]
Features - Novell Directory Services (NDS) iDataAgent
Page 23 of 72

Backup - NetWare ServerTopics | How To | Related Topics
Overview
Supported Backup Types
Backup Considerations for This Agent
Advanced Backup Options
OVERVIEW
Plan your backup jobs for this agent by reviewing the following information:
For an overview of backup jobs, see Backup Data.
For a list of supported data types for this agent, see Supported Data Types.
For information on subclients, see Subclients
For information on configuring subclients for this agent, see Subclients - NetWare/NDS/GroupWise.
For information on excluding data via subclients, see Excluding Data from Data Protection Operations.
For more information on excluding data with these agents, see Excluding Data from Being Backed Up - NetWare iDataAgents.
SUPPORTED BACKUP TYPES
This NetWare File System iDataAgent supports the following backup types:
Full Backups
Differential Backups
Incremental Backups
Synthetic Full Backups
The NetWare NDS iDataAgent supports the following backup types:
Full Backups
The GroupWise iDataAgent supports the following backup types:
Full Backups
Incremental Backups
Differential Backups
BACKING UP OPEN FILES WHEN OFM IS NOT AVAILABLE The Galaxy.ini file can be configured to allow open files to be backed up when OFM or COW is not supported or is not available. This feature should only be used in this scenario and not as an alternative for OFM, which is the recommended solution for backing up open files.
To utilize this feature, perform the following:
1. Locate the Galaxy.ini file in the root of the installation directory (i.e., <Installation Directory>\GALAXY.INI).
2. Add the following section to the Galaxy.ini file:
[CVSMS]
BackupOpenFilesWithoutProtection = TRUE
3. Save changes to the file.
4. Close the file.
OPTIMIZE BACKUPS USING NOVELL'S STORAGE MANAGEMENT SERVICES (SMS)
The NetWare File System, OES File System and Novell Directory Services iDataAgents provide the capability to utilize Novell's Storage Management Services (SMS) when backing up data.
When the Optimize for Novell SMS option is selected from the Data tab of the Advanced Backup Options dialog box (for Novell Directory Services
Features - Novell Directory Services (NDS) iDataAgent
Page 24 of 72

iDataAgent, see Configuring Novell Directory Services iDataAgent for Backup Optimization), Novell's SMS will query the configured subclient content to determine what data will be backed up. Once the data has been queried, SMS then determines the order and conduct of backing up the data. This negates the need for the iDataAgents to generate a collect file during the scan phase, which significantly reduces the amount of time taken for the scan phase to complete.
Note the following before optimizing backups using Novell's Storage Management Services (SMS):
Backup optimization can only be used for full backups.
Backup optimization cannot be used in conjunction with any filter exceptions/exclusions, wild card content, or wild card filters.
Full backups running with backup optimization enabled cannot be suspended.
BACKUP CONSIDERATIONS FOR THIS AGENT
Before performing any backup procedures for this agent, review the following information:
To back up File System data you must have Read/File Scan rights to the container object which holds the content to be backed up.
To back up NDS data you must have Admin rights to the container object which holds the content to be backed up.
The NetWare server is powered on and galaxy.nlm is loaded.
If you have a File Archiver Agent on the same client as your File System iDataAgent, and you want to include DataArchiver stubs in the file system incremental backups, see Protecting Stubs in Backups for more information.
Filters can be used in conjunction with the "Items That Failed" list on the data protection Job History Report to eliminate backup or archive failures by excluding items which consistently fail that are not integral to the operation of the system or applications. Some items fail because they are locked by the operating system or application and cannot be opened at the time of the data protection operation. This often occurs with certain system-related files and database application files.
Also, keep in mind that you will need to run a full backup after adding failed files to the filter in order to remove them.
Back to Top
Backup - NetWare Server - How ToTopics | How To | Related Topics
Start a Backup
Start a Synthetic Full Backup
Schedule Backups
Start a Backup in the Suspended State
Start a Backup on New Media
Start a Backup that Creates a New Index
Start a Backup that Marks Media Full on Completion
Start a Backup that Reserves Resources Before Scan
Start a Backup with a Set Job Priority
Start a Backup with Vault Tracking enabled
START A BACKUP
Before You Begin
Depending on your agent, you can perform the following types of backup operations: Full, Incremental, Differential or Synthetic Full.
Read Full Backups before performing a Full Backup.
Read Incremental Backups before performing a Incremental Backup.
Read Differential Backups before performing a Differential Backup.
Read Synthetic Full Backups before performing a Synthetic Full Backup.
Required Capability: See Capabilities and Permitted Actions
1. From the CommCell Browser, expand Client Computers by double-clicking Client Computers | iDA File System | defaultBackupSet. The default and
Features - Novell Directory Services (NDS) iDataAgent
Page 25 of 72

other subclients (if available) are displayed on the right-hand windowpane.
2. To back up the default subclient, right-click the subclient, and click Backup.
3. From the Backup Options dialog box, select Run Immediately.
4. Select Full, Incremental, Differential or Synthetic Full backup.
In certain circumstances a non-full backup may automatically be converted to a full backup. For a listing of these circumstances, see When a Non-Full Backup is Automatically Converted to a Full Backup.
5. Click OK. You can track the progress of the backup job from the Job Controller window. If you are using a stand-alone drive, you are prompted to load a specific cartridge into the drive. If you are using a library, you will not receive this prompt. The system loads the tapes automatically. Your cartridges should be appropriately labeled. This will enable you to locate the correct cartridge for a restore job, if necessary.
6. When the backup has completed, the Job Controller displays Completed.
After running a backup, you may want to verify the backup data. You can do this by viewing the Backup History. For more information, see Backup Job History.
START A SYNTHETIC FULL BACKUP
Before You Begin
Read Synthetic Full Backups before performing a Synthetic Full Backup.
For SharePoint Document, for a versioned document that has multiple versions, all of the backed up versions can be viewed in the View All Versionswindow and restored, until a Synthetic Full backup is run. After running the Synthetic Full backup you can only view and restore the latest backed up version for the document.
Required Capability: See Capabilities and Permitted Actions
1. From the CommCell Browser, expand Client Computers by double-clicking Client Computers | iDA File System | defaultBackupSet. The default and other subclients (if available) are displayed on the right-hand windowpane.
2. To back up the default subclient, right-click the subclient, and click Backup.
3. From the Backup Options dialog box, select Run Immediately.
4. Select Synthetic Full backup.
Running an incremental backup immediately before the synthetic full ensures that any new or recently changed data is included in the synthetic full. Running an incremental backup immediately after the synthetic full ensures that any new or recently changed data since the backup that occurred prior to the synthetic full, but was not included in the synthetic full, is backed up by the incremental. Remember, a synthetic full consolidates data; it does not actually back up data from the client computer.
5. Click OK. You can track the progress of the backup job from the Job Controller window. If you are using a stand-alone drive, you are prompted to load a specific cartridge into the drive. If you are using a library, you will not receive this prompt. The system loads the tapes automatically. Your cartridges should be appropriately labeled. This will enable you to locate the correct cartridge for a restore job, if necessary.
6. When the backup has completed, the Job Controller displays Completed.
After running a backup, you may want to verify the backup data. You can do this by viewing the Backup History. For more information, see Backup Job History.
You can also run backups of the following:
For a user-defined backup set or instance, right-click the backup set you want to back up, click All Tasks, and click Backup All Subclients. For the Lotus Notes Document iDataAgent, to back up a partition, right-click the partition you want to back up, click All Tasks, and click Backup Default Backup Set.For the Lotus Notes Database iDataAgent, to back up a partition, right-click the partition you want to back up, click All Tasks, and click Backup All Subclients. For Agents that do not have backup set or instance levels, to back up all subclients, right-click the agent icon, click All Tasks, and click Backup All Subclients.
If you chose a level higher than subclient (i.e., backup set, etc.), you are prompted to confirm that you want to back up all the subclients below that level/node. Click Yes. Starting a data protection operation on a backup set, instance or agent level causes the system to start individual data protection operations for each subclient contained therein. If the subclients are associated with the same storage policy, then their operations will run sequentially unless that storage policy is configured to accommodate multiple data streams.
You can also run synthetic full backups of the following:
For a user-defined backup set or instance, right-click the backup set you want to back up, click All Tasks, and click Backup All Subclients.
Features - Novell Directory Services (NDS) iDataAgent
Page 26 of 72
SCHEDULE BACKUPS
You can schedule backups to occur with the following procedure. You will be prompted to create a schedule for the data protection operation after selecting your data protection options.
Before You Begin
All Agents
Be sure all of the subclients are backed up, or scheduled to be backed up as needed, in order to secure all of the data for the agent. Note this does not apply to archive operations.
Required Capability: See Capabilities and Permitted Actions
1. From the CommCell Browser, select one of the following:
To back up a subclient, right-click the subclient and click Backup.
To back up a backup set or instance, right-click the backup set or instance, click All Tasks, and click Backup All Subclients.
To back up the default backup set, right-click the agent or instance node, click All Tasks, and click Backup Default Backup Set.
For the Lotus Notes Document iDataAgent, to back up a partition, right-click the partition you want to back up, click All Tasks, and click Backup Default Backup Set.For the Lotus Notes Database iDataAgent, to back up a partition, right-click the partition you want to back up, click All Tasks, and click Backup All Subclients.
For Agents that do not have backup set or instance levels, to back up all subclients, right-click the agent icon, click All Tasks, and click Backup All Subclients.
2. If you chose a level higher than subclient (i.e., backup set, etc.), you are prompted to confirm that you want to back up all the subclients below that level/node. Click Yes.
3. From the Backup Options dialog box, select the type of backup that you want to initiate. In certain circumstances a non-full backup may automatically be converted to a full backup. For a listing of these circumstances, see When a Non-Full Backup is Automatically Converted to a Full Backup.
4. Click Schedule. Click OK to continue.
5. From the Schedule Details (Schedule Details) dialog box, create a schedule for this operation. For step-by-step instructions, see Create a Job Schedule. Click OK to continue.
6. Your backup operation will execute according to the specified schedule.
START A BACKUP IN THE SUSPENDED STATE
Use the following procedure to start a backup in the suspended state.
Before You Begin
Be sure all of the subclients are backed up, or scheduled to be backed up as needed, in order to secure all of the data for the agent. Note this does not apply to archive operations.
Required Capability: See Capabilities and Permitted Actions
For the Lotus Notes Document iDataAgent, to back up a partition, right-click the partition you want to back up, click All Tasks, and click Backup Default Backup Set.For the Lotus Notes Database iDataAgent, to back up a partition, right-click the partition you want to back up, click All Tasks, and click Backup All Subclients. For Agents that do not have backup set or instance levels, to back up all subclients, right-click the agent icon, click All Tasks, and click Backup All Subclients.
If you chose a level higher than subclient (i.e., backup set, etc.), you are prompted to confirm that you want to back up all the subclients below that level/node. Click Yes. Starting a data protection operation on a backup set, instance or agent level causes the system to start individual data protection operations for each subclient contained therein. If the subclients are associated with the same storage policy, then their operations will run sequentially unless that storage policy is configured to accommodate multiple data streams.
Starting a data protection operation on a backup set, instance or agent level causes the system to start individual data protection operations for each subclient contained therein. If the subclients are associated with the same storage policy, then their operations will run sequentially unless that storage policy is configured to accommodate multiple data streams.
Features - Novell Directory Services (NDS) iDataAgent
Page 27 of 72

1. From the CommCell Browser, select one of the following:
To backup a subclient, right-click the subclient to want to backup and click Backup.
To backup a user-defined backup set or instance, right-click the backup set you want to backup, click All Tasks, and click Backup All Subclients.
To backup the default backup set, right-click the agent or instance node, click All Tasks, and click Backup Default Backup Set.
For Lotus Notes iDataAgent, to backup a partition, right-click the partition you want to backup, click All Tasks, and click Backup Default Backup Set.
For Agents that do not have backup set or instance levels, to backup all subclients, right-click the agent icon, click All Tasks, and click Backup All Subclients.
2. If you chose a level higher than subclient (i.e., backup set, etc.), you are prompted to confirm that you want to back up all the subclients below that level/node. Click Yes.
3. From the Backup Options dialog box, select Run Immediately.
4. Select the type of backup that you want to initiate.In certain circumstances a non-full backup may automatically be converted to a full backup. For a listing of these circumstances, see When a Non-Full Backup is Automatically Converted to a Full Backup.
5. Click the Advanced button to open the Advanced Backup Options dialog box.
6. Click on the Advanced Backup Options (Startup) tab, and select Startup in suspended state and click OK.
7. From the Backup Options dialog box, click OK. You can track the progress of the backup job from the Job Controller window.
8. If you are using a stand-alone drive, you are prompted to load a specific cartridge into the drive. If you are using a library, you will not receive this prompt. The system loads the tapes automatically.
9. When the backup has completed, Job Controller displays Completed.
START A BACKUP ON NEW MEDIA
Use the following procedure to start a backup on new media.
Before You Begin
Be sure all of the subclients are backed up, or scheduled to be backed up as needed, in order to secure all of the data for the agent. Note this does not apply to archive operations.
Required Capability: See Capabilities and Permitted Actions
1. From the CommCell Browser, select one of the following:
To backup a subclient, right-click the subclient to want to backup and click Backup.
To backup a user-defined backup set or instance, right-click the backup set you want to backup, click All Tasks, and click Backup All Subclients.
To backup the default backup set, right-click the agent or instance node, click All Tasks, and click Backup Default Backup Set.
For Lotus Notes iDataAgent, to backup a partition, right-click the partition you want to backup, click All Tasks, and click Backup Default Backup Set.
For Agents that do not have backup set or instance levels, to backup all subclients, right-click the agent icon, click All Tasks, and click Backup All Subclients.
2. If you chose a level higher than subclient (i.e., backup set, etc.), you are prompted to confirm that you want to back up all the subclients below that level/node. Click Yes.
3. From the Backup Options dialog box, select Run Immediately.
4. Select the type of backup that you want to initiate.In certain circumstances a non-full backup may automatically be converted to a full backup. For a listing of these circumstances, see When a Non-Full Backup is Automatically Converted to a Full Backup.
5. Click the Advanced button to open the Advanced Backup Options dialog box.
6. Click on the Advanced Backup Options (Media) tab, and select Start new media and click OK.If you would like jobs with other Job IDs to use this new media, also select the Allow other schedule to use media set option.
Your cartridges should be appropriately labeled. This will enable you to locate the correct cartridge for a restore job, if necessary.
Starting a data protection operation on a backup set, instance or agent level causes the system to start individual data protection operations for each subclient contained therein. If the subclients are associated with the same storage policy, then their operations will run sequentially unless that storage policy is configured to accommodate multiple data streams.
Features - Novell Directory Services (NDS) iDataAgent
Page 28 of 72

7. From the Backup Options dialog box, click OK. You can track the progress of the backup job from the Job Controller window.
8. If you are using a stand-alone drive, you are prompted to load a specific cartridge into the drive. If you are using a library, you will not receive this prompt. The system loads the tapes automatically.
9. When the backup has completed, Job Controller displays Completed.
START A BACKUP THAT CREATES A NEW INDEX
Use the following procedure to start a backup that creates a new Index.
Before You Begin
Be sure all of the subclients are backed up, or scheduled to be backed up as needed, in order to secure all of the data for the agent.
Required Capability: See Capabilities and Permitted Actions
1. Select one of the following:
To backup a subclient, right-click the subclient to want to backup and click Backup.
To backup a user-defined backup set, right-click the backup set you want to backup, click All Tasks, and click Backup All Subclients.
To backup the default backup set, right-click the agent or instance node, click All Tasks, and click Backup Default Backup Set.
For Lotus Notes iDataAgent, to backup a partition, right-click the partition you want to backup, click All Tasks, and click Backup Default Backup Set.
For the Microsoft SQL Server iDataAgent, to backup a database, right-click the database you want to backup, click All Tasks, and click Backup Database.
For the Microsoft SQL Server iDataAgent, to backup up an instance, right-click the instance you want to backup, click All Tasks, and click Backup SQL Server.
For Agents that do not have backup set or instance levels, to backup all subclients, right-click the agent icon, click All Tasks, and click Backup All Subclients.
2. If you chose a level higher than subclient (i.e., backup set, etc.), you are prompted to confirm that you want to back up all the subclients below that level/node. Click Yes.
3. From the Backup Options dialog box, select Run Immediately.
4. Select the type of backup that you want to initiate.In certain circumstances a non-full backup may automatically be converted to a full backup. For a listing of these circumstances, see When a Non-Full Backup is Automatically Converted to a Full Backup.
5. Click the Advanced button to open the Advanced Backup Options dialog box.
6. Click on the Advanced Backup Options (Data) tab, and select Create new index and click OK.
7. From the Backup Options dialog box, click OK. You can track the progress of the backup job from the Job Controller window.
8. If you are using a stand-alone drive, you are prompted to load a specific cartridge into the drive. If you are using a library, you will not receive this prompt. The system loads the tapes automatically.
9. When the backup has completed, Job Controller displays Completed.
START A BACKUP THAT MARKS MEDIA FULL ON COMPLETION
Your cartridges should be appropriately labeled. This will enable you to locate the correct cartridge for a restore job, if necessary.
Starting a data protection operation on a backup set, instance or agent level causes the system to start individual data protection operations for each subclient contained therein. If the subclients are associated with the same storage policy, then their operations will run sequentially unless that storage policy is configured to accommodate multiple data streams.
Your cartridges should be appropriately labeled. This will enable you to locate the correct cartridge for a restore job, if necessary.
Starting a backup on a backup set, instance or agent level causes the system to start individual backup jobs for each subclient contained therein. If the subclients are associated with the same storage policy, then their jobs will run sequentially unless that storage policy is configured to accommodate multiple data streams.
Features - Novell Directory Services (NDS) iDataAgent
Page 29 of 72

Use the following procedure to start a backup that marks media full on completion.
Before You Begin
Be sure all of the subclients are backed up, or scheduled to be backed up as needed, in order to secure all of the data for the agent. Note this does not apply to archive operations.
Required Capability: See Capabilities and Permitted Actions
1. From the CommCell Browser, select one of the following:
To backup a subclient, right-click the subclient to want to backup and click Backup.
To backup a user-defined backup set or instance, right-click the backup set you want to backup, click All Tasks, and click Backup All Subclients.
To backup the default backup set, right-click the agent or instance node, click All Tasks, and click Backup Default Backup Set.
For Lotus Notes iDataAgent, to backup a partition, right-click the partition you want to backup, click All Tasks, and click Backup Default Backup Set.
For Agents that do not have backup set or instance levels, to backup all subclients, right-click the agent icon, click All Tasks, and click Backup All Subclients.
2. If you chose a level higher than subclient (i.e., backup set, etc.), you are prompted to confirm that you want to back up all the subclients below that level/node. Click Yes.
3. From the Backup Options dialog box, select Run Immediately.
4. Select the type of backup that you want to initiate.In certain circumstances a non-full backup may automatically be converted to a full backup. For a listing of these circumstances, see When a Non-Full Backup is Automatically Converted to a Full Backup.
5. Click the Advanced button to open the Advanced Backup Options dialog box.
6. Click on the Advanced Backup Options (Media) tab, and select Mark media full after successful operation and click OK.
7. From the Backup Options dialog box, click OK. You can track the progress of the backup job from the Job Controller window.
8. If you are using a stand-alone drive, you are prompted to load a specific cartridge into the drive. If you are using a library, you will not receive this prompt. The system loads the tapes automatically.
9. When the backup has completed, Job Controller displays Completed.
START A BACKUP THAT RESERVES RESOURCES BEFORE SCAN
Use the following procedure to start a backup that reserves the backup media before the scan phase.
Before You Begin
Be sure all of the subclients are backed up, or scheduled to be backed up as needed, in order to secure all of the data for the agent.
Required Capability: See Capabilities and Permitted Actions
1. select one of the following:
To backup a subclient, right-click the subclient to want to backup and click Backup.
To backup a user-defined backup set, right-click the backup set you want to backup, click All Tasks, and click Backup All Subclients.
To backup the default backup set, right-click the agent or instance node, click All Tasks, and click Backup Default Backup Set.
For Lotus Notes iDataAgent, to backup a partition, right-click the partition you want to backup, click All Tasks, and click Backup Default Backup Set.
For the Microsoft SQL Server iDataAgent, to backup a database, right-click the database you want to backup, click All Tasks, and click Backup Database.
For the Microsoft SQL Server iDataAgent, to backup up an instance, right-click the instance you want to backup, click All Tasks, and click Backup SQL Server.
For Agents that do not have backup set or instance levels, to backup all subclients, right-click the agent icon, click All Tasks, and click Backup All Subclients.
Your cartridges should be appropriately labeled. This will enable you to locate the correct cartridge for a restore job, if necessary.
Starting a data protection operation on a backup set, instance or agent level causes the system to start individual data protection operations for each subclient contained therein. If the subclients are associated with the same storage policy, then their operations will run sequentially unless that storage policy is configured to accommodate multiple data streams.
Features - Novell Directory Services (NDS) iDataAgent
Page 30 of 72
2. If you chose a level higher than subclient (i.e., backup set, etc.), you are prompted to confirm that you want to back up all the subclients below that level/node. Click Yes.
3. From the Backup Options dialog box, select Run Immediately.
4. Select the type of backup that you want to initiate.In certain circumstances a non-full backup may automatically be converted to a full backup. For a listing of these circumstances, see When a Non-Full Backup is Automatically Converted to a Full Backup.
5. Click the Advanced button to open the Advanced Backup Options dialog box.
6. Click on the Advanced Backup Options (Media) tab, and select Reserve Resources before scan and click OK.
7. From the Backup Options dialog box, click OK. You can track the progress of the backup job from the Job Controller window.
8. If you are using a stand-alone drive, you are prompted to load a specific cartridge into the drive. If you are using a library, you will not receive this prompt. The system loads the tapes automatically.
9. When the backup has completed, Job Controller displays Completed.
START A BACKUP WITH A SET JOB PRIORITY
This option allows you to manually set a job priority. This is useful if you have jobs that are very important and must complete, and/or jobs that can be moved to a lower priority. For more information, see Job Priorities and Priority Precedence.
Before You Begin
Be sure all of the subclients are backed up, or scheduled to be backed up as needed, in order to secure all of the data for the agent. Note this does not apply to archive operations.
Required Capability: See Capabilities and Permitted Actions
1. From the CommCell Browser, select one of the following:
To backup a subclient, right-click the subclient to want to backup and click Backup.
To backup a user-defined backup set or instance, right-click the backup set you want to backup, click All Tasks, and click Backup All Subclients.
To backup the default backup set, right-click the agent or instance node, click All Tasks, and click Backup Default Backup Set.
For Lotus Notes iDataAgent, to backup a partition, right-click the partition you want to backup, click All Tasks, and click Backup Default Backup Set.
For Agents that do not have backup set or instance levels, to backup all subclients, right-click the agent icon, click All Tasks, and click Backup All Subclients.
2. If you chose a level higher than subclient (i.e., backup set, etc.), you are prompted to confirm that you want to back up all the subclients below that level/node. Click Yes.
3. From the Backup Options dialog box, select Run Immediately.
4. Select the type of backup that you want to initiate.In certain circumstances a non-full backup may automatically be converted to a full backup. For a listing of these circumstances, see When a Non-Full Backup is Automatically Converted to a Full Backup.
5. Click the Advanced button to open the Advanced Backup Options dialog box.
6. Click on the Advanced Backup Options (Startup) tab, and select Change Priority and then enter a value. Click OK to continue.
7. From the Backup Options dialog box, click OK. You can track the progress of the backup job from the Job Controller window.
8. If you are using a stand-alone drive, you are prompted to load a specific cartridge into the drive. If you are using a library, you will not receive this prompt. The system loads the tapes automatically.
9. When the backup has completed, Job Controller displays Completed.
Your cartridges should be appropriately labeled. This will enable you to locate the correct cartridge for a restore job, if necessary.
Starting a backup on a backup set, instance or agent level causes the system to start individual backup jobs for each subclient contained therein. If the subclients are associated with the same storage policy, then their jobs will run sequentially unless that storage policy is configured to accommodate multiple data streams.
Your cartridges should be appropriately labeled. This will enable you to locate the correct cartridge for a restore job, if necessary.
Features - Novell Directory Services (NDS) iDataAgent
Page 31 of 72

START A BACKUP WITH VAULT TRACKING ENABLED
Use the following procedure to start a backup with Vault Tracking enabled.
For additional information, see the following:
VaultTracker
VaultTracker Enterprise
Before You Begin
Be sure all of the subclients are backed up, or scheduled to be backed up as needed, in order to secure all of the data for the agent.
Required Capability: See Capabilities and Permitted Actions
1. select one of the following:
To backup a subclient, right-click the subclient to want to backup and click Backup.
To backup a user-defined backup set or instance, right-click the backup set you want to backup, click All Tasks, and click Backup All Subclients.
To backup the default backup set, right-click the agent or instance node, click All Tasks, and click Backup Default Backup Set.
For Lotus Notes iDataAgent, to backup a partition, right-click the partition you want to backup, click All Tasks, and click Backup Default Backup Set.
For Agents that do not have backup set or instance levels, to backup all subclients, right-click the agent icon, click All Tasks, and click Backup All Subclients.
2. If you chose a level higher than subclient (i.e., backup set, etc.), you are prompted to confirm that you want to back up all the subclients below that level/node. Click Yes.
3. From the Backup Options dialog box, select Run Immediately.
4. Select the type of backup that you want to initiate.In certain circumstances a non-full backup may automatically be converted to a full backup. For a listing of these circumstances, see When a Non-Full Backup is Automatically Converted to a Full Backup.
5. Click the Advanced button to open the Advanced Backup Options dialog box.
6. Click on the Vault Tracking tab, and select the vault tracking options you want to use and click OK.
7. From the Backup Options dialog box, click OK. You can track the progress of the backup job from the Job Controller window.
8. If you are using a stand-alone drive, you are prompted to load a specific cartridge into the drive. If you are using a library, you will not receive this prompt. The system loads the tapes automatically.
9. When the backup has completed, Job Controller displays Completed.
Back To Top
Starting a data protection operation on a backup set, instance or agent level causes the system to start individual data protection operations for each subclient contained therein. If the subclients are associated with the same storage policy, then their operations will run sequentially unless that storage policy is configured to accommodate multiple data streams.
Your cartridges should be appropriately labeled. This will enable you to locate the correct cartridge for a restore job, if necessary.
Features - Novell Directory Services (NDS) iDataAgent
Page 32 of 72

Restore Data - NetWare ServerTopics | How To | Full System Restore | Related Topics
Overview
Restore Considerations for This Agent
Restore NetWare Data to a Protected Directory (NetWare File System and NDS iDataAgents)
Restore NetWare Server Specific Information (NetWare File System and NDS iDataAgents)
Restore Single Email Messages (Novell GroupWise iDataAgent)
Restore Destinations
In-Place Restore
Out-of-Place Restore
Cross-Platform Restores
OVERVIEW
The following page describes the agent-specific restore options. Additional restore options are accessible from the Related Topics menu.
For NetWare File System and NDS iDataAgents, restore operations can be performed from the client, iDataAgent, and backup set levels in the CommCell Browser. The Novell GroupWise iDataAgent, however, does not support the use of backup sets and only performs restore operations from the iDataAgent level.
When there is a problem with the NetWare server, GroupWise server, or the operating system of the client computer, full system restores may be required. See Restore Data - NetWare Server - Full System Restore for more information.
The following restore operations are supported by the NetWare Server iDataAgents:
The NetWare File System iDataAgent allows you to restore file system data to:
the original path
a different path on the same NetWare server
a different NetWare server in the same tree
a different NetWare server in a different tree
The NDS iDataAgent allows you to restore NDS containers and objects to:
The original path within the same NDS tree, using the same NetWare server from which the data was backed up
The original path within the same NDS tree, using a different NetWare server than that from which the data was backed up
The Novell GroupWise iDataAgent allows you to restore GroupWise databases, user accounts, mailboxes, and messages to:
a different path and/or client from which the data originated (recommended)
the same path/Client computer in the CommCell
RESTORE CONSIDERATIONS FOR THIS AGENT
Before performing any restore procedures for this agent, review the following information.
All NetWare Server iDataAgents:
Review the general restore requirements described in What You Need to Know Before Performing a Restore.
In addition to the NetWare server being powered on, the galaxy.nlm must be loaded.
Do not set a quota for an object (such as a volume, directory, or user) that is lower than the amount already used. Doing so may cause improper results for data protection or recovery operations.
NetWare File System iDataAgent:
To restore File System data, you must have Read/Write/Modify/Erase/Create/File Scan rights to the container object to which the content will be restored.
NDS iDataAgent:
You cannot restore an NDS container or object to a different tree.
Features - Novell Directory Services (NDS) iDataAgent
Page 33 of 72

To restore NDS data, you must have Admin rights to the container object to which the content will be restored.
When browsing NDS data with a specific page size configured, the browse results will not reflect the selected page size; rather, all data is displayed on a single page.
When restoring on NDS, all parent containers in the object's path must exist on the destination tree. NDS objects cannot be restored if their parent does not exist.
NDS objects are always restored to their original location in the NDS tree.
There is a bug in Novell's tsands.nlm on NetWare 5 that causes it to back up alias objects as the object they pointed to instead of as the alias objects themselves. For example, an alias object for a volume object is backed up as a volume object. When restored, the alias object will not be restored, but instead the volume object will be restored.
Novell GroupWise iDataAgent:
Restores for GroupWise behave differently than that of the other NetWare iDataAgents. GroupWise iDataAgent restores will always unconditionally overwrite any data already existing at the restore destination. For this reason, unless you are restoring your GroupWise system completely, it is strongly recommended that you either:
Restore GroupWise data out-of-place to a configured restore area. (For step-by-step instructions, see Restore Out-of-Place, Cross-Platform or Cross-Application.)
Configure your restore area to point to the destination path of the restore once the job has completed successfully. A restore area is a location where restored GroupWise data can be retrieved if lost. These restore areas can be configured using ConsoleOne. (Refer to the GroupWise documentation for instructions on this procedure.)
If restoring GroupWise data with all entities selected, the databases must be restored in-place.
It is best practice to restore GroupWise databases out-of-place and then use the GroupWise utilities to point to the area you restored the data to. Whether you need to restore one mailbox or an entire GroupWise system that was lost, restoring the data out-of-place and then using tools such as ConsoleOne is recommended rather than restoring databases in place.
Single user accounts and mailboxes may be restored using ConsoleOne providing all subclients have been successfully backed up using the Novell GroupWise iDataAgent. For step-by-step instructions on restoring a single user account and mailbox, see Restore a Single GroupWise User Account and Mailbox.
RESTORE TIPS
Keep the following details in mind when restoring data:
Perform an image browse if you need to preserve the directory structure of the data you want to restore.
Perform a no-image browse if:
You do not need to preserve the directory structure of the data you want to restore.
You want to restore files that have been deleted from the client computer and therefore not included in the most recent backup.
The unconditional overwrite option restores data to the destination directory even if files of the same name already exist.
RESTORE NETWARE DATA TO A PROTECTED DIRECTORY
For NetWare File System iDataAgent, access to NetWare files and directories is controlled by a set of access privileges called trustee rights. To create a file or directory, you need Write and Create rights to the parent directory. Similarly, to restore data, these same rights are required.
When you restore file system data, the File System iDataAgent restores the data using the NetWare user account on the destination computer that was assigned. The identity of this account is revealed by the General tab of the File System iDataAgent property box. To ensure that data can be restored to any path, we recommend that this account be assigned the Supervisor right. If however, the Supervisor right is not, and for your own reasons must not be, granted to this account, and you want to restore data to a directory to which the account does not have the necessary rights, you can still restore the data using the Impersonate NetWare User restore option. Using this option, you can restore data to a directory to which the account has insufficient trustee rights.
For step-by-step instructions on restoring NetWare data to a protected directory, see Restore NetWare Data to a Protected Directory.
RESTORE NETWARE SERVER SPECIFIC INFORMATION
The system allows you to restore the Server Specific Info package, which contains configuration information on a NetWare server. This information can be
When configuring your restore area, keep in mind that any directory name within the path should not exceed more than 8 characters (as per the DOS naming convention). If a directory name exceeds 8 characters, the GroupWise client may produce error messages indicating the path is either invalid or does not exist while trying to retrieve lost items. For example:
SYS:\RestoreArea is considered an unacceptable path name
SYS:\GWRest is considered an acceptable path name
Features - Novell Directory Services (NDS) iDataAgent
Page 34 of 72

important if you need to recover an entire NetWare server. Specifically, the package contains:
SERVDATA.NDSDSMISC.LOGSTARTUP.NCFAUTOEXEC.NCFVOLSINFO.TXT
For information on each of these files, see your Novell NetWare documentation. When you restore the data, the system writes it to the following path on the destination computer:
SYS:\SYSTEM\<source_server_name>.
For step-by-step instructions on restoring NetWare Server specific information, see Restore NetWare Server Specific Information.
RESTORE SINGLE E-MAIL MESSAGES
Although the GroupWise iDataAgent will only restore entire databases, you can use the GroupWise client to retrieve individual messages. Once the admin has restored the databases to the configured restore area, users will be able to browse this area the same as they would their regular mailbox. From there, they will have the ability to pick and choose what missing messages they would like to restore.
RESTORE DESTINATIONS
NetWare File System and NDS iDataAgents:
By default, the NetWare iDataAgents restore data to the client computer from which it originated; this is referred to as an in-place restore. You can also restore the data to another Client computer in the CommCell. Keep in mind the following considerations when performing such restores:
The destination client must reside in the same CommCell as the client whose data was backed up.
Note that when you perform restores other than in-place restores, the restored data assumes the rights (i.e., permissions) of the parent directory. (Trustee rights in the case of NetWare File System.)
When restoring file system data it is possible to restore across different namespaces, as long as the filenames fit where the data will be restored. When restoring multiple objects, the restore will fail if any of the objects has a longer name than the available namespaces allow. The restore will not fail if you select the Ignore Namespace Requirements option in the Advanced Restore Options dialog, which allows those files whose filenames are valid for at least one of the available namespaces to be restored; however, those files whose filename are not supported by the available namespaces are not restored. To avoid this issue completely, it is best to ensure that all namespaces required for the restore are available on the destination drive.
Novell GroupWise iDataAgent:
By default, the GroupWise iDataAgent restores data to a different path and/or client from which it originated; this is referred to as an out-of-place restore. You can also perform an in-place restore, which restores the data to the same path/Client computer in the CommCell.
The following section enumerates the types of restore destinations that are supported by the NetWare iDataAgents. See Restore/Recover/Retrieve Destinations - Support for a list of Agents supporting each restore destination type.
IN-PLACE RESTORESame path/destination
OUT-OF-PLACE RESTORESame path/destination
Different path/destination (NFS and GroupWise only)
CROSS-PLATFORM RESTORESSame Operating System - Different Version (NFS and GroupWise only)
Back to Top
It is strongly recommended you restore the data out-of-place to prevent the overwriting of new data that may have been produced since the last backup.
Features - Novell Directory Services (NDS) iDataAgent
Page 35 of 72

Restore Data - NetWare Server - How ToTopics | How To | Full System Restore | Related Topics
Restore NetWare Data to a Protected Directory (NetWare File System and NDS iDataAgents)
Restore NetWare Server Specific Information (NetWare File System and NDS iDataAgents)
Restore a Single GroupWise User Account and Mailbox (GroupWise iDataAgent)
RESTORE NETWARE DATA TO A PROTECTED DIRECTORY
Before you Begin:
Review the general and agent-specific restore requirements accessed from Restore Backup Data prior to performing any restore operation.
Required Capability: See Capabilities and Permitted Actions
1. From the CommCell Browser, right-click the File System icon of the client computer whose System Specific Info you want to restore, click All Tasks and then click Browse Default Backup Set.
2. Continue with the Browse and Restore procedure.
3. When you then reach the File System Restore Options (General) dialog box, select the restore options that you want to use. The Destination folder is what will require the trustee rights.
4. Click Advanced. From the Advanced Restore Options (General) dialog box, select the Impersonate NetWare User check box and type the User Name (e.g., CN=Admin.O=company) and Password of a NetWare account that has the required trustee rights to the Destination folder listed on the Restore Options dialog box.
5. Optionally, from the tabs for the Advanced Restore Options dialog box, select the restore options that you want to use.
6. Click OK.
7. Optionally, from the tabs for the Restore Options dialog box, select the restore options that you want to use.
8. If you want to schedule the job, select the Job Initiation tab from the Restore Options dialog box, click Schedule, schedule the job, and then click OK. If you want to run the job now, accept or click Run Immediately in the same tab and then click OK. The progress of the restore job can be monitored using the Job Controller.
RESTORE NETWARE SERVER SPECIFIC INFORMATION
Before you Begin:
Review the general and agent-specific restore requirements accessed from Restore Backup Data prior to performing any restore operation.
Required Capability: See Capabilities and Permitted Actions
1. From the CommCell Browser, right-click the File System icon of the client computer whose System Specific Info you want to restore, click All Tasks and then click Browse Default Backup Set.
2. Continue with the Browse and Restore procedure.
3. When you reach the Browse window, select the Server Specific Info and click Recover All Selected.
4. When you then reach the File System Restore Options (General) dialog box, you must select a different server.
5. Optionally, from the tabs for the Advanced Restore Options dialog box, select the restore options that you want to use.
6. Click OK.
7. Optionally, from the tabs for Restore Options dialog box, select the restore options that you want to use.
8. If you want to schedule the job, select the Job Initiation tab from the Restore Options dialog box, click Schedule, schedule the job, and then click OK. If you want to run the job now, accept or click Run Immediately in the same tab and then click OK. The progress of the restore job can be monitored using the Job Controller.
Features - Novell Directory Services (NDS) iDataAgent
Page 36 of 72

RESTORE A SINGLE GROUPWISE USER ACCOUNT AND MAILBOX
Single user accounts and mailboxes may be restored using ConsoleOne providing all subclients have been successfully backed up using the Novell GroupWise iDataAgent. The following procedures may be used to restore a single GroupWise user account and mailbox.
Before you Begin:
Review the general and agent-specific restore requirements accessed from Restore Backup Data prior to performing any restore operation.
Ensure all subclients have been successfully backed up using the Novell GroupWise iDataAgent.
Required Capability: See Capabilities and Permitted Actions
1. From the CommCell Console, perform an out-of-place restore of the GroupWise domain to the GroupWise restore area.
(For step-by-step instructions on performing an out-of-place restore, see Restore Out-of-Place, Cross-Platform, or Cross-Application.)
2. From the Tools | GroupWise Utilities menu in ConsoleOne, select Recover Deleted Account and follow the on-screen prompts.
When prompted to select the domain database, navigate to the GroupWise restore area and select the appropriate domain database containing the user account you wish to recover.
3. ConsoleOne will display a message stating that the user account has been successfully recovered. The user account will be visible in ConsoleOne at the GroupWise System node as well as the Console View of the NDS tree.
1. From the CommCell Console, perform an out-of-place restore of the GroupWise PostOffice to the GroupWise restore area.
(For step-by-step instructions on performing an out-of-place restore, see Restore Out-of-Place, Cross-Platform, or Cross-Application.)
2. From ConsoleOne, select the user account associated with the mailbox you wish to recover.
3. From the Tools | GroupWise Utilities menu in ConsoleOne, select Backup/Restore Mailbox and follow the on-screen prompts.
4. Stop and Start the Mail Transfer Agent and Post Office Agent prior to logging in to the restored user's account.
Back to Top
The ConsoleOne options described above are designed for ConsoleOne version 1.3.6.
If you are running another version of ConsoleOne, refer to the ConsoleOne documentation for step-by-step instructions on performing the ConsoleOne-specific functions outlined in these procedures.
Features - Novell Directory Services (NDS) iDataAgent
Page 37 of 72

Backup Sets - File System, NetWare Server and Active Directory iDataAgentsTopics | How To | Related Topics
Overview
File System, NetWare Server and Active Directory iDataAgent Configurable Properties
User Accounts
User Security
Windows File System iDataAgent Configurable Properties
Use Change Journal or Classic File Scan for Backups, Set the Archive Bit Attribute, Preserve the File Access Time
Microsoft Data Protection Manager iDataAgent Configurable Properties
Use Change Journal or Classic File Scan for Backups, Set the Archive Bit Attribute, Preserve the File Access Time
UNIX File System iDataAgent Configurable Properties
Use Classic File Scan or Data Classification Enabler for Backups, Preserve the File Access Time
NetWare File System iDataAgent Configurable Properties
Decompress Data Before Backup
Enhancing the Data Scan
Enabling the Data Classification Scan
Frequently Asked Questions
Using Backup Sets
OVERVIEW
During installation of the Windows File System, UNIX File System, NetWare File System, NetWare NDS and Active Directory iDataAgents, the system automatically creates a default backup set, which contains a default subclient. After installation, you have the option of defining a User Create Backup Set, which also will contain a default subclient.
FILE SYSTEM, NETWARE SERVER AND ACTIVE DIRECTORY IDATAAGENT CONFIGURABLE PROPERTIES
Once installed, the agent is configured and is therefore able to manage the data or volumes on the client computer. However, you can change certain aspects of the backup set configuration to manage the data in the manner that best suits your needs.
You can view or change the backup set configuration from the Backup Set Properties dialog box. The following information can be configured for all File Systems:
USER ACCOUNTSThe following pertains to NetWare File System, Novell Directory Service, and Windows File System:
USER SECURITY
You can perform the following functions:
Identify the user groups to which this CommCell object is associated.
Associate this object with a user group.
Disassociate this object from a user group.
For more information, see User Administration and Security.
The security tab is not available at the NetWare NDS iDataAgent Backup Set level.
One or more of the agents of this type use one or more accounts that are configured from a non-Properties dialog box. See the appropriate section for your agent(s) in User Accounts and Passwords for more information.
Features - Novell Directory Services (NDS) iDataAgent
Page 38 of 72

WINDOWS FILE SYSTEM IDATAAGENT CONFIGURABLE PROPERTIES
You can view or change the backup set configuration from the Backup Set Properties dialog box. The following information can be configured for all Windows File Systems:
USE CHANGE JOURNAL OR CLASSIC FILE SCAN, SET THE ARCHIVE BIT ATTRIBUTE, PRESERVE THE FILE ACCESS TIMEFrom the backup set properties Job Options tab, you can choose to Use Change Journal or Classic File Scan, Set the Archive Bit Attribute, and Preserve the File Access Time. These options affect which files are backed up during incremental and differential backup jobs.
MICROSOFT DATA PROTECTION MANAGER IDATAAGENT CONFIGURABLE PROPERTIES
You can view or change the backup set configuration from the Backup Set Properties dialog box. The following information can be configured for Microsoft Data Protection Manager backup sets:
USE CHANGE JOURNAL OR CLASSIC FILE SCAN FOR BACKUPS, SET THE ARCHIVE BIT ATTRIBUTE, PRESERVE THE FILE ACCESS TIME
From the backup set properties Job Options tab, you can choose to Use Change Journal or Classic File Scan, Set the Archive Bit Attribute, and Preserve the File Access Time. These options affect which files are backed up during incremental and differential backup jobs.
UNIX FILE SYSTEM CONFIGURABLE PROPERTIES
You can view or change the backup set configuration from the Backup Set Properties dialog box. The following information can be configured for all UNIX File Systems:
USE CLASSIC FILE SCAN OR DATA CLASSIFICATION ENABLER FOR BACKUPS, PRESERVE THE FILE ACCESS TIME
From the backup set properties Job Options tab, you can choose to Use Classic File Scan or Data Classification Enabler and Preserve the File Access Time.
NETWARE FILE SYSTEM CONFIGURABLE PROPERTIES
You can view or change the backup set configuration from the Backup Set Properties dialog box. The following information can be configured for all NetWare File Systems:
DECOMPRESS DATA BEFORE BACKUP
The NetWare File System data can be in compressed format on a volume that supports compression, and data in compressed format can only be restored to a volume that supports compression. The Decompress Data before Backup option allows you to select whether to decompress data that is in compressed format on the backup media and can be restored to either a compressed or uncompressed volume. By default, data is backed up in a compressed format if the data is on a volume that supports compression.
See Enable Decompress Data before Backup for a NetWare File System Backup Set for step by step instructions.
ENHANCING THE DATA SCAN
Enable the data classification scan to maximize the scan speed, resulting in faster backup and search.
ENABLING DATA CLASSIFICATION SCAN
Follow the steps given below to enable the data classification scan for all the subclients in a BackupSet:
To enable the Data Classification scan for the Unix File System iDataAgent, you must install the Data Classification Enabler package on the computer where Unix File System iDataAgent is installed. For more information, see Install Data Classification - Unix.
1. From the CommCell Console, navigate to <Client> | File System iDataAgent | defaultBackupSet. Right-click the defaultBackupSet and select Properties.
Features - Novell Directory Services (NDS) iDataAgent
Page 39 of 72
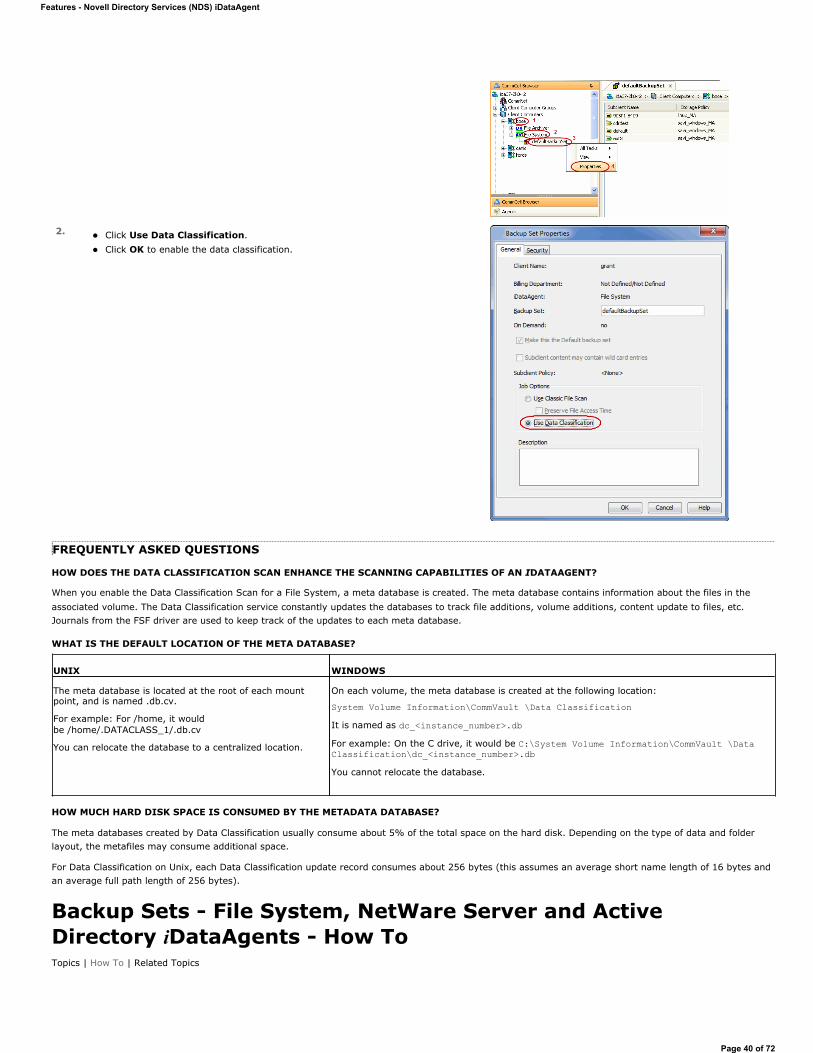
FREQUENTLY ASKED QUESTIONS
HOW DOES THE DATA CLASSIFICATION SCAN ENHANCE THE SCANNING CAPABILITIES OF AN IDATAAGENT?
When you enable the Data Classification Scan for a File System, a meta database is created. The meta database contains information about the files in the associated volume. The Data Classification service constantly updates the databases to track file additions, volume additions, content update to files, etc. Journals from the FSF driver are used to keep track of the updates to each meta database.
WHAT IS THE DEFAULT LOCATION OF THE META DATABASE?
HOW MUCH HARD DISK SPACE IS CONSUMED BY THE METADATA DATABASE?
The meta databases created by Data Classification usually consume about 5% of the total space on the hard disk. Depending on the type of data and folder layout, the metafiles may consume additional space.
For Data Classification on Unix, each Data Classification update record consumes about 256 bytes (this assumes an average short name length of 16 bytes and an average full path length of 256 bytes).
Backup Sets - File System, NetWare Server and Active Directory iDataAgents - How ToTopics | How To | Related Topics
2. Click Use Data Classification. Click OK to enable the data classification.
UNIX WINDOWS
The meta database is located at the root of each mount point, and is named .db.cv.
For example: For /home, it would be /home/.DATACLASS_1/.db.cv
You can relocate the database to a centralized location.
On each volume, the meta database is created at the following location:
System Volume Information\CommVault \Data ClassificationIt is named as dc_<instance_number>.dbFor example: On the C drive, it would be C:\System Volume Information\CommVault \Data Classification\dc_<instance_number>.dbYou cannot relocate the database.
Features - Novell Directory Services (NDS) iDataAgent
Page 40 of 72
General Backup Set Procedures
Change Default Backup Set/Archive Set Designation
Create Backup Sets/Archive Sets
Configure a Backup Set/Archive Set
Associate a Subclient to a Storage Policy
Change Account for Accessing Databases/Applications
Change Account for Executing Pre/Post Commands (Data Protection)
Rename a Backup Set/Archive Set
Delete a User-Defined Backup Set/Archive Set
Preserve the File Access Time
Windows File System
Preserve the File Access Time
Set the Archive Bit Attribute
Use Change Journal, Classic File Scan, or Data Classification Enabler
Create a New On Demand Backup Set (Windows/Unix/Macintosh)
Create a New backup Set for Wildcard Support
UNIX File System
Preserve the File Access Time
Use Classic File Scan or Data Classification Enabler
Create a New On Demand Backup Set (Windows/Unix/Macintosh)
NetWare Server
Change Account for Restoring to Mapped/Shared Network Drives and Restricted Directories
Enable Decompress Data before Backup for a NetWare File System Backup Set (NetWare File System)
CHANGE DEFAULT BACKUP SET/ARCHIVE SET DESIGNATION
Required Capability: See Capabilities and Permitted Actions
1. From the CommCell Browser, right-click the icon for any supported backup set or archive set that is not currently the default and then click Properties.
2. From the General tab of the Backup Set/Archive Set Properties dialog box, select the appropriate option to Make this the default backup set or Make this the default archive set.
3. Click OK to save your settings.
CREATE BACKUP SETS/ARCHIVE SETS
Required Capability: See Capabilities and Permitted Actions
1. From the CommCell Browser, locate the correct client computer node, right-click the iDataAgent, Agent or instance node (depending on your agent's functionality) for which you want the backup set/archive set created, select All Tasks and then click Create New Backup Set or Create New Archive Set.
2. For most agents, from the Create New Backup Set or Create New Archive Set dialog box, enter a New Backup Set Name or New Archive Set Name (up to 32 characters) of the backup set/archive set that you want to create. For the DB2 or DB2 DPF iDataAgent, from the same dialog box, click the desired database (backup set) name under Available DB Names and move this name under Selection.
NOTES
For DB2 or DB2 DPF, to prevent archive log backup failures, ensure that the name that you select is the actual name of the database and not the alias name for the database. If the database name and the corresponding alias name are different, both names are displayed under Available DB Names; if both names are the same, the name that is displayed is the database name. To find out about database names and their aliases, run the following command as a DB2 or DB2 DPF instance owner on the DB2 or DB2 DPF client: db2 list db directory.
3. Where applicable, if you want to designate this backup set/archive set as the default backup set/archive set, select Make this the Default backup set or
Features - Novell Directory Services (NDS) iDataAgent
Page 41 of 72
Make this the Default Archive Set; otherwise, leave the check box cleared.
4. For most agents, verify that the storage policy copy associated with the default subclient is the storage policy that you want. If you want to select a different storage policy, click the storage policy box and select the one you want from the list. If the agent supports a system-state subclient, repeat this step for that subclient. For the DB2 or DB2 DPF iDataAgent, to establish a storage policy for all the log files, click the storage policy in the list provided.
5. Where applicable, if you want to create additional subclients within this backup set/archive set:
Click Add.
Follow Create a New Subclient procedure.
Repeat this step for each additional subclient that you want to define within this backup set/archive set.
When all subclients have been added, click OK.
A message will advise you to schedule backups for your new backup set. It is recommended that you elect to set a schedule now. You can also associate this backup set/archive set with an All Agent Types schedule policy (which is automatically created by the system, or can be a user-defined Data Protection schedule policy). If you have already associated a schedule policy at a previous level (Agent, Client, or Client Computer Group) the schedules defined in the Schedule Policy will be automatically applied to the new backup set/archive set. See Schedule Policy for more information.
If you want to associate this backup set/archive set with an All Agent Types schedule policy, click Associate with Generic Schedule Policy, and then select that schedule policy from the drop-down list box. Click OK.
If you have selected to define a schedule for this backup set/archive set:
Click Schedule.
If applicable, from the Backup Options dialog box, select the type of backup that you want to schedule.
If you want to set Advanced Backup/Archive Options, click Advanced.
After selecting the backup type and any advanced options, click OK. The Schedule Details dialog box appears.
From the Schedule Details tab, select the scheduling options that you want to apply, then click OK.
If you don't want to create a backup/archive schedule at this time, click Do Not Schedule, and then click OK.
The new backup set/archive set is displayed in the CommCell Browser.
CONFIGURE A BACKUP SET/ARCHIVE SET
Required Capability: See Capabilities and Permitted Actions
iDataAgent database:
1. From the CommCell Browser, right-click the backup set or archive set whose configuration you want to change, and then click Properties from the shortcut menu.
2. From the General tab, change one or more of the following fields as appropriate for your agent:
Backup Set Name - The field accepts 32 characters.
Archive Set Name - The field accepts 32 characters.
Storage Policy for All Log Files
User Account - For the DB2 or DB2 DPF iDataAgent, you can add/modify an application/database user account. See the DB2 iDataAgents section in User Accounts and Passwords for more information.
Make this the default Backup Set - When selected and committed, this option will make this the default backup set on this client computer.
Make this the default Archive Set - When selected and committed, this option will make this the default archive set on this client computer.
Use Change Journal (Recommended) or Use Classic File Scan which includes (Check archive bit during backups and/or Preserve File Access Time) settings which determine the way subclients within the backup set conduct incremental and differential backups (For an explanation of this field, see Setting the Archive Bit Attribute.)
Use Data Classification - Specifies that the Data Classification scan is used to determine whether files have been modified for all subclients within the backup set.
Select to have data on compressed volumes decompressed before being sent to the backup media. See Decompress Data before Backup for more information. (NetWare File System only.)
3. If your agent uses the Backup tab, click Edit Rules for the appropriate subclient type. You can elect to have the system automatically convert the type of backup under the listed conditions. Click OK to save your backup rules configuration changes. Without setting this option, if one of these conditions exists your backup will not take place. Subclient Backup Conversion Rules are defined for default subclients and for SQL Server file/file group subclients.
4. Click OK.
A content example for NetWare File System is SYS:\public, and an example for NDS content is OU=prospects.O=engineering.[Root].
Exchange Mailbox
Features - Novell Directory Services (NDS) iDataAgent
Page 42 of 72

ASSOCIATE A SUBCLIENT TO A STORAGE POLICY
Required Capability: See Capabilities and Permitted Actions
1. From the CommCell Browser, right-click the subclient whose associated storage policy you want to change, then click Properties from the shortcut menu.
2. Click the Storage Device tab of the Subclient Properties dialog box.
3. From the Storage Policy list of the Data Storage Policy tab, select a data storage policy to associate with this subclient. If necessary, click the Create Storage Policy button to create a new storage policy to which the subclient can then be associated.
4. From the Changing a Storage Policy window select the next type of backup operation. Click OK.
5. If applicable for your agent, you can change the number of data streams from the Number of Data/Database Backup Streams field.
6. If applicable for your agent, click the Log Storage Policy tab and select a storage policy to associate with this transaction log subclient from the Transaction Log Storage Policy list. Also, you can set the Number of Transaction Log Backup Streams from this tab.
7. Click OK to save your changes and close the Subclient Properties Storage Device tab.
CHANGE ACCOUNT FOR ACCESSING DATABASES/APPLICATIONS
Required Capability: See Capabilities and Permitted Actions
1. From the CommCell Browser, expand the tree if necessary to view the desired level icon.
From the agent level, right-click the agent icon, click All Tasks from the short-cut menu, click New Instance, and go to the next step.
From the instance level, right-click the instance icon, click Properties from the short-cut menu, and go to Step 3.
From the backup set level, right-click the backup set icon, click Properties from the short-cut menu, and go to Step 4.
2. Use the Creating New Instance dialog box to create and configure the instance. Thereafter, from the General tab, click the Change button associated with the User Account information. Then go to Step 5.
3. From the General tab of the Instance Properties dialog box, click the Change button associated with the User Account information. Then go to Step 5.
4. From the General tab of the Backup Set Properties dialog box, ensure that the Connect as a Different User option is selected. Then click the Change button associated with the User Account information.
5. Enter the required information in the Set DB2 User Account dialog box.
6. Click OK to save the settings.
1. From the CommCell Browser, expand the tree if necessary to view the desired level icon.
From the agent level, right-click the agent icon, click All Tasks from the short-cut menu, and click New Instance (Oracle SID).
From the instance level, right-click the instance icon and click Properties from the short-cut menu.
2. From the General tab, click the Change button associated with the User Account information.
3. Enter the required information in the Impersonate NT User dialog box.
4. Click OK to save the settings.
1. From the CommCell Browser, expand the tree if necessary to view the QR agent icon. Then right-click the icon and click Properties.
2. From the Authentication tab, click the Oracle sub-tab.
3. From the Oracle sub-tab, either click Add Instance or select an Oracle instance to edit and then click Edit Instance.
4. From the Add Oracle Instance to QR Agent dialog box, click Change.
5. Enter the required information in the Impersonate NT User dialog box.
6. Click OK to save the settings.
If you disable the auto-discovery feature, newly created mailboxes will not be backed up unless they are manually discovered and assigned to a subclient.
Features - Novell Directory Services (NDS) iDataAgent
Page 43 of 72

1. From the CommCell Browser, expand the tree if necessary to view the desired level icon. From the agent level, right-click the agent icon, click All Tasksfrom the short-cut menu, click New Instance, and go to the next step. From the instance level, right-click the instance icon, click Properties from the short-cut menu, and go to Step 3.
2. Use the New Instance dialog box to create and configure the instance.
3. From the General tab of the Instance Properties dialog box, do one of the following, as appropriate.
For Informix, type the name of the user account in the INFORMIX USER field.
For Oracle or SAP for Oracle, type the name of the user account in the ORACLE USER field.
4. Click OK to save the settings.
CHANGE ACCOUNT FOR EXECUTING PRE/POST COMMANDS (DATA PROTECTION)Required Capability: See Capabilities and Permitted Actions
1. From the CommCell Browser, expand the tree to view the appropriate level icon for the affected agent.
From the agent, instance/partition, or backup set/archive set level, right-click the appropriate icon, click All Tasks, and click New Subclient from the short-cut menu.
From the subclient level, right-click the subclient icon and click Properties from the short-cut menu.
2. From the Subclient Properties dialog box, create and/or configure the subclient as appropriate. Then click the Pre/Post Process tab.
3. From the Pre/Post Process tab, click Change.
4. From the User Account dialog box, select one of the account options. If you select Impersonate User, type the appropriate user name and password.
5. Click OK to save the settings.
RENAME A BACKUP SET/ARCHIVE SET
Required Capability: See Capabilities and Permitted Actions
1. From the CommCell Browser, right-click the icon for the appropriate backup set or archive set and then click Properties.
2. From the General tab of the Backup Set/Archive Set Properties dialog box, type the desired name in the Backup Set or Archive Set field.
3. If you want to make this renamed backup set/archive set the default backup set/archive set, select the corresponding check box (where applicable).
4. Click OK to save your settings.
DELETE A USER-DEFINED BACKUP SET/ARCHIVE SET
Before You Begin
Each agent that utilizes backup sets/archive sets requires the default backup set/archive set in its configuration; therefore, you cannot delete a default backup set/archive set using this procedure. If you want to delete a default backup set/archive set, you must uninstall the agent software that contains it.
The system does not allow you to delete a backup set/archive set if one of its subclients is being backed up/archived. Any attempt to delete a backup set/archive set under such a condition causes the deletion to fail. If a data protection operation is in progress, do one of the following:
Wait for the data protection job to complete.
Kill the data Protection job using the Job Manager.
When you delete a backup set/archive set, several actions occur:
The backup set/archive set, its corresponding subclients, and any data that may have been backed up/archived from the backup set/archive set are logically deleted. Once the backup set/archive set is deleted, you can no longer access the corresponding data for restore/recovery purposes.
All job schedules and job histories that pertain to the subclients of the deleted backup set/archive set are deleted.
Required Capability: See Capabilities and Permitted Actions
-defined backup set or archive set:
1. From the CommCell Browser, right-click the user-defined backup set/archive set that you want to delete, select All Tasks and then click Delete.
2. A confirmation message is displayed, asking if you want to delete the backup set/archive set with all of its subclients. Click Yes to continue the deletion, or click No to cancel the deletion and retain the backup set.
Features - Novell Directory Services (NDS) iDataAgent
Page 44 of 72
3. If you clicked Yes in the previous step, then the Enter Confirmation Text dialog will appear, indicating that all the data in the backup set/archive set will be permanently removed. To confirm this action and continue with the deletion, type erase and reuse media in the entry space provided on this dialog. Click OK. The system will delete the selected backup set/archive node, the subclient nodes contained within it, and remove them from the CommCell Browser along with any associated data.
PRESERVE THE FILE ACCESS TIME
Required Capability: See Capabilities and Permitted Actions
1. From the CommCell Browser, right-click the desired file system backup set node, and then click Properties from the shortcut menu.
2. From the General tab, select the Preserve File Access Time option.
3. Click OK to save your change.
SET THE ARCHIVE BIT ATTRIBUTE
Required Capability: See Capabilities and Permitted Actions
1. From the CommCell Browser, right-click the desired file system backup set node, and then click Properties from the shortcut menu.
2. From the General tab, select the Check archive bit during backups option.
3. Click OK to save your change.
USE CHANGE JOURNAL, CLASSIC FILE SCAN, OR DATA CLASSIFICATION SCAN
Before You Begin
For Unix, review Using Classic File Scan or Data Classification Scan for Backups
For Windows, review Using Change Journal, Classic File Scan, or Data Classification Scan for Backups
Required Capability: See Capabilities and Permitted Actions
1. From the CommCell Browser, right-click the desired file system backup set or archive set and click Properties.
2. From the General tab, select the Use Change Journal, Use Classic File Scan, or Use Data Classification.
3. Optionally, select Preserve File Access Time.
4. Optionally, if applicable, select Check archive bit during backups.
5. Click OK to save your changes.
CREATE A NEW ON DEMAND BACKUP SET/ARCHIVE SET
Required Capability: See Capabilities and Permitted Actions
1. From the CommCell Browser, locate the correct client computer node, right-click the Agent for which you want the backup set or archive set created, click All Tasks and then click New On Demand Backup Set or New On Demand Archive Set.
2. From the Create New On Demand Backup Set/Archive Set dialog box, enter a New Backup Set Name or a New Archive Set Name (up to 32 characters) of the backup set/archive set that you want to create.
3. Associate a storage policy with the default subclient by selecting one from the Storage Policies drop-down list.
4. If you want to edit the properties of the default subclient, select the subclient and click Edit. From the Subclient Properties dialog box you can change the name and other properties of the subclient.
5. When done, click OK to continue.
6. For iDataAgents, a message advises you to schedule data protection operations for your new backup set. It is recommended you elect to set a schedule now. You can also associate this backup set with an All Agent Types schedule policy (which is automatically created by the system).
Features - Novell Directory Services (NDS) iDataAgent
Page 45 of 72
If you want to associate this backup set with an All Agent Types schedule policy, click Associate with Generic Schedule Policy, and then select that schedule policy from the drop-down list box. Click OK.
If you have selected to define a schedule for this backup set:
Click Schedule.
From the Backup Options dialog box, select the type of data protection operation that you want to schedule.
If you want to set Advanced Backup Options, click Advanced.
After selecting the backup type and any advanced options, click OK. The Schedule Details dialog box appears.
From the Schedule Details Schedule Details tab, select the scheduling options that you want to apply, then click OK.
If you don't want to create a schedule at this time, click Do Not Schedule, and then click OK.
The new backup set/archive set is displayed in the CommCell Browser.
NOTES
Once an On Demand Backup Set/Archive Set has been created, it cannot be changed into a traditional backup set/archive set.
CREATE A NEW BACKUP SET FOR WILDCARD SUPPORT
Required Capability: See Capabilities and Permitted Actions
1. From the CommCell Browser, locate the correct client computer node, right-click the iDataAgent, Agent for which you want the backup set created, select All Tasks and then click Create New Backup Set.
2. From the Create New Backup Set dialog box, enter a New Backup Set Name(up to 32 characters) of the backup set that you want to create.
3. Where applicable, if you want to designate this backup set as the default backup set, select Make this the Default backup set; otherwise, leave the check box cleared.
4. Select the Subclient content may contain wild card entries check box.
5. For most agents, verify that the storage policy copy associated with the default subclient is the storage policy that you want. If you want to select a different storage policy, click the storage policy box and select the one you want from the list. If the agent supports a system-state subclient, repeat this step for that subclient.
6. A message will advise you to schedule backups for your new backup set. It is recommended that you elect to set a schedule now. You can also associate this backup set/archive set with an All Agent Types schedule policy (which is automatically created by the system, or can be a user-defined Data Protection schedule policy). If you have already associated a schedule policy at a previous level (Agent, Client, or Client Computer Group) the schedules defined in the Schedule Policy will be automatically applied to the new backup set/archive set. See Schedule Policy for more information.
If you want to associate this backup set/archive set with an All Agent Types schedule policy, click Associate with Generic Schedule Policy, and then select that schedule policy from the drop-down list box. Click OK.
If you have selected to define a schedule for this backup set/archive set:
Click Schedule.
If applicable, from the Backup Options dialog box, select the type of backup that you want to schedule.
If you want to set Advanced Backup, click Advanced.
After selecting the backup type and any advanced options, click OK. The Schedule Details dialog box appears.
From the Schedule Details tab, select the scheduling options that you want to apply, then click OK.
If you don't want to create a backup/archive schedule at this time, click Do Not Schedule, and then click OK.
The new backup set is displayed in the CommCell Browser with a default subclient.
CHANGE ACCOUNT FOR RESTORING TO MAPPED/SHARED NETWORK DRIVES AND RESTRICTEDDIRECTORIES
Required Capability: See Capabilities and Permitted Actions
1. From the CommCell Browser, expand the tree to view the desired level icon for the affected agent. Then right-click the icon and click All Tasks from the short-cut menu.
2. Click the appropriate Browse or Restore option. Then populate, select, and click as appropriate to access the Restore Options (for All SelectedItems) dialog box.
3. From the Restore Options (for All Selected Items) dialog box, click Advanced.
Features - Novell Directory Services (NDS) iDataAgent
Page 46 of 72

4. From the Advanced Restore Options dialog box, select Impersonate (Windows, NetWare) User. Then type the appropriate user name and password.
5. Click OK to save the settings.
ENABLE DECOMPRESS DATA BEFORE BACKUP FOR A NETWARE FILE SYSTEM BACKUP SET
Before You Begin
Review Decompress Data before Backup
Required Capability: Capabilities and Permitted Actions
1. From the CommCell Browser, right-click the backup set of a NetWare File System iDataAgent for which you want to enable decompression, then click Properties.
2. In the General tab, select Decompress Data before Backup.
3. Click OK to save your change.
This task is now complete.
Features - Novell Directory Services (NDS) iDataAgent
Page 47 of 72

Subclients - NetWare/NDS/GroupWiseTopics | How To | Related Topics
Overview
Configurable Properties
Things to Consider when Creating and Configuring NetWare/NDS/GroupWise Subclients
OVERVIEW
The following table shows subclient creation and configuration details specific to the NetWare/NDS/GroupWise iDataAgents.
The following examples illustrate a simple subclient configuration:
Example - NetWare File System
Example - NDS
CONFIGURABLE PROPERTIES
Once installed, the agent is configured and is therefore able to manage the data or volumes on the client computer. However, you can change certain aspects of the subclient configuration to manage the data in the manner that best suits your needs.
You can view or change the subclient configuration from the Subclient Properties dialog box. The following information can be configured.
ACTIVITY CONTROL
You can enable or disable all operations for this CommCell object and all objects below it. For more information, see Activity Control.
CONTENT/DATABASES
You can define the content of the subclient. Most agents include a configure button that displays a dialog where you can add or modify the data included as subclient content. For step-by-step instructions, see Configure Subclient Content.
For more information, see File System Content. See also Subclient Content Considerations.
DATA TRANSFER OPTIONS
AGENTType of Data Default
Subclient created
during install of the Agent
Supports Default
Subclient
Supports User Defined
Subclient
Contents of the default subclient
when user-defined
subclient is present
Other Types of subclients supported by
the Agent
Notes
NetWare File System iDataAgent
NetWare files Yes Yes Yes portion of file system not assigned to
other subclients,
unless otherwise
configured*
None *See Caution Against Re-configuring Default Subclient Content.
NDS iDataAgent NDS tree data Yes Yes Yes portion of the NDS tree not assigned to
other subclients,
unless otherwise
configured*
None *See Caution Against Re-configuring Default Subclient Content.
Novell GroupWise iDataAgent
Domain, Post Office, and Document
Store databases
Yes Yes Yes database(s) not assigned to
other subclients,
unless otherwise
configured*
Do Not Backup *See Caution Against Re-configuring Default Subclient Content.
Features - Novell Directory Services (NDS) iDataAgent
Page 48 of 72

Several configurable options to efficiently use available resources for transferring data secured by data protection operations are provided in the subclient. This includes the following:
Enable or disable Data Compression either on the client or the MediaAgent.
Configure the transfer of data in the network using the options for Network Bandwidth Throttling and Network Agents.
DATA ENCRYPTION
You can enable or disable the encryption of data for transmission over unsecure networks and for storage on media. For more information, see Data Encryption.
DATA PATHS
You can view the data paths associated with the primary storage policy copy of the selected storage policy or incremental storage policy. You can also modify the data paths for the subclient including their priority. For additional information, see Configuring Alternate Data Paths for Subclients.
DATA PROTECTION FILTERS
You can perform the following functions:
Define data protection filters to exclude specified subclient data from being backed up or archived. For more information, see Filters.
Use regular expressions (or wildcards) in subclient data protection exclusion filters. See Inclusions, Exclusions, and Exceptions to Exclusions for more information.
Perform in-place editing of subclient data protection filter exclusions and exceptions. See Editing Filters for more information.
The Filters tab is not available for the GroupWise iDataAgent. Filter wildcards are only supported for the NetWare File System iDataAgent.
GLOBAL FILTERSYou can enable or disable Global Filters. For more information, see Global Filters.
Global Filters are not available for NDS and GroupWise iDataAgents.
MULTIPLE DATA READERS WITHIN A DRIVE OR MOUNT POINTSpecify whether multiple data reads are allowed for a single physical drive (Windows or NetWare) or mount point (Unix) during backups on this subclient. This should be selected only for specialized hardware such as RAID. For more information, see Automatic File System Multi-Streaming.
NUMBER OF DATA READERS
Specify the number of simultaneous backup data streams allowed for this subclient. For best performance, this should be set no higher than the number of physical drives that hold this subclient's data, except for specialized hardware such as RAID. For more information, see Automatic File System Multi-Streaming.
PRE/POST PROCESSES
You can add, modify or view Pre/Post processes for the subclient. These are batch files or shell scripts that you can run before or after certain job phases. For more information, see Pre/Post Processes.
STORAGE POLICIESYou can associate the subclient to a storage policy. For more information, see Storage Policies.
SUBCLIENT NAMEYou can rename a user-defined subclient.
USER SECURITY
You can perform the following functions:
Identify the user groups to which this CommCell object is associated.
Associate this object with a user group.
Disassociate this object from a user group.
For more information, see User Administration and Security.
The Security tab is not available for the NDS and GroupWise iDataAgents.
Features - Novell Directory Services (NDS) iDataAgent
Page 49 of 72

THINGS TO CONSIDER WHEN CREATING AND CONFIGURING NETWARE/NDS/GROUPWISESUBCLIENTS
When creating and configuring subclients for NetWare iDataAgents, keep in mind the following considerations:
ALL NETWARE IDATAAGENTSCaution Against Re-configuring Default Subclient Content
We recommend that you do not re-configure the content of a default subclient because this would disable its capability to serve as "catch-all" entity for client data. As a result, the likelihood that some data will not get backed up or scanned for archiving would increase.
NETWARE FILE SYSTEM IDATAAGENTSubclient Content Considerations
When specifying subclient contents using regular expressions, keep in mind that the option to Treat Characters as Regular Expressions applies only to the last level of the content path for user-defined subclients and is not supported for default subclients.
It is recommended you perform a full backup after changing or adding any subclient content definitions in the Subclient Properties (Content) tab in order to ensure that all of the data is backed up.
NOVELL DIRECTORY SERVICES (NDS) IDATAAGENTWhen configuring content for an NDS iDataAgent subclient, selecting the object [Root] will result in the browse of backup data to show up empty. To back up the entire NDS tree, it is recommended that you use the default subclient.
Back to Top
Subclients - NetWare/NDS/GroupWise - How ToTopics | How To | Related Topics
Add/Edit a Data Protection Filter for a Subclient (NetWare File System and NDS)
Associate a Subclient to a Storage Policy
Associate or Disassociate a User Group to a Subclient (NetWare File System)
Configure a Subclient for Pre/Post Processing of Data Protection Operations
Configure Subclient Content
Configure the Subclient for Data Encryption
Create a New Subclient
Create a New Subclient Policy (NetWare File System)
Delete a Data Protection Filter from a Subclient (NetWare File System and NDS)
Delete a User-Defined Subclient
Disable Global Filters on a Subclient (NetWare File System)
Enable Global Filters on a Subclient (NetWare File System)
Enable or Disable Data Protection Operations
Enable Software Compression for a Subclient
Remove a Process from Pre/Post Processing of Data Protection Operations
Rename a Subclient
Set the Network Bandwidth and Network Agents for a Data Protection Operation
View Data Paths
View Subclient Content
ADD/EDIT A DATA PROTECTION FILTER FOR A SUBCLIENT
Features - Novell Directory Services (NDS) iDataAgent
Page 50 of 72

Before You Begin
Review Filters.
Do not change the data protection or discovery filter of a subclient that has a data protection operation in progress.
The system does not allow you to add entries that are not content of a particular subclient to that subclient's filter.
For BlueArc and EMC Celerra (running at least DART OS 5.6.x) subclients, the filter string with or without wildcards must match the name or path of the file or directory being filtered.
For NetApp subclients only name type filters (with wildcards) are supported:
You cannot enter paths as a filter (e.g. /vol/vol0/data1). Since NetApp does not support the use of paths in filters, if there are multiple files with the same name, even though they may be in different directories, all of them will be excluded from backups.
Name of the file or directory must exactly match the filter string.
You can specify a maximum of 32 strings in the exclude list.
Select the desired procedure:
To add a data protection or discovery filter for a subclient
To edit a data protection filter for a subclient
Required Capability: Capabilities and Permitted Actions
1. From the CommCell Browser, right-click the subclient whose data protection or discovery filter you want to add, and then click Properties from the shortcut menu.
2. Click the Filters tab of the Subclient Properties dialog box.
3. For Exchange Mailbox, Exchange Mailbox/Public Folder Archiver Agents and Exchange Compliance Archiver, to specify a mailbox or folder that you want to exclude from data protection operations:
Click the upper Add button.
From the Browse window, expand the mailbox tree of the client computer.
Click the mailbox or folder that you want to exclude from the backup/archive operations on the selected subclient, and then click Add. (Repeat this step for each additional entry.)
From the Browse window, click OK.
The mailboxes or folders that you selected appear as entries in the upper pane. Repeat this step if you want to add more mailboxes and/or folders to the filter.
4. For NAS NDMP iDataAgents, click the Add button and, in the input window, type the name of the file, directory, (or path for BlueArc) that you want to exclude from the backups and click OK. The name displays as an entry in the Exclude these files/folders/patterns pane. Repeat this step if you want to add more files, directories, or paths to the filter.
5. For SharePoint Server iDataAgents, to specify a URL/file/folder/pattern that you want to exclude from data protection operations or to specify an exception filter for database backup sets, do one of the following:
Click the Add button next to Exclude these files/folder/patterns: input window and type the URLs of site collections that you want to exclude from the backups and click OK. The site collection displays as an entry in the Exclude these files/folders/patterns pane. Wildcards are supported. See Wildcards for more information. Repeat this step if you want to add more URLs, files, directories, or paths to the filter.
Click the Add button next to Except for these files/folders: input window and type the URLs/folders of site collections that you want to be exceptions for the exclusion filter and click OK. These exceptions will be included in the data protection operations. Wildcards are not supported for exception filters.
6. For Exchange Public Folder iDataAgents and SharePoint Server iDataAgent, to specify a workspace/folder that you want to exclude from the backups, click the upper Browse button and expand the iDataAgent of the client computer. Click the workspace/folder that you want to exclude from the backups and then click Add. Repeat this step for each additional entry.
7. For Windows/Unix/Macintosh File System iDataAgents, File Archiver for Windows/Unix Agents, and ProxyHost iDataAgent, to specify a file/folder/directory that you want to exclude from data protection operations, do one of the following:
Click the upper Add button and, in the Enter Path window, type the complete path (including drive letter) of the file/folder/directory that you want to exclude from the backups/archive operations. Repeat this step if you want to add more files/folders/directories to the filter.
Click the upper Browse button and expand the file system of the client computer. Click the file/folder/directory that you want to exclude from backups/archive operations and then click Add. Repeat this step for each additional entry.
8. For NetWare File System/NDS iDataAgents, to specify data that you want excluded from the backups, do one of the following:
To manually enter the path:
Click the Add button.
In the Input window, type the complete path (e.g., VOL1:\demo\disk2) of the data that you want to exclude.
Features - Novell Directory Services (NDS) iDataAgent
Page 51 of 72

Click OK. (The path that you typed displays as an entry in the upper pane.) Repeat this step if you want to exclude more data.
To browse and select a path:
Click the Browse button.
From the Backup Data window, expand the file system or NDS tree of the NetWare server.
Select the data that you want to exclude, and then click Add. Repeat this step for each additional entry.
From the Backup Data window, click OK. The data that you selected displays as entries in the upper pane.
9. For Lotus Notes Database and Lotus Notes Document iDataAgents, to specify a file or folder that you want to exclude from discovery, do one of the following:
Select the Pattern/path to be excluded field. Then type in a file or folder that you want to exclude. The format of the entry should start with a slash (\). The path entered is always relative to the data path of the partition. Then click Add. Repeat this step for each additional entry.
Click the upper Browse button and expand the file system of the client computer. Click the file or folder that you want to exclude from the backups and then click Add. Repeat this step for each additional entry.
10. For Exchange Mailbox, Exchange Mailbox/Public Folder Archiver Agents and Exchange Compliance Archiver, to specify a wildcard pattern of the folders that you want to exclude across all mailboxes within the subclient:
Click the lower Add button.
In the Input window, type the wildcard pattern of the folders that you want to exclude from backup/archive operations on the selected subclient.
Click OK. The path that you typed appears as an entry in the lower pane. Repeat this step if you want to add more entries to the filter.
11. For Exchange Public Folder iDataAgents and SharePoint Server iDataAgent, to specify an exception to an excluded workspace/folder (i.e., a folder/document that you want included in the backups, but whose parent directory has been excluded), click the lower Browse button and expand the iDataAgent of the client computer. Click the workspace/folder that you want to include in the backups and then click Add. Repeat this step for each additional entry.
12. For Windows/Unix/Macintosh File System iDataAgents, File Archiver for Windows/Unix Agents, and ProxyHost iDataAgent, to specify an exception to an excluded folder/directory (i.e., a file or folder/directory that you want included in the data protection operations, but whose parent folder/directory has been excluded), do one of the following:
Click the lower Add button and, in the Enter Path window, type the complete path (including drive letter) of the file/folder/directory that you want to include in the backups/archive operations. Repeat this step if you want to add more exceptions to the filter.
Click the lower Browse button and expand the file system of the client computer. Click the file/folder/directory that you want to include in the backups/archive operations and then click Add. Repeat this step for each additional entry.
13. For NetWare File System/NDS iDataAgents, to specify an exception to an excluded directory or NDS container (i.e., data that you want included in the backups, but whose parent directory or NDS container has been excluded), do one of the following:
To manually enter the path:
Click the Add button.
In the Input window, type the complete path (e.g., VOL1:\demo\disk2\readme) of the data that you want to include.
Click OK.
To browse and select a path:
Click the Browse button.
From the Backup Data window, expand the file system or NDS tree of the NetWare server.
Click the file or folder that you want to include in the backups and then click Add. Repeat this step for each additional entry.
Click OK. The selected data displays as entries in the lower pane.
14. Click OK to save your changes.
Required Capability: Capabilities and Permitted Actions
1. From the CommCell Browser, right-click the subclient whose data protection filter you want to edit, and then click Properties from the shortcut menu.
2. Click the Filters tab of the Subclient Properties dialog box.
3. Click the filter entry that you want to edit, and then click the Edit button associated with that pane.
4. Type the changes into the Enter Path dialog box, then click OK.
5. Click OK to save your changes.
NOTES
When you change a data protection or discovery filter, the change is effective the next time a data protection operation is run on the applicable subclient.
Performing a full backup after changing filters or exceptions is recommended.
Features - Novell Directory Services (NDS) iDataAgent
Page 52 of 72

ASSOCIATE A SUBCLIENT TO A STORAGE POLICY
Required Capability: See Capabilities and Permitted Actions
1. From the CommCell Browser, right-click the subclient whose associated storage policy you want to change, then click Properties from the shortcut menu.
2. Click the Storage Device tab of the Subclient Properties dialog box.
3. From the Storage Policy list of the Data Storage Policy tab, select a data storage policy to associate with this subclient. If necessary, click the Create Storage Policy button to create a new storage policy to which the subclient can then be associated.
4. From the Changing a Storage Policy window select the next type of backup operation. Click OK.
5. If applicable for your agent, you can change the number of data streams from the Number of Data/Database Backup Streams field.
6. If applicable for your agent, click the Log Storage Policy tab and select a storage policy to associate with this transaction log subclient from the Transaction Log Storage Policy list. Also, you can set the Number of Transaction Log Backup Streams from this tab.
7. Click OK to save your changes and close the Subclient Properties Storage Device tab.
ASSOCIATE OR DISASSOCIATE A USER GROUP TO A COMMCELL OBJECT
Required Capability: See Capabilities and Permitted Actions
1. From the CommCell Browser, click the CommServe, client computer group, client computer, agent, MediaAgent, Library, Storage Policy, backup set, subclient, or Shelf media, and then select Properties.
2. From the Security tab, select the appropriate user groups to which you want to associate to the CommCell object from the Available Groups pane, and then move the user group to the Associated Groups pane.
3. Click OK.
CONFIGURE A SUBCLIENT FOR PRE/POST PROCESSING OF DATA PROTECTION/ARCHIVE OPERATIONS
Before You Begin
We recommend not configuring a pre/post process for a subclient that is currently running a data protection or archive operation.
Verify that there are no pre/post processes already assigned for the subclient.
Review the Overview and Agent-Specific Guidelines for your agent before configuring pre/post processes for data protection/archive operations.
Pre-process commands for the iDataAgents will be executed only when the necessary resources (e.g., media, library, drive, etc.) are available.
Required Capability: Capabilities and Permitted Actions
1. From the CommCell Browser, right-click the subclient for which you want to configure a pre/post process, and then click Properties from the shortcut menu.
2. Click the Pre/Post Process tab of the Properties dialog box.
3. For an agent other than the Oracle RAC iDataAgent, click inside the space that corresponds to one of the following phases and type the full path of the process that you want executed during that phase. Alternatively, click Browse to locate the process (applicable only for paths that do not contain any spaces). For the Oracle RAC iDataAgent, click Browse for the corresponding process, click the name of the control node client in the Select Client for Browse dialog box, and click OK. Then browse for and click the process.
PreBackup
PreScan
PreArchive
PreCopy
PreSnap
PostBackup
PostScan
PostArchive
PostCopy
Features - Novell Directory Services (NDS) iDataAgent
Page 53 of 72
PostSnap
Click OK.
4. If you want to run a Post Process for all attempts to run that job phase, then select the corresponding checkbox.
5. For subclients on Windows platforms, if Run As displays Not Selected, or if you want to change the account that has permission to run these commands, click Change.
a. In the User Account dialog box, select Use Local System Account, or select Impersonate User and enter a user name and password. Click OK.
b. If you selected Local System Account, click OK to the message advising you that commands using this account have rights to access all data on the client computer.
6. Click OK to save your changes and close the Pre/Post Process tab of the Properties dialog box.
CONFIGURE SUBCLIENT CONTENT
Before You Begin
Review Subclients.
Do not configure the content of a subclient while the parent node or any sibling subclient has a data protection or archive operation currently running on it.
Exchange Mailbox iDataAgents and Exchange Mailbox/Public Folder Archiver Agents: If you change the contents of the default backup set or archive set then the auto-discover feature will be disabled. If you disable the auto-discovery feature, newly created mailboxes will not be backed up/archived unless they are manually discovered and assigned to a subclient.
NAS NDMP iDataAgents: You must ensure there is no overlap in content between all subclients. Overlap in subclient content will result in loss of data. An existing subclient's contents are not automatically changed when another subclient is added with overlapping contents.
SharePoint Server iDataAgent: The Site Content Database, the Site Collection Database, the Site Database, and the Site Index for the virtual server must all be assigned to the same subclient.
Lotus Notes Document iDataAgent: Review Assigning Restore View Names to Newly-discovered Databases
QR Agent: Follow these guidelines when adding a volume to a QR Agent subclient:
The volume must correspond to a physical disk or RAID array.
A volume created by volume management software other than VxVM is not valid subclient content.
Subclients may have overlapping content; however, if two or more subclients overlap, they all must use the same snapshot engine. If the QR policies associated with the subclients are configured to use different snap engines, they must be reconfigured to use the same snap engine in this scenario.
Caution Against Re-configuring Default Subclient Content
We recommend that you do not re-configure the content of a default subclient because this would disable its capability to serve as "catch-all" entity for client data. As a result, the likelihood that some data will not get backed up or scanned for archiving would increase.
Required Capability: See Capabilities and Permitted Actions
1. From the CommCell Browser, right-click the subclient for which you want to configure content, click All Tasks (if applicable) and then click Properties.
2. Follow the procedure below that is applicable for your agent:
For File System, Active Directory, File Archiver, Exchange Public Folder iDataAgents, NDS, and SharePoint Server iDataAgents click the Subclient Properties (Content) tab and configure content for the subclient as described below for your agent:
For File System, Active Directory, File Archiver, NDS, and SharePoint Server iDataAgents: Type the full path of the data that you want to include as subclient content in the Enter New Content field, then click Add. Optionally, click Browse to enter the content. When browsing content while configuring SharePoint subclients, you can add content via multiple selections with the CTRL or SHIFT keys. For Windows, when specifying a UNC Path, click As User, and enter the user account information for the domain user with permissions for that path. For NetWare/DNS, see the Notessection below for content path examples. For Unix File Systems, you can enter the mount point of an NFS-mounted file system, see the Notessection below for examples.
For Exchange Public Folder iDataAgents: Click Browse, select folders to include as content, then click Add.
For the Unix File System iDataAgents, to facilitate the management of resource fork data in Apple double-encoded Macintosh files, click EnableApple Double Support.
For the Unix File System iDataAgents, to view the actual data path for any symbolic link in the subclient content, click Expand symbolic links of subclient content and then click Discover.
For NAS NDMP iDataAgents, configure the Backup Content Path field(s) as described below, then click Add:
Click the drop-down list arrow to display the root volumes on the file server. To change the root volume, click one in the list. If you want to refine the content path further, use the space to the right of (or below) the root volume list to enter additional path information. Note the following:
For NetApp, the root volume is the mount path of each volume.
Features - Novell Directory Services (NDS) iDataAgent
Page 54 of 72
Example: for volume FS1 the root volume will be /vol/FS1.
For EMC Celerra, the root volume is the mount point created for a volume.Example: for volume FS1 with mount point /FS1 the root volume will be /FS1.
For Hitachi, no root volumes are shown in the drop down list. Type the full path of the root volume.Example: for volume FS1 with mount point /mnt/FS1 the root volume will be /mnt/FS1.
For BlueArc, the root volume is a combination of a descriptor of the path and the volume name.Example: for volume FS1 with a mount point of / the root volume will be /__VOLUME__/FS1.
Optionally, for NetApp NAS NDMP, click Browse to enter the content.
For Exchange Mailbox and Exchange Mailbox/Public Folder Archiver Agents follow the procedure to Discover and Assign New Mailboxes or Assign Mailboxes to Another Subclient.
For Lotus Notes Database and Document iDataAgents follow the procedure to Discover and Assign New Databases or Assign Databases to a Subclient.
For DB2, DB2 DPF, Exchange Database, Novell GroupWise, SharePoint Server, SQL Server Database, Sybase, and MySQL iDataAgents, click the Subclient Properties (Content) tab and configure content for the subclient as described below for your agent:
For the DB2 iDataAgent, specify whether you want to include the entire database or a subset of this data as content for the subclient. For the DB2 DPF iDataAgent, specify whether you want to include all the affected database partitions or a subset of this data as content for the subclient.
For Exchange and GroupWise iDataAgents: Click Configure. From the Add/Modify Subclients dialog box click the subclient entry for the database element/Storage Group that you want to add to the new subclient and select the name of the destination subclient from the list that appears. Alternatively, you can select and assign a range of databases/storage groups using the Change all selected databases/storage groups to list. Note that you must have at least one database element/Storage Group assigned to this subclient in order to save the configuration.
A database/Storage Group that is not configured for a subclient does not appear in the list. This can be the case if the subclient containing the database/Storage Group was deleted. If this happens, click Discover to display all databases/Storage Groups.
For the SharePoint Server iDataAgent, follow the procedure to Discover and Assign New Data Types.
For the Sybase iDataAgent, follow the procedure to Manually Discover Databases.
For the MySQL iDataAgent, follow the procedure to Configure MySQL Databases.
For the Informix iDataAgent, click the Subclient Properties (Content) tab and define the contents of the subclient. Specifically, establish the backup mode for the data to be backed up, set the backup level, and decide whether to back up the emergency boot file and/or the ONCONFIG file.
For the Oracle, SAP for Oracle, or Oracle RAC iDataAgent, click the Subclient Properties (Content) tab and define the contents of the subclient. To configure this subclient for specialized types of backups, follow the appropriate procedure below:
Create Subclient for Backing Up Archived Redo Log Files
Create Subclient for Backing Up Offline Databases
Create Subclient for Backing Up Online Databases
Create Subclient for Performing Selective Online Full Backups
For SAN iDataAgents, click the Subclient Properties (Content) tab and configure content for the subclient as described below for your agent:
Image Level on Unix iDataAgent: Click Add. From the Add Content Path dialog box, select the volume(s) that you want to back up (use CTRL + click to select multiple volumes). Click OK. The selected volumes are added to the Contents of subclient list. These volumes are automatically configured to be CXBF devices. Alternatively, use Volume Explorer per specific scenarios to configure CXBF devices.
To configure an unmounted block device or raw device as content, first use Volume Explorer to configure the device as a CXBF device. Then select the configured CXBF device as subclient content. You can ignore the warning that is displayed.
For more information, see When to Use Volume Explorer. For a step-by-step procedure, see Configure a CXBF Device in Volume Explorer.
Image Level and Image Level ProxyHost on Windows iDataAgents: Click Add. Then in the Add Content dialog box, type the full path of the volume or mount point that you want to include as subclient content, then click Add. Optionally, click Browse to select the content. Click OK. The volume or mount point is added to the Contents of subclient list. Add additional content by repeating this step.
ProxyHost iDataAgent: Select a backup host from the Backup Host list. This is the computer to which the BCV is connected. Click Add. In the Content field of the Add/Edit Content for Subclient dialog box, type the primary host path of the content that you want to back up, or click Browseto find and select this data. In the Backup Host BCV Path field of the Add/Edit Content for Subclient dialog box, type the path through which the backup host accesses this data on the BCV, or click Browse to find and select this path. Click OK. The primary host data path and corresponding backup host BCV path are added as a single entry in the Contents of subclient list. To add additional entries, repeat these steps. Refer to Notesbelow for more information.
For Quick Recovery Agents, click the Subclient Properties (Content) tab and configure the following options:
Click Add Volume. From the Adding Volume dialog box, select volume(s) that you want to add to the subclient content (use CTRL + click to select multiple volumes). You can add/edit additional advanced options for the selected volume by select Advanced on the Adding Volume dialog box. Click OK.
Click Add App to select an application and associated volumes. Click OK.
Any instances you intend to protect and recover with the QR Agent must be configured in the QR Agent properties Authentication tab. They will not appear in the Add App dialog box if they are not configured. Only volumes containing datafiles and archive log files will be detected by Add App. Volumes containing control files and redo log files will not be detected.
Features - Novell Directory Services (NDS) iDataAgent
Page 55 of 72

For a clustered Exchange Server, if you are not using VSS to perform an online quiesce, sufficient permissions are required in order to be able to perform an offline quiesce; in such cases, ensure that the User Name specified has Exchange Administrator rights.
See also Configure Subclients for Overlapping Content.
3. Click OK to save your content configuration.
NOTES
Content examples for NetWare are OU=prospects.O=engineering.[Root], (for NDS content), and SYS:\public (for File System content).
Content examples for adding an NFS-mounted file system to subclient content of a Unix File System iDataAgent:
/mountpointA to include the entire file system at mountpointA
/mountpointA/projects for only the projects directory within the file system at mountpointA.
Informix subclients include one or more dbspaces. As databases are added to the dbspaces, the subclients are updated automatically.
Exchange Mailbox iDataAgents and Exchange Mailbox/Public Folder Archiver Agents: Initially, all unconfigured mailboxes are assigned to the default subclient. You can create a new subclient and reassign mailboxes to this new subclient (within the same backup set/archive set). Once assigned, the mailboxes become part of the content of the new subclient.
SharePoint Server iDataAgent: Initially, all unconfigured data types are assigned to the default subclient. You can create a new subclient and reassign data types to this new subclient. Once assigned, they become part of the content of the new subclient.
ProxyHost iDataAgent: The primary host data path is backed up by the subclient and is the path through which the backup host accesses this data on the BCV. A primary host path and its corresponding backup host path are listed in the following format:
<primary_host_path> --> <backup_host_path>
For example, assume that you want to back up the D:\data directory from your primary host and D:\ is mirrored by a BCV, which is mapped to the backup host as F:\. Consequently, the path to this data on the backup host is F:\data. When you add this directory to a subclient, it is listed in the Contents of subclient pane as D:\data --> F:\data.
CONFIGURE THE SUBCLIENT FOR DATA ENCRYPTION
Encryption settings made at the subclient level are for data protection and recovery operations run from the CommCell Console and are not related in any way to settings made at the instance level which is for third-party Command Line operations only.
See Data Encryption - Support for a list of supported products.
Before You Begin
Encryption must be enabled at the client level prior to configuring any subclients residing on that client. See Configure the Client for Data Encryption.
If you are attempting to configure for third-party Command Line operations, do not use this procedure. See Configure Third-party Command Line Operations for Encryption.
Required Capability: Capabilities and Permitted Actions
1. From the CommCell Console, right-click the subclient and click Properties.
2. From the Subclient Properties (Encryption) tab, select an option based on the criteria described in the Encryption tab help.
3. Click OK to save your settings and close subclient properties.
CREATE A NEW SUBCLIENT
Before You Begin
Review Subclients.
Do not create a subclient while the parent node or any sibling subclient has a data protection or archive operation currently running on it.
In cases where a new subclient is created with the same name as a deleted subclient, the system will append a Unix time stamp to the deleted subclient's name in data protection job history reports and views to distinguish the two subclients. For example, subclientname_1104257351.
Informix iDataAgents: If you will be using the Informix ONBAR utility to create backup and restore scripts, you need not create subclients. Otherwise, if you will be using the CommCell Console to back up and restore Informix database objects (subsets/dbspaces), then you will need to create a subclient.
The primary host path in the Content field is used for browse and restore purposes. However, it is the data in the Backup Host BCV Path which is actually backed up. If these two paths do not accurately correspond, the path that appears when data is browsed for restore does not accurately reflect the data that will be restored. In the example given above, assume that D:\data is entered in the Content field, while F:\data1 is accidentally entered in the Backup Host BCV Path. If you browse and select D:\data to be restored, it is actually D:\data1 that is restored. (Remember, F:\Data1 is the path on the backup host that corresponds to D:\data1 on the primary host.)
Features - Novell Directory Services (NDS) iDataAgent
Page 56 of 72
ProxyHost iDataAgents: If you are using a BCV, you must prepare a batch file or a shell script file on the backup host containing commands to synchronize and split the BCV. The Resource Pack includes information on configurations for these batch files or shell scripts, as well as examples that apply to specific applications and hardware (e.g., Exchange databases in an EMC Symmetrix environment). See Resource Pack for more information on the Resource Pack.
The ProxyHost iDataAgent also requires that you set permissions for the batch/shell script file on the backup host.
SQL Server Database iDataAgents: When running on Windows Server 2003 and VSS is enabled, the New Subclient command is not available.
PostgreSQL iDataAgents: Once you configure the PostgreSQL instance, the system automatically generates the default backup sets and default subclients. However, you can use the CommCell Console to create user-defined subclients for dump backup sets to distribute some of the database content. You cannot create user-defined subclients for FS backup sets.
Required Capability: See Capabilities and Permitted Actions
1. From the CommCell Browser, right-click the node (agent/backup set/archive set/instance) for which you want to create a new subclient, click All Tasks (if applicable), and then simply click New Subclient for most agents.
For the SQL Server iDataAgent, expand New Subclient and click either Database to include individual databases or File/File Group to include database elements.
2. Click the General tab or General (Quick Recovery Agent) tab of the Subclient Properties dialog box and type the name (up to 32 characters) of the subclient that you want to create.
For supported agents identified in Support Information - Snapshot Engines, you can select a QSnap option to snap data and then perform a data protection operation on the data.
For Image Level on Unix and Image Level ProxyHost on Unix, use the Incremental Support Using field to configure either a CXBF subclient or a checksum subclient and to enable incremental support for either subclient type.
For QR Agents, you must also select a QR Policy from the QR Policy list.
For the Windows iDataAgents that support VSS, you can optionally Enable VSS on a Subclient.
3. Select other options from the General tab as appropriate for the agent.
4. Click the Content or Databases tab of the Subclient Properties dialog box and Configure Subclient Content as appropriate for your agent.
5. For all agents (except QR), click the Storage Device (Data Storage Policy) tab of the Subclient Properties dialog box, then select a data storage policy to associate with this subclient from the storage policy list.
For the DB2 and DB2 DPF iDataAgents, you can also change the number of data backup streams. For the DB2 DPF iDataAgent, the default stream threshold should be equal to the total number of database partitions for the subclient.
For SQL Server iDataAgents, you can also click the Storage Device (Log Storage Policy) tab of the Subclient Properties dialog box, then select a log storage policy to associate with this subclient from the storage policy list and select the number of backup streams for transaction log backup jobs.
For 1-Touch for Unix, it is strongly recommended that the storage policy that you select for the subclient configured for 1-Touch use a MediaAgent on a different computer. If you do this, and if the system crashes, the media will not have to be exported to another MediaAgent in order to recover the system.
6. For Oracle and DB2 iDataAgents, click the Backup Arguments (Oracle) or Backup Arguments (DB2, DB2 DPF) tab of the Subclient Properties dialog box and Configure Backup Arguments as appropriate for your agent. Note that the backup arguments for Informix are located on the Content tab.
7. For Migration Archiver Agents, click the Archiving Rules or Rules tab of the Subclient Properties dialog box and configure archiving rules as appropriate for your agent. In order to perform rules-based migration archiving operations, the Disable All Rules checkbox must be cleared.
If the File Archiver for Windows supports Data Classification, several filter-like configuration fields are defined as archiving rules and are available from the Subclient Properties (Rules) tab. If you want to define content and archiving rules based on file attributes other than volumes, size, and modified time (i.e., if you want to customize your rules), click the Advanced tab and configure as appropriate. Also, stub management options can be configured from the Stub Rule tab. See Configure Archiving Rules - File Archiver Agents for step-by-step instructions.
8. For ProxyHost and Image Level ProxyHost iDataAgents, click the Pre/Post Process tab of the Subclient Properties dialog box. In the PreScan field, type the path to the batch file/shell script file that contains those commands that are to run before each backup of the subclient, or click Browse to locate and select this file. For ProxyHost and Image Level ProxyHost, the file must reside on the backup host or primary host.
9. Optionally (if supported for your agent) you can:
Add a Data Protection or Discovery Filter for a Subclient on the Filters tab.
Configure a Subclient for Pre/Post Processing of Data Protection/Archive Operations on the Pre/Post Process tab.
Enable Software Compression for a Subclient on the Software Compression tab of the Storage Device tab.
Configure the Subclient for Data Encryption on the Encryption tab.
Enable or Disable Operations for this subclient on the Activity Control tab.
Configure Mailbox Stores for Auto-Discovery on the Auto-discovery tab.
Configure the Subclient for 1-Touch on the 1-Touch Recovery tab.
View or change the user group security associations for this subclient from the Security tab.
Features - Novell Directory Services (NDS) iDataAgent
Page 57 of 72

Determine location from where archive logs will be backed up or deleted from the Log Destinations tab.
10. Click OK to save the subclient configuration. For QR Agents, this procedure is now complete. For all other agents, continue on to the next step.
11. The Backup Schedule dialog box advises you to schedule data protection operations for your new subclient. It is recommended you elect to set a schedule now. You can also associate this subclient with an All Agent Types schedule policy (which is automatically created by the system, or can be a user defined Data Protection schedule policy). If you have already associated a schedule policy at a previous level (Backup Set/Instance, Agent, Client, or Client Computer Group) the schedules defined in the Schedule Policy will be automatically applied to the new subclient. See Schedule Policy for more information.
If you want to associate this subclient with an All Agent Types schedule policy, click Associate with Generic Schedule Policy, and then select that schedule policy from the drop-down list box. Click OK.
If you want to associate this subclient with a specific schedule policy, click Associate to schedule policy, and then select the schedule policy from the drop-down list box. Click OK.
If you have selected to define a schedule for this subclient:
Click Schedule.
From the Backup/Archive Options dialog box, select the type of data protection operation that you want to schedule.
If you want to set Advanced Backup/Archive Options, click Advanced.
After selecting the data protection type and any advanced options, click OK. The Schedule Details dialog box appears.
From the Schedule Details tab, select the scheduling options that you want to apply, then click OK.
If you don't want to create a data protection schedule at this time, click Do Not Schedule, and then click OK.
This task is now complete.
CREATE A NEW SUBCLIENT POLICY
Before You Begin
Ensure that no data protection operations are currently running on the backup sets that you will be associating with the new Subclient Policy.
Ensure that there are no user-defined subclients in the backup sets that you will be associating with the new Subclient Policy.
Required Capability: See Capabilities and Permitted Actions
1. From the CommCell Browser, expand the Policies node then right-click the Subclient Policies node and click New Subclient Policy. The Create New Subclient Policy dialog box will display.
2. From the Create New Subclient Policy (General) tab of the Create New Subclient Policy dialog box, enter a name for your subclient policy in the Nameentry field, then select the appropriate file system type from the iDataAgent drop-down list. The display pane will show one or more subclient templates listed for your policy.
3. From the display pane of the Create New Subclient Policy (General) tab, assign a Storage Policy for each subclient template by clicking in the Storage Policy column and selecting one from the list.
4. If you wish to set up a Regular user-defined type of Subclient Policy Subclient, then click Add. The Create New Subclient dialog box will display that will allow you to enter the following information:
Create New Subclient (General) tab (required)
Enter a name for your user-defined subclient in the Name field.
Optionally, you can change the Number of Data Readers to a value other than 1 (which is the default), if applicable for your agent type.
Optionally, you can select the Allow multiple data readers within a drive or mount point checkbox to enable this feature.
Optionally, you can clear the Backup System State checkbox, which is selected by default and causes the Default Subclient to back up the system state with the file system. Clearing the checkbox causes the Default Subclient to back up only the file system and not the system state. You can then enable system state backup for a different client in the Backup Set.
Optionally, you can select the Use VSS checkbox to enable VSS backups for this subclient, if applicable for your agent type.
Optionally, you can select the Use QSnap checkbox to enable backups of locked and/or open files for this subclient using QSnap, when QSnap is installed on clients of the applicable agent type.
Create New Subclient (Content) tab (required)
Specify the contents for this subclient by either clicking Browse to browse for content, or by typing in a path in the Enter New Content field then clicking Add. Repeat this step to include additional objects in subclient content. If you are editing the content for a Default subclient, see the Notessection below for more information.
If you are typing in a UNC path as content, then you will be prompted to enter a user name and password for accessing that path.
Optionally, you can select the Treat characters as regular expressions checkbox so that any characters that are sometimes used as wildcard characters will be treated as wildcards not as literals. See Wildcards for a list of supported regular expressions for your agent.
Features - Novell Directory Services (NDS) iDataAgent
Page 58 of 72
Create New Subclient (Filters) tab (optional)
You can select one of the following values from the Include Global Filters list to enable or disable global filters to exclude data from backups on this subclient:
Do not use - Disables Global Filters for this subclient.
Always use - Enables Global Filters for this subclient.
Auto - Enables or disables Global Filters for this subclient depending on whether the Use Global Filters on All Subclients option is enabled or disabled on the Control Panel (Global Filters) dialog.
You can specify a file/folder/pattern that you want to exclude from backups by clicking the upper Browse button to browse for an object, or by clicking the upper Add button and then typing in the object you want to exclude.
You can specify an exception to your exclude filter by either clicking the lower Browse button and browsing for the object, or by clicking the lower Add button and then typing in the object you want to enter as an exception to the exclusions list.
Create New Subclient (Pre/Post Process) tab (optional)
You can type in or Browse for a batch file or shell script that want executed after each job phase.
You can also select the Run Post Process for all attempts checkbox(es) if desired for the appropriate job phase.
For Windows agents, you can click the Change button for the Run As field to specify Local System Account or other username and password that has authorization to run the specified processes.
Create New Subclient (Storage Device - Data Storage Policy) tab (required)
Select a Storage Policy that you want to use for this subclient from the drop-down list.
Create New Subclient (Storage Device - Data Transfer Option) tab (optional)
You can select the desired software compression setting to be used in case hardware compression is not available or not selected on the destination storage policy copy. Otherwise you can leave the default setting of Off to specify no software compression.
You can change the number of Network Agents to a value other than 1 by typing in or selecting another value from the list.
You can enable the option to Throttle Network Bandwidth and adjust the throughput setting by selecting another value from the list.
Once you have entered all of your configuration for the Regular user-defined subclient type, click OK to save your changes.
5. If you wish to further define the configuration settings, or enter a different name for the Default Subclient, you can do so by selecting the desired subclient type in the display pane and then clicking Edit. Refer to Step 4 above for entering specific information on each of the subclient property tabs.
6. Click the Association tab of the Create New Subclient Policy dialog box.
7. From the Association tab, expand the tree nodes and select the desired backup set checkbox(es) for file system clients that you want to be associated to this Subclient Policy.
8. Click OK to save the new Subclient Policy, then press F5 to refresh and update the CommCell Console.
DELETE A DATA PROTECTION FILTER FROM A SUBCLIENT
Before You Begin
Review Filters.
Do not change the data protection or discovery filter of a subclient that has a data protection operation in progress.
File Archiver for Windows/Unix Agents: We recommend that you don't delete the following entries from the exclusion filter, as it could cause your file system to be inoperable. For Windows, these include: *.dll, *.bat, *.exe, *.cur, *.ico, *.lnk. For Unix, these include *.a, *.ksh, *.csh, *.sh, *.lib, *.so.
Required Capability: Capabilities and Permitted Actions
1. From the CommCell Browser, right-click the subclient whose data protection or discovery filter you want to delete, and then click Properties from the shortcut menu.
2. Click the Filters tab of the Subclient Properties dialog box.
3. To delete an entry from the Exclusions list, click the entry in the upper pane then click the upper Delete button. (Repeat this step for each entry that you want to delete.)
4. To delete an entry from the Exceptions list (if applicable for your agent), click the entry in the lower pane then click the lower Delete button. (Repeat this step for each entry that you want to delete.)
5. Click OK to save your changes.
If you want to preserve the characteristic behavior of the Default subclient to back up all content on the client that is not assigned to other subclients within the backup set, then we recommend leaving the default setting on the Content tab (which is "\" or "/" depending on your file system type).
Features - Novell Directory Services (NDS) iDataAgent
Page 59 of 72
NOTES
Whenever you delete an entry from the exclusion filter, check if the exceptions list (i.e., lower pane) contains any entries that are children of the deleted data (if applicable for your agent). If so, you should delete them as described in Step 4 since they no longer need to be listed. The system automatically deletes any exceptions that are children of a deleted exclusion unless you used wildcard expressions in the exclusion path.
When you change a data protection or discovery filter, the change is effective the next time the subclient is backed up/archived.
Data will not be backed up in a differential backup for a subclient after a filter was removed.
Since Incremental backups only back up data that has been modified since the last backup, previously filtered files whose filters are now removed, will not be backed up unless they have been modified since that last backup. To back up previously filtered files that have not been modified but whose filters have been removed since the last backup, you need to run a Full backup.
Performing a full backup after changing filters or exceptions is recommended.
DELETE A USER-DEFINED SUBCLIENT
Related Topics:
Command Line Interface - qdelete subclient
Subclients
Required Capability: See Capabilities and Permitted Actions
-defined subclient:
1. From the CommCell Browser, right-click the user-defined subclient that you want to delete, and then click Delete from the shortcut menu.
2. A confirmation message is displayed, asking if you want to delete the subclient.Click No to cancel the deletion and retain the subclient, or click Yes to continue the deletion. If you click Yes:
the subclient, and any data that may have been protected/archived by the subclient are logically deleted, and you can no longer access the corresponding data for recovery/retrieve purposes. However, the data remains valid for the length of time specified by the associated retention period. Some agents allow you to browse data from a deleted subclient provided that the Browse Data Before date and time precedes the time that the user-defined subclient was deleted.
for agents that support a default subclient, once the user-defined subclient is deleted its contents are automatically reallocated to the default subclient the next time a data protection/archive/discovery operation is run on the default subclient to ensure data protection coverage.
the system deletes the selected subclient node and removes it from the CommCell Browser.
the system deletes any data protection/archive and recovery/retrieve job schedules that are associated with the subclient.
DISABLE GLOBAL FILTERS ON A SUBCLIENT
Before You Begin
Review Global Filters.
Do not disable the Global Filter for a subclient that has a data protection operation in progress.
Performing a full backup after disabling the Global Filter on a subclient is recommended.
When you disable the Global Filter on a subclient, the change is effective the next time a data protection operation is run on the subclient.
Required Capability: Capabilities and Permitted Actions
1. From the CommCell Browser, right-click the subclient whose Global Filter you want to disable, and then click Properties from the shortcut menu.
2. Click the Filters tab of the Subclient Properties dialog box.
3. To disable Global Filters on this subclient, select one of the following values from the Include Global Filters list:
OFF - select this option to always disable Global Filters for this subclient.
Use Cell Level Policy - select this option to disable Global Filters for this subclient only when the Use Global Filters on All Subclients option is disabled on the Control Panel (Global Filters) dialog.
4. Click OK to save your changes.
ENABLE/DISABLE GLOBAL FILTERS ON A SUBCLIENT
Before You Begin
Make sure that CommCell Level Global Filters are defined or CommNet Global Filters are enabled. See Setup Global Filters in CommNet or Setup Global
Features - Novell Directory Services (NDS) iDataAgent
Page 60 of 72

Filters for a CommCell for step-by-step instructions.
Required Capability: Capabilities and Permitted Actions
1. From the CommCell Browser, right-click the subclient whose Global Filter you want to enable, and then click Properties from the shortcut menu.
2. Click the Filters tab of the Subclient Properties dialog box.
3. To enable/disable Global Filters on this subclient, select one of the following values from the Include Global Filters list:
ON - select this option to disable Global Filters for this subclient.
OFF - select this option to enable Global Filters for this subclient.
Use Cell Level Policy - select this option to enable or disable Global Filters for this subclient only when the Use Global Filters on All Subclientsoption is enabled on the Control Panel (Global Filters) dialog.
4. Click OK to save your changes.
ENABLE OR DISABLE OPERATIONS
Required Capability: See Capabilities and Permitted Actions
1. From the CommCell Browser, right-click the CommServe, client computer group, client computer, agent, or subclient, and then click Properties from the short-cut menu.
2. From the Activity Control tab of the associated Properties dialog box, select or clear option(s), as desired.
3. Click OK.
ENABLE OR DISABLE SOFTWARE COMPRESSION FOR A SUBCLIENT
Before you Begin
Do not enable/disable software compression for a subclient that is being backed up/archived.
Required Capability: Capabilities and Permitted Actions
1. From the CommCell Browser, right-click the subclient for which you wish to enable software compression and then click Properties.
2. Click the Storage Device tab and from the Data Storage Policy tab, select the storage policy from the Storage Policy list.
If applicable for the selected agent, click the Log Storage Policy tab and select a storage policy from the Transaction Log Storage Policy list.
3. Then click the Storage Device (Data Transfer Option) tab and choose the appropriate compression option for this subclient.
4. Click OK to save your changes.
This task is now complete.
REMOVE A PROCESS FROM PRE/POST PROCESSING OF DATA PROTECTION/ARCHIVE OPERATIONS
Before You Begin
We recommend not removing a pre/post process for a subclient that is currently running a data protection or archive operation.
Review the Overview and Agent-Specific Guidelines for your agent before removing pre/post processes for data protection/archive operations.
Required Capability: Capabilities and Permitted Actions
Level CapabilityCommCell Administrative Management with CommCell level associationClient Computer Group Administrative Management with Client Computer Group level association
Client Agent Management with Client level associationAgent Agent Management with Agent level association
Subclient Agent Management with Subclient level association
Disabled data management and/or data recovery operations are displayed with client and/or agent icon changes in the CommCell Browser. For a comprehensive list of all icons in the CommCell Console, see CommCell Console Icons.
Features - Novell Directory Services (NDS) iDataAgent
Page 61 of 72

1. From the CommCell Browser, right-click the subclient for which you want to remove a pre/post process, and then click Properties from the shortcut menu.
2. Click the Pre/Post Process tab of the Subclient Properties dialog box.
3. Click the text inside the space that corresponds to one of the following phases for which you want a pre/post process removed, then press the Delete key:
PreScan
PreArchive
PreCopy
PreSnap
PostBackup
PostScan
PostArchive
PostCopy
PostSnap
4. Repeat Step 3 for any additional processes that you want to remove.
5. Click OK.
RENAME A SUBCLIENT
Before You Begin
You can rename a subclient at any time. However, we recommend that you don't rename a subclient while a data protection or archive operation is running on that subclient.
In cases where a subclient is renamed using the same name as a deleted subclient, the system will append a Unix time stamp to the deleted subclient's name in data protection job history reports and views to distinguish the two subclients. For example, subclientname_1104257351.
Required Capability: See Capabilities and Permitted Actions
1. From the CommCell Browser, right-click the subclient that you want to rename, and then click Properties from the shortcut menu.
2. From the Subclient Properties (General) tab, or the QR Agent Subclient Properties (General) tab, type the new name in the Subclient Name field, and then click OK.
The CommCell Browser updates the subclient with its new name. The new name will also be reflected in any associated schedules and reports.
SET THE NETWORK BANDWIDTH AND NETWORK AGENTS FOR A DATA PROTECTION OPERATION
Before you Begin
Do not modify the network bandwidth and network agents for a subclient or instance that is being backed up.
Required Capability: Capabilities and Permitted Actions
1. From the CommCell Browser, right-click a subclient and then click Properties.
For the DB2, DB2 DPF, Informix, Oracle, Oracle RAC, SAP, or Sybase iDataAgent, right-click an instance and then click Properties.
2. Click the Storage Device Data Transfer Option tab.
For the QR Agent:
To control network bandwidth settings, use the Throttle Network Bandwidth section in the General tab of the Subclient Properties dialog box.
To control the number of network agents, you must create a nQRNetworkAgents registry key.
3. Enter a number of Network Agents that must be used to perform data protection operations on the subclient/instance.
4. Click the Throttle Network Bandwidth (MB/HR) option and then enter the throughput as needed. Note that throttling is done on a per Network Agent basis.
5. Click OK to save the changes.
This task is now complete.
Features - Novell Directory Services (NDS) iDataAgent
Page 62 of 72

VIEW DATA PATHS ASSOCIATED WITH A SUBCLIENT
Required Capability: See Capabilities and Permitted Actions
1. From the CommCell Browser, right-click the subclient whose data paths you want to view, then click Properties from the shortcut menu.
2. Click the Storage Device tab of the Subclient Properties dialog box.
3. From the Data [or Logs] Storage Policy tab, click Show Data Paths to view the data paths used by the subclient to access the storage media for data protection operations. Click Close to exit the Data Paths dialog box.
4. Click OK to exit the Subclient Properties Storage Device tab.
VIEW SUBCLIENT CONTENT
Required Capability: See Capabilities and Permitted Actions
1. From the CommCell Browser, right-click the subclient whose content you want to view, then click Properties.
2. From the Subclient Properties dialog box, click the Content tab (or Databases tab for Lotus Notes) to view the contents of the subclient.
3. Click OK to close the dialog box.
Back To Top
Features - Novell Directory Services (NDS) iDataAgent
Page 63 of 72

Backup Job HistoryTopics | How To | Related Topics
Overview
Items That Were Backed Up
Items That Failed
Pruning Backup History Information
Supported Features
Content Indexing History Information
OVERVIEW
You can view the backup and restore history of iDataAgents, BackupSets/Instances, and subclients.
The Backup Job History Filter dialog box allows you view detailed, historical information about backup jobs. Once you have chosen your filter options, they are displayed in the Backup Job History window.
For information on Job Details displayed in the Job History, see Viewing Job Information.
From this window, you can right-click a backup job to:
Browse the data backed up by the backup set or instance from the Backup Job History window. This is provided as right-click option for each job. (This menu option, when selected, initiates the Browse Options dialog box preset with the values needed to browse the data.)
Browse the snapshots created during SnapProtect backup
View items that failed during the backup job
View details of the backup job
View files that were not indexed during a backup job that performed content indexing
View associated media
View events of the backup job
View a list of items that were backed up
View a list of items that were moved to media for a SnapProtect backup job
View the log files of the backup job.
View the RMAN log of an Oracle backup job.
View the BRTools log of a SAP for Oracle job. You can view the BRTools log for only those jobs that were initiated from the CommCell Console.
ITEMS THAT WERE BACKED UP
The View backup file list option allows you to view a list of the files that were backed up during a backup job, along with the data sizes of each backed up file. The View backed up messages option allows you to view a list of messages that were backed up by using, along with the alias name, display name, email address, sender name, and recipient of each message.
From these windows you can conduct searches based on a particular string, allowing to find particular files quickly and easily.
See View the Items That Were Protected During a Data Protection Operation for step-by-step instructions.
ITEMS THAT FAILED
The items that failed for a data protection operation include individual files that may fail the job even though a particular job completed successfully. You can determine the degree of success for these jobs using this window.
Filters can be used in conjunction with the "Items That Failed" list on the data protection Job History Report to eliminate backup or archive failures by excluding items which consistently fail that are not integral to the operation of the system or applications. Some items fail because they are locked by the operating system or application and cannot be opened at the time of the data protection operation. This often occurs with certain system-related files and database
It is not recommended that this option is used to view a very large list of items that were backed up (such as lists that total over 100,000 items). It is suggested that the Browse option is used to find a list of backed up items in such cases.
Features - Novell Directory Services (NDS) iDataAgent
Page 64 of 72
application files.
Also, keep in mind that you will need to run a full backup after adding failed files to the filter in order to remove them.
See View the Items That Failed For a Data Protection Operation for step-by-step instructions.
PRUNING BACKUP HISTORY INFORMATION
You can prune backup history information based on the number of days established in the Days to keep the backup job histories option from the Media Management Configuration (Service Configuration) dialog box available in the Control Panel.
SUPPORTED FEATURESNAS iDataAgents do not support the ability to view items that failed.
The Image Level and Image Level ProxyHost iDataAgents do not support the ability to Browse the data of a selected backup job in Backup Job History.
CONTENT INDEXING HISTORY INFORMATION
Content Indexing history can also be viewed of iDataAgents, BackupSets/Instances, and subclients. The following information is displayed:
ITEMS THAT WERE SUCCESSFULLY CONTENT INDEXEDYou can view the list of items that were successfully content indexed during a Content Indexing operation for a particular job. for step-by-step instructions, see View the Items that Were Successfully Content Indexed.
CONTENT INDEXING FAILURES
Content Indexing failures allows you to look at the messages, files and documents that could not be indexed during a content indexing operation. Content Indexing looks at each file (of the supported data types) and indexes its contents allowing advanced searches of backed up/archived/migrated data.
Files that were not indexed, (perhaps because the file’s content could not be read) are added to the Content Indexing Failures list, and are viewable from the View Content Index (Failed Items) option in the Job History window. For step-by-step instruction, see View the Items that Failed to Content Index.
Back to Top
Backup Job History - How ToTopics | How To | Related Topics
View Backup Job History
View the Items That Were Protected During a Data Protection Operation
View the Items That Failed For a Data Protection Operation
View Job History Details
View the Media or Mount Paths of a Job History
View the Events of a Job History
View the Items that were Moved to Media during SnapProtect Backup
View the Log Files of a Job History
A listing of files and folders that failed is not available for the Quick Recovery Agent, or the Image Level and Image Level ProxyHost iDataAgents. These agents do not perform a file level backup/copy.
Certain application related files can never be backed up by the File System iDataAgent due to the nature of the data. For example, Microsoft SQL Server database files cannot be backed up by the File System iDataAgent. In this and other similar circumstances, consider entering files such as these as exclusions in the corresponding subclient filter.
If you have installed the SQL Server iDataAgent, do not use the stored procedure sp_delete_backuphistory, sp_delete_database_backuphistory and sp_delete_backup_and_restore_history provided by Microsoft clean up backup history. By default backup history is automatically pruned from the CommServe database and the Microsoft SQL Server, as necessary.
Features - Novell Directory Services (NDS) iDataAgent
Page 65 of 72

View the Items that Were Not Indexed During Content Indexing
View the Items that Were Successfully Content Indexed
Resubmit a Backup Job
VIEW BACKUP JOB HISTORY
1. From the CommCell Browser, right-click the entity (client computer, iDataAgent, backup set or subclient) whose backup history you want to view, click View, and then click View Backup History.
2. From the Backup History filter window select the filter options, if any, that you want to apply, and then click OK. The system displays the Backup Job History window.
3. Click OK.
VIEW THE ITEMS THAT WERE PROTECTED DURING A DATA PROTECTION OPERATION
Required Capability: none required
1. From the CommCell Browser, right-click the entity whose history of data protection operations you want to view, click View, and then click the necessary options to view a job history.
2. From the Job History Filter dialog box, select the filter options, if any, that you want to apply, and then click OK.
3. From the Job History window, right-click the operation whose list of protected items you want to view, and then select View backup file list/View Backed Up Messages. The Backup file List window displays a list of the backed up files/messages that were included in the backup job. You can use the Search option to find items in the window.
4. Click File -> Exit.
5. Click Close from the Job History window.
VIEW THE ITEMS THAT FAILED FOR A DATA PROTECTION OPERATION
1. From the CommCell Browser, right-click the entity whose history of data protection operations you want to view, click View, and then click to view a job history.
2. From the Job History Filter dialog box, select the filter options, if any, that you want to apply, and then click OK.
3. From the Job History window, right-click the operation whose list of failed items you want to view, and then select View Failed Items. The Unsuccessful Backup Files window (for DataArchiver Agents, Items On Which Archive Failed) displays those items that failed. If no items failed, a message to that effect is displayed.
4. Click Close.
VIEW JOB HISTORY DETAILS
Required Capability: See Capabilities and Permitted Actions
1. From the CommCell Browser, right-click the entity (e.g., subclient, client computer, etc.) whose job history you want to view, click View, and then click job history.
2. From the Job History Filter dialog box, select the filter options that you want to apply and click OK.
This option is available for File System-like agents.
A listing of files and folders that failed is not available for the Quick Recovery Agent, nor the Image Level and Image Level ProxyHost iDataAgents. These agents do not perform a file level backup/copy.
Features - Novell Directory Services (NDS) iDataAgent
Page 66 of 72
3. From the Data Management Job History window, right-click the job whose job details you want to view, and then click View Job Details.
4. The Job Details dialog box appears, displaying detailed job history in General, Details, Phase Details and Attempts tabs for the selected job.
5. Click OK.
VIEW THE MEDIA OR MOUNT PATHS OF A JOB HISTORY
1. From the CommCell Browser, right-click the entity (e.g., subclient, client computer, etc.) whose job history you want to view, click View, and then select the appropriate history.
2. From the Job History window select the filter options, if any, that you want to apply, and then click OK.
3. From the job history widow, right-click the backup whose media or mount paths you want to view, and then click View Media.
4. The Media Used By Job ID window displays a list of media or mount paths used by the operation.
5. Click OK.
VIEW THE EVENTS OF A JOB HISTORY
Required Capability: See Capabilities and Permitted Actions
1. From the CommCell Browser, right-click the entity (e.g., subclient, client computer, etc.) whose job history you want to view, click View, and then click Job History.
2. From the Job History Filter dialog box, select the filter options that you want to apply and click OK.
3. From the Data Management Job History window, right-click the job whose job details you want to view, and then click View Events.
4. The All Found Events window gets displayed. If no events where found for the back up, a message is displayed to that effect.
5. Click Close.
VIEW THE ITEMS THAT WERE MOVED TO MEDIA DURING SNAPPROTECT BACKUP
1. From the CommCell Browser, right-click the entity whose history of data protection operations you want to view, click View, and then click the necessary options to view a job history.
2. From the Job History Filter dialog box, select the filter options, if any, that you want to apply, and then click OK.
3. From the Job History window, right-click the operation whose list of items moved to media you want to view, and then select View Backup Copy file listing. The Backup file List window displays a list of the backed up files that were included in the backup copy job. You can use the Search option to find items in the window.
4. Click File -> Exit.
5. Click Close from the Job History window.
VIEW THE LOG FILES OF A JOB HISTORY
Required Capability: See Capabilities and Permitted Actions
If viewing the details of a job with a pending or failed status, the Reason for Job Delay field will contain an Error Code, which, if clicked, will launch the customer support website displaying troubleshooting article(s) related to the specific issue.
This option is available for the SnapProtect Backup.
To view the files moved to media for a backup copy job, right-click the SnapProtect backup job corresponding to the Backup Copy job and select View Backup Copy file listing. View backup items will not display anything for a Backup Copy job.
Features - Novell Directory Services (NDS) iDataAgent
Page 67 of 72
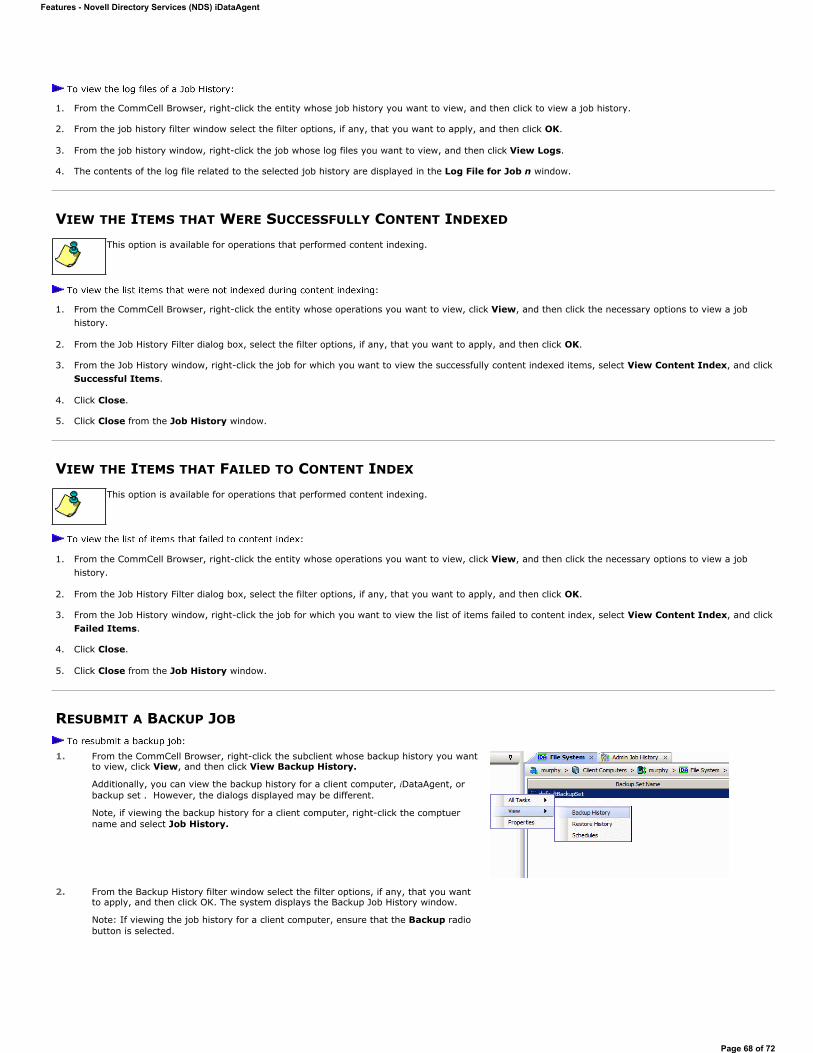
1. From the CommCell Browser, right-click the entity whose job history you want to view, and then click to view a job history.
2. From the job history filter window select the filter options, if any, that you want to apply, and then click OK.
3. From the job history window, right-click the job whose log files you want to view, and then click View Logs.
4. The contents of the log file related to the selected job history are displayed in the Log File for Job n window.
VIEW THE ITEMS THAT WERE SUCCESSFULLY CONTENT INDEXED
1. From the CommCell Browser, right-click the entity whose operations you want to view, click View, and then click the necessary options to view a job history.
2. From the Job History Filter dialog box, select the filter options, if any, that you want to apply, and then click OK.
3. From the Job History window, right-click the job for which you want to view the successfully content indexed items, select View Content Index, and click Successful Items.
4. Click Close.
5. Click Close from the Job History window.
VIEW THE ITEMS THAT FAILED TO CONTENT INDEX
1. From the CommCell Browser, right-click the entity whose operations you want to view, click View, and then click the necessary options to view a job history.
2. From the Job History Filter dialog box, select the filter options, if any, that you want to apply, and then click OK.
3. From the Job History window, right-click the job for which you want to view the list of items failed to content index, select View Content Index, and click Failed Items.
4. Click Close.
5. Click Close from the Job History window.
RESUBMIT A BACKUP JOB
This option is available for operations that performed content indexing.
This option is available for operations that performed content indexing.
1. From the CommCell Browser, right-click the subclient whose backup history you want to view, click View, and then click View Backup History.
Additionally, you can view the backup history for a client computer, iDataAgent, or backup set . However, the dialogs displayed may be different.
Note, if viewing the backup history for a client computer, right-click the comptuer name and select Job History.
2. From the Backup History filter window select the filter options, if any, that you want to apply, and then click OK. The system displays the Backup Job History window.
Note: If viewing the job history for a client computer, ensure that the Backup radio button is selected.
Features - Novell Directory Services (NDS) iDataAgent
Page 68 of 72

3. The Backup Job History window displays with the specified filter options.
4. Right-click on any job, and select Resubmit Job.
5. From the Backup Options dialog box, select the job options appropriate for the job you want to restart.
6. If you need to run the backup operation immediately, select Immediate from the Job Initiation tab. Go to step 11.
7. If you need to schedule the restore operation, select Schedule from the Job Initiation tab and click Configure.
8. From the Schedule Details dialog box that appears, select the appropriate scheduling options.
Click Options to view the Advanced Schedule Options dialog box.
9. From the Advanced Schedule Options dialog box: Range of recurrence: Specify the date on which you want this schedule to take effect.
Features - Novell Directory Services (NDS) iDataAgent
Page 69 of 72

Back to Top
Repeat: Select the value for which you want to run the job repeatedly on the day in which the job is scheduled to run. Time Zone: Select a specific time zone from which the job schedule time will be based.
Click OK to close the Advanced Schedule Options dialog box.
10. Click OK to close the Schedule Details window.
11. Click OK to close the job restart window.
Features - Novell Directory Services (NDS) iDataAgent
Page 70 of 72
Restore Job HistoryTopics | How To | Related Topics
Overview
Items That Restored
Supported Features
OVERVIEW
The Restore History Filter dialog box allows you to view detailed, historical information about restore jobs.
For information on Job Details displayed in the Job History, see Viewing Job Information.
Once you have chosen your filter options, they are displayed in the Restore Job History window. From this window you can right-click a restore job to:
View Restore Items; items in the job that were Successful, Failed, Skipped or All. These items, if any, will be listed in the Restored Files window.
View Job Details of the restore job. The job details will be listed in the Job Details window.
View Events of the restore job. The job events will be listed in the All Found Events window.
View Log files of the restore job. The job log files will be listed in the Log File window.
View the RMAN Log of an Oracle restore job. The RMAN Log will be listed in the Oracle Restore Log window.
View the BRTools log of a SAP for Oracle restore job. You can view the BRTools log for only those jobs that were initiated from the CommCell Console.
ITEMS THAT ARE RESTORED
When viewing files that are restored in the Restored Files window, each of the files is listed with the restore status level appended at the end of the file path. The possible status levels are: RESTORED, FAILED and OLDER.
Successfully restored files will be listed with RESTORED appended to the file path. If files are not restored/recovered due to errors, the file paths will be appended with FAILED. Under some circumstances, the system may not restore/recover certain files because they are older versions of the same files already present in the files system; these files are appended with the word OLDER.
SUPPORTED FEATURES
Consider the following.
NAS iDataAgents do not support the ability to view failed/successful item lists.
Restore Job History will not display Oracle rman_util jobs at the instance level.
Back to Top
Restore History - How ToTopics | How To | Related Topics
View Restore Job History
View the Events of a Job History
View the Media of a Job History
View the Log Files of a Job History
VIEW RESTORE JOB HISTORY
1. From the CommCell Browser, right-click the entity (e.g., subclient, client computer, etc.) whose job restore history you want to view, click View, and then click Restore History.
Features - Novell Directory Services (NDS) iDataAgent
Page 71 of 72
2. From the Job History filter window, select the filter options, if any, that you want to apply, and then click OK.
3. From the Job History window, right-click the job whose restored items you want to view; click View Restore Items, and select from the type of items to view: Successful, Failed, Skipped or All.
4. The Restored Files window will display the selected type of restored items for the job.
5. Click OK.
VIEW THE EVENTS OF A JOB HISTORY
Required Capability: See Capabilities and Permitted Actions
1. From the CommCell Browser, right-click the entity (e.g., subclient, client computer, etc.) whose job history you want to view, click View, and then click Job History.
2. From the Job History Filter dialog box, select the filter options that you want to apply and click OK.
3. From the Data Management Job History window, right-click the job whose job details you want to view, and then click View Events.
4. The All Found Events window gets displayed. If no events where found for the back up, a message is displayed to that effect.
5. Click Close.
VIEW THE MEDIA OR MOUNT PATHS OF A JOB HISTORY
1. From the CommCell Browser, right-click the entity (e.g., subclient, client computer, etc.) whose job history you want to view, click View, and then select the appropriate history.
2. From the Job History window select the filter options, if any, that you want to apply, and then click OK.
3. From the job history widow, right-click the backup whose media or mount paths you want to view, and then click View Media.
4. The Media Used By Job ID window displays a list of media or mount paths used by the operation.
5. Click OK.
VIEW THE LOG FILES OF A JOB HISTORY
Required Capability: See Capabilities and Permitted Actions
1. From the CommCell Browser, right-click the entity whose job history you want to view, and then click to view a job history.
2. From the job history filter window select the filter options, if any, that you want to apply, and then click OK.
3. From the job history window, right-click the job whose log files you want to view, and then click View Logs.
4. The contents of the log file related to the selected job history are displayed in the Log File for Job n window.
Back to Top
Features - Novell Directory Services (NDS) iDataAgent
Page 72 of 72