F&c220 p40 44 workshop & jigs moxon vise
6
30 F&C220 www.woodworkersinstitute.com The Moxon vise Following the recent resurgence of all things Moxon, Jason Thigpen shows you how to make your own version of the vise that carries his name T he Moxon vise is certainly not a new concept: its use has been documented as far back as the 17th century. For reasons unknown to us, it fell out of use until just recently but its resurgence is due in part to Christopher Schwarz, whose keen eye noticed the commonality between two prints in Joseph Moxon’s Mechanick Exercises (1678) and André Félibien’s Principles de L’architecture (1676). The twin screw vises depicted in the works were quite unlike anything in use today. Intrigued, Chris decided to build one and, quite honestly, workholding hasn’t been the same since. With all of the recent interest concerning the Moxon vise, how could I not want one? The benefits are readily apparent. This relatively simple tool can assist me in the workshop in multiple ways. For example, whether I’m cutting dovetails on drawer fronts or planing small pieces, raising the work up higher not only improves my form and posture for certain jobs, it also reduces fatigue when working for long periods of time. Bringing the work up a little closer to the eyes is also a benefit that is appreciated a little more each day. Let’s face it, the height of your workbench isn’t ideal for every operation and sometimes a little assistance is needed. PHOTOGRAPHS BY JASON THIGPEN
-
Upload
txheritage -
Category
Documents
-
view
225 -
download
1
description
Â
Transcript of F&c220 p40 44 workshop & jigs moxon vise

30 F&C220 www.woodworkersinstitute.com www.woodworkersinstitute.com F&C220 31
The Moxon viseFollowing the recent resurgence of all things Moxon, Jason Thigpen shows you how to make your own version of the vise that carries his name
The Moxon vise is certainly not a new concept: its use has been documented as far back as the 17th century. For
reasons unknown to us, it fell out of use until just recently but its resurgence is due in part to Christopher Schwarz, whose keen eye noticed the commonality between two prints in Joseph Moxon’s Mechanick Exercises (1678) and André Félibien’s Principles de L’architecture (1676). The twin screw vises
depicted in the works were quite unlike anything in use today. Intrigued, Chris decided to build one and, quite honestly, workholding hasn’t been the same since.
With all of the recent interest concerning the Moxon vise, how could I not want one? The benefits are readily apparent. This relatively simple tool can assist me in the workshop in multiple ways. For example, whether I’m cutting dovetails on drawer
fronts or planing small pieces, raising the work up higher not only improves my form and posture for certain jobs, it also reduces fatigue when working for long periods of time. Bringing the work up a little closer to the eyes is also a benefit that is appreciated a little more each day. Let’s face it, the height of your workbench isn’t ideal for every operation and sometimes a little assistance is needed.
PROJECTS & TECHNIQUESWorkshop & jigs tech – the Moxon vise
Quality components
Hardware
There are several kits available today from reputable manufacturers that take a lot of the guesswork out of the vise construction. Utilising Acme-threaded components, these kits are user friendly and designed to last a lifetime. What I didn’t like were the higher prices listed for some of the readily available kits. While I understand the costs involved in research and the manufacturing process, I just couldn’t bring myself to drop that kind of cash, and wood screws were not an option for me. I don’t have a lathe and I don’t have
a wood thread kit. And when it comes down to it, I just prefer metal when it comes to screws. If the craftsmen that Joseph Moxon wrote about had access to Acme-threaded metal rod, I bet they would have used it too! So, I decided to kick my brain cells into high gear and figure out a way to build a Moxon on the cheap, without sacrificing any of the abilities or performance of the kits available at this time. I’ve been using the vise that I built for a few months now. It is everything I had hoped for and then some.
The Benchcrafted Moxon vise clamps to any bench, raising your workpiece to a convenient height and holding it rock-solid
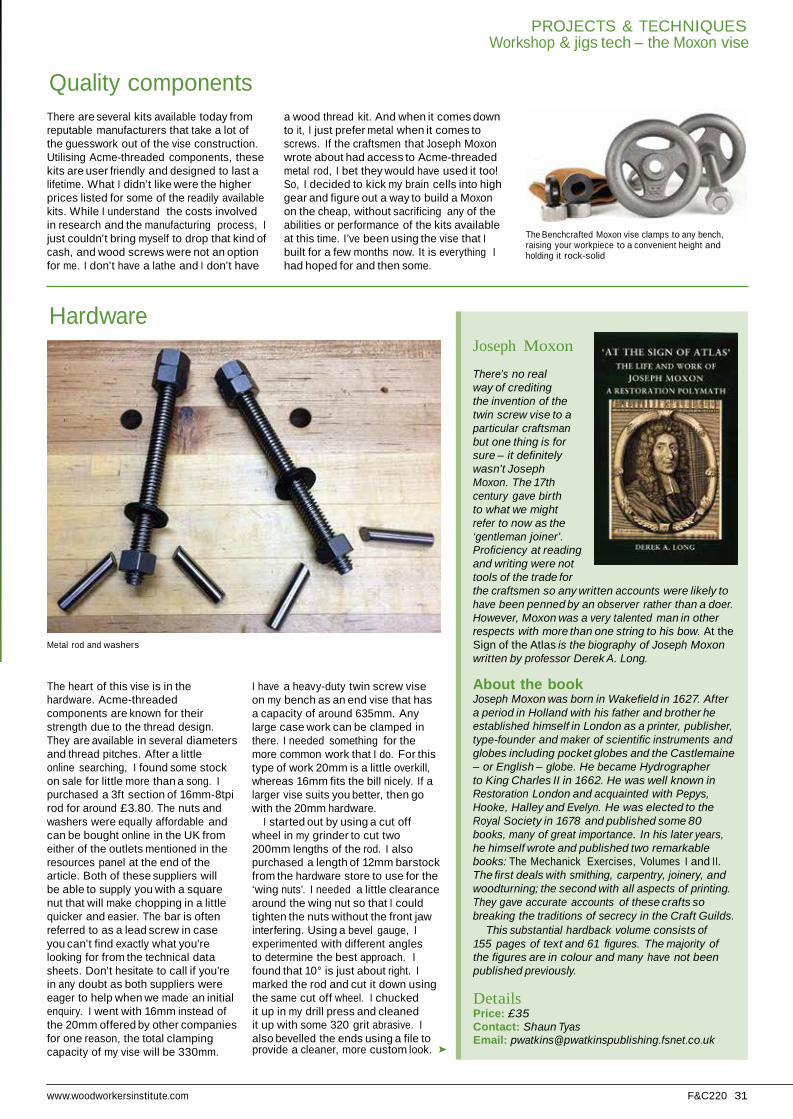
The heart of this vise is in the hardware. Acme-threaded components are known for their strength due to the thread design. They are available in several diameters and thread pitches. After a little online searching, I found some stock on sale for little more than a song. I purchased a 3ft section of 16mm-8tpi rod for around £3.80. The nuts and washers were equally affordable and can be bought online in the UK from either of the outlets mentioned in the resources panel at the end of the article. Both of these suppliers will be able to supply you with a square nut that will make chopping in a little quicker and easier. The bar is often referred to as a lead screw in case you can’t find exactly what you’re looking for from the technical data sheets. Don’t hesitate to call if you’re in any doubt as both suppliers were eager to help when we made an initial enquiry. I went with 16mm instead of the 20mm offered by other companies for one reason, the total clamping capacity of my vise will be 330mm.
I have a heavy-duty twin screw vise on my bench as an end vise that has a capacity of around 635mm. Any large case work can be clamped in there. I needed something for the more common work that I do. For this type of work 20mm is a little overkill, whereas 16mm fits the bill nicely. If a larger vise suits you better, then go with the 20mm hardware.
I started out by using a cut off wheel in my grinder to cut two 200mm lengths of the rod. I also purchased a length of 12mm barstock from the hardware store to use for the ‘wing nuts’. I needed a little clearance around the wing nut so that I could tighten the nuts without the front jaw interfering. Using a bevel gauge, I experimented with different angles to determine the best approach. I found that 10° is just about right. I marked the rod and cut it down using the same cut off wheel. I chucked it up in my drill press and cleaned it up with some 320 grit abrasive. I also bevelled the ends using a file to provide a cleaner, more custom look.
Metal rod and washers
PHOT
OGRA
PHS
BY J
ASON
THI
GPEN
Joseph Moxon
There’s no real way of crediting the invention of the twin screw vise to a particular craftsman but one thing is for sure – it definitely wasn’t Joseph Moxon. The 17th century gave birth to what we might refer to now as the ‘gentleman joiner’. Proficiency at reading and writing were not tools of the trade for the craftsmen so any written accounts were likely to have been penned by an observer rather than a doer. However, Moxon was a very talented man in other respects with more than one string to his bow. At the Sign of the Atlas is the biography of Joseph Moxon written by professor Derek A. Long.
About the bookJoseph Moxon was born in Wakefield in 1627. After a period in Holland with his father and brother he established himself in London as a printer, publisher, type-founder and maker of scientific instruments and globes including pocket globes and the Castlemaine – or English – globe. He became Hydrographer to King Charles II in 1662. He was well known in Restoration London and acquainted with Pepys, Hooke, Halley and Evelyn. He was elected to the Royal Society in 1678 and published some 80 books, many of great importance. In his later years, he himself wrote and published two remarkable books: The Mechanick Exercises, Volumes I and II. The first deals with smithing, carpentry, joinery, and woodturning; the second with all aspects of printing. They gave accurate accounts of these crafts so breaking the traditions of secrecy in the Craft Guilds.
This substantial hardback volume consists of 155 pages of text and 61 figures. The majority of the figures are in colour and many have not been published previously.
Details Price: £35 Contact: Shaun Tyas Email: [email protected]
➤
30 F&C220 www.woodworkersinstitute.com www.woodworkersinstitute.com F&C220 31
The Moxon vise T
PHOT
OGRA
PHS B
Y JAS
ON TH
IGPEN
Quality components
PROJECTS & TECHNIQUES Workshop & jigs tech – the Moxon vise
There are several kits available today from reputable manufacturers that take a lot of the guesswork out of the vise construction. Utilising Acme-threaded components, these kits are user friendly and designed to last a lifetime. What I didn’t like were the higher prices listed for some of the readily available kits. While I understand the costs involved in research and the manufacturing process, I just couldn’t bring myself to drop that kind of cash, and wood screws were not an option for me. I don’t have a lathe and I don’t have
a wood thread kit. And when it comes down to it, I just prefer metal when it comes to screws. If the craftsmen that Joseph Moxon wrote about had access to Acme-threaded metal rod, I bet they would have used it too! So, I decided to kick my brain cells into high gear and figure out a way to build a Moxon on the cheap, without sacrificing any of the abilities or performance of the kits available at this time. I’ve been using the vise that I built for a few months now. It is everything I had hoped for and then some.
The Benchcrafted Moxon vise clamps to any bench, raising your workpiece to a convenient height and holding it rock-solid
Hardware Joseph Moxon
Following the recent resurgence of all things Moxon, Jason Thigpen shows you how to make your own version of the vise that carries his name
Metal rod and washers The heart of this vise is in the hardware. Acme-threaded components are known for their strength due to the thread design. They are available in several diameters and thread pitches. After a little online searching, I found some stock on sale for little more than a song. I purchased a 3ft section of 16mm-8tpi rod for around £3.80. The nuts and washers were equally affordable and can be bought online in the UK from either of the outlets mentioned in the resources panel at the end of the article. Both of these suppliers will be able to supply you with a square nut that will make chopping in a little quicker and easier. The bar is often
I have a heavy-duty twin screw vise on my bench as an end vise that has a capacity of around 635mm. Any large case work can be clamped in there. I needed something for the more common work that I do. For this type of work 20mm is a little overkill, whereas 16mm fits the bill nicely. If a larger vise suits you better, then go with the 20mm hardware.
I started out by using a cut off wheel in my grinder to cut two 200mm lengths of the rod. I also purchased a length of 12mm barstock from the hardware store to use for the ‘wing nuts’. I needed a little clearance around the wing nut so that I could tighten the nuts without the front jaw
There’s no real way of crediting the invention of the twin screw vise to a particular craftsman but one thing is for sure – it definitely wasn’t Joseph Moxon. The 17th century gave birth to what we might refer to now as the ‘gentleman joiner’. Proficiency at reading and writing were not tools of the trade for the craftsmen so any written accounts were likely to have been penned by an observer rather than a doer. However, Moxon was a very talented man in other respects with more than one string to his bow. At the Sign of the Atlas is the biography of Joseph Moxon written by professor Derek A. Long. About the book Joseph Moxon was born in Wakefield in 1627. After a period in Holland with his father and brother he established himself in London as a printer, publisher, type-founder and maker of scientific instruments and globes including pocket globes and the Castlemaine – or English – globe. He became Hydrographer to King Charles II in 1662. He was well known in Restoration London and acquainted with Pepys, Hooke, Halley and Evelyn. He was elected to the Royal Society in 1678 and published some 80 books, many of great importance. In his later years, he himself wrote and published two remarkable books: The Mechanick Exercises, Volumes I and II. The first deals with smithing, carpentry, joinery, and woodturning; the second with all aspects of printing. They gave accurate accounts of these crafts so breaking the traditions of secrecy in the Craft Guilds.
he Moxon vise is certainly not a new concept: its use has been documented as far back as the 17th century. For
reasons unknown to us, it fell out of use until just recently but its resurgence is due in part to Christopher Schwarz, whose keen eye noticed the commonality between two prints in Joseph Moxon’s Mechanick Exercises (1678) and André Félibien’s Principles de L’architecture (1676). The twin screw vises
depicted in the works were quite unlike anything in use today. Intrigued, Chris decided to build one and, quite honestly, workholding hasn’t been the same since.
With all of the recent interest concerning the Moxon vise, how could I not want one? The benefits are readily apparent. This relatively simple tool can assist me in the workshop in multiple ways. For example, whether I’m cutting dovetails on drawer
fronts or planing small pieces, raising the work up higher not only improves my form and posture for certain jobs, it also reduces fatigue when working for long periods of time. Bringing the work up a little closer to the eyes is also a benefit that is appreciated a little more each day. Let’s face it, the height of your workbench isn’t ideal for every operation and sometimes a little assistance is needed.
referred to as a lead screw in case you can’t find exactly what you’re looking for from the technical data sheets. Don’t hesitate to call if you’re in any doubt as both suppliers were eager to help when we made an initial enquiry. I went with 16mm instead of the 20mm offered by other companies for one reason, the total clamping capacity of my vise will be 330mm.
interfering. Using a bevel gauge, I experimented with different angles to determine the best approach. I found that 10° is just about right. I marked the rod and cut it down using the same cut off wheel. I chucked it up in my drill press and cleaned it up with some 320 grit abrasive. I also bevelled the ends using a file to provide a cleaner, more custom look. ➤
This substantial hardback volume consists of 155 pages of text and 61 figures. The majority of the figures are in colour and many have not been published previously. Details Price: £35 Contact: Shaun Tyas Email: [email protected]
32 F&C220 www.woodworkersinstitute.com www.woodworkersinstitute.com F&C220 33
Welding
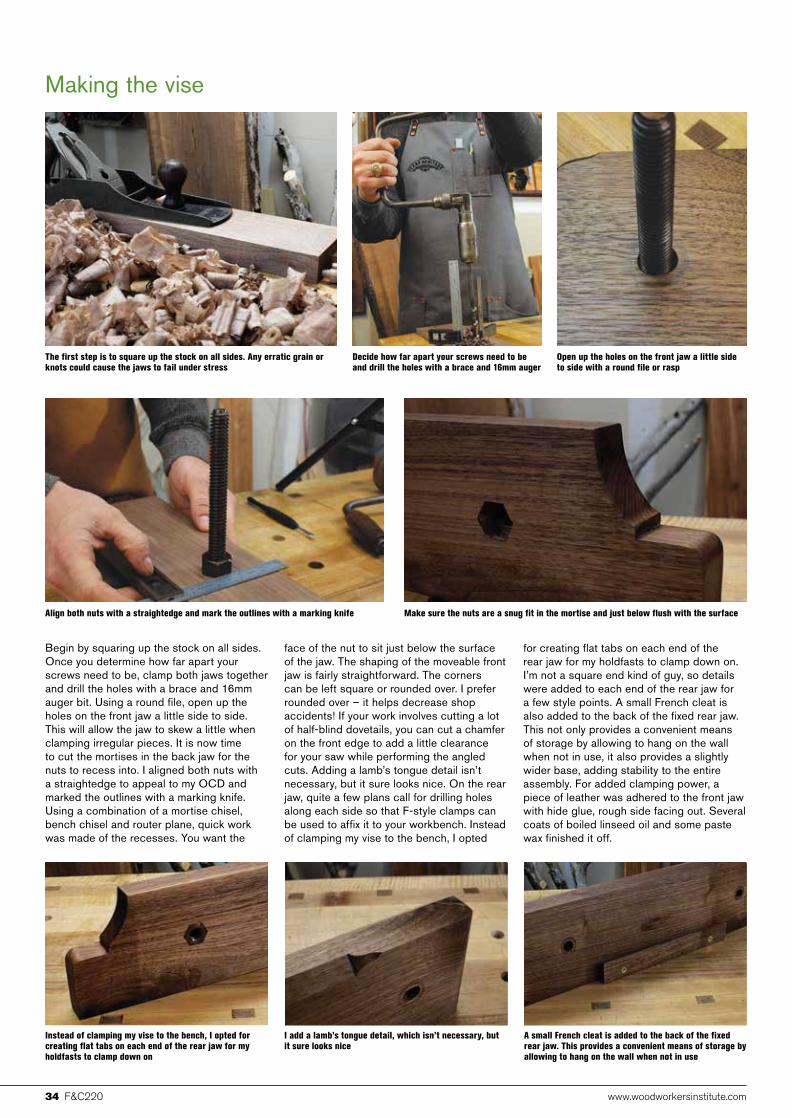
After all of the prep work was complete, I took a trip to my friend’s house to try out his new TIG welder. I prefer TIG welding to MIG or Arc welding for a few reasons. TIG welding doesn’t produce splatters indicative of MIG and Arc welding. The last thing I wanted to do was file splatters off of the threads. This build is supposed to be simple, not tedious. TIG welding also produces cleaner looking welds, which is very important for someone as picky as me. It’s also strong as an ox. If you don’t have access to a welder, then contact your local metal fabricating shop. They should be able to help you out. A six-pack of beer will probably be all the payment that is needed!
These handles should be able to take anything I can throw at them. I went a slightly different route when it came to finishing the steel. Instead of leaving the steel bare or covering it in a thick layer of paint, I opted for the flax oil technique, which is outlined on www.benchcrafted.com. Jameel has an excellent write-up on the corrosion resistant finish and I love the chocolate bronze colour that this process brings forth. The process is pretty straightforward. To do it, clean the metal thoroughly with denatured alcohol, then brush on a liberal layer of flax oil, making sure you get good coverage. Using a lint free cloth, wipe off as much oil as you
can. The goal here is to have as thin a coat as possible. You don’t want any runs. Bake the components – I used my toaster oven – at 260°C for one hour. Let them cool and repeat the process. The more coats you apply, the darker the colour. I found that 3-4 coats looked best.
After the prep work is done, it’s time to use the TIG welder
The joints, once welded together
Once welded, you need to clean the metal thoroughly with denatured alcohol, then brush on a liberal layer of flax oil
Wood selectionIn my mind, one of the benefits of building a Moxon vise is the freedom in terms of wood selection. It can be built of scraps lying around the workshop, any hardwood will do. Since I hoard my scraps, this worked out well. I had a chunk of 38mm walnut (Juglans spp.) which was leftover from a previous commission project. It was just the right
size for what I had intended. I broke out my trusty 610mm Atkins panel crosscut saw and went to work. The fixed rear jaw is 660mm long and 140mm tall. The moveable front jaw is 485mm long and 140mm tall. Dimensions here aren’t critical. Look at the type of work you commonly perform and build the vise to fit that.
PROJECTS & TECHNIQUESWorkshop & jigs tech – the Moxon vise
Lamb’s tongue detail is purely cosmetic
Create a cut-out to suit your clamping needs
Acme thread
Half the French cleat to hang the vise on the wall when not in use
Acme nuts mortised into back
Leather helps to prevent boards from slipping in the vise
’Shop made wing nuts
Chamfer allows saw clearance for certain cuts
➤
➤

PROJECTS & TECHNIQUES Workshop & jigs tech – the Moxon vise
32 F&C220 www.woodworkersinstitute.com www.woodworkersinstitute.com F&C220 33
➤Welding
After the prep work is done, it’s time to use the TIG welder
After all of the prep work was complete, I took a trip to my friend’s house to try out his new TIG welder. I prefer TIG welding to MIG or Arc welding for a few reasons. TIG welding doesn’t produce splatters indicative of MIG and Arc welding. The last thing I wanted to do was file splatters off of the threads. This build is supposed to be simple, not tedious. TIG welding also produces cleaner looking welds, which is very important for someone as picky as me. It’s also strong as an ox. If you don’t have access to a welder, then contact your local metal fabricating shop. They should be able to help you out. A six-pack of beer will probably be all the payment that is needed!
These handles should be able to take anything I can throw at them. I went a slightly different route when it came to finishing the steel. Instead of leaving the steel bare or covering it in a thick layer of paint, I opted for the flax oil technique, which is outlined on www.benchcrafted.com. Jameel has an excellent write-up on the corrosion resistant finish and I love the chocolate bronze colour that this process brings forth. The process is pretty straightforward. To do it, clean the metal thoroughly with denatured alcohol, then brush on a liberal layer of flax oil, making sure you get good coverage. Using a lint free cloth, wipe off as much oil as you
The joints, once welded together
can. The goal here is to have as thin a coat as possible. You don’t want any runs. Bake the components – I used my toaster oven – at 260°C for one hour. Let them cool and repeat the process. The more coats you apply, the darker the colour. I found that 3-4 coats looked best.
Once welded, you need to clean the metal thoroughly with denatured alcohol, then brush on a liberal layer of flax oil
Lamb’s tongue detail is purely cosmetic
Create a cut-out to suit your clamping needs
Chamfer allows saw clearance for certain cuts
Acme thread
Half the French cleat to hang the vise on the wall when not in use
Acme nuts mortised into back
Leather helps to prevent boards from slipping in the vise
’Shop made wing nuts
Wood selection
In my mind, one of the benefits of building a Moxon vise is the freedom in terms of wood selection. It can be built of scraps lying around the workshop, any hardwood will do. Since I hoard my scraps, this worked out well. I had a chunk of 38mm walnut (Juglans spp.) which was leftover from a previous commission project. It was just the right
size for what I had intended. I broke out my trusty 610mm Atkins panel crosscut saw and went to work. The fixed rear jaw is 660mm long and 140mm tall. The moveable front jaw is 485mm long and 140mm tall. Dimensions here aren’t critical. Look at the type of work you commonly perform and build the vise to fit that.
➤
34 F&C220 www.woodworkersinstitute.com www.woodworkersinstitute.com F&C220 35
Making the vise
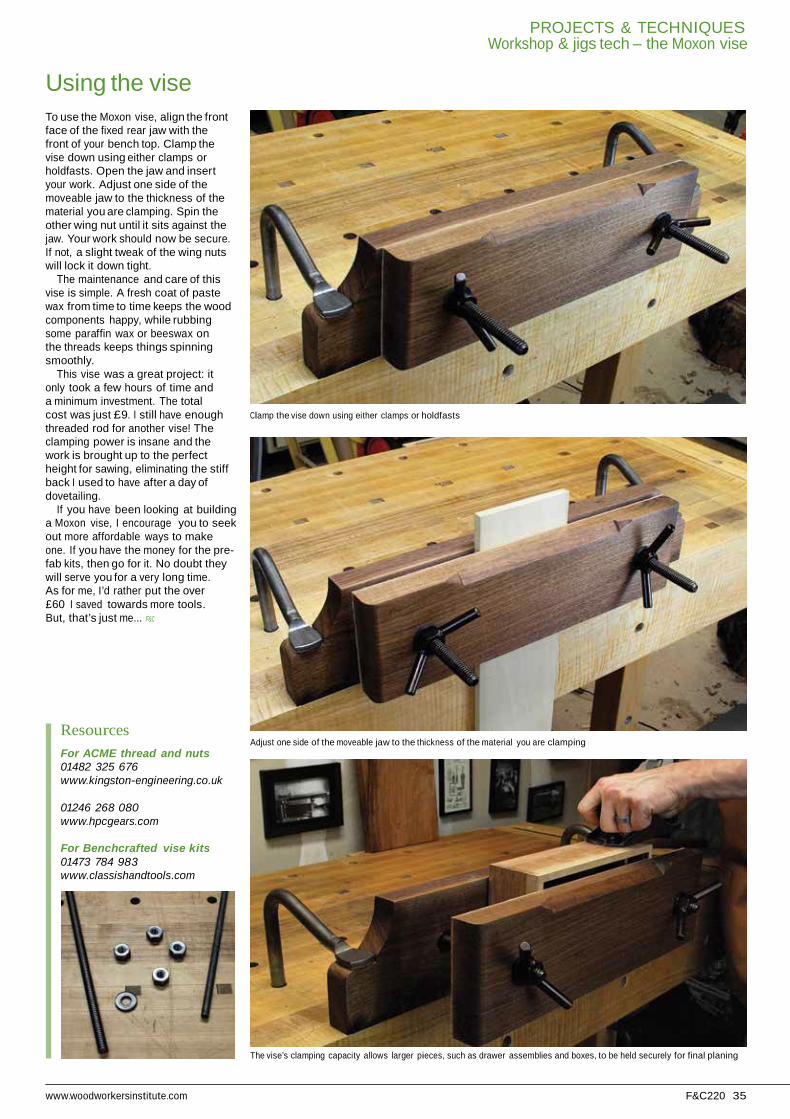
Begin by squaring up the stock on all sides. Once you determine how far apart your screws need to be, clamp both jaws together and drill the holes with a brace and 16mm auger bit. Using a round file, open up the holes on the front jaw a little side to side. This will allow the jaw to skew a little when clamping irregular pieces. It is now time to cut the mortises in the back jaw for the nuts to recess into. I aligned both nuts with a straightedge to appeal to my OCD and marked the outlines with a marking knife. Using a combination of a mortise chisel, bench chisel and router plane, quick work was made of the recesses. You want the
face of the nut to sit just below the surface of the jaw. The shaping of the moveable front jaw is fairly straightforward. The corners can be left square or rounded over. I prefer rounded over – it helps decrease shop accidents! If your work involves cutting a lot of half-blind dovetails, you can cut a chamfer on the front edge to add a little clearance for your saw while performing the angled cuts. Adding a lamb’s tongue detail isn’t necessary, but it sure looks nice. On the rear jaw, quite a few plans call for drilling holes along each side so that F-style clamps can be used to affix it to your workbench. Instead of clamping my vise to the bench, I opted
for creating flat tabs on each end of the rear jaw for my holdfasts to clamp down on. I’m not a square end kind of guy, so details were added to each end of the rear jaw for a few style points. A small French cleat is also added to the back of the fixed rear jaw. This not only provides a convenient means of storage by allowing to hang on the wall when not in use, it also provides a slightly wider base, adding stability to the entire assembly. For added clamping power, a piece of leather was adhered to the front jaw with hide glue, rough side facing out. Several coats of boiled linseed oil and some paste wax finished it off.
The first step is to square up the stock on all sides. Any erratic grain or knots could cause the jaws to fail under stress
Decide how far apart your screws need to be and drill the holes with a brace and 16mm auger
Make sure the nuts are a snug fit in the mortise and just below flush with the surfaceAlign both nuts with a straightedge and mark the outlines with a marking knife
I add a lamb’s tongue detail, which isn’t necessary, but it sure looks nice
Instead of clamping my vise to the bench, I opted for creating flat tabs on each end of the rear jaw for my holdfasts to clamp down on
A small French cleat is added to the back of the fixed rear jaw. This provides a convenient means of storage by allowing to hang on the wall when not in use
Open up the holes on the front jaw a little side to side with a round file or rasp
Using the viseTo use the Moxon vise, align the front face of the fixed rear jaw with the front of your bench top. Clamp the vise down using either clamps or holdfasts. Open the jaw and insert your work. Adjust one side of the moveable jaw to the thickness of the material you are clamping. Spin the other wing nut until it sits against the jaw. Your work should now be secure. If not, a slight tweak of the wing nuts will lock it down tight.
The maintenance and care of this vise is simple. A fresh coat of paste wax from time to time keeps the wood components happy, while rubbing some paraffin wax or beeswax on the threads keeps things spinning smoothly.
This vise was a great project: it only took a few hours of time and a minimum investment. The total cost was just £9. I still have enough threaded rod for another vise! The clamping power is insane and the work is brought up to the perfect height for sawing, eliminating the stiff back I used to have after a day of dovetailing.
If you have been looking at building a Moxon vise, I encourage you to seek out more affordable ways to make one. If you have the money for the pre- fab kits, then go for it. No doubt they will serve you for a very long time. As for me, I’d rather put the over £60 I saved towards more tools. But, that’s just me... F&C
Clamp the vise down using either clamps or holdfasts
Adjust one side of the moveable jaw to the thickness of the material you are clamping
PROJECTS & TECHNIQUESWorkshop & jigs tech – the Moxon vise
ResourcesFor ACME thread and nuts01482 325 676www.kingston-engineering.co.uk
01246 268 080www.hpcgears.com
For Benchcrafted vise kits01473 784 983www.classishandtools.com
The vise’s clamping capacity allows larger pieces, such as drawer assemblies and boxes, to be held securely for final planing
PROJECTS & TECHNIQUES Workshop & jigs tech – the Moxon vise
34 F&C220 www.woodworkersinstitute.com www.woodworkersinstitute.com F&C220 35
Making the vise Using the vise
The first step is to square up the stock on all sides. Any erratic grain or knots could cause the jaws to fail under stress
Decide how far apart your screws need to be and drill the holes with a brace and 16mm auger
Open up the holes on the front jaw a little side to side with a round file or rasp
To use the Moxon vise, align the front face of the fixed rear jaw with the front of your bench top. Clamp the vise down using either clamps or holdfasts. Open the jaw and insert your work. Adjust one side of the moveable jaw to the thickness of the material you are clamping. Spin the other wing nut until it sits against the jaw. Your work should now be secure. If not, a slight tweak of the wing nuts will lock it down tight.
The maintenance and care of this vise is simple. A fresh coat of paste wax from time to time keeps the wood components happy, while rubbing some paraffin wax or beeswax on the threads keeps things spinning smoothly.
This vise was a great project: it only took a few hours of time and a minimum investment. The total cost was just £9. I still have enough threaded rod for another vise! The clamping power is insane and the work is brought up to the perfect height for sawing, eliminating the stiff back I used to have after a day of dovetailing.
If you have been looking at building a Moxon vise, I encourage you to seek out more affordable ways to make one. If you have the money for the pre- fab kits, then go for it. No doubt they will serve you for a very long time. As for me, I’d rather put the over
Clamp the vise down using either clamps or holdfasts
Align both nuts with a straightedge and mark the outlines with a marking knife
Make sure the nuts are a snug fit in the mortise and just below flush with the surface £60 I saved towards more tools.
But, that’s just me... F&C
Begin by squaring up the stock on all sides. Once you determine how far apart your screws need to be, clamp both jaws together and drill the holes with a brace and 16mm auger bit. Using a round file, open up the holes on the front jaw a little side to side. This will allow the jaw to skew a little when clamping irregular pieces. It is now time to cut the mortises in the back jaw for the nuts to recess into. I aligned both nuts with a straightedge to appeal to my OCD and marked the outlines with a marking knife. Using a combination of a mortise chisel, bench chisel and router plane, quick work was made of the recesses. You want the
Instead of clamping my vise to the bench, I opted for creating flat tabs on each end of the rear jaw for my holdfasts to clamp down on
face of the nut to sit just below the surface of the jaw. The shaping of the moveable front jaw is fairly straightforward. The corners can be left square or rounded over. I prefer rounded over – it helps decrease shop accidents! If your work involves cutting a lot of half-blind dovetails, you can cut a chamfer on the front edge to add a little clearance for your saw while performing the angled cuts. Adding a lamb’s tongue detail isn’t necessary, but it sure looks nice. On the rear jaw, quite a few plans call for drilling holes along each side so that F-style clamps can be used to affix it to your workbench. Instead of clamping my vise to the bench, I opted
I add a lamb’s tongue detail, which isn’t necessary, but it sure looks nice
for creating flat tabs on each end of the rear jaw for my holdfasts to clamp down on. I’m not a square end kind of guy, so details were added to each end of the rear jaw for a few style points. A small French cleat is also added to the back of the fixed rear jaw. This not only provides a convenient means of storage by allowing to hang on the wall when not in use, it also provides a slightly wider base, adding stability to the entire assembly. For added clamping power, a piece of leather was adhered to the front jaw with hide glue, rough side facing out. Several coats of boiled linseed oil and some paste wax finished it off.
A small French cleat is added to the back of the fixed rear jaw. This provides a convenient means of storage by allowing to hang on the wall when not in use
Resources
For ACME thread and nuts 01482 325 676 www.kingston-engineering.co.uk 01246 268 080 www.hpcgears.com For Benchcrafted vise kits 01473 784 983 www.classishandtools.com
Adjust one side of the moveable jaw to the thickness of the material you are clamping
The vise’s clamping capacity allows larger pieces, such as drawer assemblies and boxes, to be held securely for final planing