Fairy Doll - HowTo · PDF file2 Part 3. of our HowTo when making Fairy doll is all about...
13
1 Fairy Doll - HowTo Part 3. Painting Eyes Copyright © Vanja Grundmann - AmigurumiBB 2013-2014
Transcript of Fairy Doll - HowTo · PDF file2 Part 3. of our HowTo when making Fairy doll is all about...

1
Fairy Doll - HowTo
Part 3. Painting Eyes
Copyright © Vanja Grundmann - AmigurumiBB 2013-2014

2
Part 3. of our HowTo when making Fairy doll is all about painting eyes. Tried to take
photos to show you step by step how to use your paint and create eyes on your
crocheted doll. Hope you will find it useful and enjoyable. For any questions you
might have or help, please feel free to write and ask.
Wishing you happy painting!
As paint I suggest one in the bottles. Once you can apply with brush. It is textile
paint you can find in any craft supplies shop. It doesn’t have to be professional one,
simple hobby, textile paint will work great for this work. Colors you will need are
white and black. For the iris you can choose any color of your choice. I like this very
light blue. Brush I’ll use is No.1. If you can find thinner brush, work with it! Specially
if you are not familiar with painting. With thin brush, mistakes you might make will
not be that visible and you will have a chance to correct them.
Painting doll’s eyes is giving you many options on what design to use and what
expression to make on your doll. For fairies and most of my dolls, I like to go after
this dreamy, cartoon looking eyes, that are very simple and easy to do. If you would
like to try some different shapes, all over the internet you can find photos and
designs you can apply on your doll. Some like manga or anime eyes, make such eyes on
your fairy. If you prefer traditional oval looking doll’s eyes, go for them. Possibilities

3
are endless. Don’t be afraid to experiment and try different options. This photo
tutorial will show you what steps are made when painting eyes on your doll. One thing
you have to keep in mind. When painting eyes as well as making, crocheting doll
yourself it is little piece of art you are making. If you work it with your heart it can’t
end up wrong. It will express you as creator of this piece. Whatever you do, and
however it ends it will be your beautiful piece of art. Keep this in mind when making
your dolls. Work with your hands but use your heart as guide and you will not go
wrong!
Now let’s continue to work and paint some :D
For this purpose I used pencil to draw the outline and position my eyes on the head.
You can do that. Pencil works great and won’t be seen after. Having an outline you can
fill in with the paint will help you a lot if this is going to be your first try in painting
eyes.
Now that we have idea where our eyes will be placed and how they will look, we can
start applying the colors. First one, the base we’ll make in white.
Use white to cover space inside the outline. Don’t rush, take your time when painting.
Use little bit of paint each time and try to fill all the stitches with this white. This is
going to be our base for other colors later and we want to make it look as good as

4
possible. When you are satisfied with your work, and space between the outline is
completely covered, let it dry completely before applying next color.
By now our white paint has dried and we can continue with adding next color, or
making iris. Choose color that you like. I like this very light blue, baby blue or light
sky blue. This color gives me soft kind of look and works great with peachy color of
doll’s skin. Try to find color that works the best for you. Most of these textile
paints can be mixed what is giving you opportunity to make your own shades.
Now back to work, applying second color and making iris. What is important in this
step is t make iris round. Try to avoid making straight line that will cut and cover

5
half of the eye in color. Try to make it as round as possible. At the end of this
tutorial I have made few eye designs you can use as your guide for your future
paintings. Once you finish with painting iris, wash your brush(es) and let paint dry
completely before applying next color.

6
Last but not least is adding pupil and outline in black. This is always the most
difficult part; specially if the brush is not super fine. Best advice I can give you is to
try to work this part with lots of patience. Color the pupil first. Make it circle, size
smaller than the iris. For the outline, eyelashes and eyebrows, instead of making long
lines, try to make them very short. Use little bits of paint on your brush and add
these little lines here and there, trying to connect them as you go. You can help
yourself with needle or toothpick; use them instead of brush. Dip them in the paint
and make lines as you go. When adding black, less is always better than more.
Specially with outline. Once finished with painting the pupil and outline, adding
eyelashes and eyebrows, leave it dry completely.

7
There is one last touch to make. Little white sparks in eyes to bring life and light to
it. We will create them using white.

8
Dip tip of your brush in white paint and simply make a dot on each of the black area
on the eye. All you need is little white dot on each eye. Don’t try to paint or make
circle motions with your brush what might result making stains of white on black
pupils or entire eye. Simple, little dot is all it needs.
After finished, let it dry completely.
9
And eyes are painted!!! Not that difficult, right?
Addition to painted eyes is making cheeks nice and healthy.
I have tried different methods and have to say, they all work great. You can blush
cheeks with powder blush, or you can use textile paint. You can even use oil based
pastels to add color to doll’s cheeks.
Powder blush is great one. Only flaw, it doesn’t stay in too long.
Textile paint is permanent and looks very nice on crocheted base. Texture it creates
when applied is different than one left after powder blush is applied or crayons.
Paint will cover the area leaving no visible yarn color underneath. Many dolls ask for
this “plastic” kind of look and if you are making one of them, use paint on cheeks as
well. I wasn’t sure which technique to use in this tutorial. I even prepared two of
them. Many of my fairies I have blushed with textile paint and results were always
great. At the end, for this tutorial decided to work with oil based pastels and show
you how to apply them on doll’s head and use as blush on it’s cheeks.
Look around your crafty boxes or your children’s crayons for nice pinky one you can
use on your doll. Here is what I have found:
10
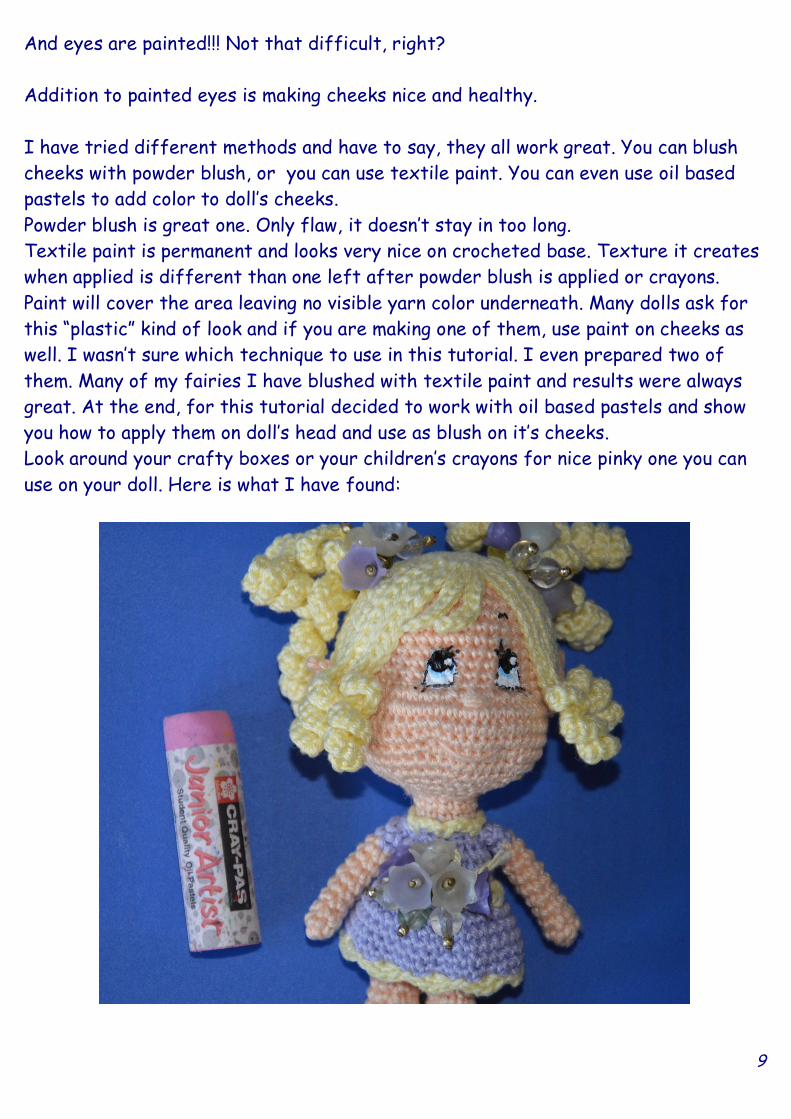
What you will have to do is simply apply the crayon on cheeks. Then use your fingers
or Cotton bud to smudge the crayon into crocheted work.
And cheeks are done!

11
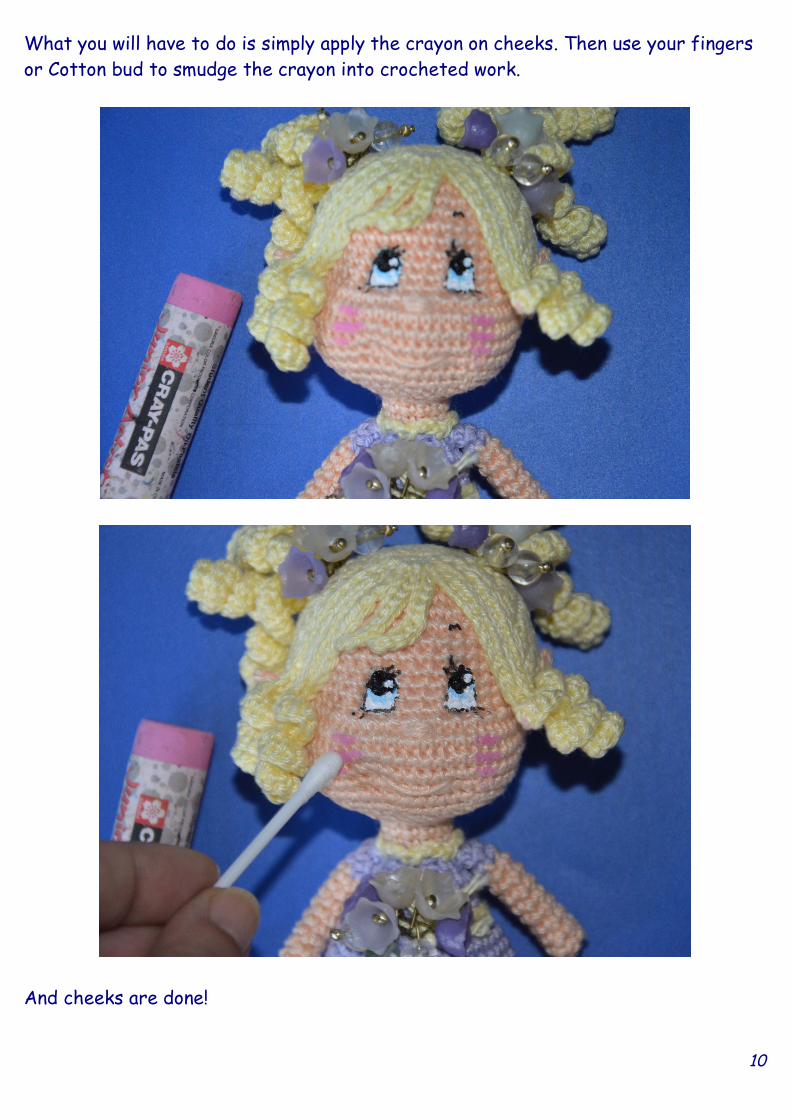
What is left is tiny little detail and that is to add color on doll’s lips. If you prefer
they stay in same color yarn as the rest of the head, then your doll is finished by
now. If you like to add color on her lips, here is how you can do that.
And again you can choose among different techniques. You can use the textile paint
again (same color you used for cheeks) and apply it on this little line we added for
the mouth. Or, you can use some old and almost dry marker in pink or color of your
choice and apply on this little line.
When making lips you don’t need to apply or color it strong. Even here, the rule, less
is more, works better. If you decide to use paint, add it little by little, trying to
color only this one strand of yarn that is going from side to side. Do the same if
using the marker. Work slowly and carefully. Use light colors, specially if working
with markers as they like to “soak” the paint. Apply the color gently and all will work
great.
For this doll I used old, half dried marker to add color on lips. Here is how:
12
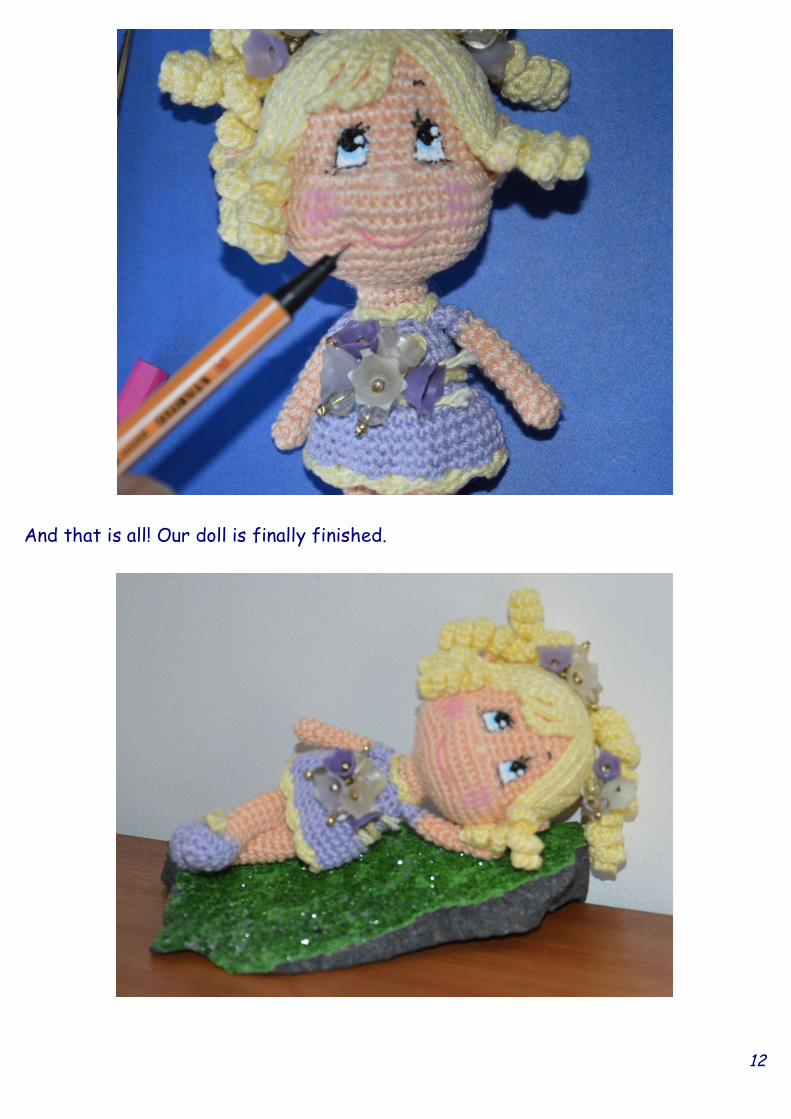
And that is all! Our doll is finally finished.

13
I hope you have enjoyed. More than this I hope you have learned something new, and
this tutorial have helped you make your first doll. Let me know how it works for you.
Don’t forget to send me photos of your work as well. Ask me if you need additional
help!
You can find me on my blog www.amigurumibb.com
Or you can contact me by mail: [email protected]
Vanja