FairCom Java-Based GUI Tools · the OpenSSL Project for use in the OpenSSL Toolkit ... This...
107
FairCom Java-Based GUI Tools
Transcript of FairCom Java-Based GUI Tools · the OpenSSL Project for use in the OpenSSL Toolkit ... This...

FairCom Java-Based GUI Tools
Copyright Notice
Copyright © 1992-2018 FairCom Corporation. All rights reserved. No part of this publication may be stored in a retrieval
system, or transmitted in any form or by any means, electronic, mechanical, photocopying, recording or otherwise without
the prior written permission of FairCom Corporation. Printed in the United States of America.
Information in this document is subject to change without notice.
Trademarks
c-treeACE, c-treeRTG, c-treeAMS, c-tree Plus, c-tree, r-tree, FairCom and FairCom’s circular disc logo are trademarks of
FairCom, registered in the United States and other countries.
The following are third-party trademarks: AMD and AMD Opteron are trademarks of Advanced Micro Devices, Inc.
Macintosh, Mac, Mac OS, and Xcode are trademarks of Apple Inc., registered in the U.S. and other countries.
Embarcadero, the Embarcadero Technologies logos and all other Embarcadero Technologies product or service names
are trademarks, service marks, and/or registered trademarks of Embarcadero Technologies, Inc. and are protected by the
laws of the United States and other countries. Business Objects and the Business Objects logo, BusinessObjects, Crystal
Reports, Crystal Decisions, Web Intelligence, Xcelsius, and other Business Objects products and services mentioned
herein as well as their respective logos are trademarks or registered trademarks of Business Objects Software Ltd.
Business Objects is an SAP company. HP and HP-UX are registered trademarks of the Hewlett-Packard Company. AIX,
IBM, POWER6, POWER7, and pSeries are trademarks or registered trademarks of International Business Machines
Corporation in the United States, other countries, or both. Intel, Intel Core, Itanium, Pentium and Xeon are trademarks or
registered trademarks of Intel Corporation or its subsidiaries in the United States and other countries. Microsoft, the .NET
logo, the Windows logo, Access, Excel, SQL Server, Visual Basic, Visual C++, Visual C#, Visual Studio, Windows,
Windows Server, and Windows Vista are either registered trademarks or trademarks of Microsoft Corporation in the
United States and/or other countries. Novell and SUSE are registered trademarks of Novell, Inc. in the United States and
other countries. Oracle and Java are registered trademarks of Oracle and/or its affiliates. QNX and Neutrino are
registered trademarks of QNX Software Systems Ltd. in certain jurisdictions. CentOS, Red Hat, and the Shadow Man logo
are registered trademarks of Red Hat, Inc. in the United States and other countries, used with permission. UNIX and
UnixWare are registered trademarks of The Open Group in the United States and other countries. Linux is a trademark of
Linus Torvalds in the United States, other countries, or both. Python and PyCon are trademarks or registered trademarks
of the Python Software Foundation. OpenServer is a trademark or registered trademark of Xinuos, Inc. in the U.S.A. and
other countries. Unicode and the Unicode Logo are registered trademarks of Unicode, Inc. in the United States and other
countries.
Btrieve is a registered trademark of Actian Corporation.
ACUCOBOL-GT, MICRO FOCUS, RM/COBOL, and Visual COBOL are trademarks or registered trademarks of Micro
Focus (IP) Limited or its subsidiaries in the United Kingdom, United States and other countries.
isCOBOL and Veryant are trademarks or registered trademarks of Veryant in the United States and other countries.
All other trademarks, trade names, company names, product names, and registered trademarks are the property of their
respective holders.
Portions Copyright © 1991-2016 Unicode, Inc. All rights reserved.
Portions Copyright © 1998-2016 The OpenSSL Project. All rights reserved. This product includes software developed by
the OpenSSL Project for use in the OpenSSL Toolkit (http://www.openssl.org/).
Portions Copyright © 1995-1998 Eric Young ([email protected]). All rights reserved. This product includes cryptographic
software written by Eric Young ([email protected]). This product includes software written by Tim Hudson
Portions © 1987-2018 Dharma Systems, Inc. All rights reserved. This software or web site utilizes or contains material
that is © 1994-2007 DUNDAS DATA VISUALIZATION, INC. and its licensors, all rights reserved.
Portions Copyright © 1995-2013 Jean-loup Gailly and Mark Adler.
6/16/2018

All Rights Reserved iii www.faircom.com
Contents
1. c-treeACE Graphical Tools ................................................................................ 1
2. c-treeACE Explorer ............................................................................................ 2
2.1 Connecting c-treeACE Explorer to a Server ......................................................... 4
Connections Options Window ............................................................................................. 6
Securing Your Connection with SSL ................................................................................... 8
Servers Manager Window ................................................................................................... 9
2.2 ISAM and SQL Servers ...................................................................................... 11
Viewing ISAM Tables ........................................................................................................ 12
Viewing SQL Tables.......................................................................................................... 16
Viewing Sqlized Data ........................................................................................................ 19
2.3 Menus and Tool Bar ........................................................................................... 20
SQL Options Dialog .......................................................................................................... 23
ISAM Options Dialog ......................................................................................................... 25
2.4 SQL Operations ................................................................................................. 28
Database Operations ........................................................................................................ 28
User Operations ................................................................................................................ 28
Table Group Operations ................................................................................................... 30
Table Operations ............................................................................................................... 36
Index Operations ............................................................................................................... 46
Convert / Import SQL Tables ............................................................................................ 50
2.5 ISAM Operations................................................................................................ 53
Server Operations ............................................................................................................. 53
Database Operations ........................................................................................................ 55
Table Operations ............................................................................................................... 64
3. c-treeACE Monitor ........................................................................................... 69
3.1 Startup ............................................................................................................... 70
3.2 Dashboard ......................................................................................................... 71
3.3 Active Connections ............................................................................................ 73
3.4 Files / Locks ....................................................................................................... 74
3.5 Files Stats .......................................................................................................... 77
3.6 Files History ....................................................................................................... 77
3.7 System Snapshot ............................................................................................... 79
3.8 User Snapshot ................................................................................................... 80
3.9 SQL Snapshot ................................................................................................... 80
c-treeACE Graphical Tools
All Rights Reserved iv www.faircom.com
3.10 Snapshot Favorites ............................................................................................ 81
3.11 System Configuration ......................................................................................... 82
3.12 I/O Performance ................................................................................................ 83
3.13 Function Timing ................................................................................................. 84
3.14 System Monitor .................................................................................................. 84
3.15 Log Analyzer ...................................................................................................... 85
3.16 Charts ................................................................................................................ 88
3.17 Users ................................................................................................................. 90
3.18 Menus and Tool Bar ........................................................................................... 93
Servers Manager Window ................................................................................................. 94
4. Error Viewer ..................................................................................................... 96
4.1 Startup ............................................................................................................... 96
4.2 LookUp Tab ....................................................................................................... 96
4.3 Error List ............................................................................................................ 98
5. Dr. c-tree ........................................................................................................... 99
6. Index ............................................................................................................... 100

FairCom Typographical Conventions
Before you begin using this guide, be sure to review the relevant terms and typographical
conventions used in the documentation.
The following formatted items identify special information.
Formatting convention Type of Information
Bold Used to emphasize a point or for variable expressions such as parameters
CAPITALS Names of keys on the keyboard. For example, SHIFT, CTRL, or ALT+F4
FairCom Terminology FairCom technology term
FunctionName() c-treeACE Function name
Parameter c-treeACE Function Parameter
Code Example Code example or Command line usage
utility c-treeACE executable or utility
filename c-treeACE file or path name
CONFIGURATION KEYWORD c-treeACE Configuration Keyword
CTREE_ERR c-treeACE Error Code

All Rights Reserved vi www.faircom.com
All Rights Reserved 1 www.faircom.com
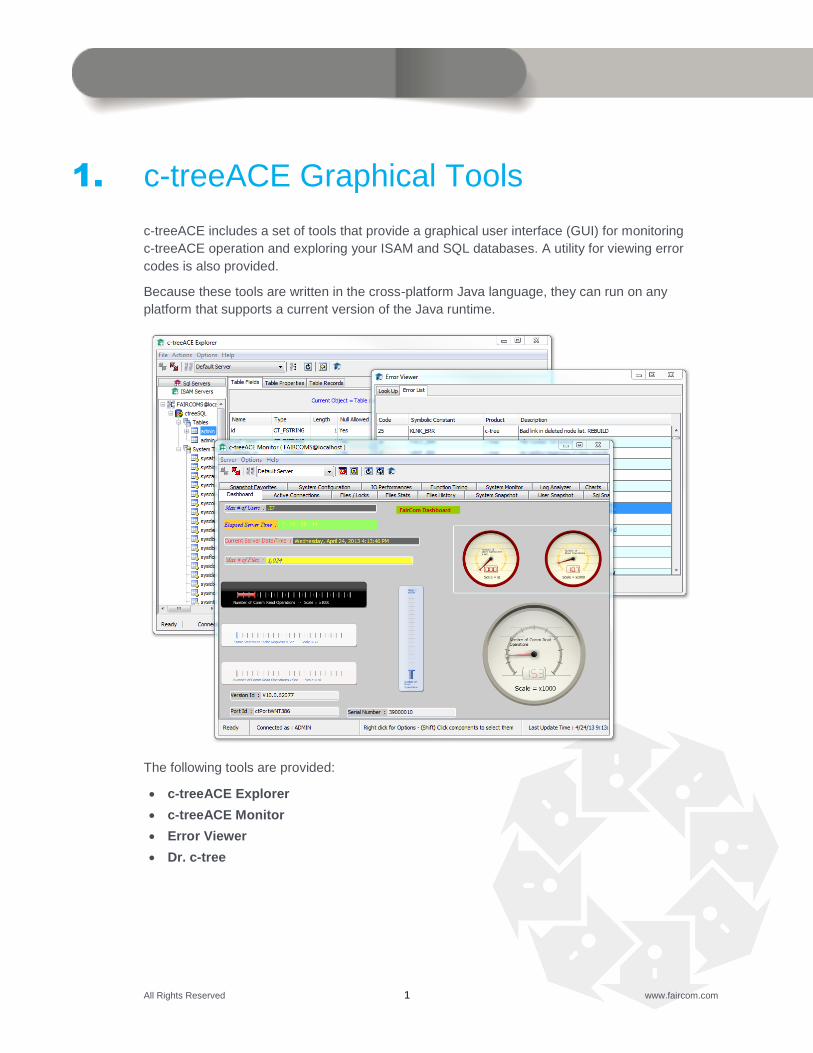
1. c-treeACE Graphical Tools
c-treeACE includes a set of tools that provide a graphical user interface (GUI) for monitoring
c-treeACE operation and exploring your ISAM and SQL databases. A utility for viewing error
codes is also provided.
Because these tools are written in the cross-platform Java language, they can run on any
platform that supports a current version of the Java runtime.
The following tools are provided:
c-treeACE Explorer
c-treeACE Monitor
Error Viewer
Dr. c-tree

All Rights Reserved 2 www.faircom.com
2. c-treeACE Explorer
The c-treeACE Explorer is your “one-stop” utility to view and manage ISAM and SQL
tables and data in your c-treeACE system. Constructed with the database administrator in
mind, the c-treeACE Explorer provides the ability to:
View ISAM and SQL servers.
Create, Display, Edit, and Drop tables, columns, indexes, uses, etc.
Execute Custom SQL Statements.
Load, Edit, and Run SQL Scripts Interactively.
View query execution plans to profile and examine complex queries for optimization
analysis.
and much more.
The Left Tree
The pane at the left side of the c-treeACE Explorer, called the “Left Tree,” displays a tree view of
the connected servers and the databases, tables, etc. they contain.
If the Left Tree is not visible, click the icon in the tool bar to display it.

c-treeACE Explorer
All Rights Reserved 3 www.faircom.com
Use the Left Tree to navigate through the details of you servers and databases. As you navigate
through the Left Tree, details about the selected object (server, database, table, etc.) are
displayed in the grid area to the right of the tree.
The Left Tree contains a separate tab for each type of server: the ISAM Servers Tab (page 11)
and the SQL Servers Tab.
c-treeACE Explorer provides a menu bar and a tool bar at the top of the window (described in
Menus and Tool Bar (page 20)) and context menus, which are available by right-clicking on
various objects in the Left Tree (e.g., servers, tables, indexes, etc.). The operations available in
the context menus are described later in the sections titled SQL Operations (page 28) and ISAM
Operations (page 53).
Note: ISAM and SQL servers require separate connections, as explained in Connecting c-treeACE Explorer to a Server (page 4).
c-treeACE Explorer
All Rights Reserved 4 www.faircom.com
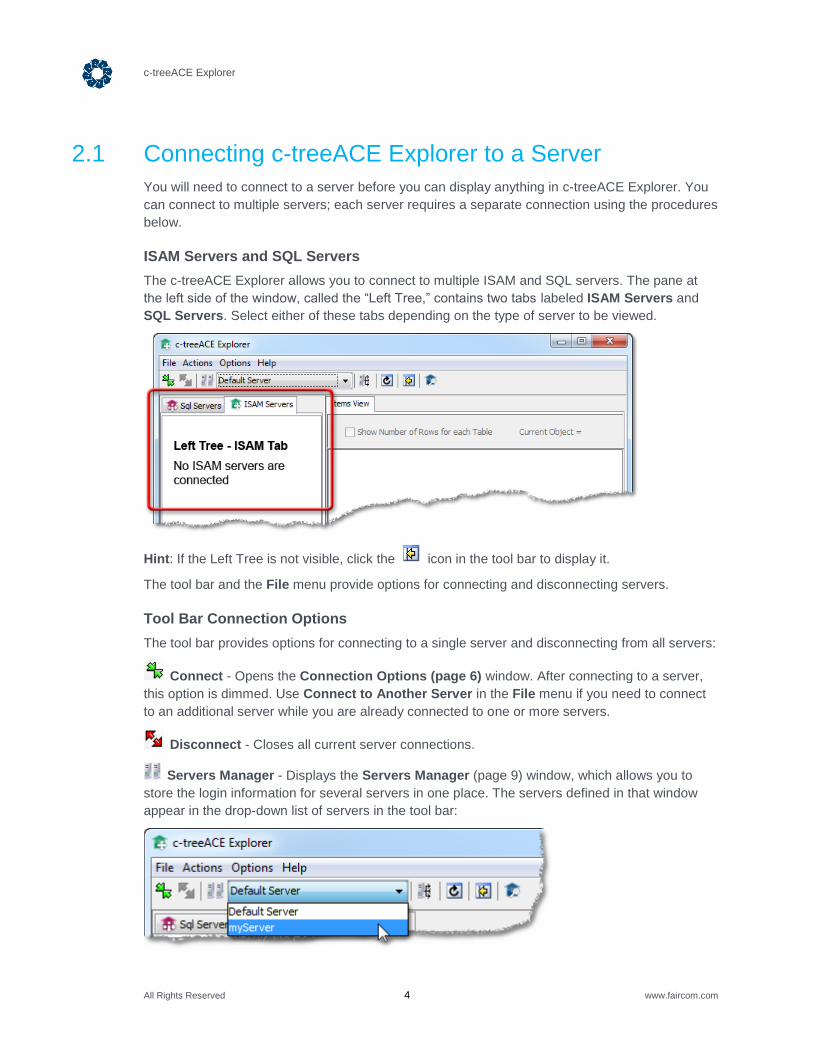
2.1 Connecting c-treeACE Explorer to a Server
You will need to connect to a server before you can display anything in c-treeACE Explorer. You
can connect to multiple servers; each server requires a separate connection using the procedures
below.
ISAM Servers and SQL Servers
The c-treeACE Explorer allows you to connect to multiple ISAM and SQL servers. The pane at
the left side of the window, called the “Left Tree,” contains two tabs labeled ISAM Servers and
SQL Servers. Select either of these tabs depending on the type of server to be viewed.
Hint: If the Left Tree is not visible, click the icon in the tool bar to display it.
The tool bar and the File menu provide options for connecting and disconnecting servers.
Tool Bar Connection Options
The tool bar provides options for connecting to a single server and disconnecting from all servers:
Connect - Opens the Connection Options (page 6) window. After connecting to a server,
this option is dimmed. Use Connect to Another Server in the File menu if you need to connect
to an additional server while you are already connected to one or more servers.
Disconnect - Closes all current server connections.
Servers Manager - Displays the Servers Manager (page 9) window, which allows you to
store the login information for several servers in one place. The servers defined in that window
appear in the drop-down list of servers in the tool bar:
c-treeACE Explorer
All Rights Reserved 5 www.faircom.com
Drop-Down Servers List - The drop-down list next to the Servers Manager icon allows you
to select from the servers you have saved in the Servers Manager window. After selecting a
server from the list, click the Connect icon to open the Connection Options (page 6)
window populated with that server's information.
File Menu Connection Options
The File menu provides these options for connecting and disconnecting multiple servers:
Disconnect All - Closes all current server connections.
Connect to Another Server - Displays the Connection Options (page 6) window. After
connecting to a server, this option remains available so you can connect to an additional server
while you are already connected to one or more servers.
Servers Manager - Displays the Servers Manager (page 9) window, which allows you to
store the login information for several servers in one place.
Connection Windows
The c-treeACE Explorer provides two windows for connecting to servers, which are described in
the next sections:
The Connection Options (page 6) window allows you to enter logon information to connect
to a server.
The Servers Manager (page 9) window allows you to save and manage logon information for
a list of servers.
c-treeACE Explorer
All Rights Reserved 6 www.faircom.com
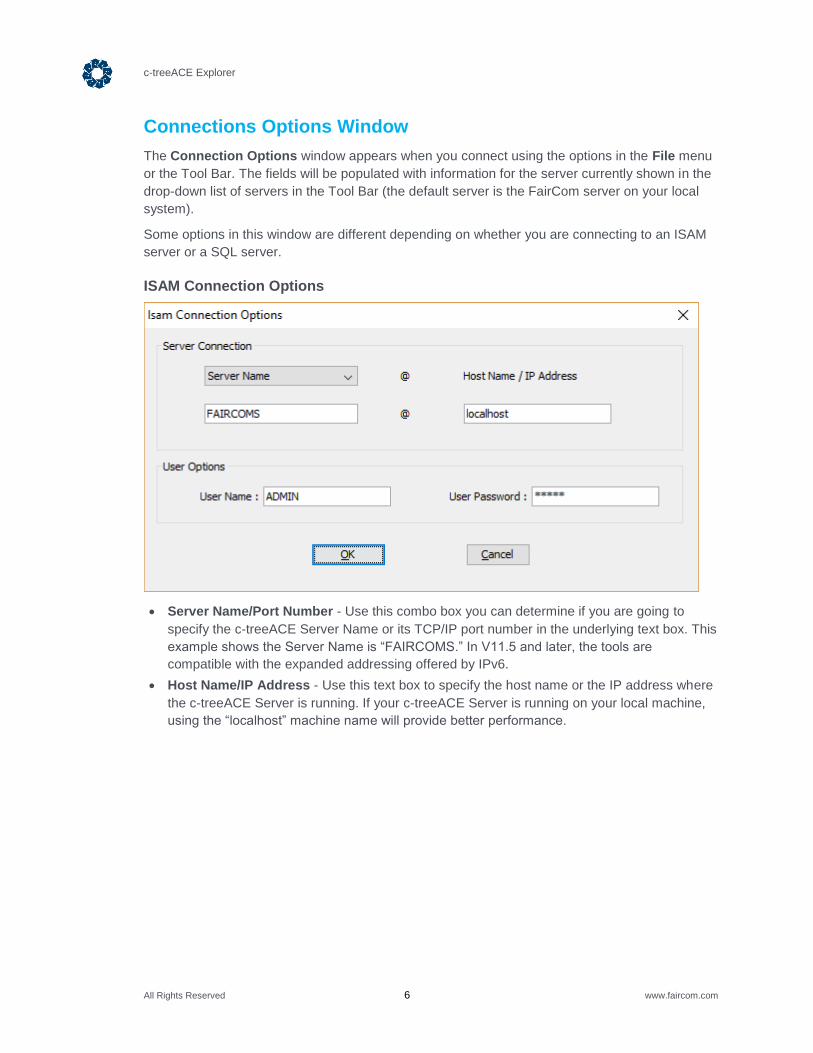
Connections Options Window
The Connection Options window appears when you connect using the options in the File menu
or the Tool Bar. The fields will be populated with information for the server currently shown in the
drop-down list of servers in the Tool Bar (the default server is the FairCom server on your local
system).
Some options in this window are different depending on whether you are connecting to an ISAM
server or a SQL server.
ISAM Connection Options
Server Name/Port Number - Use this combo box you can determine if you are going to
specify the c-treeACE Server Name or its TCP/IP port number in the underlying text box. This
example shows the Server Name is “FAIRCOMS.” In V11.5 and later, the tools are
compatible with the expanded addressing offered by IPv6.
Host Name/IP Address - Use this text box to specify the host name or the IP address where
the c-treeACE Server is running. If your c-treeACE Server is running on your local machine,
using the “localhost” machine name will provide better performance.
c-treeACE Explorer
All Rights Reserved 7 www.faircom.com
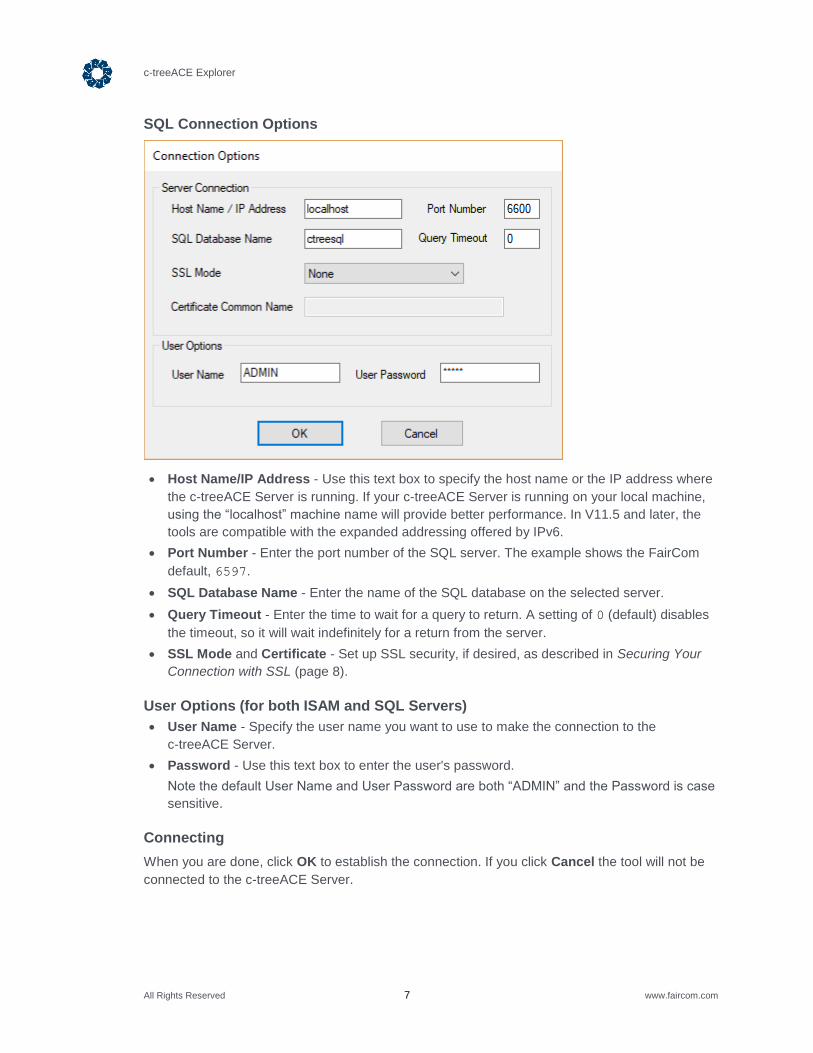
SQL Connection Options
Host Name/IP Address - Use this text box to specify the host name or the IP address where
the c-treeACE Server is running. If your c-treeACE Server is running on your local machine,
using the “localhost” machine name will provide better performance. In V11.5 and later, the
tools are compatible with the expanded addressing offered by IPv6.
Port Number - Enter the port number of the SQL server. The example shows the FairCom
default, 6597.
SQL Database Name - Enter the name of the SQL database on the selected server.
Query Timeout - Enter the time to wait for a query to return. A setting of 0 (default) disables
the timeout, so it will wait indefinitely for a return from the server.
SSL Mode and Certificate - Set up SSL security, if desired, as described in Securing Your
Connection with SSL (page 8).
User Options (for both ISAM and SQL Servers)
User Name - Specify the user name you want to use to make the connection to the
c-treeACE Server.
Password - Use this text box to enter the user's password.
Note the default User Name and User Password are both “ADMIN” and the Password is case
sensitive.
Connecting
When you are done, click OK to establish the connection. If you click Cancel the tool will not be
connected to the c-treeACE Server.

c-treeACE Explorer
All Rights Reserved 8 www.faircom.com
Securing Your Connection with SSL
In V11.5 and later, the GUI tools allow the use of SSL to protect data in transit between the server
and the utility. Controls for configuring your connection are provided in the Connection Options
window, which is similar to the image below:
SSL Mode - Select the desired level of SSL protection from this drop-down:
None - Do not use SSL.
Basic - Use SSL without certificate checking.
Peer Authentication - Use SSL with certificate checking using the certificate file specified
below.
Certificate (or Certificate Common Name) - If Peer Authentication has been selected, enter
the name of the certificate in this field. If no path is entered, the file must be in the current working
directory.
The three dots to the right of the Certificate field display a dialog box so you can navigate to the
certificate.
Security Note: For testing and evaluation purposes only, a self-signed X.509 certificate is included in your default c-treeACE package. OpenSSL was used to create this certificate. It is critical this included certificate is never used in a production setting.
c-treeACE Explorer
All Rights Reserved 9 www.faircom.com
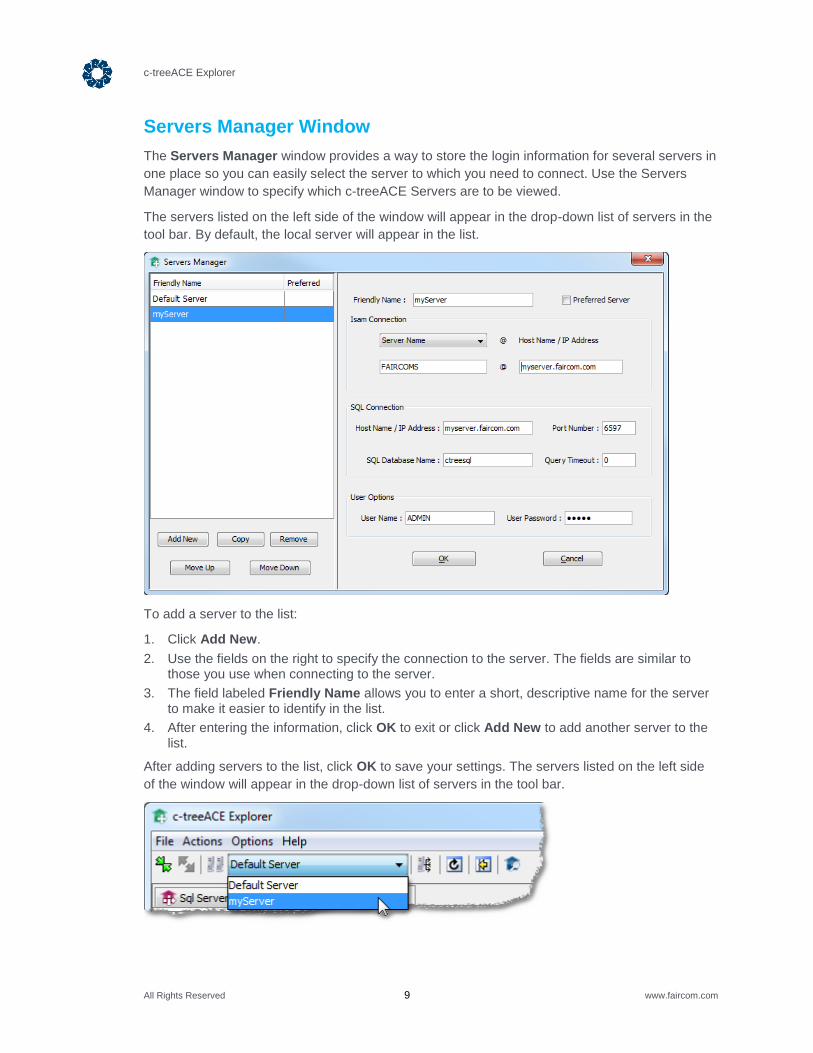
Servers Manager Window
The Servers Manager window provides a way to store the login information for several servers in
one place so you can easily select the server to which you need to connect. Use the Servers
Manager window to specify which c-treeACE Servers are to be viewed.
The servers listed on the left side of the window will appear in the drop-down list of servers in the
tool bar. By default, the local server will appear in the list.
To add a server to the list:
1. Click Add New.
2. Use the fields on the right to specify the connection to the server. The fields are similar to those you use when connecting to the server.
3. The field labeled Friendly Name allows you to enter a short, descriptive name for the server to make it easier to identify in the list.
4. After entering the information, click OK to exit or click Add New to add another server to the list.
After adding servers to the list, click OK to save your settings. The servers listed on the left side
of the window will appear in the drop-down list of servers in the tool bar.

c-treeACE Explorer
All Rights Reserved 10 www.faircom.com
To connect to a server, simply select it from the drop-down list and click the Connect icon.
The information for the selected server will appear in the Connections Options (page 6) window.
c-treeACE Explorer
All Rights Reserved 11 www.faircom.com
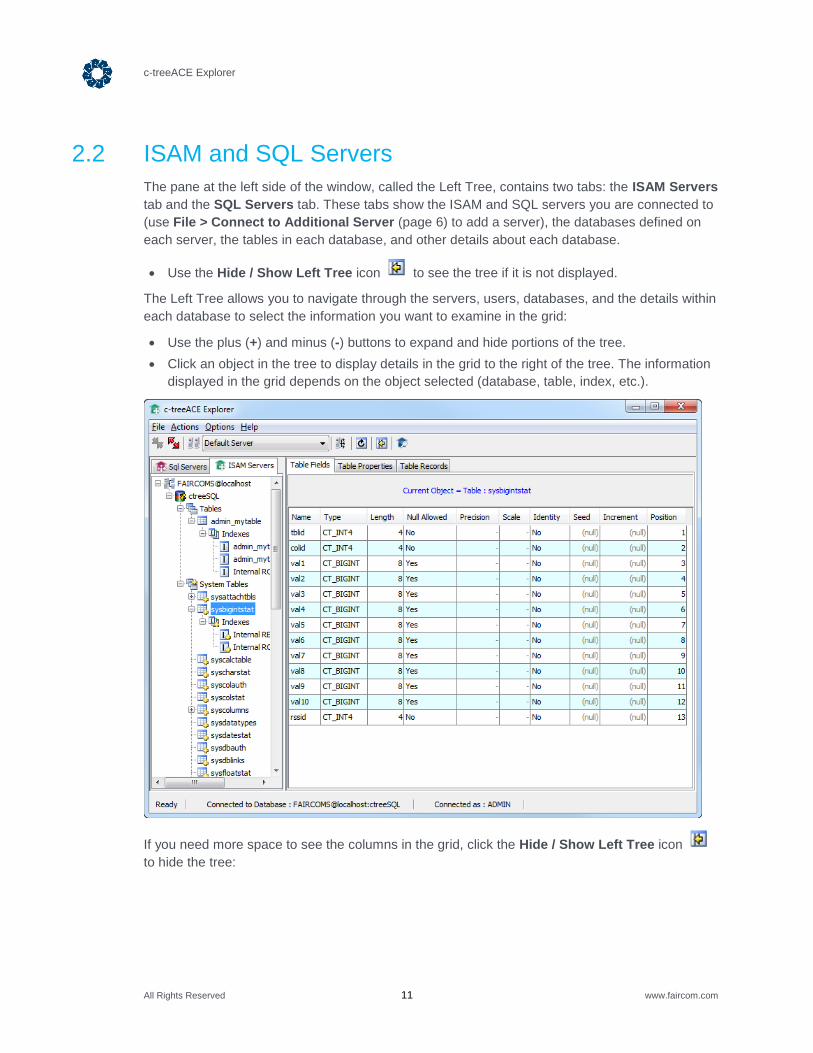
2.2 ISAM and SQL Servers
The pane at the left side of the window, called the Left Tree, contains two tabs: the ISAM Servers
tab and the SQL Servers tab. These tabs show the ISAM and SQL servers you are connected to
(use File > Connect to Additional Server (page 6) to add a server), the databases defined on
each server, the tables in each database, and other details about each database.
Use the Hide / Show Left Tree icon to see the tree if it is not displayed.
The Left Tree allows you to navigate through the servers, users, databases, and the details within
each database to select the information you want to examine in the grid:
Use the plus (+) and minus (-) buttons to expand and hide portions of the tree.
Click an object in the tree to display details in the grid to the right of the tree. The information
displayed in the grid depends on the object selected (database, table, index, etc.).
If you need more space to see the columns in the grid, click the Hide / Show Left Tree icon
to hide the tree:

c-treeACE Explorer
All Rights Reserved 12 www.faircom.com
The information displayed depends on the type of server you are viewing:
Viewing ISAM Tables (page 12)
Viewing SQL Tables (page 16)
For more information about the options available in the menu bar and tool bar, see Menus and
Tool Bar (page 20).
Viewing ISAM Tables
When a table is selected in the Left Tree, details are shown in the grid to the right. If the table is in
the ISAM tab, the information shown below is available.
Table Fields
The Table Fields tab shows information about the fields in the table. This is the default view
when a table is selected in the Left Tree.

c-treeACE Explorer
All Rights Reserved 13 www.faircom.com
Table Properties
The Table Properties tab displays more information about the selected table. This information is
read-only (if you need to modify these settings, use the Modify Table (page 65) selection in the
Table Operations (page 64) menu).
Table Records
The Table Records tab displays the data in the selected table. Several operations can be
performed in this tab:
To edit a record, click the field and enter a new value. To save your changes exit from the
current row.
To add a new record, enter data in the row with the * (asterisk). Your new record will be
saved when you leave the current row.
To delete a record, select it and click the red X delete icon.
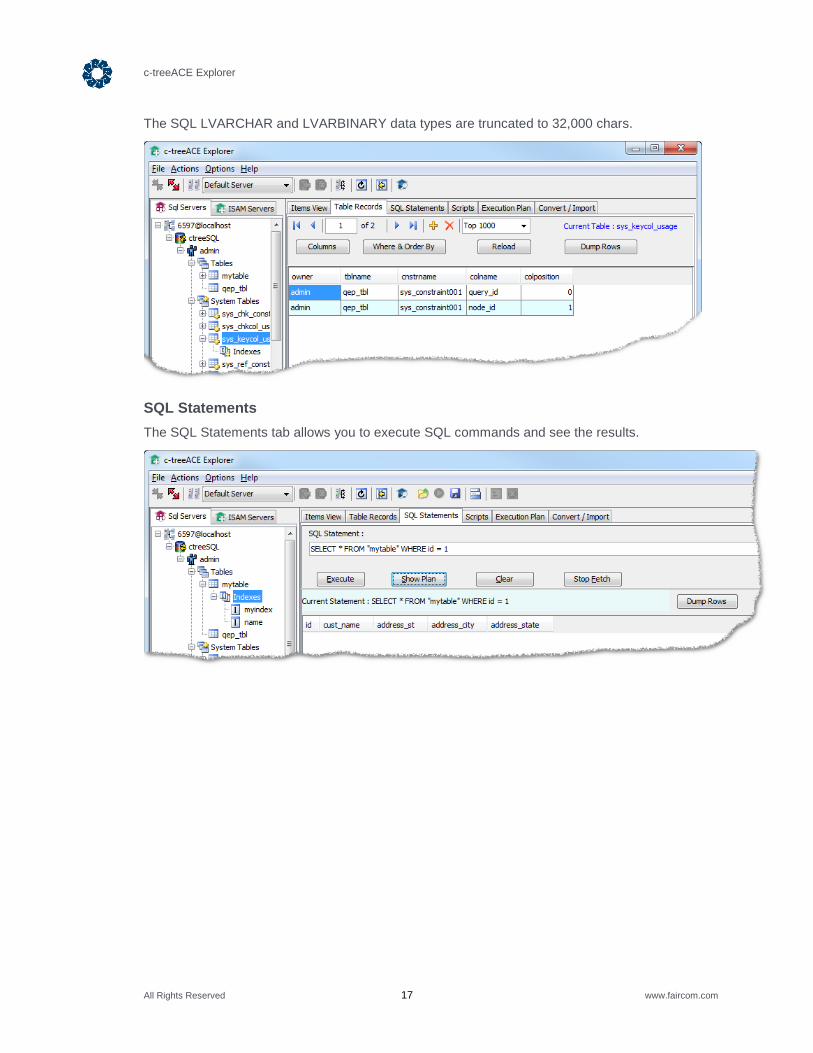
The SQL LVARCHAR and LVARBINARY data types are truncated to 32,000 chars.
c-treeACE Explorer
All Rights Reserved 14 www.faircom.com
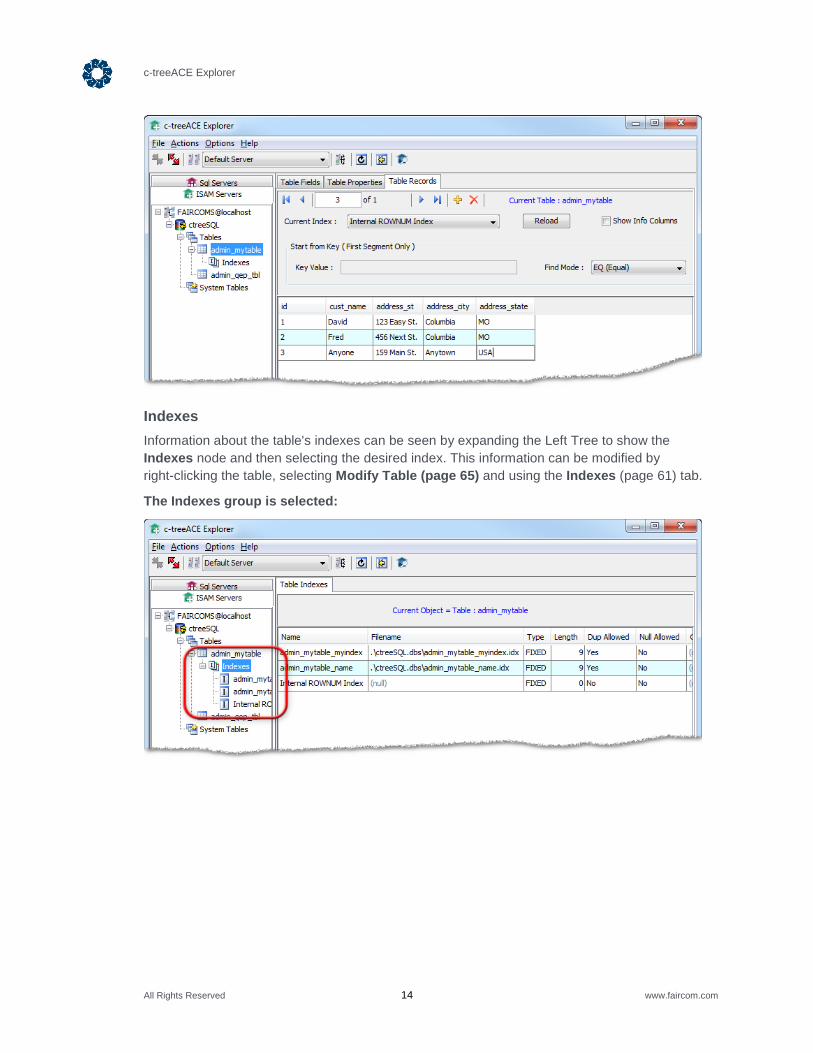
Indexes
Information about the table's indexes can be seen by expanding the Left Tree to show the
Indexes node and then selecting the desired index. This information can be modified by
right-clicking the table, selecting Modify Table (page 65) and using the Indexes (page 61) tab.
The Indexes group is selected:

c-treeACE Explorer
All Rights Reserved 15 www.faircom.com
An individual index is selected:

c-treeACE Explorer
All Rights Reserved 16 www.faircom.com
Viewing SQL Tables
When a table is selected in the SQL tab of the Left Tree, the information shown below is available
in the grid to the right of the tree.
Items View
When a table is selected in the Left Tree the Items View lists the fields in that table. When the
Tables group is selected in the Left Tree, this tab lists the tables. Similarly, information about
indexes can be displayed by selecting the Indexes group or an individual index in the Left Tree.
Table Records
The Table Records tab displays the data in the selected table. Several operations can be
performed in this tab:
To edit a record, simply click a field and enter the new value. To save your changes, exit from
the current row.
To add a new record, edit the row with the * (asterisk). Your new record will be saved when
you leave the current row.
To delete a record, select it and click the red delete X icon.
The number of records loaded by this page can be changed using the drop-down list labeled Top
1000.
c-treeACE Explorer
All Rights Reserved 17 www.faircom.com
The SQL LVARCHAR and LVARBINARY data types are truncated to 32,000 chars.
SQL Statements
The SQL Statements tab allows you to execute SQL commands and see the results.
c-treeACE Explorer
All Rights Reserved 18 www.faircom.com
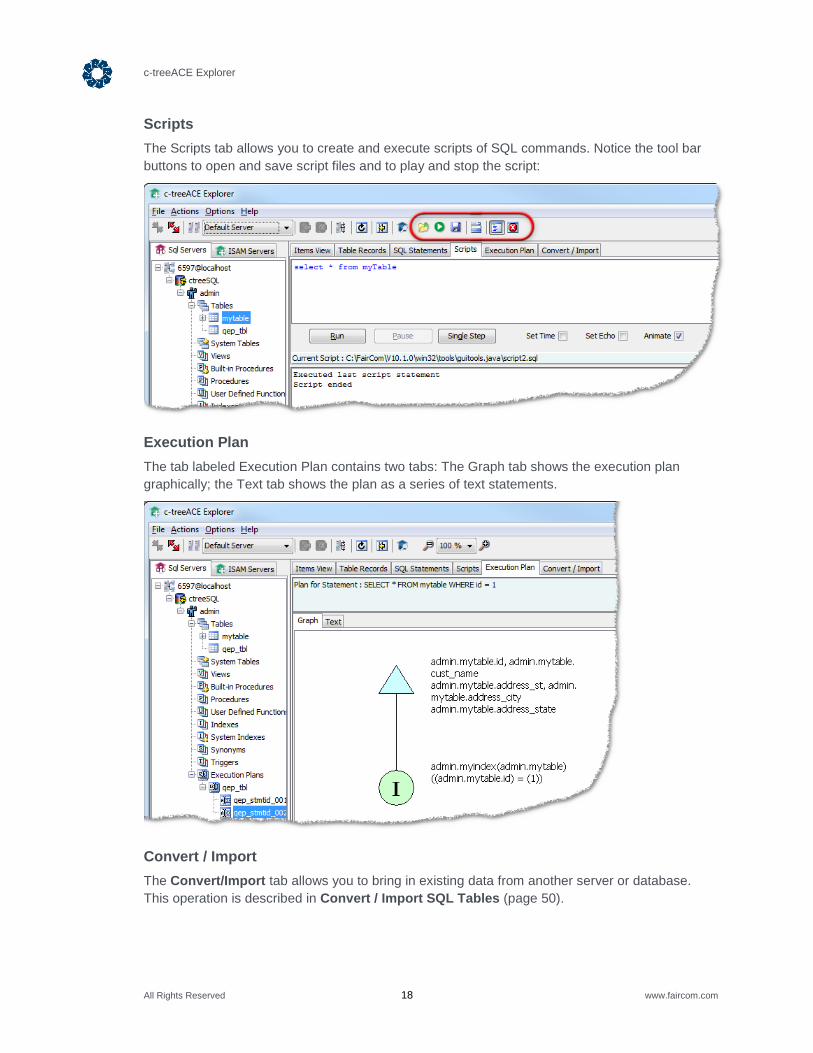
Scripts
The Scripts tab allows you to create and execute scripts of SQL commands. Notice the tool bar
buttons to open and save script files and to play and stop the script:
Execution Plan
The tab labeled Execution Plan contains two tabs: The Graph tab shows the execution plan
graphically; the Text tab shows the plan as a series of text statements.
Convert / Import
The Convert/Import tab allows you to bring in existing data from another server or database.
This operation is described in Convert / Import SQL Tables (page 50).
c-treeACE Explorer
All Rights Reserved 19 www.faircom.com
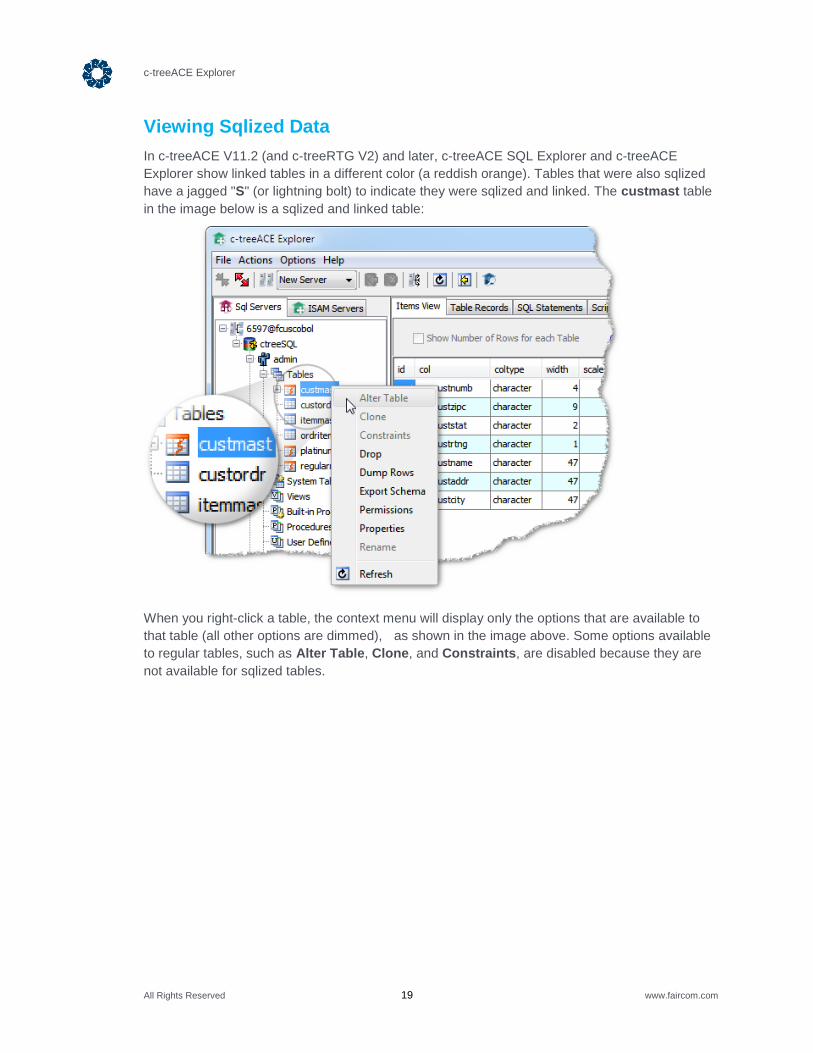
Viewing Sqlized Data
In c-treeACE V11.2 (and c-treeRTG V2) and later, c-treeACE SQL Explorer and c-treeACE
Explorer show linked tables in a different color (a reddish orange). Tables that were also sqlized
have a jagged "S" (or lightning bolt) to indicate they were sqlized and linked. The custmast table
in the image below is a sqlized and linked table:
When you right-click a table, the context menu will display only the options that are available to
that table (all other options are dimmed), as shown in the image above. Some options available
to regular tables, such as Alter Table, Clone, and Constraints, are disabled because they are
not available for sqlized tables.
c-treeACE Explorer
All Rights Reserved 20 www.faircom.com
2.3 Menus and Tool Bar
In addition to the menu bar at the top of the window (described below) and the tool bar below it
(described at the end of this section), c-treeACE Explorer provides context menus, which are
available by right-clicking on various objects in the Left Tree (e.g., servers, tables, indexes, etc.).
The operations available in those menus are described later in the sections titled SQL Operations
(page 28) and ISAM Operations (page 53).
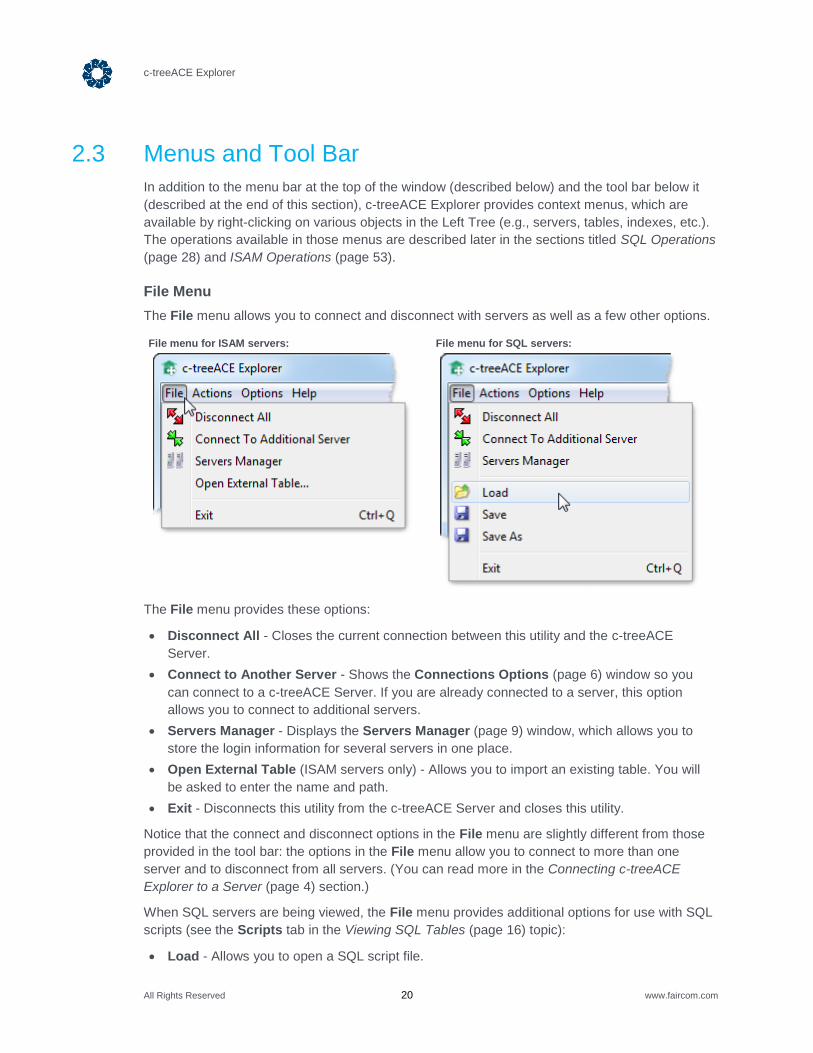
File Menu
The File menu allows you to connect and disconnect with servers as well as a few other options.
File menu for ISAM servers:
File menu for SQL servers:
The File menu provides these options:
Disconnect All - Closes the current connection between this utility and the c-treeACE
Server.
Connect to Another Server - Shows the Connections Options (page 6) window so you
can connect to a c-treeACE Server. If you are already connected to a server, this option
allows you to connect to additional servers.
Servers Manager - Displays the Servers Manager (page 9) window, which allows you to
store the login information for several servers in one place.
Open External Table (ISAM servers only) - Allows you to import an existing table. You will
be asked to enter the name and path.
Exit - Disconnects this utility from the c-treeACE Server and closes this utility.
Notice that the connect and disconnect options in the File menu are slightly different from those
provided in the tool bar: the options in the File menu allow you to connect to more than one
server and to disconnect from all servers. (You can read more in the Connecting c-treeACE
Explorer to a Server (page 4) section.)
When SQL servers are being viewed, the File menu provides additional options for use with SQL
scripts (see the Scripts tab in the Viewing SQL Tables (page 16) topic):
Load - Allows you to open a SQL script file.

c-treeACE Explorer
All Rights Reserved 21 www.faircom.com
Save - Allows you to save a SQL script file.
Save As - Allows you to save a SQL script under a new file name.
Actions Menu
Actions menu with many options:
Actions menu in a different context:
The Actions menu is context-sensitive: The list of options provided in the Actions menu
depends on the object being viewed in the grid. If MultiSelect is enabled in the Options menu, the
Actions menu applies to all items that are checked in the Left Tree. The Actions menu lists the
same options you will see in the context menu when right-clicking on the object in the Left Tree.
Options Menu
Use the Options menu to access the c-treeACE Explorer option settings.
The Options menu provides these choices:
SQL Options (page 23) - Allows you to configure the way the c-treeACE Explorer handles
SQL servers (e.g., connections, transaction control, execution plans, etc.)..
ISAM Options (page 25) - Allows you to configure the way the c-treeACE Explorer handles
ISAM servers (e.g., connections, callback libraries, etc.).
Open Mode (available only when ISAM servers are viewed) - Use this fly-out menu to select
different Open Modes to open tables in special situations:
Corrupt - Opens tables with corrupted indexes or in certain cases, tables with corrupted
data.
DataOnly - Opens only the data table. Useful for a table that may be missing indices.
Exclusive - Opens the table as exclusive. While a table is opened in this mode, no other user
or application can open it.

c-treeACE Explorer
All Rights Reserved 22 www.faircom.com
Multiselect Mode - Toggles between standard mode, in which a single object can be
selected in the LEft Tree for viewing, and MultiSelect mode in which check boxes are
displayed in the Left Tree so you can select multiple tables.
Look & Feel - Allows you to select from several “skins” that determine the color scheme and
other details about the controls.
Help Menu
Use this menu to access the c-treeACE Explorer help information.
About - Provide information about the version of the c-treeACE Explorer executable.
Tool Bar
Tool bar items are shortcuts to the menu commands, which can be useful for quick access to
frequently used operations.
Connect - Shows the connection dialog in order to create a new connection between this
utility and the c-treeACE Server. This icon is dimmed when a server is connected. (To connect to
an additional server, use the Files menu.
Disconnect - Closes the current connection between this utility and the c-treeACE Server. If
the “gray” icon is currently showing it means this utility is not currently connected to the Server.
This icon is dimmed when the server is disconnected.
Servers Manager - Displays the Servers Manager (page 9) window, which allows you to
store the login information for several servers in one place.
Drop-down List - The drop-down list next to the Servers Manager icon allows you to select from
the servers you have saved in the Servers Manager window.
Enable / Disable Broadcast - Allows c-treeACE Explorer to listen for an available c-treeACE
Server that has been configured to broadcast its Server Name and IP address over a TCP/IP
port.
Refresh - Refreshes all displayed values.
Note: You will find Refresh options throughout the menus. The results of some operations may not appear until you use a Refresh menu option to update the view.
Hide / Show Left Tree - Use this icon to hide and show the Left Tree, which shows currently
connected ISAM and SQL servers, databases, etc. You can display the Left Tree to select the
information to be displayed in the grid; you can hide it to gain more room for the grid.
c-treeACE Explorer
All Rights Reserved 23 www.faircom.com
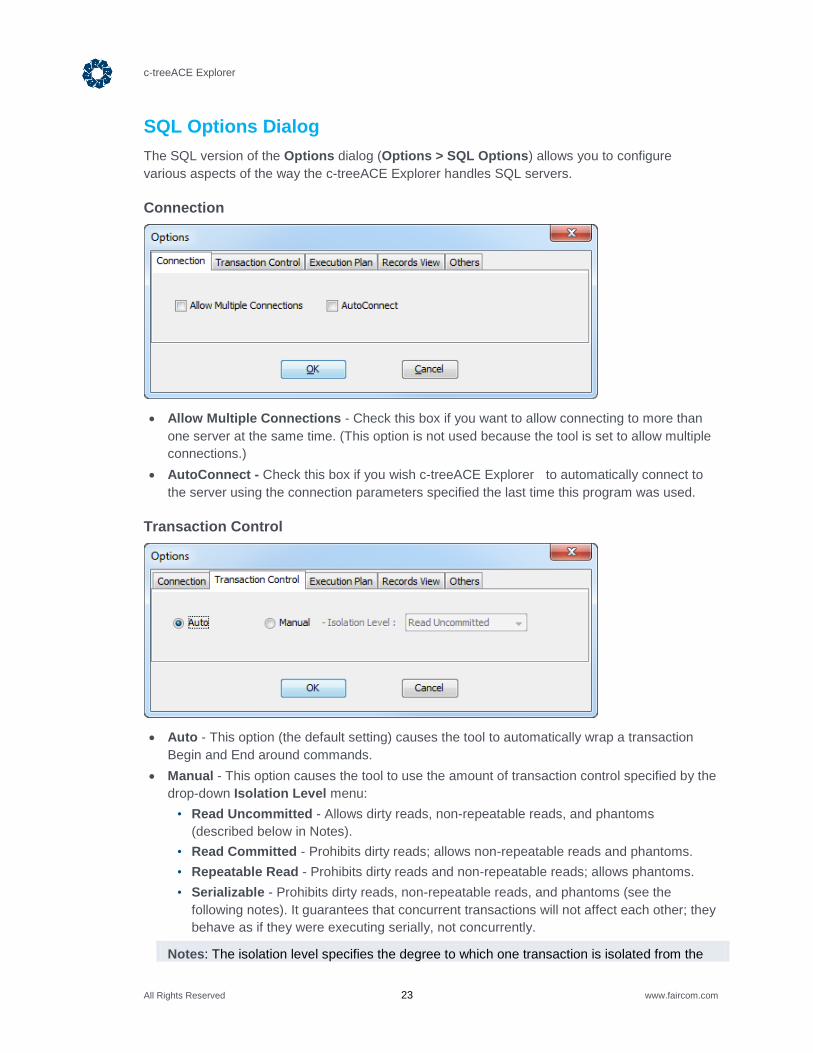
SQL Options Dialog
The SQL version of the Options dialog (Options > SQL Options) allows you to configure
various aspects of the way the c-treeACE Explorer handles SQL servers.
Connection
Allow Multiple Connections - Check this box if you want to allow connecting to more than
one server at the same time. (This option is not used because the tool is set to allow multiple
connections.)
AutoConnect - Check this box if you wish c-treeACE Explorer to automatically connect to
the server using the connection parameters specified the last time this program was used.
Transaction Control
Auto - This option (the default setting) causes the tool to automatically wrap a transaction
Begin and End around commands.
Manual - This option causes the tool to use the amount of transaction control specified by the
drop-down Isolation Level menu:
• Read Uncommitted - Allows dirty reads, non-repeatable reads, and phantoms
(described below in Notes).
• Read Committed - Prohibits dirty reads; allows non-repeatable reads and phantoms.
• Repeatable Read - Prohibits dirty reads and non-repeatable reads; allows phantoms.
• Serializable - Prohibits dirty reads, non-repeatable reads, and phantoms (see the
following notes). It guarantees that concurrent transactions will not affect each other; they
behave as if they were executing serially, not concurrently.
Notes: The isolation level specifies the degree to which one transaction is isolated from the

c-treeACE Explorer
All Rights Reserved 24 www.faircom.com
effects of concurrent access of the database by other transactions. Higher isolation levels provide greater data consistency to the user’s transaction but reduce access to data by concurrent transactions. The isolation level SERIALIZABLE guarantees the highest consistency. The isolation level READ UNCOMMITTED guarantees the least consistency. Only READ COMMITTED and REPEATABLE READ are supported. The ANSI/ISO standard
defines isolation levels in terms of the of the inconsistencies they allow
Execution Plan
Ask for Table and Statement ID Before Explaining - When checked, the name of the table
into which the query plan will be saved and statement ID (up to 32-character identifier for the
query plan) will be requested before generating the execution plan.
If the table name and statement ID are not specified, the plan will be stored in admin.qep_tbl
with a unique ID of the form qep_stmtid_xx.
Records View
Use "English" Locale - This option forces the tool to use English as the locale regardless of
the machine's settings.
Use Machine Locale - This option allows the tool to use the locale specified in the machine's
settings.
c-treeACE Explorer
All Rights Reserved 25 www.faircom.com
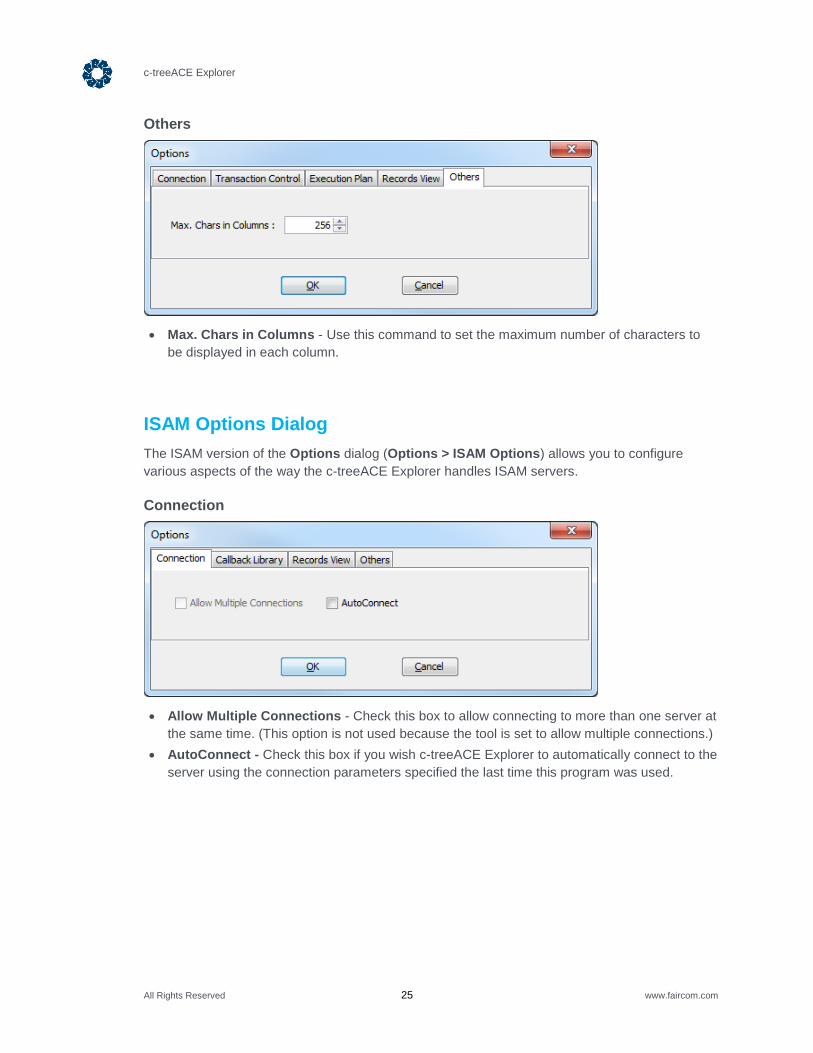
Others
Max. Chars in Columns - Use this command to set the maximum number of characters to
be displayed in each column.
ISAM Options Dialog
The ISAM version of the Options dialog (Options > ISAM Options) allows you to configure
various aspects of the way the c-treeACE Explorer handles ISAM servers.
Connection
Allow Multiple Connections - Check this box to allow connecting to more than one server at
the same time. (This option is not used because the tool is set to allow multiple connections.)
AutoConnect - Check this box if you wish c-treeACE Explorer to automatically connect to the
server using the connection parameters specified the last time this program was used.
c-treeACE Explorer
All Rights Reserved 26 www.faircom.com
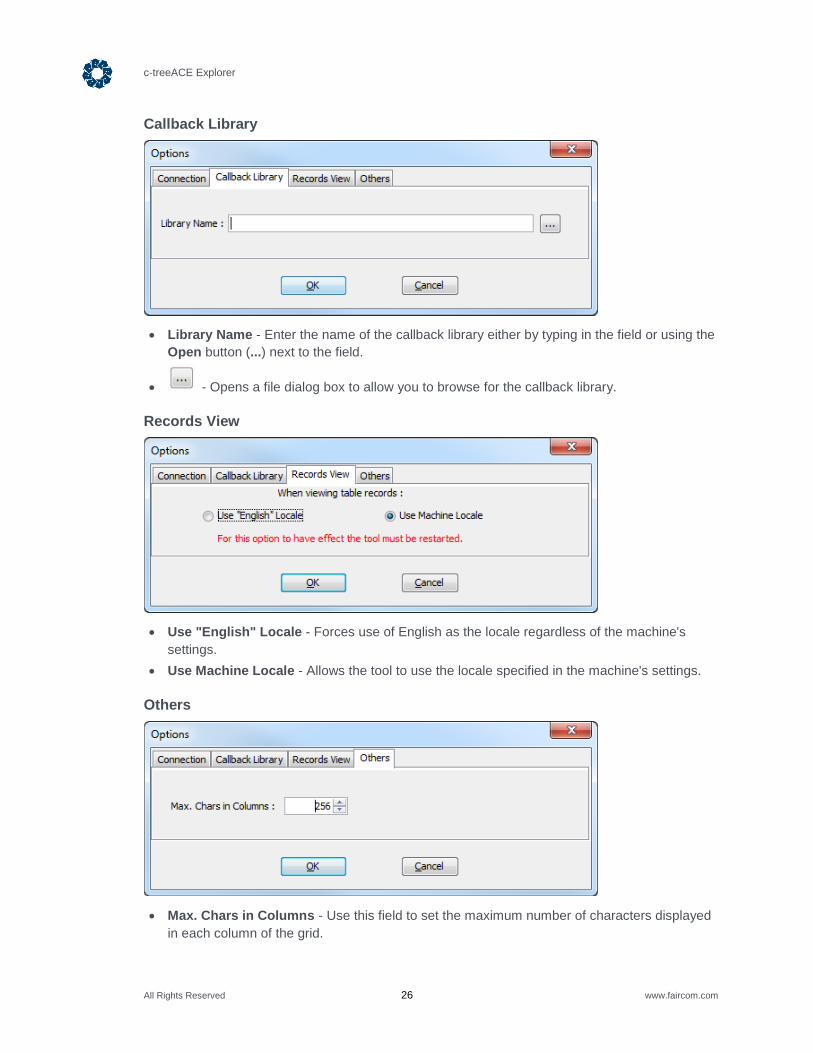
Callback Library
Library Name - Enter the name of the callback library either by typing in the field or using the
Open button (...) next to the field.
- Opens a file dialog box to allow you to browse for the callback library.
Records View
Use "English" Locale - Forces use of English as the locale regardless of the machine's
settings.
Use Machine Locale - Allows the tool to use the locale specified in the machine's settings.
Others
Max. Chars in Columns - Use this field to set the maximum number of characters displayed
in each column of the grid.

c-treeACE Explorer
All Rights Reserved 27 www.faircom.com
c-treeACE Explorer
All Rights Reserved 28 www.faircom.com
2.4 SQL Operations
The following types of operations are available when viewing SQL servers:
Database Operations (page 28)
User Operations (page 28)
Table Group Operations (page 30)
Table Operations (page 36)
Index Operations (page 46)
Additional operations can be performed from some of the tabs displayed when viewing SQL
tables (e.g., adding, editing, and deleting records, running SQL statements and scripts, and
converting and importing data from another database). For information, see Viewing SQL Tables
(page 16), Viewing Sqlized Data (page 19), and Convert / Import SQL Tables (page 50).
Database Operations
The SQL Servers tab in the Left Tree shows the Servers you are connected to (see the
Connecting c-treeACE Explorer to a Server (page 4) section), the SQL databases defined on
each server, the users, the tables, and the details about each database.
Use the Hide / Show Left Tree icon to see the tree if it is not displayed.
The Database menu can be accessed by highlighting a database and performing either of these
actions:
Right-click the database to see the Database context menu.
Click Actions in the menu bar at the top of the window.
The Database menu offers these options:
Clear Database - This action will delete all user tables, views, and triggers from the current
database. You will be asked if you want to continue.
Note: The user tables, views, and triggers will be deleted from the current database. ALL DATA WILL BE LOST.
Refresh - Refreshes all displayed values (same as clicking the Refresh icon in the tool
bar).
Note: The results of some operations may not appear until you use a Refresh menu option to
update the view.
User Operations
The User menu can be accessed by highlighting a user in the Left Tree and performing either of
these actions:
Right-click the user to see the User Operations context menu.

c-treeACE Explorer
All Rights Reserved 29 www.faircom.com
Click Actions in the menu bar at the top of the window.
Notice that users are displayed only when viewing SQL servers.
The User menu allows you to perform these operations:
Set Privileges - Opens the Set User Privileges dialog, described below.
Refresh - Refreshes all displayed values (same as clicking the Refresh icon in the tool
bar).
Note: You will find Refresh options throughout the menus. The results of some operations may not appear until you use a Refresh menu option to update the view.
Set User Privileges
The Set User Privileges window allows you to modify the privileges for the selected user:
User Name - Enter the name of the user.
Password - To change passwords, enter a new password in the is field.
Confirm Password - Retype the new password in this field.
Privileges - Two levels of privileges are provided:
DBA - Check this box if you want to make the selected user a database administrator.
Resource - Check the Resource box if you want to make the selected user a resource user.
Click OK to commit your changes.
Note: You can perform this operation only if you are connected as database administrator.
c-treeACE Explorer
All Rights Reserved 30 www.faircom.com
Table Group Operations
The Table Group menu can be accessed by highlighting a table in the Left Tree and performing
either of these actions:
Right-click the table to see the Table Group context menu.
Click Actions in the menu bar at the top of the window.
The Table Group menu allows you to perform these operations:
Create (page 30)
Dump Rows (All Tables) (page 34)
Export Schema (All Tables) (page 35)
Refresh - Refreshes all displayed values (same as clicking the Refresh icon in the tool
bar).
Note: You will find Refresh options throughout the menus. The results of some operations may not appear until you use a Refresh menu option to update the view.
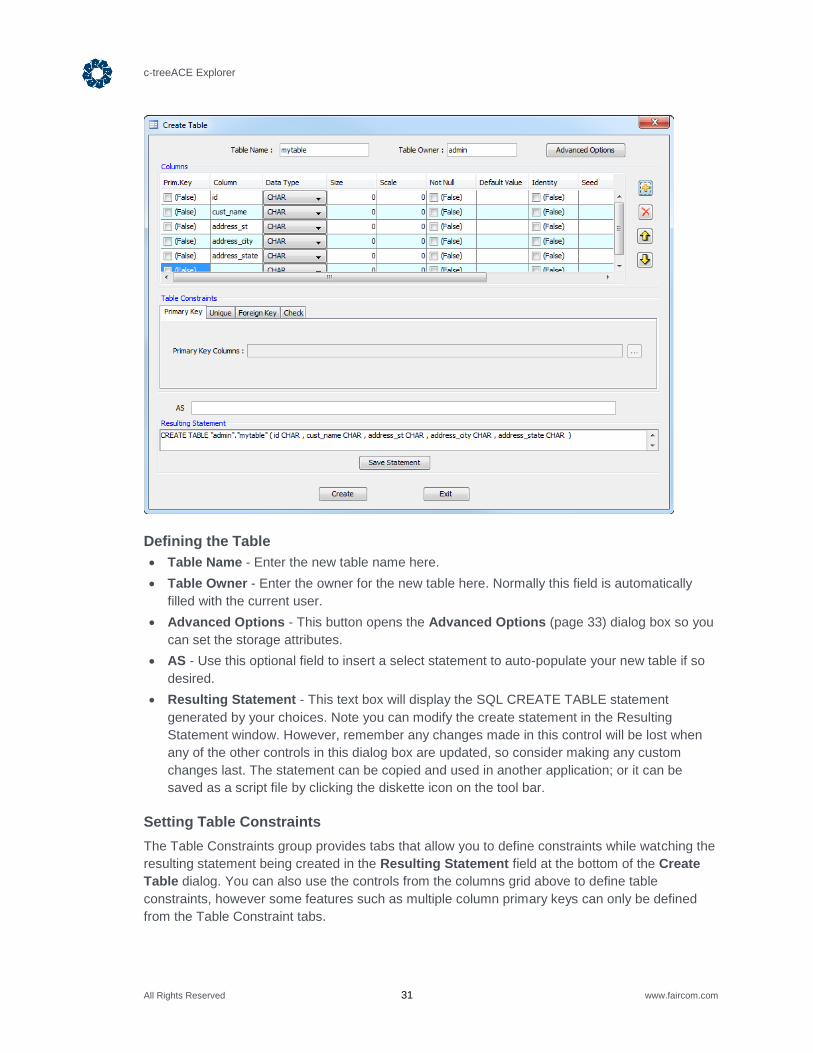
Create Table
The Create Table window allows you to add a new table to the selected database.
To display this window, highlight the Tables group in the Left Tree and either:
Right-click the table and select Create from the Table Operations context menu.
Click Actions in the menu bar at the top of the window and select Create.
c-treeACE Explorer
All Rights Reserved 31 www.faircom.com
Defining the Table
Table Name - Enter the new table name here.
Table Owner - Enter the owner for the new table here. Normally this field is automatically
filled with the current user.
Advanced Options - This button opens the Advanced Options (page 33) dialog box so you
can set the storage attributes.
AS - Use this optional field to insert a select statement to auto-populate your new table if so
desired.
Resulting Statement - This text box will display the SQL CREATE TABLE statement
generated by your choices. Note you can modify the create statement in the Resulting
Statement window. However, remember any changes made in this control will be lost when
any of the other controls in this dialog box are updated, so consider making any custom
changes last. The statement can be copied and used in another application; or it can be
saved as a script file by clicking the diskette icon on the tool bar.
Setting Table Constraints
The Table Constraints group provides tabs that allow you to define constraints while watching the
resulting statement being created in the Resulting Statement field at the bottom of the Create
Table dialog. You can also use the controls from the columns grid above to define table
constraints, however some features such as multiple column primary keys can only be defined
from the Table Constraint tabs.
c-treeACE Explorer
All Rights Reserved 32 www.faircom.com
Primary Key
Use this tab page to define a primary key with multiple columns.
Primary Key Columns - Enter the column names you want to define as the primary key
using a “,” (comma) as the separator between each column. Optionally pressing the
button will invoke a Select Table Column list that allows you to quickly select the column(s).
Note you can use the up and down arrows to place the columns in the desired order before
clicking OK, which will insert the columns in the selected order (the top column with a check
mark is listed first).
Unique
Use this tab page to define what columns you want to store unique values.
Columns - Enter the column names you want to store unique values using “,” (comma) as
the separator between each column, or press enter after each column and place each
column on its own row. Optionally pressing the button will invoke a Select Table Column
list that allows you to quickly select the column(s). Note you can use the up and down arrows
to place the columns in the desired order before clicking OK, which will insert the columns in
the selected order (the top column with a check mark is listed first).
Foreign Key
This tab allows you to define foreign keys /references for your new table.
Foreign Key Columns - Enter the column names you want to be referenced with another
table. Use a “,” (comma) as the separator. You can specify more references by using
multiple rows. In order to simplify selecting the columns of the current table you can use the
button to invoke the Select Table Column dialog list.
References Table [(Columns)] - Enter the name of the table you want to reference here.
Optionally you can specify the table's column between round brackets separated by a
comma.
Check
Use this tab to define check conditions for your new table.
Search Condition - Enter your custom condition here. For example:
cust_name != 'me'
Multiple conditions can be specified on a single line by using the AND and OR operators. For
example:
cust_number > 1000 and cust_zip > 0.
Creating the Table
When your table is properly defined, click the Create button to create your new table. Then click
exit to return to the main window. Be sure to check the table create results in the status bar at the
bottom of the window for any possible errors.
Save Statement saves a copy of the SQL statement you are creating.
c-treeACE Explorer
All Rights Reserved 33 www.faircom.com
Click Create to commit your changes.
Click Exit to close the window after you are done creating tables.
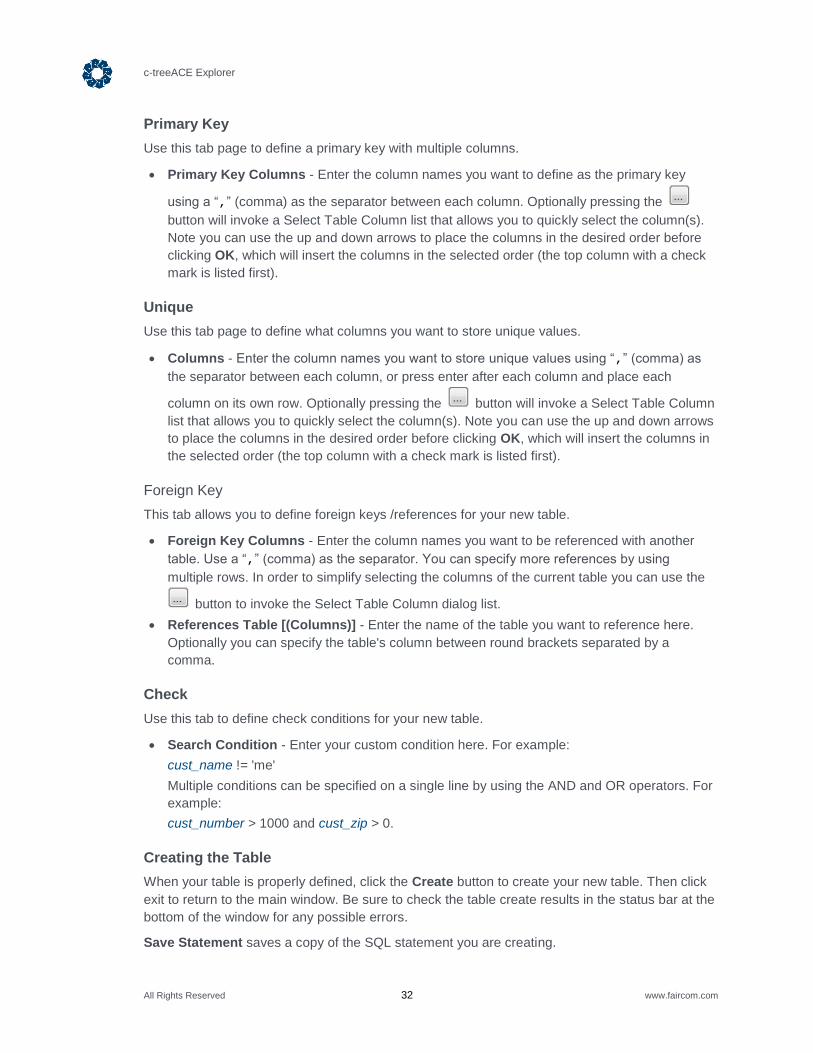
Advanced Options
The Advanced Options button in the Create Table (page 30) window opens the dialog box
shown below so you can set the storage attributes listed:
PREIMG - If checked, sets PREIMG (“pre-image”) transaction mode, which supports
transaction atomicity but not transaction recoverability.
Recbyt_Idx - Select if you want to create the table with a RECBYT index.
RowID_Fld - Select if you want a ROWID field (an auto-incrementing number which takes
advantage of the c-tree serial segment index mode) or NOROWID_FLD.
Huge Mode - Select if the table should be created as a c-tree HUGE file (64-bit file offset
addressing) or NOTHUGE (32-bit file offset addressing; a limit of 2Gb or 4Gb depending on
your OS platform).
Encryption - Select the type of encryption, if any.
c-treeACE Explorer
All Rights Reserved 34 www.faircom.com
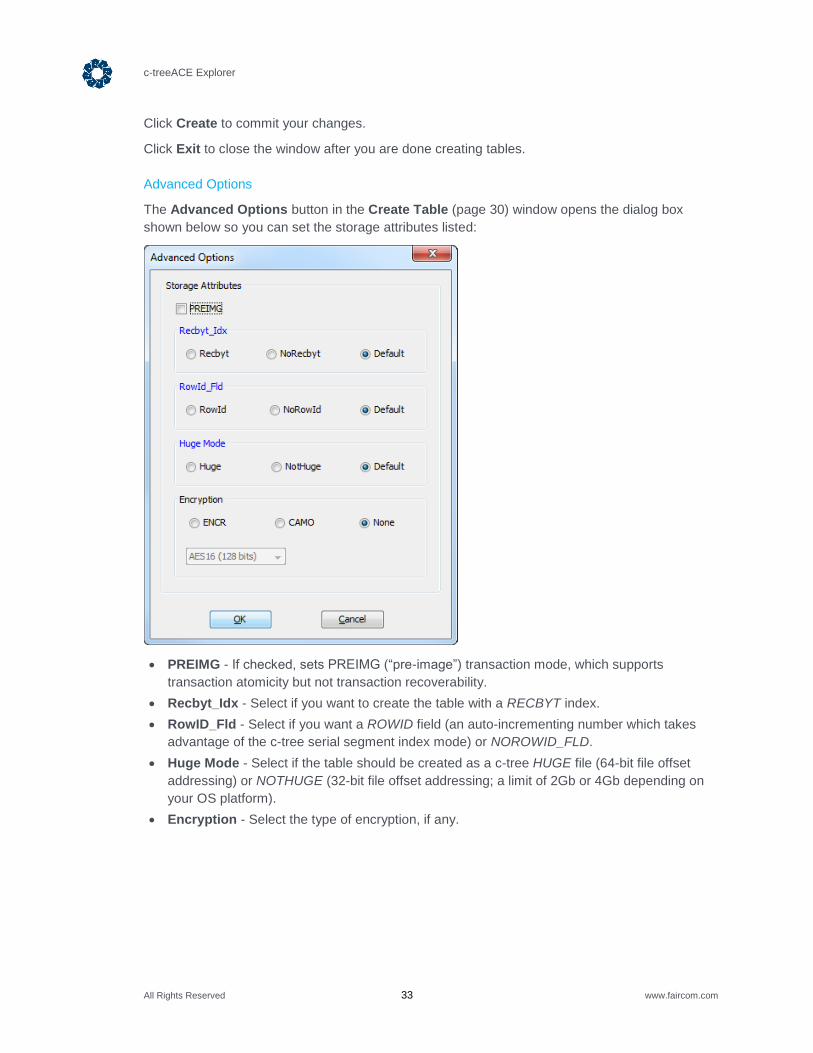
Dump Rows (All Tables)
Use this option to dump (export) all the data in the tables for the selected user. This option is
similar to Dump Rows (page 42), which is used if you need to limit the export to a selected table.
The data is exported in the form of an INSERT INTO statement for each row.
Output Format - Select either CSV or XML.
Include Columns' Names in Output File -
One File Per Object - Check this box if you want divide the export into multiple files.
Use Object Name and File Name - Check this box if you want the object name to be used
as the file name. Use the Output File field (which changes names to Output Directory) so
you can indicate the directory where you want the file saved.
Append To Output File - If you check this box the output script will be appended to a
selected script file without overwriting any existing script file contents.
Output File - Specify the output script file name or you can use the button to select an
existing file or the output file directory.
When you are done, click OK to begin the export. If you press Exit you discard the export
operation.

c-treeACE Explorer
All Rights Reserved 35 www.faircom.com
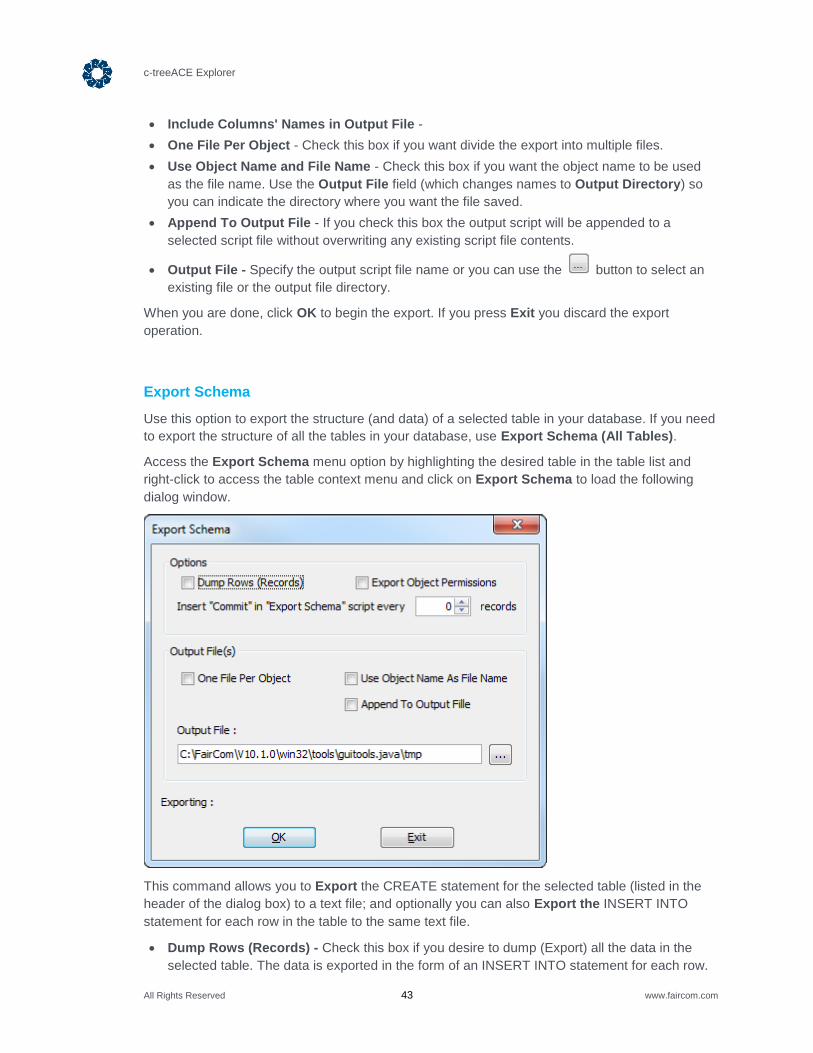
Export Schema (All Tables)
Use this option to export the table definitions for all the tables defined within a database. This
option is similar to Export Schema (page 43), which is used to export the schema of a selected
table.
To use this option, highlight the Tables group and either right-click it or click Actions in the
menu bar. Select Export Schema (All Tables) from the menu that appears. The following dialog
box will be displayed:
This command allows you to export the CREATE statement for all the tables owned by the given
user. Optionally you can export the INSERT INTO statement for each row in each table.
Options:
Dump Rows (Records) - Check this box if you desire to dump (Export) all the data in the
selected table. The data is exported in the form of an INSERT INTO statement for each row.
Export Object Permissions - Check this box if you want to include object permissions in the
exported file.
Insert “Commit” in “Export Schema” script every X records - Adjust the number to a
value greater than 0 if you need to divide the script into separate transactions.
Output File(s):
One File Per Object - Check this box if you want divide the export into multiple files.
Use Object Name as File Name - Check this box if you want the object name to be used as
the file name. Use the Output File field (which changes names to Output Directory) so you
can indicate the directory where you want the file saved.
Append To Output File - If you check this box the output script will be appended to a
selected script file without overwriting any existing script file contents.
c-treeACE Explorer
All Rights Reserved 36 www.faircom.com
Output File - Specify the output script file name or you can use the button to select an
existing file or the output file directory.
When you are done click OK in order to begin the export. If you press Exit you discard the export
operation.
If you need to export the structure (and data) of only a single (or just a few tables) from your
database, right-click the desired table and select Export Schema (page 43) from the context
menu.
Table Operations
The Table menu can be accessed by highlighting an individual table in the Left Tree and
performing either of these actions:
Right-click the table to see the Table Operations context menu.
Click Actions in the menu bar at the top of the window.
The Table menu allows you to perform these operations:
Alter Table (page 37)
Clone (page 38)
Constraints (page 39)
Drop (page 42)
Dump Rows (page 42)
Export Schema (page 43)
Permissions (page 44)
Properties (page 45)
Rename (page 46)
Refresh - Refreshes all displayed values (same as clicking the Refresh icon in the tool
bar).
Note: The results of some database operations may not appear until you use the Refresh
menu option to update the view.
Additional operations can be performed from some of the tabs displayed when viewing SQL
tables (e.g., adding, editing, and deleting records, running SQL statements and scripts, and
converting and importing data from another database). For information, see Viewing SQL Tables
(page 16), Viewing Sqlized Data (page 19), and Convert / Import SQL Tables (page 50).
c-treeACE Explorer
All Rights Reserved 37 www.faircom.com
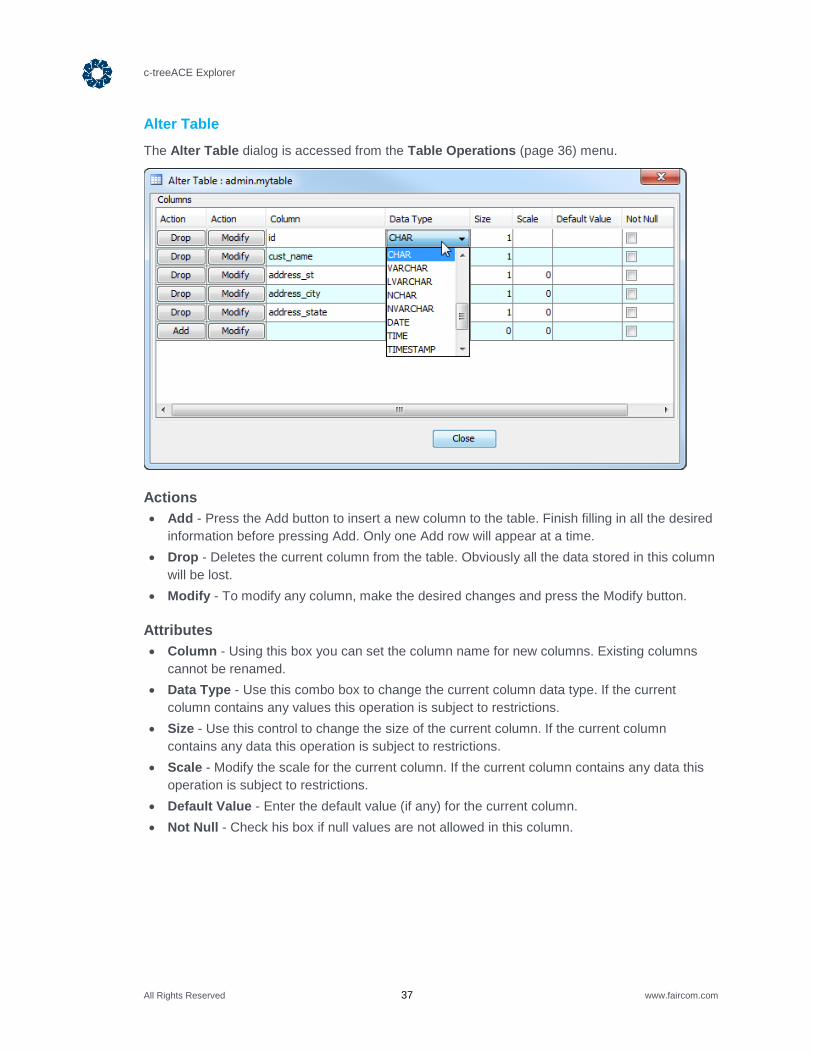
Alter Table
The Alter Table dialog is accessed from the Table Operations (page 36) menu.
Actions
Add - Press the Add button to insert a new column to the table. Finish filling in all the desired
information before pressing Add. Only one Add row will appear at a time.
Drop - Deletes the current column from the table. Obviously all the data stored in this column
will be lost.
Modify - To modify any column, make the desired changes and press the Modify button.
Attributes
Column - Using this box you can set the column name for new columns. Existing columns
cannot be renamed.
Data Type - Use this combo box to change the current column data type. If the current
column contains any values this operation is subject to restrictions.
Size - Use this control to change the size of the current column. If the current column
contains any data this operation is subject to restrictions.
Scale - Modify the scale for the current column. If the current column contains any data this
operation is subject to restrictions.
Default Value - Enter the default value (if any) for the current column.
Not Null - Check his box if null values are not allowed in this column.
c-treeACE Explorer
All Rights Reserved 38 www.faircom.com
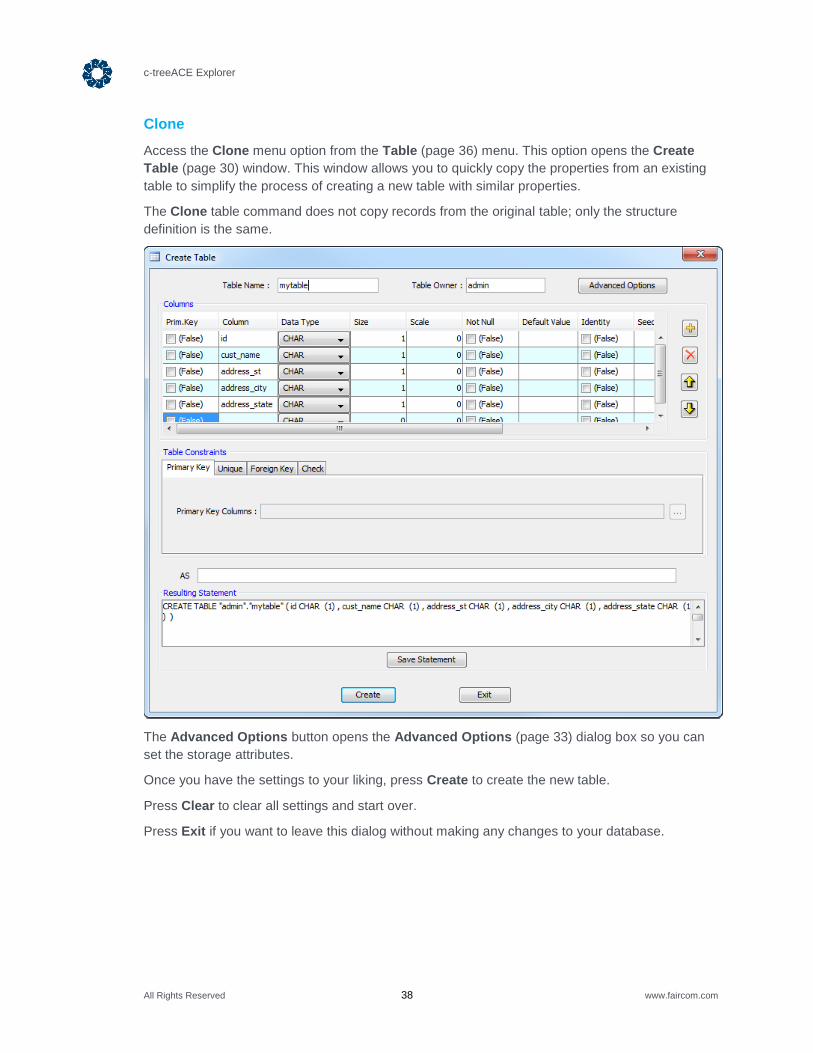
Clone
Access the Clone menu option from the Table (page 36) menu. This option opens the Create
Table (page 30) window. This window allows you to quickly copy the properties from an existing
table to simplify the process of creating a new table with similar properties.
The Clone table command does not copy records from the original table; only the structure
definition is the same.
The Advanced Options button opens the Advanced Options (page 33) dialog box so you can
set the storage attributes.
Once you have the settings to your liking, press Create to create the new table.
Press Clear to clear all settings and start over.
Press Exit if you want to leave this dialog without making any changes to your database.

c-treeACE Explorer
All Rights Reserved 39 www.faircom.com
Table Constraints
Access the Constraints menu option from the Table (page 36) menu. The following dialog will
open:
This dialog allows you to add new constraints using the provided controls. To create a new
constraint, define it by completing the required fields and then click on the Add button. To remove
an existing constraint, click the Drop button on the line of the constraint you want to delete.
Note: Never manually drop the indexes created by the constraints; instead, delete the constraint using its associated Drop button.
For a complete understanding of constraints, refer to the Table Constraints section in the
c-treeACE SQL Reference Guide.
Primary Key Constraints
Use the controls in this group to create Primary Key constraints
Actions
Add - Creates a new constraint. First define the new constraint by completing the required
fields and then then click the Add button to create the new constraint.
Drop - (Available only for existing constraints) Delete this constraint.
c-treeACE Explorer
All Rights Reserved 40 www.faircom.com
Attributes
Owner - (Read Only) This field will be completed automatically with the owner of the Table
once a Column Name is selected.
Name - Enter the name you want to assign to the constraint. If the constraint already exists
an error message is displayed.
Columns - Enter the name of the column to be used as a primary key (or a portion of a
primary key). Use the button to load the Column Select List box to see a list of available
columns.
Index Name - (Read Only) This field will be completed automatically with the index name
assigned to this constraint.
Unique Constraints
Use the controls inside this group to manage Unique constraints.
Actions
Add - Creates a new constraint. First define the new constraint by completing the required
fields and then then click the Add button to create the new constraint.
Drop - (Available only for existing constraints) Delete this constraint.
Attributes
Owner - (Read Only) This field will be completed automatically with the owner of the Table
once a Column Name is selected.
Name - Enter the name you want to assign to the constraint. If the constraint already exists
an error message is displayed.
Columns - Enter the name of the column to be used as a primary key (or a portion of a
primary key). Use the button to load Column Select List box to see a list of available
columns.
Index Name - (Read Only) This field will be completed automatically with the index name
assigned to this constraint.
Foreign Keys References
The controls in this group box can be used to define foreign key constraints with other tables'
keys.
Actions
Add - Creates a new constraint. First define the new constraint by completing the required
fields and then then click the Add button to create the new constraint.
Drop - (Available only for existing constraints) Delete this constraint.
Attributes
Owner - (Read Only) This field will be completed automatically with the owner of the Table
once a Column Name is selected.
Name - Enter the name you want to assign to the constraint. If the constraint already exists
an error message is displayed.

c-treeACE Explorer
All Rights Reserved 41 www.faircom.com
Columns - Enter the name of the column to be used as a primary key (or a portion of a
primary key). Use the button to load Column Select List box to see a list of available
columns.
Reference Owner - (Read Only) This field will be completed automatically with the owner of
the Reference Table for the current constraint.
Reference Table - Enter here the complete table name you want to Reference with this
foreign key. Optionally after the Referenced table's name, specify the Column name between
parenthesis separated by a comma, for example: customers_table (cust_num, cust_name)
Check
Use the controls in this group to manage Check constraints.
Actions
Add - Creates a new constraint. First define the new constraint by completing the required
fields and then then click the Add button to create the new constraint.
Drop - (Available only for existing constraints) delete this constraint.
Attributes
Owner - (Read Only) This field will be completed automatically with the owner of the Table
once a Column Name is selected.
Name - Enter the name you want to assign to the constraint. If the constraint already exists
an error message is displayed.
Columns - Enter the name of the column to be used as a primary key (or a portion of a
primary key). Use the button to load Column Select List box to see a list of available
columns.
Check Clause - Enter the conditions to be verified. You have to enter the clauses as a SQL
clause. For example:
cust_num > 0
Multiple fields can be affected by using AND, NOT, and OR clauses. For example:
cust_rating > 0 and cust_zip > 0
c-treeACE Explorer
All Rights Reserved 42 www.faircom.com
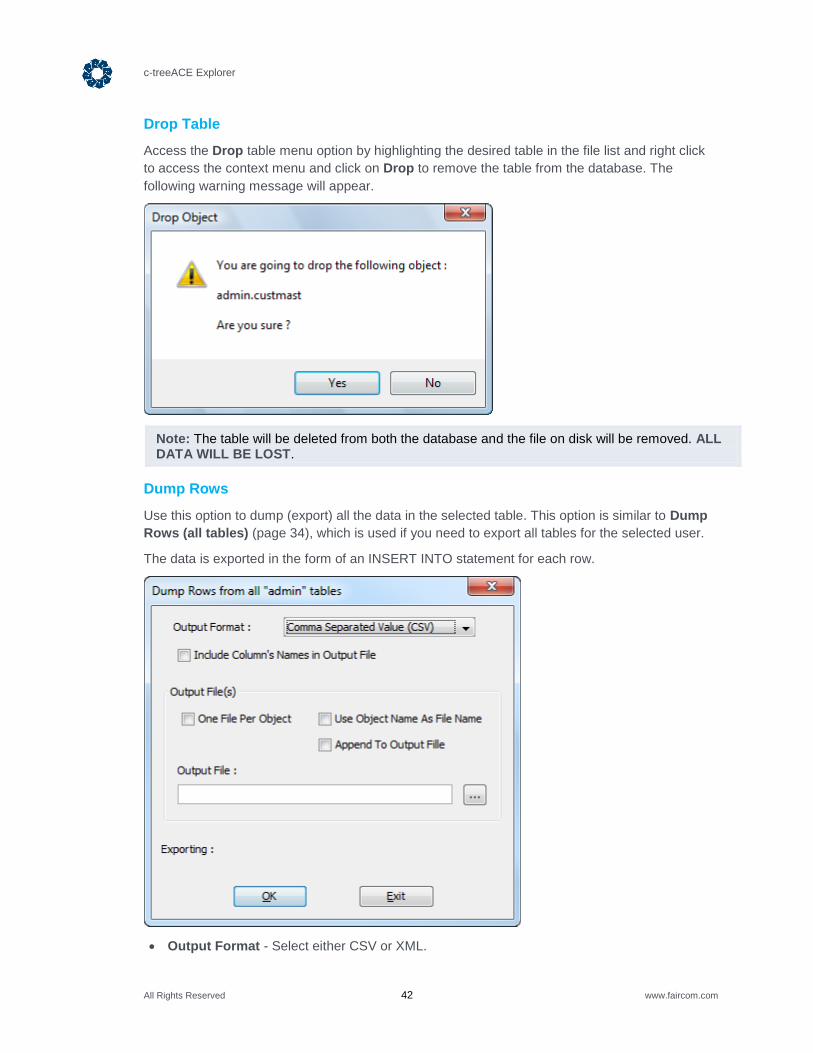
Drop Table
Access the Drop table menu option by highlighting the desired table in the file list and right click
to access the context menu and click on Drop to remove the table from the database. The
following warning message will appear.
Note: The table will be deleted from both the database and the file on disk will be removed. ALL DATA WILL BE LOST.
Dump Rows
Use this option to dump (export) all the data in the selected table. This option is similar to Dump
Rows (all tables) (page 34), which is used if you need to export all tables for the selected user.
The data is exported in the form of an INSERT INTO statement for each row.
Output Format - Select either CSV or XML.
c-treeACE Explorer
All Rights Reserved 43 www.faircom.com
Include Columns' Names in Output File -
One File Per Object - Check this box if you want divide the export into multiple files.
Use Object Name and File Name - Check this box if you want the object name to be used
as the file name. Use the Output File field (which changes names to Output Directory) so
you can indicate the directory where you want the file saved.
Append To Output File - If you check this box the output script will be appended to a
selected script file without overwriting any existing script file contents.
Output File - Specify the output script file name or you can use the button to select an
existing file or the output file directory.
When you are done, click OK to begin the export. If you press Exit you discard the export
operation.
Export Schema
Use this option to export the structure (and data) of a selected table in your database. If you need
to export the structure of all the tables in your database, use Export Schema (All Tables).
Access the Export Schema menu option by highlighting the desired table in the table list and
right-click to access the table context menu and click on Export Schema to load the following
dialog window.
This command allows you to Export the CREATE statement for the selected table (listed in the
header of the dialog box) to a text file; and optionally you can also Export the INSERT INTO
statement for each row in the table to the same text file.
Dump Rows (Records) - Check this box if you desire to dump (Export) all the data in the
selected table. The data is exported in the form of an INSERT INTO statement for each row.
c-treeACE Explorer
All Rights Reserved 44 www.faircom.com
Append To Output File - If you check this box the output script will be appended to a
selected script file without overwriting any existing script file contents.
Output file - Specify the output script file name or you can use the button to select an
existing file or the output file directory.
When you are done, press OK in order to begin the export. If you press Cancel you discard the
Export operation.
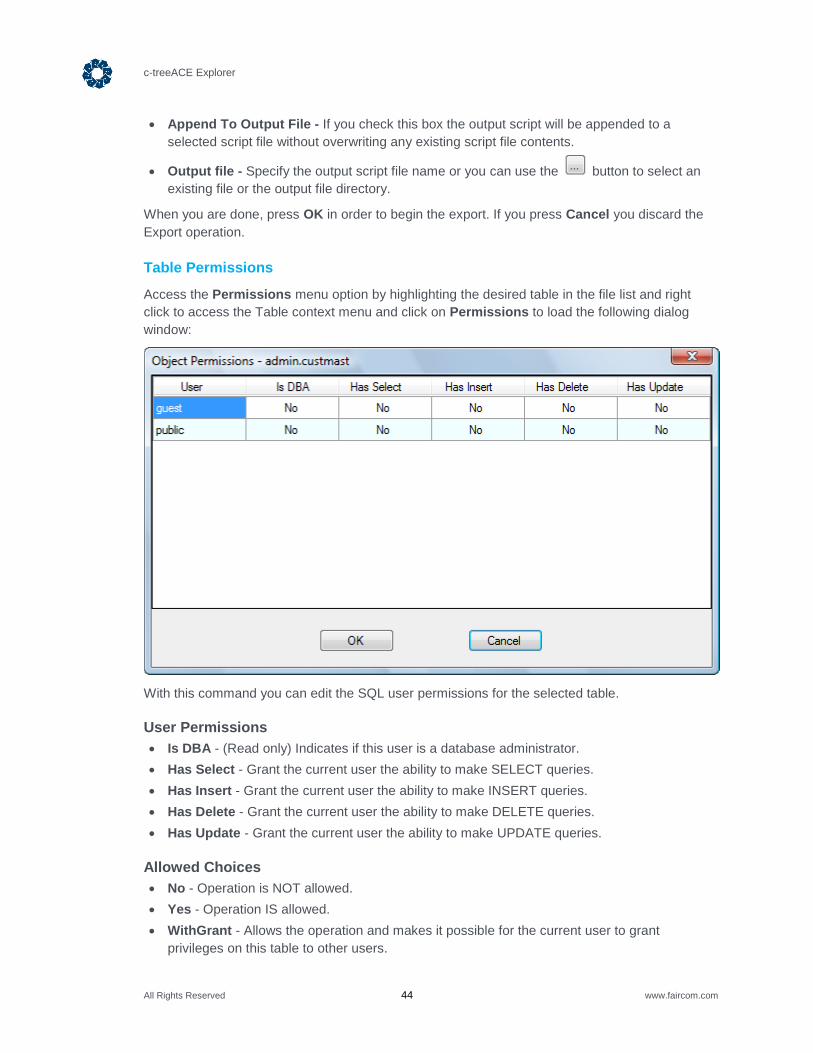
Table Permissions
Access the Permissions menu option by highlighting the desired table in the file list and right
click to access the Table context menu and click on Permissions to load the following dialog
window:
With this command you can edit the SQL user permissions for the selected table.
User Permissions
Is DBA - (Read only) Indicates if this user is a database administrator.
Has Select - Grant the current user the ability to make SELECT queries.
Has Insert - Grant the current user the ability to make INSERT queries.
Has Delete - Grant the current user the ability to make DELETE queries.
Has Update - Grant the current user the ability to make UPDATE queries.
Allowed Choices
No - Operation is NOT allowed.
Yes - Operation IS allowed.
WithGrant - Allows the operation and makes it possible for the current user to grant
privileges on this table to other users.
c-treeACE Explorer
All Rights Reserved 45 www.faircom.com
Refer to Table Permissions in the c-treeACE SQL Reference Guide to learn more about these
operations.
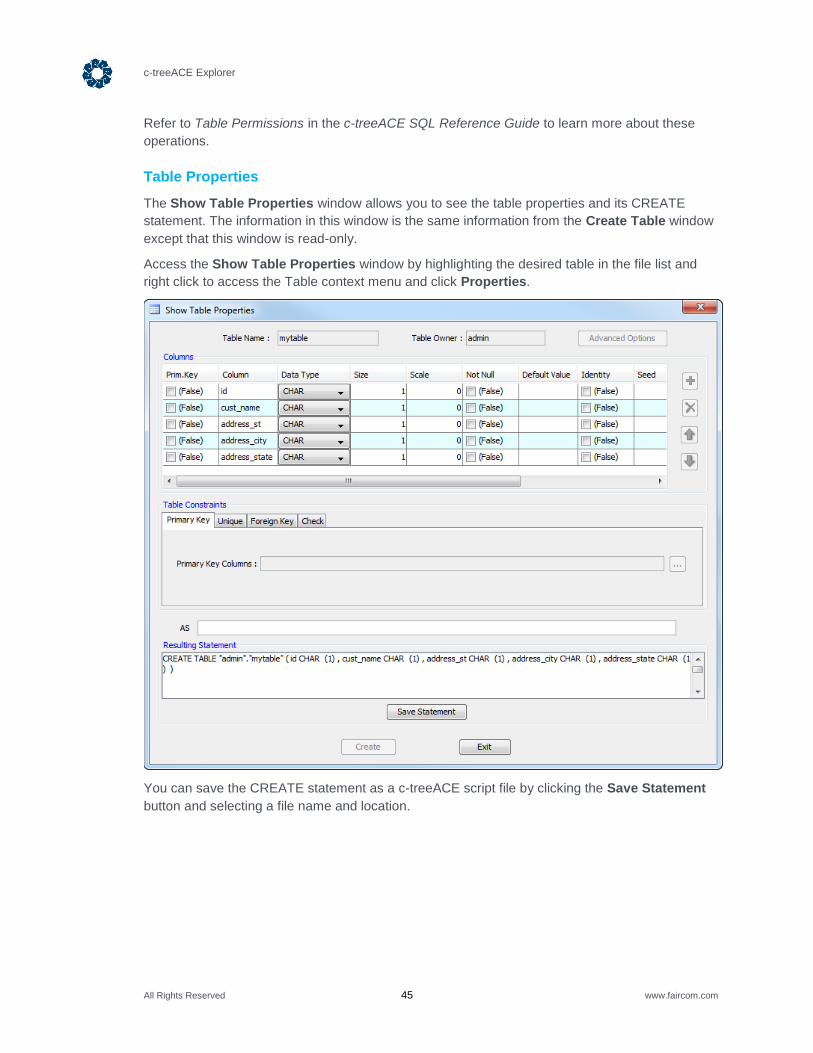
Table Properties
The Show Table Properties window allows you to see the table properties and its CREATE
statement. The information in this window is the same information from the Create Table window
except that this window is read-only.
Access the Show Table Properties window by highlighting the desired table in the file list and
right click to access the Table context menu and click Properties.
You can save the CREATE statement as a c-treeACE script file by clicking the Save Statement
button and selecting a file name and location.

c-treeACE Explorer
All Rights Reserved 46 www.faircom.com
Rename Table
Access the Rename table menu option by highlighting the desired table in the file list and right
click to access the table context menu and click on Rename to load the following dialog window.
With this window you can rename a table. Enter the new name for the selected table in the To
box and then click OK. Click the Cancel button if you need to exit without making any changes.
Index Operations
The Index menu can be accessed by highlighting an index in the Left Tree and performing either
of these actions:
Right-click the table to see the Index Operations context menu.
Click Actions in the menu bar at the top of the window.
The Index menu allows you to perform these operations:
Create - Use this option to create a new index.
Refresh - Refreshes all displayed values.
Note: The results of some operations may not appear until you use the Refresh menu option to update the view.
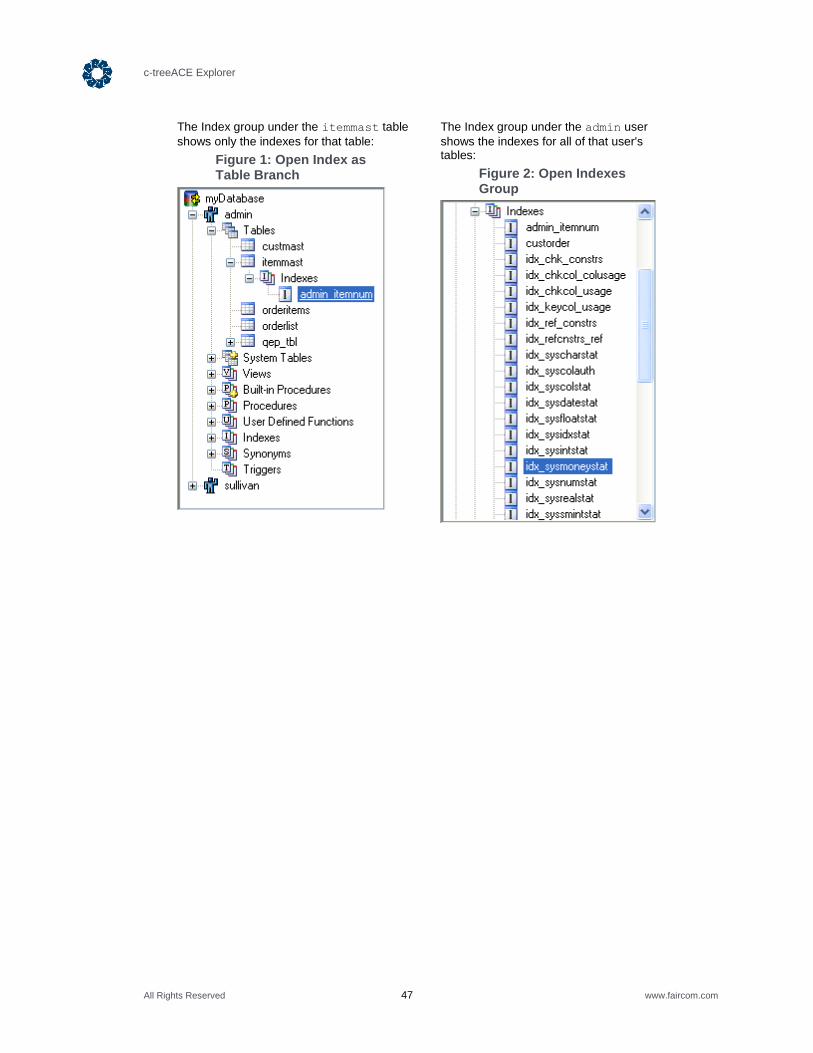
Hint: There are two methods for finding a specific index:
Expand the Indexes group that appears under a specific table, which shows only the indexes
for that table. (This method tends to be easier because it narrows the search to only the
indexes for a single table.)
Expand the Indexes group that appears under the user, which shows the indexes for all of
that user's tables.
c-treeACE Explorer
All Rights Reserved 47 www.faircom.com
The Index group under the itemmast table
shows only the indexes for that table:
Figure 1: Open Index as Table Branch
The Index group under the admin user
shows the indexes for all of that user's tables:
Figure 2: Open Indexes Group
c-treeACE Explorer
All Rights Reserved 48 www.faircom.com
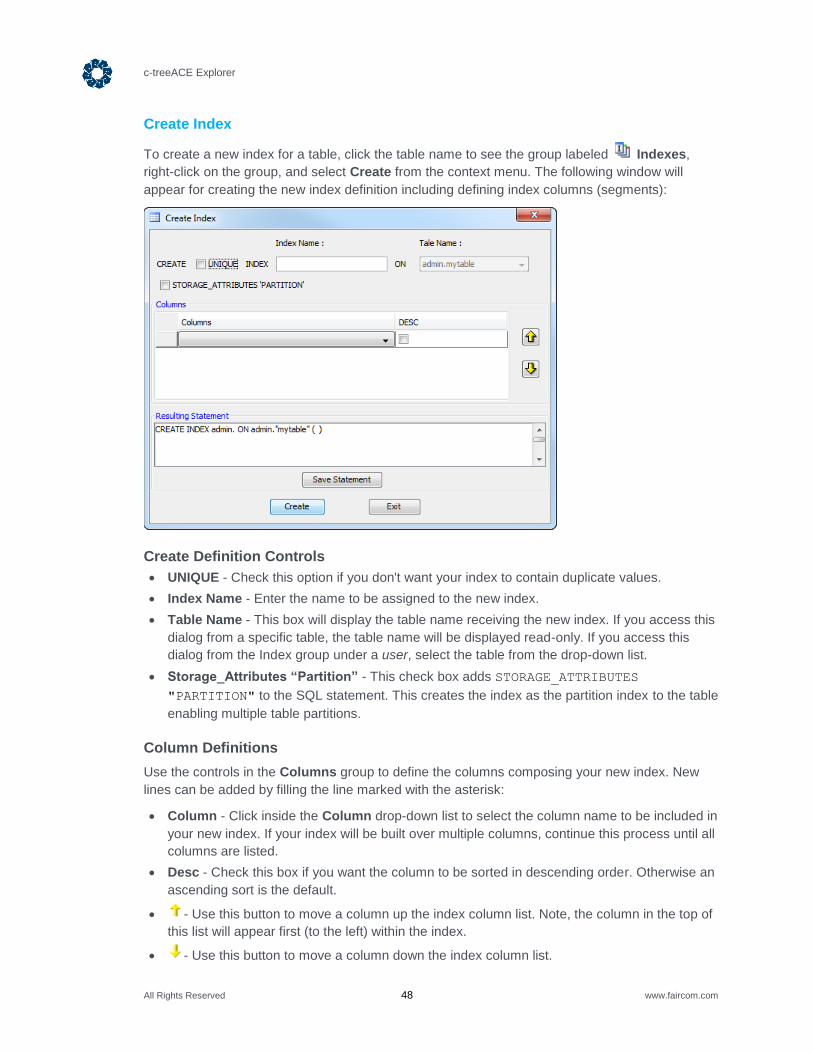
Create Index
To create a new index for a table, click the table name to see the group labeled Indexes,
right-click on the group, and select Create from the context menu. The following window will
appear for creating the new index definition including defining index columns (segments):
Create Definition Controls
UNIQUE - Check this option if you don't want your index to contain duplicate values.
Index Name - Enter the name to be assigned to the new index.
Table Name - This box will display the table name receiving the new index. If you access this
dialog from a specific table, the table name will be displayed read-only. If you access this
dialog from the Index group under a user, select the table from the drop-down list.
Storage_Attributes “Partition” - This check box adds STORAGE_ATTRIBUTES
"PARTITION" to the SQL statement. This creates the index as the partition index to the table
enabling multiple table partitions.
Column Definitions
Use the controls in the Columns group to define the columns composing your new index. New
lines can be added by filling the line marked with the asterisk:
Column - Click inside the Column drop-down list to select the column name to be included in
your new index. If your index will be built over multiple columns, continue this process until all
columns are listed.
Desc - Check this box if you want the column to be sorted in descending order. Otherwise an
ascending sort is the default.
- Use this button to move a column up the index column list. Note, the column in the top of
this list will appear first (to the left) within the index.
- Use this button to move a column down the index column list.
c-treeACE Explorer
All Rights Reserved 49 www.faircom.com
To delete an index column: Select the row header that contains the column to be deleted and
then press the Delete key on your keyboard.
Resulting Statement
The Resulting Statement window will show the CREATE statement to be executed for building
the new index. Once your index is completely defined, press the Create button to create your
index and remember to check Result in the left corner of the status bar at the bottom of the
window for either Success or an error message. Once you see Success in the status window,
click on exit to return to the main window.
You can save the CREATE statement shown in the Resulting Statement window by clicking Save
Statement or using the File menu or pressing CTRL+S.
Finishing Up
Save Statement - Click this button if you want to save the SQL statement so you can execute it
at a later time.
Create - Click this button to create the index.
Exit - Click this button to close this dialog.
Drop
To drop (delete) an index, right-click an index in the Left Tree and select Drop.

c-treeACE Explorer
All Rights Reserved 50 www.faircom.com
Convert / Import SQL Tables
The Convert/Import tab is available when a table is selected in the SQL Servers tab of the Left
Tree. This tab allows you to bring in existing data from another server or database. It allows you
to connect to an additional server and database, which will be the source of the data. You will be
able to select the destination from a list of currently connected servers and databases (the
destination will be one of the servers and databases shown in the Left Tree).
Server Information
The buttons at the top of the Convert / Import tab (Server Type, Server Address, Connect, and
Trusted Connect) allow you to connect to another server and database, which will be the source
of the data to be converted/imported.
c-treeACE Explorer
All Rights Reserved 51 www.faircom.com
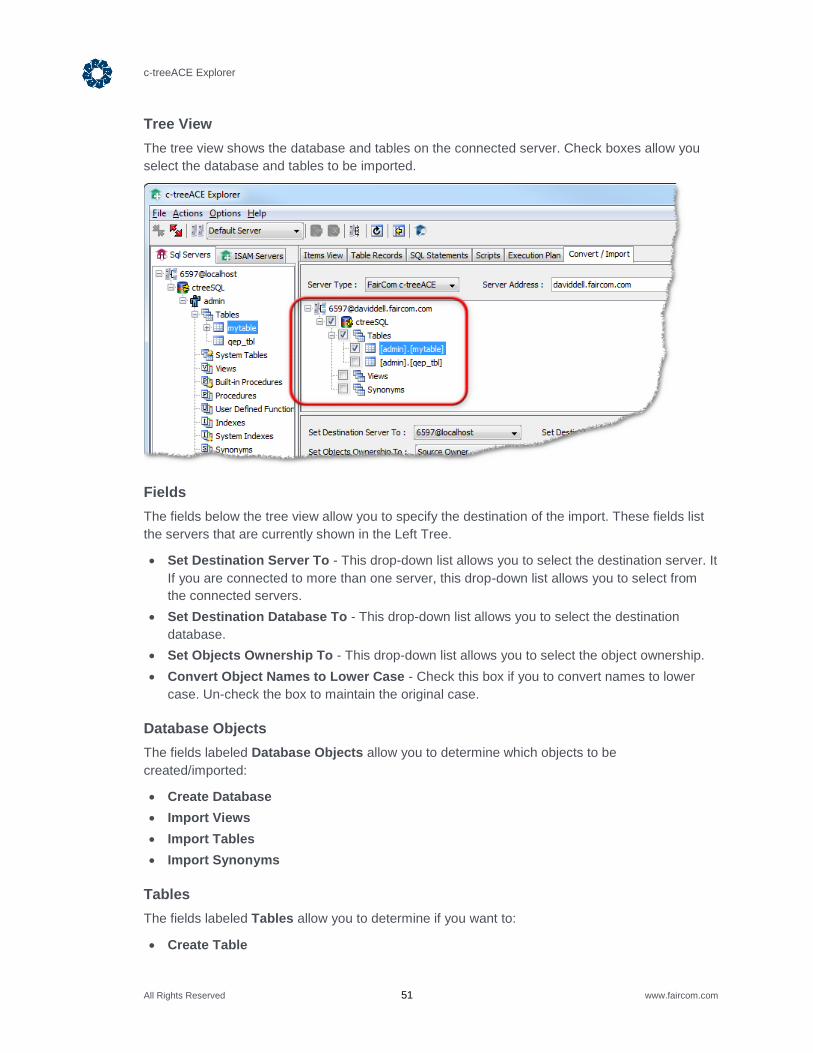
Tree View
The tree view shows the database and tables on the connected server. Check boxes allow you
select the database and tables to be imported.
Fields
The fields below the tree view allow you to specify the destination of the import. These fields list
the servers that are currently shown in the Left Tree.
Set Destination Server To - This drop-down list allows you to select the destination server. It
If you are connected to more than one server, this drop-down list allows you to select from
the connected servers.
Set Destination Database To - This drop-down list allows you to select the destination
database.
Set Objects Ownership To - This drop-down list allows you to select the object ownership.
Convert Object Names to Lower Case - Check this box if you to convert names to lower
case. Un-check the box to maintain the original case.
Database Objects
The fields labeled Database Objects allow you to determine which objects to be
created/imported:
Create Database
Import Views
Import Tables
Import Synonyms
Tables
The fields labeled Tables allow you to determine if you want to:
Create Table
c-treeACE Explorer
All Rights Reserved 52 www.faircom.com
Copy Rows
Create Indexes
Create Constraints
Conversion Operations
The bottom of the tab provides these controls:
Stop on Syntax Errors - Check this box if you want the operation to halt if a syntax error is
encountered.
Create Script Only - Check this box if you want to create a script for the operation without
actually running it. This will create a script that you can run later.
Currently Converting and Progress show the operation as it progresses.
Buttons
Start - Click this button when you are ready to begin the conversion/import.
Stop - Click this button if you need to stop the conversion/import.

c-treeACE Explorer
All Rights Reserved 53 www.faircom.com
2.5 ISAM Operations
The following operations are available when viewing ISAM servers:
Server Operations (page 53)
Database Operations (page 55)
Table Operations (page 64)
Server Operations
By highlighting the server name in the tree view pane and right-clicking it you can access the
Server menu:
Disconnect from this Server - Allows you to disconnect from the selected server. To
reconnect or connect to a different server, see Connecting c-treeACE Explorer to a Server
(page 4).
Add Existing Database (page 54) - Allows you to import an existing database from a
database dictionary file (.fdd).
Create New Database (page 54) - Allows you to create a new database on the server.
Refresh - Refreshes all displayed values (same as clicking the Refresh icon in the tool
bar).
Note: The results of some operations may not appear until you use a Refresh menu option to
update the view.
c-treeACE Explorer
All Rights Reserved 54 www.faircom.com
Add Existing Database
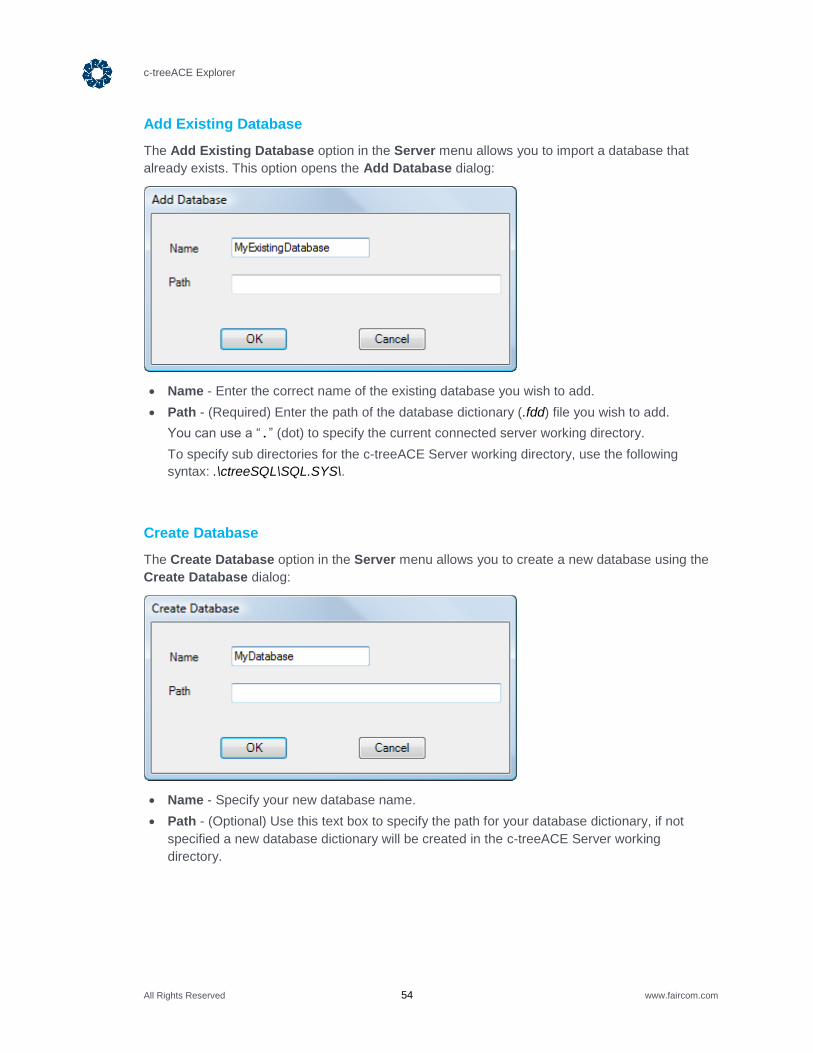
The Add Existing Database option in the Server menu allows you to import a database that
already exists. This option opens the Add Database dialog:
Name - Enter the correct name of the existing database you wish to add.
Path - (Required) Enter the path of the database dictionary (.fdd) file you wish to add.
You can use a “.” (dot) to specify the current connected server working directory.
To specify sub directories for the c-treeACE Server working directory, use the following
syntax: .\ctreeSQL\SQL.SYS\.
Create Database
The Create Database option in the Server menu allows you to create a new database using the
Create Database dialog:
Name - Specify your new database name.
Path - (Optional) Use this text box to specify the path for your database dictionary, if not
specified a new database dictionary will be created in the c-treeACE Server working
directory.
c-treeACE Explorer
All Rights Reserved 55 www.faircom.com
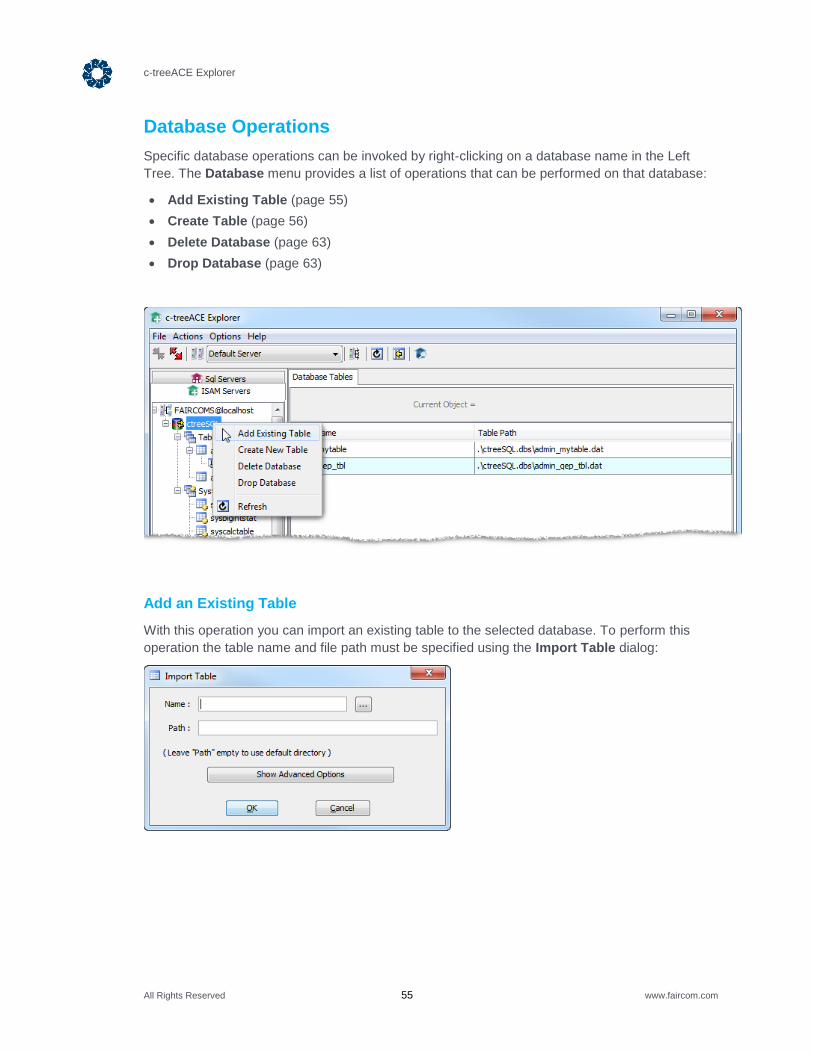
Database Operations
Specific database operations can be invoked by right-clicking on a database name in the Left
Tree. The Database menu provides a list of operations that can be performed on that database:
Add Existing Table (page 55)
Create Table (page 56)
Delete Database (page 63)
Drop Database (page 63)
Add an Existing Table
With this operation you can import an existing table to the selected database. To perform this
operation the table name and file path must be specified using the Import Table dialog:

c-treeACE Explorer
All Rights Reserved 56 www.faircom.com
Click the Show Advanced Options button to see additional controls:
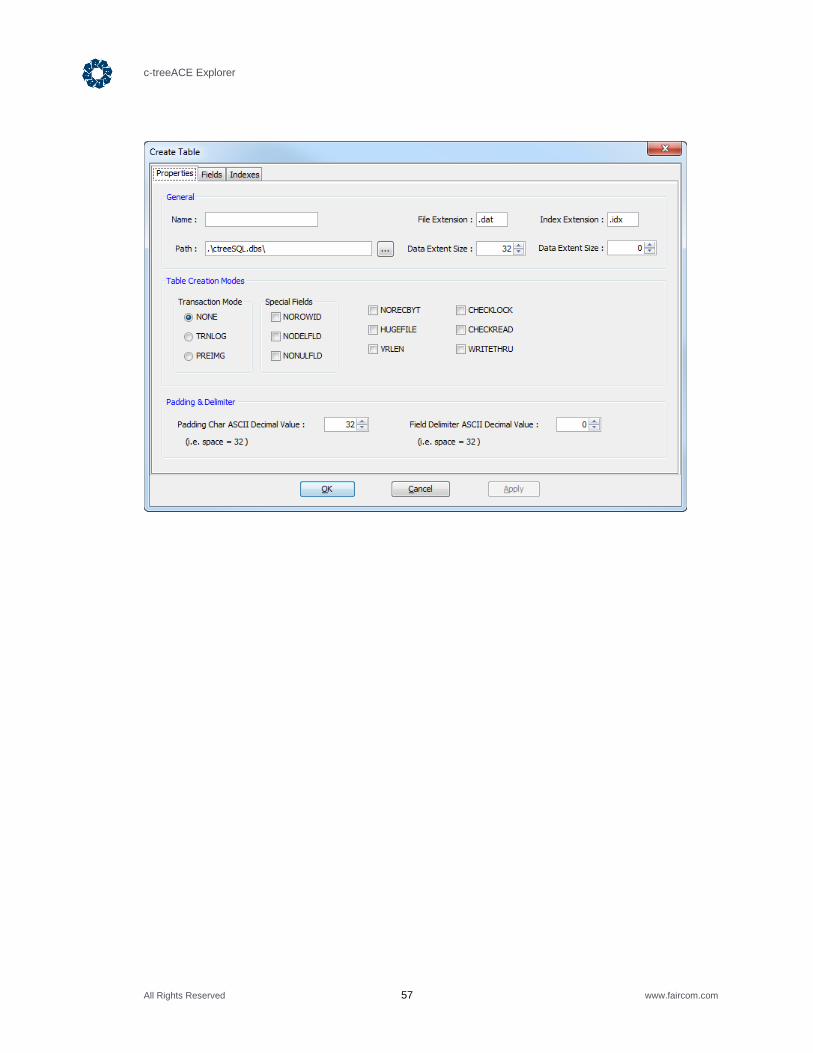
Create New Table
Use the Create New Table menu option to create a table in a selected database using the
Create Table window. This window provides three tabs:
Properties (page 58)
Fields (page 60)
Indexes (page 61)
c-treeACE Explorer
All Rights Reserved 57 www.faircom.com

c-treeACE Explorer
All Rights Reserved 58 www.faircom.com
Define Table Properties
Use the Properties tab to set all the relevant properties for your new table. This tab can change
depending on your user type selection in the Options Menu. If a SQL user type is selected,
several advanced features are disabled as these are maintained strictly at the c-treeSQL level.
Note: Use caution when modifying c-treeACE SQL databases and tables with <FC_JAVAOOLS_EXPLORER>. c-treeACE Explorer allows you to make intricate changes which can affect SQL performance and integrity.
General
If you have the User Type as specified in the General tab of the Options Menu set to SQL you can
only specify the table Name.
Name - The name you want to assign to your new table.
File Extension - Your new table file extension name.
Index Extension - The new table’s index file extension name.
Path - Specify where your new table’s files will be created. Use the “.” (Dot) to specify the
current c-treeACE Server working directory.
Data Extent Size - The extent size for your new table’s data file. (0 for default.) The “Data
Extent” is the default size by which the data file is extended when necessary.
Index Extent Size - The new table's index file extent size. (0 for default.) The “Index Extent”
is the default size by which the index file is extended when necessary.
c-treeACE Explorer
All Rights Reserved 59 www.faircom.com
Table Creation Modes
The controls in this pane are only available when the User Type in the Options Menu is set to the
C/C++ connection mode.
Transaction Mode - Use these radio buttons to select the transaction mode you want to use for
your new table. Refer to the c-tree Plus for .NET Programmer's Reference for complete
information about table modes.
Special Fields
Refer to c-treeDB and c-tree Plus for .NET documentation for complete information about these
special fields and indices.
Experienced c-tree users with specific needs can modify these special settings.
Caution: FairCom strongly advises to use the default internal settings unless you understand the
ramifications of making changes below.
NOROWID - Check this option if you don't want the ROWID in your new table.
If this table will be used with c-treeSQL DON'T check the NOROWID checkbox. The ROWID
index (and its related fields) are required for management of c-treeACE SQL tables.
NODELFLD - If you check this option your new table will not have the delete field.
NONULFLD - If this option is checked your new table will be created without $NULFLD$
support.
Creation Modes
NORECBYT - Check this option if you want to create your new table without a RECBYT
index.
HUGEFILE - If checked, your new table will be created with HUGE file support. With this
mode on, your table will support 8-byte addresses for file offsets. This provides a maximum
file size of 18 exabytes per file.
Refer to FairCom’s c-tree Plus Programmer’s Reference Guide for more information on huge
file support.
VRLEN - This checkbox is read-only and will be checked automatically if you specify fields
with variable length field types in the Fields pane discussed below. .
CHECKLOCK - Check this option if your new table requires a record lock before a record can
be updated. If this option is enabled and a lock is not obtained a DADV_ERR (42) error code
is returned.
CHECKREAD - If you check this setting your new table will require a record lock before
reading a record, otherwise the read function will return DADV_ERR (42) error code.
WRITETHRU - If activated, your new table will be created with the c-tree writethru mode. This
mode forces the operating system to flush all disk cache buffers when a data write occurs.
This mode will greatly decrease performance; however, it guarantees your data persists to
disk. This is most useful in unstable operating environments where the processor or disk
drives face frequent outages.
Refer to FairCom’s reference manuals for complete information about table creation modes.

c-treeACE Explorer
All Rights Reserved 60 www.faircom.com
Padding & Delimiter
The controls in this pane are only available when the User Type in the Options menu is set to
the C/C++ connection mode.
Padding Char ASCII Decimal Value - Use this control to set the data padding character.
Refer to an ASCII table as necessary to determine the decimal values for desired characters.
This value is set to 32 (space) as the default.
Field Delimiter ASCII Decimal Value - Use this control to set the field delimiter character.
Refer to an ASCII table as necessary to determine the decimal values for desired characters.
This value is automatically set to 0 (NULL) as default.
Refer to FairCom’s reference manuals for complete information about data padding and
delimiters.
Define Fields
Use the Field tab to define fields for your table. When you click the Add button, a new field
appears in the grid; use drop-down selections and text entry to define the field.
Field Definition Grid
This grid represents a tabular view of the fields defined for your table.
# - This column shows the field number, which is automatically maintained.
Field Name - Enter the logical name you want assigned to this field.
Type - With this combo box you can select the data type for the field. If the SQL user type is
selected the data types are filtered and you can only see the SQL data types. If C/C++ is

c-treeACE Explorer
All Rights Reserved 61 www.faircom.com
selected, you can see both the SQL and non-SQL data types. See the General Options
discussion below for more details on setting the User Type.
Length - Use this column to set the field length; for fixed length types this value will be
automatically set.
Null Allowed - Use the Null combo box column to specify if the selected field will accept null
values.
Binary Flag - Use this drop down to set the label for the Boolean field to TRUE/FALSE to
YES/NO.
Precision - Use this column to set the field's precision for NUMERIC and CTNUMBER data
types only.
Scale - Use this column to set the field's scale value for NUMERIC and CTNUMBER data
types only.
Increment - If the field is to be automatically incremented, enter the amount it is to be
incremented (and entry of 0 turns off auto-incrementing).
Buttons
Add - Use this button to add a new field to the end of the list.
Insert - This button inserts a new field before the selected field.
Delete - This button deletes the selected field.
Move Up/Move Down - Move the selected field up/down the field list.
Define Indexes
The Indexes tab allows you to define indexes for your new table.
c-treeACE Explorer
All Rights Reserved 62 www.faircom.com
Index Definitions
Note, if the User Type in the Options menu is set to SQL, you will only have access to the Index
Name and Dup Allowed columns because the additional columns are automatically maintained
by the SQL engine. The rest of the columns will not show up unless you change the User Type
from SQL to C/C++.
# - This column specifies the index number that is automatically assigned by this program.
Index Name - Insert the logical index name here.
Index Filename - In this column insert the file name on disk for the index. If you leave this
blank the index file name on disk will be automatically assigned. Recall this column is
disabled if you are using SQL user type. Please refer to FairCom's reference guides to learn
more about index naming conventions.
Type - Select with this combo box the index type, you can set FIXED to create a fixed length
key, LEADING to create an index with fixed length keys that are likely to have leading
character duplication among the key values, PADDING to create an index with variable
length keys for which not much leading character duplication is expected and LEADPAD to
create an index using variable length keys for which much leading character duplication is
expected. This feature is disabled if you are using SQL user type.
Refer to FairCom's reference guides to learn more about indexes types.
Dup Allowed - Define if you want this index to accept duplicates values. If set to True,
duplicates will be accepted. False is the default.
Null Allowed - Use this control to set whether you want your index to accept null values.
True activates null values. False is the default.
Empty Char - Use this control to set the empty character value for the index. Zero (0) is the
default.
Cndx - Use this control to make this a conditional index. Use the Condition button to enter a
condition.
Buttons
Add - Adds a new index to the list.
Delete - Deletes the current index.
Condition - Click this button to enter the condition for a conditional index (Cndx=Yes).
Segment Definitions
This table lists the segments defined for the index definition highlighted in the Indexes Definition
pane above. Note, if the User Type in the Options Menu is set to SQL, you will only have access
to the Field Name and Descending columns because the additional columns are automatically
maintained by the SQL engine. The rest of the columns will not show up unless you change the
User Type from SQL to C/C++.
# - This column specifies the segment number that is automatically assigned by this program.
Field Name - Use this combo box to select the field for the selected index.
Mode - Use this combo box to set the segment mode for the current segment. Please refer to
the FairCom documentation to obtain segment mode definitions. This feature is disabled if
you are using the SQL User Type.

c-treeACE Explorer
All Rights Reserved 63 www.faircom.com
Descending - Set this column to true if you want the order for this segment to be
descending.
Buttons
Add - Use this button to add a new segment to the end of the list.
Insert - The insert button inserts a new segment before the selected segment.
Delete - This button deletes the selected segment from the selected index.
Move Up/Move Down - Move the selected segment up/down the segment list.
Delete Database
Selecting the Delete Database menu option from the Database menu completely removes the
database from the current c-treeACE Engine dictionary and permanently deletes the dictionary
files, data files and associated index files from disk. Note this action is permanent.
Drop Database
The Drop Database menu option removes the database from the dictionary for the current
c-treeACE Engine. All dictionary, data and index files will remain on disk. You can then re-add the
database at a later date if so desired or add it to a different c-treeACE Engine.
Note: Only one c-treeACE Engine can operate on a c-tree database at a time. Database integrity cannot be maintained with more than one server operating on the same database.

c-treeACE Explorer
All Rights Reserved 64 www.faircom.com
Table Operations
The Table menu can be invoked by right-clicking on a table name. These operations can be
performed from this menu:
Delete Table (page 64)
Drop Table (page 65)
Modify Table (page 65)
Rebuild / Compact Table (page 65)
Additional operations can be performed from the Records tab when viewing ISAM tables (e.g.,
adding, editing, and deleting records). For information, see Viewing ISAM Tables (page 12).
Delete Table
This operation will remove the table from the c-treeACE dictionary files.
Note: This action will remove the data and index files from disk.

c-treeACE Explorer
All Rights Reserved 65 www.faircom.com
Drop Table
This operation will remove the table from the c-treeACE dictionary files but it will NOT remove the
data and index files from disk.
Modify Table
This feature displays the Create Table (page 56) window allowing you to alter table properties,
modify the fields and alter table indexes. Note that some options are grayed out and cannot be
modified. Also, pay attention to data type conversions because these operations can cause data
loss. If your table contains valuable data, be sure to make a backup copy of your table
before making changes.
Refer to the Create New Table (page 56) section for more information on these windows.
Rebuild / Compact Table
Use this dialog to rebuild and optionally compact the selected table. The buttons and check boxes
allow you to select the exact operation to be performed.
Click Start to begin the operation. The Action bar will show progress.
You can click Exit to close the dialog without performing the operation.

c-treeACE Explorer
All Rights Reserved 66 www.faircom.com
Show Structure
This menu option will show the basic structure of the selected table. Note that this is the default
view when you select a table from the tree pane on the left.

c-treeACE Explorer
All Rights Reserved 67 www.faircom.com
Show Properties
This operation will display the properties of the selected table in read only form. If you need to
modify any table settings, use the Modify Table menu.
Show Records
This menu option will display the records for the selected table.
To edit a record simply click on the field you desire to alter and enter the new value. To save
your changes exit from the current row.
• To add a new record edit the row with the * (asterisk). Your new record will be saved
when you leave the current row.
The number of records loaded by this page defaults to 100 records and can be changed in the
Options menu.

c-treeACE Explorer
All Rights Reserved 68 www.faircom.com
The SQL LVARCHAR and LVARBINARY data types are truncated to 32,000 chars.
All Rights Reserved 69 www.faircom.com
3. c-treeACE Monitor
c-treeACE provides a wealth of statistics for performance monitoring. The c-treeACE
Monitor tool captures and organizes these statistics in real-time for any c-treeACE
administrator to observe. The c-treeACE Monitor provides a Dashboard to monitor
operation as well as tools to:
Stop the c-treeACE Server
Quiesce the c-treeACE Server
View active connections
See information about files and locks as well as file statistics and history
Capture a snapshot of various aspects of the system at a single point in time
View the system configuration
Display various charts and graphs of operation
Manage Users, Groups, and Files
In addition to the Dashboard (page 71), tabs are provided so you can see detaIls about areas
such as connections (page 73), files & locks (page 74), stats (page 77), history (page 77),
snapshot (page 79), user snapshot (page 80), SQL snapshot (page 80), snapshot "favorites"
(page 80), configuration (page 82), I/O (page 83), functions (page 84), system events (page 84),
status logs (page 85), real-time charts (page 88), and users (page 90).

c-treeACE Monitor
All Rights Reserved 70 www.faircom.com
3.1 Startup
The Connection Options window appears each time this utility is started. It also appears
whenever you disconnect and then reconnect using the options in the Server menu or the Tool
Bar.
Server Connection
Server Name/Port Number - Using this combo box you can select if you are going to specify
the c-treeACE Server Name or its TCP/IP port number in the underlying text box. This
example shows the Server Name "FAIRCOMS". In V11.5 and later, the tools are compatible
with the expanded addressing offered by IPv6.
Machine Name/IP Address - Use this text box to specify the IP address or the machine
name where the c-treeACE Server is running. If your c-treeACE Server is running on your
local machine, using the "localhost" machine name will provide better performance.
SSL Mode and Certificate - Set up SSL security, if desired, as described in Securing Your
Connection with SSL (page 8).
User Options
User Name - Specify the user name you want to use to make the connection to the
c-treeACE Server.
Password - Use this text box to enter the user's password.
Note the default User Name and User Password are both "ADMIN" and the Password is case
sensitive.
When you are done, click OK to establish the connection. If you press Cancel the tool will not be
connected to the c-treeACE Server.
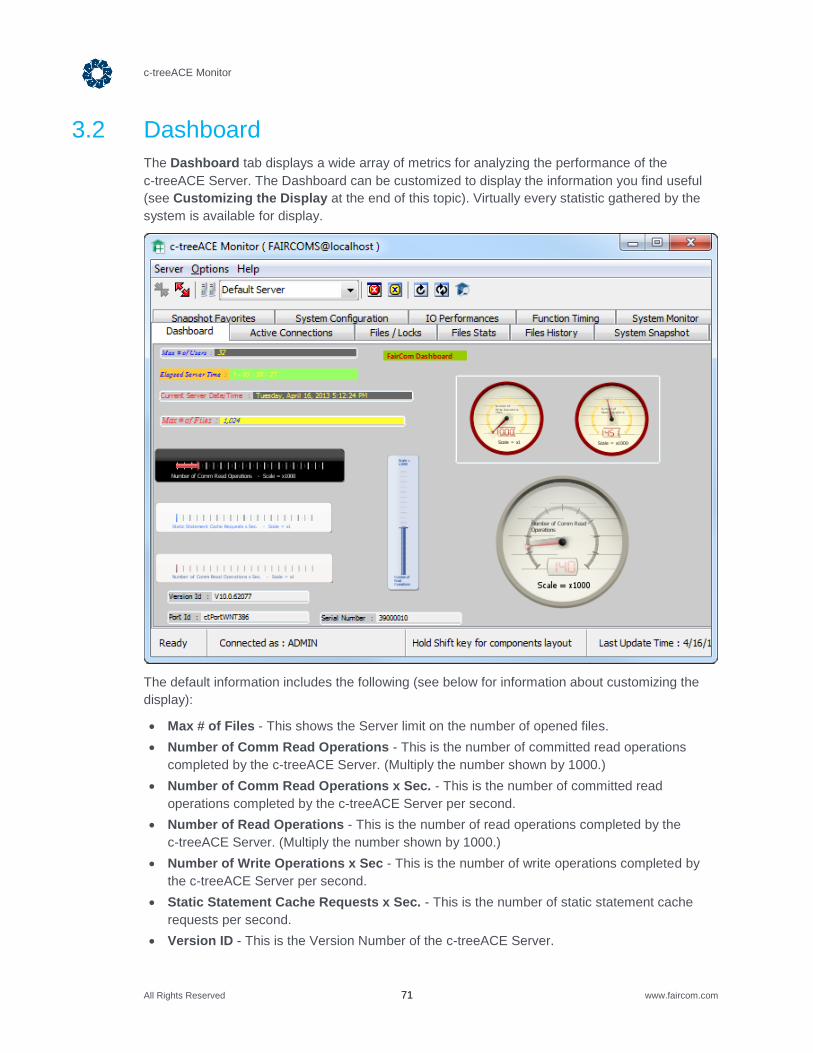
c-treeACE Monitor
All Rights Reserved 71 www.faircom.com
3.2 Dashboard
The Dashboard tab displays a wide array of metrics for analyzing the performance of the
c-treeACE Server. The Dashboard can be customized to display the information you find useful
(see Customizing the Display at the end of this topic). Virtually every statistic gathered by the
system is available for display.
The default information includes the following (see below for information about customizing the
display):
Max # of Files - This shows the Server limit on the number of opened files.
Number of Comm Read Operations - This is the number of committed read operations
completed by the c-treeACE Server. (Multiply the number shown by 1000.)
Number of Comm Read Operations x Sec. - This is the number of committed read
operations completed by the c-treeACE Server per second.
Number of Read Operations - This is the number of read operations completed by the
c-treeACE Server. (Multiply the number shown by 1000.)
Number of Write Operations x Sec - This is the number of write operations completed by
the c-treeACE Server per second.
Static Statement Cache Requests x Sec. - This is the number of static statement cache
requests per second.
Version ID - This is the Version Number of the c-treeACE Server.
c-treeACE Monitor
All Rights Reserved 72 www.faircom.com
Port ID - This is the communications port being used for the connection to the c-treeACE
Server.
Serial Number - This is the Serial Number assigned to this c-treeACE Server. The Serial
Number is usually assigned when the c-treeACE Server is installed.
Max # of Users - This is the Server limit on number of user connections.
Elapsed Server Time - This is the number of days, hours, minutes and seconds that this
c-treeACE Server has been running.
Current Server Date/Time - This is the current date and time reported by the c-treeACE
Server.
Customizing the Display
The information displayed in the Dashboard can be modified to suit your needs. Customization is
performed by right-clicking on parts of the display. the Dashboard consists of a collection of
"components" (circular, horizontal, and vertical gauges, fields, etc.). Each component displays a
different statistic. You can add or remove components by right-clicking and selecting from the
context menu that appears.
To add a component to the Dashboard:
1. Right-click anywhere and select Add Component.
2. Select the type of component based on the type of information and the space where you are trying to fir it:
• Horizontal Gauge - The value is displayed in a bar stretching from left to right
• Vertical Gauge - The value is displayed in a vertical column, similar to a classic
thermometer.
• Radial Gauge - The value is displayed in a circular gauge, similar to a classic
speedometer.
• Text Field with Label - The value is displayed as text with a label (no graphical
representation).
• Label - A static piece of text is displayed in the font of your choice.
The component will appear on the Dashboard. At this point the component does not display
any information.
3. Right-click on the new component and select Component Properties. A fly-out menu lists two properties:
• Palette - You can use this option to select the color scheme and look of the component.
• Counter - Use this option to select the information to be displayed in the component.
Virtually every statistic gathered by the system is available for display.
To remove a component from the Dashboard:
1. Right-click on the component to be removed and select Remove Current Component.
2. The component will be removed from the Dashboard.
To save your current Dashboard layout:
1. Right-click in the "background" area between the components.
2. Select Save Dashboard. A fly-out menu lists two options:
• As Default - This option will update your default setting so that the Dashboard tab will
open with the settings you are saving. After making changes, you can return to your

c-treeACE Monitor
All Rights Reserved 73 www.faircom.com
default by right-clicking between the components and selecting Load Dashboard >
Default.
• As Custom - This option will save your settings to a file. A file dialog will allow you to
enter a name for the settings and save them in a file.
You can save different settings for different purposes. Any of those saved settings can be
loaded by right-clicking between the components and selecting Load Dashboard >
Custom.
You can return to your default setting at any time by by right-clicking between the
components and selecting Load Dashboard > Default.
To load a saved layout or return to the default layout:
1. Right-click in the "background" area between the components.
2. Select Load Dashboard. A fly-out menu lists two options:
• Default - This option will return to the default settings.
• Custom - This option will allow you to load a save setting. You will be given a file dialog
to select the settings you want to open.
Several other options are available to adjust the look of the Dashboard when you right-click in
the "background" area between the components:
Remove All Components - Clears the Dashboard to facilitate heavy customization.
Auto Scale - The components will scale to fit the area available as you resize the window.
Scale to Fit - The components will scale to fit the area that is currently available.
Panel Background - Select the color of the area between the components.
Global Palette - Select a color scheme for the Dashboard.
Save Dashboard - Use the procedures above to either update the default layout or save the
current layout to a file that can be loaded again later.
Load Dashboard - Use the procedures above to either reload the default layout or load a
load a layout that has been saved earlier.
3.3 Active Connections
This page shows information about each user actively connected to the c-treeACE Server.
Task # - This column lists the user's unique task id assigned by the c-treeACE Server.
User Name - This column lists the name the user specified at connection time.
Client IP Address - This column shows the IP address of the connected client.
Node ID Info - This column lists the node information set by the client application used by
current user. (See SetNodeName (http://docs.faircom.com/doc/ctreeplus/#setnodename.htm)
in the c-treeACE Function Reference Guide.) In V11.5 and later, the node name is shown in
the Node ID Info column for easy identification of the connection.
Last Function - This column lists the last function called by this user.
Active - This column indicates if the user is currently active.
c-treeACE Monitor
All Rights Reserved 74 www.faircom.com
Last Request Time - This column lists the last time this user made a request to the
c-treeACE Server.
Last TRANBEG Time - This column lists the last time when a Transaction Begin
(TRANBEG()) function call was issued. This is a common function call for signifying activity
(note, it is possible to design an application that will not make this function call so it is
possible for this value to be static).
Logon Time - This column lists when this user connected to the c-treeACE Server.
Files - This column lists the number of files opened by the current user.
Memory - This column lists the amount of memory in use by the current user.
Comm Info - This column lists the communication protocol being used by the current user to
connect to the c-treeACE Server. Typical values will be:
FSHAREMM = a non-SQL connection has been established from the local machine using the
Shared Memory communication protocol.
SQL_SHAREMM = a SQL connection has been established from the local machine using the
Shared Memory communication protocol.
F_TCPIP = a non-SQL connection has been established using the TCP/IP communication
protocol.
SQL_TCPIP = a SQL connection has been established using the TCP/IP communication
protocol.
Terminating a User Connection
It is possible to terminate a user from this list of connected users. To terminate a user connection,
right-click on the user's row and select the Terminate Selected Connection menu item.
Note: If Auto Refresh is active, all the values listed here will be automatically updated every time the Auto Refresh Rate (defined in the Options menu) lapses.
3.4 Files / Locks
The Files / Locks tab provides information at the file and file-locking level. It displays files
opened by the c-treeACE Server and individual Users in addition to locks held by individual users.
The information displayed is determined by two controls at the top of the tab: Files Opened By
and Lower Grid Shows.
The buttons labeled Files Opened By allow you to display files that are opened by the Server or
by a specific User selected from the drop-down next to the button.
The buttons labeled Lower Grid Shows determine the information displayed in the lower part of
the tab:
Users - The lower grid will display information about the users for the file selected in the
upper grid.
Locks - The lower grid will display information about the locks for the file selected in the
upper grid.

c-treeACE Monitor
All Rights Reserved 75 www.faircom.com
Snapshot - The lower grid will display snapshot information about the file selected in the
upper grid.
Upper Grid
The upper grid, Opened Files, shows the following:
# - A unique number assigned for display purposes on this page.
Filename - The name of the file as it appears on disk.
File Type - The type of file. Options for this column include: D = Data File with Fixed length
records; V = Data File with Variable length records; I = Index File; H = Superfile Host; M =
Superfile Member.
UFN (User File Number) - This is the file number the end user application is using for the
specific file, or if the file number is a negative value, it has one of the following meanings:
-1 = File is blocked by a c-treeACE file close.
-3 = File is blocked by a ctFBsysclose file block.
-4 = File is blocked by a ctFBsysclose file block established by this connection (or user).
-5 = File is suspended by a ctFBsysclose file block.
SFN (System File Number) - Specifies the file number the c-treeACE Server is using for this
file.
Open Count - This column specifies the number of users that have the specific file open.
Tag - True or False
Lower Grid
The lower grid depends on the setting of Lower Grid Shows.
If Lower Grid Shows is set to Users, the lower grid is labeled Users for File and displays:
# - A unique user number assigned for display purposes on this page.
Task # - This column lists the user's unique task number assigned by the c-treeACE Server.
User Name - This column lists the name the user specified at connection time.
UFN (User File Number) - This is the file number the end user application is using for the
specific file, or if the file number is a negative value, it has one of the following meanings:
-1 = File is blocked by a c-treeACE file close.
-3 = File is blocked by a ctFBsysclose file block.
-4 = File is blocked by a ctFBsysclose file block established by this connection (or user).
-5 = File is suspended by a ctFBsysclose file block.
Client IP Address - This is the IP address or the Host Name (DNS) for the specified User.
If Lower Grid Shows is set to Locks, the lower grid is labeled Locks for File and displays:
# - A unique lock number assigned for display purposes on this page.
Offset - The offset from the beginning of the file where the lock is being held.
Lock Type - The type of lock being held (see Types of Locks below).
Task # - The Task ID that is currently holding the lock.
User Name - The name of the user that is currently holding the lock.

c-treeACE Monitor
All Rights Reserved 76 www.faircom.com
Client IP Address - The IP address or the Host Name (DNS) for the user currently holding
the lock.
Waiters - The number of other users (or processes) currently waiting for the lock.
If Lower Grid Shows is set to Snapshot, the lower grid is labeled Snapshot for File and
displays:
Number - A unique number assigned to each SnapShot structure member for display
purposes on this page
Member - The current SnapShot member name.
Category - The SnapShot members are grouped into categories to simplify finding related
information.
Value - The total cumulative value for the current SnapShot member.
Value/Sec - The per-second average for the current SnapShot member.
Types of Locks
The possible lock types are shown in the following table.
Lock Type Value Explanation
SS open 1 SS (strict serializer) logical Open lock
SS commit intent 2 SS commit intent lock
SS commit 3 SS commit lock
NS commit intent 4 NS (nonstrict serializer) commit intent lock
NS commit 5 NS commit lock
read 6 Read lock - A read lock requested and held by a user thread.
write/1 9 Exclusive write lock - A write lock requested and held by a user thread.
write/2 10 Exclusive write lock (no aggregate check) - An internal lock very briefly held by the c-tree Server for files under transaction control. You may occasionally observe these in a system with a high transaction volume, and these can be safely ignored.
forcei cmtlok 11 A very briefly held commit read lock enforced by the c-tree Server. These will only occur when the COMMIT_READ_LOCK option is enabled in the server
configuration file. These may be occasionally observed in systems with high transaction volumes.
Note: The first five lock types listed in the table are only supported with a c-tree Server built with strict serialization support.

c-treeACE Monitor
All Rights Reserved 77 www.faircom.com
3.5 Files Stats
The File Stats tab provides the following statistics about each file in use. This page shows
statistics about files opened by the c-treeACE Server and individual users.
The Buttons
The group of buttons labeled Files Opened By allow you to display files that are opened by the
Server or by a specific User selected from the drop-down next to the button.
The group of buttons labeled File Type allow you to select the types of files to display: Data,
Index, Sup. Members, or All.
The Columns
The following information is displayed for each file selected using the Files Opened By and File
Type buttons:
File Name - The name of the file.
bufcnt - The number of buffer pages used by the file.
bufcnt %, Total = X - The number of buffer pages as a percentage of the total. The total
number of buffer pages for all files is displayed in the column heading in Total = X.
datcnt - The number of data cache pages.
datcnt %, Total = X - The number of data cache pages as a percentage of the total. The total
number of data cache pages is displayed in the column heading in Total = X.
fredops - The file-specific number of read ops.
fredops x Sec. - The file-specific number of read ops performed in each second.
fredbyte - The file-specific number of bytes read.
fwrtops - The file-specific number of write ops.
fwrtops x Sec. - The file-specific number of write ops performed in each second.
fwrtbyt - The file-specific number of bytes written.
fwrtbyt x Sec. - The file-specific number of bytes written in each second.
3.6 Files History
The File History tab displays information about the history of selected files.
Selecting the Information to Display
The upper part of the File History tab allows you to select the files and information to be
displayed in the grid below.
File Selection:
All Data Files
All Index Files

c-treeACE Monitor
All Rights Reserved 78 www.faircom.com
Mask (wild cards allowed) - Allows you to enter a path and file name. Wild cards can be
used in the file name to select all matching files.
Target:
Key Value
User
Nodename
The field labeled Key / User / Nodename allows you to enter a specific name to match.
If both User and Nodename are checked, enter the user name followed by the node name with a
vertical pipe (|) delimiter between them, e.g., ADMIN|mynode.
Recbyte:
Match a specific recbyte position that you enter in the field to the right of this button. To match all,
enter 0 in the field or leave it blank.
History Mode:
Data
Index
Net Affect
Output Format:
Full - Displays more fields in the grid below.
Text - Shows the record buffer as a string.
Refresh: Click to refresh the data displayed.
Information Displayed
Each row in the File History tab provides the following information about a change to the files
being monitored:
# - A unique identifier assigned to each row for display purposes on this page.
Time Stamp - The date and time the information in the row was captured.
Tran. # - Transaction number.
Tran. Type - The type of transaction.
Log Number - Log number.
Log Offset - The offset in the log.
Imglen - The amount of data that was changed.
Image Map
File Name - The name of the file that was changed.
File Type - The type of file (e.g., index, data).
File Number - A number assigned to the file.
Member Number
File Offset - the offset within the file.
User Number - The name of the user.
c-treeACE Monitor
All Rights Reserved 79 www.faircom.com
User Name - The name of the user.
Node Name - The node on which the change occurred.
Record Status
Record Image / Key Value - Depending on the nature of the change, shows either the
record or key in text.
3.7 System Snapshot
The System SnapShot tab shows all the information stored within the c-treeACE System
SnapShot Structure which includes useful Server activity and performance information. Items
listed in this tab can be added to the SnapShot Favorites tab by right-clicking on a specific item.
System SnapShot Columns
Number - A unique number assigned to each System SnapShot structure member for display
purposes on this page
Member - The current System SnapShot member name.
Category - The System SnapShot members are grouped into categories to simplify finding
related information.
Description - A description for the current System SnapShot member.
Value - The total cumulative value for the current System SnapShot member.
Value/Sec - The per-second average for the current System SnapShot member.
System SnapShot Context Menu
The context menu is available by right-clicking on a System SnapShot item. It provides support
for:
Add Selected to Favorites - Adds the selected System SnapShot member to the SnapShot
Favorites tab.
Add Selected Categories to Favorites - Adds all the selected System SnapShot members
contained within the selected member category to the SnapShot Favorites tab.
More information about the System SnapShot structure and its members can be found in the
c-treeACE product documentation by searching for SnapShot.
Note: If Auto Refresh is active all the values listed here will be automatically updated every time the Auto Refresh Rate (defined in the Options menu) lapses. Otherwise you will need to press the Refresh Icon to renew the values.
c-treeACE Monitor
All Rights Reserved 80 www.faircom.com
3.8 User Snapshot
The User SnapShot tab displays information stored in c-treeACE User SnapShot structure for
the connected user. User SnapShot entries can be added to SnapShot favorites by right-clicking
the desired row header and selecting Add to Favorites.
User SnapShot for Connection - Use the drop-down to limit the SnapShot to the selected Task
ID or User Name.
User SnapShot Columns
Number - A unique number assigned to each User SnapShot structure member for display
purposes on this page.
Member - The current User SnapShot member name.
Category - The User SnapShot members are grouped into categories to simplify finding
related information.
Description - A description for the current User SnapShot member.
Value - The total cumulative value for the current User SnapShot member.
Value/Sec - The per-second average for the current User SnapShot member.
User SnapShot Context Menu
The context menu is available by right-clicking on a User SnapShot Item. It provides support for:
Add Selected to Favorites - Adds the selected System SnapShot member to the SnapShot
Favorites tab.
Add Selected Categories to Favorites - Adds all the selected System SnapShot members
contained within the selected member category to the SnapShot Favorites tab.
More information about the User SnapShot structure and its members can be found in the
c-treeACE product documentation by searching for SnapShot.
Note: If Auto Refresh is active all the values listed here will be automatically updated every time the Auto Refresh Rate (defined in the Options menu) lapses. Otherwise you will need to press the Refresh Icon to renew the values.
3.9 SQL Snapshot
The SQL SnapShot tab shows information for each member of the c-treeACE SQL SnapShot
Structure, which provides a useful view of SQL activity and performance. Items listed in this tab
can be added to the SnapShot Favorites tab by right-clicking on a specific item.
SQL SnapShot Columns
The following information is displayed:
Number - A unique number assigned to each SQL SnapShot structure member for display
purposes on this page.
Member - The current SQL SnapShot member name.
c-treeACE Monitor
All Rights Reserved 81 www.faircom.com
Category - The SQL SnapShot members are grouped into categories to simplify finding
related information.
Description - A description for the current SQL SnapShot member.
Value - The total cumulative value for the current SQL SnapShot member.
Value/Sec - The per-second average for the current SQL SnapShot member.
SQL SnapShot Context Menu
The context menu is available by right-clicking on a SQL SnapShot item. It provides support for:
Add Selected to Favorites - Adds the selected System SnapShot member to the SnapShot
Favorites tab.
Add Selected Categories to Favorites - Adds all the selected System SnapShot members
contained within the selected member category to the SnapShot Favorites tab.
More information about the SQL SnapShot structure and its members can be found in the
c-treeACE product documentation by searching for SnapShot.
Note: If Auto Refresh is active all the values listed here will be automatically updated every time the Auto Refresh Rate (defined in the Options menu) lapses. Otherwise you will need to press the Refresh Icon to renew the values.
3.10 Snapshot Favorites
This page shows the SnapShot values you have added by using the context menu (accessed by
right-clicking) on the System SnapShot, User SnapShot, and SQL Snapshot tabs. Favorite
schemes can be saved and loaded from disk with the Load and Save buttons under Favorites.
Live monitoring can be recorded and saved to disk for detailed analysis at a future time by using
the Record menu.
SnapShot Favorite Buttons
Load - Loads a previously saved SnapShot Favorites scheme from a file.
Save - Saves the current SnapShot Favorite scheme to a file.
Reset - Click this button to reset any counters that are resettable.
Start / Stop - Starts and stops recording the current SnapShot Favorite session to a file.
Upon starting, a file dialog will allow you to select a file name.
Pause / Resume - Pauses and resumes the recording session.
Current Value - Check this box if you want to include the Current Value column in the
recording session.
Values / sec. - Check this box if you want to include the Values / sec. column in the
recording session.
SnapShot Columns
# - A unique number assigned to each member listed on the SnapShot "Favorites" page.

c-treeACE Monitor
All Rights Reserved 82 www.faircom.com
SnapShot - This column reports the current SnapShot type, User, or System indicating the
source the listed value was obtained from.
Member - The current System SnapShot member name.
Category - The System SnapShot members are grouped into categories to simplify finding
related information.
Description - A description for the current System SnapShot member.
Value - The total cumulative value for the current System SnapShot member.
Value/Sec - The per-second average for the current System SnapShot member.
SnapShot Favorites Context Menu
The SnapShot Favorites context menu is available by right-clicking on a SnapShot item. This
menu provides these options:
Remove From Favorites - Removes the selected member from the SnapShot Favorites tab.
Remove Category From Favorites - Removes all the members in the selected category
from the SnapShot Favorites tab.
Remove All - Removes all the entries from the SnapShot Favorites tab.
Set Reset Mode
Set Function - Allows you to apply a function (Sum, Subtract, Multiply, Divide, Modulo,
Percent, Subtract and Percent) to two or more selected rows. All of the selected rows must
be of the same type: System, User, or SQL.
More information about the SnapShot structure and its members can be found in the c-treeACE
product documentation by searching for "SnapShot".
Note: If Auto Refresh is active all the values listed here will be automatically updated every time the Auto Refresh Rate (defined in the Options menu) lapses. Otherwise you will need to press the Refresh Icon to renew the values.
3.11 System Configuration
This read-only page shows information about the configuration and current values of selected
metrics (e.g., current memory usage, number of open file handles, etc.) for the c-treeACE Server.
System Configuration Columns
Element Index - The unique number of the element item for display purposes on this page.
Element Name - The current element name.
Value - The total cumulative value for the current configuration element.
Note: If Auto Refresh is active all the values listed here will be automatically updated every time the Auto Refresh Rate (defined in the Options menu) lapses. Otherwise you will need to press the Refresh Icon to renew the values.
c-treeACE Monitor
All Rights Reserved 83 www.faircom.com
3.12 I/O Performance
This tab details the following input/output performance metrics for the c-treeACE Server. Most of
the metrics are also available in a graphical view in the Dashboard tab.
Data Buffer Requests
Data Buffer Hits
Index Buffer Requests
Index Buffer Hits
Number of Read Operations
Number of Bytes Read
Number of Write Operations
Number of Bytes Written
Number of Committed Read Operations
Number of Committed Bytes Read
Number of Committed Write Operations
Number of Committed Bytes Written
Number of Transaction Savepoint
Number of Transaction Restores
Number of Transaction Begins
Number of Transaction Ends
Number of Transaction Aborts
Number of Transaction Checkpoints
System Time Value
Number of SyncDosFlush
Number of SyncLogFile
Number of SyncCtreeFile
I/O Performance Columns
Element Index - The unique number of the element item for display purposes on this page.
Element Name - The current element name.
Value - The total cumulative value for the current element.
Value/Sec - The per-second average for the current element.
Note: If Auto Refresh is active all the values listed here will be automatically updated every time the Auto Refresh Rate (defined in the Options menu) lapses. Otherwise you will need to press the Refresh Icon to renew the values.

c-treeACE Monitor
All Rights Reserved 84 www.faircom.com
3.13 Function Timing
The Function Timing Tab collects call frequency and accumulates execution time for the
functions executed by the c-treeACE Server. To start collecting timing information, click the Start
Collecting button. To stop collecting, click the Stop Collecting button. Reset the counters by
pressing Clear Timings button.
Function Timing Buttons
Start Collecting - Starts collecting function call frequency and execution time.
Stop Collecting - Stops collecting function call frequency and execution time.
Clear Timings - Clears the function call counters.
Function Timing Columns
Number - The unique function call number for display purposes on this page.
Name - This column lists the function call name.
Call Count - This column lists how many times the function has been called since the last
time this tool loaded or the counters were reset with the Clear Timing button.
Call Count/Sec. - This column lists how many times the function has been called in the
current second.
Total Time (sec) - This column lists the total execution time of the current function since the
last time this tool loaded or the counters were reset with the Clear Timing button. Note this
column is measured in seconds.
Time/Call (msec) - This column lists the amount of time (measured in milliseconds) the last
execution of the function required to execute.
Chart Total Row
The top row (highlighted in yellow) lists the call count totals and the total elapsed time.
Call Count - Represents the number of different function calls
Total Time (sec.) - Represents the sum of the total execution time for all function calls.
Note: If Auto Refresh is active all the values listed here will be automatically updated every time the Auto Refresh Rate (defined in the Options menu) lapses. Otherwise you will need to press the Refresh Icon to renew the values.
3.14 System Monitor
The System Monitor tab collects system event information. An example of this would be: each
time the Server is stopped, a Thread is terminated; a Dynamic Dump (the c-treeACE hot backup
facility) is initiated; etc.
This tab can display two separate monitors: (1) The Main Monitor watches critical server events;
and (2) The Perf Monitor watches performance-related events.
c-treeACE Monitor
All Rights Reserved 85 www.faircom.com
To enable either Monitor press the Start Monitor button. To stop collecting press the stop Stop
Monitor button.
If you don't have auto-refresh enabled you will need to click the Refresh button to see new
events.
"Main" Monitor Buttons
Start Monitor - Starts the system monitor in "Main" mode and begins to collect "Main"
monitor events, which include Server Shutdown messages, Thread Terminated messages,
Dynamic Dump status, etc.
Forced Start - Forces the start of the system monitor in "Main" mode by first shutting down
any other active Main Monitors.
Stop Monitor - Stops the system monitor in "Main" mode.
"Perf" Monitor Buttons
Start Monitor - Starts the system monitor in "Perf" mode and begins to collect performance
related events.
Forced Start - Forces the start of the system monitor in "Perf" mode by first shutting down
any other active Perf Monitors.
Stop Monitor - Stops the system monitor in "Main" mode.
System Monitor Columns
Date/Time - The date and time when the current event occurred.
Type - The type of Monitor (Main or Perf) that triggered the event.
Return Value - The current event return value or error code.
Event Text or Error Description - The description of the current event or error code.
Note: If Auto Refresh is active all the values listed here will be automatically updated at intervals determined by the Auto Refresh Rate (defined in the Options menu). Otherwise you will need to click the Refresh button to renew the values.
3.15 Log Analyzer
The Log Analyzer tab allows you to look at data placed in the status logs (ctstatus.fcs) by the
c-treeACE Server.
The Logs icons at the top of the window allow you to load a log for analysis:
Opens a file dialog so you can select the log file to open. After opening the file, the Select
Interval window will display the date range for the entire status log and allow you to choose a
range to analyze. The Include Time Details In Selections check box displays times as well
as dates.
Allows you to change the interval of information to be displayed.

c-treeACE Monitor
All Rights Reserved 86 www.faircom.com
The tabs provide various views of the information:
Filtered Events View
Filtered Text View
Filtered Graphic View
Raw View
Messages
Filtered Events View
The Filtered Event View is displays selected event messages from the Status Log File.
The Event(s) drop-down menu above the grid allows you to select the events to display:
Startup
Shutdown
Startup and Shutdown
Panic
Autorecovery
The following information is displayed in the Filtered Events View:
TimeStamp - The date and time that the message was logged.
User # - The user number that generated the message.
Error # - The error number associated with the message.
Description - A description of the event.
Elapsed Time - The total time required to complete the event.
Filtered Text View
This view shows all of the information contained within the Status Log File sorted by message
type.
The event categories are listed in the leftmost column. Event categories with a "+" sign preceding
the name have information to view. Click the plus sign to see the available information then click
the desired category to see it in the grid.
The following information is displayed in the Filtered Text View:
TimeStamp - The date and time that the message was logged.
User # - The user number that generated the message.
Error # - The error number associated with the message.
Description - A description of the message.
c-treeACE Monitor
All Rights Reserved 87 www.faircom.com
Filtered Graphic View
The Filtered Graphic View provides a column for each day in the interval being viewed. The dates
are displayed at the top of each column. The event categories are listed in the leftmost column,
Event Category.
The colored cells show the locations where information is present. Double-click a colored cell to
see the message in the Filtered Text View.
Raw View
The Raw View is a complete list of all of the messages from the Status Log File in an unfiltered
list. The following information is displayed in the Raw View:
TimeStamp - The date and time that the message was logged.
User # - The user number that generated the message.
Error # - The error number for the message.
Description - A description of the message.
Messages
The Messages View is a complete list of all of the event messages that may appear within the
Status Log File. The following information is displayed in the Messages grid:
Number - The numeric code associated with the message.
Category - The message category.
Action - An abbreviation of the action.
Xtr
Description - A description of the event.

c-treeACE Monitor
All Rights Reserved 88 www.faircom.com
3.16 Charts
The Charts tab allows you to display selected charts to monitor system operation in real-time.
The Charts Toolbar
Preset Area
Use this icon to Open a preset configuration file from disk.
Use this icon to Save the presets to disk including the graphs selected, graph color and
layout, etc.
Charts Area
Use this icon to Pause a graph (and restart movement once paused).
Use this icon to Remove all charts.
c-treeACE Monitor
All Rights Reserved 89 www.faircom.com
Record Area
Use this icon to Record a graph session to disk.
Use this icon to Playback a recorded session. A file dialog box will allow you to load the
session.
Display Area
Use this icon to hide and show the Tree Pane on the left.
Use this icon to hide and show the Options Pane immediately below this Icon row.
The Options Pane
The Options Pane allows you to adjust settings for how the charts will be displayed.
You can use this icon to show the Options Pane if you do not see it and to hide it to make room for more charts.
Global Options
Update Frequency - Use this control to change the frequency at which the charts are updated.
Changing this setting clears all charts, starting them populating all over again.
Graph Window - This control changes the number of minutes of data shown in each chart.
Category Options
Rows and Columns - These controls allow you to determine the number of rows and columns in
the grid.
Left Graph and Right Graph
Hide - This control hides the data in the selected chart.
Scale - This control adjusts the vertical scale in the selected chart.
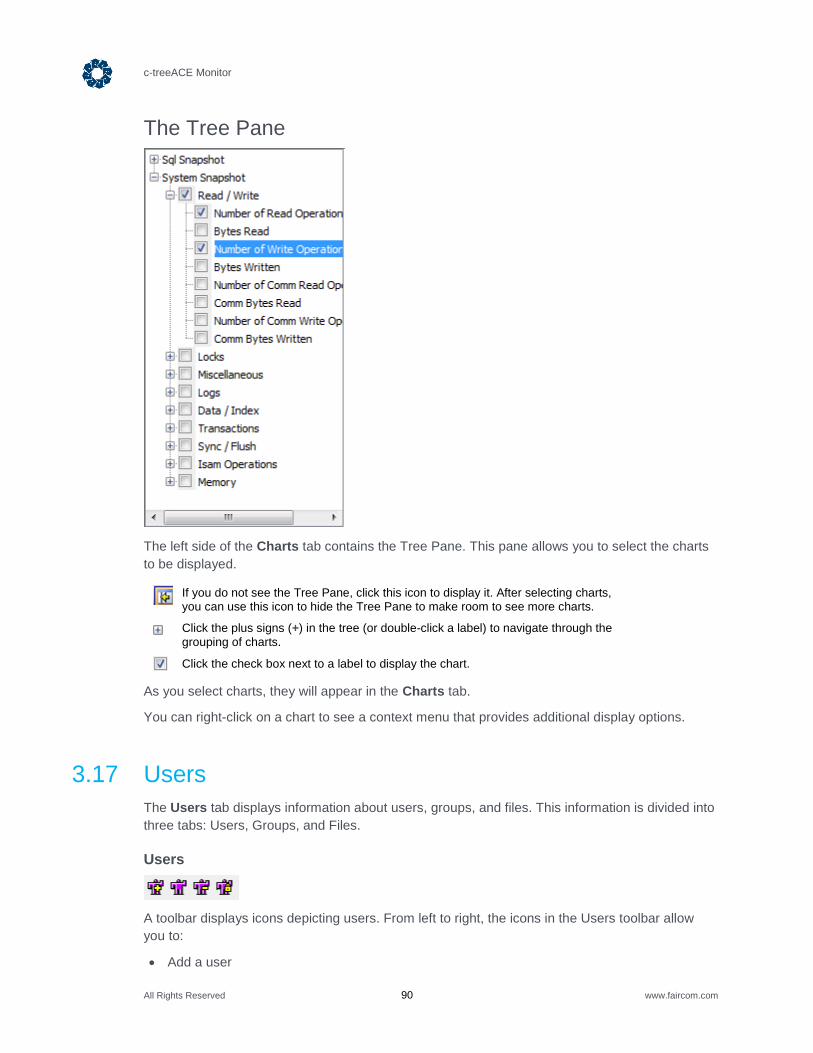
c-treeACE Monitor
All Rights Reserved 90 www.faircom.com
The Tree Pane
The left side of the Charts tab contains the Tree Pane. This pane allows you to select the charts
to be displayed.
If you do not see the Tree Pane, click this icon to display it. After selecting charts, you can use this icon to hide the Tree Pane to make room to see more charts.
Click the plus signs (+) in the tree (or double-click a label) to navigate through the
grouping of charts.
Click the check box next to a label to display the chart.
As you select charts, they will appear in the Charts tab.
You can right-click on a chart to see a context menu that provides additional display options.
3.17 Users
The Users tab displays information about users, groups, and files. This information is divided into
three tabs: Users, Groups, and Files.
Users
A toolbar displays icons depicting users. From left to right, the icons in the Users toolbar allow
you to:
Add a user
c-treeACE Monitor
All Rights Reserved 91 www.faircom.com
Modify the selected user
Delete the selected user
Change the password of the selected user
The grid on the Users tab displays the following information:
ID - The User ID
Description - A description of the user, if one was provided in the user's records.
Groups - The groups to which the user belongs.
Last Valid Date - This user account is valid until the date shown (blank indicates the account
does not expire).
Invalid Logon Limit - The number if invalid logon attempts allowed before the account is
suspended (blank indicates unlimited).
Must Logon Limit
Logon Blocked Until - The account will not be available for logon until the date shown (if
any).
Groups
A toolbar displays icons depicting groups of users. From left to right, the icons in the Groups
toolbar allow you to:
Add a group
Modify the selected group
Delete the selected group
The grid on the Groups tab displays the following information:
ID - The User ID
Description - A description of the user, if one was provided in the user's records.
Users - The users in this group.
Memory - The amount of memory (in bytes) being used by this user.
Mem. Rule
Files
Use Session / Database - Click this button to toggle between displaying information about the
session or the database.
Show Session / Database Files - Click this button to toggle the display of session and database
files.
The grid on the Files tab displays the following information:
Database Name
File Name
Owner
Group

c-treeACE Monitor
All Rights Reserved 92 www.faircom.com
Mask
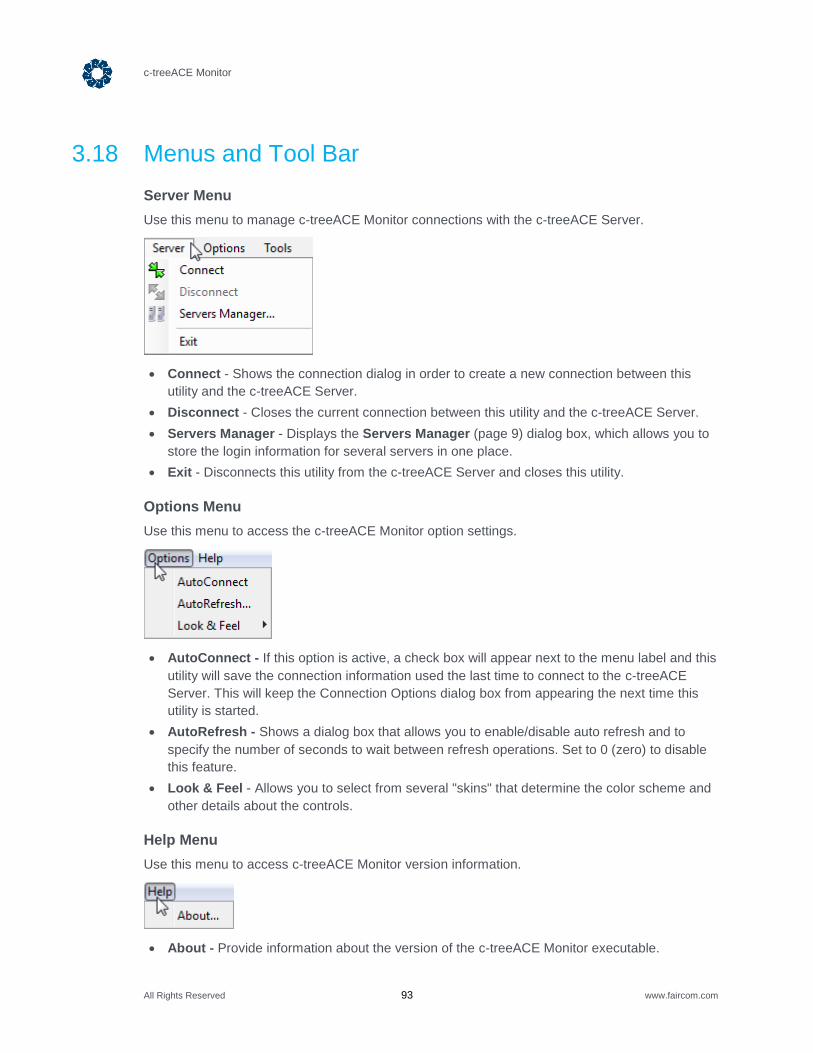
c-treeACE Monitor
All Rights Reserved 93 www.faircom.com
3.18 Menus and Tool Bar
Server Menu
Use this menu to manage c-treeACE Monitor connections with the c-treeACE Server.
Connect - Shows the connection dialog in order to create a new connection between this
utility and the c-treeACE Server.
Disconnect - Closes the current connection between this utility and the c-treeACE Server.
Servers Manager - Displays the Servers Manager (page 9) dialog box, which allows you to
store the login information for several servers in one place.
Exit - Disconnects this utility from the c-treeACE Server and closes this utility.
Options Menu
Use this menu to access the c-treeACE Monitor option settings.
AutoConnect - If this option is active, a check box will appear next to the menu label and this
utility will save the connection information used the last time to connect to the c-treeACE
Server. This will keep the Connection Options dialog box from appearing the next time this
utility is started.
AutoRefresh - Shows a dialog box that allows you to enable/disable auto refresh and to
specify the number of seconds to wait between refresh operations. Set to 0 (zero) to disable
this feature.
Look & Feel - Allows you to select from several "skins" that determine the color scheme and
other details about the controls.
Help Menu
Use this menu to access c-treeACE Monitor version information.
About - Provide information about the version of the c-treeACE Monitor executable.
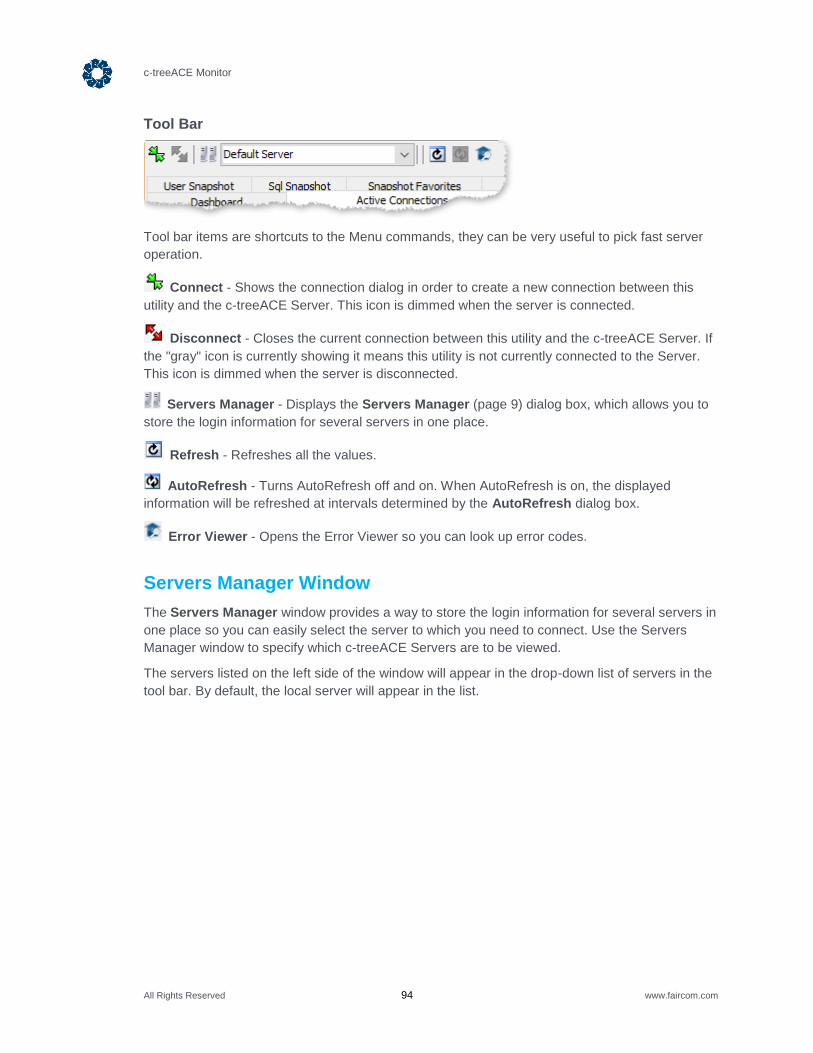
c-treeACE Monitor
All Rights Reserved 94 www.faircom.com
Tool Bar
Tool bar items are shortcuts to the Menu commands, they can be very useful to pick fast server
operation.
Connect - Shows the connection dialog in order to create a new connection between this
utility and the c-treeACE Server. This icon is dimmed when the server is connected.
Disconnect - Closes the current connection between this utility and the c-treeACE Server. If
the "gray" icon is currently showing it means this utility is not currently connected to the Server.
This icon is dimmed when the server is disconnected.
Servers Manager - Displays the Servers Manager (page 9) dialog box, which allows you to
store the login information for several servers in one place.
Refresh - Refreshes all the values.
AutoRefresh - Turns AutoRefresh off and on. When AutoRefresh is on, the displayed
information will be refreshed at intervals determined by the AutoRefresh dialog box.
Error Viewer - Opens the Error Viewer so you can look up error codes.
Servers Manager Window
The Servers Manager window provides a way to store the login information for several servers in
one place so you can easily select the server to which you need to connect. Use the Servers
Manager window to specify which c-treeACE Servers are to be viewed.
The servers listed on the left side of the window will appear in the drop-down list of servers in the
tool bar. By default, the local server will appear in the list.

c-treeACE Monitor
All Rights Reserved 95 www.faircom.com
To add a server to the list:
1. Click Add New.
2. Use the fields on the right to specify the connection to the server. The fields are similar to those you use when connecting to the server.
3. The field labeled Friendly Name allows you to enter a short, descriptive name for the server to make it easier to identify in the list.
4. After entering the information, click OK to exit or click Add New to add another server to the list.
After adding servers to the list, click OK to save your settings. The servers listed on the left side
of the window will appear in the drop-down list of servers in the tool bar.
To connect to a server, simply select it from the drop-down list and click the Connect icon.
The information for the selected server will appear in the Connections Options (page 6) window.

All Rights Reserved 96 www.faircom.com
4. Error Viewer
The Error Viewer is a convenient way of viewing error messages you see in the logs. It
provides two tabs:
Look Up - Enter the error number and click Look Up to see information about any given
error code. This tab also allows you to add custom text to the error messages for later
reference.
Error List - Scroll through the list to find the error of interest and then double-click the error to
see the details in the Look Up tab.
In V11 and later, it is possible to pass the error number or the symbolic error name to the Java
version of the Error Viewer on the command-line. The Error Viewer accepts an optional
command-line parameter and shows the error description directly. The parameter is interpreted
as error number when it starts with a digit (0-9) otherwise it is considered to be a symbolic name.
4.1 Startup
The main Error Viewer window is composed of two tabbed pages, LookUp and ErrorList.
The LookUp Tab
The LookUp tabbed page is your main location to search saved error codes. You can search by
either the c-tree Plus error code number, or the symbolic constant. Additionally, you can add
additional information to the error from this page and save it!
The Error List Tab
This view displays all current saved error descriptions with a tabular layout.
4.2 LookUp Tab
In this view you can find the appropriate error description associated with a specific error code or
symbolic constant.

Error Viewer
All Rights Reserved 97 www.faircom.com
To find out about an error, enter the error code or symbolic constant and click Look Up. You will
see information about any given error code. In V11 and later, the entry field is not case-sensitive.
To locate an error description, type the error code in the Error Code text box and press the
LookUp button. The Symbolic Constant and the Description boxes will be automatically filled.
Alternatively, you may search by symbolic constant in the appropriate text box.
Customizing Your Errors
The Look Up tab allows you to add custom text to the error messages and save it for later
reference.
For example, if you find that a particular error can be solved by a certain action (e.g, rebooting
one of your servers), that information can be added to the error message.
After adding text to the description, click Save.
To make changes to an error description, select the error you wish to modify, make your changes
to the description, and click the Save button to save your changes.
To prevent inadvertent changes, Error Viewer creates a copy of fh.txt as fh.bak in the Error
Viewer working directory before saving changes to fh.txt.
The Check button can be used to merge new error codes from the cterrc.h c-tree errors header
file into your fh.txt. When prompted, navigate to your appropriate c-tree Plus source code include
directory.

Error Viewer
All Rights Reserved 98 www.faircom.com
4.3 Error List
The Error List view reports all of your current error descriptions. Scroll through the list to find the
error of interest and then double-click the error to see the details in the Look Up tab.
You can reorder the table by clicking the column headers.
If you select an error and double-click its row header you will return to the Look Up tab showing
the selected error.

All Rights Reserved 99 www.faircom.com
5. Dr. c-tree
Dr. c-tree provides a graphical interface for working with c-treeACE data files, index files, and
data dictionaries. As Dr. c-tree works directly on the files, it does not require a c-tree Server
connection.
With Dr. c-tree you browse your disks for c-tree files. Once you select a file you can open and in
some cases, even modify the c-tree internal structures.
Warning: Use caution when modifying c-tree internal structures! You could easily damage your data file!
To effectively use Dr. c-tree requires an intimate knowledge of c-tree Plus file structures and
concepts. This tool allows you to view and edit the critical IFIL and DODA resources, as well as
walk through the index keys. Your best source of information is the c-tree Programmer’s
Reference Guide.
All Rights Reserved 100 www.faircom.com
6. Index
A Actions Menu .......................................................... 20 Active Connections ................................................. 73 Add an Existing Table ............................................. 55 Add Existing Database ........................................... 54 Advanced Options .................................................. 33 Alter Table .............................................................. 37 AS ........................................................................... 30
C Callback Library ...................................................... 25 Charts ..................................................................... 88 Clone ...................................................................... 38 Connecting c-treeACE Explorer to a Server ............. 4 Connections Options Window .................................. 6 Constraints .............................................................. 30 Convert / Import SQL Tables .................................. 50 Copyright Notice ....................................................... ii Create Database ..................................................... 54 Create Index ........................................................... 48 Create New Table ................................................... 56 Create Table ........................................................... 30 c-treeACE Explorer ................................................... 2 c-treeACE Graphical Tools ....................................... 1 c-treeACE Monitor .................................................. 69
D Dashboard .............................................................. 71 Database Operations ........................................ 28, 55 Default Server (Drop-Down Servers List) ... 4, 6, 9, 20 Define Fields ........................................................... 60 Define Indexes ........................................................ 61 Define Table Properties .......................................... 58 Delete Database ..................................................... 63 Delete Table ........................................................... 64 Dr. c-tree ................................................................. 99 Drop ........................................................................ 49 Drop Database ........................................................ 63 Drop Table ........................................................ 42, 65 Drop-Down Servers List ............................. 4, 6, 9, 20 Dump Rows ............................................................ 42 Dump Rows (All Tables) ......................................... 34
E Error List ................................................................. 98 Error Viewer ............................................................ 96 Execution Plan ........................................................ 23 Export Schema ....................................................... 43 Export Schema (All Tables) .................................... 35 exporting schema ............................................. 35, 43
F FairCom Typographical Conventions ....................... v File Menu ............................................................... 20 Files / Locks ........................................................... 74 Files History ........................................................... 77 Files Stats .............................................................. 77 Foreign Key Columns ............................................ 30 Function Timing ..................................................... 84
H Help Menu .............................................................. 20
I I/O Performance ..................................................... 83 Index Operations.................................................... 46 ISAM and SQL Servers ......................................... 11 ISAM Operations.................................................... 53 ISAM Options Dialog ............................................. 25
L Left Tree ................................................................. 11 Locale .............................................................. 23, 25 Log Analyzer .......................................................... 85 LookUp Tab ........................................................... 96
M Menus and Tool Bar......................................... 20, 93 Modify Table .......................................................... 65
O Options Menu ......................................................... 20
P Privileges ............................................................... 28
R Read Committed .................................................... 23 Read Uncommitted ................................................ 23 Rebuild / Compact Table ....................................... 65 Rename Table ....................................................... 46 Repeatable Read ................................................... 23
S schema, exporting............................................ 35, 43 Securing Your Connection with SSL.........................8 Serializable ............................................................ 23 Server Operations .................................................. 53 Servers Manager Window ................................. 9, 94 Set User Privileges ................................................ 28 Show Properties ..................................................... 67 Show Records ........................................................ 67 Show Structure ...................................................... 66 Snapshot Favorites ................................................ 81 SQL Operations ..................................................... 28 SQL Options Dialog ............................................... 23 SQL Snapshot ........................................................ 80 Startup ............................................................. 70, 96 System Configuration ............................................ 82

Index
All Rights Reserved 101 www.faircom.com
System Monitor ....................................................... 84 System Snapshot .................................................... 79
T Table Constraints .............................................. 30, 39 Table Group Operations ......................................... 30 Table Operations .............................................. 36, 64 Table Permissions .................................................. 44 Table Properties ..................................................... 45 Tool Bar .................................................................. 20
U User Operations ...................................................... 28 User Privileges ........................................................ 28 User Snapshot ........................................................ 80 Users ...................................................................... 90
V Viewing ISAM Tables.............................................. 12 Viewing SQL Tables ............................................... 16 Viewing Sqlized Data .............................................. 19